Windows Server 2012 R2 Pocket Consultant: Storage, Security, & Networking (2014)
Chapter 4. Data security and auditing
§ Object management, ownership, and inheritance
§ File and folder permissions
§ Auditing system resources
§ Using, configuring, and managing NTFS disk quotas
§ Using, configuring, and managing Resource Manager disk quotas
Data is the heart of any enterprise and few aspects of administration are more important than ensuring that data is protected. Although file and folder permissions protect important resources by restricting access, protecting enterprise data isn’t just about file and folder permissions. To secure enterprise data appropriately, you need a firm understanding of object management, ownership, inheritance, and auditing. To help ensure that enterprise data is manageable, you also need to know how to implement quotas that restrict the amount of data that can be stored on servers.
Object management, ownership, and inheritance
Windows Server 2012 R2 takes an object-based approach to describing resources and managing permissions. Objects that describe resources are defined on NTFS volumes and in Active Directory Domain Services (AD DS). With NTFS volumes, you can set permissions for files and folders. With Active Directory, you can set permissions for other types of objects, such as users, computers, and groups. You can use these permissions to control access with precision.
Objects and object managers
Whether defined on an NTFS volume or in Active Directory, each type of object has an object manager and primary management tools. The object manager controls object settings and permissions. The primary management tools are the tools of choice for working with the object. Objects, their managers, and management tools are summarized in Table 4-1.
Table 4-1. Windows Server 2012 R2 objects
|
Object Type |
Object Manager |
Management Tool |
|
Files and folders |
NTFS |
File Explorer |
|
Printers |
Print spooler |
Printers in Control Panel |
|
Registry keys |
Windows registry |
Registry Editor |
|
Services |
Service controllers |
Security Configuration Tool Set |
|
Shares |
Server service |
File Explorer, Computer Management, Share And Storage Management |
Object ownership and transfer
It’s important to understand the concept of object ownership. In Windows Server 2012 R2, the object owner isn’t necessarily the object’s creator; instead, the object owner is the person who has direct control over the object. Object owners can grant access permissions and give other users permission to take ownership of the object.
As an administrator, you can take ownership of objects on the network to ensure that you can’t be locked out of files, folders, printers, and other resources. After you take ownership of files, however, you can’t return ownership to the original owner (in most cases). This prevents administrators from accessing files and then trying to hide the fact.
The way ownership is assigned initially depends on the location of the resource being created. In most cases, the Administrators group is listed as the current owner, and the object’s actual creator is listed as a person who can take ownership.
Ownership can be transferred in several ways:
§ If the Administrators group is initially assigned as the owner, the creator of the object can take ownership, if she does this before someone else takes ownership.
§ The current owner can grant the Take Ownership permission to other users, allowing those users to take ownership of the object.
§ An administrator can take ownership of an object, if the object is under his administrative control.
To take ownership of an object, follow these steps:
1. Open the management tool for the object. For example, if you want to work with files and folders, start File Explorer.
2. Press and hold or right-click the object you want to take ownership of, and then tap or click Properties. In the Properties dialog box, tap or click the Security tab.
3. On the Security tab, tap or click Advanced to display the Advanced Security Settings dialog box where the current owner is listed under the file or folder name.
4. Tap or click Change. Use the options in the Select User, Computer, Service Account, Or Group dialog box to select the new owner.
5. Tap or click OK twice when you have finished.
TIP
If you’re taking ownership of a folder, you can take ownership of all subfolders and files within the folder by selecting the Replace Owner On Subcontainers And Objects check box. This option also works with objects that contain other objects, in which case you would take ownership of all child objects.
Object inheritance
Objects are defined by using a parent-child structure. A parent object is a top-level object, and a child object is an object defined below a parent object in the hierarchy. For example, the folder C:\ is the parent of the folders C:\Data and C:\Backups. Any subfolders created in C:\Data or C:\Backups are children of these folders and grandchildren of C:\.
Child objects can inherit permissions from parent objects; in fact, all Windows Server 2012 R2 objects are created with inheritance enabled by default. This means that child objects automatically inherit the permissions of the parent; therefore, the parent object permissions control access to the child object. If you want to change permissions on a child object, you must do one of the following:
§ Edit the permissions of the parent object.
§ Stop inheriting permissions from the parent object, and then assign permissions to the child object.
§ Select the opposite permission to override the inherited permission. For example, if the parent allows the permission, you would deny it on the child object.
To stop inheriting permissions from a parent object, follow these steps:
1. Open the management tool for the object. For example, if you want to work with files and folders, start File Explorer.
2. Press and hold or right-click the object with which you want to work, and then tap or click Properties. In the Properties dialog box, tap or click the Security tab.
3. Tap or click Advanced to display the Advanced Security Settings dialog box.
4. On the Permissions tab, tap or click Change Permissions to display an editable version of the Permissions tab.
5. On the Permissions tab, you’ll see a Disable Inheritance button if inheritance currently is enabled. Tap or click Disable Inheritance.
6. You can now either convert the inherited permissions to explicit permissions or remove all inherited permissions and apply only the permissions that you explicitly set on the folder or file.
Keep in mind that if you remove the inherited permissions and no other permissions are assigned, everyone but the owner of the resource is denied access. This effectively locks out everyone except the owner of a folder or file; however, administrators still have the right to take ownership of the resource regardless of the permissions. Thus, if an administrator is locked out of a file or a folder and truly needs access, she can take ownership and then have unrestricted access.
To start inheriting permissions from a parent object, follow these steps:
1. Open the management tool for the object. For example, if you want to work with files and folders, start File Explorer.
2. Press and hold or right-click the object with which you want to work, and then tap or click Properties. In the Properties dialog box, tap or click the Security tab.
3. Tap or click Advanced to display the Advanced Security Settings dialog box.
4. On the Permissions tab, tap or click Enable Inheritance, and then tap or click OK. Note that the Enable Inheritance button is available only if permission inheritance currently is disabled.
File and folder permissions
NTFS permissions are always evaluated when a file is accessed. On NTFS and ReFS volumes, you can set security permissions on files and folders to grant or deny access to the files and folders. Because Windows Server 2012 R2 adds new layers of security, NTFS permissions now encompass the following:
§ Basic permissions
§ Claims-based permissions
§ Special permissions
You can view NTFS permissions for files and folders by following these steps:
1. In File Explorer, press and hold or right-click the file or folder with which you want to work, and then tap or click Properties. In the Properties dialog box, tap or click the Security tab.
2. In the Group Or User Names list, select the user, computer, or group whose permissions you want to view. If the permissions are not available (dimmed), the permissions are inherited from a parent object.
Shared folders have both share permissions and NTFS permissions. You can view the underlying NTFS permissions for shared folders by following these steps:
1. In Server Manager, the Shares subnode of the File And Storage Services node shows existing shares for file servers that have been added for management.
2. Press and hold or right-click the folder with which you want to work, and then tap or click Properties to display a Properties dialog box.
3. When you tap or click Permissions in the left pane, the current share permissions and NTFS permissions are shown in the main pane.
4. To get more information, tap or click Customize Permissions to open the Advanced Security Settings dialog box.
On file servers running Windows Server 2012 R2, you can also use central access policies to precisely define the specific attributes that users and devices must have to access resources.
Understanding file and folder permissions
The basic permissions you can assign to files and folders are summarized in Table 4-2. File permissions include Full Control, Modify, Read & Execute, Read, and Write. Folder permissions include Full Control, Modify, Read & Execute, List Folder Contents, Read, and Write.
Table 4-2. File and folder permissions used by Windows Server 2012 R2
|
Permission |
Meaning for Folders |
Meaning for Files |
|
Read |
Permits viewing and listing files and subfolders |
Permits viewing or accessing a file’s contents |
|
Write |
Permits adding files and subfolders |
Permits writing to a file |
|
Read & Execute |
Does not permit viewing the contents of files. You can list file and folder names, but you can’t open files to read, nor can you execute files if that execute requires opening the file (as in a batch or PS1 file). Inherited by files and folders. |
Permits viewing and accessing a file’s contents in addition to executing a file |
|
List Folder Contents |
Permits viewing and listing file names and subfolder names in addition to executing files; inherited by folders only |
Not applicable |
|
Modify |
Permits reading and writing of files and subfolders; allows deletion of the folder |
Permits reading and writing of a file; allows deletion of a file |
|
Full Control |
Permits reading, writing, changing, and deleting files and subfolders |
Permits reading, writing, changing, and deleting a file |
Any time you work with file and folder permissions, you should keep the following in mind:
§ Read is the only permission needed to run scripts. Execute permission doesn’t matter.
§ Read access is required to access a shortcut and its target.
§ Giving a user permission to write to a file but not to delete it doesn’t prevent the user from deleting the file’s contents.
§ If a user has full control over a folder, the user can delete files in the folder regardless of the permission on the files.
The basic permissions are created by combining special permissions in logical groups. Table 4-3 shows special permissions used to create the basic permissions for files. By using advanced permission settings, you can assign these special permissions individually, if necessary. As you study the special permissions, keep the following in mind:
§ By default, if no access is specifically granted or denied, the user is denied access. Further, if a permission has been explicitly denied, the deny will override any permission grant.
§ Actions that users can perform are based on the sum of all the permissions assigned to the user and to all the groups of which the user is a member. For example, if the user GeorgeJ has Read access and is a member of the group Techies, which has Change access, GeorgeJ will have Change access. If Techies is a member of Administrators, which has Full Control, GeorgeJ will have complete control over the file. However, if GeorgeJ has been explicitly denied a permission, the deny will override any grant.
Table 4-3. Special permissions for files
|
Basic Permissions |
|||||
|
Special Permissions |
Full Control |
Modify |
Read & Execute |
Read |
Write |
|
Traverse Folder/Execute File |
Yes |
Yes |
Yes |
||
|
List Folder/Read Data |
Yes |
Yes |
Yes |
Yes |
|
|
Read Attributes |
Yes |
Yes |
Yes |
Yes |
|
|
Read Extended Attributes |
Yes |
Yes |
Yes |
Yes |
|
|
Create Files/Write Data |
Yes |
Yes |
Yes |
||
|
Create Folders/Append Data |
Yes |
Yes |
Yes |
||
|
Write Attributes |
Yes |
Yes |
Yes |
||
|
Write Extended Attributes |
Yes |
Yes |
Yes |
||
|
Delete Subfolders And Files |
Yes |
||||
|
Delete |
Yes |
Yes |
|||
|
Read Permissions |
Yes |
Yes |
Yes |
Yes |
Yes |
|
Change Permissions |
Yes |
||||
|
Take Ownership |
Yes |
||||
Table 4-4 shows special permissions used to create the basic permissions for folders. As you study the special permissions, keep in mind that when you create files and folders, these files and folders inherit certain permission settings from parent objects. These permission settings are shown as the default permissions.
Table 4-4. Special permissions for folders
|
Basic Permissions |
||||||
|
Special Permissions |
Full Control |
Modify |
Read & Execute |
List Folder Contents |
Read |
Write |
|
Traverse Folder/Execute File |
Yes |
Yes |
Yes |
Yes |
||
|
List Folder/Read Data |
Yes |
Yes |
Yes |
Yes |
Yes |
|
|
Read Attributes |
Yes |
Yes |
Yes |
Yes |
Yes |
|
|
Read Extended Attributes |
Yes |
Yes |
Yes |
Yes |
Yes |
|
|
Create Files/Write Data |
Yes |
Yes |
Yes |
|||
|
Create Folders/Append Data |
Yes |
Yes |
Yes |
|||
|
Write Attributes |
Yes |
Yes |
Yes |
|||
|
Write Extended Attributes |
Yes |
Yes |
Yes |
|||
|
Delete Subfolders And Files |
Yes |
|||||
|
Delete |
Yes |
Yes |
||||
|
Read Permissions |
Yes |
Yes |
Yes |
Yes |
Yes |
|
|
Change Permissions |
Yes |
|||||
|
Take Ownership |
Yes |
|||||
Setting basic file and folder permissions
To set basic NTFS permissions for files and folders, follow these steps:
1. In File Explorer, press and hold or right-click the file or folder with which you want to work, and then tap or click Properties. In the Properties dialog box, tap or click the Security tab.
2. Tap or click Edit to display an editable version of the Security tab, as shown in Figure 4-1.
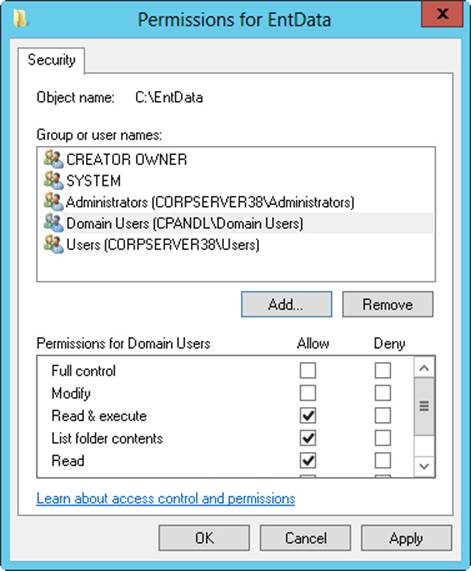
Figure 4-1. Configure basic permissions for the file or folder on the Security tab.
3. Users or groups that already have access to the file or folder are listed in the Group Or User Names list. You can change permissions for these users and groups by doing the following:
a. Select the user or group you want to change.
b. Grant or deny access permissions in the Permissions box.
TIP
Inherited permissions are shaded (dimmed). If you want to override an inherited permission, select the opposite permission.
4. To set access permissions for additional users, computers, or groups, tap or click Add to display the Select Users, Computers, Service Accounts, Or Groups dialog box.
5. Enter the name of a user, computer, or group in the current domain, and then tap or click Check Names. One of the following actions occurs:
o If a single match is found, the dialog box is updated and the entry is underlined.
o If no matches are found, you entered an incorrect name part or are working with an incorrect location. Modify the name and try again, or tap or click Locations to select a new location.
o If multiple matches are found, select the name or names you want to use, and then tap or click OK. To add more users, computers, or groups, enter a semicolon (;), and then repeat this step.
NOTE
The Locations button allows you to access account names in other domains. Tap or click Locations to view a list of the current domain, trusted domains, and other resources you can access. Because of the transitive trusts in Windows Server 2012 R2, you can usually access all the domains in the domain tree or forest.
6. In the Group Or User Names list, select the user, computer, or group you want to configure, and in the check boxes in the Permissions list, allow or deny permissions. Repeat for other users, computers, or groups.
7. Tap or click OK.
Because shared folders also have NTFS permissions, you might want to set basic NTFS permissions by using Server Manager. To do this, follow these steps:
1. In Server Manager, select File and Storage Services, select the server with which you want to work, and then Select Shares.
2. Press and hold or right-click the folder with which you want to work, and then tap or click Properties to display a Properties dialog box.
3. When you tap or click Permissions in the left pane, the current share permissions and NTFS permissions are shown in the main pane.
4. Tap or click Customize Permissions to open the Advanced Security Settings dialog box with the Permissions tab selected.
5. Users or groups that already have access to the file or folder are listed under Permission Entries. Use the options provided to view, edit, add, or remove permissions for users and groups.
Setting special permissions on files and folders
To set special NTFS permissions for files and folders, follow these steps:
1. In File Explorer, press and hold or right-click the file or folder with which you want to work, and then tap or click Properties.
2. In the Properties dialog box, select the Security tab, and then tap or click Advanced to display the Advanced Security Settings dialog box. Before you can modify permissions, you must click Change Permissions. As shown in Figure 4-2, the permissions are presented much as they are on the Security tab. The key differences are that you see individual allow or deny permission sets, whether permissions are inherited and where they are from, and the resources to which the permissions apply.
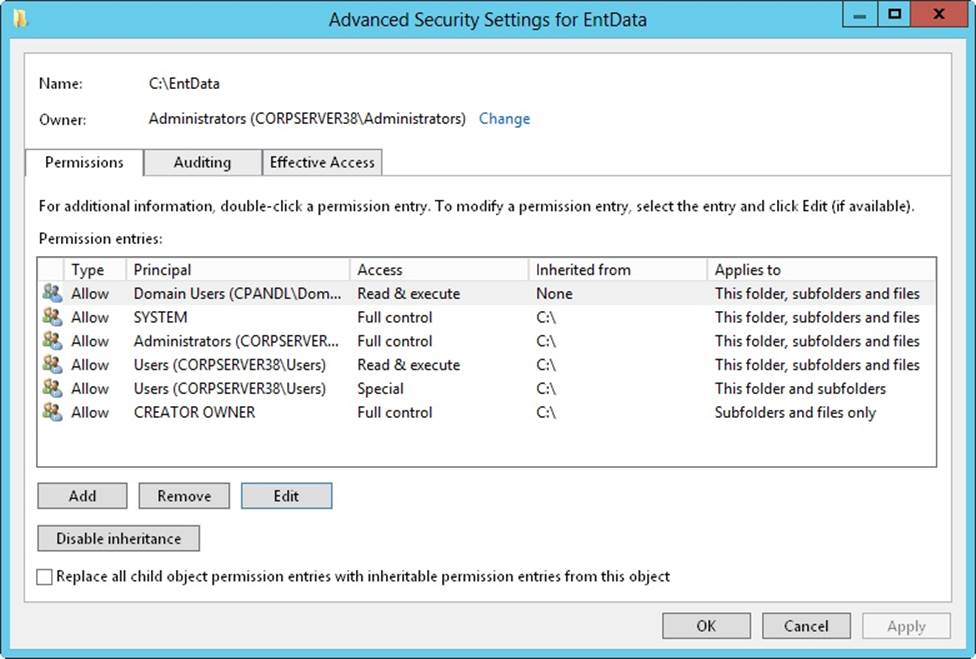
Figure 4-2. Configure special permissions on files and folders.
3. If a user or group already has permissions set for the file or folder (and those permissions are not being inherited), you can modify the special permissions by selecting the user or group, and then clicking Edit. Afterward, skip steps 4–7, and then follow the rest of the steps in this procedure.
4. To add special permissions for a user or group, tap or click Add to display the Permission Entry dialog box. Tap or click Select A Principal to display the Select User, Computer, Service Account, Or Group dialog box.
5. Enter the name of a user or a group account. Be sure to reference the user account name rather than the user’s full name. Only one name can be entered at a time.
6. Tap or click Check Names. If a single match is found for each entry, the dialog box is automatically updated and the entry is underlined; otherwise, you’ll get an additional dialog box. If no matches are found, you either entered the name incorrectly, or you’re working with an incorrect location. Modify the name in the Name Not Found dialog box and try again, or tap or click Locations to select a new location. When multiple matches are found, in the Multiple Names Found dialog box, select the name you want to use, and then tap or click OK.
7. Tap or click OK. The user and group are added as the Principal, and the Permission Entry dialog box is updated to show this.
8. When you are editing permissions, only basic permissions are listed by default. Tap or click Show Advanced Permissions to display the special permissions, as shown in Figure 4-3.
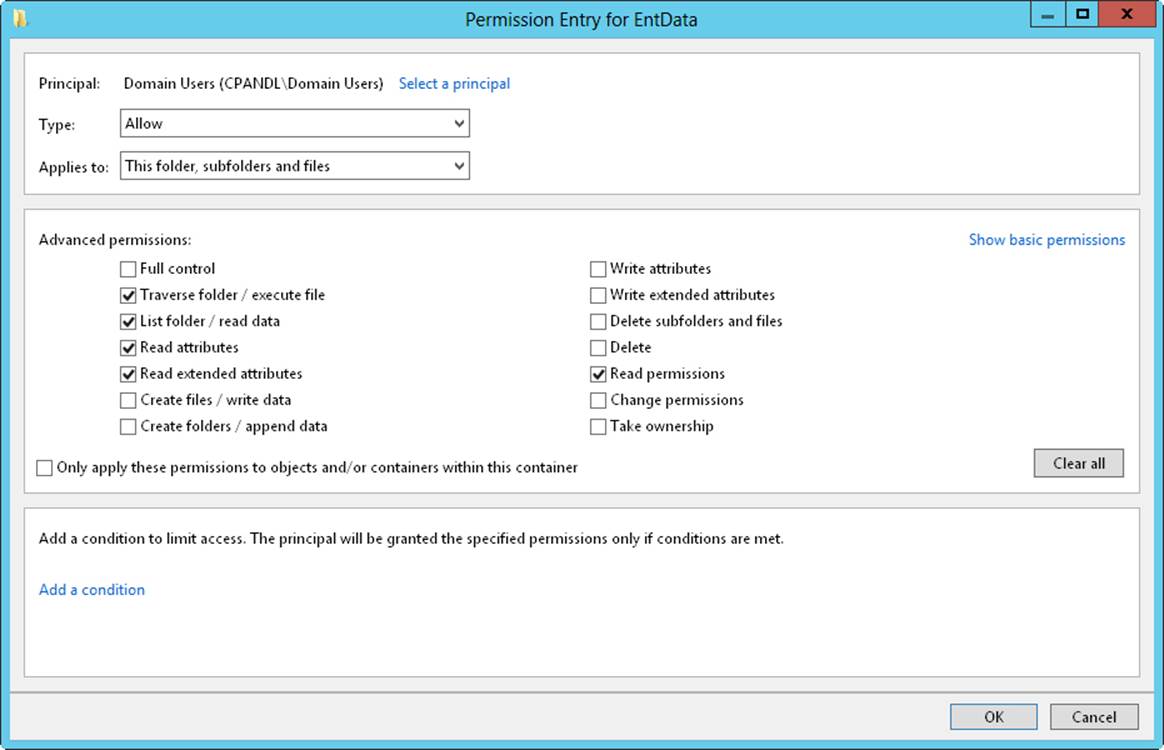
Figure 4-3. Configure the special permissions that should be allowed or denied.
9. Use the Type list to specify whether you are configuring allowed or denied special permissions, and then select the special permissions you want to allow or deny. If any permissions are dimmed (unavailable), they are inherited from a parent folder.
NOTE
You allow and deny special permissions separately. Therefore, if you want to both allow and deny special permissions, you need to configure the allowed permissions, and then repeat this procedure starting with step 1 to configure the denied permissions.
10.If the options in the Applies To list are available, choose the appropriate option to ensure that the permissions are properly inherited. The options include the following:
o This Folder Only. The permissions apply only to the currently selected folder.
o This Folder, Subfolders And Files. The permissions apply to this folder, any subfolders of this folder, and any files in any of these folders.
o This Folder And Subfolders. The permissions apply to this folder and any subfolders of this folder. They do not apply to any files in any of these folders.
o This Folder And Files. The permissions apply to this folder and any files in this folder. They do not apply to any subfolders of this folder.
o Subfolders And Files Only. The permissions apply to any subfolders of this folder and any files in any of these folders. They do not apply to this folder itself.
o Subfolders Only. The permissions apply to any subfolders of this folder but not to the folder itself or any files in any of these folders.
o Files Only. The permissions apply to any files in this folder and any files in subfolders of this folder. They do not apply to this folder itself or to subfolders.
11.When you have finished configuring permissions, tap or click OK.
Because shared folders also have NTFS permissions, you might want to set special NTFS permissions by using Server Manager. To do this, follow these steps:
1. In Server Manager, select File And Storage Services, select the server with which you want to work, and then select Shares. Next, press and hold or right-click the folder with which you want to work, and then tap or click Properties to display a Properties dialog box.
2. When you tap or click Permissions in the left pane, the current share permissions and NTFS permissions are shown in the main pane.
3. Tap or click Customize Permissions to open the Advanced Security Settings dialog box with the Permissions tab selected.
Users or groups that already have access to the file or folder are listed under Permission Entries. Use the options provided to view, edit, add, or remove permissions for users and groups. When you are editing or adding permissions in the Permission Entry dialog box, follow steps 8–11 of the previous procedure to display and work with special permissions.
Setting claims-based permissions
Claims-based access controls use compound identities that incorporate not only the groups of which a user and the user’s computer is a member, but also claim types, which are assertions about objects based on Active Directory attributes, and resource properties, which classify objects and describe their attributes. When resources are remotely accessed, claims-based access controls and central access policies rely on Kerberos with Armoring for authentication of computer device claims. Kerberos with Armoring improves domain security by allowing domain-joined clients and domain controllers to communicate over secure, encrypted channels.
You use claims-based permissions to fine-tune access by defining conditions that limit access as part of a resource’s advanced security permissions. Typically, these conditions add device claims or user claims to the access controls. User claims identify users; device claims identify devices. For example, you could define claim types based on business category and country code. The Active Directory attributes are businessCategory and countryCode, respectively. By using these claim types, you could then fine-tune access to ensure that only users, devices, or both that belong to specific business categories and have certain country codes are granted access to a resource. You could also define a resource property called Project to help fine-tune access even more.
MORE INFO
With central access policies, you define central access rules in Active Directory and those rules are applied dynamically throughout the enterprise. Central access rules use conditional expressions that require you to determine the resource properties, claim types, and/or security groups required for the policy, in addition to the servers to which the policy should be applied.
Before you can define and apply claim conditions to a computer’s files and folders, a claims-based policy must be enabled. For computers that are not joined to the domain, you can do this by enabling and configuring the KDC Support For Claims, Compound Authentication And Kerberos Armoring policy in the Administrative Templates policies for Computer Configuration under System\KDC. The policy must be configured to use one of the following modes:
§ Supported. Domain controllers support claims, compound identities, and Kerberos armoring. Client computers that don’t support Kerberos with Armoring can be authenticated.
§ Always Provide Claims. This mode is the same as the Supported mode, but domain controllers always return claims for accounts.
§ Fail Unarmored Authentication Requests. Kerberos with Armoring is mandatory. Client computers that don’t support Kerberos with Armoring cannot be authenticated.
The Kerberos Client Support For Claims, Compound Authentication And Kerberos Armoring policy controls whether the Kerberos client running on Windows 8.1 and Windows Server 2012 R2 requests claims and compound authentication. The policy must be enabled for compatible Kerberos clients to request claims and compound authentication for Dynamic Access Control and Kerberos armoring. You’ll find this policy in the Administrative Templates policies for Computer Configuration under System\Kerberos.
For application throughout a domain, a claims-based policy should be enabled for all domain controllers in a domain to ensure consistent application. Because of this, you typically enable and configure this policy through the Default Domain Controllers Group Policy Object (GPO), or the highest GPO linked to the domain controllers organizational unit (OU).
After you’ve enabled and configured the claims-based policy, you can define claim conditions by completing these steps:
1. In File Explorer, press and hold or right-click the file or folder with which you want to work, and then tap or click Properties. In the Properties dialog box, select the Security tab, and then tap or click Advanced to display the Advanced Security Settings dialog box.
If the user or group already has permissions set for the file or folder, you can edit their existing permissions. Here, tap or click the user with which you want to work, tap or click Edit, and then skip steps 3–6.
2. Tap or click Add to display the Permission Entry dialog box. Tap or click Select A Principal to display the Select User, Computer, Service Account, Or Group dialog box.
3. Enter the name of a user or a group account. Be sure to reference the user account name rather than the user’s full name. Only one name can be entered at a time.
4. Tap or click Check Names. If a single match is found for each entry, the dialog box is automatically updated and the entry is underlined. Otherwise, you’ll get an additional dialog box. If no matches are found, you either entered the name incorrectly or you’re working with an incorrect location. Modify the name in the Name Not Found dialog box and try again, or tap or click Locations to select a new location. When multiple matches are found, in the Multiple Names Found dialog box, select the name you want to use and then tap or click OK.
5. Tap or click OK. The user and group are added as the Principal. Tap or click Add A Condition.
6. Use the options provided to define the condition or conditions that must be met to grant access. With users and groups, set basic claims based on group membership, previously defined claim types, or both. With resource properties, define conditions for property values.
7. When you have finished configuring conditions, tap or click OK.
Because shared folders also have NTFS permissions, you might want to set claims-based permissions by using Server Manager. To do this, follow these steps:
1. In Server Manager, select File and Storage Services, select the server with which you want to work, and then Select Shares.
2. Press and hold or right-click the folder with which you want to work, and then tap or click Properties to display a Properties dialog box.
3. When you tap or click Permissions in the left pane, the current share permissions and NTFS permissions are shown in the main pane.
4. Tap or click Customize Permissions to open the Advanced Security Settings dialog box with the Permissions tab selected.
Users or groups that already have access to the file or folder are listed under Permission Entries. Use the options provided to view, edit, add, or remove permissions for users and groups. When you are editing or adding permissions in the Permission Entry dialog box, you can add conditions just as I discussed in steps 6–8 of the previous procedure.
Auditing system resources
Auditing is the best way to track what’s happening on your Windows Server 2012 R2 systems. You can use auditing to collect information related to resource usage such as file access, system logons, and system configuration changes. Any time an action occurs that you’ve configured for auditing, the action is written to the system’s security log, where it’s stored for your review. The security log is accessible from Event Viewer.
NOTE
For most auditing changes, you need to be logged on using an account that’s a member of the Administrators group or you need to be granted the Manage Auditing And Security Log right in Group Policy.
Setting auditing policies
Auditing policies are essential to help ensure the security and integrity of your systems. Just about every computer system on the network should be configured with some type of security logging. You configure auditing policies for individual computers with local Group Policy and for all computers in domains with Active Directory–based Group Policy. Through Group Policy, you can set auditing policies for an entire site, a domain, or an organizational unit. You can also set policies for an individual workstation or server.
After you access the GPO with which you want to work, you can set auditing policies by following these steps:
1. In the Group Policy Management Editor, shown in Figure 4-4, access the Audit Policy node by working your way down the console tree. Expand Computer Configuration, Policies, Windows Settings, Security Settings, and Local Policies, and then select Audit Policy.
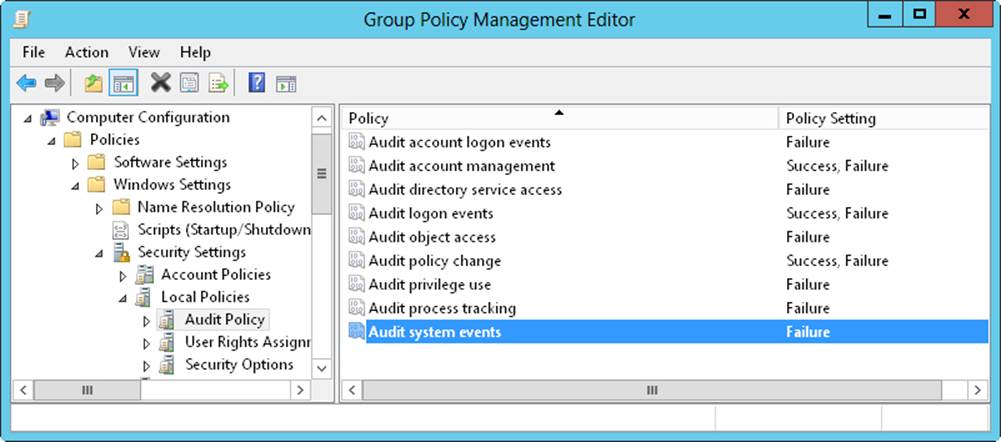
Figure 4-4. Set auditing policies by using the Audit Policy node in Group Policy.
2. The auditing options are as follows:
o Audit Account Logon Events. Tracks events related to user logon and logoff.
o Audit Account Management. Tracks account management by means of Active Directory Users And Computers. Events are generated any time user, computer, or group accounts are created, modified, or deleted.
o Audit Directory Service Access. Tracks access to Active Directory. Events are generated any time users or computers access the directory.
o Audit Logon Events. Tracks events related to user logon, logoff, and remote connections to network systems.
o Audit Object Access. Tracks system resource usage for files, directories, shares, printers, and Active Directory objects.
o Audit Policy Change. Tracks changes to user rights, auditing, and trust relationships.
o Audit Privilege Use. Tracks the use of user rights and privileges, such as the right to back up files and directories.
NOTE
The Audit Privilege Use policy doesn’t track system access-related events, such as the use of the right to log on interactively or the right to access the computer from the network. You track these events with logon and logoff auditing.
o Audit Process Tracking. Tracks system processes and the resources they use.
o Audit System Events. Tracks system startup, shutdown, and restart, in addition to actions that affect system security or the security log.
3. To configure an auditing policy, double-tap or double-click its entry, or press and hold or right-click the entry, and then tap or click Properties.
4. In the dialog box that is displayed, select the Define These Policy Settings check box, and then select either the Success check box, the Failure check box, or both. Success logs successful events, such as successful logon attempts. Failure logs failed events, such as failed logon attempts.
5. Tap or click OK.
When auditing is enabled, the security event log will reflect the following:
§ Event IDs of 560 and 562 detailing user audits
§ Event IDs of 592 and 593 detailing process audits
Auditing files and folders
If you configure a GPO to enable the Audit Object Access option, you can set the level of auditing for individual folders and files. This enables you to control precisely how folder and file usage is tracked. Auditing of this type is available only on NTFS volumes.
You can configure file and folder auditing by following these steps:
1. In File Explorer, press and hold or right-click the file or folder to be audited, and then tap or click Properties.
2. Tap or click the Security tab, and then tap or click Advanced to display the Advanced Security Settings dialog box.
3. On the Auditing tab, tap or click Continue. You can now view and manage auditing settings by using the options shown in Figure 4-5.
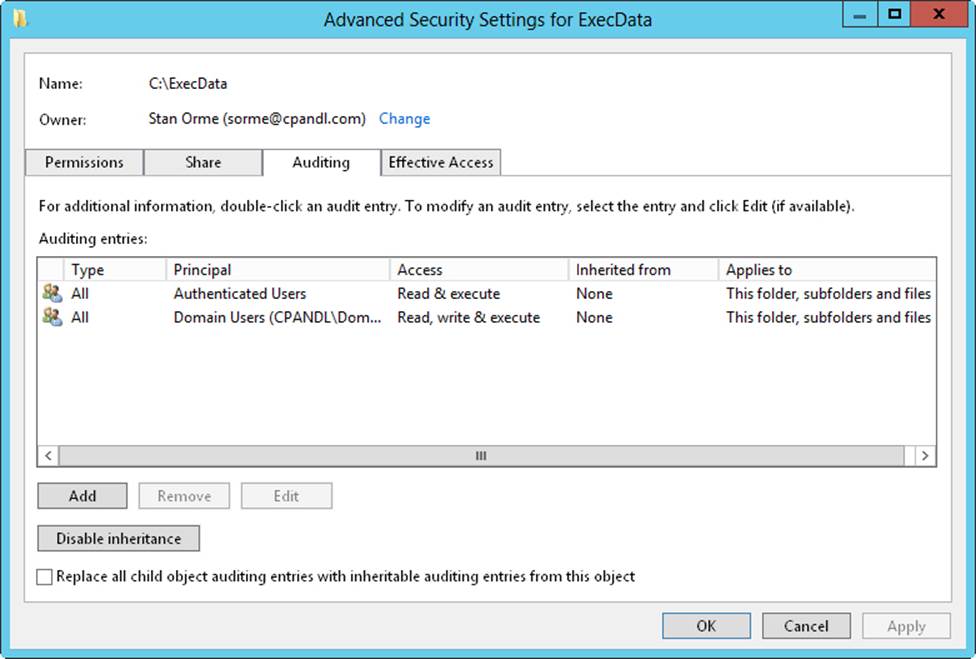
Figure 4-5. After you audit object access, you can set auditing policies on individual files and folders on the Auditing tab.
4. The Auditing Entries list shows the users, groups, or computers whose actions you want to audit. To remove an account, select the account in the Auditing Entries list, and then tap or click Remove.
5. To configure auditing for additional users, computers, or groups, tap or click Add. This displays the Select Users, Computers, Service Accounts, Or Groups dialog box.
6. Enter the name of a user, computer, or group in the current domain, and then tap or click Check Names. If a single match is found, the dialog box is automatically updated and the entry is underlined; otherwise, you’ll get an additional dialog box. If no matches are found, you either entered the name incorrectly or you’re working with an incorrect location. Modify the name in the Name Not Found dialog box and try again, or tap or click Locations to select a new location. When multiple matches are found, in the Multiple Names Found dialog box, select the name you want to use, and then tap or click OK.
7. Tap or click OK. The user and group are added, and the Principal and the Auditing Entry dialog box are updated to show this. Only basic permissions are listed by default. If you want to work with advanced permissions, tap or click Show Advanced Permissions to display the special permissions.
8. As necessary, use the Applies To list to specify where objects are audited. If you are working with a folder and want to replace the auditing entries on all child objects of this folder (and not on the folder itself), select Only Apply These Settings To Objects And/Or Containers Within This Container.
Keep in mind that the Applies To list lets you specify the locations where you want the auditing settings to apply. The Only Apply These Settings To Objects And/Or Containers Within This Container check box controls how auditing settings are applied. When this check box is selected, auditing settings on the parent object replace settings on child objects. When this check box is cleared, auditing settings on the parent are merged with existing settings on child objects.
9. Use the Type list to specify whether you are configuring auditing for success, failure, or both, and then specify which actions should be audited. Success logs successful events, such as successful file reads. Failure logs failed events, such as failed file deletions. The events you can audit are the same as the special permissions listed in Table 4-3 and Table 4-4, except that you can’t audit the synchronizing of offline files and folders. For essential files and folders, you’ll typically want to track the following:
o Write Attributes—Successful
o Write Extended Attributes—Successful
o Delete Subfolders And Files—Successful
o Delete—Successful
o Change Permissions—Successful
TIP
If you want to audit actions for all users, use the special group Everyone; otherwise, select the specific user groups, users, or both that you want to audit.
10.If you’re using claims-based policies and want to limit the scope of the auditing entry, you can add claims-based conditions to the auditing entry. For example, if all corporate computers are members of the Domain Computers group, you might want to closely audit access by devices that aren’t members of this group.
11.When you have finished configuring auditing, tap or click OK. Repeat this process to audit other users, groups, or computers.
Auditing the registry
If you configure a GPO to enable the Audit Object Access option, you can set the level of auditing for keys within the registry. This enables you to track when key values are set, when subkeys are created, and when keys are deleted.
You can configure registry auditing by following these steps:
1. Open the Registry Editor. At a command prompt, enter regedit; or enter regedit in the Everywhere search box, and then press Enter.
2. Browse to a key you want to audit. On the Edit menu, select Permissions.
3. In the Permissions dialog box, tap or click Advanced. In the Advanced Security Settings dialog box, tap or click the Auditing tab.
4. Tap or click Add to display the Auditing Entry dialog box. Tap or click Select A Principal to display the Select User, Computer, Service Account, Or Group dialog box.
5. In the Select User, Computer, Service Account, Or Group dialog box, enter Everyone, tap or click Check Names, and then tap or click OK.
6. In the Auditing Entry dialog box, only basic permissions are listed by default. Tap or click Show Advanced Permissions to display the special permissions.
7. Use the Applies To list to specify how the auditing entry is to be applied.
8. Use the Type list to specify whether you are configuring auditing for success, failure, or both, and then specify which actions should be audited. Typically, you’ll want to track the following advanced permissions:
o Set Value—Successful and Failed
o Create Subkey—Successful and Failed
o Delete—Successful and Failed
9. Tap or click OK three times to close all open dialog boxes and apply the auditing settings.
Auditing Active Directory objects
If you configure a GPO to enable the Audit Directory Service Access option, you can set the level of auditing for Active Directory objects so that you can control precisely how object usage is tracked.
To configure object auditing, follow these steps:
1. In Active Directory Users And Computers, ensure that Advanced Features is selected on the View menu, and then access the container for the object.
2. Double-tap or double-click the object to be audited to open the related Properties dialog box.
3. Tap or click the Security tab, and then tap or click Advanced.
4. In the Advanced Settings dialog box, tap or click the Auditing tab. The Auditing Entries list shows the users, groups, or computers whose actions you are auditing currently (if any). To remove an account, select the account in the Auditing Entries list, and then tap or click Remove.
5. To add specific accounts, tap or click Add to display the Auditing Entry dialog box. Tap or click Select A Principal to display the Select User, Computer, Service Account, Or Group dialog box.
6. Enter the name of a user, computer, or group in the current domain, and then tap or click Check Names. If a single match is found, the dialog box is automatically updated and the entry is underlined; otherwise, you’ll get an additional dialog box. If no matches are found, you either entered the name incorrectly or you’re working with an incorrect location. Modify the name in the Name Not Found dialog box and try again, or tap or click Locations to select a new location. When multiple matches are found, in the Multiple Names Found dialog box, select the name you want to use, and then tap or click OK.
7. Tap or click OK to return to the Auditing Entry dialog box. Use the Applies To list to specify how the auditing entry is to be applied.
8. Use the Type list to specify whether you are configuring auditing for success, failure, or both, and then specify which actions should be audited. Success logs successful events, such as a successful attempt to modify an object’s permissions. Failed logs failed events, such as a failed attempt to modify an object’s owner.
9. Tap or click OK. Repeat this process to audit other users, groups, or computers.
Using, configuring, and managing NTFS disk quotas
Windows Server 2012 R2 supports two mutually exclusive types of disk quotas:
§ NTFS disk quotas. NTFS disk quotas are supported on all editions of Windows Server 2012 R2 and enable you to manage disk space usage by users. You configure quotas on a per-volume basis. Although users who exceed limits get warnings, administrators are notified primarily through the event logs.
§ Resource Manager disk quotas. Resource Manager disk quotas are supported on all editions of Windows Server 2012 R2, allowing you to manage disk space usage by folder, by file type, and by volume. Users who are approaching or have exceeded a limit can be automatically notified by email. The notification system also allows for notifying administrators by email, triggering incident reporting, running commands, and logging related events.
The sections that follow discuss NTFS disk quotas.
NOTE
Regardless of the quota system being used, you can configure quotas only for NTFS volumes. You can’t create quotas for FAT, FAT32, or ReFS volumes.
REAL WORLD
When you apply disk quotas, you need to be particularly careful in the way you enforce quotas, especially with respect to system accounts, service accounts, or other special purpose accounts. Improper application of disk quotas to these types of accounts can cause serious problems that are difficult to diagnose and resolve. Enforcing quotas on the System, NetworkService, and LocalService accounts could prevent the computer from completing important operating system tasks. As an example, if these accounts reach their enforced quota limit, you would not be able to apply changes to Group Policy because the Group Policy client runs within a LocalSystem context by default and would not be able to write to the system disk. If the service can’t write to the system disk, Group Policy changes cannot be made, and being unable to change Group Policy could have all sorts of unexpected consequences because you would be stuck with the previously configured settings. For example, you would be unable to disable or modify the quota settings through Group Policy.
In this scenario, where service contexts have reached an enforced quota limit, any other configuration settings that use these service contexts and require making changes to files on disk would likely also fail. For example, you would be unable to complete the installation or removal of roles, role services, and features. This would leave the server in a state in which Server Manager always includes a warning that you need to restart the computer to complete configuration tasks, but restarting the computer would not resolve these issues.
To address this problem, you need to edit the disk quota entries for the system disk, raise the enforced limits on the service accounts, and then restart the computer. Restarting the computer triggers the finalization tasks and enables the computer to complete any configuration tasks stuck in a pending status. Because the Group Policy client service could process changes and write them to the system disk, changes to Group Policy would then be applied as well.
Understanding NTFS disk quotas and how NTFS quotas are used
Administrators use NTFS disk quotas to manage disk space usage for critical volumes, such as those that provide corporate data shares or user data shares. When you enable NTFS disk quotas, you can configure two values:
§ Disk quota limit. Sets the upper boundary for space usage, which you can use to prevent users from writing additional information to a volume, to log events regarding the user exceeding the limit, or both.
§ Disk quota warning. Warns users and logs warning events when users are getting close to their disk quota limit.
TIP
You can set disk quotas but not enforce them, and you might be wondering why you’d want to do this. Sometimes you want to track disk space usage on a per-user basis and know when users have exceeded some predefined limit, but instead of denying them additional disk space, you log an event in the application log to track the overage. You can then send out warning messages or figure out other ways to reduce the space usage.
NTFS disk quotas apply only to end users and not to administrators. Administrators can’t be denied disk space even if they exceed enforced disk quota limits.
In a typical environment, you restrict disk space usage in megabytes (MB) or gigabytes (GB). For example, on a corporate data share used by multiple users in a department, you might want to limit disk space usage from 20 to 100 GB. For a user data share, you might want to set the level much lower, such as from 5 to 20 GB, which restricts the user from creating large amounts of personal data. Often you’ll set the disk quota warning as a percentage of the disk quota limit. For example, you might set the warning from 90 to 95 percent of the disk quota limit.
Because NTFS disk quotas are tracked on a per-volume, per-user basis, disk space used by one user doesn’t affect the disk quotas for other users. Thus, if one user exceeds his limit, any restrictions applied to this user don’t apply to other users. For example, if a user exceeds a 5-GB disk quota limit and the volume is configured to prevent writing over the limit, the user can no longer write data to the volume. Users can, however, remove files and folders from the volume to free up disk space. They can also move files and folders to a compressed area on the volume, which might free up space, or they can elect to compress the files themselves. Moving files to a different location on the volume doesn’t affect the quota restriction. The amount of file space is the same unless the user moves uncompressed files and folders to a folder with compression. In any case, the restriction on a single user doesn’t affect other users’ ability to write to the volume (as long as there’s free space on the volume).
You can enable NTFS disk quotas on the following:
§ Local volumes. To manage disk quotas on local volumes, you work with the local disk itself. When you enable disk quotas on a local volume, the Windows system files are included in the volume usage for the user who installed those files. Sometimes this might cause the user to go over the disk quota limit so to prevent this, you might want to set a higher limit on a local workstation volume.
§ Remote volumes. To manage disk quotas on remote volumes, you must share the root directory for the volume, and then set the disk quota on the volume. Remember, you set quotas on a per-volume basis, so if a remote file server has separate volumes for different types of data—that is, a corporate data volume and a user data volume—these volumes have different quotas.
Only members of the Domain Admins group or the local system Administrators group can configure disk quotas. The first step in using quotas is to enable quotas in Group Policy, which you can do at two levels:
§ Local. Through local Group Policy, you can enable disk quotas for an individual computer.
§ Enterprise. Through Group Policy that applies to a site, a domain, or an organizational unit, you can enable disk quotas for groups of users and computers.
Having to keep track of disk quotas does cause some overhead on computers. This overhead is a function of the number of disk quotas being enforced, the total size of the volumes and their data, and the number of users to which the disk quotas apply.
Although on the surface disk quotas are tracked per user, behind the scenes Windows Server 2012 R2 manages disk quotas according to security identifiers (SIDs). Because SIDs are tracked by disk quotas, you can safely modify user names without affecting the disk quota configuration. Tracking by SIDs does cause some additional overhead when viewing disk quota statistics for users because Windows Server 2012 R2 must correlate SIDs to user account names so that the account names can be displayed in dialog boxes. This means contacting the local user manager and the Active Directory domain controller as necessary.
After Windows Server 2012 R2 looks up names, it caches them to a local file so that they can be available immediately the next time they’re needed. The query cache is infrequently updated—if you notice a discrepancy between what’s displayed and what’s configured, you need to refresh the information. Usually, this means choosing Refresh from the View menu or pressing F5 in the current window.
Setting NTFS disk quota policies
The best way to configure NTFS disk quotas is through Group Policy. When you configure disk quotas through local policy or through unit, domain, and site policy, you define general policies that are set automatically when you enable quota management on individual volumes. Thus, rather than having to configure each volume separately, you can use the same set of rules and apply them in turn to each volume you want to manage.
Policies that control NTFS disk quotas are applied at the system level. You access these policies through Computer Configuration\Administrative Templates\System\Disk Quotas. Table 4-5 summarizes the available policies.
Table 4-5. Policies for Setting NTFS disk quotas
|
Policy Name |
Description |
|
Apply Policy To Removable Media |
Determines whether quota policies apply to NTFS volumes on removable media. If you don’t enable this policy, quota limits apply only to fixed media drives. |
|
Enable Disk Quotas |
Turns disk quotas on or off for all NTFS volumes of the computer, and prevents users from changing the setting. |
|
Enforce Disk Quota Limit |
Specifies whether quota limits are enforced. If quotas are enforced, users will be denied disk space if they exceed the quota. This overrides settings on the Quota tab on the NTFS volume. |
|
Log Event When Quota Limit Exceeded |
Determines whether an event is logged when users reach their limit, and prevents users from changing their logging options. |
|
Log Event When Quota Warning Level Exceeded |
Determines whether an event is logged when users reach the warning level. |
|
Specify Default Quota Limit And Warning Level |
Sets a default quota limit and warning level for all users. This setting overrides other settings and affects only new users. |
Whenever you work with quota limits, you should use a standard set of policies on all systems; however, you typically, won’t want to enable all the policies. Instead, you’ll selectively enable policies and then use the standard NTFS features to control quotas on various volumes. If you want to enable quota limits, follow these steps:
1. Access Group Policy for the system (for example, a file server) with which you want to work. Access the Disk Quotas node by expanding Computer Configuration, Administrative Templates, System, and then selecting Disk Quotas.
2. Double-tap or double-click Enable Disk Quotas. Select Enabled, and then tap or click OK.
3. Double-tap or double-click Enforce Disk Quota Limit. If you want to enforce disk quotas on all NTFS volumes residing on this computer, tap or click Enabled. Otherwise, tap or click Disabled, and then set specific limits on a per-volume basis. Tap or click OK.
4. Double-tap or double-click Specify Default Quota Limit And Warning Level. In the dialog box shown in Figure 4-6, select Enabled.
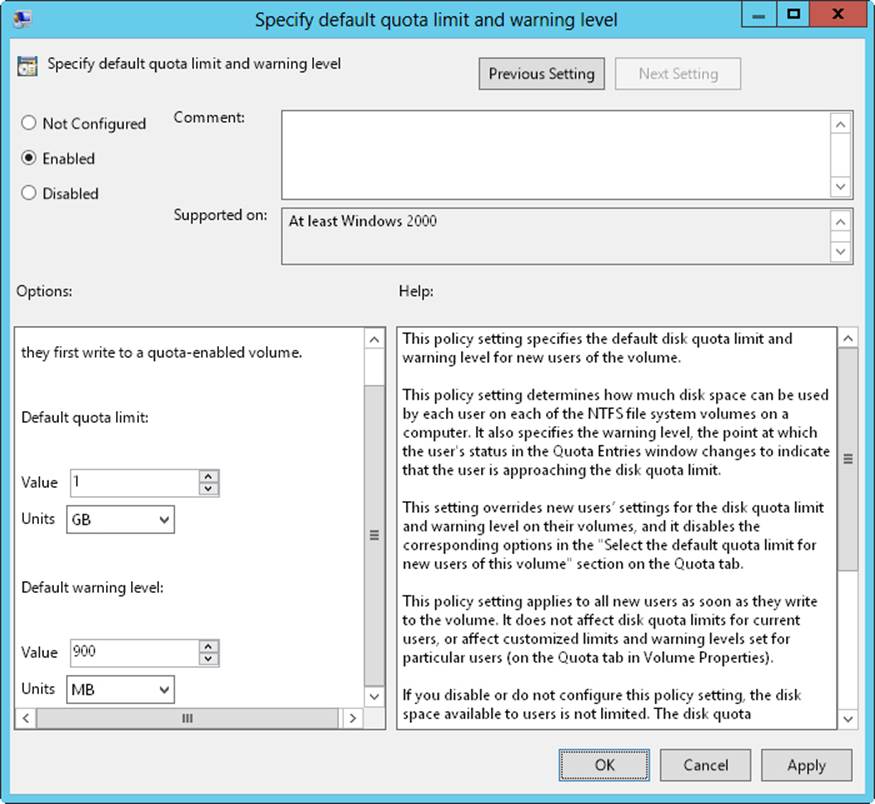
Figure 4-6. Enforce disk quotas in the Specify Default Quota Limit And Warning Level dialog box.
5. Under Default Quota Limit, set a default limit that’s applied to users when they first write to the quota-enabled volume. The limit doesn’t apply to current users or affect current limits in place. On a corporate share, such as a share used by members of a project team, a good limit is between 5 and 10 GB. Of course, this depends on the size of the data files that the users routinely work with, the number of users, and the size of the disk volume. Graphic designers and data engineers might need much more disk space.
6. To set a warning limit, scroll down in the Options window. A good warning limit is about 90 percent of the default quota limit, which means that if you set the default quota limit to 10 GB, you should set the warning limit to 9 GB. Tap or click OK.
7. Double-tap or double-click Log Event When Quota Limit Exceeded. Select Enabled so that limit events are recorded in the application log, and then tap or click OK.
8. Double-tap or double-click Log Event When Quota Warning Level Exceeded. Select Enabled so that warning events are recorded in the application log, and then tap or click OK.
9. Double-tap or double-click Apply Policy To Removable Media. Select Disabled so that the quota limits apply only to fixed media volumes on the computer, and then tap or click OK.
TIP
To ensure that the policies are enforced immediately, access the Computer Configuration\Administrative Templates\System\Group Policy node, and then double-tap or double-click Configure Disk Quota Policy Processing. Select Enabled, and then select the Process Even If The Group Policy Objects Have Not Changed check box. Tap or click OK.
Enabling NTFS disk quotas on NTFS volumes
You can set NTFS disk quotas on a per-volume basis. Only NTFS volumes can have disk quotas. After you configure the appropriate group policies, you can use Computer Management to set disk quotas for local and remote volumes.
NOTE
If you use the Enforce Disk Quota Limit policy setting to enforce quotas, users are denied disk space if they exceed the quota. This overrides settings on the Quota tab on the NTFS volume.
To enable NTFS disk quotas on an NTFS volume, follow these steps:
1. Open Computer Management. If necessary, connect to a remote computer.
2. In the console tree, expand Storage, and then select Disk Management. The volumes configured on the selected computer are displayed in the details pane.
3. Using Volume List view or Graphical View, press and hold or right-click the volume with which you want to work, and then tap or click Properties.
4. On the Quota tab, select the Enable Quota Management check box, shown in Figure 4-7. If you already set quota management values through Group Policy, the options are unavailable and you can’t change them. You must modify options through Group Policy instead.
BEST PRACTICES
Whenever you work with the Quota tab, pay particular attention to the Status text and the associated traffic light icon. Both change based on the state of quota management. If quotas aren’t configured, the traffic light icon shows a red light and the status is inactive or not configured. If the operating system is working or updating the quotas, the traffic light icon shows a yellow light and the status shows the activity being performed. If quotas are configured, the traffic light icon shows a green light and the status text states that the quota system is active.
5. To set a default disk quota limit for all users, select Limit Disk Space To. In the text boxes provided, set a limit in kilobytes, megabytes, gigabytes, terabytes, petabytes, or exabytes. Then set the default warning limit in the Set Warning Level To text boxes. Again, you’ll usually want the disk quota warning limit to be 90–95 percent of the disk quota limit.
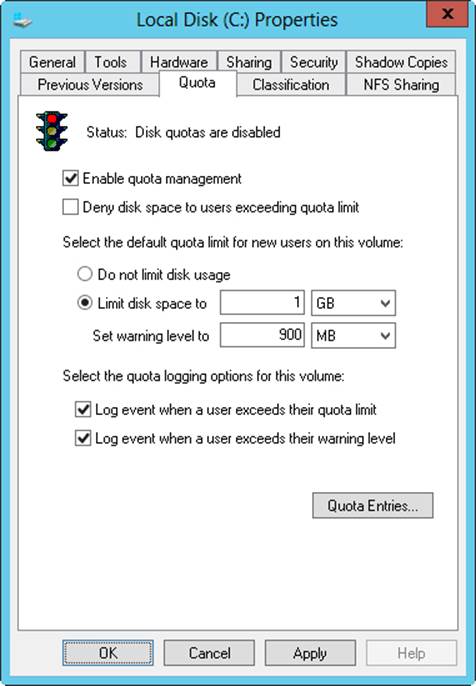
Figure 4-7. After you enable quota management, you can configure a quota limit and quota warning for all users.
TIP
Although the default quota limit and warning apply to all users, you can configure different levels for individual users. You do this in the Quota Entries dialog box. If you create many unique quota entries and don’t want to re-create them on a volume with similar characteristics and usage, you can export the quota entries and import them into a different volume.
6. To enforce the disk quota limit and prevent users from going over the limit, select the Deny Disk Space To Users Exceeding Quota Limit check box. Keep in mind that this creates an actual physical limitation for users (but not for administrators).
7. To configure logging when users exceed a warning limit or the quota limit, select the Log Event check boxes. Tap or click OK to save your changes.
8. If the quota system isn’t currently enabled, you’ll get a prompt asking you to enable the quota system. Tap or click OK so that Windows Server 2012 R2 can rescan the volume and update disk usage statistics. Actions might be taken against users who exceed the current limit or warning levels. These actions can include preventing additional writing to the volume, notifying them the next time they access the volume, and logging applicable events to the application log.
Viewing disk quota entries
Disk space usage is tracked on a per-user basis. When disk quotas are enabled, each user storing data on a volume has an entry in the disk quota file. This entry is updated periodically to show the current disk space used, the applicable quota limit, the applicable warning level, and the percentage of allowable space being used. As an administrator, you can modify disk quota entries to set different limits and warning levels for particular users. You can also create disk quota entries for users who haven’t yet saved data on a volume. The key reason for creating entries is to ensure that when a user does make use of a volume, the user has an appropriate limit and warning level.
To view the current disk quota entries for a volume, follow these steps:
1. Open Computer Management. If necessary, connect to a remote computer.
2. In the console tree, expand Storage, and then select Disk Management. The volumes configured on the selected computer are displayed in the details pane.
3. Using Volume List view or Graphical View, press and hold or right-click the volume with which you want to work, and then tap or click Properties.
4. On the Quota tab, tap or click Quota Entries to display the Quota Entries dialog box. Each quota entry is listed according to a status, which is meant to quickly depict whether a user has gone over a limit. A status of OK means the user is working within the quota boundaries. Any other status usually means the user has reached the warning level or the quota limit.
Creating disk quota entries
You can create disk quota entries for users who haven’t yet saved data on a volume. This enables you to set custom limits and warning levels for a particular user. You usually use this feature when a user frequently stores more information than other users and you want to allow the user to go over the normal limit or when you want to set a specific limit for administrators. As you might recall, administrators aren’t subject to disk quota limits, so if you want to enforce limits for individual administrators, you must create disk quota entries for each administrator you want to limit.
REAL WORLD
You shouldn’t create individual disk quota entries haphazardly. You need to track individual entries carefully. Ideally, you should keep a log that details any individual entries so that other administrators understand the policies in place and how those policies are applied. When you modify the base rules for quotas on a volume, you should reexamine individual entries to see whether they’re still applicable or need to be updated as well. I’ve found that certain types of users are exceptions more often than not, and that it’s sometimes better to put different classes of users on different volumes and then apply disk quotas to each volume. In this way, each class or category of user has a quota limit that’s appropriate for its members’ typical usage, and you have fewer (perhaps no) exceptions. For example, you might use separate volumes for executives, managers, and standard users, or you might have separate volumes for management, graphic designers, engineers, and all other users.
To create a quota entry on a volume, follow these steps:
1. Open the Quota Entries dialog box as discussed in Viewing disk quota entries earlier in this chapter. Current quota entries for all users are listed. To refresh the listing, press F5 or choose Refresh from the View menu.
2. If the user doesn’t have an existing entry on the volume, you can create it by choosing New Quota Entry from the Quota menu. This opens the Select Users dialog box.
3. In the Select Users dialog box, enter the name of a user you want to use in the Enter The Object Names To Select text box, and then tap or click Check Names. If a match is found, select the account you want to use, and then tap or click OK. If no matches are found, update the name you entered and try searching again. Repeat this step as necessary, and then tap or click OK. You also can enter user names separated by semicolons to apply the same quota to multiple users at the same time.
4. After you select a user, the Add New Quota Entry dialog box is displayed, as shown in Figure 4-8. You have two options. You can remove all quota restrictions for this user by selecting Do Not Limit Disk Usage, or you can set a specific limit and warning level by selecting Limit Disk Space To and then entering the appropriate values. Tap or click OK.
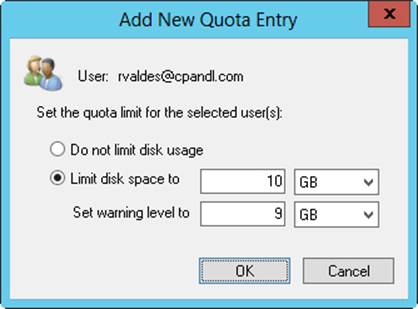
Figure 4-8. In the Add New Quota Entry dialog box, you can customize the user’s quota limit and warning level or remove quota restrictions altogether.
Deleting disk quota entries
When you’ve created disk quota entries on a volume and a user no longer needs to use the volume, you can delete the associated disk quota entry. When you delete a disk quota entry, all files owned by the user are collected and displayed in a dialog box so that you can permanently delete the files, take ownership of the files, or move the files to a folder on a different volume.
To delete a disk quota entry for a user and manage the user’s remaining files on the volume, follow these steps:
1. Open the Quota Entries dialog box as discussed in Viewing disk quota entries earlier in this chapter. Current quota entries for all users are listed. To refresh the listing, press F5 or choose Refresh from the View menu.
2. Select the disk quota entry you want to delete, and then press Delete, or choose Delete Quota Entry from the Quota menu. You can select multiple entries by using the Shift and Ctrl keys.
3. When prompted to confirm the action, tap or click Yes to display the Disk Quota dialog box with a list of current files owned by the selected user or users.
4. In the List Files Owned By list, display files for a user whose quota entry you’re deleting. You must now specify how the files for the user are to be handled. You can handle each file separately by selecting individual files and then choosing an appropriate option, or you can select multiple files by using the Shift and Ctrl keys. The following options are available:
o Permanently Delete Files. Select the files to delete, and then press Delete. When prompted to confirm the action, tap or click Yes.
o Take Ownership Of Files. Select the files you want to take ownership of, and then tap or click Take Ownership Of Files.
o Move Files To. Select the files you want to move, and then enter the path to a folder on a different volume. If you don’t know the path you want to use, tap or click Browse to display the Browse For Folder dialog box. When you find the folder, tap or click Move.
5. Tap or click Close when you have finished managing the files. If you’ve appropriately handled all user files, the disk quota entries will be deleted.
Exporting and importing NTFS disk quota settings
Rather than re-creating custom disk quota entries on individual volumes, you can export the settings from a source volume, and then import the settings to another volume. You must format both volumes by using NTFS. To export and then import disk quota entries, follow these steps:
1. Open the Quota Entries dialog box as discussed in Viewing disk quota entries earlier in this chapter. Current quota entries for all users are listed. To refresh the listing, press F5 or choose Refresh from the View menu.
2. Select Export from the Quota menu to display the Export Quota Settings dialog box. Choose the save location for the file containing the quota settings, and then enter a name for the file in the File Name text box. Tap or click Save.
NOTE
If you save the settings file to a mapped drive on the target volume, you’ll have an easier time importing the settings. Quota files are usually small, so you don’t need to worry about disk space usage.
3. On the Quota menu, tap or click Close to exit the Quota Entries dialog box.
4. Press and hold or right-click Computer Management in the console tree, and then tap or click Connect To Another Computer. In the Select Computer dialog box, choose the computer containing the target volume. The target volume is the one on which you want to use the exported settings.
5. As explained previously, open the Properties dialog box for the target volume. Then tap or click Quota Entries on the Quota tab to display the Quota Entries dialog box for the target volume.
6. Tap or click Import on the Quota menu. In the Import Quota Settings dialog box, select the quota settings file you saved previously. Tap or click Open.
7. If the volume had previous quota entries, you are given the choice to replace existing entries or keep existing entries. When prompted about a conflict, tap or click Yes to replace an existing entry, or tap or click No to keep the existing entry. To apply the option to replace or keep existing entries to all entries on the volume, select the Do This For All Quota Entries check box prior to tapping or clicking Yes or No.
Disabling NTFS disk quotas
You can disable quotas for individual users or all users on a volume. When you disable quotas for a particular user, the user is no longer subject to the quota restrictions but disk quotas are still tracked for other users. When you disable quotas on a volume, quota tracking and management are completely removed. To disable quotas for a particular user, follow the technique outlined earlier in the chapter in Viewing disk quota entries. To disable quota tracking and management on a volume, follow these steps:
1. Open Computer Management. If necessary, connect to a remote computer.
2. Open the Properties dialog box for the volume on which you want to disable NTFS quotas.
3. On the Quota tab, clear the Enable Quota Management check box. Tap or click OK. When prompted to confirm, tap or click OK.
IMPORTANT
Disabling quota tracking doesn’t delete existing quota entries on a volume. If you later enable quota management, the previously created quota entries will be available and will be enforced.
Using, configuring, and managing Resource Manager disk quotas
Windows Server 2012 R2 supports an enhanced quota management system called Resource Manager disk quotas. By using Resource Manager disk quotas, you can manage disk space usage by folder and by volume.
TIP
Because you manage Resource Manager disk quotas separately from NTFS disk quotas, you can configure a single volume to use both quota systems; however, it’s recommended that you use one quota system or the other. Alternatively, if you’ve already configured NTFS disk quotas, you might want to continue by using NTFS disk quotas on a per-volume basis and supplement this quota management with Resource Manager disk quotas for important folders.
Understanding Resource Manager disk quotas
When you’re working with Windows Server 2012 R2, Resource Manager disk quotas are another tool you can use to manage disk usage. You can configure Resource Manager disk quotas on a per-volume or per-folder basis. You can set disk quotas with a specific hard limit—meaning a limit can’t be exceeded—or a soft limit, meaning a limit can be exceeded.
Generally, you should use hard limits when you want to prevent users from exceeding a specific disk-usage limitation. Use soft limits when you want to monitor usage and simply warn users who exceed or are about to exceed usage guidelines. All quotas have a quota path, which designates the base file path on the volume or folder to which the quota is applied. The quota applies to the designated volume or folder and all subfolders of the designated volume or folder. The particulars of how quotas work and how users are limited or warned are derived from a source template that defines the quota properties.
Windows Server 2012 R2 includes the quota templates listed in Table 4-6. By using the File Server Resource Manager, you can easily define additional templates that would then be available whenever you define quotas, or you can set single-use custom quota properties when defining a quota.
Quota templates or custom properties define the following:
§ Limit. The disk space usage limit
§ Quota type. Hard or soft
§ Notification thresholds. The types of notification that occur when usage reaches a specific percentage of the limit
Although each quota has a specific limit and type, you can define multiple notification thresholds as either a warning threshold or a limit threshold. Warning thresholds are considered to be any percentage of the limit that is less than 100 percent. Limit thresholds occur when the limit reached is 100 percent. For example, you could define warning thresholds that are triggered at 85 percent and 95 percent of the limit and a limit threshold that is triggered when 100 percent of the limit is reached.
Users who are approaching or have exceeded a limit can be automatically notified by email. The notification system also allows for notifying administrators by email, triggering incident reporting, running commands, and logging related events.
Table 4-6. Disk quota templates
|
Quota Template |
Limit |
Quota Type |
Description |
|
100 MB Limit |
100 MB |
Hard |
Sends warnings to users as the limit is approached and exceeded |
|
200 MB Limit Reports To User |
200 MB |
Hard |
Sends storage reports to the users who exceed the threshold |
|
200 MB Limit With 50 MB Extension |
200 MB |
Hard |
Uses the DIRQUOTA command to grant an automatic, one-time, 50-MB extension to users who exceed the quota limit |
|
250 MB Extended Limit |
250 MB |
Hard |
Meant to be used by those whose limit has been extended from 200 MB to 250 MB |
|
Monitor 200 GB Volume Usage |
200 GB |
Soft |
Monitors volume usage, and warns when the limit is approached and exceeded |
|
Monitor 500 MB Share |
500 MB |
Soft |
Monitors share usage, and warns when the limit is approached and exceeded |
Managing disk quota templates
You use disk quota templates to define quota properties, including the limit, quota type, and notification thresholds. In File Server Resource Manager, you can view the currently defined disk quota templates by expanding the Quota Management node, and then selecting Quota Templates.Table 4-6, shown earlier, provides a summary of the default disk quota templates. Table 4-7, which follows, shows variables that can be used for automatically generated messages and events.
Table 4-7. Key variables available for disk quota messages and event logging
|
Variable Name |
Description |
|
[Admin Email] |
Inserts the email addresses of the administrators defined under the global options |
|
[File Screen Path] |
Inserts the local file path, such as C:\Data |
|
[File Screen Remote Path] |
Inserts the remote path, such as \\server\share |
|
[File Screen System Path] |
Inserts the canonical file path, such as \\?\VolumeGUID |
|
[Server Domain] |
Inserts the domain of the server on which the notification occurred |
|
[Server] |
Inserts the server on which the notification occurred |
|
[Source File Owner] |
Inserts the user name of the owner of the file/folder |
|
[Source File Owner Email] |
Inserts the email address of the owner of the file/folder |
|
[Source File Path] |
Inserts the source path of the file/folder |
You can modify existing disk quota templates by following these steps:
1. In File Server Resource Manager, expand the Quota Management node, and then select Quota Templates.
Currently defined disk quota templates are listed by name, limit, and quota type.
2. To modify disk quota template properties, double-tap or double-click the disk quota template name. This displays a related Properties dialog box, as shown in Figure 4-9.
3. On the Settings tab, you can set the template name, limit, and quota type. Current notification thresholds are listed. To modify an existing threshold, select it and then tap or click Edit. To define a new threshold, tap or click Add.
4. When you have finished modifying the quota template, tap or click OK to save the changes.
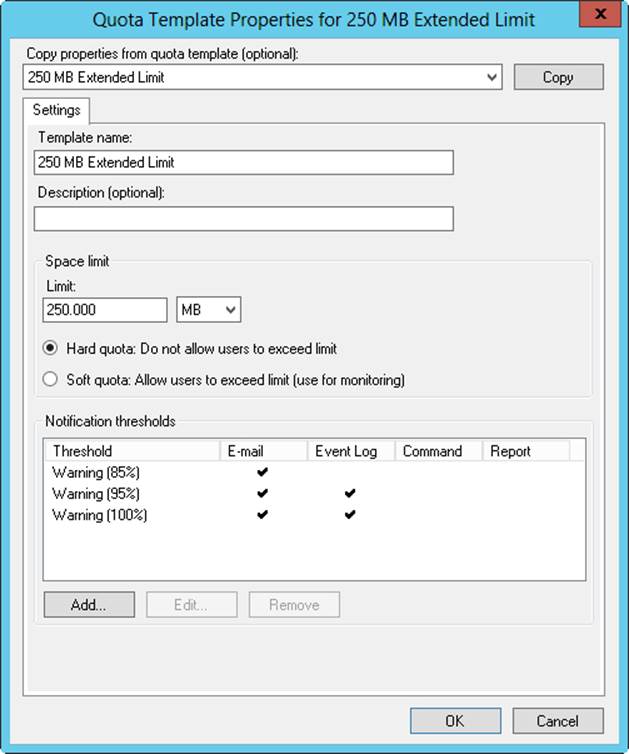
Figure 4-9. Use disk quota properties to configure the limit, quota type, and notification thresholds.
You can create a new disk quota template by following these steps:
1. In File Server Resource Manager, expand the Quota Management node, and then select Quota Templates.
2. On the Action menu or in the Actions pane, tap or click Create Quota Template to display the Create Quota Template dialog box.
3. On the Settings tab, set the template name, limit, and quota type. You should create a limit threshold first, and then create additional warning thresholds as necessary. In the Limit list, enter the limit value and specify whether you are setting the limit in kilobytes, megabytes, gigabytes, or terabytes.
4. Tap or click Add to add warning thresholds. In the Add Threshold dialog box, enter a percentage value under Generate Notifications When Usage Reaches (%). Warning thresholds are considered to be any percentage of the limit that is less than 100 percent. Limit thresholds occur when the limit reached is 100 percent.
5. On the E-Mail Message tab, you can configure notification as follows:
o To notify an administrator when the disk quota is triggered, select the Send E-Mail To The Following Administrators check box, and then enter the email address or addresses to use. Be sure to separate multiple email addresses with a semicolon. Use the value [Admin Email] to specify the default administrator as configured previously under the global options.
o To notify users, select the Send E-Mail To The User Who Exceeded The Threshold check box.
o Specify the contents of the notification message in the Subject and Message Body text boxes. Table 4-7 lists available variables and their meanings.
6. On the Event Log tab, you can configure event logging. Select the Send Warning To Event Log check box to enable logging, and then specify the text of the log entry in the Log Entry text box. Table 4-7 lists available variables and their meanings.
7. On the Command tab, you can optionally specify a command or script to run, arguments to pass in to the command or script, and a working directory. The default security context for commands is Local Service, which grants standard user access to local resources but denies access to network resources. If the command requires access to both local and network resources, you can run the command as Network Service.
8. On the Report tab, select the Generate Reports check box to enable incident reporting, and then select the types of reports to generate. Incident reports are stored under %SystemDrive%\StorageReports\Incident by default, and they can also be sent to designated administrators. Use the value [Admin Email] to specify the default administrator as configured previously under the global options.
9. Repeat steps 5–7 to define additional notification thresholds.
10.Tap or click OK when you have finished creating the template.
Creating Resource Manager disk quotas
You use disk quotas to designate file paths that have specific usage limits. In File Server Resource Manager, you can view current disk quotas by expanding the Quota Management node, and then selecting Quotas. Before you define disk quotas, you should specify screening file groups and disk quota templates that you will use, as discussed in Managing disk quota templates earlier in this chapter.
After you define the necessary file groups and disk quota templates, you can create a disk quota by following these steps:
1. In File Server Resource Manager, expand the Quota Management node, and then select Quotas.
2. Tap or click Create Quota on the Action menu or in the Actions pane.
3. In the Create Quota dialog box, set the local computer path for the quota by tapping or clicking Browse and then by using the Browse For Folder dialog box to select the path, such as C:\Data. Tap or click OK.
4. In the Derive Properties From This Quota Template list, choose the disk quota template that defines the quota properties you want to use.
5. Tap or click Create.