MCSA: Windows Server 2012 R2 Configuring Advanced Services Study Guide Exam 70-412 (2015)
Chapter 2
Configure File and Storage Solutions
THE FOLLOWING 70-412 EXAM OBJECTIVES ARE COVERED IN THIS CHAPTER:
1. ![]() Configure advanced file services
Configure advanced file services
§ Configure NFS data store
§ Configure BranchCache
§ Configure File Classification Infrastructure (FCI) using File Server Resource Manager (FSRM)
§ Configure file access auditing
2. ![]() Implement Dynamic Access Control (DAC)
Implement Dynamic Access Control (DAC)
§ Configure user and device claim types
§ Create and configure resource properties and lists
§ Create and configure Central Access Rules and Policies
§ Configure file classification
§ Implement policy changes and staging
§ Perform access-denied remediation
3. ![]() Configure and optimize storage
Configure and optimize storage
§ Configure iSCSI Target and Initiator
§ Configure Internet Storage Name Server (iSNS)
§ Implement thin provisioning and trim
§ Manage server free space using Features on Demand
§ Configure tiered storage
Taking the time to understand and configure file and storage solutions fully is essential to managing an IT infrastructure efficiently. Companies will rely heavily on your ability as an administrator to properly manage their users and data. In this chapter, you will learn about some of the tools that will help to make you successful in controlling how data is accessed and stored, as well as how users will interact with that data throughout their environment.
Configure Advanced File Services
Windows Server has come a long way in terms of its file and storage capabilities. I have talked quite a bit about the new features and functionality provided in Windows Server 2012 R2. In this section, you will take a closer look at some of the advanced configuration options available in the Network File System (NFS), BranchCache, and the File Server Resource Manager (FSRM).
Configure the NFS Data Store
The NFS role service and feature set gives IT administrators the ability to integrate a Windows Server–based environment with Unix-based operating systems. Most corporate environments today consist of a mixed operating system infrastructure to some extent. Using a Windows NFS file server, you can configure file shares for use by multiple operating systems throughout the environment.
Windows Server 2012 R2 takes those capabilities even further by enabling you to integrate with platforms such as ESXi. ESXi is VMware’s exclusive operating system–independent hypervisor. ESXi is referred to as a bare-metal operating system because once it is installed on server virtualization hardware, guest virtual machines can be installed without requiring the use of any other underlying operating system. With Windows Server 2012 R2, you can use an NFS share efficiently as an ESXi data store to house all of your guest virtual machines. Let’s take a look at configuring an NFS data store in Exercise 2.1.
For this exercise, you will need the following:
§ A Windows Server 2012 R2 server
§ A VMware ESXi 5 server
Exercise 2.1: Configure the NFS Data Store
1. Open Server Manager on your Windows Server 2012 R2 machine.
2. Launch the Add Roles And Features Wizard from the dashboard.
3. Install the Server for NFS role on the server. A reboot is not required.
4. Create a new folder on your server named NFS_Datastore, right-click and select Properties, and then navigate to the NFS Sharing tab, as shown here.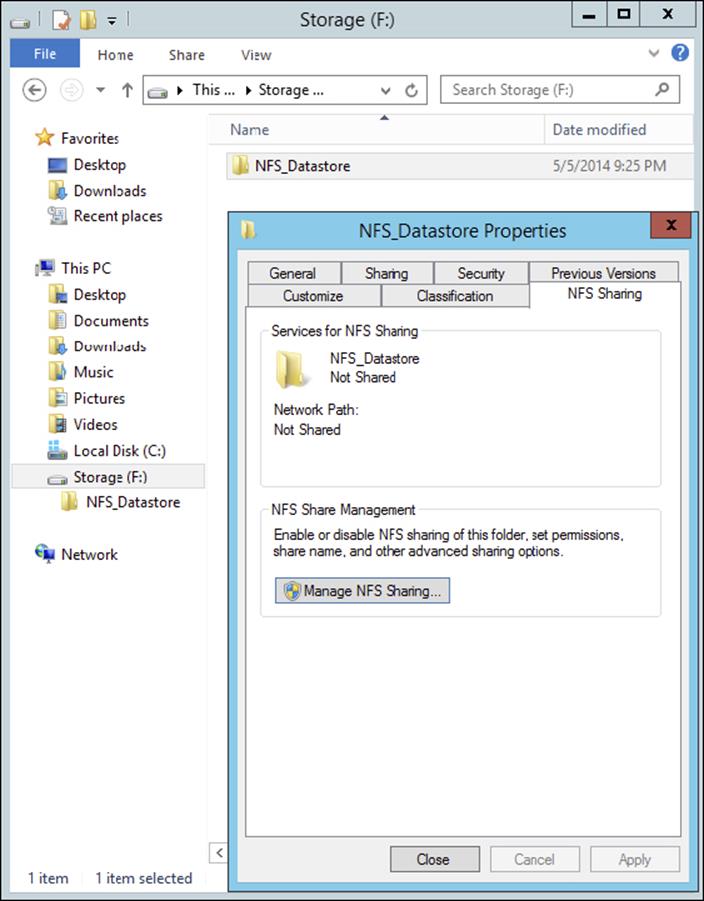
5. Click the Manage NFS Sharing button to open the NFS Advanced Sharing page and then check the Share This Folder box, as shown here. Notice how enabling the share also enables the share’s default settings. The share settings let you configure share authentication and user access further if the need arises. The default settings will work just fine for this exercise.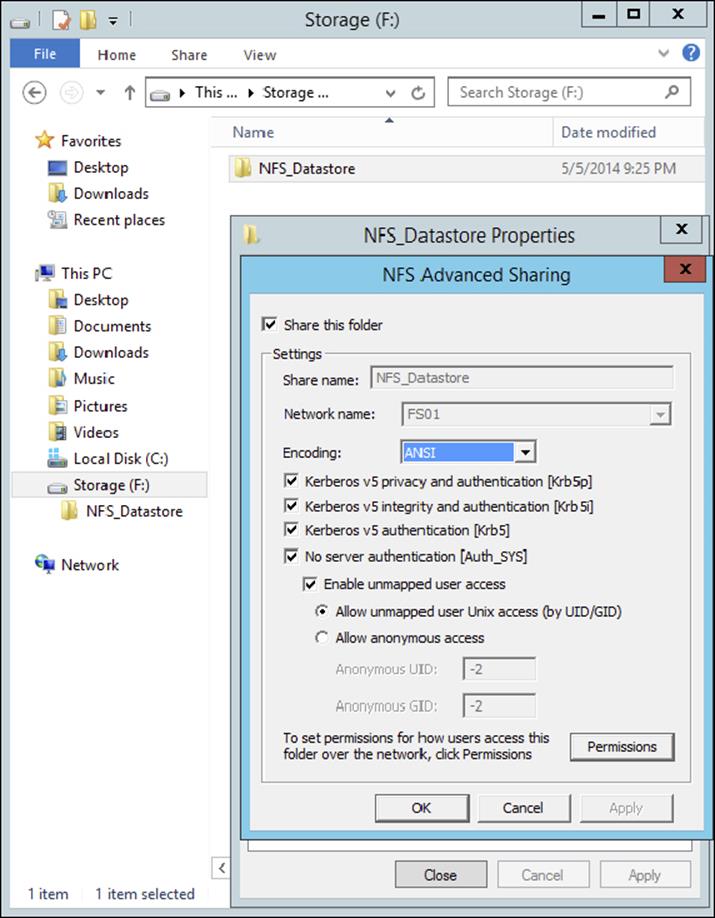
6. Click the Permissions tab to open the NFS Share Permissions page. This is where you will configure the type of access that will be allowed by machines accessing this NFS data store. By default, the NFS share permissions are set to Read-Only and do not include root access. For this exercise, you will need to change the type of access to Read-Write and check the box to allow root access, as shown here.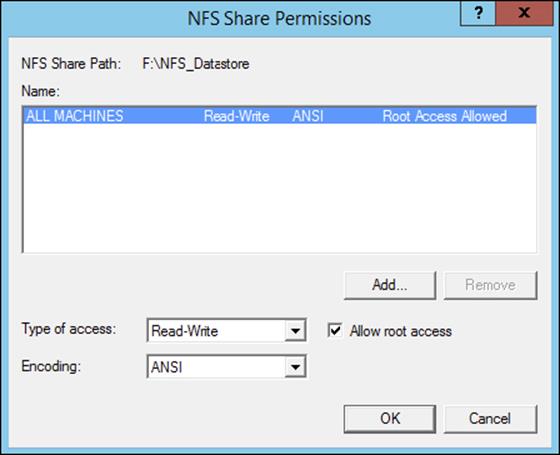
7. Click OK to close the NFS Share Permissions page and then click Apply and OK on the NFS Advanced Sharing page. Your new NFS share is now built, ready to be presented as an NFS data store to a VMware ESXi host. Be sure to record the network path displayed on the NFS Sharing tab of the share’s Properties page. You will need that information to perform a proper mount on the ESXi host.
8. Switch to your ESXi host and launch the Add Storage Wizard from the Configuration tab.
9. On the Select Storage Type page of the wizard, select the Network File System storage type; click Next to continue to the Locate Network File System page.
10.On this page of the wizard, you will fill in the server and folder information for the NFS share that you will be using as a vSphere data store. Using the information recorded from step 7, properly fill out the server and folder fields and then name your new data store as shown here.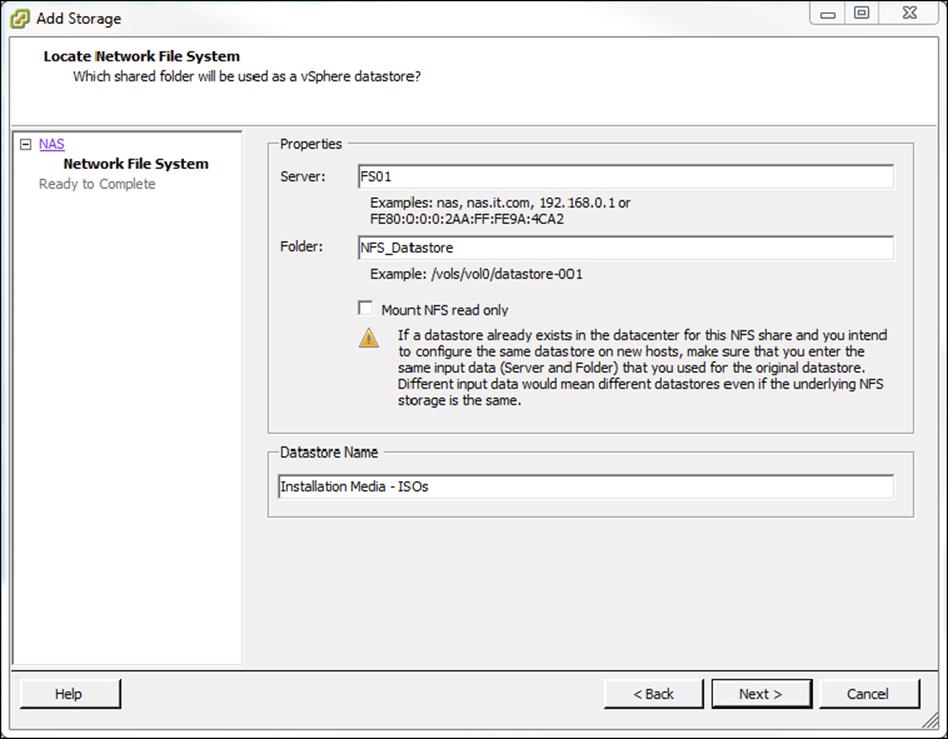
11.Click Next to continue to the Ready To Complete page of the wizard. Review the information and click Finish. Once the Create NAS data store task completes on the ESXi host, you are ready to use your Windows Server 2012 R2 shared folder as a vSphere ESXi data store. The graphic shown here confirms that the NFS share is mounted and available from the ESXi host.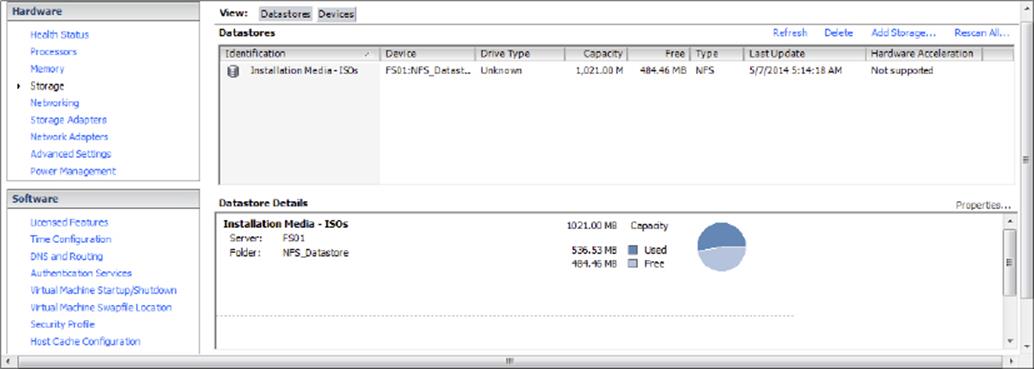
The previous exercise shows how versatile Windows Server 2012 R2 shares can be. The same principals can be applied to making Windows Server shares available to other Unix-based operating systems such as ESXi. Now that you have configured a NFS data store, let’s take a look at what BranchCache has to offer.
Configure BranchCache
BranchCache is a technology that was introduced with Windows Server 2008 R2 and Windows 7. BranchCache allows an organization with slower links between offices to cache data so that downloads between offices do not have to occur each time a file is accessed.
For example, John comes into work and logs into the network. John accesses the corporate website and downloads a media file that takes four minutes to download. With BranchCache enabled, when Judy comes into work, connects to the corporate website, and tries to download the same media file, the file will be cached from the previous download and Judy will have immediate access to the file.
You can set up two types of BranchCache configurations:
Distributed Cache Mode In the distributed cache mode configuration, all Windows 7 and Windows 8 client machines cache the files locally on the client machines. Thus, in the previous example, after John downloaded the media file, Judy would receive the cached media file from John’s Windows 7 or Windows 8 machine.
Hosted Mode In the hosted mode configuration, the cache files are cached on a local (within the site) Windows Server 2012 R2 machine. So, in the previous example, after John downloads the media file, the cached file would be placed on a Windows Server 2012 R2 machine by default, and all other users (Judy) would download the media file from the Windows Server 2012 R2 machine.
Distributed Cache Mode Requirements
If you decide to install BranchCache in the distributed cache mode configuration, a hosted cache server running Windows Server 2012 R2 is not required at the branch office. To set up distributed cache mode, the client machines must be running Windows 7 Enterprise, Windows 7 Ultimate, Windows 8 Pro, or Windows 8 Enterprise.
The Windows 7 or Windows 8 machines would download the data files from the content servers at the main branch office, and then these machines become the local cache servers. To set up distributed cache mode, you must install a Windows Server 2012 R2 content server at the main office first. After the content server is installed, physical connections (WAN or VPN connections) between the sites and branch offices must be established.
Client computers running Windows 7 and Windows 8 have BranchCache installed by default. However, you must enable and configure BranchCache and configure firewall exceptions. Complete Exercise 2.2 to configure BranchCache firewall rule exceptions.
Exercise 2.2: Configuring BranchCache Firewall Exceptions
1. On a domain controller, open the Group Policy Management Console.
2. In the Group Policy Management Console, expand the following path: Forest ![]() Domains
Domains ![]() Group Policy Objects. Make sure the domain you choose contains the BranchCache Windows 7/Windows 8 client computer accounts that you want to configure.
Group Policy Objects. Make sure the domain you choose contains the BranchCache Windows 7/Windows 8 client computer accounts that you want to configure.
3. In the Group Policy Management Console, right-click Group Policy Objects and select New. Name the policy BranchCache Client and click OK. Right-click BranchCache Client and click Edit. The Group Policy Management Editor console opens.
4. In the Group Policy Management Editor console, expand the following path: Computer Configuration ![]() Policies
Policies ![]() Windows Settings
Windows Settings ![]() Security Settings
Security Settings ![]() Windows Firewall With Advanced Security
Windows Firewall With Advanced Security ![]() Windows Firewall With Advanced Security – LDAP
Windows Firewall With Advanced Security – LDAP ![]() Inbound Rules.
Inbound Rules.
5. Right-click Inbound Rules and then click New Rule. The New Inbound Rule Wizard opens.
6. On the Rule Type screen, click Predefined, expand the list of choices, and then click BranchCache – Content Retrieval (Uses HTTP). Click Next.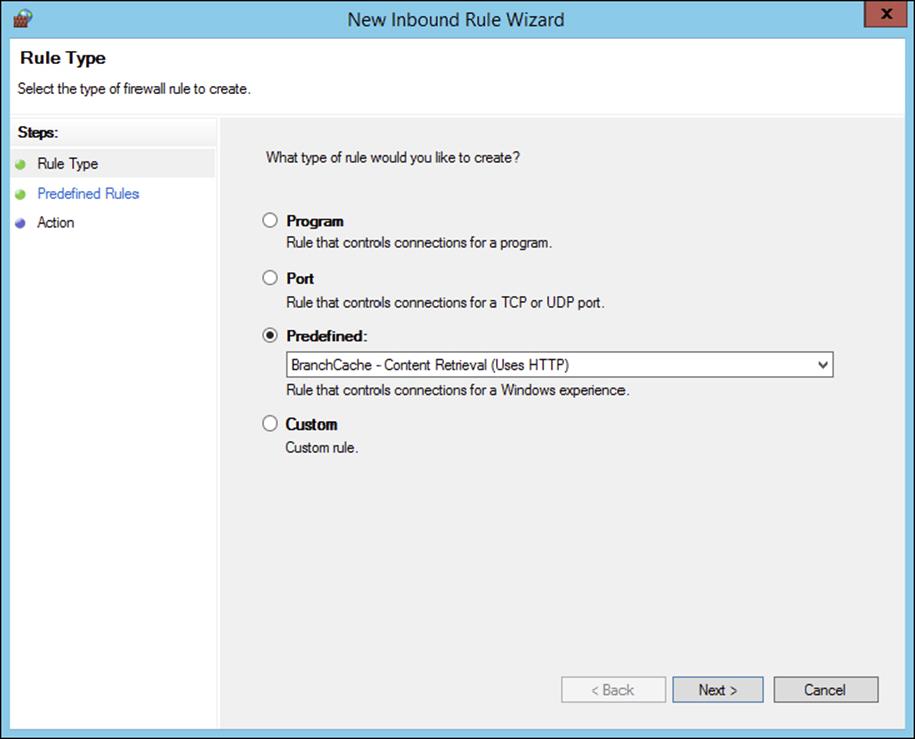
7. On the Predefined Rules screen, click Next.
8. On the Action screen, ensure that Allow The Connection is selected and then click Finish. You must select Allow The Connection for the BranchCache client to be able to receive traffic on this port.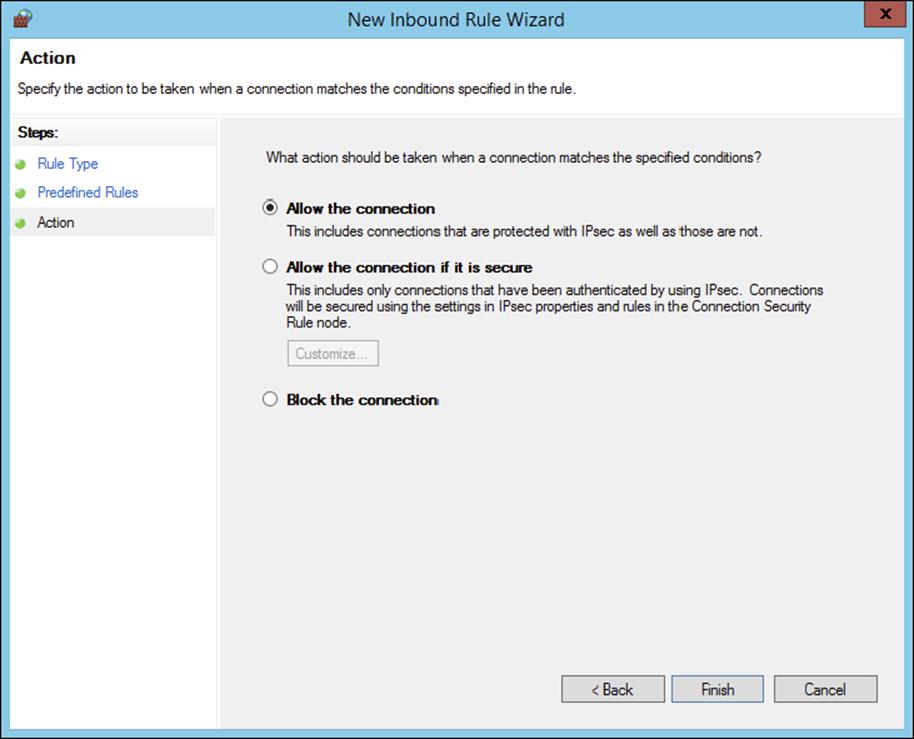
9. To create the WS-Discovery firewall exception, right-click Inbound Rules and click New Rule. The New Inbound Rule Wizard opens.
10.On the Rule Type screen, click Predefined, expand the list of choices, and then click BranchCache – Peer Discovery (Uses WSD). Click Next.
11.On the Predefined Rules screen, click Next.
12.On the Action screen, ensure that Allow The Connection is selected and then click Finish.
13.In the Group Policy Management Editor console, right-click Outbound Rules and then click New Rule. The New Outbound Rule Wizard opens.
14.On the Rule Type screen, click Predefined, expand the list of choices, and then click BranchCache – Content Retrieval (Uses HTTP). Click Next.
15.On the Predefined Rules screen, click Next.
16.On the Action screen, make sure that Allow The Connection is selected and then click Finish.
17.Create the WS-Discovery firewall exception by right-clicking Outbound Rules and then click New Rule. The New Outbound Rule Wizard opens.
18.On the Rule Type screen, click Predefined, expand the list of choices, and then click BranchCache – Peer Discovery (Uses WSD). Click Next.
19.On the Predefined Rules screen, click Next.
20.On the Action screen, make sure that Allow The Connection is selected and then click Finish.
Now that you have looked at the distributed cache mode configuration, let’s take a look at the hosted mode configuration.
Hosted Mode Requirements
To set up a hosted mode BranchCache configuration, you must first set up a Windows Server 2012 R2 hosted cache server at the main and branch offices. You also need Windows 7 Enterprise, Windows 7 Ultimate, Windows 8 Pro, or Windows 8 Enterprise computers at the branch offices.
The Windows 7 or Windows 8 machines download the data from the main cache server, and then the hosted cache servers at the branch offices obtain a copy of the downloaded data for other users to access.
Your network infrastructure must also allow for physical connections between the main office and the branch offices. These connections can be VPNs or some type of WAN links. After these requirements are met, your cache server must obtain a server certificate so that the client computers in the branch offices can positively identify the cache servers.
Exercise 2.3 walks you through the process of installing the BranchCache feature on a Windows Server 2012 R2 machine. To begin this exercise, you must be logged into the Windows Server 2012 R2 machine as an administrator.
Exercise 2.3: Installing BranchCache on Windows Server 2012 R2
1. Open Server Manager by selecting the Server Manager icon or by running servermanager.exe.
2. Select Add Roles And Features.
3. Select Next at the Before You Begin pane (if shown).
4. Select Role-Based Or Feature-Based Installation and select Next to continue.
5. Select the Select A Server From The Server Pool option and click Next.
6. At the Select Server Roles screen, click Next.
7. At the Select Features screen, click the check box for BranchCache. Then click Next.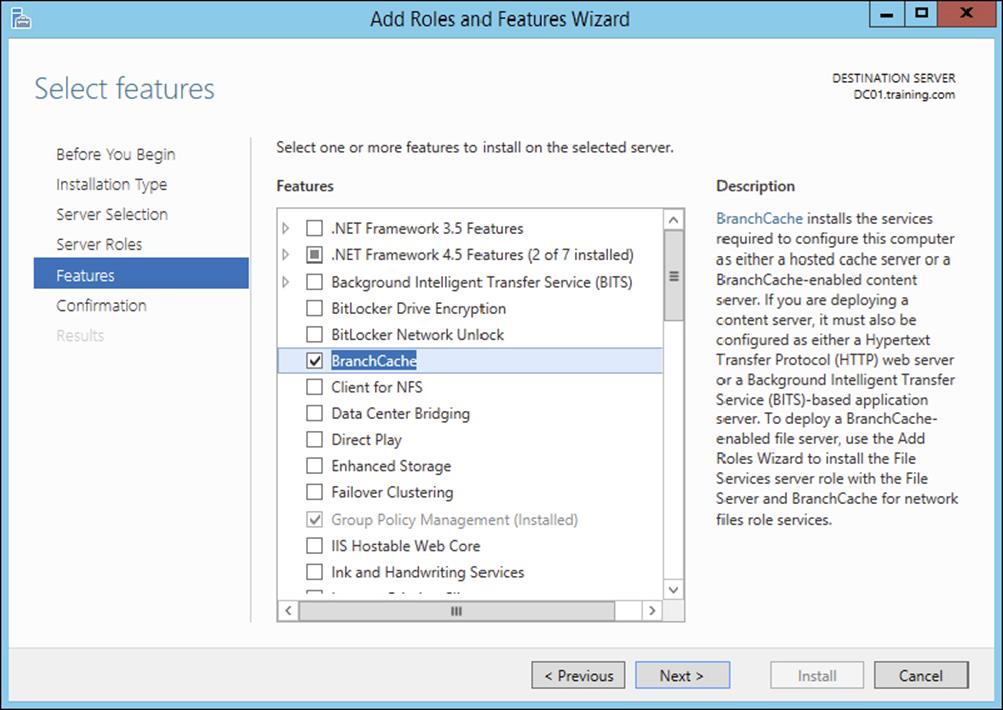
8. Check the Restart The Destination Server If Required box and then click the Install button. If a dialog box appears about restarting, click the Yes button. The system should restart.
9. After the system restarts, log in as the administrator.
Make sure to repeat this exercise on all branch office cache servers. One of the requirements for BranchCache is a physical connection between the main office and the branch offices.
BranchCache and PowerShell
As stated throughout this book, PowerShell is a command-line shell and scripting tool. BranchCache has many different PowerShell cmdlets that allow you to configure and maintain the BranchCache feature. Table 2.1 shows just some of the different PowerShell cmdlets for BranchCache.
TABLE 2.1 PowerShell cmdlets for BranchCache
|
Cmdlet |
Description |
|
Add-BCDataCache Extension |
Increases the amount of cache storage space that is available on a hosted cache server by adding a new cache file |
|
Clear-BCCache |
Deletes all data in all data and hash files |
|
Disable-BC |
Disables the BranchCache service |
|
Disable-BCDowngrading |
Disables downgrading so that client computers that are running Windows 8 Consumer Preview do not request Windows 7–specific versions of content information from content servers |
|
Enable-BCDistributed |
Enables BranchCache and configures a computer to operate in distributed cache mode |
|
Enable-BCHostedClient |
Configures BranchCache to operate in hosted cache client mode |
|
Enable-BCHostedServer |
Configures BranchCache to operate in hosted cache server mode |
|
Enable-BCLocal |
Enables the BranchCache service in local caching mode |
|
Export-BCCachePackage |
Exports a cache package |
|
Export-BCSecretKey |
Exports a secret key to a file |
|
Get-BCClient Configuration |
Gets the current BranchCache client computer settings |
|
Get-BCContent ServerConfiguration |
Gets the current BranchCache content server settings |
|
Get-BCDataCache |
Gets the BranchCache data cache |
|
Get-BCStatus |
Gets a set of objects that provide BranchCache status and configuration information |
|
Import-BCCachePackage |
Imports a cache package into BranchCache |
|
Import-BCSecretKey |
Imports the cryptographic key that BranchCache uses for generating segment secrets |
|
Set-BCAuthentication |
Specifies the BranchCache computer authentication mode |
|
Set-BCCache |
Modifies the cache file configuration |
|
Set-BCSecretKey |
Sets the cryptographic key used in the generation of segment secrets |
Enhanced Features in Windows Server 2012 R2 BranchCache
Microsoft continues to improve on many of the features of Windows Server, and BranchCache is no different. Microsoft has improved BranchCache in Windows Server 2012 R2 and Windows 8. The following list includes some of the enhanced features:
Office sizes and the number of branch offices are not limited. Windows Server 2012 R2 BranchCache allows any number of offices along with any number of users once an administrator deploys hosted cache mode with multiple hosted cache servers.
There are no requirements for a Group Policy object (GPO) for each office location, streamlining deployment. All that is required to deploy BranchCache is a single GPO that contains a small number of settings.
Client computer configuration is automatic. Administrators have the ability to configure their clients through the use of a Group Policy object. If this is done, client configuration will automatically be configured through the GPO, and if a client can’t find a hosted cache server, the client will automatically self-configure as a hosted cache mode client.
BranchCache is deeply integrated with the Windows file server. BranchCache is automatically integrated with Windows file server technology. Because of this, the process of finding duplicate pieces in independent files is greatly improved.
Duplicate content is stored and downloaded only once. BranchCache stores only one instance of the content on a hosted cache server or content server, and because of this, you get greater disk storage savings. Since client computers at the remote offices download only one instance of any content, your network saves on additional WAN bandwidth.
Small changes to large files produce bandwidth savings. One advantage of BranchCache is the file server chunking system that helps divide files and web pages into smaller parts. Now when a file is changed, only the part of that file that has been changed gets replicated. This allows BranchCache to use lower bandwidth requirements.
Offline content creation improves performace. When BranchCache is deployed as content or file servers, the data is calculated offline before a client even has the chance to request it. Because of this, the systems get faster performance and bandwidth.
Cache encryption is enabled automatically. BranchCache stores its cached data as encrypted data. This guarantees data security without the need to encrypt the entire drive.
You can deploy multiple hosted cache servers. In Windows 7 and Windows Server 2008 R2, BranchCache was able to deploy only one hosted cache server per office location. Windows Server 2012 R2 allows you to deploy as many hosted cache servers as are needed at a location.
Configure File Classification Infrastructure Using File Server Resource Manager
The File Server Resource Manager (FSRM) is a suite of tools that allows an administrator to place quotas on folders or volumes, filter file types, and create detailed storage reports. These tools allow an administrator to plan and implement policies on data properly and as needed.
One of the advantages of using FSRM is all of the included features that allow administrators to manage the data that is stored on their file servers. Some of the features included with FSRM are as follows:
File Management Tasks FSRM allows an administrator to apply a policy or action to data files. Some of the actions that can be performed are encrypting files and running custom commands.
Quota Management Quotas give an administrator the ability to limit how much disk space a user can use on a file server. Administrators have the ability to limit space to an entire volume or to specific folders.
File Classification Infrastructure This feature uses rules to assign specific properties to files automatically and then performs tasks on those files based on the classification. A few examples of file classification properties are Country, Department, Birthday, and Social Security Number. The tasks performed using these classifications include restricting file access, implementing file encryption, and setting file expiration policies.
File Screening Management Administrators can set up file screening on the server and limit what types of files can be stored on that server. For example, an administrator can set a file screen on the server so that any file ending in .bmp gets rejected.
Storage Reports Administrators can create reports that show them how data is classified and accessed. You also have the ability to see what users are trying to save unauthorized file extensions.
Installing FSRM is easy when using either Server Manager or PowerShell. To install using Server Manager, you go into Add Features and choose File And Storage Services ![]() File Services
File Services ![]() File Server Resource Manager. To install FSRM using PowerShell, use the following command:
File Server Resource Manager. To install FSRM using PowerShell, use the following command:
Install-WindowsFeature -Name FS-Resource-Manager -IncludeManagementTools
Configuring FSRM using the Windows GUI version is straightforward, but setting up FSRM using PowerShell is a bit more challenging. Table 2.2 describes some of the PowerShell commands for FSRM.
Table 2.2 PowerShell commands for FSRM
|
PowerShell cmdlet |
Description |
|
Get-FsrmAutoQuota |
Gets auto-apply quotas on a server |
|
Get-FsrmClassification |
Gets the status of the running file classification |
|
Get-FsrmClassificationRule |
Gets classification rules |
|
Get-FsrmFileGroup |
Gets file groups |
|
Get-FsrmFileScreen |
Gets file screens |
|
Get-FsrmFileScreenException |
Gets file screen exceptions |
|
Get-FsrmQuota |
Gets quotas on the server |
|
Get-FsrmSetting |
Gets the current FSRM settings |
|
Get-FsrmStorageReport |
Gets storage reports |
|
New-FsrmAutoQuota |
Creates an auto-apply quota |
|
New-FsrmFileGroup |
Creates a file group |
|
New-FsrmFileScreen |
Creates a file screen |
|
New-FsrmQuota |
Creates an FSRM quota |
|
New-FsrmQuotaTemplate |
Creates a quota template |
|
Remove-FsrmClassificationRule |
Removes classification rules |
|
Remove-FsrmFileScreen |
Removes a file screen |
|
Remove-FsrmQuota |
Removes an FSRM quota from the server |
|
Set-FsrmFileScreen |
Changes configuration settings of a file screen |
|
Set-FsrmQuota |
Changes configuration settings for an FSRM quota |
Configure File Access Auditing
One of the most important aspects of controlling security in networked environments is ensuring that only authorized users are able to access specific resources. Although system administrators often spend much time managing security permissions, it is almost always possible for a security problem to occur.
Sometimes the best way to find possible security breaches is actually to record the actions that specific users take. Then, in the case of a security breach (the unauthorized shutdown of a server, for example), system administrators can examine the log to find the cause of the problem.
The Windows Server 2012 R2 operating system and Active Directory offer you the ability to audit a wide range of actions. In the following sections, you’ll see how to implement auditing for Active Directory.
Overview of Auditing
The act of auditing relates to recording specific actions. From a security standpoint, auditing is used to detect any possible misuse of network resources. Although auditing does not necessarily prevent resources from being misused, it does help determine when security violations have occurred (or were attempted). Furthermore, just the fact that others know that you have implemented auditing may prevent them from attempting to circumvent security.
You need to complete several steps in order to implement auditing using Windows Server 2012 R2:
1. Configure the size and storage settings for the audit logs.
2. Enable categories of events to audit.
3. Specify which objects and actions should be recorded in the audit log.
Note that there are trade-offs to implementing auditing. First, recording auditing information can consume system resources. This can decrease overall system performance and use up valuable disk space. Second, auditing many events can make the audit log impractical to view. If too much detail is provided, system administrators are unlikely to scrutinize all of the recorded events. For these reasons, you should always be sure to find a balance between the level of auditing details provided and the performance-management implications of these settings.
Implementing Auditing
Auditing is not an all-or-none type of process. As is the case with security in general, system administrators must choose specifically which objects and actions they want to audit.
The main categories for auditing include the following:
1. Audit account logon events
2. Audit account management
3. Audit directory service access
4. Audit logon events
5. Audit object access
6. Audit policy change
7. Audit privilege use
8. Audit process tracking
9. Audit system events
In this list of categories, four of the categories are related to Active Directory. Let’s discuss these auditing categories in a bit more detail.
Audit Account Logon Events You enable this auditing event if you want to audit when a user authenticates with a domain controller and logs onto the domain. This event is logged in the security log on the domain controller.
Audit Account Management This auditing event is used when you want to watch what changes are being made to Active Directory accounts. For example, when another administrator creates or deletes a user account, it would be an audited event.
Audit Directory Service Access This auditing event occurs whenever a user or administrator accesses Active Directory objects. Let’s say that an administrator opens Active Directory and clicks a user account; even if nothing is changed on that account, an event is logged.
Audit Logon Events Account logon events are created for domain account activity. For example, you have a user who logs onto a server so that they can access files; the act of logging onto the server creates this audit event.
Audit Object Access Audit object access allows you to audit objects within your network, such as folders, files, and printers. If you suspect that someone is trying to hack into an object (for example, the finance folder), this is the type of auditing you should use. You still would need to enable auditing on the actual object (the finance folder in this case).
Audit Policy Change Audit policy change allows you to audit changes to user rights assignment policies, audit policies, or trust policies. This auditing allows you to see whether anyone changes any of the other audit policies.
Audit Privilege Use Setting the audit privilege use allows an administrator to audit each instance of a user exercising a user right. For example, if a user changes the system time on a machine, this is a user right. Logging on locally is another common user right.
To audit access to objects stored within Active Directory, you must enable the Audit Directory Service Access option. Then you must specify which objects and actions should be tracked.
Exercise 2.4 walks you through the steps you must take to implement the auditing of Active Directory objects on domain controllers.
Exercise 2.4: Enabling Auditing of Active Directory Objects
1. Open the Local Security Policy tool (located in the Administrative Tools program group).
2. Expand Local Policies ![]() Audit Policy.
Audit Policy.
3. Double-click the Audit Directory Service Access setting.
4. In the Audit Directory Service Access Properties dialog box, place check marks next to Success and Failure. Click OK to save the settings.
5. Close the Local Security Policy tool.
Viewing Auditing Information
One of the most important aspects of auditing is regularly monitoring the audit logs. If this step is ignored, as it often is in poorly managed environments, the act of auditing is useless. Fortunately, Windows Server 2012 R2 includes the Event Viewer tool, which allows system administrators to view audited events quickly and easily. Using the filtering capabilities of Event Viewer, you can find specific events of interest.
Exercise 2.5 walks you through the steps that you must take in order to generate some auditing events and to examine the data collected for these actions. In this exercise, you will perform some actions that will be audited, and then you will view the information recorded within the audit logs.
Exercise 2.5: Generating and Viewing Audit Logs
1. Open the Active Directory Users and Computers tool.
2. Within an OU that has auditing enabled, right-click a user account and select Properties.
3. In the user’s account Properties dialog box, add the middle initial A for this user account and enter Software Developer in the Description box. Click OK to save the changes.
4. Close the Active Directory Users and Computers tool.
5. Open the Event Viewer tool from the Administrative Tools program group. Select the Security item under Windows Logs. You will see a list of audited events categorized under Directory Service Access. Note that you can obtain more details about a specific item by double-clicking it.
6. When you have finished viewing the security log, close the Event Viewer tool.
Using the Auditpol.exe Command
There may be a time when you need to look at the auditing policies set on a user or system. This is where an administrator can use the Auditpol.exe command. Auditpol not only gives administrators the ability to view an audit policy but also lets them set, configure, modify, restore, and even remove an audit policy. Auditpol is a command-line utility, and there are multiple switches that can be used with Auditpol. The following is the syntax used with Auditpol, and Table 2.3 describes some of the switches.
Auditpol command [<sub-command><options>]
Here’s an example:
Auditpol /get /user:mrice /category:"Detailed Tracking" /r
Table 2.3 Auditpol commands
|
Command |
Description |
|
/backup |
Allows an administrator to save the audit policy to a file |
|
/clear |
Allows an administrator to clear an audit policy |
|
/get |
Gives administrators the ability to view the current audit policy |
|
/list |
Allows you to view selectable policy elements |
|
/remove |
Removes all per-user audit policy settings and disables all system audit policy settings |
|
/restore |
Allows an administrator to restore an audit policy from a file that was previously created by using auditpol /backup |
|
/set |
Gives an administrator the ability to set an audit policy |
|
/? |
Displays help |
Enhanced Features in Windows Server 2012 R2 Auditing
Auditing in Windows Server 2012 R2 and Windows 8 has been enhanced in many ways. Microsoft has increased the level of detail in the security auditing logs. Microsoft has also simplified the deployment and management of auditing policies. The following list includes some of the major enhancements:
Global Object Access Auditing Administrators using Windows Server 2012 R2 and Windows 8 have the ability to define computer-wide system access control lists (SACLs). Administrators can define SACLs either for the file system or for the registry. After the specified SACL is defined, the SACL is then applied automatically to every object of that type. This can be helpful to administrators for verifying that all critical files, folders, and registry settings on a computer are protected. This is also helpful for identifying when an issue occurs with a system resource.
“Reason For Access” Reporting When an administrator is performing auditing in Windows Server 2012 R2 and Windows 8, they can now see the reason why an operation was successful or unsuccessful. Previously, they lacked the ability to see the reason why an operation succeeded or failed.
Advanced Audit Policy Settings In Windows Server 2012 R2, there are 53 advanced audit policy settings that can be used in place of the 9 basic auditing settings. These advanced audit settings also help eliminate the unnecessary auditing activities that can make audit logs difficult to manage and decipher.
Expression-Based Audit Policies Administrators have the ability, because of Dynamic Access Control, to create targeted audit policies by using expressions based on user, computer, and resource claims. For example, an administrator has the ability to create an audit policy that tracks all Read and Write operations for files that are considered high-business impact. Expression-based audit policies can be directly created on a file or folder or created through the use of a Group Policy.
Removable Storage Device Auditing Administrators have the ability to monitor attempts to use a removable storage device on your network. If an administrator decides to implement this policy, an audit event is created every time one of your users attempts to copy, move, or save a network resource onto a removable storage device.
Implement Dynamic Access Control
One of the advantages of Windows Server 2012 R2 is the ability to apply data governance to your file server. This will help control who has access to information and auditing. You get these advantages through the use of Dynamic Access Control (DAC). Dynamic Access Control allows you to identify data by using data classifications (both automatic and manual) and then control access to these files based on these classifications.
DAC also gives administrators the ability to control file access by using a central access policy. This central access policy will also allow an administrator to set up audit access to files for reporting and forensic investigation.
DAC allows an administrator to set up Active Directory Rights Management Service (AD RMS) encryption for Microsoft Office documents. For example, you can set up encryption for any documents that contain financial information.
Dynamic Access Control gives an administrator the flexibility to configure file access and auditing to domain-based file servers. To do this, DAC controls claims in the authentication token, resource properties, and conditional expressions within permission and auditing entries.
Administrators have the ability to give users access to files and folders based on Active Directory attributes. For example, a user named Dana is given access to the file server share because in the user’s Active Directory (department attribute) properties, the value contains the value Sales. Over the next few sections, you will take a deep dive into implementing Dynamic Access Control.
 For DAC to function properly, an administrator must enable Windows 8 computers and Windows Server 2012 R2 file servers to support claims and compound authentication.
Configure User and Device Claim Types
Dynamic Access Control is a must-have for any corporate environment. DAC takes folder and file permissions to a whole new level by enabling more granular methods of access and authentication within Active Directory. In this section, you will focus on configuring user and device claim types. Let’s start off by enabling DAC (see Exercise 2.6).
Exercise 2.6: Enable Dynamic Access Control
1. On a domain controller, launch Server Manager and then navigate to the Group Policy Management Console under Tools.
2. Launch Group Policy Management and navigate to Default Domain Controllers Policy.
3. Right-click Default Domain Controllers Policy and select Edit to launch the Group Policy Management Editor.
4. Within the Group Policy Management Editor, navigate to Computer Configuration ![]() Policies
Policies ![]() Administrative Templates
Administrative Templates ![]() System
System ![]() KDC, as shown here.
KDC, as shown here.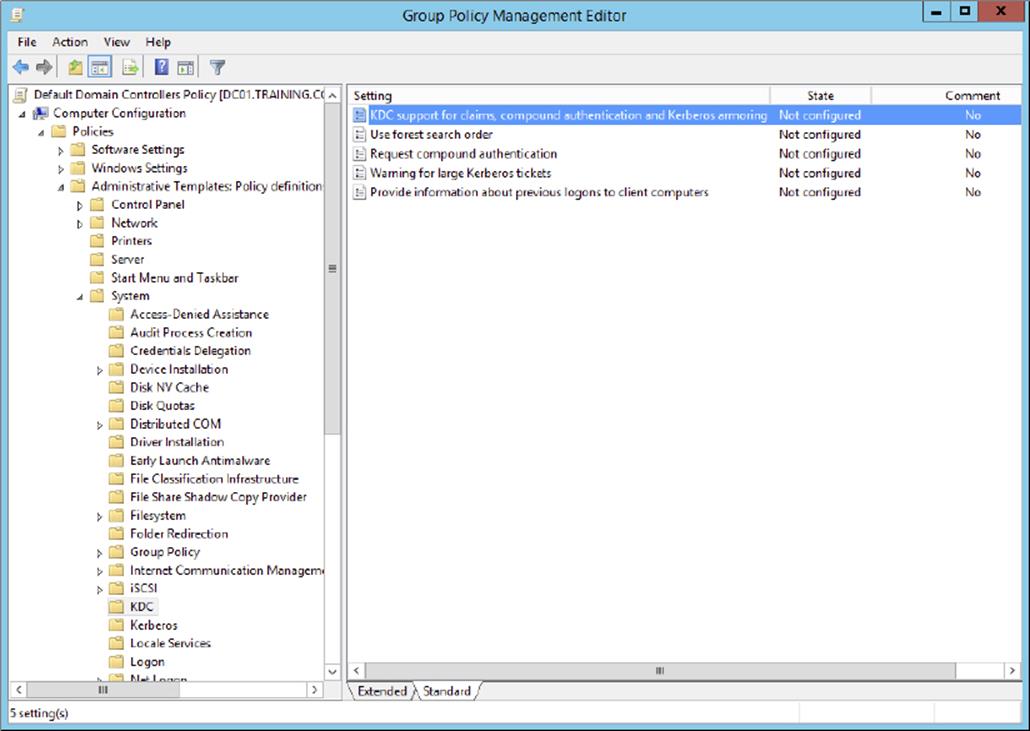
5. Double-click the KDC Support For Claims, Compound Authentication, And Kerberos Armoring policy, and select the Enabled radio button, as shown here.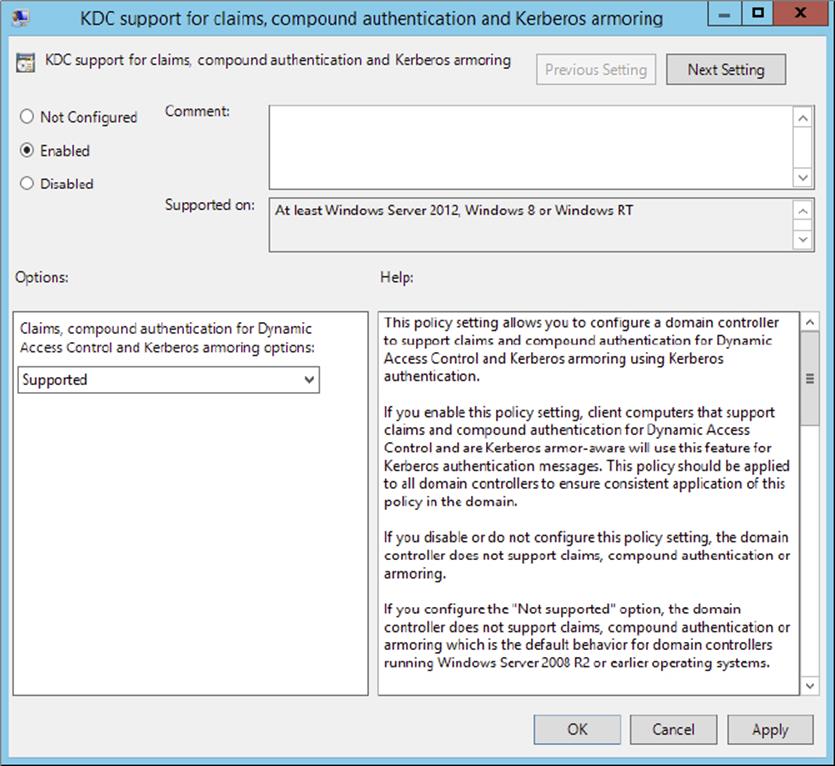
6. Click Apply and OK to save the new policy setting.
That’s all there is to it. Now you are ready to take a look at user and device claims. For the next exercise, you will need to have a functional Active Directory environment populated with multiple users across multiple departments. A simple lab environment consisting of a domain controller and a domain-joined file server will be sufficient.
Now that you have successfully enabled DAC within the environment, everything is managed from the Active Directory Administrative Center on a domain controller. You can now set what’s referred to as conditions on your environment’s folder and file server hierarchy. Conditions are user or device claims that you can set. For example, you could set a condition on a folder or file that limits user access to a specific department, or you could set a condition that allows a user to view folders and files from only a specific workstation. Setting these types of conditions will make managing your environment easier, and it will do so with enhanced security. Allowing file and folder access from only domain-joined machines bars users from connecting with an unsecured personal device. Also, setting conditions based upon the Active Directory department attribute makes user access available to those files and folders based on them being in that specific department. Let’s put this into practice (see Exercise 2.7).
Exercise 2.7: Configure User and Device Claim Types
1. On a domain controller, launch Server Manager and then navigate to the Active Directory Administrative Center under Tools.
2. Launch the Active Directory Administrative Center and navigate to Dynamic Access Control, as shown here.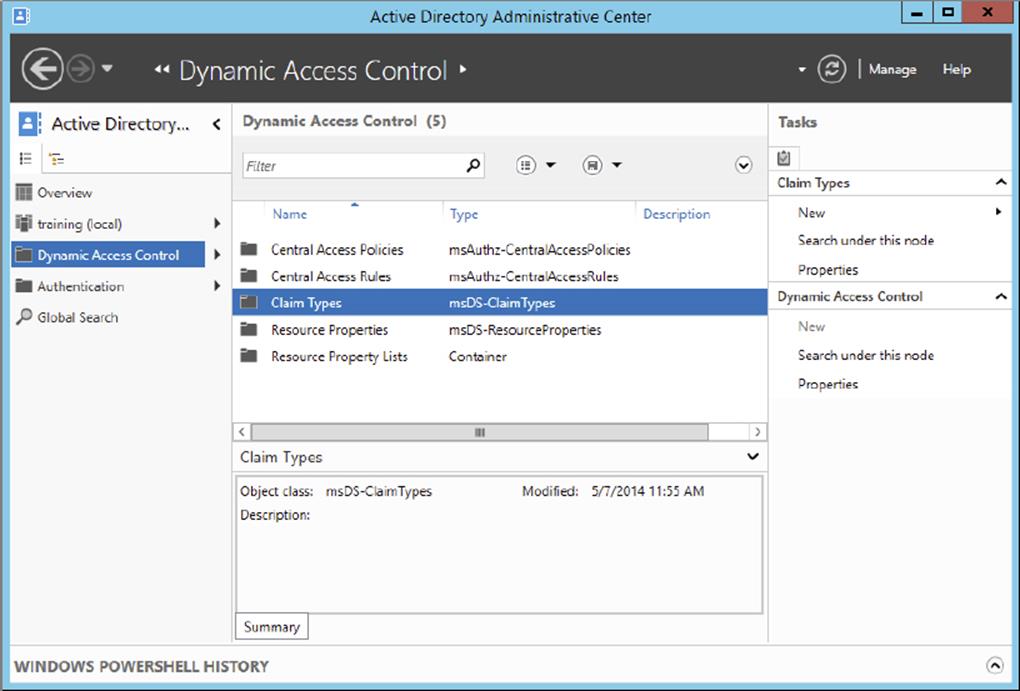
3. Select New ![]() Claim Type to open the Create Claim Type dialog box.
Claim Type to open the Create Claim Type dialog box.
4. This is where you will choose what claims will be used to define permissions. You can filter claim types with the search field. Search for and select the Department claim type, as shown here. Notice how the Display Name, Description, User Claim Type, and Protect From Accidental Deletion fields are enabled by default.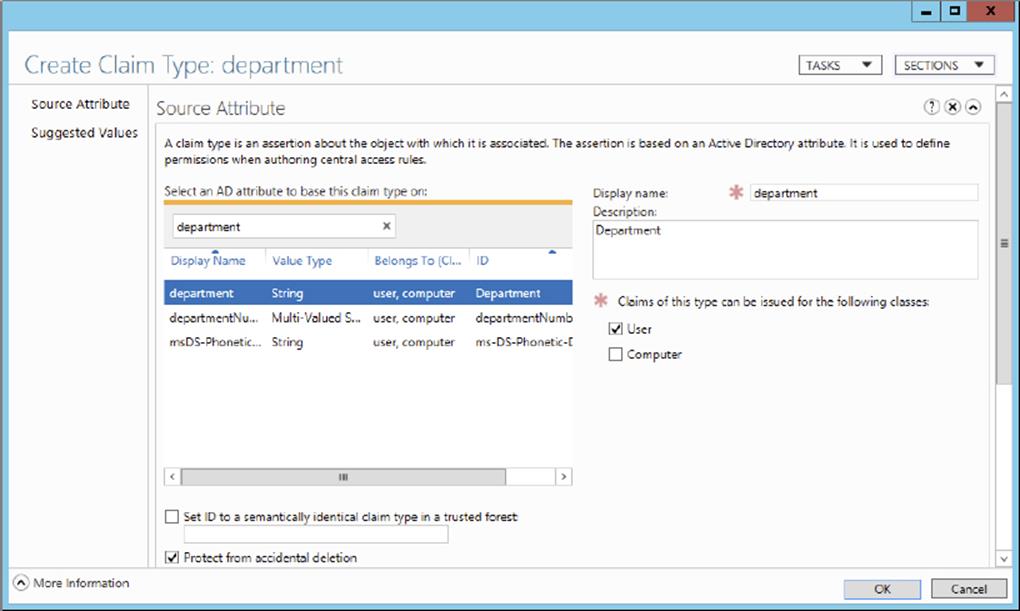
5. Click OK to finish creating the new claim type. You can now use the Active Directory department attribute as a condition for allowing access on file shares.
6. Navigate to a shared folder within the environment and open the Advanced Security Settings properties on that share.
7. Click the Add button to create a new permission entry.
8. Select a principal. A principal can be any Active Directory user or group. You must select a principal before the option Add A Condition becomes available.
9. Click Add A Condition to bring up the condition’s parameters, as shown here. For this exercise, I have selected a user who belongs to the IT department. As long as that user remains in the IT department, the user will have full control over this file share.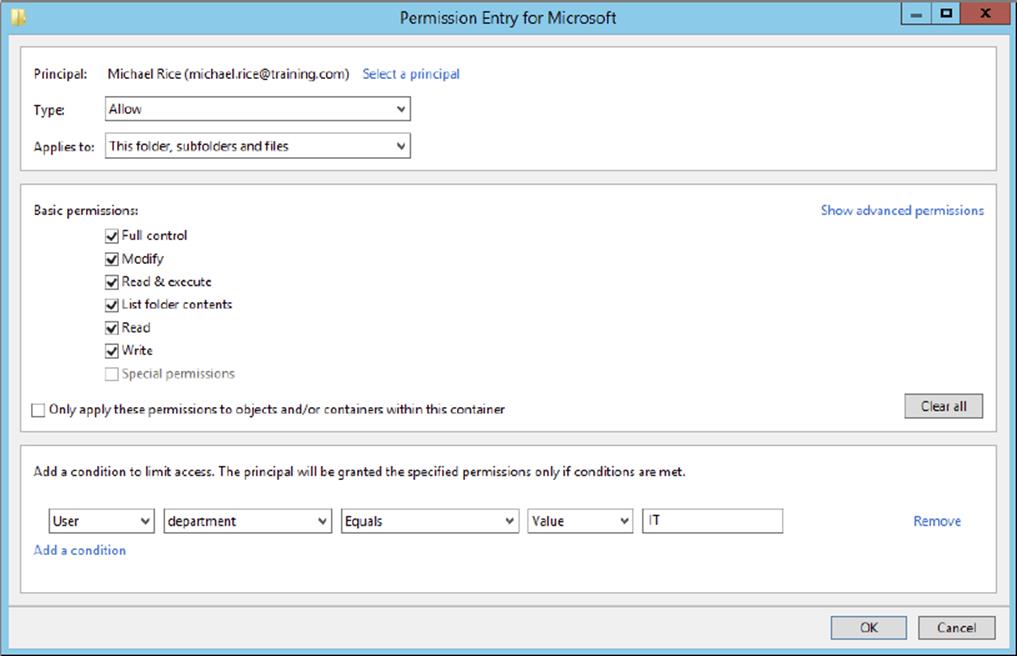
10.Click OK to save this new conditional permission entry.
That was just one example of how Dynamic Access Control can be used to control folder and file access. Spend some time configuring different user and device claims types. It is really handy to be able to change a user’s department, country, or office location in Active Directory and have that change automatically affect what folders and files that user can access throughout the environment.
Create and Configure Resource Properties and Lists
Now that you have a practical understanding of configuring user and device claims, the next logical Dynamic Access Control configuration is to configure resource properties and lists. Resource properties are used to define additional properties that will appear on files and folders. These additional properties can be used for file access based on file classifications such as country or department. There are quite a few default resource properties already configured in DAC, and you can also create your custom resource properties as needed.
Once you have selected or created resource properties, they are added to the Global Resource Property List within DAC. The default resource properties have already been added for you. Note that any custom resource properties you create will also be added automatically to the Global Resource Property List. The list is then automatically pushed out via Group Policy and downloaded to all of the file servers within the environment. In Exercise 2.8, you will create and configure Resource Properties and Lists.
Exercise 2.8: Create and Configure Resource Properties and Lists
1. On a domain controller, launch Server Manager and then navigate to the Active Directory Administrative Center under Tools.
2. Launch the Active Directory Administrative Center and navigate to Dynamic Access Control.
3. Click and open Resource Properties. You will see that all of the default resource properties are listed, but they are all disabled by default.
4. Right-click and enable the Department resource property, as shown here.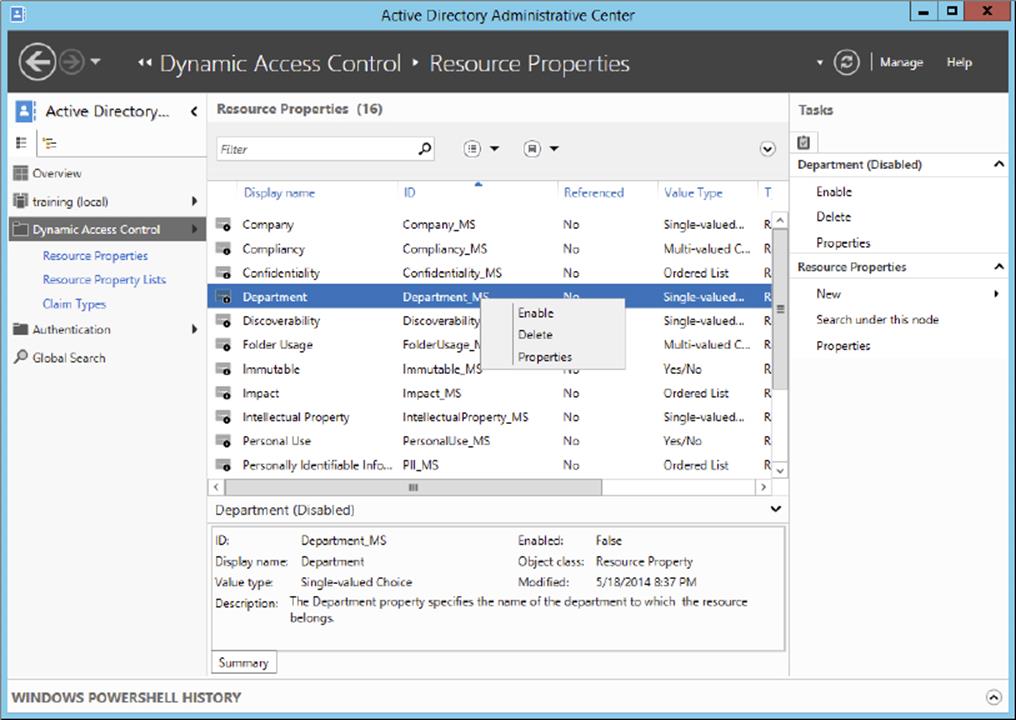
5. You’ll also create a custom resource property. On the same page that you enabled the Department resource property, click New ![]() Resource Property.
Resource Property.
6. Name the resource property Country and then click Add to list all of the countries that will be values of this resource property, as shown here.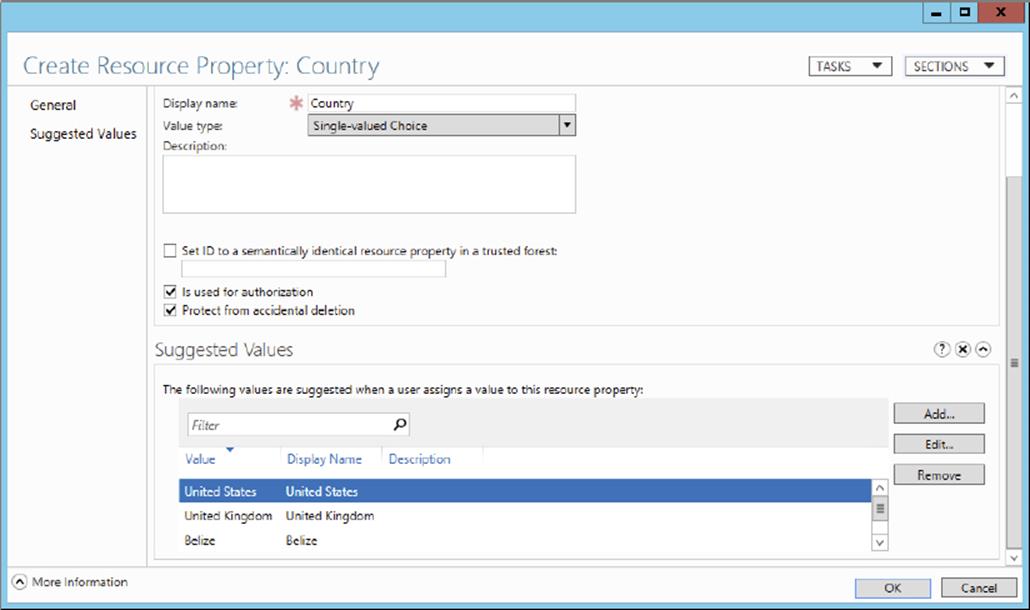
7. Click OK to create this new resource property.
8. Navigate to and open the global resource property list within the DAC management GUI to verify that both the Country and Department resource properties are enabled and ready to be downloaded to your file servers.
Now that you have defined resource properties, you can use those properties to create and configure central access rules and policies.
Create and Configure Central Access Rules and Policies
Central access rules are used to govern file and folder access based on the resource properties that have been previously defined, such as those you configured in the previous exercise. Let’s say you wanted to limit access to a corporate software share to only corporate IT personnel. DAC uses central access rules and policies to accomplish this task. Once the rule has been created, Group Policy will be used to keep all of the environment’s file servers up-to-date with all of your dynamic access control central access rules. Exercise 2.9will demonstrate the configuration of Central Access Rules and Policies.
Exercise 2.9: Create and Configure Central Access Rules and Policies
1. On a domain controller, launch Server Manager and then navigate to the Active Directory Administrative Center under Tools.
2. Launch the Active Directory Administrative Center and navigate to Dynamic Access Control.
3. Click and open Central Access Rules. The list should be empty.
4. Click New ![]() Central Access Rule.
Central Access Rule.
5. Provide a name and set proper permissions for the resource, as shown here. For this exercise, I have created a central access rule named Corporate IT Software & Installation Media Access, which will be used to limit user access to IT resources to only members of the IT department.
6. Click OK to create the new central access rule.
7. Navigate to and open Central Access Policies within the DAC management GUI.
8. Click New ![]() Central Access Policy. Note that a central access policy can contain multiple central access rules.
Central Access Policy. Note that a central access policy can contain multiple central access rules.
9. Name the central access policy and add the central access rule created in step 6 of this exercise. Your screen should look similar to what’s shown here.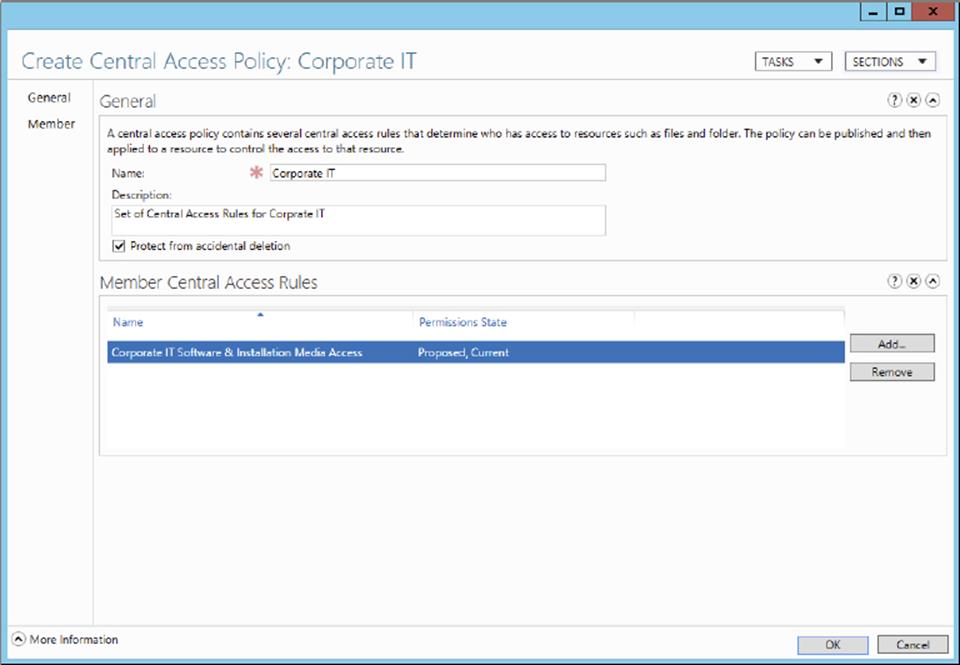
10.Now you can configure Group Policy in Active Directory to push out the new central access policy. Launch the Group Policy Manager on your domain controller and edit the default Domain Controllers Policy.
11.Drill down to Computer Configuration ![]() Policies
Policies ![]() Windows Settings
Windows Settings ![]() Security Settings
Security Settings ![]() File System
File System ![]() Central Access Policy and then right-click and select Manage Central Access Policies.
Central Access Policy and then right-click and select Manage Central Access Policies.
12.Add the central access policy, as shown here.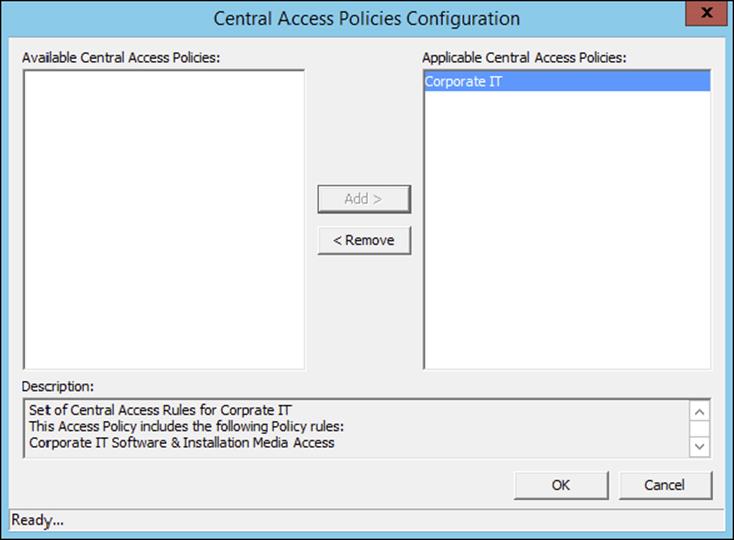
13.Click OK to save the new central access policy configuration.
By now, I’m sure you can see the power you have with Dynamic Access Control. By taking the time to configure central access rules and policies for your company’s users and devices fully, you will enhance environmental security and ease of management significantly. Now that the new central access policy is applied to your environment, all you have to do to finish completely enabling DAC on your file shares is to configure file classification.
Configure File Classification
Administrators can set file classifications and then manage the data more effectively by using these classifications. By classifying files and then setting policies to those classifications, an administrator can set policies on those classifications that assist with managing environmental resources. These policies include restricting file access, file encryption, and file expirations. In Exercise 2.10, you will configure file classification through Dynamic Access Control and then test your work by using the Effective Access tab in the Advanced Security Settings of a file share.
Exercise 2.10: Configure File Classification
1. On a DAC-enabled file share, right-click and open Properties.
2. Select the Classification tab and enable values for both the Country and Department file classification properties, as shown here.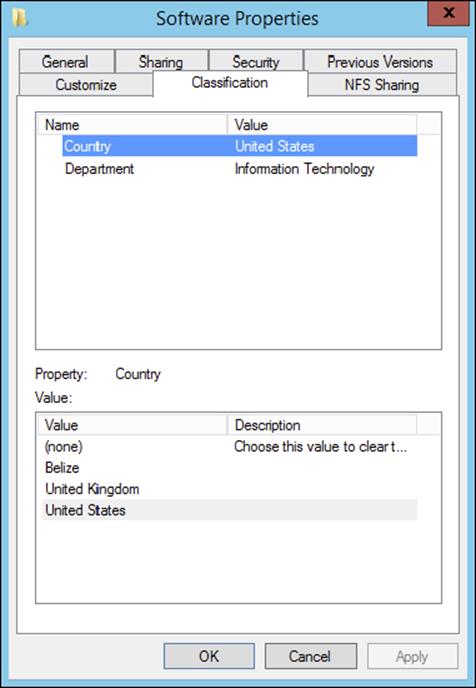
3. Click Apply to save the file classification.
4. Select the Security tab and click Advanced.
5. Select the Central Policy tab, making sure the central policy is set to the appropriate central access policy, as shown here. If you change the central access policy, make sure to click Apply before changing tabs.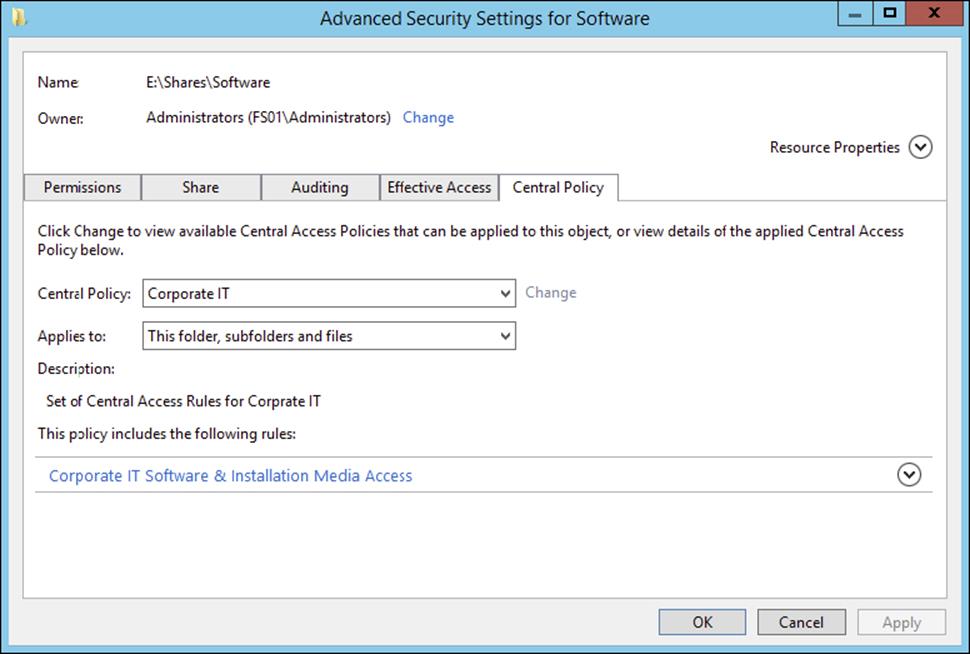
6. Select the Effective Access tab and test the effective access of a user to test your work.
Implement Policy Changes and Staging
One of the nice features of DAC is its ability to stage and test the effects of a new central access policy before actually implementing it. In Exercise 2.11, you will stage a central access policy and then test the effects of that policy on a file share.
Exercise 2.11: Implement Policy Stages and Staging
1. On a domain controller, launch Server Manager and then navigate to the Active Directory Administrative Center under Tools.
2. Launch the Active Directory Administrative Center and navigate to Dynamic Access Control.
3. Click Central Access Rules.
4. Right-click and open the properties of a central access policy.
5. Click the Proposed Permissions section, as shown here, to edit and stage the newly proposed permissions. For demonstration purposes, I have staged a policy change that would allow authenticated users to view the contents of the software library under the conditions that the user is a domain user who is logged into a domain computer.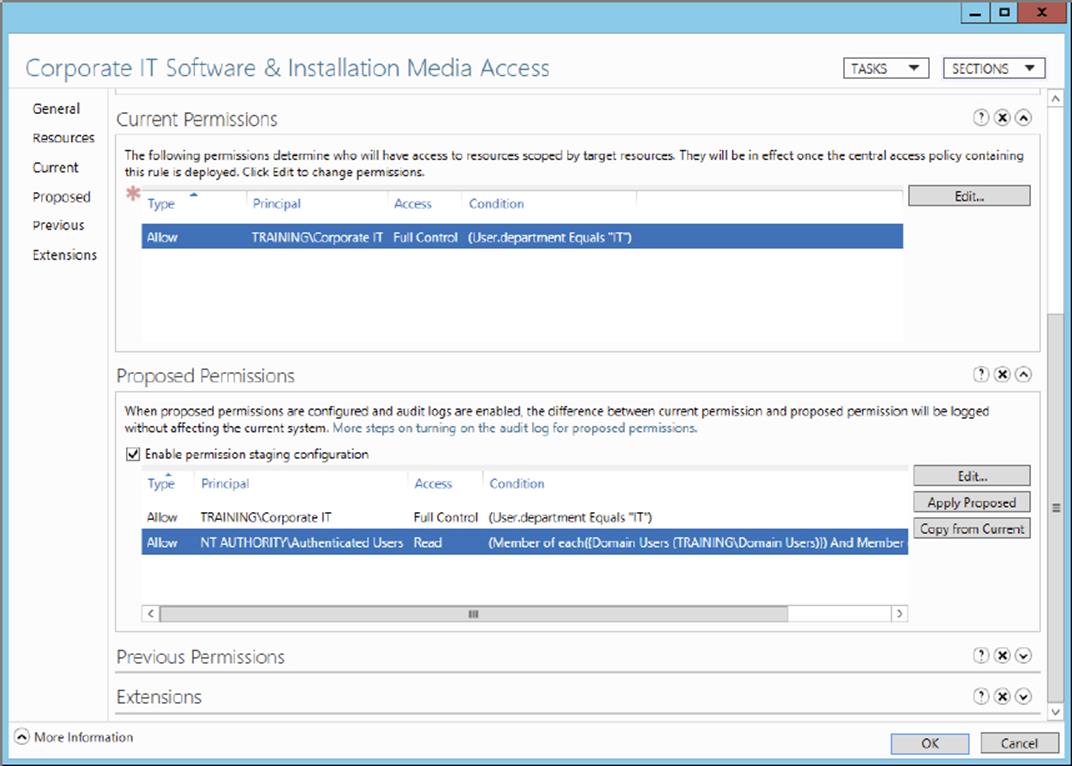
6. Click OK to set the new policy staging.
7. Switch to your file server and log in as an authenticated user.
8. Run a gpupdate /force from the command line to update the Group Policy settings on the file server.
9. As just an authenticated user, browse the share on which you staged your policy change. Notice how you have access as that authenticated user.
10.Now check the Event Viewer on the file server. Expand Windows Logs and then select Security. Under the Central Access Policy Staging task category, open the entries with Event ID 4818. You will notice how the authenticated user was allowed access to this share because of the staging policy.
11.Applying the staged policy is relatively straightforward. Switch to your domain controller and open the properties of the central access rule that was used in step 4 of this exercise. In the Proposed Permissions section, click Apply Proposed to save and enable the staged policy change, as shown here.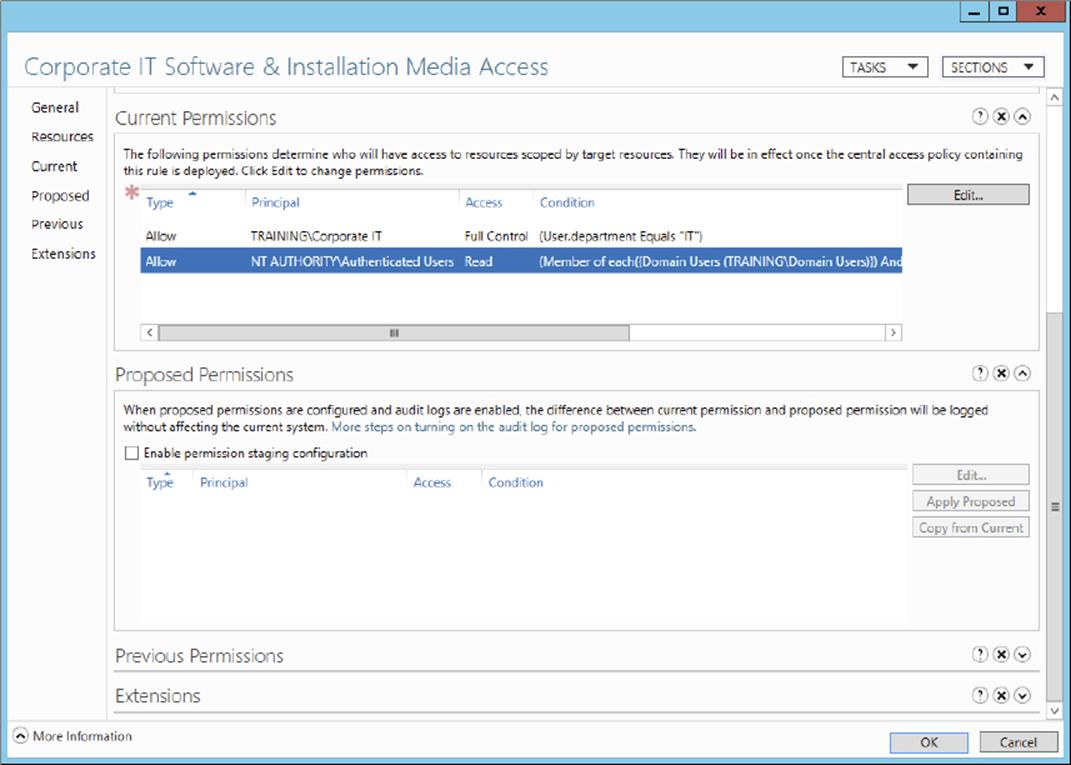
12.Verify that the current permissions reflect the applied proposed permissions and then click OK to close the Central Access Rules Properties dialog box.
Perform Access-Denied Remediation
One of the best features of Windows Server 2012 R2 is the ability to configure Access-Denied Assistance. With Access-Denied Assistance, you can set a preconfigured Windows error message to be displayed to users when they try to access resources to which they don’t have proper permissions to access. The best part is that users can “request assistance” via the displayed error message. When a user requests assistance, an email notification can notify the administrator who is either on duty or on call that one of their users needs help accessing a resource. When the user requests assistance, they are provided with a dialog box that will be attached to the email sent to the administrator. Within the dialog box, the user can explain why they need access to the desired resource. In Exercise 2.12, you will configure and test Access-Denied Assistance using Group Policy.
Exercise 2.12: Configure Access-Denied Assistance
1. On a domain controller, launch Server Manager and then navigate to Group Policy Management under Tools.
2. Launch the Group Policy Management Tool and create a new GPO that targets both your file servers and domain-joined client machines.
3. Within the Group Policy Object Editor, navigate to Computer Configuration ![]() Policies
Policies ![]() Administrative Templates
Administrative Templates ![]() System
System ![]() Access-Denied Assistance and double-click Customize Message For Access Denied Errors.
Access-Denied Assistance and double-click Customize Message For Access Denied Errors.
4. Enable the policy, configure an access-denied message that will be displayed to users who are denied access, and check the box to enable users to request assistance, as shown here.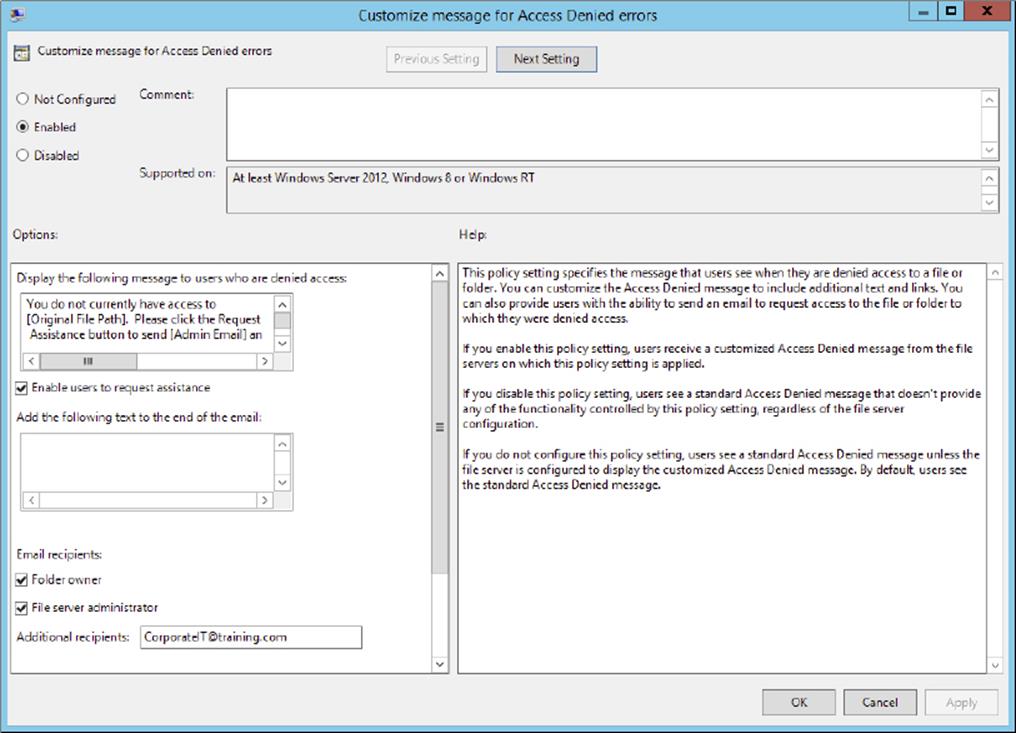
One of the great things about this policy is that it comes with preconfigured macros you can use to automate the access-denied message that will be displayed to users. Here are the four macros available within the access-denied message:
[Original File Path]: The original file path that was accessed by the user
[Original File Path Folder]: The parent folder of the original file path that was accessed by the user
[Admin Email]: The administrator email recipient list
[Data Owner Email]: The data owner email recipient list
For this exercise, I have configured the following access-denied message: “You do not currently have access to [Original File Path]. Please click the Request Assistance button to send [Admin Email] an email requesting assistance.”
5. Click OK to save and close the policy.
6. Invoke the Enable Access-Denied Assistance On Client For All File Types policy here as well.
7. Launch the File Server Resource Manager on one of your file servers to configure the email notification settings for the access-denied assistance email service.
8. Within the File Server Resource Manager, click Configure Options to configure the SMTP server and email addresses that will be used for access-denied assistance email notifications, as shown here.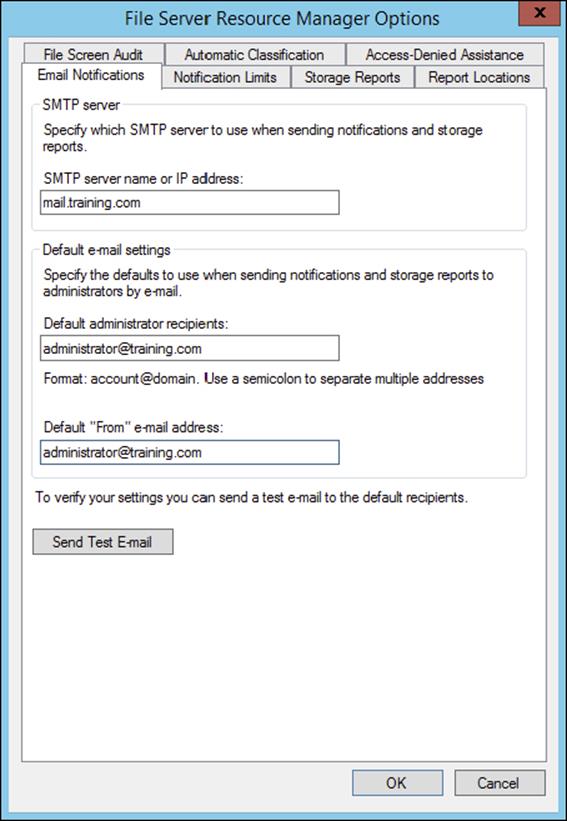
9. Click the Send Test Email button to verify your settings.
10.Click OK to save the configuration.
11.Test your work by trying to access a resource as a user who does not have permission for that resource and then use the Request Assistance feature to ask for help.
Configure and Optimize Storage
Disk storage is a requirement for just about every computer and application used in any corporate environment. Administrators have some familiarity with storage, whether it is internal storage, a locally attached set of disks, or network attached storage (NAS). In this section, you will examine the various aspects of Windows Server 2012 R2 file and storage solutions. Though I’ll discuss the various types of file and storage technologies, this section will primarily focus on iSCSI because of the native features in Windows Server 2012 R2. You will also look at some of the advanced configuration options of implementing thin provisioning and trim, managing server free space, and configuring tiered storage.
Configure iSCSI Target and Initiator
Internet Small Computer System Interface (iSCSI) is an Internet protocol used to establish and manage a connection between a computer (initiator) and a storage device (target). It does this by using a connection through TCP port 3260, which allows it to be used over a LAN, a WAN, or the Internet. Each initiator is identified by its iSCSI Qualified Name (iqn), and it is used to establish its connection to an iSCSI target.
iSCSI was developed to allow block-level access to a storage device over a network. This is different from using a NAS device that connects through the use of Common Internet File System (CIFS) or NFS.
Block-level access is important to many applications that require direct access to storage. Microsoft Exchange and Microsoft SQL are examples of applications that require direct access to storage.
By being able to leverage the existing network infrastructure, iSCSI was also developed as an alternative to Fibre Channel storage by alleviating the additional hardware costs associated with a Fibre Channel storage solution.
iSCSI also has another advantage over Fibre Channel in that it can provide security for the storage devices. iSCSI can use Microsoft Challenge Handshake Authentication Protocol (CHAP or MS-CHAP) for authentication and Internet Protocol Security (IPsec) for encryption. Windows Server 2012 R2 is able to connect an iSCSI storage device out of the box with no additional software needing to be installed. This is because the Microsoft iSCSI initiator is built into the operating system.
Windows Server 2012 R2 supports two different ways to initiate an iSCSI session:
§ Through the native Microsoft iSCSI software initiator that resides on Windows Server 2012 R2
§ Using a hardware iSCSI host bus adapter (HBA) that is installed in the computer
Both the Microsoft iSCSI software initiator and iSCSI HBA present an iSCSI qualified name that identifies the host initiator. When the Microsoft iSCSI software initiator is used, the CPU utilization may be as much as 30 percent higher than on a computer with a hardware iSCSI HBA. This is because all of the iSCSI process requests are handled within the operating system. Using a hardware iSCSI HBA, process requests can be offloaded to the adapter, thus freeing the CPU overhead associated with the Microsoft iSCSI software initiator. However, iSCSI HBAs can be expensive, whereas the Microsoft iSCSI software initiator is free.
It is worthwhile installing the Microsoft iSCSI software initiator and performing load testing to see how much overhead the computer will have prior to purchasing an iSCSI HBA or HBAs, depending on the redundancy level. Exercise 2.13 explains how to install and configure an iSCSI connection.
Exercise 2.13: Configuring iSCSI Storage Connection
1. Press the Windows key or the Start button in the lower-left corner and select Administrative Tools ![]() iSCSI Initiator.
iSCSI Initiator.
2. If a dialog box appears, click Yes to start the service.
3. Click the Discovery tab.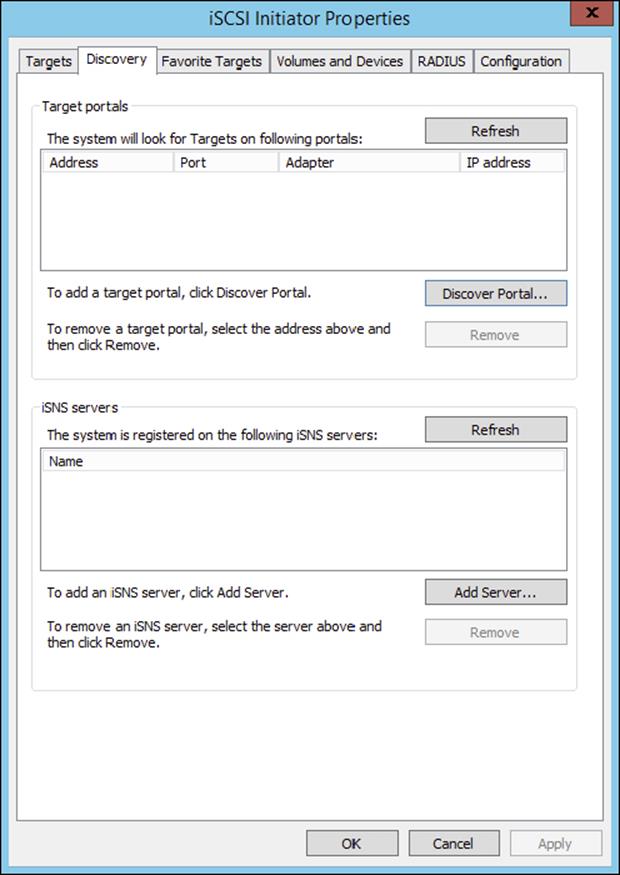
4. In the Target Portals portion of the page, click Discover Portal.
5. Enter the IP address of the target portal and click OK.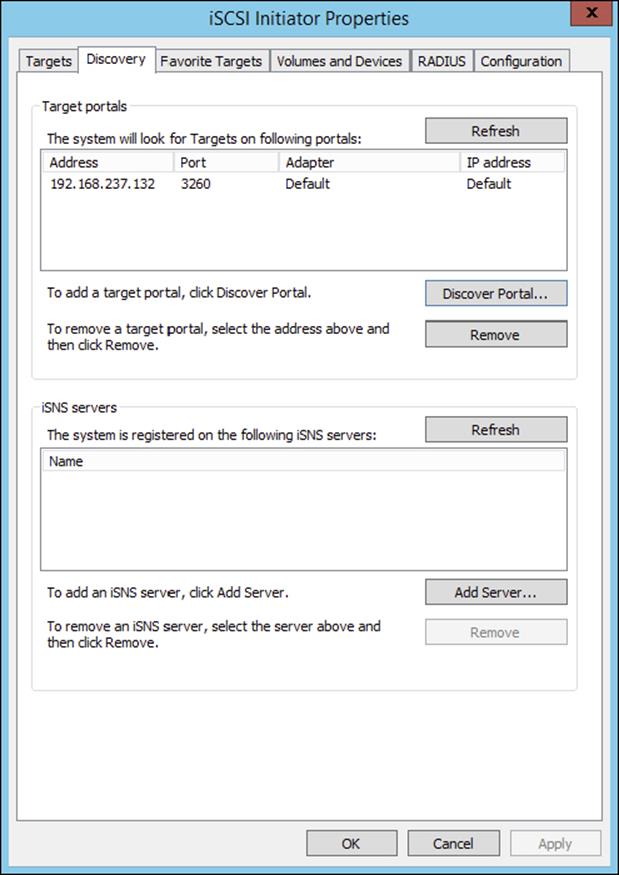
6. The IP address of the target portal appears in the Target Portals box.
7. Click OK.
To use the storage that has now been presented to the server, you must create a volume on it and format the space.
Configure Internet Storage Name Server
Internet Storage Name Service (iSNS) allows for the central registration of an iSCSI environment because it automatically discovers available targets on the network. The purpose of iSNS is to help find available targets on a large iSCSI network.
The Microsoft iSCSI initiator includes an iSNS client that is used to register with the iSNS. The iSNS feature maintains a database of clients that it has registered either through DCHP discovery or through manual registration. iSNS DHCP is available after the installation of the service, and it is used to allow iSNS clients to discover the location of the iSNS. However, if iSNS DHCP is not configured, iSNS clients must be registered manually with the iscsicli command.
To execute the command, launch a command prompt on a computer hosting the Microsoft iSCSI and type iscsicli addisnsserver server_name, where server_name is the name of the computer hosting iSNS. Exercise 2.14 walks you through the steps required to install the iSNS feature on Windows Server 2012 R2, and then it explains the different tabs in iSNS.
Exercise 2.14: Installing the iSNS Feature on Windows Server 2012 R2
1. Open Server Manager.
2. Launch the Add Roles And Features Wizard.
3. Choose role-based or featured-based installation and click Next.
4. Choose your server and click Next.
5. Click Next at the Roles screen.
6. At the Select Features screen, choose the iSNS Server Service check box. Click Next.
7. At the Confirmation screen, click the Install button.
8. Click the Close button. Close Server Manager and reboot.
9. Log in and open the iSNS server under Administrative Tools.
10.Click the General tab. This tab displays the list of registered initiators and targets. In addition to their iSCSI qualified names, it lists storage node type (Target or Initiator), alias string, and entity identifier (the fully qualified domain name [FQDN] of the machine hosting the iSNS client).
11.Click the Discovery Domains tab. The purpose of discovery domains is to provide a way to separate and group nodes. This is similar to zoning in Fibre Channel.
The following options are available on the Discovery Domains tab:
1. Create creates a new discovery domain.
2. Refresh repopulates the Discovery Domain drop-down list.
3. Delete deletes the currently selected discovery domain.
4. Add adds nodes that are already registered in iSNS to the currently selected discovery domain.
5. Add New adds nodes by entering the iSCSI qualified name of the node. These nodes do not have to be currently registered.
6. Remove Used removes selected nodes from the discovery domain.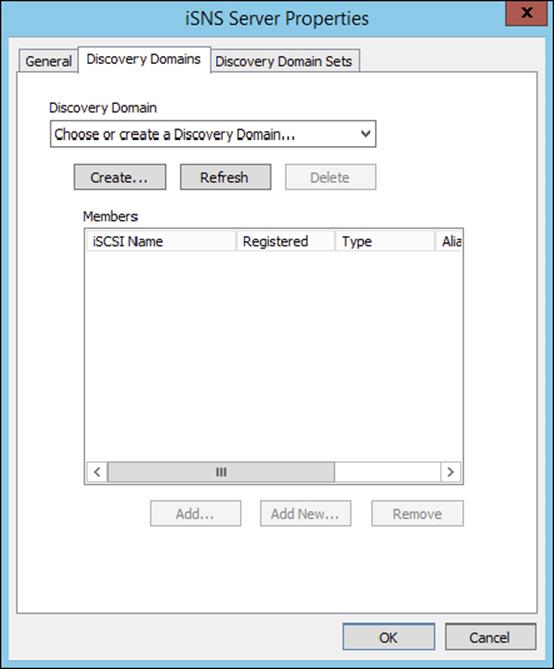
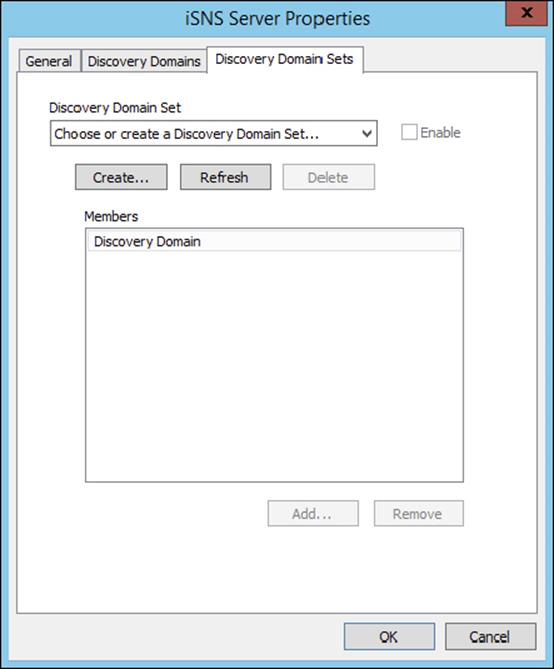
12.Click the Discovery Domain Sets tab. The purpose of discovery domain sets is to separate further discovery domains. Discovery domains can be enabled or disabled, giving administrators the ability to restrict further the visibility of all initiators and targets.
The options on the Discovery Domain Sets tab are as follows:
1. The Enable check box indicates the status of the discovery domain sets and turns them off and on.
2. Create creates new discovery domain sets.
3. Refresh repopulates the Discovery Domain Sets drop-down list.
4. Delete deletes the currently selected discovery domain set.
5. Add adds discovery domains to the currently selected discovery domain set.
6. Remove removes selected nodes from the discovery domain sets.
13.Close the iSNS server.
Implement Thin Provisioning and Trim
Thin provisioning and trim can be useful features that allow organizations to get the most out of their storage arrays. These solutions apply directly to a virtualized environment using virtual disks that are thin provisioned.
Thin provisioning is a way of providing what is known as just-in-time allocations. Blocks of data are written to disk only as they are used instead of zeroing out all of the blocks of data that have been allocated to the virtual disk configuration. Thin provisioning is tricky to manage properly because you could easily find yourself in a position where you have an over-provisioned environment because of over-allocation.
For example, you have 100 VMs that are all provisioned with 40GB thin-provisioned virtual disks. Each VM is currently utilizing only 20GB of the total 40GB that has been allocated. The problem is that you have only 2TB worth of storage. Without realizing it, you’ve over-provisioned your environment by 200 percent because of thin provisioning.
This is where trim comes in to help us manage thin provisioning. Trim automatically reclaims free space that is not being used. In addition to trim, Windows Server 2012 R2 provides standardized notifications that will alert administrators when certain storage thresholds are crossed.
Manage Server Free Space Using Features on Demand
Features on Demand was first introduced in Windows Server 2012. This feature lets you conserve disk space within the environment by installing only basic operating system components with every new installation of a Windows Server 2012 R2 or Windows 8 machine. Instead of loading unnecessary payload files, those files are stored in a central repository and used as needed to install roles and features. When I talk about payload files, I am talking about the binaries for all permissions, settings, and components of a feature. Features on Demand gives you the ability not only to disable Windows Server features but also to remove all of the payloads. This lets administrators keep a tighter security footprint at the operating system level, which is similar to a Server Core installation but without the limitation of not being able to control which source files are loaded during operating system installation.
Configure Tiered Storage
Tiered storage is an excellent new feature in Windows Server 2012 R2 that gives administrators the ability to use solid-state drives (SSDs) and conventional hard-disk drives (HDDs) within the same storage pool. You can configure virtual disks that span SSD and HDD tiers, which are presented as a single LUN. One of the really nice things about this feature is that with Windows Server 2012 R2, data is automatically saved to either an SSD or an HDD based on actual usage within the environment. Most frequently accessed data is stored on an SSD, and the less frequently accessed data is stored on an HDD.
Quite a few organizations these days use some sort of charge-back or show-back application to track and even charge for hosted solutions and services. Having the capability to tier storage gives users more options in selecting a plan that works for them. It also makes it possible for administrators to keep high I/O servers and applications on faster and better-performing drives without having to move data manually across multiple tiers of storage.
Summary
In this chapter, I discussed how configuring file and storage solutions can be highly effective within your organization. You now have a better understanding of how Windows Server 2012 R2 can provide you with extended functionality for effectively controlling corporate data. Quite a few of these solutions are essential to managing a Windows Server environment to the best of your ability. Take the time to complete each exercise thoroughly until you are comfortable with performing the majority of these tasks without documentation.
You learned how to configure and test some of the great features provided by Dynamic Access Control. Many of the exam questions will involve using both DAC and FSRM to manage and control shared resources. You will also want to focus heavily on auditing capabilities and the storage solutions talked about throughout the chapter. Configure and test the full extent of all of these applications and solutions to prepare appropriately for the exam.
Exam Essentials
Understand the purpose and function of auditing. Auditing helps determine the cause of security violations and helps troubleshoot permissions-related problems. Configure and test the effects of auditing within a file share hierarchy in a lab environment.
Know storage technologies. Understand how to use the Fibre Channel, iSCSI, and NAS storage technologies. Know how to configure an iSCSI initiator and how to establish a connection to a target. Practice configuring tiered storage and using thin provisioning and trim.
Understand the features and functionality of BranchCache. BranchCache helps eliminate the problems of slow access and bandwidth issues when sharing data across multiple, geographically disparate locations. By syncing and caching data between sites, users can use company-wide shared resources more efficiently when slower site links exist between site locations.
Know how to configure Dynamic Access Control. DAC has a wide array of features and functionality that will make an administrator’s job of controlling file and folder access much easier. It will also provide tighter data security and data classification throughout the environment.
Understand file classification. File classification is used when an administrator needs to manage and control both the type and the amount of data that is stored on their servers. You can use both Dynamic Access Control and the File Sever Resource Manager to implement file classification.
Review Questions
1. LaDonna is a system administrator for an Active Directory environment that is running in Native mode. Recently, several managers have reported suspicions about user activities and have asked her to increase security in the environment. Specifically, the requirements are as follows:
§ The accessing of certain sensitive files must be logged.
§ Modifications to certain sensitive files must be logged.
§ System administrators must be able to provide information about which users accessed sensitive files and when they were accessed.
§ All logon attempts for specific shared machines must be recorded.
Which of the following steps should LaDonna take to meet these requirements? (Choose all that apply.)
E. Enable auditing with the Computer Management tool.
F. Enable auditing using the Group Policy Management Console.
G. Enable auditing with the Active Directory Domains and Trusts tool.
H. Enable auditing with the Event Viewer tool.
I. View the audit log using the Event Viewer tool.
J. View auditing information using the Computer Management tool.
K. Enable failure and success auditing settings for specific files stored on NTFS volumes.
L. Enable failure and success auditing settings for logon events on specific computer accounts.
2. What is the default TCP port for iSCSI?
. 3260
A. 1433
B. 21
C. 3389
3. You create a GPO and link it to the Engineering OU. You want to monitor users in the Engineering OU who connect to the file server. What type of auditing do you enable?
. Audit object access
A. Audit system events
B. Audit logon events
C. Audit process tracking
4. You have been hired by a small company to implement new Windows Server 2012 R2 systems. The company wants you to set up a server for users’ home folder locations. What type of server would you be setting up?
. File server
A. Web server
B. Exchange server
C. PDC server
5. Your company has decided to implement a Windows 2012 R2 server. The company IT manager before you always used FAT32 as the system partition. Your company wants to know whether it should move to NTFS. Which of the following are some advantages of NTFS? (Choose all that apply.)
. Security
A. Quotas
B. Compression
C. Encryption
6. What command would be used to register an iSCSI initiator manually to an iSNS server?
. iscsicli refreshisnsserver server_name
A. iscsicli listisnsservers server_name
B. iscsicli removeisnsserver server_name
C. iscsicli addisnsserver server_name
7. You are a server administrator, and you are trying to save hard drive space on your Windows Server 2012 R2 machine. Which feature can help you save hard disk space?
. Features On Demand
A. HDSaver.exe
B. WinRM
C. ADDS
8. You are an IT administrator who manages an environment that runs multiple Windows Server 2012 R2 servers from multiple site locations across the United States. Your Windows Server 2012 R2 machines use iSCSI storage. Other administrators report it is difficult to locate available iSCSI resources on the network. You need to make sure other administrators can easily access iSCSI resources using a centralized repository. What feature should you deploy?
. The iSCSI Target Storage Provider feature
A. The Windows Standards-Based Storage Management feature
B. The iSCSI Target Server role feature
C. The iSNS Server service feature
9. Your company is headquartered in Colorado Springs and has a remote site location in Tampa. The Colorado Spring office has a file server named FS01. FS01 has the BranchCache for Network Files role service installed. Your Tampa Office has a file server named FS02. FS02 has been configured as a BranchCache hosted cache server. You need to preload the data from the file shares on FS01 to the cache on FS02. You have already generated hashes for the file shares on FS01. Which cmdlet should you run next?
. Export-BCCachePackage
A. Publish-BCFileContent
B. Set-BCCache
C. Add-BCDataCacheExtension
10. You have a Windows Server 2012 R2 file server named FS01. FS01 has the File Server Resource Manager role service installed. You attempt to delete a classification property, and you receive the error message “The classification property is in use and cannot be deleted.” You need to delete the Contains Personal Information classification property. What should you do?
. Clear the Contains Personal Information classification property value for all files.
A. Delete the classification rule that is assigned the Contains Personal Information classification property.
B. Disable the classification rule that is assigned the Contains Personal Information classification property.
C. Set files that have a Contains Personal Information classification property value of Yes to No.