MCSA: Windows Server 2012 R2 Configuring Advanced Services Study Guide Exam 70-412 (2015)
Chapter 3
Implement Business Continuity and Disaster Recovery
THE FOLLOWING 70-412 EXAM OBJECTIVES ARE COVERED IN THIS CHAPTER:
1. ![]() Configure and manage backups
Configure and manage backups
§ Configure Windows Server backups
§ Configure Windows Azure backups
§ Configure role-specific backups
§ Manage VSS settings using VSSAdmin
2. ![]() Recover Servers
Recover Servers
§ Restore from backups
§ Perform a Bare Metal Restore (BMR)
§ Recover servers using Windows Recovery Environment (Win RE) and safe mode
§ Configure the Boot Configuration Data (BCD) store
3. ![]() Configure site-level fault tolerance
Configure site-level fault tolerance
§ Configure Hyper-V Replica including Hyper-V Replica Broker and VMs
§ Configure multi-site clustering including network settings, Quorum, and failover settings
§ Configure Hyper-V Replica extended replication
§ Configure Global Update Manager
§ Recover a multi-site failover cluster
Throughout this book, I have stressed the importance of setting up your network properly. Once your network is set up and running properly, your users will get the most functionality out of the network. Your users will also become dependent on the network. Try taking a network offline for even 10 minutes, and your users will scream and complain.
Now that you have your users hooked, you must protect the network and the data. If your company loses their data, can they survive? Probably not. Most companies would go bankrupt if they lost all of their data and had no way to recover it. Data protection and recoverability is one of the most critical jobs you have as an administrator.
It is important to have multiple servers available to provide backup in case of a problem. The same goes for Active Directory itself—it too should be backed up. This way, if there is a massive disaster after which you need to restore your directory services, you will have that option available to you.
The process of reformatting a computer from scratch after a catastrophic system failure is a bare-metal restore and usually involves reinstalling the operating system and all of the system software.
In this chapter, you will learn about all the different ways to protect and recover your system.
Protecting the System
One of the worst events you will experience is a computer that won’t boot. But far worse is discovering that there is no recent backup for that computer.
The first step in preparing for disaster recovery is to expect that a disaster will happen at some point and to take proactive measures to plan for recovery before the failure occurs. Here are some of the preparations you can make:
§ Keep your computer up-to-date with Windows Update.
§ Perform regular system backups.
§ Use current software to scan for malware (such as viruses, spyware, and adware) and make sure you have the most recent updates.
§ Perform regular administrative functions, such as monitoring the logs in the Event Viewer utility.
If you can’t start Windows Server 2012 R2, you can use several options and utilities to identify and resolve Windows errors. The following is a broad list of troubleshooting options:
§ If you have recently made a change to your computer’s configuration by installing a new device driver or application and Windows Server 2012 R2 will not load properly, you can use the Last Known Good Configuration, roll back the driver, or use System Restore to restore a previous system configuration.
§ If you can boot your computer to Safe Mode and you suspect you have a system conflict, you can temporarily disable an application or processes, troubleshoot services, or uninstall software.
§ If your computer will not boot to Safe Mode, you can use the Startup Repair tool to replace corrupted system files.
§ If necessary, you can use the Windows Server Backup utility to restore files from backup media and to restore a complete image of your computer.
To safeguard your server, one of the most important functions is to protect Active Directory. Active Directory is the heart and soul of a Microsoft network, and losing your data would be a catastrophic event. So, let’s start by discussing how to protect Active Directory.
Backup and Recovery of Active Directory
If you have deployed Active Directory in your network environment, your users now depend on it to function properly in order to do their jobs. From network authentications to file access to print and web services, Active Directory has become a mission-critical component of your business. Therefore, the importance of backing up the Active Directory data store should be evident.
As I discussed in earlier chapters, it is important to have multiple domain controllers available to provide backup in case of a problem. The same goes for Active Directory itself—it too should be backed up by being saved. This way, if a massive disaster occurs in which you need to restore your directory services, you will have that option available to you.
Backups are just good common sense, but here are several specific reasons to back up data:
Protect Against Hardware Failures Computer hardware devices have finite lifetimes, and all hardware eventually fails. I discussed this when I mentioned MTBF earlier in the book. Mean Time Between Failures (MTBF) is the average time a device will function before it actually fails. There is also a rating derived from benchmark testing of hard disk devices that tells you when you may be at risk for an unavoidable disaster. Some types of failures, such as corrupted hard disk drives, can result in significant data loss.
Protect Against Accidental Deletion or Modification of Data Although the threat of hardware failures is real, in most environments mistakes in modifying or deleting data are much more common. For example, suppose a system administrator accidentally deletes all of the objects within a specific OU. Clearly, it’s important to be able to retrieve this information from a backup.
Keep Historical Information Users and system administrators sometimes modify files and then later find out that they require access to an older version of the file. Or a file is accidentally deleted, and a user does not discover that fact until much later. By keeping multiple backups over time, you can recover information from prior backups when necessary.
Protect Against Malicious Deletion or Modification of Data Even in the most secure environments, it is conceivable that unauthorized users (or authorized ones with malicious intent!) could delete or modify information. In such cases, the loss of data might require valid backups from which to restore critical information.
Windows Server 2012 R2 includes a Backup utility that is designed to back up operating system files and the Active Directory data store. It allows for basic backup functionality, such as scheduling backup jobs and selecting which files to back up. Figure 3.1 shows the main screen of the Windows Server 2012 R2 Backup utility.
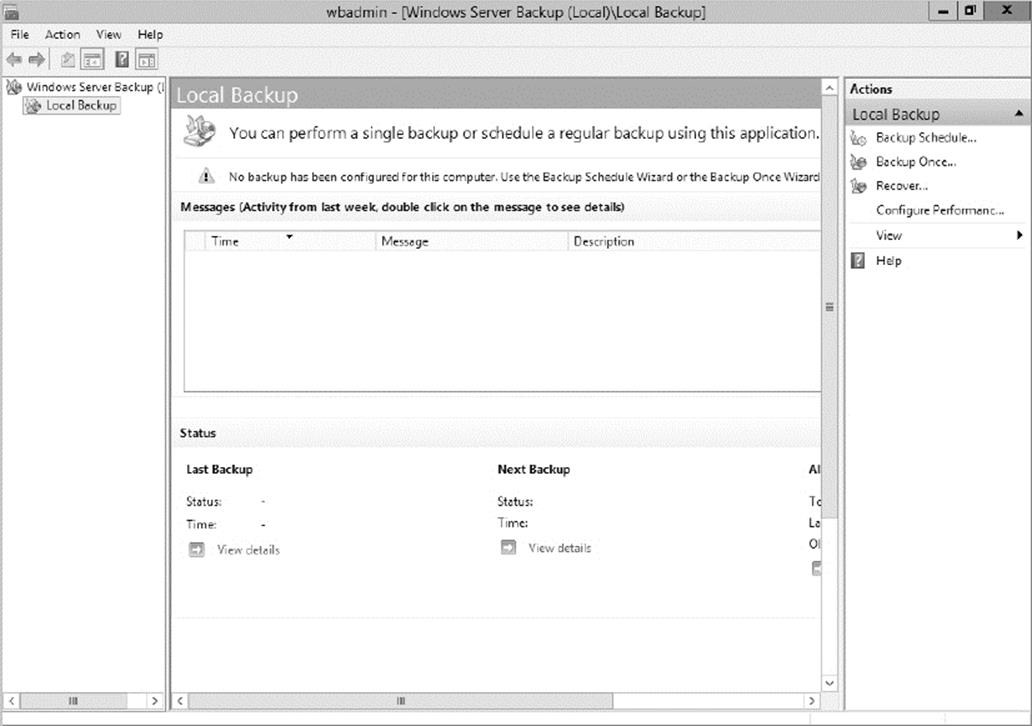
Figure 3.1 The main screen of the Windows Server 2012 R2 Backup utility
In the following sections, you’ll learn about the details of using the Windows Server 2012 R2 Backup utility and how you can restore Active Directory when problems do occur.
Overview of the Windows Server 2012 R2 Backup Utility
Although the general purpose behind performing backup operations—protecting information—is straightforward, system administrators must consider many options when determining the optimal backup-and-recovery scenario for their environment. Factors include what to back up, how often to back up, and when the backups should be performed.
In this section, you’ll see how the Windows Server 2012 R2 Backup utility makes it easy to implement a backup plan for many network environments.
 Although the Windows Server 2012 R2 Backup utility provides the basic functionality required to back up your files, you may want to investigate third-party products that provide additional functionality. These applications can provide options for specific types of backups (such as those for Exchange Server and SQL Server) as well as disaster recovery options, networking functionality, centralized management, and support for more advanced hardware.
Backup Types
One of the most important issues you will have to deal with when you are performing backups is keeping track of which files you have backed up and which files you need to back up. Whenever a backup of a file is made, the archive bit for the file is set. You can view the attributes of system files by right-clicking them and selecting Properties. By clicking the Advanced button in the Properties dialog box, you will access the Advanced Attributes dialog box. Here you will see the option Folder Is Ready For Archiving. Figure 3.2shows an example of the attributes for a folder.
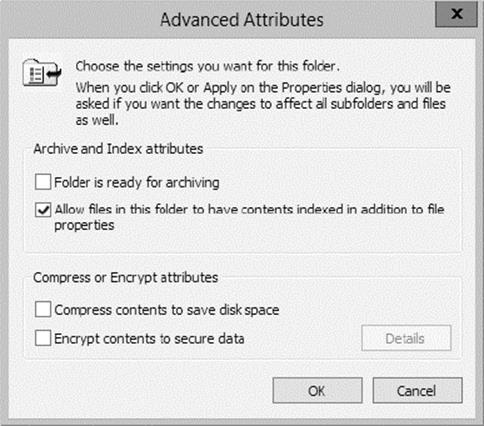
Figure 3.2 Viewing the archive attributes for a folder
Although it is possible to back up all of the files in the file system during each backup operation, it’s sometimes more convenient to back up only selected files (such as those that have changed since the last backup operation). When performing backups, you can back up to removable media (DVD) or to a network location.
It is recommended by Microsoft to do a backup to a network location. The reason for this is that if your company suffers from a disaster (fire, hurricane, and so forth), your data can all still be lost—including the backup. If you back up to a removable media source, a copy of the backup can be taken offsite. This protects against a major disaster.
 Although Windows Server 2012 R2 does not support all of these backup types, it’s important to understand the most common backup types. Most administrators use third-party software for their backups. That’s why it’s important to know all of the different types.
Several types of backups can be performed:
Normal Normal backups (also referred to as system or full backups) back up all of the selected files and then mark them as backed up. This option is usually used when a full system backup is made. Windows Server 2012 R2 supports this backup.
Copy Copy backups back up all of the selected files but do not mark them as backed up. This is useful when you want to make additional backups of files for moving files offsite or you want to make multiple copies of the same data for archival purposes.
Incremental Incremental backups copy any selected files that are marked as ready for backup (typically because they have not been backed up or they have been changed since the last backup) and then mark the files as backed up. When the next incremental backup is run, only the files that are not marked as having been backed up are stored. Incremental backups are used in conjunction with normal (full) backups.
The most common backup process is to make a full backup and then make subsequent incremental backups. The benefit to this method is that only files that have changed since the last full or incremental backup will be stored. This can reduce backup times and disk or tape storage space requirements.
When recovering information from this type of backup method, a system administrator must first restore the full backup and then restore each of the incremental backups.
Differential Differential backups are similar in purpose to incremental backups with one important exception: Differential backups copy all files that are marked for backup but do not mark the files as backed up. When restoring files in a situation that uses normal and differential backups, you need only restore the normal backup and the latest differential backup.
Daily Daily backups back up all of the files that have changed during a single day. This operation uses the file time/date stamps to determine which files should be backed up and does not mark the files as having been backed up.
Backing Up System State Data
When you are planning to back up and restore Active Directory, be aware that the most important component is known as the system state data. System state data includes the components upon which the Windows Server 2012 R2 operating system relies for normal operations. The Windows Server 2012 R2 Backup utility offers you the ability to back up the system state data to another type of media (such as a hard disk or network share). Specifically, it will back up the following components for a Windows Server 2012 R2 domain controller:
Active Directory The Active Directory data store is at the heart of Active Directory. It contains all of the information necessary to create and manage network resources, such as users and computers. In most environments that use Active Directory, users and system administrators rely on the proper functioning of these services in order to do their jobs.
Boot Files Boot files are the files required for booting the Windows Server 2012 R2 operating system and can be used in the case of boot file corruption.
COM+ Class Registration Database The COM+ class registration database is a listing of all the COM+ class registrations stored on the computer. Applications that run on a Windows Server 2012 R2 computer might require the registration of various share code components. As part of the system state backup process, Windows Server 2012 R2 stores all of the information related to Component Object Model+ (COM+) components so that it can be quickly and easily restored.
Registry The Windows Server 2012 R2 registry is a central repository of information related to the operating system configuration (such as desktop and network settings), user settings, and application settings. Therefore, the registry is absolutely vital to the proper functioning of Windows Server 2012 R2.
Sysvol Directory The Sysvol directory includes data and files that are shared between the domain controllers within an Active Directory domain. Many operating system services rely on this information in order to function properly.
Bare-Metal Backups and Restores
One of the options you have in Windows Server 2012 R2 is to do a bare-metal restore (BMR). This is a restore of a machine after the machine has been completely wiped out and formatted. This type of restore is done usually after a catastrophic machine failure or crash.
Windows Server 2012 R2 gives you the ability to back up all of the files needed for a bare-metal restore by choosing the Bare Metal Recovery check box (see Figure 3.3).
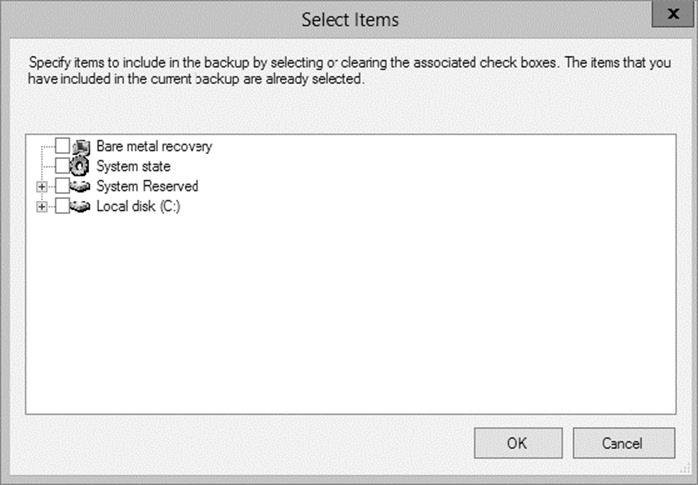
Figure 3.3 Bare Metal Recovery option
When you choose the Bare Metal Recovery option in Windows Server 2012 R2, all of the suboptions (System State, System Reserved, and Local Disk) automatically get checked.
When preparing your network for a bare-metal backup, you want to make sure you have everything you need on hand to complete this type of restore. You may want to keep a copy of the server software, server drivers, and so forth, on hand and ready to go, just in case you have to do a full restore.
Scheduling Backups
In addition to specifying which files to back up, you can schedule backup jobs to occur at specific times. Planning when to perform backups is just as important as deciding what to back up. Performing backup operations can reduce overall system performance; therefore, you should plan to back up information during times of minimal activity on your servers.
To add a backup operation to the schedule, you can simply click the Add button in the Specify Backup Time window.
Restoring System State Data
In some cases, the Active Directory data store or other system state data may become corrupt or unavailable. This could be because of many different reasons. A hard disk failure might, for example, result in the loss of data. Or the accidental deletion of an OU and all of its objects might require a restore operation to be performed.
The actual steps involved in restoring system state data are based on the details of what has caused the data loss and what effect this data loss has had on the system. In the best-case scenario, the system state data is corrupt or inaccurate, but the operating system can still boot. If this is the case, all you must do is boot into a special Directory Services Restore Mode (DSRM) and then restore the system state data from a backup. DSRM is available only on a domain controller. This process will replace the current system state data with that from the backup. Therefore, any changes that have been made since the last backup will be completely lost and must be redone.
In a worst-case scenario, all of the information on a server has been lost or a hardware failure is preventing the machine from properly booting. If this is the case, here are the steps you must take in order to recover system state data:
1. Fix any hardware problem that might prevent the computer from booting (for example, replace any failed hard disks).
2. Reinstall the Windows Server 2012 R2 operating system. This should be performed like a regular installation on a new system.
3. Reinstall any device drivers that may be required by your backup device. If you backed up information to the file system, this will not apply.
4. Restore the system state data using the Windows Server 2012 R2 Backup utility. When restoring the system state data on a domain controller, you must specify either an authoritative or nonauthoritative restore.
I’ll cover the technical details of performing restores later in this chapter. For now, however, you should understand the importance of backing up information and, whenever possible, testing the validity of backups.
Backing Up and Restoring Group Policy Objects
Group Policy objects (GPOs) are a major part of Active Directory. When you back up Active Directory, GPOs can also get backed up. You also have the ability to back up GPOs through the Group Policy Management Console (GPMC). This gives you the ability to back up and restore individual GPOs.
To back up all GPOs, open the GPMC and right-click the Group Policy Objects container. You will see the option Back Up All. After you choose this option, a wizard will start asking you for the backup location. Choose a location and click Backup.
To back up an individual GPO, right-click the GPO (in the Group Policy Objects container) and choose Backup. Again, after you choose this option, a wizard will start asking you for the backup location. Choose a location and click Backup.
To restore a GPO, it’s the same process, except instead of choosing Backup, you will choose either Manage Backups (to restore all GPOs) or Restore (for an individual GPO).
Configure the Boot Configuration Data Store
BCDEdit is another great command-line utility that is used primarily for managing boot configuration data (BCD) stores. A BCD store is a set of configuration files that describe an operating system’s boot applications and settings. These files essentially replace theBoot.ini file in your local Windows directory. You will notice that the BCDEdit command-line utility is similar to the Bootcfg.exe utility used in earlier versions of Windows operating systems. You can effectively use BCDEdit to create new boot parameters for your Windows boot loader, modify the existing BCD stores, and create new BCD stores as needed. Please note that administrative permissions are required to use BCDEdit to modify a BCD store.
Setting Up an Active Directory Backup
The Windows Server 2012 R2 Backup utility makes it easy to back up the system data (including Active Directory) as part of a normal backup operation. I’ve already covered the ideas behind the different backup types and why and when they are used.
Exercise 3.1 walks you through the process of backing up the domain controller. To complete this exercise, the local machine must be a domain controller, and you must have a DVD burner or network location to back up the system state.
The Windows Server 2012 R2 Backup utility is not installed by default. If you have already installed the Windows Server 2012 R2 Backup utility, skip to step 9.
Exercise 3.1: Backing Up Active Directory
1. To install the Windows Server 2012 R2 Backup utility, press the Windows key and select Administrative Tools ![]() Server Manager.
Server Manager.
2. In the center console, click the Add Roles And Features link.
3. At the Select Installation Type screen, choose a role-based or feature-based installation and click Next.
4. The Select Destination Server screen appears. Choose Select A Server From The Server Pool and choose your server under Server Pool. Click Next.
5. Click Next at the Select Server Roles screen.
6. At the Select Features screen, scroll down and check the box next to Windows Server Backup. Click Next.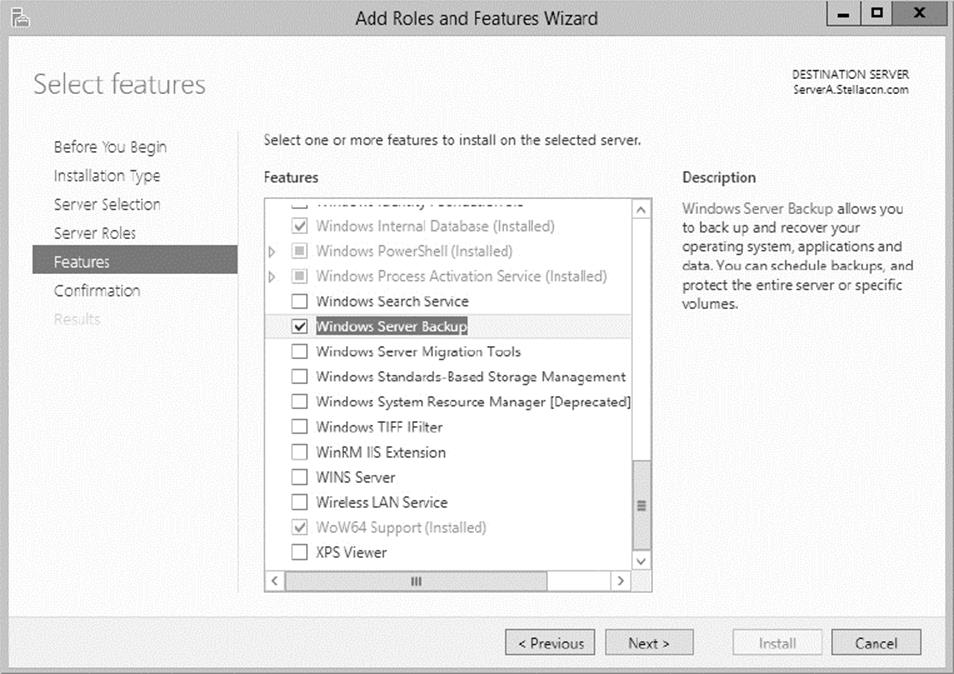
7. At the Confirmation screen, click the check box to restart the destination server automatically. This will bring up a dialog box. Click Yes and then click the Install button.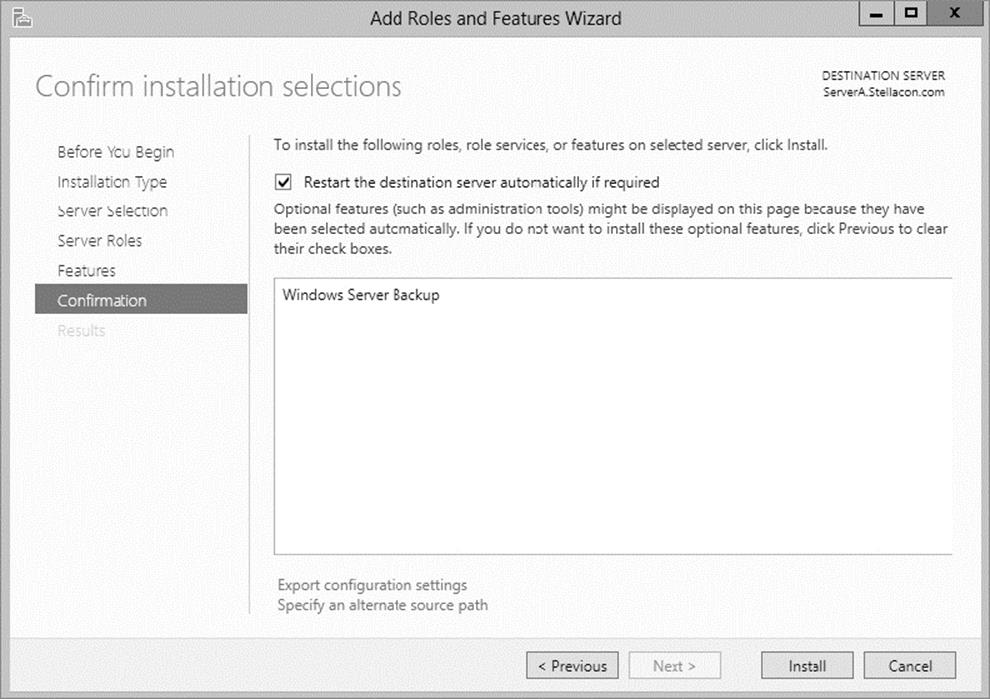
8. Click the Close button when finished. Close Server Manager.
9. Open Windows Backup by pressing the Windows key and selecting Administrative Tools ![]() Windows Server Backup.
Windows Server Backup.
10.On the left side, click Local Backup. Then, under Actions, click Backup Once.
11.When the Backup Once Wizard appears, click Different Options and click Next.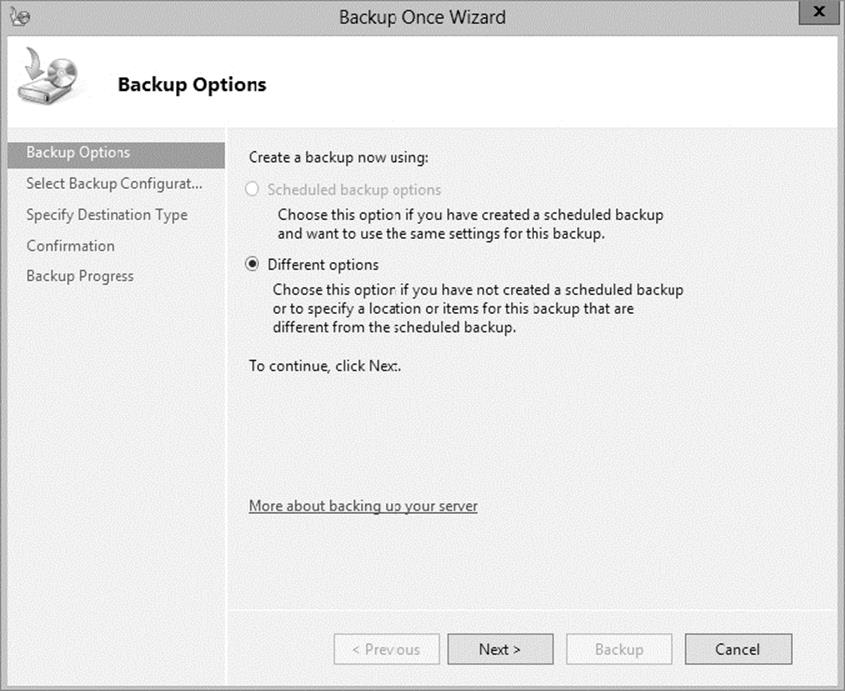
12.At the Select Backup Configuration screen, choose Custom and click Next.
13.Click the Add Items button. Choose System State and click OK. Click Next.
14.At the Specify Destination Type, choose Remote Shared Folder. Click Next.
15.Put in the shared path you want to use and click Next.
16.At the Confirmation screen, click the Backup button.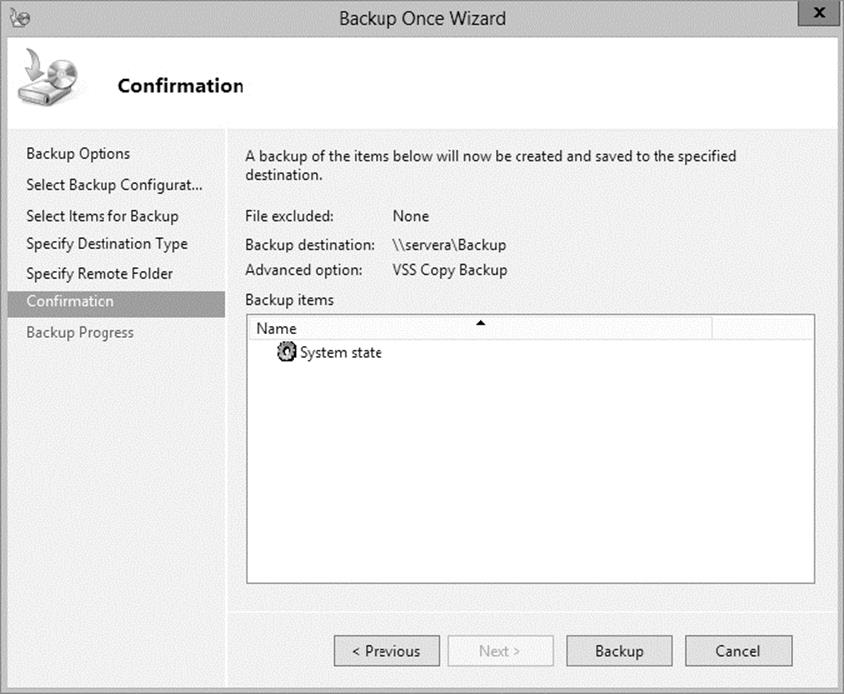
17.Once the backup is complete, close the Windows Server Backup utility.
Restoring Active Directory
Active Directory has been designed with fault tolerance in mind. For example, it is highly recommended by Microsoft that each domain have at least two domain controllers. Each of these domain controllers contains a copy of the Active Directory data store. Should one of the domain controllers fail, the available one can take over the failed server’s functionality. When the failed server is repaired, it can then be promoted to a domain controller in the existing environment. This process effectively restores the failed domain controller without incurring any downtime for end users because all of the Active Directory data is replicated to the repaired server in the next scheduled replication.
In some cases, you might need to restore Active Directory from a backup. For example, suppose a system administrator accidentally deletes several hundred users from the domain and does not realize it until the change has been propagated to all of the other domain controllers. Manually re-creating the accounts is not an option because the objects’ security identifiers will be different (and all permissions must be reset). Clearly, a method for restoring from backup is the best solution. You can elect to make the Active Directory restore authoritative or nonauthoritative, as described in the following sections.
Overview of Authoritative Restore
Restoring Active Directory and other system state data is an important process should system files or the Active Directory data store become corrupt or otherwise unavailable. Fortunately, the Windows Server 2012 R2 Backup utility allows you to restore data easily from a backup, should the need arise.
I mentioned earlier that in the case of the accidental deletion of information from Active Directory, you might need to restore Active Directory from a recent backup. But what happens if there is more than one domain controller in the environment? Even if you did perform a restore, the information on this domain controller would be seen as outdated, and it would be overwritten by the data from another domain controller. This data from the older domain controller is exactly the information you want to replace. The domain controller that was reloaded using a backup would have an older timestamp, and the other domain controllers would re-delete the information from the backup.
Fortunately, Windows Server 2012 R2 and Active Directory allow you to perform what is called an authoritative restore. The authoritative restore process specifies a domain controller as having the authoritative (or master) copy of the Active Directory data store. When other domain controllers communicate with this domain controller, their information will be overwritten with Active Directory data stored on the local machine.
Now that you have an idea of how an authoritative restore is supposed to work, let’s move on to looking at the details of performing the process.
Performing an Authoritative Restore
When you are restoring Active Directory information on a Windows Server 2012 R2 domain controller, make sure Active Directory services are not running. This is because the restore of system state data requires full access to system files and the Active Directory data store. If you attempt to restore system state data while the domain controller is active, you will see an error message.
In general, restoring data and operating system files is a straightforward process. It is important to note that restoring a system state backup will replace the existing registry, Sysvol, and Active Directory files so that any changes you made since the last backup will be lost.
In addition to restoring the entire Active Directory database, you can also restore only specific subtrees within Active Directory using the restoresubtree command in the ntdsutil utility. This allows you to restore specific information, and it is useful in case of accidental deletion of isolated material.
Following the authoritative restore process, Active Directory should be updated to the time of the last backup. Furthermore, all other domain controllers for this domain will have their Active Directory information overwritten by the results of the restore operation. The result is an Active Directory environment that has been recovered from media.
Overview of Nonauthoritative Restore
Now that you understand why you would use an authoritative restore and how it is performed, it’s an easy conceptual jump to understand a nonauthoritative restore. Remember that by making a restore authoritative, you are simply telling other domain controllers in the domain to recognize the restored machine as the newest copy of Active Directory for replication purposes. If you have only one domain controller, the authoritative restore process becomes moot; you can simply skip the steps required to make the restore authoritative and begin using the domain controller immediately after the normal restore is complete.
If you have more than one domain controller in the domain and you need to perform a nonauthoritative restore, simply allow the domain controller to receive Active Directory database information from other domain controllers in the domain using normal replication methods.
Active Directory Recycle Bin
The Active Directory recycle bin is a great feature that allows administrators to restore an Active Directory object that has been deleted.
Let’s say you have a junior administrator who has been making changes to Active Directory for hours. The junior admin then deletes an OU from Active Directory. You would then have to reload the OU from a tape backup, or even worse, you may have to reload the entire Active Directory (depending on your backup software), thus losing the hours of work the junior admin has completed.
The problem here is that when you delete a security object from Active Directory, the object’s security ID (SID) gets removed. All users’ rights and permissions are associated with the users’ SID number and not their account name. This is where the AD recycle bin can help.
The Active Directory recycle bin allows you to preserve and restore accidentally deleted Active Directory objects without the need of using a backup.
The Active Directory recycle bin works for both the Active Directory Domain Services (AD DS) and Active Directory Lightweight Directory Services (AD LDS) environments.
By enabling (disabled by default) the Active Directory recycle bin, any deleted Active Directory objects are preserved, and Active Directory objects can be restored, in their entirety, to their same condition immediately before the deletion. This means all group memberships and access rights that the object had before deletion will remain intact.
To enable the Active Directory recycle bin, you must do the following (you must be a member of the Schema Admins group):
1. Run the adprep /forestprep command to prepare the forest on the server that holds the schema master to update the schema.
2. Run the adprep /domainprep /gpprep command to prepare the domain on the server that holds the infrastructure operations master role.
3. If a read-only domain controller (RODC) is present in your environment, you must also run the adprep /rodcprep command.
4. Make sure that all domain controllers in your Active Directory forest are running Windows Server 2012 R2 or at least Windows Server 2008 R2.
5. Make sure that the forest functional level is set to Windows Server 2012 R2 or at least Windows Server 2008 R2.
Restartable Active Directory
Administrators have the ability to stop and restart Active Directory in the Windows Server 2012 R2 operating system without the need to reboot the entire system. Administrators can perform these actions by using either the Microsoft Management Console (MMC) snap-ins or the command line.
With Restartable Active Directory Services, an administrator has the ability to stop Active Directory Services so that updates and other tasks can be applied to a domain controller. One task that an administrator can perform while Active Directory is stopped is an offline defragmentation of the database.
One of the advantages of a restartable Active Directory is that other services running on the same server do not depend on Active Directory to continue to function properly while Active Directory is stopped. An administrator has the ability to stop and restart the Active Directory Domain Services in the Local Services MMC snap-in.
Offline Maintenance
As mentioned, sometimes you have to be offline to do maintenance. For example, you need to perform authoritative and nonauthoritative restores while the domain controller is offline. The main utility administrators use for offline maintenance is ntdsutil.
Ntdsutil.exe
The primary method by which system administrators can do offline maintenance is through the ntdsutil command-line tool. You can launch this tool by simply entering ntdsutil at a command prompt. The ntdsutil command is both interactive and context sensitive. That is, once you launch the utility, you’ll see an ntdsutil command prompt. At this prompt, you can enter various commands that set your context within the application. For example, if you enter domain management, you’ll be able to enter domain-related commands. Several operations also require you to connect to a domain, a domain controller, or an Active Directory object before you perform a command.
Table 3.1 describes the domain-management commands supported by the ntdsutil tool. You can access this functionality by typing the command at a command prompt.
Table 3.1 Ntdsutil offline maintenance commands
|
Ntdsutil domain management command |
Purpose |
|
Help or ? |
Displays information about the commands that are available within the Domain Management menu of the ntdsutil utility |
|
compact to (at the file maintenance prompt) |
Allows you to compact the Active Directory database (offline defragmentation) |
|
metadata cleanup |
Removes metadata from decommissioned domain controllers |
|
Set DSRM Password |
Resets the Directory Service Restore mode administrator account password |
Active Directory Database Mounting Tool
One issue that an administrator may run into when trying to restore Active Directory is the need to restore several backups to compare the Active Directory data that each backup contains. Windows Server 2012 R2 has a utility called the Active Directory database mounting tool (Dsamain.exe) that can resolve this issue.
The Dsamain.exe tool can help the recovery processes by giving you a way to compare data as it exists in snapshots (taken at different times) so that you have the ability to decide which Active Directory database to restore.
Creating snapshots on a regular basis will allow you to have enough data so that you can keep accurate records of how the Active Directory database changes over time. The ntdsutil utility allows you to take snapshots by using the ntdsutil snapshot operation.
You are not required to run the ntdsutil snapshot operation to use Dsamain.exe. You have the ability to use a backup of the Active Directory database.
You must be a member of the Domain Admins group or the Enterprise Admins group to view any snapshots taken because these snapshots contain sensitive Active Directory data.
Compact the Directory Database File (Offline Defragmentation)
One task you have probably done for years is defrag the operating systems that you run. Defragging a system helps return free space from data to the hard drive, and the defragmentation utility has been available since Windows NT.
You can also use the defragmentation process to compact the Active Directory database while it’s offline. Offline defragmentation helps return free disk space and check Active Directory database integrity.
To perform an offline defragmentation, you use the ntdsutil command. When you perform a defragmentation of the Active Directory database, a new compacted version of the database is created. This new database file can be created on the same machine (if space permits) or on a network location. After the new file is created, copy the compacted Ntds.dit file to the original location.
It is a good practice, if space allows, to maintain a copy of the older, original database file. You can either rename the older database file and keep it in its current location or copy the older database file to an alternate location.
Monitoring Replication
At times you may need to keep an eye on how your replication traffic is working on your domain controllers. I will cover the replication utility that you can use to help determine whether there are problems on your domain.
Repadmin Utility
The Repadmin utility is included when you install Windows Server 2012 R2. This command-line tool helps administrators diagnose replication problems between Windows domain controllers.
Repadmin allows administrators to view the replication topology of each domain controller as seen from the domain controller’s perspective. Administrators can also use Repadmin to create the replication topology manually. By manually creating the replication topology, administrators can force replication events between domain controllers and view the replication metadata vectors.
To access the Repadmin utility, open a command prompt using an elevated privilege (Run ![]() CMD). At the command prompt, type Repadmin.exe, and all of the available options will appear.
CMD). At the command prompt, type Repadmin.exe, and all of the available options will appear.
Using the ADSI Editor
Another utility that allows you to manage objects and attributes in Active Directory is the Active Directory Service Interfaces Editor (ADSI Edit). ADSI Edit allows you to view every object and attribute in an Active Directory forest.
One advantage to using the Adsiedit.msc MMC snap-in is that this tool allows you to query, view, create, and edit attributes that are not exposed through other Active Directory Microsoft Management Console (MMC) snap-ins.
ADSI Edit allows you to administer an AD LDS instance. To do this, you must first connect and bind to the instance. After you connect and bind to the instance, you can administer the containers and objects within the instance by browsing to the containers or objects and then right-clicking them. To complete this task, you must be a member of the Administrators group for the AD LDS instance.
Wbadmin Command-Line Utility
The wbadmin command allows you to back up and restore your operating system, volumes, files, folders, and applications from a command prompt.
You must be a member of the Administrators group to configure a backup schedule. You must be a member of the Backup Operators or the Administrators group (or you must have been delegated the appropriate permissions) to perform all other tasks using thewbadmin command.
To use the wbadmin command, you must run wbadmin from an elevated command prompt (to open an elevated command prompt, click Start, right-click Command Prompt, and then click Run As Administrator). Table 3.2 describes some of the wbadmin commands.
Table 3.2 Wbadmin commands
|
Command |
Description |
|
wbadmin enable backup |
Configures and enables a daily backup schedule |
|
wbadmin disable backup |
Disables your daily backups |
|
wbadmin start backup |
Runs a one-time backup |
|
wbadmin stop job |
Stops the currently running backup or recovery operation |
|
wbadmin get items |
Lists the items included in a specific backup |
|
wbadmin start recovery |
Runs a recovery of the volumes, applications, files, or folders specified |
|
wbadmin get status |
Shows the status of the currently running backup or recovery operation |
|
wbadmin start systemstaterecovery |
Runs a system state recovery |
|
wbadmin start systemstatebackup |
Runs a system state backup |
|
wbadmin start sysrecovery |
Runs a recovery of the full system state |
Configure Windows Azure Backups
Microsoft continues to offer robust cloud solutions to assist administrators with effective backup options. With Windows Server 2012 R2, you can integrate with Windows Azure Online Services to store short-term backup data to an off-premises location. This solution comes with additional costs for storing the data after the initial free trial. The cost model is relatively straightforward, and it is comparable to other cloud storage solutions that are currently available. To run backup jobs from your organization to the Microsoft Azure cloud solution, your environment must be running System Center 2012 with Data Protection Manager.
Data Protection Manager
System Center 2012 Data Protection Manager (DPM) is an application that runs on the server and allows disk-based and tape-based data protection and recovery. This recovery is for all the computers in the Active Directory domain. One of the nice features of DPM is that all replication, synchronization, and recovery point creation is done by DPM.
Because you are able to use DPM and set up recoverability for your computers, if a system needs to be recovered, DPM provides reliable protection and rapid recovery of the computer’s data either by the system administrator and/or by end users.
DPM uses multiple features to help keep the computers in your network safe. These features include replication, the Volume Shadow Copy Service (VSS) infrastructure, and a policy-driven engine. DPM helps provide protection and fast data recovery for businesses of all sizes.
Windows Azure Backup Prerequisites
Before you can start using the Windows Azure backup services, you must first have a few prerequisites set up within your environment. The following are the deployment prerequisites that you will need to accomplish the task:
§ A Windows Server 2012 R2 server running Data Protection Manager in System Center 2012 R2.
§ An active Windows Azure account with the Windows Azure Backup feature enabled.
§ The Windows Azure backup agent must be installed on the DPM servers that you want to back up, and the DPM servers must have at least 2.5GB of free space reserved for caching. At least 15GB to 20GB of free space is recommended.
§ A management certificate that will be uploaded to the backup vault in Windows Azure Backup.
Please note the following in regard to the certificate parameters:
§ To upload to the certificate to the vault, you must export it as a .cer format file that contains the public key.
§ The certificate should be an x.509 v3 certificate.
§ The key length should be at least 2,048 bits.
§ The certificate must have a valid ClientAuthentication EKU.
§ The certificate should be valid currently, with a validity period that does not exceed 3 years.
§ The certificate should reside in the Personal certificate store of your local computer.
§ The private key should be included during installation of the certificate.
§ You can create a self-signed certificate using the makecert tool or use any valid SSL certificate issued by a certification authority (CA) trusted by Microsoft whose root certificates are distributed via the Microsoft Root Certificate Program.
Make sure to take full advantage of the Microsoft Azure free trial when preparing for your exam. You can start your free trial by following this web link: http://azure.microsoft.com/en-us/pricing/free-trial/.
Configure Backup Vaults for Windows Azure Backup
The Windows Azure backup vault is where your data will be stored in the cloud. After you obtain a Windows Azure account, you will be able to create and manage your cloud backups from the Windows Azure Management Portal. Before you can start storing data using Windows Azure, you must first configure the backup vault by following four easy configuration steps:
1. Obtain a management certificate that will be used by Windows Azure:
§ You can either use an existing management certificate or obtain one by using makecert.exe. If you want to register a server that was not used to run makecert.exe, you must export the .pfx file (containing the private key) from that server, copy it to the server that you want to register, and import it to the Personal certificate store on that computer.
2. Create a backup vault in Windows Azure:
a. Log in to the Windows Azure Management Portal.
b. Click Recovery Services and then click Create New. Point to Backup Vault and then click Quick Create.
c. Name the Vault, specify the geographic region, enter your Windows Azure subscription, and then click Create Backup Vault. It usually takes only a few minutes for the backup vault to finish building. Notifications are provided at the bottom of the management portal.
3. Upload a management certificate to Windows Azure:
. Log in to the Windows Azure Management Portal.
a. Click Recovery Services, click the backup vault you want to certify, and then open the Quick Start page by clicking the Quick Start icon.
b. On the Quick Start page, click Manager Certificate. A dialog box will appear allowing you to browse your computer for the appropriate certificate that has been staged for upload. Select and upload that certificate.
4. Download and Install the Windows Azure Backup Agent onto each of your DPM servers that you want to back up:
. Log in to the Windows Azure Management Portal.
a. Select Download Agent from the Quick Start page.
b. Select the appropriate agent for your deployment to start the Agent Installation Wizard.
c. Complete the installation wizard, keeping all defaults.
Register DPM Servers with the Backup Vault
Now that your Windows Azure Backup Vault is fully configured and all of your DPM servers have agents installed, it’s time to register your DPM servers with the backup vault.
1. Launch the Windows Azure Backup application from one of your DPM servers.
2. Click the Register Server task in the Action pane to start the Register Server Wizard.
3. Follow the wizard, making appropriate selections suitable for your particular environment.
4. If the process is successful, a registration confirmation message is displayed, and you can close the wizard.
That’s all there is to it. If you have completed these steps properly, you are ready to configure backup jobs to run from your DPM servers to your backup vault in Microsoft Azure. Make sure to spend lots of time running through all of the available options found in the Microsoft Azure Management Portal. The exam is likely to cover multiple scenarios surrounding the configuration and troubleshooting of backups using Microsoft Azure.
Understanding Shadow Copies
An excellent way to protect your shared folders is by using shadow copies (Volume Snapshot Service [VSS]). Shadow copies allow an administrator to back up shared folders to a remote location. Shadow copies are designed to help recover files that were accidentally deleted, that were overwritten, or that have become corrupt. One major advantage to shadow copies is that open files can be backed up. This means that even if users are currently working on files in a shared folder that has shadow copies enabled, the shadow copies will continue to function.
Once administrators have configured and enabled shadow copies (using the Computer Management snap-in), network users can restore earlier versions of files. After the initial shadow copy of the shared folder is created, only changes are copied and not the entire file.
You can enable shadow copies of entire volumes.
The following are some of the settings that you can configure when setting up shadow copies:
Schedule You have the ability to set the schedule of the shadow copies. You can set this schedule to run daily, weekly, monthly, once, at system startup, at logon, or when the system is idle. You can also set the time at which the shadow copy will run.
Storage Locations An administrator needs to set the location of the shadow copy backup. If you are on a network, it is a good idea to place the shadow copy on a network drive.
Maximum Size You can set a maximum size on your shadow copies, or you can specify that they have no size limit. One of the predetermined settings is 64 shadow copies per volume.
In Exercise 3.2, you’ll set up a volume to make shadow copies every Monday at 7 a.m. To set up the shadow copies, you will use the Computer Management MMC snap-in.
Exercise 3.2: Configuring a Shadow Copy on a Volume
1. Open Computer Management by pressing the Windows key and selecting Administrative Tools ![]() Computer Management.
Computer Management.
2. Expand Storage and then right-click Disk Management. Choose All Tasks ![]() Configure Shadow Copies.
Configure Shadow Copies.
3. When the Shadow Copies dialog box appears, click the Settings button.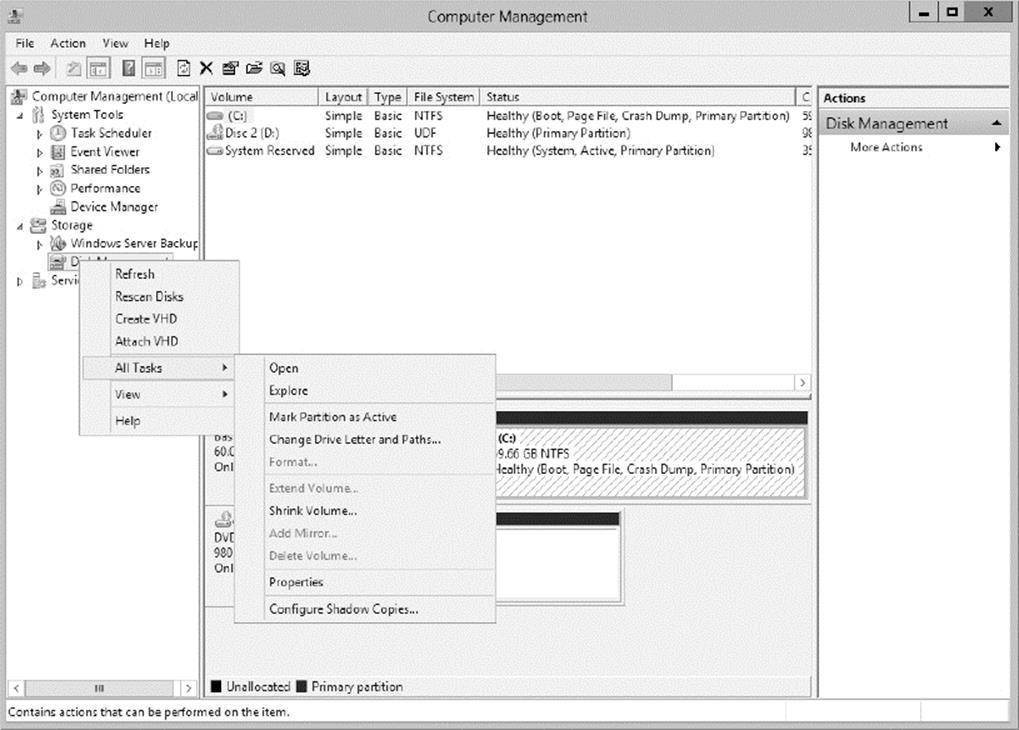
4. When the Settings windows appears, click the Schedule button.
5. In the Schedule window, set the schedule task to weekly and the start time for 7 a.m. Uncheck all of the days-of-the-week boxes except Mon. Click OK.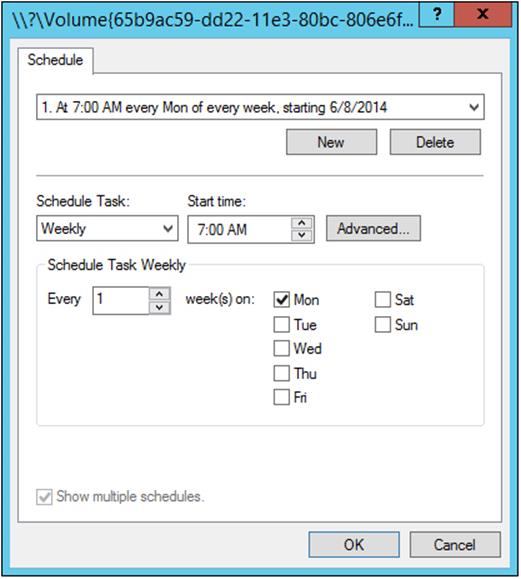
6. When the Settings window reappears, click OK.
7. If the Enable button is enabled, click it. Then click OK.
8. Exit the Computer Management MMC.
To recover a previous version of a file from a shadow copy, you use the \\servername\sharename path. The operating system determines how you will gain access to the shared folders and shadow copies. Shadow copies are built into Windows XP (SP1), Windows Vista, Windows 7, Windows 8, Windows Server 2003, Windows Server 2008/2008 R2, Windows Server 2012, and Windows Server 2012 R2. If you are using a different Microsoft operating system, you need to download the Shadow Copy Client Pack from the Microsoft download center.
VssAdmin Command
Another way to create, configure, and manage shadow copies is by using the vssadmin.exe command-line utility (see Figure 3.4). The vssadmin.exe command allows you to create, delete, list, and resize shadow copies and shadow storage.
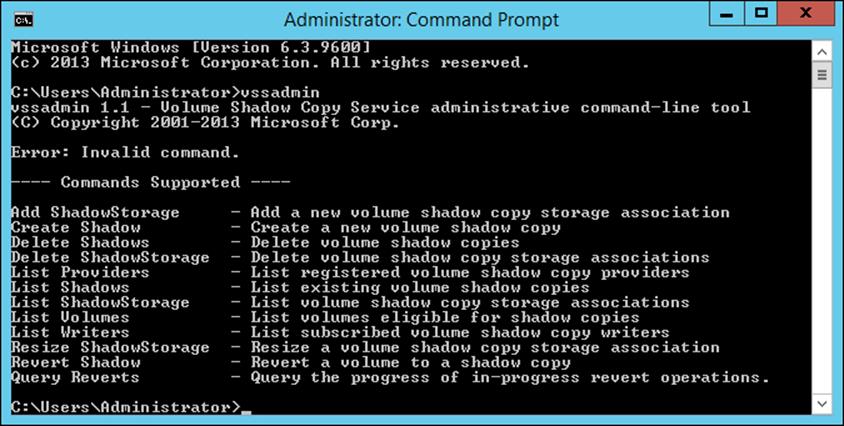
Figure 3.4 vssadmin.exe command-line utility
Table 3.3 describes the vssadmin.exe command and the different commands associated with the vssadmin utility.
Table 3.3 Vssadmin.exe commands
|
Command |
Description |
|
Add ShadowStorage |
Adds a new volume shadow copy storage association |
|
Create Shadow |
Creates a new volume shadow copy |
|
Delete Shadows |
Deletes volume shadow copies |
|
Delete ShadowStorage |
Deletes the volume shadow copy storage associations |
|
List Providers |
Lists registered volume shadow copy providers |
|
List Shadows |
Lists existing volume shadow copies |
|
List ShadowStorage |
Lists volume shadow copy storage associations |
|
List Volumes |
Lists volumes eligible for shadow copies |
|
List Writers |
Lists subscribed volume shadow copy writers |
|
Resize ShadowStorage |
Resizes a volume shadow copy storage association |
|
Revert Shadow |
Reverts a volume to a shadow copy |
|
Query Reverts |
Queries the progress of in-progress revert operations |
Using Advanced Boot Options
The Windows Server 2012 R2 advanced startup options can be used to troubleshoot errors that keep Windows Server 2012 R2 from successfully booting.
To access the Windows Server 2012 R2 advanced startup options, start or reboot the computer and press the F8 key after the firmware POST process but before Windows Server 2012 R2 is loaded. This will bring up the Advanced Boot Options menu, which offers numerous options for booting Windows Server 2012 R2.
These advanced startup options are covered in the following three sections (see Figure 3.5).
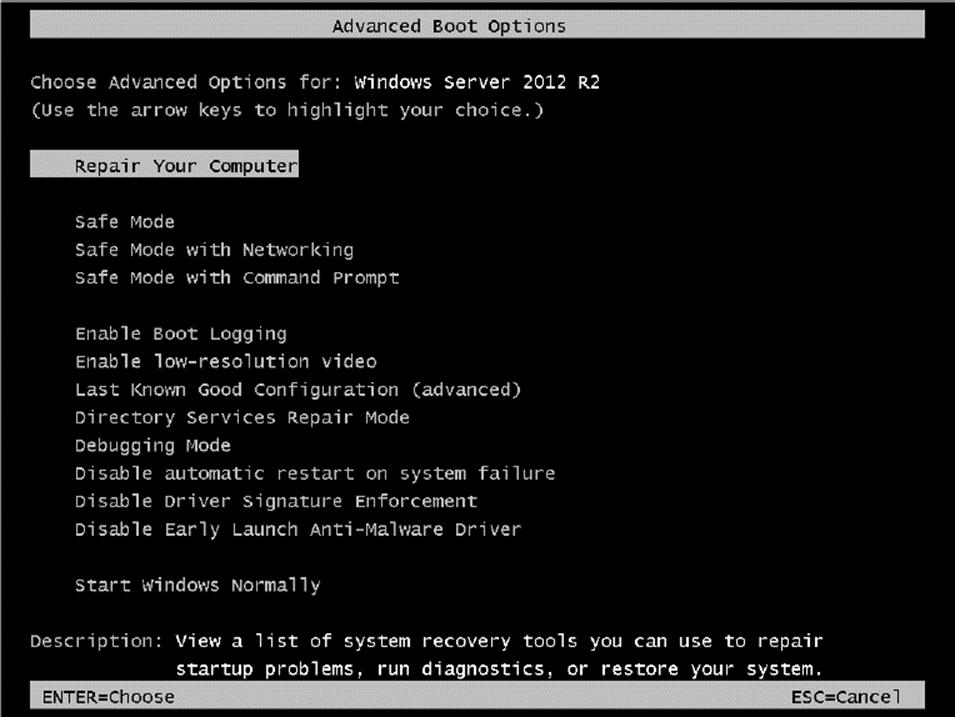
Figure 3.5 Advanced Boot Options screen
Starting in Safe Mode
When your computer will not start, one of the fundamental troubleshooting techniques is to simplify the configuration as much as possible. This is especially important when you do not know the cause of your problem and you have a complex configuration. After you have simplified the configuration, you can determine whether the problem is in the basic configuration or is a result of your complex configuration.
If the problem is in the basic configuration, you have a starting point for troubleshooting. If the problem is not in the basic configuration, you should proceed to restore each configuration option you removed, one at a time. This helps you to identify what is causing the error.
If Windows Server 2012 R2 will not load, you can attempt to load the operating system through Safe Mode. When you run Windows Server 2012 R2 in Safe Mode, you are simplifying your Windows configuration as much as possible. Safe Mode loads only the drivers needed to get the computer up and running.
The drivers that are loaded with Safe Mode include basic files and drivers for the mouse, monitor, keyboard, hard drive, standard video driver, and default system services. Safe Mode is considered a diagnostic mode, so you do not have access to all of the features and devices in Windows Server 2012 R2 that you have when you boot normally, including networking capabilities.
A computer booted to Safe Mode will show Safe Mode in the four corners of your desktop.
If you boot to Safe Mode, check all of your computer’s hardware and software settings in Device Manager and try to determine why Windows Server 2012 R2 will not boot properly. After you take steps to fix the problem, try to boot to Windows Server 2012 R2 as you normally would.
In Exercise 3.3, you will boot your computer to Safe Mode.
Exercise 3.3: Booting Your Computer to Safe Mode
1. If your computer is currently running, restart the system.
2. During the boot process, press the F8 key to access the Advanced Boot Options menu.
3. Highlight Safe Mode and press Enter.
4. When Windows Server 2012 R2 starts, log in.
5. You will see a Help And Support dialog box letting you know what Safe Mode is. Exit Help And Support.
6. You should see that a network connection is not available in the lower-right corner.
7. Don’t restart your computer yet; you will do this as a part of the next exercise.
Enabling Boot Logging
Boot logging creates a log file that tracks the loading of drivers and services. When you choose the Enable Boot Logging option from the Advanced Boot Options menu, Windows Server 2012 R2 loads normally, not in Safe Mode. This allows you to log all of the processes that take place during a normal boot sequence.
This log file can be used to troubleshoot the boot process. When logging is enabled, the log file is written to \WINDOWS\Ntbtlog.txt (see Figure 3.6).
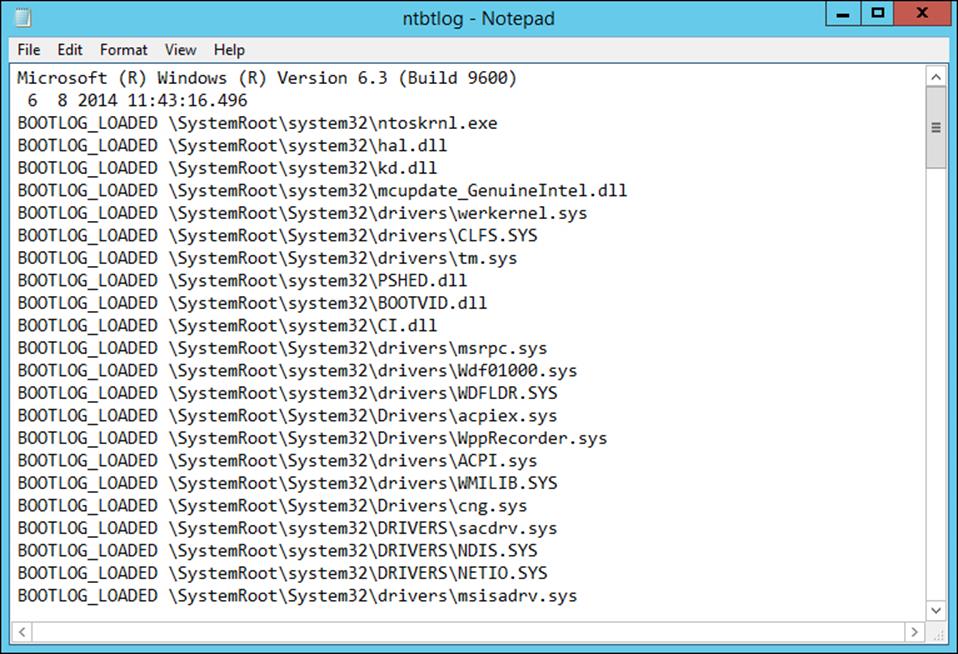
Figure 3.6 Ntbtlog.txt file
In Exercise 3.4, you will create and access a boot log file.
Exercise 3.4: Using Boot Logging
1. Restart your computer.
2. During the boot process, press the F8 key to access the Advanced Boot Options menu.
3. Highlight Enable Boot Logging and press Enter.
4. When Windows Server 2012 R2 starts, log in.
5. Click the Folders icon on the bottom left of the desktop and browse to C:\WINDOWS\Ntbtlog.txt. Double-click this file.
6. Examine the contents of your boot log file.
7. Shut down your computer and restart it without using Advanced Boot Options.
The boot log file is cumulative. Each time you boot to Safe Mode, you are writing to this file. This enables you to make changes, reboot, and see whether you have fixed any problems. If you want to start from scratch, you should manually delete this file and reboot to an Advanced Boot Options menu selection that supports logging.
Using Other Advanced Boot Options Menu Modes
In this section, you will learn about additional Advanced Boot Options menu modes. These include the following:
Safe Mode With Networking This is the same as the Safe Mode option, but it adds networking features. You might use this mode if you need networking capabilities to download drivers or service packs from a network location.
Safe Mode With Command Prompt This starts the computer in Safe Mode, but after you log in to Windows Server 2012 R2, only a command prompt is displayed. This mode does not provide access to the desktop. Experienced troubleshooters use this mode.
Enable Low-Resolution Video (640×480) This loads a standard VGA driver without starting the computer in Safe Mode. You might use this mode if you changed your video driver, did not test it, and tried to boot to Windows Server 2012 R2 with a bad driver that would not allow you to access video. The Enable VGA mode bails you out by loading a default driver, providing access to video so that you can properly install (and test!) the correct driver for your computer.
Safe Mode starts Windows Server 2012 R2 at a resolution of 800×600.
Last Known Good Configuration (Advanced) This boots Windows Server 2012 R2 by using the registry information that was saved the last time the computer was successfully booted. You would use this option to restore configuration information if you improperly configured the computer and did not successfully reboot it. When you use the Last Known Good Configuration option, you lose any system configuration changes that were made since the computer last successfully booted.
Directory Services Restore Mode This option is used for domain controllers only, and it is not relevant to Windows Server 2012 R2 unless it is a domain controller.
Debugging Mode This runs the Kernel Debugger, if it is installed. The Kernel Debugger is an advanced troubleshooting utility.
Disable Automatic Restart On System Failure This prevents Windows from restarting when a critical error causes Windows to fail. This option should be used only when Windows fails every time you restart so that you are not able to access the desktop or any configuration options.
Disable Driver Signature Enforcement This allows drivers to be installed even if they do not contain valid signatures.
Start Windows Normally This boots to Windows Server 2012 R2 in the default manner. This option is on the Advanced Boot Options menu in case you accidentally hit F8 during the boot process but really wanted to boot Windows Server 2012 R2 normally.
Windows Recovery Environment
When your Windows Server 2012 R2 machine fails to start, it will automatically enter into the Windows Recovery Environment (Windows RE). This environment is an extensible recovery platform based on Windows Preinstallation Environment (Windows PE).
When your server starts in the Windows RE, the Startup Repair tool starts the diagnosis, and it will begin to help you repair the system. The Windows RE is also an environment in which you can use various tools to help you do a manual system recovery. The boot options for the Windows RE are as follows:
§ Start recovery, troubleshooting, or diagnostic tools
§ Boot from a device
§ Access the Firmware menu
§ Choose which operating system to boot, if multiple operating systems are installed on the same computer
Administrators also have the ability to configure a hardware button to run an alternate boot path that includes the Windows RE. This gives administrators the ability to help their users get to the Windows RE menus more easily, which allows your users to recover their PCs easily in the event of a corrupted system.
There are certain instances where Windows RE will automatically try to repair the system:
§ Two successive failed attempts to start Windows
§ Two successive unexpected shutdowns that occur within two minutes of boot completion
§ A Secure Boot error (except for issues related to Bootmgr.efi)
§ A BitLocker error on touch-only devices
Configure Site-Level Fault Tolerance
Disaster recovery is a key piece of maintaining a solid corporate infrastructure. Companies will rely heavily on the ability to configure fault tolerance, redundancy, and replication within the environment to ensure production uptime across the organization. Windows Server 2012 R2 has quite a few new features to help administrators accomplish these tasks in a failover clustered environment.
Hyper-V in Windows Server 2012 R2 gives you the power you need to be truly fault tolerant. Using the Hyper-V Replica feature, you can keep entire replicated copies of your virtual machines readily available to keep your production environment online when virtual machines fail. The nice thing about the replica VM is that it doesn’t share storage with the primary VM like you are used to seeing with a traditional failover cluster. The replica starts off with a full cloned copy of the primary VM’s virtual hard disk and then updates itself automatically through replication frequency from the primary VM. These automatic updates are configurable to occur anywhere from 30 seconds to 15 minutes.
To set up a Hyper-V replica properly, you must first configure the server-level replication settings for both physical Hyper-V hosts that will make up this failover configuration. One host will act as the primary, and the other will serve as the replica. You must enable replication on the replica host before you can replicate VMs from the primary host. These configuration settings are found in the Hyper-V Manager settings navigation pane under Replication Configuration. Check the box Enable This Computer As A Replica Server and then make your authentication, port, and storage selections, as shown in Figure 3.7. The authentication, port, and storage selections must be configured on both physical Hyper-V hosts.
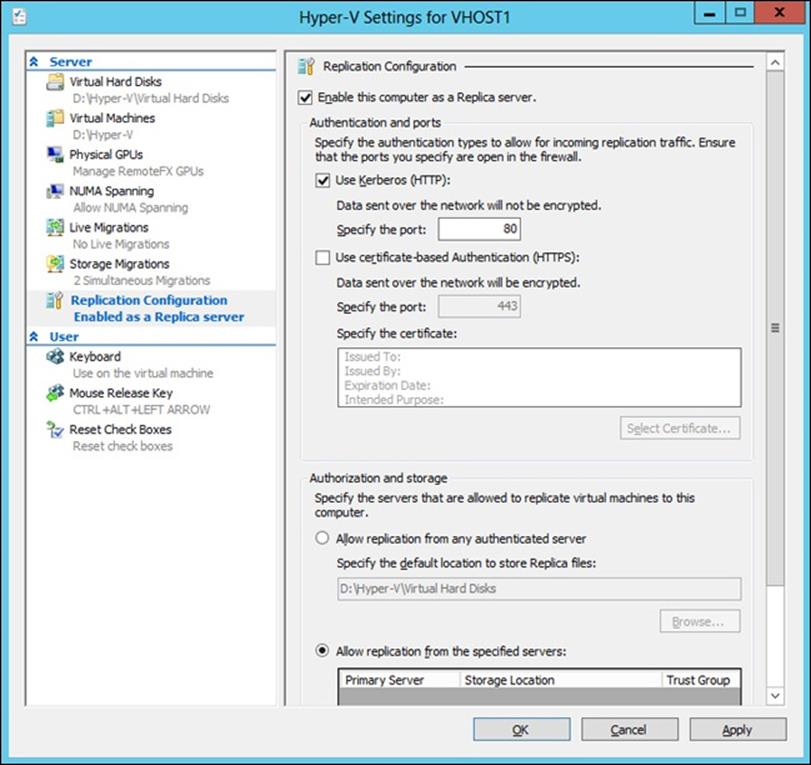
Figure 3.7 Hyper-V settings
Once the Hyper-V hosts have been configured, you can enable replication on the VMs running on the primary Hyper-V host. Simply right-click a virtual machine running on the primary host and select the new Enable Replication option to start the EnableReplication Wizard. Once you are finished configuring failover settings using the wizard, that VM is now considered to be fault tolerant between your two physical Hyper-V hosts. You should initiate a test failover action by launching the Hyper-V Manager on the replica host, right-clicking a replica VM, clicking Replication, and then clicking Test Failover. Testing failover is the only way you know for sure that your configuration settings are correct.
In addition to having the ability to create Hyper-V replicas, Windows Server 2012 R2 also has the ability to perform Hyper-V Extended Replication. Hyper-V Extended Replication is a new feature that allows administrators to extend the replication boundaries from the primary and replica hosts to an actual third site location. For example, you have a Hyper-V primary host in Denver replicating to a Hyper-V replica host in Tampa. Using Hyper-V Extended Replication, you can configure the Tampa replica host to replicate to a third Hyper-V host located at your London office. This feature gives you an added level of fault tolerance within your environment.
The component that manages how the cluster databases are updated within a failover cluster environment is known as the Global Update Manager. Whenever the state of the cluster changes, such as when a node goes down or offline, all of the other nodes in the cluster must acknowledge the change before those changes can be written to the cluster database. The Global Update Manager has three configurable settings available to you through Windows PowerShell using the following command:
(Get-Cluster).DatabaseReadWriteMode
The three configurable Global Update Manager settings are as follows:
0 = All (Write) And Local (Read) This is the default setting in Windows Server 2012 R2 for all cluster workloads except Hyper-V. It requires that all of the cluster nodes acknowledge the update before the change is committed to the database. Database reads occur on the local node.
1 = Majority (Read And Write) This is the default setting for Windows Server 2012 R2 Hyper-V failover clusters. It requires that only a majority of nodes acknowledge the update before the change is committed to the database. Database read involves comparing the most recent timestamp from the majority of available nodes and using the most recent data.
2 = Majority (Write) And Local (Read) This mode also requires that the majority of the cluster nodes acknowledge the update before committing the change to the database. The difference is that database read occurs on the local node, which means the data may be stale.
Microsoft recommends that you use mode 0 only when you have a requirement to make sure that the cluster database is consistent between all nodes in the cluster. For example, you would want to use mode 0 only when using availability groups in a Microsoft Exchange Server 2013 or Microsoft SQL Server 2012 environment to ensure that all of the cluster nodes acknowledge the change before the update is committed to the database. You cannot afford mismatched or stale data within a SQL or Exchange failover clustered environment. Having this situation could result in serious performance issues within the cluster.
Using the Startup Repair Tool
If your Windows Server 2012 R2 computer will not boot because of missing or corrupted system files, you can use the Startup Repair tool to correct these problems. Startup Repair cannot repair hardware failures. Additionally, Startup Repair cannot recover personal files that have been corrupted, damaged by viruses, or deleted. To ensure that you can recover your personal files, you should use the Backup utility previously discussed in this chapter.
To use the Startup Repair tool, follow these steps:
1. Boot your computer using the Windows Server 2012 R2 media.
2. When the Install Windows dialog box appears, select the language, the time and currency format, and the keyboard or input method. Click Next to continue.
3. The Install Now button appears in the center of the screen. Click Repair Your Computer in the lower-left corner.
4. Select the operating system to recover and click Next. If you do not see your operating system, you might need to load your hard disk drivers by clicking the Load Drivers button.
5. The System Recovery Options dialog box appears. You can choose one of the following options:
1. Startup Repair
2. System Restore
3. Windows Complete PC Restore
4. Windows Memory Diagnostic Tool
5. Command Prompt
6. Choose Startup Repair to continue.
6. Startup Repair checks your computer for problems and attempts to repair them. After Startup Repair has finished, click Shut Down or Restart.
 If you were not provided the Windows Server 2012 R2 media when you purchased your computer, the computer manufacturer might have placed the files on a recovery partition—or they might have replaced the Startup Repair tool with one of their own. Check with the manufacturer for more information.
If Startup Repair is unable to correct the problem, you might have to reinstall Windows Server 2012 R2. This should be done as a last resort. This is a reason why you should always back up your Windows Server 2012 R2 machine.
Summary
In this chapter, you learned about the different ways to recover and protect your Windows Server 2012 R2 machine from hardware and software issues. I discussed using the Advanced Boot Options, such as Last Known Good Configuration, Safe Mode, debugging mode, and VGA mode. You can use these Advanced Boot Options for troubleshooting multiple software and hardware related issues within your environment.
Other important items that need to be completed on a Windows Server 2012 R2 machine are backups and restores. Backing up a Windows Server 2012 R2 machine protects it in the event of a hardware or software failure. Don’t find yourself caught in the situation where a machine fails, and you don’t have a fresh backup copy to restore data from. Take the time to back up all of the data that you care about.
Another way to protect data is by the use of shadow copies. Shadow copies allow you to keep previous versions of data and revert to that previous version in the event of a problem. Shadow copies are very convenient when you need to restore a file quickly.
Exam Essentials
Understand the various backup types available with the Windows Server 2012 R2 Backup utility. The Windows Server 2012 R2 Backup utility can perform full and incremental backup operations. Some third-party backup utilities also support differential and daily backups. You can use each of these operations as part of an efficient backup strategy.
Know how to back up Active Directory. The data within the Active Directory database on a domain controller is part of the system state data. You can back up the system state data to a file using the Windows Server 2012 R2 Backup utility.
Know how to restore Active Directory. Restoring the Active Directory database is considerably different from other restore operations. To restore some or the entire Active Directory database, you must first boot the machine into Directory Services Restore mode.
Understand the importance of an authoritative restore process. You use an authoritative restore when you want to restore earlier information from an Active Directory backup and you want the older information to be propagated to other domain controllers in the environment.
Understand offline maintenance using ntdsutil. The ntdsutil command-line tool is a primary method by which system administrators perform offline maintenance. Understand how to launch this tool by entering ntdsutil at a command prompt.
Review Questions
1. You need to ensure that you can recover your Windows Server 2012 R2 configuration and data if the computer’s hard disk fails. What should you do?
A. Create a complete PC Backup.
B. Create a backup of all file categories.
C. Perform an automated system recovery (ASR) backup.
D. Create a system restore point.
2. After you update multiple drivers on your Windows Server 2012 R2 machine, the machine hangs at the logon screen, and you can’t log into the machine. You need to get this computer up and running as quickly as possible. Which of the following repair strategies should you try first to correct your problem?
A. Restore your computer’s configuration with your last backup.
B. Boot your computer with the Safe Mode option.
C. Boot your computer with the Last Known Good Configuration option.
D. Boot your computer to the recovery console and manually copy the old driver back to the computer.
3. You are the system administrator for a large organization that uses Windows Server 2012 R2 and Windows 8. You have a Windows 8 machine that needs to be configured with a normal backup schedule to restore sensitive data in the event of a catastrophic failure. At a worst case interval, you need to be able to perform a full restore from within the last 24 hours of a failure. What type of backup should you schedule?
A. Normal
B. Differential
C. Incremental
D. Daily
4. You are the network administrator for a small company. You manage the computers for the Marketing department, all of which are running the Windows Server 2012 R2 operating system. You are making several configuration changes to the manager’s computer to enhance performance. Before you make any changes, you want to create a restore point that can be used if any problems arise. How do you manually create a restore point?
A. By using the System Restore utility
B. By using the Shadow Copies tab of the System Properties dialog box
C. By using the System Configuration utility
D. By using the Startup Repair tool
5. Your computer uses a SCSI adapter that supports a SCSI drive, which contains your Windows 8 system and boot partitions. After updating the SCSI driver, you restart your computer, but Windows 8 will not load. You need to get this computer up and running as quickly as possible. Which of the following repair strategies should you try first to correct your problem?
A. Restore your computer’s configuration with your last backup.
B. Boot your computer with the Last Known Good Configuration.
C. Boot your computer with the Safe Mode option.
D. Boot your computer to the recovery console and manually copy the old driver back to the computer.
6. You enable the Boot Logging option on the Advanced Boot Options menu. Where can you find the log file that is created?
A. \Windows\netlog.txt
B. \Windows\System32\netlog.txt
C. \Windows\ntbtlog.txt
D. \Windows\System32\netboot.log
7. After you updated Will’s computer, his system files became corrupted because of a virus and now need to be restored. Which of the following processes should you use to fix the problem?
A. Restore a backup.
B. Restore an image.
C. Use the Startup Repair tool.
D. Boot to Safe Mode.
8. You are unable to boot your Windows Server 2012 R2 computer, so you decide to boot the computer to Safe Mode. Which of the following statements regarding Safe Mode is false?
A. When the computer is booted to Safe Mode, there is no network access.
B. Safe Mode loads all of the drivers for the hardware that is installed on the computer.
C. When you run Safe Mode, boot logging is automatically enabled.
D. When you run Safe Mode, the screen resolution is set to 800×600.
9. You need to back up the existing data on a computer before you install a new application. You also need to ensure that you are able to recover individual user files that are replaced or deleted during the installation. What should you do?
A. Create a System Restore point.
B. Perform an automated system recovery (ASR) backup and restore.
C. In the Windows Server Backup utility, click the Backup Once link.
D. In the Backup And Restore Center window, click the Back Up Computer button.
10. Your data recovery strategy must meet the following requirements:
§ Back up all data files and folders in C:\Data.
§ Restore individual files and folders in C:\Data.
§ Ensure that data is backed up to and restored from external media.
What should you do?
D. Use the Previous Versions feature to restore the files and folders.
E. Use the System Restore feature to perform backup and restore operations.
F. Use the NTBackup utility to back up and restore individual files and folders.
G. Use the Windows Server Backup to back up and restore files.