MCSA: Windows Server 2012 R2 Configuring Advanced Services Study Guide Exam 70-412 (2015)
Chapter 6
Configure Access and Information Protection Solutions
THE FOLLOWING 70-412 EXAM OBJECTIVES ARE COVERED IN THIS CHAPTER:
1. ![]() Install and configure Active Directory Certificate Services (AD CS)
Install and configure Active Directory Certificate Services (AD CS)
§ Describe and explain the new features in Windows Server 2012 Active Directory Certificate Services
§ Install and configure Active Directory Certificate Services using Server Manager and Windows PowerShell
§ Manage Active Directory Certificate Services using management consoles and Windows PowerShell
§ Configure CRL distribution points
§ Install and configure Online Responder
§ Implement administrative role separation
§ Configure CA Disaster recovery
§ Manage certificates
§ Manage certificate templates
§ Implement and manage certificate deployment, validation, and revocation
§ Manage certificate renewal
§ Manage certificate enrollment and renewal to computers and users using Group Policies
§ Configure and manage key archival and recovery
§ Manage trust between organizations including Certificate Trust List (CTL)
§ Managing Cross certifications and bride CAs
§ Monitoring CA Health
2. ![]() Install and Configure Active Directory Federation Services (AD FS)
Install and Configure Active Directory Federation Services (AD FS)
§ Implement claims-based authentication including Relying Party Trusts
§ Configure authentication policies
§ Configure Workplace Join
§ Configure multi-factor authentication
3. ![]() Install and configure Active Directory Rights Management Services (AD RMS)
Install and configure Active Directory Rights Management Services (AD RMS)
§ Install a licensing or certificate AD RMS server
§ Manage AD RMS Service Connection Point (SCP)
§ Manage RMS templates
§ Configure Exclusion Policies
§ Backup and restore AD RMS
In this chapter, I will discuss certificate services and the importance of securing the corporate public key infrastructure (PKI) environment. The Windows 2012 PKI implementation resides in Active Directory Certificate Services. PKI is the collection of technology, protocols, services, standards, and policies that control the issuing and management of public and private keys using digital certificates, which are the core of PKI. Encryption is used to protect data messages. While certificates provide a certain level of security, they are still vulnerable.
Next, I will cover federation services and how to set up relying party trusts with certificates. Finally, I will discuss rights management, which Microsoft created to further protect documents, email, and web pages from unauthorized copying, printing, forwarding, editing, deleting, and so forth.
What’s New in Windows Server 2012 R2 with Active Directory Certificate Services?
Active Directory Certificate Services is a server role included in Windows Server 2012 R2. AD CS allows administrators to customize, issue, and manage public key certificates. AD CS issues digital certificates for authentication, encryption and decryption, and signing.
The following are the new features regarding Active Directory Certificate Services (AD CS) in Windows Server 2012 R2:
Server Core and Minimal Server Interface Support You can install and deploy any of the six AD CS role services to any version of Windows Server 2012 R2, including Server Core and Minimal Server Interface. The Minimal Server Interface looks and feels like a Server Core installation with most of the GUI management utilities intact. Windows Server 2012 R2 Minimal Server Interface reduces the attack surface and lowers the footprint by removing components such as Windows Explorer and Internet Explorer and their supporting libraries.
Site-Aware Certificate Enrollment Windows 8/8.1 and Windows Server 2012 R2 computers default to using certificate authorities within their sites when requesting certificates. However, you must configure site information on the certificate authorities’ objects within Active Directory for the site-awareness feature to be worthwhile. Once configured, computers running Windows 8/8.1 and Windows Server 2012 R2 request certificates from a certificate authority running in the same site as the computer.
Automatic Certificate Renewal for Non-Domain-Joined Computers Certificate Enrollment Web Services (CES) allows non-domain-joined computers and computers not directly connected to the corporate network to request and retrieve certificates. AD CS in Windows Server 2012 R2 includes the ability for these clients to renew certificates automatically for non-domain-joined computers.
Enforcement of Certificate Renewal with the Same Key In earlier versions of Windows, clients that received certificates from templates that were configured for renewal with the same key had to renew their certificates using the same key, or renewal would fail.
With Windows 8/8.1 or Windows Server 2012 R2, you can continue this behavior, or you can configure certificate templates to give higher priority to Trusted Platform Module (TPM)–based KSPs for generating keys. Moreover, using renewal with the same key, administrators can rest assured that the key remains on TPM after renewal.
This feature allows you to enforce renewal with the same key, which can reduce administrative costs (when keys are renewed automatically) and increase key security (when keys are stored using TPM-based KSPs).
Internationalized Domain Names (IDNs) International languages often contain characters that cannot be represented using ASCII encoding, which limits the function of these languages when enrolling for a certificate. Windows Server 2012 R2 now includes support for international domain names.
Default Security Increased on the Certificate Authority Role Service Certificate authorities running on Windows Server 2012 R2 include increased RPC security. Increased RPC security on the CA requires that all clients must encrypt the RPC communication between themselves and the CA when requesting certificates.
Active Directory Certificate Services Roles
The Active Directory Certificate Services role provides six role services to issue and manage public key certificates in an enterprise environment. These roles are listed in Table 6.1 and described in the following sections.
Table 6.1 AD CS roles
|
Role service |
Description |
|
Certificate Authority (CA) |
The CA service includes root and subordinate CAs for issuing certificates to users, computers, and services. This role service also manages certificate validity. |
|
Web Enrollment |
This is a web-based interface to enable users to enroll, request, and retrieve certificates as well as retrieve certificate revocation lists from a CA using a web browser. |
|
Online Responder (OCSP) |
The Online Responder service retrieves revocation status requests for specific certificates and the status of these certificates, and it returns a signed response with the requested certificate status information. |
|
Network Device Enrollment Service (NDES) |
NDES enables routers and other non-domain-joined network devices to acquire certificates. |
|
Certificate Enrollment Policy Web Server (CEP) |
CEP enables users and computers to inquire about certificate enrollment policy information. |
|
Certificate Enrollment Web Services (CES) |
CES enables users and computers to enroll for certificates with the HTTPS protocol. CEP and CES can be used together to support certificate enrollment for non-domain-joined computers and computers not directly connected to the corporate network. |
Planning the Certificate Authority Hierarchy
A certification authority (CA) is a trusted server designed to grant certificates to individuals, computers, or organizations to certify the identity and other attributes of the certificate subject.
A CA receives a certificate request, verifies the requester’s identity data according to the policy of the CA, and uses its private key to apply its digital signature to the certificate. The CA issues the certificate to the subject of the certificate as a security credential within a PKI environment. A CA is also responsible for revoking certificates and publishing a certificate revocation list (CRL).
A CA can be a third-party issuer, such as VeriSign, or you can create your own CA by installing Active Directory Certificate Services. Every CA also has a certificate confirming its identity, issued by another trusted CA or root CAs.
Cryptography
The Cryptography options for a certificate authority provide increased deployment flexibility to those with a more advanced understanding of cryptography. You can implement cryptographic options by using cryptographic service providers (CSPs) or key storage providers (KSPs).
CSPs are hardware and software components of Windows operating systems that provide generic cryptographic functions. CSPs can provide a variety of encryption and signature algorithms. Key storage providers can provide strong key protection on computers running Windows Server 2012/2012 R2, Windows Server 2008/2008 R2, Windows Vista, Windows 7, or Windows 8. Figure 6.1 shows some of the Cryptography options in the AD CS installation.
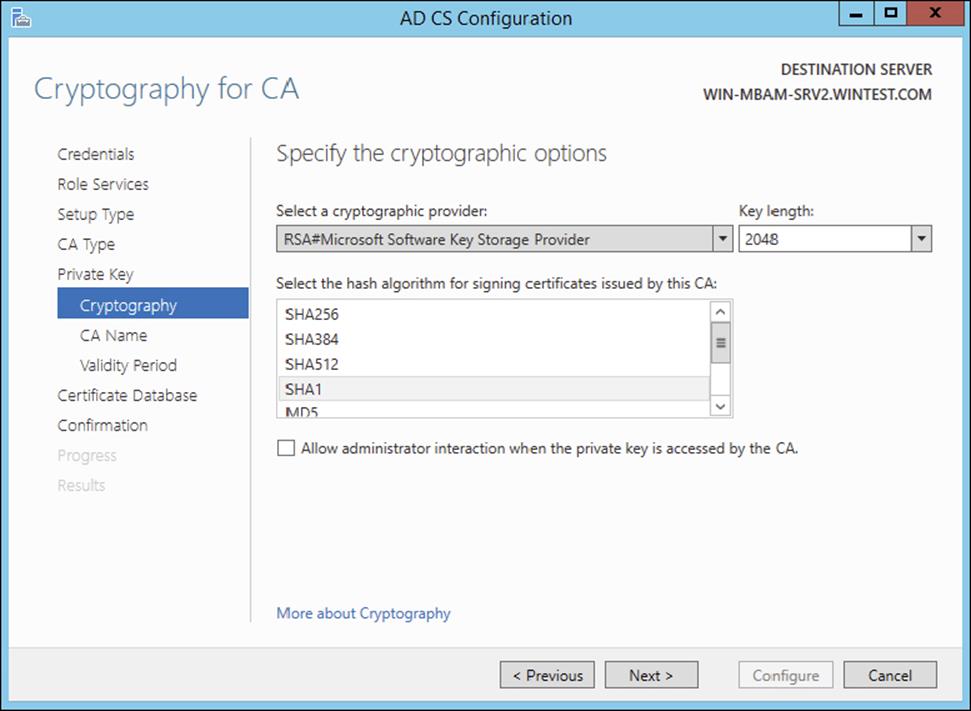
Figure 6.1 Cryptography for CA screen
Here are the options:
Select a Cryptographic Provider Windows Server 2012 R2 provides many CSPs and KSPs, and you can install additional CSPs or KSPs provided by third parties. In Windows Server 2012 R2, the algorithm name is listed in the provider list. All providers with a number sign (#) in the name are cryptography next-generation (CNG) providers. CNG providers can support multiple asymmetric algorithms. CSPs implement only a single algorithm.
Key Length Each CSP and KSP supports different character lengths for cryptographic keys. Configuring a longer key length hardens against an attack by a hacker to decrypt the key and also degrades the performance of cryptographic operations.
Select The Hash Algorithm For Signing Certificates Used By This CA The CA uses hash algorithms to sign CA certificates and issues certificates to ensure that an external identity has not tampered with a certificate. Each CSP can support different hash algorithms.
 Make sure that your applications, your devices, and all operating systems that may request certificates from this certificate authority support the selected hash algorithm.
Allow Administrator Interaction When The Private Key Is Accessed By The CA Use this option to help secure the CA and its private key by requiring an administrator to enter a password before every cryptographic operation.
Exercise caution with this setting because this requires user interaction each time the certificate authority accesses the private key. A certificate authority signs each issued certificate. To sign the issued certificate, the certificate authority must access the private key.
Private Key
A certificate authority uses its assigned certificate to generate and issue certificates. The certificate used by the CA includes a public key and a private key. The private key should be available only to the owner. The public key is publicly available to other entities on the network.
For example, a user’s public key can be published within a certificate in a folder so that it is accessible to other people in the organization. The sender of a message can retrieve the user’s certificate from Active Directory Domain Services, obtain the public key from the certificate, and then encrypt the message by using the recipient’s public key.
Data encrypted with a public key can be decrypted only with the mathematically paired private key. Certificate authorities use their private key to create a digital signature in the certificate when issuing certificates.
Enterprise Certificate Authorities
Enterprise certificate authorities (CAs) publish certificates and CRLs to Active Directory. Enterprise CAs access domain data stored in Active Directory. Enterprise CAs engage certificate templates when issuing certificates. The enterprise CA uses default configuration data in the certificate template to create a certificate with the appropriate attributes for that certificate type.
If you want to enable automatic certificate approval and automatic user certificate enrollment, use enterprise CAs to issue certificates. These features are available only when the CA infrastructure is integrated with Active Directory. Additionally, only enterprise CAs can issue certificates that enable smart card logon because this process requires the CA to map the user account in Active Directory to the smart card certificates.
A root CA, sometimes called a root authority, is the most trusted CA type in an organization’s PKI. The root CA is the only CA that signs its own certificate. The physical security and the certificate issuance policy of a root CA should be tightly reinforced. If the root CA is compromised or if it issues a certificate to an unauthorized identity, any certificate-based security in your organization is compromised by the exposed private key. The best practice is to deploy a second PKI tier to issue certificates from other CAs, calledsubordinate CAs (see Figure 6.2).
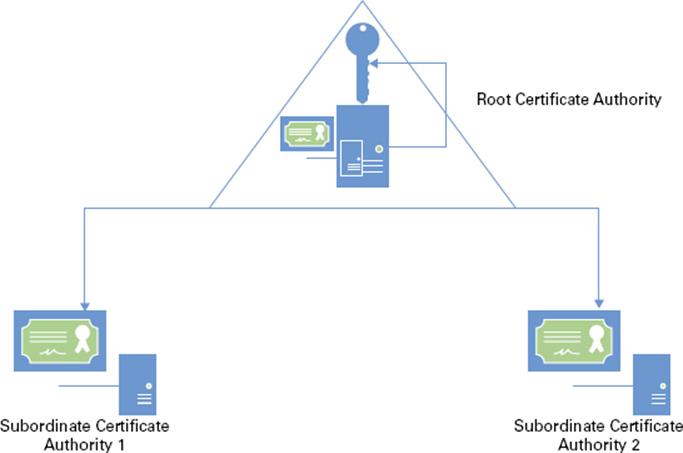
Figure 6.2 Two-tier PKI hierarchy model
A subordinate CA is one that has received its signing certificate by a root CA, third-party CA, or stand-alone CA in your organization. Subordinate CAs normally issue certificates for specific purposes, such as secure email, SSL, Wireless 801.x security, or smart card authentication. Subordinate CAs can also issue certificates to other, more subordinate CAs. A root CA, the subordinate CAs certified by the root, and subordinate CAs certified by other subordinate CAs form a certification hierarchy.
Stand-alone certificate authorities are not integrated into Active Directory and do not support certificate templates. If you deploy stand-alone CAs, you must include all the information about the requested certificate type in the certificate request. By default, all submitted certificate requests to a stand-alone CA are placed in a pending queue, awaiting a CA administrator’s approval. Stand-alone CAs can issue certificates automatically upon request, but this is not recommended because the requests are not authenticated.
Because stand-alone CAs are not Active Directory integrated, a stand-alone CA would seem like a less appropriate choice for an enterprise. However, stand-alone root CAs offer a layer of protection when a powered-down stand-alone CA is less likely to be compromised and does not have a footprint in Active Directory. More organizations are deploying offline stand-alone root CAs that are brought online only temporarily for re-issuing signing certificates to subordinate CAs. Some organizations permanently keep the offline stand-alone root CA disconnected from the network and distribute signing certificates only via removable media such as CDs, DVDs, or USB flash drives. Offline root CAs have the following characteristics:
§ Deployed as a stand-alone root CA
§ Deployed on a non-domain-joined server to avoid being offline or powered down for long periods without requiring computer password synchronizations
![]()
Protect the Offline Root CA
Best practice strongly recommends you securely store and back up the offline stand-alone root CA. A large Medical center implemented their offline stand-alone root CA solution by installing their root CA on a laptop. They routinely kept the laptop in the datacenter until a new administrator discovered and returned laptop to the help desk for repurposing. Needless to say, the laptop was re-imaged, and the entire PKI infrastructure was wiped out. No one was aware until the subordinate CA’s certificate had expired a year later and certificates could no longer be issued. You can avoid this catastrophic scenario by securely storing and backing up the offline stand-alone CA.
Two-Tier and Three-Tier Models
It’s acceptable for a single enterprise to have multiple PKIs. Multiple PKIs result in one root CA for each PKI and possibly multiple subordinate CAs that chain to their respective roots.
Organizations also may choose a third-tier CA hierarchy model, which involves adding a CA policy server. CA policy servers are designed to implement specific certificate policies that can include certificate life cycle, encryption type, key length, and some approval workflow.
Validity Period
All certificates issued by a certification authority have a validity period. The validity period is a time range that specifies how long PKI clients can accept the certificate as an authoritative credential based on the identity stated in the subject of the certificate. This assertion presumes the certificate is not revoked before the validity period ends and the issuing CA remains trusted. The validity period limits the time in which an issued certificate is exposed to the possibility of being compromised (http://technet.microsoft.com/en-us/library/cc740209(v=WS.10).aspx).
All CAs have an expiration date based on its CA certificate’s validity ending period. This rule affects the CA’s ability to issue certificates and not the validity period of its CA certificate. Because of this rule, organizations must plan for the renewal of every certificate issued to a CA in the certification hierarchy to ensure the existing trust chains and to extend the lifetimes of CAs.
Active Directory Certificate Services enforces a rule that a CA never issues a certificate past the expiration date of its own certificate. Because of this behavior, when a CA’s certificate reaches the end of its validity period, all certificates issued by the CA will also expire. Certificates issued by the now-expired CA will not be honored as valid security credentials.
Active Directory Certificate Services allows for the maximum validity periods shown in Table 6.2, which are based on the type of certificate. You configure these validity periods using certificate templates.
Table 6.2 AD CS maximum validity periods
|
Certificate type |
Maximum validity period |
|
Root certificate authority |
Determined during CA deployment |
|
Subordinate CA |
Up to five years, but never more than the root CA’s or the issuing CA’s validity period |
|
All other certificates |
One year, but never more than the root CA’s or issuing CA’s validity period |
Certificate Validation
PKI trust requires a certificate to be validated for both for its expiration and its overall chain of trust. When a certificate user leaves the company, you will want to make sure that no one can use that certificate for authentication and revoke the certificate. Revocation checking is one of the key components of PKI.
Certificate revocation uses certificate revocation lists. CRLs contain a list of certificates that are no longer valid, and the CRL can become large. To solve this, you can access a delta CRL that contains changes or new revocations.
CRLs are accessed through CRL distribution points (CDPs), which are part of a CA role in Windows Server 2012. HTTP, FTP, LDAP, or file-based addresses may be used as URLs. Only newly issued certificates will recognize new changes in the CRL URL; old certificates will use the old URL for revocation list operations.
Online Responders
When a new certificate is issued, the computer queries the issuing CA to find out whether the certificate has been revoked. Traditionally, certificate revocation checking can be done by retrieving certificate revocation lists that are published in Lightweight Directory Access Protocol (LDAP) or Hypertext Transfer Protocol (HTTP) or by using a newer HTTP method named the Online Certificate Status Protocol (OCSP).
OCSP is a lightweight HTTP protocol that responds faster and more efficiently than downloading a traditional CRL. An online responder is a trusted server that receives and responds to individual client requests for the status of a certificate. An OCSP responder retrieves CRLs and provides digitally signed real-time certificate revocation status responses to clients based on a given certificate authority’s CRL. The amount of data retrieved per request remains constant regardless of the number of revoked certificates.
Online responders process certificate status requests more efficiently than direct access to CRLs in several scenarios (http://technet.microsoft.com/en-us/library/cc725958.aspx):
§ When clients have slow VPN connections or do not have the high-speed connections required to download large CRLs
§ When network utilization peaks because revocation-checking activity is high, such as when large numbers of users log on or send signed email simultaneously
§ When revocation data for certificates is needed from a non-Microsoft certification authority
§ When revocation data is needed to verify individual certificate status requests rather than all revoked or suspended certificates
Installing AD CS
Server Manager provides a graphical user interface to install Active Directory Certificate Services on local and remote computers running Windows Server 2012 R2. The Remote Server Administration Tools for Windows Server 2012 R2 also includes Server Manager, which allows you to run Server Manager on a computer running Windows 8/8.1. In Exercise 6.1, you’ll install an AD CS role on the local computer using Server Manager.
Exercise 6.1: Installing AD CS Through Server Manager
1. Start Server Manager.
2. Click Manage and click Add Roles And Features
3. The Add Roles And Features Wizard shows the Before You Begin screen. Click Next.
4. Click Role-Based Or Feature-Based Installation on the Select Installation Type screen. Click Next.
5. Click the server on which you want to install Active Directory Certificate Services from the Server Pool list on the Select Destination Server screen. Click Next.
6. Select the Active Directory Certificate Services check box on the Select Server Roles screen.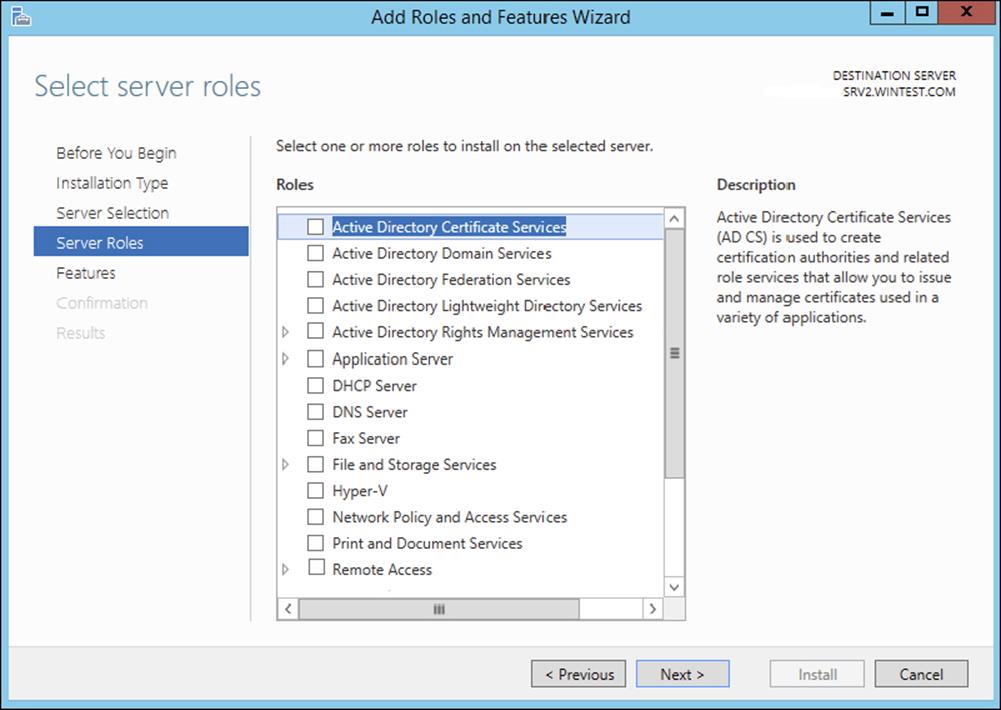
Server Manager prompts you to add more features associated with this role, such as management tools. Leave the default selections. Click Add Features to close the dialog. Click Next on the Select Server Roles screen.
7. Click Next on the Select Features screen.
8. Server Manager displays the Active Directory Certificate Services screen. This screen provides a simple role introduction and noteworthy information, such as that the name of the certificate authority cannot be changed. Click Next.
9. From the Select Role Services screen, select the check boxes next to the AD CS role services you want to install on the computer. Click Next.
10.Read the Confirm Installation Selections screen. This screen provides a list of roles, role services, and features that the current installation prepares on the computer. Click Install to start the installation.
Installation Using Windows PowerShell
A major benefit gained from basing Windows Server 2012 R2’s Server Manager on Windows PowerShell is consistency of installation. Server Manager relies on its Windows PowerShell foundation as the underlying engine responsible for installing any of the Active Directory Certificate Services role services. However, you cannot use Server Manager to install roles and features on a Windows Server 2012 R2 core installation.
The Server Manager module for Windows PowerShell provides cmdlets to install, view, and remove features and roles included in Windows Server 2012 R2. You can use these cmdlets on any installation of Windows Server 2012 R2 because it provides Windows PowerShell in all installation types. Also, these cmdlets can install, view, and uninstall Active Directory Certificate Services role services from remote computers running Windows Server 2012 R2.
To view the installation state of Active Directory Certificate Services using Windows PowerShell, follow these steps:
1. Open an elevated Windows PowerShell console. (On Server Core installations, type PowerShell in the command console.)
2. In the Windows PowerShell console, type the following command and press Enter:
Get-WindowsFeature | where {$_.name -like "adcs*" -or $_.name -like "ad-c*"}
The Windows PowerShell cmdlet outputs three columns of information: Display Name, Name, and Install State. The Display Name column is a user-friendly name that describes the feature or service role’s use. The Name column represents the name of the component. You use this name with the Install-WindowsFeature and Remove-WindowsFeature cmdlets. Use the Install State column to determine the installation state of the role or service role.
Typically, the Install State column shows one of three install states: Removed, Available, and Installed. The Removed install state designates that its associated role or feature is not included in the current installation of Windows. You cannot install the associated role or feature without the installation media or Internet connectivity to Windows Update if the feature or role is removed. The Available installation state indicates that the role or feature is staged in the current installation of Windows; however, it is currently not installed. The Installed installation state indicates that the role or feature is installed on the current installation of the computer and is ready, or it has been deployed or configured.
The Active Directory Certificate Services entry from the cmdlet’s output represents the parent role. Six child role services appear underneath the parent role. A lowercase x appears between the opening and closing square brackets in the parent role if any of the six child role services are installed. The cmdlet also places a lowercase x between the opening and closing square brackets for any installed child role service. You should interpret entries without a lowercase x between the opening and closing square brackets as not installed. Check the install state to determine whether the role or role service is staged on your installation of Windows.
To install Active Directory Certificate Services using Windows PowerShell, follow these steps:
1. Open an elevated Windows PowerShell console.
2. Use the Get-WindowsFeature cmdlet to ensure the Active Directory Certificate Services role’s installation state is Available.
3. In the Windows PowerShell console, type the following command and press Enter:
Install-WindowsFeature adcs-cert-authority -IncludeManagementTools
4. Use the Get-WindowsFeature cmdlet to verify the installation (see Figure 6.1).
The preceding command instructs the Server Manager module of Windows PowerShell to take the staged binaries for the Certificate Authority role service and install them to the current computer.
It’s important to remember the -IncludeManagementTools argument when installing a feature using Windows PowerShell. The Server Manager module for Windows PowerShell does not install a feature or role management tool by default. TheInstall-WindowsFeature cmdlet does not install the role management tool without this argument. The Server Manager GUI automatically selects installing the role management tool for you, and it gives you a choice of not to install it before completing the installation.
You can install any of the other child role services using the Install-WindowsFeature cmdlet simply by replacing the adcs-cert-authority argument with the associated name of the child role service. The following example installs the Active Directory Certificate Services Web Enrollment role service:
Install-WindowsFeature adcs-web-enrollment -IncludeManagementTools
 The role and feature installation experience is consistent on Windows Server 2012 R2 using the Server Manager module for Windows PowerShell. You can use the same syntax to install a feature or role listed using Get-WindowsFeature.
Configuring Active Directory Certificate Services
You begin the Active Directory Certificate Services deployment by starting the AD CS Configuration Wizard (Exercise 6.2). To start the wizard, click the Configure Active Directory Certificate Services On The Destination Server link shown in the Action Flag dialog. The wizard shows the current destination for the role deployment in the Destination Server portion of the screen.
Exercise 6.2: Configuring AD CS Through Server Manager
1. After the AD CS installation is successful, click the Configure Active Directory Certificate Services On The Destination Server link.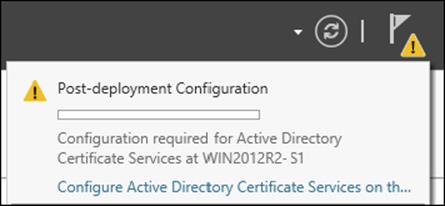
2. The Credentials screen of the AD CS Configuration Wizard displays the required credentials to perform specific AD CS role services deployment. The wizard shows your current credentials in the Credentials portion of the screen. Click Change if your current credentials do not match the credentials needed for the current role service deployment. Otherwise, continue by clicking Next.
3. Select the check boxes for the Certification Authority and Online Responder role services.
4. The Setup Type screen of the AD CS Configuration Wizard shows the two types of certificate authorities you can configure with Active Directory Certificate Services: enterprise or stand-alone. An enterprise certificate authority must run on domain-joined computers and typically remains online to issue certificates or certificate policies. Select Enterprise and click Next.
5. In the Setup Type dialog box, select Enterprise CA and click Next.
6. In the CA Type dialog box, click Root CA and click Next.
7. In the Private Key dialog box, verify that Create A New Private Key is selected and click Next.
8. Select the RSA# Microsoft Software Key Storage Provider.
9. Windows Server 2012 includes a number of CSPs and KSPs, and you can install additional CSPs or KSPs provided by third parties. In Windows Server 2012 R2, the provider list includes the name of the algorithm. All providers with a number sign (#) in the name are CNG providers. CNG providers can support multiple asymmetric algorithms. CSPs implement only a single algorithm.
10.Select a key length of 2048.
11.Each CSP and KSP supports different character lengths for cryptographic keys. Configuring a longer key length can enhance security by making it more difficult for a hacker or disgruntled employee to decrypt the key, but it can also slow down the performance of cryptographic operations.
12.Select the SHA1 hash algorithm and click Next.
13.Enter a name for the root CA Server and click Next.
14.In the Certificate Request dialog box, verify that Save A Certificate Request To File On The Target Machine is selected and click Next.
15.In the CA Database dialog box, verify the location for the log files in the Certificate Database Log Location box and click Next.
16.In the Confirmation dialog box, click Configure.
17.In the Results dialog box, click Close.
The CA uses hash algorithms to sign CA certificates and issues certificates to ensure that an external identity has not tampered with a certificate. Each CSP can support different hash algorithms. Make sure your applications, devices, and all operating systems that may request certificates from this certificate authority support the selected hash algorithm.
Use the Create A New Private Key option when creating or reinstalling a certificate authority.
Certificate Authority Name
Names for CAs cannot exceed 64 characters in length. You can create a name by using any Unicode character, but you might want the ANSI character set if interoperability is a concern.
In Active Directory Domain Services (AD DS), the name you specify when you configure a server as a CA (Figure 6.3) becomes the common name of the CA, and this name is reflected in every certificate the CA issues. Because of this behavior, it is important that you do not use the fully qualified domain name (FQDN) for the common name of the CA. Hackers can acquire a copy of a certificate and use the FQDN of the CA to compromise security.
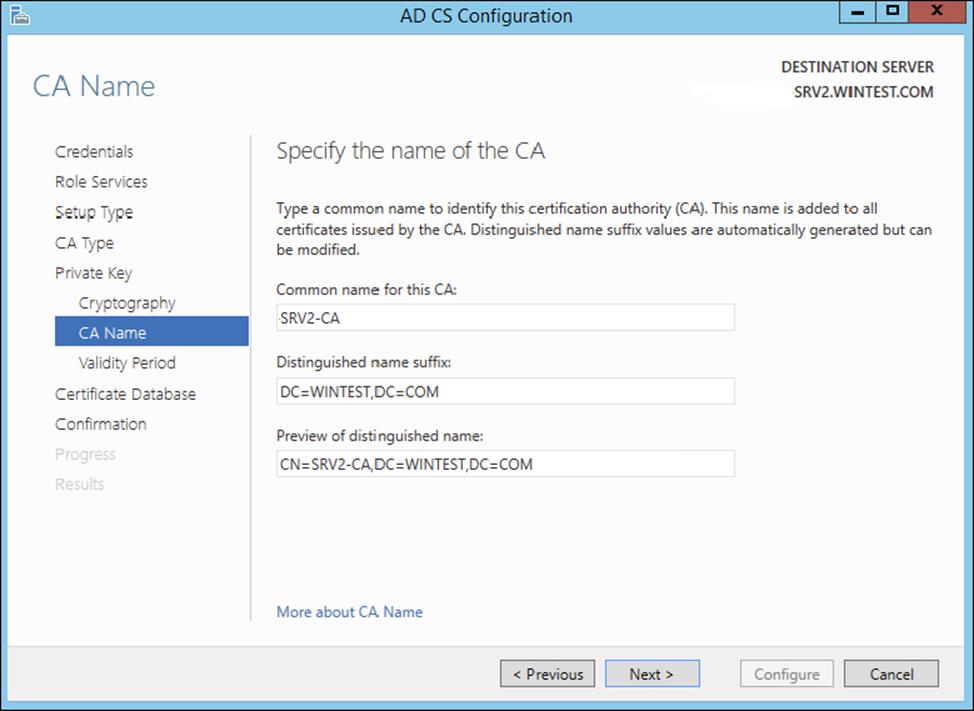
Figure 6.3 Specifying the name of the CA
The CA name does not have to be the computer’s name. Changing the name after installing Active Directory Certificate Services (AD CS) will invalidate every certificate issued by the CA.
Group Policy Certificate Auto-enrollment
Many certificates can be distributed without the client interaction. These can include most types of certificates issued to computers and services, as well as many certificates issued to users.
To enroll clients automatically for certificates in a domain environment, you must do the following:
§ Configure a certificate template with auto-enroll permissions
§ Configure an auto-enrollment policy for the domain
Membership in Domain Admins or Enterprise Admins, or equivalent, is the minimum required to complete this procedure. In Exercise 6.3 we are going to configure a group policy to support the auto-enrollment feature.
Exercise 6.3: Configure an Auto-enrollment Group Policy for a Domain
1. On a domain controller running Windows Server 2008 R2 or Windows Server 2008, click Start ![]() Administrative Tools
Administrative Tools ![]() Group Policy Management.
Group Policy Management.
2. In the console tree, double-click Group Policy Objects in the forest and domain containing the Default Domain Policy Group Policy object (GPO) that you want to edit.
3. Right-click the Default Domain Policy GPO and click Edit.
4. In the Group Policy Management Console (GPMC), go to User Configuration ![]() Windows Settings
Windows Settings ![]() Security Settings and click Public Key Policies.
Security Settings and click Public Key Policies.
5. Double-click Certificate Services Client – Auto-Enrollment.
6. Select the Enroll Certificates Automatically check box to enable auto-enrollment. If you want to block auto-enrollment from occurring, select the Do Not Enroll Certificates Automatically check box.
7. If you are enabling certificate auto-enrollment, you can select the following check boxes:
“Renew expired certificates, update pending certificates, and remove revoked certificates enables auto-enrollment for certificate renewal, issuance of pending certificate requests, and the automatic removal of revoked certificates from a user’s certificate store.”
“Update certificates that use certificate templates enables auto-enrollment for issuance of certificates that supersede issued certificates.”
8. Click OK to accept your changes.
Key-Based Renewal for Non-Domain-Joined Computers
Windows Server 2012 R2 combines automatic certificate renewal with AD CS Certificate Enrollment Web Services to enable non-domain-joined computers to renew their certificates automatically before they expire like Internet-facing web servers.
Many organizations and service providers maintain servers that require SSL certificates. These servers are not typically joined to the same domain as an issuing certificate authority, and they do not have identity records or accounts in the organization’s Active Directory. This means they cannot benefit from today’s automatic certificate renewal, which is based on secured certificate templates in Active Directory. As a result, these organizations manage and renew SSL certificates manually, a time-intensive and error-prone process. Neglecting to renew a single SSL certificate can cause a massive and costly system outage.
Currently, Certificate Enrollment Web Services supports three types of server-side authentication modes:
§ Windows integrated (Kerberos)
§ Certificate-based
§ Username and password
These authentication mode options, however, are not viable choices when the client is not joined to a domain and the enterprise certificate authority makes authorization decisions using templates that are based on the Active Directory group membership of the requestor.
Consider the following authentication options for automatic renewal:
Windows Integrated This authentication option is not suitable for auto renewal because the two domains to which the certificate authority and the requesting server belong do not have a trust relationship between them or the requesting server is not joined to any domain.
Certificate-Based The initially enrolled server certificate is not suitable for authentication because it contains no identity information within it that can be mapped to a directory account object.
Username And Password Usernames and passwords can be cached within the system’s identity vault and used for authentication to the enrollment server. However, passwords usually have shorter lifetimes than server SSL certificates. (Both default and recommended settings for passwords are shorter than the default and recommended certificate lifetime.) Thus, by the time renewal happens, the password will likely have changed.
Anonymous This authentication option is not suitable since MS CEP and CES do not support this option, making automatic renewal impossible for these targeted server systems.
Enforcement of Certificate Renewal with Same Key
Windows 8/8.1 and Windows Server 2012 R2 provide an efficient mechanism to increase the security of renewing hardware-based certificates. This is accomplished by enforcing the certificate renewal to occur for the same key. This guarantees the same assurance level for the key throughout its life cycle. Additionally, Windows Server 2012 R2’s Certificate Template Management Console supports CSP/KSP ordering that clients may choose for generating a private/public key pair. This way, you can give a higher priority to hardware-based keys (Trusted Platform Module or smart card) over software-based keys.
Cryptographic Service Provider/Key Service Provider Ordering
Another problem addressed in Windows Server 2012 R2 is GUI support for CSP/KSP ordering. With increased interest in the deployment of Trusted Platform Module in enterprise scenarios, providing a mechanism for prioritizing TPM-based keys over other types of keys has become a “must-have” for certificate enrollment based on certificate templates. This is important from the client perspective when enrolling for a non-exportable key. You want to have assurance that the non-exportable keys are generated in the TPM and are not software-based (assuming that no malware is involved and the user is not malicious).
Currently this prioritization is captured as an attribute of a certificate template object in Active Directory; however, a user interface does not exist for modifying such properties, and Microsoft does not support it. Windows Server 2012 R2’s Certificate Template Management Console fully supports CSP/KSP ordering.
Managing Certificate Authority: Certificate Templates Overview
Enterprise certificate authorities issue certificates from certificate templates, a preconfigured list of certificate settings. This allows administrators to enroll users and computers for certificates without the need to create complex certificate requests. Windows Server 2012 AD CS does include a minor user interface change and the Active Directory Certificate Services Administration module for Windows PowerShell. The new Compatibility tab in the Certificate Templates Management Console lets you identify incompatible certificate template settings between different versions of Windows-based certificate recipients and the certificate authority. The AD CS Administration module for Windows PowerShell lets you manage common AD CS management tasks using Windows PowerShell.
Certificate Template Compatibility
Multiple versions of certificate templates have been released for the family of Windows Server products. New certificate template versions include settings that control the features relevant to each new certificate authority. However, not all features are compatible with all certificate authorities and certificate requests. Therefore, it can be difficult to determine which certificate templates are compatible with different versions of certificate authorities and different Windows-based certificate requestors.
Version 2 certificate templates are customizable certificate templates that are supported with Windows Server 2008 Enterprise CAs or Windows Server 2003 Enterprise edition CAs. Version 2 certificate templates enable advanced CA features, such as key archiving and recovery and certificate auto-enrollment.
To use version 2 templates, Active Directory must be upgraded to support Windows Server 2008 or Windows Server 2003 schema changes. Standard editions of Windows Server 2008 and Windows Server 2003 support only version 1 certificate templates, which are not customizable and do not support key archival or automatic enrollment.
Version 3 certificate templates were new to Windows Server 2008. Version 3 certificate templates function similarly to version 2 templates, and they support new Active Directory Certificate Services features available in Windows Server 2008. These features include CNG, which introduces support for Suite B cryptographic algorithms such as elliptic curve cryptography (ECC).
The Windows Server 2012 R2 Certificate Template Management Console includes a new certificate template Compatibility tab that lets you select the Windows operating system of the certificate authority and the Windows operating system of the certificate recipient. The Certificate Template Management Console determines incompatible settings between the selections and shows a list of template settings that the management console adds or removes from template selection.
You view the compatibility table from the Certificate Template Management Console. You can launch the Certificate Template Management Console by typing certtmpl.msc in the Run dialog or on the Start screen and pressing Enter.
Creating Certificate Templates
When creating a new certificate template, you copy an existing template similar to the configuration defaults needed for your particular application. It is best to review the default list of certificate template and find the template that best matches your application’s requirements.
The Request Handling tab (Figure 6.4) in the Certificate Templates Management console has the Renew With Same Key Certificate Template Configuration option. This certificate template option becomes visible in the user interface when you configure the Certification Authority and the Certificate Recipient options to Windows Server 2012 R2 and Windows 8/8.1, respectively.

Figure 6.4 Request Handling tab of the Certificate Templates Management console
You will create an example certificate template in Exercise 6.4.
Exercise 6.4: Creating a Certificate Template
1. Start the Certificate Templates snap-in, read through the certificate templates titles, and choose the Computer Template.
2. In the details pane, right-click an existing certificate and click Duplicate Template.
3. Choose to duplicate the template as a Windows Server 2008–based template.
4. On the General tab, enter the template display name and the template name and click OK.
5. Define any additional attributes for the newly created certificate template.
Publishing the Certificate Template
After creating a certificate template and applying the proper security permissions, you will want to deploy the new certificate template by publishing to the Active Directory where it can be shared with other Enterprise CAs. The following exercise will take us through the steps to perform the task.
In Exercise 6.5, you will deploy a certificate template.
Exercise 6.5: Publishing a Certificate Template
1. In Server manager, click Tools and then Certification Authority
2. In the Certification Authority MMC, expand the CA Server Name
3. Select the Certificate Templates container.
4. Right-click Certificate Templates container and then click New Certificate Template To Issue.
5. In the Enable Certificate Templates dialog box, select the certificate template or templates that you want the CA server to issue and click OK. The newly selected certificate template or templates should appear in the right side details pane.
If a certificate template is not displayed in the Enable Certificate Templates dialog box, the replication of the certificate template may not have finished on all domain controllers in the forest.
Certificate Revocation
Revocation renders a certificate invalid and lists the revoked certificate in the CRL. You can revoke a certificate in the Certificate Authority snap-in with the steps shown in Exercise 6.6.
Exercise 6.6: Revoking a Certificate
1. Start the Certification Authority snap-in.
2. In the console tree, click the Issuing certificate container.
3. In the right pane, select and right-click the target certificate.
4. Select All Tasks.
5. Select Revoke Certificate.
6. In Certificate Revocation dialog box, you must select one of the following reason codes:
1. Unspecified: Default reason code. This lacks information during future audits.
2. Key Compromise: Select this when you think the key has been compromised.
3. CA Compromise: Select this when you suspect the issuing CA of being compromised.
4. Change of Affiliation: Select this when the person has exited the organization or changed roles.
5. Superseded: Select this when issuing a new certificate to replace an existing certificate.
6. Cease of Operation: Select this when the issuing device or server has been decommissioned.
7. Certificate Hold: Select this to suspend an existing certificate temporarily.
7. Click OK.
Display the Current Site Name for Certificate Authorities
Enter the following command to display current site names for one or more certificate authorities:
Certutil -ping caDnsName, [caDnsName, ...]
The command utilizes the DsGetSiteName API on each named certificate authority. After determining the site for all the certificate authorities, certutil.exe uses the DsQuerySitesByCost API to obtain the client’s site costs for all the name certificate authorities.
CA Policy Auditing
PKI auditing logging is not enabled on the Windows 2012 R2 CA server by default. After the auditing is enabled, all the events will be logged in the Security log.
Exercise 6.7 covers the steps that the CA administrator must complete to enable auditing.
Exercise 6.7: Configuring CA Policy Auditing
1. Enable Object Access/Success Auditing in the CA machine’s local security policy.
a. Start mmc.exe.
b. Add the snap-in Group Policy Object Editor and select the Local Computer GPO.
c. Under the path Computer Configuration\Windows Settings\Security Settings\Local Policies\Audit Policy, enable success auditing for Object Access.
2. Enable auditing on the CA.
a. Start the CA Management snap-in.
b. Open the CA Properties dialog.
c. On the Auditing tab, check the Change CA Configuration and Change CA Security Settings options.
Backing Up the Certificate Authority Server
The AD CS certificate authority deployment creates a database. The CA records certificates issued by the CA, private keys archived by the CA, revoked certificates, and all certificate requests to the database regardless of issuance status.
Configure the database location on an NTFS partition on the server’s disk drives to provide the best security possible for the database file. Specify the location for the database in the Certificate Database Location box. By default, the wizard configured the database location to systemroot\system32\certlog. The name of the database file uses the CA’s name, with an .edb extension.
The certificate database uses a transaction log to ensure the integrity of the database. The CA records its transactions in its configured log files. The CA then commits each transaction from the log file into the database. The CA then updates the last committed transaction in the database, and the process continues.
The CA database logs are selected when restoring the CA from a backup. If a CA is restored from a backup that is one month old, then the CA database can be updated with more recent activity recorded in the log to restore the database to its most current state. When you back up a CA, the existing certificate database logs are truncated in size because they are no longer needed to restore the certificate database to its most current state.
The recommended method to back up a CA is to leverage the native Backup utility (included with the operating system) to back up the entire server, including the system state, which contains the CA’s data. However, the Certificate Authority snap-in can be used to back up and restore the CA, but this backup method is intended only in cases where you want to migrate CA data to different server hardware. The public key and private key are backed up or restored using the PKCS #12 PFX format.
The Backup Or Restore Wizard will ask you to supply a password when backing up the public and private keys and CA certificates. This password will be needed to restore the CA.
Start the Certificate Authority snap-in for Exercise 6.8, which explains how to back up a CA.
Exercise 6.8: Backing Up the Certificate Authority Server
1. Start the Certification Authority MMC.
2. In the left pane, right-click the name of the server; then choose All Tasks > Back Up CA.
3. When the Certification Authority Backup Wizard appears, click Next.
4. At the Items To Back Up screen, click the Private Key And CA Certificate check box. Next to the Back Up To This Location field, click the Browse button. Choose a location for your backup and click OK. Click Next.
5. At the Select A Password screen, enter and confirm a password. For this exercise, enter P@ssw0rd. Click Next.
Configuring and Managing Key Archive and Recovery
The key archive stores a certificate’s subject name, public key, private key, and supported cryptographic algorithms in its CA database. This procedure can be performed manually or automatically, depending on the configuration. If the certificate template requires key archiving, then the process requires no manual intervention. However, key archiving can also be performed manually if the private key is exported and then sent to an administrator for import into the CA database.
There is also a Key Recovery Agent template available in the standard templates within Active Directory Certificate Services. The Key Recovery Agent template enables Domain Admins and Enterprise Admins to export private keys. Additionally, you can add other accounts and groups to have the necessary permissions (Read and Enroll) through the Security tab of the template.
The Key Recovery Agent template also needs to be enabled, as with other certificate templates, through the Certification Authority tool by selecting Certificate Template To Issue. See “Publishing a Certificate Template” earlier in this chapter for more details on enabling a certificate template on a CA.
With the Key Recovery Agent template in place, the following process must take place for key archiving and recovery:
1. Request a key recovery agent certificate using the Certificates snap-in.
2. Issue the key recovery agent certificate using the Certification Authority tool.
3. Retrieve the enrolled certificate using the Certificates snap-in.
4. Configure the CA for key archiving and recovery.
The final step, configuring the CA for key archiving and recovery, takes place in the Properties dialog box of each CA that will need to archive and recover keys. Specifically, the Recovery Agents tab configures the behavior of the CA when a request includes key archiving.
Each Key Recovery Agent certificate should be added using the Add button on the Recovery Agents tab.
Implement Active Directory Federation Services
Active Directory Federation Services (AD FS) demands a great deal of preparation and planning to ensure a successful implementation. The type of certificate authority used to sign the AD FS server’s certificate must be planned. The SSL encryption level must be negotiated with the partnering organization. For instance, how much Active Directory information should be shared with the partnering organization? What should the DNS structure look like to support federation communications? You must explore all of these questions before implementing AD FS. In this section, I will discuss how to deploy AD FS and the configurations used to set up a federated partnership between businesses.
What Is a Claim?
A claim is an identifiable element (email address, username, password, and so on) that a trusted source asserts about an identity, for example, the SID of a user or computer. An identity can contain more than one claim, and any combination of those claims can be used to authorize access to resources.
Windows Server 2012 R2 extends the authorization identity beyond using the SID for identity and enables administrators to configure authorization based on claims published in Active Directory.
Today, the claims-based identity model brings us to cloud-based authentication. One analogy to the claim-based model is the old airport check-in procedure.
1. You first check in at the ticket counter.
2. You present a suitable form of ID (driver’s license, passport, credit card, and so on). After verifying that your picture ID matches your face (authentication), the agent pulls up your flight information and verifies that you’ve paid for a ticket (authorization).
3. You receive a boarding pass (token). The boarding pass lets the gate agents know your name and frequent flyer number (authentication and personalization), your flight number and seating priority (authorization), and more. The boarding pass has bar-code information (certificate) with a boarding serial number proving that the boarding pass was issued by the airline and not a (self-signed) forgery.
Active Directory Federation Service is Microsoft’s claims-based identity solution providing browser-based clients (internal or external to your network) with transparent access to one or more protected Internet-facing applications.
When an application is hosted in a different network than the user accounts, users are occasionally prompted for secondary credentials when they attempt to access the application. These secondary credentials represent the identity of the users in the domain where the application is hosted. The web server hosting the application usually requires these credentials to make the most proper authorization decision.
AD FS makes secondary accounts and their credentials unnecessary by providing trust relationships that send a user’s digital identity and access rights to trusted partners. In a federated environment, each organization continues to manage its own identities, but each organization can also securely send and accept identities from other organizations. This seamless process is referred to as single sign-on (SSO).
Windows Server 2012 R2 AD FS federation servers can extract Windows authorization claims from a user’s authorization token that is created when the user authenticates to the AD FS federation server. AD FS inserts these claims into its claim pipeline for processing. You can configure Windows authorization claims to pass through the pipeline as is, or you can configure AD FS to transform Windows authorization claims into a different or well-known claim type.
Claims Provider
A claims provider is a federation server that processes trusted identity claims requests. A federation server processes requests to issue, manage, and validate security tokens. Security tokens consist of a collection of identity claims, such as a user’s name or role or an anonymous identifier. A federation server can issue tokens in several formats. In addition, a federation server can protect the contents of security tokens in transmission with an X.509 certificate.
For example, when a Stellacon Corporation user needs access to Fabrikam’s web application, the Stellacon Corporation user must request claims from the Stellacon Corporation AD FS server claim provider. The claim is transformed into an encrypted security token, which is then sent to Fabrikam’s AD FS server.
Relying Party
A relying party is a federation server that receives security tokens from a trusted federation partner claims provider. In turn, the relying party issues new security tokens that a local relying party application consumes. In the prior example, Fabrikam is the relying party that relies on the Stellacon’s claim provider to validate the user’s claim. By using a relying-party federation server in conjunction with a claims provider, organizations can offer web single sign-on to users from partner organizations. In this scenario, each organization manages its own identity stores.
Endpoints
Endpoints provide access to the federation server functionality of AD FS, such as token issuance, information card issuance, and the publishing of federation metadata. Based on the type of endpoint, you can enable or disable the endpoint or control whether the endpoint is published to AD FS proxies.
Table 6.3 describes the property fields that distinguish the various built-in endpoints that AD FS exposes. The table includes the types of endpoints and their methods of client authentication. Table 6.4 describes the AD FS security modes.
Table 6.3 AD FS Endpoints
|
Name |
Description |
|
WS-Trust 1.3 |
An endpoint built on a standard Simple Object Access Protocol (SOAP)–based protocol for issuing security tokens. |
|
WS-Trust 2005 |
An endpoint built on a prestandard, SOAP-based protocol for issuing security tokens. |
|
WS-Federation Passive/SAML Web SSO |
An endpoint published to support protocols that redirect web browser clients to issue security tokens. |
|
Federation Metadata |
A standard-formatted endpoint for exchanging metadata about a claims provider or a relying party. |
|
SAML Artifact Resolution |
An endpoint built on a subset of the Security Assertion Markup Language (SAML) version 2.0 protocol that describes how a relying party can access a token directly from a claims provider. |
|
WS-Trust WSDL |
An endpoint that publishes WS-Trust Web Services Definition Language (WSDL) containing the metadata that the federation service must be able to accept from other federation servers. |
|
SAML Token (Asymmetric) |
The client accepts a SAML token with an asymmetric key. |
Table 6.4 AD FS Security Modes
|
Name |
Description |
|
Transport |
The client credentials are included at the transport layer. Confidentiality is preserved at the transport layer (Secure Sockets Layer [SSL]). |
|
Mixed |
The client credentials are included in the header of a SOAP message. Confidentiality is preserved at the transport layer (SSL). |
|
Message |
The client credentials are included in the header of a SOAP message. Confidentiality is preserved by encryption inside the SOAP message. |
Claim Descriptions
Claim descriptions are claim types based on an entity’s or user’s attribute like a user’s email address, common name or UPN. AD FS publishes these claims types in the federation metadata and most common claim descriptions are pre-configured in the AD FS Management snap-in.
The claim descriptions are published to federation metadata which is stored in the AD FS configuration database. The claim descriptions include a claim type URI, name, publishing state, and description.
Claim Rules
Claim rules define how AD FS processes a claim. The most common rule is using a user’s email address as a valid claim. The email address claim is validated through the partner’s Active Directory email attribute for the user’s account. If there is a match, the claim is accepted as valid.
Claim rules can quickly evolve into more complex rules with more attributes such as a user’s employee ID or department. The key goal of claim rules is to process the claim in a manner that validates the user’s claim and to assemble a user’s profile information based on a sufficient number of attributes to place the user into a role or group.
The Attribute Store
Attribute stores are the repositories containing claim values. AD FS natively supports Active Directory by default as an attribute store. SQL Server, AD LDS, and custom attribute stores are also supported.
AD FS Role Services
The AD FS server role includes federation, proxy, and web agent services. These services enable the following:
§ Web SSO
§ Federated web-based resources
§ Customizing the access experience
§ Managing authorization to access applications
Based on your organization’s requirements, you can deploy servers running any one of the following AD FS role services:
Active Directory Federation Service Microsoft federation solution for accepting and issuing claims based token for users to experience a single sign-on to a partnered web application.
Federation Service Proxy The Federation Service Proxy forwards user claims over the internet or DMZ using WS-Federation Passive Requestor Profile (WS-F PRP) protocols to the internal ADFS farm. Only the user credential data is forwarded to the Federation Service. All other datagram packets are dropped.
Claims-Aware Agent The claims-aware agent resides on a web server with a claims-aware application to enable the Microsoft ASP.NET application to accept AD FS security token claims.
Windows Token-Based Agent The Windows token-based agent resides on a web server with a Windows NT token-based application to translate an AD FS security token to an impersonation-level Windows NT token-based authentication.
What’s New for AD FS in Windows Server 2012 R2?
The Active Directory Federation Services role in Windows Server 2012 R2 introduces the following new features:
§ HTTP.SYS
§ Server Manager integration
§ AD FS deployment cmdlets in the AD FS module for Windows PowerShell
§ Interoperability with Windows authorization claims
§ Web proxy service
HTTP.SYS
Prior AD FS versions relied on IIS components for the AD FS claim functions. Microsoft has improved the overall claims handling performance and SSO customization by building the AD FS 3.0 code on top of the standard kernel mode driver—HTTP.SYS. This approach also avoids the huge security “no-no” of hosting IIS on a domain controller.
The classic netsh HTTP command can be entered to query and configure HTTP.SYS. AD FS proxy server introduces interesting deployment nuisances and “gotchas” with HTTP.SYS, which I will discuss in the “Web Proxy Service” section.
Improved Installation Experience
The installation experience for Active Directory Federation Services 3.0 was cumbersome, requiring multiple hotfixes, as well as .NET Framework 3.5, Windows PowerShell, and the Windows Identity Foundation SDK. Windows Server 2012 R2’s AD FS role includes all of the software you need to run AD FS for an improved installation experience.
Web Proxy Service
The kernel mode (HTTP.SYS) in Windows Server 2012 R2 includes server name indication (SNI) support configuration. I strongly recommend verifying that your current load balancer/reverse proxy firmware supports SNI. This prerequisite is a sore spot for most AD FS 3.0 upgrade projects in the field. Therefore, it’s worthwhile checking the following:
§ Your preferred load balancer/device needs to support SNI.
§ Clients and user agents need to support SNI and should not become locked out of authentication.
§ All SSL termination endpoints vulnerable to the recent heartbleed bug (http://heartbleed.com) need to be patched, exposing OpenSSL libraries and certificates.
AD FS Dependency Changes in Windows Server 2012 R2
Active Directory Federation Services was built on a claim-based identity framework called Windows Identity Foundation (WIF). Prior to Windows Server 2012 R2, WIF was distributed in a software development kit and the .NET runtime. WIF is currently integrated into version 4.5 of the .NET Framework, which ships with Windows Server 2012 R2.
Windows Identity Foundation
WIF is a set of .NET Framework classes; it is a framework for implementing claims-based identity for applications. Any web application or web service that uses .NET Framework version 4.5 or newer can run WIF.
New Claims Model and Principal Object
Claims are at the core of .NET Framework 4.5. The base claim classes (Claim, ClaimsIdentity, ClaimsPrincipal, ClaimTypes, and ClaimValueTypes) all live directly in mscorlib. Interfaces are no longer necessary to plug claims in the .NET identity system.WindowsPrincipal, GenericPrincipal, and RolePrincipal now inherit from ClaimsPrincipal, WindowsIdentity, and GenericIdentity, and FormsIdentity now inherit from ClaimsIdentity. In short, every principal class will now serve claims. The integration classes and interfaces (WindowsClaimsIdentity, WindowsClaimsPrincipal, IClaimsPrincipal, and IClaimsIdentity) have thus been removed. The ClaimsIdentity object model also contains various improvements, which makes it easier to query the identity’s claims collection.
As you climb further up “Mount Federation,” you will realize that not all vendor SAML flavors are compatible, and configuration challenges can bring even the most seasoned system integrators to their knees. SAML deserves an entire book, so to avoid this chapter reaching encyclopedia size, I will touch on just a few pointers.
AD FS negotiates SAML authentication in order of security strength from the weakest to the strongest, as shown in Table 6.5. The default mode, Kerberos, is considered the strongest method. The authentication precedence can be tuned by executing the PowerShell command Set-AD FSProperties –AuthenticationContextOrder to select an order to meet your organization’s security requirements.
Table 6.5 SAML-supported authentication methods
|
Authentication method |
Authentication context class URI |
|
Username/password |
urn:oasis:names:tc:SAML:3.0:ac:classes:Password |
|
Password-protected transport |
urn:oasis:names:tc:SAML:3.0:ac:classes:PasswordProtectedTransport |
|
Transport Layer Security (TLS) Client |
urn:oasis:names:tc:SAML:3.0:ac:classes:TLSClient |
|
X.509 certificate |
urn:oasis:names:tc:SAML:3.0:ac:classes:X509 |
|
Integrated Windows authentication |
urn:federation:authentication:windows |
|
Kerberos |
urn:oasis:names:tc:SAML:3.0:classes:Kerberos |
Active Directory Federation Services Installation
This section describes how to install and deploy Active Directory Federation Services roles on computers running Windows Server 2012 R2 (see Exercise 6.9). You will learn about the following:
§ Deploying AD FS role services using Windows PowerShell
§ Supporting upgrade scenarios for AD FS
Exercise 6.9: Installing the AD FS Role on a Computer Using Server Manager
1. Start Server Manager.
2. Click Manage and click Add Roles And Features. Click Next.
3. The Add Roles And Features Wizard shows the Before You Begin screen. Click Next.
4. Click Role-Based Or Feature-Based Installation on the Select Installation Type screen. Click Next.
5. Click the server on which you want to install Active Directory Federation Services from the Server Pool list on the Select Destination Server screen. Click Next.
6. Select the Active Directory Federation Services check box on the Select Server Roles screen. Server Manager will prompt you to add other features associated with this role, such as management tools. Leave the default selections. Click Add Features to close the dialog.
7. Click Next on the Select Server Roles screen.
8. Click Next on the Select Features screen.
9. Server Manager shows the Active Directory Federation Services screen. This screen displays simple role introduction and important AD FS configuration information. Click Next.
10.From the Select Server Roles screen, select the check box next to the AD FS role services to install on the computer. Click Next.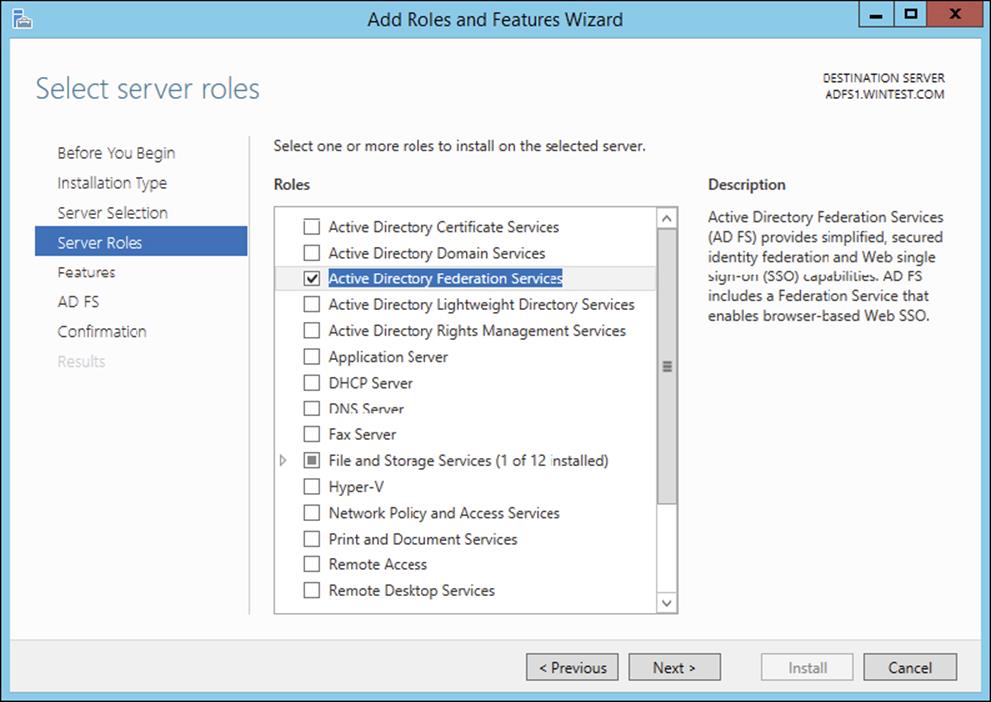
11.Server Manager prompts you to add other features associated with this role, such as management tools. Leave the default selections. Click Add Features to close the dialog.
12.Read the Confirm Installation Selections screen. This screen provides a list of roles, role services, and features that the current installation prepares on the computer. Click Install to begin the installation.
Role Installation Using Windows PowerShell
To view the installation state of AD FS using Windows PowerShell, open an elevated Windows PowerShell console, type the following command, and press Enter:
Get-WindowsFeature "adfs*","*fed*"
Upgrading to Windows AD FS 2012 R2
Windows Server 2012 R2’s AD FS role supports upgrading version 3.0 of Active Directory Federation Services. You cannot upgrade versions of AD FS prior to version 3.0 using Windows Server 2012 R2.
Table 6.6 represents the support upgrade matrix for the AD FS role in Windows Server 2012 R2.
Table 6.6 Support upgrade matrix for the AD FS role in Windows Server 2012 R2
|
AD FS and operating system version |
Windows Server 2012 R2 upgrade supported |
|
AD FS 3.0 running on Windows Server 2008 |
Yes |
|
AD FS 3.0 running on Windows Server 2008 R2 |
Yes |
|
AD FS 3.0 Proxy running on Windows Server 2008 |
Yes |
|
AD FS 3.0 Proxy running on Windows Server 2008 R2 |
Yes |
|
AD FS 1.1 running on Windows Server 2008 |
No |
|
AD FS 1.1 running on Windows Server 2008 R2 |
No |
|
AD FS 1.1 Proxy running on Windows Server 2008 |
No |
|
AD FS 1.1 Proxy running on Windows Server 2008 R2 |
No |
|
AD FS 1.1 Web Agents on Windows Server 2008 or Windows Server 2008 R2 |
Yes |
Configuring Active Directory Federation Services
Windows Server 2012 R2 delineates role installation and role deployment. Role installations make staged role services and features available for deployment. Role deployment enables you to configure the role service, which enables the role service in your environment. AD FS in Windows Server 2012 R2 uses the same deployment tools as AD FS 3.0. However, an entry point to start these tools is included in Server Manager. Server Manager indicates that one or more role services are eligible for deployment by showing an exclamation point inside a yellow triangle on the Action Flag notification. Click the action flag to show the role services you can deploy (see Figure 6.5).
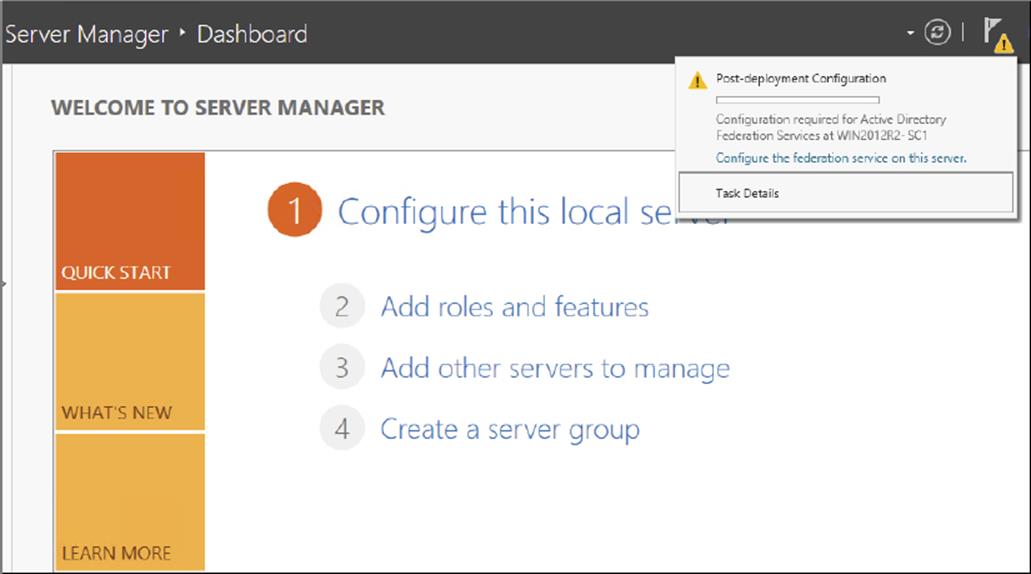
Figure 6.5 Alert for role services eligible for deployment in Server Manager
AD FS Graphical Deployment
The Run The AD FS Management snap-in link in Windows Server 2012 R2 Server Manager is how you perform the initial configuration for the AD FS roles using the graphical interface. Alternatively, you can start the AD FS management console using the AD FS Management tile on the Start screen. The Start screen tile points to the Microsoft.IdentityServer.msc file located in the c:\windows\adfs folder.
To configure AD FS, select Start ![]() Run and type FsConfigWizard.exe; alternatively, click the FsConfigWizard.exe file located in the c:\windows\adfs folder.
Run and type FsConfigWizard.exe; alternatively, click the FsConfigWizard.exe file located in the c:\windows\adfs folder.
Exercise 6.10 uses the AD FS Federation Server Configuration Wizard. To complete this exercise, you’ll need an active SSL certificate assigned to the server and a managed service account for AD FS service.
Exercise 6.10: Configuring the AD FS Role on the Computer Using Server Manager
1. Select Create The First Federation Server In The Federation Server Farm.
2. Select the administrative account with permissions to configure the AD FS server and click Next.
3. Select the server certificate from the SSL certificate drop-down list.
4. Select the AD FS service name from the drop-down list.
5. Type ADFS-Test in the federation service’s Display Name field and click Next.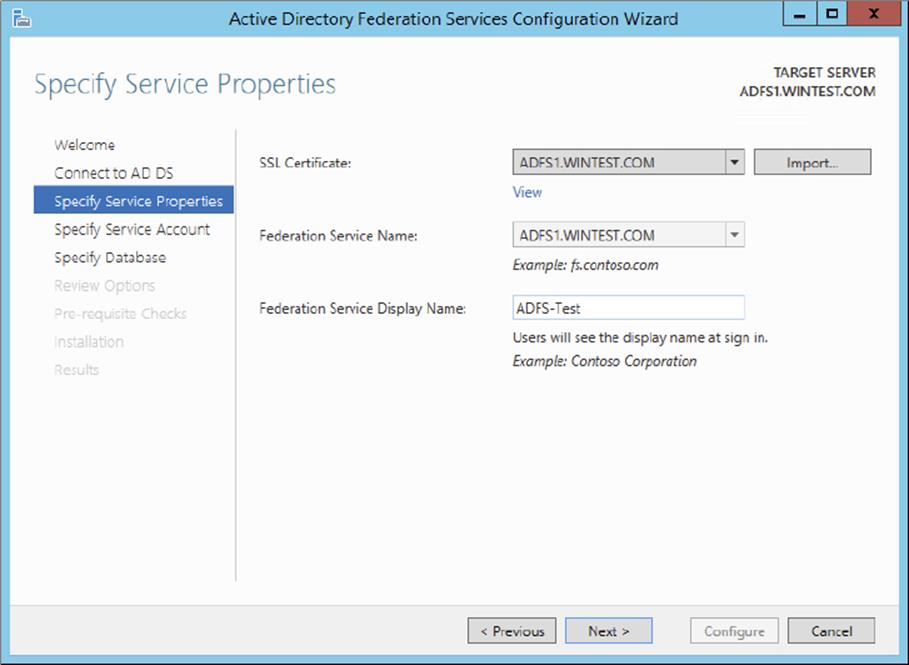
6. Select Create A Database On This Server Using Windows Internal Database and click Next.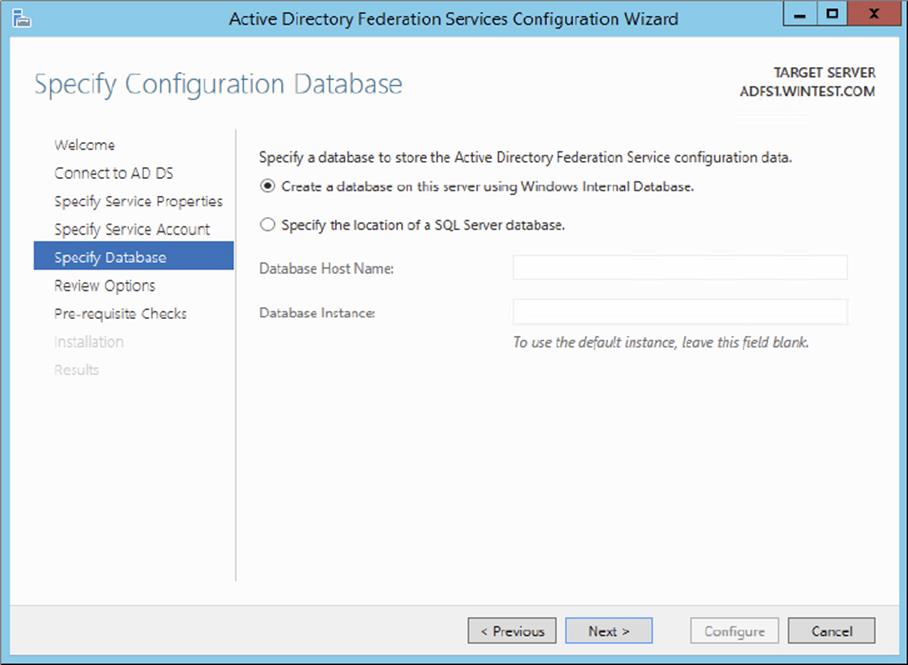
7. Click Next on the Review Options screen.
8. If the prerequisites check is successful, click Configure on the Prerequisite Check screen.
9. If the Result screen displays “This Server was successfully configured,” you can click Close.
Deployment Using Windows PowerShell
Windows Server 2012 R2 includes the Active Directory Federation Services module for Windows PowerShell when you install the AD FS role using Server Manager. The AD FS module for Windows PowerShell includes five new cmdlets to deploy the AD FS role.
§ Add-AdfsProxy
§ Add-AdfsFarmNode
§ Export-AdfsDeploymentSQLScript
§ Install-AdfsStand-alone
§ Install-AdfsFarm
These AD FS cmdlets provide the same functionality as the command-line version of the AD FS Federation Server Configuration Wizard, fsconfig.exe. The AD FS role in Windows Server 2012 R2 includes fsconfig.exe to remain compatible with previously authored deployment scripts. New deployments should take advantage of the deployment cmdlets included in the AD FS module for Windows PowerShell.
Add-AdfsProxy Configures a server as a federation server proxy.
FederationServiceName Specifies the name of the federation service for which a server proxies requests.
FederationServiceTrustCredentials Specifies the credentials of the Active Directory identity that is authorized to register new federation server proxies. By default, this is the account under which the federation service runs or an account that is a member of the Administrators group on the federation server.
ForwardProxy Specifies the DNS name and port of an HTTP proxy that this federation server proxy uses to obtain access to the federation service.
Add-AdfsFarmNode Adds this computer to an existing federation server farm.
CertificateThumbprint Specifies the value of the certificate thumbprint of the certificate that should be used in the SSL binding of the default website in IIS. This value should match the thumbprint of a valid certificate in the Local Computer certificate store.
OverwriteConfiguration Must be used to remove an existing AD FS configuration database and overwrite it with a new database.
SQLConnectionString Specifies the SQL Server database that will store the AD FS configuration settings. If not specified, AD FS uses Windows Internal Database to store configuration settings.
ServiceAccountCredential Specifies the Active Directory account under which the AD FS service runs. All nodes in the farm must have the same service account.
PrimaryComputerName Specifies the name of the primary federation server in the farm that this computer will join.
PrimaryComputerPort Specifies the value of the HTTP port that this computer uses to connect with the primary computer in order to synchronize configuration settings. Specify a value for this parameter only if the HTTP port on the primary computer is not 80.
Active Directory Federation Services Certificates
There are three types of certificates used by an AD FS implementation:
§ Service communications
§ Token decrypting
§ Token signing
The service communications certificate is required for communication with web clients over SSL and with web application proxy services using Windows Communication Foundation (WCF) components. This certificate is specified at configuration time for AD FS.
The token decrypting certificate is required to decrypt claims and tokens received by the federation service. The public key for the decrypting certificate is usually shared with relying parties and others to encrypt the claims and tokens using the certificate.
The token signing certificate is required to sign all claims and tokens created by the server. You can have multiple token encrypting and signing certificates for an implementation, and new ones can be added within the AD FS management tool, shown in Figure 6.6.
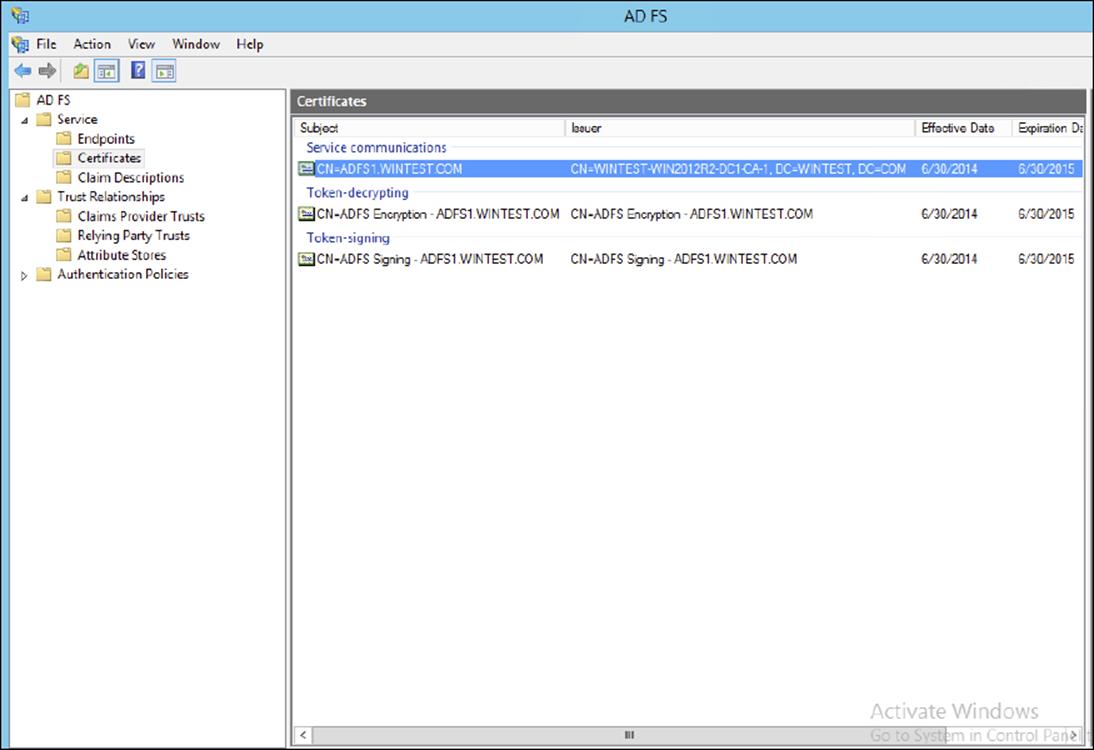
Figure 6.6 Active Directory Federation Certificate Console screen
Relying-Party Trust
The federation service name originates from the SSL certificate used for AD FS. The SSL certificate can be template-based and needs to be enrolled and used by IIS.
The next step in setting up AD FS is to configure a relying-party trust. A relying-party trust can be configured with a URL acquired from the relying party. The URL contains the federation metadata used to complete the federation trust configuration. The federation metadata may also be exported to a file that can then be imported into the relying-party trust. There is also a manual option for configuring a relying-party trust.
See Table 6.7 for the Federation Metadata fields.
Table 6.7 Federation Metadata Fields
|
Field |
Description |
|
Display Name |
This is the friendly display name given to this relying party trust. |
|
Profile |
Select AD FS Profile for the standard Windows Server 2012 AD FS, or select AD FS 1.0 And 1.1 Profile for AD FS configurations that need to work with older versions of AD FS. |
|
Certificate |
This is the optional certificate file from the relying party for token encryption. |
|
URL |
This is the URL for the relying party. WS-Federation Passive Protocol URL or SAML 2.0 WebSSO protocols are supported. |
|
Identifiers |
This is the unique identifier used for this trust. |
|
Authorization Rules |
Selecting this permits all users to access the relying party or denies all users access to the relying party, depending on the needs of this trust. |
Configuring Claims Provider and Transform Claims Rules
Claims provider trust rules are configured within the AD FS management console and are configured on a per-trust basis. Planning claims rules involves determining what claims are needed by the relying party to complete the authentication and authorization process and which users will need access to the relying-party trust. The relying party determines what claims need to be received and trusted from the claims provider.
Trust rules start with templates as the basis for the rule. There are different types of claims templates depending on the type of rule being used. The claims rule templates for transforms are described in Table 6.8.
Table 6.8 Transform claims rule templates
|
Template |
Description |
|
Send LDAP Attributes as Claims |
Attributes found in an LDAP directory (such as Active Directory) can be used as part of the claim. |
|
Send Group Membership as Claim |
The group memberships of the logged-in user are sent as part of the claim. |
|
Transform an Incoming Claim |
This is used for configuring a rule to change an incoming claim. Changes include both the type and the value of an incoming claim. |
|
Pass Through or Filter an Incoming Claim |
This performs an action such as pass-through or filter on an incoming claim based on certain criteria, as defined in the rule. |
|
Send Claims Using a Custom Rule |
This creates a rule that’s not covered by a predefined template, such as an LDAP attribute generated with a custom LDAP filter. |
Defining Windows Authorization Claims in AD FS
Windows Server 2012 R2 stores information that describes Windows authorization claims in the configuration partition of Active Directory. Windows refers to this information as claim types; however, Active Directory Federation Services typically refers to this information as claim descriptions (see Figure 6.7). There are more than 40 new claims descriptions available in the AD FS Windows Server 2012 R2 release.
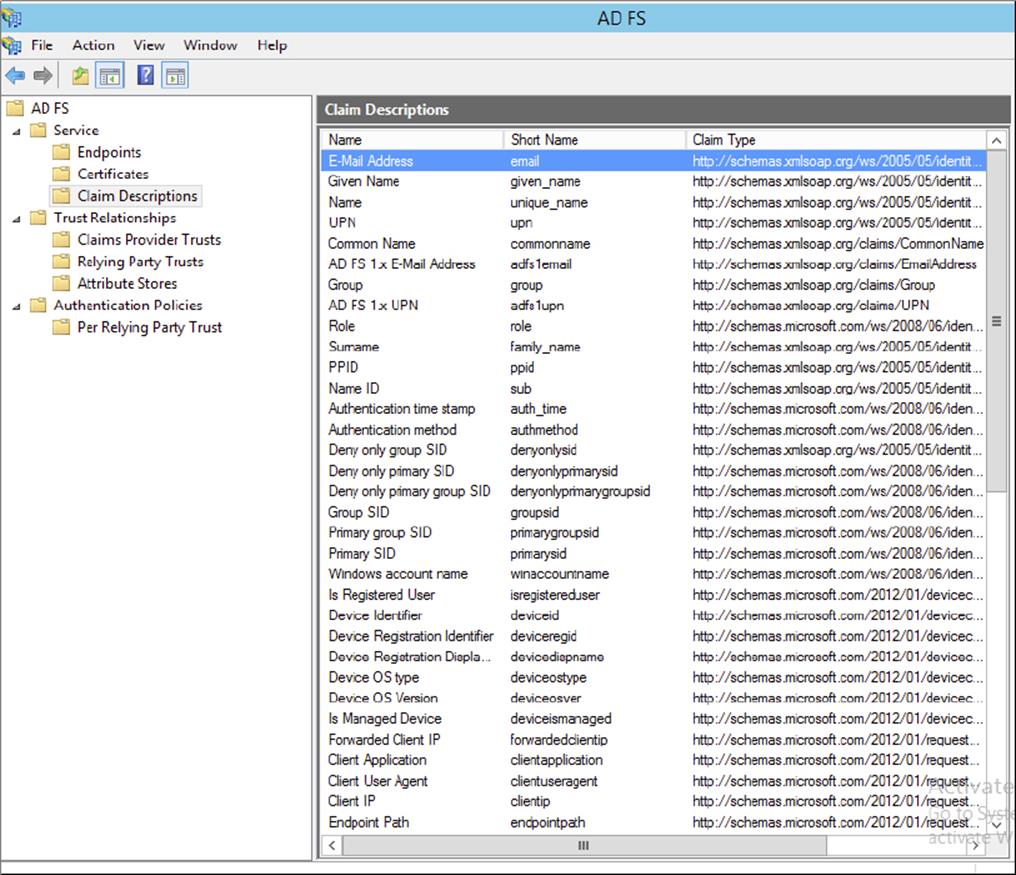
Figure 6.7 AD FS claim descriptions
The Active Directory Federation Services role included in Windows Server 2012 R2 lets you configure AD FS to include Windows authorization claims in the AD FS claim pipeline. To simplify this configuration, you can create claim descriptions in AD FS. Claim types in Windows authorization claims are analogous to claim descriptions in AD FS. The Windows authorization claim ID maps to the AD FS claim description’s claim identifier (see Figure 6.8).
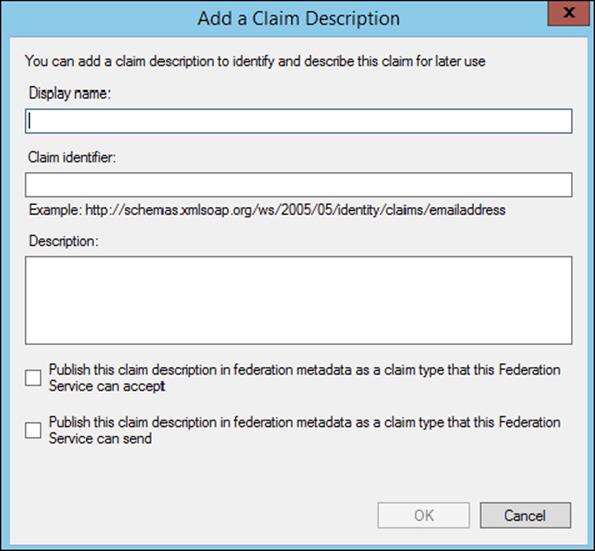
Figure 6.8 Adding a claim description
To simplify AD FS configuration using Windows authorization claims, create a claim description in AD FS for each Windows authorization claim you intend to deploy in AD FS.
Create Claim Pass-Through and Transformation Rules
You need to configure a claim rule with the Active Directory Claims Provider Trusts Wizard to insert Windows authorization claims into the AD FS claims pipeline.
Creating a claim description makes it easier to select the incoming claim type. Alternatively, you can type the claim type ID directly in the Incoming Claim Type list. A pass-through claim rule enables the Windows authorization claim to enter the AD FS claimpipeline. A pass-through claim leaves the claim type ID intact. Therefore, the pass-through claim ID begins with ad://ext, whereas most claim description URIs begin with http://. In addition, you can create a claim transformation claim rule on the Active Directory Claim Provider Trust Wizard to transform a Windows authorization claim into a well-known claim description (see Figure 6.9).
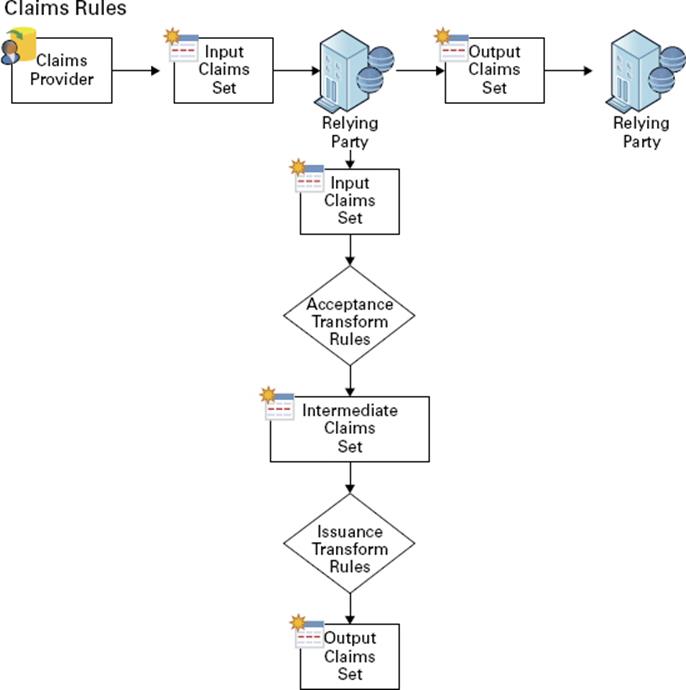
Figure 6.9 Claim transformation claim rule
Creating a claim provider trust claim rule enables the Windows authorization claim to enter the AD FS claim pipeline. However, this does not ensure that AD FS sends the Windows authorization claim. AD FS claim processing begins with the claim provider. This allows the claim to enter the pipeline. Claim processing continues for the targeted relying party—first with the issuance authorization rules and then with the issuance transform rules.
You can configure Windows authorization claims in claims rules configured on a relying party. By default, a relying party does not have any issuance transform rules. Therefore, AD FS drops all claims in the pipeline destined for a relying party when the relying party does not have any rules that pass incoming claims. Additionally, issuance authorization rules determine whether a user can receive claims for a relying party and, therefore, access the relying party.
Choose the claims types from the list of inbound rules created in the Active Directory claim provider trust that you want to send to the designated relying party. Then create rules that continue to pass the selected claim types through the pipeline to the relying party. Alternatively, you can create a rule that passes all the inbound claims to the relying party (see Figure 6.10).
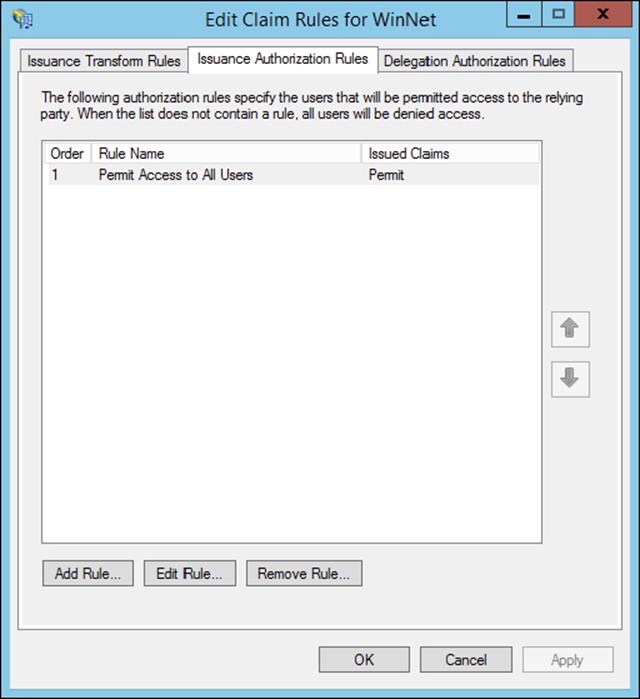
Figure 6.10 Editing the claims rules
The AD FS role in Windows Server 2012 R2 cannot provide claim information when the incoming authentication is not Kerberos. Clients must authenticate to AD FS using Kerberos authentication. If Windows authorization claims are not entering the AD FS claim pipeline, then make sure the client authenticates to AD FS using Kerberos and the correct service principal name is registered on the computer/service account.
Enabling AD FS to Use Compound Authentication for Device Claims: Compound Authentication
Windows Server 2012 R2 enhances Kerberos authentication by introducing compound authentication. Compound authentication enables a Kerberos TGS request to include two identities: the identity of the user and the identity of the user’s device. Windows accomplishes compound authentication by extending Kerberos Flexible Authentication Secure Tunneling (FAST) or Kerberos armoring.
During normal Kerberos authentication, the Kerberos client requesting authentication for a service sends the ticket-granting service (TGS) a request for that service. Using Kerberos armoring, the TGS exchange is armored using the user’s ticket-granting ticket (TGT). Prior to sending the ticket-granting service reply (TGS-REP) to the client, the KDC checks the 0x00020000 bit in the value of the msDS-SupportedEncryptionTypes attribute of the security principal’s object running the service. An enabled bit means that the service can accept compound authentication. The KDC sends the TGS-REP, which includes the service’s ability to support compound authentication.
The Kerberos client receives the ticket-granting service TGS-REP that includes compound authentication information. The Kerberos client then sends another ticket-granting service request (TGS-REQ), with the difference being that this TGS-REQ is armored with the device’s TGT rather than the user. This allows the KDC to retrieve authentication information about the principal and the device.
The Active Directory Federation Services role included in Windows Server 2012 R2 automatically enables compound authentication when creating an AD FS web farm. During the creation of the first node in the farm, the AD FS configuration wizard enables the compound authentication bit on the msDS-SupportedEncryptionTypes attribute on the account that you designate to run the AD FS service. If you change the service account, then you must manually enable compound authentication by running the Set-ADUser -compoundIdentitySupported:$true Windows PowerShell cmdlet.
In Exercise 6.11, you will learn how to configure multifactor authentication.
Exercise 6.11: Configuring Multifactor Authentication
1. In the AD FS Management Console, traverse to Trust Relationships And Relying Party Trusts.
2. Select the relying party trust that represents your sample application (claimapp) and then either by using the Actions pane or by right-clicking this relying party trust, select Edit Claim Rules.
3. In the Edit Claim Rules For Claimapp window, select the Issuance Authorization Rules tab and click Add Rule.
4. In the Add Issuance Authorization Claim Rule Wizard, on the Select Rule Template screen, select Permit Or Deny Users Based On An Incoming Claim Rule Template and click Next.
5. On the Configure Rule screen, complete all of the following tasks and click Finish.
a. Enter a name for the claim rule, for example TestRule.
b. Select Group SID As Incoming Claim Type.
c. Click Browse, type in Finance for the name of your AD test group, and resolve it for the Incoming Claim Value field.
d. Select the Deny Access To Users With This Incoming Claim option.
e. In the Edit Claim Rules For Claimapp window, make sure to delete the Permit Access To All Users rule that was created by default when you created this relying party trust.
Verify Multifactor Access Control Mechanism
In this phase, you will verify the multifactor access control policy that you set up in the previous phase. You can use the following procedure to verify that a test AD user can access your sample application because the test account belongs to the Finance group. Conversely, you will use the procedure to verify that AD users who do not belong to the Finance group cannot access the sample application.
1. On your client computer, open a browser window and navigate to your sample application: https://webserv1.contoso.com/claimapp. This action automatically redirects the request to the federation server, and you are prompted to sign in with a username and password.
2. Type in the credentials of a test AD account to be granted access to the application.
3. Type in the credentials of another test AD account that does not belong to the Finance group.
At this point, because of the access control policy that you set up in the previous steps, an access denied message is displayed for an AD account that does not belong to the Finance group. The default message text is “You are not authorized to access this site. Click here to sign out, and sign in again or contact your administrator for permissions.” However, this text is fully customizable.
Workplace Join
Today’s employees are mobile and remote, working across a plethora of consumer platforms. The age of bring your own device (BYOD) is here to stay. CIOs, IT security workers, and administrators cringe at the idea of storing company data on unmanaged devices. The Workplace Join feature adds a safety measure to ensure that only registered devices have access to company data.
For Workplace Join to work, a certificate is placed on the mobile device. AD FS challenges the device as a claims-based authentication to applications or other resources without requiring administrative control of the device.
Device Registration Service
Workplace Join is supported by the Device Registration Service (DRS) included with the Active Directory Federation Services role in Windows Server 2012 R2. When a device is set up with Workplace Join, the DRS registers a device as an object in Active Directory and sets a certificate on the consumer device that is used to represent the device identity. The DRS is meant to be both internal and external facing.
DRS requires at least one global catalog server in the forest root domain. The global catalog server is needed to run the PowerShell cmdlet -Initialize-ADDeviceRegistration during AD FS authentication.
Workplace Join Your Device
For Workplace Join to succeed, the client computer must trust the AD FS SSL certificate. It must also be able to access and validate revocation information for the certificate from the CRL.
In Exercise 6.12, you will configure the DRS.
Exercise 6.12: Workplace Joining a Device
1. Start a Windows PowerShell command window and type Initialize-ADDevice Registration.
2. When prompted for a service account, type contoso\fsgmsa$. Now run the Windows PowerShell cmdlet.
Enable-AdfsDeviceRegistration
3. On the AD FS server, in the AD FS Management console, navigate to the Authentication Policies tab. Select Edit Global Primary Authentication. Select the Enable Device Authentication check box and click OK.
Finally, you will need to make sure you have the following DNS records for the DRS.
|
Entry |
Type |
Address |
|
adfs1 |
A |
IP address of the AD FS server |
|
enterpriseregistration |
Alias (CNAME) |
adfs1.contoso.com |
4. Log on to the client with your Microsoft account.
5. On the Start screen, start the Charms bar and then select the Settings charm. Select Change PC Settings.
6. On the PC Settings screen, select Network and click Workplace.
7. In the Enter Your UserID To Get Workplace Access Or Turn On Device Management box, type the user’s UPN or email address—for example, RobertM@contoso.com—and click Join.
8. When prompted for credentials, type the user’s UPN or email address—for example, roberth@contoso.com—and a password such as P@ssword. Click OK.
9. You should now see the message “This device has joined your workplace network.”
Active Directory Rights Management Services
Active Directory Rights Management Services (AD RMS), included with Microsoft Windows Server 2012 R2, helps safeguard sensitive information created and distributed using AD RMS–enabled applications such as Word, Outlook, or InfoPath, similar to Adobe Acrobat’s permissions for print, save, fill-form, and copy functions. Unlike traditional file permission methods, RMS rights stay with the content and ensure exclusive access to the intended recipient.
Application developers may enable their applications to work with RMS extensions. AD RMS uses policies managed from the RMS server to provide a consistent experience for users across the enterprise.
You can enforce AD RMS usage policy templates directly to protect confidential information. You can install AD RMS easily using Server Manager, and you can administer it through the MMC snap-in. These three new administrative roles allow you to delegate AD RMS responsibilities:
§ AD RMS Enterprise Administrators
§ AD RMS Template Administrators
§ AD RMS Auditors
AD RMS integrates with AD FS, which allows two organizations to share information without requiring AD RMS in both organizations.
Self-enrollment AD RMS server enrollment allows for the creation and signing of a server licensor certificate (SLC). This SLC enables the AD RMS server to issue certificates and licenses whenever required.
Considerations and Requirements for AD RMS
Before installing Active Directory Rights Management Services on Windows Server 2012 R2 for the first time, you must meet several requirements:
AD RMS Server Install the AD RMS server as a member server in the same Active Directory domain as the user accounts that will be using rights-protected content.
AD RMS Service Account Create a domain user account that has no additional permissions that can be used as the AD RMS service account. I recommend using a group-managed service account to ensure that the account password is managed by Active Directory and that it does not require a manual password change by an administrator.
If you are registering the AD RMS service connection point during installation, the user account installing AD RMS must be a member of the AD DS Enterprise Admins group or equivalent.
Which database AD RMS Will Store Configuration Data Microsoft SQL Server 2008 or newer and WID are supported databases for the AD RMS configuration data. Windows Internal Database is more suitable for small and/or test environments. If you are using an external SQL database server for the AD RMS databases, the user account installing AD RMS must have the right to create new databases.
AD RMS URL Reserve a URL for the AD RMS cluster that will be available throughout the lifetime of the AD RMS installation. Make sure the reserved URL differs from the computer name.
Cryptographic Mode Mode 1 is composed of RSA 1024-bit keys and SHA-1 hashes. Mode 2 includes RSA 2048-bit keys and SHA-256 hashes for a more secure and recommended option.
Location for Cluster Key Storage By default, the cluster key is stored within AD RMS. You may also deploy a cryptographic service provider to store the cluster key. However, you will have to distribute the key manually when installing additional AD RMS servers.
Cluster Key Password The Cluster Key password helps to encrypt the cluster key, and it must be provided when adding AD RMS servers to the cluster. The Cluster Key password must also be provided when recovering an AD RMS cluster from backup.
Cluster Name Choose the fully qualified domain name to be hosted on the AD RMS server. An SSL certificate should be configured with the FQDN of the AD RMS server. The cluster address and port cannot be changed after AD RMS is deployed. A non-SSL address can be configured, but you will lose the AD RMS with Identity Federation functionality.
AD RMS Add-on for Internet Explorer
The Windows Rights Management Add-on (RMA) for Internet Explorer enables rights-protected content to be viewed only. Because you can only view and not alter these restricted files, this prevents sensitive documents, web-based information, and email messages from being forwarded, edited, or copied by unauthorized individuals. For you to run RMA for Internet Explorer successfully, you must first install the Windows Rights Management (RM) client. The Extensible Rights Markup Language (XrML) is the XML verbiage used by AD RMS to express usage rights for rights-protected content.
AD RMS Requirements
AD RMS requires an AD RMS–enabled client. Windows Vista, Windows 7, and Windows 8/8.1 include the AD RMS client by default. If you are not using Windows Vista, Windows 7, Windows 8/8.1, Windows Server 2008, Windows Server 2008 R2, or Windows Server 2012 R2, you can download the AD RMS client for previous versions of Windows from Microsoft’s Download Center.
1. File System: The NTFS file system is recommended.
2. Messaging: Message Queuing.
3. Web Services: Internet Information Services (IIS). ASP.NET must be enabled.
Active Directory Domain Services
AD RMS must be installed in an Active Directory domain in which the domain controllers are running Windows Server 2008, Windows Server 2008 R2, or Windows Server 2008 R2. All users and groups that use AD RMS to acquire licenses and publish content require an email address configured in Active Directory.
1. Database Server: AD RMS requires a SQL database server. Microsoft SQL Server 2005, 2008, and 2012 are supported SQL versions.
The new AD RMS administrative roles are as follows:
AD RMS Service Group When the AD RMS role is installed onto a server, a local AD RMS service account is created and added to the local AD RMS service group. The server uses the service account to start services at system startup and cannot be the same account used to install the service.
AD RMS Enterprise Administrators The AD RMS policies and settings are managed by members of the local AD RMS Enterprise Administrators group. When AD RMS is installed onto the server, the user account installing the role is added to the AD RMS Enterprise Administrators group. Only administrators who manage RMS should be added to this group.
AD RMS Template Administrators Users who belong to the local AD RMS Templates Administrators group are allowed to manage rights policy templates. AD RMS template administrators have the rights to read cluster data, list rights policy templates, create new rights policy templates, modify existing rights policy templates, and export rights policy templates.
AD RMS Auditors The local AD RMS Auditors role allows administrators who have this right to manage logs and reports. The AD RMS Auditors role is a read-only role that is restricted to running reports available on the AD RMS cluster, reading cluster information, and reading logging settings.
Installing AD RMS
AD RMS deployment is described as a root cluster, which is not used in terms of failover or network balancing clustering. An AD RMS root cluster manages all of the AD RMS licensing and certificate provisions for the forest. There can be only one AD RMS root cluster per AD forest. After a root cluster is deployed, there is the option of installing additional licensing-only clusters, which issue licenses to clients for publishing their content.
Now that you have a basic understanding of AD RMS, let’s take the next step and install it. In Exercise 6.13, you will install AD RMS using the Server Manager MMC.
Exercise 6.13: Installing an AD RMS Role on the Local Computer Using Server Manager
1. Start Server Manager. Click Manage and then click Add Roles And Features.
2. The Add Roles And Features Wizard shows the Before You Begin screen. Click Next.
3. Select the Active Directory Rights Management Services Role and click Next.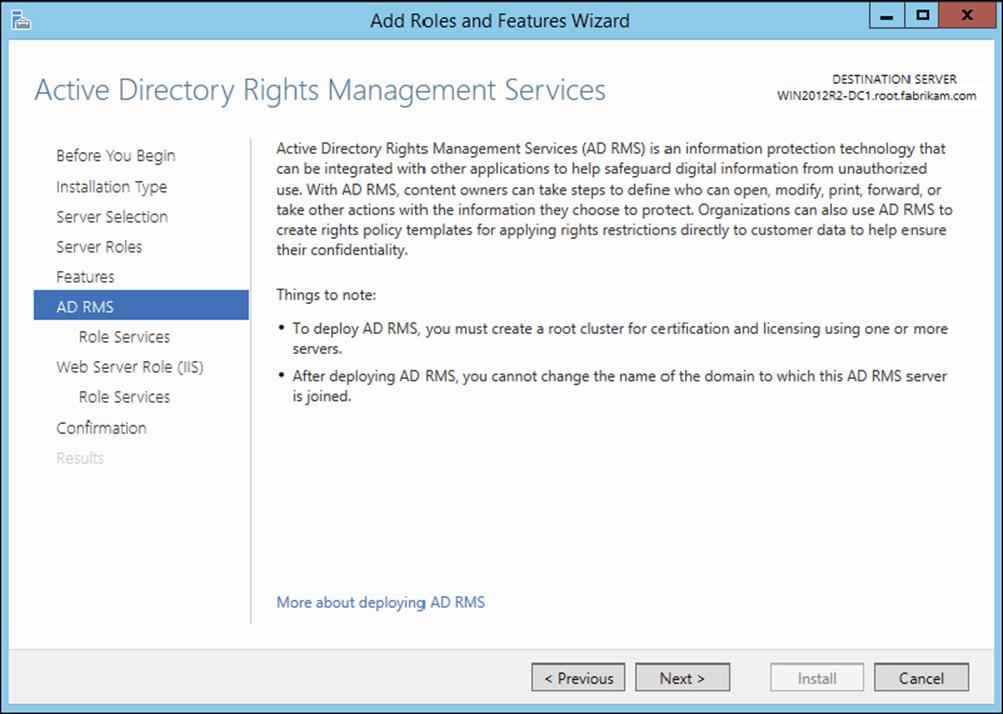
4. Add the required Active Directory Rights Management Services by default and click Add Features.
5. Click Next.
6. On the screen that explains ADRMS, click Next.
7. On the Select Role Services screen, by default Active Directory Rights Management Server is selected. Identity Federation Support uses AD FS federated trust between organizations to establish user identities and provide access to the RMS-protected content across the federation. Click Next.
8. Click Next on the Web Server (IIS) screen.
9. At the confirmation screen, click Install.
10.Once the installation is complete, click Close.
11.While still in Server Manager, click the AD RMS link on the left side.
12.Click the More About The AD RMS Service Account link next to Configuration Required For Active Directory Rights Management Service.
13.Under Action, click the Perform Additional Configuration link.
14.At the AD RMS introduction screen, click Next.
15.On the Create Or Join An AD RMS Cluster screen, choose Create A New AD RMS Cluster. (The other choice will not be available because you are installing the first AD RMS server and must start the cluster.) Click Next.
16.AD RMS uses a database to store configuration and policy information. At the Select Configuration Database screen, choose Use Windows Internal Database on this server. (The other option is to use a third-party database engine or MSSQL.) Click Next.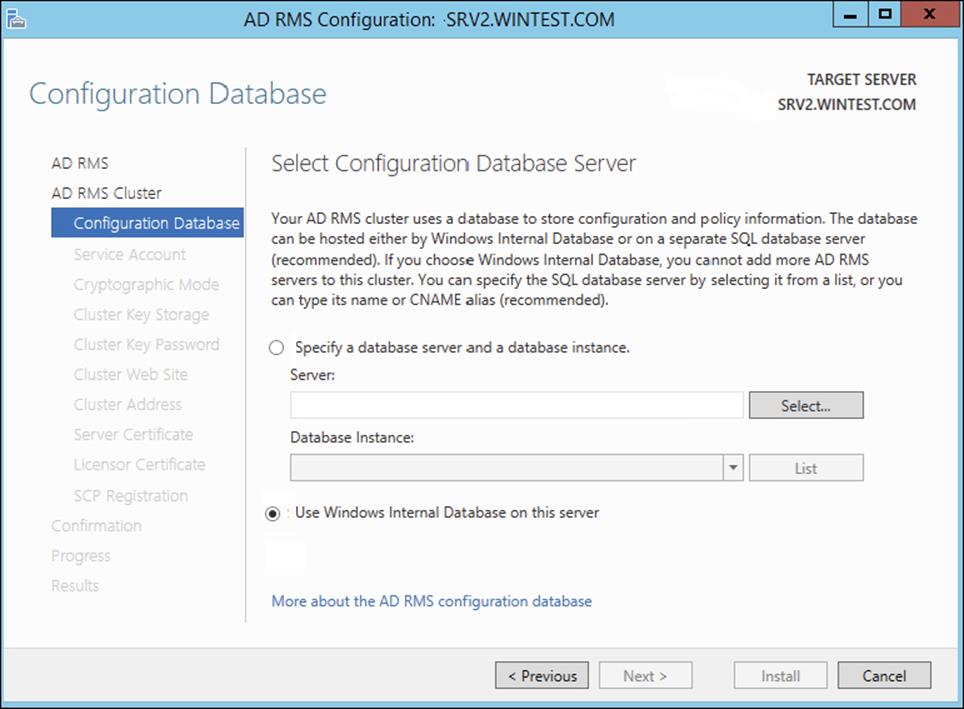
17.On the Specify Service Account screen, choose the service account that AD RMS will use. Click the Specify button and type in an administrator account and password other than the ones with which you are currently logged in. Click Next.
18.At the Cryptographic Mode screen, choose Cryptographic Mode 2 (RSA 2048-bit keys/SHA-256 hashes) and click Next.
19.At the Configure AD RMS Cluster Key Storage screen, choose Use AD RMS Centrally Managed Key Storage and click Next.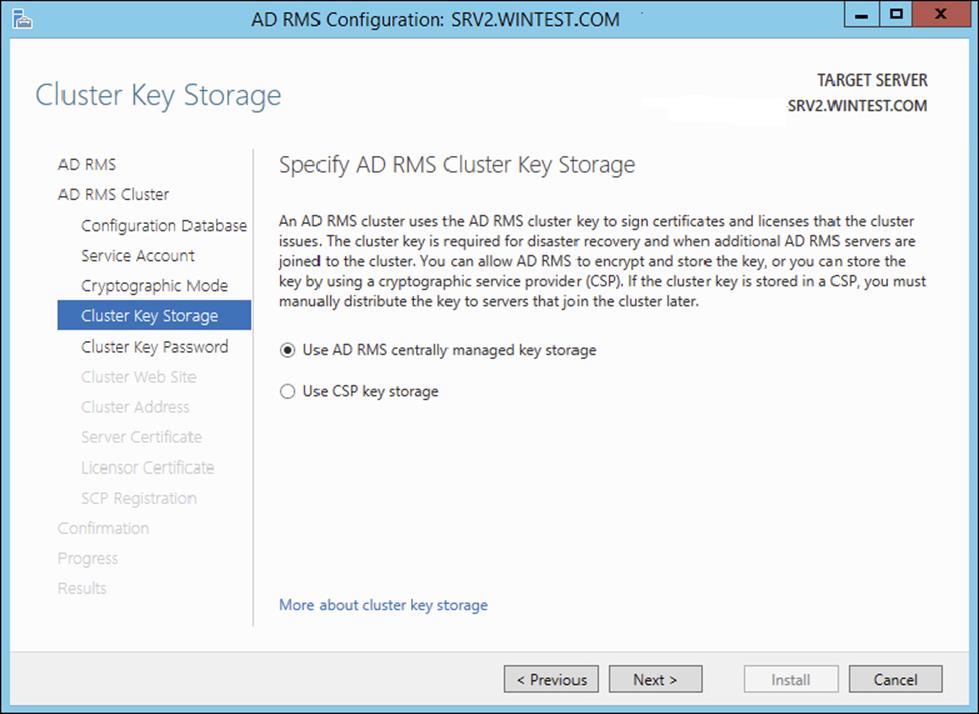
20.Next you will be asked to enter a password in the AD RMS Cluster Key Password field. The AD RMS cluster key password is used to encrypt the AD RMS cluster key that is stored in the AD RMS database. Type P@ssw0rd, confirm it, and click Next.
21.On the Select Website screen, click default website and click Next. AD RMS needs to be hosted in IIS. This will set up a default website for AD RMS.
22.On the Specify Cluster Address screen, choose whether to use a secure or a nonsecure website. Choose the Use An SSL-Encrypted Connection (https://) check box. In the Internal Address box, type in the server name and click the Validate button. After the address is verified, click Next.
23.The Choose A Server Authentication Certificate For SSL Encryption screen appears. If you receive a message stating the certificate for this server is already created, just click Next. If the message doesn’t appear, choose one of your certificates and click Next.
24.The Name The Server Licensor Certificate screen appears. Accept the default server and click Next.
25.You have the option to register AD RMS now or later. If you register the server now, AD RMS will take effect immediately. If you register the server later, AD RMS will not work until you register. You will not register during this exercise. Choose Register Later and click Next.
26.At the Configure Identity Federation Support screen, specify the name of the web server that Identity Federation will use and click the Validate button. The Next button will become available once the server is validated. If an error appears during validation, it will not affect this exercise. Click Next.
27.At the Confirm Installation Selections screen, verify all of your settings and click Install.
28.The install progress screen appears. When the install is complete, click Close.
29.Close the Server Manager MMC.
Managing AD RMS: AD RMS Service Connection Point
The service connection point (SCP) is used to store the URL of the AD RMS cluster. The SCP is stored as an object in Active Directory. The SCP can be configured when AD RMS is being installed or later through the Active Directory Rights Management Services console. Only one SCP can exist in an Active Directory forest.
The AD RMS SCP can be registered automatically during AD RMS installation, or it can be registered after installation has finished. To register the SCP, you must be a member of the local AD RMS Enterprise Administrators group and the Active Directory Domain Services (AD DS) Enterprise Admins group, or you must have been given the appropriate authority.
Managing the SCP is accomplished on the SCP tab of the AD RMS cluster’s Properties dialog box.
If a client computer is not located within the Active Directory forest, you must use registry keys to point the AD RMS client to the AD RMS cluster. These registry keys are created in HKEY_Local_Machine\Software\Microsoft\MSDRM\ServiceLocation. Create a key called Activation with the value of http(s)://<your_cluster>/_wmcs/certification, where <your_cluster> is the URL of the root cluster used for certification.
AD RMS Templates
As you know, a template is a mold that you can use over and over again. AD RMS templates are no different. Before you start creating AD RMS templates, you must first create a shared directory where the templates can be stored. An administrator can then create AD RMS rights policy templates on the AD RMS cluster and export those templates to the shared directory. If your users are connected to the company intranet and they are using AD RMS–enabled applications, they can access the AD RMS templates right from the shared directory as long as they have read access to the shared folder. If your users are not connected to the company intranet, just copy the template to their computers, and this will allow AD RMS–enabled applications to continue to function properly.
When publishing protected content, the author selects the rights policy template to apply from the templates that are available on the local computer. Visibility of the templates is controlled via NTFS permissions. If the user does not have NTFS read access, the respective template will not be visible in an RMS-aware application.
When a user attempts to use protected content, the RMS-enabled application obtains the latest version of the rights policy template that was used to publish the content from the configuration database. The RMS-enabled application then applies its settings to the content. When the rights policy template is modified on the RMS server, RMS updates the template accordingly, in both the configuration database and the shared folder.
If a rights policy template is deleted, it is removed from the configuration database and also from the shared folder (that is specified as the file location for storing copies of templates) location when the template is deleted.
When working with rights policy templates, perform the following tasks:
1. Create and edit rights policy templates.
2. When creating a rights policy template, define the users and rights that apply. Also define how the rights policy template is to be applied to content.
3. Edit the rights policy templates later when they need to be updated.
4. Create as many rights policy templates as are required to manage rights in the organization, but consider that some applications are limited in the number of templates that can be displayed in the application’s user interface. If more than a few templates are created in a cluster, you might want to scope the different templates to different groups of users by modifying NTFS permissions.
5. When a template is no longer appropriate, archive the rights policy template and update the distribution of the rights policy templates to the clients so that users do not try to protect content with the retired template. Users attempting to use content protected with the template will still be able to do so because the archived template is still accessible to the RMS servers issuing licenses.
6. If usage of all documents protected with a template is no longer desired, you can delete the template instead of archiving it. If users attempt to use content that was published by using the deleted rights policy template, they will not be issued licenses to do so.
See Table 6.9 for a description of the RMS template rights.
Table 6.9 Description of rights in RMS templates
|
Right |
Description |
|
Full control |
If established, this right enables a user to exercise all rights in the license, whether or not the rights are specifically established to that user. |
|
View |
If this right is established, the AD RMS client enables protected content to be decrypted. Usually, when this right is established, the RMS-aware application will allow the user to view protected content. |
|
Edit |
If this right is established, the AD RMS client enables protected content to be decrypted and re-encrypted by using the same content key. Usually, when this right is established, the RMS-aware application will allow the user to change protected content and then save it to the same file. This right is effectively identical to the Save right. |
|
Save |
If this right is established, the AD RMS client enables protected content to be decrypted and then re-encrypted by using the same content key. Usually, when this right is established, the RMS-aware application will allow the user to change protected content and then save it to the same file. This right is effectively identical to the Edit right. |
|
Export (Save As) |
If this right is established, the AD RMS client enables protected content to be decrypted and then re-encrypted by using the same content key. Usually, when this right is established, the RMS-aware application will allow the user to use the Save As feature to save protected content to a new file. |
|
|
Usually when this right is established, the RMS-aware application will allow the user to print protected content. |
|
Forward |
Usually when this right is established, the RMS-aware application will allow an email recipient to forward a protected message. |
|
Reply |
Usually when this right is established, the RMS-aware application will allow an email recipient to reply to a protected message and include a copy of the original message. |
|
Reply All |
Usually when this right is established, the RMS-aware application will allow an email recipient to reply to all recipients of a protected message and include a copy of the original message. |
|
Extract |
Usually when this right is established, the RMS-aware application will allow the user to copy and paste information from protected content. |
|
Allow Macros |
Usually when this right is established, the RMS-aware application will allow the user to run macros in the document or use an editor to modify macros in the document. |
|
View Rights |
If this right is established, the AD RMS client enables a user to view the user rights that are assigned by the license. |
|
Edit Rights |
If this right is established, the AD RMS client enables a user to edit the user rights that are assigned by the license. |
Backing Up AD RMS
Follow these steps to allow you to recover from any AD rights management server failure:
1. Record your cluster key password and store it in a safe manner.
2. Export the trusted publishing domain (see Exercise 6.18).
3. Create database backups.
Record and Store Your Cluster Key Password
During installation, take note of the cluster key password and securely store it. If you inherited the AD RMS server and the cluster key password hasn’t been documented, you should change it before backup. To accomplish this, start the Active Directory Rights Management Services console under ServerName ![]() Security Policies
Security Policies ![]() Cluster Key Password. Click Change Cluster Key Password.
Cluster Key Password. Click Change Cluster Key Password.
Create a Backup of the AD RMS Database
AD RMS uses three databases in the database server:
Configuration Database This is a critical component of an AD RMS installation. The database stores, shares, and retrieves all configuration data and other data that the service requires to manage account certification, licensing, and publishing services for a whole cluster.
Directory Services Database This contains information about users, identifiers (such as email addresses), security IDs, group membership, and alternate identifiers. This information is a cache of directory services data.
Logging Database This is all of the historical data about client activity and license acquisition. For each root or licensing-only cluster, by default AD RMS installs a logging database in the same database server instance hosting the configuration database.
In Exercise 6.14, we will perform a backup of the RMS database.
Exercise 6.14: Backing Up an AD RMS Database
1. Log on to the SQL server.
2. Click Start ![]() All Programs
All Programs ![]() Microsoft SQL Server 2008 or 2012 and select SQL Server Management Studio. The Connect To Server dialog box will appear. Verify the server name is correct and that authentication is set for Windows Authentication.
Microsoft SQL Server 2008 or 2012 and select SQL Server Management Studio. The Connect To Server dialog box will appear. Verify the server name is correct and that authentication is set for Windows Authentication.
3. Click Connect.
4. Expand the Databases node.
5. Right-click DRMS_Config_rms_domain_com_443, select Tasks, and then select Back Up.
6. Click Add in the Destination section and select the location.
7. Click OK to finish the backup.
8. Repeat these steps to back up the logging and directory services cache database.
If you cannot restore the configuration database, you can recover your AD RMS infrastructure with the exported TPD and the cluster key password.
AD RMS Trust Policies
Trust policies are implemented to define how content licensing requests are processed throughout the enterprise, including rights-protected content from other AD RMS clusters. Trust policies are defined as follows:
Trusted User Domains A trusted user domain (TUD) is the boundary mechanism for the AD RMS root cluster to process client licensor certificates or use licenses from users whose rights account certificates (RACs) were issued by another AD RMS root cluster. You must import the server licensor certificate of the AD RMS cluster to be trusted, to define your TUD.
Trusted Publishing Domains A trusted publishing domain (TPD) is another boundary type for one AD RMS cluster to issue licenses against publishing licenses issued by another AD RMS cluster. You must also import the server licensor certificate and private key of the server to be trusted, to define the TPD.
Windows Live ID Microsoft offers an online RMS service for an AD RMS user to send rights-protected content to another user with their Windows Live ID. The Windows Live ID recipient is then able to read rights-protected content from the originating AD RMS cluster registered through Microsoft’s online RMS service. This extended AD RMS implantation does not allow the Windows Live ID user to create rights-protected content from the on-premise AD RMS cluster.
Federated Trust With a federated trust established between AD forests, users from one organization can share rights-protected content with another organization without requiring AD RMS implementation on both sides of the trust.
Microsoft Federation Gateway Microsoft also offers federated trust through the Microsoft Federation Gateway, which is essentially a trusted broker between organizations. Microsoft Federation Gateway handles all of the identity verifications with all participating Microsoft federated organizations. Microsoft federated organizations can take advantage of this gateway by filtering lists to select which domains can receive certificates or licenses from the on-premise AD RMS cluster.
Managing Trusted User Domains Trusted user domains enable trust between domains running AD RMS, and they are often used to connect users between forests. TUD management is accomplished in the AD RMS Management console. TUD information is exported to a .bin file and then subsequently imported using the Import Trusted User Domain dialog box.
Adding a Trusted User Domain By default, Active Directory Rights Management Services (AD RMS) will not process requests from users whose rights account certificate was issued by a different AD RMS installation. However, you can add user domains to the list of trusted user domains, which allows AD RMS to process such requests.
For each TUD, you can also add and remove specific users or groups of users. In addition, you can remove a TUD; however, you cannot remove the root cluster for this Active Directory forest from the list of TUDs. Every AD RMS server trusts the root cluster in its own forest. In Exercise 6.15 we’ll add a TUD into the test domain.
Exercise 6.15: Adding a Trusted User Domain
Before getting started, the TUD of the AD RMS installation should already be exported and available.
1. Start the Active Directory Rights Management Services console and expand the AD RMS cluster.
2. In the console tree, expand Trust Policies and click Trusted User Domains.
3. In the Actions pane, click Import Trusted User Domain.
4. In the Trusted User Domain File dialog box, type the path to the exported server licensor certificate of the user domain to trust or click Browse to locate it.
5. In Display Name, type a name to identify this trusted user domain. If you would like to extend this trust to federated users, select Extend Trust To Federated Users Of The Imported Server.
7. Click Finish.
Exporting the Trusted User Domain
TUDs allow an AD RMS cluster to issue licenses to users whose rights account certificate was established by another server in an AD RMS cluster. Exporting a TUD’s key and importing it into another AD RMS cluster allows the cluster to process requests for use licenses from users whose rights account certificates are in a different cluster.
Membership in the local AD RMS Enterprise Admins group, or equivalent, is the minimum required to complete this procedure. In Exercise 6.16, we will export the TUD and store the data in a location you provide.
Exercise 6.16: Exporting the Trusted User Domain
1. Start the Active Directory Rights Management Services console and expand the AD RMS cluster.
2. In the console tree, expand Trust Policies and click Trusted User Domains.
3. In the Actions pane, click Export Trusted User Domain.
4. The Save As dialog box appears. I recommend you modify the .bin file name to include the name of your server, such as ADRMS_Cluster1_LicensorCert.bin.
5. Click Save to save the file with the name and location you specified.
Exporting the Trusted Publishing Domain
Unlike a trusted user domain, a trusted publishing domain enables an AD RMS cluster to issue licenses as if it was a different AD RMS cluster. To accomplish this, both the certificate and the private key need to be imported. This is different from a TUD scenario, where only the certificate is imported.
Importing a TPD is accomplished within the AD RMS Management console using the Import Trusted Publishing Domain dialog box. Saving a copy of the trusted publishing domain can be done from within the AD RMS administration console. In the Exercise 6.17, we will export the TPD.
Exercise 6.17: Exporting the Trusted Publishing Domain
1. Start the AD RMS administration console.
2. In the console tree view, select Trusted Publishing Domains node.
3. In the details pane on the right, select Export Trusted Publishing Domain. The Export Trusted Publishing Domain dialog box will appear.
4. From the Export Trusted Publishing Domain dialog box, click Save As. The Export Trusted Publishing Domain File Save As dialog box will appear. On the left pane, select the folder you want to save the trusted publishing domain.
5. In File Name enter a filename; then verify the XML File (*.xml) type is selected for Save As Type.
6. Click Save. This will close the Export Trusted Publishing Domain As dialog box.
7. In the Export Trusted Publishing Domain dialog box, enter a password in the Password box.
8. Enter a password again in the Confirm Password dialog box.
9. Click Finish.
Adding a Trusted Publishing Domain
Exercise 6.18 assumes you have exported the trusted publishing domain of another AD RMS cluster (as described in the preceding section). Membership in the local AD RMS Enterprise Admins group, or equivalent, is the minimum required to complete this procedure.
Exercise 6.18: Adding the Trusted Publishing Domain
1. Start the Active Directory Rights Management Services console and expand the AD RMS cluster.
2. In the console tree, expand Trust Policies and click Trusted Publishing Domains.
3. In the Actions pane, click Import Trusted Publishing Domain.
4. In the Trusted Publishing Domain File dialog box, type the path to the trusted publishing domain file or click Browse to locate it. This file contains the licensor certificate, private key (if the key is stored in software), and rights policy templates. This file is encrypted.
5. In Password, type the password required to decrypt this file.
6. In Display Name, type a name to identify this trusted user domain.
7. Click Finish.
Managing Distributed and Archived Rights Policy Templates
Rights policy templates are managed in the AD RMS Management console. Planning and overviews of rights policies are available here:
http://technet.microsoft.com/en-us/library/ee221094
http://technet.microsoft.com/en-us/library/dd996658
You can designate the location for the templates as well as set whether the templates can be exported by using the properties of the Rights Policy Template tab.
Summary
In this chapter, I discussed the certificate authority role and some of the new features in Microsoft Windows Server 2012 R2, including additional management options, new certificate templates, and better support for globalized organizations with limited IDN support. I also covered the details of the same-key certificate renewal requirement and the effects of the new increased default security settings on the CA role service.
I also discussed Active Directory Federation Services, which provides Internet-based clients with a secure identity access solution that works on both Windows and non-Windows operating systems.
Finally, I talked about Active Directory Rights Management Services. I explained that AD RMS is included with Microsoft Windows Server 2012 R2 and discussed how it allows administrators or users to determine what access to give other users in an organization.
Exam Essentials
Understand the concepts behind certificate authority. Certificate authority servers manage certificates. Make sure you understand why companies use certificate servers and how they work.
Understand certificate enrollment. You need to understand the many different ways to issue certificates to users and computers. You also need to understand the differences between installing certificates using GPOs, auto-enrollment, and web enrollment.
Understand Active Directory Federation Service. Active Directory Federation Service gives users the ability to do a single sign-on and access applications on other networks without needing a secondary password. Organizations can set up trust relationships with other trusted organizations so that a user’s digital identity and access rights can be accepted without a secondary password.
Know how to install Active Directory Rights Management Services. Active Directory Rights Management Services, included with Microsoft Windows Server 2012 R2, allows administrators and users to determine what access (open, read, modify, and so on) they give to other users in an organization. This access can be used to secure email messages, internal websites, and documents.
Review Questions
1. Channel Fishing Company wants to configure a CA server in the DMZ to issue certificates to remote users. How would you accomplish this? (Choose all that apply.)
A. You should consider having the Certificate Enrollment Policy Web Server role included in the solution.
B. You should consider having the online responder included in the solution.
C. You should consider having the Network Device Enrollment Service included in the solution.
D. You should consider having the web service included in the solution.
E. You should consider having the Certificate Enrollment Web Service included in the solution.
F. You should consider having the Web Enrollment service included in the solution.
2. The certificate revocation list (CRL) polling begins to consume bandwidth. What steps should you consider to reduce network traffic?
A. You should consider implementing the Certificate Enrollment Policy Web Server role and Certificate Enrollment Web Services role.
B. You should consider implementing an online responder.
C. You should consider implementing an online issuing CA and a root CA.
D. You consider publishing more CRLs.
3. ABC Industries wants configuration modifications of the Certification Authority role service to be logged. How would you implement this? (Choose all that apply.)
A. You should consider enabling auditing of system events.
B. You should consider enabling logging.
C. You should consider enabling auditing of object access.
D. You should consider enabling auditing of privilege use.
E. You should consider enabling auditing of process tracking.
4. Federation proxy services are installed through which of the following?
A. Separate Active Directory Federation Proxy install download
B. Server Manager ![]() Remote Access
Remote Access ![]() Web Proxy
Web Proxy
C. Server Manager ![]() Active Directory Federation Services
Active Directory Federation Services ![]() Active Directory Proxy services
Active Directory Proxy services
D. Windows PowerShell ![]() Install-Windows-Feature Web Proxy
Install-Windows-Feature Web Proxy
5. The new Workplace Join feature supports which of following? (Choose all that apply.)
A. Federates an iPhone to the corporate intranet
B. Allows Windows 8 clients to process claim-based trusts
C. Allows Windows 8 clients to form claim-based trusts automatically with the home domain
D. None of the above
6. You install and configure four Windows Server 2012 R2 servers as an AD FS server farm. The AD FS configuration database is stored in a Microsoft SQL Server 2012 database. You need to ensure that AD FS will continue to function in the event of an AD FS server failure. You also need to ensure that all four servers in the AD FS farm will actively perform AD FS functions. What should you include in your solution?
A. Windows Failover Clustering
B. Windows Identity Foundation 3.5
C. Network Load Balancing
D. Web Proxy Server
7. Your network contains an Active Directory domain named contoso.com. You plan to deploy a Windows 2012 R2 Active Directory Federation Services (AD FS) farm that will contain eight federation servers. You need to identify which technology or technologies must be deployed on the network before you install the federation servers. Which technology or technologies should you identify? (Choose all that apply.)
A. Network Load Balancing
B. Microsoft Forefront Identity Manager 2010
C. Windows Internal Database feature
D. Microsoft SQL Server 2012 R2
E. The Windows Identity Foundation 3.5 feature
8. You are the system administrator at JavaCup, which hosts a web RMS-aware application that the JavaCup forest and Boston Tea Company forest users need to access. You deploy a single AD FS server in the JavaCup forest. Which of the following is a true statement about your AD FS implementation? (Choose all that apply.)
A. You will configure a relying-party server on the JavaCup AD FS server.
B. The AD FS server in the Boston Tea Company forest functions as the claims provider.
C. The AD FS server in the Boston Tea Company forest functions as the relying-party server.
D. You will configure a claims provider trust on the JavaCup AD FS server.
9. You store AD FS servers in an OU named Federation Servers. You want to auto-enroll the certificates used for AD FS. Which certificates should you add to the GPO?
A. The CA certificate of the forest
B. The third-party (VeriSign, Entrust) CA certificate
C. The SSL certificate assigned to the AD FS servers
D. The Token Signing certificate assigned to the AD FS Servers
10. You plan to implement Active Directory Rights Management Services (AD RMS) across the enterprise. You need to plan the AD RMS cluster installations for the forest. Users in all domains will access AD RMS–protected documents. You need to minimize the number of AD RMS clusters. Which of the following will help you determine how many AD RMS root clusters you require?
A. You need at least one AD RMS root cluster for the enterprise.
B. You need at least one AD RMS root cluster per forest.
C. You need at least one AD RMS root cluster per domain.
D. You need at least one AD RMS root cluster per Active Directory site.
E. An AD RMS root cluster is not required.