Programming Windows Store Apps with HTML CSS and JavaSript(2014)
Chapter 19
Apps for Everyone, Part 1: Accessibility and World-Readiness
The shared title of this chapter and the next, “Apps for Everyone”—especially the ”Everyone” part—has several shades of meaning. First is the vitally central role that the Windows Store plays in the whole Windows experience. As first mentioned in Chapter 1, “The Life Story of a Windows Store App,” the Store is the place where you distribute apps to customers (outside of the enterprise and sharing with other developers). Everyone, in other words, gets their apps from the Store.
In this same way, everyone who does business with apps does business with the Store. To define your app’s relationship to the Store is in many ways to define your business itself, and that relationship affects all stages of the app lifecycle, from planning and development to distribution and servicing. As I recommended in Chapter 1, you might want to read the first part of Chapter 20, “Apps for Everyone, Part 2,” even before starting your first coding experiments! Truly, the Windows Store is like a pair of bookends to the whole app development process: you think about the Store when planning the business of your app, and when all is said and done, you go to the Store’s developer portal itself to make your app available to others.
Those “others” are the context for the additional meanings of “everyone,” which is the focus of this present chapter. In general, when you set out to offer a product to customers, you want to broaden your reach to include as many potential customers as you can. There are, of course, cases where you might want to specifically limit your audience, but for most apps, being able to reach more customers is certainly an attractive opportunity. And if you don’t, your competitors will!
One way to broaden your reach is to cover your bases where accessibility is concerned. Though accessibility has its origins in serving people with serious disabilities, research has shown that a majority of people—nearly 60%—use accessibility features in some capacity, even though there’s no disability involved. For one, being able to accommodate limited input models—like keyboard-only or mouse/pointer-only—is inherent in dealing with touch-only devices. Resolution-scaling, similarly, serves the needs of the visually impaired alongside the desires of the financially unimpaired (that is, those customers who splurge for a high-DPI device just to get sharper graphics). An app that works well with a screen reader for the visually impaired can also work rather well for the mobile customer whose otherwise sound eyes need to be focused elsewhere—like the road they’re ostensibly driving on! And providing for high-contrast color schemes helps not only those whose eyes don’t do well with subtle colorations but also those who might be working with a mobile device in bright sunlight.
It therefore behooves app developers to take accessibility concerns seriously, especially as the Store will specifically mark fully accessible apps. As we will see, this primarily involves adding the appropriate aria-*attributes to your HTML markup, adapting your layout to different screen sizes, and making sure to provide image variations for different contrast settings.
The second way to extend your reach is to make your app world-ready—that is, to utilize localized resources within the app so that it adapts itself to each user’s language, regional conventions, date and time formats, currency formats, and so on. Fortunately, Windows enables you to structure your resources—images and strings, primarily—so that the right variations show up automatically, just like they do for resolution scales and contrasts. The Windows Runtime also contains a number of APIs to help an app be world-ready, and the app itself can take additional steps to localize the web services from which it’s drawing data, how it works with live tiles and notifications, and so on. And additional tools like the Multilingual App Toolkit make it all the easier to translate your resources.
The reward for all this effort, of course, is that users who search in the Windows Store for apps in their regional language will see your app and not those that are available only in a single language. Those users are more likely to express their appreciation in your app’s reviews and ratings.
One of the great things about the Windows Store is the access it gives you to global markets from wherever you happen to be working. In the past, learning to do business around the world has been a tedious and expensive process, sometimes requiring that you understand local tax laws, manage currency conversions, and so forth. No longer—this is really what the Windows Store is doing on your behalf. Once the Store becomes available in a market, it means that Microsoft has done the work to embed local policies into the Store itself. Put another way, whatever small fee you pay to upload apps to the Store has made it possible for you to do business in those markets with little or no effort! This is good. The Store also automatically adjusts your pricing tier—if you charge for the app or in-app purchases—because standards of living do vary widely around the world. This is also good.
In this penultimate chapter then, we’ll take a tour of accessibility followed by another through the world of world-readiness. That will set us up well for Chapter 20, in which we’ll come full circle to where we started in Chapter 1: uploading your app to the Store and what you can expect there. Now that you’ve brought your app this far, let’s get it ready for everyone to enjoy!
Accessibility
As I mentioned, nearly 60% of users employ accessibility features in some capacity—sometimes because of a disability, sometimes due to personal preference, and sometimes just to make the device easier to use within certain environments. In many countries, accessibility is a legal requirement, so it will be necessary if you plan to make an app available in those regions. In the United States, for example, the 21st Century Communications and Accessibility Act contains regulations for communications apps.
In short, supporting accessibility is something that every app should do and do well, and fortunately this isn’t the onerous task you might think it to be. (For reference, see Accessibility for Windows Store Apps. Also see Guidelines and checklist for Accessibility, Practices to avoid for accessible apps, and Implementing accessibility for particular content types.)
Accessibility might feel like a lot of work because developers are relatively unfamiliar with what it means. To remedy this, take a few minutes to give yourself some direct experience. But before you do anything else:
Go to PC Settings OneDrive > Sync Settings and turn off the options for Desktop Personalization. Otherwise the effects of your tinkering will roam to other devices you might have. I learned this the hard way when I was playing around with contrast settings on my main laptop after which a game my son wanted to play on a tablet came up mostly black! Clearly, that app didn’t handle high contrast well, but it also took me a while to figure out what was going on!
Now that we’ve taken care of that detail, try the following:
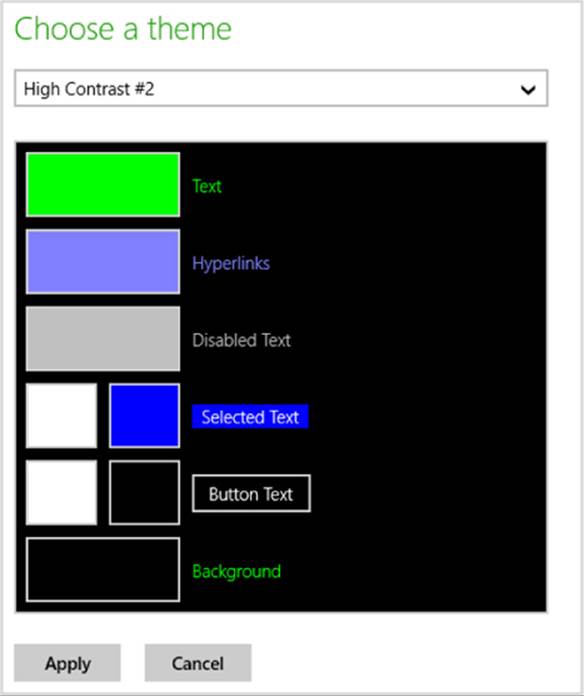
• Press LeftShift+Alt+PrintScreen or go to PC Settings > Ease of Access > High Contrast > Choose a Theme (see below), and then select different options and tap Apply. How does the app respond? Are all of the critical elements visible? A mode like this is important for users who have difficulty distinguishing subtle colors and those using a device in bright sunlight.
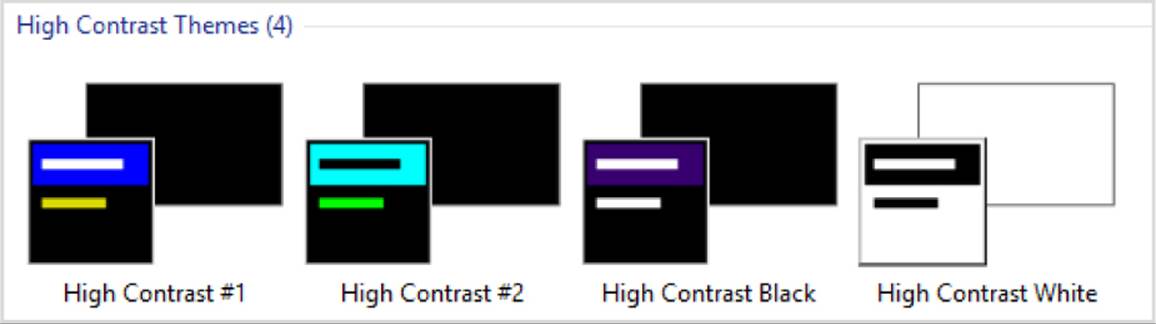
• You can also select a high-contrast theme through Control Panel > Appearance And Personalization > Personalization, where you have the same choices as in PC Settings: three black background themes and one white-background theme; the latter is the same one that’s activated through Left Shift + Alt + Print Screen:
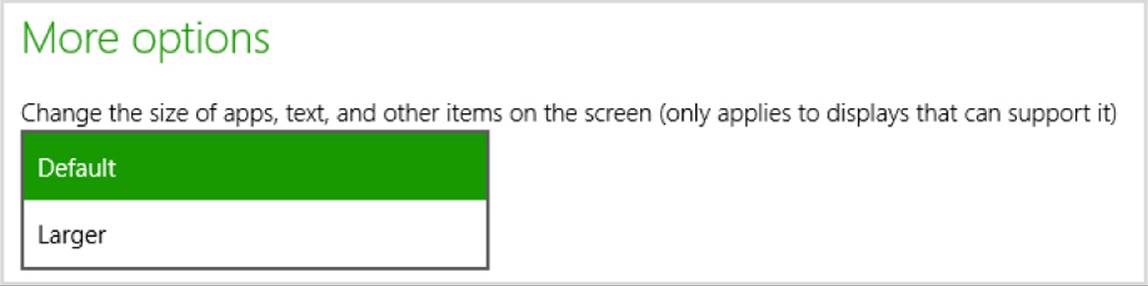
• In PC Settings > PC & Devices > Display, the More Options drop-down (below) can change the effective scaling on the display. How does the app respond to the new screen dimensions? As discussed in Chapter 8, “Layout and Views,” turning this on will activate the 140% resolution scaling, even if you’re not using a high pixel density device.
• Press Win+Ctrl+U to start (and stop) the built-in screen reader called Narrator. Win+Enter also starts it, and you can go to PC Settings > Ease of Access > Narrator. (Note that Narrator is a desktop application that starts minimized; you can close that application to stop Narrator or use PC Settings again.) Now turn off the monitor. Can you still use the app? What happens when you navigate around with the keyboard? Do you hear an audible indication of where the focus is? This is clearly important for users who are blind or visually impaired. (Tip: If you run Narrator for your app inside the Visual Studio simulator, it will apply to only that session and not everything else on your desktop, such as Visual Studio itself.)
• If you have a mouse, disconnect it and try keyboard-only navigation (you can open your eyes now). This is important for users with mobility issues and those who rely on speech recognition.
• With your mouse connected, go to PC Settings >Ease of Access > Keyboard andactivate the On-Screen Keyboard to try mouse/touch-only navigation. This special on-screen keyboard is different from the one activated for touch with input fields (as we saw in Chapter 12, “Input and Sensors”) because it always remains visible. In this same page of PC Settings you can also turn sticky keys on and off.
Through this experience I hope you’ve gained some understanding of what accessibility means. Simply said, four key scenarios exist for accessibility support: screen readers, keyboard-only or mouse-only input, high contrast, and resolution scaling.
Be very clear that supporting accessibility is something that starts at design time—it’s a common mistake to implement an app and then think about accessibility only at the end of the process. But then you’ll be going back and fixing many things in your code and UI layer that would have been easier to handle up front. Think about all the scenarios I just listed as part of your app design!
We’ve already covered two scenarios in this book. In Chapter 8 we saw how to work with different resolution scales, how to handle varying screen sizes (which can occur as a result of scaling), and how to provide raster graphics for different scales so that they always look their best. For a quick review, you might want to revisit the Scaling according to DPI sample.
Input considerations were also covered in Chapter 12, and I’ll remind you again that the Store certification policy (section 6.13.4) requires that apps disclose when they lack keyboard and mouse support. Typically, the real work to be done is making sure that your app can be used with nothing but a keyboard; see Implementing keyboard accessibilityfor full details. Testing your app with Narrator turned on will also reveal whether you’ve paid attention to keyboard navigation, because no matter how well your elements are labeled for that purpose, those labels don’t do any good if the user can never set the focus to them!
It’s also worth mentioning that including closed captions in video will assist users who are hearing-impaired. Doing so, however, is a detail for the video data itself or can be implemented via text overlays on a video element. See the HTML5 and Accessibility (MSDN Magazine) for more on video accessibility.
One other important component to accessibility is respecting when users have disabled animations. We discussed this in Chapter 14, “Purposeful Animations,” in “Systemwide Enabling and Disabling of Animations.” If you’re using the animations library, all this is taken care of automatically, but if you do any custom animations, be sure to check the
Windows.UI.ViewManagement.UISettings.-animationsEnabled property and respond accordingly:
var settings = new Windows.UI.ViewManagement.UISettings();
var enabled = settings.animationsEnabled;
Let’s now look at how we support screen readers and contrast variations.
Sidebar: Accessibility Test Tools
The Windows SDK includes two tools to help you verify your implementation of accessibility. The first is Inspect, a UI automation tool that checks through the accessibility information you’ve made available to screen readers and lets you know what you’ve missed. The second is AccChecker, which runs a series of verifications on the rest of the app and validates that you’ll work with a variety of third-party screen readers in addition to Narrator. (AccChecker is somewhat aggressive in its reporting: it flags warnings about a host of possible issues, a number of which you don’t need to address especially if they occur within hosted web content. It also doesn’t check app bars, nav bars, flyouts, and settings panes.)
You’ll find these tools in the Windows SDK install folder, typically c:\Program Files (x86)\Windows Kits\8.1\bin\x86. You might also be interested in the Accessible Event Watcher and the UI Automation Verify tools. For usage details on all of these, see Automation Testing Toolsin the documentation as well as Testing your app for accessibility. Of course, for the most complete kind of testing, find yourself a few users who regularly work with assistive technologies, set them up with a developer license (so that you can share your app package), and let them put your app through its paces!
Sidebar: Narrator and tabindex Attributes
When making your app navigable by keyboard, be careful to not overuse tabindex attributes on elements that don’t need them, thinking that this will help Narrator for noninteractive elements. It doesn’t. Narrator has its own keyboard commands (like CapsLock+arrows) and its own navigation modes that skilled users employ to read anything on a page, irrespective of tabindex. For this reason, setting tabindex properties on static elements decreases Narrator’s usability; you should set the property only on interactive elements. In other words, understand that using an app through the keyboard and using it through Narrator are different processes, and think of tabindex only in the context of keyboard navigation.
Screen Readers and Aria Attributes
Screen readers like the built-in Narrator work best if the app provides some kind of information that properly describes elements in the UI. For Windows Store apps written in HTML, CSS, and JavaScript, this is achieved through aria-* attributes on your UI elements.
Tip If you need separate text to speech capabilities, remember that you have the Windows.Media.-SpeechSynthesis API available to you, as discussed in Chapter 13, “Media” and demonstrated in the Speech synthesis sample.
ARIA stands for Accessible Rich Internet Applications, a standard that’s spelled out in the WAI-ARIA specifications. WIA itself stands for the W3C Web Accessibility Initiative. Two other W3C documents of interest are the WAI-ARIA Primer and WAI-ARIA Authoring Practices.
What it really boils down to is that assistive technologies like Narrator are first able to automatically derive what they need from certain elements, like headers, paragraphs, the title attribute, label elements associated with focusable elements (using the label’s for attribute), button text, input elements, the caption attribute of a table, and the alt attribute of img elements. The role attribute also comes into play here.
For everything else, like div elements (including custom controls) whose role cannot be inferred, the specs define a number of attributes, starting with aria-, to indicate the role that a particular element plays in the app. Full details can of course be found in the specifications linked above, along with the ARIA reference on the Windows Developer Center. Another good reference topic is also Exposing basic information about UI elements in the documentation, which shows examples of a number of the core aria-* attributes. That page makes a special note about the canvaselement. Because a canvas is just a pixel bucket, it doesn’t have content that is accessible to screen readers, even though it might appear as text. Make a special effort, then, to give a canvas appropriate attributes as you would with other custom elements (again see the HTML5 and Accessibility article for more on canvas).
All of the controls in WinJS are fully stocked with ARIA attributes and other bits that work with assistive technologies, so by using them you get lots of accessibility for free. (An exception is the SemanticZoom control that specifically does not use aria-label because it’s a container for other controls that should have such labels.) That said, it’s still necessary for you to properly adorn other elements, including HTML controls like progress. Here’s a summary of the core aria-* attributes:
• aria-label Directly provides text for screen readers.
• aria-labelledby (Note the spelling with two L’s.) Specifies the identifier of another element that contains the appropriate label for an element. The specifications state that aria-labelledby should be used instead of aria-label if that text is already on the screen.
• aria-describedby Similar to aria-labelledby, identifies an element (which doesn’t have to be visible) that contains fuller description instead of just label text. Narrator reads that text when the user presses the Win+Alt+F key on the element with this attribute. This is a good option to use with a canvas that contains drawn text if it doesn’t work to use aria-label directly. (The Here My Am! app as updated for this chapter uses aria-label.)
• aria-valuemin, aria-valuemax, and aria-valuenow For div elements whose role is set to slider, progressbar, or spinbutton, these indicate the values within the control. aria-valuetext can also provide text that corresponds to the value of aria-valuenow.
• aria-selected, aria-checked, aria-disabled and aria-hidden Indicate the state of an element.
• aria-live Needed for “live region” content that changes dynamically, such as master-detail views, chat, RSS feeds, fragment loading, and so forth. This is also appropriate for transitions and on progress controls.
Back in Chapter 6, “Data Binding, Templates, and Collections,” we saw that a special syntax was necessary to do data-binding on attributes of target elements where there are no associated JavaScript properties. The aria-* attributes are the primary example of this, because of their hyphenated names. For these we use this[ ] along with special WinJS initializers in data-win-bind:
<div data-win-bind="this['aria-label']: title WinJS.Binding.setAttribute"></div>
<div data-win-bind="this['aria-label']: title WinJS.Binding.setAttributeOneTime"></div>
It’s probably more typical, though, that you’ll provide localized ARIA labels in your app’s resources, and for this there is a different declarative syntax that we’ll see later on “World Readiness and Localization.”
The ARIA Sample
To see the various aria-* attributes and Narrator in action, the best place to turn is a unique sample in the Windows SDK, the ARIA sample. One of its unique characteristics (besides having the shortest name of all the samples!) is that is doesn’t at all look like an SDK sample, as you can see in Figure 19-1. This was done to intentionally represent the content of a typical app, without the normal SDK décor. In this case the sample emulates a simple chat app with a kind of master-detail view.
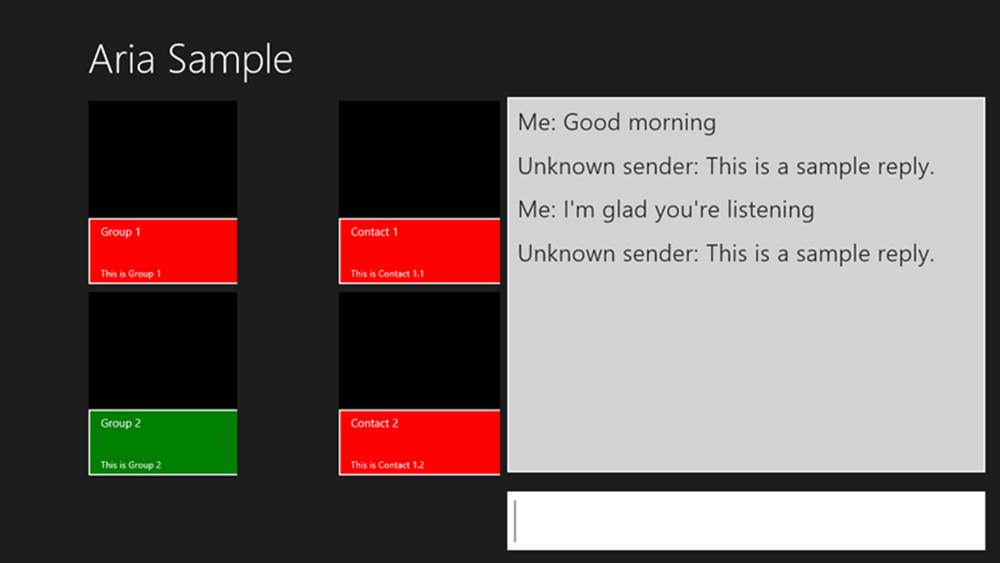
FIGURE 19-1 The ARIA sample’s main page.
When you run this sample, be sure to turn on Narrator to hear what it has to say. (Again, I highly recommend doing this in the Visual Studio simulator because then Narrator is running in that session only and not for your entire machine!) You’ll find that it’s accurately reflecting what’s happening on the screen, especially as you Tab or Shift+Tab between controls, press Enter or the spacebar to select items, and enter chat text. Again, turn off your monitor, close your eyes, get a blindfold, or have your five-year-old come up behind you and cover your eyes to get the full experience.
Pressing Enter on an item in the left-hand list will update the contacts shown in the middle. Selecting a contact and pressing enter will then open another page containing a table—a contrived table, certainly, but one that shows the aria-* attributes that apply there. The page, shown inFigure 19-2, also provides an opportunity to experience page navigation through the keyboard and Narrator.
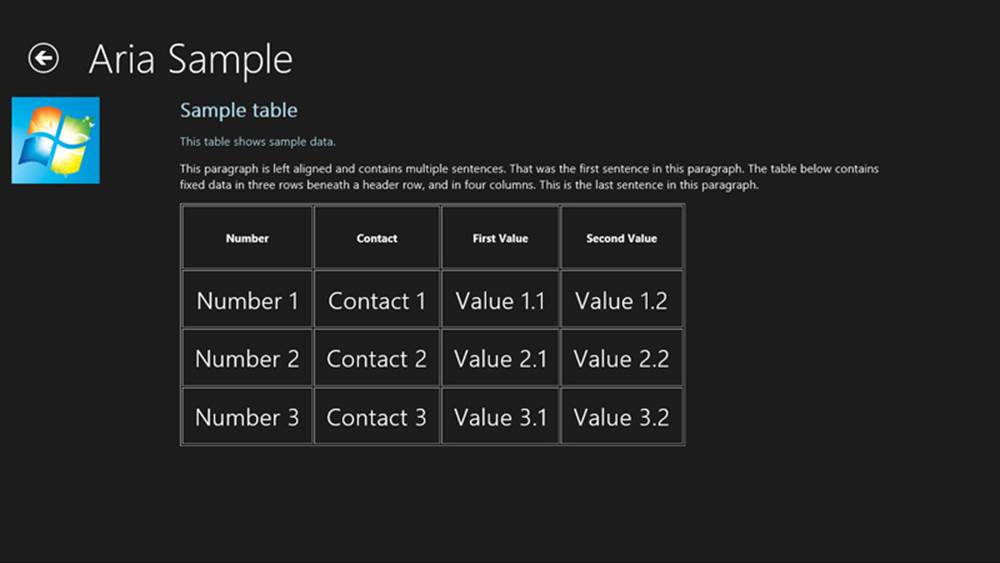
FIGURE 19-2 The ARIA sample’s secondary page (cropped a bit).
Apart from the small bits of code in pages/chat/chat.js to work the chat window, the really interesting parts of this sample are all contained in the markup, specifically pages/chat/chat.html (the main page) and pages/table/ table.html (the secondary page). In the first we can see aria-labelon most of the controls (with the text you hear as you tab around) and much more extensive roster of attributes for the chat output div near the bottom:
<div class="chatpage fragment">
<header aria-label="Header content" role="banner">
<button class="win-backbutton" aria-label="Back" disabled></button>
<h1 class="titlearea win-type-ellipsis">
<span class="pagetitle">Aria Sample</span>
</h1>
</header>
<section aria-label="Main content" role="main">
<div class="chat">
<div class="groupslist" aria-label="List of groups"
data-win-control="WinJS.UI.ListView"
data-win-options="{ selectionMode: 'none'}"></div>
<div class="contactslist" aria-label="List of contacts"
data-win-control="WinJS.UI.ListView"
data-win-options="{ selectionMode: 'none' }"></div>
<div class="chatTextContainer">
<div class="chatTextEchoContainer" aria-label="Chat text area"
aria-live="assertive" aria-multiline="true" aria-readonly="true"
aria-relevant="additions" role="log"
tabindex="0"></div>
<input class="chatTextInput" accesskey="i"
aria-label="Chat input area" type="text"
value="Type here..."/>
</div>
</div>
</section>
</div>
That div, with the chatTextEchoContainer class, is updated at run time to contain child div elements for each text entry. This makes it a “live region” and thus has the aria-live attribute, whose values are described as a “politeness level” in the W3C spec. The value of assertive says “communicate the change right away,” which is appropriate for chat but should be used carefully. The other value, polite (the default for role="log" elements), indicates a lower priority such that Narrator won’t interrupt the current task. The aria-relevant="additions" attribute is related to this, indicating what kind of changes are relevant to the live area. Its values are additions, removals, text, and all. With additions, if we happened to add an image to the chat window with an alt attribute, that would be communicated; if we set this to text, only text elements would be read.
The aria-multiline attribute indicates that the chat window is a multiline textbox such that the Enter key is taken as text input rather than as a button press that would submit a form (as with the single-line textbox). The aria-readonly attribute then indicates that this control cannot be edited, to distinguish it from those marked with aria-disabled.
If you play with the sample, you’ll notice that when you tab to the chat window, Narrator reads the entire contents. When you enter a line of text in the single line control, on the other hand, Narrator reads only the new element that’s been added. This is due to a default value of false for the aria-atomic attribute (not present in the markup). When used on an aria-live element, this tells the screen reader to read only the changed node in that element. If you set aria-atomic to true, a change to any child element is considered a change to the whole element such that all the contents will be read. This can apply on multiple levels, mind you, so that if you add a child element that is atomic and add grandchild elements within it, only that atomic child element would be read if the parent element is not atomic.
As for the markup in pages/table/table.html, this gives us an example of aria-describedby. Here’s the relevant section, omitting the table contents:
<div class="detail">
<h2 id="title" role="heading" aria-level="2">Sample table</h2>
<p id="subtitle" role="note">This table shows sample data.</p>
<p class="generaltext">...</p>
<table class="tabledetail" aria-describedby="subtitle"
aria-labelledby="title" border="1">
<!-- Contents omitted -->
</table>
</div>
When you set the focus to the table in the running sample (you have to use the mouse for this unless you add a tabindex to the table), you’ll initially hear “Sample table” according to the aria-labelledby attribute. Then press Win+Alt+F, and you’ll hear “Item described by…” followed by the aria-describedby text. (And yes, go ahead and change it so that Narrator says some silly things. You know you want to!)
Note, finally, that it’s essential that the title and subtitle elements also have some aria-related attributes, such as role. Otherwise aria-labelledby and aria-describedby won’t work.
Handling Contrast Variations
Working with high-contrast modes is primarily one of accommodating changes to the Windows color theme and making sure that you apply graphics that meet high-contrast requirements. Technically speaking, high contrast is defined by the W3C as a minimum luminosity ratio of 4.5 to 1. A full explanation including how to measure this ratio can be found on http://www.w3.org/TR/WCAG20-TECHS/G18.html. A Contrast Analyzer (from the Paciello Group) is also available to check your images (some of mine in Here My Am! originally failed the test). Do note, however, that creating high-contrast graphics isn’t required for noninformational content such as logos and decorative graphics. At the same time, full-color graphics might look out of place in a high-contrast mode, so be sure to evaluate your entire end-to-end user experience under such conditions.
An app handles high contrast through four means. The first is to use built-in controls (both HTML and WinJS) and let the system do the work! To see what happens, run a few of the controls samples, such as the HTML essential controls sample and the HTML Rating control sample, and switch between the different high-contrast themes in PC Settings > Ease of Access > High Contrast.
Of course, an app will almost always have some layout of its own, such as div elements with custom color schemes defined in CSS. You’ll want to make sure you have appropriate style rules for high-contrast settings, for which we have the ms-high-contrast media feature for media queries. This feature can have the values of active (all high-contrast themes), black-on-white (the white background theme), white-on-black (a black background theme), and none. Clearly, none is implied when you don’t use -ms-high-contrast to group any rules; active is also implied if you use -ms-high-contrast without a value. We’ll take a closer look at all this coming up.
As with other queries, you can use media query listeners andmatchMedia to pick up contrast themes in code. This is useful for updating canvas elements, as we’ll see shortly. There is also the -ms-high-contrast-adjust CSS style, which indicates whether to allow the element’s normal CSS properties to be overridden for high contrast. The default value, auto, allows this; the value of none prevents this behavior. Again, we’ll see more shortly.
Next, WinRT surfaces the current contrast settings through the Windows.UI.ViewManagement.-AccessibilitySettings class. This has two properties: highContrast, a Boolean indicating if any high-contrast theme is active, and highContrastScheme, a string with the name of the specific theme exactly as it appears in PC Settings, which is also localized for the user’s current language. In English, the black on white theme will be “High Contrast White”; for the other three themes the strings will be “High Contrast #1”, “High Contrast #2”, and “High Contrast Black” (going from left to right). You can see these results through scenario 2 of the UI contrast and settings sample, where the code is very simple:
var accessibilitySettings = new Windows.UI.ViewManagement.AccessibilitySettings();
id("highContrast").innerHTML = accessibilitySettings.highContrast;
id("highContrastScheme").innerHTML = accessibilitySettings.highContrast ?
accessibilitySettings.highContrastScheme : "undefined";
WinRT also provides detailed color information through the Windows.UI.ViewManagement.-UISettings.uIElementColor method. (Note the odd casing on uIElementColor, an artifact of WinRT names projecting into JavaScript.) This returns a Windows.UI.Color object for an element identified with a UIElementType. Scenario 1 of the UI contrast and settings sample shows all these possibilities with a piece of instructive but otherwise uninspiring code that I won’t duplicate here!
The AccessibilitySettings object also supports one event, highcontrastchanged, which lets you know when high contrast is turned on or off; its eventArgs.target is the updated Accessbility-Settings object. You can use this event to trigger any programmatic updates you need to make in your UI, such as redrawing a canvas with high-contrast colors if you’re not using a media query listener for that purpose. I use this in Here My Am! to redraw placeholder images appropriately.
Finally, with both raster and vector images, there are file-naming conventions that you use in conjunction with the .scale-100, .scale-140, and .scale-180 suffixes for pixel density. For contrast, the appropriate suffixes are .contrast-standard, .contrast-high, .contrast-black (black-on-white), and .contrast-white (white on black), where the black and white names are mutually exclusive with high. We’ll see all this in action later in “High-Contrast Resources,” and we’ll see how to combine both the scaling and contrast suffixes in “Scale + Contrast = Resource Qualifiers.”
CSS Styling for High Contrast
The CSS styling for high contrast mode sample provides a valuable look at dealing with high-contrast modes where media queries and image files are concerned. As you might expect, most of these features are demonstrated declaratively in CSS and through the app’s resources; only one scenario actually has any JavaScript code at all!
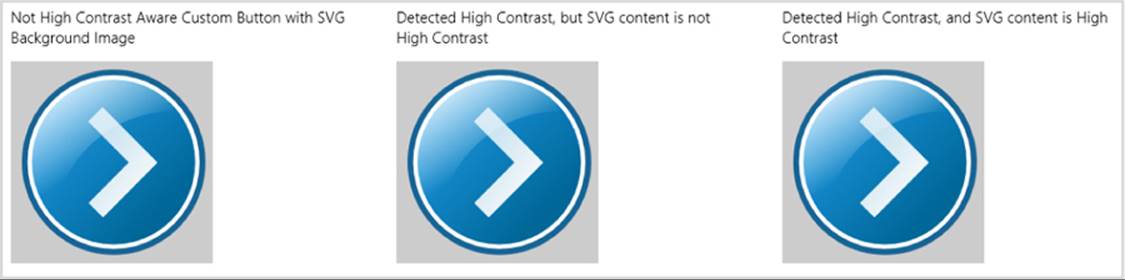
Scenario 1 shows the difference between elements that are and are not aware of contrast. With a normal color scheme in effect, its three buttons appear as follows, where the first two are div elements and the third a true button:

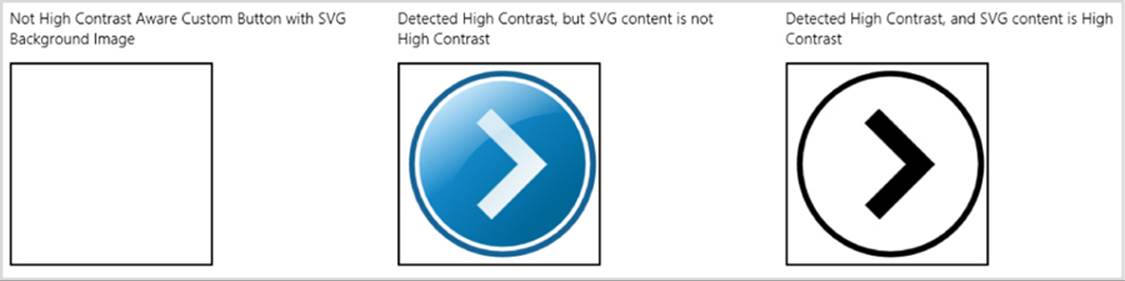
When high contrast is turned on (Left Shift + Alt + Print Screen is handy to toggle the setting for this sample), they appear as shown here for a black on white theme:

The first control, lacking contrast awareness, is still using white for its border, which of course disappears against a white background. The second button, on the other hand, has styles that use system-defined colors associated with a high-contrast media query, so the button works well with any theme (css/scenario1.css):
@media( -ms-high-contrast) {
.s1-hc {
background-color: ButtonFace;
color: ButtonText;
border: 1pxsolidButtonText;
}
/* ... */
}
Tip If you just stick with system colors entirely, both in CSS and in SVGs, you won’t need to use media queries or different SVG files at all, because those colors will be adjusted for high-contrast modes automatically. See User-defined system colors for a reference. You can also use thecurrentColor value in SVGs for fill, stroke, stop-color, flood-color, and lighting-color properties to reflect contrast settings.
Scenario 2 shows similar effects with button elements that use SVGs for their background images. With normal settings, those buttons appear as follows:
With high contrast turned on, they appear like this:
All that’s happening here is that a media query sets a high-contrast background image for the button when necessary:
.s2-button-hc-bg-svg {
background-image: url(../button-not-aware.svg);
background-size: 100%100%;
width: 200px;
height: 200px;
}
@media( -ms-high-contrast) {
.s2-button-hc-bg-svg {
background-image: url(../button.contrast-high.svg);
background-repeat: no-repeat;
background-size: cover;
}
}
If you look in button-not-aware.svg, you’ll see that its gradient colors have many different values; in button.contrast-high.svg, on the other hand, those colors are generally set to black or ButtonFace, the latter reflecting the system color setting as is appropriate. (It would probably be better, in fact, to replace black with ButtonText, a system color that will automatically adjust to contrast settings.)
What’s going on with the first and second buttons? If you look in the CSS (css/scenario2.css), the only difference is that the style class for the first button, .s2-button, lacks a rule within the high-contrast media query, whereas the second, .s2-button-hc, has a rule there that just specifies the exact same background image. What’s the deal? What’s happening is that because the first button lacks any applicable style rule within the media query, its styles are automatically overridden with high-contrast values. Turning on high contrast overrides most color styles as well asbackground-image, in the latter case simply removing those images. This is why the first button shows up blank. The second button has a rule to define a background-image within the media query, so that image appears.
This brings us to the purpose of the -ms-high-contrast-adjust style. By default this is set to auto, allowing CSS properties to be overridden. Setting this to none prevents those styles from being overridden or adjusted. Thus, if you add -ms-high-contrast-adjust:none; to the .s2-buttonrule in css/scenario2.css, you’ll see that the first and second buttons behave exactly the same. You can see this change in the copy of the sample included with this chapter’s companion content.
Moving now to scenario 3, it normally draws the Internet Explorer ‘e’ on a canvas in color (below left), whereas in high-contrast mode it draws the logo in black and white (below right):

In this case, high contrast is picked up in JavaScript (js/scenario3.js) using a media query listener; no CSS is involved (this code is simplified for clarity; the sample also detects high contrast on startup):
var fillStyleOuterColor = "rgb(9, 126, 196)";
var fillStyleInnerColor = "rgb(255, 255, 255)";
var mql = matchMedia("(-ms-high-contrast)");
mql.addListener(updateColorValues);
function updateColorValues(listener) {
if (listener.matches) {
fillStyleOuterColor = "ButtonText";
fillStyleInnerColor = "ButtonFace";
draw();
}
else {
fillStyleOuterColor = "rgb(9, 126, 196)";
fillStyleInnerColor = "rgb(255, 255, 255)";
draw();
}
Note that the AccessibilitySettings.onhighcontrastchanged event could be used here instead of the media query listener.
Canvas a better choice? In my original versions of the Here My Am! app, I used images to provide messages in img elements when a photograph or the map isn’t available. When considering the needs for contrast and localized variations of those images, it was ultimately easier to generate the images on the fly by drawing text onto a canvas, as we’ve been doing since Chapter 2, “Quickstart.” This eliminates the need for many different image files and makes the app package smaller, while still fully addressing both accessibility and localization needs.
High-Contrast Resources
In the previous section with the CSS styling for high contrast mode sample we saw a bit of the filename conventions that the Windows resource loader uses for high contrast: button.contrast-high.svg, for example. Scenario 4 of that sample shows how this lookup can happen automatically. In the project there is a file named button.svg alongside one named button.contrast-high.svg, with an img element declared in html/scenario4.html as follows:
<img src="../button.svg"/>
If the system is running with normal contrast, the resource loader resolves the URI here to button.svg. (The ../ is because the scenario page is one level down in the HTML folder—generally it’s better to give the full in-package path like /images/....) When high contrast is in effect, the resource loader instead looks for that same filename but with one of three qualifiers in the filename. If you have distinct resources for black-on-white and white-on-black themes, name those files with .contrast-white and .contrast-black, respectively. If, on the other hand, you have just a single high-contrast variant, use .contrast-high. This is because Windows will ignore any high variants if you provide black and white files with the same root name.
Note If you’re using custom app bar icons, as discussed in “Custom Icons” in Chapter 9, “Commanding UI,” remember to include high-contrast variants of your source images by using this naming scheme.
If you like having more parallel filenames, you can also name the normal contrast file with .contrast-standard, as in button.contrast-standard.svg. If you do this in the sample project, leaving the HTML as is, you’ll see no difference in the output. At the same time, because of behavior nuances with contrast handling, it’s recommended to use .contrast-standard only if you also supply .contrast-white and .contrast-black variants.
As noted before, contrast variants are applied automatically for black-on-white (white background) and white-on-black (black background) themes, respectively. To see this, rename button.contrast-high.svg in the SDK sample to button.contrast-white.svg, and then make a copy named button.contrast-black.svg. In that copy, modify the gradient colors in the CDATA block by exchanging black with ButtonFace. When you then switch on a black background theme, you’ll see a button that’s white on black, as it should be. (All these changes can be found in the copy of the sample included with this chapter’s companion content.)
The one caveat with the img element in scenario 4 is that it won’t be updated when contrast is changed while the app is running, as happens with media queries in scenarios 1–3. That is, the app host will not re-render the img element in response to a contrast switch. To change this behavior, we have to trick the app host into thinking that the source URI has changed by appending some dummy URI parameters. We can do this inside AccessibilitySettings.onhighcontrastchanged with eventArgs.target.highContrastScheme providing a decent variable for the URI (see js/scenario4.js in the modified sample; you can also set src to "" and then reassign):
var page = WinJS.UI.Pages.define("/html/scenario4.html", {
ready: function (element, options) {
var accSet = new Windows.UI.ViewManagement.AccessibilitySettings();
accSet.addEventListener("highcontrastchanged", function (e) {
var image = document.getElementById("buttonImage");
//Use the scheme name (sans whitespace) as the dummy URI parameter
var params = e.target.highContrast ?
"?" + e.target.highContrastScheme.replace(/\s*/g, "") : "";
image.src = "../button.svg" + params;
});
}
});
One significant advantage to highcontrastchanged over media query listeners is that the latter will be fired very soon after the change happens, at which point the resource loader might not have picked up the change by the time you set the img.src attribute. This results in the wrong image being displayed. highcontrastchangedis fired much later, so the code above generally works. That said, my experiments along these lines (with the sample running and making changes in the desktop control panel) show that it’s still not 100% reliable: changing contrasts is an expensive operation that triggers many events throughout the system, and there’s no guarantee when the resource loader will get reset. For this reason you can consider just bypassing the whole matter and explicitly setting the src attribute to a known file with a specific name. The modified sample contains code like this in comments, or you can just use media queries!
Scale + Contrast = Resource Qualifiers
Because the graphics we just worked with are SVGs, there is no need to supply separate files for different pixel densities. But what if we have raster graphics? How do we combine scaling and contrast? This will also come up when we look at localization later, because that will introduce language variants as well. This brings us to the matter of resource qualifiers, a topic that’s discussed in its fullest extent on How to name resources using qualifiers. Qualifiers include scale and contrast as we’ve seen, along with language, layout direction, home region, and a few other obscure variants.
To combine qualifiers within a single filename, append them together with underscores. The general form is filename.qualifiername-value_qualifiername-value.ext. So, a graphic named logo.png can have variants like logo.contrast-standard_scale-180.png and logo.scale-100_contrast-white.png (the order of qualifiers doesn’t matter). Clearly, with the full set of three or four scales (accounting for the few scale-80 cases) and two or three possible contrasts, you might have as many as 12 distinct graphics files for that one resource. Indeed, for all the core images in your manifest alone—the ones we talked about in Chapter 3, “App Anatomy and Performance Fundamentals,” you can have up to 52 total images (for standard/high contrast) or 78 (for standard/black/white). For a few examples of this, load the Application resources and localization sample into Visual Studio and look in the images folder. (Although the sample shows only contrast+100% scale examples, be sure to provide at 140% and 180% scales as well in your own app; Here My Am! for this chapter does so with its splash screen, tile, and other logo graphics.)
As we get into the topic of world readiness, we’ll find that localized image resources will require a set of scale and contrast variants for each language. As you can guess, the file-naming conventions here could get really messyas the file count increases! Fortunately, the resource loader also allows qualifiers in folder names, so localized resources are typically placed within language-specific folders. We’ll see more of this later in “Part 2: Structuring Resources for the Default Language.”We’ll also avoid this complexity entirely in Here My Am! by using a canvas instead of discrete images for those graphics that contain text messages (the logos aren’t localized).
High-Contrast Tile and Toast Images
Like any other images in your app, tile images in your manifest, images sent to the tile through updates, and images used in toast notifications all respect contrast settings. (Badges are not an issue because they are already monochromatic and adapt automatically.) In the manifest, naming images with resource qualifiers works for scale, contrast, and language.
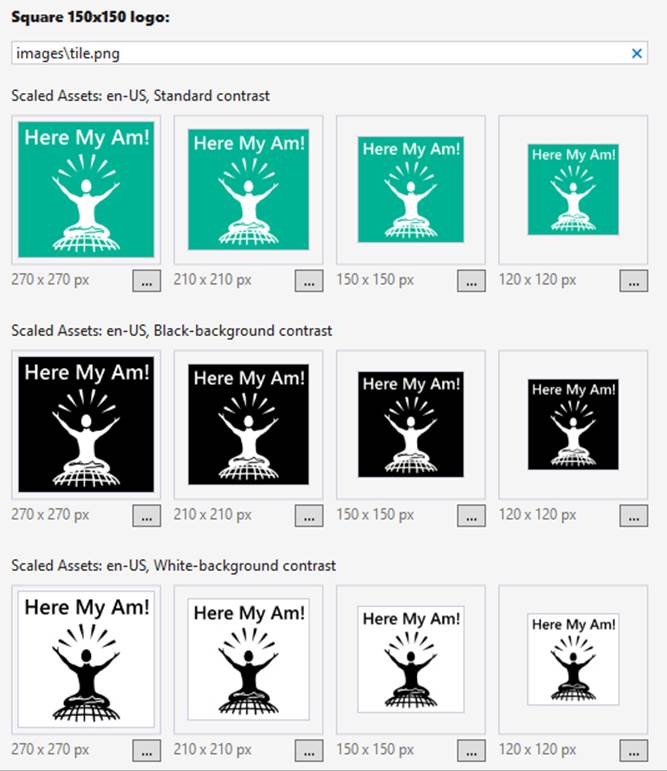
Tip For your manifest images, Visual Studio’s manifest editor shows all the contrast variants alongside scale variants, which gives you a way to quickly see if you have all the filename qualifiers spelled correctly, because misspelled files will not appear in the editor:
XML payloads for tiles and toasts can refer to local images using ms-appx:/// URIs, and the resource loader will look for the appropriately qualified file. This does not apply to ms-appdata:/// URIs, however, so if you’re working with downloaded or dynamically generated images, you’ll need to identify a specific file yourself.
For XML payloads that refer to remote images, setting the addImageQuery option in the payload to true (as discussed in “Using Local and Web Images” in Chapter 16, “Alive with Activity”) will append query strings to the remote URIs that indicate scale, contrast, and language:
?ms-scale=<scale>&ms-contrast=<contrast>&ms-lang=<language>
These details are described on Globalization and accessibility for tile and toast notifications, along with how to localize strings in the XML payload. We’ll see these details for ourselves later on.
World Readiness and Localization
Over the years I’ve heard a number of words used to describe the process of making an app ready for different regional markets, and I imagine you have too: localization, localizability, internationalization, globalization, and world readiness. To be honest, the differences between these terms have confused me for some time, but I finally found a good explanation in an older book for desktop applications called Developing International Software, by Dr. International (Microsoft Press, 2003). The same ideas are also expressed on Understanding Internationalization. Let me begin this section then by offering a simple summary of that view.
The goal with Windows Store apps is to make them available in many markets around the world, as provided for so conveniently by the Store itself. To do this, an app must be written to adapt itself to just about any language and culture that it might encounter. In some situations you may need to produce specific builds of the app, but hopefully you can have one app with localized resources that works for most markets. Truly, the days of monolingual apps are over. Indeed, there are even aspects of localization, like branding, that apply to markets that otherwise share a common language, such as when you use a different company logo in England, Australia, New Zealand, Canada, and the USA.
To reach this goal you must first make your app world-ready. World readiness means that even though the app initially supports only one language and culture (most likely your own), it doesn’t actually make any assumptions about those specifics anywhere within its HTML, CSS, and JavaScript (including tile and toast payloads and any WinRT components). That is, the core app is language-, culture-, and market-neutral, taking all these factors into account:
• Each and every text string that might be shown in the app’s user interface, including element attributes like aria-label and img.alt, has been separated out into a resource file such that different resources can be loaded for different languages. Strings should include their punctuation because it is also subject to localization. (Using UTF-8 Unicode text is pretty much a given nowadays, so displaying text in many languages isn’t an issue, but be sure to keep this in mind if you’re migrating older software or using web services that might work otherwise.)
• Leave adequate space in your layout to allow strings to expand when localized.
• Each and every localized image (those that contain text or culture-specific content) has been organized into language-specific folders, appropriately named so that the resource loader can find them automatically.
• Localization isn’t just for languages and doesn’t have any inherent relationship with the user’s region. A user living in one country might want to use a different language, and some resources for otherwise common languages might still need to be localized for different regions (such as specific word spellings, business logos and branding, etc.).
• Any formatting and manipulation of dates, times, time zones, and currencies use APIs that automatically apply regional settings.
• Use format strings to place dynamic content into strings rather than string concatenation. Similarly, do not make assumptions about where first names and surnames are placed, the structure of street addresses and phone numbers, and so on.
• Any sorting or collation of data takes the user’s language into account, using APIs for this purpose.
• Make no assumptions about how strings are concatenated. Use format strings with appropriate placeholders instead, and include those in language-specific resource strings so that they can be localized.
• The web services an app uses might vary from location to location because of the need for local information or regional legal requirements.
• The app communicates language and region information to any services it uses to generate tile updates and toast notifications, and the XML payloads provided by those services set the appropriate lang attributes so that Windows can use the right fonts when rendering text.
• Text might be laid out left to right or right to left (including text within images). Vertical is also possible but might be implemented in a separate version of an app because of its unique layout needs.
• Text input just works for all languages, whether from a keyboard or an Input Method Editor (IME), which implies that you should avoid hard-coding font names that don’t have full Unicode support. It’s good to stick with the typography in the WinJS stylesheets—they have built-in support for at least 109 languages.
• The user might switch languages at run time, and the app responds accordingly.
• Test early and test often!
A world-ready app, in short, is both globalized—using APIs that isolate regional specifics—and is readily localizable such that adding support for another language requires no code changes, just the addition of new string and image resources. This is mostly a matter of how you structure those resources and how you reference them within the app’s markup and source code.
The process of localization, then, is one of generating or acquiring those language-specific and culture-specific resources, for which some very helpful tools are available to streamline translation work. Adding a new set of resources does not require any changes to the app code, and even though you upload an app package with those new resources to the Windows Store, it will not trigger an app update to customers that don’t need them.
Next we’ll look at matters of globalization, we’ll explore how to structure resources to be localizable, and we’ll see how to go about obtaining localized resources. After that, we’ll be ready to look at the last step in the long journey of an app’s creation—uploading to the Store—which is the story of Chapter 20.
Alert! One of the last steps in uploading your app will be providing localized information for your app’s page in the Windows Store. Because you won’t be asked for this until you thought you were all done and ready to release your app, the need for these resources will catch you off guard! To avoid that pain and avoid delays in releasing your app, we’ll talk about what’s needed here as part of the overall localization process. See “Part 3: Creating a Project for Nonpackaged Resources” later on.
Globalization
Besides language, the things that vary around the world are the representation of dates and times (including calendars and time zones); the representation of numbers, measures (units), phone numbers, and addresses; currencies; paper sizes (already discussed in Chapter 17, “Devices and Printing”); how text is sorted (collation); the direction of text; word breaking within text; and the fonts used for text along with the input method. To globalize an app means to make no assumptions about how any of this is accomplished, instead using the WinRT APIs that will do the right thing according to the current user’s settings. Working with those APIs is what globalization is mostly about.
Globalization is also about analyzing an app’s content, checking for words, phrases, or expressions that might be very difficult to translate (or potentially politically offensive), especially colloquialisms, vernacular, slang, metaphors, jargon, and the like. Use images that travel well and aren’t likely to be misinterpreted elsewhere in the world (imagine wearing a T-shirt with such imagery in a country where you intend to market the app!). And exercise caution with maps because there is disagreement among different nations about where, exactly, their borders should be drawn. Be sure also to refer to “country/region” rather than just “country,” because disputed territories might not be recognized specifically as a country.
Also be aware of your regional export laws regarding encryption algorithms, because you might not be allowed to make the app available in certain markets. See Staying within export restrictions on cryptography. In addition, if you’re writing a game, be mindful of regional game rating requirements that might create more work for you than it’s worth. See Preparing your Windows game for publishing.
If you use web services, make sure they’re appropriate to the user’s locale. This might be required by law in some parts of the world (especially for financial transactions and maps) and often ensures that the user gets regionally relevant information from that service, unless they’ve specifically configured the app otherwise. Also communicate the user’s locale and language to those services so that they can return content that’s already localized. It’s also helpful for the app’s overall performance to use servers that are relatively close to the user rather than on the other side of the world!
The first step in any of this, however, is to know where your app is actually running and the user’s language and cultural preferences, so let’s see how that is accomplished.
User Language and Other Settings
When a user first acquires a Windows device or installs Windows on a machine, it will likely be configured for their country of residence. However, many users speak multiple languages irrespective of where they live and might want to work with Windows in a particular language that has nothing to do with their location. For this reason, always think about the user’s preferences separately from the actual location of the device, applying the user’s preferences to how your app displays information but using the physical location to control the services you use and other more functional aspects.
Languages, region, and other preferences are configured through PC Settings > Time and Language (or Control Panel >Clock, Language, and Region). Here you can add languages and select your primary one (see Figure 19-3), change input methods, specifically set your location (a country or territory), and set date and time formats (see Figure 19-4). The desktop control panel lets you also set number and currency formats (see Figure 19-5).
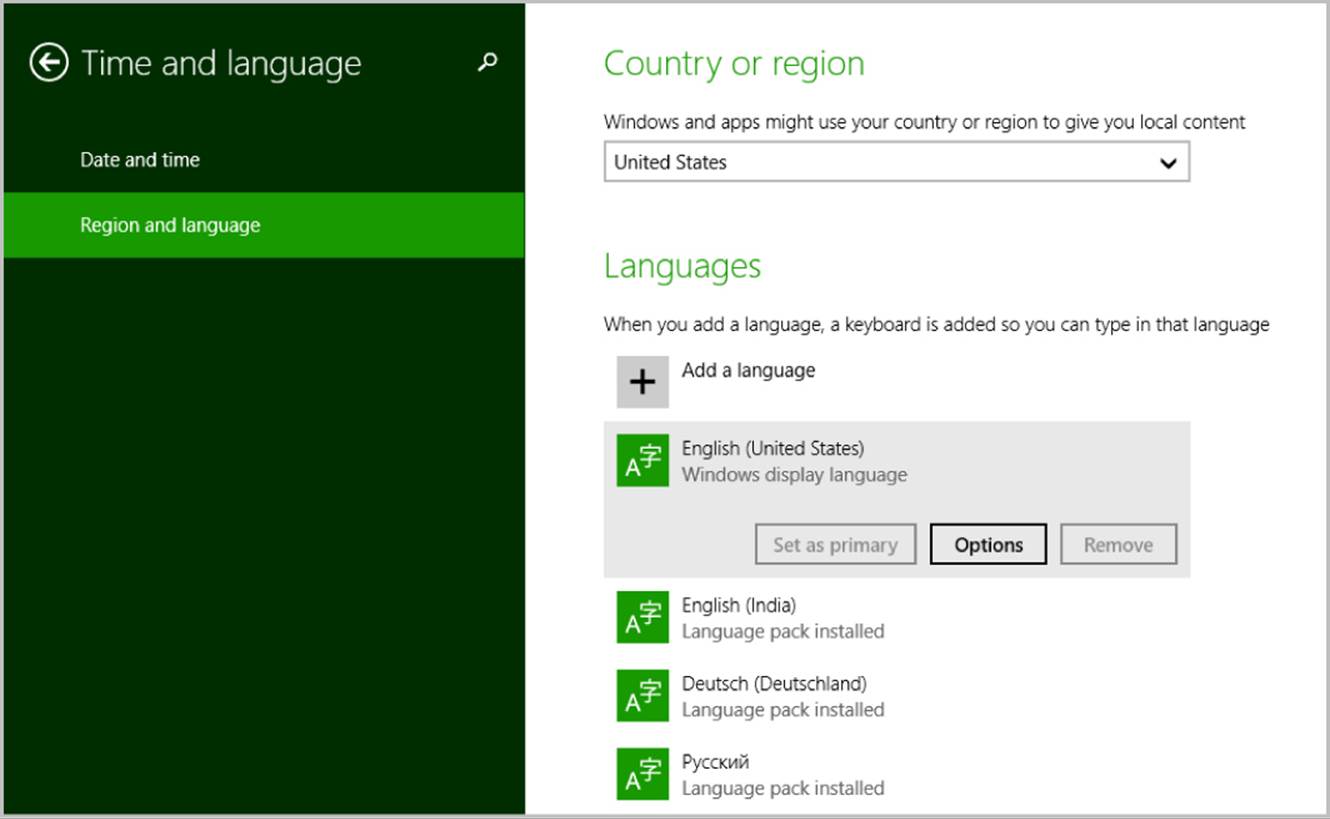
FIGURE 19-3 Managing and selecting a language in PC Settings.
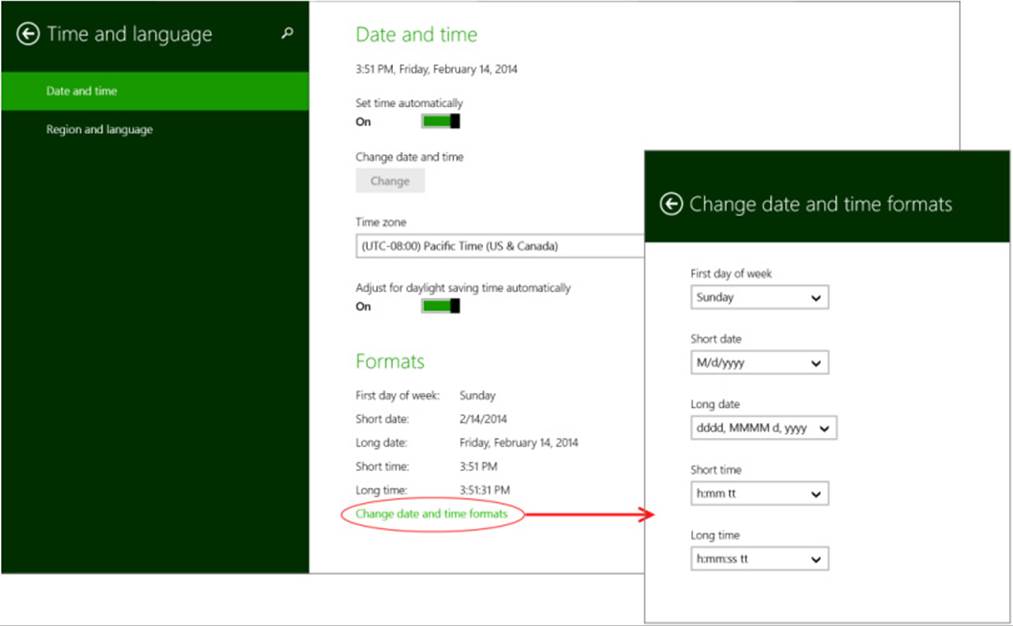
FIGURE 19-4 PC Settings panes for formatting and region.
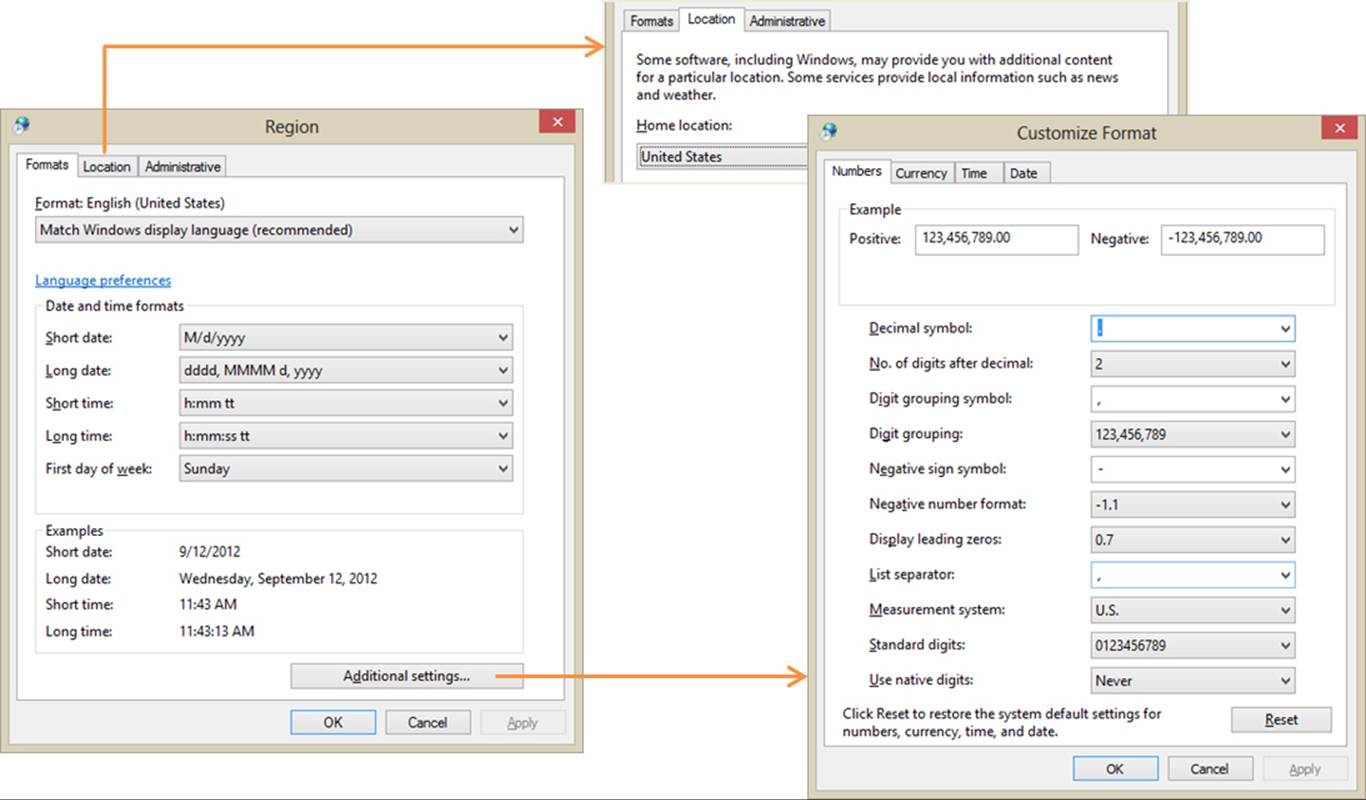
FIGURE 19-5 Control panel dialogs for formatting and region.
It’s a good thing there are globalization APIs, because dealing with all the variations here would be quite a chore otherwise! (Note that changes to the formats in Figure 19-4 will affect only those Windows Store apps that are running in the language you’re configuring; each set of custom formats is particular to a language.)
The basic details of the user’s settings are available through the Windows.System.UserProfile.-GlobalizationPreferences object and the classes in the Windows.Globalization namespace. GlobalizationPreferences just provides a handful of properties. Four of these—calendars, clocks,currencies, and languages—are each an array of strings (an IVectorView to be precise) with the user’s preferred settings in order of preference. In the case of languages, it contains a list of BCP-47 language tags.
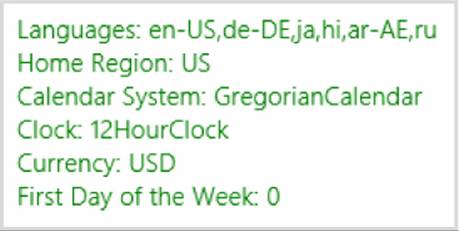
It also contains a string property called homeGeographicRegion, which is the abbreviation for the selected value in the Country or Region setting of Figure 19-3, and a property called weekStartsOn, which is a DayOfWeek value. Scenario 1 of the Globalization preferences sample will retrieve and display these values, except that you’ll want to add a line for currencies, which is missing from the sample. Having made that change and added a number of languages to my system, I see this output:
Generally speaking, these values are exactly what you’ll typically need to communicate to a web service if it will be providing localized data to the app. However, the user’s language preference is best obtained in a slightly different manner, as we’ll see shortly.
Oftentimes you’ll need more detail for all of these settings, for which we can turn to the classes in Windows.Globalization. Some of these are static classes that are just there in the API to provide you with all the string identifiers that you would use to make comparisons in code without writing out the strings explicitly. ClockIdentifiers, for instance, just contains two string properties, twelveHour and twentyFourHour, whose values match those returned from GlobalizationPreferences.clocks. Similarly, CalendarIdentifiers contains string properties for gregorian, hebrew,hijri, japanese, julian, korean, taiwan, thai, and umAlQura. So, if you wanted to compare the user’s preferred calendar to a specific one, you’d write code like this:
var userCalendar = Windows.System.UserProfile.GlobalizationPreferences.calendars[0];
if (userCalendar == Windows.Globalization.CalendarIdentifiers.julian) {
// ...
}
This way you’re fully honoring the key principle of globalization by not making any assumptions about what those calendar strings are.
The other globalization classes are somewhat richer in scope and function. The Language class, which you typically instantiate with a specific BCP-47 tag, provides details like the displayName, nativeName, languageTag(and subtags via the getExtensionSubtags method), and script. Scenario 2 of the aforementioned sample demonstrates this. The Language class also has two static members. One is the isWellFormed method, which will tell you if a string contains a valid BCP-47 tag. The other is the currentInputMethodLanguageTag property, which contains the BCP-47 tag for the user’s preferred input. This can be customized in PC Settings to be something other than the language’s default (this happens through the Options button shown for a language in Figure 19-3; this is also demonstrated in scenario 4 of the sample.)
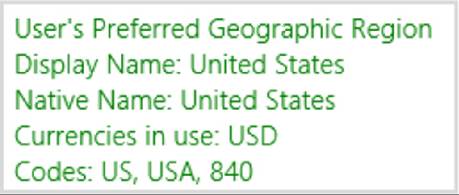
Then we have the GeographicRegion class, which, if instantiated with no arguments, provides details on the user’s home region. You can also instantiate it with a specific location string. Either way, it then provides you with and isSupported flag, a displayName, a nativeName, a variety of code formats for the region (code, codeThreeDigit, codeThreeLetter, and codeTwoLetter), and an array of ISO 4217 three-letter codes in currenciesInUse. Scenario 3 of the sample shows these values for your configuration, such as:
The ApplicationLanguages class, for its part, contains just a few things. manifestLanguages is an array of languages as defined by the app’s manifest; you’ll set these when you localize an app. languages contains a combination of the GlobalizationPreferences.languages array and those from manifestLanguages. The first item in this list is the best value to use for the user’s preferred language in your app, so this will be the one to send to web services for localization purposes.
Lastly, there’s primaryLanguageOverride, a property (BCP-47 tag) that allows you to set an app-specific language preference (and add it to the mix of languages). Setting this (which is persistent across sessions) tells the system what language to use in its own UI that appears in the context of the app (such as system-provided flyouts). It’s a relatively expensive operation, so avoid using primaryLanguageOverride for transient purposes, such as rendering a few elements in a different language. For that, create a new language context and use that explicitly; seeResourceContext.-getForCurrentView and scenario 13 of the Application resources and localization sample.
The last class, Calendar, is quite extensive and contains too many members to list here, many of which work with formatting as well performing calendar math. Before stepping into that arena, however, let’s look more broadly at the question of formatting data.
Formatting Culture-Specific Data and Calendar Math
If you clicked around within the formatting and region panes of PC Settings and Control Panel (refer back to Figure 19-4 and Figure 19-5), you’ll find that the possible permutations for formatting something as simple as a number is quite mind boggling, let alone dates, times, and currencies! Fortunately, “formatter” classes in WinRT take care of all the details such that you can take a value from newDate(), for example, and get back a string that completely reflects the user’s preferences. The APIs also provide parsing services that work in the opposite direction.
In Windows.Globalization.NumberFormatting we have CurrencyFormatter, Decimal-Formatter, PercentFormatter, and PermilleFormatter, which you should always use when converting data values into UI display strings. All of these classes are demonstrated in the Number formatting and parsing sample, where the basic process is to instantiate the formatter with or without specific codes or languages, set any necessary properties for the formatter (such as the number of digits, separator usage, and the CurrencyFormatterMode), and then call its format method to obtain a string or, alternately, one of its parse* methods to turn a string into a number.
For example, to format a currency value (perhaps to present the cost of an in-app purchase in your UI), instantiate a CurrencyFormatter with a currency identifier (and an optional language list and geographic region), set up any options, and then call format (js/CurrencyFormatting.js; I’ve created a namespace variable for simplicity):
var nf = Windows.Globalization.NumberFormatting;
var currs = Windows.Globalization.CurrencyIdentifiers;
var userCurrency = Windows.System.UserProfile.GlobalizationPreferences.currencies;
var wholeNumber = 12345;
var fractionalNumber = 12345.67;
// Apply user defaults
var userCurrencyFormat =newnf.CurrencyFormatter(userCurrency);
var currencyDefault = userCurrencyFormat.format(fractionalNumber);
// Apply a specific currency
var currencyFormatUSD = newnf.CurrencyFormatter(currs.usd);
var currencyUSD = currencyFormatUSD.format(fractionalNumber);
// Apply a specific currency, language, and region (France, then Ireland)
var currencyFormatEuroFR =newnf.CurrencyFormatter(currs.eur, ["fr-FR"], "ZZ");
var currencyEuroFR = currencyFormatEuroFR.format(fractionalNumber);
var currencyFormatEuroIE =newnf.CurrencyFormatter(currs.eur, ["gd-IE"], "IE");
var currencyEuroIE = currencyFormatEuroIE.format(fractionalNumber);
// Include fractions with a whole number
var currencyFormatUSD1 =newnf.CurrencyFormatter(currs.usd);
currencyFormatUSD1.fractionDigits = 2;
var currencyUSD1 = currencyFormatUSD1.format(wholeNumber);
// Group integers
var currencyFormatUSD2 =newnf.CurrencyFormatter(currs.usd);
currencyFormatUSD2.isGrouped = 1;
var currencyUSD2 = currencyFormatUSD2.format(fractionalNumber);
// Formatted using currency code instead of currency symbol
var currencyFormatEuroModeSwitch = newnf.CurrencyFormatter(currs.eur);
currencyFormatEuroModeSwitch.mode = nf.CurrencyFormatterMode.useCurrencyCode;
var currencyEuroCode = currencyFormatEuroModeSwitch.format(fractionalNumber);
// Return back to currency symbol
currencyFormatEuroModeSwitch.mode = nf.CurrencyFormatterMode.useSymbol;
var currencyEuroSymbol = currencyFormatEuroModeSwitch.format(fractionalNumber);
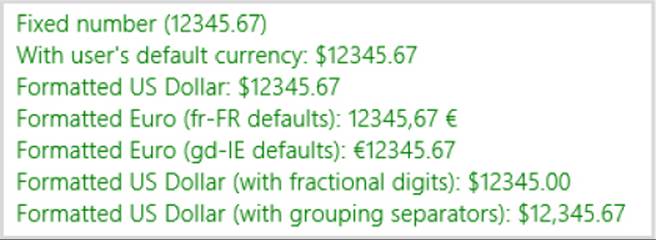
The output of this code is as follows:
The other number formatters all work like this, so I’ll leave it to you to check out the details in the documentation and the scenarios 1–4 of the sample. In addition, scenario 5 (js/RoundingAnd-Padding.js) demonstrates the use of rounding and padding capabilities of the NumberFormattingAPI, which involves the IncrementNumberRounder and SignificantDigitNumberRounder classes, along with the RoundingAlgorithm enumeration providing the options: none, roundDown, roundUp, roundTowardZero, roundAwayFromZero, roundHalfDown, roundHalfUp, roundHalfTowardZero,roundHalfAwayFromZero, roundHalfToEven, androundHalfToOdd.
Scenario 6 (js/NumericalSystemTranslation.js) shows use of the NumeralSystemTranslator class that converts between the common Latin system and a wide variety of others used around the world. Refer to NumeralSystem values for the options. And scenario 7 shows how to do number formatting with Unicode extensions to language tags, such as a tag ofja-jp-u-nu-arab.
To format dates and times, we turn now to the Windows.Globalization.DateTimeFormatting namespace, where we find the DateTimeFormatterclass along with many enumerations for the different ways to formats seconds, minutes, hours, days, months, and years. To use the API, you instantiate a formatter object specifying the desired formats and applicable languages. (There are no less than seven separate constructors here!) You then set options like the clock, geographicRegion, and so forth and call its format method with the desired Date value. You can even apply custom formats, if desired. Many such variations are demonstrated in the Date and time formatting sample, including tags with Unicode extensions in scenario 5 and time-zone handling in scenario 6. I trust a small code snippet will suffice here (from scenario 2, js/stringtemplate.js):
var mydatefmt1 = new Windows.Globalization.DateTimeFormatting.DateTimeFormatter(
"month day");
var mytimefmt1 = new Windows.Globalization.DateTimeFormatting.DateTimeFormatter(
"hour minute ");
var dateToFormat = new Date();
var mydate1 = mydatefmt1.format(dateToFormat);
var mytime1 = mytimefmt1.format(dateToFormat);
The other bit of relevant code from the SDK is the Calendar details and math sample. A world-ready app must not make assumptions about how time periods are computed or compared because this can vary with regional calendars. This is why the extensive Windows.Globalization.-Calendar class contains ten distinct add* methods that range from addNanoseconds to addEras, along with its compare and compareDateTime methods (and a bunch to get all the little bits of calendar-related text). In other words, drill it into your mind now to never, ever use arithmetic operators on date and time values because they won’t work properly in every locale. Even where you think you know what you’re doing, you can get wrong answers when situations like daylight savings time get involved, where the number of hours in two days of every year will not actually be 24!
The bottom line is although we make many assumptions about calendar math in day to day life, where exact precision isn’t needed, we must avoid writing code using those same assumptions. For example, if I say “I’ll get back to you in a month” and today is February 12th, do I really mean March 12th or something else? What I don’t want to do in code is just add 1 to the month (even if I do remember to check for December!). Instead, I should always use Calendar.addMonths method.
Sorting and Grouping
Just as a world-ready app cannot make assumptions about comparing date and time values, it cannot make assumptions about how strings are sorted. Every language has its own way of sorting that doesn’t necessarily have anything to do with the values of the character codes involved. I was reminded of this just recently: my work on this second-edition chapter coincided with the opening of the 2014 Winter Olympics in Sochi, Russia (or, I should write, ![]() ). During the opening ceremonies, some were surprised that the Zimbabwe team (
). During the opening ceremonies, some were surprised that the Zimbabwe team (![]() in Russian) entered ahead of Chile (
in Russian) entered ahead of Chile (![]() ), which happened because З comes before
), which happened because З comes before ![]() in the Russian alphabet.
in the Russian alphabet.
The bottom line here is that you should never sort strings by character code or based on any assumptions you might think would apply: always use a language-aware API instead.
For Windows Store apps written in HTML and JavaScript, you can use the localeCompare method that’s already built into strings (even for individual characters). This performs the comparison based on the user’s current language. You can also use a string’s tolocaleLowerCase andtoLocaleUpperCase methods. In Chapter 7, “Collection Controls,” specifically in “Quickstart #4: The ListView Grouping Sample,“ we also saw how to use the Windows.Globalization.Collation.Character-Groupings API to create proper groupings by the first character of item titles.
Fonts and Text Handling
Thanks to Unicode and the ability of HTML to directly handle text in different languages, there’s little you need to do to make text appear properly within your layout. For example, if you look at the Language font mapping sample, pages like html/scenario2.html that contain this markup:

just show up like you expect they would (and if you read Hindi, you’ll see that this is just jibberish):

What this particular sample is meant to demonstrate is the Windows.Globalization.Font.-LanguageFontGroup object, which provides specific font recommendations for different parts of the UI. Once created using a specific BCP-47 tag, the object contains a number of properties, each of type LanguageFont, such as uITextFontand uIHeadingFont (notice the odd casing again). Each LanguageFont object then contains properties of fontFamily, fontStretch, fontStyle, fontWeight, and scaleFactor. Through a couple of helper functions in js/langfont.js, which are deceivingly added to the WinJS.UI namespace without being part of WinJS itself, these recommendations are applied to elements in the DOM simply by setting the appropriate styles for those elements.
Be clear that these font recommendations are really refinements and not necessary for basic functionality. As scenario 4 of the sample demonstrates, a basic English font (with Unicode characters, of course) applied to mixed English/Japanese text will still render the Japanese but perhaps not optimally. Applying the recommended font will make that refinement.
With text, let me remind you of a few APIs in the Windows.Data.Text namespace that we saw briefly in Chapter 15, “Contracts,” and are worth mentioning again. These are the ones for semantic text querying (the SemanticTextQuery class), segmenting words (WordsSegmenter), segmenting selection ranges (SelectableWordsSegmenter), and tokenizing identifiers within strings (UnicodeCharacters). For demonstrations of these, refer to the Semantic text query sample, the Text segmentation API sample, and the Unicode string processing API sample.
The other aspect to working with different fonts and languages is how these affect your overall layout, something we didn’t go into in Chapter 8. This is discussed in the documentation on How to adjust layout for various languages and support RTL layout, but let me summarize that material and add a bit more.
First of all, a world-ready app leaves extra space for various bits of content like headings and labels because the words and phrases will be longer in some languages and shorter in others. The general guidelines are to leave at least 30% more room over what’s needed in English for typical strings and as much as 300% for really short strings or single words. As a simple example, the English word “wrench” translates into German as “Schraubenschlüssel”; the word “click” (if I’m to trust Bing Translator), translates into Greek as “Κάντε κλικ στο κουμπί” (literally “do click on the button”—the click word is just κλικ). You might need word wrapping in some cases too!
For all such purposes you can and should use the :lang()/:-ms-lang() pseudo-class selector in CSS to adjust styles like width for specific languages. Be sure to test your app with those languages or test thoroughly with the pseudo-language (see “Testing with the Pseudo Language” later).
Secondly, different languages flow text in directions other than the left to right (and top to bottom), like English and many Indo-European languages. Arabic and Hebrew, for instance, read right to left (RTL) instead of left to right; a few will flow top to bottom first, then right to left.
When making your app world-ready for RTL languages (considering that such markets are significant), you’ll want to support what is called mirroring in your layout. It really means reversing your layout, including images, the direction of the back button, the direction of animations, panning directions, and so forth.
Fortunately, HTML and CSS layout automatically accommodate this, and the WinJS stylesheets, ui-light.css and ui-dark.css, set the CSS direction style appropriately as follows (something you should use on the element level for RTL languages rather than align):
html:-ms-lang(ar, dv, fa, he, ku-Arab, pa-Arab, prs, ps, sd-Arab, syr, ug, ur, qps-plocm) {
direction: rtl;
}
In fact, look around in the WinJS stylesheets and you’ll find many adjustments made for RTL languages with :-ms-lang, specifically with margins and padding. By using HTML, CSS, and WinJS—including built-in controls—much of the mirroring is taken care of automatically. Here My Am!, for instance, just works in Hebrew.
With images, you can reverse them when needed by applying a transform:scaleX(-1) style to the necessary elements. If, however, you have images that really need to be replaced (as when some parts would be mirrored but other parts would not), you can use layoutdir-RTL in the image filename in the same way we’ve seen for pixel densities and contrast. In fact, there are many qualifiers for use with resources that are described on How to name resources using qualifiers, something we’ll be looking at more closely in a moment.
Sometimes you’ll need to reverse a certain portion of text, as when mixing languages in the same paragraph. For this you can apply the unicode-bidi style in conjunction with direction. (Do note that numbers are generally direction-neutral so that they take on the directionality of their containing element, so you might need to set direction separately.) Along similar lines, you can also use the -ms-writing-mode style to flow text in just about any other direction, something you might use for an app that presents classical Chinese, Japanese, or Korean poetry.
Preparing for Localization
Once your app has been made world-ready and can handle just about any language and regional settings you want to throw at it, the next step is to make sure that language-specific resources in the app are cleanly separated from your HTML, CSS, and JavaScript and placed in your resources where the Windows resource loader (also referred to as the Resource Management System) can find them.
Before going further, there’s an excellent topic in the documentation on this subject, How to prepare for localization, which provides suggestions for translation and other details. It’s not productive to repeat all of that here, of course, so I’ll instead to break that guidance down into a couple of steps that you can apply to an app and its default language before adding support for additional languages. As you’ll see, one of these steps has nothing to do with the app package itself but has to do with localized resources you’ll need when submitting the app to the Windows Store.
Tip Early in your development work, reserve localized names for your app in the App Name section of the Windows Store dashboard.
Note The resource loader supports sparse localization for dealing with slight variations between similar languages or regions. It means that with languages like American English (en-US) and British English (en-GB), most of the app’s resources can be assigned to en-US with en-GB resources for only those bits that vary, like “color” vs. “colour” and changing “Contoso, Inc.” to “Contoso, Ltd.,” or vice-versa. You might also need to provide region-specific graphics, such as the logos under which you do business in those regions. In any case, because each resource is resolved individually according to the user’s preferences, an app running in an en-GB context will find those specific bits first, if they exist, otherwise the loader will look in the en-US resources. There is also support for dealing with specific language exceptions through the use of resources marked with the undetermined tag und. See How to manage language and region, step 4 (toward the end), for details, along with Language Matching.
Part 1: Separating String Resources
The first step in preparing for localization is to move language-specific or region-specific strings from source files into a string resource file and then to insert resource references where necessary. Coming up, in “Part 2: Structuring Resources for the Default Language,” we’ll set up the folder structure for this file and image resources that will then accommodate localized versions.
To create your first string resource file, right-click your project in Visual Studio’s solution explorer, select Add > New Item, and select Resources File (.resjson). Although you can change the filename, just leave it set to the default resources.resjson for now. Press Add, and the file will be created in your project root, where we’ll also leave it until Part 2.
Omitting a comment at the top, the contents of this file appear as follows:
{
“greeting” : “Hello World!”,
“_greeting.comment” : “This is a comment to the localizer”
}
As you can see, the file is just plain JSON where each property has a string identifier and a string value; any resjson file can have as many properties as you want.
Clearly, too, there is a relationship between the two entries above. The first entry of the form <identifier> : <value>, is a real string resource that maps a valid JSON identifier (no whitespace) to a string value. This is what the resource loader will use to replace references to the identifier with the string value.
Any entry that begins with an underscore, as in <_identifier.comment> : <value> (a conventional form), is ignored by the resource loader. Such entries provide notes for a translator so that they can fully understand how the string is used and specific parts that shouldn’t be translated. A second optional entry, <_identifier.source> : <value>, provides the original string in the default language, which is very helpful for reference.
If you want to see some more extensive resjson files, open the Application resources and localization sample and look in the strings folder under a particular language. In the ja/resources.resjson file, for example, you’ll see the string resources along with both comment and source entries:
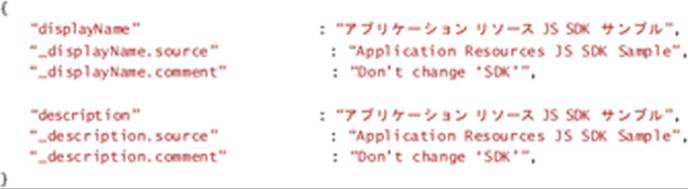
Turning back to your own app with the new resources.resjson file in hand, we’re now ready to go on a search-and-replace mission throughout the app project, looking for localizable strings, extracting them into the resource file, and replacing them in the source files with an appropriate reference. The three primary places we need to look at are your HTML files, JavaScript files, and the app manifest. To demonstrate, I’ll show what I did with the Here My Am! example (to which I’ve added a resources.res-json file).
Note CSS files can contain string literals in the content and quotesstyles; however, resource lookup from CSS is not supported for Windows Store apps. Localization must be done in CSS with the :langand :-ms-lang pseudo-selectors.
JavaScript: Let’s start with JavaScript, where you need to scrub your code for string literals, including any you are drawing to a canvas. In Here My Am! I found only a couple localizable strings, namely a folder name used in the Pictures library, text for placeholder images (six instances total), and the title and description used when formatting text for the Share contract and live tiles (pages/home/home.js):
var folderName = “HereMyAm”;
data.properties.title = “Here My Am!”;
setPlaceholderImage(“photo”, “Tap to capture photo”);
setPlaceholderImage(“mapDiv”, “Could not create the map.”, “Tap to try again.”);
return “At latitude “ + lat + “, longitude “ + long;
return “At (“ + lat + “, “ + long + “)”;
and the Settings commands in js/default.js:
e.detail.applicationcommands =
{
“about”: { title: “About”, href: “/html/about.html” },
“help”: { title: “Help”, href: “/html/help.html” },
“privacy”: { title: “Privacy Statement”, href: “/html/privacy.html” }
};
Note that in home.js English strings are used for exceptions, but because they’re only for debugging purposes they don’t need to be localized.
Extracting the appropriate strings into resources.resjson, then, that file appears as below where I’m using regular comments to identify where the strings are used. Note that I’ve include the folder name and share title although they won’t typically be translated, and note that the format strings are used in the formatLocation function in js/home.js:
{
// pages/home/home.js
“foldername” : “HereMyAm”,
“_foldername.comment” : “Not translated”,
“share_title” : “Here My Am!”,
“_share_title.comment” : “Not translated”,
“location_formatShort” : “At (%s, %s)”,
“_location_formatShort_comment” : “Used to format a short location as in ‘At (120, 45)”,
“location_formatLong” : “At latitude %s, longitude %s”,
“_location_formatLong_comment” :
“Used to format a long location, ‘At latitude 120, longitude 45”,
// default.js
// Settings panel commands
“about_command” : “About”,
“help_command” : “Help”,
“privacy_command” : “Privacy Statement”,
}
I highly recommend that you organize your entries by source file like this, and you can also use multiple resource files if you like, as explained in “Part 2” coming up. Also be careful about how you reuse the same string that occurs in multiple places. If it’s for the same kind of UI with the same intent, that’s fine, but if the usage context is different, make a separate copy of the string because it might translate differently for that context. In the resources above, notice how I also included a comment for location_formatShort because the word “At” by itself probably needs more context to translate properly.
With the strings separated as resources, we can now use the resource loader to obtain those strings at run time. This can be done in two ways. First is with the WinRT APIs directly, namely Windows.-ApplicationModel.Resources.ResourceLoader.getString:
var loader = new Windows.ApplicationModel.Resources.ResourceLoader();
var text = loader.getString(‘location_formatShort’);
or, more simply, with the WinJS.Resources.getString wrapper:
var text = WinJS.Resources.getString(‘location_formatShort’).value;
that also happens to work in the web context where WinRT isn’t defined (see scenario 12 of the Application resources and localization sample). Note that getString returns an object that has the string in its value property along with lang and an empty flag indicating if the resource wasn’t found.
The concise WinJS method is clearly helpful in cases like our settings commands because we can call it inline. Thus, in our code we just replace the string literals with the WinJS call, such as the following in pages/home/home.js:
data.properties.title = WinJS.Resources.getString(‘share_title’).value;
and the following inside the object for the Settings commands:
“about”: { title: WinJS.Resources.getString(‘about_command’).value,
href: “/html/about.html” },
Note that WinJS, being optimized for common scenarios, supports loading strings in the user’s default language only. The WinRT ResourceLoader class, on the other hand, is much more flexible and can load a string for any specific language and apply a different language for each app view. You’ll need to use that API when your requirements exceed what WinJS provides.
And that’s really it for JavaScript. If you’ve made these changes to your app, now is a good time to use the Build > Build Solution command in Visual Studio. This will compile the resources.resjson file into a more efficient binary format called resources.pri, ignoring entries that begin with an underscore. Doing an occasional build (without starting the app) is a good practice when working with resources so that you can clean up any problems in your files, such as duplicate entries or syntax errors. Then you can run the app to see the resource loader in action—mostly by seeing no difference from the app as it was before! Be sure to test all the code paths that were affected, however, to ensure that all the strings are being loaded properly.
Manifest: Let’s turn now to the manifest, where the story is even simpler because there’s no code involved. The textual pieces here that might need localization are
• The Display Name, Description, and URI Template fields on the Application tab.
• The Short Name on the Visual Assets tab.
• Any text descriptions for specific entries on the Declarations tab, such as the Share Description for a Share Target declaration.
• The Package Display Name on the Packaging tab. (You would change the package name only if you were going to submit the app to the Store under a different name in certain markets, in which case it’s a different app package entirely.)
• Possibly some URIs on the Content URIs tab.
While we’re looking at the manifest, note the Default Language setting on the Application tab. This is what defines the app’s default or fallback language if the user runs the app with a language that isn’t provided for in your resources. We’ll also come back to images in the manifest in “Part 2.”
Looking at all the strings in the manifest, extract these to your resources.resjson file, giving them appropriate identifiers. Again, if you have some strings in the manifest that match those elsewhere in the app, carefully evaluate them to determine if they can all use the same resource. When in doubt, keep them separate (the overhead is quite small). In the case of Here My Am!, the app’s display name and the string used for the header on the main page are the same and have the same usage, so they can refer to the same resource.
To refer to those resources in the manifest, use ms-resource:<identifier>. For example, I moved the Application > Display Name value into the resource file and called it app_title, so in that field of the manifest editor I simply write ms-resource:app_title. I did the same for the description and the package display name.
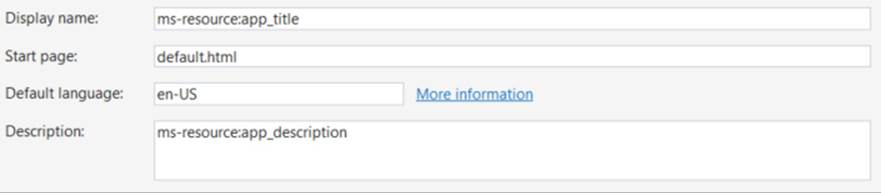
Once you’ve made these changes, run the app and make sure that the text on your tile, if you’re using it, shows up properly. You might temporarily check the Visual Assets > Show Name options so that you can see the name, but be sure to uncheck these boxes before you ship!
Sidebar: Localized Strings in Tile and Toast XML Payloads
As described on Globalization and accessibility for tile and toast notifications, XML payloads for tile and toast notifications use the ms-resource: syntax to identify string resources in text elements. This will trigger the resource loader’s lookup mechanism when the tile or toast is rendered, and this works regardless of whether the notification was issued locally, obtained from a web service, or received as a push notification. The web services just need to be sure they use the app’s particular resource identifiers.
A web service can also issue localized tile updates directly. In this case, an app will generally append query strings to the service URI to communicate the desired language, updating those parameters as necessary when the language changes (see “Localization Wrap-Up” for details). An app can also combine this with using regional web services that help localize the update content.
If you configure a periodic tile update in your manifest (on the Application tab), you won’t be able to modify the URI from code, obviously. Instead, include the tokens {language} and {region} in your URI parameters, which Windows will replace at run time with the settings. For example, if you give the URI http://<host>/<service>?lang={languages}®ion={region}, your service will receive a parameters string like ?lang=en-US®ion=US.
Finally, remember to set the lang attribute in various elements of your tile and toast XML payloads so that Windows can select the proper font for text content. Also, use the addImageQuery option in the payload to append query strings for scale, contrast, and language to any requests made for remote images. Refer to “Using Local and Web Images” in Chapter 16.
HTML: The final place we need to look for strings is our HTML, which I’ve saved for last because it’s the most involved. In HTML, really scrub, scrub, scrub your markup for any hard-coded text that will become visible in the UI. Check the body content of elements like p, h1, span,div, button, option, and so on, as well as the value of attributes like title, alt, aria-label, etc. Also look inside WinJS
controls like AppBar and Flyout, and look for any embedded URIs that you’ll want to localize, including those of services you employ and content you show in a webview or iframe. Note, though, that title elements in a page head are not shown and do not need localization.
In Here My Am! I found lots of strings in pages/html/home.html, which I’ve highlighted below:
<header id=”header” aria-label=”Header content” role=”banner”>
<h1 class=”titlearea win-type-ellipsis”><span class=”pagetitle”>Here My Am! (16)</span></h1>
<section id=”section” aria-label=”Main content” role=”main”>
<div id=”photoSection” class=”subsection” aria-label=”Photo section”>
<h2 class=”group-title” role=”heading”>Photo</h2>
<img id=”photoImg” src=”#” alt=”Tap to capture photo” role=”img”/>
<div id=”cannotCapture” class=”errorOverlay win-type-x-large”>
Widen the view to capture a photo</div>
<div id=”locationSection” class=”subsection” aria-label=”Location section”>
<h2 class=”group-title” role=”heading”>Location</h2>
<img id=”errorImg” src=”#” alt=”Could not create the map. Tap to try again.” Role=”img”/>
<div id=”noLocation” class=”errorOverlay win-type-x-large”>
Unable to obtain geolocation;<br/> use the app bar to try again.</div>
<div id=”retryFlyout” data-win-control=”WinJS.UI.Flyout” aria-label=”Trying geolocation”
data-win-options=”{anchor: ‘mapDiv’, placement: ‘bottom’, alignment: ‘center’}”>
<div class=”win-type-large”>Attempting to obtain geolocation...</div>
</div>
In default.html, I also found labels and tooltips in the data-win-options attributes of the appbar commands (and I’m omitting some of the other markup for brevity):
<div id=”appbar” data-win-control=”WinJS.UI.AppBar” data-win-options=””>
<button data-win-options=”{id:’cmdPickFile’, label:’Load picture’, icon:’browsephotos’,
section:’global’, tooltip:’Load a picture through the file picker’}”>
</button>
<button data-win-options=”{id:’cmdRecentPictures’, label:’Recent pictures’,
icon:’pictures’,
section:’global’, tooltip:’Browse recent pictures taken in the app’}”>
</button>
<button data-win-options=”{id:’cmdRefreshLocation’, label:’Refresh location’,
icon:’globe’,
section:’global’, tooltip:’Refresh your location’}”>
</button>
</div>
Tip When preparing for localization, consider whether your appbar icons have a universal meaning. If not, they’ll also need to be localized. Fortunately, the icon values are strings and can be localized as such, in which case you can treat them like the labels and tooltips.
Other affected files in this app include all of those in the HTML folder that are used for Settings commands. With such commands, be especially careful to note the short header labels that might be in a div amongst a bunch of other markup. Leave nothing behind!
Once you’ve located your strings, copy them as before to resources.resjson. This will likely be an extensive workout with copy and paste, so grab some refreshments and go for it. It’s also fine to have HTML in these strings—they’ll just be inserted into the markup and they’ll render as such if you attach them to a property like innerHTML, but don’t include the surrounding tag (we’ll need it shortly). For example, in html/about.html I have a number of p elements with text, such as:
<p>Here My Am!<br/>Version 2.0.0.0<br/></p>
for which I make the following string in the resources (no p tag):
“about1” : “Here My Am!<br />Version 2.0.0.0<br />”,
Using data-win-res attributes: Now comes the fun part. How do we reference the string resources in markup? If you think about it a little bit, we have to run some piece of code to go through and replace whatever references we make with the appropriate string from the resource file. Hmmm. Haven’t we seen something like this before? Indeed we have. With controls, we added data-win-control attributes to the markup and used WinJS.UI.processAll or WinJS.UI.process to run the code to instantiate the control. We have a similar setup for resources: a data-win-resattribute and WinJS.Resources.processAll, the latter of which should be called in each page’s processed or ready method (processed is a good place because it’s called after WinJS.UI.processAll), or wherever else HTML content like the appbar is loaded, such as in the app’s activatedhandler after WinJS.UI.processAll (so that the controls are instantiated).130 Here’s what you do in markup:
• Replace attributes and their string values with data-win-res=”{<attribute> : ‘<identifier>’}” where <attribute> is the original attribute name and <identifier> matches the desired string in the resource file, contained in single quotes.
• Where there are multiple attributes in the same element, you can separate each <attribute> : ‘<identifier>’ pair with a comma.
• When the string is directly inside a tag, we use data-win-res with the equivalent attribute name, such as textContent for a div, p, or span. If the string contains markup, use innerHTML instead, but use it only when necessary because textContent is much faster.
• For hyphenated attributes like aria-label, use the syntax {attributes: {‘<attribute>’ : ‘<identifier>’}} in the data-win-res value, using single quotes around <attribute>. This is how you combine localization and accessibility together.
• For properties of WinJS controls that would normally appear within data-win-options, place those in data-win-res with the syntax {winControl: {<property> : ‘<identifier>’}}. Multiple properties are again separated with a comma within the inner { }’s.
Here are some examples as modified from the earlier markup:

Tip If you add a data-win-resattribute and it’s not working, make sure you are really calling WinJS.Resources.processAll in the page control’s readyor processedmethod, otherwise that page’s resource strings won’t be set.
When WinJS.Resources.processAll goes through the DOM, it doesn’t actually remove any of the data-win-res attributes; it just processes those values and adds other attributes to the element that contain the string resource. The advantage of this is that a later call to processAll will go through the DOM and refresh all those strings. That means that when handling the WinJS.Resources.oncontext-changed event, which tells you when the language changes, you can call processAll again and your UI appears in that new language! We’ll add this little piece of code later on once we’ve added a few more languages to Here My Am!.
It also means that if you want to perform WinJS data binding in conjunction with a string that originates in your resources, simply include data-win-bind attributes inside those strings, assign that string to an element’s innerHTML property within data-win-res, and then be sure to callWinJS.Resources.processAll before calling WinJS.Binding.processAll. This is demonstrated in scenario 8 of the Application resources and localization sample (html/scenario8.html and js/scenario8.js):
HTML: <p id=”messageCount” data-win-res=”{innerHTML: ‘scenario8MessageCount’}”>
Resources: “scenario8MessageCount” : “You have <span
data-win-bind=\”innerText:count\”></span> message(s)”,
And with that (except for the following sidebar that I’ve cleverly inserted), we’re ready for the next step that will take care of our image resources and set us up to localize all this content we’ve extracted.
Sidebar: String Resources in Settings Flyouts
When localizing Here My Am!, one of the more challenging pieces of markup to work with were the HTML pages for settings flyouts, namely about.html, help.html, and privacy.html in the project’s HTML folder. These pages are not loaded until the settings command is invoked, and because that’s happening all within WinJS, we have to use the flyout’s beforeshow event to call WinJS.Resources.processAll for the flyout’s markup. To catch that event, I added onbeforeshow : beforeShow in each flyout’s data-win-options string and then this piece of code within ascript tag at the end of the body element:
function beforeShow() {
WinJS.Resources.processAll();
}
beforeShow.supportedForProcessing = true;
where the last line is necessary because WinJS will be calling WinJS.UI.processAll when the page is loaded. In any case, this works just great for patching up the string resources, including setting a webview’s src attribute with a localized URI. Note, however, that this doesn’t work foriframe attributes because that’s blocked from processAll and will throw an exception that complains about something not being marked with supportedForProcessing. Bottom line is that you can’t use data-win-res with an iframe.
Fortunately, the simple solution is to give the iframe an id (say privacyFrame), load the string manually in the beforeshow handler, and then set the iframe.src attribute:
document.getElementById(“privacyFrame”).src =
WinJS.Resources.getString(‘privacy_URI’).value;
This code is included in comments of the privacy.html file of Here My Am! for this chapter.
Part 2: Structuring Resources for the Default Language
In “Part 1: Separating String Resources,” we created only a single resources.resjson file in the root folder of the project and we deferred any work on images. The next step is to introduce a little more structure into the project that will allow us to add localized resources for additional languages, including our images.
Starting with strings, do the following steps:
12. Create a strings folder in the root of your app project.
13. Within that folder, create a subfolder that matches the BCP-47 language tag specified as the default language in the manifest (for example, en-US, fr-FR, ja-JP, or just the base language like en or ru).
14. Move your resources.resjson file into that folder.
If you run your app again at this point, you should see that everything still works. If you go back to the How to name resources using qualifiers topic we mentioned earlier, you’ll see that the resource loader is perfectly happy when you use qualifiers like a BCP-47 name as a folder name. It basically parses entire folder names looking for qualifiers, so you can create deep hierarchies to sort your resources however you like. That is, you can sort by contrast or scale first, if desired, and include language suffixes in the filename (where the format is lang-<BCP-47 tag>). What’s more, you can create secondary .resjson files in these folders as well and play some other tricks. See “Sidebar: Secondary String Resource Files” for details.
Anyway, what you’ve just done by moving your resources into a folder for your default language is set your fallback language resources—this is what the resource loader will turn to if it cannot find a more specific match for the user’s current language. Finding a match is actually a sophisticated process wherein the resource loader measures a kind of “distance” between the user’s preferences and the available resources and chooses whichever is closest. This makes it possible to select en-GB as a closer match to en-AU than en-US, for example. Generally, though, it means that the resource loaded will search for a specific match like de-DE (German-Germany) first, then search for the next closest language using the base qualifier de, and then eventually fall back to your default language (if there are no resources for the user’s other languages). The short of it is that you should always make sure the language identified in your manifest is fully populated with your full set of resources! Then even if you don’t happen to localize some of those resources (say, for exact cultural alignment with images), one will still be found. For the complete story on this subject, refer to Language Matching in the documentation.
Sidebar: Secondary String Resource Files
Both WinRT and WinJS are able to work with secondary string resource (.resjson) files, allowing you to organize your strings in multiple files, if desired. For example, it’s common to separate error strings into a file called errors.resjson. When referencing a string identifier in one of these secondary files, all that’s needed is that you use the syntax /<file>/<identifier> instead of just <identifier>. This syntax works in HTML, JavaScript, and the app manifest. See scenario 5 of the Application resources and localization sample for an example.
Something else you can do with .resjson files is name them with other qualifiers for contrast, scale, home region, and so forth and even organize those files under any old folder. This is demonstrated in scenario 13 of the same sample, where it has many different .resjson files underneath strings/scenario13, each of which is named as scenario13.<qualifiers>.resjson. Because the folder name itself doesn’t use a standard qualifier, you have to do a little more work to get at everything, using the Windows.ApplicationModel.Resources.Core.Resource-Manager API, but it can be done if you’re a serious resource junkie!
With images, we’ve already seen that if you have something like an images folder and you place files like logo.contrast-high_scale-140.png there, you can just refer to that file with a nonqualified relative URI like /images/logo.png and the resource loader will find them.
To prepare for localization, we only need to move those images into a folder for our default language, as we did with strings. Because you’re already using relative URIs to refer to your images (with or without ms-appx:///), you can use whatever folder path you want as your image root. There, create a folder with the appropriate BCP-47 tag and move all your default language images into that one. In Here My Am!, for example, images live in the images folder, so all I need to do is create an en-US folder under there, move all the images, and all my references such as/images/tile.png will still work. And because they now live in a folder that corresponds to the app’s default language, they become the fallback images.
You can place images in as many folders as you like, provided that they each have language-specific folders therein. It’s probably most convenient, however, to use a single root folder, or just a few; with Here My Am!, at the end of this step I had just two language folders in the project:
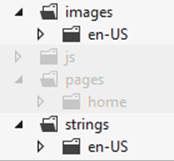
In your own app, then, look for app image references throughout your project. In HTML, look especially for img elements. In CSS, look especially for background-image styles. In the manifest, look at the Visual Assets tab for logos and badges, along with the Declarations tab for logos that are associated with file type/URI associations, for instance. In JavaScript, finally, check any URIs you might be assigning to element properties or CSS styles, as well as any you might be referring to in the XML for tiles, badges, and toasts.
After that, evaluate each graphic to determine whether it will require localization, including those that need to be reversed generally for right to left languages (for these you can use single copies for all RTL languages, named with the layoutdir qualifier; refer back to How to name resources using qualifiers). For images that don’t require localization (perhaps your tile and other logos, along with plain graphic elements you use in your layout), keep them in your fallback language folder. These will be used if no other match to the current set of qualifiers is found (language, scale, contrast, etc.) Depend on the fallbacks only if you have no other variants.
With that, we’re now ready to localize!
Sidebar: Managing Overall Package Size
The potential multiplicity of images with (scale variants * contrast variants * language variants) and potentially others (like direction) is an important consideration for your app package: more images will make the package size larger. Fortunately, this mainly affects your upload package to the Windows Store: provided that you’ve structured your resources as we’ve been discussing, the Store and the Windows deployment manager automatically minimizes the size of the download when a user installs the app. The system will download only those resources that the user needs based on their language, device characteristics, and other settings. (You can control this from Visual Studio, and we’ll look at additional aspects of packaging in Chapter 20.)
This works even if you add new language resources at a later time (or update a set of resources of a language), provided that you don’t update any other code files (.js, .html, and .css) and don’t update the package’s version number. That is, making a non-esource change will update the app for all users across languages, rather than just making a new set of resources available.
Irrespective of this automatic download optimization, it’s worth carefully evaluating exactly which images really need to vary with these different factors, especially the larger ones, and to optimize the degree of compression for all of your images to minimize the package size. Ask especially whether your splash screen image—typically one of the largest, especially at the 180% scale—needs to be localized at all, and even test whether the 180% image will look good when scaled down to 140%, 100%. If your splash screen, in other words, is just imagery with a sufficient contrast ratio and you have used a universally acceptable app name, one file might work everywhere.
Note also that you don’t want to provide an unqualified resource if you provide any other specific variants, because a scale variant will always be matched before the unqualified one. As a result, the unqualified resource will just take up space in the app package but will never be used.
Sidebar: The Application Resources and Localization Sample
The Application resources and localization sample shows many different scenarios for managing and referring to localized resources. It’s worth spending some time with this sample because it will reinforce much of what we’ve discussed here: image resources (scenario 1); string resources in HTML, JavaScript, and the manifest (scenarios 2–4); using secondary resource files (scenario 5); sending language info to web services (scenario 7); combining resources and data binding (scenario 8); using resources with hyphenated attributes (scenario 9); triggering and detecting language changes (scenarios 10 and 6); overriding the default language context (scenario 11); using WinJS for resource lookup in the web context (scenario 12); and multidimensional fallback(scenario 13).
Part 3: Creating a Project for Nonpackaged Resources
Everything we’ve talked about so far has to do with the resources that are included in the app package that you’ll eventually upload to the Windows Store. All of this is well and good, but I want to alert you now to another set of resources that you’ll need as part of the Store onboarding process: localized text for your app’s Store page, localized promotional graphics and screenshots, localized search keywords, and localized names for in-app purchases. All of these are essential for presenting your app well in local markets, especially the keywords.
The reason why I’m telling you about these now is that you won’t be asked for them until very late in the onboarding process, namely after you’ve uploaded the app package. Early on, when you first set up an app, you can reserve multiple app names and also indicate the markets where you’d like to make the app available. These choices generally guide your localization efforts, of course. But unless you know that the Store is going to ask for a bunch of other resources later on, you’ll find yourself desperate to create them at the last minute. If you’re unprepared, then, it will mean going through another round of (rushed) translation and additional expense. It’s much more efficient, then, to include your Store information with everything else you need translated.
As a preview to what we’ll encounter in Chapter 20, here’s what the Store dashboard will ask for on its Description page but only after you’ve uploaded your app package (in the order of appearance):
• The full text for your product page in the Windows Store (up to 10,000 characters).
• Short descriptions of your app’s key features (up to twenty 200-character strings).
• At least one but as many as nine screenshots and representational graphics.
• Captions for each screenshot and graphic (200 characters each).
• Notes that are visible to customers, such as release notes.
• Short descriptions of required hardware configurations (up to eleven 200-character strings).
• Keywords (45-characters each) used to match customer searches in the Store. These are not visible to customers directly but very much affect app visibility.
• Copyright and trademark information (200 characters).
• Additional license terms (10,000 characters).
• Four promotional images that affect the chances of your app being featured.
• Your website URI.
• Your support contact information (email address or URI).
• URI for your privacy policy, which would ideally be available in multiple languages.
• Descriptions (100 characters each) for every one of your in-app purchases.
Clearly, there is quite a lot of localizable content here, none of which you want to leave until the very end of your project!
If nothing else, localize your search keywords Although it’s entirely allowable to make a non-localized app available in any number of markets, the chances that consumers in those countries actually finding your app via search is next to nil because they’ll be searching the Store using terms in their own language. If you submit an app with English keywords like “weather,” it simply won’t be found by users searching for Wetter in German, Погода in Russian, Cuaca in Indonesian. At the very least, then, make a definitive list of keywords and get them translated for each of your target markets.
Once you’ve collected all your localizable resources for the Store, you’ll want to again structure them in such a way that makes it easy to involve translators. You could include everything as part of your app project in Visual Studio, but that would just make your package bigger with no benefit to your customers. Instead, create a separate project expressly for the sake of managing these Store resources. This way you can use all the tools that we’ll be talking about next in “Creating Localized Resources” and have them all ready to go at the same time you build your app package for upload. Trust me: doing so will save you much anxiety when you’re ready to release you app!
Creating Localized Resources: The Multilingual App Toolkit
Congratulations! With all the work you’ve done earlier in this chapter, you should have an app that’s completely ready to be localized. The process here is really just one of acquiring translated strings for your various resjson files and translated copies of any necessary images—including all those in your separate project for Windows Store resources.
First tip If you have images that contain text, make sure that you have strings in your resources that match the image content, as you’d use for imgalt attributes and aria-label attributes. In doing so, you’ll obtain the necessary translations for the graphics in the process of localizing the strings.
Second tip When doing business with your app in different regions, be attentive to the region’s privacy requirements and make sure your privacy statement contains region-specific sections or that you provide fully localized privacy statements.
If you like, you can just send your resjson files, along with the text inside images, to an appropriate translator or translation agency and have them do the work. When you get them back, simply create additional BCP-47 folders in your strings and images, drop in those files, and away you go. You’ll see such structures in the Application resources and localization sample, as we’ve referred to before.
Such manual translation can take a long time, however, and can become expensive. This is partly because professional translators don’t necessarily have tools to work with resjson files other than a text editor. What they do have—namely sophisticated tools that help them track the status of translation jobs and much more—work with an industry-standard XML format known as XLIFF (XML Language Files). So it behooves us (and our cash flow!) to make life as easy as we can for translators, even reducing their job to reviewing suggested translations rather than generating everything from scratch.
Let me point to a couple of highly valuable resources. First is the Microsoft Language Portal, http://www.microsoft.com/Language, where you have access to very large translations dictionaries of terms as they’ve appeared in the UI of Microsoft products. These terms are also available asdownloadable dictionaries on MSDN if you have a subscription. Various other resources (like www.bing.com/translator) also exist for general translation, and the Microsoft Manual of Style also has a chapter on localization that you might find helpful.
Beyond all these, a very helpful tool that provides automated assistance using these same dictionaries is the free Multilingual App Toolkit. Once you’ve downloaded and installed the Toolkit, load your project into Visual Studio and select the Tools > Enable Multilingual App Toolkit menu item. You have to do this for each project separately, because what happens from here on is that the Toolkit will be generating multilingual resources for your app—in the resources.pri file and separate .xlf (XLIFF) files—without you having to actually add any more .resjson files. Ultimately, then, you’ll have only a single resjson file in your project but a number of other files generated by the Toolkit.
Once you’ve enabled the Toolkit, a command appears on the Project menu called Add Translation Languages. This brings up the Translation Languages dialog, as in Figure 19-6, in which you select desired target languages. At the top of the list, the Pseudo Language option (qps-ploc) will be automatically checked; we’ll be using it later to test localization. This is something you typically want to do before doing specific localizations. Also note that many languages sport a “Microsoft Translator” logo, which means they can be mostly translated automatically, saving paid translators much time and saving you much money.
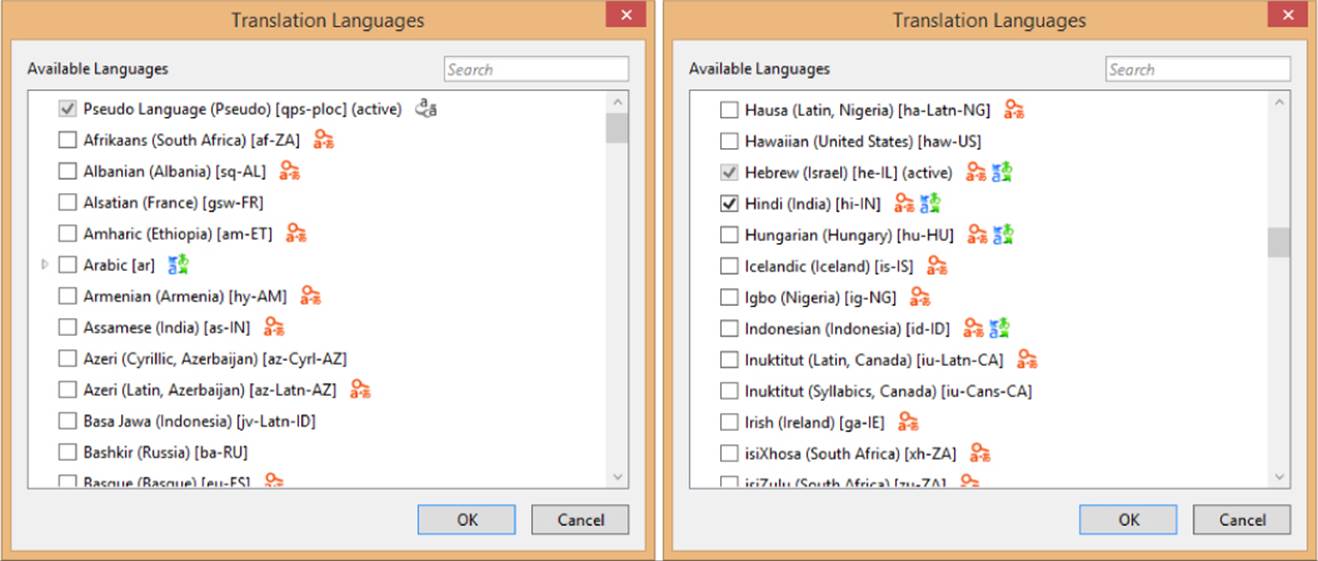
FIGURE 19-6 The Multilingual App Toolkit’s dialog for language selection. At left we see the option for Pseudo Language, an artificial language with lots of funky characters that represents the needs of most other languages.
Videos! For a video series on the Toolkit from the team who created it, see the following:
Introduction to the Multilingual App Toolkit (3m 50s)
Build Multi-language apps using the Multilingual App Toolkit (9m 01s), covers creating string resources as we’ve already discussed.
Test Multi-language apps using the Multilingual App Toolkit (5m 36s), covers what we’ll talk about in “Testing with the Pseudo Language” later on.
Localize Multi-language apps using the Multilingual App Toolkit (6m 40s) demonstrates the Multilingual App Toolkit Editor as we’ll see shortly.
Submitting your localized app to the Store (9m, 05s) highlights considerations for getting your app to the right markets.
Once you’ve made your selections (you can add more later), press OK and the Toolkit will create a folder in your project called MultilingualResources stocked with a bunch of XLF files (the ones the translators like). At first these will be mostly empty, but now here’s why it was worth the effort to build up your default resources.resjson file. Right-click your project in Solution Explorer and select Build or Rebuild, or use the Build > [Re]build Solution menu item. This will go through your string resources (including any localized variants you might have created already) and populate all the XLF files with all your strings. The process will also draw in references to nonlogo images (that is, tiles and splash screens are omitted) that might also need translation.
Now for the real fun: double-click an XLF file to launch the Multilingual App Toolkit Editor, shown in Figure 19-7. Here you can manage which resources can or should be translated along with the state of the translation. If the language is also supported by Microsoft Translator, the Translate button at the top will be enabled to translate a single entry as well as to Translate All. Select the latter and sit back to enjoy the show. In a few moments you’ll see that the tool has translated all your strings, marking each with the state of Review, as shown in Figure 19-8.
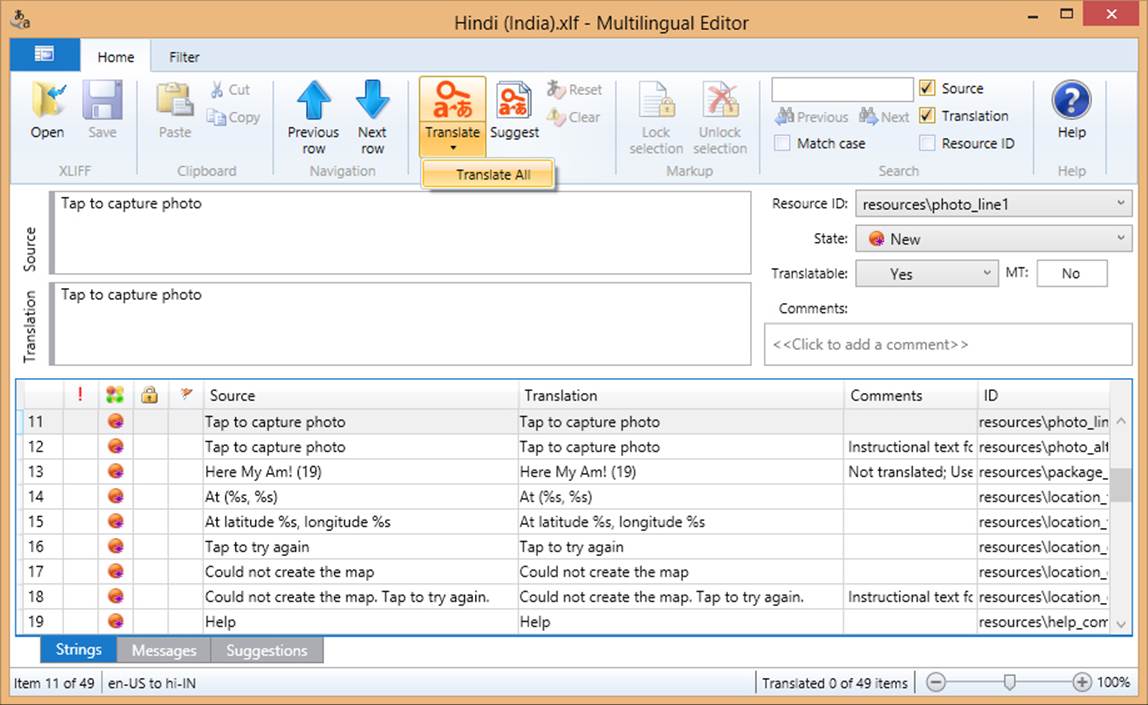
FIGURE 19-7 The Multilingual App Toolkit Editor, an XLF editor with machine translation built in.
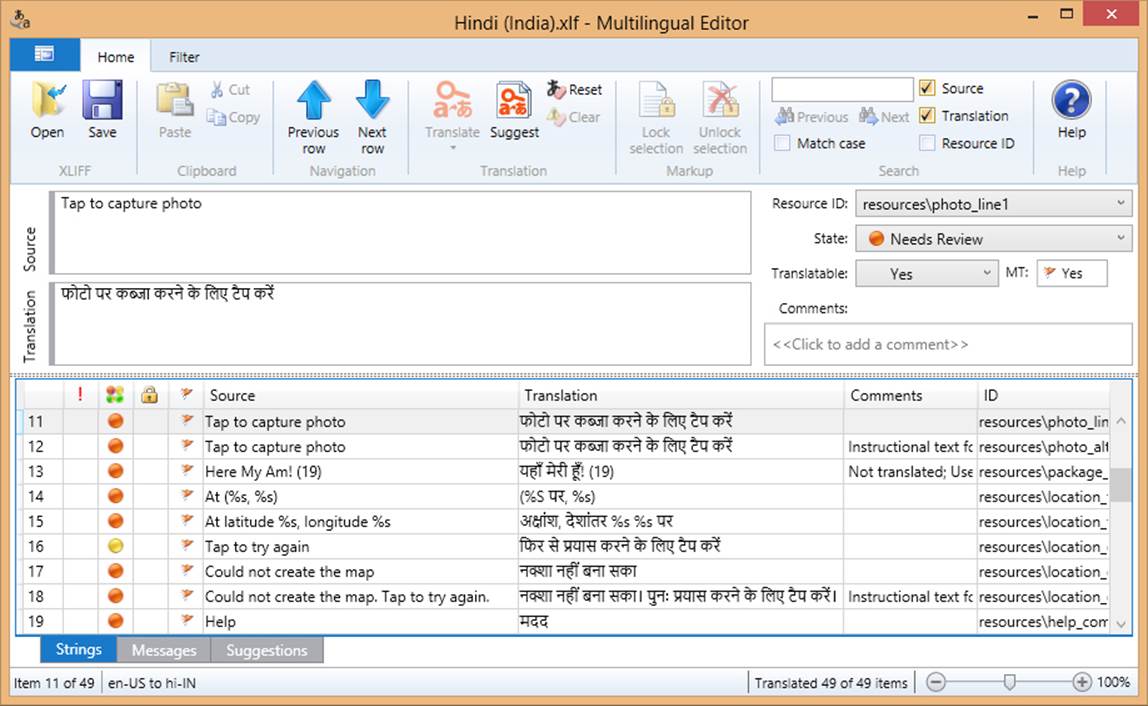
FIGURE 19-8 The string resources of Here My Am! after being machine-translated into Hindi.
Once the translation is complete, save the file and close the editor if you want. Go to PC Settings > Time and Language>Region and Language and make sure the target language is added and set as primary. Then return to Visual Studio and launch the app—and there is your first-pass localization, as shown in Figure 19-9 for Here My Am! (Notice that I elected to not translate the title, something that my translators suggested I keep in English because of its uniquely incorrect grammar.) And just to show how the app works with an RTL language, Figure 19-10 shows it running in Hebrew.

FIGURE 19-9 Here My Am! running in Hindi using machine translation output, which should still be checked by a native speaker, of course. As you can see, I’m checking if Yogananda has any advice apropos to the language.
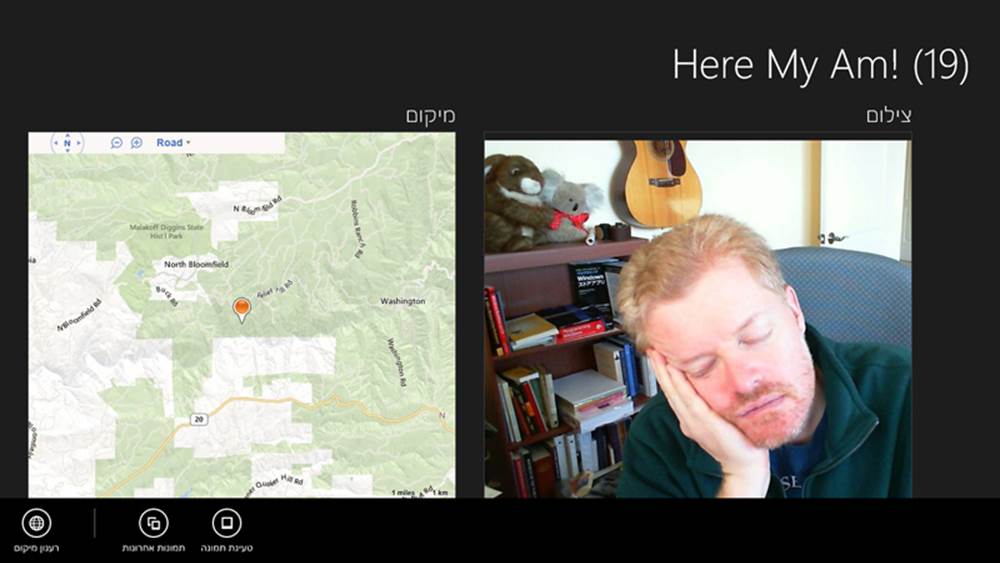
FIGURE 19-10 Here My Am! running in Hebrew (with human translation); notice how the direction of the whole experience changed, including the app bar, without having to write any code, and the nontranslated title still renders left to right. (Oh my, did I nod off while the camera timer was running?)
If you like living on the edge and don’t mind shipping an app that people in other markets might laugh at or otherwise criticize for your carelessness, there’s nothing stopping you from making your app available to those markets in the Windows Store with such machine translations. If you like positive ratings and reviews, on the other hand, it’s a good idea to at least find some native speaker who can validate and correct what the automatic translation process suggested. You can have this helpful person use the Toolkit editor to review your XLF files, in fact. When those files are reviewed and returned to you, import them back into your project by right-clicking the existing XLF file in Visual Studio and selecting Import Translation. The new translations will then be included in your next build.
When working with professional translators, you can also select specific XLIFF Translation file formats by right-clicking the XLF file in Visual Studio and selecting Send For Translation. The dialog here gives you an option to create a ZIP file with multiple XLF files together.
Three other notes about this process. First, some strings or parts of strings won’t require translation. In the Toolkit editor you can set the Translatable option to No for whole strings to prevent the machine translation from changing that string. For parts of a string, those will be translated but you can edit them back to their original and make a note in the Comments area for your translators.
Second, the Toolkit will detect if you’ve already made translations in an XLF file such that running a Build/Rebuild will not overwrite those strings. At the same time it will import any new strings you’ve added to your resource file in the meantime and remove any that have been deleted. A change in a resource identifier, however, is treated as a delete+add, meaning that the translation will be lost.
Lastly, if you want to remove a language, just right-click the XLF file and select Exclude From Project. This will keep the language out of the build while preserving the file (and its translations) in your project folder.
Testing with the Pseudo Language
As much fun as it is to produce many translations for your app, there is still the matter of testing it well, a task that is clearly overwhelming if you’re targeting many languages! To reduce this burden, the best approach is to test your app using the Pseudo Language, a step that’s ideally done before incurring the cost of specific translations. It helps you validate that your app can handle a variety of languages, because the fictitious Pseudo Language contains some of the most problematic characteristics of localized text.
As previously noted, this language is automatically added to your project through the Multilingual App Toolkit’s language selection dialog. This creates a Pseudo Language (pseudo).xlf file in your MultilingualResources folder, alongside the real translations. Next, right-click that file and select the Generate Pseudo Translations command. This will populate the XLF file with translations of your default resources where basic characters are often converted to extended characters and strings are generally expanded with extra !!!’s tacked on. So, a string like “Recent pictures” gets translated to “[62BD8][!!_Ŗęćęйť þîćťµŗêš_!!!!]” where the hexadecimal stuff in the first set of square brackets is a resource identifier that helps testers identify the exact resource that’s being used. (Note that this process will “translate” every string whether you will ultimately translate those strings for real, because it’s helpful for testing.)
To run the app with this translation, you need to make Pseudo Language the system default. In Control Panel >Clock, Language, and Region>Language, click Add a Language, and enter qps-ploc in the search box. This is the only way to make the Pseudo Language option appear:
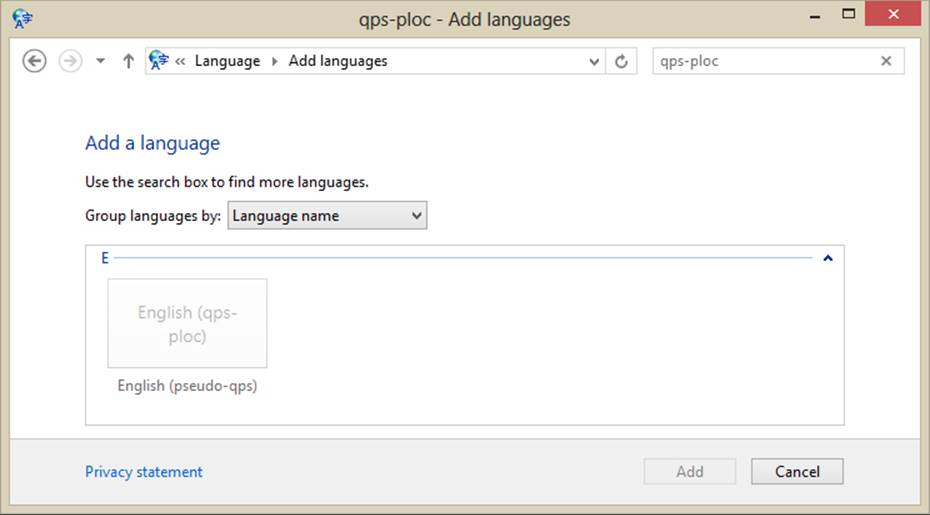
Select that language, click Add, and then move it to the top of the list:
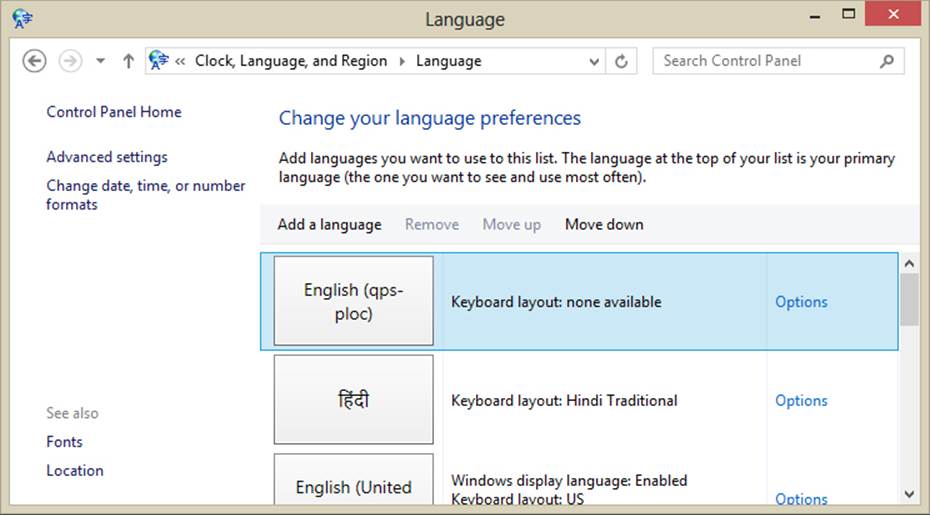
When you run you app now, you should see it appear in Pseudo Language:
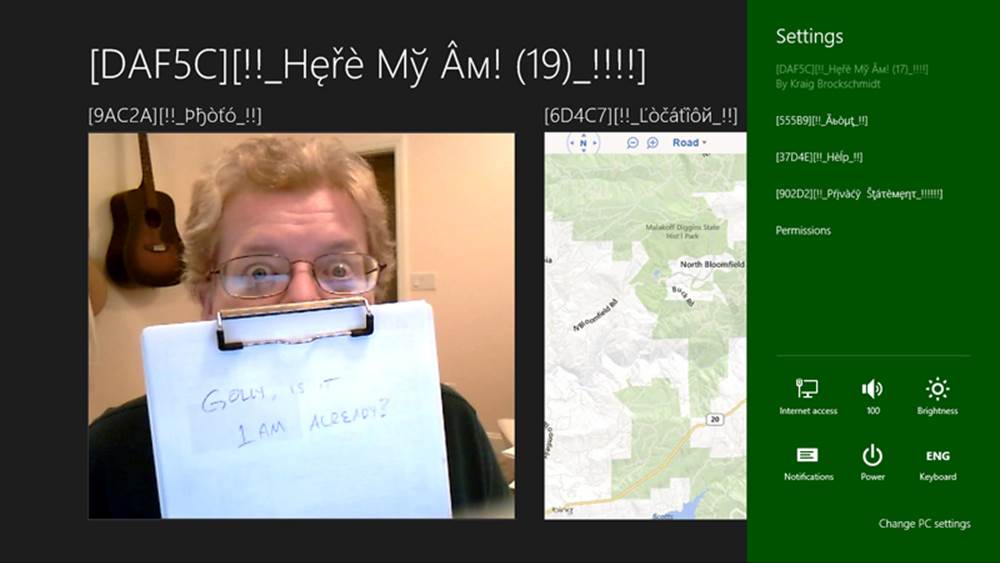
With your app running in Pseudo Language, be sure to exercise every feature and option. Check every page in different views; check all your app bar commands; check all of your settings; check any error messages, flyouts, and message dialogs that might only appear under specific circumstances like changes in network connectivity; and test your app with all its activation paths according to the contracts you support. As you do so, look for any strings that don’t appear in Pseudo Language, a clear indication that you missed pulling that string from your markup or code. Also check for truncated text, unintended word wrapping, and so forth, which reveals where your layout isn’t accommodating longer translated strings.
This is the time to be as thorough as possible, because once you upload to the Store, issuing another update can take at least a few days, during which time your customers might find those problems and ding your ratings accordingly. It’s always something to keep in mind, especially if you’ve been accustomed to instantly fixing bugs on websites: apps simply take longer, so you want to invest in testing ahead of time.
Localization Wrap-Up
Well, we’re almost done with the app and ready to go to the Store! There are just a few more things to mention about localization:
• Testing with the Pseudo Language does not cover RTL language considerations; you’ll need to run with those languages separately. I’m happy to say that when I ran the Hebrew translation of Here My Am!, the layout automatically mirrored, thanks to the direction style set in the WinJS stylesheets.
• Be sure to test any and all interactions with online services, including periodic tile/badge updates and those that arrive through push notifications.
• Test any toast notifications that you configure to appear with background transfers (see Chapter 4, “Web Content and Services,” in “Completion and Error Notifications”), as well as any toasts or tile updates you issue from background tasks.
• To dynamically update your app when the user changes languages (which is a good idea instead of requiring a restart of the app), listen for the WinJS.Resources.oncontextchanged event and call WinJS.Resources.processAll. This code is in Here My Am! (default.js) as well as scenario 6 of the Application resources and localization sample:
WinJS.Resources.addEventListener("contextchanged", function () {
WinJS.Resources.processAll();
});
• The above code will refresh string resources but not image resources or content obtained from online sources. You’ll want to refresh those using additional code, such as giving Windows a new URI for periodic tile updates or indicating the new language to a service that issues push notifications. For the app’s overall UI, try using document.location = document.location + "?reload", picking up that URI parameter in your activated handler to take additional steps. This essentially mimics relaunching your app.
• If you like, you can allow the user to select the language for the app independent of the system settings. This is done by setting the Windows.Globalization.ApplicationLanguages.-primaryLanguageOverride property, as demonstrated in scenario 10 the Application resources and localization sample. Scenario 11 also shows loading specific language resources rather than the default.
• In Visual Studio, open your manifest in the XML code editor (right-click and select View Code) and check if you see this line within the Resources element:<Resource Language="x-generate" />. If so, replace that line with individual entries like <Resource Language="en-US" />, where the first is your default language, and you must have localized resources for all the rest.
• For translation on the fly, you can use various web services such as Bing Translator.
What We’ve Just Learned
• Accessibility features are a concern for the majority of users, even those without disabilities who find those features useful at different times. Apps support accessibility by including ARIA attributes (for screen readers) in markup, implementing keyboard interaction, providing scaled raster graphics, and responding to high-contrast modes.
• Globalization is the process of removing language and cultural assumptions from an app, using globalization APIs to properly handle user language, calendars, formatting of numbers, dates, times, and currencies, sort orders, strings combining, string segmentation, varying text input methods, and configuring which web services are used from which regions.
• To prepare for localization, an app needs to be scrubbed for text and image content that will be subject to translation, separating strings into resources files and inserting references in their place, and then structuring those resources in folders and files that employ resource qualifiers.
• When onboarding an app to the Windows Store, you’ll be asked for many localizable resources at the very end of the process. To have these in hand by that time, treat them like other in-app resources and include them in your translation efforts.
• For efficient localization, the Multilingual App Toolkit for Visual Studio generates and translates an app’s default resources into any number of other languages, using the file formats employed by professional translators who can verify the results. It also produces a Pseudo Language translation for localization testing.
130 If you see a null reference exception within WinJS.Resources.processAll, it’s probably because you’re trying to map resources for a WinJS control that hasn’t been instantiated.