Programming Windows Store Apps with HTML CSS and JavaSript(2014)
Chapter 20
Apps for Everyone, Part 2: The Windows Store
Understanding the Windows Store is really quite simple: the Windows Store is the point of distribution through which your apps—your feature-rich, accessible, and world-ready apps that we’ve been working on throughout this book—are made available to consumers around the world. Because of this, as I said at the beginning of Chapter 19, “Apps for Everyone, Part 1,” to do business with apps is to do business with the Store, and your app’s relationship to the Store very much reflects the nature of your business, or put more broadly, everyone’s business.
That relationship affects all stages of the app lifecycle, from planning and development to distribution and servicing. Thinking about the Store is not something you want to do only when you’ve completed an app: you want to be thinking about it when you start first designing the apps you’d like to build—considerations like ad placement, and the fact that ad providers offer ads with specific sizes, will certainly affect your design. You also want to think about promoting the app early on too, because that can also affect design choices.
The Windows Store is like a pair of bookends to the whole app development process: you think about the Store when planning the business of your app, and, when all is said and done, you go to the Store’s developer portal itself to make your app available to the customers with whom you’re doing business.
You might in fact have come here directly from Chapter 1, “The Life Story of a Windows Store App,” where I recommended reading “Your App, Your Business” (including its subsidiary topics) below, even before starting your first coding experiments. I suggest also reading “Releasing Your App to the World.” This will help you understand what’s needed when you reach the point of uploading your app, such as promotional graphics and localized text for your Store page, which you’ll want to be working on well before you start the onboarding process.
It must be said, of course, that if you’re working within an enterprise with line-of-business apps that will be side-loaded onto user’s devices, you won’t actually be working with the Store or making an effort to monetize your apps, and thus most of this chapter doesn’t apply to you.
This chapter will explore a wide gamut of Store-related topics. We’ll of course go through the technical side of the story—the capabilities of the Store for apps, working with the Store APIs, instrumenting your app to collect detailed telemetry, going through the process of onboarding and certification, and updating your app. We’ll also talk about the business side of the story. Why? Because as soon as you publish an app to the Store, it means that you’re running a business whether or not you want to admit it! You might not necessarily be in business to make money, but you’re in business for some reason and so you might as well act like it. That’s why we’ll begin this chapter by looking at the relationship between your app and your business goals, exploring aspects of planning, monetization, and building a customer base. After a lengthy interlude of technical matters, we’ll wrap up with a little more about marketing and discoverability and with some thoughts about what it means to run a business and think like a businessperson—supporting your customers, managing risk, and planning for future app releases.
For indeed, just as uploading an app to the Store is only the start of the app’s real life in the world, so too is it just the beginning of your business. And although I cannot claim to be a business expert, my hope is to provide you with some inspiration and also the awareness of things you can do beyond the code to increase your success with your apps. It’s a success that I certainly hope all of you, my readers, will realize more and more.
Before going further! Submitting an app to the Windows Store requires a developer account in the Store (not a developer license in Visual Studio). It can take a day or two to set up an account (or longer if you’re creating a company account), so if you haven’t done this already, start the process on the Store dashboard. You must also fill out tax forms for your country of origin to receive any revenue. Once you have an account, make sure to reserve a name for your app (including localized names), which is the first step when you click Submit An App in the dashboard and can be done from Visual Studio through the Store > Reserve App Name menu.
Your App, Your Business
If you check in with your local psychologist of philosopher, they’d probably agree with the idea that just about all people, across all professions, cultures, and capabilities, are driven by a small number of fundamental motivations: fear, lust, power, love, service to others, and just plain ol’ joy. Indeed, the wisest among them will even say that the last one—the quest for joy or happiness—is actually the root of all the others.
Leaving all that aside, and assuming that you’re not programming under threat of death or working on apps that are going to be rejected from the Windows Store as a matter of policy, let’s take a simpler view and identify the few basic motivations for writing apps:
• Fortune You want to make money.
• Philanthropy You want to contribute to and/or promote a cause.
• Fame You want social recognition, which also helps with Fortune and Philanthropy. Fun You just want to enjoy yourself through coding—an activity that, alas, nonprogrammers just don’t understand!
I like to think of these motivations as another way to interpret the phrase “apps for everyone.” Apps can serve the needs of many different customers around the word. So too can they serve the needs of many different developers and their business goals!
Your motivations—in whatever combination—essentially define your “business” as a developer. I use the term loosely here. In English, at least, there are about a dozen different definitions of this word, only a third of which relate to commercial activities, organizations, practices, and commerce. The other definitions have to do with what you consider to be important, as when we say “It’s none of your business” or “I make it my business to know about such things.” In short, apps can reflect the nature of your “business,” whatever it is, and that nature is reflected in how you share apps with others.
Again, with the exception of side loading (which we’ll talk about later), sharing your app means distributing it through the Windows Store. For that reason, your app’s relationship to the Store effectively defines your business with that app, and that relationship spans the entire app lifecycle:
• Planning and design Determining whether the app can actually be a Store app, meet Store certification requirements, and be suitably monetized (if desired). Effective monetization is also a critical aspect of design—it’s not something you can really do well at the end of the process!
• Development Implementing Store-related features and using the APIs for trial versions, in-app purchases, etc., along with incorporating other SDKs for ads and telemetry.
• Testing Using precertification tools prior to onboarding the app to the Store, and checking the app against certification requirements.
• Availability Making the app available in various markets through the Store developer portal, and indicating Accessibility support.
• Marketing, sales, and support Promoting your app, increasing its visibility, working with your customers (responding to ratings and reviews), linking it to your website (if applicable), and using Store analytics through the developer portal (as well as your own analytics).
• Updates and growth Improving your app over time, or removing it from the market.
If you look at this list—which merely reflects how the Store itself intersects with the business of creating and publishing an app—you’ll notice that “development,” which is where we’ve spent most of our time in this book, is a rather small part of the overall app lifecycle. It’s essential, of course, because development is how you create the product around which you build your business. But the rest cannot be ignored because they affect how you run that business.
Indeed, by publishing an app you are running a business! We’ll talk more about what this means at the end of this chapter, but let me summarize. To think like a businessperson means that you look for opportunities in the market where you can fulfill your business goals, whatever they are. You also see apps as a vehicle through which you explore and take advantage of those opportunities, and if one doesn’t pan out like you hoped, you try again with something else. You also make sure to service the customers you do acquire, to support your apps over time, to provide new products. (Gathering telemetry from your apps is essential to this process, which we’ll discuss in “Instrumenting Your App for Telemetry and Analytics.”)
Truth be told, the “fortune” business is the one for which we find direct support in the Store and the WinRT APIs, because that’s where the majority of developers will be focusing their energies. We’ll be spending quite a bit of time in this chapter on those matters. If you’re in business for “fame” or “philanthropy,” on the other hand, there are some things you can consider doing to grow your customer base—all of which are also helpful if you’re also trying to make money! As for “fun,” well, just getting an app in the Store might be good enough for that, but if you’re seeking to experience joy from the process, why not also produce apps that can bring joy to others as well?
Planning: Can the App Be a Windows Store App?
In a slight contradiction to this chapter’s title, the idea of “apps for everyone” doesn’t necessarily mean that every app can, in fact, be a Windows Store app. There are two sides to this: technical feasibility and meeting Store certification requirements.
Technically, as we covered in Chapter 3, “App Anatomy and Performance Fundamentals,” and a few other places, Window Store apps run under certain conditions and restrictions. Here's a summary:
• Windows Store apps always run in the app container (at base trust) and have no access to APIs that can openly access the file system or any other sensitive resource (i.e., medium or full trust).
• Sharing data between Windows Store apps always goes through the Share contract, the clipboard, or web services. Local interprocess communication is not supported (except in side-loaded enterprise scenarios where the Store is not involved).
• Windows Store apps can use only the WinRT APIs and a subset of Win32 and .NET APIs; apps written in HTML and JavaScript can also use the intrinsic HTML and JavaScript APIs provided by the app host. Third-party libraries you use in the app must also use only these APIs.
• Apps cannot install custom device drivers or anything else that affects the system, nor can apps customize their install process. (Many devices, of course, do not need custom drivers and you can work with them through the APIs discussed in Chapter 17, “Devices and Printing.”)
• Only certain apps can run in the background, and for specific purposes, as we’ve seen in Chapter 13, “Media,” and Chapter 16, “Alive with Activity.”
• Some UI interaction models aren’t appropriate for touch input, such as high precision CAD. Because Windows Store apps must support all forms of input, high precision apps either need to be redesigned for touch or should be implemented as a desktop app.
• Windows Store apps run in variable-sized views alongside other apps and can utilize multiple views, but cannot utilize multiple overlapping windows.
If any of these technical aspects would prevent you from writing the kind of app you want to write, working with the Windows Store as your business location, if you will, is not really possible. For example, many development tools, network administration tools, file system utilities, antimalware utilities (that scan the whole hard drive), and database management systems must be implemented as desktop applications and distributed through the Internet or other retail channels.131
More generally, because Windows Store apps run full screen or side by side with one to three other apps, they are intended to be much more specifically focused on certain tasks. Apps that try to do too much—Swiss Army Knife apps, if you will—may end up feeling cumbersome or confusing. It’s good to hone the purpose of the app, as discussed in Defining vision; otherwise you should probably implement a desktop app instead (for which there is still a very large market, mind you!).
When planning any app, be sure to review the App certification requirements for the Windows Store to understand whether the app you’re thinking about will be summarily rejected during the onboarding process. For example, the very first requirement is that your app offers real value or utility for customers. So, if you’re thinking to submit the next great bodily-functions-sound-effects app, you might think again. Other policies apply to advertising (section 2), predictable behavior (section 3), respecting privacy and putting the user in control (section 4), providing content that’s appropriate for the global audience (section 5), and app identity (section 6).
Tip Windows Store policies change over time (they’re on version 5 as of this writing), so be sure to review them before starting a new project. For the most part, policies are more often relaxed than hardened.
A final consideration is whether the Windows Store is itself available in a target market when you plan to release your app and whether there are locale-specific restrictions based on where you operate as a developer. The most up-to-date information is best found on Choosing your markets.
Planning for Monetization (or Not)
Just as there are a number of reasons why you’re interested in creating apps in the first place, there are also a number of ways to fulfill your business goals. Will your app be completely free? Will it be free but supported by ads? Will it be paid, with or without a trial version? Will it involve in-app purchases? Each of these business models has its place, especially if you plan on releasing multiple apps, and many apps employ a combination of these models. Furthermore, it’s likely that your business model or models will change over time as you improve your apps and creatively respond to competition. That’s part of the fun of running a business!
In this section and the two that follow, we’ll conceptually explore these different models and better understand how they relate to one another; the technical aspects will come later. Remember in this whole context that licenses for apps and in-app purchases are granted to the user and will apply across their devices. This isn’t typically a concern for apps because the details are automatically handled by the Store—in the unlikely case that a user goes over the limit, Windows will inform him or her appropriately.
Free Apps
You don't need to do anything special to create a free app so far as the Store is concerned. You write it, upload it to the Store, set the price to 0.00, have it certified, and then get the word out.
Free apps can serve several purposes:
• Earn you praise and glory from customers and possibly other developers.
• Grow a developer base who might be interested in later products.
• Give you experience producing apps (otherwise known as résumé items!).
• Provide a space for marketing your own products and/or services (as opposed to hosting third-party ads, as discussed below), so long as you do more than just show ads.
The first purpose here is self-explanatory and doesn’t need any elaboration, I hope! If this is your motivation, I imagine you’re already doing daily or hourly web searches on your own name and will be watching your app’s ratings and reviews like a day trader watches stock tickers.
As for gaining experience, it’s a great exercise, of course, but every app you make available through the Store, along with their ratings and reviews, becomes a permanent part of your developer reputation. Because of this, uploading apps to the Store before they’re ready—or before you’re really ready as a businessperson—could backfire over the long term. You don’t want your reputation to be weighed down by early experiments when you finally have the idea that’s really going to take off!
To manage this risk, you could start by sharing apps only with other developers who can side-load the packages you provide. Also consider creating a developer account just for your experimental work, keeping it separate from the account through which you’d post your real apps. This way, any negative reputation from your experiments doesn’t accrue to your serious work; neither does positive reputation, of course, but that’s a balance you have to find for yourself. Note that creating an extra account will require an additional annual fee, but that might be well worth it in the end.
As for marketing, what I mean here differs greatly from ad-supported apps. I’m specifically referring to promoting your own business or causes (such as a charity) through the functioning of the app where you have complete control over the content.
Be aware, however, that Section 2.1 of the present Store certification policy states, “Your app must not display only ads.” This means that you can’t just create an ad farm. But assuming that you do show meaningful content elsewhere, it’s allowable to display ads just about anywhere else, including tiles, notifications, or on your app bar (which was a restriction until early 2014). It’s also recognized that the very purpose of some apps is to provide offers, for example, in which case it’s not really displaying ads, per se, but content for which the user has expressed interest through the act of installing the app.
The other point to these policies reflects Section 1.1 of the requirements: “Your app must offer customers unique, creative value or utility in all languages and markets that it supports.” What this means is that if you want to promote a cause or business through the app, do it in a way that delivers value to consumers. For example, an app for a nonprofit organization should do more than just solicit donations (which you’d do through a consumable in-app purchase). It could help its users understand and be inspired by the organization’s activities and keep them up to date on current projects, which helps inspire donations to that cause.
Tip Collecting donations through an in-app purchase incurs 30% revenue sharing with the Store, so it’s typically better to direct donations to a website or an alternate payment provider with less overhead.
More generally, free apps can provide some useful functions in themselves but otherwise be a demonstration of features of any number of other apps—something like a sampling tour of your paid offerings (so long as there’s again real value in the app by itself). When related to only a single app, such a demo or “lite” version is usually quite different from a trial version of a full app. As we’ll see shortly, a trial version should look and operate as if you had acquired a license to a full version, but it restricts its use through hobbled features or a time limit. A demo app, on the other hand, is meant more to showcase features rather than provide a complete experience.
For example, let’s say you have a game with five levels in each of five distinct “worlds” through which a player would normally progress in the app's full version. A trial version would allow a player to start working through those worlds but would cease to operate completely after some short period of time, say 30 or 60 minutes. In that time, a player might not progress past the first few levels in the first world, so the experience of the overall game is incomplete. A free demo/lite version, on the other hand, could be played as much as one wished but would contain only one level from, say, three of the five worlds. This gives the user a broader taste of the app and, because it can be played many times, serves as a continual advertisement for the full experience without giving anything more away. A demo app is like a movie’s teaser trailer: enough to create a hunger but not satisfy it. (And, yes, while there may be some people who only ever watch free trailers and never go see a full movie, those are a rare breed.)
Great free apps can also fit well into an overall business model without asking for anything: they can help build a positive reputation for your business, thereby supporting other paid offerings. Having multiple apps also gives you an easy way to cross-promote. Every app in the store also provides links to your website and support information, so each one is a doorway to the rest of your business. In this way, free apps are like the giveaways (or loss leaders) that many businesses offer to get you in the door so that you can explore and experience their full line of products.
Ad-Supported Apps
Ad-supported apps, which are typically free but can also be paid, are those that deliver some clear value in themselves and use that value to sell advertising space to others. Such advertising, although hopefully well-directed to the user’s interests, typically isn’t integral to the app’s own function. Many free games, for instance, place interstitial (time-filling) ads between levels or boards, ostensibly to keep you entertained while the next level is loading but in truth to take full advantage of your captured attention in a moment of relaxation! The bottom line is that a user’s attention has real value to advertisers, who are willing to pay you for a bit of that focus.
As a user of the web, you’re undoubtedly familiar with how ads can appear in an app’s overall layout: filling gaps in space rather than in time. Typically, an app places an ad control in its layout and lets the control acquire and display ads from its backend (known as impressions) and track click-throughs (which typically pay more than impressions).
Either way, many developers have found that selling ad space is a profitable means of monetizing an app and building a business, but of course you have to understand whether your target audience and will respond to advertising at all. There is also a common strategy of offering a free, ad-supported app with an in-app purchase to eliminate the ads, and the trick here is to make the ads just annoying enough to encourage customers to get rid of them but not so annoying that those customers will just abandon your app altogether! In other words, it’s very important to consciously integrate ads into the overall user experience of your app, not as an afterthought. Ads are often beautifully designed in and of themselves, so they can be a pleasing and even delightful part of an app experience.
Note At present sections 2.1, 2.2, 4.2, and 5 of the Store certification requirements pertain to ads, namely that your app does more than just display ads, that ads follow content policies (appropriate for the app’s age rating), and that your app respects customer preferences.
The advertising control will come from the ad provider you choose to work with. Current providers that support Windows Store apps can be found on the Windows Partner Directory by filtering on “Advertising” on the left-hand side. For the most part you’ll need to download the provider’s SDK separately and add the appropriate references to your project. With Microsoft Ads, Visual Studio provides a little shortcut: right-click your project in the Solution Explorer, select Add > Connected Service, and select Microsoft Ads. If you haven’t created an account with the Microsoft Ads, you can sign in here and then create an app configuration:
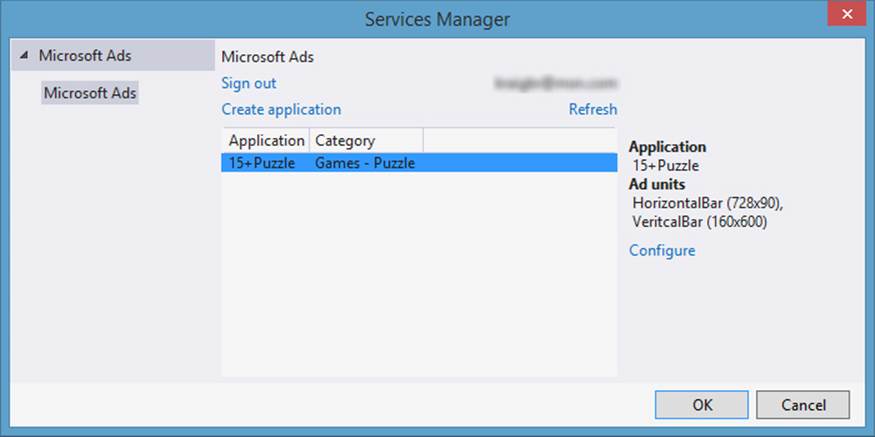
Clicking OK will bring the Ads SDK into your project, which automatically supplies a Settings command through which the user can control preferences. Including the SDK also create a file called AdSamplePage.html.txt that includes sample markup according to the sizes you selected in the configuration:
<div id="MyAd_1" style="position: absolute; top: 50px; left: 0px; width: 728px; height: 90px; z-index: 1"
data-win-control="MicrosoftNSJS.Advertising.AdControl"
data-win-options="{applicationId: 'b4d8cf08-d9b5-4148-a012-2b412bf1d70e',
adUnitId: '163139'}">
</div>
<div id="MyAd_2" style="position: absolute; top: 140px; left: 0px; width: 160px; height: 600px; z-index: 1"
data-win-control="MicrosoftNSJS.Advertising.AdControl"
data-win-options="{applicationId: 'b4d8cf08-d9b5-4148-a012-2b412bf1d70e',
adUnitId: '163140'}">
</div>
Note that you’ll have your own applicationId value—otherwise you’ll be sending your revenue to my app instead! Not that I’d mind, but I’d rather you get the earnings you deserve.
Having now incorporated ad SDKs into your project and ad controls into your design, the most important thing for an ad-supported app is achieving a high fill rate, which is the overall percentage of time that the space to which you’ve dedicated ads is actually showing an ad. You see, for ads to appear in an ad control, they have to be served up by the provider’s backend. Those ads get into that backend service because some advertiser has paid for that privilege. Ad providers, then, are constantly trying to stock their supply to meet demand. If, however, their salespeople aren’t 100% successful in this, the ad control can come up blank, giving you a less than 100% fill rate.
Here are some strategies to avoid this:
• Always stay up to date with your provider’s SDK in case there are backend changes.
• Use the recommended sizes proscribed by your provider, because using arbitrary sizes might not get any fill. For the Microsoft Ads SDK, the sizes are 250x250, 300x350, 160x600, 728x90, and 300x600. Your choices here clearly dictate how you use ads in your app’s layout!
• Be mindful of your app’s age rating because that information is communicated to the ad control’s backend to determine what kinds of ads can be shown. In this case, a lower age rating means greater restriction. Indeed, a 3+ age rating will typically not allow any ads; some ads work at 7+, and most will work for 12+.
• Sign up with multiple ad providers and use an ad rotator to draw from those providers in a prioritized cascade. If your primary provider doesn’t fill the ad space, the rotator attempts to retrieve an ad from the secondary provider. If that one is empty, it keeps going down the line until it gets an ad.
• In the hopefully rare case when you don’t get ads from any provider, always have some default images to show in your ad space. This is why it’s helpful to have other apps of your own in the Store that you can cross-promote!
Much more could be said on effective strategies for ad-supported apps, but we have other topics yet to explore. For more information, see the Monetization through Ads post on the Windows developer blog and continue to watch that blog for more monetization strategies in general.
Paid Apps and Trial Versions
Producing an app and charging for a license is certainly the one of the oldest means of monetizing, and it still works quite well, especially in certain Store categories such as Productivity and Reference. Value received for value delivered: that’s the simple equation on which many successful products are built. Generally speaking, paid apps are free of advertising and are not advertisements themselves, hence customers’ willingness to pay money for the apps in the first place.132
Tip For a broad discussion about price points, see You’re Pricing It Wrong: Software Pricing Demystified (Smashing Magazine).
An important consideration for paid apps especially (but really for all apps) is the need for marketing. The Windows Store is primarily a distribution mechanism and doesn’t eliminate the need for finding your customers and making them aware of your product. Sure, customers can find your app through casual browsing, and there’s a chance that your app (if it’s really good) can be spotlighted, but you can’t depend on that, nor can you depend on customers just finding the app through search. As a result, you have to generate interest and awareness through other means. This is again one of the functions of other free apps or demo versions that you might produce: if one of your free apps gets featured in some category, every user who downloads that free app at least has an opportunity to learn about your other products. And of course there are all the other means to market your product: the social web, your website and SEO, advertising in traditional media, and so forth.
You should also strongly consider offering a trial version of the paid app. Store data shows that customers are something like 12 times more likely to convert to a paid app if they can try it out first. Also, 70% of the most popular paid apps and 95% of the top grossing paid apps have trials. Trials give users a way to get to know the app and understand its value, both of which are important in making a purchase decision.
A trial is free and subject to a time period that is clearly shown to customers in the Windows Store. As noted before, a trial app looks, feels, and operates like the real thing but is simply time-limited or feature-hobbled. A picture editor might allow you to edit but not save your work, meaning that you get the full experience of using the product without the full benefits of owning a license. A video converter app might place a logo or watermark (that is, an advertisement) on the output video, so the functionality is all there, but the result isn’t as useful. A trial version might also just disable in-app purchases, thereby limiting its extensibility until the full app is acquired.
Whether the trial is hobbled is your choice as a developer—if an app creates something and saves it in a particular format, such that you could not re-open those files without the same app (unlike pictures), there may be no reason to disable a save feature at all. In such cases, the strategy is to get the trial user heavily invested in continued use of the app, such that purchasing the full license is a better choice than letting go of that investment. Personal finance and contact management are good examples: in a 30-day trial period (or whatever period the app sets), users of such apps could amass quite a bit of useful data that they would not want to re-enter into another app. (Such a trial might also quietly disable any exporting features.)
If you implement a trial version, be sure to remind the user of their trial status and make it super-easy for them to convert to a paid version. That is, keep them well aware of the fact that they’re just borrowing your app for the time being, make sure they know when, exactly, that loan period will run out, and make it easy to convert with a single tap or click. (Personally, I’ve been amazed at how many apps don’t do any of this with their trials, which essentially defeats the purpose of a trial!)
As we’ll see, the APIs for working with the Windows Store make it simple to check for trial status and its pending expiration. APIs also exist to initiate a streamlined purchase flow through which the user can acquire a full license with minimal disruption, all within the context of the app itself. In short, trial versions are an important monetization model that are, fortunately, quite easy to implement.
A technical stipulation of a trial version is that all the bits of the full version are actually already present on the user’s machine: purchasing a full license from a trial version is simply an act of setting the license information in the Windows Store, and such a purchase will not initiate any new downloading. For a user, this means that to download and install a trial is to download and install the full version, with the Store simply indicating that the user doesn’t have full rights. If such a full download would be an obstacle, however, such as when the app is large, it may be a better strategy to create a smaller demo version that invites the user to visit the Store to buy the full app.
All of this is really about creating a smooth and painless experience for users to try new software. One of the primary motivations behind the Store (and the associated packaging technology) is to eliminate nearly all of the past risk of software acquisition: unknown or untrusted sources, potential malware, inconsistent install/uninstall procedures, and so forth. Microsoft wants Windows users to feel confident that they can experiment and try out new apps—your apps!—without corrupting their system, compromising their data, or in other ways being exposed to those sorts of problems.
Sidebar: Piracy Protection
The existence of the Windows Store and the fact that users cannot install an app except in the context of the Store provides a certain inherent level of piracy protection. Users are blocked from accessing the folders that contain installed appx packages, and even if they managed to extract and install one elsewhere, the Store would report that the app is unlicensed for that user and would thus refuse to run it.
Beyond that, any additional levels of protection are up to the app. It’s perfectly allowable for an app to ask the user to register with the publisher (because customer information isn’t shared from the Store) and to obtain a secondary license key. Windows does not block such procedures but doesn’t provide any such services itself. Do consider, however, that customers might be annoyed by such additional requirements. It’s best to exercise caution in such a decision.
In-App Purchases
In-app purchases, commonly referred to as IAPs, are proving to be the most popular means of monetizing an application over time by selling incremental add-ons, options, in-app currency, periodicals, time-limited subscriptions/rentals, and so forth. In-app purchases are the basis for what are called freemium apps: the basic app is free, but extending its functionality, adding content, acquiring in-app features or game currency, and so on are all done through in-app purchases. Indeed, a Distmo report from February 2014 showed that 70% of revenue globally and over 90% in China and Japan come through freemium apps and that they generally produce more revenue per app than other monetization models. (It also showed that regions like Japan, South Korea, and Australia have the highest profit margins per download, suggesting that those are good regions in which to focus localization efforts. It’s worthwhile to watch these kinds of reports!)
By definition, in-app purchases are options: the core operation of the app must not depend on any of them. Also, in-app purchases cannot be interdependent—that is, users cannot be required to purchase other options to use one they’ve already bought. Furthermore, an in-app purchase is made by a user and is thus licensed across all of their devices by default. If you need for whatever reason to place a limit on the applicability of a purchase (such as honoring contractual obligations of a backend service provider), you can use the Store’s receipt feature to implement secondary validation as we’ll cover later on.
There are two main classes of in-app purchases. Durable purchases are those that the user acquires once and that remain in effect permanently. This is true even if the user uninstalls the app on all of their devices and later reinstalls it: just as a user’s purchase of a paid app is kept permanently with their Microsoft account, so too are in-app purchases. That said, a durable in-app purchase can have an expiration date (for example 30-day access to premium content), in which case the license gets reset after that time and the durable can be purchased again. Some apps, for example, use an expiring durable purchase to disable ads for a certain length of time.
The second type is a consumable purchase, which can be done many times because the Store doesn’t record it as having been purchased (as it does with durables). Consumables are typically used for in-game currency, content rentals, or when an app separately maps a generic consumable purchase to a more specific one at run time. Because there is no Store-managed license involved, the app must track consumable purchases itself and must report fulfillment to the Store (such as a successful download from a service) before the item is made available again. This is essential for the user to trust that the purchase went through before their account is charged for the transaction.
With both types of purchases, the Store has a limit of 200 different listings, which seems like it would pose a problem for apps that offer access to large libraries or collections of things like books, movies, images, research reports, and so on. Fortunately, you can define generic purchases in the Store dashboard and then differentiate them with specific identifiers at run time through the Store API. For example, you can define a “3-day movie rental” item through the Store dashboard and fill in the specific title when the user chooses one in your UI. This also means you don’t have to update your purchase definitions in the Store when you add new content to your catalog; you’d need to do that only if you introduce a new type of purchase altogether.
Whether in-app purchases are the right choice for your app involves a number of considerations:
• Implementing them well can be difficult because they introduce complexities into an app’s architecture.
• The app has full responsibility for correct delivery of the purchased item or feature, as opposed to the Store handling all the details.
• In-app purchases effectively create multiple variations of an app, which can increase user support and interaction.
• Overuse or inappropriate use of in-app purchases can generate the perception that you’re trying to get money from users at every possible opportunity. Users who don’t or won’t pay for in-app purchases can still leave bad reviews about their experience. Effective use of in-app purchases, in other words, is an act of conscious merchandising that takes user psychology into account.
• In-app purchases through the Windows Store do not trigger download of additional content; they only change the user’s license for that product. If needed, an app can initiate its own downloads once the product license has been acquired.
• At present, the Windows Store does not provide support for subscription purchases apart from consumables; third-party providers do offer specific subscription services.
• An in-app purchase can activate or enable a feature in the app but cannot trigger download and installation of new code from the Store (or any other service, for that matter). That is, the code must already be present in the app package. In-app purchases of content, on the other hand, can be used to initiate a download from any service.
• At present, the lowest price tier that the Windows Store offers for in-app purchases is US$0.99, which means that whatever purchases you offer need to provide at least that much perceived value to your customers. You should group offers into a single purchase that you would otherwise think to offer separately at lower but unavailable price points. (Do note that this price tier is automatically adjusted up or down to reflect different standards of living across regions.)
On the flip side, offering a new full version of an app with new features might generate better sales than offering the same features as in-app purchases. A major app update is an event that can generate renewed interest in and energy around your product like the release of a new movie. In-app purchases, on the other hand, are by nature more prosaic, like the popcorn and drinks you buy in the theater—always there, and integral to the whole experience, but not particularly exciting outside that context. The best approach is probably to follow Hollywood’s example and do both!
It’s worthwhile at even the earliest stages of design to think about what kinds of in-app purchases make sense for your product and how and when to merchandise those options in your app. You might not even at this time have anything you plan to offer, but you might want to add them later on. In short, keep the door open for expansion and creativity without necessarily having to revise the app. It’s equally important to also think about what makes sense for your customers. We emphasize this point because there have been stories of outright abuse in this area. Apps aimed at young children, for example, have been known to dangle in-app purchases like candy, enticing those children to press a “buy” button when they have no sense of the transaction. For this reason, Store policy (section 4.8) requires that transactions are authenticated (and the Windows Store does this automatically when you use its commerce engine).
The key thing is that if you try to be sleazy, you probably won’t get far with your app. If you try to trick users out of their money, your app will certainly decline in ratings and reviews over time. And if you’re found to be truly abusive, Microsoft does reserve the right to remove your app from the Store altogether, if it even passes certification at the outset.
Done well, though, in-app purchases are very effective for exchanging a little bit of money for a little bit of pain relief. This is a creative matter of user psychology where an app intentionally introduces small pain points alongside an in-app purchase to avoid that pain. For example, you can make users wait 15–30 seconds while the app displays an interstitial ad, or inject a visual distraction with ads in your layout, and then offer an in-app purchase to remove ads altogether. In many games, you can earn in-app currency through continued play or receive additional currency by simply waiting an hour or a day. This kind of thing becomes irritating for your more impatient users, so offering an in-app purchase that immediately relieves their anxiety can be very profitable. (In this context, I love the creative in-app purchase in Jetpack Joyride called the “counterfeit machine” that doubles all the coins you collect in the game. I’ve found this much more engaging that buying coins outright.)
All in all, these are considerations that will eventually affect how you set prices in the Store. You'll need to consider the tradeoffs involved between setting a higher price point with an initial-app purchase versus monetizing through multiple in-app purchases, and you'll need to be sensitive to how willing your target customers might be to making one purchase versus making multiple purchases. Apps that constantly nag their users to make additional purchases will be on par with pushy street vendors who just won’t leave you alone. Apps that are sensitive to the user’s engagement, on the other hand, present purchases (which is to say, upsell opportunities) at appropriate times for appropriate reasons and are thus much more likely to be appreciated than loathed.
Revenue Sharing and Custom Commerce for In-App Purchases
The subject of monetization is not complete without answering one of the most important questions: how much of the Store-related revenue stream do you, as the publisher of the app, get to keep? The basic answer is simple: 70% comes to you, 30% goes to the Store (you have to pay your rent). However, once an app achieves US$25,000 in sales (from both the app and in-app purchases), your share increases to 80%.
Revenue sharing is always in effect for paid apps. For in-app purchases, however, you have the option to bypass the Windows Store altogether and use a commerce platform of your own or a third-party provider (see the Windows Partner Directory and click Payments on the left side). Doing so potentially allows you to realize a much higher percentage of the revenue. This is an especially great option if you already have arrangements with a transaction provider through your existing websites. Be aware that Sections 4.7 through 4.9 of the present Store certification requirements apply here, where you need to identify the provider at the time of the transaction, ensure that the user enters credentials for each purchase, and ensure that each transaction meets the PCI Data Security Standards.
With this custom commerce option, you’re pretty much on your own where all the details are concerned, including UI—the Windows Store API itself doesn’t provide for extensibility of its own mechanisms. You might draw from The in-app purchase user experience for a customer topic in the documentation to understand the flow; third-party providers do typically supply their own UI.
Growing Your Customer Base and Other Value Exchanges
Whatever your business is with your app, it’s unlikely to fulfill your goals if nobody is using it. When you’re motivated primarily by fortune or philanthropy, expanding your customer base is likely your primary concern. And even if you’re shooting for fortune, it might make more sense in the early stages of your app (or of your overall business) to focus first on growing your customer base and then after a time shift to monetizing that base. And by “a time” here it’s generally best to think in terms of a couple of months, to catch the app’s peak traffic levels.
Marketing your product to potential customers that are within reach of your campaigns is obviously a big part of this, and we’ll talk more of this later in “Getting Known.” What I want to discuss here is more about expanding your customer base through the app itself, because the strategies for this are often similar to those you use for monetization.
The general idea is that your customers have assets of value to you other than their money. The most important of these is their social network. While your general marketing efforts can reach random populations, reaching other potential customers through your existing ones is much more valuable because there’s an existing relationship there that gives you some credibility.
I’m sure you’ve seen the effects of this on the receiving end, where friends in your social networks are posting or tweeting their status or activity in some game or another. The reason why this happens is that the game rewards your friend’s social activity with some in-app value, such as extra in-game currency. Oftentimes—and this is an important point for app design—your friend can earn this currency through social sharing instead of spending real money.
What you’re doing is sacrificing the income from a direct in-app purchase for a bit of marketing to a customer’s social network, which is something you couldn’t buy even if you had tons of money in your marketing budget! That is, instead of trying to make money from your existing customers that you might then spend on marketing, you just shortcut the process and reach new customers directly.
Another valuable asset is a customers’ opinion of your app, meaning the time they might take to give you a rating and review in the Windows Store, as well as feedback through your own in-app mechanism. Leaving feedback, in short, is an important customer activity that you can reward with some in-app feature, rather than trying to monetize that feature. (Do note that it’s not allowed to offer rewards for positive ratings and reviews, which you cannot determine at run time anyway.)
A third type of asset that your customers have is their usage data. Provided that you protect user identity, respect privacy, clearly inform your customers that you’re collecting data, and give them the ability to opt out (see “Instrumenting Your App for Telemetry and Analytics” later), the data you collect over time can become highly valuable to other businesses. A number of companies earn their revenues by collecting, processing, packaging, and selling information (through reports, web services, etc.), which means that their contact points with customers—such as apps and websites—are merely collection portals rather than products they try to monetize directly.
For example, data collected from a music app can identify consumption trends that music producers might be very willing to pay for. In this case you’d want to get that app into the hands (and ears) of as many customers as possible, even to the point of giving away up-front value (such as free downloads) in an effort to increase your customer base, increase your data collection, and thereby increase the reliability and value of that data.
In short, when you’re thinking like a businessperson, you’re not thinking only about monetizing the app you happen to produce: you’re thinking about the larger context in which your business operates and look for any and all opportunities to earn revenue. It makes you appreciate why “business” is indeed a creative profession!
Measuring and Experimenting with Revenue Performance
No matter what revenue model or models you choose to employ in your app, you’ll want to know how well they’re doing in relation to your business goals. The Windows Store itself will provide you with revenue tracking for paid apps as well as in-app purchases that go through the Store’s commerce engine. If you’re using a third-party commerce platform, it will provide you with similar information, as will your advertising providers.
Beyond such backend data, though, you’ll want to instrument your app to collect its own telemetry where customer behavior is concerned (as we’ll discuss later), especially if you’re providing options like social sharing in lieu of an in-app purchase. You’ll also want to know when and where, exactly, your customers are engaging with your monetization strategies, because your providers won’t be able to make such determinations for you. For example, when and where are your customers most likely to make an in-app purchase? What ad placements within different pages of your app get the most impressions and click-throughs? Knowing such things can help you adjust the design of your app to produce more revenue and can give you valuable insights for other apps you’ll produce.
Such telemetry, along with customer feedback, also enables you to experiment with your monetization and track the results, which you again use to optimize your apps market performance. For example, one publisher initially offered a $3.99 game with a seven-day trial but found that most users finished the game in five days. As a result, they weren’t making much money. So they changed the model to a feature-differentiated trial—meaning you couldn’t complete the game with just a trial license—and lowered the price to $2.49. In doing so their revenues rose. Another example is an app that started out with ads and in-app purchases to add content. Customers expressed interest through their Store reviews that they’d like to remove ads, so the app added three tiers of in-app purchases to remove ads for different periods of time.
So don’t be afraid to try different things! After all, part of running a business with your app is creatively adjusting your business model to the needs of your customers and trends in the market.
The Windows Store APIs
Now that you’ve likely decided on a course for your app, let’s see how you use the Windows Store APIs to accomplish those ends. These are found in the Windows.ApplicationModel.Store namespace; all objects referred to in this section are contained in this namespace unless noted.133Furthermore there’s only one sample that we’ll be drawing from: Trial app and in-app purchase sample.
For basic licensing and trial enforcement, the good news is that both are effortless: the app doesn’t need to do anything at all! A user cannot acquire your app without going through the Store, and even if he did manage to, he’d have to have a developer license to install and run it. Furthermore, because the Store automatically tracks trial periods for apps, Windows will simply not launch an app once the trial is expired. Instead, Windows will redirect the user to the product’s page in the Store where the user can purchase a full license. The same is true is Windows detects that a package has been tampered with: the Windows will direct the user to repair the app through the Store.
As noted before, apps can enforce a secondary licensing scheme if desired. Here it would ask the user for a separate registration or a separately acquired license key of some sort. Windows does not offer an API for this but will not block schemes of your own.
That said, WinRT provides for the following features:
• Retrieving app and product (in-app purchase) information from the Store, including price values formatted for the user’s current locale.
• Retrieving license information for the app and in-app purchases, indicating trials, expirations, etc. The app can make any decisions it wants with these details.
• Prompting the user to purchase a full license during or after a trial period; this is especially useful when the app is running and the trial period expires.
• Handling in-app (product) purchases for durables and consumables, with large catalog support.
• Generating receipts, which are primarily used for secondary validation and purchase tracking.
• Testing all the app’s Store interactions prior to uploading to the store.
Tip Although the Store API retrieves information from its backend service, an app is not required to declare the Internet (Client) capability itself unless it needs network access for other purposes.
When an app runs for real—that is, after it has been uploaded to the Store and has made its way into the hands of customers—interaction with the API happens through the static CurrentApp object:
var currentApp = Windows.ApplicationModel.Store.CurrentApp;
whose methods and properties are as follows:134
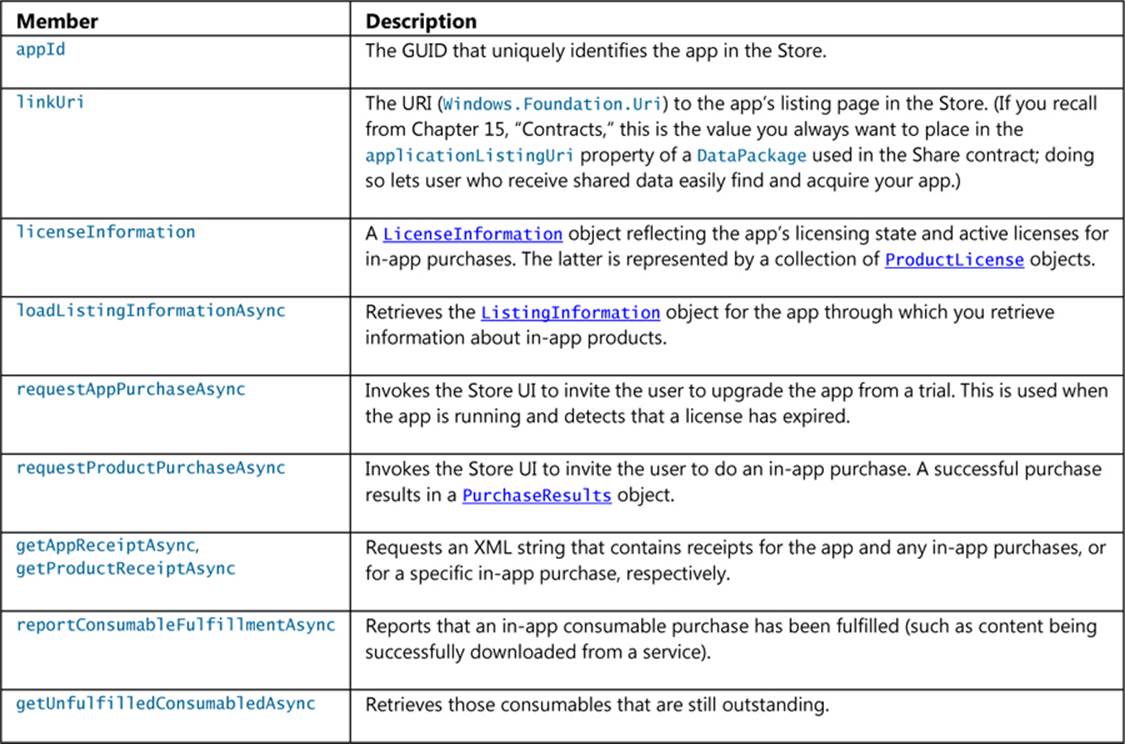
A ListingInformation object contains a number of properties that come pre-localized as appropriate: ageRating (a number, currently one of 3, 7, 12, and 16), currentMarket (a BCP-47 string indicating the user’s market that is used for transactions), description (a string containing the app’s localized description as you provided to the Store dashboard), formattedPrice (a string containing the app’s purchase price formatted for the user’s current market and currency), name (a string with the app’s name in the current language, as supplied to the dashboard), andproductListings. The latter is an array of ProductListing objects, each of which represents an in-app purchase that you configured on the Store dashboard.
On Windows 8.1, a ProductListing contains four properties: productId (a string containing the app-defined product identifier), formattedPrice (a localized string containing the product price), a localized name (a string), and a productType value from the ProductType enumeration, which can be durable (1), consumable (2), or unknown (0). You can see, then, that the listing collection is exactly what you’ll use to present the user with your localized list of in-app purchases, where the productId could be used to retrieve additional content like images from your package or a web service. You can also use productType to separate your lists of durable and consumable purchases.
The LicenseInformation object for its part contains simple properties of expirationDate (a Date), isActive (a Boolean), and isTrial (a Boolean). It has one event, licensechanged, which fires when these properties change. You can use this to prompt for purchase if a license expires while the app is running. The remaining property, productLicenses, is a collection of ProductLicense objects. Each contains the appropriate productId, expirationDate, isActive, and isConsumable properties. The LicenseInformation.licensechanged event also fires for changes in anyProductLicense.
Tip For globalization purposes, never compare two dates with simple arithmetic operators like <, >, and =. Instead. Use the Windows.Globalization.Calendar.compareDateTime method, which will account for the specific needs of different calendar systems that might be in effect.
Roaming and offline access Because a user can make purchases on other devices, Windows makes sure to roam licenses to and cache them on all the user’s devices. This allows apps to validate purchases and check license status when a device is offline. The upshot of this is that you should always use the API to check licenses rather than trying to manage such state yourself.
That’s really the extent of the Store APIs in a nutshell, and we’ll go into all the details in the discussions that follow. You may notice that the APIs don’t concern themselves with ad-supported apps, because ads don’t involve the Store itself and are implemented through ad-provider controls.
But you might be asking yourself some very significant questions: how on earth can this API return any meaningful information while the app is under development and has yet to be uploaded to the Store in the first place? How can you get product information and test all your purchase features when there’s nothing yet available to purchase?
These are great questions, and the answers lie in the one other object in the Store namespace (and our next topic): the Windows Store app simulator.
Sidebar: Use the licensechanged Event for UI Updates
In general, a best practice is to use the licensechanged to update whatever UI is affected by changes to app licenses or in-app purchases. That is, this event is the central location where you pick up all changes, be it from purchases (which you are hoping for!) or licenses that expire (which you hope to convert before then). You have to use this event anyway to handle expirations while the app is running, and thus it’s better to also use it to process the successful purchases, rather than doing it within your handlers for the request*PurchaseAsync methods.
The CurrentAppSimulator Object
To make it possible to test an app’s interactions with the Store before the app is actually onboarded, WinRT provides the static CurrentAppSimulator object that is identical to CurrentApp with two exceptions. First, the simulator object works against data from a local XML file rather than live data from the Store, which won’t exist until you’ve actually on-boarded the app. By definition, then, everything you do to test Store interactions before your app is published will use the simulator. The second difference is that the simulator object has an extra method, reloadSimulatorAsync, to reinitialize the simulator with such XML.
During development, you use this line of code to start your work with the API:
var currentApp = Windows.ApplicationModel.Store.CurrentAppSimulator;
and then delete the Simulator suffix when you’re ready to send the app to the Store. (If you forget, you’ll fail Store certification.) Alternately, you can use the method described in Chapter 2, “Quickstart,” under “Sidebar: Debug or Release?” to select the right object based on your build target. Details are provided on my blog at A reliable way to differentiate Debug and Release builds for JavaScript apps and in the DebugRelease example in Chapter 2’s companion content.
When your app accesses CurrentAppSimulator, WinRT looks for a file called WindowsStore-Proxy.xml in your app data, specifically under %userprofile%\AppData\local\packages\<package name>\LocalState\Microsoft\Windows Store\ApiData. If it exists, the simulator is initialized from that data; otherwise the file is created with the following defaults (slightly formatted to fit the page):
<?xml version="1.0"encoding="utf-16" ?>
<CurrentApp>
<ListingInformation>
<App>
<AppId>00000000-0000-0000-0000-000000000000</AppId>
<LinkUri>
http://apps.microsoft.com/webpdp/app/00000000-0000-0000-0000-000000000000</LinkUri>
<CurrentMarket>en-US</CurrentMarket>
<AgeRating>3</AgeRating>
<MarketData xml:lang="en-us">
<Name>AppName</Name>
<Description>AppDescription</Description>
<Price>1.00</Price>
<CurrencySymbol>$</CurrencySymbol>
<CurrencyCode>USD</CurrencyCode>
</MarketData>
</App>
<Product ProductId="1"LicenseDuration="0">
<MarketData xml:lang="en-us">
<Name>Product1Name</Name>
<Price>1.00</Price>
<CurrencySymbol>$</CurrencySymbol>
<CurrencyCode>USD</CurrencyCode>
</MarketData>
</Product>
</ListingInformation>
<LicenseInformation>
<App>
<IsActive>true</IsActive>
<IsTrial>true</IsTrial>
</App>
<Product ProductId="1">
<IsActive>true</IsActive>
</Product>
</LicenseInformation>
<ConsumableInformation>
<Product ProductId="2"TransactionId="00000000-0000-0000-0000-000000000000" Status="Active" />
</ConsumableInformation>
</CurrentApp>
The full XML schema for this can be found on the CurrentAppSimulator page (except for the ConsumableInformation part, which I’ll fill in below), and it’s straightforward to see exactly where you’d modify the XML to test different scenarios:
• Create additional MarketData elements to specify app details for other locales. The CurrentMarket element indicates the default.
• Create additional Product elements (including their MarketData children) for each in-app purchase.
• In the App element under LicenseInformation, change the values of IsActive (that is, not expired) and IsTrial between true and false to test the variations: active/non-trial, active/trial, expired/non-trial, and expired/trial. You can also add an ExpirationDate element to indicate when the app expires (in UTC time), using the form of yyyy-mm-ddThh:mm:ss.ssZ (replacing yyyy:mm:dd with the date and mm:ss.ss with the time). For automated testing, additional elements let you hard-code result codes; details on the CurrentAppSimulator page.
• For each in-app purchase, add a Product element under LicenseInformation with the appropriate ProductId attribute and ProductType attribute (Consumable or Durable). Supported child elements are IsActive and ExpirationDate, with the same meaning as the app license.
• For each consumable in-app product, add a Product element under ConsumableInformation with the appropriate ProductId, an optional OfferId (for large catalogs), the TransactionId to report when you simulate a purchase, and a Status attribute. The latter can have values of Active(consumable is available), PurchasePending (waiting fulfillment), PurchaseRevoked (canceled on the backend), or ServerError. These let you test different scenarios when using the in-app purchase API for consumables.
Tip When you reach the point of publishing your app to the Store, you’ll be configuring all of these options for real. By that point, your XML file that you use in development should be the exact representation of the capabilities that the app expects, so make sure that you accurately transfer all the details to the Store dashboard.
When using the methods in the simulator object that change license status, such as converting a trial app to a purchased app or acquiring in-app purchases, they will not alter the contents of the WindowsStoreProxy.xml file. This means you can just restart the app to reset the state of the simulator object, but it also means you’d need to edit the XML and launch the app again to test how different variations are handled on startup. (Note also that the Store simulator state is not persisted when the app is suspended and terminated.)
For this purpose, the simulator object’s reloadSimulatorAsyncmethod takes a StorageFile containing the XML initialization data. This can very much simplify your testing procedures, and often you’ll have such files directly in your project folder such that you can refer to them with ms-appx:/// URIs. However, make sure that these files don’t end up in your app package when you upload to the Store. In Visual Studio, right-click the file in the Solution Explorer pane and select Properties. In the Property Pages dialog that appears, as shown in Figure 20-1, set Package Action to None.
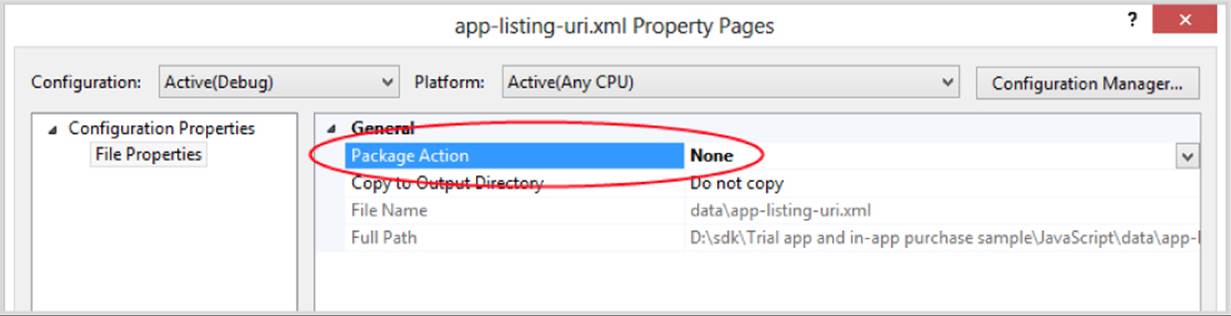
FIGURE 20-1 Make sure that XML configuration files for the simulator object don’t end up in your Store packages.
The Trial app and in-app purchase sample, which we’ll be drawing from in the explanations ahead, uses reloadSimulatorAsync to load a specific XML file for each of its scenarios (but note that it has not set the Package Action to None!). In scenario 7, for example (js/api-listing-uri.js), it loads data/app-listing-uri.xml as follows:
var currentApp = Windows.ApplicationModel.Store.CurrentAppSimulator;
var page = WinJS.UI.Pages.define("/html/app-listing-uri.html", {
ready: function (element, options) {
// ...
loadAppListingUriProxyFile();// Initialize the license proxy file
},
unload: function () {
currentApp.licenseInformation.removeEventListener("licensechanged",
appListingUriRefreshScenario);
}
});
function loadAppListingUriProxyFile() {
// We could also use folder.getFileFromPathAsync("ms-appx:///data/app-listing-uri.xml")
// instead of the two-step process with getFileAsync as shown here.
Windows.ApplicationModel.Package.current.installedLocation.getFolderAsync("data").done(
function (folder) {
folder.getFileAsync("app-listing-uri.xml").done(
function (file) {
currentApp.licenseInformation.addEventListener("licensechanged",
appListingUriRefreshScenario);
Windows.ApplicationModel.Store.CurrentAppSimulator
.reloadSimulatorAsync(file).done();
});
});
}
Notice how this sample listens for the licensechanged event and makes sure to call removeEvent-Listener when the page is unloaded. (See “WinRT Events and removeEventListener” in Chapter 3.)
This same scenario 7 shows the basic retrieval of app information from the Store. When you click the Show Uri button on that page, it goes to the handler below, which outputs the app’s linkUri property:
function displayLink() {
WinJS.log && WinJS.log(currentApp.linkUri.absoluteUri, "sample", "status");
}
Getting at the app’s other properties would look the same, just using currentApp.loadListing-InformationAsync first to obtain that data. This is shown in scenario 1 (js/trial-mode.js):
function trialModeRefreshScenario() {
currentApp.loadListingInformationAsync().done(
function (listing) {
document.getElementById("purchasePrice").innerText =
"You can buy the full app for: "+ listing.formattedPrice + ".";
});
displayCurrentLicenseMode();
}
And on that note, let’s look at the rest of the sample more fully because it shows the other use scenarios of the Store API as a whole.
Trial Versions and App Purchase
When you configure your app on the Store dashboard, the first question under Selling Details is the Price Tier. If you set this to anything other than Free, you also set the Free Trial Period, as shown in Figure 20-2. As noted before, offering a free trial increases the likelihood of a customer making a full purchase by an order of magnitude, so it’s definitely something to consider!
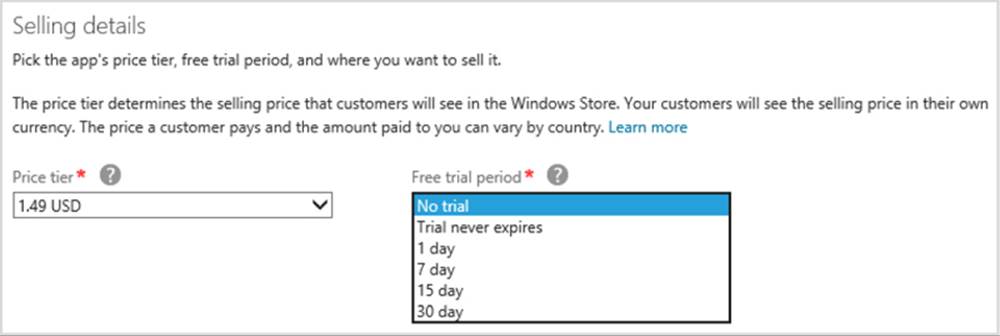
FIGURE 20-2 Setting a price tier and trial period for an app on the Store dashboard.
In your XML for the CurrentAppSimulator, you set the app price in the ListingInformation > App > MarketData > Price element and configure a trial period under LicenseInformation > App > IsTrial and ExpirationDate. Handling a trial is demonstrated in scenario 1 of the Trial app and in-app purchase sample, and the relevant XML from data/trial-mode.xml is as follows (other parts omitted for brevity):
<CurrentApp>
<ListingInformation>
<App>
<MarketData xml:lang="en-us">
<Name>Trial management full license</Name>
<Description>Sample app for demonstrating trial license management</Description>
<Price>4.99</Price>
</MarketData>
</App>
</ListingInformation>
<LicenseInformation>
<App>
<IsActive>true</IsActive>
<IsTrial>true</IsTrial>
<ExpirationDate>2014-01-01T00:00:00.00Z</ExpirationDate>
</App>
</LicenseInformation>
</CurrentApp>
When you run this scenario in the sample, as shown in Figure 20-3, the simulator object is initialized with this XML. The app’s IsActive and IsTrial elements are both set to true, meaning that the app can run and that it has a valid trial license. The ExpirationDate for this license is set to January 1, 2014, which is in the past as of this writing, so you’ll need to update it to see expiration in the future rather than the past.
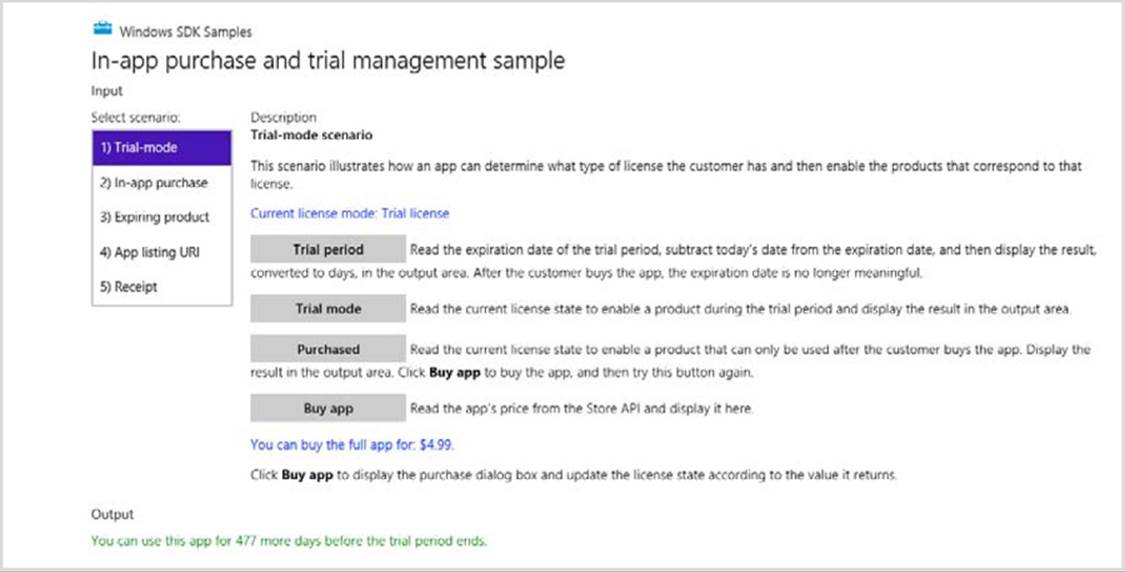
FIGURE 20-3 Scenario 1 of the Trial apps and in-app purchases sample (cropped slightly).
The Trial Period button calculates the number of days remaining in the trial period, using basic arithmetic and the licenseInformation.expirationDate property. Note that you should always use the licenseInformation.isTrial flag to check for trial validity instead of checking the date yourself, because it will properly handle regional variations in time/date handling. The sample’s use of the expirationDate is just for UI purposes.
The Trial Mode and Purchased buttons just output different messages based on the state of the isActive and isTrial properties. Both button click handlers start like this:
var licenseInformation = currentApp.licenseInformation;
if (licenseInformation.isActive) {
if (licenseInformation.isTrial) {
What can make the output from these buttons more interesting is modifying the data/trail-mode.xml file with different initial values for IsActive and IsTrial. Given that you’ll be reading this book after the 1 January 2014 date in the sample, you’ll see an expiration message on first run (isActive will be false, regardless of the flag’s value in the XML). So try setting the ExpirationDate to a time in the future (remembering that its UTC time, not local time), rerun the sample, and you’ll see that IsActive comes through as to true. Then set ExpirationDate about a minute in the future, set a breakpoint on the trialModeRefreshScenario function inside js/trial-mode.js, and restart the sample.
You won’t hit your breakpoint immediately after ExpirationDate has passed, however. For performance reasons, the licensechanged event is not triggered instantly—there could be hundreds of expiration dates to track throughout the system. The event will instead fire reasonably soon, within about 20 minutes, so you might start such a test before going out for lunch.
This sample, of course, merely changes some output messages according to the validity of the license. In a real app you would either disable certain features for an active trial license or let the user do nothing more except purchase the app if the trial has expired. You’d want to make such checks both when the app is launched (for any reason) and in the resuming event.
Tip When an app license expires, Windows marks the app tile with an “X” glyph and prevents the app from being launched. Instead, the user is prompted to buy the app in the Store directly. Although this suggests that a newly launched app should never seelicenseInformation.isActive set to false in the CurrentApp object, you always want to check for an active license on startup. This guards against side-loading hacks, because side-loaded apps will always have an inactive license.
Upgrading from an expired trial to a paid license is handled by the Buy App button in this scenario, an option that you should have to remind the user anytime they’re running a trial, regardless of expiration status. This button calls a handler (named doTrialConversion) that makes use of the CurrentApp.-requestAppPurchaseAsync method (js/trial-mode.js):
var licenseInformation = currentApp.licenseInformation;
if (!licenseInformation.isActive || licenseInformation.isTrial) {
currentApp.requestAppPurchaseAsync(false).done(
function () {
if (licenseInformation.isActive && !licenseInformation.isTrial) {
// Purchase was fulfilled
} else {
// Purchase UI was shown, but the user canceled. Trial is still in effect.
}
},
function () {
// There was an error in the transaction; purchase did not occur
});
The one argument to requestAppPurchaseAsync indicates whether a receipt string is sent to your completed handler; see “Receipts” later on. In any case, if the user makes a purchase, the license-changed event will fire as it does for trial expiration, so you can consolidate your license handling there.
With the CurrentAppSimulator, invoking requestAppPurchaseAsync won’t show the actual Store UI. Instead you’ll get an ultra-prosaic dialog in which you specify the exact return value (an HRESULT):
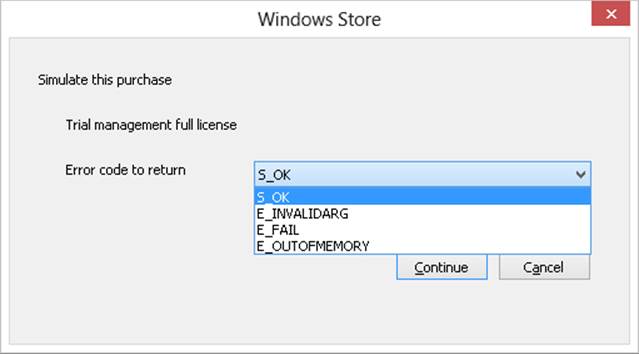
Sending back S_OK indicates that the purchase was made. The isTrial flag should change to false and isActive set to true. Returning any of the other errors will invoke the error handler for requestAppPurchaseAsync. Pressing Cancel, on the other hand, will call your completed handler but the values of isTrial and isActive will remain unchanged.
In the real world, of course, consumers will not be fiddling around with simulated Store conditions. Instead, if your app is marked to offer a trial version (something you set while uploading to the Store), they’ll see a Try button on the app’s listing page like this:
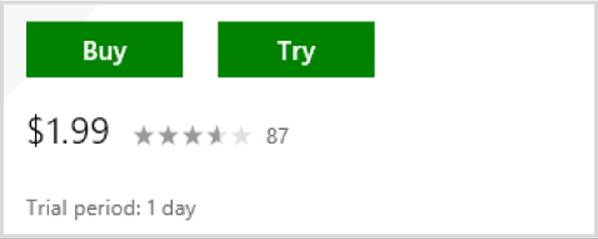
Tapping Try will install the app and set both isActive and isTrial to true. At the point when the app calls requestAppPurchaseAsync, Windows will launch the Store and take the user to the app’s listing page where they can tap the Buy button if they choose.
Tip When writing this book, I looked at a number of apps that were available in the Windows Store and found that although many offered trials, few of them gave me any indication about why and how to purchase a full version, nor told me that I was even running a trial and how long I had left in the trial period. I was presented with such an option only when the trial period had passed. If you want to convert trials into paid licenses, it’s better, even as the sample demonstrates, to inform the user that she’s running a trial and give her reminders and opportunities to convert!
Expiring apps? It’s possible, when testing an app, to set an expiration time for the full app in the XML and not just for a trial. However, the Store dashboard doesn’t provide a means to do this for a released app. Instead, you just stop making the app available.
Listing and Purchasing In-App Products
Working with your in-app purchases, or products as the API calls them, involves three aspects. The first is retrieving locale-specific product information from the Store for use in your own UI. The second is then completing the purchase and either activating the product’s license for durables or reporting fulfillment for consumables. We’ll cover these two steps in this section. The third aspect, covered in the section that follows, is handling large catalogs of purchase options that exceed the 200-item limit of the Store dashboard.
In-app purchases are configured on the Store Dashboard under Selling Details, as shown in Figure 20-4. If you check the box for using a third-party commerce system, you’ll be entering details with that provider and not the Store and you’ll be using that provider’s API rather than what’s discussed here. But if you’re using the Store, click Use The Windows Store In-App Purchase System link and you’ll go to the Services page where you add the details, as shown in Figure 20-5.
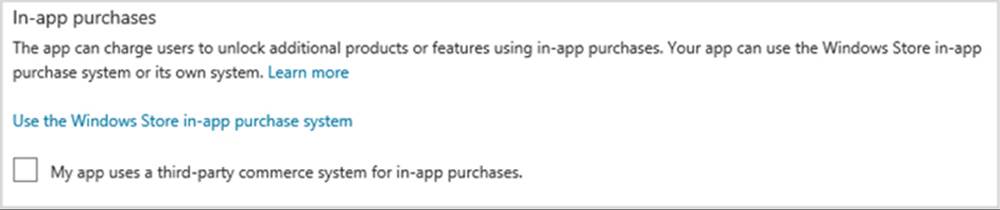
FIGURE 20-4 The Store dashboard area for in-app purchases under Selling Details.
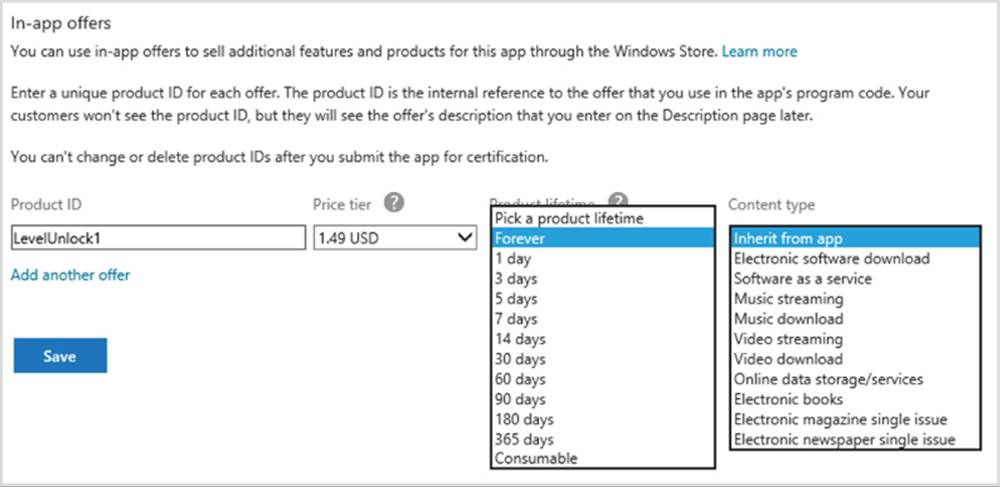
FIGURE 20-5 Entering details for in-app purchases on the Store dashboard’s Service page.
Each product has an ID that you assign, a price, a lifetime, and a specific content type. As you can see in Figure 20-5, the lifetime is where you differentiate durables and consumables, with every option in this drop-down being for durables except the very last one. As for the content type, this setting is needed for taxation purposes; it has no effect on the app and isn’t exposed through the API. And note that when you’re managing a large catalog, the products you describe here will be generic classes or types of offers for which you’ll fill in specific details at run time (see “Handling Large Catalogs”).
One bit of information you might be wondering about is the actual description of the in-app purchase that the Store will show to the user. It’s not here because you’ll enter it later after you upload your app package. At that time you’ll then enter localized descriptions for each language you support at the same time you provide other descriptive text and graphics:

When using XML to configure the CurrentAppSimulator, you enter the same details (including the description) within the ListingInformation > Product nodes (for markets, pricing, duration, and purchase type) and the LicenseInformation > Product nodes (for license status and expiration dates). You can see some variations in scenarios 2–5 of the Trial app and in-app purchase sample.
Again, a consumable purchase can be repurchased as soon as a previous one is reported as fulfilled. A durable purchase is similar in that it can have an expiration date, meaning that the product license is in effect for a time, after which the user needs to repurchase it to continue its use. Either way, be sure that your app UI fully informs the user about the exact nature of the product at the time of purchase: don’t surprise your users or they’ll likely surprise you with less than favorable reviews in the Store!
Handling in-app purchases follows this general pattern:
• Retrieving a list of available products from the Store and displaying them in the app as needed.
• Initiating the purchase through the Store API and checking the result status, which reflects the user’s actions in the Store’s UI.
• Apply the purchase, which might initiate downloads or other async actions. At this point the particular consumable purchase is temporarily disabled while the transaction is in progress.
• If purchase-related actions for consumables are successful, the app reports fulfillment to complete the transaction. This is also necessary to re-enable the purchase.
Obtaining a list of in-app purchases is done through CurrentApp.loadListingInformationAsyncto obtain the app’s ListingInformation, whose productListings collection then contains all of the in-app purchases you’ve registered through the Store dashboard, regardless of type:
currentApp.loadListingInformationAsync().done(
function (listingInfo) {
// listingInfo.productListings contains in-app purchase details.
});
The collection is a MapView object and not an array. To retrieve a specific item in the collection, use its lookup method:
var product1 = listing.productListings.lookup("product1");
or use a key-based lookup with the [ ] operator:
var product1 = listing.productListings["product1"];
You would do singular lookups like this when you know ahead of time which specific products you want to show in some part of your UI. That is, you might have certain set of purchases that you present in different parts of the app, or even individual purchases that you offer in specific contexts.
In other cases you’ll want to iterate the collection and generate a list of applicable purchases in your UI. This takes a little more work because the MapView does not support index-based lookup nor the foreach method, as discussed in Chapter 6, “Data Binding, Templates, and Collections.” You instead use an Iterator obtained through the first method, as shown here:
var iterator = listing.productListings.first()
var product;
while (iterator.hasCurrent) {
product = iterator.current.value;
// Use product.productId, name, formattedPrice, and productType to generate your UI.
iterator.moveNext();
};
Here you’d use the product.productType, which will be durable or consumable (or unknown) to filter your list by type. For durable in-app purchases, you’ll also likely filter out those products that have already been purchased. In that case, look up the product license within theCurrentApp.license-Information.productLicenses collection (a MapView of ProductLicense objects) using the product’s ID as the key. Here’s how we’d modify the code above to perform this additional step:
var iterator = listing.productListings.first()
var licenses = currentApp.licenseInformation.productLicenses;
var product;
while (iterator.hasCurrent) {
product = iterator.current.value;
if (licenses[product.productId].isActive) {
// Product has already been purchased
} else {
// Product is available for purchase
}
iterator.moveNext();
};
With each consumable, you instead need to check if there is a pending fulfillment such that it cannot be repurchased at present. You do this through getUnfulfilledConsumablesAsync, using its results to omit or disable the appropriate items in your UI. The result of this method is aVectorView of UnfulfilledConsumable objects, each containing just a productId, a transactionId, and an offerId (for large catalogs, see the next section):
currentApp.getUnfulfilledConsumablesAsync().done(
function (unfulfilledList) {
unfulfilledList.forEach(function (product) {
// Handle the unfulfilled consumable
});
});
To initiate an in-app purchase, call one of the three requestProductPurchaseAsync variants:
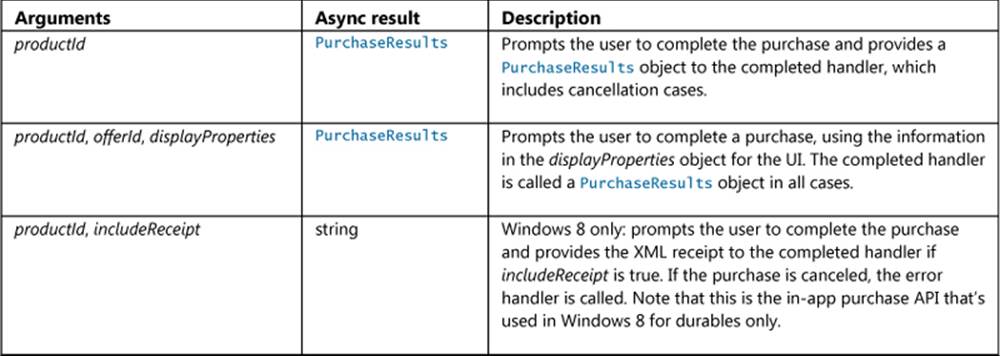
To be clear, the third variant above is the one that was available in Windows 8 for durables and exists for compatibility purposes. When targeting Windows 8.1, you’ll use the first variant for both durables and consumables and the second when working with a large catalog.
Scenario 2 of the sample shows the most basic in-app durable purchase call, checking first that the user doesn’t already have a license (js/in-app-purchase.js):
var licenseInformation = currentApp.licenseInformation;
if (!licenseInformation.productLicenses.lookup("product1").isActive) {
currentApp.requestProductPurchaseAsync("product1").done(
function () {
if (licenseInformation.productLicenses.lookup("product1").isActive) {
WinJS.log && WinJS.log("You bought Product 1.", "sample", "status");
} else {
WinJS.log && WinJS.log("Product 1 was not purchased.", "sample", "status");
}
},
function () {
WinJS.log && WinJS.log("Unable to buy Product 1.", "sample", "error");
});
}
Note that the error handler for the async call is called only when there’s an error in invoking the Store UI, such as when the device is offline and the Store cannot communicate with its backend services. Otherwise the completed handler will be called both when the purchase goes through and when the user cancels.
If the product already has an active license, requestProductPurchaseAsync will simply call your completed handler without showing any UI, as none is needed. Otherwise the user will see a series of prompts to confirm the purchase, including confirmation of their credentials. For the whole flow, see The in-app purchase user experience for a customer. A typical confirmation message is shown below (taken from Jetpack Joyride):
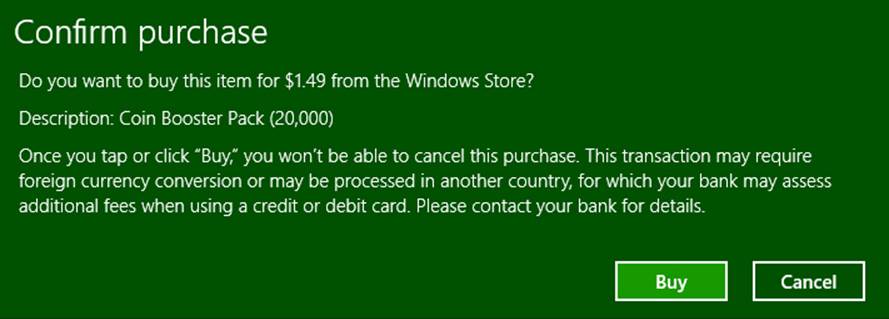
Note that the “Buy” warning in this dialog, which exists to meet regulations in some countries, is not entirely true: you can also cancel when entering your credentials in the next dialog unless you’ve specifically configured your account to not prompt for a password with each purchase.
When using the CurrentAppSimulator, of course, you won’t see the Store prompts but only another simple dialog to control the result:
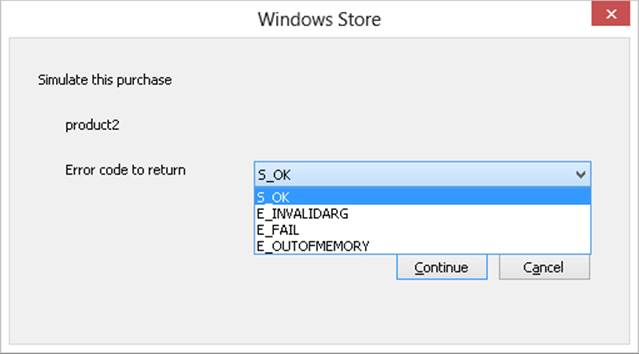
In the code shown earlier, notice that it is checking the license status within the purchase request completed handler. It’s better to keep any license-related code inside your licensechanged event handler instead. This is because the event is also fired if a time-limited product license expires, which is your signal to make the purchase available again (checking this expiration time for a durable in-app purchase is shown in scenario 3 of the sample135). It’s likely that you’ll want to alert the user to that status, perhaps with a toast notification or inline message when the user tries to access that feature.
In your completed handler, then, examine the PurchaseResults result to determine your next step. This object will contain a transactionId, an offerId (for large catalogs), a receiptXml string, and a ProductPurchaseStatus value in its status property. For durables the applicable status values are succeeded, alreadyPurchased, and notPurchased (user canceled). For consumables you can see succeeded, notPurchased, and notFulfilled, the latter of which means that there’s already an outstanding purchase of this item that’s awaiting fulfillment and that this attempted repeat purchase was blocked. For both durables and consumables alike, then, a status of succeeded indicates that you can go ahead and download content, activate a feature, or whatever else is necessary.
Checking the status is straightforward, as we can see code from scenario 4 of the sample below (js/in-app-purchase-consumables.js). Note that when using the CurrentAppSimulator, the purchase request will give you a simple dialog box in which you can control success and error conditions:
function purchaseProduct1() {
currentApp.requestProductPurchaseAsync("product1").done(
function (purchaseResults) {
if (purchaseResults.status === ProductPurchaseStatus.succeeded) {
// Grant the user their content here, and then call
// currentApp.reportConsumableFulfillment when appropriate
} else if (purchaseResults.status === ProductPurchaseStatus.notFulfilled) {
// A previous purchase is waiting on fulfillment
tempTransactionId["product1"] = purchaseResults.transactionId;
} else if (purchaseResults.status === ProductPurchaseStatus.notPurchased) {
// User canceled
}
},
function () {
// There was an error invoking the purchase UI; device could be offline.
});
}
To see the relationship between purchase and fulfillment of consumables, scenario 5 of the sample, part of which is shown in Figure 20-6, lets you separately control purchase and fulfillment—and does so with the warning that you should never require a user action to fulfill a purchase! And in cases where you attempt to repurchase a consumable that’s still unfulfilled, you’ll see the notFulfilled status.
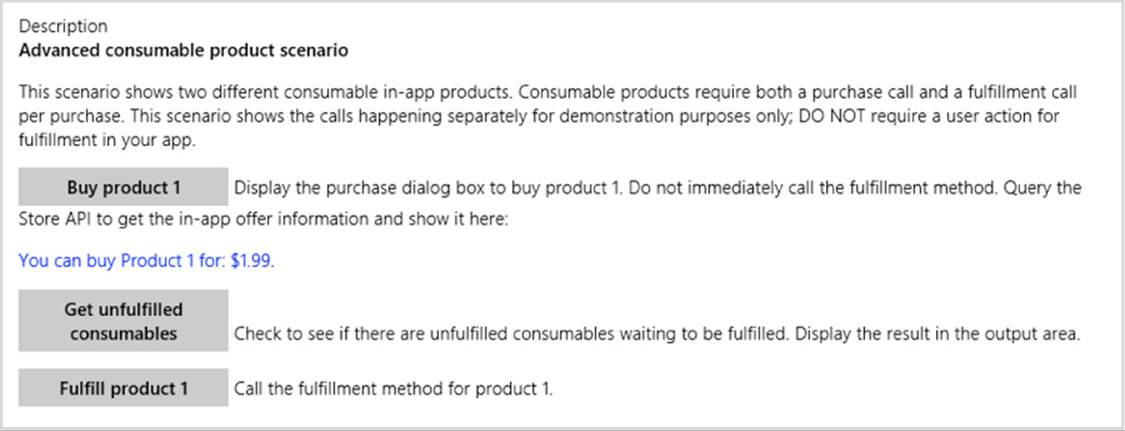
FIGURE 20-6 Scenario 5 of the Trial apps and in-app purchases sample (cropped) allowing specific control of purchase and fulfillment of consumables.
Reporting fulfillment of a consumable purchase—which is appropriate when the app can confirm that it how has full access to whatever value the user believe he or she purchased—is done by calling reportConsumableFulfillmentAsync with the productId and the transactionId (the latter being the one reported in the PurchaseResults object). Scenario 4 of the sample does it as follows: (js/in-app-purchase-consumables.js):
currentApp.reportConsumableFulfillmentAsync(productId, transactionId).done(
function (result) {
switch (result) {
case FulfillmentResult.succeeded:
break;
case FulfillmentResult.nothingToFulfill:
break;
case FulfillmentResult.purchasePending:
break;
case FulfillmentResult.purchaseReverted:
// User's purchase was revoked, and they got their money back.
// Revoke the user's access to the consumable content as necessary.
break;
case FulfillmentResult.serverError:
break;
}
});
As you can see, this call will provide a FulfillmentResult value so you can determine if you’ve really completed the transaction. The possibilities here are as follows:
• succeeded The fulfillment is complete and the consumable can be offered again.
• nothingToFulfill The transactionId has already been fulfilled or is otherwise complete.
• purchasePending The purchase has not yet cleared and could still be revoked.
• purchaseReverted The transaction was canceled on the backend and the app should disable access to the feature or content.
Because it’s the app’s responsibility to fulfill each consumable to complete the transaction, there will be times when you need to determine which consumable purchases are still outstanding, for example, to disable those options in your UI. You do this throughgetUnfulfilledConsumablesAsync, which results in a VectorView of UnfulfilledConsumable objects, each of which contains just a productId, a transactionId, and an offerId (for large catalogs, see the next section). Scenario 5 of the sample uses this to keep a list of pending transactions (js/in-app-purchase-consumabled-advanced.js):
currentApp.getUnfulfilledConsumablesAsync().done(
function (unfulfilledList) {
unfulfilledList.forEach(function (product) {
// Usually check fulfillment and call reportConsumableFulfillment if needed
tempTransactionId[product.productId] = product.transactionId;
});
});
This brings up one last question with in-app purchases—how do you cancel an unfulfilled consumable? For example, if fulfillment depends on acquiring specific data from a backend, but for some reason that just isn’t possible for that particular request, how do you cancel the transaction and thus re-enable the purchase for content that is available?
The present answer is that you don’t—there’s not an API to back out a pending purchase as it’s a relatively rare scenario. Still, if you encounter such a situation, you’ll want to inform the user that the content they originally selected is no longer available and give them a list of alternate choices. This encourages them to fulfill the purchase quickly in another way.
Handling Large Catalogs
By design, the Store dashboard limits the number of in-app purchases (durables and consumables combined) to 200. Although this is plenty for many apps, it is insufficient for apps that want to present users with a much larger array of choices, such as ebooks, movie libraries, music tracks, stock images, special reports, and so forth. In these cases, it doesn’t make sense for each and every piece of content to have its own product ID in the Store. Instead, it makes sense for the products to represent classes of purchases, each with its own price tier, which can then be particularized further with another identifier. This way you can have up to 200 such classes, each backed by however many items your identification scheme can accommodate.
Supporting large catalogs is the purpose of the requestProductPurchaseAsync variant that takes three arguments: a productId (a string), an offerId (another string), and a ProductPurchaseDisplay-Properties object. Here, the productId must match one of your entries in the Store dashboard, while offerId can be whatever you want because the Store does nothing more with it than pass it back to you in the PurchaseResults.offerId property. (This saves you the trouble of having to maintain your own associations between productId, offerId, and transactionId—isn’t that considerate?)
The ProductPurchaseDisplayProperties object, and specifically its name property, is how you then provide an exact description of the offerId.136 Thus, instead of having the Store UI just show the productId description, which might be “3-day movie rental,” it can show “3-day rental: The Song of Bernadette” and so forth.
It almost goes without saying that how you map an offerId to names and images is completely up to you and—most likely—your app’s backend. Indeed, almost every app that needs a large catalog will be retrieving catalog data from a backend in the first place, and will thus query some database through a service API, get back a list of applicable items (offerId, name, and image URI), and then show those results in a ListView or other gallery-style UI. When initiating a purchase, you’d just take the information from the item in that list, populate theProductPurchaseDisplayProperties, and make the requestProductPurchaseAsync call.
Scenario 6 of the Trial app and in-app purchase sample provides a simple demonstration of making the call, though of course it doesn’t work with a large catalog of real data. Instead, it just lets you enter an offerId and a product name to use in the call (js/in-app-purchase-large-catalog.js):
var offerId = document.getElementById("offerId").value;
var displayPropertiesName = document.getElementById("displayPropertiesName").value;
var displayProperties = new ProductPurchaseDisplayProperties(displayPropertiesName);
currentApp.requestProductPurchaseAsync("product1", offerId, displayProperties).done(
function (purchaseResults) {
// Process results
},
function () {
// Failure to show the Store UI
});
}
As with all other purchases, the CurrentAppSimulator will display its return value dialog; with the live Store, you’ll instead see the usual confirmation dialog with the specific product name from the display properties object.
Receipts
As we’ve discussed, an app validates purchases by checking license status and/or PurchaseResults values at run time. Many apps, however, present in-app purchases for capabilities or content that are managed on a server. For example, renting a video from a streaming service might have two parts: making a purchase in the app and then having your backend service validate itself on the app’s behalf with its secondary providers. As a result, your services need a way to validate those purchases with some piece of trusted information, because those services don’t have access to the Window Store APIs.
This is the purpose of receipts, which are XML strings that you can obtain from the CurrentApprequestAppPurchaseAsync and requestProductPurchaseAsync methods. The getAppReceiptAsync and getProductReceiptAsync methods also provide an all-up receipt (app and products) or an individual receipt at any time. You then send these XML documents to your services when needed.
Note Receipts are not cached locally for security purposes; the receipt APIs fail if the device is offline.
Receipts can also be used to protect your app against certain hacks that attempt to modify license information that’s cached on a system. See Protecting your Windows Store app from unauthorized use for a discussion.
In all cases, the receipt XML contains the app or product id, the dates for both when the purchase was made and when the receipt was issued, and a digital signature. The details of the XML schema can be found on the reference pages linked above. As an example, here’s the receipt string provided from getAppReceiptAsync in scenario 8 of the sample:
<?xml version="1.0"encoding="utf-8"?>
<Receipt Version="1.0"ReceiptDate="2014-02-21T23:20:22Z"CertificateId=""
ReceiptDeviceId="94c007cb-12b4-47be-8a4a-d7e94d7ba6d6">
<AppReceipt Id="917b34ef-738e-49bb-84ba-c783c2dafba6"
AppId="Microsoft.SDKSamples.Store.JS_8wekyb3d8bbwe"
PurchaseDate="2014-02-21T23:20:19Z"LicenseType="Full" />
<ProductReceipt Id="66505c93-fe55-4d77-a941-dbd61e7f1177"
AppId="Microsoft.SDKSamples.Store.JS_8wekyb3d8bbwe"
ProductId="product2"PurchaseDate="2014-02-21T23:20:19Z"
ProductType="Durable"ExpirationDate="2014-01-01T00:00:00Z" />
<ProductReceipt Id="6974609e-5572-44ab-9444-1b24096f7d48"
AppId="Microsoft.SDKSamples.Store.JS_8wekyb3d8bbwe"
ProductId="product1"PurchaseDate="2014-02-21T23:20:19Z"ProductType="Durable" />
</Receipt>
An individual app or product receipt will look the same but have only one AppReceipt or ProductReceipt child node under Receipt.
Tip If you want to consume a receipt as an XML document instead of a string (for display, print, or programmatic traversal), it’s a simple matter to create such an object like we did with tile and notification XML in Chapter 16:
var receiptDOM = new Windows.Data.Xml.Dom.XmlDocument();
receiptDOM.loadXml(receipt);
In the top-level Receipt node, the ReceiptDate is obviously when it was issued. CertificateId is a GUID when you get a receipt from the live Store (which is why it’s empty in the sample), and in that case you’ll also see a Signature node under Receipt. You use both of these on the server to validate the authenticity of the receipt. For details (using C# code for an ASP.NET service), refer to Using receipts to verify purchases.
The ReceiptDeviceId is then a unique identifier for the specific device where this receipt was issued. Remember that the Store maintains licenses for in-app purchases on a per-user basis, so it will report a valid license on every one of the user’s devices. Each receipt, however, will have a unique ReceiptDeviceId, so a server can use this attribute to track how many unique requests are coming from the app under the same user account. This becomes important when your backend is using other services that have usage limits, such as perhaps five simultaneous sessions or no more than three requests for the same content. Thus, when your app requests content from a service, it uploads the receipt. The server validates the receipt and checks its necessary quotas. If access can be granted, the server responds accordingly; if the quota has been exceeded, the server can instead respond with an error code and the app can inform the user of that condition. The user might then choose to purchase additional access rights or will know that he needs to close a session on another device.
Having the purchase and expiration dates within the receipt allows the server to apply its own validation policies, including enforcing expiration dates and detecting old receipts (“replay attempts”) that can no longer be used. In addition, the Id attribute of AppReceipt and ProductReceiptuniquely identifies a given purchase transaction (at a specific time on a specific device), which a server can use for further authentication and protection.
For further discussion about receipts, see //build 2013 session 3-126, Validating Windows Store Purchases for Your App.
Instrumenting Your App for Telemetry and Analytics
At this stage in your app’s journey you’re getting very near the point of uploading it to the Window Store and working with real customers. But before you do so, ask yourself this question: how will you understand what your customers are actually doingwith the app?
First of all, the Windows Store provides you quite a bit of information, as described in the topics under Analyze and improve. This includes average app usage per day with comparisons to other apps in your category, quality reports (crash dumps, unresponsive events, and JavaScript exceptions, which I hope you never see!), ratings and reviews, adoption rates, download history, in-app purchases, and app sales. Furthermore, various third parties, such as Distimo and AppFeds, produce analytics for the Windows Store as a whole, which is very valuable for tracking overall market trends and activities.
However, none of this really tells you about users’ specific activity within the app itself.
You might be thinking, “Hey, no problem—I’ve littered my code with all kinds of logging. Won’t that work?” Well, logging is a good start, but logging is generally a tool that you use during development so that you can diagnose errors and code flows. Logging is typically oriented around the internal structure of your app rather than reflecting real-world customer usage. In short, logging is how you collect data about your app in the lab; instrumenting your app for telemetry, on the other hand, is how you collect data once the app is released into the wild.
Telemetry, or tele-metering, is automated remote measurement and data collection. It’s used in all kinds of industries, from tracking spacecraft, tracking wildlife, medical monitoring, law enforcement, and so on. I especially like to think of it in the context of spacecraft, where it is theway in which mission controllers monitor the health and operation of a very expensive piece of hardware that is otherwise completely unreachable. Without telemetry, in short, you’re flying blind.
Putting an app into the global market is, in many ways, similar to launching a spacecraft. Your app represents a significant investment, and once it gets out to more than a handful of customers the main issue is not so much distance, but scale. And what you need is a way to both collect the data and then condense it into useful analytics, or reports that human beings can read to make decisions.
These analytics are a gold mine. They enable you to peer over your user’s shoulders (respecting privacy of course!) and know what they’re really doing. This enables you to answer many questions, such as:
• How are customers really engaging with the app? Do people use the features you thought they wanted?
• Where are they spending (or not spending) their time? How long do users spend in each app session, between sessions, and between suspend/resume?
• What device configurations do your users prefer (view size, screen orientation, display types, input modalities)?
• How are customers using options you provide via Settings?
• What’s going on when crashes happen? How often do users encounter noncrashing errors such as a failed HTTP request, a failed sync, timeouts, etc.?
• How successful and engaging are the various features of the app? Are social features being used? Are there usage patterns that you can reward or discourage in some way to drive behavior?
• How successful are your trial versions and/or in-app purchases? Where are trial conversion reminders and/or in-app purchase options most effectively displayed? How many users look at purchase options but don’t buy anything?
• Are users clicking ads (or converting to a paid version to get rid of them)?
• How often do users run online vs. offline?
• Where should you concentrate future investments for quality, performance, and feature updates? What ideas could you test in your next update or in a separate app?
• Is the app truly serving your business goals?
I can’t imagine that anyone who is serious about their apps business would not want answers to these kinds of questions, which is why many app developers consider telemetry a must-do for their apps, starting with any beta-testing or early previews they might put out.
Tip If you collect telemetry for beta or preview apps, be sure to separate that data from production versions, and also consider separating data from each major version of the app so that you can answer your questions clearly.
Early in this chapter I said that publishing an app means going into business, and telemetry tells you a lot about the success of that business. To return for a moment to the four “F’s” as I call them—the four motivations for writing apps—here’s how telemetry is typically used for each:
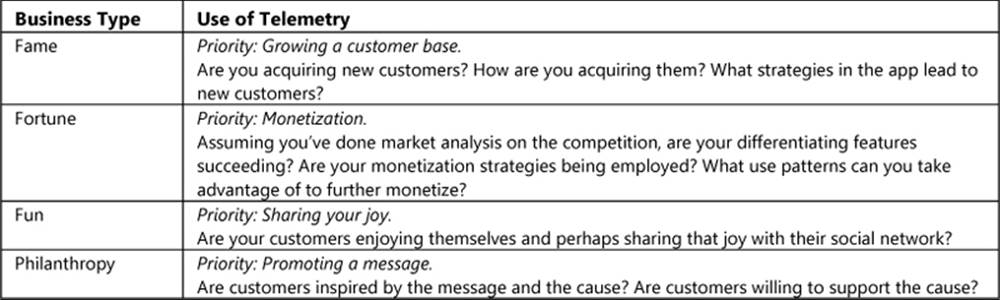
The questions you want to answer with your app will lead directly into how you instrument your app to gather telemetry. That is, your questions lead to telemetry design, and your telemetry design leads to what are called events. Events are broad, human-readable verbs or actions that you want to track—generally just strings that you use to categorize your telemetry data. This way they become the basic unit of organization for the analytics that you’ll eventually get from your telemetry.
Typical apps log about 30 distinct events, which often include (but are not limited to) app start, app exist, registration, login/log off, settings changes, content sharing, recoverable errors, non-recoverable exceptions, view content, mark as favorite, comment on content, viewing and item or category in a catalog, search or filter, add to wishlist, begin/complete/abandon checkout, invite friend, accept a friend’s invitation, game started, game completed, hint requested, and so on.
The relatively small number of events is driven by the fact that each one surfaces separately in the analytics that get generated from the telemetry—each event perhaps translates to a separate chart. Too many (or too few) events makes it difficult to harvest actionable information from the analytics, so when you think about events you really want to think about the insights you want to gain. For example, it’s more important to track what content items are being tapped or clicked rather than the pointer events themselves, except perhaps to gather secondary data about the type of input (mouse, touch, or stylus).
Events help identify users’ flow through the app and per-page feature usage. As such, they are usually static (not dynamically generated) and are usually somewhat generic, such as “Article read.” Event attributes or properties (think adjectives or subject nouns) then provide specific details, such as the URI or title of the article being read. This way the top-level events answer one level of questions about app usage, with the attributes providing another level. This becomes very helpful when generating charts from all this data, where the overall chart is for an event with attributes and properties providing the individual data points, bars, lines, and so on.
If you think about charting—which is probably the most common way to consume analytics—it’s also important that the properties and attributes you assign to events will chart well. For this reason, numerical attributes that can vary widely are best grouped into “buckets” or ranges, rather than reported as discrete values. For example, you could track the time spent on a given page or the time it took to complete a game level in terms of 0–5s, 6–10s, 11–20s, 21–60s, 61s–120s, and so on so that a pie chart or bar chart has a reasonable and meaningful number of elements.
It’s also best to report events at the end of an action when you have all the data you might attach to it, thereby making each event as rich as you can and reducing clutter in your analytics.
I hope that I’ve convinced you that instrumenting your app for telemetry is a good idea! So how then do you go about it? Well, you have two choices:
• The hard way Implement some kind of tracing/logging API of your own, sprinkle calls to that API throughout your app, implement a backend service to which you regularly upload your collected data (and make sure it can scale to thousands or tens of thousands of users), and then implement an entire analytics engine to process that data into meaningful reports.
• The easy way Register with a third-party analytics provider who is in the business of doing most of the hard work for you. Incorporate their SDK into your app, make calls to their API as needed, and spend most of your time using the analytics to create better apps!
Unless you already have an infrastructure in place, I suspect that you’ll choose the easy way! If you go to the Windows Partner Directory, where perhaps you’ve already looked for ads and commerce providers, you can click the Analytics filter and see a number of companies that offer great tools in this regard. Do note that the directory here intermixes partners that provide telemetry services, like we’re talking about here, and those who provide services like error tracking, market performance tracking, or marketwide trend reports (which are also useful, but different). But just spend a little time looking through the list and you’ll find the right ones—such as Localytics, MarkedUp, AppFireworks, mtiks, Adobe Omniture, and Parse. (Note that Flurry, the most popular analytics SDK for Windows Phone and other platforms, is not at present available for Windows Store apps, whereas many of the others in this list work on both. Furthermore, some providers might not offer an SDK for apps written in JavaScript, so check on the specifics.) Microsoft is also busy creating an analytics platform of its own called Application Insights.
What I very much appreciate is that these providers typically offer a free service tier so that you can get started without any up-front cost and start paying only when your app is successful enough to be generating significant data.
The typical flow with these providers is that you visit their portal to create an account, download the SDK and incorporate it into your project, and then register an app for which you receive a unique key. You provide this key when you initialize the SDK’s main object, and then you call that object’s methods to log your events. Depending on the SDK, you might need to request an upload of the data, or it might do it automatically. Either way, after using the app for some time, you visit the provider’s portal and explore the results.
A few tips:
• Use separate development, beta test, and production keys The purpose of telemetry is to gather actionable data from real-world users, so you always want to keep any data gathered during your development phase separate from real customer data. It’s likely that you’ll also want to separate beta testing data (e.g., for side-loaded versions, which probably has correlations with distinct time periods) from final production data (for the app acquired from the Store). This means creating separate keys through the provider’s portal and make sure to change them when you build each variant of the app.
• Create a telemetry layer in your app This allows you to easily switch providers at any time, if the need arises, and encapsulates any computation or bucketing logic behind the layer’s interface so that it doesn’t interfere with the rest of the app. If you define a simple enablement flag and check it within each method of your layer, it also makes it very easy to turn telemetry on and off (as when the user opts out) without touching any other part of your code.
• Test your telemetry by visiting the analytics portal early and often At the end of the day, you’re doing all of this to get actionable insights from the provider’s analytics. So even when you first start doing your instrumentation, gather some data and then visit the provider’s portal to see the results. You’ll quickly find whether the events you defined are meaningful, whether the attributes and properties you include with the events have the right granularity, and whether you’re correctly reporting that data.
• Be sure to turn on the Internet (Client) capability in your manifest Otherwise nothing will ever make it to the backend! Note that so long as you collect no personal information, email addresses, screenshots, or browsing history, gathering telemetry should not affect your app’s required age rating.
• Inform the user and allow opt out Telemetry data is a form of user information, though not personally identifiable. For this reason, make sure that your app’s page in the Store and your privacy policy, and provide an option in your settings to disable telemetry altogether if the user chooses to opt out.
As a small example, I instrumented the 15+Puzzle game I have in the Windows Store with telemetry so that I can determine usage patterns, especially patterns that affect different monetization strategies. I used the Localytics SDK, but anything specific to that SDK is isolated in my telemetry layer. That layer is implemented in my own Telemetry namespace that’s defined as follows, where the init function gets everything going:
WinJS.Namespace.define("Telemetry", {
inputType: { touch: 0, mouse: 1, keyboard: 2},
session: null,
enabled: true,
_curPage: null,
_lastNavTime: 0,
_settingsTime: 0,
_timeLastStarted: 0,
_timeLastCompleted: 0,
_inputTally: new Array(3),
_now: function () {
returnnew Date().getTime();
},
_convertToRange: function (value, granularity) {
//For telemetry, we don’t want to log every number, but should group them together
// into ranges.This method returns a string based on the granularity. For 25 for
// example, it’ll create strings"0-24", "25-49", "50-74", etc.
//Special case a true zero
if (value === 0) {
return"0";
}
var rangeBase = Math.floor(value / granularity);
return (granularity * rangeBase) + "-" + ((granularity * (rangeBase + 1)) — 1);
},
init: function () {
var keyDeveloper = "...";
var keyBeta = "...";
var keyProduction = "...";
Telemetry.session = LocalyticsSession(/* key */);
Telemetry.session.open();
Telemetry.session.upload();
} else {
Telemetry.session = null;
}
Telemetry.enabled = (Telemetry.session !== null);
//Automatically log app errors
WinJS.Application.addEventListener("error", functionI {
Telemetry.error("WinJS.Application.onerror", { "Line": e.detail.errorLine,
"Character": e.detail.errorCharacter, "File": e.detail.errorUrl,
"Message": e.message });
});
},
// Other event methods, such as error
}
You can see here that I have a generic bucketing method, _convertToRange, which I use elsewhere in the layer, whose other methods reflect my event design. These include: error, appStarted, syspending, resuming, visibilityChange, licenseChanged, appResized, newGrid, restarted, pageNav, scoredCleared, scoresViewChanged, gameStarted, gameRestarted, gameCompleted, tallyInput, optionsEnter, optionsExit, settingsEnter, settingsExit, and feedback. (This last one, by the way, is how I log user comments in a Feedback panel that’s part of the app’s Settings. This way I don’t need some other service to collect the data.)
To show what I mean by encapsulating telemetry logic in this layer, below is the appResized method that’s called on window.onresize events; as you can see, I gather up information about the device characteristics, because I want to know if the customer is playing full screen in portrait or landscape, how large of a screen they’re on, and the size of the app view itself. This data can inform future investments in layout and user experience. If I know, for example, that customers prefer portrait over landscape, I can focus on that layout first and landscape second:
appResized: function () {
if (Telemetry.session === null || !Telemetry.enabled) { return; }
var wgd = Windows.Graphics.Display;
var displayInfo = wgd.DisplayInformation.getForCurrentView();
var w = document.body.clientWidth;
var h = document.body.clientHeight;
//Convert orientation enum into a simple string value
var orientation = "landscape";
if (displayInfo.currentOrientation == wgd.DisplayOrientations.portrait
|| displayInfo.currentOrientation == wgd.DisplayOrientations.portraitFlipped) {
orientation = "portrait";
}
//Here I group window sizes at a 200px granularity for better analytics.
var data = {
"Display Orientation": orientation,
"Scale": displayInfo.resolutionScale,
"View Orientation": (w < h) ? "portrait" : "landscape",
"Width": Telemetry._convertToRange(w, 200),
"Height": Telemetry._convertToRange(h, 200)
};
Telemetry.session.tagEvent("View resized", data);
},
With my gameCompleted event, I also report what kind of input was used to play the game, bucketing the specific counts, of course. This is data that I want to drive further investments in handling input, such as my implementation of keyboard support:
gameCompleted: function (data) {
if (Telemetry.session === null || !Telemetry.enabled) { return; }
data = data || {};
Telemetry._timeLastCompleted = Telemetry._now();
//Add a range for inputs used in this game.
data["InputTally_Touch"] =
Telemetry._convertToRange(Telemetry._inputTally[Telemetry.inputType.touch], 25);
data["InputTally_Mouse"] =
Telemetry._convertToRange(Telemetry._inputTally[Telemetry.inputType.mouse], 25);
data["InputTally_Keyboard"] =
Telemetry._convertToRange(Telemetry._inputTally[Telemetry.inputType.keyboard], 25);
//Add an attribute for network connectivity: I don’t use this in the game at present,
//but thedata can help me understand whether to add network-related features.
var connected = false;
//Returns null if offline
var profile = Windows.Networking.Connectivity.NetworkInformation
.getInternetConnectionProfile();
if (profile != null) {
var level = profile.getNetworkConnectivityLevel();
//internetAccess or constrainedInternetAccess is probably acceptable; none or
//limitedAccess is not.
connected =
(level == Windows.Networking.Connectivity.NetworkConnectivityLevel.internetAccess) ||
(level ==Windows.Networking.Connectivity.NetworkConnectivityLevel
.constrainedInternetAccess);
}
data["Has Connectivity"] = connected;
Telemetry.session.tagEvent("Game completed", data);
},
Where all of this telemetry and analytics becomes even more valuable is if I decide to produce multiple apps of the same nature. By collecting telemetry in one app, I learn a great deal that I can apply to the first versions of subsequent apps. Indeed, one reason why you might choose to release a free app and strive to build up a large user base is just to acquire telemetry that can then inform a more significant investment in an app you’d like to monetize. Like I said, people who are serious about their apps business consider telemetry as a must-do! I strongly encourage you to do the same.
Releasing Your App to the World
We have finally come full circle to the exact point where we started in Chapter 1: onboarding your world-ready app to the Windows Store and making it available to that world.
Because the onboarding process is well documented already in the Publish your app in the Windows Store topic, I’m not going to spend our time here giving you too many screenshots from the Store dashboard, where all of this action takes place. I’ll point you to specific pages in those docs when appropriate, but it’s definitely a section of the documentation where you should spend some time and not just assume that you know what’s best. After all, the Windows Store is the retail channel for your app, so you want to understand that channel as best you can. The Store dashboard is also designed to lead you through the process directly.
For example, on the “Selling apps” topic there’s a section on Write a great app description. I can’t encourage you to think about this enough! Why? Because your app description, along with promotional graphics, are one of the primary ways that users in the Store make a decision about acquiring your app. Furthermore, if your app happens to be featured in the Store, the first line or two of that description is what users will see. Every word of that description counts and counts so much that it’s one of the things that the Store team looks at when selecting apps to feature, because they want the Store’s home page to look good too. Take time to do this well, and if you don’t feel up to the challenge, hire a writer for this purpose.
But like I said, that section of the documentation is quite comprehensive, so I’m not going to repeat it. What I want to focus on here specifically are those aspects of the process that aren’t always so obvious, based on the real-world experience that I and my teammates in the Windows Ecosystem Team have gained through working with the partners to submit apps to the Store. Through this I hope to raise your awareness of issues that you’ll likely face so that you’re more prepared to address them.
Sidebar: Build Targets and Maintaining Windows 8 and Windows 8.1 Versions
When you create your app package to upload to the Store, be mindful to set your project’s configuration to Release instead of Debug, otherwise it will fail certification. When choosing the target platform, set this to “Any CPU” unless you specifically have WinRT components written in C++. That is, JavaScript and .NET languages (C#/VisualBasic) are architecture-neutral; anything written in C++, on the other hand, must target x86, x64, and ARM specifically and therefore requires uploading three builds to the Store.
Similarly, your customer base might require that you support both Windows 8 and Windows 8.1 versions of your app for a time. The Store supports this, and you can find more information on the blog post Managing your app on Windows 8 and Windows 8.1. Also note that your Windows 8.1 version must have a higher version number than your Windows 8 version, but be sure to leave space between the version numbers so that you can update the Windows 8 app and increment the version number.
Promotional Screenshots, Store Graphics, and Text Copy
Before you starting thinking of the obvious steps of uploading a package to the Store, , review the topic How your app appears in the Windows Store and a couple of its associated topics: What to name your app, Your app’s description, Choosing your app images, and Make your app easy to promote.
The reason why I specifically call out these topics is because you’ve invested or you’re going to invest a lot of time and energy developing your app (and testing it, as we’ll discuss soon), and so you should make a comparable effort to make it look great in the Store. All of the content described by the links above—your app’s name and description, its details, keywords (search terms, that is), in-app purchase descriptions, and its promotional images, localized for each market you want to target—constitute your customers’ first experience of your app and play a definite role in the possibility of your app getting featured in the Store. (Go back to Chapter 19 and review “Part 3: Creating a Project for Nonpackaged Resources” for a complete list of what you’ll need when onboarding your app.)
Let me say that again: all of this information is what potential customers will use to evaluate your app before they tap any button to acquire it. It’s what the Store team also uses to evaluate the marketability of your app. In short, it is all marketing material, plain and simple, so make it shine! Spend time writing really good copy for your app description—even to the point of having it professionally edited or hiring a professional writer. If you feel your app is fun and engaging, communicate that experience through your description and imagery. Share everything you love about your own work! Truly, you want customers’ first impression of your app—just from a quick glance at your app’s page in the Store—to be WOW! And this content is all that determines that response.
The other reason I emphasize this so strongly is that the Store won’t ask for any of this information until you’re very near the end of the onboarding process, which is exactly when you’ll be most anxious to complete the process! If you haven’t prepared those materials already—including localized versions—and you’re trying to get the app out as quickly as possible, you’ll end up cutting some serious corners. As a result, your app’s first impression will be nowhere near as good as it could be.
Tip You can enable access to the Description area of the dashboard if you upload any package to the Store for your app, regardless of its completeness. I recommend that you do this early on with any old test package just so that you can see for yourself what information will be needed later.
I also encourage you to watch Pete Brown’s //build 2013 session entitled The Wow Factor: Making Your Windows Store App Promotable, where he discusses the many criteria that the Store team uses to select featured apps and those that are used in demos and conference keynotes. To summarize:
• Build a great app, because that’s what gets attention first and foremost, but then your app also has to be promotable.
• Have a great Start screen presence with a beautiful tile and/or live tiles. Whenever you see a Start screen in advertisements, a keynote session, or anywhere else, every tile has been consciously chosen. If you don’t support live tiles, invest the most in your 150x150 square tile and be sure your branding is clear. Also provide scaled versions of your tile for maximum sharpness.
• An app should have a “best-at” statement that’s reflected in the first line of its description. Apps that have a clear and valuable purpose make a great featured item in the Store, because users will see it and say “I want this.”
• In your app description, say what the user experiences in your app in support of your best-at statement. Grab attention with the first sentences (which can show in the Store feature page), use lists and short paragraphs, avoid dry or pedantic language, and be clear about trials, in app purchases, and so forth. Get inspiration by reviewing write-ups for other apps, and don’t forget spelling and grammar.
• Be honest in your app description, and make sure to disclose geographical restrictions, hardware requirements, partial localization, and why you’ve declared any questionable capabilities in your manifest.
• If you’re using ads, consciously incorporate them into the app design so that they integrate naturally and beautifully and contribute, rather than detract, from the user experience.
• Handle view sizing really well so that the app appears beautifully alongside other apps, and support multiple views if appropriate. Views and view handling are a key differentiator for the Windows platform as a whole and thus something that’s highlighted in marketing. If your app works really well in those scenarios, it might be included in that marketing.
• Use the app bar and nav bar intelligently and creatively.
• Offer a trial for paid apps.
• Be part of the bigger picture with apps as a whole by supporting contracts like Share.
• Submit awesome age-appropriate screenshots and promotional graphics (the first one being the most important), and think outside the box a little. Graphics don’t have to be straight-on screenshots but can show the app in other contexts, including human interaction with the product. In other words, think like you’re designing a box for your app that would sit on a retail store shelf—you’d show what the app does but not limit yourself to screenshots.
• Match exact sizes for promotional graphics: 414x180 (the only one if you do one), 414x468 (used more in Windows 8.1), 558x756, and 846x468.
• Support every architecture—x86, x64, and ARM—because otherwise a customer might see your app in advertising and then be unable to find it on their device.
In short, as much as you plan to build a great app, also plan for its promotion rather than just leaving it all to chance.
The last bit I’ll mention here is that you also want to make it easy for people outside of the Store and Microsoft to promote your app. The information on your Store page helps with this, but you should also offer a “press kit” on your website that includes various forms of promotional text, press releases, a variety of marketing images, app and/or company logos, links to your Facebook page, your Twitter handle, links to other web resources (like YouTube videos), and the like. By doing this work ahead of time, you make it all the easier for others to promote you.
Testing and Pre-Certification Tools
Unless you’re a born tester, app testing is an activity that has little glory and thrill compared to development, yet it can make a huge difference in the success of your app. Indeed, for many developers—especially those who have been primarily focused on the web, as I expect many readers are—rigorous testing is not one of their skill sets. I think this is because the nature of web development, where you can upload a fix to a site and have it take effect immediately, has not demanded much testing discipline. How often have you seen one of your favorite websites just blow up one day, hobble around for a few hours, and then come back to life? (I’ve seen this even with Facebook.) It’s probably because some developer introduced a nasty bug that was discovered and purged during those hours of awkwardness. For some sites, that downtime can be disastrous, but for many others the impact is small to negligible.
The costliness of bugs in web apps is generally quite small because the update time is also very small. But this is not a reality with apps. The time from when you submit an app to the Windows Store to when it’s made available averages two days, but it can be longer. This means that each submission is far more significant.
Just look at it in terms of turnaround time. Let’s say it takes five minutes to upload a fix to a web app. Compare that to the number of minutes in three days, which is 4320. The ratio? 1 to 864. In other words, it’s nearly hundreds of times more expensive in terms of time and effort to update an app in the Store. Practically speaking, this means that you might need to spend orders of magnitude more effort testing apps than testing websites. That’s significant! (And don’t make the argument that because you spend zero time testing web apps the multiple still comes out zero.)
If you don’t have some testing methodology in place, start building one, even from the basics. For example, be sure to always test your app on a clean install of Windows on a machine without a developer license, as well as on low-end machines whose performance is similar to many ARM devices. One developer I worked with had an app rejected by the Store because it came up blank on first run—he never saw this happen because of all the cached data on his development machine!
You also want to develop a solid checklist of how to poke and prod your app to exercise all its code paths. This should include subjecting it to all the conditions that come from outside your app: changing view sizes and device orientations; invocation of the different charms; changes in network connectivity; running on slow networks; varying screen sizes and pixel densities; input from different sources; having your temp files cleaned out with the Disk Cleanup tool; signing on with different credentials; suspending, resuming, and restarting after termination; running with high contrast modes and other accessibility features; and running under different languages. The better your app behaves under all these circumstances—which are all those things that real-world users will subject the app to!—the more solid it will look and feel to those same customers who will be writing ratings and reviews.
Having great performance, of course, is also essential, but we already talked about that back in Chapter 3. Be sure to review the Debugging and Testing Windows Store apps and Analyzing the performance of Windows Store apps in the documentation.
The other very important part of testing is running your app through the Windows App Certification Kit, otherwise known as the WACK. This tool—which you can find through the Start screen by searching on “Cert Kit”—subjects your app to all the automated tests that will happen when you onboard to the Store, thereby letting you correct any problems it finds beforehand. Passing the tests in the WACK is no guarantee that your app will be fully certified, but it will certainly save you a great deal of time waiting for onboarding results and having to resubmit over and over.
You should, in fact, run the WACK just about every day during development. You won’t necessarily fix everything it brings up immediately, but the ongoing data will be very valuable.
For complete details on the tool and what it does, see Using the Windows App Certification Kit and Windows App Certification Kit tests.
Tip If you find the WACK coming up blank (showing no apps to test), try uninstalling SDK samples that you might have run from Visual Studio. It seems the tool can get overloaded sometimes.
Creating the App Package
When you’re confident that your app and its presence in the Store is ready for the world, it’s time to finally create an app package for upload! To do this, start the submission process for your app on the Store dashboard to create an identity with the Store and reserve names for it (including localized names). Then, to make sure the information in your app manifest matches what’s in the Store, which is absolutely necessary if you’re using push notification and similar services, use the Visual Studio menu command Store > Associate App with Store.
Tip Before building the package, make one last check of the Store Logo image in your manifest’s Visual Assets section. This graphic is never used at run time and easily escapes your attention, and yet it’s very visible on your app’s page in the Windows Store.
Now you can create the app package. For starters, remember to set your build target to Release in Visual Studio, and then select the menu command Store > Create App Package. The first dialog that appears (see Figure 20-7) asks whether the package you create will be uploaded. (Note that you can also create a package outside of Visual Studio; see Create an app package at the command prompt.)
FIGURE 20-7 The first dialog box shown when you create an app package in Visual Studio.
If you want to create packages for side-loading (see “Sidebar: Side-Loading” coming up), select No. If you’re planning to submit now, on the other hand, press Yes and click Next, after which you’ll be asked to sign in again and then you’ll double-check your app’s association with those you’ve created in the Store.
Next you’ll specify an output directory for your package and indicate target architectures, if needed, as shown in Figure 20-8. Here’s where I want to explain a little about the Generate App Bundle option you see there, which is important if you have localized resources, scaled resources (that is, 100%, 140%, and 180% raster graphics), and resources for different versions of DirectX (which won’t happen with JavaScript apps, but I wanted to mention it). As I’ve noted elsewhere, such as in “Sidebar: Managing Overall Package Size” in Chapter 19, having lots of resources to cover variations in scale, language, and contrast can make your upload package somewhat large (the allowable limit if 8GB). Fortunately, this mostly affects your upload to the Store rather than customer downloads, if you select If Needed or Always for Generate App Bundle drop down.
A bundle, in other words, is a way to structure your package so that the Store can selectively download only those resources that a user needs for their particular device configuration. For most apps, selecting If Needed is sufficient because it instructs Visual Studio to handle everything automatically. Choosing between Always and Never applies mostly when you are using C++ code that must be specifically compiled for x86, x64, and ARM (including any WinRT components). Choosing Never means that you’ll upload separate architecture-specific packages yourself; selecting Always (or If Needed) will include builds for each architecture in the bundle, saving you some trouble during upload.
Note You can set the default bundle option in your app manifest in the Packaging > Generate App Bundle control.
FIGURE 20-8 The second step in creating a package for the Store, where you indicate an output folder, a package version, specify bundle options, and identify architecture targets.
Speaking of compiled components, another aspect of packaging affects the user experience of app acquisition: when a user acquires any new app, the Store works with Windows to automatically check whether the user already any of matching library components installed on their device (checking for exact version matches, file sizes, and so forth). If so—and this applies to JavaScript libraries as much as compiled .dll and .winmd files—Windows shares those components between multiple apps, thereby reducing download time and saving storage space.137 If an app update requires a newer or different version of a component, of course the Store will bring down the one it needs.
For the most part, this is completely transparent to app developers with one exception: if you’re using any kind of third-party library or component that might be used by other apps, avoid making modifications or recompiling that library. If you do, you effectively create another variant of the library and Windows will not be able to share it with other apps. To be honest, this doesn’t matter much with small JavaScript libraries: it matters most with large frameworks like game engines that can be hundreds of megabytes. Still, keep this in mind for any frameworks that you employ.
In any case, once you press Create in the dialog box shown in Figure 20-7, Visual Studio will build the package in the specified location. When it’s done, if you indicated that you wanted a package to upload to the Store, the last dialog box (not shown here) gives you the option to run the WACK as a final check before you upload.
If you go now to the folder where Visual Studio created your package, you’ll see an .appxupload file (along with a folder ending in _Test that contains what you need for side-loading; see “Sidebar: Side-Loading”). As explained in Chapter 1, a package is just a ZIP file, so you can append .zip to the full filename and then explore its contents. What you’ll then find is an .appxbundle file (if you created a bundle) or an .appx file (if you did not bundle). If you copy these out of the ZIP file and rename them to .zip as well, you can see the full package contents.
In the case of .appx, you’ll see the structure described in Chapter 1, with your source files, certificates, and the block map. In the .appxbundle, on the other hand, you’ll see that it contains a number of individual .appx files organized by scale, language, and DirectX versions, each of which is somewhat smaller than the full upload package. These smaller .appx packages are the ones that the Store will download as needed according to each user’s configuration.
Anyway, when you’re ready to upload a package, just make sure that you remove the .zip extension from your .appxupload file!
Protecting your code When inspecting the package contents for an app written in JavaScript, you’ll see that all your source code is sitting right there, which means that your customers will get all that source code on their machines. Naturally, you’ll be asking how you can protect this code from hacks and/or individuals who would unscrupulously “borrow” from you. For the answers, see Dan Reagan’s post Protecting your Windows Store app from unauthorized use, which describes some of the steps that Windows does to validate package integrity, along with my blog post Protecting Your Code.
Sidebar: Side-Loading
Side-loading means installing an app without going through the Store. This is most common for developers (who have a developer license on their machine) to share their apps without sharing their projects, perhaps to get early testing. It’s also used in enterprise environments and line-of-business apps where the Store isn’t involved. Either way, the process is the same: you create an app package through Visual Studio as already described, just choosing No in Figure 20-7. This will take you through the same configuration step as in Figure 20-8 but skips the step to associate the app with the Store.
Going to the package folder you’ll see a folder whose name ends with _Test. In that folder you’ll see the following:
• The app package (.appx or .appxbundle file).
• A temporary certificate (.cer file).
• A Dependencies folder that contains any libraries that would normally be provided by the Store; WinJS is one such library.
• Most importantly, a PowerShell script named Add-AppDevPackage.ps1 (and a folder with associated resources) that will install the app on a side-loading-capable machine.
Running the PowerShell script installs the app very much like it would be from the Store, so if testers side-load on a machine where your app has not been installed before, it closely approximates a typical user’s environment. This way you can truly test the first-run experience of your app on a variety of devices.
For more information about side-loading, see Deploying enterprise apps and Try It Out: Sideload Windows Store Apps.
Onboarding and Working through Rejection
With your app package in hand, you’re now ready to send it out from home for the first time. Uploading your package is done through the Store dashboard in the Packages section for your app. Visual Studio’s Store > Upload App Package command, for its part, just takes you to the dashboard.
In the Store, you might find that the Packages section is disabled. This means that you probably still have a few bits to fill in first. If you haven’t done so already, be sure to go into your Selling Details to set your price tier, set a trial period (if applicable), select the markets in which you want your app to be available, specify a release date, assign a category and subcategory (if applicable), and check the box for Accessibility if you’ve honestly done the work we discussed in Chapter 19. See Declaring your app as accessible.
Limiting your app’s initial reach? One feature that you’ll find missing from the present Windows Store is a way to do beta or preview testing with a limited audience. You can do some of this through side-loading, but that requires each user to have a developer license, which generally means they need to install Visual Studio or at least the Remote Debugging tools. Hardly an attractive requirement! (That said, there are third parties that can help with these arrangements.)
What you can do instead is target only a single market for your initial release—Trinidad and Tobago seems to be the favorite as it’s the smallest country in the list! Users in that country will be able to see the app in the Store, but users in other regions will not unless you send them a direct link as part of your preview invitation.
Next go into Services and, if you have nothing to do here, just click Save. Then visit Age Rating and Rating Certificates, and carefully read the restrictions for each rating. I emphasis this because the certification testers take age rating very seriously and will reject your app if you don’t meet those restrictions. You should also double-check your privacy policy to make sure that you’re being clear and forthright about how you collect and/or use personal information—such information is typically the key factor in age ratings. Remember that you must have a privacy policy if the app is network-enabled in any way (such as declaring the Internet (Client) capability) or uses devices that require consent.
Tip Store requirement 4.1 describes what must be in your privacy statement. Also be sure that your privacy policy is accessible through your apps Settings commands—the lack of this will cause the app to fail certification.
Game rating certificates When uploading an app into the Games category, you’ll be required to provide game rating certificates for different markets in the form of a GDF file. For details, see Prepare your Windows game for publishing. You upload these certificates on the Age Rating and Rating Certificates page.
The last piece before you enable the Packages area in the Store dashboard is Cryptography, where you must declare whether your app calls, supports, contains, or uses cryptography or encryption, because your country of origin might have export restrictions.
Finally, you’ll get to the Packages section, which might seem anticlimactic after all this! As shown in Figure 20-9, you’ll just drag and drop your .appxupload file onto this page. This is also where you can upload both Windows 8 and Windows 8.1 packages. Note that uploading begins as soon as you drag and drop—wait for the upload to complete before clicking Save.
FIGURE 20-9 The Packages page in the Store dashboard.
Next you’ll go to the Description page, where you enter all the information that will show up on your app’s page in the Store. It’s ironic that this page comes so near the end of the onboarding process (and isn’t even enabled until you upload a package) because most developers, I imagine, are getting quite anxious by this point to get the app certified! But, please, take a deep breath, relax, and convince yourself that you should invest all the time and energy you need here to make your app shine in the Store. This is exactly why talked about promotional graphics and text copy much earlier—you shouldn’t leave these very critical elements of your app to the last minute!
Remember too that you’ll have the opportunity to provide versions of all these details for each language that you support. This again includes descriptive text (including any necessary disclosure about keyboard/mouse support for requirement 6.13.4), graphics, descriptions of in-app purchases, website URIs, a link to your privacy policy, and so forth. A full list can be found on the App submission checklist and in Chapter 19 in “Part 3: Creating a Project for Nonpackaged Resources.” As I wrote then, pay special attention to your app’s keywords and prioritize them for localization—even if you do no other translation work—because customers will be searching the Store in their regional languages.
The very last step in the process is writing notes to testers. Include here any details that are necessary for a real person to exercise your app as part of the certification process, such as credentials for a test account, finding nonobvious features, using background tasks, and so on. And yes, a real human being will look at your app (and read your notes, so be courteous)! Automated tests can only accomplish so much—in the end, someone needs to run the app and make sure it does what it says.
With all the information and packages in place for your app, you’re ready to click the Submit for Certification button on the app’s page in the dashboard. After that, you’ll get an acknowledgment email followed by the joy of waiting for the results! I’m told that typical certification turnaround is about two days. It can be shorter if you happen to submit during a relative lull—when I submitted Here My Am! as part of writing this chapter it went through in less than two hours! Certification can take longer, too, if you’re submitting during a busy season or if special circumstances will take more time (such as declaring special use capabilities with a company account that require written justifications). Whatever the case, the Store dashboard tries to keep the process transparent.
Once your app has completed the testing process, it will either be accepted or rejected. Acceptance is really a nonissue—that’s what you’re looking for! The app will then become available either immediately or on the release date that you specified. So congratulations! You’re in business!
Tip When your app is certified, you’ll get an email with the link to its page in the Store, which looks like http://apps.microsoft.com/webpdp/app/<app_id>. You can also retrieve this from the Store dashboard. Click Apps In The Store, and then click Details for that app.
If your app is rejected, on the other hand, the Store will tell you why, specifically citing violations of the certification requirements. Indeed, these policies contain the only reasons that an app can be rejected, so any rejection must necessarily indicate the particular requirement that isn’t being met. The Store also provides some information about failures, such as where an app crashed (a violation of requirement 1.2).
By and large, most of the policies are straightforward such that if you fail on them, it’s pretty clear why. A few, however, seem to be more confusing or subjective, and in the early days of Windows 8 previews they were downright mysterious. Now, fortunately, there is an extensive list of reasons why an app might fail a number of requirements on Resolving certification errors, many of which come from our experience with real apps submitted to the Store. The Store testers can also provide direct feedback regarding specific failures, like where and when an app might have crashed, which certainly caused them to reject it.
Hopefully you only need to correct the problems that are reported and then resubmit your app. If you get rejected multiple times and just can’t figure out what to do, I suggest asking questions on the Windows Store forum where you’ll find assistance.
App Updates
One thing that apps and books share in common is that the moment you release them, you’ll find errors, bugs, typos, and a hundred other things you wish you could change. Fortunately, updating apps is easier than updating books, which I guess makes up for the fact that fixing a typo in a book is much easier than fixing a typical app bug!
There are many reasons to issue an update besides fixing obvious problems and adding features that didn’t make it into your current version. As described on Releasing improved versions, you might want to respond to user reviews and requests, add more in-app purchase options, add features to pursue new opportunities, add new language resources, update your promotional information, or update your telemetry layer to improve your analytics. In fact, many insights for your next updates will come from your telemetry.
For nearly all of these purposes, the data that the Store itself gathers will be highly valuable. There is a series of topics in the documentation on this, starting with Understanding app quality and performance. This gets you to the index for applicable subtopics, including Viewing app usage, Reviewing app ratings and feedback, and Tracking app sales. You’ll want to start reviewing the data for your app as soon as it’s in the Store, and make a plan for monitoring those reports that are most interesting to you. Monitoring ratings and reviews, for example, is an important part of ongoing customer support. In fact, schedule some time in the future right now to check in with these reports, lest you forget they exist. Truly, these reports are your best link to real customers!138 Remember that you published an app, so you're now running a business!
All such data will surely feed back into your planning and development processes, ultimately bringing you to the point of once again uploading another app package and perhaps updating other app information in the Store. A great feature of this in Windows 8.1 is that your update is automatically deployed to all of your users except those that have specifically opted out. To cover the latter, you could have your app check its version number, available from Windows.Application-Model.-Package.current.id.-version, against your most recent update as reported by a service, so that you can inform opted-out users that an update is available. You can then direct them to the Store’s update page by launching the ms-windows-store:Updates URI. If you want to give details about the updates to your users, you can also have your service provide that data.139
Note Certification requirement 3.4 states that an app update “must not decrease your app’s functionality in a way that would be unexpected to a reasonable consumer.” This suggests that you can prune off seldom-used features (as revealed by your telemetry), but you’ll fail certification if you take a popular feature of your free app, for example, and start charging for it as an in-app purchase.
When creating the new package, be sure to increment the version number in the manifest. (There’s an option to do that automatically in the Visual Studio dialog; refer back to Figure 20-8.) Onboarding is then the same as for any other app—no matter how little you might have changed, the app goes through the whole certification process again (something the Store team is working to improve, by the way). For this reason, don’t think to make whimsical updates—make each one count! Also, be aware that the certification requirements change over time, so make it a point to periodically review the requirements.
In your updated app, be prepared to migrate any state that might already exist on the machine, if you’ve changed state versions. We talked about this in Chapter 10, “The Story of State, Part 1,” in “State Versioning,” where we distinguished between the version of an app and the version of its state; many app versions can use the same state version. However, if the app now uses a new state version, the old state must be migrated. Remember too that you can use the servicingComplete background task for this purpose, as mentioned in Chapter 16 in “Tasks for System Triggers (Non-Lock Screen).” Finally, once you introduce new versions of your state, roaming data will roam between apps of the same version only—you’ll be able to migrate old state when the new app is run, but once the state version is increased, that data will no longer roam to devices with apps that use older state.
Tip To test an update, load both new and old app projects into separate instances of Visual Studio. Edit each one’s .user file to add a <LayoutDir>[folder]</LayoutDir> element that points to the same folder in both. Run your old version, exercise the app to establish your state, and then stop it. Then set breakpoints on your activation and migration code in your new version and run that one.
Another key point about updates is that although your new app package might be fairly large, existing customers will not have to download the whole thing again. If you go way, way back in this book to Figure 1-1 in Chapter 1, we talked about the package’s blockmap, which describes how the app package is segmented into 64K blocks. For an update, only those blocks that have actually changed between versions are necessary to download. This means that you shouldn’t worry about making a critical update to your app: if it affects only a small part of the code, the download impact is as little as 64K. (To help this along, try to have more small files in your project than a few large ones, and it’s better to make changes at the ends of files than at the beginning or the middle.)
Other kinds of updates don’t involve code but do require recertification. Fortunately, recertification typically goes much quicker, especially if no code changes are involve. One such update is adding a new set of localized resources to your app. Although this means uploading your app package to the Store and recertifying, it won’t affect any of your customers except those who are operating in your newly supported language. Another type of update is when you want to change the pricing of the app or in-app purchases or change the app’s name. To do this, you just go into your app’s page on the Store dashboard, make the necessary changes, and resubmit.
Finally, a kind of nonupdate is if you need to delist the app either temporarily or permanently. You do this through the Store dashboard on the Details page for your app by clicking Manage Availability > Remove This App’s Listing. This hides the app in the Store, although existing customers will be able to reinstall it (but cannot make in-app purchases). So long as you don’t completely delete the app from your dashboard, you can later click Manage Availability > Restore This App’s Listing to make it available once again.
Getting Known: Marketing, Discoverability, and the Web
Long ago, when the Internet and the notion of “search engines” first became popular, many people believed that you could just put up a website to sell whatever trinkets and gazingus pins you happened to have, and customers would come flocking on their own. We might laugh at such folly today, and yet oftentimes we make the same mistake with apps. We mistakenly believe that just getting an app into the Store is enough. Truth is, the Windows Store is fundamentally a distribution mechanism, which just so happens to handle transactions and highlight a few apps here and there. And although this is a big improvement over distributing software via the Web, and despite whatever praises we might sing for app stores in general, they haven’t really changed what’s been true about software for decades: to be successful, you have to write great software and you have to invest in marketing.
If you were to set up a small brick-and-mortar shop in your home town, you'd immediately engage in promotional activities of some kind because the business will quickly go under otherwise. And you'd never question that need especially because you've invested so much in getting the business started, and the cost of failure is losing that investment. With apps, you can get something in the Store with a much smaller up-front investment, and so the perceived risk of failure is much lower. As a result, developers aren't as invested in the success of that app as they might be with a real business. But if you want that app to succeed and not just exist, you have to treat it like a business investment.
What's also true in business is that when you start to generate revenue from your initial promotions, part of that stream should go into continued marketing as well as expansion of the business. In other words, some portion of every dollar you earn with an app should be earmarked for marketing activities, because that's how you'll begin to build a sustainable flow. By also earmarking another portion for further development, you're investing in the longer-term sustainability of the business when revenue from the first product begins to wane.
The bottom line is that although apps stores have brought a new distribution method with built-in commerce, running a successful software business requires the same dedication and investment as it always has:have a great product, and invest in the effort to let people know about it.
Toward this end, the Promote section of the documentation has some helpful guidance, some of which we’ve already covered. It doesn’t talk about promotion outside the Store, however, and for that I cannot claim much insight for myself. My best recommendation is to find a marketing specialist who can work for you on an hourly basis initially to get things moving. You can then establish a relationship into which you can direct later investments when you have the funds. In the meantime, there’s plenty of material on the web about app marketing, such as The Art of Launching an App: A Case Study (Smashing Magazine).
One important part that you can do that is outside of the Store is making sure you link your app to your website, especially if your app is presenting the same or similar content that can show up in search results. Let’s see those details next.
OEM preinstalls One other promotional possibility is that you might be approached by an OEM to include the app preinstalled on their devices. If this happens—it’s quite a prize!—the OEM will give you special instructions about how to onboard and maintain an app specifically for their customers. For general details, see Working with OEMs.
Connecting Your Website and Web-Mapped Search Results
If you have an app, you’ll almost certainly have a site that provides additional information and support. (Requirement 6.3 deals with support specifically.) What, then, if potential customers come to your site (or some other) first? Surely you’ll want to provide easy ways for them to acquire your app if they’re running on Windows. The same is also true if they search the web—whether in Internet Explorer or through the Search charm—and find results from your site that could be displayed in your app.
To make a connection between your site and your app, there are first some URIs that get to your app’s page in the Store. For browsers, the form is http://apps.microsoft.com/webpdp/app/<app_id>. To see your specific URI, go to the Apps in the Store section of the Store dashboard and click Details for the app. You can also get it at run time from CurrentApp.linkUri, which is the same link you include with data packages through the Share contract, as covered in Chapter 15.
Another URI scheme, ms-windows-store, opens the Store itself on a Windows device, where the specific URIs are described on Linking to your app:
• ms-windows-store:PDP?PFN=<package_family_name> Links directly to the app’s page; the package family name is what comes back from Windows.ApplicationModel.Package.-current.id.familyName.
• ms-windows-store:REVIEW?PFN=<package_family_name> Goes to the Ratings and Reviews section of the Store for your app, which is what the Rate And Review command in your Settings pane does. You can launch this URI from your app directly when inviting a review.
• ms-windows-store:Publisher?name=<publisher_display_name> Links to a page that shows all your apps, which you might do from an About pane in your Settings. The publisher name can be from Package.current.id.publisher.
• ms-windows-store:Updates Opens the Store’s updates page (no arguments). As described earlier in “App Updates,” you can use this if you detect that the user is running an older version of your app, which suggest they’ve opted out of auto-updates.
• ms-windows-store:Search?query=<search_string> Executes a search in the Store.
With Internet Explorer, a little bit of metadata in your web page’s <head> makes it easy for a customer to acquire your app and even run it if the app is already installed. This is fully explained on Connect your website to your Windows Store app, which shows how Internet Explorer lets users know that an app is available. From your point of view, all you need is a bit of markup, such as:
<meta name="msApplication-ID" content="14750NuthatchProductions.HereMyAm"/>
<meta name="msApplication-PackageFamilyName" content="14750NuthatchProductions.HereMyAm"/>
where the two content values come from the Package Name and Package Family Name fields in your manifest’s Packaging tab. Again, if the user doesn’t have your app, this makes the acquisition process easy. If the user does have your app, he’ll have the opportunity to launch it, in which case the app will be activated with the launch kind of protocol. If you want to customize the string passed with activation, you can add a <meta name="msAapplication-Arguments" content="[string]">. You can similarly specify an msApplication-MinVersion for the app and alsomsApplication-OptOut to prevent the behavior if desired.
Note For a working example, visit the site of Inrix Traffic, one of the earliest app partners who implemented these features.
The other step you can take to more deeply connect your app and your website is to support app linking through the Search charm. This means that web-based results that show up in Windows search can go straight to your app rather than going to the website first only to redirect the user to the app anyway. To do this, you link your web domain to your app through the Bing webmaster portal, add markup to your web pages to create mappings to deep links in the app, and then enable deep linking by processing the arguments in your site’s markup through the app’s activation handler, just as you would to support secondary tiles. (See “Secondary Tiles” in Chapter 16.)
I’d say more but full information was not available at the time of writing, so refer to Introducing App Linking for Windows Search.
Face It: You’re Running a Business!
In different parts of this chapter I’ve repeated the sentiment that to publish an app in the Windows Store is to go into business. You might not think of yourself as a businessperson, but publishing an app makes you one by default. Thus, whether you’re in business for fame, fortune, fun, or philanthropy, why not acknowledge that reality, make a business plan, and execute on it to give yourself a better chance of fulfilling your goals? Here I want to outline some of the aspects of running a business, primarily for your awareness and inspiration because I cannot personally guarantee your success!
Let’s start with a basic truth: customers acquire apps to solve problems and have an experience. They do not acquire apps to pay you money, to support you or your cause, or to make you famous—those are just side effects of their receiving value through your apps. If you do well at solving customer problems and giving them great experiences, the rewards should follow naturally.
For the sake of simplicity, let me focus now on some principles as they apply to the business of fortune, because that’s the one that most developers are involved with and one for which there are the most resources to draw from. (Many of the principles can apply to other business models, of course.140)
Look for Opportunities
In simple terms, business is commerce, meaning a trade or exchange within some given market. A key business skill is to look for opportunities in whatever market you might enter. Look for areas where the market can support another player, or areas that no one has yet explored—analytics services like Distmo, AppFeds, and AppAnnie are super-valuable here. Watch reports on the global app economy too, especially to see regions where profit margins are higher and where you might concentrate localization efforts. Once you identify the opportunity, invest in fulfilling a current market need as soon as you can, before the opportunity passes by.
A good piece of advice is to not enter a market solely on personal interest: that can help and serve as a source of inspiration, but focus primarily on picking and solving problems because they are business opportunities, not because you’re going to change the world through your efforts. This is not to say that there’s no place for your idealism, but it’s good to balance that idealism with a strong dose of practicality and reality.
When looking for opportunities, competitive analysis is a must. You have to know what others are doing in the market that’s similar to you, which helps you identify gaps you can fill, problems you can solve, and the strengths that your solution can uniquely offer. And remember that your competition doesn’t sit still, so such analysis is an ongoing process.
Invest in Your Business
Going into business always requires some up-front investment. Ask yourself: what are the core assets you need for your business to sustain itself? It’s one thing to get started, but another thing altogether to keep moving and not end up as a “one-shot wonder.” This is one reason why you don’t need to implement every great idea in the first version of your first app!
Investing also means understanding risk. Look to manage multiple investments to spread your risk, using safe investments to support riskier ones. Investment is also a long-term concern: it’s a relationship with your customers, most of all, and also an ongoing relationship with the market in which you’re operating. Indeed, with app publishing it’s very important to invest in real human relationships. It’s fascinating that we’ve created a marketplace with app stores where you can write and publish an app to solve customer problems without ever having contact with another human being. And yet human beings are behind each and every sale!
Fear Not the Marketing
We’ve talked a bit about this already, but let me say again that you should plan to constantly steer some of your revenue into marketing to help build and sustain momentum. Otherwise you risk making a splash and then going silent! Social media channels are essential here too, because they’re one of the primary ways to keep energy around your apps, but sustaining that energy is always the key.
Cultivating relationships is also important for marketing. Support your customers now and commit to doing so in the future, because they are your foundation. Also make relationships with other app publishers, who can provide mutual support if not cross-promotion opportunities. And get involved in the industry more widely than just your areas of involvement—that is, see yourself as a participant in a larger reality to which you can contribute and from which you can draw energy and inspiration.
Plan also keep your products fresh and lively, just like a merchant does when stocking shelves. In your app, this means bringing in new content, making changes in how you present or highlight in-app purchases, and otherwise helping the user become more away of everything you have to offer. Outside of the app, consider periodically refreshing your screenshots, promotional graphics, description, and anything else on your Store page, if for no other reason than keeping energy around it all. I worked for a while in a retail bookstore where my wife was the gift buyer, and we regularly “fluffed” the shelves which meant going through the entire store to move things around, tidy up areas that have been neglected, and move products that were gathering momentum to more prominent positions. We also made sure to cut losses and discontinue products that weren’t working, thereby releasing energy to invest in new areas. In short, don’t get attached to products, features, or how you describe and promote them: if something isn’t serving the business, an astute businessperson will let it go.
Another marketing trend is to share your expertise to assist buyers, without trying to sell yourself or your products directly. This follows a principle of providing value first before trying to sell, in order to earn trust. For example, you can do reviews of apps in your category, being honest about their strengths, even those of your competitors. By positioning yourself as an expert in that area, customers are more likely to trust what you produce yourself.
Support Your Customers
This almost goes without saying, but many app publishers probably haven’t given this any thought to customer support at all. As soon as you publish an app, commit some time every day to watch your ratings, reviews, and other feedback, and be immediately responsive to your customer’s needs. Demonstrate that you’re listening to their problems, and issue app updates in a timely manner to fix bugs and provide other critical updates. Along these lines, watch your telemetry and crash reports and respond to them quickly as well.
Also think about how you’re thanking your customers rather than just trying to exploit them or ignoring them in your quest to acquire new customers. In other words, your existing customers are the ones who have already made at least some commitment to you and have given you some of their life energy. How can you give them some energy in return? Truly, it’s the flow of energy that creates positive magnetism, so keep that flow strong.
Plan for the Future
This can be put simply: it’s not necessary to implement every idea in the first version of your app, nor is it necessary to implement every idea in one app. Plan ahead for two major updates, which helps keep up a flow of ideas and will give your customers reasons to re-engage with your product. Remember that apps on Windows 8.1 are updated by default, which makes it much easier to put new features and capabilities in front of your user base, including new in-app purchases. Also remember to educate your customers on what’s new in your updates, because they won’t be going to the Store to see what you’ve written in your release notes.
Plan also for having multiple apps. For one, this builds up a presence in the Store for your business, not just for one app. The Store encourages this by listing other apps from the same publisher on any given app’s product page, but if you’re a one-app shop, you’re sacrificing that space to others.
Allowing yourself to spread ideas across multiple apps keeps each app more focused to its primary purpose. Through contracts including URI scheme activations, you can build a family of apps that work great together as well as with apps from other publishers. You can also think about repurposing an existing app, especially games, with new themes that require nothing more than a new set of graphical assets (as with a “holiday” variant that can sell separately). Doing this reduces per-app costs while increasing per-app visibility.
In all of this, I think of how movie studios generally have a multiyear pipeline for their releases. This is necessary in part because it takes several years to produce any given film, but it means those studios are always looking at their business over a five-year or even ten-year timespan. With apps it might be more appropriate to think in terms of 6–18 months, but the principle is the same.
Selling Your App When It’s Not Running
User experience is not just what’s on the screen when the app is running: there are a number of places where you app has a presence when it’s not in the foreground. This include tiles, notifications, raw push notifications, background tasks, your lock screen presence, your roaming experience, and your description page in the Store. Think also about your presence in the media, both for your app and business. Are you blogging? Are you sharing the experience of the app on YouTube (even cheat videos for your game)? Do you provide press kits on your website so that others understand how to promote you and have access to the high-quality assets they’d need for that purpose?
Think also about the overall customer experience lifecycle of your app. When we talk about user experience, we typically refer to the experience inside the app itself, but this is only a small part of the story. How you attract users in the first place is the first experience users will have of your app and your business. How are you presenting yourself in social media channels? And are you giving your existing customers an incentive to share their experience to their social network?
When users first express interest in your app, which means visiting your website and/or your product page in the Store, how are you orienting them to the experience you provide? You want to make sure they understand what the app does and why they should care. Again, you want to invest good time and energy into your app’s description and promotional graphics because these make a huge difference to potential customers!
I mentioned before the idea of thanking your customers every now and then. This is important for customer retention; it gives them a reason to come back. That is, an important part of the overall user experience is the long-term value of the relationship, which is expressed through your updates, fresh content, re-engagement with your customers, and maybe even the occasional giveaway.
Indeed, thanking your customers is a way to involve them in an emotionally positive way. And once customers are invested like this, they are more likely to become your advocates or even your champions. Indeed, be sure to enable and empower your most passionate users to put their own credibility on the line. When they do, thank them profusely. Give them special previews of new work you’re doing. Send them chocolate. Do anything you can for them, because their passion is worth far more than any bits of money you might get from them as a single user.
You’re Not Alone
Publishing apps is something you can do in complete isolation, but that won’t serve you or your business in the long run. Given that your primary instincts are those of a developer and probably not those of a businessperson, it’s a good idea to find a business mentor to guide and counsel you, or perhaps a support group. Your mentor or associates don’t need to be in the software business specifically—what you’re looking for is experience and magnetism in doing business, which has many universal principles and best practices. Along these same lines, find opportunities like business lunches or other events where you can just mix with businesspeople and draw from their magnetism. More often than not, people at such events are more than happy to discuss your challenges and offer insights that could make a huge difference for you.
Final Thoughts: Qualities of a Rock Star App
As Gandalf the White says to Frodo, Sam, Merry, and Pippin at the conclusion of the Lord of the Rings movies, “Here at last, on the shores of the sea, comes the end of our fellowship.” And, my friends, it has been a delight to share the journey with you! I’d like to leave you with just a few final thoughts.
After Windows 8 was first released, it didn’t take long for the Windows Store to become crowded, so differentiating your app and yourself as a developer is paramount. There’s plenty to do with marketing and gaining awareness for your app, of course, as well as being responsive to customers. But beyond that, what does it really mean to make an app that’s truly special?
Early on, long before Microsoft landed on the rather pedestrian term “Windows Store apps,” we referred to them as “tailored apps.” To play with that older term, think of what tailoring means in the context of clothes: well-tailored clothes are very distinctive. They make you look really good. They make you feel great. That’s how you want the users of your app to feel when they’re immersed in your experience. Indeed, just as joy and happiness are the undercurrent behind your own app-building efforts, so also do they live in the hearts of your customers. If you can deliver joy to them through your app, I think you’ll have a winner!
Another meaning of “tailored” implies that the kinds of apps we’ve been building in this book—apps that run full screen (usually) and deeply immerse a user in an experience—lend themselves well to being very specific to both the device and the user’s context. As we saw in Chapter 12, “Input and Sensors,” sensors give you the ability to know the device’s relationship to the physical world, which is an extension of the user who is holding that device. Ask then, “What can I do with that information? How can the app really light up when it has a deeper understanding of where the user is and how the user is moving about in this world of ours? Is there something more the app can do to say, ‘Aren’t you glad you brought me along?’”
To differentiate your app, think through how a consumer might use various form factors in different situations and have the app present itself differently in those contexts. This kind of tailoring means that the app surfaces the most relevant features or content for the most likely or appropriate use cases. As shown in the last figure of Chapter 1 within “Sidebar: The Opportunity of Per-User Licensing and Data Roaming,” I like to think of there being one app across many devices and that the user has a much stronger relationship to the app than to the devices it’s running on. The app and its underlying state becomes the consistent element across the whole experience, with the devices just being the vehicles. The more you can deliver an app that understands and supports this (and obviously roaming data is important here!), the more I think the app will stand out from others that, sure, run on Windows but otherwise offer the same experience as we’ve had for many years.
So, what about being a rock star? Let’s be honest here. You’re in this game for name and fame, right? And for the big money that could come with it? What kind of app will get you there?
In what is now the very last paragraph of the main body of this book, I can’t really give you a bunch of specific ideas. (Otherwise I’d be writing those apps instead of writing books, but someone has to do this dirty work….) But ponder this: what makes a rock star in the music industry? Well, it’s not typically about the philosophical depth of the lyrics or the virtuosity of the musicians, it’s about performance, personality, and sheer entertainment value. It’s about delivering a joyful experience that turns everyday customers into raving lunatic fans who can’t wait to be your greatest champions. In a very real way, the experience is one that truly lets people escape their everyday realities and become part of something larger for a time, or even just part of a fantasy. And like great music or movies, the app experience is one that people want to repeat many times over and not just check the box as another “Been there, done that.” Although there are certainly aspects of timing and sheer luck, all rock stars—along with great athletes, Oscar-winning movies like Lord of the Rings, and so on—strive for and achieve one thing above all: excellence. Commit yourself to that. Commit yourself to excellence in everything you do—not just in your apps but in all parts of your life. Such striving, certainly, will bring many rewards!
What We’ve Just Learned
• An app’s relationship to the Windows Store is closely related to your business as a developer, because it supports a range of options from free apps, ad-supported apps, limited-time trials, paid apps, and in-app purchases (using a custom commerce engine for the latter if desired).
• Side-loading of app packages is supported for developers (on a machine with a developer license) and for enterprises. Otherwise all apps come from the Windows Store.
• The Windows Store APIs provide for managing app licenses, licenses for in-app purchases, and receipts. During development, the app uses a simulator object where data is obtained from a local XML file instead of the live Store, which allows for testing different types of transactions and license conditions.
• To track customer activity within your app directly, instrument it to collect telemetry data according to your business goals for the app. For this you typically use a third-party provider who also turns telemetry data into actionable analytics.
• Getting an app in the Store starts with testing the app both manually and through the Windows App Certification Kit and being prepared for possible rejection during the onboarding process.
• As part of onboarding, you’re asked for an app description, promotional graphics, search keywords, feature lists, and other information that should be localized for each supported language. Be sure to give yourself enough time before submission to gather this information.
• App updates can be submitted to the Store at a later time, with improvements based on feedback and telemetry, and the updated code needs to be ready to migrate state.
• Being in the Windows Store does not reduce the need for marketing. Cross-linking your app and website and supporting Windows search can very much help discoverability.
• Publishing an app means that you’re running a business, so it’s essential that you start thinking (at least a little) like a businessperson to help build your business.
131 With developer tools, it’s feasible that a Windows Store app could itself provide an interpreted runtime environment for developing apps that would always run inside that tool. A Windows Store app cannot, however, directly produce another Windows Store app because the necessary packaging and deployment APIs are only available to desktop apps.
132 We may eventually see creative ad insertion into paid apps: after all, you pay for issues of a magazine and yet that magazine contains ads (unless you pay for premium magazines that contain none). Think how we once balked at the idea of advertising on cable television or in movie theaters, but all that’s just a matter-of-course now. The simple truth is that wherever there is a focus of customer attention, there is a value to advertisers and to the businesses that can sell them access to that attention. You just have to be careful not to abuse your customers!
133 The Windows.ApplicationModel.Packageclass also provides a few details about the installed app package. Usage is simple, and you can refer to the App package information sample for more.
134 Excluding a few methods that are exclusive to Windows Phone, namely loadListingInformationBy[Keywords | ProductId]Async and reportProductFulfillment.
135 There’s a bug in the sample’s js/expiring-product.js file that throws an exception when you switch to that scenario: a string "scenario3Product1Message" should be just "product1Message", which is easily corrected.
136 The other properties in this object apply only to Windows Phone.
137 During the production of Windows 8, we investigated whether it made sense to enable separate onboarding of third-party frameworks and library components to the Store, such that the Store would manage dependencies and updates. In the end, we concluded that the risk-to-reward ratio was too high and we enabled this sort of thing only for a few libraries like WinJS. The solution presented here for Windows 8.1 took the previous investigation into account, avoiding the risks while making faster downloads and saving end-user storage space, which were the primary goals.
138 These reports will not give you any personal information about your customers, of course. If you want to collect that, you’ll need to implement an opt-in registration system in the app that complies with requirement 4.1.2.
139 It’s very easy to create a service endpoint through Windows Azure Mobile Services, rather than having to set up a web host separately. Refer to “Windows Azure and Azure Mobile Services” in Chapter 16.
140 Two resources that I found helpful are Thinking Like a Businessperson and Stop Thinking Like an Employee.
All materials on the site are licensed Creative Commons Attribution-Sharealike 3.0 Unported CC BY-SA 3.0 & GNU Free Documentation License (GFDL)
If you are the copyright holder of any material contained on our site and intend to remove it, please contact our site administrator for approval.
© 2016-2026 All site design rights belong to S.Y.A.