Programming Windows Store Apps with HTML CSS and JavaSript(2014)
Chapter 2
Quickstart
This is a book about developing apps. So, to quote Paul Bettany’s portrayal of Geoffrey Chaucer in A Knight’s Tale, “without further gilding the lily, and with no more ado,” let’s create some!
A Really Quick Quickstart: The Blank App Template
We must begin, of course, by paying due homage to the quintessential “Hello World” app, which we can achieve without actually writing any code at all. We simply need to create a new app from a project template in Visual Studio:
1. Run Visual Studio Express for Windows. If this is your first time, you’ll be prompted to obtain a developer license. Do this, because you can’t go any further without it!
2. Click New Project… in the Visual Studio window, or use the File > New Project menu command.
3. In the dialog that appears (Figure 2-1), make sure you select JavaScript under Templates on the left side, and then select Blank App in the middle. Give it a name (HelloWorld will do), a folder, and click OK.
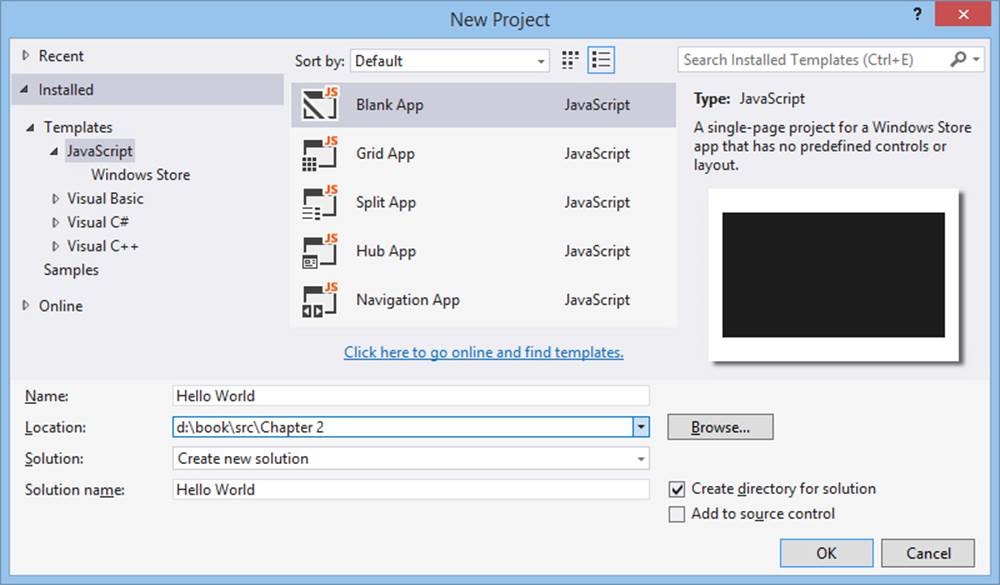
FIGURE 2-1 Visual Studio’s New Project dialog using the light UI theme. (See the Tools > Options menu command, and then change the theme in the Environment/General section). I use the light theme in this book because it looks best against a white page background.
4. After Visual Studio churns for a bit to create the project, click the Start Debugging button (or press F5, or select the Debug > Start Debugging menu command). Assuming your installation is good, you should see something like Figure 2-2 on your screen.

FIGURE 2-2 The only vaguely interesting portion of the Hello World app’s display. The message is at least a better invitation to write more code than the standard first-app greeting!
By default, Visual Studio starts the debugger in local machine mode, which runs the app full screen on your present system. This has the unfortunate result of hiding the debugger unless you’re on a multimonitor system, in which case you can run Visual Studio on one monitor and your Windows Store app on the other. Very handy. See Running apps on the local machine for more on this.8
Visual Studio offers two other debugging modes available from the drop-down list on the toolbar (Figure 2-3) or the Debug/[Appname] Properties menu command (Figure 2-4):
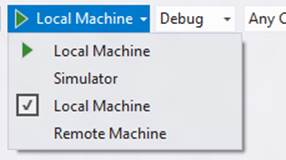
FIGURE 2-3 Visual Studio’s debugging options on the toolbar.
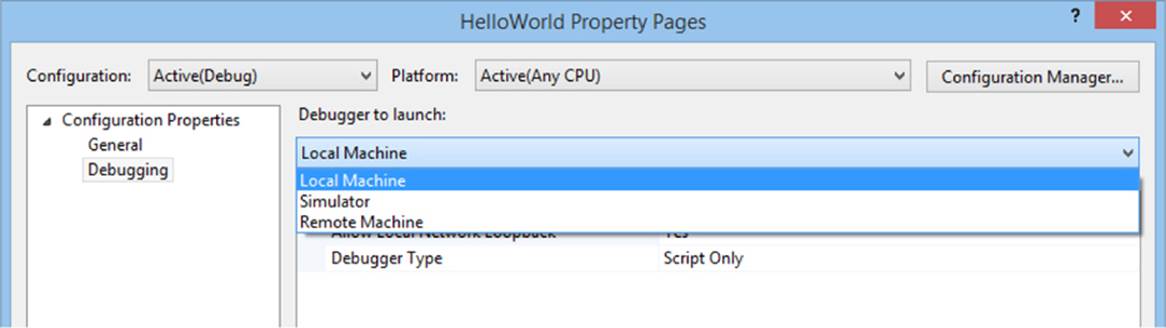
FIGURE 2-4 Visual Studio’s debugging options in the app properties dialog.
The Remote Machine option allows you to run the app on a separate device, which is absolutely essential for working with Windows RT devices that can’t run desktop apps at all, such as the Microsoft Surface and other ARM devices. Setting this up is a straightforward process, and it works on both Ethernet and wireless networks: see Running apps on a remote machine, and I do recommend that you get familiar with it. Also, when you don’t have a project loaded in Visual Studio, the Debug menu offers the Attach To Process command, which allows you to debug an already-running app. See How to start a debugging session (JavaScript).
Tip If you ever load a Windows SDK sample into Visual Studio and Remote Machine is the only debugging option that’s available, the build target is probably set to ARM (the rightmost drop-down):
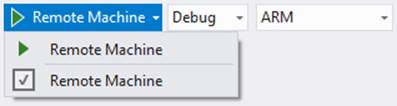
Set the build target to Any CPU and you’ll see the other options. Note apps written in JavaScript, C#, or Visual Basic that contain no C++ WinRT components (see Chapter 18, “WinRT Components”), should always use the Any CPU target.
Another tip If you ever see a small ⊗ on the tile of one of your app projects, or for some reason it just won’t launch from the tile, your developer license is probably out of date. Just run Visual Studio or Blend to renew it. If you have a similar problem on a Windows RT device, especially when using remote debugging, you’ll need renew the license from the command line using PowerShell. See Installing developer packages on Windows RT in the section “Obtaining or renewing your developer license” for instructions.
The Simulator, for its part, duplicates your current environment inside a new login session and allows you to control device orientation, set various screen resolutions and scaling factors, simulate touch events, configure network characteristics, and control the data returned by geolocation APIs. Figure 2-5 shows Hello World in the simulator with the additional controls labeled on the right. We’ll see more of the simulator as we go along, though you may also want to peruse the Running apps in the simulator topic.
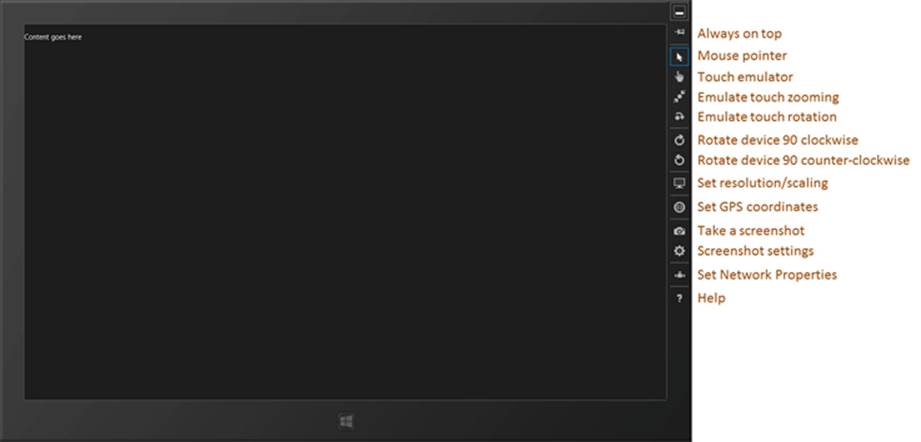
FIGURE 2-5 Hello World running in the simulator, with added labels on the right for the simulator controls. Truly, the “Blank App” template lives up to its name!
Sidebar: How Does Visual Studio Run an App?
Under the covers, Visual Studio is actually deploying the app similar to what would happen if you acquired it from the Store. The app will show up on the Start screen’s All Apps view, where you can also uninstall it. Uninstalling will clear out appdata folders and other state, which is very helpful when debugging.
There’s no magic involved: deployment can actually be done through the command line. To see the details, use the Store/Create App Package in Visual Studio, select No for a Store upload, and you’ll see a dialog in which you can save your package to a folder. In that folder you’ll then find an appx package, a security certificate, and a batch file called Add-AppxDevPackage. That batch file contains PowerShell scripts that will deploy the app along with its dependencies.
These same files are also what you can share with other developers who have a developer license, allowing them to side-load your app without needing your full source project.
Blank App Project Structure
Although an app created with the Blank template doesn’t offer much in the visual department, it lets us see the core structure of all projects you’ll use. That structure is found in Visual Studio’s Solution Explorer (as shown in Figure 2-6).
In the project root folder:
• default.html The starting page for the app.
• <Appname>_TemporaryKey.pfx A temporary signature created on first run.
• package.appxmanifest The manifest. Opening this file will display Visual Studio’s manifest editor (shown later in this chapter). Browse around in this UI for a few minutes to familiarize yourself with what’s here: references to the various app images (see below), a checkmark on theInternet (Client) capability, default.html selected as the start page, and all the places where you control different aspects of your app. We’ll be seeing these throughout this book; for a complete reference, see the App packages and deployment and Using the manifest designer topics. And if you want to explore the manifest XML directly, right-click this file and select View Code. This is occasionally necessary to configure uncommon options that aren’t represented in the editor UI. The APIs for accessing package details are demonstrated in the App package information sample.
The css folder contains a default.css file that’s empty except for a blank rule for the body element.
The images folder contains four placeholder branding images, and unless you want to look like a real doofus developer, always customize these before sending your app to the Store (and to provide scaled versions too, as we’ll see in Chapter 3, “App Anatomy and Performance Fundamentals”):
• logo.scale-100.png A default 150x150 (100% scale) image for the Start screen.
• smalllogo.scale-100.png A 30x30 image for the zoomed-out Start screen and other places at run time.
• splashscreen.scale-100.png A 620x300 image that will be shown while the app is loading.
• storelogo.scale-100.png A 50x50 image that will be shown for the app in the Windows Store. This needs to be part of an app package but is not used within Windows at runtime. For this reason it’s easy to overlook—make a special note to customize it.
The js folder contains a simple default.js.
The References folder points to CSS and JavaScriptsource files for the WinJS library, which you can open and examine anytime. (If you want to search within these files, you must open and search only within the specific file. These are not included in solution-wide or project-wide searches.)
NuGet Packages If you right-click References you’ll see a menu command Manage NuGet Packages…. This opens a dialog box through which you can bring many different libraries and SDKs into your project, including jQuery, knockout.js, Bing Maps, and many more from both official and community sources. For more information, see http://nuget.org/.

FIGURE 2-6 A Blank app project fully expanded in Solution Explorer.
As you would expect, there’s not much app-specific code for this type of project. For example, the HTML has only a single paragraph element in the body, the one you can replace with “Hello World” if you’re really not feeling complete without doing so. What’s more important at present are the references to the WinJS components: a core stylesheet (ui-dark.css or ui-light.css), base.js, and ui.js:
<!DOCTYPE html>
<html>
<head>
<meta charset="utf-8">
<title>Hello World</title>
<!-- WinJS references -->
<link href="//Microsoft.WinJS.2.0/css/ui-dark.css" rel="stylesheet">
<script src="//Microsoft.WinJS.2.0/js/base.js"></script>
<script src="//Microsoft.WinJS.2.0/js/ui.js"></script>
<!-- HelloWorld references -->
<link href="/css/default.css" rel="stylesheet">
<script src="/js/default.js"></script>
</head>
<body>
<p>Content goes here</p>
</body>
</html>
You will generally always have these references in every HTML file of your project (using an appropriate version number, and perhaps using ui-light.css instead). The //’s in the WinJS paths refer to shared libraries rather than files in your app package, whereas a single / refers to the root of your package. Beyond that, everything else is standard HTML5, so feel free to play around with adding some additional HTML of your own to see the effects.
Tip When referring to in-package resources, always use a leading / on URIs, which means “package root.” This is especially important when using page controls (see Chapter 3) because those pages are typically loaded into a document like default.html whose location is different from where the page exists in the project structure.
Where JavaScript is concerned, default.js just contains the basic WinJS activation code centered on the WinJS.Application.onactivated event along with a stub for an event called WinJS.Application.oncheckpoint (from which I’ve omitted a lengthy comment block):
(function () {
"use strict";
var app = WinJS.Application;
var activation = Windows.ApplicationModel.Activation;
app.onactivated = function (args) {
if (args.detail.kind === activation.ActivationKind.launch) {
if (args.detail.previousExecutionState !==
activation.ApplicationExecutionState.terminated) {
// TODO: This application has been newly launched. Initialize
// your application here.
} else {
// TODO: This application has been reactivated from suspension.
// Restore application state here.
}
args.setPromise(WinJS.UI.processAll());
}
};
app.oncheckpoint = function (args) {
};
app.start();
})();
We’ll come back to checkpoint in Chapter 3. For now, remember from Chapter 1, “The Life Story of a Windows Store App,” that an app can be activated in many ways. These are indicated in the args.detail.kind property whose value comes from the Windows.ApplicationModel.-Activation.ActivationKind enumeration.
When an app is launched directly from its tile on the Start screen (or in the debugger as we’ve been doing), the kind is just launch. As we’ll see later on, other values tell us when an app is activated to service requests like the search or share contracts, file-type associations, file pickers, protocols, and more. For the launch kind, another bit of information from the Windows.ApplicationModel.-Activation.ApplicationExecutionState enumeration tells the app how it was last running. Again, we’ll see more on this in Chapter 3, so the comments in the default code above should satisfy your curiosity for the time being.
Now, what is that args.setPromise(WinJS.UI.processAll())for? As we’ll see many times, WinJS.UI.processAll instantiates any WinJS controls that are declared in yourHTML—that is, any element (commonly a div or span) that contains a data-win-control attribute whose value is the name of a constructor function. The Blank app template doesn’t include any such controls, but because just about every app based on this template will, it makes sense to include it by default.9 As for args.setPromise, that’s employing something called a deferral that we’ll also defer toChapter 3.
As short as it is, that little app.start(); at the bottom is also very important. It makes sure that various events that are queued during startup get processed. We’ll again see the details in Chapter 3. I’ll bet you’re looking forward to that chapter now!
Finally, you may be asking, “What on earth is all that ceremonial (function () { … })(); business about?” It’s just a convention in JavaScript called a self-executing anonymous function that implements the module pattern. This keeps the global namespace from becoming polluted, thereby propitiating the performance gods. The syntax defines an anonymous function that’s immediately executed, which creates a function scope for everything inside it. So variables like app along with all the function names are accessible throughout the module but don’t appear in the global namespace.10
You can still introduce variables into the global namespace, of course, and to keep it all organized, WinJS offers a means to define your own namespaces and classes (see WinJS.Namespace.define and WinJS.Class.define), again helping to minimize additions to the global namespace. We’ll learn more of these in Chapter 5, “Controls and Control Styling,” and Appendix B, “WinJS Extras.”
Now that we’ve seen the basic structure of an app, let’s build something more functional and get a taste of the WinRT APIs and a few other platform features.
Get familiar with Visual Studio If you’re new to Visual Studio, the tool can be somewhat daunting at first because it supports many features, even in the Express edition. For a quick, roughly 10-minute introduction, Video 2-1 in this chapter’s companion content to will show you the basic workflows and other essentials.
QuickStart #1: Here My Am! and an Introduction to Blend for Visual Studio
When my son was three years old, he never—despite the fact that he was born to two engineers parents and two engineer grandfathers—peeked around corners or appeared in a room saying “Hello world!” No, his particular phrase was “Here my am!” Using that variation of announcing oneself to the universe, our next app can capture an image from a camera, locate your position on a map, and share that information through the Windows Share charm. Does this sound complicated? Fortunately, the WinRT APIs actually make it quite straightforward!
Sidebar: How Long Did It Take to Write This App?
This app took me about three hours to write. “Oh sure,” you’re thinking,“you’ve already written a bunch of apps, so it was easy for you!” Well, yes and no. For one thing, I also wrote this part of the chapter at the same time, and endeavored to make some reusable code, which took extra time. More importantly, the app came together quickly because I knew how to use my tools—especially Blend—and I knew where I could find code that already did most of what I wanted, namely all the Windows SDK samples on http://code.msdn.microsoft.com/windowsapps/.
As we’ll be drawing from many of these most excellent samples in this book, I encourage you to download the whole set—go to the URL above, and click the link for “Windows 8.1 app samples”. On that page you can get a .zip file with all the JavaScript samples. Once you unzip these, get into the habit of searching that folder for any API or feature you’re interested in (make sure it’s being indexed by the Windows file system too). For example, the code I use in this app to implement camera capture and sharing data came directly from a couple of samples.
I also strongly encourage you to spend a half-day getting familiar with Visual Studio and Blend for Visual Studio and running samples so that you know what tremendous resources are available. Such small investments will pay huge productivity dividends even in the short term!
Design Wireframes
Before we start on the code, let’s first look at design wireframes for this app. Oooh…design? Yes! Perhaps for the first time in the history of Windows, there’s a real design philosophy to apply to apps in Windows 8. In the past, with desktop apps, it’s been more of an “anything goes” scene. There were some UI guidelines, sure, but developers could generally get away with making up any user experience that made sense to them, like burying essential checkbox options four levels deep in a series of modal dialog boxes. Yes, this kind of stuff does make sense to developers; whether it makes sense to anyone else is highly questionable!
If you’ve ever pretended or contemplated pretending to be a designer, now is the time to surrender that hat to someone with real training or set development aside for a focused time to invest in that training yourself. Simply said, design matters for Windows Store apps, and it will make the difference between apps that really succeed and apps that merely exist in the Windows Store and are largely ignored. And having a design in hand will just make it easier to implement because you won’t have to make those decisions when you’re writing code. (If you still intend on filling designer shoes and communing with apps like Adobe Illustrator, at least be sure to visit Designing UX for apps for the philosophy and details of Windows Store app design, plus design resources.)
Note Traditional wireframes are great to show a static view of the app, but in the “fast and fluid” environment of Windows, the dynamic aspects of an app—animations, transitions, and movement—are also very important. Great app design includes consideration of not just where content is placed but how and when it gets there in response to which user actions. Chapter 14, “Purposeful Animations,” discusses the different built-in animations that you can use for this purpose.
When I had the idea for this app, I drew up simple wireframes, let a few designers laugh at me behind my back (and offer helpful adjustments), and eventually landed on layouts for the various views as shown in Figures 2-7 through 2-9. These reflect the guidelines of the “grid system” described on Laying out an app page, which defines what’s called the layout silhouette that includes the size of header fonts, their placement, and specific margins. These suggestions encourage a degree of consistency between apps so that users’ eyes literally develop muscle memory for common elements of the UI. That said, they are not hard and fast rules, just a starting point—designers can and do depart from them when there’s reason to do so.
Generally speaking, layout is based on a basic 20 pixel unit, with 5 pixel sub-units. In the full landscape view of Figure 2-7, you can see the recommended left margin of 120px, the recommended top margin of 140px above the content region, and placement of the header’s baseline at 100px, which for a 42pt font translates to a 44px top margin. For partial landscape views with width <= 1024px, the left margin shrinks to 40px (not shown). In the portrait and narrow views of Figure 2-8 and 2-9, the various margins and gaps get smaller but still align to the grid.
What happened to snapped and filled views? In the first release of Windows 8, app design focused on four view states known as landscape, portrait, filled, and snapped. With Windows 8.1, each view of an app can be arbitrarily sized in the horizontal, so distinct names for these states are deprecated in favor of simply handling different view sizes and aspect ratios—known as responsive design on the web. For apps, the minimum design size is now 500x768 pixels, and an app can indicate in the manifest whether it supports a narrower view down to a 320px minimum. The “Here My Am!” app as designed in this section supports all sizes including narrow. Aspect ratios (width/height) of 1 and below (meaning square to tall) use the vertically-oriented layouts; aspect ratios greater than 1 use a horizontally-oriented layout.
To accommodate view sizes, you can use standard CSS3 orientation media queries to differentiate aspect ratios; the view state media queries from Windows 8 don’t differentiate between the filled state (a narrower landscape) and the 50% split view that will often have an aspect ratio less than 1.
Note, however, that the header font sizes, from which we derive the top header margins, were defined in the WinJS 1.0 stylesheets in Windows 8 but were removed in WinJS 2.0 for Windows 8.1. To adjust the font size for narrow views, then, default.css in Here My Am! has specific rules to set h1 and h2 element sizes.
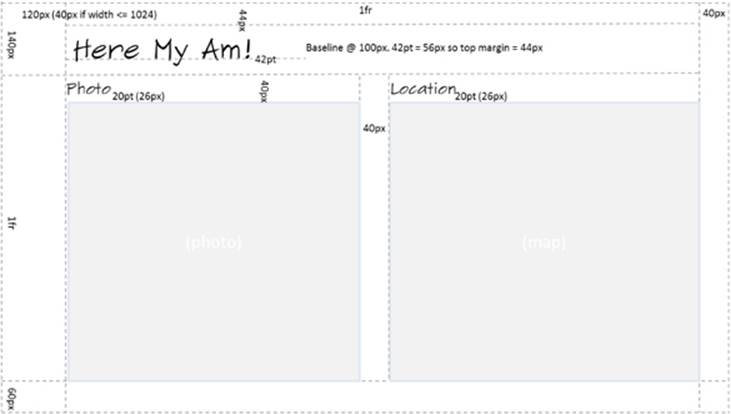
FIGURE 2-7 Wireframe for wide aspect ratios (width/height > 1). The left margin is nominally 120px, changing to 40px for smaller (<1024px) widths. The “1fr” labels denote proportional parts of the CSS grid (see Chapter 8, “Layout and Views”) that occupy whatever space remains after the fixed parts are laid out.

FIGURE 2-8 Wireframes for narrow (320–499px) and portrait (500px or higher) aspect ratios (width/height <= 1). These views also happen to work nicely on a portrait-first Windows Phone.
Sidebar: Design for All Size Variations!
Just as I thought about all size variations for Here My Am!, I encourage you to do the same for one simple reason: your app will be put into every state whether you design for it or not (with the exception of the narrow 320–499px view if you don’t indicate it in your manifest). Users control the views, not the app, so if you neglect to design for any given state, your app will probably look hideous in that state. You can, as we’ll see in Chapter 8, lock the landscape/portrait orientation for your app if you want, but that’s meant to enhance an app’s experience rather than being an excuse for indolence. So in the end, unless you have a very specific reason not to, every page in your app needs to anticipate all different sizes and dimensions.
This might sound like a burden, but these variations don’t affect function: they are simply different views of the same information. Changing the view never changes the mode of the app. Handling different views, therefore, is primarily a matter of which elements are visible and how those elements are laid out on the page. It doesn’t have to be any more complicated than that, and for apps written in HTML and JavaScript the work can mostly, if not entirely, be handled through CSS media queries.
Enough said! Let’s just assume that we have a great design to work from and our designers are off sipping cappuccino, satisfied with a job well done. Our job is now to execute on that great design.
Create the Markup
For the purposes of markup, layout, and styling, one of the most powerful tools you can add to your arsenal is Blend for Visual Studio, which is included for free when you install Visual Studio Express. Blend has full design support for HTML, CSS, and JavaScript. I emphasize that latter point because Blend doesn’t just load markup and styles: it loads and executes your code, right in the “Artboard” (the design surface), because that code so often affects the DOM, styling, and so forth. Then there’s Interactive Mode…but I’m getting ahead of myself!
Blend and Visual Studio are very much two sides of a coin: they can share the same projects and have commands to easily switch between them, depending on whether you’re focusing on design (layout and styling in Blend) or development (coding and debugging in Visual Studio). To demonstrate that, let’s actually start building Here My Am! in Blend. As we did before with Visual Studio, launch Blend, select New Project…, and select the Blank App template. This will create the same project structure as before. (Note: Video 2-2 shows all these steps together.)
Following the practice of writing pure markup in HTML—with no styling and no code, and even leaving off a few classes we’ll need for styling—let’s drop the following markup into the body element of default.html (replacing the one line of <p>Content goes here</p>):
<div id="mainContent">
<header aria-label="Header content" role="banner">
<h1 class="titlearea win-type-ellipsis">
<span class="pagetitle">Here My Am!</span>
</h1>
</header>
<section aria-label="Main content" role="main">
<div id="photoSection" aria-label="Photo section">
<h2 class="group-title" role="heading">Photo</h2>
<img id="photo" src="/images/taphere.png"
alt="Tap to capture image from camera" role="img"/>
</div>
<div id="locationSection" aria-label="Location section">
<h2 class="group-title" role="heading">Location</h2>
<iframe id="map" src="ms-appx-web:///html/map.html" aria-label="Map"></iframe>
</div>
</section>
</div>
Here we see the five elements in the wireframe: a main header, two subheaders, a space for a photo (for now an img element with a default “tap here” graphic), and an iframe that specifically houses a page in which we’ll instantiate a Bing maps web control.11
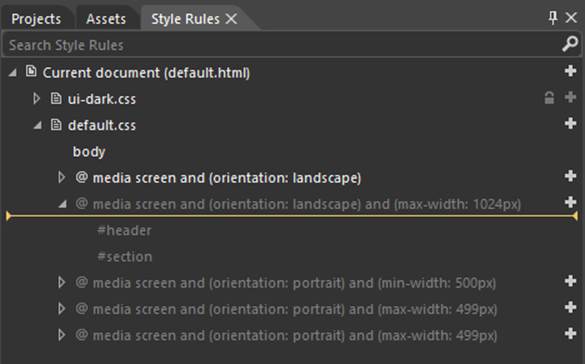
You’ll see that some elements have style classes assigned to them. Those that start with win- come from the WinJS stylesheet (among others).12 You can browse these in Blend on the Style Rules tab, shown in Figure 2-9. Other styles like titlearea, pagetitle, and group-title are meant for you to define in your own stylesheet, thereby overriding the WinJS styles for particular elements.
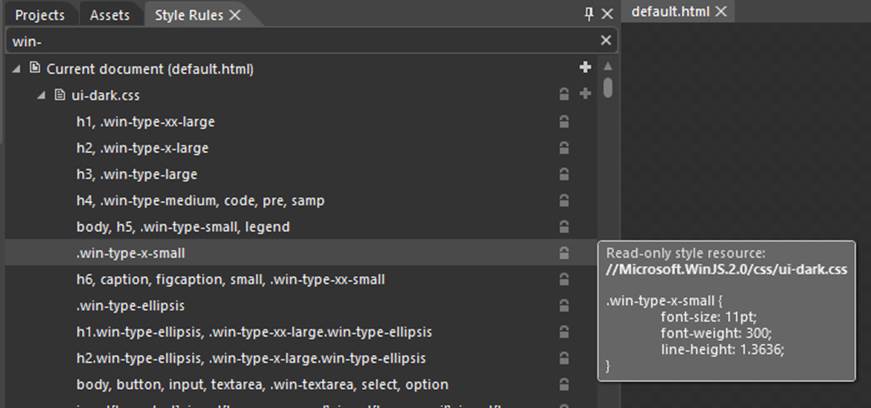
FIGURE 2-9 In Blend, the Style Rules tab lets you look into the WinJS stylesheet and see what each particular style contains. Take special notice of the search bar under the tabs where I’ve typed “win-“. This helps you avoid visually scanning for a particular style—just start typing in the box, and let the computer do the work!
The page we’ll load into the iframe, map.html, is part of our app package that we’ll add in a moment, but note how we reference it. The ms-appx-web:/// protocol indicates that the iframe and its contents will run in the web context (introduced in Chapter 1), thereby allowing us to load the remote script for the Bing maps control. The triple slash, for its part—or more accurately the third slash—is shorthand for “the current app package” (a value that you can obtain from document.location.host) For more details on this and other protocols, see URI schemes in the documentation.
To indicate that a page should be loaded in the local context, the protocol is just ms-appx. It’s important to remember that no script is shared between these contexts (including variables and functions), relative paths stay in the same context, and communication between the two goes through the HTML5 postMessage function, as we’ll see later. All of this prevents an arbitrary website from driving your app and accessing WinRT APIs that might compromise user identity and security.
Note I’m using an iframe element in this first example because it’s probably familiar to most readers. In Chapter 4, “Web Content and Services,” we’ll change the app to use an x-ms-webview element, which is much more flexible than an iframe and is the recommended means to host web content.
I’ve also included various aria-*attributes on these elements (as the templates do) that support accessibility. We’ll look at accessibility in detail in Chapter 19, “Apps for Everyone, Part 1,”but it’s an important enough consideration that we should be conscious of it from the start: a majority of Windows users make use of accessibility features in some way. And although some aspects of accessibility are easy to add later on, adding aria-* attributes in markup is best done early.
In Chapter 19 we’ll also see how to separate strings (including ARIA labels) from our markup, JavaScript, and even the manifest, and place them in a resource file for the purposes of localization. This is something you might want to do from early on, so see the “Preparing for Localization” section in that chapter for the details. Note, however, that resource lookup doesn’t work in Blend, so you might want to hold off on the effort until you’ve done most of your styling.
Styling in Blend
At this point, and assuming you were paying enough attention to read the footnotes, Blend’s real-time display of the app shows an obvious need for styling, just like raw markup should. See Figure 2-10.
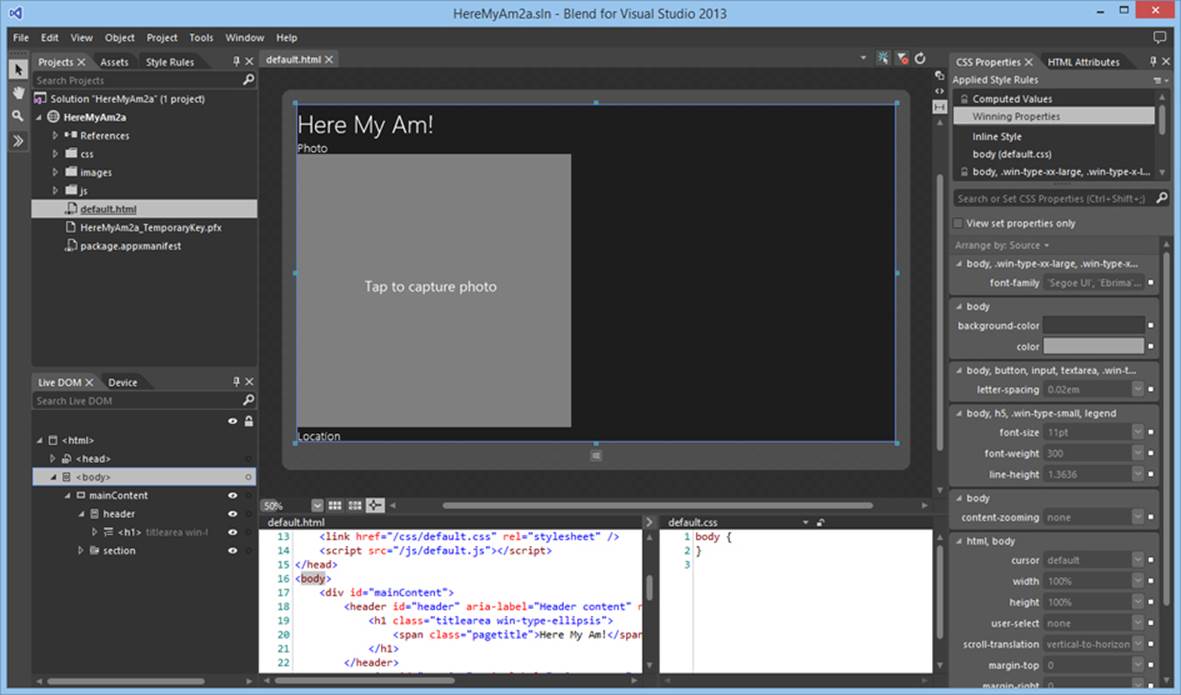
FIGURE 2-10 The app in Blend without styling, showing a view that is much like the Visual Studio simulator. If the taphere.png image doesn’t show after adding it, use the View/Refresh menu command.
The tabs along the upper left give you access to your Project files, Assets like all the controls you can add to your UI, and a browser for all the Style Rules defined in the environment. On the lower left side, the Live DOM tab lets you browse your element hierarchy and the Device tab lets you set orientation, screen resolution, view sizes and positions, and minimum size. Clicking an element in the Live DOM will highlight it in the designer, and clicking an element in the designer will highlight it in the Live DOM section. Also note the search bar in the Live DOM, where you can enter any CSS selector to highlight those elements that match that selector.
Over on the right side you see what will become a very good friend: the section for HTML Attributes and CSS Properties. With properties, the list at the top shows all the sources for styles that are being applied to the currently selected element and where, exactly, those styles are coming from (often a headache with CSS). The location selected in this list, mind you, indicates where changes in the properties pane below will be written, so be very conscious of your selection! That list also contains an item called “Winning Styles,” which shows the styles that are actually being applied to the element, and an item called “Computed Values,” which will show you the exact values applied in the layout engine, such as the actual sizes of rows and columns in a CSS grid and how values like 1.5em translate into pixels.
Now to get our gauche, unstylish page to look like the wireframe, we need to go through the elements and create the necessary selectors and styles. First, I recommend creating a 1x1 grid in the body element as this seems to help everything in the app size itself properly. So add display: -ms-grid; -ms-grid-rows: 1fr; -ms-grid-columns: 1fr; to default.css for body.
CSS grids also make this app’s layout fairly simple: we’ll just use some of nested grids to place the main sections and the subsections, following the general pattern of styling that works best in Blend:
• Set the insertion point of the style rule within Blend’s Style Rules tab by dragging the orange-yellow line control. This determines exactly where any new rule you create will be written. In the image below, new rules would be inserted in default.css at the beginning of the landscape/max-width: 1024px media query:
• In the Live DOM pane (the lower left side in Blend, where you can again search for rules to highlight elements that use them), right-click the element you want to style and select Create Style Rule From Element Id or Create Style Rule From Element Class. This will create a new style rule (at the insertion point indicated in Style Rules above). Then in the CSS properties pane on the right, find the rule that was created and add the necessary style properties.
Note If the menu items in the Live DOM pane are both disabled, go to the HTML Attributes pane (upper right) and add an id, a class, or both, then return to the menu in the Live DOM. If you do styling without having a distinct rule in place, you’ll create inline styles in the HTML, although Blend makes it easy to copy those out and paste them into a rule.
• Repeat with every other element you want to style, which could include body, html, and so forth, all of which appear in the Live DOM.
So for the mainContentdiv, we create a rule from the Id and set it up with display: -ms-grid; -ms-grid-columns: 1fr;-ms-grid-rows: 140px 1fr 60px;. (See Figure 2-11.) This creates the basic vertical areas for the wireframes. In general, you won’t want to put left or right margins directly in this grid because the lower section will often have horizontally scrolling content that should bleed off the left and right edges. In the case of Here My Am! we could use one grid, but instead we’ll add those margins in a nested grid within the header and section elements.
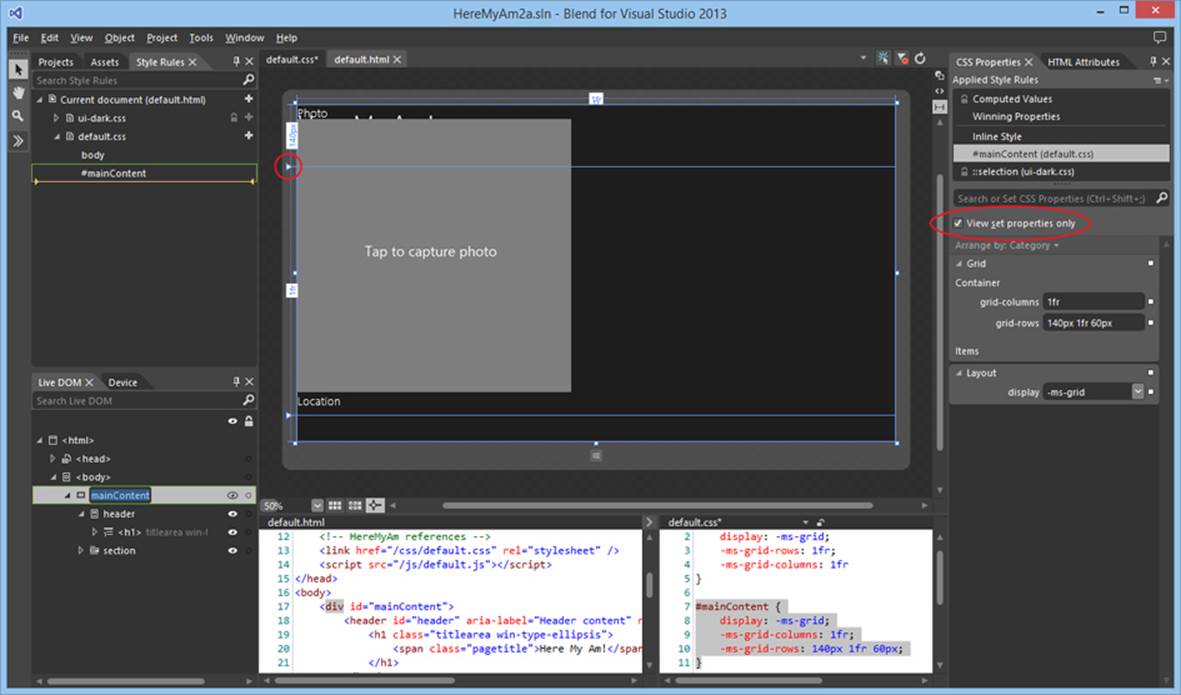
FIGURE 2-11 Setting the grid properties for the mainContentdiv. Notice how the View Set Properties Only checkbox (upper right) makes it easy to see what styles are set for the current rule. Also notice how the grid rows and columns appear on the artboard, including sliders (circled) to manipulate rows and columns directly.
Showing this and the rest of the styling—going down into each level of the markup and creating appropriate styles in the appropriate media queries—is best done in video. Video 2-2 (available with this book’s companion content) shows this process starting with the creation of the project, styling the different views, and switching to Visual Studio (right-click the project name in Blend and select Edit In Visual Studio) to run the app in the simulator for verification. It also demonstrates the approximate time it takes to style such an app once you’re familiar with the tools. (I also highly recommend watching What’s New in Blend for HTML Developers from //build 2013, which goes much more in depth with various styling processes.)
The result of all this in the simulator looks just like the wireframes—see Figures 2-12 through 2-14—and all the styling is entirely contained within the appropriate media queries of default.css. Most importantly, the way Blend shows us the results in real time is an enormous time-saver over fiddling with the CSS and running the app over and over again, a painful process that I’m sure you’re familiar with! (And the time savings are even greater with Interactive Mode; see Video 5-3 in the companion content created for Chapter 5 and the //build 2013 talk linked above.)
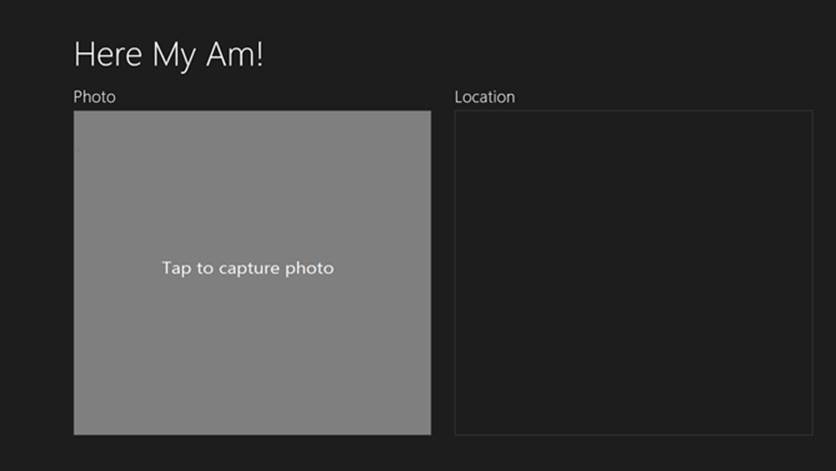
FIGURE 2-12 Full landscape view.
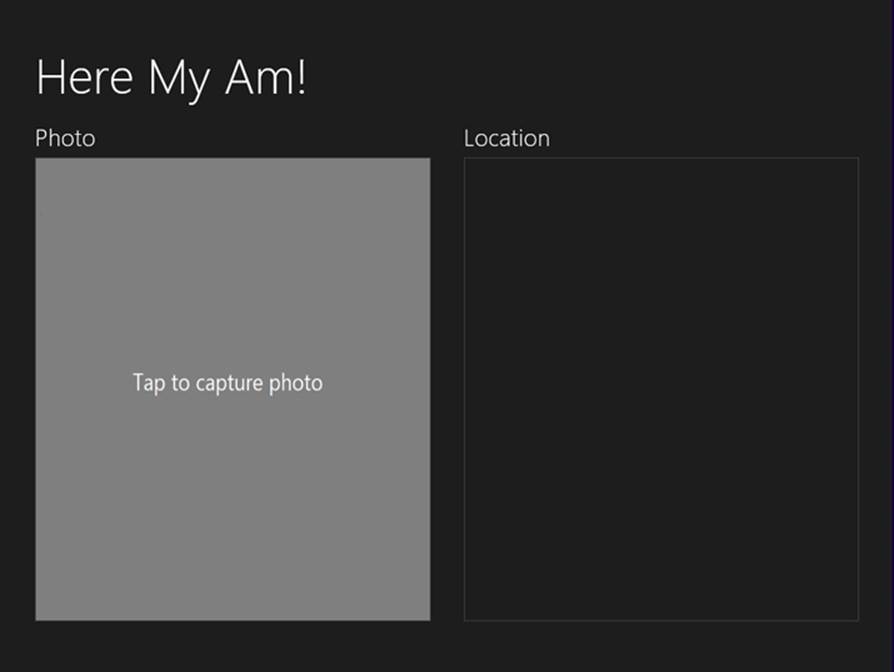
FIGURE 2-13 Partial landscape view (when sharing the screen with other apps).
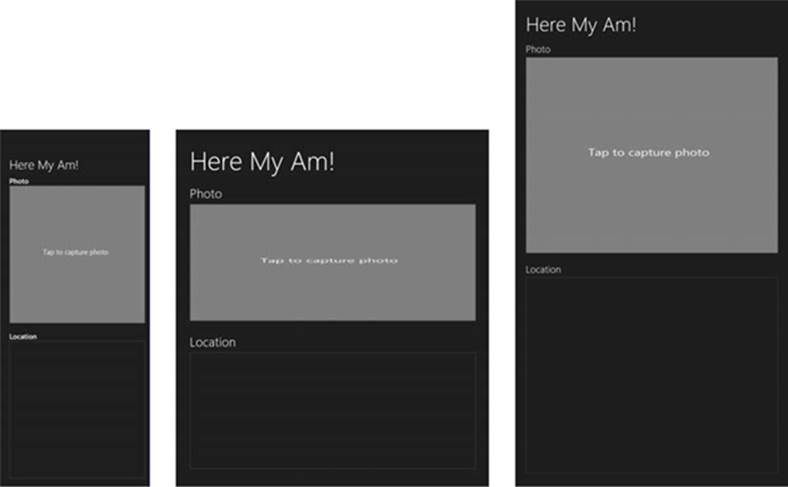
FIGURE 2-14 Narrow aspect ratio views: 320px wide (left), 50% wide (middle), and full portrait (right). These images are not to scale with one another. You can also see that the fixed placeholder image in the Photo section doesn’t scale well to the 50% view; we’ll solve this later in this chapter in “Improving the Placeholder Image with a Canvas Element.”
Adding the Code
Let’s complete the implementation now in Visual Studio. Again, right-click the project name in Blend’s Project tab and select Edit In Visual Studio if you haven’t already. Note that if your project is already loaded into Visual Studio when you switch to it, it will (by default) prompt you to reload changed files. Say yes.13 At this point, we have the layout and styles for all the necessary views, and our code doesn’t need to care about any of it except to make some refinements, as we’ll see.
What this means is that, for the most part, we can just write our app’s code against the markup and not against the markup plus styling, which is, of course, a best practice with HTML/CSS in general. Here are the features that we’ll now implement:
• A Bing maps control in the Location section showing the user’s current location. We’ll create and display this map automatically.
• Use the WinRT APIs for camera capture to get a photograph in response to a tap on the Photo img element.
• Provide the photograph and the location data to the Share charm when the user invokes it.
Figure 2-15 shows what the app will look like when we’re done, with the Share charm invoked and a suitable target app like Twitter selected.
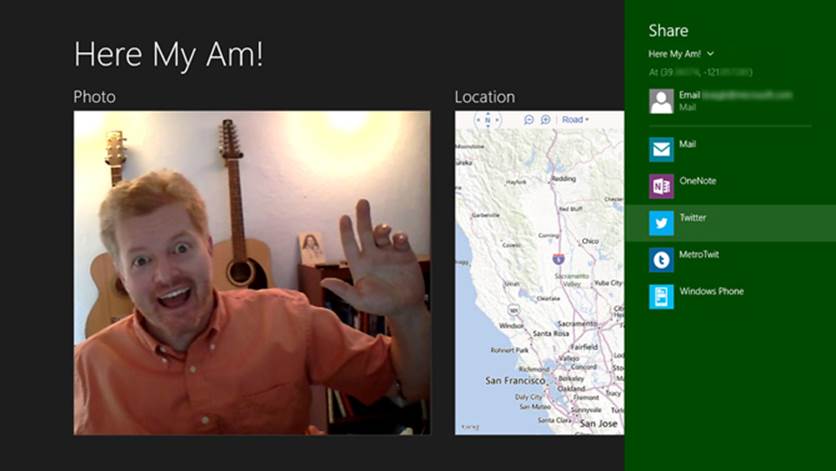
FIGURE 2-15 The completed Here My Am! app with the Share charm invoked (with my exact coordinates blurred out, because they do a pretty accurate job of pinpointing my house).
Creating a Map with the Current Location
For the map, we’re using a Bing maps web control instantiated through the map.html page that’s loaded into an iframe on the main page (again, we’ll switch over to a webview element later on). As we’re loading the map control script from a remote source, map.html must be running in the web context. We could employ the Bing Maps SDK here instead, which provides script we can load into the local context. For the time being, I want to use the remote script approach because it gives us an opportunity to work with web content and the web context in general, something that I’m sure you’ll want to understand for your own apps. We’ll switch to the local control in Chapter 10, “The Story of State, Part 1.”
That said, let’s put map.html in an html folder. Right-click the project and select Add/New Folder (entering html to name it). Then right-click that folder, select Add/New Item…, and then select HTML Page. Once the new page appears, replace its contents with the following, and insert your own key for Bing Maps obtained from https://www.bingmapsportal.com/ into the init function (highlighted):
<!DOCTYPE html>
<html>
<head>
<title>Map</title>
<script type="text/javascript"
src="http://ecn.dev.virtualearth.net/mapcontrol/mapcontrol.ashx?v=7.0"></script>
<script type="text/javascript">
//Global variables here
var map = null;
document.addEventListener("DOMContentLoaded", init);
window.addEventListener("message", processMessage);
//Function to turn a string in the syntax { functionName: ..., args: [...] }
//into a call to the named function with those arguments. This constitutes a generic
//dispatcher that allows code in an iframe to be called through postMessage.
function processMessage(msg) {
//Verify data and origin (in this case the local context page)
if (!msg.data || msg.origin !== "ms-appx://" + document.location.host) {
return;
}
var call = JSON.parse(msg.data);
if (!call.functionName) {
throw"Message does not contain a valid function name.";
}
var target = this[call.functionName];
if (type of target !='function') {
throw"The function name does not resolve to an actual function";
}
return target.apply(this, call.args);
}
//Create the map (though the namespace won't be defined without connectivity)
function init() {
if (typeof Microsoft =="undefined") {
return;
}
map = new Microsoft.Maps.Map(document.getElementById("mapDiv"), {
//NOTE: replace these credentials with your own obtained at
//http://msdn.microsoft.com/en-us/library/ff428642.aspx
credentials: "...",
//zoom: 12,
mapTypeId: Microsoft.Maps.MapTypeId.road
});
}
function pinLocation(lat, long) {
if (map === null) {
throw"No map has been created";
}
var location = new Microsoft.Maps.Location(lat, long);
var pushpin = new Microsoft.Maps.Pushpin(location, { });
map.entities.push(pushpin);
map.setView({ center: location, zoom: 12, });
return;
}
function setZoom(zoom) {
if (map === null) {
throw"No map has been created";
}
map.setView({ zoom: zoom });
}
</script>
</head>
<body>
<div id="mapDiv"></div>
</body>
</html>
Note that the JavaScript code here could be moved into a separate file and referenced with a relative path, no problem. I’ve chosen to leave it all together for simplicity.
At the top of the page you’ll see a remote script reference to the Bing Maps control. We can again reference remote script here because the page is loaded in the web context within the iframe (ms-appx-web:// in default.html). You can then see that the init function is called onDOMContentLoaded and creates the map control. Then we have a couple of other methods, pinLocation and setZoom, which can be called from the main app as needed.14
Of course, because this page is loaded in an iframe in the web context, we cannot simply call those functions directly from the local context in which our app code runs. We instead use the HTML5 postMessage function, which raises a message event within the iframe. This is an important point: the local and web contexts are kept separate so that arbitrary web content cannot drive an app or access WinRT APIs (as required by Windows Store certification policy). The two contexts enforce a boundary between an app and the web that can only be crossed with postMessage.
In the code above, you can see that we pick up such messages (the window.onmessage handler) and pass them to the processMessage function, a little generic routine I wrote to turn a JSON string into a local function call, complete with arguments.
To see how this works, let’s look at calling pinLocation from within default.js (our local context app code). To make this call, we need some coordinates, which we can get from the WinRT Geolocation APIs. We’ll do this within the app’s ready event (which fires after the app is fully running). This way the user’s location is set on startup and saved in the lastPosition variable for later sharing:
//Drop this after the line: var activation = Windows.ApplicationModel.Activation;
varlastPosition = null;
varlocator = new Windows.Devices.Geolocation.Geolocator();
//Add this after the app.onactivated handler
app.onready = function () {
locator.getGeopositionAsync().done(function (geocoord) {
var position = geocoord.coordinate.point.position;
//Save for share
lastPosition = { latitude: position.latitude, longitude: position.longitude };
callFrameScript(document.frames["map"], "pinLocation",
[position.latitude, position.longitude]);
});
}
where callFrameScript is another little helper function to turn a target element, function name, and arguments into an appropriate postMessage call:
function callFrameScript(frame, targetFunction, args) {
var message = { functionName: targetFunction, args: args };
frame.postMessage(JSON.stringify(message), "ms-appx-web://" + document.location.host);
}
A few points about all this code. First, in the second parameter to postMessage (both in default.js and map.html) you see ms-appx:// or ms-appx-web:// combined with document.location.host. This essentially means “the current app from the [local or web] context,” which is the appropriate origin of the message. We use the same value to check the origin when receiving a message: the code in map.html verifies it’s coming from the app’s local context, whereas the code in default.js verifies that it’s coming from the app’s web context. Always make sure to check the origin appropriately; see Validate the origin of postMessage data in Developing secure apps.
Next, to obtain coordinates you can use either the WinRT or HTML5 geolocation APIs. The two are almost equivalent, with the differences described in Chapter 12, “Input and Sensors,” in “Sidebar: HTML5 Geolocation.” The API exists in WinRT because other supported languages (C# and C++) don’t have access to HTML5 APIs. We’re focused on WinRT APIs in this book, so we’ll just use functions in the Windows.Devices.Geolocation namespace.
Note that it’s necessary for the WinRT Geolocation.Geolocator object to stay in scope while an async location request is happening; otherwise it will cancel the request when a user consent prompt appears (which we’ll see shortly). This is why I’m creating it outside the app.onreadyhandler.
Finally, the call to getGeopositionAsync has an interesting construct, wherein we make the call and chain this function called done onto it, whose argument is another function. This is a very common pattern that we’ll see while working with WinRT APIs, as any API that might take longer than 50ms to complete runs asynchronously. This conscious decision was made so that the API surface area leads to fast and fluid apps by default.
In JavaScript, async APIs return what’s called a promise object, which represents results to be delivered at some time in the future. Every promise object has a done method whose first argument is the function to be called upon completion, known as the completed handler (often an anonymous function). done can also take two optional functions to wire up error and progress handlers as well. We’ll see much more about promises as we progress through this book, such as the then function that’s just like done and allows further chaining (Chapter 3), and how promises fit into async operations more generally (Chapter 18). Also, put it deeply into your awareness that anytime you want to stop an uncompleted async operation that’s represented by a promise, just call the promise’s cancel method. It’s surprising how often developers forget this!
The argument passed to your completed handler contains the results of the getGeopositionAsync call, which in our example above is a Windows.Geolocation.Geoposition object containing the last reading. The coordinates from this reading are what we then pass to the pinLocationfunction within the iframe, which in turn creates a pushpin on the map at those coordinates and then centers the map view at that same location. (Later in the section “Receiving Messages from the iframe” we’ll make the pushpin draggable and show how the app can pick up location changes from the map.)
Async result types When reading the docs for an async function, you’ll see that the return type is listed like IAsyncOperation<Geoposition>; the name within <> indicates the actual data type of the results, so refer to the docs on that class for its details. Note also that the IAsyncOperationand similar interfaces that exist in WinRT never surface in JavaScript—they are projected as promises.
What’s in an (async) name? Within the WinRT API, all async functions have Async in their names. Because this isn’t common practice within the DOM API and other JavaScripttoolkits, async functions within WinJS don’t use that suffix. In other words, WinRT is designed to be language-neutral and follows its own conventions; WinJS consciously follows typical JavaScript conventions.
Oh Wait, the Manifest!
Now you may have tried the code above and found that you get an “Access is denied” exception when you try to call getGeopositionAsync. Why is this? Well, the exception says we neglected to set the Location capability in the manifest. Without that capability set, calls that depend on the capability will throw an exception.
If you were running in the debugger, that exception is kindly shown in a dialog box:
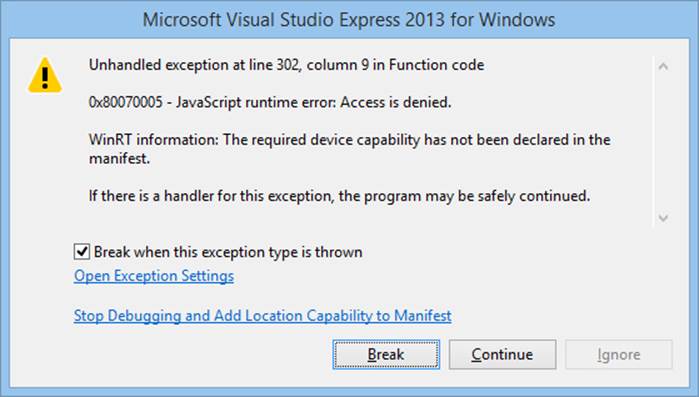
If you run the app outside of the debugger—from the tile on your Start screen—you’ll see that the app just terminates without showing anything but the splash screen. This is the default behavior for an unhandled exception. To prevent that behavior, add an error-handling function as the second parameter to the async promise’s done method:
locator.getGeopositionAsync().done(function (geocoord) {
//...
}, function(error) {
console.log("Unable to get location:" + error.message);
});
The console.log function writes a string to the JavaScript Console window in Visual Studio, which is obviously a good idea (you can also use WinJS.log for this purpose, which allows more customization, as we’ll discuss in Chapter 3). Now run the app outside the debugger and you’ll see that the app runs, because the exception is now considered “handled.” Back in the debugger, set a breakpoint on the console.log line and you’ll hit that breakpoint after the exception appears and you press Continue. (This is all we’ll do with the error for now; in Chapter 9, “Commanding UI,” we’ll add a better message and a retry command.)
If the exception dialog gets annoying, you can control which exceptions pop up like this through the Debug > Exceptions dialog box in Visual Studio (shown in Figure 2-16), under JavaScript Runtime Exceptions. If you uncheck the box under User-unhandled, you won’t get a dialog when that particular exception occurs.
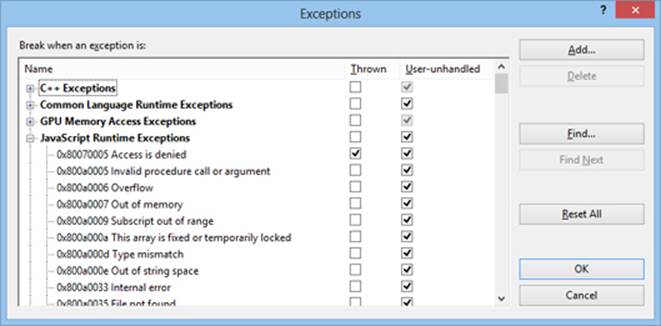
FIGURE 2-16 JavaScript run-time exceptions in the Debug/Exceptions dialog of Visual Studio.
When the Thrown box is checked for a specific exception (as it is by default for Access is denied to help you catch capability omissions), Visual Studio will always display the “exception occurred” message before your error handler is invoked. If you uncheck Thrown, your error handler will be called without any message.
Back to the capability: to get the proper behavior for this app, open package.appxmanifest in your project, select the Capabilities tab (in the editor UI), and check Location, as shown in Figure 2-17.
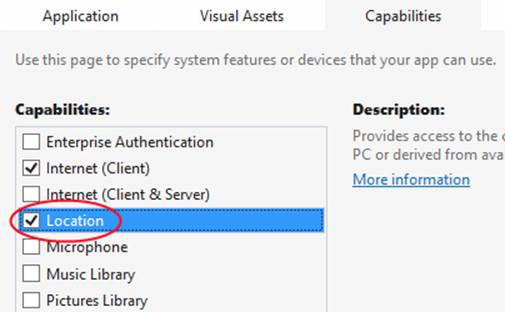
FIGURE 2-17 Setting the Location capability in Visual Studio’s manifest editor. (Note that Blend supports editing the manifest only as XML.)
Now, even when we declare the capability, geolocation is still subject to user consent, as mentioned in Chapter 1. When you first run the app with the capability set, then, you should see a popup like this, which appears in the user’s chosen color scheme to indicate that it’s a message from the system:

If the user blocks access here, the error handler will be invoked with an error of “Canceled.” (This is also what you get if the Geolocator object goes out of scope while the consent prompt is visible, even if you click Allow, which is again why I create the object outside the app.onreadyhandler.)
Keep in mind that this consent dialog will appear only once for any given app, even across debugging sessions (unless you change the manifest or uninstall the app, in which cases the consent history is reset). After that, the user can at any time change their consent in the Settings > Permissions panel as shown in Figure 2-18, and we’ll learn how to deal with such changes in Chapter 9. For now, if you want to test your app’s response to the consent dialog, go to the Start screen and uninstall the app from its tile. You’ll then see the popup when you next run the app.
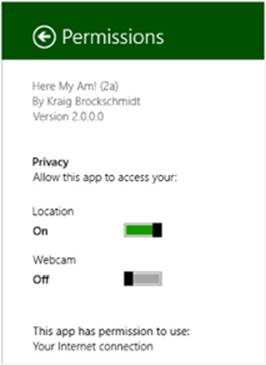
FIGURE 2-18 Any permissions that are subject to user consent can be changed at any time through the Settings Charm > Permissions pane.
Sidebar: Writing Code in Debug Mode
Because of the dynamic nature of JavaScript, it’s impressive that the Visual Studio team figured out how to make the IntelliSense feature work quite well in the Visual Studio editor. (If you’re unfamiliar with IntelliSense, it’s the productivity service that provides auto-completion for code as well as popping up API reference material directly inline; learn more at JavaScript IntelliSense). That said, a helpful trick to make IntelliSense work even better is to write code while Visual Studio is in debug mode. That is, set a breakpoint at an appropriate place in your code, and then run the app in the debugger. When you hit that breakpoint, you can then start writing and editing code, and because the script context is fully loaded, IntelliSense will be working against instantiated variables and not just what it can derive from the source code. You can also use Visual Studio’s Immediate Window to execute code directly to see the results. (You will need to restart the app, however, to execute any new code you write.)
Capturing a Photo from the Camera
In a slightly twisted way, I hope the idea of adding camera capture within a so-called “quickstart” chapter has raised serious doubts in your mind about this author’s sanity. Isn’t that going to take a whole lot of code? Well, it used to, but no longer. The complexities of camera capture have been encapsulated within the Windows.Media.Capture API to such an extent that we can add this feature with only a few lines of code. It’s a good example of how a little dynamic code like JavaScript combined with well-designed WinRT components—both those in the system and those you can write yourself—are a powerful combination! (You can also write your own capture UI, as we’ll see in Chapter 13, “Media,” which is presently necessary on Windows Phone as the API we’re using here isn’t available.)
To implement this feature, we first need to remember that the camera, like geolocation, is a privacy-sensitive device and must also be declared in the manifest, as shown in Figure 2-19.
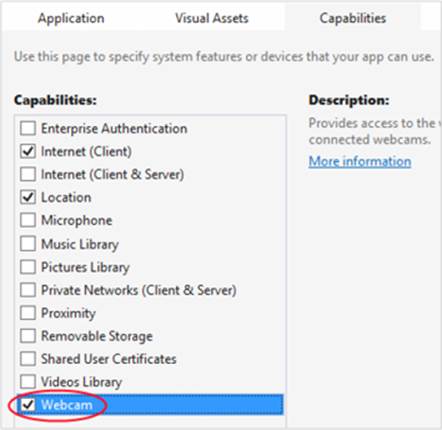
FIGURE 2-19 The camera capability in Visual Studio’s manifest editor.
On first use of the camera at run time, you’ll see another consent dialog as follows, where again the user can later change their consent in Settings > Permissions (shown earlier in Figure 2-18):

Next we need to wire up the img element to pick up a tap gesture. For this we simply need to add an event listener for click, which works for all forms of input (touch, mouse, and stylus), as we’ll see in Chapter 12:
document.getElementById("photo").addEventListener("click", capturePhoto.bind(photo));
Here we’re providing capturePhoto as the event handler, and using the function object’s bind method to make sure the this object inside capturePhoto is bound directly to the img element. The result is that the event handler can be used for any number of elements because it doesn’t make any references to the DOM itself:
//Place this under var lastPosition = null; (within the app.onactivated handler)
varlastCapture = null;
//Place this after callFrameScript
function capturePhoto() {
//Due to the .bind() call in addEventListener, "this" will be the image element,
//but we need a copy for the async completed handler below.
var captureUI = new Windows.Media.Capture.CameraCaptureUI();
var that = this;
//Indicate that we want to capture a JPEG that's no bigger than our target element --
//the UI will automatically show a crop box of this size.
captureUI.photoSettings.format = Windows.Media.Capture.CameraCaptureUIPhotoFormat.jpeg;
captureUI.photoSettings.croppedSizeInPixels =
{ width: that.clientWidth, height: that.clientHeight };
//Note: this will fail if we're in any view where there's not enough space to display the UI.
captureUI.captureFileAsync(Windows.Media.Capture.CameraCaptureUIMode.photo)
.done(function (capturedFile) {
//Be sure to check validity of the item returned; could be null if the user canceled.
if (capturedFile) {
lastCapture = capturedFile; //Save for Share
that.src = URL.createObjectURL(capturedFile, { oneTimeOnly: true });
}
}, function (error) {
console.log("Unable to invoke capture UI:" + error.message);
});
}
We do need to make a local copy of this within the click handler, though, because once we get inside the async completed handler (the anonymous function passed to captureFileAsync.done) we’re in a new function scope and the this object will have changed. The convention for such a copy of this is to call it that. Got that? (You can call it anything, of course.)
To invoke the camera UI, we only need create an instance of Windows.Media.Capture.-CameraCaptureUIwith new (a typical step to instantiate dynamic WinRT objects), configure it with the desired format and size (among many possibilities; see Chapter 13), and then callcaptureFileAsync. This will check the manifest capability and prompt the user for consent, if necessary (and unlike the Geolocator, a CameraCaptureUI object can go out of scope without canceling the async operation).
This is an async call, so it returns a promise and we hook a .done on the end with our completed handler, which in this case will receive a Windows.Storage.StorageFile object. Through this object you can get to all the raw image data you want, but for our purpose we simply want to display it in the img element. That’s easy as well! Data types from WinRT and those in the DOM API are made to interoperate seamlessly, so a StorageFile can be treated like an HTML blob. This means you can hand a WinRT StorageFile object to the HTML URL.createObjectURL method and get back an URI that can be directly assigned to the img.src attribute. The captured photo appears!
Tip The {oneTimeOnly: true} parameter to URL.createObjectURL indicates that the URI is not reusable and should be revoked via URL.revokeObjectURL when it’s no longer used, as when we replace img.src with a new picture. Without this, we’d leak memory with each new picture unless you explicitly call URL.revokeObjectURL. (If you’ve used URL.createObjectURL in the past, you’ll see that the second parameter is now a property bag, which aligns with the most recent W3C spec.)
Note that captureFileAsync will call the completed handler if the UI was successfully invoked but the user hit the back button and didn’t actually capture anything (this includes if you cancel the promise to programmatically dismiss the UI). This is why we do the extra check on the validity of capturedFile. An error handler on the promise will, for its part, pick up failures to invoke the UI in the first place. This will happen if the current view of the app is too small (<500px) for the capture UI to be usable, in which case error.message will say “A method was called at an unexpected time.” You can check the app’s view size and take other action under such conditions, such as displaying a message to make the view wider. Here we just fail silently; we could also just use the 500px minimum.
Note that a denial of consent will show a message in the capture UI directly, so it’s unnecessary to display your own errors with this particular API:
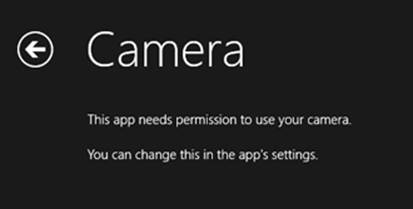
When this happens, you can again go to Settings > Permissions and give consent to use the camera, as shown in Figure 2-18 earlier.
Sharing the Fun!
Taking a goofy picture of oneself is fun, of course, but sharing the joy with the rest of the world is even better. Up to this point, however, sharing information through different social media apps has meant using the specific APIs of each service. Workable, but not scalable.
Windows 8 instead introduced the notion of the share contract, which is used to implement the Share charm with as many apps as participate in the contract. Whenever you’re in an app and invoke Share, Windows asks the app for its source data, which it provides in one or more formats. Windows then generates a list of target apps (according to their manifests) that understand those formats, and displays that list in the Share pane. When the user selects a target, that app is activated and given the source data. In short, the contract is an abstraction that sits between the two, so the source and target apps never need to know anything about each other.
This makes the whole experience all the richer when the user installs more share-capable apps, and it doesn’t limit sharing to only well-known social media scenarios. What’s also beautiful in the overall experience is that the user never leaves the original app to do sharing—the share target app shows up in its own view as an overlay that only partially obscures the source app (refer back to Figure 2-15). This way, the user remains in the context of the source app and returns there directly when the sharing is completed. In addition, the source data is shared directly with the target app, so the user never needs to save data to intermediate files for this purpose.
So instead of adding code to our app to share the photo and location to a particular target, like Facebook or Twitter, we need only package the data appropriately when Windows asks for it. That asking comes through the datarequested event sent to the Windows.ApplicationModel.-DataTransfer.DataTransferManager object.15 First we just need to set up an appropriate listener—place this code is in the activated event in default.js after setting up the click listener on the img element:
var dataTransferManager =
Windows.ApplicationModel.DataTransfer.DataTransferManager.getForCurrentView();
dataTransferManager.addEventListener("datarequested", provideData);
Note The notion of a current view as we see here is a way of saying, “get the singular instance of this system object that’s related to the current window,” which supports the ability for an app to have multiple windows/views (see Chapter 8). You use getForCurrentView instead of creating an instance with new because you only ever need one instance of such objects for any given view. getForCurrentViewwill instantiate the object if necessary, or return one that’s already available.
For this event, the handler receives a Windows.ApplicationModel.DataTransfer.DataRequest object in the event args (e.request), which in turn holds a DataPackage object (e.request.data). To make data available for sharing, you populate this data package with the various formats you have available, as we’ve saved in lastPosition and lastCapture.So in our case, we make sure we have position and a photo and then fill in text and image properties (if you want to obtain a map from Bing for sharing purposes, see Get a static map):
//Drop this in after capturePhoto
function provideData(e) {
var request = e.request;
var data = request.data;
if (!lastPosition || !lastCapture) {
//Nothing to share, so exit
return;
}
data.properties.title = "Here My Am!";
data.properties.description = "At ("
+ lastPosition.latitude + ", " + lastPosition.longitude + ")";
//When sharing an image, include a thumbnail
var streamReference =
Windows.Storage.Streams.RandomAccessStreamReference.createFromFile(lastCapture);
data.properties.thumbnail = streamReference;
//It's recommended to always use both setBitmap and setStorageItems for
// sharing a single image since the target app may only support one or the other.
//Put the image file in an array and pass it to setStorageItems
data.setStorageItems([lastCapture]);
//The setBitmap method requires a RandomAccessStream.
data.setBitmap(streamReference);
}
The latter part of this code is pretty standard stuff for sharing a file-based image (which we have in lastCapture). I got most of this code, in fact, directly from the Share content source app sample, which we’ll look at more closely in Chapter 15, “Contracts.” We’ll also talk more about files and streams in Chapter 10.
With this last addition of code, and a suitable sharing target installed (such as the Share content target app sample, as shown in Figure 2-20, or Twitter as shown in Figure 2-21), we now have a very functional app—in all of 35 lines of HTML, 125 lines of CSS, and less than 100 lines of JavaScript!
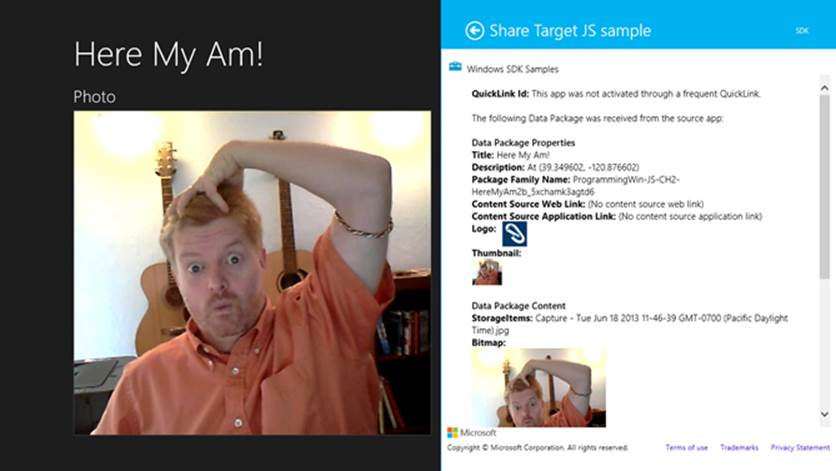
FIGURE 2-20 Sharing (monkey-see, monkey-do!) to the Share target sample in the Windows SDK, which is highly useful for debugging as it displays information about all the formats the source app has shared. (And if you still think I’ve given you coordinates to my house, the ones shown here will send you some miles down the road where you’ll make a fine acquaintance with the Tahoe National Forest.)
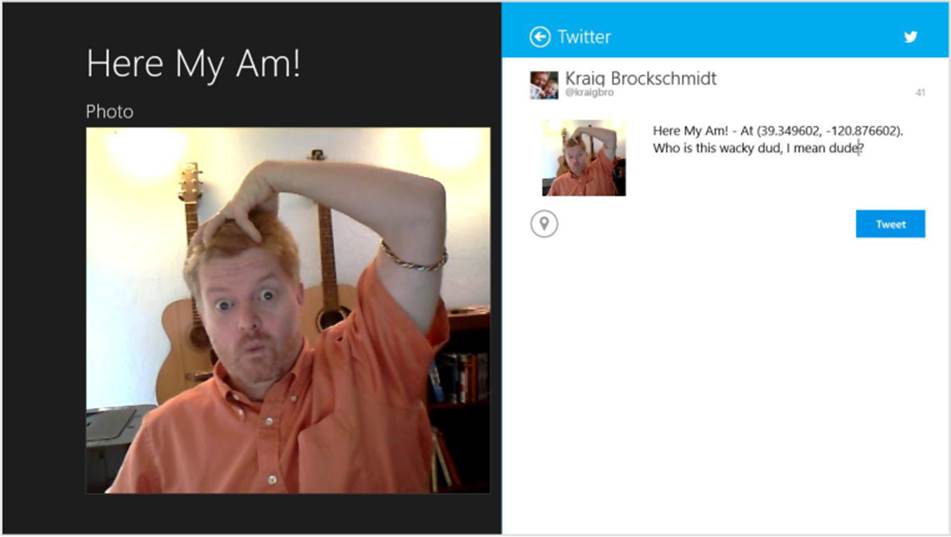
FIGURE 2-21Sharing to Twitter. The fact that Twitter’s brand color is nearly identical to the Windows SDK is sheer coincidence. The header color of the sharing pane always reflects the target app’s specific color.
Extra Credit: Improving the App
The Here My Am! app as we’ve built it so far is nicely functional and establishes core flow of the app, and you can find this version in the HereMyAm2a folder of the companion content. However, there are some functional deficiencies that we could improve:
• Because geolocation isn’t always as accurate as we’d like, the pushpin location on the map won’t always be where we want it. To correct this, we can make the pin draggable and report its updated position to the app via postMessage from the iframe to the app. This will also complete the interaction story between local and web contexts.
• The placeholder image that reads “Tap to capture photo” works well in some views, but looks terrible in others (such as the 50% view as seen in Figure 2-14). We can correct this, and simplify localization and accessibility concerns later on, by drawing the text on a canvas element and using it as the placeholder.
• Auto-cropping the captured image to the size of the photo display area takes control away from users who might like to crop the image themselves. Furthermore, as we change views in the app, the image just gets scaled to the new size of the photo area without any concern for preserving aspect ratio. By keeping that aspect ratio in place, we can then allow the user to crop however they want and adapt well across different view sizes.
• By default, captured images are stored in the app’s temporary app data folder. It’d be better to move those images to local app data, or even to the Pictures library, so we could later add the ability to load a previously captured image (as we’ll do in Chapter 9 when we implement an app bar command for this purpose).
• Originally we used URL.createObjectURL directly on an image’s StorageFile. Because many images are somewhat larger than most displays, this can use more memory than is necessary. It’s better, for consumption scenarios, to use a thumbnail instead.
The sections that follow explore all these details and together produce the HereMyAm2b app in the companion content.
Note For the sake of simplicity, we’ll not separate strings (like the text for the canvas element) into a resource file as you typically want to do for localization. This gives us the opportunity in Chapter 19 to explore where such strings appear throughout an app and how to extract them. If you’re starting your own project now, however, you might want to read the section “World Readiness and Globalization” in Chapter 19 right away so you can properly structure your resources from the get-go.
Sidebar: Debug or Release?
Because JavaScript code is interpreted at run time instead of being compiled, it lacks conditional compilation directives like #ifdef that are commonly used in languages like C++ to provide separate code for Debug and Release builds. Fortunately, it’s not difficult to edit your project fileto detect the Visual Studio build target and then selectively copy a debug or release specific file into the resulting package. This helps you isolate target-specific variables and methods and avoid littering the rest of your code with a bunch of if statements. I explain the details of doing this on my blog, A reliable way to differentiate Debug and Release builds for JavaScript apps.
A similar question is whether you can write generic JavaScript code that could be used in a Windows Store app or a web application. A reasonable way to detect the run-time environment is to check for the existence of the MSApp object and one of its member functions. See my StackOverflow answer on Conditional statement to check for Win8 or iOS.
Receiving Messages from the iframe
Just as app code in the local context can use postMessage to send information to an iframe in the web context, the iframe can use postMessage to send information to the app. In our case, we want to know when the location of the pushpin has changed so that we can update lastPosition.
First, here’s a simple utility function I added to map.html to encapsulate the appropriate postMessage calls to the app from the iframe:
function notifyParent(event, args) {
//Add event name to the arguments object and stringify as the message
args["event"] = event;
window.parent.postMessage(JSON.stringify(args), "ms-appx://" + document.location.host);
}
This function basically takes an event name, adds it to an object containing parameters, stringifies the whole thing, and then posts it back to the parent.
To make a pushpin draggable, we simply add the draggable: true option when we create it in the pinLocation function (in map.html):
var pushpin = new Microsoft.Maps.Pushpin(location, { draggable: true });
When a pushpin is dragged, it raises a dragend event. We can wire up a handler for this in pinLocation just after the pushpin is created, which then calls notifyParent with a suitable event:
Microsoft.Maps.Events.addHandler(pushpin, "dragend", function (e) {
var location = e.entity.getLocation();
notifyParent("locationChanged",
{ latitude: location.latitude, longitude: location.longitude });
});
Back in default.js (the app), we add a listener for incoming messages inside app.onactivated:
window.addEventListener("message", processFrameEvent);
where the processFrameEvent handler looks at the event in the message and acts accordingly:
function processFrameEvent (message) {
//Verify data and origin (in this case the web context page)
if (!message.data || message.origin !== "ms-appx-web://" + document.location.host) {
return;
}
if (!message.data) {
return;
}
var eventObj = JSON.parse(message.data);
switch (eventObj.event) {
case"locationChanged":
lastPosition = { latitude: eventObj.latitude, longitude: eventObj.longitude };
break;
default:
break;
}
};
Clearly, this is more code than we’d need to handle a single message or event from an iframe, but I wanted to give you something that could be applied more generically in your own apps. In any case, these additions now allow you to drag the pin to update the location on the map and thus also the location shared through the Share charm.
Improving the Placeholder Image with a Canvas Element
Although our default placeholder image, /images/taphere.png, works well in a number of views, it gets inappropriately squashed or stretched in others. We could create multiple images to handle these cases, but that will bloat our app package and make our lives more complicated when we look at variations for pixel density (Chapter 3) along with contrast settings and localization (Chapter 19). To make a long story short, handling different pixel densities can introduce up to four variants of an image, contrast concerns can introduce four more variants, and localization introduces as many variants as the languages you support. So if, for example, we had three basic variants of this image and multiplied that with four pixel densities, four contrasts, and ten languages, we’d end up with 48 images per language or 480 across all languages! That’s too much to maintain, for one, and that many images will dramatically bloat the size of your app package (although the Windows Store manages resource packaging such that users download only what they need).
Fortunately, there’s an easy way to solve this problem across all variations, which is to just draw the text we need (for which we can adjust contrast and use a localized string later on) on a canvas element and then use the HTML blob API to display that canvas in an img element. Here’s a routine that does all of that, which we call within app.onready (to make sure document layout has happened):
function setPlaceholderImage() {
//Ignore if we have an image (shouldn't be called under such conditions)
if (lastCapture != null) {
return;
}
var photo = document.getElementById("photo");
var canvas = document.createElement("canvas");
canvas.width = photo.clientWidth;
canvas.height = photo.clientHeight;
var ctx = canvas.getContext("2d");
ctx.fillStyle = "#7f7f7f";
ctx.fillRect(0, 0, canvas.width, canvas.height);
ctx.fillStyle = "#ffffff";
//Use 75% height of the photoSection heading for the font
var fontSize = .75 *
document.getElementById("photoSection").querySelector("h2").clientHeight;
ctx.font = "normal " + fontSize + "px 'Arial'";
ctx.textAlign = "center";
ctx.fillText("Tap to capture photo", canvas.width / 2, canvas.height / 2);
var img = photo.querySelector("img");
//The blob should be released when the img.src is replaced
img.src = URL.createObjectURL(canvas.msToBlob(), { oneTimeOnly: true });
}u
Here we’re simply creating a canvas element that’s the same width and height as the photo display area, but we don’t attach it to the DOM (no need). We draw our text on it with a size that’s proportional to the photo section heading. Then we obtain a blob for the canvas using itsmsToBlob method, hand it to our friend URL.createObjectURL, and assign the result to the img.src. Voila!
Because the canvas element will be discarded once this function is done (that variable goes out of scope) and because we make a oneTimeOnly blob from it, we can call this function anytime the photo section is resized, which we can detect with the window.onresize event. We need to use this same event to handle image scaling, so let’s see how all that works next.
Handling Variable Image Sizes
If you’ve been building and playing with the app as we’ve described it so far, you might have noticed a few problems with the photo area besides the placeholder image. For one, if the resolution of the camera is not sufficient to provide a perfectly sized image as indicated by our cropping size, the captured image will be scaled to fit the photo area without concern for preserving the aspect ratio (see Figure 2-22, left side). Similarly, if we change views (or display resolution) after any image is captured, the photo area gets resized and the image is again scaled to fit, without always producing the best results (see Figure 2-22, right side).
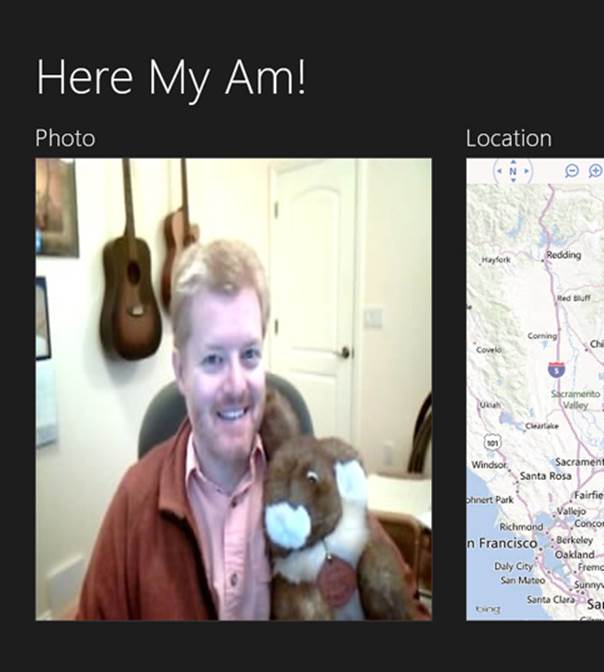

FIGURE 2-22Poor image scaling with a low-resolution picture from the camera where the captured image isn’t inherently large enough for the display area (left), and even worse results in the 50% view when the display area’s aspect ratio changes significantly.
To correct this, we’ll need to dynamically determine the largest image dimension we can use within the current display area and then scale the image to that size while preserving the aspect ratio and keeping the image centered in the display. For centering purposes, the easiest solution I’ve found to this is to create a surrounding div with a CSS grid wherein we can use row and column centering. So in default.html:
<div id="photo" class="graphic">
<img id="photoImg" src="#" alt="Tap to capture image from camera" role="img"/>
</div>
and in default.css:
#photo {
display: -ms-grid;
-ms-grid-columns: 1fr;
-ms-grid-rows: 1fr;
}
#photoImg {
-ms-grid-column-align: center;
-ms-grid-row-align: center;
}
The graphic style class on the div always scales to 100% width and height of its grid cell, so the one row and column within it will also occupy that full space. By adding the centering alignment to the photoImg child element, we know that the image will be centered regardless of its size.
To scale the image in this grid cell, then, we either set the image element’s width style to 100% if its aspect ratio is greater than that of the display area, or set its height style to 100% if the opposite is true. For example, on a 1366x768 display, the size of the display area in landscape view is 583x528 for an aspect ratio of 1.1, and let’s say we get an 800x600 image back from camera capture with an aspect ratio of 1.33. In this case the image is scaled to 100% of the display area width, making the displayed image 583x437 with blank areas on the top and bottom. Conversely, in 50% view the display area on the same screen is 612x249 with a ratio of 2.46, so we scale the 800x600 image to 100% height, which comes out to 332x249 with blank areas on the left and right.
The size of the display area is readily obtained through the clientWidth and clientHeight properties of the surrounding div we added to the HTML. The actual size of the captured image is then readily available through its StorageFile object’s properties.getImagePropertiesAsyncmethod. Putting all this together, here’s a function that sets the appropriate style on the img element given its parent div and the captured file:
function scaleImageToFit(imgElement, parentDiv, file) {
file.properties.getImagePropertiesAsync().done(function (props) {
var scaleToWidth =
(props.width / props.height > parentDiv.clientWidth / parentDiv.clientHeight);
imgElement.style.width = scaleToWidth ? "100%" : "";
imgElement.style.height = scaleToWidth ? "" : "100%";
}, function (e) {
console.log("getImageProperties error: " + e.message);
});
}
With this in place, we can simply call this in our existing capturePhoto function immediately after we assign a new image to the element:
img.src = URL.createObjectURL(capturedFile, { oneTimeOnly: true });
scaleImageToFit(img, photoDiv, capturedFile);
To handle view changes and anything else that will resize the display area, we can add a resize handler within app.onactivated:
window.addEventListener("resize", scalePhoto);
where the scalePhoto handler can call scaleImageToFit if we have a captured image or the setPlaceholderImage function we created in the previous section otherwise:
function scalePhoto() {
var photoImg = document.getElementById("photoImg");
//Make sure we have an img element
if (photoImg == null) {
return;
}
//If we have an image, scale it, otherwise regenerate the placeholder
if (lastCapture != null) {
scaleImageToFit(photoImg, document.getElementById("photo"), lastCapture);
} else {
setPlaceholderImage();
}
}
With such accommodations for scaling, we can also remove the line from capturePhoto that set captureUI.photoSettings.croppedSizeInPixels, thereby allowing us to crop the captured image however we like. Figure 2-23 shows these improved results.
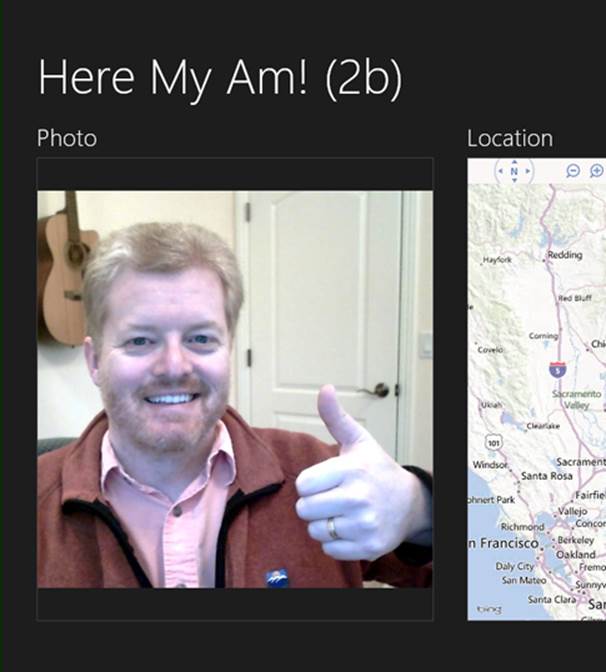
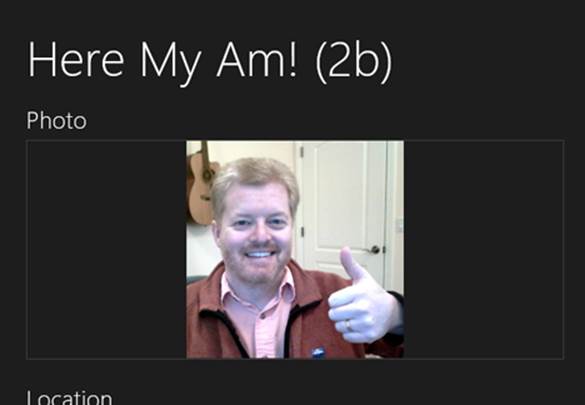
FIGURE 2-23Proper image scaling after making the improvements.
Moving the Captured Image to AppData (or the Pictures Library)
If you take a look in Here My Am! TempState folder within its appdata, you’ll see all the pictures you’ve taken with the camera capture UI. If you set a breakpoint in the debugger and look at capturedFile, you’ll see that it has an ugly file path likeC:\Users\kraigb\AppData\Local\Packages\ProgrammingWin-JS-CH2-HereMyAm2b_5xchamk3agtd6\TempState\picture001.png. Egads. Not the friendliest of locations, and definitely not one that we’d want a typical consumer to ever see!
Because we’ll want to allow the user to reload previous pictures later on (see Chapter 10), it’s a good idea to move these images into a more reliable location. Otherwise they could disappear at any time if the user runs the Disk Cleanup tool.
Tip For quick access to the appdata folders for your installed apps, type %localappdata%/packages into the path field of Windows Explorer or in the Run dialog (Windows+R key). Easier still, just make a shortcut on your desktop, Start screen, or task bar.
For the purposes of this exercise, we’ll move each captured image into a HereMyAm folder within our local appdata and also rename the file in the process to add a timestamp. In doing so, we can also briefly see how to use an ms-appdata:///local/ URI to directly refer to those images within the img.src attribute. (This protocol is described in URI schemes along with its roaming and temp variants, the ms-appx protocol for in-package contents, and the ms-resource protocol for resources, as described in Chapter 19.) I say “briefly” here because in the next section we’ll change this code to use a thumbnail instead of the full image file.
To move the file, we can use its built-in StorageFile.copyAsync method, which requires a target StorageFolder object and a new name, and then delete the temp file with its deleteAsync method.
The target folder is obtained from Windows.Storage.ApplicationData.current.localFolder. The only real trick to all of this is that we have to chain together multiple async operations. We’ll discuss this in more detail in Chapter 3, but the way you do this is to have each completed handler in the chain return the promise from the next async operation in the sequence, and to use then for each step except for the last, when we use done. The advantage to this is that we can throw any exceptions along the way and they’ll be picked up in the error handler given to done. Here’s how it looks in a modified capturePhoto function:
var img = photoDiv.querySelector("img");
var capturedFile;
captureUI.captureFileAsync(Windows.Media.Capture.CameraCaptureUIMode.photo)
.then(function (capturedFileTemp) {
if (!capturedFileTemp) { throw ("no file captured"); }
capturedFile = capturedFileTemp;
//Open the HereMyAm folder, creating it if necessary
var local = Windows.Storage.ApplicationData.current.localFolder;
returnlocal.createFolderAsync("HereMyAm",
Windows.Storage.CreationCollisionOption.openIfExists);
//Note: the results from the returned promise are fed into the
//completed handler given to the next then in the chain.
})
.then(function (myFolder) {
//Again, check validity of the result
if (!myFolder) { throw ("could not create local appdata folder"); }
//Append file creation time to the filename (should avoid collisions,
//but need to convert colons)
var newName = " Capture - " +
capturedFile.dateCreated.toString().replace(/:/g, "-") + capturedFile.fileType;
//Make the copy
returncapturedFile.copyAsync(myFolder, newName);
})
.then(function (newFile) {
if (!newFile) { throw ("could not copy file"); }
lastCapture = newFile; //Save for Share
img.src = "ms-appdata:///local/HereMyAm/" + newFile.name;
//newFile.name includes extension
scaleImageToFit(img, photoDiv, newFile);
//Delete the temporary file
returncapturedFile.deleteAsync();
})
//No completed handler needed for the last operation
.done(null, function (error) {
console.log("Unable to invoke capture UI:" + error.message);
});
This might look a little complicated to you at this point, but trust me, you’ll quickly become accustomed to this structure when dealing with multiple async operations. If you can look past all the syntactical ceremony here and simply follow the words Async and then, you can see that the sequence of operations is simply this:
• Capture an image from the camera capture UI, resulting in a temp file, then…
• Create or open the HereMyAm folder in local appdata, resulting in a folder object, then…
• Copy the captured file to that folder, resulting in a new file, then…
• Delete the temp file, which has no results, and we’re done.
To help you follow the chain, I’ve use different colors in the code above to highlight each set of async calls and their associated then methods and results, along with a final call to done. What works very well about this chaining structure—which is much cleaner than trying to nest operations within each completed handler—is that any exceptions that occur, whether from WinRT or a direct throw, are shunted to the one error handler at the end, so we don’t need separate error handlers for every operation (although you can if you want).
Finally, by changing two lines of this code and—very importantly—declaring the Pictures library capability in the manifest, you can move the files to the Pictures library instead. Just change the line to obtain localFolder to this instead:
var local = Windows.Storage.KnownFolders.picturesLibrary;
and use URL.createObjectUrl with the img element instead of the ms-appdata URI:
img.src = URL.createObjectURL(newFile, {oneTimeOnly: true});
as there isn’t a URI scheme for the pictures library. Of course, the line above works just fine for a file in local appdata, but I wanted to give you an introduction to the ms-appdata:// protocol. Again, we’ll be removing this line in the next section, so in the example code you’ll only see it in comments.
Using a Thumbnail Instead of the Full Image
As we’ll learn in Chapter 11, “The Story of State, Part 2,” most image consumption scenarios never need to load an entire image file into memory. Images from digital cameras, for example, are often much larger than most displays, so the image will almost always be scaled down even when shown full screen. Unless you’re showing the zoomed-in image or providing editing features, then, it’s more memory efficient to use thumbnails for image display rather than just passing a StorageFile straight to URL.createObjectURL. This is especially true when loading many images into a collection control.
To obtain a thumbnail, use either StorageFile.getThumbnailAsync or StorageFile.getScaled-ImageAsThumbnailAsync, where the former always relies on the thumbnail cache whereas the latter will use the full image as a fallback. For the purposes of Here My Am!, we’ll want to use the latter. First we need to remove the img.src assignment inside capturePhoto, then have the scaleImageToFit function load up the thumbnail:
function scaleImageToFit(imgElement, parentDiv, file) {
file.properties.getImagePropertiesAsync().done(function (props) {
var requestedSize;
var scaleToWidth =
(props.width / props.height > parentDiv.clientWidth / parentDiv.clientHeight);
if (scaleToWidth) {
imgElement.style.width = "100%";
imgElement.style.height = "";
requestedSize = parentDiv.clientWidth;
} else {
imgElement.style.width = "";
imgElement.style.height = "100%";
requestedSize = parentDiv.clientHeight;
}
//Using a thumbnail is always more memory efficient unless you really need all the
//pixels in the image file.
//Align the thumbnail request to known caching sizes (for non-square aspects).
if (requestedSize > 532) { requestedSize = 1026; }
else { if (requestedSize > 342) { requestedSize = 532; }
else { requestedSize = 342; }}
file.getScaledImageAsThumbnailAsync(
Windows.Storage.FileProperties.ThumbnailMode.singleItem, requestedSize)
.done(function (thumb) {
imgElement.src = URL.createObjectURL(thumb, { oneTimeOnly: true });
});
}
}
As we’ll see in Chapter 11, the ThumbnailMode.singleItem argument to getScaledImageAs-ThumbnailAsync is the best mode for loading a larger image, and the second argument specifies the requested size, which works best when aligned to known cache sizes (190, 266, 342, 532, and 1026 for non-square aspects). The resulting thumbnail of this operation is conveniently something you can again pass directly to URL.createObjectURL, but ensures that we load only as much image data as we need for our UI.
With that, we’ve completed our improvements to Here My Am!, which you can again find in the HereMyAm2b example with this chapter’s companion content. And I think you can guess that this is only the beginning: we’ll be adding many more features to this app as we progress through this book!
The Other Templates: Projects and Items
In this chapter we’ve worked with only the Blank App template so that we could understand the basics of writing a Windows Store app without any other distractions. In Chapter 3, we’ll look more deeply at the anatomy of apps through a few of the other templates, yet we won’t cover them all. To close this chapter, then, here’s a short introduction to these handy tools to get you started on your own projects.
Navigation App Template
“A project for a Windows Store app that has predefined controls for navigation.” (Blend/Visual Studio description)
The Navigation template builds on the Blank template by adding support for “page” navigation, where the pages in question are more sections of content than distinct pages like we know on the Web. As discussed in Chapter 1, Windows Store apps written in JavaScript are best implemented by having a single HTML page container into which other pages are dynamically loaded. This allows for smooth transitions (as well as animations) between those pages and preserves the script context. Many web apps, in fact, use this single-page approach.
The Navigation template, and the others that remain, employ a Page Navigator control that facilitates loading (and unloading) pages in this way. You need only create a relatively simple structure to describe each page and its behavior. We’ll see this in—you guessed it—Chapter 3.
In this model, default.html is little more than a simple container, with everything else in the app coming through subsidiary pages. The Navigation template creates only one subsidiary page, yet it establishes the framework for how to work with multiple pages. Additional pages are easily added to a project through a page item template (right click a folder in your project in Visual Studio and select Add > New Item > Page Control).
Grid App Template
“A three-page project for a Windows Store app that navigates among grouped items arranged in a grid. Dedicated pages display group and item details.” (Blend/Visual Studio description)
Building on the Navigation template, the Grid template provides the basis for apps that will navigate collections of data across multiple pages. The home page shows grouped items within the collection, from which you can then navigate into the details of an item or into the details of a group and its items (from which you can then go into individual item details as well).
In addition to the navigation, the Grid template also shows how to manage collections of data through the WinJS.Binding.List class, a topic we’ll explore much further in Chapter 7, “Collection Controls.” It also provides the structure for an app bar and shows how to simplify the app’s behavior in narrow views.
The name of the template, by the way, derives from the particular grid layout used to display the collection, not from the CSS grid.
Hub App Template
“A three-page project for a Windows Store app that implements the hub navigation pattern by using a hub control on the first page and provides two dedicated pages for displaying group and item details.” (Blend/Visual Studio description)
Functionally similar to a Grid Template app, the Hub template uses the WinJS Hub control for a home page with heterogeneous content (that is, where multiple collections could be involved). From there the app navigates to group and item pages. We’ll learn about the Hub control inChapter 8.
Split Template
“A two-page project for a Windows Store app that navigates among grouped items. The first page allows group selection while the second displays an item list alongside details for the selected item.” (Blend/Visual Studio description)
This last template also builds on the Navigation template and works over a collection of data. Its home page displays a list of groups, rather than grouped items as with the Grid template. Tapping a group navigates to a group detail page that is split into two sides (hence the template name). The left side contains a vertical list of items; the right side shows details for the currently selected item.
Like the Grid template, the Split template provides an app bar structure and handles different views intelligently. That is, because vertically oriented views don’t lend well to splitting the display horizontally, the template shows how to switch to a page navigation model within those views to accomplish the same ends.
Item Templates
In addition to the project templates described above, there are a number of item templates that you can use to add new files of particular types to a project, or add groups of files for specific features. Once a project is created, right-click the folder in which you want to create the item in question (or the project file to create something at the root), and select Add > New item. This will present you with a dialog of available item templates, as shown in Figure 2-24 for features specific to Store apps. We’ll encounter more of these throughout this book.
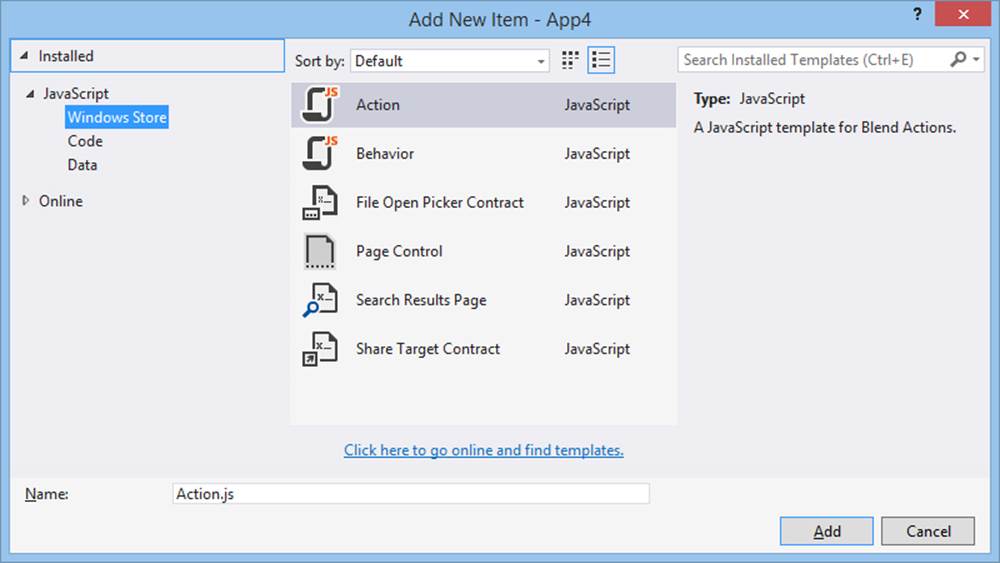
FIGURE 2-24Available item templates for a Windows Store app written in JavaScript.
What We’ve Just Learned
• How to create a new Windows Store app from the Blank app template.
• How to run an app inside the local debugger and within the simulator, as well as the role of remote machine debugging.
• The features of the simulator that include the ability to simulate touch, set views, and change resolutions and pixel densities.
• The basic project structure for Windows Store apps, including WinJS references.
• The core activation structure for an app through the WinJS.Application.onactivated event.
• The role and utility of design wireframes in app development, including the importance of designing for all views, where the work is really a matter of element visibility and layout.
• The power of Blend for Visual Studio to quickly and efficiently add styling to an app’s markup. Blend also makes a great CSS debugging tool.
• How to safely use web content (such as Bing maps) within a web context iframe and communicate between that page and the local context app by using the postMessage method.
• How to use the WinRT APIs, especially async methods involving promises such as geolocation and camera capture. Async operations return a promise to which you provide a completed handler (and optional error and progress handlers) to the promise’s then or done method.
• Manifest capabilities determine whether an app can use certain WinRT APIs. Exceptions will result if an app attempts to use an API without declaring the associated capability.
• How to share data through the Share contract by responding to the datarequested event.
• How to handle sequential async operations through chained promises.
• How to move files on the file system and work with basic appdata folders.
• The kinds of apps supported through the other app templates: Navigation, Grid, Hub, and Split.
8 For debugging the app and Visual Studio side by side on a single monitor, check out the utility called ModernMix from Stardock that allows you to run Windows Store apps in separate windows on the desktop.
9 There is a similar function WinJS.Binding.processAllthat processes data-win-bindattributes (Chapter 6), and WinJS.Resources.processAllthat does resource lookup on data-win-resattributes (Chapter 19).
10 See Chapter 2 of Nicolas Zakas’s High Performance JavaScript (O’Reilly, 2010) for the performance implications of scoping. More on modules can be found in Chapter 5 of JavaScript Patterns by Stoyan Stefanov (O’Reilly, 2010) and Chapter 7 of Eloquent JavaScript by Marijn Haverbeke (No Starch Press, 2011).
11 If you’re following the steps in Blend yourself, the taphere.png image should be added to the project in the images folder. Right-click that folder, select Add Existing Item, and then navigate to the complete sample’s images folder and select taphere.png. That will copy it into your current project. Note, though, that we’ll do away with this later in this chapter.
12 The two standard stylesheets are ui-dark.cssand ui-light.css. Dark styles are recommended for apps that deal with media, where a dark background helps bring out the graphical elements. We’ll use this stylesheet because we’re doing photo capture. The light stylesheet is recommended for apps that work more with textual content.
13 On the flip side, note that Blend doesn’t automatically save files going in and out of Interactive Mode. Be aware, then, if you make a change to the same file open in Visual Studio, switch to Blend, and reload the file, you will lose changes.
14 Be mindful when using the Bing Maps control that every instance you create is a “billable transaction” that counts against your daily limit depending on your license key. For this reason, avoid creating and destroying map controls across page navigation, as I explain on my blog post, Minimizing billable transactions with Bing Maps.
15 Because we’re always listening to datarequested while the app is running and add a listener only once, we don’t need to worry about calling removeEventListener. For details, see “WinRT Events and removeEventListener” in Chapter 3.
All materials on the site are licensed Creative Commons Attribution-Sharealike 3.0 Unported CC BY-SA 3.0 & GNU Free Documentation License (GFDL)
If you are the copyright holder of any material contained on our site and intend to remove it, please contact our site administrator for approval.
© 2016-2026 All site design rights belong to S.Y.A.