Programming Windows Store Apps with HTML CSS and JavaSript(2014)
Chapter 3
App Anatomy and Performance Fundamentals
During the early stages of writing this book (the first edition, at least), I was working closely with a contractor to build a house for my family. Although I wasn’t on site every day managing the effort, I was certainly involved in nearly all decision-making throughout the home’s many phases, and I occasionally participated in the construction itself.
In the Sierra Nevada foothills of California, where I live, the frame of a house is built with the plentiful local wood, and all the plumbing and wiring has to be in the walls before installing insulation and wallboard (aka sheetrock). It amazed me how long it took to complete that infrastructure. The builders spent a lot of time adding little blocks of wood here and there to make it much easier for them to do the finish work later on (like hanging cabinets), and lots of time getting the wiring and plumbing put together properly. All of this disappeared from sight once the wallboard went up and the finish work was in place.
But then, imagine what a house would be like without such careful attention to structural details. Imagine having some light switches that just don’t work or control the wrong fixtures. Imagine if the plumbing leaks inside the walls. Imagine if cabinets and trim start falling off the walls a week or two after moving into the house. Even if the house manages to pass final inspection, such flaws would make it almost unlivable, no matter how beautiful it might appear at first sight. It would be like a few of the designs of the famous architect Frank Lloyd Wright: very interesting architecturally and aesthetically pleasing, yet thoroughly uncomfortable to actually live in.
Apps are very much the same story—I’ve marveled, in fact, just how many similarities exist between the two endeavors! An app might be visually beautiful, even stunning, but once you start using it day to day (or even minute to minute), a lack of attention to the fundamentals will become painfully apparent. As a result, your customers will probably start looking for somewhere else to live, meaning someone else’s app! Another similarity is that taking care of core problems early on is always less expensive and time-consuming than addressing them after the fact, as anyone who has remodeled a house will know! This is especially true of performance issues in apps—trying to refactor an app at the end of a project to improve the user experience is like adding plumbing and wiring to a house after all the interior surfaces (walls, floors, windows, and ceilings) walls have been covered and painted.
This chapter, then, is about those fundamentals: the core foundational structure of an app upon which you can build something that looks beautiful and really works well. This takes us first into the subject of app activation (how apps get running and get running quickly) and then app lifecycle transitions (how they are suspended, resumed, and terminated). We’ll then look at page navigation within an app, working with promises, async debugging, and making use of various profiling tools. One subject that we won’t talk about here are background tasks; we’ll see those inChapter 16, “Alive with Activity,” because there are limits to their use and they are best discussed in the context of the lock screen.
Generally speaking, these anatomical concerns apply strictly to the app itself and its existence on a client device. Chapter 4, “Web Content and Services,” expands this story to include how apps reach out beyond the device to consume web-based content and employ web APIs and other services. In that context we’ll look at additional characteristics of the hosted environment that we first encountered in Chapter 2, “Quickstart,” such as the local and web contexts, basic network connectivity, and authentication. We’ll pick up a few other platform fundamentals, like input, in later chapters.
Let me offer you advance warning that this chapter and the next are more intricate than most others because they specifically deal with the software equivalents of framing, plumbing, and wiring. With my family’s house, I can completely attest that installing the lovely light fixtures my wife picked out seemed, in those moments, much more satisfying than the framing work I’d done months earlier. But now, actually living in the house, I have a deep appreciation for all the nonglamorous work that went into it. It’s a place I want to be, a place in which my family and I are delighted, in fact, to spend the majority of our lives. And is that not how you want your customers to feel about your apps? Absolutely! Knowing the delight that a well-architected app can bring to your customers, let’s dive in and find our own delight in exploring the intricacies!
App Activation
One of the most important things to understand about any app is how it goes from being a package on disk to something that’s up and running and interacting with users. Such activation can happen a variety of ways: through tiles on the Start screen or the desktop task bar, toast notifications, and various contracts, including Search, Share, and file type and URI scheme associations. Windows might also pre-launch the user’s most frequently used apps (not visibly, of course), after updates and system restarts. In all these activation cases, you’ll be writing plenty of code to initialize your data structures, acquire content, reload previously saved state, and do whatever else is necessary to establish a great experience for the human beings on the other side of the screen.
Tip Pay special attention to what I call the first experience of your app, which starts with your app’s page in the Store, continues through download and installation (meaning: pay attention to the size of your package), and finished up through first launch and initialization that brings the user to your app’s home page. When a user taps an Install button in the Store, he or she clearly wants to try your app, so streamlining the path to interactivity is well worth the effort.
Branding Your App 101: The Splash Screen and Other Visuals
With activation, we first need to take a step back even before the app host gets loaded, to the very moment a user taps your tile on the Start screen or when your app is launched some other way (except for pre-launching). At that moment, before any app-specific code is loaded or run, Windows displays your app’s splash screen image against your chosen background color, both of which you specify in your manifest.
The splash screen shows for at least 0.75 seconds (so that it’s never just a flash even if the app loads quickly) and accomplishes two things. First, it guarantees that somethingshows up when an app is activated, even if no app code loads successfully. Second, it gives users an interesting branded experience for the app—that is, your image—which is better than a generic hourglass. (So don’t, as one popular app I know does, put a generic hour class in your splash screen image!) Indeed, your splash screen and your app tile are the two most important ways to uniquely brand your app. Make sure you and your graphic artist(s) give full attention to these. (For further guidance, see Guidelines and checklist for splash screens.)
The default splash screen occupies the whole view where the app is being launched (in whatever view state), so it’s a much more directly engaging experience for your users. During this time, an instance of the app host gets launched to load, parse, and render your HTML/CSS, and load, parse, and execute your JavaScript, firing events along the way, as we’ll see in the next section. When the app’s first page is ready, the system removes the splash screen.16
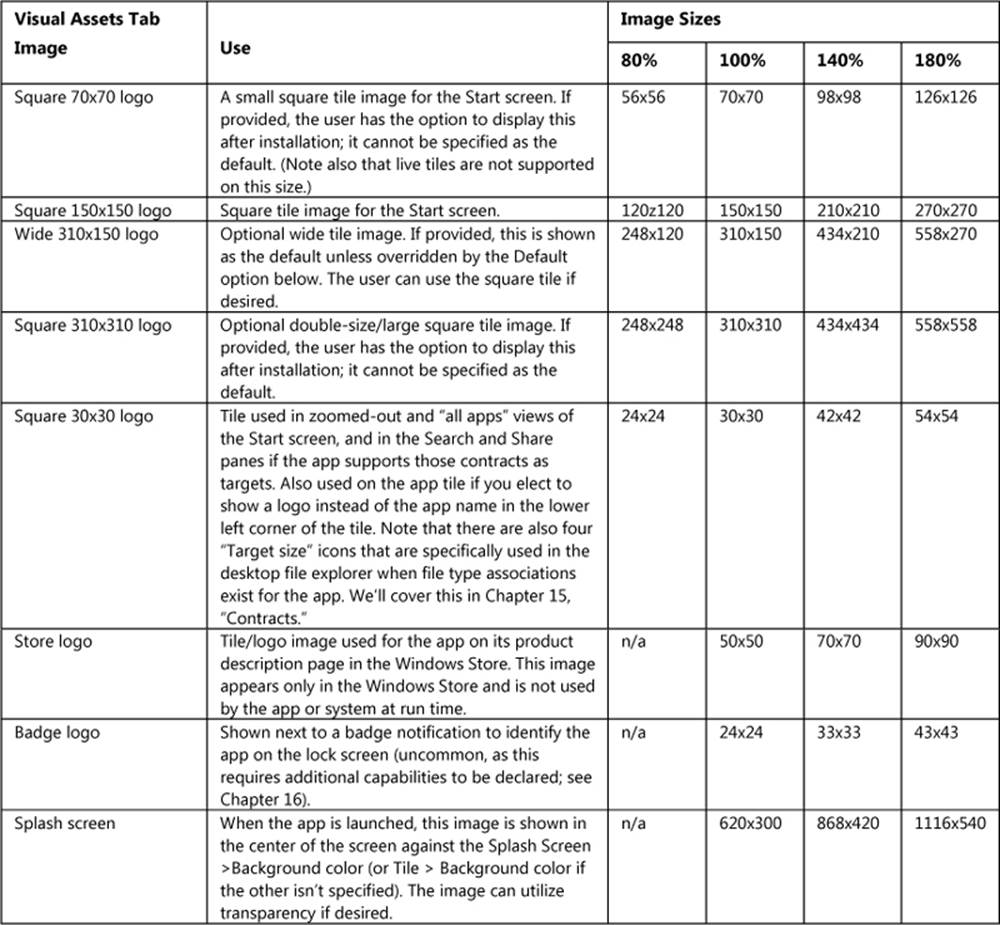
Additional settings and graphics in the manifest also affect your branding and overall presence in the system, as shown in the tables on the next page. Be especially aware that the Visual Studio and Blend templates provide some default and thoroughly unattractive placeholder graphics. Take a solemn vow right now that you truly, truly, cross-your-heart will not upload an app to the Windows Store with these defaults graphics still in place! (The Windows Store will reject your app if you forget, delaying certification.)
In the second table, you can see that it lists multiple sizes for various images specified in the manifest to accommodate varying pixel densities: 100%, 140%, and 180% scale factors, and even a few at 80% (don’t neglect the latter: they are typically used for most desktop monitors and can be used when you turn on Show More Tiles on the Start screen’s settings pane). Although you can just provide a single 100% scale image for each of these, it’s almost guaranteed that stretching that graphics for higher pixel densities will look bad. Why not make your app look its best? Take the time to create each individual graphic consciously.
![]()
The Visual Assets tab in the editor shows you which scale images you have in your package, as shown in Figure 3-1. To see all visual elements at once, select All Image Assets in the left-hand list.
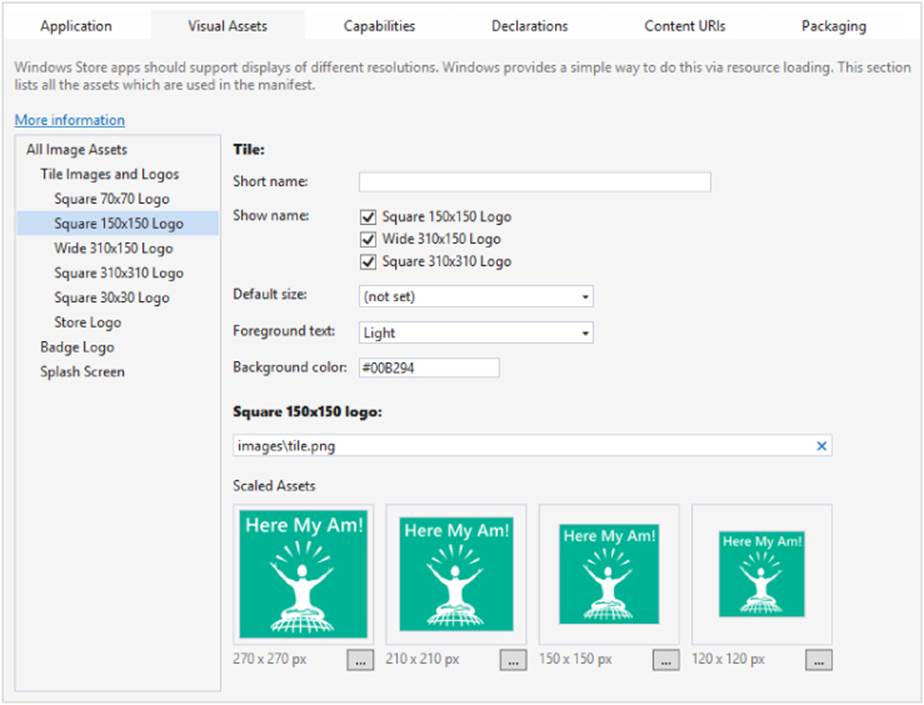
FIGURE 3-1 Visual Studio’s Visual Assets tab of the manifest editor. It automatically detects whether a scaled asset exists for the base filename (such as images\tile.png).
In the table, note that 80% scale tile graphics are used in specific cases like low DPI modes (generally when the DPI is less than 130 and the resolution is less than 2560 x 1440) and should be provided with other scaled images. When you upload your app to the Windows Store, you’ll also need to provide some additional graphics. See the App images topic in the docs under “Promotional images” for full details.
The combination of small, square, wide, and large square tiles allows the user to arrange the start screen however they like. For example:
Of course, it’s not required that your app supports anything other than the 150x150 square tile; all others are optional. In that case Windows will scale your 150x150 tile down to the 70x70 small size to give users at least that option.
When saving scaled image files, append .scale-80, .scale-100, .scale-140, and .scale-180 to the filenames, before the file extension, as in splashscreen.scale-140.png (and be sure to remove any file that doesn’t have a suffix). This allows you, both in the manifest and elsewhere in the app, to refer to an image with just the base name, such as splashscreen.png, and Windows will automatically load the appropriate variant for the current scale. Otherwise it looks for one without the suffix. No code needed! This is demonstrated in the HereMyAm3a example, where I’ve added all the various branded graphics (with some additional text in each graphic to show the scale). With all of these graphics, you’ll see the different scales show up in the manifest editor, as shown in Figure 3-1 above.
To test these different graphics, use the set resolution/scaling button in the Visual Studio simulator—refer to Figure 2-5 in Chapter 2—or the Device tab in Blend, to choose different pixel densities on a 10.6” screen (1366 x 768 =100%, 1920 x 1080 = 140%, and 2560 x 1440 = 180%), or the 7” or 7.5” screens (both use 140%). You’ll also see the 80% scale used on the other display choices, including the 23” and 27” settings. In all cases, the setting affects which images are used on the Start screen and the splash screen, but note that you might need to exit and restart the simulator to see the new scaling take effect.
One thing you might notice is that full-color photographic images don’t scale down very well to the smallest sizes (store logo and small logo). This is one reason why Windows Store apps often use simple logos, which also keeps them smaller when compressed. This is an excellent consideration to keep your package size smaller when you make more versions for different contrasts and languages. We’ll see more on this in Chapter 19, “Apps for Everyone, Part 1” and Chapter 20, “Apps for Everyone, Part 2.”
Package bloat? As mentioned already in Chapters 1 and 2, the multiplicity of raster images that you need to create to accommodate scales, contrasts, and languages will certainly increase the size of the package you upload to the Store. (There are 104 possible variants per language of the manifest image assets alone!) Fortunately, the default packaging model for Windows 8.1 structures your resources into separate packs that are downloaded only as a user needs them, as we’ll discuss in Chapters 19 and 20. In short, although the package you upload will contain all possible resources for all markets where your app will be available, most if not all users will be downloading a much smaller subset. That said, it’s also good to consider the differences between file formats like JPEG, GIF, and PNG to get the most out of your pixels. For a good discussion, see PNG vs. GIF vs. JPEG on StackOverflow.
Tip Three other branding-related resources you might be interested in are the Branding your Windows Store app topic in the documentation (covering design aspects) the CSS styling and branding your app sample (covering CSS variations and dynamically changing the active stylesheet), and the very useful Applying app theme color (theme roller) sample (which lets you configure a color theme, showing its effect on controls, and which generates the necessary CSS).
Activation Event Sequence
As the app host is built on the same parsing and rendering engines as Internet Explorer, the general sequence of activation events is more or less what a web application sees in a browser. Actually, it’s more rather than less! Here’s what happens so far as Windows is concerned when an app is launched (refer to the ActivationEvents example in the companion code to see this event sequence as well as the related WinJS events that we’ll discuss a little later):
1. Windows displays the default splash screen using information from the app manifest (except for pre-launching).
2. Windows launches the app host, identifying the app’s installation folder and the name of the app’s Start Page (an HTML file) as indicated in the Application tab of the manifest editor.17
3. The app host loads that page’s HTML, which in turn loads referenced stylesheets and script (deferring script loading if indicated in the markup with the defer attribute). Here it’s important that all files are properly encoded for best startup performance. (See the sidebar on the next page.)
4. document.DOMContentLoaded fires. You can use this to do early initialization specifically related to the DOM, if desired. This is also the place to perform one-time initialization work that should not be done if the app is activated on multiple occasions during its lifetime.
5. window.onload fires. This generally means that document layout is complete and elements will reflect their actual dimensions. (Note: In Windows 8 this event occurs at the end of this list instead.)
6. Windows.UI.WebUI.WebUIApplication.onactivatedfires. This is typically where you’ll do all your startup work, instantiate WinJS and custom controls, initialize state, and so on.
Once the activated event handler returns, the default splash screen is dismissed unless the app has requested a deferral, as discussed later in the “Activation Deferrals and setPromise” section.With the latter four events, your app’s handling of these very much determines how quickly it comes up and becomes interactive. It almost goes without saying that you should strive to optimize that process, a subject we’ll return to a little later in “Optimizing Startup Time.”
What’s also different between an app and a website is that an app can again be activated for many different purposes, such as contracts and associations, even while it’s already running. As we’ll see in later chapters, the specific page that gets loaded (step 3) can vary by contract, and if a particular page is already running it will receive only the Windows.UI.WebUI.WebUIApplication.onactivated event and not the others.
For the time being, though, let’s concentrate on how we work with this core launch process, and because you’ll generally do your initialization work within the activated event, let’s examine that structure more closely.
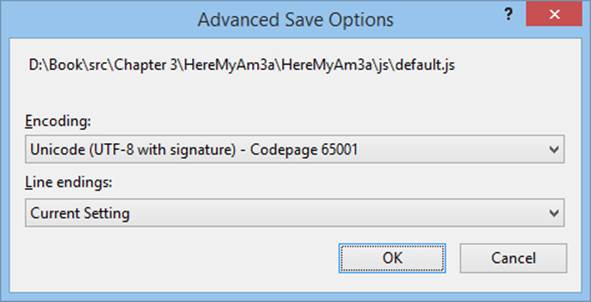
Sidebar: File Encoding for Best Startup Performance
To optimize bytecode generation when parsing HTML, CSS, and JavaScript, which speeds app launch time, the Windows Store requires that all .html, .css, and .js files are saved with Unicode UTF-8 encoding. This is the default for all files created in Visual Studio or Blend. If you’re importing assets from other sources including third-party libraries, check this encoding: in Visual Studio’s File Save As dialog (Blend doesn’t have a Save As feature), select Save with Encoding and set that to Unicode (UTF-8 with signature) – Codepage 65001. The Windows App Certification Kit will issue warnings if it encounters files without this encoding.
Along these same lines, minification of JavaScript isn’t particularly important for Windows Store apps. Because an app package is downloaded from the Windows Store as a unit and often contains other assets that are much larger than your code files, minification won’t make much difference there. Once the package is installed, bytecode generation means that the package’s JavaScript has already been processed and optimized, so minification won’t have any additional performance impact. If your intent is to obfuscate your code (because it is just there in source form in the installation folder), see “Protecting Your Code” in Chapter 18, “WinRT Components.”
Activation Code Paths
As we saw in Chapter 2, new projects created in Visual Studio or Blend give you the following code in js/default.js (a few comments have been removed):
(function () {
"use strict";
var app = WinJS.Application;
var activation = Windows.ApplicationModel.Activation;
app.onactivated = function (args) {
if (args.detail.kind === activation.ActivationKind.launch) {
if (args.detail.previousExecutionState !==
activation.ApplicationExecutionState.terminated) {
// TODO: This application has been newly launched. Initialize
// your application here.
} else {
// TODO: This application has been reactivated from suspension.
// Restore application state here.
}
args.setPromise(WinJS.UI.processAll());
}
};
app.oncheckpoint = function (args) {
};
app.start();
})();
Let’s go through this piece by piece to review what we already learned and complete our understanding of this core code structure:
• (function () { … })(); surrounding everything is again the JavaScript module pattern.
• "use strict"instructs the JavaScript interpreter to apply Strict Mode, a feature of ECMAScript 5. This checks for sloppy programming practices like using implicitly declared variables, so it’s a good idea to leave it in place.
• var app = WinJS.Application; and var activation = Windows.ApplicationModel.Activation; both create substantially shortened aliases for commonly used namespaces. This is a common practice to simplify multiple references to the same part of WinJS or WinRT, and it also provides a small performance gain.
• app.onactivated = function (args) {…} assigns a handler for the WinJS.UI.onactivated event, which is a wrapper for Windows.UI.WebUI.WebUIApplication.onactivated(but will be fired after window.onload). In this handler:
• args.detail.kind identifies the type of activation.
• args.detail.previousExecutionState identifies the state of the app prior to this activation, which determines whether to reload session state.
• WinJS.UI.processAll instantiates WinJS controls—that is, elements that contain a data-win-control attribute, as we’ll cover in Chapter 5, “Controls and Control Styling.”
• args.setPromiseinstructs Windows to wait until WinJS.UI.processAll is complete before removing the splash screen. (See “Activation Deferrals and setPromise” later in this chapter.)
• app.oncheckpoint, which is assigned an empty function, is something we’ll cover in the “App Lifecycle Transition Events” section later in this chapter.
• app.start() (WinJS.Application.start()) initiates processing of events that WinJS queues during startup.
Notice how we’re not directly handling any of the events that Windows or the app host is firing, like DOMContentLoaded or Windows.UI.WebUI.WebUIApplication.onactivated. Are we just ignoring those events? Not at all: one of the convenient services that WinJS offers throughWinJS.UI.Application is a simplified structure for activation and other app lifetime events. Its use is entirely optional but very helpful.
With its start method, for example, a couple of things are happening. First, the WinJS.-Application object listens for a variety of events that come from different sources (the DOM, WinRT, etc.) and coalesces them into a single object with which you register your handlers. Second, when WinJS.Application receives activation events, it doesn’t just pass them on to the app’s handlers immediately, because your handlers might not, in fact, have been set up yet. So it queues those events until the app says it’s really ready by calling start. At that point WinJS goes through the queue and fires those events. That’s all there is to it.
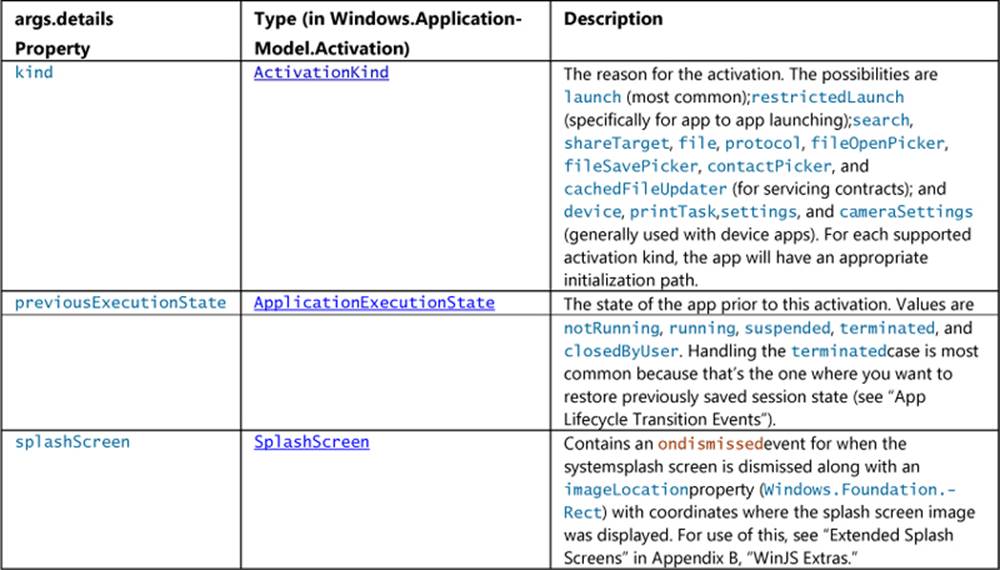
As the template code shows, apps typically do most of their initialization work within the WinJS activated event, where there are a number of potential code paths depending on the values in args.details (an IActivatedEventArgs object). If you look at the documentation for activated, you’ll see that the exact contents of args.details depends on specific activation kind. All activations, however, share some common properties:
Additional properties provide relevant data for the activation. For example, launch provides the tileId and argumentsfrom secondary tiles (see Chapter 16). Thesearch kind (the next most commonly used) provides queryText and language, the protocol kind provides a uri, and so on. We’ll see how to use many of these in their proper contexts, and sometimes they apply to altogether different pages than default.html. What’s contained in the templates (and what we’ve already used for an app like Here My Am!) is primarily to handle normal startup from the app tile or when launched within Visual Studio’s debugger.
WinJS.Application Events
WinJS.Application isn’t concerned only with activation—its purpose is to centralize events from several different sources and turn them into events of its own. Again, this enables the app to listen to events from a single source (either assigning handlers via addEventListener(<event>) oron<event> properties; both are supported). Here’s the full rundown on those events and when they’re fired (if queued, the event is fired within your call to WinJS.Application.start):
• loaded Queued for DOMContentLoaded in both local and web contexts.18 This is fired before activated.
• activated Queued in the local context for Windows.UI.WebUI.WebUIApplication.-onactivated (which fires afterwindow.onload). In the web context, where WinRT is not applicable, this is instead queued for DOMContentLoaded (where the launch kind will be launch andpreviousExecutionState is set to notRunning).
• ready Queued after loaded and activated. This is the last one in the activation sequence.
• error Fired if there’s an exception in dispatching another event. (If the error is not handled here, it’s passed onto window.onerror.)
• checkpoint Fired when the app should save the session state it needs to restart from a previous state of terminated. It’s fired in response to both the document’s beforeunloadevent as well as Windows.UI.WebUI.WebUIApplication.onsuspending.
• unload Also fired for beforeunload after the checkpoint event is fired.
• settings Fired in response to Windows.UI.ApplicationSettings.SettingsPane.-oncommandsrequested. (See Chapter 10, “The Story of State, Part 1.”)
I think you’ll generally find WinJS.Application to be a useful tool in your apps, and it also provides a few more features as documented on the WinJS.Application page. For example, it provides local, temp, roaming, and sessionState properties, which are helpful for managing state. We saw a little of local already in Chapter 2; we’ll see more later on in Chapter 10.
The other bits are the queueEvent and stop methods. The queueEvent method drops an event into the queue that will get dispatched, after any existing queue is clear, to whatever listeners you’ve set up on the WinJS.Applicationobject. Events are simply identified with a string, so you can queue an event with any name you like, and call WinJS.Application.addEventListener with that same name anywhere else in the app. This makes it easy to centralize custom events that you might invoke both during startup and at other points during execution without creating a separate global function for that purpose. It’s also a powerful means through which separately defined, independent components can raise events that get aggregated into a single handler. (For an example of using queueEvent, see scenario 2 of the App model sample.)
As for stop, this is provided to help with unit testing so that you can simulate different activation sequences without having to relaunch the app and somehow recreate a set of specific conditions when it restarts. When you call stop, WinJS removes its listeners, clears any existing event queue, and clears the sessionState object, but the app continues to run. You can then call queueEvent to populate the queue with whatever events you like and then call start again to process that queue. This process can be repeated as many times as needed.
Activation Deferrals and setPromise
As noted earlier under “Activation Event Sequence,” once you return from your handler for WebUIApplication.onactivated(or WinJS.Application.onactivated), Windows assumes that your home page is ready and that it can dismiss the default splash screen. The same is true forWebUIApplication.onsuspending(and by extension, WinJS.Application.oncheckpoint): Windows assumes that it can suspend the app once the handler returns. More generally, WinJS.Application assumes that it can process the next event in the queue once you return from the current event.
This gets tricky if your handler needs to perform one or more async operations, like an HTTP request, whose responses are essential for your home page. Because those operations are running on other threads, you’ll end up returning from your handler while the operations are still pending, which could cause your home page to show before its ready or the app to be suspended before it’s finished saving state. Not quite what you want to have happen! (You can, of course, make other secondary requests, in which case it’s fine for them to complete after the home page is up—always avoid blocking the home page for nonessentials.)
For this reason, you need a way to tell Windows and WinJS to defer their default behaviors until your most critical async work is complete. The mechanism that provides for this is in WinRT called a deferral, and the setPromise method that we’ve seen in WinJS ties into this.
On the WinRT level, the args given to WebUIApplication.onactivated contains a little method called getDeferral(technically Windows.UI.WebUI.ActivatedOperation.getDeferral). This function returns a deferral object that contains a complete method. By calling getDeferral, you tell Windows to leave the system splash screen up until you call complete (subject to a 15-second timeout as described in “Optimizing Startup Time” below). The code looks like this:
//In the activated handler
var activatedDeferral = Windows.UI.WebUI.ActivatedOperation.getDeferral();
someOperationAsync().done(function () {
//After initialization is complete
activatedDeferral.complete();
}
This same mechanism is employed elsewhere in WinRT. You’ll find that the args for WebUIApplication.onsuspending also has a getDeferral method, so you can defer suspension until an async operation completed. So does the DataTransferManager.ondatarequested event that we saw inChapter 2 for working with the Share charm. You’ll also encounter deferrals when working with the Search charm, printing, background tasks, Play To, and state management, as we’ll see in later chapters. In short, wherever there’s a potential need to do async work within an event handler, you’ll find getDeferral.
Within WinJS now, whenever WinJS provides a wrapper for a WinRT event, as with WinJS.-Application.onactivated, it also wraps the deferral mechanism into a single setPromise method that you’ll find on the args object passed to the relevant event handler. Because you need deferrals when performing async operations in these event handlers, and because async operations in JavaScript are always represented with promises, it makes sense for WinJS to provide a generic means to link the deferral to the fulfillment of a promise. That’s exactly what setPromisedoes.
WinJS, in fact, automatically requests a deferral whether you need it or not. If you provide a promise to setPromise, WinJS will attach a completed handler to it and call the deferral’s complete at the appropriate time. Otherwise WinJS will call complete when your event handler returns.
You’ll find setPromise on the args passed to the WinJS.Applicationloaded, activated, ready, checkpoint, and unload events. Again, setPromise both defers Windows’ default behaviors for WinRT events and tells WinJS.Application to defer processing the next event in its queue. This allows you, for example, to delay the activated event until an async operation within loaded is complete.
Now we can see the purpose of setPromise within the activation code we saw earlier:
var app = WinJS.Application;
app.onactivated = function (args) {
if (args.detail.kind === activation.ActivationKind.launch) {
//...
args.setPromise(WinJS.UI.processAll());
}
};
WinJS.UI.processAll starts an async operation to instantiate WinJS controls. It returns a promise that is fulfilled when all those controls are ready. Clearly, if we have WinJS controls on our home page, we don’t want to dismiss the default splash screen until processAll is done. So we defer that dismissal by passing that promise to setPromise.
Oftentimes you’ll want to do more initialization work of your own when processAll is complete. In this case, simply call then with your own completed handler, like so:
args.setPromise(WinJS.UI.processAll().then(function () {
//Do more initialization work
}));
Here, be sure to use then and not done because the latter returns undefined rather than a promise, which means that no deferral will happen. See “Error Handling Within Promises: then vs. done” later on.
Because setPromise just waits for a single promise to complete, how do you handle multiple async operations? Just pick the one you think will take the longest? No—there are a couple of ways to do this. First, if you need to control the sequencing of those operations, you can chain them together as we already saw in Chapter 2 and as we’ll discuss further in this chapter under “Async Operations: Be True to Your Promises.” Just be sure that the end result of the chain is a promise that becomes the argument to setPromise—again, use then and not done!
Second, if the sequence isn’t important but you need all of them to complete, you can combine those promises by using WinJS.Promise.join, passing the result to setPromise. If you need only one of the operations to complete, you can use WinJS.Promise.any instead. Again, see “Be True to Your Promises” later on.
The other means is to register more than one handler with WinJS.Application.onactivated; each handler will get its own event args and its own setPromise function, and WinJS will combine those returned promises together with WinJS.Promise.join.
Optimizing Startup Time
Ideally, an app launches and its home page comes up within one second of activation, with an acceptable upper bound being three seconds. Anything longer begins to challenge most user’s patience threshold, especially if they’re already pressed for time and swilling caffeine-laden beverages! In fact, the Windows App Certification Toolkit, which we’ll meet at the end of this chapter, will give you a warning if your app takes more than a few seconds to get going.
Windows is much more generous here, however. It allows an app to hang out on the default start screen for as long as the user is willing to stare at it. Apparently that willingness peaks out at about 15 seconds, at which point most users will pretty much assume that the app has hung and return to the Start screen to launch some other app that won’t waste the afternoon. For this reason, if an app doesn’t get its home page up in that time—that is, return from the activated event and complete any deferral—and the user switches away, then boom!: Windows will terminate the app. (This saves the user from having to do the sordid deed in Task Manager.)
Of course, some apps, especially on first run after acquisition, might really need more time to get started. To accommodate this, there is an implementation strategy called an extended splash screen wherein you make you home page look just like the default start screen and then place additional controls on it to keep the user informed of progress so that she knows the app isn’t hung. Once you’re on the extended splash screen, the 15-second limit no longer applies. For more info, see Appendix B.
For most startup scenarios, though, it’s best to focus your efforts on minimizing time to interactivity. This means prioritizing work that’s necessary for the primary workflows of the home page and deferring everything else until the home page it up. This includes deferring configuration of app bars, nav bars, settings panels, and secondary app pages, as well as acquiring and processing content for those secondary pages. But even before that, let’s take a step back to understand what’s going on behind the default splash screen to begin with, because there are things you can do to help that process along as well.
When the user taps your tile, Windows first creates a new app host process and points it to the start page specified in your manifest. The app host then loads and parses that file. In doing so, it must also load and parse the CSS and JavaScript files it refers to. This process will fire various events, as we’ve seen, at which point it enters your activation code.
Up to that point, one thing that really matters is the structure of your HTML markup. As much as possible, avoid inline styles and scripts because these cause the HTML parser to switch from an HTML parsing context into a CSS or JavaScript parsing context, which is relatively expensive. In other words, the separation of concerns between markup, styling, and script is both a good development practice and a good performance practice! Also make sure to place any static markup in the HTML file rather than creating it from JavaScript: it’s faster to have the app host’s inner engine parse HTML than to make DOM API calls from code for the same purpose. And even if you must create elements dynamically, once you use more than four DOM API calls it’s faster to build an HTML string and assign it to an innerHTML or similar property (so that the inner engine does the work).
Similarly, minimize the amount of CSS that has to be loaded for your start page to appear; CSS that’s needed for secondary pages can be loaded with those pages (see “Page Controls and Navigation” later in this chapter).
Loading JavaScript files can also be deferred, both for secondary pages but also on the start page. That is, you can use the defer="defer"attribute on <script> tags to delay loading specific .js files until after the first parsing pass, or you can dynamically inject <script> tags or call eval at a later time in your activation path or after your initial activation is complete.
Review all the resources that your markup references as well, and place any critical ones directly into the app package where you can reference them with ms-appx:/// URIs. Any remote resources will, of course, require a round trip to the network with possible connectivity failures. Where making HTTP requests is unavoidable, suggest your most critical URIs to the Windows.Networking.-BackgroundTransfer.ContentPrefetcher object (see “Prefetching Content” in Chapter 4). If the prefetcher determines that those URIs are among the top requests, it will actively cache requests to those URIs such that requests from your code will draw directly from that cache. This won’t help the app the first time it’s run, but it can help with subsequent activations.
Consider whether you can also cache such content directly in your app package. That way you have something to work with immediately, even if there’s no connectivity when the app is first run. This would mean building a refresh/sync strategy into your data model, but it’s certainly doable.
Once you hit your activation code, a new set of considerations come into play. The key thing to consider here is this: so long as you’re on the default or an extended splash screen, go ahead and block the UI thread for high-priority work. A splash screen, by definition, is noninteractive, so any UI thread work that deals with interactivity is a much lower priority than work that’s necessary to initialize controls, retrieve and process data, and otherwise get ready for interactivity. (Page content animations, similarly, should be disabled while the splash screen is up.)
Most important, though, is making sure that your critical non-UI work runs at a higher priority than UI rendering processes, especially while the splash screen is still active. For this you use the WinJS scheduler API, which we’ll return to later in “Managing the UI Thread with the WinJS Scheduler.” For now, know that you can schedule work to happen at a higher priority than layout and rendering and also at other lower priorities. This way you can kick off a number of HTTP requests, for example, but give your most important ones a high priority while giving your secondary ones a much lower priority so that they happen after layout and rendering. With this API you can also reprioritize work at any time: for example, if the user immediately navigates to a secondary page as soon as the app comes up, you can set that request (or more specifically, the function that processes its results) to high priority.
For a deeper dive on these matters of startup performance, I recommend two talks from //build 2013: Create Fast and Fluid Interfaces with HTML and JavaScript (Paul Gildea) and Web Runtime Performance (Tobin Titus). Also refer to Reducing your app’s loading time in the documentation.
WinRT Events and removeEventListener
Before going further, we need to take a slight detour into a special consideration for events that originate from WinRT, such as dismissed. You may have noticed that I’m highlighting these with a different text color than other events.
As we’ve already been doing in this book, typical practice within JavaScript, especially for websites, is to call addEventListener to specify event handlers or to simply assign an event handler to an on<event> property of some object. Oftentimes these handlers are just declared as inline anonymous functions:
var myNumber = 1;
element.addEventListener(<event>, function (e) { myNumber++; } );
Because of JavaScript’s particular scoping rules, the scope of that anonymous function ends up being the same as its surrounding code, which allows the code within that function to refer to local variables like myNumber as used here.
To ensure that such variables are available to that anonymous function when it’s later invoked as an event handler, the JavaScript engine creates a closure: a data structure that describes the local variables available to that function. Usually the closure requires only a small bit of memory, but depending on the code inside that event handler, the closure could encompass the entire global namespace—a rather large allocation! Every such active closure increases the memory footprint or working set of the app, so it’s a good practice to keep closures at a minimum. For example, declaring a separate named function—which has its own scope—rather than using an anonymous function, will reduce the size of any necessary closure.
More important than minimizing closures is making sure that the event listeners themselves—and their associated closures—are properly cleaned up and their memory allocations released. Typically, this is not even something you need to think about. When objects such as HTML elements are destroyed or removed from the DOM, their associated listeners are automatically removed and closures are released. However, in a Windows Store app written in HTML and JavaScript, events can also come from WinRT objects. Because of the nature of the projection layer that makes WinRT available in JavaScript, WinRT ends up holding references to JavaScript event handlers (known also as delegates) and the JavaScript closures hold references to those WinRT objects. As a result of these cross-references, the associated closures aren’t released unless you do so explicitly with removeEventListener (or assignment of null to an on<event> property).
This is not a problem, mind you, if the app is always listening to a particular event. For example, the suspending and resuming events are two that an app typically listens to for its entire lifetime, so any related allocations will be cleaned up when the app is terminated. It’s also not much of a concern if you add a listener only once, as with the splash screen dismissed event. (In that case, however, it’s good to remove the listener explicitly, because there’s no reason to keep any closures in memory once the splash screen is gone.)
Do pay attention, however, when an app listens to a WinRT object event only temporarily and neglects to explicitly call removeEventListener, and when the app might call addEventListener for the same event multiple times (in which case you can end up duplicating closures). With page controls, which are used to load HTML fragments into a page (as discussed later in this chapter under “Page Controls and Navigation”), it’s common to call addEventListener or assign a handler to an on<event> property on some WinRT object within the page’s ready method. When you do this, be sure to match that call with removeEventListener(or assignnulltoon<event>)in the page’s unload method to release the closures.
Note Events from WinJS objects don’t need this attention because the library already handles removal of event listeners. The same is true for listeners you might add for window and document events that persist for the lifetime of the app.
Throughout this book, the WinRT events with which you need to be concerned are highlighted with a special color, as in datarequested (except where the text is also a hyperlink). This is your cue to check whether an explicit call to removeEventListener or on<event>=null is necessary. Again, if you’ll always be listening to the event, removing the listener isn’t needed, but if you add a listener when loading a page control, or anywhere else where you might add that listener again, be sure to make that extra call. Be especially aware that the samples in the Windows SDK don’t necessary pay attention to this detail, so don’t duplicate the oversight.
In the chapters that follow, I will remind you of what we’ve just discussed on our first meaningful encounter with a WinRT event. Keep your eyes open for the WinRT color coding in any case. We’ll also come back to the subject of debugging and profiling toward the end of this chapter, where we’ll learn about tools that can help uncover memory leaks.
App Lifecycle Transition Events and Session State
Now that we’ve seen how an app gets activated into a running state, our next concern is with what can happen to it while it’s running. To an app—and the app’s publisher—a perfect world might be one in which consumers ran that app and stayed in that app forever (making many in-app purchases, no doubt!). Well, the hard reality is that this just isn’t reality. No matter how much you’d love it to be otherwise, yours is not the only app that the user will ever run. After all, what would be the point of features like sharing or split-screen views if you couldn’t have multiple apps running together? For better or for worse, users will be switching between apps, changing view states, and possibly closing your app, none of which the app can control. But what you can do is give energy to the “better” side of the equation by making sure your app behaves well under all these circumstances.
The first consideration is focus, which applies to controls in your app as well as to the app itself (the window object). Here you can simply use the standard HTML blur and focus events. For example, an action game or one with a timer would typically pause itself on window.onblur and perhaps restart again on window.onfocus.
A similar but different condition is visibility. An app can be visible but not have the focus, as when it’s sharing the screen with others. In such cases an app would continue things like animations or updating a feed, which it would stop when visibility is lost (that is, when the app is actually in the background). For this, use the visibilitychange event in the DOM API, and then examine the visibilityState property of the window or document object, as well as the document.hidden property. (The event works for visibility of individual elements as well.) A change in visibility is also a good time to save user data like documents or game progress.
For view state changes, an app can detect these in several ways. As shown in the Here My Am! example, an app typically uses media queries (in declarative CSS or in code through media query listeners) to reconfigure layout and visibility of elements, which is really all that view states should affect. (Again, view state changes never change the modeof the app.) At any time, an app can also retrieve its view state through Windows.UI.ViewManagement.ApplicationView.orientation(returning an ApplicationViewOrientation value of either portrait or landscape), the size of the app window, and other details from ApplicationView like isFullScreen; details in Chapter 8, “Layout and Views.”19
When your app is closed (the user swipes top to bottom and holds, or just presses Alt+F4), it’s important to note that the app is first moved off-screen (hidden), then suspended, and then closed, so the typical DOM events like body.unload aren’t much use. A user might also kill your app in Task Manager, but this won’t generate any events in your code either. Remember also that apps should not close themselves nor offer a means for the user to do so (this violates Store certification requirements), but they can use MSApp.terminateApp to close due to unrecoverable conditions like corrupted state.
Suspend, Resume, and Terminate
Beyond focus, visibility, and view states, there are three other critical moments in an app’s lifetime:
• Suspending When an app is not visible in any view state, it will be suspended after five seconds (according to the wall clock) to conserve battery power. This means it remains wholly in memory but won’t be scheduled for CPU time and thus won’t have network or disk activity (except when using specifically allowed background tasks, discussed in Chapter 16). When this happens, the app receives the Windows.UI.WebUI.WebUIApplication.onsuspending event, which is also exposed through WinJS.Application.oncheckpoint. Apps must return from this event within the five-second period, or Windows will assume the app is hung and terminate it (period!). During this time, apps save transient session state and should also release any exclusive resources acquired as well, like file streams or device access. (See How to suspend an app.) If you need to do async work in the suspending handler, WinRT provides a deferral object as with activation and WinJS provides the setPromise equivalent. Using the deferral will not, however, extend the suspension deadline.
• Resuming If the user switches back to a suspended app, it receives the Windows.UI.WebUI.WebUIApplication.onresuming event. This is not surfaced through WinJS.Application, mind you, because WinJS has no value to add, but it’s easy enough to use WinJS.Application.queueEvent for this purpose. We’ll talk more about this event in coming chapters, as it’s used to refresh any data that might have changed while the app was suspended. For example, if the app is connected to an online service, it would refresh that content if enough time has passed while the app was suspended, as well as check connectivity status (Chapter 4). In addition, if you’re tracking sensor input of any kind (like compass, geolocation, or orientation, see Chapter 12, “Input and Sensors”), resuming is a good time to get a fresh reading. You’ll also want to check license status for your app and in-app purchases if you’re using trials and/or expirations (see Chapter 20). There are also times when you might want to refresh your layout (as we’ll see in Chapter 8), because it’s possible for your app to resume directly into a different view state than when it was suspended, or resume to a different screen resolution as when the device has been connected to an external monitor. The same goes for enabling/disabling clipboard-related commands (Chapter 9, “Commanding UI”), refreshing any tile updates and push notification channels (seeChapter 16), and checking any saved state that might have been modified by background tasks or roaming (Chapter 10).
• Terminating When suspended, an app might be terminated if there’s a need for more memory. There is no event for this, because by definition the app is already suspended and no code can run. Nevertheless, this is important for the app lifecycle because it affectspreviousExecutionState when the app restarts.
Before we go further, it’s essential to know that you can simulate these conditions in the Visual Studio debugger by using the toolbar drop-down shown in Figure 3-2. These commands will trigger the necessary events as well as set up the previousExecutionState value for the next launch of the app. (Be very grateful for these controls—there was a time when we didn’t have them, and it was painful to debug these conditions!)
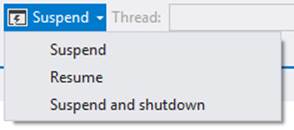
FIGURE 3-2 The Visual Studio toolbar drop-down to simulate suspend, resume, and terminate.
We’ve briefly listed those previous states before, but let’s see how they relate to the events that get fired and the previousExecutionState value that shows up when the app is next launched. This can get a little tricky, so the transitions are illustrated in Figure 3-3 and the table below describes how the previousExecutionState values are determined.
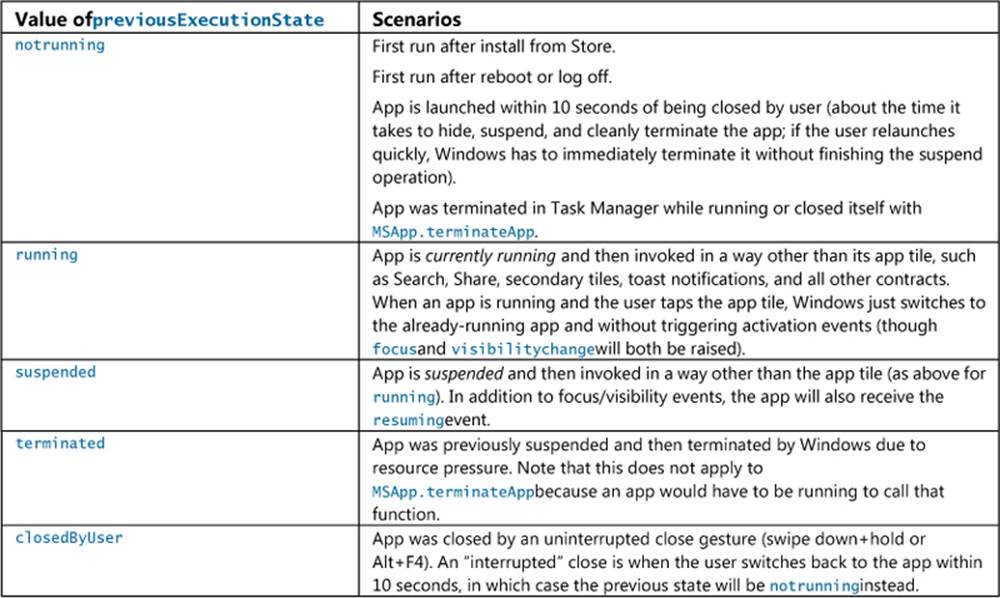
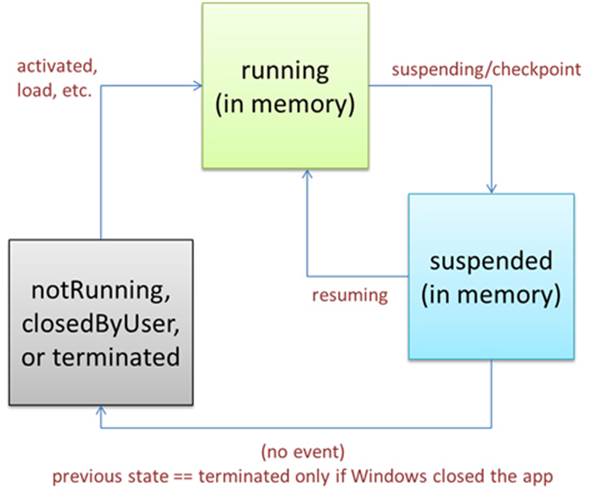
FIGURE 3-3 Process lifecycle events and previousExecutionStatevalues.
The big question for the app, of course, is not so much what determines the value of previousExecutionState as what it should actually do with this value during activation. Fortunately, that story is a bit simpler and one that we’ve already seen in the template code:
• If the activation kind is launch and the previous state is notrunning or closedByUser, the app should start up with its default UI and apply any persistent state or settings. With closedByUser, there might be scenarios where the app should perform additional actions (such as updating cached data) after the user explicitly closed the app and left it closed for a while.
• If the activation kind is launch and the previous state is terminated, the app should start up in the same session state as when it was last suspended.
• For launch and other activation kinds that include additional arguments or parameters (as with secondary tiles, toast notifications, and contracts), it should initialize itself to serve that purpose by using the additional parameters. The app might already be running, so it won’t necessarily initialize its default state again.
In the first two requirements above, persistent state refers to state that always applies to an instance of the app, such as user accounts, UI configurations, and similar settings. Session state, on the other hand, is the transient state of a particular instance and includes things like unsubmitted form data, page navigation history, scroll position, and so forth.
We’ll see the full details of managing state in Chapter 10. What’s important to understand at present is the relationship between the lifecycle events and session state, in particular. When Windows terminates a suspended app, the app is still running in the user’s mind. Thus, when the user activates the app again for normal use (activation kind is launch, rather than through a contract), he or she expects that app to be right where it was before. This means that by the time an app gets suspended, it needs to have saved whatever state is necessary to make this possible. It then rehydrates the app from that state when previousExecutionState is terminated. This creates continuity across the suspend-terminate-restart boundary.
For more on app design where this is concerned, see Guidelines for app suspend and resume. Be clear that if the user directly closes the app with Alt+F4 or the swipe-down+hold gesture, the suspending and checkpoint events will also be raised, so the app still saves session state. However, the app won’t be asked to reload session state when it’s restarted because previousExecutionStatewill be notRunning or closedByUser.
It works out best, actually, to save session state as it changes during the app’s lifetime, thereby minimizing the work needed within the suspending event (where you have only five seconds). Mind you, this session state does not include persistent state that an app would always reload or reapply in its activation path. The only concern here is maintaining the illusion that the app was always running.
You always save session state to your appdata folders or settings containers, which are provided by the Windows.Storage.ApplicationData API. Again, we’ll see all the details in Chapter 10. What I want to point out here are a few helpers that WinJS provides for all this.
First is the WinJS.Application.checkpoint event, which is raised when suspending fires. checkpoint provides a single convenient place to save both session state and any other persistent data you might have, if you haven’t already done so. If you need to do any async work in this handler, be sure to pass the promise for that operation to eventArgs.setPromise. This ties into the WinRT deferral mechanism as with activation (and see “Suspending Deferrals” below).
Second is the WinJS.Application.sessionState object. On normal startup, this is just an empty object to which you can add whatever properties you like, including other objects. A typical strategy is to just use sessionState directly as a container for session variables. Within thecheckpoint event, WinJS automatically serializes the contents of this object (using JSON.stringify) into a file within your local appdata folder (meaning that all variables in sessionState must have a string representation). Note that because WinJS ensures that its own handler for checkpointis always called after your app gets the event, you can be assured that WinJS will save whatever you write into sessionState at any time before your checkpoint handler returns.
Then, when the app is activated with the previous state of terminated, WinJS automatically rehydrates the sessionState object so that everything you put there is once again available. If you use this object for storing variables, you need only to avoid setting those values back to their defaults when reloading your state.
Finally, if you don’t want to use the sessionState object or you have state that won’t work with it, the WinJS.Application object makes it easy to write your own files without having to use async WinRT APIs. Specifically, it provides (as shown in the documentation) local, temp, androaming objects that each have methods called readText, writeText, exists, and remove. These objects each work within their respective appdata folders and provide a simplified API for file I/O, as shown in scenario 1 of the App model sample.
Suspending Deferrals and Deadlines
As noted earlier, the suspending event has a deferral mechanism, like activation, to accommodate async operations in your handler. That is, Windows will normally suspend your app as soon as you return from the suspending event (regardless of whether five seconds have elapsed), unless you request a deferral.
The event args for suspending contains an instance of Windows.UI.WebUI.WebUIApplication.-SuspendingOperation.Its getDeferral method returns a deferral object with a complete method, which you call when your async operations are finished. WinJS wraps this with the setPromisemethod on the event args object passed to a checkpoint handler. To this you pass whatever promise you have for your async work and WinJS automatically adds a completed handler that calls the deferral’s complete method.
Well, hey! All this sounds pretty good—is this perhaps a sneaky way to circumvent the restriction on running Windows Store apps in the background? Will my app keep running indefinitely if I request a deferral by never calling complete?
No such luck, amigo. Accept my apologies for giving you a fleeting moment of exhilaration! Deferral or not, five seconds is the most you’ll ever get. Still, you might want to take full advantage of that time, perhaps to first perform critical async operations (like flushing a cache) and then to attempt other noncritical operations (like a sync to a server) that might greatly improve the user experience. For such purposes, the suspendingOperation object also contains a deadline property, a Date value indicating the time in the future when Windows will forcibly suspend you regardless of any deferral. Once the first operation is complete, you can check if you have time to start another, and so on.
Note The suspendingOperation object is not surfaced through the WinJS checkpoint event; if you want to work with the deadline property, you must use a handler for the WinRT suspending event.
A basic demonstration of using the suspending deferral can be found in the App activated, resume, and suspend sample. This also shows activation through a custom URI scheme, a subject that we’ll be covering later in Chapter 15. An example of handling state, in addition to the updates we’ll make to Here My Am! in the next section, can be found in scenario 3 of the App model sample.
Basic Session State in Here My Am!
To demonstrate some basic handling of session state, I’ve made a few changes to Here My Am! as given in the HereMyAm3b example in the companion content. Here we have two pieces of information we care about: the variables lastCapture (a StorageFile with the image) andlastPosition (a set of coordinates). We want to make sure we save these when we get suspended so that we can properly apply those values when the app gets launched with the previous state of terminated.
With lastPosition, we can just move this into the sessionState object (prepending app.sessionState.). If this value exists on startup, we can skip making the call to getGeopositionAsync because we already have a location:
//If we don't have a position in sessionState, try to initialize
if (!app.sessionState.lastPosition) {
locator.getGeopositionAsync().done(function (geocoord) {
var position = geocoord.coordinate.point.position;
//Save for share
app.sessionState.lastPosition = {
latitude: position.latitude,longitude: position..longitude};
updatePosition();
}, function (error) {
console.log("Unable to get location.");
});
}
With this change I’ve also moved the bit of code to update the map location into a separate function that ensures a location exists in sessionState:
function updatePosition() {
if (!app.sessionState.lastPosition) {
return;
}
callFrameScript(document.frames["map"], "pinLocation",
[app.sessionState.lastPosition.latitude, app.sessionState.lastPosition.longitude]);
}
Note also that because app.sessionState is initialized to an empty object by default, { }, lastPosition will be undefined until the geolocation call succeeds. This also works to our advantage when rehydrating the app. Here’s what the previousExecutionState conditions look like for this:
if (args.detail.previousExecutionState !==
activation.ApplicationExecutionState.terminated) {
//Normal startup: initialize lastPosition through geolocation API
} else {
//WinJS reloads the sessionState object here. So try to pin the map with the saved location
updatePosition();
}
Because the contents of sessionState are automatically saved in WinJS.Application.-oncheckpoint and automatically reloaded when the app is restarted with the previous state of terminated, our previous location will exist in sessionState and updatePosition just works.
You can test all this by running the HereMyAm3b app, taking a suitable picture and making sure you have a location. Then use the Suspend and Shutdown option on the Visual Studio toolbar to terminate the app. Set a breakpoint on the updatePosition call above, and then restart the app in the debugger. You’ll see that sessionState.lastPosition is initialized at that point.
With the last captured picture, we don’t need to save the StorageFile, just the URI: we copied the file into our local appdata (so it persists across sessions already) and can just use the ms-appdata:// URI scheme to refer to it. When we capture an image, we just save that URI intosessionState.imageURI (the property name is arbitrary) at the end of the promise chain inside capturePhoto:
app.sessionState.imageURI = "ms-appdata:///local/HereMyAm/" + newFile.name;
Again, because imageURI is saved within sessionState, this value will be available when the app is restarted after being terminated. We also need to re-initialize lastCapture with a StorageFile so that the image is available through the Share contract. For this we can useWindows.Storage.-StorageFile.getFileFromApplicationUriAsync. Here, then, is the code within the previousExecutionState == terminated case during activation:
//WinJS reloads the sessionState object here: initialize from the saved image URI and location.
if (app.sessionState.imageURI) {
var uri = new Windows.Foundation.Uri(app.sessionState.imageURI);
Windows.Storage.StorageFile.getFileFromApplicationUriAsync(uri).done(function (file) {
lastCapture = file;
var img = document.getElementById("photoImg");
scaleImageToFit(img, document.getElementById("photo"), file);
});
}
updatePosition();
As always, the code to set img.src with a thumbnail happens inside scaleImageToFit. This call is also inside the completed handler here because we want the image to appear only if we can also access its StorageFile again for sharing. Otherwise the two features of the app would be out of sync.
In all of this, note again that we don’t need to explicitly reload these variables within the terminated case because WinJS reloads sessionState automatically. If we managed our state more directly, such as storing some variables in roaming settings within the checkpoint event, we would reload and apply those values at this time.
Note Using ms-appdata:/// and getFileFromApplicationUriAsync (or its sibling getFileFromPathAsync) works because the file exists in a location that we can access programmatically by default. It also works for libraries for which we declare a capability in the manifest. If, however, we obtain a StorageFile from the file picker, we need to save that in the Windows.Storage.AccessCache to preserve access permissions across sessions. We’ll revisit the access cache in Chapter 11, “The Story of State, Part 2.”
Page Controls and Navigation
Now we come to an aspect of Windows Store apps that very much separates them from typical web applications but makes them very similar to AJAX-based sites.
To compare, many web applications do page-to-page navigation with <a href> hyperlinks or by setting document.location from JavaScript. This is all well and good: oftentimes there’s little or no state to pass between pages, and even then there are well-established mechanisms for doing so, such as HTML5 sessionStorage and localStorage (which work just fine in Store apps, by the way).
This type of navigation presents a few problems for Store apps, however. For one, navigating to a new page means a wholly new script context—all the JavaScript variables from your previous page will be lost. Sure, you can pass state between those pages, but managing this across an entire app likely hurts performance and can quickly become your least favorite programming activity. It’s better and easier, in other words, for client apps to maintain a consistent in-memory state across pages and also have each individual page be able to load what script it uniquely needs, as needed.
Also, the nature of the HTML/CSS rendering engine is such that a blank screen appears when navigating a hyperlink. Users of web applications are accustomed to waiting a bit for a browser to acquire a new page (I’ve found many things to do with an extra 15 seconds!), but this isn’t an appropriate user experience for a fast and fluid Windows Store app. Furthermore, such a transition doesn’t allow animation of various elements on and off the screen, which can help provide a sense of continuity between pages if that fits with your design.
So, although you can use direct links, Store apps typically implement “pages” by dynamically replacing sections of the DOM within the context of a single page like default.html, akin to how “single-page” web applications work. By doing so, the script context is always preserved and individual elements or groups of elements can be transitioned however you like. In some cases, it even makes sense to simply show and hide pages so that you can switch back and forth quickly. Let’s look at the strategies and tools for accomplishing these goals.
WinJS Tools for Pages and Page Navigation
Windows itself, and the app host, provides no mechanism for dealing with pages—from the system’s perspective, this is merely an implementation detail for apps to worry about. Fortunately, the engineers who created WinJS and the templates in Visual Studio and Blend worried about this a lot! As a result, they’ve provided some marvelous tools for managing bits and pieces of HTML+CSS+JS in the context of a single container page:
• WinJS.UI.Fragmentscontains a low-level “fragment-loading” API, the use of which is necessary only when you want close control over the process (such as which parts of the HTML fragment get which parent). We won’t cover it in this book; see the documentation and the Loading HTML fragments sample.
• WinJS.UI.Pages is a higher-level API intended for general use and is employed by the templates. Think of this as a generic wrapper around the fragment loader that lets you easily define a “page control”—simply an arbitrary unit of HTML, CSS, and JS—that you can easily pull into the context of another page as you do other controls.20 They are, in fact, implemented like other controls in WinJS (as we’ll see in Chapter 5), so you can declare them in markup, instantiate them with WinJS.UI.process[All], use as many of them within a single host page as you like, and even nest them.
These APIs provide only the means to load and unload individual “pages”—they pull HTML in from other files (along with referenced CSS and JS) and attach the contents to an element in the DOM. That’s it. As such they can be used for any number of purposes, such as a custom control model, depending on how you like to structure your code. See scenario 1 of the HTML Page controls sample.
Page controls and fragments are not gospel To be clear, there’s absolutely no requirement that you use the WinJS mechanisms described here in a Windows Store app. These are simply convenient tools for common coding patterns. In the end, it’s just about making the right elements and content appear in the DOM for your user experience, and you can implement that however you like.
Assuming that you’ll want to save yourself loads of trouble and use WinJS for page-to-page navigation, you’ll need two other pieces. The first is something to manage a navigation stack, and the second is something to hook navigation events to the loading mechanism of WinJS.UI.Pages.
For the first piece, you can turn to WinJS.Navigation, which supplies, through about 150 lines of CS101-level code, a basic navigation stack. This is all it does. The stack itself is just a list of URIs on top of which WinJS.Navigation exposes location, history, canGoBack, and canGoForwardproperties, along with one called state in which you can store any app-defined object you need. The stack (maintained in history) is manipulated through the forward, back, and navigate methods, and the WinJS.Navigation object raises a few events—beforenavigate, navigating, andnavigated—to anyone who wants to listen (through addEventListener).21
Tip In the WinJS.Navigation.history.current object there’s an initialPlaceholder flag that answers the question, "Can WinJS.Navigation.navigate go to a new page without adding an entry in the history?" If you set this flag to true, subsequent navigations won’t be stored in the nav stack. Be sure to set it back to false to reenable the stack.
What this means is that WinJS.Navigation by itself doesn’t really do anything unless some other piece of code is listening to those events. That is, for the second piece of the navigation puzzle we need a linkage between WinJS.Navigation and WinJS.UI.Pages, such that a navigation event causes the target page contents to be added to the DOM and the current page contents to be removed.
The basic process is as follows, and it’s also shown in Figure 3-4:
1. Create a new div with the appropriate size (typically the whole app window).
2. Call WinJS.UI.Pages.render to load the target HTML into that element (along with any script that the page uniquely references). This is an async function that returns a promise. We’ll take a look at what render does later on.
3. When that loading (that is, rendering) is complete, attach the new element from step 1 to the DOM.
4. Remove the previous page’s root element from the DOM. If you do this before yielding the UI thread, you won’t ever see both pages on-screen together.
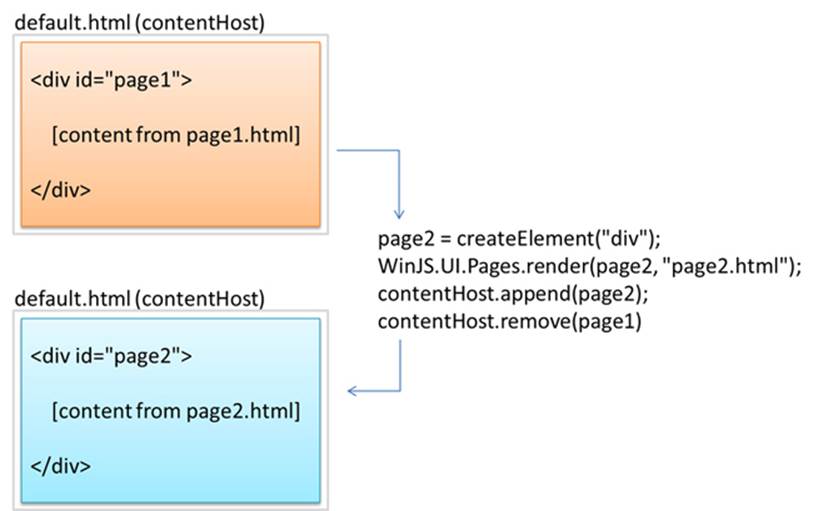
FIGURE 3-4 Performing page navigation in the context of a single host (typically default.html) by replacing appending the content from page2.html and removing that from page1.html. Typically, each page occupies the whole display area, but page controls can just as easily be used for smaller areas.
As with page navigation in general, you’re again free to do whatever you want here, and in the early developer previews of Windows 8 that’s all that you could do! But as developers built the first apps for the Windows Store, we discovered that most people ended up writing just about the same boilerplate code over and over. Seeing this pattern, two standard pieces of code have emerged. One is the WinJS back button control, WinJS.UI.BackButton, which listens for navigation events to enable itself when appropriate. The other is a piece is called the PageControlNavigatorand is magnanimously supplied by the Visual Studio templates. Hooray!
Because the PageControlNavigator is just a piece of template-supplied code and not part of WinJS, it’s entirely under your control: you can tweak, hack, or lobotomize it however you want.22 In any case, because it’s likely that you’ll often use the PageControlNavigator (and the back button) in your own apps, let’s look at how it all works in the context of the Navigation App template.
Note Additional samples that demonstrate basic page controls and navigation, along with handling session state, can be found in the following SDK samples: App activate and suspend using WinJS (using the session state object in a page control), App activated, resume and suspend(described earlier; shows using the suspending deferral and restarting after termination), and Navigation and navigation history (showing page navigation along with tracking and manipulating the navigation history). In fact, just about every sample uses page controls to switch between different scenarios, so you have no shortage of examples to draw from!
The Navigation App Template, PageControl Structure, and PageControlNavigator
Taking one step beyond the Blank App template, the Navigation App template demonstrates the basic use of page controls. (The more complex templates build navigation out further.) If you create a new project with this template in Visual Studio or Blend, here’s what you’ll get:
• default.html Contains a single container div with a PageControlNavigator control pointing to pages/home/home.html as the app’s home page.
• js/default.js Contains basic activation and state checkpoint code for the app.
• css/default.css Contains global styles.
• pages/home Contains a page control for the “home page” contents, composed of home.html,home.js, and home.css. Every page control typically has its own markup, script, and style files. Note that CSS styles for page controls are cumulative as you navigate from page to page. See “Page-Specific Styling” later in this chapter.
• js/navigator.js Contains the implementation of the PageControlNavigator class.
To build upon this structure, you can add additional pages to the app with the page control item template in Visual Studio. For each page I recommend first creating a specific folder under pages, similar to home in the default project structure. Then right-click that folder, select Add > New Item, and select Page Control. This will create suitably named .html, .js. and .css files in that folder.
Now let’s look at the body of default.html (omitting the standard header and a commented-out AppBar control):
<body>
<div id="contenthost" data-win-control="Application.PageControlNavigator"
data-win-options="{home: '/pages/home/home.html'}"></div>
</body>
All we have here is a single container div named contenthost (it can be whatever you want), in which we declare the Application.PageControlNavigator as a custom WinJS control. (This is the purpose of data-win-control and data-win-options, as we’ll see in Chapter 5.) With this we specify a single option to identify the first page control it should load (/pages/home/home.html). The PageControlNavigator will be instantiated within our activated handler’s call to WinJS.UI.processAll.
Within home.html we have the basic markup for a page control. Below is what the Navigation App template provides as a home page by default, and it’s pretty much what you get whenever you add a new page control from the item template (with different filenames, of course):
<!DOCTYPE html>
<html>
<head>
<!--... typical HTML header and WinJS references omitted -->
<link href="/css/default.css" rel="stylesheet">
<link href="/pages/home/home.css" rel="stylesheet">
<script src="/pages/home/home.js"></script>
</head>
<body>
<!-- The content that will be loaded and displayed. -->
<div class="fragment homepage">
<header aria-label="Header content" role="banner">
<button data-win-control="WinJS.UI.BackButton"></button>
<h1 class="titlearea win-type-ellipsis">
<span class="pagetitle">Welcome to NavApp!</span>
</h1>
</header>
<section aria-label="Main content" role="main">
<p>Content goes here.</p>
</section>
</div>
</body>
</html>
The div with fragment and homepage CSS classes, along with the header, creates a page with a standard silhouette and a WinJS.UI.BackButton control that automatically wires up keyboard, mouse, and touch events and again keeps itself hidden when there’s nothing to navigate back to. (Isn’t that considerate of it!) All you need to do is customize the text within the h1 element and the contents within section, or just replace the whole smash with the markup you want. (By the way, even though the WinJS files are referenced in each page control, they aren’t actually reloaded; they exist here to allow you to edit a standalone page control in Blend.)
Tip The leading / on what looks like relative paths to CSS and JavaScript files actually creates an absolute reference from the package root. If you omit that /, there are many times—especially with path controls—when the relative path is not what you’d expect, and the app doesn’t work. In general, unless you really know you want a relative path, use the leading /.
The definition of the actual page control is in pages/home/home.js; by default, the templates just provide the bare minimum:
(function () {
"use strict";
WinJS.UI.Pages.define("/pages/home/home.html", {
// This function is called whenever a user navigates to this page. It
// populates the page elements with the app's data.
ready: function (element, options) {
// TODO: Initialize the page here.
}
});
})();
The most important part is WinJS.UI.Pages.define, which associates a project-based URI (the page control identifier, always starting with a /, meaning the project root), with an object containing the page control’s methods. Note that the nature of define allows you to define different members of the page in multiple places: multiple calls to WinJS.UI.Pages.define with the same URI will add members to an existing definition and replace those that already exist.
Tip Be mindful that if you have a typo in the URI that creates a mismatch between the URI in define and the actual path to the page, the page won’t load but there won’t be an exception or other visible error. You’ll be left wondering what’s going wrong! So, if your page isn’t loading like you think it should, carefully examine the URI and the file paths to make sure they match exactly.
For a page created with the Page Control item template, you get a couple more methods in the structure (some comments omitted; in this example page2 was created in the pages/page2 folder):
(function () {
"use strict";
WinJS.UI.Pages.define("/pages/page2/page2.html", {
ready: function (element, options) {
},
unload: function () {
// TODO: Respond to navigations away from this page.
}
updateLayout: function (element) {
// TODO: Respond to changes in layout.
},
});
})();
A page control is essentially just an object with some standard methods. You can instantiate the control from JavaScript with new by first obtaining its constructor function from WinJS.UI.Pages.-get(<page_uri>) and then calling that constructor with the parent element and an object containing its options. This operation already encapsulated within WinJS.UI.Pages.render, as we’ll see shortly.
Although a basic structure for the ready method is provided by the templates, WinJS.UI.Pages and the PageControlNavigator will make use of the following if they are available, which are technically the members of an interface called WinJS.UI.IPageControlMembers:
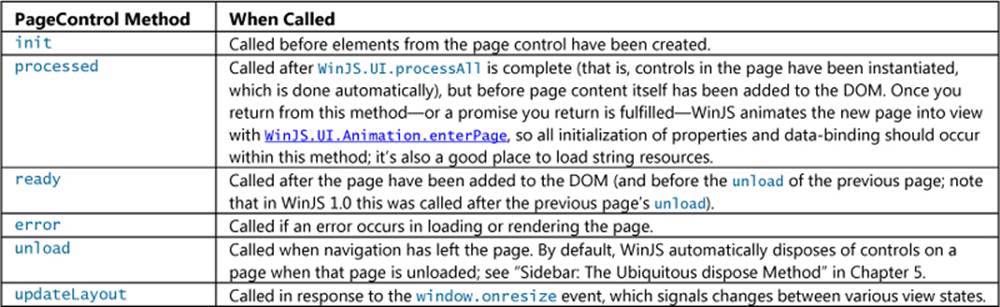
Note that WinJS.UI.Pages calls the first four methods; the unload and updateLayout methods, on the other hand, are used only by the PageControlNavigator.
Of all of these, the ready method is the most common one to implement. It’s where you’ll do further initialization of controls (e.g., populate lists), wire up other page-specific event handlers, and so on. Any processing that you want to do before the page content is added to the DOM should happen in processed, and note that if you return a promise from processed, WinJS will wait until that promise is fulfilled before starting the enterpage animation.
The unload method is also where you’ll want to remove event listeners for WinRT objects, as described earlier in this chapter in “WinRT Events and removeEventListener.” The updateLayout method is important when you need to adapt your page layout to a new view, as we’ve been doing in the Here My Am! app.
As for the PageControlNavigator itself, which I’ll just refer to as the “navigator,” the code in js/navigator.js shows how it’s defined and how it wires up navigation events in its constructor:
(function () {
"use strict";
// [some bits omitted]
var nav = WinJS.Navigation;
WinJS.Namespace.define("Application", {
PageControlNavigator: WinJS.Class.define(
// Define the constructor function for the PageControlNavigator.
functionPageControlNavigator (element, options) {
this.element = element || document.createElement("div");
this.element.appendChild(this._createPageElement());
this.home = options.home;
// ...
// Adding event listeners; addRemovableEventListener is a helper function
addRemovableEventListener(nav, 'navigating',
this._navigating.bind(this), false);
addRemovableEventListener(nav, 'navigated',
this._navigated.bind(this), false);
// ...
}, {
// ...
First we see the definition of the Application namespace as a container for the PageControl-Navigator class (see “Sidebar: WinJS.Namespace.define and WinJS.Class.define” later). Its constructor receives the element that contains it (the contenthostdiv in default.html), or it creates a new one if none is given. The constructor also receives an options object that is the result of parsing the data-win-options string of that element. The navigator then appends the page control’s contents to this root element, adds listeners for the WinJS.Navigation.onnavigated event, among others.23
The navigator then waits for someone to call WinJS.Navigation.navigate, which happens in the activated handler of js/default.js, to navigate to either the home page or the last page viewed if previous session state was reloaded:
if (app.sessionState.history) {
nav.history = app.sessionState.history;
}
args.setPromise(WinJS.UI.processAll().then(function () {
if (nav.location) {
nav.history.current.initialPlaceholder = true;// Don’t add first page to nav stack
return nav.navigate(nav.location, nav.state);
} else {
return nav.navigate(Application.navigator.home);
}
}));
Notice how this code is using the WinJS sessionState object exactly as described earlier in this chapter, taking advantage again of sessionState being automatically reloaded when appropriate.
When a navigation happens, the navigator’s _navigating handler is invoked, which in turn calls WinJS.UI.Pages.render to do the loading, the contents of which are then appended as child elements to the navigator control:
_navigating: function (args) {
var newElement = this._createPageElement();
var parentedComplete;
var parented = new WinJS.Promise(function (c) { parentedComplete = c; });
this._lastNavigationPromise.cancel();
this._lastNavigationPromise = WinJS.Promise.timeout().then(function () {
return WinJS.UI.Pages.render(args.detail.location, newElement,
args.detail.state, parented);
}).then(function parentElement(control) {
var oldElement = this.pageElement;
if (oldElement.winControl && oldElement.winControl.unload) {
oldElement.winControl.unload();
}
WinJS.Utilities.disposeSubTree(this._element);
this._element.appendChild(newElement);
this._element.removeChild(oldElement);
oldElement.innerText = "";
parentedComplete();
}.bind(this));
args.detail.setPromise(this._lastNavigationPromise);
},
If you look past all the business with promises that you see here (which essentially makes sure the rendering and parenting process is both asynchronous and yields the UI thread), you can see how the navigator is handling the core process shown earlier in Figure 3-4. It first creates a new page element. Then it calls the previous page’s unload event, after which it asynchronously loads the new page’s content. Once that’s complete, the new page’s content is added to the DOM and the old page’s contents are removed. Note that the navigator uses the WinJS disposal helper,WinJS.Utilities.-disposeSubTree to make sure that we fully clean up the old page. This disposal pattern invokes the navigator’s dispose method (also in navigator.js), which makes sure to release any resources held by the page and any controls within it, including event listeners. (More on this in Chapter 5.)
Tip In a page control’s JavaScript code you can use this.element.querySelector rather than document.querySelector if you want to look only in the page control’s contents and have no need to traverse the entire DOM. Because this.element is just a node, however, it does not have other traversal methods like getElementById (which, by the way, operates off an optimized lookup table and actually doesn’t traverse anything).
And that, my friends, is how it works! In addition to the HTML Page controls sample, and to show a concrete example of doing this in a real app, the code in the HereMyAm3c sample has been converted to use this model for its single home page. To make this conversion, I started with a new project by using the Navigation App template to get the page navigation structures set up. Then I copied or imported the relevant code and resources from HereMyAm3b, primarily into pages/home/home.html, home.js, and home.css. And remember how I said that you could open a page control directly in Blend (which is why pages have WinJS references)? As an exercise, open the HereMyAm3c project in Blend. You’ll first see that everything shows up in default.html, but you can also open home.html by itself and edit just that page.
Note To give an example of calling removeEventListener for the WinRT datarequested event, I make this call in the unload method of pages/home/home.js.
Be aware that WinJS calls WinJS.UI.processAll in the process of loading a page control (before calling the processed method), so we don’t need to concern ourselves with that detail when using WinJS controls in a page. On the other hand, reloading state whenpreviousExecutionState==terminated needs some attention. Because this is picked up in the WinJS.Application.onactivated event before any page controls are loaded and before the PageControlNavigator is even instantiated, we need to remember that condition so that the home page’sready method can later initialize itself accordingly from app.sessionState values. For this I simply write another flag into app.sessionState called initFromState (true if previousExecutionState is terminated, false otherwise.) The page initialization code, now in the page’s ready method, checks this flag to determine whether to reload session state.
The other small change I made to HereMyAm3c is to use the updateLayout method in the page control rather than attaching my own handler to window.onresize. With this I also needed to add a height: 100%; style to the #mainContent rule in home.css. In previous iterations of this example, the mainContent element was a direct child of the body element and it inherited the full screen height automatically. Now, however, it’s a child of the contentHost, so the height doesn’t automatically pass through and we need to set it to 100% explicitly.
Sidebar: WinJS.Namespace.define and WinJS.Class.define
WinJS.Namespace.defineprovides a shortcut for the JavaScript namespace pattern. This helps to minimize pollution of the global namespace as each app-defined namespace is just a single object in the global namespace but can provide access to any number of other objects, functions, and so on. This is used extensively in WinJS and is recommended for apps as well, where you define everything you need in a module—that is, within a (function() { ... })() block—and then export selective variables or functions through a namespace. In short, use a namespace anytime you’re tempted to add any global objects or functions!
Here’s the syntax: var ns = WinJS.Namespace.define(<name>, <members>) where <name>is a string (dots are OK) and <members> is any object contained in { }’s. Also, WinJS.Namespace.-defineWithParent(<parent>, <name>, <members>) defines one within the <parent>namespace.
If you call WinJS.Namespace.define for the same <name> multiple times, the <members> are combined. Where collisions are concerned, the most recently added members win. For example:
WinJS.Namespace.define("MyNamespace", { x: 10, y: 10 });
WinJS.Namespace.define("MyNamespace", { x: 20, z: 10 });
//MyNamespace == { x: 20, y: 10, z: 10}
WinJS.Class.define is, for its part, a shortcut for the object pattern, defining a constructor so that objects can be instantiated with new.
Syntax: var className = WinJS.Class.define(<constructor>, <instanceMembers>, <staticMembers>) where <constructor>is a function, <instanceMembers> is an object with the class’s properties and methods, and <staticMembers> is an object with properties and methods that can be directly accessed via <className>.<member> (without using new).
Variants: WinJS.Class.derive(<baseClass>, ...) creates a subclass (... is the same arg list as with define) using prototypal inheritance, and WinJS.Class.mix(<constructor>, [<classes>]) defines a class that combines the instance (but not static) members of one or more other<classes> and initializes the object with <constructor>.
Finally, note that because class definitions just generate an object, WinJS.Class.define is typically used inside a module with the resulting object exported to the rest of the app as a namespace member. Then you can use new <namespace>.<class> anywhere in the app.
For more details on classes in WinJS, see Appendix B.
Sidebar: Helping Out IntelliSense
If you start poking around in the WinJS source code—for example, to see how WinJS.UI.Pages is implemented—you’ll encounter certain structures within code comments, often starting with a triple slash, ///. These are used by Visual Studio and Blend to provide rich IntelliSense within the code editors. You’ll see, for example, /// <reference path…/> comments, which create a relationship between your current script file and other scripts to resolve externally defined functions and variables. This is explained on the JavaScript IntelliSense page in the documentation. For your own code, especially with namespaces and classes that you will use from other parts of your app, use these comment structures to describe your interfaces to IntelliSense. For details, see Extending JavaScript IntelliSense, and again look around the WinJS JavaScript files for many examples.
The Navigation Process and Navigation Styles
Having seen how page controls, WinJS.UI.Pages, WinJS.Navigation, and the PageControl-Navigator all relate, it’s straightforward to see how to navigate between multiple pages within the context of a single HTML container (e.g., default.html). With the PageControlNavigator instantiated and a page control defined via WinJS.UI.Pages, simply call WinJS.Navigation.navigate with the URI of that page control (its identifier). This loads that page’s contents into a child element inside the PageControlNavigator, unloading any previous page. That becomes page visible, thereby “navigating” to it so far as the user is concerned. You can also use (like the WinJS BackButton does) the other methods of WinJS.Navigation to move forward and back in the nav stack, which results in page contents being added and removed. The WinJS.Navigation.canGoBack andcanGoForward properties allow you to enable/disable navigation controls as needed. Just remember that all the while, you’ll still be in the overall context of your host page where you created the PageControlNavigator control.
As an example, create a new project using the Grid App template and look at these particular areas:
• pages/groupedItems/groupedItems is the home or “hub” page. It contains a ListView control (see Chapter 6, “Data Binding, Templates, and Collections”) with a bunch of default items.
• Tapping a group header in the list navigates to section page (pages/groupDetail). This is done in pages/groupedItems/groupedItems.html, where an inline onclick handler event navigates to pages/groupDetail/groupDetail.html with an argument identifying the specific group to display. That argument comes into the ready function of pages/groupDetail/groupDetail.js.
• Tapping an item on the hub page goes to detail page (pages/itemDetail). The itemInvoked handler for the items, the _itemInvoked function in pages/groupedItems/groupedItem.js, calls WinJS.Navigation.navigate("/pages/itemDetail/itemDetail.html") with an argument identifying the specific item to display. As with groups, that argument comes into the ready function of pages/itemDetail/itemDetail.js.
• Tapping an item in the section page also goes to the details page through the same mechanism—see the _itemInvoked function in pages/groupDetail/groupDetail.js.
• The back buttons on all pages wire themselves into WinJS.Navigation.back for keyboard, mouse, and touch events.
The Split App template works similarly, where each list item on pages/items is wired to navigate to pages/split when invoked. Same with the Hub App template that has a hub page using the WinJS.UI.Hub control that we’ll meet in Chapter 8.
The Grid App and Hub App templates also serve as examples of what‘s called the Hub-Section-Item navigation style (it’s most explicitly so in the Hub App). Here the app’s home page is the hub where the user can explore the full extent of the app. Tapping a group header navigates to a section, the second level of organization where only items from that group are displayed. Tapping an item (in the hub or in the section) navigates to a details page for that item. You can, of course, implement this navigation style however you like; the Grid App template uses page controls,WinJS.Navigation, and the PageControlNavigator. (Semantic zoom, as we’ll see in Chapter 7, “Collection Controls,” is also supported as a navigation tool to switch between hubs and sections.)
An alternate navigation choice is the Flatstyle, which simply has one level of hierarchy. Here, navigation happens to any given page at any time through a navigation bar(swiped in along with the app bar, as we’ll see in Chapter 9). When using page controls and PageControlNavigator, navigation commands or buttons can just invoke WinJS.Naviation.navigate for this purpose. Note that in this style, there typically is no back button: users are expected to always swipe in the navigation bar from the top and go directly to the desired page.
These styles, along with many other UI aspects of navigation, can be found on Navigation design for Windows Store apps.This is an essential topic for designers.
Sidebar: Initial Login and In-App Licensing Agreements (EULA) Pages
Some apps might require either a login or acceptance of a license agreement to do anything, and thus it’s appropriate that such pages are the first to appear in an app after the splash screen. In these cases, if the user does not accept a license or doesn’t provide a login, the app should display a message describing the necessity of doing so, but it should always leave it to the user to close the app if desired. Do not close the app automatically. (This is a Store certification requirement.)
Typically, such pages appear only the first time the app is run. If the user provides a valid login, or if you obtain an access token through the Web Authentication Broker (see Chapter 4), those credentials/token can be saved for later use via the Windows.Security.Credentials.-PasswordVault API. If the user accepts a EULA, that fact should be saved in appdata and reloaded anytime the app needs to check. These settings (login and acceptance of a license) should then always be accessible through the app’s Settings charm. Legal notices, by the way, as well as license agreements, should always be accessible through Settings as well. See Guidelines and checklist for login controls.
Optimizing Page Switching: Show-and-Hide
Even with page controls, there is still a lot going on when navigating from page to page: one set of elements is removed from the DOM, and another is added in. Depending on the pages involved, this can be an expensive operation. For example, if you have a page that displays a list of hundreds or thousands of items, where tapping any item goes to a details page (as with the Grid App template), hitting the back button from a detail page will require complete reconstruction of the list (or at least its visible parts if the list is virtualized, which could still take a long time).
Showing progress indicators can help alleviate the user’s anxiety, of course, but users are notoriously impatient and will likely want to quickly switch between a list of items and item details. (You’ve probably already encountered apps that seem to show progress indicators all the time for just about everything—how do they make you feel?) Indeed, the recommendation is that switching between fully interactive pages takes a quarter second or less, if possible, and no more than half a second. In some cases, completely swapping out chunks of the DOM with page controls will just become too time-consuming. (You could use a split master-detail view, of course, but that means splitting the available screen real estate.)
A good alternative is to actually keep the list/master page fully loaded the whole time. Instead of navigating to the item details page in the way we’ve seen, simply render that details page (using WinJS.UI.Pages.render directly) into another div that occupies the whole screen and overlays the list (similar to what we do with an extended splash screen), and then make that div visible without removing the list page from the DOM. When you dismiss the details page, just hide its div. This way you get the same effect as navigating between pages but the whole process is much quicker. You can also apply WinJS animations like enterContent and exitContent to make the transition more fluid.
If necessary, you can clear out the details div by just setting its innerHTML to "". However, if each details page has the same structure for every item, you can leave it entirely intact. When you “navigate” to the next details page, you would go through and refresh each element’s data and properties for the new item before making that page visible. This could be significantly faster than rebuilding the details page all over again.
Note that because the PageControlNavigator implementation in navigator.js is provided by the templates and becomes part of your app, you can modify it however you like to handle these kinds of optimizations in a more structured manner that’s transparent to the rest of your code.
Page-Specific Styling
When creating an app that uses page controls, you’ll end up with each page having its own .css file in which you place page-specific styles. What’s very important to understand here, though, is that while each page’s HTML elements are dynamically added to and removed from the DOM,any and all CSS that is loaded for page controls is cumulative to the app as a whole. That is, styles behave like script and are preserved across page “navigations.” This can be a source of confusion and frustration, so it’s essential to understand what’s happening here and how to work with it.
Let's say the app's root page is default.html and its global styles are in css/default.css. It then has several page controls defined in pages/page1 (page1.html. page1.js, page1.css), pages/page2 (page2.html. page2.js, page2.css), and pages/page1 (page3.html. page3.js, page3.css). Let's also say that page1 is the “home” page that’s loaded at startup. This means that the styles in default.css and page1.css have been loaded when the app first appears.
Now the user navigates to page2. This causes the contents of page1.html to be dumped from the DOM, but its styles remain in the stylesheet. So when page2 is loaded, page2.css gets added to the overall stylesheet as well, and any styles in page2.css that have identical selectors to page1.css will overwrite those in page1.css. And when the user navigates to page3 the same thing happens again: the styles in page3.css are added in and overwrite any that already exist. But so far we haven’t seen any unexpected effect of this.
Now, say the user navigates back to page1. Because the apphost's rendering engine has already loaded page1.css into the stylesheet, page1.css won't be loaded again. This means that any styles that were overwritten by other pages' stylesheets will not be reset to those in page1.css—basically you get whichever ones were loaded most recently. As a result, you can see some mix of the styles in page2.css and page3.css being applied to elements in page1.24
There are two ways to handle CSS files to avoid these problems. The first way is to take steps to avoid colliding selectors: use unique selectors for each page or can scope your styles to each page specifically. For the latter, wrap each page’s contents in a top-level div with a unique class (as in <div class="page1">) so that you can scope every rule in page1.css with the page name. For example:
.page1p {
font-weight: bold;
}
Such a strategy can also be used to define stylesheets that are shared between pages, as with implementing style themes. If you scope the theme styles with a theme class, you can include that class in the top-level div to apply the theme.
A similar case arises if you want to use the ui-light.css and ui-dark.css WinJS stylesheets in different pages of the same app. Here, whichever one is loaded second will define the global styles such that subsequent pages that refer to ui-light.css might appear with the dark styles.
Fortunately, WinJS already scopes those styles that differ between the two files: those in ui-light.css are scoped with a CSS class win-ui-light and those in ui-dark.css are scoped with win-ui-dark. This means you can just refer to whichever stylesheet you use most often in your .html files and then add either win-ui-light or win-ui-dark to those elements that you need to style differently. When you add either class, note that the style will apply to that element and all its children. For a simple demonstration of an app with one dark page (as the default) and one light page, see the PageStyling example in the companion content.
The other way of avoiding collisions is to specifically unload and reload CSS files by modifying <link> tags in the page header. You can either remove one <link> tag and add a different one, toggle the disabled attribute for a tag between true and false, or change the href attribute of an existing link. These methods are demonstrated for styling an iframe in the CSS styling and branding your app sample, which swaps out and enables/disables both WinJS and app-specific stylesheets. Another demonstration for switching between the WinJS stylesheets is in scenario 1 of theHTML NavBar control sample that we’ll see more of in Chapter 9 (js/1-CreateNavBar.js):
function switchStyle() {
var linkEl = document.querySelector('link');
if (linkEl.getAttribute('href') === "//Microsoft.WinJS.2.0 /css/ui-light.css") {
linkEl.setAttribute('href', "//Microsoft.WinJS.2.0 /css/ui-dark.css");
} else {
linkEl.setAttribute('href', "//Microsoft.WinJS.2.0 /css/ui-light.css");
}
}
The downside of this approach is that every switch means reloading and reparsing the CSS files and a corresponding re-rendering of the page. This isn’t much of an issue during page navigation, but given the size of the WinJS files I recommend using it only for your own page-specific stylesheets and using the win-ui-light and win-ui-dark classes to toggle the WinJS styles.
Async Operations: Be True to Your Promises
Even though we’ve just got our first apps going, we’ve already seen a lot to do with async operations and promises. We’ve seen their basic usage, and in the “Moving the Captured Image to AppData (or the Pictures Library)” section of Chapter 2, we saw how to combine multiple async operations into a sequential chain. At other times you might want to combine multiple parallel async operations into a single promise. Indeed, as you progress through this book you’ll find that async APIs, and thus promises, seem to pop up as often as dandelions in a lawn (without being a noxious weed, of course)! Indeed, the implementation of the PageControlNavigator._navigating method that we saw earlier has a few characteristics that are worth exploring.
To reiterate a very important point, promises are simply how async operations in WinRT are projected into JavaScript, which matches how WinJS and other JavaScript libraries typically handle asynchronous work. And because you’ll be using all sorts of async APIs in your development work, you’re going to be using promises quite frequently and will want to understand them deeply.
Note There are a number of different specifications for promises. The one presently used in WinJS and the WinRT API is known as Common JS/Promises A. Promises in jQuery also follow this convention and are thus interoperable with WinJS promises.
The subject of promises gets rather involved, however, so instead of burdening you with the details in the main flow of this chapter, you’ll find a full treatment of promises in Appendix A, “Demystifying Promises.” Here I want to focus on the most essential aspects of promises and async operations that we’ll encounter throughout the rest of this book, and we’ll take a quick look at the features of the WinJS.Promise class. Examples of the concepts can be found in the WinJS Promise sample.
Using Promises
The first thing to understand about a promise is that it’s really nothing more than a code construct or a calling convention. As such, promises have no inherent relationship to async operations—they just so happen to be very useful in that regard! A promise is simply an object that represents a value that might be available at some point in the future (or might be available already). It’s just like we use the term in human relationships. If I say to you, “I promise to deliver a dozen donuts,” it doesn’t matter when and how I get them (or even whether I have them already in hand), it only matters that I deliver them at some point in the future.
A promise, then, implies a relationship between two people or, to be more generic, two agents, as I call them. There is the originatorwho makes the promise—that is, the one who has some goods to deliver—and the consumer or recipient of that promise, who will also be the later recipient of the goods. In this relationship, the originator creates a promise in response to some request from the consumer (typically an API call). The consumer can then do whatever it wants with both the promise itself and whatever goods the promise delivers. This includes sharing the promise with other interested consumers—the promise will deliver its goods to each of them.
The way a consumer listens for delivery is by subscribing a completed handler through the promise’s then or done methods. (We’ll discuss the differences later.) The promise invokes this handler when it has obtained its results. In the meantime, the consumer can do other work, which is exactly why promises are used with async operations. It’s like the difference between waiting in line at a restaurant’s drive-through for a potentially very long time (the synchronous model) and calling out for pizza delivery (the asynchronous model): the latter gives you the freedom to do other things.
Of course, if the promised value is already available, there’s no need to wait: it will be delivered synchronously to the completed handler as soon as then/done is called.
Similarly, problems can arise that make it impossible to fulfill the promise. In this case the promise will invoke any error handlers given to then/done as the second argument. Those handlers receive an error object containing name and message properties with more details, and after this point the promise is in what’s called the error state. This means that any subsequent calls to then/done will immediately (and synchronously) invoke any given error handlers.
A consumer can also cancel a promise if it decides it no longer needs the results. A promise has a cancel method for this purpose, and calling it both halts any underlying async operation represented by the promise (however complex it might be) and puts the promise into the error state.
Some promises—which is to say, some async operations—also support the ability to report intermediate results to any progress handlers given to then/done as the third argument. Check the documentation for the particular API in question.25
Finally, two static methods on the WinJS.Promise object might come in handy when using promises:
• is determines whether an arbitrary value is a promise, returning a Boolean. It basically makes sure it’s an object with a function named “then”; it does not test for “done”.
• theneachtakes an array of promises and subscribes completed, error, and progress handlers to each promise by calling its then method. Any of the handlers can be null. The return value of then each is itself a promise that’s fulfilled when all the promises in the array are fulfilled. We call this a join, as described in the next section.
Tip If you’re new to the concept of static methods, these refer to functions that exist on an object class that you call directly through the fully-qualified name, such as WinJS.Promise.theneach. These are distinct from instance methods, which must be called through a specific instance of the class. For example, if you have a WinJS.Promise object in the variable p, you cancel that particular instance with p.cancel().
Joining Parallel Promises
Because promises are often used to wrap asynchronous operations, it’s certainly possible that you can have multiple operations going on in parallel. In these cases you might want to know either when one promise in a group is fulfilled or when all the promises in the group are fulfilled. The static functions WinJS.Promise.any and WinJS.Promise.join provide for this. Here’s how they compare:
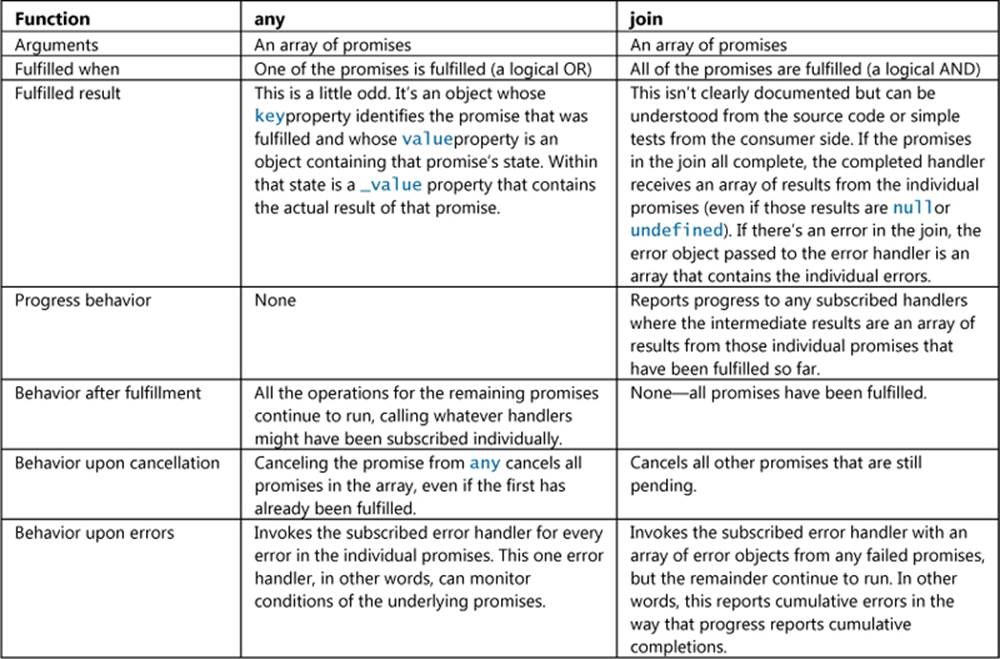
Appendix A, by the way, has a small code snippet that shows how to use join and the array’s reduce method to execute parallel operations but have their results delivered in a specific sequence.
Sequential Promises: Nesting and Chaining
In Chapter 2, when we added code to Here My Am! to copy the captured image to another folder, we got our first taste of using chained promises to run sequential async operations. To review, what makes this work is that any promise’s then method returns another promise that’s fulfilled when the given completed handler returns. (That returned promise also enters the error state if the first promise has an error.) That completed handler, for its part, returns the promise from the next async operation in the chain, the results of which are delivered to the next completed handler down the line.
Though it may look odd at first, chaining is the most common pattern for dealing with sequential async operations because it works better than the more obvious approach of nesting. Nesting means to call the next async API within the completed handler of the previous one, fulfilling each with done. For example (extraneous code removed for simplicity):
//Nested async operations, using done with each promise
captureUI.captureFileAsync(Windows.Media.Capture.CameraCaptureUIMode.photo)
.done(function (capturedFileTemp) {
//...
local.createFolderAsync("HereMyAm", ...)
.done(function (myFolder) {
//...
capturedFile.copyAsync(myFolder, newName)
.done(function (newFile) {
})
})
});
The one advantage to this approach is that each completed handler will have access to all the variables declared before it. Yet the disadvantages begin to pile up. For one, there is usually enough intervening code between the async calls that the overall structure becomes visually messy. More significantly, error handling becomes much more difficult. When promises are nested, error handling must be done at each level with distinct handlers; if you throw an exception at the innermost level, for instance, it won’t be picked up by any of the outer error handlers. Each promise thus needs its own error handler, making real spaghetti of the basic code structure:
captureUI.captureFileAsync(Windows.Media.Capture.CameraCaptureUIMode.photo)
.done(function (capturedFileTemp) {
//...
local.createFolderAsync("HereMyAm", ...)
.done(function (myFolder) {
//...
capturedFile.copyAsync(myFolder, newName)
.done(function (newFile) {
},
function (error) {
})
},
function (error) {
});
},
function (error) {
});
I don’t know about you, but I really get lost in all the }’s and )’s (unless I try hard to remember my LISP class in college), and it’s hard to see which error function applies to which async call. And just imagine throwing a few progress handlers in as well!
Chaining promises solves all of this with the small tradeoff of needing to declare a few extra temp variables outside the chain for any variables that need to be shared amongst the various completed handlers. Each completed handler in the chain again returns the promise for the next operation, and each link is a call to then except for a final call to done to terminate the chain. This allows you to indent all the asynccalls only once, and it has the effect of propagating errors down the chain, as any intermediate promise that’s in the error state will be passed through to the end of the chain very quickly. This allows you to have only a single error handler at the end:
captureUI.captureFileAsync(Windows.Media.Capture.CameraCaptureUIMode.photo)
.then(function (capturedFileTemp) {
//...
return local.createFolderAsync("HereMyAm", ...);
})
.then(function (myFolder) {
//...
return capturedFile.copyAsync(myFolder, newName);
})
.done(function (newFile) {
},
function (error) {
})
To my eyes (and my aging brain), this is a much cleaner code structure—and it’s therefore easier to debug and maintain. If you like, you can even end the chain with done(null, errorHandler), as we did in Chapter 2:
captureUI.captureFileAsync(Windows.Media.Capture.CameraCaptureUIMode.photo)
//...
.then(function (newFile) {
})
.done(null, function (error) {
})
})
Remember, though, that if you need to pass a promise for the whole chain elsewhere, as to a setPromise method, you’ll use then throughout.
Error Handling in Promise Chains: then vs. done
This brings us to why we have both then and done and to why done is used at the end of a chain as well as for single async operations. To begin with, then returns another promise, thereby allowing chaining, whereas done returns undefined, so it always occurs at the end of a chain. Second, if an exception occurs within one async operation’s then method and there’s no error handler at that level, the error gets stored in the promise returned by then (that is, the returned promise is in the error state). In contrast, if done sees an exception and there’s no error handler, it throws that exception to the app’s event loop. This will bypass any local (synchronous) try/catch block, though you can pick them up in either in WinJS.Application.onerroror window.onerror handlers. (The latter will get the error if the former doesn’t handle it.) If you don’t have an app-level handler, the app will be terminated and an error report sent to the Windows Store dashboard. For that reason we recommend that you implement an app-level error handler using one of the events above.
In practical terms, then, this means that if you end a chain of promises with a then and not done, all exceptions in that chain will get swallowed and you’ll never know there was a problem! This can place an app in an indeterminate state and cause much larger problems later on. So, unless you’re going to pass the last promise in a chain to another piece of code that will itself call done (as you do, for example, when using a setPromise deferral or if you’re writing a library from which you return promises), always use done at the end of a chain even for a single async operation.26
Promise error events If you look carefully at the WinJS.Promisedocumentation, you’ll see that it has an error event along with addEventListener, removeEventListener, and dispatchEvent methods. This is primarily used within WinJS itself and is fired on exceptions (but notcancellation). Promises from async WinRT APIs, however, do not fire this event, so apps typically use error handlers passed to then/done for this purpose.
Managing the UI Thread with the WinJS Scheduler
JavaScript, as you are probably well aware, is a single-threaded execution environment, where any and all of your code apart from web workers and background tasks run on what we call the UI thread. The internal working of asynchronous APIs, like those of WinRT, happen on other threads as well, and the internal engines of the app host are also very much optimized for parallel processing.27 But regardless of how much work you offload to other threads, there’s one very important characteristic to always keep in mind:
The results from all non-UI threads eventually get passed back to the app on the main UI thread through callback functions such as the completed handler given to a promise.
Think about this very clearly: if you make a whole bunch of async WinRT calls within a short amount of time, such as to make HTTP requests or retrieve information from files, those tasks will execute on separate threads but each one will pass their results back to the UI thread when the task is complete. What this means is that the UI thread can become quite overloaded with such incoming traffic! Furthermore, what you do (or what WinJS does on your behalf) in response to the completion of each operation—such as adding elements to the DOM or innocently changing a simple layout-affecting style—can trigger more work on the UI thread, all of which competes for CPU time. As a result, your UI can become sluggish and unresponsive, the very opposite of “fast and fluid”!
This is something we certainly saw with JavaScript apps on Windows 8, and developers created a number of strategies to cope with it such as starting async operations in timed batches to manage their rate of callbacks to the UI thread, and batching together work that triggers a layout pass so as to combine multiple changes in each pass.
Still, after plenty of performance analysis, the WinJS and app host teams at Microsoft found that what was really needed is a way to asynchronously prioritize different tasks on the UI thread itself. This meant creating some low-level scheduling APIs in the app host such asMSApp.executeAtPriority. But don’t use such methods directly—use the WinJS.Utilities.Scheduler API instead. The reason for this is that WinJS very carefully manages its own tasks through the Scheduler, so by using it yourself you ensure that all the combined work is properly coordinated. This API also provides a simpler interface to the whole process, especially where promises are concerned.
Let’s first understand what the different priorities are, then we’ll see how to schedule and manage work at those priorities. Keep in mind, though, that using the scheduler is not at all required—it’s there to help you tune the performance of your app, not to make your life difficult!
Scheduler Priorities
The relative priorities for the WinJS Scheduler are expressed in the Scheduler.Priority enumeration, which I list here in descending order: max, high, aboveNormal, normal (the default for app code), belowNormal, idle, and min. Here’s the general guidance on how to use these:

Although you need not use the scheduler in your own code, a little analysis of your use of async operations will likely reveal places where setting priorities might make a big difference. Earlier in “Optimizing Startup Time,” for example, we talked about how you want to prioritize non-UI work while your splash screen is visible, because the splash screen is noninteractive by definition. If you’re doing some initial HTTP requests, for example, set the most critical ones for your home page to max or high, and set secondary requests to belowNormal. This will help those first requests get processed ahead of UI rendering, whereas your handling of the secondary requests will then happen after your home page has come up. This way you won’t make the user wait for completion of those secondary tasks before the app becomes interactive. Other requests that you want to start, perhaps to cache data for a secondary leaderboard page, can be set to belowNormal or idle. Of course, if the user navigates to a secondary page, you’ll want to change its task priorities to aboveNormal or high.
WinJS, for its part, makes extensive use of priorities. For example, it will batch edits to a data-binding source at high priority while scheduling cleanup tasks at idle priority. In a complex control like the ListView, fetching new items that are necessary to render the visible part of a ListView control is done at max, rendering of the visible items is done at aboveNormal, pre-loading the next page of items forward is set to normal (anticipating that the user will pan ahead), and pre-loading of the previous page (to anticipate a reverse pan) is set to belowNormal.
Scheduling and Managing Tasks
Now that we know about scheduling priorities, the way to asynchronously execute code on the UI thread at a particular priority is by calling the Scheduler.schedule method (whose default priority is normal). This method allows you to provide an optional object to use as this inside the function along with a name to use for logging and diagnostics.28
As a simple example, scenario 1 of the HTML Scheduler sample schedules a bunch of functions at different priorities in a somewhat random order (js/schedulesjobscenario.js):
window.output("\nScheduling Jobs...");
var S = WinJS.Utilities.Scheduler;
S.schedule(function () { window.output("Running job at aboveNormal priority"); },
S.Priority.aboveNormal);
window.output("Scheduled job at aboveNormal priority");
S.schedule(function () { window.output("Running job at idle priority"); },
S.Priority.idle, this);
window.output("Scheduled job at idle priority");
S.schedule(function () { window.output("Running job at belowNormal priority"); },
S.Priority.belowNormal);
window.output("Scheduled job at belowNormal priority");
S.schedule(function () { window.output("Running job at normal priority"); }, S.Priority.normal);
window.output("Scheduled job at normal priority");
S.schedule(function () { window.output("Running job at high priority"); }, S.Priority.high);
window.output("Scheduled job at high priority");
window.output("Finished Scheduling Jobs\n");
The output then shows that the “jobs,” as they’re called, which execute in the expected order:
Scheduling Jobs...
Scheduled job at aboveNormalPriority
Scheduled job at idlePriority
Scheduled job at belowNormalPriority
Scheduled job at normalPriority
Scheduled job at highPriority
Finished Scheduling Jobs
Running job at high priority
Running job at aboveNormal priority
Running job at normal priority
Running job at belowNormal priority
Running job at idle priority
No surprises here, I hope!
When you call schedule, what you get back is an object with the Scheduler.IJob interface, which defines the following methods and properties:
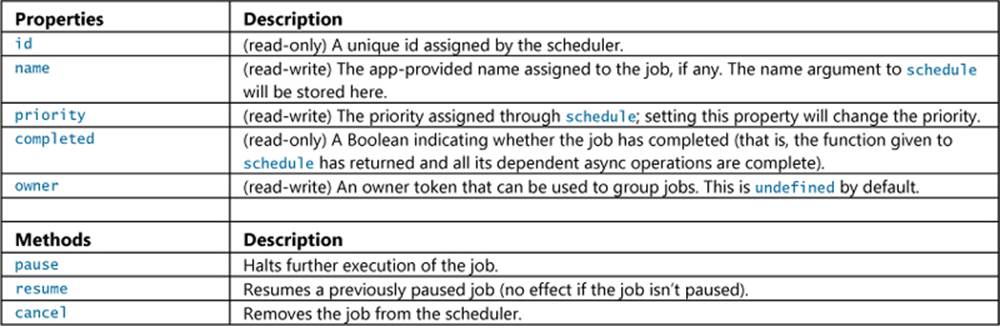
In practice, if you’ve scheduled a job at a low priority but navigate to a page that really needs that job to complete before the page is rendered, you simply bump up its priority property (and then drain the scheduler as we’ll see in a moment). Similarly, if you scheduled some work on a page that you don’t need to continue when navigating away, then call the job’s cancel method within the page’s unload method. Or perhaps you have an index page from which you typically navigate into a details page, and then back again. In this case you can pause any jobs on the index page when navigating to the details, then resume them when you return to the index. See scenarios 2 and 3 of the sample for some demonstrations.
Scenario 2 also shows the utility of the owner property (the code is thoroughly mundane so I’ll leave you to examine it). An owner token is something created through Scheduler.createOwner-Token and then assigned to a job’s owner (which replaces any previous owner). An owner token is simply an object with a single method called cancelAll that calls the cancel method of whatever jobs are assigned to it, nothing more. It’s a simple mechanism—the owner token really does nothing more than maintain an array of jobs—but clearly allows you to group related jobs together and cancel them with a single call. This way you don’t need to maintain your own lists and iterate through them for this purpose. (To do the same for pause and resume you can, of course, just duplicate the pattern in your own code.)
The other important feature of the Scheduler is the requestDrain method. This ensures that all jobs scheduled at a given priority or higher are executed before the UI thread yields. You typically use this to guarantee that high priority jobs are completed before a layout pass. requestDrainreturns a promise that is fulfilled when the jobs are drained, at which time you can drain lower priority tasks or schedule new ones.
A simple demonstration is shown in scenario 5 of the sample. It has two buttons that schedule the same set of varying jobs and then call requestDrain with either high or belowNormal priority. When the returned promise completes, it outputs a message to that effect (js/drainingscenario.js):
S.requestDrain(priority).done(function () {
window.output("Done draining");
});
Comparing the output of these two side by side (high on the left, belowNormal on the right), as below, you can see that the promise is fulfilled at different points depending on the priority:
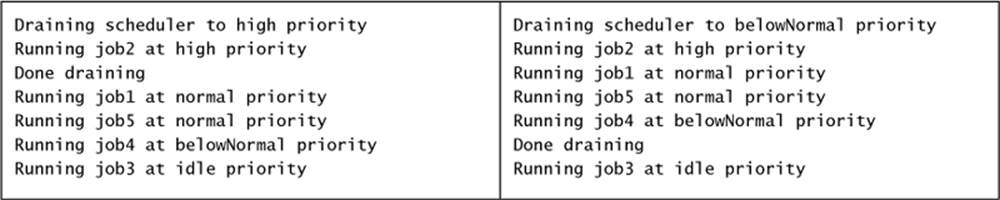
The other method that exists on the Scheduler is retrieveState, a diagnostic aid that returns a descriptive string for current jobs and drain requests. Adding a call to this in scenario 5 of the sample just after the call to requestDrain will return the following string:
Jobs:
id: 28, priority: high
id: 27, priority: normal
id: 31, priority: normal
id: 30, priority: belowNormal
id: 29, priority: idle
Drain requests:
*priority: high, name: Drain Request 0
Setting Priority in Promise Chains
Let’s say you have a set of async data-retrieval methods that you want to execute in a sequence as follows, processing their results at each step:
getCriticalDataAsync().then(function (results1) {
varsecondaryPages = processCriticalData(results1);
return getSecondaryDataAsync(secondaryPages);
}).then(function (results2) {
varitemsToCache = processSecondaryData(results2);
returngetBackgroundCacheDataAsync(itemsToCache);
}).done(function (results3) {
populateCache(results3);
});
By default, all of this would run at the current priority against everything else happening on the UI thread. But you probably want the call to processCriticalData to run at a high priority, processSecondaryData to run at normal, and populateCache to run at idle. With schedule by itself, you’d have to do everything the hard way:
var S = WinJS.Utilities.Scheduler;
getCriticalDataAsync().done(function (results1) {
S.schedule(function () {
var secondaryPages = processCriticalData(results1);
S.schedule(function () {
getSecondaryDataAsync(secondaryPages).done(function (results2) {
var itemsToCache = processSecondaryData(results2);
S.schedule(function () {
getBackgroundCacheDataAsync(itemsToCache).done(function (results3) {
populateCache(results3);
});
}, S.Priority.idle);
});
}, S.Priority.normal);
}, S.Priority.high);
});
Urg. Blech. Ick. It’s more fun going to the dentist than writing code like this! To simplify matters, you could encapsulate the process of setting a new priority within another promise that you can then insert into the chain. The best way to do this is to dynamically generate a completed handler that would take the results from the previous step in the chain, schedule a new priority, and return a promise that delivers those same results (see Appendix A for the use of new WinJS.Promise):
function schedulePromise(priority) {
//This returned function is a completed handler.
returnfunctioncompletedHandler (results) {
//The completed handler returns another promise that's fulfilled
//with the same results it received...
returnnew WinJS.Promise(functioninitializer (c) {
//But the delivery of those results are scheduled according to a priority.
WinJS.Utilities.Scheduler.schedule(function () {
c(results);
}, priority);
});
}
}
Fortunately we don’t have to write this code ourselves. The WinJS.Utilities.Scheduler already has five pre-made completed handlers like this that also automatically cancel a job if there is an error. These are called schedulePromiseHigh, schedulePromiseAboveNormal,schedulePromiseNormal, schedulePromiseBelowNormal, or schedulePromiseIdle.
Because these APIs are pre-made completed handlers rather than methods you call directly, simply insert the appropriate name at those points in a promise chain where you want to change the priority, as highlighted below:
var S = WinJS.Utilities.Scheduler;
getCriticalDataAsync().then(S.schedulePromiseHigh).then(function (results1) {
var secondaryPages = processCriticalData(results1);
return getSecondaryDataAsync(secondaryPages);
}).then(S.schedulePromise.normal).then(function (results2) {
var itemsToCache = processSecondaryData(results2);
return getBackgroundCacheDataAsync(itemsToCache);
}).then(S.schedulePromiseIdle).done(function (results3) {
populateCache(results3);
});
Long-Running Tasks
All the jobs that we’ve seen so far are short-running in that we schedule a worker function at a certain priority and it just completes its work when it’s called. However, some tasks might take much longer to complete, in which case you don’t want to block higher priority work on your UI thread. To help with this, the scheduler has a built-in interval timer of sorts for tasks that are scheduled at aboveNormal priority or lower, so a task can check whether it should cooperatively yield and have itself rescheduled for its next bit of work. Let me stress that word cooperatively: nothing forces a task to yield, but because all of this is affecting the UI performance of your app and your app alone, if you don’t play nicely you’ll just be hurting yourself!
The mechanism for this is provided through a job info object that’s passed as an argument to the worker function itself. To make sure we’re clear on how this fits in, let’s first look at everything a worker has available within its scope, which is best explained with a few comments within the basic code structure:
var job = WinJS.Utilities.Scheduler.schedule(functionworker(jobInfo) {
//jobInfo.job is the same as the job returned from schedule.
//Scheduler.currentPriority will match the second argument to schedule.
//this will be the third argument passed to schedule.
}, S.Priority.idle, this);
The members of the jobInfo object are defined by Scheduler.IJobInfo:
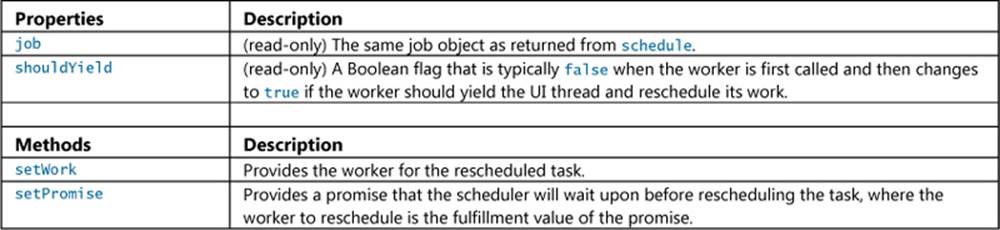
Scenario 4 of the HTML Scheduler sample shows how to work with these. When you press the Execute a Yielding Task button, it schedules a function called worker at idle priority that just spins within itself until you press the Complete Yielding Task button, which sets thetaskCompleted flag below to true (js/yieldingscenario.js, with the 2s interval changed to 200ms):
S.schedule(function worker(jobInfo) {
while (!taskCompleted) {
if (jobInfo.shouldYield) {
// not finished, run this function again
window.output("Yielding and putting idle job back on scheduler.");
jobInfo.setWork(worker);
break;
}
else {
window.output("Running idle yielding job...");
var start = performance.now();
while (performance.now() < (start + 200)) {
// do nothing;
}
}
}
if (taskCompleted) {
window.output("Completed yielding task.");
taskCompleted = false;
}
}, S.Priority.idle);
Provided that the task is active, it does 200ms of work and then checks if shouldYield has changed to true. If so, the worker calls setWork to reschedule itself (or another function if it wants). You can trigger this while the idle worker is running by pressing the Add Higher Priority Tasks to Queue button in the sample. You’ll then see how those tasks are run before the next call to the worker. In addition, you can poke around elsewhere in the UI to observe that the idle task is not blocking the UI thread.
Note here that the worker function checks shouldYield first thing to immediately yield if necessary. However, it’s perfectly fine to do a little work first and then check. Again, this is all about cooperating within your own app code, so such self-throttling is your choice.
As for setPromise, this is slightly tricky. Calling setPromise tells the scheduler to wait until that promise is fulfilled before rescheduling the task, where the next worker function for the task is provided directly through the promise’s fulfillment value. (As such, IJobInfo.setPromisedoesn’t pertain to handling async operations like other setPromise methods in WinJS that are tied in with WinRT deferrals. If you called IJobInfo.setPromise with a promise from some random async API, the scheduler would attempt to use the fulfillment value of that operation—which could be anything—as a function and thus likely throw an exception.)
In short, whereas setWork says “go ahead and reschedule with this worker,” setPromise says “hold off rescheduling until I deliver the worker sometime later.” This is primarily useful to create a work queue composed of multiple jobs with an ongoing task to process that queue. To illustrate, consider the following code for such an arrangement:
var workQueue = [];
function addToQueue(worker) {
workQueue.push(worker);
}
S.schedule(function processQueue(jobInfo) {
while (work.length) {
if (jobInfo.shouldYield) {
jobInfo.setWork(processQueue);
return;
}
work.shift()(); //Pull the first from the FIFO queue and call it.
}
}}, S.Priority.belowNormal);
Assuming that there are some jobs in the queue when you first call schedule, the processQueue task will cooperatively empty that queue. And if new jobs are added to the queue in the meantime, processQueue will continue to be rescheduled.
The problem, however, is that the processQueue worker will finish and exit as soon as the queue is empty, meaning that any jobs you add to the queue later on won’t be processed. To fix this you could just have processQueue repeatedly call setWork on itself again and again even when the queue is empty, but that would be wasteful. Instead, you can use setPromise to have the scheduler wait until there is more work in the queue. Here’s how that would work:
var workQueue = [];
var haveWork = function () { }; //This function is just a placeholder
function addToQueue(worker) {
workQueue.push(worker);
haveWork();
}
S.schedule(function processQueue(jobInfo) {
while (work.length) {
if (jobInfo.shouldYield) {
jobInfo.setWork(processQueue);
return;
}
work.shift()(); //Pull the first from the FIFO queue and call it.
}
//If we reach here the queue is empty, but we don't want to exit the worker.
//Instead of calling setWork without work to do, create a promise that's fulfilled
//when addToQueue is called again, which we do by replacing the haveWork function
//with one that calls the promise's completed handler.
jobInfo.setPromise(new WinJS.Promise(function (completeDispatcher) {
haveWork = function () { completeDispatcher(processQueue) };
}))
});
With this code, say we populate workQueue with a number of jobs and then make the call to schedule. Up to this point and so long as the queue doesn’t become empty, we stay inside the while loop of processQueue. Any call to the empty haveWork function so far is just a no-op.
If the queue becomes empty, however, we’ll exit the while loop but we don’t want processQueue to exit. Instead, we want to tell the scheduler to wait until more work is added to the queue. This is why we have that placeholder function for haveWork, because we can now replace it with a function that will complete the promise with processQueue, thereby triggering a rescheduling of that worker function.
Note that an alternate way to accomplish the same goal is to use this assignment for haveWork:
haveWork = completeDispatcher.bind(null, processQueue);
This accomplishes the same result as an anonymous function and avoids creating a closure.
Debugging and Profiling
As we’ve been exploring the core anatomy of an app in this chapter along with performance, now’s a good time to talk about debugging and profiling. This means, as I like to put it, becoming a doctor of internal medicine for your app and learning to diagnose how well that anatomy is working.
Tip Debug logging, which is local to and only relevant on your development machine, is a very different concern from telemetry logging, with which you monitor and record user activity. See “Instrumenting Your App for Telemetry and Analytics” in Chapter 20.
Debug or release? Because JavaScript is not a compiled language, it lacks conditional compilation directives like #ifdef in C#/C++. There are, however, a few ways to more or less make this determination at run time (with some caveats). See “Sidebar: Debug or Release?” in Chapter 2.
Debug Output and Logging
It’s sometimes heartbreaking to developers that window.promptand window.alert are not available to Windows Store apps as quickie debugging aids. Fortunately, you have two other good options for that purpose. One is Windows.UI.Popups.MessageDialog, which is actually what you use for real user prompts in general (see Chapter 9). The other is console.log, as we’ve used in our code already, which sends text to Visual Studio’s output pane. These messages can also be logged as Windows events, as we’ll see shortly.
For readers who are seriously into logging, beyond the kind you do with chainsaws, there are two other options: a more flexible method in WinJS called WinJS.log, and the logging APIs in Windows.Foundation.Diagnostics.
WinJS.log is a curious beast because although it’s ostensibly part of the WinJS namespace, it’s actually not implemented within WinJS itself! At the same time, it’s used all over the place in the library for errors and other reporting. For instance:
WinJS.log && WinJS.log(safeSerialize(e), "winjs", "error");
This kind of JavaScript syntax, by the way, means “check whether WinJS.log exists and, if so, call it.” The && is a shortcut for an if statement: the JavaScript engine will not execute the part after the && if the first part is null, undefined, or false. It’s a very convenient bit of concise syntax.
Anyway, the purpose of WinJS.log is to allow you to implement your own logging function and have it pick up WinJS’s logging as well as any you add to your own code. What’s more, you can turn the logging on and off at any time, something that’s not possible with console.log unless, well, you write a wrapper like WinJS.log!
Your WinJS.log function, as described in the documentation, should accept three parameters:
1. The message to log (a string).
2. Astring with a tag or tags to categorize the message. WinJS always uses “winjs” and sometimes adds an additional tag like “binding”, in which case the second parameter is “winjs binding”. I typically use “app” in my own code.
3. Astring describing the type of the message. WinJS will use “error”, “info”, “warn”, and “perf”.
Conveniently, WinJS offers a basic implementation of this which you set up bycalling WinJS.Utilities.startLog(). This assigns a function to WinJS.log that uses WinJS.Utilities.-formatLog to produce decent-looking output to the console. What’s very useful is that you can pass a list of tags (in a single string) to startLog and only those messages with those tags will show up. Multiple calls to startLog will aggregate those tags. Then you can call WinJS.Utilities.stopLog to turn everything off and start again if desired (stopLog is not made to remove individual tags). As a simple example, see the HereMyAm3d example in the companion content.
Tip Although logging will be ignored for released apps that customers will acquire from the Store, it’s a good idea to comment out your one call to startLog before submitting a package to the Store and thus avoid making any unnecessary calls at run time.
WinJS.log is highly useful for generating textual logs, but if you want to go much deeper you’ll want to use the WinRT APIs in Windows.Foundation.Diagnostics, namely the LoggingSession and FileLoggingSession classes. These work with in-memory and continuous file-based logging, respectively, and generate binary “Event Trace Log” (ETL) data that can be further analyzed with the Windows Performance Analyzer (wpa.exe) and the Trace Reporter (tracerpt.exe) tools in the Windows SDK. This is a subject well beyond the scope of this book (and this author’s experience), so refer to the Windows Performance Analyzer documentation for more, along with the LoggingSession sample and FileLoggingSession sample.
Error Reports and the Event Viewer
Similar to window.alert, another DOM API function to which you might be accustomed is window.close. You can still use this as a development tool, but in released apps Windows interprets this call as a crash and generates an error report in response. This report will appear in the Store dashboard for your app, with a message telling you to not use it! Generally, Store apps should not provide their own close affordances.
There might be situations, however, when a released app absolutely needs to close itself in response to unrecoverable conditions. Although you can use window.close for this, it’s better to use MSApp.terminateApp because it allows you to also include information as to the exact nature of the error. These details show up in the Store dashboard, making it easier to diagnose the problem.
In addition to the Store dashboard, you should make fast friends with the Windows Event Viewer.29 This is where error reports, console logging, and unhandled exceptions (which again terminate the app without warning) can be recorded. To enable this, start Event Viewer, navigate to Application And Services Logs on the left side (after waiting for a minute while the tool initializes itself), and then expand Microsoft > Windows > AppHost. Then left-click to select Admin (this is important), right-click Admin, and select View > Show Analytic And Debug Logs. This turns on full output, including tracing for errors and exceptions, as shown in Figure 3-5. Then right-click AppTracing (also under AppHost) and select Enable Log. This will trace any calls to console.log as well as other diagnostic information coming from the app host.
FIGURE 3-5 App host events, such as unhandled exceptions, load errors, and logging can be found in Event Viewer.
We already introduced Visual Studio’s Exceptions dialog in Chapter 2; refer back to Figure 2-16. For each type of JavaScript exception, this dialog supplies two checkboxes labeled Thrown and User-unhandled. Checking Thrown will display a dialog box in the debugger (see Figure 3-6) whenever an exception is thrown, regardless of whether it’s handled and before reaching any of your error handlers.

FIGURE 3-6 Visual Studio’s exception dialog. As the dialog indicates, it’s safe to press Continue if you have an error handler in the app; otherwise the app will terminate. Note that the checkbox in this dialog is a shortcut to toggle the Thrown checkbox for this exception type in the Exceptions dialog.
If you have error handlers in place, you can safely click the Continue button in the dialog of Figure 3-6 and you’ll eventually see the exception surface in those error handlers. (Otherwise the app will terminate; see below.) If you click Break instead, you can find the exception details in the debugger’s Locals pane, as shown in Figure 3-7.
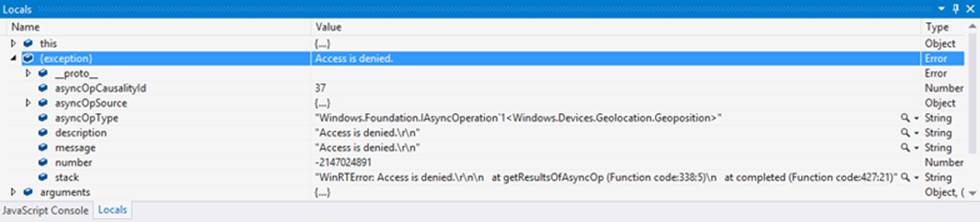
FIGURE 3-7 Information in Visual Studio’s Locals pane when you break on an exception.
The User-unhandled option (enabled for all exceptions by default) will display a similar dialog whenever an exception is thrown to the event loop, indicating that it wasn’t handled by an app-provided error function (“user” code from the system’s perspective).
You typically turn on Thrown for only those exceptions you care about; turning them all on can make it very difficult to step through your app! But it’s especially helpful if you’re debugging an app and end up at the debugger line in the following bit of WinJS code, just before the app is terminated:
var terminateAppHandler = function (data, e) {
debugger;
MSApp.terminateApp(data);
};
If you turn on Thrown for all JavaScript exceptions, you’ll then see exactly where the exception occurred. You can also just check Thrown for only those exceptions you expect to catch.
Do leave User-unhandled checked for everything else. In fact, unless you have a specific reason not to, make sure that User-unhandled is checked next to the topmost JavaScript Runtime Exceptions item because this includes all exceptions not otherwise listed. This way you can catch (and fix) exceptions that might abruptly terminate the app, which is something your customers should never experience.
WinJS.validation Speaking of exceptions, if you set WinJS.validation to true in your app, you’ll instruct WinJS to perform a few extra checks on arguments and internal state, and throw exceptions if something is amiss. Just search on “validation” in the WinJS source files for where it’s used.
Async Debugging
Working with asynchronous APIs presents a challenge where debugging is concerned. Although we have a means to sequence async operations with promise chains (or nested calls, for that matter), each step in the sequence involves an async call, so you can’t just step through as you would with synchronous code. If you try this, you’ll step through lots of promise code (in WinJS or the JavaScript projection layer for WinRT) rather than your completed handlers, which isn’t particularly helpful.
What you’ll need to do instead is set a breakpoint on the first line of each completed handler and on the first line of each error function. As each breakpoint is hit, you can step through that handler. When you reach the next async call in a completed handler, click the Continue button in Visual Studio so that the async operation can run. After that you’ll hit the breakpoint in the next completed handler or the breakpoint in the error handler.
When you stop at a breakpoint, or when you hit an exception within an async process, take a look at the debugger’s Call Stack pane (typically in the lower right of Visual Studio), as shown here:
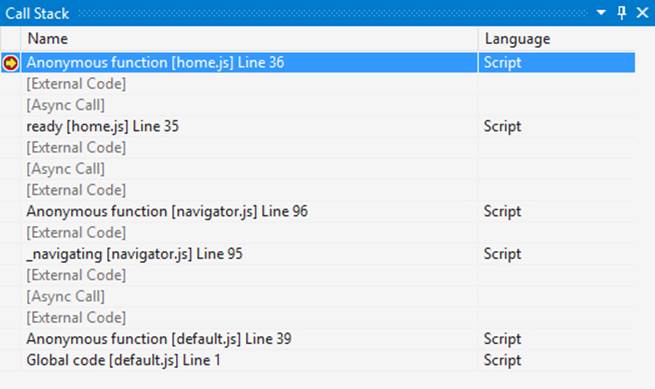
The Call Stack shows you the sequence of functions that lead up to the point where the debugger stopped, at which point you can double-click any of the lines and examine that function’s context. With async calls, this can get really messy with all the generic handlers and other chaining that happens within WinJS and the JavaScript projection layer. Fortunately—very fortunately!—Visual Studio spares you from all that. It condenses such code into the gray [Async Call] and [External Code] markers, leaving only a clear call chain for your app’s code. In this example I set a breakpoint in the completed handler for geolocation in HereMyAm3d. That completed handler is an anonymous function, as the first line of the Call Stack indicates, but the next reference to the app code clearly shows that the real context is the ready method within home.js, which itself is part of a longer chain that originated in default.js. Double-clicking any one of the app code references will open that code in Visual Studio and update the Locals pane to that context.
The real utility of this comes when an exception occurs somewhere other than within you own handlers, because you can then easily trace the causality chain that led to that point.
The other feature for async debugging is the Tasks pane, as shown below. You turn this on through the Debug > Windows >Tasks menu command. You’ll see a full list of active and completed async operations that are part of the current call stack.
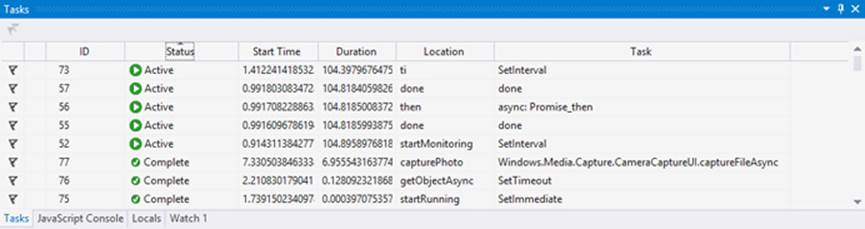
Performance and Memory Analysis
Alongside its excellent debugging tools, Visual Studio also offers additional aids to help evaluate the performance of an app, analyze its memory usage, and otherwise discover and diagnose problems that affect the user experience and the app’s effect on the system. To close this chapter, I wanted to give you a brief overview of what’s available along with pointers to where you can learn more—because this subject could fill a book in itself! (In lieu of that, a general pointer is to filter the //build 2013 videos by the “performance” tag, which turns up a healthy set.)
For starters, the Writing efficient JavaScript topic is well worth a read (as are its siblings under Best practices using JavaScript), because it explains various things you should and should not do in your code to help the JavaScript engine run best. One thing you shouldn’t worry about is the performance of querySelector and getElementById, both of which are highly optimized because they’re used so often. Keep this in mind, because I know for myself that any function that starts with “query” just sounds like it’s going to do a lot of work, but that’s not true here.
Next, when thinking about performance, start by setting specific goals for your user experience, such as “the app should become interactive within 1.5 seconds” and “navigating between the gallery and details pages happens in 0.5 seconds or less.” In fact, such goals should really be part of the app’s design that you discuss with your designers, because they’re just as essential to the overall user experience as static considerations like layout. In the end, performance is not about numbers but about creating a great user experience.
Establishing goals also helps you stay focused on what matters. You can measure all kinds of different performance metrics for an app, but if they aren’t serving your real goals, you end up with a classic case of what Tom DeMarco, in his book Why Does Software Cost So Much? (Dorset House, 1995), calls “measurement dysfunction”: lots of data with meaningless results or results that lead to undesired action.30
Along the same lines, when running analysis tools, it’s important that you exercise the app like a user would. That way you get results that are meaningful to the real user experience—that is, the human experience!—rather than results that would be meaningful to a robot. In the end, all the performance analysis in the world won’t be worth anything unless is translates into two things: better ratings and reviews in the Windows Store, and greater app revenue.
With your goals in mind, run analysis tools on a regular basis and evaluate the results against your goals. Then adjust your code, run the tools again, and evaluate. In other words, running performance tools to evaluate your performance goals is just another part of making sure you’re creating the app according to its design—the static and dynamic parts alike.
Remember also to run performance analysis on a variety of hardware, especially lower-end devices such as ARM tablets that are much more sensitive to performance issues than is your souped-up dev machine. In fact, slower devices are the ones you should be most concerned about, because their users will probably be the first to notice any issues and ding your app ratings accordingly. And yes, you can run the performance tools on a remote machine in the same way you can do remote debugging (but not in the simulator). Also be aware that analysis tools always runoutside of the debugger for obvious reasons, because stopping at breakpoints and so forth would produce bad performance data!
I very much encourage you, then, to spend a few hours exercising the available tools and getting familiar with the information they provide. Make them a regular part of your coding/testing cycle so that you can catch performance and memory issues early on, when it’s easier and less costly to fix them. Doing so will also catch what we call “regressions,” where a later change to the code causes performance problems that you fixed a long time ago to rear their ugly heads once again. As the character Alistor Moody of the Harry Potter books says, “Constant vigilance!”
Tip Two topics in the documentation also contain loads of detailed information in these areas: Performance best practices for Windows Store apps using JavaScript and General best practices for performance.
So, on to the tools. These are found on the Debug > Performance And Diagnostics… menu, which brings up the hub shown below with tools that are appropriate to your project’s language:
Get Visual Studio updates New tools are often released with updates to Visual Studio, so be sure to install them and read the accompanying blogs or release notes to understand what’s new.
By default, Visual Studio will set the target to be the currently loaded project. However, you can run the tools on any app by using the options on the Change Target drop-down:
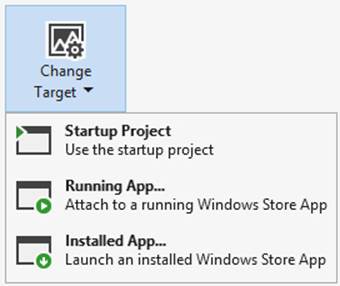
As the drop-down indicates, the Installed App option will launch an app anew, whereas the Running App option attaches to one that’s already been launched. Both are essential for profiling apps on devices where your full project is not present; the latter is also useful if your app is already running and you want to analyze specific user interactions for a set of conditions that you’ve already set up. This way you won’t collect a bunch of extra data that you don’t need.
Note that you can run these tools on any installed app, not just your own, which means you can gather data from other apps that have the level of performance you’d like to achieve for yours.
The Performance and Diagnostic Hub as a whole is designed to be extensible with third-party tools, giving you a one-stop shop for enabling multiple tools simultaneously. The ones shown above are those built into Visual Studio, and be sure to install new Visual Studio updates because that’s often how new tools are released.
Here’s a quick overview of what the current tools accomplish:
For a video demonstration of most of these, watch the Visual Studio 2013 Performance and Diagnostics Hub video on Channel 9 and Diagnosing Issues in JavaScript Windows Store Apps with Visual Studio 2013 from the //build 2013 conference, both by Andrew Hall, the real expert on these matters. Note that everything you see in these video (with the exception of the console app profiler) is available in the Visual Studio Express edition that we’ve been using, and if you want to skip the part about XAML UI responsiveness in the first video, you can jump ahead to about 13:30 where he talks about the JavaScript tools.
Tip In the first video, the responsiveness problems for the demo apps written both in XAML/C# and HTML/JavaScript primarily come from loading full image files just to generate thumbnails for gallery views. As the video mentions, you can avoid this entirely and achieve much better performance by using Windows.Storage.StorageFile.getThumbnailAsync. This API draws on thumbnail caches and other mechanisms to avoid the memory overhead and CPU cost of loading full image files. We’ll see more of this in Chapter 11.
It’s important, of course, with all these tools to clearly correlate certain events in the app with the various measurements. This is the purpose of the performance.mark function, which exists in the global JavaScript namespace.31 Events written with this function appear as User Marks in the timelines generated by the different tools, as shown in Figure 3-8. In looking at the figure, note that the resolution of marks on the Memory Analyzer timeline on the scale of seconds, so use marks to indicate only significant user interaction events rather than every function entry and exit. (With other tools, however, the resolution is much finer, so you can use performance.mark more frequently.)
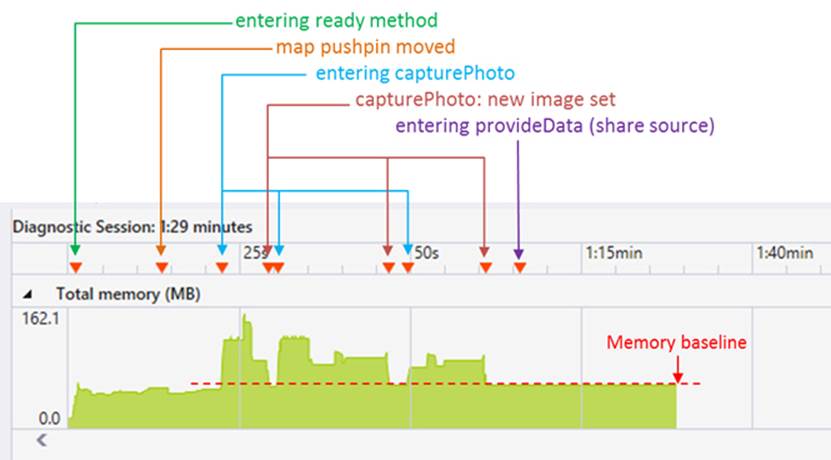
FIGURE 3-8 Output of the JavaScript Memory analyzer annotated with different marks. The red dashed line is also added in this figure to show the ongoing memory footprint; it is not part of the tool’s output.
As one example of using these tools, let’s run the Here My Am! app through the memory analyzer to see if we have any problems. We’ll use the HereMyAm3d example in the companion code where I’ve added some performance.mark calls for events like startup, capturing a new photo, rendering that photo, and exercising the Share charm. Figure 3-8 shows the results. For good measure—logging, actually!—I’ve also converted console.log calls to WinJS.log, where I’ve used a tag of “app” in each call and in the call to WinJS.Utilities.startLog (see default.js).
Referring to Figure 3-8, here’s what I did after starting up the app in the memory analyzer. Once the home page was up (first mark), I repositioned the map and its pushpin (second mark), and you can see that this increased memory usage a little within the Bing maps control. Next I invoked the camera capture UI (third mark), which clearly increased memory use as expected. After taking a picture and displaying it in the app (fourth mark), you can see that the allocations from the camera capture UI have been released, and that we land at a baseline footprint that now includes a rendered image. I then do into the capture UI two more times, and in each case you can see the memory increase during the capture, but it comes back to our baseline each time we return to the main app. There might be some small differences in memory usage here depending on the size of the image, but clearly we’re cleaning up the image when it get replaced. Finally I invoked the Share charm (last mark), and we can see that this causes no additional memory usage in the source app, which is expected because all the work is being done in the target. As a result, I feel confident that the app is managing its memory well. If, on the other hand, that baseline kept increasing over time, then I’d know I have a leak somewhere.
Tip There’s no rule anywhere that says you have to profile your full app project. When you’re trying to compare different implementation strategies, it can be much easier to create a simple test project and run the profiling tools on it so that you can obtain very focused comparisons for different approaches. Doing so will speed up your investigations and avoid disturbing your main project in the process.
The Windows App Certification Toolkit
The other tool you should run on a regular basis is the Windows App Certification Toolkit (WACK), which is actually one of the first tools that’s automatically run on your app when you submit it to the Windows Store. If this toolkit reports failures on your local machine, you can be certain that you’ll fail certification very early in the process.
Running the toolkit can be done as part of building an app package for upload, but until then, launch it from your Start screen (it’s called Windows App Cert Kit). When it comes up, select Validate Windows Store App, which (after a disk-chewing delay) presents you with a list of installed apps, including those that you’ve been running from Visual Studio. It takes some time to generate that list if you have lots of apps installed, so you might use the opportunity to take a little stretching break. Then select the app you want to test, and take the opportunity to grab a snack, take a short walk, play a few songs on the guitar, or otherwise entertain yourself while the WACK gives your app a good whacking.
Eventually it’ll have an XML report ready for you. After saving it (you have to tell it where), you can view the results. Note that for developer projects it will almost always report a failure on bytecode generation, saying “This package was deployed for development or authoring mode. Uninstall the package and reinstall it normally.” To fix this, uninstall it from the Start menu, select a Release target in Visual Studio, and then use the Build > Deploy Solution menu command. But you can just ignore this particular error for now. Any other failure will be more important to address early on—such as crashes, hangs, and launch/suspend problems—rather than waiting until you’re ready to submit to the Store.
Note Visual Studio also has a code analysis tool on the Build > Run Code Analysis On Solution menu, which examines source code for common defects and other violation of best practices. However, this tool does not presently work with JavaScript.
What We’ve Just Learned
• How apps are activated (brought into memory) and the events that occur along the way.
• The structure of app activation code, including activation kinds, previous execution states, and the WinJS.UI.Application object.
• Using deferrals when needing to perform async operations behind the splash screen, and optimizing startup time.
• How to handle important events that occur during an app’s lifetime, such as focus events, visibility changes, view state changes, and suspend/resume/terminate.
• The basics of saving and restoring state to restart after being terminated, and the WinJS utilities for implementing this.
• How to implement page-to-page navigation within a single page context by using page controls, WinJS.Navigation, and the PageControlNavigator from the Visual Studio/Blend templates, such as the Navigation App template.
• Details of promises that are commonly used with, but not limited to, async operations.
• How to join parallel promises as well as execute a sequential async operations with chained promises.
• How exceptions are handled within chained promises and the differences between then and done.
• How to create promises for different purposes.
• Using the APIs in WinJS.Utilities.Scheduler for prioritizing work on the UI thread, including the helpers for prioritizing different parts of a promise chain.
• Methods for getting debug output and error reports for an app, within the debugger and the Windows Event Viewer.
• How to debug asynchronous code and how Visual Studio makes it easy to see the causality chain.
• The different performance and memory analysis tools available in Visual Studio.
16 This system-provided splash screen is composed of only your splash screen image and your background color and does not allow any customization. Through an extended splash screen (see Appendix B) you can control the entire display.
17 To avoid confusion with the Windows Start screen, I’ll often refer to this as the app’s home page unless I’m specifically referring to the entry in the manifest.
18 There is also WinJS.Utilities.ready through which you can specifically set a callback for DOMContentLoaded. This is used within WinJS, in fact, to guarantee that any call to WinJS.UI.processAll is processed after DOMContentLoaded.
19 The Windows 8 view states from ApplicationView.value—namely fullscreen-landscape, fullscreen-portrait,filled, and snapped—are deprecated in Windows 8.1 in favor of just checking orientation and window size.
20 If you are at all familiar with user controls in XAML, this is the same idea.
21 The beforenavigate event can be used to cancel the navigation, if necessary. Either call args.preventDefault (args being the event object), return true, or call args.setPromise where the promise is fulfilled with true.
22 The Quickstart: using single-page navigation topic also shows a clever way to hijack HTML <a href> hyperlinks and hook them into WinJS.Navigation.navigate. This can be a useful tool, especially if you’re importing code from a web app or otherwise want to create page links in declarative markup.
23 If the use of .bind(this)is unfamiliar to you, please see my blog post, The purpose of this<event>.bind(this).
24The same thing happens with .js files, by the way, which are not reloaded if they've been loaded already. To avoid collisions in JavaScript, you either have to be careful to not duplicate variable names or to use namespaces to isolate them from one another.
25 If you want to impress your friends while reading the WinRT API documentation, know that if an async function shows it returns IAsync[Action | Operation]WithProgress (for whatever result type), it will invoke progress handlers. If it lists only IAsync[Action | Operation], progress is not supported.
26 Some samples in the Windows SDK might still use then instead of done, especially for single async operations. This came from the fact that done didn’t yet exist at one point and not all samples have been updated.
27 In Windows 8 and Internet Explorer 10, most parsing, JavaScript execution, layout, and rendering on a single thread. Rewriting these processes to happen in parallel is one of the major performance improvements for Windows 8.1 and Internet Explorer 11, from which apps also benefit.
28 The Scheduler.execHigh method is also a shortcut for directly calling MSApp.execAtPriority with Priority.high. This method does not accommodate any added arguments.
29 If you can’t find Event Viewer, press the Windows key to go to the Start screen and then invoke the Settings charm. Select Tiles, and turn on Show Administrative Tools. You’ll then see a tile for Event Viewer on your Start screen.
30 DeMarco tells an amusing story of metrics at their worst: “Consider the case of the Soviet nail factory that was measured on the basis of the number of nails produced. The factory managers hit upon the idea of converting their entire factory to production of only the smallest nails, tiny brads. Some commissar, realizing this as a case of dysfunction, came up with a remedy. He instituted measurement of tonnage of nails produced, rather than numbers. The factory immediately switched over to producing only railroad spikes. The image I propose to mark the dysfunction end of the spectrum is a Soviet carpenter, looking perplexed, with a useless brad in one hand and an equally useless railroad spike in the other.”
31This function is part of a larger group of methods on the performance object that reflect developing standards. For more details, see Timing and Performance APIs. performance.mark specifically replaces msWriteProfilerMark.