Programming Windows Store Apps with HTML CSS and JavaSript(2014)
Chapter 8
Layout and Views
Compared to other members of my family, I seem to need the least amount of sleep and am often up late at night or up before dawn. To avoid waking the others, I generally avoid turning on lights and just move about in the darkness (and here in the rural Sierra Nevada foothills, it can getreally dark!). Yet because I know the layout of the house and the furniture, I don’t need to see much. I need only a few reference points, such as a door frame, a corner on the walls, or the edge of the bed, to know exactly where I am. What’s more, my body has developed a muscle memory for where doorknobs are located, how many stairs there are, how many steps it takes to get around the bed, and so on. It’s helped me understand how visually impaired people “see” their own world.
If you observe your own movements in your home and your workplace—probably when the spaces are lit!—you’ll probably find that you move in fairly regular patterns. This is one of the most important considerations in home design: a skilled architect looks carefully at how people in the home might move between primary spaces like the kitchen, dining room, and living room, and even within a single workspace like the kitchen. Then the architect designs the home’s layout so that the most common patterns of movement are easy and free from obstructions. If you’ve ever lived in a home where it wasn’t designed this way, you can very much appreciate what I’m talking about!
There are two key points here: first, good layout makes a huge difference in the usability of any space, and second, human beings quickly form habits around how they move about within a space, habits that hopefully make their movement more efficient and productive.
Good app design follows the same principles, which is exactly why Microsoft recommends following consistent patterns within your apps, as described on the Design Principles page and UX Patterns. Those recommendations are not in any way whimsical or haphazard: they are the result of many years of research and investigation into what works best for apps and for Windows as a whole. The placement of the charms, for instance, as well as commands on an app bar (as we’ll see in Chapter 9, Commanding UI”), arise from the reality of human anatomy, namely how far we can move our thumbs around the edges of the screen when holding a tablet device.
With page layout, in particular, the recommendations on Laying out an app page—describing where headers and body content are ideally placed, the spacing between items, and so forth—can seem rather limiting, if not draconian. The silhouette, however, is meant to be a good starting point, not a hard-and-fast rule. What’s most important is that the shape of an app’s layout helps users develop a visual and physical muscle memory that can be applied across many apps. Research has shown that users develop such habits very quickly, even within a matter of minutes, but of course those habits are not exact to specific pixels! In other words, the silhouette represents a general shape that helps users immediately understand how an app works and where to go for certain functions, just like you can easily recognize the letter “S” in many different fonts. This is very efficient and productive. On the other hand, when presented with an app that uses a completely different layout (or, worse, a layout that is similar to the silhouette but behaves differently), users must expend much more energy just figuring out where to look and where to tap, just as I would have to be much more careful late at night if you moved my furniture around!
The bottom line is that very good reasons support all the design principles for Windows Store apps, layout included. As I’ve said before, if you’re fulfilling the designer role for your app, study the principles and patterns referred to above. If someone else is fulfilling that role, make surethey study those principles!
Either way, we’ll be reviewing the key ones early in this chapter. After that, our focus will be on how we implement layout designs, not creating the designs themselves. (Although I apparently got the mix of my parent’s genes that bestowed an aptitude for technical communication, my brother got most of the genes for artistry.)
With layout, make sure to remember that the user is always in control of where each view of your app appears on the screen and how much space it has to work with. Users can move app views around on their displays, narrowing the view down to 500px (or even 320px if the app allows it) to share display space with other apps. On a large monitor, this means having as many as four app views running side-by-side—and the same is true with each additional monitor on the system.
The display space for any view also depends on the display hardware itself—different monitors have different sizes, of course, as well as different pixel densities for which Windows might apply automatic scaling. Most displays can also be rotated, so orientation plays an important role in layout. We’ll be exploring all of these factors in the first half of this chapter.
You might have noticed in the last few paragraphs that I switched from using the word app in this context to the word view. This was intentional. Windows 8.1 introduces the ability for apps to create multiple independent views that operate on independent UI threads. Each view is an additional space in which the app can display content and even maintain a separate navigation stack, and the user retains control over each view’s size, placement, and lifetime (that is, the user can close a view at any time). With multiple views, then, apps can extend themselves across multiple monitors or have multiple side-by-side views on the same monitor.
That said, each view is essentially just a page container, so layout principles for any one page applies across views. In the latter half of this chapter, we’ll talk about the additional layout tools you have to handle whatever conditions you encounter. This includes the WinJS hub control and various CSS capabilities, such as pannable sections, snap points, flexbox, grid, and multicolumn text.
I’ll remind you again that some UI elements like the app bar and flyouts don’t participate in layout; I’ll cover these in other chapters. Also, auxiliary app pages that service contracts (such as Settings and Search) will exist outside your main navigation flow. These should employ the same layout principles covered in this chapter, but how and when they should appear will be covered in later chapters.
Principles of Page Layout
Page layout (in whatever view) is truly one of the most important considerations in Windows app design. The principle of “do more with less” (also referred to as “content before chrome”) means that most of what you display on any given page is meaningful content, with little in the way of commanding surfaces, persistent navigation tabs, and passive graphical elements like separators, blurs, and gradients that don’t in themselves mean anything. Another way of putting this is that content itself should be directly interactive rather than composed of passive elements that are acted upon when the user invokes some other command (the chrome). Semantic zoom is a good example of such interactive content—instead of needing buttons or menus elsewhere in the app to switch between views, the capability is inherent in the control itself, with the small zoom button appearing only when needed for mouse users. Other app commands, for the most part, are similarly placed on UI surfaces that appear when needed through app bars, nav bars, and other flyouts, as we’ll see in Chapter 9.
In short, “do more with less” means immersing the user in the experience of the content rather than distracting them with nonessentials. In Windows app design, then, emphasis is given to the space around and between content, which serves to organize and group content without the need for lines and boxes. These essentially transparent “space frames” help consumer’s eyes focus on the content that really matters. Windows app design also uses typography (font size, weight, color, etc.) to convey a sense of structure, hierarchy, and relative importance of different content. That is, because the text on a page is already content, why not use its characteristics—the typography—to communicate what is often communicated with extraneous chrome? (As with the layout silhouette, the general use of the Segoe UI font within app design is not a hard-and-fast requirement but a starting point. Having a consistent type ramp for different headings is more important than the font.)
Figure 8-1 shows a typical web application design for a blog. Notice the persistent chrome along the top and right side: search commands, navigation tabs, navigation controls, and so forth. Perhaps only 50% of the screen space is left for content.
Figure 8-2 shows a Windows Store app design for the same content (with a single view)—in this case using the Feed reader sample in the Windows SDK. All the ancillary commands have been moved offscreen. Search is accomplished through the Search charm (or on the app bar); Settings through the Settings charm; adding feeds, refresh, and navigation through commands on the app bar; and switching views through semantic zoom. Typography is used to convey the hierarchy instead of a menu or folder structure. All this reduces distractions, leaves much more room for content, and creates a much more immersive and engaging experience, don’t you think? (Note that a Search box is one control that often does appear on-canvas because of its central role in many app experiences.)
Design ideas a-plenty The Windows Developer Center has a great Inspiration section that contains a few case studies and quite a number of “idea books” for different categories of apps, from games, entertainment, and news apps to medical, enterprise administration, and educational apps. Each idea book discusses not only design but also key features that such apps would want to use. The case studies, for their part, show how to convert websites, iOS apps, and enterprise line-of-business apps to Windows Store apps. Definitely worth a few minutes of your time to at least see what’s available!

FIGURE 8-1 A typical desktop or web application design that emphasizes chrome at the expense of content.
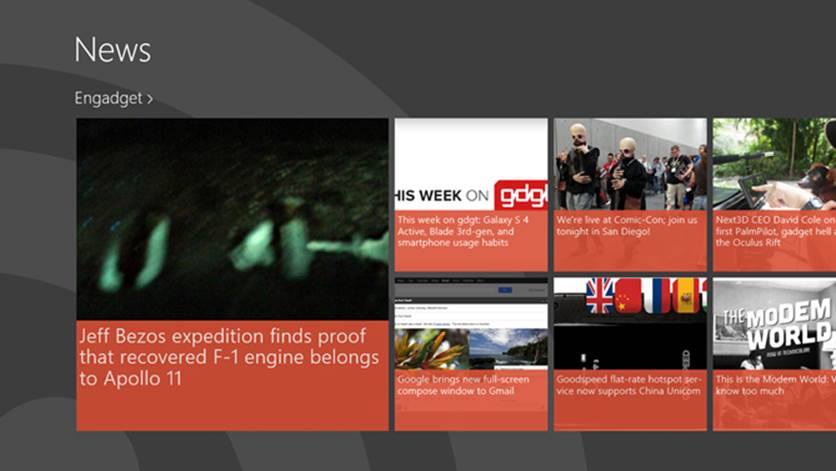
FIGURE 8-2 The Feed reader sample drawing on the same feed as the web app in Figure 8-1. Most of the chrome has disappeared, leaving much more space for content or visually-relaxing space.
Even where typography is concerned, Windows app design encourages the use of distinct font sizes, again called the typographic ramp, to establish a sense of hierarchy. The default WinJS stylesheets—ui-light.css and ui-dark.css—provide four fixed sizes where each level is proportionally larger than the previous (42pt = 80px, 20pt = 40px, etc.), as shown in Figure 8-3 and described more fully on Guidelines for fonts (and see also Guidelines for typography). These proportions allow users to easily establish an understanding of content structure with just a glance. Again, it’s a matter of encouraging habit and muscle memory, and Microsoft’s research has shown that beyond this size granularity, users are generally unable to differentiate where a piece of content fits in a hierarchy.
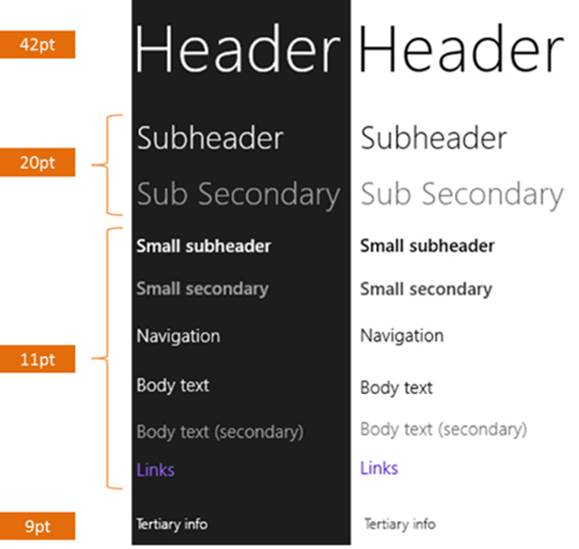
FIGURE 8-3 The typographic ramp of Windows Store app design, shown in both the ui-dark.css (left) and ui-light.css (right) stylesheets.
Within the body of content, Windows app design encourages these layout principles:
• Let content flow from edge to edge (full bleed).
• Keep ergonomics in mind: pan the page along the long edge of the view (primarily horizontal in landscape aspect ratios, vertical in portrait aspect ratios).
• Pan on a single axis only to create a sense of stability and to support swiping to select (as with the ListView control), or employ rails to limit panning directions to a single axis.
• Create visual alignment, structure, and clarity with the page silhouette, aligning elements on a grid for consistency. Refer again to Laying out an app page. This shape is what allows a consumer’s eyes to recognize something as a Store app without having to think about it, which provides a feeling of familiarity and confidence.
As I’ve mentioned before, the project templates in Visual Studio and Blend have these principles baked right in and thus provide a convenient starting point for apps. Even if you start with the Blank App template, the others like the Grid App and Hub App will serve as a reference point. This is exactly what we did with the Here My Am! app in Chapter 2, “Quickstart.”
Another important guiding principle that’s relevant to layout is “scaling beautifully on any size screen.” What we’ve talked about in this section has been the design principles for laying out a page. Scaling beautifully, on the other hand, means understanding the conditions that affect and drive the layout: view sizes, display resolutions, and pixel densities. This means making sure you design every page in your app to appropriately handle all these concerns and then using the tools you have at your disposal to implement those designs, as we’ll see next.
The last piece to consider with layout in general is that it’s often not a static concern only: the ease of creating animations means that a dynamic relationship can exist between a page and the content on that page. Keep this in mind with your designs; animation can certainly affect the personality of your app and the user’s enjoyment of your app.
Sizing, Scaling, and Views: The Many Faces of Your App
If there’s one certainty about layout for a Windows Store app, it’s that the display space for each of its views (whether one or multiple) will likely change during a single app session and change frequently. For one, auto-rotation—especially on tablet devices—makes it quick and simple for the user to switch between landscape and portrait orientations. Second, a device might be connected to an external display or a user might move an app view from one display to another, meaning that the view needs to adjust itself to different resolutions and pixel densities on the fly. Third, users can change display settings through PC Settings > PC & Devices > Display, including orientation and effective scaling. Fourth, users have the ability to arrange app views to share space on the same monitor, meaning that any given view can be sized down to 500 horizontal pixels or even 320px if the app indicates such support in its manifest. (Resizing is accomplished using touch/mouse gestures or the Windows+. [period] and Windows+> [shift+period] keystrokes.) And finally, an app can create multiple independent views that the user can place on separate monitors, where each monitor can again have different display characteristics.
You definitely want to test each view of your app with all of these variances: view sizes, orientations, display resolutions, and pixel densities. Different app sizes can be tested directly on any given machine, but for the others you’ll need access to a variety of hardware or you can use the Visual Studio simulator and the Device tab of Blend to simulate the most canonical conditions. But however you test these variations, the big question is how to write an app that can handle them.
Layout performance tips The Managing layout efficiently topic in the documentation has some helpful tips to improve layout performance in your app. One is to recognize that accessing and setting certain properties and styles—specifically those that affect placement and visibility of an element—will trigger a layout pass. As such, it helps to write code such that these changes are batched together. The second recommendation is to create and initialize elements before adding them to the DOM, or, if that’s unavoidable, to hide the element by setting the display: nonestyle rather than setting visibility or opacity. Only display: none will remove an element from layout passes.
Variable View Sizing and Orientations
We already got an introduction to view sizing in Chapter 1, “The Life Story of a Windows Store App” (see Figure 1-6), and we encountered the basics in Chapter 2. To review what we’ve learned and fill out the story, here are the conditions that affect view size and the basic guidelines for responding to them:
• Regardless of width, views always span the full height of the display, in either orientation. The minimum height is always 768px.
• When the device is in portrait mode, meaning the physical display’s aspect ratio is taller than it is wide, only one view can appear on the screen at a time (implying that multiple views is for landscape and multimonitor scenarios). Portrait mode is very common with small tablet devices, which are often called portrait first devices.
• When the device is in landscape mode, multiple views from multiple apps can share the horizontal screen space. The number is determined by the total width and the minimum size of the views involved.
• By default, views can be sized down to 500px wide. This value allows two 500px-wide views to run side-by-side on a 1024x768 display (the smallest on which Windows will run), with a 24px gutter between them. Views should always be fully functional down to 500px—that is, all of its features are still accessible, though an app can collapse command structures, remove labels, or otherwise tighten up the UI as needed.
• With a minimum 768px height, resizing a view to a width narrower than 768px will change the effective aspect ratio from landscape to portrait. The app decides, though, at what width it might change its layout from a landscape-oriented model (horizontally panning) to a portrait-oriented model (vertically panning).
• If an app has the Minimum Width in its manifest set to 320px, the user can size views down to that narrower size. Use this optional setting only if a narrow width makes sense for your app as a whole (and it’s appropriate to display reduced functionality at this width). At the same time, supporting the narrow width increases the likelihood that a user will keep the view visible alongside others, especially on larger displays. You can also consider using extra vertical space to display other content when the primary content does not fill the space. For example, a video app could show additional information and recommendations that wouldn’t be shown when playing the video in full screen landscape.
• Views can be sized up from these minimums to the full extent of the current display, which can be very large. Views need to adapt themselves to more space by reflowing content, showing more content, and/or scaling content to larger sizes.
• Apps can be launched directly into different widths at the request of other apps (affecting the initial size of the primary view).
• An app does not have programmatic control over view width. The user always controls resizing.70
• An app can specify Supported Rotations in the manifest—these specifically affect whether an app can be launched without affecting the device rotation and how the app is notified when rotations happen. Apps can also lock the orientation at run time to prevent device orientation changes while that app is in the foreground.
As a result of these conditions, every page of an app, in each view—including an extended splash screen—must be prepared to handle arbitrary sizes and aspect ratios down to the app’s supported minimum. Repeat this like a mantra because it’s easy to forget when you’re just developing and testing an app on a single device. And make sure your designers are thinking about it too, because when your app gets out to thousands of customers, they will certainly be exercising all the possibilities! (For more design details, especially about reducing functionality in narrow views, see Guidelines for resizing windows to tall and narrow layouts.)
It should also be obvious that resizing a view never changes the mode of the app in that view or causes it to navigate to another page. That is, always maintain the state of the view across size boundaries. Otherwise users will become very confused about where they are in your app experience!
Let’s now go into the details of a few areas. First we’ll explore how to handle size changes, we’ll compare adaptive and fixed layout strategies, and then we’ll see how we work with device orientations. Later on we’ll talk about scaling considerations, but as those factors come back to the app as an effective view size, they aren’t directly important for layout decisions. The same goes for creating and managing views, which are again just additional page containers where each page has the same layout concerns as we’re discussing here.
Sidebar: View Properties in the ApplicationView Object
The ApplicationView object in the Windows.UI.ViewManagement namespace provides a number of interesting properties for any given view. You obtain this object by calling its static getForCurrentView method:
var view = Windows.UI.ViewManagement.ApplicationView.getForCurrentView();
Each view as an id used to identify it when an app uses multiple views (see “Multiple Views” later on), as well as a title that Windows will show when switching between views. The isFullScreen, isOnLockScreen, and isScreenCaptureEnabled flags serve obvious purposes, the latter being important when an app displays rights-protected content. Two other Boolean flags, adjacentToLeftDisplayEdge and adjacentToRightDisplayEdge tell you where the view is specifically located on the screen, allowing you to make specific layout decisions for those cases if needed. The orientation property (a value from the ApplicationViewOrientation enumeration) can be landscape and portrait. This along with the full screen and edge properties are demonstrated in the Application Views sample, if you’re interested.
The view object has one other member, the consolidated event, that is fired when the view is closed, as when the user executes a close gesture (a swipe down or Alt+F4).
Handling Size Changes
Designing an app for different sizes, as noted previously, is a matter of thinking through the user experience for full screen landscape and portrait views, partial landscape views (landscape aspect ratio), partial portrait views (narrow views down to 500px with a portrait aspect ratio), and possibly narrow views below 500px. We did this in Chapter 2 with the Here My Am! app. Once you get to the implementation details, however, handling size changes in each view of an app is very much the same story as responsive design for web pages and generally doesn’t need to be more complicated than that.
Responsive design has two parts. First are those things you can handle declaratively in CSS:
• Place all size-independent and default styles outside of any media queries. Apps typically specify styles for their preferred full screen orientation, such as landscape, as the default.
• For size-specific styles, use media queries with appropriate combinations of orientation, min-width, max-width, min-height, and max-height media features to isolate different layout cases. For example:
/*Default styles here*/
@mediascreenand( orientation: landscape)and( max-width: 1024px) {
/*Styling for smaller landscape layouts*/
}
@mediascreenand( orientation: portrait)and( min-width: 500px) {
/*Styling for portrait aspect ratios (width/height < 1)*/
}
@mediascreenand( orientation: portrait)and( max-width: 499px) {
/*Styling for narrow portrait aspect ratios (width/height < 1)*/
}
@mediascreenand( orientation: landscape)
and( min-width: 1600px)and( min-height: 1200px) {
/*Styling for landscape layouts on larger displays*/
}
@mediascreenand( orientation: portrait)
and( min-width: 1200px)and( min-height: 1600px) {
/*Styling for portrait layouts on larger displays*/
}
• The CSS for each size typically changes placement of elements within CSS grids, the flow directions within a CSS flexbox, and element display styles (to show or hide those elements).
• In CSS there are also variables for the viewport height and viewport width: vh and vw. You can prefix these with a percentage number—for example, 100vh is 100% of the viewport height, and 3.5vw is 3.5% of the viewport width. These variables can also be used in CSS calcexpressions.
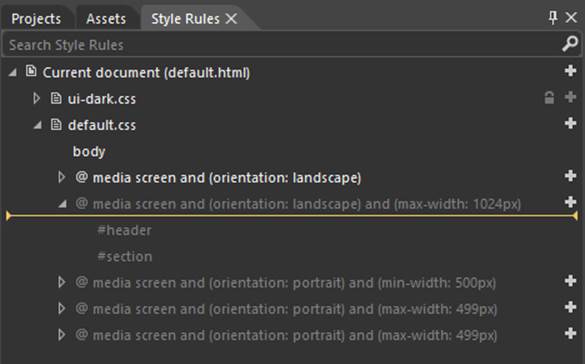
Remember when styling your app in Blend that there’s a visual affordance in the Style Rules pane that lets you control the exact insertion point of any new CSS styles in the given stylesheet. This is very helpful when working with the specific media queries:
Tip With media queries you might be tempted to use <link media=> tags in page headers to keep styles separate. Except for printing, this doesn’t typically work because you’re not reloading the page when a size change happens and the media-specific stylesheets won’t be loaded.
The second part of responsive design involves those things that you can change only from JavaScript. For example, to change the panning direction of a ListView or Hub control, you need to change its appropriate orientation property (or switch a ListView from a GridLayout to aListLayout). You might also change a list of buttons to a single drop-down select element to offer the same functionality through a more compact UI. These things can’t be done through CSS. (Note that some controls like the WinJS.UI.AppBar handle size changes automatically, as we’ll see in Chapter 9.)
There are two main events you can use to trigger such layout changes. First is window.onresize, of course (as well as resize events that controls like the Hub and ListView raise), where you can obtain exact dimensions of the current view through the window.innerWidth andwindow.innerHeight properties. The document.body.clientWidth and document.body.clientHeight properties will be the same, as will be the clientWidth and clientHeight properties of any element (like a div) that occupies 100% of the document body. Within the window.onresize event, theargs.view.outerWidth and args.view.outerHeight properties are also available.
Tip When the user initiates resizing, the active app will receive the window.onblur event. Games often use this event to pause themselves while resizing takes place.
The other event comes from the standard Media Query Listener API in JavaScript. This interface (part of the W3C CSSOM View Module, see http://dev.w3.org/csswg/cssom-view/) allows you to add event handlers for media query state changes, such as:
var mql = window.matchMedia("(orientation: portrait)");
mql.addListener(styleForPortrait);
function styleForPortrait() {
if (mql.matches) {
//...
}
}
You can see that the media query strings you pass to window.matchMedia are the same as used in CSS directly, and in the handler you can, of course, perform whatever actions you need from JavaScript.
And yet another tip You might find cases where you want to check your layout on the resuming event, as display characteristics might have changed while an app was suspended. You’ll get a resize event when a view is resumed to a different size, of course, but if the app is resumed to the same size as before, you won’t see the event.
Adaptive and Fixed Layouts
As just described, app design has to consider sizes from 500px wide (or 320px wide) by 768px high, all the way up to 3200px by 1800px QHD displays. How does one approach this wide range of possibilities? A design typically starts with a baseline experience for the common 1366x768 size. Here each view should be fully functional, of course, and display enough content to be really engaging. Going down from there to smaller sizes, a view need to retain its functionality to the 500px width, collapsing and/or changing some of the UX controls along the way. If it goes down to a 320px width, it can design a more focused experience on the assumption that the view will occupy a narrow space alongside a number of other apps. In such cases you might elect to hide some functionality.
Going up from the baseline is a different story. Of course the view will continue to be fully functional, but now the question becomes, “What do you do with more space?” On this subject, I recommend you read the Guidelines for scaling to screens, which has good information on the kinds of display sizes your app might encounter as well as guidance on what to do with additional real estate when you have it.71
The first part of the answer is “Fill the view!” Nothing looks more silly than an app running on a 27” monitor that was designed and implemented with only 1366x768 in mind, because it will occupy only a quarter to half of the screen at best. As I’ve said a number of times, imagine the kinds of reviews and ratings your app might be given in the Windows Store if you don’t pay attention to details like this!
The second part of the answer depends on your app’s content for the view in question. If you have only fixed content, which is common with games, you’ll want to use a fixed layout that scales up (and down) to the window size. If you have variable content, meaning that you should show more when there’s more screen space, you want to use an adaptive layout.
To implement a fixed layout, start by designing around a minimum size and a fixed aspect ratio, such as 1024x768 (a 4:3 aspect ratio) or 1366x768 (a 16:9 aspect ratio).72 You then code against these fixed coordinate systems regardless of actual view size. That is, wrap your content into adiv that’s styled to your fixed dimensions. I’ve also added a body background color here to see the letterboxing:
<!-- In markup -->
<div id="viewbox" class="fixedlayout">
<p>Content goes here</p>
</div>
/* In CSS */
body {
background-color: #8e643c;
}
.fixedlayout {
height: 768px;
width: 1024px;
}
Then add a listener for window.onresize events and apply a CSS 2D scaling transform to the root element based on the difference between the reference size and the actual size:
window.onresize = resizeLayout;
function resizeLayout(e) {
var viewbox = document.getElementById("viewbox");
var w = window.innerWidth;
var h = window.innerHeight;
var bw = viewbox.clientWidth;
var bh = viewbox.clientHeight;
var wRatio = w / bw;
var hRatio = h / bh;
var mRatio = Math.min(wRatio, hRatio);
var transX = Math.abs(w - (bw * mRatio)) / 2;
var transY = Math.abs(h - (bh * mRatio)) / 2;
viewbox.style["transform"] =
"translate(" + transX + "px," + transY + "px) scale(" + mRatio + ")";
viewbox.style["transform-origin"] = "top left";
}
This preserves the aspect ratio and works to scale the contents up as well as down. The translation included with the transform makes sure the body background shows around any part that the fixed content doesn’t occupy.
You can find an example of this in the FixedLayout project in the companion content. This app draws a 4x3 grid of circles on a canvas, as shown in Figure 8-4, to match the 1024x768 layout size. On a 1366x768 display or larger with a 16:9 aspect ratio, we get letterboxing on the sides; in the 320px narrow view (as set in the manifest), we get letterboxing on the top.
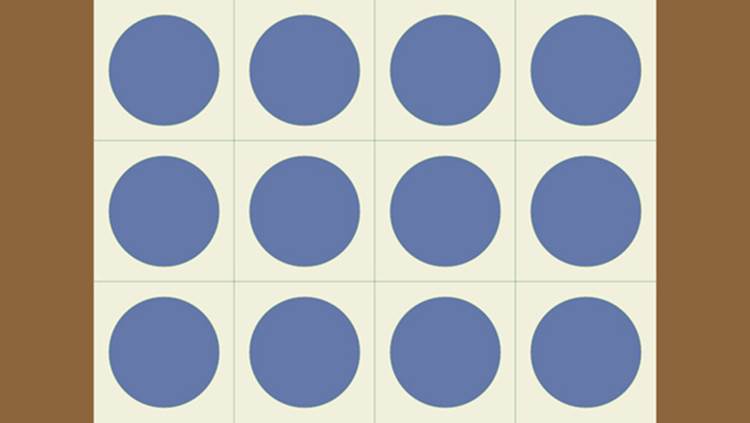
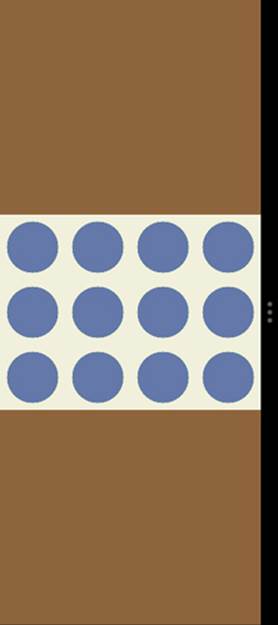
FIGURE 8-4 Fixed layout scaling with a simple CSS transform, showing letterboxing on a full-screen 16:9 ratio display (left) and in a narrow 320px view (right).
Sidebar: Raster Graphics and Fixed Layouts
If you use raster graphics within a fixed layout, size them according to the maximum 2560x1440 resolution so that they’ll look good on the largest screens and they’ll still scale down to smaller ones (rather than being stretched up). Alternately, you can load different graphics (through different img.src URIs) that are better suited for the most common screen size.
Note that resolution scaling (discussed later in this chapter) will still be applicable. If you’re running on a high-density 10.6” 2560x1440 display (180% scale), the app and thus the fixed content will still see smaller screen dimensions. But if you’re supplying a graphic for the native device resolution, it will look sharp when rendered on the screen.
In contrast to a fixed layout, where you always see the same content, an adaptive layout is one in which a view shows more stuff when more screen space is available. Such a layout is most easily achieved with a CSS grid where proportional rows and columns will automatically scale up and down; elements within grid cells will then find themselves resized accordingly. This is demonstrated in the Visual Studio/Blend project templates, especially the Grid App project. On a typical 1366x768 display you’ll see a few items on a screen, as shown at the top of Figure 8-5. Switch over to a 27” 2560x1440 and you’ll see a lot more, as you can see at the bottom of the figure.
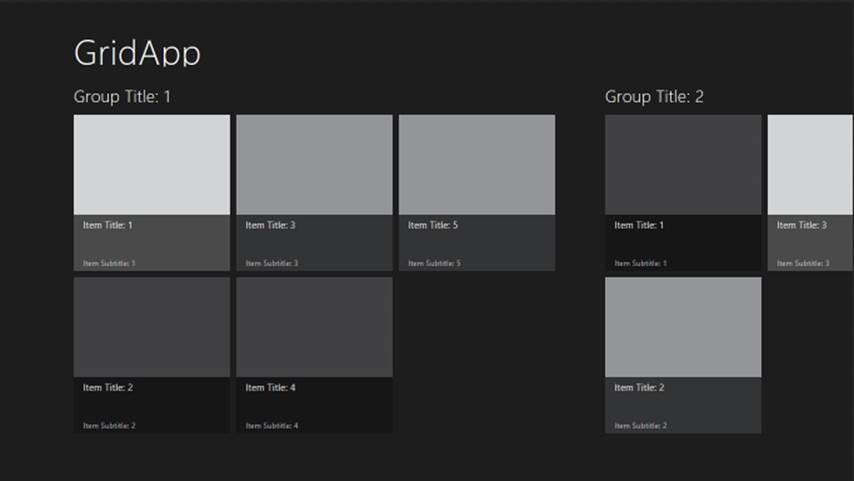

FIGURE 8-5 Adaptive layout in the Grid App project template shown for a 1366x768 display (top) and a 2560x1440 display (bottom).
To be honest, the Grid App project template doesn’t do anything particularly special for view sizes. Because it uses CSS grids and proportional cells, the cell containing the ListView control automatically becomes bigger. The ListView control is listening for window.onresize on its own, and it reflows itself to show more items when it has more space; we don’t need to instruct it directly. In any case, the Grid App template does demonstrate the basic strategy:
• Use a CSS grid (or flexbox) where possible to handle adaptive layout automatically.
• Listen for window.onresize as necessary to reposition and resize elements manually, such as an HTML canvaselement.
• Have controls listen to window.onresize to adapt themselves directly.
As another reference point, refer to the Adaptive layout with CSS sample, which takes the same approach as the Grid App project template, relying on controls to resize themselves. In the sample, you will see that the app isn’t doing any direct calculations based on view size.
Hint If you have an adaptive layout and want a background image specified in CSS to scale to its container (rather than being repeated), style background-size to either contain or 100% 100%.
Finally, let me again recommend the Guidelines for scaling to screens topic in the documentation, which goes into many more design questions, such as:
• Which regions of a view are fixed and which are adaptive?
• How do adaptive regions make use of available space, including the directions in which that region adapts?
• How do adaptive and fixed regions relate in the wireframe?
• How does the view’s layout overall make use of space—that is, how does whitespace itself expand so that content doesn’t become too dense? This can mean collapsing some areas of the UI in narrower views to lighten the density when there’s less room.
• How does the view make use of multicolumn text?
Answering these sorts of questions will help you understand how the layout should adapt.
Handling Orientations
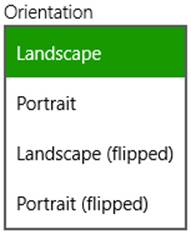
If you’ve worked with any kind of accelerometer-equipped device, you know that one of the most natural things to do is rotate it 90 degrees in some direction to reorient an app. On other systems, the user can change orientation manually through PC Settings > PC & Devices > Display > Orientation:
When this happens, an app receives a window.onresize event and is expected to update its view accordingly. A key point here is that landscape orientations support multiple side-by-side views, but portrait does not. In fact, Windows locks the orientation when you have multiple apps showing side by side. To switch to portrait, an app must be running full screen by itself.
If you structure your CSS appropriate for different view states and handle resize events as needed, you typically don’t care about the actual physical orientation of the device—you care about only the size of the view in which you need to lay out your content. Still, you can determine the physical orientation a number of ways. One is through the ApplicationView.orientation property that was noted earlier in “Sidebar: View Properties in the ApplicationView Object.” It has possible values of portrait and landscape.
A more specific value comes from the Windows.Graphics.Display.DisplayInformation class (obtained via DisplayInformation.getForCurrentView()) and its currentOrientation property. This identifies one of the four rotation quadrants that are possible for a device relative to its native orientation: landscape, portrait, landscapeFlipped, and portraitFlipped. There’s also an orientationchanged event if you need it (see scenario 3 of the Display orientation sample for usage of this event).
Thirdly, the APIs in Windows.Devices.Sensors—specifically, the SimpleOrientationSensor and OrientationSensor classes—can provide more information from the hardware itself, including exact rotation angles. These are covered in Chapter 12, “Input and Sensors.”
Note Internet Explorer 11 and the app host for Windows 8.1 also support the W3C orientation standards for orientation on the screen object through the msOrientation property, the onmsorientationchange event, and the msLockOrientation and msUnlockOrientation methods.
Some apps, of course, would prefer to not have their views resized in response to accelerometer-induced rotation. A full screen video player, for example, wants to remain in landscape irrespective of the device orientation, allowing you to watch videos while laying sideways on a couch with a tablet propped up on a chair!73
Locking the orientation can be done in two places. First, you can specify the orientations the app supports in the app manifest on the Supported Rotations on the Application tab:

By default, all these options are unchecked which means the app will be resized (and thus redrawn) when the device orientation changes (and checking all of them means the same thing). When you check a subset of the options, the following effects apply:
• If the device is not in a supported rotation when the app is launched, the app is launched in the nearest supported rotation. For example, if you check the Portrait and Landscape-flipped rotations (I have no idea why you’d choose that combination!) and the device is in Landscape mode, the app will launch into Portrait.
• When the app is in the foreground, rotating the device to a nonsupported orientation has no effect on the app.
• When the user switches away from the app, the device orientation is restored unless the new foreground app also has preferences. Of course, it’s likely that the user will have rotated the device to match the app’s preference, in which case that’s the new device orientation.
• When the user switches back to the app, it will switch to the nearest supported rotation.
• In all cases, when the app’s preference is in effect, system edge gestures work relative to that orientation—that is, the left and right edges are relative to the app’s orientation.
You can achieve the same effects at run time—changing preferences dynamically and overriding the manifest—by setting the autoRotationPreferences property of the aforementioned DisplayInformation class. The preference values come from the DisplayOrientations enumeration and can be combined with the bitwise OR (|) operator. For example, here are the bits of code to set a Portrait preference and the combination of Portrait and Landscape-flipped:
var wgd = Windows.Graphics.Display;
wgd.DisplayInformation.autoRotationPreferences = wgd.DisplayOrientations.portrait;
wgd.DisplayInformation.autoRotationPreferences =
wgd.DisplayOrientations.portrait | wgd.DisplayOrientations.landscapeFlipped;
Note Orientation preferences set in the manifest and through the autoRotationPreferences property do not work with nonaccelerometer hardware, such as desktop monitors and also the Visual Studio simulator (they are ignored). The rotations that the simulator performs happen on the level of the display driver, which is different than the WinRT display orientation. To test these preferences, in other words, you’ll need a real accelerometer-equipped device.
To play around with these settings, refer to the Device auto rotation preferences sample. Its different scenarios set one of the orientation preferences so that you can see the effect when the device is rotated; scenario 1 for its part clears all preferences and restores the usual behavior for apps. You can also change rotation settings in the manifest to see their effects, but those are again overridden as soon as you change the preferences through any of the scenarios.
For a live demonstration of this sample, see Video 8-1. This is definitely one feature that you just can’t show in static images!
Screen Resolution, Pixel Density, and Scaling
I don’t know about you, but when I first read that the minimum view widths were always 500 and 320 pixels—real pixels, not a percentage of the screen width—it set me wondering. Wouldn’t that give a significantly different user experience on different monitors? The answer is actually no. Consider the narrow 320px width. 320 pixels is about 25% of the baseline 1366x768 target display, which means that the remaining 75% of the screen is a familiar 1024x768 . And on a 10-inch screen, it means that this narrow width is about the 2.5 physical inches wide. So far so good.
With a large monitor, on the other hand, let’s say a 2560x1440 monster, those 320 pixels would only be 12.5% of the width, so the layout of the whole screen looks quite different. However, given that such monitors are in the 24-inch range, those 320 pixels still end up being about 2.5 physical inches wide, meaning that the narrow view gives essentially the same visual experience as before, just now with much more vertical space to play with and much more remaining screen space for other app views.
This now brings up the question of pixel density—what happens if your app ends up on a really small screen that also has a very high resolution, like a 7” 1920x1200 (323dpi) screen? Obviously, 320 pixels on the latter display would be barely an inch wide. Anyone got a magnifying glass? And as new and even higher density displays are produced in the years ahead, it seems like the problem will just get harder to deal with.
Fortunately, this isn’t anything a Store app has to worry about…almost. The main user benefit for such displays is greater sharpness, not greater density of information. Touch targets need to be the same size on any size display no matter how many pixels it occupies, because human fingers don’t change with technology! To accommodate this, Windows automatically scales down the effective resolution that’s reported to apps, which is to say that whatever coordinates you use within your app (in HTML, CSS, and JavaScript) are automatically scaled up to the necessary device resolution when the UI is actually rendered. This happens within the low-level HTML/CSS rendering engine in the app host so that everything is drawn directly against native device pixels for maximum sharpness.
As for the “almost” above, the one place where you do need to care about pixel density is with raster graphics, as we discussed in Chapter 3, “App Anatomy and Performance Fundamentals,” for your splash screen and tiles. We’ll return to this shortly in “Graphics that Scale Well” below.
Display sizes and pixel densities can both be tested again using the Visual Studio simulator or the Device tab in Blend. The latter, shown in Figure 8-6, indicates the applicable DPI and scaling factor. 100% scale means the device resolution is reported directly to an app. 140% and 180%, on the other hand, indicate that scaling is taking place. Doing a little math, you can see that the effective resolution that the app sees is generally near the standard 1366x768 or 1024x768 sizes:

In all these cases, layouts designed for 1024x768 and 1366x768 are quite sufficient. Of course, you’ll need to adapt to the exact pixel dimensions and to the larger 100% resolutions, but you don’t have to worry about resizing touch targets and such based on pixel density—all that happens transparently.
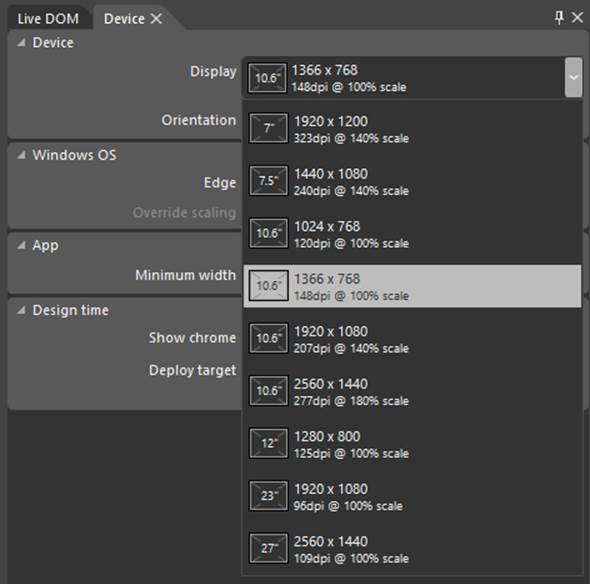
FIGURE 8-6 Options for display sizes and pixel densities in Blend’s Device tab.
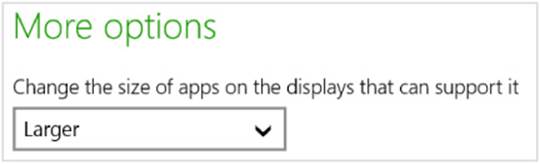
Scaling can also happen on 100% displays if the user goes to PC Settings > PC & Devices > Display and sets the Larger option in the control shown below. This sets the scaling to 140% and is enabled only for larger monitors where the effective resolution would not fall below 1024x768.
As noted earlier, the effective/scaled resolution is what you’ll see for a view in the window.innerWidth and window.innerHeight properties, the document.body.clientWidth and document.body.clientHeight properties, and the clientWidth and clientHeight properties of any element that occupies 100% of the body. Within window.onresize, you can also use these (or the args.view.outerWidth and args.view.outerHeight properties) to adjust the app’s layout for changes in the overall display. Of course, if you’re using something like the CSS grid with fractional rows and columns to do your layout, much of that will be handled automatically.
In all cases, these dimensions will already reflect automatic scaling for pixel densities, so they are the dimensions against which to do layout. If you want to know the physical display dimensions, on the other hand, you’ll find these in the window.screen.width and window.screen.heightproperties. Other aspects of the display can be found in the DisplayInformation class (in Windows.Graphics.-Display) as we used before for orientation. The properties of interest here are logicalDPI and the current resolutionScale. The latter is a value from the ResolutionScaleenumeration, one of scale100Percent, scale140Percent, and scale180Percent. The actual values of these identifiers are 100, 140, and 180 so that you can use resolutionScale directly in calculations. Also, the logicaldpichanged event tells you when the scaling factor changes, as when the user changes the app’s size option in PC Settings or switches to a different display.
Sidebar: A Good Opportunity for Remote Debugging
Working with different device capabilities provides a great opportunity to work with remote debugging as described on Running Windows Store apps on a remote machine. This will help you test your app on different displays without needing to set up Visual Studio on each one, and it also gives you the benefit of multimonitor debugging. You only need to install and run the remote debugging tools on the target machine and make sure it’s connected to the same local network as your development machine. The Remote Debugging Monitor running on the remote machine will announce itself to Visual Studio running on your development machine. Note that the first time you run the app remotely, you’ll be prompted to obtain a developer license for that machine, so it will need to be connected to the Internet during that time.
Graphics That Scale Well
In addition to layout, variable view sizes and pixel densities present a challenge to apps in making sure that graphical assets always look their best. You can certainly draw graphics directly with the HTML5 canvas, but oftentimes that’s not possible and you have to use predrawn assets of some kind.
HTML5 scalable vector graphics (SVGs) are very handy here. You can include inline SVGs in your HTML (including page fragments), or you can keep them in separate files and refer to them in an img.src attribute. One of the easiest ways to use an SVG is to place an img element inside a proportionally sized cell of a CSS grid and set the element’s width and height styles to 100%. The SVG will then automatically scale to fill the cell, and since the cell will resize with its container, everything is handled automatically.
One caveat with this approach is that the SVG will be scaled to the aspect ratio of the containing grid cell, which isn’t always what you want. To control this behavior, make sure the SVG has viewBox and preserveAspectRatio attributes where the viewBox aspect ratio matches that defined by the SVG’s width and height properties:
<svg
xmlns: svg="http://www.w3.org/2000/svg"
xmlns="http://www.w3.org/2000/svg"
xmlns: xlink="http://www.w3.org/1999/xlink"
version="1.0"
width="300"
height="150"
viewBox="0 0 300 150"
preserveAspectRatio="xMidYMid meet">
Of course, you don’t always have nice vector graphics. Bitmaps that you include in your app package, pictures you load from files, and raster images you obtain from a service won’t be so easily scalable. In these cases, you’ll need to be aware of and apply the current scaling factor appropriately.
For assets in your app package, we already saw how to work with varying pixel densities in Chapter 3 through the .scale-100, .scale-140, and .scale-180 file name suffixes (the Here My Am! App has such variants). These work for any and all graphics in your app, just as they do for the splash screen, tile images, and other images referenced by the manifest. So, if you have a raster graphic named banner.png, you’ll create three graphics in your app package called banner.scale-100.png, banner.scale-140.png, and banner.scale-180.png. You then just refer to the base name as in <img src="images/banner.png"> and background-image: url('images/banner.png'), and the Windows resource loader will magically load the appropriately scaled graphic automatically. (If files with .scale-* suffixes aren’t found, it will look for banner.png directly.) We’ll see even more such magic in Chapter 19, “Apps for Everyone, Part 1,” when we also include variants for different languages and contrast settings that introduce additional suffixes of their own.
If your developer sensibilities object to this file-naming scheme, know that you can also use similarly named folders instead. That is, create scale-100, scale-140, and scale-180 folders in your images folder and place appropriate files with unadorned names (like banner.png) therein.
Tip If you have an app with a fixed layout, you can address pixel density issues by simply using graphical assets that are scaled to 200% of your standard design. This is because a fixed layout can be scaled to arbitrary dimensions, so a 200% image scales well in all cases. Such an app does not need to provide 100%, 140%, and 180% variants of its images.
In CSS you can also use media queries with max-resolution and min-resolution settings to control which images get loaded. Remember, however, that CSS will see the logical DPI, not the physical DPI, so the approximate cutoffs for each scaling factor are more or less as follows:
@mediaalland( max-resolution: 133dpi) {
/*100% scaling*/
}
@mediaalland( min-resolution: 134dpi) {
/*140% scaling*/
}
@mediaalland( min-resolution: 172dpi) {
/*180% scaling*/
}
As explained in the Guidelines for scaling to pixel density, such media queries are especially useful for images you obtain from a remote source, where you might need to amend the specific URI or the URI query string. See “Using Local and Web Images” in Chapter 16, “Alive with Activity,” for how tile updates handle this for scale, contrast, and language.
The “more or less” part is that the cutoff numbers here are not that exact. What I show above comes from empirical tests, even though the documentation suggest 134, 135, and 174 dpi, respectively. Still, it’s the best we can do in CSS at present. One ramification of this is that you shouldnever refer to scale-specific graphics (using .scale-nnn in filenames). This is because the Windows Store will download only those scale graphics that are needed on the device (see Package Bloat? below), and if there’s a mismatch between your media queries and what the system actual reports, you can end up referring to images that aren’t present.
Package bloat? When providing multiple variations of graphics for scales, languages, and contrasts, the natural concern is that they will cause your app package to get bigger and bigger, to the point where those assets dwarf the rest of the app code. It’s actually not anything to worry about. Sure, when you create a package in Visual Studio and upload it to the Windows Store, it will contain all those assets together. However, if you structure resources with the appropriate folder names and/or file suffixes for the variations, the Store automatically breaks out those resources into separate packs so that your customers download onlythe resources that they actually need for their configuration.
Programmatically, you can again obtain logicalDpi and resolutionScale properties from the DisplayInformation object. Its logicaldpichanged event (a WinRT event) can also be used to check for changes in the resolutionScale, since the two are always coupled.
If your app manages a cache of graphical assets, by the way, especially those downloaded from a service, organize them according to the resolutionScale for which that graphic was obtained. This way you can obtain a better image if and when necessary, or you can scale down a higher resolution image that you already obtained. It’s also something to be aware of with any app settings you might roam, because the pixel density and screen size may vary between a user’s devices.
Note img elements on a page that have scale variations in the app’s resources are not automatically reloaded when the scale changes, as when moving a view between monitors with different DPI. The Scaling according to DPI sample recommends using theWinJS.Resources.oncontextchanged event instead, which fires for conditions that change what resources are loaded—contrast, language, and scale. For details, see js/scenario1.js in the sample, especially the comments in the refresh method.
Multiple Views
Many years ago, when I was very actively giving presentations at many developer conferences, I so much wished that Microsoft PowerPoint could present my slides on the main display for the audience while I got a view on my display that showed the next slide as well as my notes. You might be laughing because PowerPoint has had this feature for quite some time (I wasn’t the only one who made the request!). The point, though, is that likely app scenarios include a single app managing multiple independent views, possibly and oftentimes on separate monitors, and the user rearranging and resizing those views, which includes dragging them between monitors. Any one view, though, is limited to a single display (that is, a view cannot span displays).
Projection scenarios like PowerPoint are clearly one of the primary uses for multiple views; a game might also use a second view for various controls and output windows so they don’t interfere with the main display. A different kind of use is where an app has several independent (or loosely coupled) functions that can operate independently and can benefit from being placed side by side with views from other apps (multitasking at its best!). A customer-management system for a mobile sales rep might have one view for appointments and contacts, another for data entry forms, and a third for managing presentations and media. Although these functions could be part of the same layout within a single app view, they don’t need to be. Having them as separate views—which means they operate on different threads and can share data only via the file system—allows the user to place them in relation to other apps such as a web browser (for customer research) and an email app.
The caveat with multiple views is that they run on separate threads and therefore each have their own script context. Views can only communicate with each other through postMessage calls (like we use to communicate between the local and web contexts), but they can exchange data also via appdata settings and/or files, which they share in common.
A view is created through the MSApp.createNewView API, provided by the app host and not WinRT because it’s specific to apps written in HTML and JavaScript. The one argument you give to this method is a string with the ms-appx URI of an in-package HTML page to use for the new view (only ms-appx URIs are allowed, meaning the view runs in the local context). That HTML file can, of course, reference whatever own stylesheets and script (including WinJS) that it needs. All of this will be loaded as part of the createNewView call, even though the view is not yet visible. The usual DOM events like DOMContentLoaded will be raised in the process, and you can use the WinJS.Application events as always (provided that you call app.start() to drain the queue).
The MSAppView object that createNewView returns will have a unique viewId property to identify it, along with postMessage and close methods. The latter is what the app clearly uses to close the view. The secondary view receives messages through the window.onmessage event, as usual. The new view can also call window.close to close itself, and the user can also close the view with touch/mouse gestures or Alt+F4. As for sending data back to the app, the view calls MSApp.getViewOpener to obtain the MSAppView object for the app’s primary view—its postMessage method will raise a window.onmessage event in the primary view. These relationships are shown in Figure 8-7.
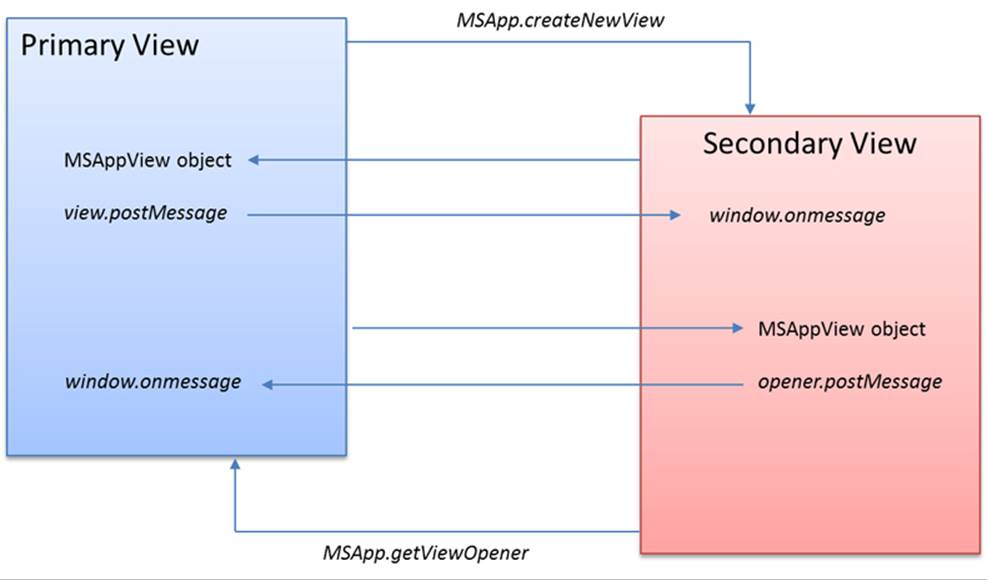
FIGURE 8-7 A primary view creates a secondary view through MSApp.createNewView. The secondary view retrieves a reference to the primary view through MSApp.getViewOpener. The result in both cases is an MSAppViewobject whose postMessage call sends a message to the other view.
Let me note up front that if a secondary view closes itself with window.close, the app won’t receive any kind of event. Typically, then, the secondary view will use postMessage to inform the app that it’s closing. This is also where the view should subscribe to theApplicationView.onconsolidated event to detect when the user closes it directly, and post a message to the app. We’ll see an example shortly.
Now creating a new view doesn’t actually make it visible—the view’s HTML, CSS, and JavaScript are all loaded and run, but nothing will have appeared on the screen. For that you need to use one of two APIs: the ProjectionManager or the ApplicationViewSwitcher, both of which are in Windows.UI.-ViewManagement.
The ProjectionManager is meant for full-screen scenarios and works with a single secondary view. Its projectionDisplayAvailable property, first off, tells you whether projection is possible and, along with the projectiondisplayavailablechanged event, is what you use to enable a projection feature in an app. To make the view visible you pass its viewId to startProjectingAsync along with the ID of the primary view (the one from ApplicationView.getForCurrentView().id). Later on, call stopProjectingAsync to close the view and swapDisplaysForViewsAsync to do what it implies.
For a simple example, refer to the SimpleViewProjection example in this chapter’s companion content. On startup it gets the primary view and the ProjectionManager (js/default.js):
var view = vm.ApplicationView.getForCurrentView();
var projMan = vm.ProjectionManager;
The Start button in the example is itself enabled or disabled according to the ProjectionManager.
btnStart.addEventListener("click", startProjection);
projMan.onprojectiondisplayavailablechanged = function () {
checkEnableProjection();
}
function checkEnableProjection() {
btnStart.disabled = !projMan.projectionDisplayAvailable;
}
When you click Start, the app creates the view and starts projecting, using the id’s of both views:
viewProjection = MSApp.createNewView("ms-appx:///projection/projection.html");
projMan.startProjectingAsync(viewProjection.viewId, view.id).done(function () {
// enable/disable buttons
});
Other buttons will call stopProjectingAsync and swapDisplaysForViewAsync, and other code handles selectively enabling the UI as needed. There’s also a button to do a postMessage to the projection with the current time.
function sendMessage() {
var date = new Date();
var timeString = date.getHours() + ":" + date.getMinutes() + ":" + date.getSeconds()
+ ":" + date.getMilliseconds();
var msgObj = { text: timeString };
viewProjection.postMessage(JSON.stringify(msgObj),
document.location.protocol + "//" + document.location.host);
}
The projection page is in projection/projection.html with associated .css and .js files. Within its activated handler it retrieves the opener view and listens for the consolidated event (js/projection.js):
var opener = MSApp.getViewOpener();
var thisView = Windows.UI.ViewManagement.ApplicationView.getForCurrentView();
thisView.onconsolidated = function () {
sendCloseMessage();
}
where sendCloseMessage is a function that just does a postMessage with a “close” indicator so the main app can reset its UI. The same thing happens when you click the Close button in the projection, after which it calls window.close.
For another demonstration, refer to the Projection sample in the SDK. It basically does the same thing as the simple example above, adding a little more to set view properties like the title. I’m not showing any code from the sample, however, because it buries the basic API calls likecreateNewView and getViewOpener deep inside helper classes called ProjectionView.ViewManager (for the primary view) and ProjectionView.ViewLifeTimeControl (for the secondary view). These classes (in js/viewLifetimeControl.js) provide a mini-framework around the various events likeconsolidated and visibility changes, and creates a message protocol between the primary and secondary views. It also does reference counting on secondary views to control their lifetime, and makes sure that the primary view is notified when a secondary view is closed. It’s the kind of stuff you’d write if you started using multiple views, but it’s a little too complicated to use as an introduction to the API!
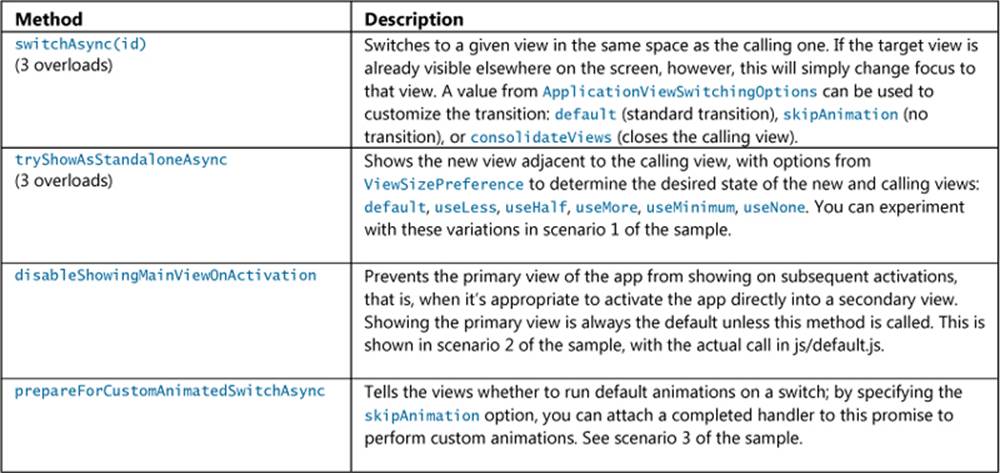
This same mini-framework is also used in the SDK’s Multiple Views sample, which demonstrates the methods of the ApplicationViewSwitcher class. Those methods—with some verbose names!—are:
Because the details and variations of these APIs get rather complex, I’ll leave it to you to explore the sample directly. Note that in the main scenarios of the app you won’t find any calls to switchAsync—these are made in the secondary view (js/secondaryView.js) to switch back to the primary view. In each case the view closes itself as part of the switch, which isn’t a required behavior, of course.
To show the basic switching behavior, I’ve made a few small modifications to a copy of this sample in the companion content. First, the button in the secondary view to switch back to the main view does not close the secondary one. Then I’ve added a button to scenario 1 of the main app to call switchAsync on the selected secondary view. You’ll see how it brings that view up in the same space as the original one, rather than alongside. If you switch back from the secondary view, the main view will appear in that space.
Things get interesting when you create an adjacent view first and then in the main app switch to a secondary view in the space. You’ll see two secondary views at once. If you switch to the main app in either, you’ll find that the Switch to Main View button in the other secondary view just changes focus to the already-visible app. Otherwise you’d be seeing the main app view twice, which would be very confusing!
Pannable Sections and Styles
In Chapter 7, “Collection Controls,” we spent a little time looking at when a ListView control was the right choice and when it wasn’t. One of the primary cases where developers have inappropriately attempted to use a ListView is to implement a home or hub page that contains a variety of distinct content groups arranged in columns, as shown in Figure 8-8 and explained on Navigation design for Windows Store apps. At first glance this might look like a ListView, but because the data it’s representing isn’t actually a collection, just a layout of fixed content, it makes sense to use other options for the job. One option is the WinJS.UI.Hub control, which works great for layouts like that in Figure 8-8, and we’ll see that control fairly soon. The other option, which I want to discuss first, is to simply use tried-and-true HTML and CSS for the job!
I point this out because with all the great controls that WinJS provides, it’s easy to forget that everything you know about HTML and CSS still applies in Store apps. After all, those controls are in themselves just blocks of HTML and CSS with some additional methods, properties, and events. So let’s look at how we might create a hub page directly, as it gives us an opportunity to learn about a few features that controls like the Hub employ.
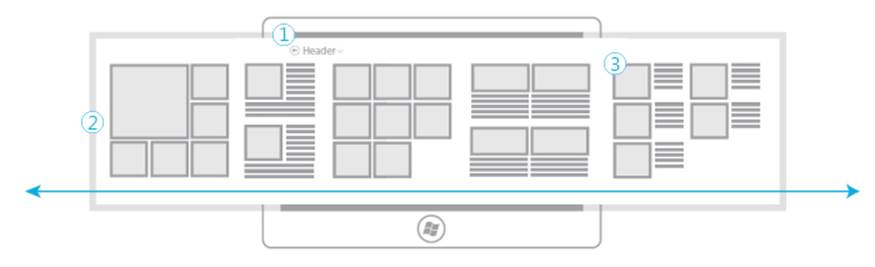
FIGURE 8-8 The layout of a typical home or hub page of a Store app with a fixed header (1), a horizontally pannable section (2), and content sections or categories (3).
Laying Out the Hub
Let’s start by asking how we’d use straight HTML and CSS to implement the whole pannable area of the hub page in Figure 8-8. Referring first to Laying out an app page, we know that the padding between groups or sections should be four units of 20px each, or 80px. Let’s say that each section should be square, except for the second one which is only half the width. On a baseline 1366x768 display, the height of each section would be 768px minus 128px (for the header) minus the minimum 50px on the bottom, which leaves 590px (if we add headings for each section, subtract another 40px).
Thus, a square section on the baseline display would be 590px wide (we’d set the actual height to 100% of its containing grid cell). The total width of the pannable area will be:
(590 * 4 full-size sections) + (295 * 1 half-width section) + (80 * 4 for the separator gaps)
This equals 2975px. To this we’ll add border columns of 120px on the left (according to the silhouette) and 80px on the right, for a total of 3175px.
To create the whole region with exactly this layout, we can use a CSS grid within a block element. To demonstrate this, run Blend and create a new project with the Navigation App template (so we just get a basic page with the silhouette and not all the secondary pages). Within thesection element of pages/home/home.html, create another div element and give is a class of hubSections:
<section aria-label="Main content" role="main">
<div class="hubSections">
</div>
</section>
In pages/home/home.css, add a few style rules. Give overflow-x: auto to the section element, and lay out the grid in the hubSectionsdiv, using added columns on the left and right for spacing (removing the margin-left: 120px from the section and adding it as the first column in thediv):
.homepagesection[role=main] {
overflow-x: auto;
}
.homepage.hubSections {
width: 2975px;
height: 100%;
display: -ms-grid;
-ms-grid-rows: 1fr 50px;
-ms-grid-columns: 120px 2fr 80px 1fr 80px 2fr 80px 2fr 80px 2fr 80px;
}
With just these styles we can see the layout taking shape in Blend by zooming out in the artboard:

Now let’s create the individual sections, each one starting as a div in pages/home/home.html:
<section aria-label="Main content" role="main">
<div class="hubSections">
<div class="hubSection1"></div>
<div class="hubSection2"></div>
<div class="hubSection3"></div>
<div class="hubSection4"></div>
<div class="hubSection5"></div>
</div>
</section>
and styled into their appropriate grid cells with 100% width and height. I’m showing hubSection1 here; the others are the same with just a different column number (4, 6, 8, and 10, respectively):
.homepage.hubSection1 {
-ms-grid-row: 1;
-ms-grid-column: 2; /* 4 for hubSection2, 6 for hubSection3, etc. */
width: 100%;
height: 100%;
}
All of this is implemented in the HubPage example in this chapter’s companion content.
Laying Out the Sections
Now we can look at the contents of each section. Depending on your content and how you want those sections to interact, you can again just use layout (CSS grids or perhaps flexbox) or controls like Repeater or ListView. hubSection3 and hubSection5 have gaps at the end, so they might be collection controls with variable items. Note that if we created lists with more than 9 or 6 items, respectively, we’d want to adjust the column size in the overall grid and make the section element width larger, but let’s assume the design calls for a maximum of 9 and 6 items in those sections.
Let’s also say that we want each section to be interactive, where tapping an item would navigate to a details page. (Not shown in this example are group headers to navigate to a group page.) We’ll just use a ListView in each, where each ListView has a separate data source. ForhubSection1 we’ll need to use cell spanning, but the rest of the groups can just use a simple GridLayout. The key consideration with all of these is to style the items so that they fit nicely into the basic dimensions we’re using. And referring again back to the silhouette, the spacing between image items should be 10px and the spacing between columns of mixed content (hubSection4 and hubSection5) should be 40px (which can be set with appropriate CSS margins).
Hint If you need to make certain areas of your content unselectable, use the -ms-user-select attribute in CSS for a div element. Refer to the Unselectable content areas with -ms-user-select CSS attribute sample. How’s that for a name?
Panning Styles and Railing
To make an element pannable, you use the standard CSS overflow-x (horizontal), overflow-y (vertical), or overflow (bi-directional) styles where the values can be visible (the default, where content visible overflows its element boundaries), scroll (content is clipped to the element and scrollbars are always visible), hidden (content is clipped and cannot be panned), and auto (content is clipped and panning is enabled when necessary). Most often, as in the HubPage example we just saw, you’ll use auto so that an element pans with auto-hiding scrollbars.
If an element is pannable, you can control the appearance of the scrollbar with –ms-overflow-style. Its default setting, auto, provides the auto-hiding scrollbar (-ms-autohiding-scrollbar does the same). Other options include scrollbar (always visible) and none (never visible). Usingnone is what creates a pannable region that never shows any kind of scrollbar, which is certainly appropriate when you don’t want anything interfering with the content. The one caveat is that panning with the mouse requires a mousewheel—if you want drag-to-pan behavior, you’ll need to handle pointer events directly (see Chapter 12). And speaking of the mouse wheel, the –ms-scroll-translation style allows you to translate vertical mousewheel events to horizontal panning.
By default, when an element is styled panning in both vertical and horizontal directions, panning via touch (or the touchpad) follows the movement of the touchpoint in both directions together. This doesn’t work well, however, for content that the user will typically want to pan in only one dimension. For this you can use railing to lock panning (again, only for touch and touchpad) along the axis that the user is panning most, as shown in Figure 8-9. And once panning is locked in that dimension, it stays in effect until the touch point is released, meaning that arbitrary movements will not change the lock. If the user does happen to pan evenly in both directions (a narrow 45-degree line in each quadrant), bi-directional panning can go into effect, but the user would have to deliberately try to make this happen.
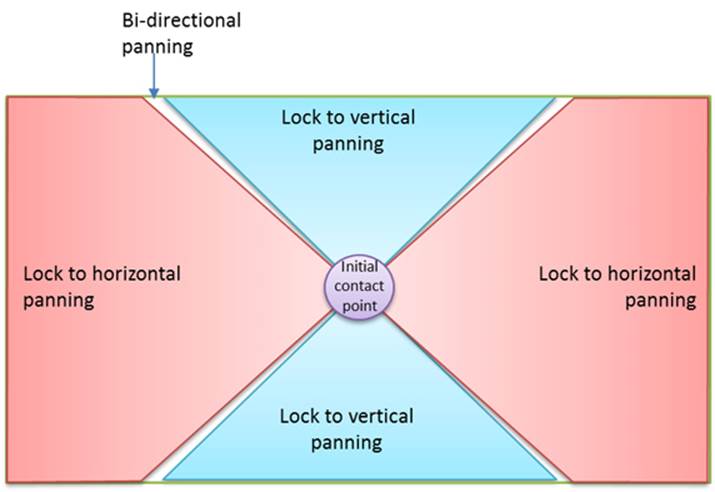
FIGURE 8-9 The concept of rails, where the white areas indicate regions where the touch point is moved equally along both axes and bi-directional panning can happen. Note that railing is determined along 45-degree lines from the touch point and has nothing to do with the shape of the region itself.
Setting up railing is quite simple, as demonstrated in scenario 1 of the HTML scrolling, panning, and zooming sample. Assuming that the panning area (a div containing an image in this case) allows bi-directional panning (overflow: auto), rails are added with –ms-scroll-rails: railed(js/panning.js):
.Railed {
overflow: auto;
-ms-scroll-rails: railed;
}
and they are removed by setting –ms-scroll-rails: none:
.Unrailed {
overflow: auto;
-ms-scroll-rails: none;
}
At present it isn’t possible to adjust the rail thresholds nor to set vertical and horizontal rails independently. In any case, the effects of rails are shown in Video 8-2.
A related style for touch is touch-action, which sets allowable panning directions, allowable zooming gestures, and allowable cross-slide gestures, a few of which are shown in scenario 6 of the sample.
Parallax panning A parallax effect is when you see multiple layers of a page panning at different speeds, thereby giving a sense of visual depth. The Windows Start screen itself does this, where the tiles pan faster than the background. Such an effect is possible through HTML and CSS, and it’s easy to find guidance on the subject. Be specifically mindful of the properties you’re animating for the effect. If you use CSS transforms exclusively, those animations will run “independently” in the GPU. If you animate any other positional properties, the animations will run on the UI thread and likely perform poorly on lower-end hardware.
Panning Snap Points and Limits
If you run the HubPage example and pan around a bit using inertial touch gestures (that is, those that continue panning after you’ve released your finger, explained more in Chapter 12), you’ll notice that panning can stop in any position along the way. You or your designers might like this, but it also makes sense in many scenarios to automatically stop on a section or group boundary. This can be accomplished for touch interactions using CSS styles for snap points as described in the following table. These are styles that you add to a pannable element alongside overflow styles, otherwise they have no effect. Documentation for these (and some others) can be found on the CSS reference for Touch: Zooming and Panning. Be clear that snap points are a touch-only feature (including touchpads); if you want to provide the same kind of behavior with mouse and/or keyboard input, you’ll need to do such work manually along the lines of how the FlipView control handles transition between items.
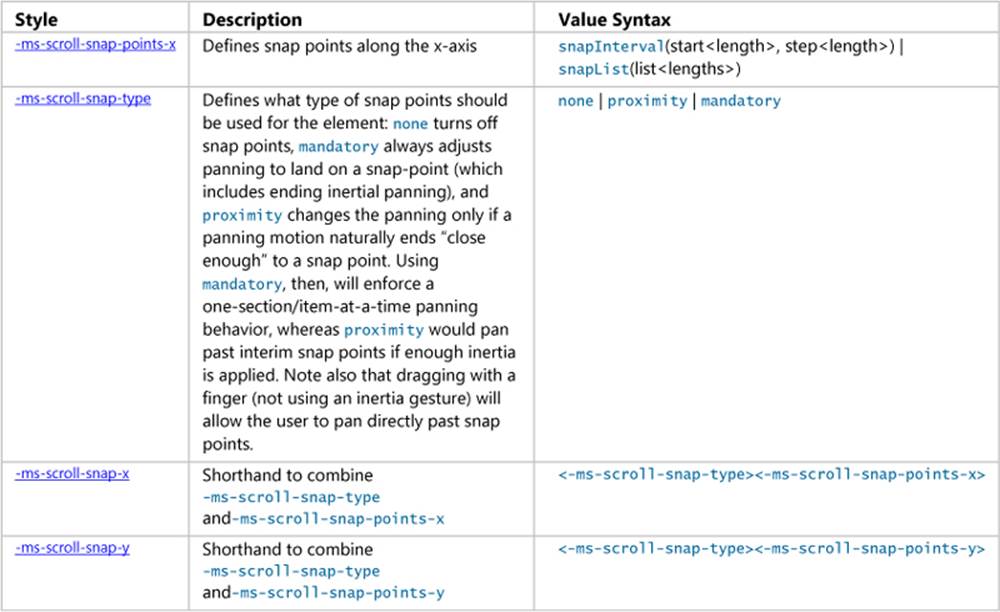
In the table, <length> is a floating-point number, followed by an absolute units designator (cm, mm, in, pt, or pc) or a relative units designator (em, ex, or px).
To add snap points for each of our hub sections in the Hub Page example, we only need to add two snap points styles after overflow-x:
.homepagesection[role=main] {
overflow-x: auto;
-ms-scroll-snap-type: mandatory;
-ms-scroll-snap-points-x: snapList(0px,670px,1045px,1715px,2385px, 3055px);
}
Note that the snap points indicated here include the 120px left border so that each one aligns the section underneath the header text. The 0px point thus snaps to the first section, with the box being 120px in so that it alights to the header. The 670px point for the second reflects that 120px plus the 590px width of the first section. 1045 is 670 plus a half-width section (295px) plus 80px, and so on. We also set snap points all the way to what would be the position past the last section—that is, the rightmost panning point. This makes sure that you can fully pan into the last section in narrow views.
With these changes you’ll now find that panning around stops nicely (with animations) on the section boundaries—see Video 8-3. For a hub page like this, proximity snapping is usually more appropriate. Mandatory snap points are intended more for items that can’t be interacted with or consumed without seeing their entirety, such as flipping between pictures, articles, and so on. (The FlipView control uses these.)
Additional demonstrations of snap points can be found in scenario 2 of the HTML scrolling, panning, and zooming sample. Snap points are not presently supported on the ListView control, as they are intended for use with your own layout.
Related to snap points are the styles that set minimum and maximum extents for panning: -ms-scroll-limit-x-[min | max], -ms-scroll-limit-y-[min | max], and the shorthand combined style–ms-scroll-limit. These specifically limit the values of the element’s scrollLeft (x axis) andscrollTop (y axis).
The –ms-scroll-chaining style is also important when limits are in effect (whether set explicitly or by the size of the content). By default, if you pan content to its limit within an element and continue panning outside the boundaries of that element, the element’s contents will compress a little and then bounce back to normal size when you release the pointer. By setting this style to chained, a pan that goes outside the boundary of one element picks up and pans the next nearest pannable element, and no bounce effect occurs. Scenarios 4 and 5 of the sample demonstrates some of this, and you can read more about chaining in Guidelines for panning.
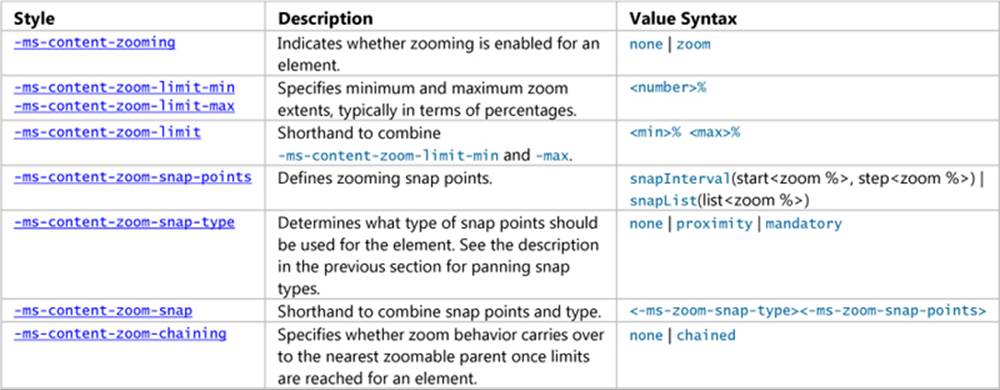
Zooming Snap Points and Limits
While we’re on the subject and looking at the HTML scrolling, panning, and zooming sample, I should mention the -ms-content-zoom-* styles that are also in the CSS reference for Touch: Zooming and Panning, a few of which are used in scenario 3 of the sample:
The Hub Control and Hub App Template
Although it’s certainly possible, as seen previously, to create any layout you want for an app with straight HTML and CSS (and to enable panning and zooming behaviors), WinJS helps out hub page design quite a bit through the WinJS.UI.Hub control (which isn’t available on Windows Phone, use WinJS.UI.Pivot instead)). The control is organized much like the raw layout we saw earlier: the root div for the control plays hosts to any number of sections but has the added feature that it supports a large “hero” image on the left side, as we’ll see, along with both horizontal and vertical layouts. The Hub also supports semantic zoom, meaning that you can host it within a semantic zoom control and use either another Hub or a ListView for the zoomed-out view. All in all, then, it’s a good control to use unless you have layout needs that it can’t accommodate.
Each section in the Hub is defined by a WinJS.UI.HubSection control. Each section can have an invocable header and can host whatever other content you want, including templates, repeaters, and ListView controls. That content can be expressed as however many child elements you like, as the HubSection will always create another div container for them alongside one that it creates for the header.
Apart from the usual suspects like addEventListener, the following methods and properties are found on the Hub control:
You can find reference code for the Hub in two places: the HTML Hub control sample and the Hub App project template in Visual Studio. The project template is in many ways similar to the Grid App project—it uses the same data source (in js/data.js once you create a project with it) and navigates between hub, section, and item pages that correspond to the Grid App template’s groupedItems, groupDetail, and itemDetail pages; the latter two in both templates are virtually the same.
Here, let’s look at the control through the lens of the sample because it isolates the Hub’s capabilities more clearly. Once we’ve done that, you should be able to look through the Hub App project template and understand what’s going on.
When you run the sample, you’ll see that each scenario has a Launch Full Screen Sample button because the Hub is definitely meant to occupy an entire page. When you look through the project structure, all the pages with the Hub control are found in the pages folder—the individual scenarios just navigate to those pages, which then provide a back button to return to the sample’s home page. (Of course, if you use the Hub on your own home page, like the Hub App project template, you certainly wouldn’t have a back button! You could also take it as an exercise to convert the navigation in the sample to using multiple views, as described earlier in this chapter.)
Scenario 1 navigates to pages/basichub.html whose full layout is shown in Figure 8-10. Four sections labeled Images, ListView, Video, and Form Controls describe exactly what kind of content that section contains. In this particular case, the headers are static and do not include a hero image—we’ll see those shortly. The video, though, is playing inline so that you can see the media controls for it. Again note that a typical app would not have a back button on its home page!
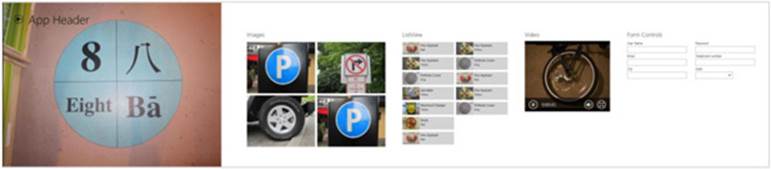
FIGURE 8-10 The full layout for scenario 1 of the HTML Hub Control sample.
In pages/basichub.html, the Hub control and its sections are hosted in div elements. Omitting the content of each section (especially the <select> element in the form with <option> elements for all fifty United States!), we can see the overall structure clearly:
<div data-win-control="WinJS.UI.Hub">
<div class="section1" data-win-control="WinJS.UI.HubSection"
data-win-options="{header: 'Images', isHeaderStatic: true}">
</div>
<div id="list" class="section2" data-win-control="WinJS.UI.HubSection"
data-win-options="{header: 'ListView', isHeaderStatic: true}">
</div>
<div class="section3" data-win-control="WinJS.UI.HubSection"
data-win-options="{header: 'Video', isHeaderStatic: true}">
</div>
<div class="section4" data-win-control="WinJS.UI.HubSection"
data-win-options="{header: 'Form Controls', isHeaderStatic: true}">
</div>
</div>
As you can see, each HubSection control has a header property (read-write) to provide its header text and an isHeaderStatic property (read-write) to indicate whether that header is inert (true) or can be clicked or tapped (false, the default). In the latter case, a chevron character > will be appended to the header text and clicking a header will raise a headerinvoked event on the overall Hub control, not the section.
The section control, in fact, has only one other property, contentElement (read-only), which will be the div that the HubSection creates to contain whatever child elements you declare for the control.
Speaking of child elements, here’s that markup for the first three sections (slightly condensed; I’m omitting section 4 because its full markup takes two pages!):
<div data-win-control="WinJS.UI.Hub">
<div class="section1" data-win-control="WinJS.UI.HubSection"
data-win-options="{header: 'Images', isHeaderStatic: true}">
<div class="imagesFlexBox">
<img class="imageItem" src="/images/circle_image1.jpg"/>
<img class="imageItem" src="/images/circle_image3.jpg"/>
<!-- And so on for nine total images -->
</div>
</div>
<div id="list" class="section2" data-win-control="WinJS.UI.HubSection"
data-win-options="{header: 'ListView', isHeaderStatic: true}">
<div id="listView" class="win-selectionstylefilled"
data-win-control="WinJS.UI.ListView"
data-win-options="{ itemTemplate: smallListIconTextTemplate,
itemDataSource: select('.pagecontrol').winControl.myData.dataSource,
selectionMode: 'none', tapBehavior: 'none', swipeBehavior: 'none' }">
</div>
</div>
<div class="section3" data-win-control="WinJS.UI.HubSection"
data-win-options="{header: 'Video', isHeaderStatic: true}">
<video class="promoVideo" src="images/cycle.mp4" controls></video>
</div>
<!-- section4 omitted -->
</div>
Tip Do you see the select('.pagecontrol').winControl.myData.dataSource reference for the ListView’s itemDataSource property in section 2? The pageControl class identifies the page control element defined in html/basichub.js. That element’s winControl property gets you to the object defined with WinJS.UI.Pages.define, wherein you’ll find the myData property that returns a Binding.List.
The item template for the ListView is, of course, defined earlier in html/basichub.html. Styles are pulled in from pages/commonstyles.css, which we’ll look at soon after we finish up with the other Hub control features.
Scenario 2 of the sample now adds a hero image at the beginning of the Hub, the full result of which is shown in Figure 8-11 and the limited 1366x768 view in Figure 8-12. In reality, the hero image is not actually a concept of the Hub control at all—it’s simply another HubSection that’s been added to the top of the list (pages/heroimage.html):
<div data-win-control="WinJS.UI.Hub">
<div class="hero" data-win-control="WinJS.UI.HubSection"
data-win-options="{header: 'Hero'}"></div>
<div class="section1" data-win-control="WinJS.UI.HubSection"
data-win-options="{header: 'Images', isHeaderStatic: true}">
where the styling for the hero class in pages/heroimage.css sets the image, the width, and margins, and hides the section header (using the win-hub-section-header selector):
.hero {
background-image: url(/images/circle_hero.jpg);
background-size: cover;
}
.win-hub-horizontal .hero {
width: 944px;
margin-left: -80px;
margin-right: 80px;
}
.win-hub-section.hero .win-hub-section-header {
visibility: hidden;
}
No magic here—just straight CSS, although it’s important to note that the HubSection control extends fully top to bottom within the Hub, so the background image bleeds to the edges.
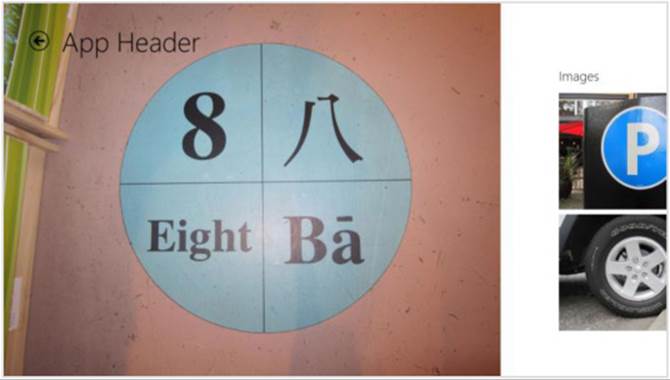
FIGURE 8-11 The full layout for scenario 2 of the HTML Hub Control sample. The hero image is just another HubSection added to the beginning of the Hub control, where the image, width, and margins are defined in CSS. The header for that section is also hidden via CSS.
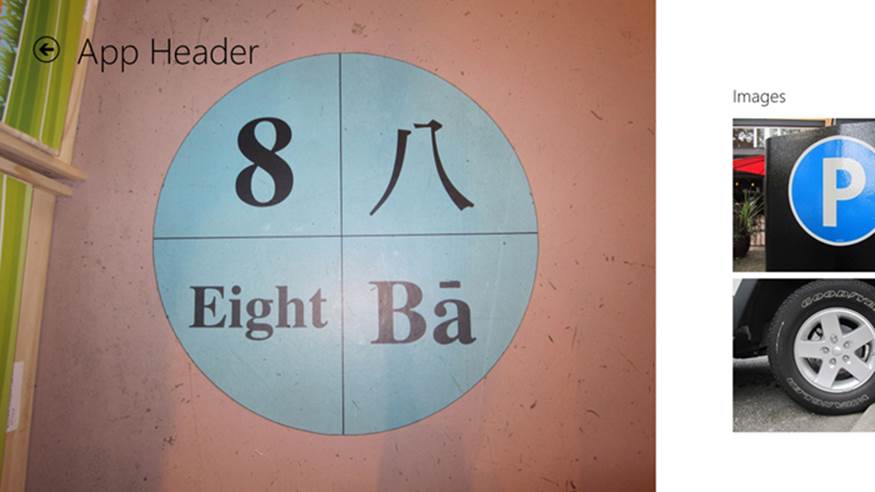
FIGURE 8-12 The appearance of the hero image of scenario 2 on a 1366x768 display.
Scenario 3 enables interactive headers for the ListView and Video sections simply by removing the isHeaderStatic options from the markup (defaulting to false; pages/interactiveheaders.html):
<div id="list" class="section2" data-win-control="WinJS.UI.HubSection"
data-win-options="{header: 'ListView'}">
<!-- ... -->
</div>
<div class="section3" data-win-control="WinJS.UI.HubSection"
data-win-options="{header: 'Video'}">
<video class="promoVideo" src="images/cycle.mp4" controls></video>
</div>
This makes it possible to navigate to the header with the Tab key, and it adds chevrons to the header text (circled in red):

Invoking a header (click, tap, spacebar, or Enter key) then raises the Hub’s headerinvoked event. This scenario’s code picks them up as follows to navigate to subsidiary pages. The section’s index and element are included in the eventArgs.detail object (pages/interactiveheaders.js):74
// Inside the page control
ready: function (element, options) {
this._hub = element.querySelector(".win-hub").winControl;
this._onHeaderInvokedBound = this.onHeaderInvoked.bind(this);
this._hub.addEventListener("headerinvoked", this._onHeaderInvokedBound);
},
//navigate to deeper levels by invoking interactive headers
onHeaderInvoked: function (ev) {
var index = ev.detail.index;//Section index
var section = ev.detail.section;//Section element
//check that the correct section is invoked
if (index === 2) {
WinJS.Navigation.navigate("/pages/listview.html");
}
if (index === 3) {
WinJS.Navigation.navigate("/pages/video.html");
}
},
unload: function () {
this._hub.removeEventListener("headerinvoked", this._onHeaderInvokedBound);
},
Supporting semantic zoom, which is shown in scenario 4, is nothing new—the sample (pages/semanticzoom.html) just places the Hub control as the first child of a WinJS.UI.SemanticZoom control and declares a ListView for the zoomed-out view that just navigates to the sections:

Scenario 5 (pages/verticallayout.html) takes one more step to handle a narrow 320px view by switching the Hub control into a vertical orientation (with appropriate styles in pages/vertical-layout.css). When vertical, the Hub simply lays out the sections vertically, and the sample also handles semantic zoom in this state are well. To illustrate all this, Figure 8-13 shows the 500px wide view of the app, where it still uses the horizontal orientation, then the 320px narrow view, and then the narrow zoomed-out view.
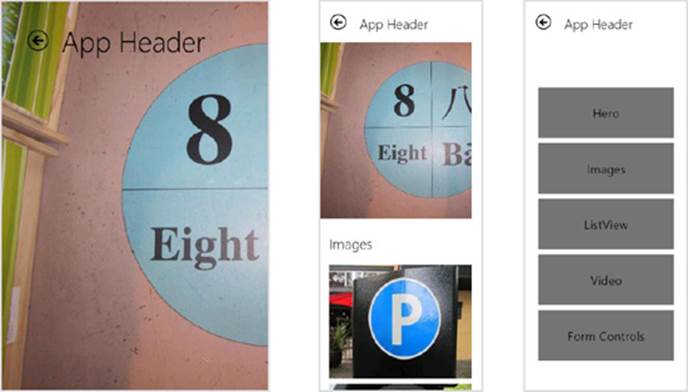
FIGURE 8-13 Scenario 5 at 500px wide (left), 320px wide (middle) with the vertical Hub layout, and 320px wide zoomed out (right) with a vertical ListView.
The only bit of code needed to handle this is the updateHubLayout function that’s called on window.onresize (pages/verticallayout.js; the arguments to the function are the Hub and the zoomed-out ListView control, respectively):
function updateHubLayout(hub, listview) {
if (document.body.clientWidth < 500) {
if (hub.orientation !== WinJS.UI.Orientation.vertical) {
hub.orientation = WinJS.UI.Orientation.vertical;
listview.layout = new WinJS.UI.ListLayout();
}
}
else {
if (hub.orientation !== WinJS.UI.Orientation.horizontal) {
hub.orientation = WinJS.UI.Orientation.horizontal;
listview.layout = new WinJS.UI.GridLayout();
}
}
}
The code here changes orientation whenever the view width falls below 500px. In many cases you might want to make the switch when the aspect ratio goes to a portrait orientation, which can be done simply by changing the if statement to compare with document.body.clientHeightand changing the CSS media query to check for an orientation change rather than widths:
// pages/verticallayout.js
if (document.body.clientWidth < document.body.clientHeight)
/* pages/verticallayout.css */
/* Original was @media (min-width: 320px) and (max-width:499px) */
@media( orientation: portrait)
Hub Control Styling
Styling the hub control is a matter of styling its various parts, like we’ve seen in earlier chapters with the ListView, the FlipView, and the ItemContainer controls. To lay the div structure out clearly, a bit of markup like this:
<div data-win-control="WinJS.UI.Hub">
<div class="hero" data-win-control="WinJS.UI.HubSection"
data-win-options="{header: 'Hero'}"></div>
<div class="section1" data-win-control="WinJS.UI.HubSection"
data-win-options="{header: 'Images', isHeaderStatic: true}"></div>
</div>
turns into a deeper div hierarchy with various win-hub-* classes assigned (and a few other elements):
<!-- The root element (win-vertical if vertically oriented) -->
<div class="win-hub win-horizontal">
<!-- The panning region with snap points for the sections -->
<div class="win-hub-viewport">
<!-- The container for sections -->
<div class="win-hub-surface">
<!-- hero section -->
<div class="hero win-hub-section">
<!-- header -->
<div class="win-hub-section-header">
<button class="win-hub-section-header-tabstop
win-hub-section-header-interactive"></button>
<h2 class="win-hub-section-header-content">Hero</h2>
<span class="win-hub-section-header-chevron"></span>
</div>
<!-- content -->
<div class="win-hub-section-content">
</div>
</div>
<!-- section1 -->
<div class="section1 win-hub-section">
<!-- same structure for header and content but without
win-hub-section-header-interactive for non-invocable header -->
</div>
</div>
</div>
</div>
The most common classes to style differently than the defaults are win-hub-section, win-hub-section-header, and win-hub-section-content to change margins and/or padding. The win-hub-section-header-tabstop class identifies the button element in the header, regardless of whether it’s interactive.
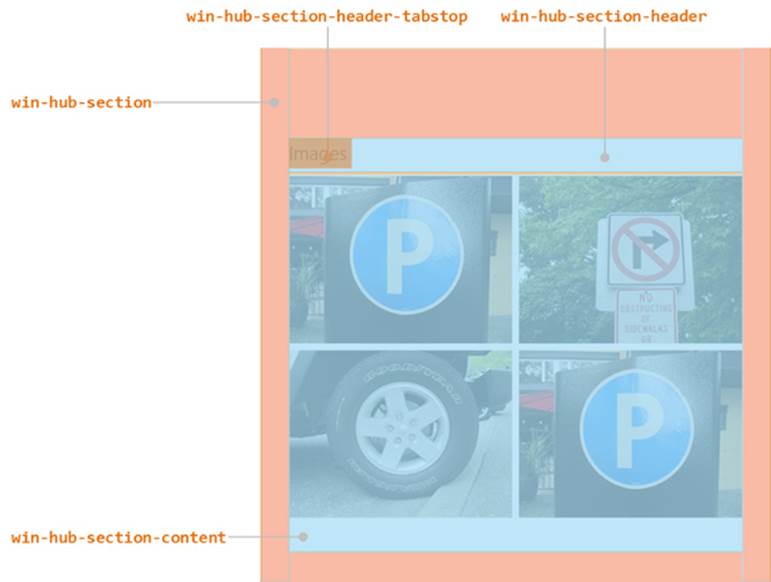
Because the win-hub-surface background is transparent by default, you can set a background color on win-hub-viewport to have it show through or you can use a background image that will stay fixed behind the sections. Typically you’d use a low-contrast image (like those on the Start screen) to not distract from the rest of the content.
Beyond that, the content within your sections is, of course, under your complete control, so you can style all that however you wish.
Using the CSS Grid
Starting back in Chapter 2, we’ve already been employing CSS grids for many purposes. Personally, I love the grid model because it so effortlessly allows for relative placement of elements and scaling easily to different screen sizes.
Because the focus of this book is on the specifics of the Windows platform, I’ll leave it to the W3C specs on http://www.w3.org/TR/css3-grid-layout/ and http://dev.w3.org/csswg/css3-grid-align/ to explain all the details. These specs are essential references for understanding how rows and columns are sized, especially when some are declared with fixed sizes, some are sized to content, and others are declared such that they fill the remaining space. The nuances are many!
Because the specs themselves are still in the draft stages as of this writing, it’s good to know exactly which parts of those specs are actually supported by the HTML/CSS engine used for Store apps.
For the element containing the grid, the supported styles are simple. First use the -ms-grid and -ms-inline-grid display models (the display:style). We’ll come back to -ms-inline-grid later.
Second, use -ms-grid-columns and -ms-grid-rows on the grid element to define its arrangement. If left unspecified, the default is one column and one row. The repeat syntax such as -ms-grid-columns: (1fr)[3]; is supported, which is most useful when you have repeated series of rows or columns, which appear inside the parentheses. As examples, all the following are equivalent:
-ms-grid-rows:10px10px10px20px10px20px10px;
-ms-grid-rows:(10px)[3](20px10px)[2];
-ms-grid-rows:(10px)[3](20px10px)20px10px;
-ms-grid-rows:(10px)[2](10px20px)[2]10px;
How you define your rows and columns is the interesting part, because you can make some fixed, some flexible, and some sized to the content using the following values. Again, see the specs for the nuances involving max-content, min-content, minmax, auto, and fit-content specifiers, along with values specified in units of px, em, %, and fr. Windows Store apps can also use vh (viewport height) and vw (viewport width) as units.
Within the grid now, child elements are placed in specific rows and columns, with specific alignment, spanning, and layering characteristics using the following styles:
• -ms-grid-column identifies the 1-based column of the child in the grid.
• -ms-grid-row identifies the 1-based row of the child in the grid.
• -ms-grid-column-align and -ms-grid-row-align specify where the child is placed in the grid cell. Allowed values are start, end, center, and stretch (default).
• -ms-grid-column-span and -ms-grid-row-span indicate that a child spans one or more rows/columns.
• -ms-grid-layercontrols how grid items overlap. This is similar to the z-index style as used for positional element. Since grid children are not positioned directly with CSS and are instead positioned according to the grid, -ms-grid-layer allows for separate control.
Be very aware that row and column styles are 1-based, not 0-based. Re-program your JavaScript-oriented mind to remember this, as you’ll need to do a little translation if you track child elements in a 0-based array.
Also, when referring to any of these -ms-grid* styles as properties in JavaScript, drop the hyphens and switch to camel case, as in msGrid, msGridColumns, msGridRowAlign, msGridLayer, and so on.
Overall, grids are fairly straightforward to work with, especially within Blend where you can immediately see how the grid is taking shape. Let’s now take a look at a few tips and tricks that you might find useful.
Overflowing a Grid Cell
One of the great features of the grid, depending on your point of view, is that overflowing content in a grid cell doesn’t break the layout at all—it just overflows. (This is very different from tables!) What this means is that you can, if necessary, offset a child element within a grid cell so that it overlaps an adjacent cell (or cells). Besides not breaking the layout, this makes it possible to animate elements moving between cells in the grid, if desired.
A quick example of content that extends outside its containing grid cell can be found in the GridOverflow example with this chapter’s companion content. For the most part, it creates a 4x4 grid of rectangles, but this code at the end of the doLayout function (js/default.js), places the first rectangle well outside its cell:
children[0].style.width = "350px";
children[0].style.marginLeft = "150px";
children[0].style.background = "#fbb";
This makes the first element in the grid wider and moves it to the right, thereby making it appear inside the second element’s cell (the background is changed to make this obvious). Yet the overall layout of the grid remains untouched.
I’ll cast a little doubt on this being a great feature because you might not want this behavior at times, hoping instead that the grid would resize to the content. For that behavior, use an HTML table.
Centering Content Vertically
Somewhere in your own experience with CSS, you’ve probably made the bittersweet acquaintance with the vertical-align style in an attempt to place a piece of text in the middle of a div, or at the bottom. Unfortunately, it doesn’t work: this particular style works only for table cells and for inline content (to determine how text and images, for instance, are aligned in that flow).
As a result, various methods have been developed to do this, such as those discussed in http://blog.themeforest.net/tutorials/vertical-centering-with-css/. Unfortunately, just about every technique depends on fixed heights—something that can work for a website but doesn’t work well for the adaptive layout needs of a Windows Store app. And the one method that doesn’t use fixed heights uses an embedded table. Urk.
Fortunately, both the CSS grid and the flexbox (see “Item Layout” later on) easily solve this problem. With the grid, you can just create a parent div with a 1x1 grid and use the -ms-grid-row-align: center style for a child div (which defaults to cell 1, 1):
<!--In HTML -->
<div id="divMain">
<div id="divChild">
<p>Centered Text</p>
</div>
</div>
/*In CSS */
#divMain {
width: 100%;
height: 100%;
display: -ms-grid;
-ms-grid-rows: 1fr;
-ms-grid-columns: 1fr;
}
#divChild {
-ms-grid-row-align: center;
-ms-grid-column-align: center;
/*Horizontal alignment of text also work with the following*/
/*text-align: center;*/
}
The solution (below) is even simpler with the flexbox layout, where flex-align: center handles vertical centering, flex-pack: center handles the horizontal, and a child div isn’t needed at all. You can use this styling for any centering needs, such as placing content in the middle of a fixed layout.
<!--In HTML -->
<div id="divMain">
<p>Centered Text</p>
</div>
/*In CSS */
#divMain {
width: 100%;
height: 100%;
display: -ms-flexbox;
-ms-flex-align: center;
-ms-flex-direction: column;
-ms-flex-pack: center;
}
Code for both these methods can be found in the CenteredText example for this chapter, with the Grid method commented out in css/default.css. (This example also demonstrates the use of ellipses later on, so there’s more text in the markup.)
Scaling Font Size
One particularly troublesome area with HTML is figuring out how to scale a font size with an adaptive layout. I’m not suggesting you do this with the standard typography recommended by Windows app design as we saw earlier in this chapter. It’s more a consideration when you need to use fonts in some other aspect of your app such as large letters on a tile in a game.
With an adaptive layout, you typically want certain font sizes to be proportional to the dimensions of its parent element. (It’s not a concern if the parent element is a fixed size, because then you can fix the size of the font.) Unfortunately, percentage values used in the font-size style in CSS are based on the default font size (1em), not the size of the parent element as happens with height and width. What you’d love to be able to do is something like font-size: calc(height * .4), but, well, the value of other CSS styles on the same element are just not available to calc.
One exception to this is the vh value (which can be used with calc). If you know, for instance, that the text you want to scale is contained within a grid cell that is always going to be 10% of the viewport height and if you want the font size to be half of that, you can just use font-size: 5vh (5% of viewport height).
Another method is to use an SVG for the text, wherein you can set a viewBox attribute and a font-size relative to that viewBox. Scaling the SVG to a grid cell will effectively scale the font:
<svg viewBox="0 0 600 400" preserveAspectRatio="xMaxYMax">
<text x="0" y="150" font-size="200" font-family="Verdana">
Big SVG Text
</text>
</svg>
You can also use JavaScript to calculate the desired font size programmatically based on the clientHeight property of the parent element. If that element is in a grid cell, the font size (and line height) can be some percentage of that cell’s height, thereby allowing the font to scale with the cell.
Item Layout
So far in this chapter we’ve explored page-level layout, which is to say, how top-level items are positioned on a page, typically with a CSS grid. Of course, it’s all just HTML and CSS—you can use tables, line breaks, and anything else supported by the rendering engine so long as you adapt well to view sizes.
It’s also important to work with item layout in the flexible areas of your page. That is, if you set up a top-level grid to have a number of fixed-size areas (for headings, title graphics, control bars, etc.), the remaining area can vary greatly in size as the window size changes. Let’s look now at some of the tools we have within those specific regions: CSS transforms, flexbox, nested and inline grids, multicolumn text, CSS figures, and CSS connected frames.
I don’t intend to teach you all the details of CSS, so let me give you a few other resources. A general reference for these and all other CSS styles that are supported for Windows Store apps (such as background, borders, and gradients) can be found on the Cascading Style Sheets topic (note the border-image style that’s available in Windows 8.1 and Internet Explorer 11). Also check out CSS for Windows 8 App Development, by Jeremy Foster (APress, 2013). The CSS specifications themselves can be found on http://www.w3.org/; specifically start with the HTML & CSS standards reference. I also highly recommend the well-designed and curated resources from Smashing Magazinefor learning the many nuances of CSS, which I must admit still seems mysterious to me at times!
CSS 2D and 3D Transforms
It’s quite impossible to think about layout for elements without taking CSS transforms into consideration. Transforms are very powerful because they make it possible to change the display of an element without actually affecting the document flow or the overall layout. This is very useful for animations and transitions; transforms are used heavily in the WinJS animations library that provides the Windows look and feel for all the built-in controls. As we’ll explore in Chapter 14, “Purposeful Animations,” and as we’ve seen with the ExtendedSplashScreen example in the companion content, you can make direct use of this library as well.
CSS transforms can be used directly, of course, anytime you need to translate, scale, or rotate an element. Both 2D and 3D transforms (http://dev.w3.org/csswg/css3-2d-transforms/ and http:/www.w3.org/TR/css3-3d-transforms/) are supported for Windows Store apps, specifically these styles:75

Full details can be found on the Transforms reference. Know also that because the app host uses the same underlying engines as Internet Explorer, transforms enjoy all the performance benefits of hardware acceleration. Be aware when doing animations and transitions, however, that hardware acceleration only happens for transform and opacity styles, not for perspective.
Flexbox
Just as the grid is magnificent for solving many long-standing problems with page layout, the CSS flexbox module, documented at http://www.w3.org/TR/css3-flexbox/, is excellent for handling variable-sized areas wherein the content wants to “flex” with the available space. To quote the W3C specification:
In [this] box model, the children of a box are laid out either horizontally or vertically, and unused space can be assigned to a particular child or distributed among the children by assignment of ‘flex’ to the children that should expand. Nesting of these boxes (horizontal inside vertical, or vertical inside horizontal) can be used to build layouts in two dimensions.
The specific display styles for Store apps are display: -ms-flexbox (block level) and display: -ms-inline-flexbox (inline). For a complete reference of the other supported properties, see the Flexible Box (“Flexbox”) Layout documentation:76
As with all styles, Blend is a great tool in which to experiment with different flexbox styles because you can see the effect immediately. It’s also helpful to know that flexbox is used in a number of places around WinJS. The ListView control in particular takes advantage of it, allowing more items to appear when there’s more space. The FlipView uses flexbox to center its items, and the Ratings, DatePicker, and TimePicker controls all arrange their inner elements using an inline flexbox. It’s likely that your own custom controls will do the same.
Nested and Inline Grids
Just as the flexbox has both block level and inline models, there is also an inline grid: display: -ms-inline-grid. Unlike the block level grid, the inline variant allows you to place several grids on the same line. This is shown in the InlineGrid example for this chapter, where we have threediv elements in the HTML that can be toggled between inline (the default) and block level models:
//Within the activated handler
document.getElementById("chkInline").addEventListener("click", function () {
setGridStyle(document.getElementById("chkInline").checked);
});
setGridStyle(true);
//Elsewhere in default.js
function setGridStyle(inline) {
var gridClass = inline ? "inline" : "block";
document.getElementById("grid1").className = gridClass;
document.getElementById("grid2").className = gridClass;
document.getElementById("grid3").className = gridClass;
}
/* default.css */
.inline {
display: -ms-inline-grid;
}
.block {
display: -ms-grid;
}
When using the inline grid, the elements appear as follows:

When using the block level grid, we see this instead:
Fonts and Text Overflow
As discussed earlier, typography is an important design element for Store apps, and for the most part the standard font styles using Segoe UI are already defined in the default WinJS stylesheets. The very helpful CSS typography JS samplein the Windows SDK compares the HTML header elements and the win-type-* styles, demonstrating font fallbacks and how to use bidirectional fonts (left to right and right to left directions).
Speaking of fonts, custom font resources using the @font-face rule in CSS are allowed in Store apps. For local context pages, the src property for the rule must refer to an in-package font file (that is, a URI that begins with / or ms-appx:///). Pages running in the web context can load fonts from remote sources. Blend for Visual Studio 2013 supports this directly. First import a font into your project in Blend: right-click a project folder in the Project tab and select Add Existing Item, navigate to your font file, and press OK. As soon as you do so, Blend will bring up a series of two dialog boxes asking if you’d like to create an @font-face rule:
Completing these dialogs (such as adding multiple font files in the second dialog) will add the appropriate CSS to your stylesheet. For a single font it looks like this:
@font-face {
src: url('/images/assets/JoyCards.ttf')format('truetype');
font-family: JoyCards;
font-style: normal;
font-weight: 500;
font-stretch: normal;
font-variant: normal;
}
which makes the font available in the CSS Properties pane alongside all other installed fonts.
Another piece of text and typography is dealing with text that overflows its assigned region. You can use the CSS text-overflow: ellipsis;style to crop the text with a …, and the WinJS stylesheets contain the win-type-ellipsis class for this purpose. In addition to setting text-overflow, this class also adds overflow: hidden (to suppress scrollbars) and white-space: nowrap. It’s basically a style you can add to any text element when you want the ellipsis behavior.
The W3C specification on text overflow, http://dev.w3.org/csswg/css3-ui/#text-overflow, is a helpful reference as to what can and cannot be done here. One of the limitations of the current spec is that multiline wrapping text doesn’t work with ellipsis. That is, you can word-wrap with theword-wrap: break-word style, but it won’t cooperate with text-overflow: ellipsis (word-wrap wins). I also investigated whether flowing text from a multiline CSS region (see next section) into a single-line region with ellipsis would work, but text-overflow doesn’t apply to regions. If you want to do the work, you can use complex CSS approaches or you can just shorten the text and insert ellipses manually if it spans multiple lines. An MSDN forum post on multiline ellipses shows some options.
For a demonstration of ellipsis and word-wrapping, see the CenteredText example for this chapter.By default, the example shows ellipsis. To see word wrapping, remove the win-type-ellipsis class from the divChild element in default.html and add word-wrap: break-word to the.textbox class in css/default.css.
Multicolumn Elements and Regions
Translating the multicolumn flow of content that we’re so accustomed to in print media has long been a difficult proposition for web developers. While it’s been easy enough to create elements for each column, there was no inherent relationship between the content in those columns. As a result, developers have had to programmatically determine what content could be placed in each element, accounting for variations like font size or changing the number of columns based on the screen width or changes in device orientation.
CSS3 provides for doing multicolumn layout within an element (see http://www.w3.org/TR/css3-multicol). With this, you can instruct a single element to lay out its contents in multiple columns, with specific control over many aspects of that layout. The specific styles supported for Windows Store apps (with no pesky little vendor prefixes!) are as follows:

The reference documentation for these can be found on Multi-column layout, and Blend, of course, provides a great environment to explore how these different styles work. If you’re placing a multicolumn element within a variable-size grid cell, you can set column-width and let the layout engine add and remove columns as needed, or you can use media queries or JavaScript to set column-count directly.
CSS3 multicolumn again only applies to the contents of a single element. While highly useful, it does impose the limitation of a rectangular element and rectangular columns (spans aside). Certain apps like magazines need something more flexible, such as the ability to flow content across multipleelements with more arbitrary shapes, and columns that are offset from one another.
To support irregular columns, CSS Regions (see http://dev.w3.org/csswg/css3-regions/) are supported in Store apps (see Regions reference). Regions allow arbitrarily (that is, absolutely) positioned elements like images to interact with inline content.
The key style for a positioned element is the float: -ms-positioned style which should accompany position: absolute. Basically that’s all you need to do: drop in the positioned element, and the layout engine does the rest. It should be noted that CSS Hyphenation, yet another module, relates closely to all this because doing dynamic layout on text immediately brings up such matters. Fortunately, Store apps support the –ms-hyphens and the -ms-hyphenation-* styles (and their equivalent JavaScript properties). The hyphenation spec is located at http://www.w3.org/TR/css3-text/; documentation for Store apps is found on the Text styles reference.
The second part of the story consists of named flows and region chains (which are also part of the Regions spec). These provide the ability for content to flow across multiple container elements, as shown in Figure 8-14. Region chains can also allow the content to take on the styling of a particular container, rather than being defined at the source. Each container, in other words, gets to set its own styling and the content adapts to it, but commonly all the containers share similar styling for consistency.
FIGURE 8-14 CSS region chains to flow content across multiple elements.
How this all works is that the source content is defined by an iframe that points to an HTML file (and the iframe can be in the web or local context, of course). It’s then styled with -ms-flow-into: <element> (msFlowInfo in JavaScript) where <element> is the id of the first container:
<!-- HTML -->
<iframe id="s1-content-source" src="/html/content.html"></iframe>
<div class="s1-container"></div>
<div class="s1-container"></div>
<div class="s1-container"></div>
/* CSS */
#s1-content-source {
-ms-flow-into: content;
}
Note that -ms-flow-into prevents the iframe content from displaying on its own.
Container elements can be any nonreplaced element—that is, any element whose appearance and dimensions are not defined by an external resource, such as img—and can contain content between its opening and closing tabs, like a div (the most common) or p. Each container is styled with -ms-flow-from: <element> (msFlowFrom in JavaScript) where the <element> is the first container in the flow. The layout then happens in the order elements appear in the HTML (as above):
.s1-container {
-ms-flow-from: content;
/* Other styles */
}
This simple example was taken from the Static CSS regions sample (Windows 8), which also provides a few other scenarios; the Dynamic CSS regions sample (Windows 8) is also helpful. (Note: these are Windows 8 samples and will need to be retargeted for Windows 8.1; they were not updated for 8.1, but they work just fine.) In all cases, though, be aware that styling for regions is limited to properties that affect the container and not the content—content styles are drawn from the iframe HTML source. This is why using text-overflow: ellipsis doesn’t work, nor willfont-color and so forth. But styles like height and width, along with borders, margin, padding, and other properties that don’t affect the content can be applied.
What We’ve Just Learned
• Layout that is consistent with Windows design principles—specifically the silhouette and typography—helps users focus immediately on content rather than having to figure out each specific app.
• The principle of “content before chrome” allows content to use 75% or more of the display space rather than 25% as is common with chrome-heavy desktop or web applications.
• An app can create and manage multiple views that can be displayed on separate monitors or adjacent to one another on the same monitor (in landscape mode).
• The user is always in control of view size and placement. All views can be sized down to 500px wide by the height of the display, and an app can optionally support a 320px narrow view.
• Every page of an app (including an extended splash screen) can encounter all view sizes, so an app design must show how those views are handled. Media queries and the Media Query Listener API, along with window.onresize, can be used to handle view sizing declaratively and programmatically.
• Apps can specify a preferred orientation in their manifest and also lock the orientation at run time.
• Handling varying screen sizes is accomplished either through a grid-based adaptive layout or a fixed layout utilizing CSS transforms to scale of its content.
• The chief concern with pixel density is providing graphics that scale well. This means either using vector graphics or providing scaled variants of each raster graphic.
• Pannable HTML sections can use snap points to automatically stop panning at particular intervals within the content and can use railing to limit panning to one dimension at a time. Snap points are also available for zooming.
• The WinJS.UI.Hub control supports creating a home or hub page of an app with varied and content that does not come from a single collection. Straight HTML/CSS layout can also be used to achieve this.
• Windows Store apps can take advantage of a wide range of CSS 3 options, including the grid, flexbox, transforms, multicolumn text, and regions. The CSS grid is a highly useful mechanism for adaptive page-level layout, and it can also be used inline. The CSS flexbox is most useful for inline content, though it has uses at the page level as well, as for centering content vertically and horizontally.
70 The tryUnsnap API that existed in Windows 8 is deprecated in Windows 8.1 and does nothing.
71 Another good resource is session 2-150 from the //build 2013 conference, entitled “Beautiful apps at any size screen,” and the Mail app, used as a demo in that session, provides a strong example of dynamic adaptation.
72 Some apps might be able to adjust their aspect ratio and fill the window, but more commonly the ratio remains fixed and extra space is filled with letterboxing. Note also that WinJS 1.0 provided a ViewBox control that does what I’m showing here, but it was removed in WinJS 2.0 because it was seldom used and is very simple to replicate.
73 Apps like movie players, aside from locking the orientation, typically need to keep the screen on even when the user hasn’t interacted with the system for a long time. For this, see the Windows.System.Display.DisplayRequest API.
74 The sample actually uses window.addEventListener, which works only because the otherwise unhandled event bubbles up to the window level. Adding it on this._hub as shown in the code here is more direct.
75 At the time of writing, the -ms-* prefixes on these styles were no longer needed but are still supported.
76 If you’re accustomed to the -ms-box* styles for flexbox, Microsoft aligned to the W3C specifications as they existed at that time for Windows 8 and Internet Explorer 10. As of Windows 8.1 and Internet Explorer 11 and this writing, the [-]ms prefixes are apparently no longer needed, but they are still what’s recognized by Visual Studio’s IntelliSense, so I’m showing them as such here.
All materials on the site are licensed Creative Commons Attribution-Sharealike 3.0 Unported CC BY-SA 3.0 & GNU Free Documentation License (GFDL)
If you are the copyright holder of any material contained on our site and intend to remove it, please contact our site administrator for approval.
© 2016-2026 All site design rights belong to S.Y.A.