Mastering System Center 2012 R2 Configuration Manager (2014)
Chapter 9. Software Updates
Ever since the I Love You (ILoveyou) worm hit the Internet in May 2000 and the Nimda worm hit the Internet in September 2001, patch management has become a very important part of maintaining network security. Those worms revealed the importance of patch management because it was vulnerabilities in Windows that had allowed the worm to spread so fast around the world, and Microsoft had released patches for these vulnerabilities several months earlier.
At the time, patching an operating system was a very labor-intensive task. Windows Update was available, but you still had to run it manually on each machine that needed updates. This meant connecting to the Internet, which was really too dangerous for corporate networks while ILoveyou and Nimda were spreading. As a result, network administrators and PC support staff ended up traveling to all their computers with a CD full of updates to get them patched up and safe again.
Microsoft released Software Update Services in 2002, and System Management Server (SMS) 2.0 got some patch-management functionality through an add-on feature pack. However, it wasn’t really until SMS 2003 that there was a truly functional patch-management solution for the corporate enterprise. SMS 2003 used Microsoft Update technology to detect and install its updates, and it allowed reporting to show the progress. This was not without its problems; as more and more patches became available for Microsoft’s operating systems and applications, this patch solution became more taxing on server and workstation resources.
The Software Updates feature in Configuration Manager 2007 was rewritten from the ground up and made the software update process even more effective by leveraging the Windows Server Update Services (WSUS) product and incorporating its capabilities into patch management and also by taking some of the load off Configuration Manager clients in the process. With the introduction of Configuration Manager 2012, Microsoft made configuring, deploying, and maintaining the software update role much easier than before.
In this chapter, you will learn to
· Plan to use Software Updates
· Configure Software Updates
· Use the Software Updates feature to manage software updates
· Use automatic update deployment to deploy software updates
What’s New in Software Updates
After integrating Windows Server Update Services in Configuration Manager 2007 as the Software Updates feature, Microsoft further enhanced the feature in Configuration Manager 2012. With Configuration Manager 2012 you can manage your software updates more easily and quickly. The following changes and enhancements are available in Configuration Manager 2012:
1. Software Update Groups New in Configuration Manager 2012 are the software update groups; these replace the update lists that were available in Configuration Manager 2007. When you want to organize your software updates in your environment effectively, you need to use software update groups. With automatic deployment rules you can add new updates automatically, or you can add them yourself manually. The deployment of software update groups can also be done automatically or manually.
2. With software update groups you are also able to retrieve compliance information from devices for the software updates without deploying them.
3. Automatic Deployment Rules Software update administrators will have a ball with this new feature. With automatic deployment rules you can automatically approve and deploy software updates. You can specify criteria for software updates, and the software updates are automatically added to the software update group. When creating an automatic deployment rule, you can, for instance, use all Windows 8 updates released since the last Patch Tuesday; this way the Windows 8 updates will be automatically added to the software update group. When a deployment for the software update group is available, the software updates will be automatically rolled out to your clients.
4. Software Update Filtering The new Configuration Manager 2012 console has a good search engine; this search engine is also used for searching or filtering software updates. While defining a search, you can add a set of criteria that makes it easy to filter and find the updates you need. You can save the defined criteria when you are finished and use the criteria at a later stage.
5. With the results of the search you can select those software updates and add them to an existing or new software update group. You can also see the compliance information about the selected updates.
6. Software Update Monitoring The in-console monitoring feature is also implemented in the Software Updates feature. The Configuration Manager 2012 console provides real-time monitoring information about software updates and running processes. For instance, you can view the following information:
· Compliance and deployment information about key software updates
· Detailed state messages for the deployments and software update assets
· Error codes with additional information for software updates
· State messages for software update synchronizations
· Alerts for software update issues
7. Besides real-time information in the Configuration Manager 2012 console, you can also use the software update reports that are available out of the box.
8. Managing Superseded Software Updates In Configuration Manager 2007 software updates automatically expired after being superseded. This was done in the full software update synchronization process. You could not deploy superseded software updates because they were expired, and Configuration Manager 2007 doesn’t allow you to deploy expired software updates.
9. Configuration Manager 2012 lets you choose to manage superseded software updates. You can also choose to configure a specific period of time in which the software update doesn’t automatically expire after being superseded. This way you can deploy superseded software updates if necessary.
How to Manage Expired Updates
If software updates are expired, you can easily identify them and remove the membership of the software update groups. After you remove the membership, the maintenance cycle will remove the expired updates from the distribution points. This allows you to remove the expired updates from your distribution points in the Configuration Manager hierarchy.
10.Increased User Control over Installation of Software Updates The Empower Users pillar of Configuration Manager 2012 fits perfectly in the Software Updates feature. Configuration Manager 2012 allows users to have more control over when software updates are installed on their devices (Figure 9.1). Users can schedule or reschedule software installations or updates via the Software Center during non-working hours.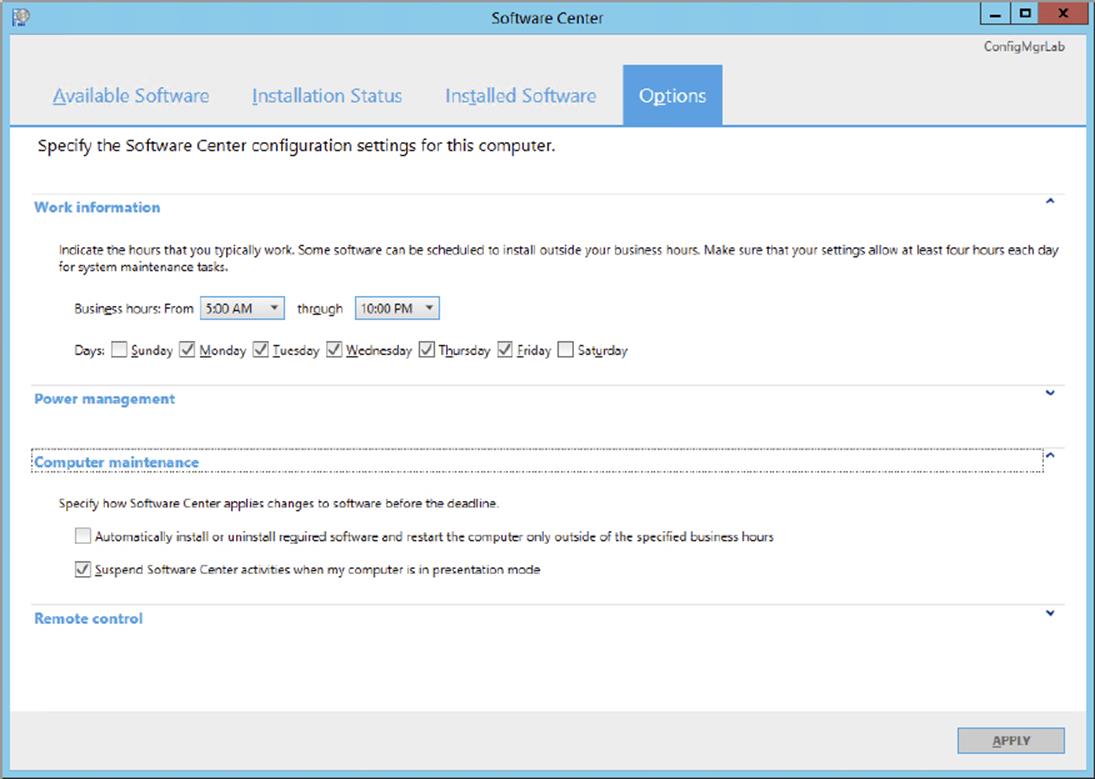
Figure 9.1 Defining business hours in the Software Center
11.Software Update Files Are Stored in the Content Library The content of software updates is also stored in the new content library of Configuration Manager 2012. The single-instance storage of the content library is also used for software updates. Before content files are downloaded, Configuration Manager 2012 checks to see if the content file is already in the content library. If the content file is available, it will use that file for the new software update.
12.Administrative Access Especially for the Software Update features, a role for software update management is defined in role-based administration. You can now delegate the deployment of software updates to your systems to the security officer, for instance. Or you can delegate it to a local administrator by limiting the scope of the role assignment.
13.Software Update Deployment Template Software update deployment templates could be created in the Configuration Manager 2007 console, but in Configuration Manager 2012 you can only create deployment templates with the Automatic Deployment Rules wizard or the Deploy Software Updates Wizard. The deployment template stores many of the deployment properties that will not change when you create new deployments.
Besides the new or enhanced features in the Software Updates feature, some others have been removed from Configuration Manager. Table 9.1 lists the removed features.
Table 9.1: Removed features
|
Feature |
Description |
|
Update lists |
The update lists have been replaced by the new software update groups. |
|
Deployments |
Of course you can still deploy software updates. But now the deployment is nested in the software update group. |
Prerequisites for Software Updates
Before you can plan and set up the Software Updates feature, you need to be familiar with its components, so you can determine which ones to install and configure for your environment. Table 9.2 provides a list of these components.
Table 9.2: External prerequisites to the Configuration Manager Software Updates feature
|
Prerequisite |
Description |
|
Windows Server Update Services (WSUS) 3.0 SP2 or later |
Software Updates requires WSUS 3.0 or later to be installed before setting up the software update point site system role because it is used for update synchronization and compliance assessment on clients. |
|
WSUS 3.0 Administrator Console or later |
The WSUS 3.0 Administrator Console or later is required on the Configuration Manager site server when WSUS is not on the site server itself. The console is required in order to communicate with a remote WSUS server. |
|
Windows Update Agent (WUA) 3.0 or later |
The WUA 3.0 client or later is required, in addition to the Configuration Manager client, to connect to the WSUS server so it can retrieve the list of software updates that need to be scanned for. |
|
Background Intelligent Transfer Service (BITS) 2.5 |
Microsoft highly recommends that BITS be enabled and configured for a Configuration Manager site and that distribution points also be BITS enabled. Because software updates are downloaded to the local client cache before they are installed, having BITS enabled will allow clients to continue a download of updates if a client is disconnected from a distribution point. |
|
Windows Installer 3.1 |
Certain updates, such as ones for Microsoft Office, require Windows Installer 3.1 or they will not be detected during a scan for compliance. If you were using the ITMU tool for SMS 2003, this requirement has probably already been met. |
|
Site server communication to the software update point (SUP) |
There may be configuration settings that need to be examined depending on your software update point infrastructure and Configuration Manager settings. We will go into that in more detail in the section on planning the software update point installation. |
Of course, you will also need to configure a SQL Reporting Services (SRS) reporting point before you can use the Software Updates reports. We’ll go into more detail on configuring a reporting point in Chapter 13, “Reporting.”
Elements of Software Updates
Before you can plan to implement the Software Update process, you need to become familiar with the various elements of the process and their roles in the overall picture.
Software Update Point
As discussed in Chapter 4, “Installation and Site Role Configuration,” the software update point is a site system role that is required for managing software updates in Configuration Manager. Each Configuration Manager site must have at least one software update point that is able to synchronize with a source like Microsoft Update before it can deploy software updates to Configuration Manager clients. The software update point role can only be configured on a server that already has Windows Server Update Services (WSUS) 3.0 SP2 installed. The software update point software provides the bridge between the WSUS components and Configuration Manager. It allows synchronization with the WSUS database to download the latest software update information from Microsoft Update and locally published updates.
When the software update point site system role is created and configured as the software update point that synchronizes with a synchronization source, the software update point components are installed and enabled. The WSUS Control Manager component configures the associated WSUS server with the settings that were chosen when you set up the software update point site system role.
When you are deploying a Central Administration Site (CAS), you need to install the software update point in the CAS first.
The software update point settings can be changed from the Software Update Component Properties window via the Configuration Manager console:
1. Choose the System Center 2012 Configuration Manager console ⇒ Administration ⇒ Overview ⇒ Site Configuration ⇒ Sites.
2. Select the site for which you want to change properties.
3. Choose Configure Site Components ⇒ software update point.
The software update point settings can modify the software update point site system server, the synchronization source, the schedule, and the products, classifications, and languages for which software updates will be synced with the database. You will find more details on these settings later in the chapter.
The first time the software update point completes its synchronization; the Software Updates client agent components are activated from a dormant state and will connect on a schedule to WSUS on the software update point server to start a scan for update scan compliance, as described earlier in the chapter.
Software Updates Agent
The Software Updates Agent is part of the Configuration Manager 2012 client. You can
configure the Software Updates Agent with the client settings. With Configuration Manager 2012 you can create different client agent settings for groups of computers, so you are able to assign different settings for different groups of computers and servers. For instance, you can configure client settings for computers in such a way that all mandatory software updates that reach their deadline are installed immediately. For servers you can configure a different setting.
Software Updates Metadata
A software update has two parts: the software update file(s) and the metadata. The metadata is contained in the Configuration Manager database and provides information about the software update, including its name, description, products supported, update class, size, article ID, download URL, rules that apply, and so on.
Most important, the metadata for each software update defines what products are applicable to the update. A product (for example, Windows 7) is a specific edition of an OS or application. A product family (for example, Microsoft Windows) is a base OS or application from which single products come. You can select a product family or individual products when choosing what will be synced by Configuration Manager.
Multiple Product Updates
If an update is applicable to many products, and at least a few of those products from a product family have been chosen for synchronization, then all the updates will appear in the Configuration Manager console.
The metadata for each update also defines the update’s classification. This represents the type of software an update will modify on clients. There can be many different classifications for any given product family, which we will go over in the “Planning to Use Software Updates in Configuration Manager” section of this chapter. The metadata also defines what languages the update file is applicable to, and it provides a summary of the software update in one or more languages.
Software Update Files
The software update files are the actual files that the client downloads, such as an .exe, a Windows Installer file (.msi), a Microsoft Update Standalone Package (.msu), or a Windows Installer patch (.msp), and then installs to update a component or application. The software update file might be stored on a WSUS 3.0 SP2 server that is configured to be a software update point, but it is always stored on distribution points for the site when the software update is downloaded or deployed. The process is as follows:
1. Software update files are retrieved from either the upstream server or Microsoft Update.
An upstream server is a software update point higher in the Configuration Manager 2012 hierarchy.
2. The updates are then copied to distribution points when the software update is downloaded using the Download Software Updates Wizard or deployed to clients using the Deploy Software Updates Wizard.
Both methods are covered in detail later in this chapter.
3. Both methods download the software update files to a temporary location on the site server hard drive.
4. The site server creates and stores a compressed package file containing the software update.
5. It decompresses the package file.
6. Then it copies the update file to the content library on the distribution point.
Software Update Objects
The Software Updates node in the Configuration Manager 2012 console is divided into four nodes, as shown in Figure 9.2.

Figure 9.2 The Configuration Manager console showing the Software Updates node
In these nodes you will find the items that are related to the Software Updates feature. Table 9.3 lists the items that are related to Software Updates.
Table 9.3: Software Updates related items
|
Object |
Description |
|
All Software Updates |
Every software update has a configuration item object that is created during the software update sync cycle. |
|
Software Update Groups |
These are fixed sets of software updates that can be used for delegated administration and creating software update deployments. |
|
Deployment Packages |
These host the software update source files. |
|
Automatic Deployment Rules |
Automatic deployment rules give you the ability to automatically approve, download, and deploy software updates to all or a subset of your devices. |
|
Deployment Template |
This stores many of the deployment properties that may not change from one deployment to the next and are used to save time and ensure consistency when creating deployments. The deployment template is stored within the Configuration Manager database and is only accessible when creating a deployment or an automatic deployment rule. |
|
Search |
This feature provides an easy way to retrieve a set of software updates that meet the search criteria; the searches can be saved in the Configuration Manager database. |
As noted in some of the preceding descriptions, software update deployment and deployment package objects are replicated from the site where they were created to all sites in the Configuration Manager hierarchy. The objects replicated to a child site will be read-only. Even though the properties for these objects must be modified at the site where they were created, the actions available for deployments at child sites are the same as those at the site where they were created. Also, deployment packages can be used to host the software updates that are deployed on the child sites.
Software Update Groups
A software update group in Configuration Manager contains a set of software updates. Software update groups offer several benefits for deploying and monitoring software updates and are part of Microsoft’s recommended Software Updates workflow.
Using a software update group allows you to automate the process of approving and deploying software updates with automatic deployment rules. Tracking the compliance state for the software updates in deployments is an important task for Configuration Manager admins. If deployments are made without update groups, it’s very hard to get the overall compliance state for the same set of software updates that have been sent out with multiple deployments. When update groups are used instead, you can use the Compliance 1 - Overall Compliance report for the set of updates in the software update group or the Compliance 3 - Update Group (Per Update) report to get a list of the updates in an update group and the overall compliance of each. This is a great reason to use software update groups as a part of your software update procedure.
Deployment Templates
Deployment templates can store many of the software update deployment properties, and they can be created for consistency, to save time, or to fit your software update procedures. You can create a deployment template in the process of creating a deployment or automatic deployment rule and save the settings in a template. Table 9.4 shows the deployment properties that are saved in a deployment template.
Table 9.4: Deployment template properties
|
Setting |
Description |
|
Collection |
Indicates the collection that will be targeted for the software update deployment. This setting is optional when you make a deployment template. |
|
Deployment Settings |
Configured deployment settings such as Send Wake-up Packets or Verbosity Level are saved in the deployment template. |
|
Deployment Schedule |
Sets whether the user will be notified of pending updates, the installation progress for updates, whether the client evaluates the deployment schedule in local or Coordinated Universal Time (UTC), and the timeframe between when an update is available and when it is mandatory on clients. |
|
User Experience |
Hides software update installation and notifications. Sets the system restart behavior when an update installs on a client and needs to restart to finish. Also allows a system restart to be completed outside a maintenance window. |
|
Alerts |
Sets if alerts are generated for the in-console alerting feature. Sets whether Operations Manager alerts are disabled while updates install and/or send an alert if the install fails. |
|
Download Settings |
Sets how clients will interact with the distribution points when they get a software update deployment. |
|
Deployment Location |
Sets whether to download the software updates from the Internet or a network file share. |
|
Language Settings |
Sets the language of the software updates that need to be downloaded and deployed. |
Creating deployment templates in advance for typical deployment scenarios in your environment allows you to create deployments using templates that populate many of the properties that are most often static for the particular deployment scenario. Using the deployment template also reduces the number of wizard pages to work through in the Deploy Software Updates Wizard by up to seven pages, depending on what information you have already populated. This not only saves time but also helps to prevent mistakes when setting up a deployment.
Deployment Packages
A deployment package is the method used to download software updates (either one or several) to a network shared folder, which must be manually created before it is used, and copy the software updates source file to distribution points defined in the deployment.
Software updates can be downloaded and added to deployment packages prior to deploying them by using the Download Software Updates Wizard. This wizard provides admins with the capability to provision software updates on distribution points and verify that this part of the deployment process works properly.
When downloaded software updates are deployed using the Deploy Software Updates Wizard, the deployment automatically uses the deployment package that contains each software update. When software updates are selected that haven’t been downloaded or deployed, a new or existing deployment package must be specified in the Deploy Software Updates Wizard, and the updates are downloaded to the package when the wizard is finished.
There is no hard link between a deployment and a specific deployment package. Clients will install software updates in a deployment by using any distribution point that has the software updates, regardless of the deployment package. Even if a deployment package is deleted for an active deployment, clients will still be able to install the software updates in the deployment—as long as each update has been defined in at least one other deployment package and is present on a distribution point that the client can get to. To help prevent software update deployment failures, you should make sure that deployment packages are sent to a group of distribution points that can be accessed by all the clients you are targeting.
Deployment package access accounts allow you to set permissions to specify users and user groups who can access a deployment package folder on distribution points. Configuration Manager makes these folders available to everyone by default, but you can modify this access if required for a specific security need.
Configuration Manager 2012 client computers also have the option of selective download: A deployment package might contain both updates that are required for a client and some that are not, but the client can determine which software updates are applicable and retrieve only those files. This allows admins to have multiple updates in a single deployment package and use it to target clients that might need only some of those updates.
Deployments
While it is deployment packages that host the update files, it is software update deployments that actually deliver software updates to clients. The Deploy Software Updates Wizard is used to create deployments and can be started using several methods, which we will detail later in the chapter. Table 9.5 lists all the pages in this wizard and describes the settings that can be configured in each one to create a software update deployment.
Table 9.5: Deploy Software Updates Wizard settings
|
Page |
Description |
|
General |
Provides the name of and comments about the deployment; the update or update group and collection also need to be supplied. |
|
Deployment Settings |
Defines if the deployment is required or optional and sets the verbosity level. Also configures whether to send wake-up packets. |
|
Scheduling |
Sets whether the user will be notified of pending updates and/or the installation progress for updates, if the client evaluates the deployment schedule in local or Coordinated Universal Time, and the timeframe between when an update is available and when it is mandatory on clients. |
|
User Experience |
Defines if users will receive notice of installations of software updates and what happens when an installation deadline is reached. Defines the system restart behavior when an update installs on a client and needs to restart to finish. Defines if the Windows Embedded write filter is enabled or bypassed for this deployment. |
|
Alerts |
Sets the in-console alert handling of Configuration Manager and sets if System Center Operations Manager (SCOM) alerts are disabled while updates install and whether to send an alert if the install fails. |
|
Download Settings |
Sets how clients will interact with the distribution points when they get a software update deployment. Defines whether clients should use Microsoft Updates for content download if the updates are not present on the preferred distribution point, or whether to download software updates content when on a metered Internet connection. |
|
Deployment Package |
Shows the deployment package that will host the software updates for the deployment. This setting won’t appear if the updates have already been downloaded to a package. |
|
Download Location |
Lets you choose to download the updates from the Internet or from a source on the local network. |
|
Languages Selection |
Lets you select the languages for which the software updates that will be in the deployment are downloaded. |
If an update in a deployment has Microsoft Software License Terms that have not been accepted yet, then a Review/Accept License Terms dialog box will appear before the Deploy Software Updates Wizard and give you a chance to review and accept the license terms. When you accept the terms, then you can deploy the updates. If you don’t accept the terms, the process is canceled.
Automatic Deployment Rules
A new Software Updates feature in Configuration Manager 2012 is Automatic Deployment Rules. This feature lets you define rules for specific types of software updates that can be downloaded and added to a software update group automatically. If a software update group is enabled for deployment, the updates are automatically deployed to your workstations. The Automatic Deployment Rules feature can be used for two common scenarios, namely:
· Automatically deploying Endpoint Protection definition and engine updates
· Patch Tuesday security patches
For both scenarios two out of the box templates are available to assist you in creating the automatic deployment rules. When you create an automatic deployment rule, you need to define whether you want to add the updates to an existing software update group or to automatically create a software update group.
When you deploy Endpoint Protection (System Center Endpoint Protection) definition and engine updates, you can add these updates to an existing software update group. The reason for this is that only four definition updates are available per agent for Endpoint Protection. Three of them are superseded, and only one is active. Every fifth definition update will be expired and fall out of the software update group. Configuration Manager 2012 R2 is able to run the automatic deployment rule up to three times a day, in line with the definition updates publishing frequency.
If you want to deploy the Tuesday patches automatically, it is recommended that you create a new software update group every Patch Tuesday. This keeps your software updates organized.
You can automatically select software updates based on the following parameters:
· Article ID
· Bulletin ID
· Custom severity
· Date released or revised
· Description
· Language
· Product
· Required
· Severity
· Superseded
· Title
· Update classification
· Vendor
Running an automatic deployment rule for a longer time can result in a very large package size. You are able to change the deployment package in an automatic deployment rule to limit the size of the package.
Automatic Deployment of Patch Tuesday Software Updates
The Automatic Deployment Rules feature allows you to automate the deployment of software updates. You can use it to automatically deploy the Patch Tuesday software updates for test purposes or prepare the deployment in production. Depending on your requirements, you can configure an automatic deployment rule for Windows 8 or 8.1 Patch Tuesday updates by creating an automatic deployment rule with the following steps:
1. Create a new software update group each time the rule runs. This way you are able to group the update groups per Patch Tuesday cycle, and you will limit the size of the software update deployment.
2. Select Enable The Deployment after this rule has run.
3. Select a collection with your test systems where you want to automatically test the Patch Tuesday patches.
4. Supply the following search criteria for the rule:
· Product: Windows 8 OR Windows 8.1
· Date Released Or Revised: Last 1 Day
· Update Classification: Security Updates
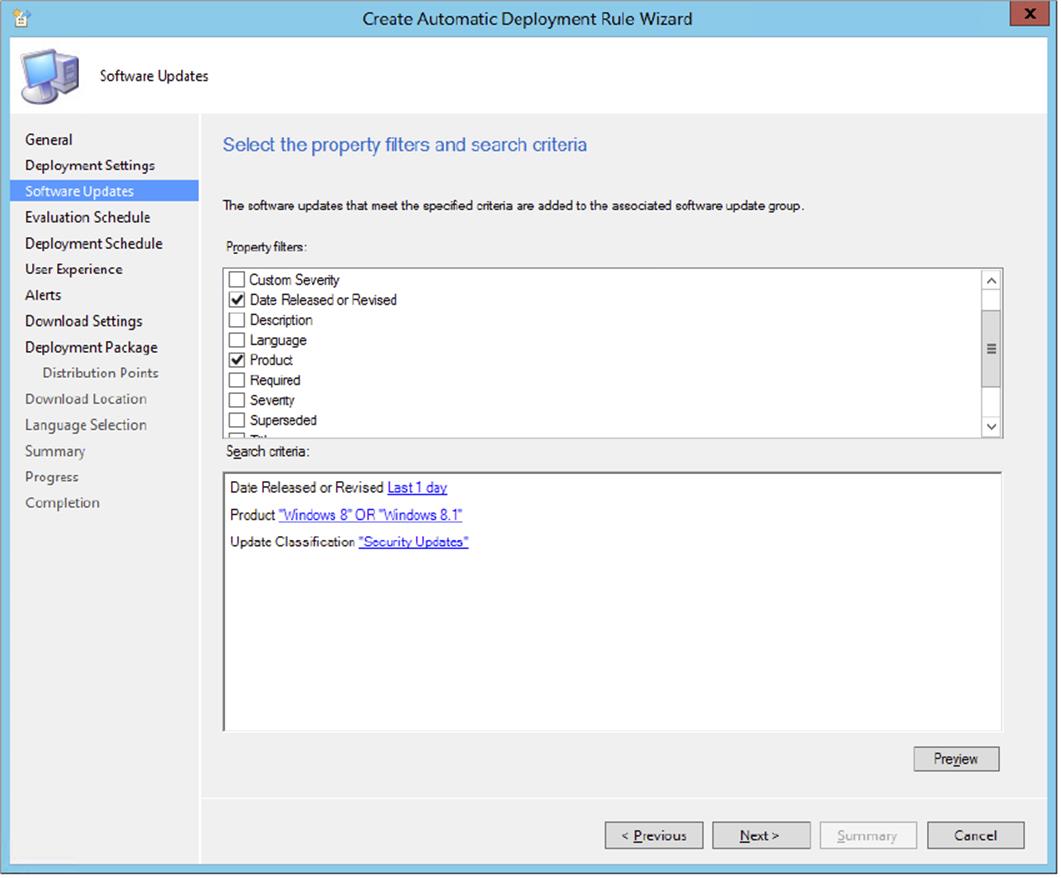
5. Before going further, preview the number of updates that will be initially discovered. This way you can test your criteria before going into production and, for instance, accidently automatically deploying hundreds of updates.
6. Evaluation Schedule: Be sure the evaluation runs after the Software Update Synchronization Schedule on the second Tuesday of every month.
7. Deployment Schedule: Enable the availability of the deployment for four hours after the deployment is created so that you are sure that the deployment has been distributed throughout your Configuration Manager hierarchy. Configure whether you want the deadline for the deployment.
After you configure the rest of the automatic deployment rule, the rule will create a software update deployment every second Tuesday of the month.
System Center Updates Publisher
The System Center Updates Publisher was built on the custom updates framework that was introduced in Systems Management Server 2003 R2. Updates Publisher is a stand-alone tool that enables independent software vendors or line-of-business developers to import custom software update catalogs, create and modify software update definitions, export update definitions to catalogs, and publish software update information to a configured WSUS server. By using Updates Publisher to define software updates and publish them to the WSUS server, the Software Updates feature in Configuration Manager is able to synchronize the custom update from the WSUS server database to the site server database. This will allow you to enable client computers to scan for custom update compliance and to provide administrators with the ability to deploy the custom updates to client computers.
The Software Update Process in Configuration Manager
As you’ll see throughout the hands-on portions of this chapter, the biggest parts of the software update process are planning and configuration. After you’ve completed those, Configuration Manager itself performs three main operational phases: synchronization, scanning for compliance, and deployment.
Synchronization
Synchronization is the process of retrieving the metadata for software updates that meet the configured criteria; it can be retrieved from either the upstream Windows Server Update Services (WSUS) 3.0 SP2 server or Microsoft Update. The WSUS Synchronization Manager component on the software update point works with WSUS to complete the synchronization process. The highest site (Central Administration Site) in the Configuration Manager hierarchy that has a software update point synchronizes with, for instance, Microsoft Update; this is done either on a schedule you set up or manually by using the Synchronize Software Updates action on the All Software Updates node in the Configuration Manager console. (We go into more detail on how to do that later in the chapter.) When a sync cycle is started at the CAS, the WSUS Synchronization Manager makes a request to the WSUS service to start a sync cycle. The software update’s metadata is then synchronized from Microsoft Update, and any changes are inserted into the WSUS database.
When WSUS finishes its sync cycle, WSUS Synchronization Manager starts syncing with the WSUS database and inserts any changes into the site server database. When that process is finished, the WSUS Synchronization Manager component (SMS_WSUS_SYNC_MANAGER) creates a status message with an ID of 6702.
Difference between Scheduled and Manual Synchronization
A scheduled synchronization does a full sync, but the Run Synchronization action does only a delta sync. Updates are marked as expired if they are superseded by another software update or marked as expired in the update catalog. They are marked as expired only during the scheduled synchronization.
When a sync is run on a schedule, all changes to the software update metadata since the last scheduled sync are put into the site database. This includes metadata that is new (products, languages, and so on), modified, or removed. A manually run sync will be faster than a scheduled one because it downloads only delta changes to what already exists in the database.
When a software update sync finishes at the CAS, a sync request is sent out to all of its child sites. When a child site gets that request, it will first sync itself from its parent site and then send out a request to any child sites that are configured as software update points. This continues on down the hierarchy until all child sites have been synchronized.
With an Internet-based software update point (which is also used in Network Access Protection scenarios), a sync request is sent to it right after the software update point that synchronizes with the synchronization source is finished with its syncing request. The process for both is the same except that the upstream server of the Internet-based software update point is automatically configured to be the first software update point for the site, and the site server database is not updated when the Internet-based software update point finishes its sync cycle.
If the synchronization fails, there is a retry interval of 60 minutes. The WSUS Synchronization Manager component will schedule the sync to run again 60 minutes after the process fails and start over. WSUS Synchronization Manager will create a status message with an ID of 6703 in the case of a sync failure.
Compliance
When software update synchronization completes at each site, a sitewide machine policy is created that allows client computers to retrieve the location of the WSUS server and to start a scan for software update compliance. When a client receives that machine policy, a compliance assessment scan is scheduled to start at a random time within the next two hours. When the scan runs, a component of the client Software Updates Agent clears the previous scan history, sends a request to find the WSUS server that should be used for the scan, and then updates the local Group Policy with the WSUS server location.
The scan request is then passed to the Windows Update Agent (WUA). The WUA then connects to the WSUS server that it just got information about, downloads a list of the software updates that have been synced with the WSUS server, and scans the client computer for the updates in the list. A component of the Software Updates Agent then sees that the scan for compliance is finished and sends a state message for each software update that had a change in compliance state since the last scan. Those state messages are then sent to the client’s management point in bulk every five minutes. The management point will then forward the state messages to the site server, where they are inserted into the site server database.
Supersedence occurs when a new software update has the same fixes as a previous update but may have fixed issues with the update and/or added new fixes. In SMS 2003, when new software updates supersede ones that had the same fixes, they may both be marked as needed when only the new one is necessary. In Configuration Manager 2012 Software Updates, you can now configure the supersedence behavior; you can either choose to expire a superseded update or choose to expire the update after a configurable number of months at the software update point. When new software updates are released that supersede others, Microsoft Update is refreshed with that information. When client computers are scanned for compliance, the new updates produce a compliance state by the client, but the older updates do not. The only time this is not the case is when a service pack contains a required update. The WUA will then return a compliance state on both, which allows admins to deploy individual updates or service packs as needed. Table 9.6 shows details on the four states of compliance for Software Updates.
Table 9.6: Software Updates compliance states
|
State |
Description |
|
Required |
The software update is applicable to the client, which means any of the following conditions could be true:
|
|
Not Required |
The update isn’t applicable on the client. |
|
Installed |
The update is applicable on the client, and it has already been installed. |
|
Unknown |
This state usually means that the software update has been synced to the site server, but the client hasn’t been scanned for compliance for that update. |
Deployment
The compliance assessment data is then used to determine which software updates are required on client computers. When you create a software update deployment with the Deploy Software Updates Wizard, as described later in this chapter, the software updates in the deployment are downloaded from the location specified on the Download Location page of the wizard to the configured package source, if they haven’t been downloaded already. When the wizard finishes, a deployment policy is added to the machine policy for the site. The updates are then copied from the package source to the shared folders on the distribution points set up in the package, where they will be available for clients.
When a client in the target collection of the deployment receives the machine policy, the software update client component starts an evaluation scan. Updates that are still required on the client are then added to a class in Windows Management Instrumentation (WMI). Any updates that are mandatory deployments are downloaded as soon as possible from the distribution point to the local cache on the client. The updates in the optional deployment category are not downloaded until they are manually started. If an optional deployment has a deadline that makes it mandatory, the client will download the update as soon as it registers the change in deployment status.
Software Updates in Configuration Manager Are Always Downloaded to the Client
Software updates are always downloaded to the local client cache before they are run in Configuration Manager. You no longer have the option to have them run from a distribution point as you did in SMS 2003.
If the client can’t find the location of the distribution point through Location Services (via requests of the management point), it will keep trying to find a distribution point for up to 5 days before it stops. If the client can’t connect to the distribution point to which it has been referred as a source of the software updates in order to download the updates, it will try for up to 10 days before it stops trying. When you start updates manually, the client will try every hour for each distribution point for up to 4 hours before it fails.
When an update deployment has a deadline that becomes available for deployment on a client, the Available Software Update icon will show up in the notification area to tell a user that the deadline is coming up. By default, these display notifications will show up on a periodic basis until all mandatory updates have been installed. They will be displayed every 48 hours for deadlines more than 24 hours away, every 4 hours for deadlines less than 24 hours away, and every 15 minutes for deadlines less than an hour away.
Just imagine the phone calls you’d get if you left things that way! Fortunately, Microsoft has given you the option to turn these notifications off with the client agent settings that let you hide all software update deployments from users. This setting doesn’t affect regular Software Deployment settings, but it will keep display notifications, notification area icons, and software update installation progress boxes from appearing at all. However, this will also mean that you can send out only mandatory software update deployments to your clients. We recommend doing this anyway because users will more than likely delay deployments until they become mandatory.
Unless you hide your update deployments, users will be able to open the Express/Advanced dialog box to start up the installation of all mandatory software updates at once. They will also be able to open the Available Software Updates dialog box, where they can choose to install whatever is available.
When the deadline passes on a mandatory update, a scan will start on the client to make sure that the updates are still required; the local client cache will be checked to make sure the updates are still available, and then the updates will be started. When that is done, another scan will start to make sure that the updates are no longer required on the client. Finally, a state message is sent to the management point saying that the updates are now installed.
Limit of 1,000 Software Updates in a Deployment
Be sure to limit the number of software updates in your Software Updates Deployments. Configuration Manager 2012 supports up to 1,000 software updates per deployment. When using automatic deployment rules, be sure that the criteria you use will not return more than 1,000 software updates as a result.
Planning to Use Software Updates in Configuration Manager
Now that you have seen what is new in Configuration Manager Software Updates, the prerequisites, and the major components of the process, you can plan the use of Software Updates in your environment.
To plan the implementation of Software Updates in Configuration Manager, you can use the same process of deployment intelligence that we used to plan the deployment of Configuration Manager itself in Chapter 2, “Planning a Configuration Manager Infrastructure.” Using this method will help you ensure that you get everything out of Software Update that your company requires to keep your computer resources up to date with the latest software upgrades and patches.
Deployment intelligence for Software Updates has three parts:
· Determine what needs to be accomplished with Software Updates.
· Determine what is on the network now and what has been used in the past.
· Test in an isolated lab.
Determining What Needs to Be Accomplished
This may seem like a no-brainer, because the first thing that probably comes to mind is “deploy patches,” but with Configuration Manager you can do a lot more than just deploy security patches, as you will soon learn.
This part of the planning will also let you decide how you want to configure your test environment, your Software Update point infrastructure, and the settings for the Software Update servers and client agent.
Planning for Software Update Point Infrastructure
Software update points can be used in a hierarchy or in stand-alone sites. In both cases you need to plan the placement of the software update point. Determine whether you need more than one software update point in a site.
Planning Software Update Points in a Hierarchy
When you have a Configuration Manager 2012 hierarchy, the Central Administration Site server is at the top of the Configuration Manager hierarchy. One software update point is configured on the Central Administration Site so that software updates can be managed. Most of the synchronization settings are configured there and propagated down to the rest of the sites in the hierarchy. The software update point on the Central Administration Site is what syncs with Microsoft Update or another upstream WSUS server. The software update points in the primary sites that are children of the Central Administration Site are automatically configured to synchronize with the software update point in the Central Administration Site.
When using a software update point in a primary site with secondary sites, the child sites sync with the software update point that is set up on the parent site. Secondary sites can be set up with a software update point, or clients at the secondary site can connect directly to the software update point on the parent primary site.
Planning a Software Update Point in a Stand-Alone Primary Site
When you have only a single primary site, the software update point needs to be configured on the primary site server, and it will sync with Microsoft Update or another upstream WSUS server.
Planning to Add More Than One Software Update Point per Primary Site
With Configuration Manager 2012 R2 you are able to install more than one software update point per primary site. When installing more than one software update point in your primary site, you can create a form of high availability for deploying software updates. By adding software updates points, you provide the ability for clients to switch between software update points when one is unavailable. Switching software update points is based on a software update point list; this list allows the client to randomly select a software update point when the configured software update point is not available. Configuration Manager can provide a client with a different list, depending on the type of client:
1. Intranet-Based Clients Intranet-based clients will receive a list of software update points that are configured to allow connections from the intranet only combined with those that allow connections from the Internet and intranet.
2. Internet-Based Clients Internet-based clients will receive a list of software update points that are configured to allow connections from the Internet only combined with those that allow connections from the Internet and intranet.
The software update points that are in the same Active Directory forest are prioritized above the ones that are not in the same forest but are part of the same Configuration Manager infrastructure.
When using software update point switching, keep the following in mind. When a client is assigned to one software update point, it stays assigned to this software update point until it fails and becomes unavailable. Then the client will automatically connect to a different software update point. It stays assigned to this new software update point until it fails and becomes unavailable, even if the first software update point becomes available again. The following process is used to switch a software update point:
1. When an initiated or scheduled software update scan fails, the client waits 30 minutes and retries the scan using the same software update point.
2. After the scan fails four times at an interval of 30 minutes (2 hours total), the clients waits another 2 minutes before switching to another software update point based on the software update point list.
3. When the software update scan is successful, the client will be connected to the new software update point going forward.
When using this default method in a large environment and one software update point becomes unavailable for a longer time, all clients will be connected to one software update point. This may cause unnecessary extra load on the software update point. Another, better way is using Network Load Balancing (NLB); this way the clients will connect to the virtual IP address of the Network Load Balancer instead of directly to the site server.
If you are going to have more than 25,000 clients connecting to WSUS on a software update point, a NLB cluster must be configured on the WSUS server and then configured for the Configuration Manager site so that the NLB cluster is used as the software update point.
Enable Network Load Balancing for a Software Update Point
Enabling Network Load Balancing awareness for software update points cannot be done from the Configuration Manager 2012 R2 console. To be able to do this, you need to use PowerShell to set up NLB.
When you want to enable NLB for software update points at site servers CM01 and CM02, you need to use the following PowerShell command to configure it:
Set-CMSoftwareUpdatePoint -NlbVirtualIP SUP.CONFIGMGRLAB.COM
-SiteSystemServerName CM01.CONFIGMGRLAB.COM -SiteCode PS1
Set-CMSoftwareUpdatePoint -NlbVritualIP SUP.CONFIGMGRLAB.COM
-SiteSystemServerName CM02.CONFIGMGRLAB.COM -SiteCode PS1
Planning for Internet
When your site is in secure (HTTPS) mode, you have the option to configure a software update point to accept connections from clients on both the intranet and the Internet, from only clients on the intranet, or from only clients on the Internet. When Internet-based client connectivity is not accepted on the primary software update point used for clients in the intranet, you can set up separate Internet-based software update points if needed.
This site system server role must be assigned to a site system server that is remote from the site server and the software update point. When the Internet-based software update point doesn’t have connectivity to the first software update point for the site, you will have to use the export and import functions of the WSUSUtil tool to sync the software update metadata.
Planning for the Software Update Point Install
Before setting up the software update point site system role in Configuration Manager, you must consider several requirements depending on your Configuration Manager infrastructure, such as when the software update point will be configured to communicate using SSL, or when the site server is in secure mode, and so on. You must take additional steps before the software update point in the hierarchy will work properly.
As discussed earlier in the chapter, Software Updates requires that Windows Server Update Services 3.0 SP2 be installed on all site systems servers that will be configured for the software update point site system role. There can be many site systems with the software update point role, but only one site system can be configured as the software update point. Also, when the software update point is not on the site server itself, the WSUS 3.0 SP2 administrative console is required on the site server, which lets the site server communicate with the WSUS components on the software update point. You can configure an account to connect to a remote WSUS server or a WSUS server in another forest. If you are going to use an NLB cluster, the full install of WSUS 3.0 SP2 is required on all site systems that will be in the cluster.
During the WSUS install, you can choose to use the default or a custom website to host the WSUS components. If WSUS is going to be installed on a primary Configuration Manager site system, Microsoft recommends that you choose a custom website so that IIS hosts the WSUS 3.0 SP2 services in a dedicated website instead of sharing the site with Configuration Manager site systems or other applications.
You can use a WSUS server that was active in your environment before Configuration Manager was implemented. When the WSUS server is configured as the first software update point, the sync settings are then specified. All of the software update metadata from the WSUS server will be synced to the Configuration Manager database regardless of the sync settings for the software update point. Be sure to disable the Group Policies that point the clients to the WSUS server.
When your Configuration Manager site server is in secure mode or when the software update point is configured to use SSL, a web server certificate must be assigned to the website used by WSUS. When you use a custom website for WSUS, per Microsoft’s recommendation, the WSUS website must be assigned a web server certificate where the Subject Name or Subject Alternate Name field contains the Internet fully qualified domain name (FQDN). The upstream WSUS server must be set with the same certificate, or SSL communication will fail between the servers. The certificate must also reside in Trusted Root Certification Authorities in the Computer certificate store on each client computer, or it will fail to scan for software update compliance.
When the site server is in secure mode, the web server certificate that is used for the Configuration Manager site systems can also be used by the WSUS website. Also, when the WSUS uses the same website as the Configuration Manager site server, and the site is in secure mode, the default website might already be assigned the right web server certificate. The certificate would still need to be configured on the upstream WSUS server, but it should already be configured on Configuration Manager clients.
If there is a firewall between the Configuration Manager software update point and the Internet, a software update point and its upstream server, or an Internet-based software update point and the software update point for the site, the firewall might have to be configured to accept the HTTP and HTTPS ports used for the WSUS website. By default, a WSUS server that is configured for the default website uses port 80 for HTTP and 443 for HTTPS communication, while one configured for a custom website uses port 8530 for HTTP and 8531 for HTTPS communication.
If your company doesn’t allow these ports and protocols to be open for all addresses on the firewall between the software update point and the Internet, you can restrict access to the following URLs so that WSUS and Automatic Updates can communicate with Microsoft Update.
http://windowsupdate.microsoft.com
http://*.windowsupdate.microsoft.com
https://*.windowsupdate.microsoft.com
http://*.update.microsoft.com
https://*.update.microsoft.com
http://*.windowsupdate.com
http://download.windowsupdate.com
http://download.microsoft.com
http://*.download.windowsupdate.com
http://test.stats.update.microsoft.com
http://ntservicepack.microsoft.com
If there is an Internet-based software update point, or there are child sites with a software update point, these addresses might also need to be added to a firewall between the servers:
http://<FQDN for software update point on child site>
https://<FQDN for software update point on child site>
http://<FQDN for software update point on parent site>
https://<FQDN for software update point on parent site>
Planning the Software Update Server Settings
There are software update point settings and general site settings that have an impact on software updates in Configuration Manager. These settings configure the first software update point and determine which updates are synchronized, whether there are maintenance windows for installing updates, how much time software updates have to complete, and so on.
The software update point settings configure which site system server is the software update point that is used to synchronize with Microsoft Update or another source. You can also configure which site system server is the Internet-based software update point if one is specified at the site, the sync source, the sync schedule, the products, the classifications, and the languages for which software updates will be synchronized. After starting the Add Site Systems Roles Wizard, you will be faced with several decisions to make about how you want the software update point configured for your environment.
General Settings
At the general settings page you are able to set which ports and, if needed, which proxy server and proxy-account are used.
1. Software Update Point This setting will determine which ports are used for connectivity to the site system server that is assigned the software update point role and whether SSL is used when synchronizing data from the software update point and when clients connect to the WSUS server on the software update point. Ports 80 and 443 are set as the default for client communications, and SSL is not set by default.
2. Proxy and Account Settings If a proxy server will be required by your environment in order to synchronize this software update point, you will have the opportunity to determine whether to use a proxy server for synchronizing software updates, to use a proxy server to download content using an automatic deployment rule, or both. You will also be able to specify alternate credentials in order to make authenticated connections from the site to the WSUS server if desired.
Synchronization Settings
The sync settings for the software update point specify the sync source and whether WSUS reporting events are created during the sync process.
1. Synchronization Source The sync source for the first software update point at the central site is configured to use Microsoft Update, but it can be changed to use a custom upstream data source location (URL), or you can choose not to synchronize with any of the two sources. The software update point on child sites is automatically configured to use the software update point on its parent site as the sync source. When there is an Internet-based software update point, the software update point for the site is automatically set to be the sync source. When you choose not to sync with a sync source, you can use the export and import functions of the WSUSUtil tool instead to get the updates you need.
2. WSUS Reporting Events The Windows Update Agent on clients can create event messages that are used for WSUS reporting. These events are not used in Configuration Manager, so the Do Not Create WSUS Reporting Events setting is checked by default. When these events are not created, the only time clients should connect to the WSUS server is during software update evaluation and compliance scans. If these events are needed outside of the Configuration Manager reporting for software updates for some reason, then you will need to modify this setting for your specific needs.
3. Synchronization Schedule The sync schedule can be configured only at the software update point on the central Configuration Manager site (Central Administration Site or stand-alone primary site). When this schedule is configured, the software update point on the central site will start syncing with the configured synchronization source at the scheduled date and time. The custom schedule allows you to sync software updates on a date and time when the demands from the WSUS server, site server, and the network are low and less likely to interfere with regular network traffic. You can also run a sync cycle manually from the central site from the Update Repository using the Run Synchronization action in the Configuration Manager console.
4. After the software update point successfully syncs with the synchronization source, a sync request is sent to the Internet-based software update point, if there is one, and to the software update point on child sites. This process repeats throughout the hierarchy until it is successful.
5. Supersedence Rules You can configure a software update to expire as soon as it is superseded by a more recent software update. You also can set an update to expire that is superseded after a specific period of time. Supersedence settings are not applicable forSystem Center endpoint definition updates. Definition files are automatically expired after four newer definition updates are released. Supersedence settings are also not applicable for software updates that are superseded by a service pack; these software updates will never expire after they are superseded.
6. Update Classifications Updates are defined with classifications that help to organize the different types of updates. During the sync process, the software updates metadata for the specified classification will be synchronized. Table 9.7 shows the classifications of updates that can be synced with Configuration Manager.
Table 9.7: Update classes
|
Update Class |
Description |
|
Critical updates |
Broadly released fixes for specific problems addressing bugs that are critical but not security related. |
|
Definition updates |
Updates to virus or other definition files. |
|
Feature packs |
Feature packs will often bring more functionality to a product; they are also deployed via software updates. |
|
Security updates |
Broadly released fixes for specific products, addressing security issues. |
|
Service packs |
Cumulative sets of all hotfixes, security updates, and updates created since the release of the product. Service packs might also contain a limited number of customer-requested design changes or features. |
|
Tools |
Utilities of features that aid in accomplishing a task or set of tasks. |
|
Update rollups |
Cumulative set of hotfixes, security updates, critical updates, and updates packaged together for easy deployment. A rollup generally targets a specific area, such as security, or a specific component, such as IIS. |
|
Updates |
Broadly released fixes for specific problems addressing non-critical, non–security-related bugs. |
7. You will need to decide if you are going to deploy some or all of these categories or even pick and choose specific updates from each category in your environment. The update classification settings are configured only on the highest software update point in the Configuration Manager hierarchy. They are not configured anywhere else because they synchronize the metadata from the upstream sync source using the class settings from the central site. When you choose update classes to sync, remember that the more classes you choose, the longer it will take to sync the software update metadata.
8. Products The metadata for each update sets the product or products for which the update is applicable. A product is a specific edition of an operating system (such as Windows 8) or application, while a product family is the base operating system or application to which the individual products belong (such as Microsoft Windows). You can choose a product family or individual products within a product family.
9. When updates are applicable to several products and at least one of the products is one you have chosen to update, all of the products will appear in the Configuration Manager console even if they haven’t been selected.
10.The Products settings, like other software update settings, are configured only on the software update point highest in the Configuration Manager hierarchy.
11.Languages This setting allows you to configure the languages for which the summary details will be synced for a software update and the update file languages that will be downloaded for the software update.
12.Software Update File The languages configured for the Software Update File setting provide the default set of languages that will be available when downloading updates at the site server. When you’re on the Language page of the Deploy Software Updates Wizard or Download Software Updates Wizard, the languages configured for the first software update point are automatically selected, but they can be modified each time updates are downloaded or deployed. When the wizard finishes, the software update files for the configured languages are downloaded, if they are available, to the deployment package source location and copied to the distribution points configured for the package.
13.The Software Update File language settings should be configured with the languages that are most often used in your environment. For example, if your clients use English and Spanish for the operating systems or applications and not much else, then select those languages in the Software Update File column and clear the others. This will allow you to use the default settings on the Language Selection page of the wizards most of the time, and it also prevents unneeded update files from being downloaded. This setting is configured at each software update point in the Configuration Manager hierarchy.
14.Summary Details During the sync process, the Summary Details information (Software Update metadata) is updated for the languages selected. The metadata provides information about the software update, such as name, description, products supported, update class, article ID, download URL, applicability rules, and so on.
15.When selecting the Summary Details languages, you should select only the languages needed in your environment. The more languages that are selected, the longer it will take to sync the Software Update metadata. The metadata is displayed in the location of the operating system where the Configuration Manager console is running. If localized properties for the software are not available, the information displays in English.
Maintenance Windows
Maintenance windows provide admins with a way to define a period of time that limits when changes can be made on the systems that are members of a collection. Maintenance windows restrict when the software updates in deployments can be installed on client computers, as well as restrict operating system and software distribution deployments. In Configuration Manager 2012 R2 you can create maintenance windows that apply specifically to software updates, as shown in Figure 9.3. This way you are able to create more granular maintenance windows for software updates that may have a higher priority, for instance, than an application deployment. You can create more than one maintenance window.

Figure 9.3 Creating a maintenance window
Client computers determine whether there is enough time to start a software update install through the following settings:
1. Restart Countdown The length of the client restart notification (in minutes) for computers in the site. The default interval is 15 minutes, and it is a global site setting that can be changed in the Client Settings dialog box, in the Computer Restart setting.
2. System Restart Turnaround Time The length of time given for computers to restart and reload the operating system. This setting is in the site control image and has a default of 10 minutes.
3. Maximum Run Time The amount of time estimated for a software update to install on a client. The default is 10 minutes for updates and 60 minutes for a service pack. This timeframe can be changed for each software update on the Maximum Run Time tab of the properties of a software update.
When you use these setting to determine the available time in a maintenance window, each software update has a default of 35 minutes. For service packs, the default is 85 minutes. When you plan for maintenance windows in your deployments, take these defaults into consideration. When planning software update deployments, be aware of the collection’s maintenance window and how many updates are in a deployment so that you can calculate whether clients will be able to install all the updates within the maintenance window or the installation of updates will span multiple maintenance windows.
When a software update installation completes but there is not enough time left in the maintenance window for a restart, the computer will wait until the next maintenance window and restart before starting any more update installs.
If more than one update is to be installed on a client during a maintenance window, the update with the lowest maximum run time installs first, then the next lowest installs, and so on. Before installing each update, the client will verify that the available maintenance window is long enough to install the update. Once an update starts installing, it will continue to install even if the install goes beyond the maintenance window.
When you create a software update deployment, there are two settings that can allow maintenance windows to be ignored:
1. Deadline Behavior - System Restart (If Necessary) You can set this option to indicate whether you want to allow system restarts outside configured maintenance windows. By default, this setting is disabled. This setting comes in handy when you want your software update install to complete on clients as soon as possible. When this setting is not enabled, a system restart will not be triggered if the maintenance window ends in 10 minutes or less. This could prevent the install from completing and leave the client in a vulnerable state until the next maintenance window. This setting is available on the User Experience page of the Create Automatic Deployment Rule Wizard or the Deploy Software Updates Wizard.
2. Deadline Behavior - Software Updates Installation This setting determines whether software updates in the deployment are installed at the deadline regardless of a configured maintenance window. It is disabled by default. This setting comes in handy when you have software updates that must be installed on clients as soon as possible, such as security patches to fix a vulnerability that is being exploited on the Internet. This setting is available on the User Experience page of the Create Automatic Deployment Rule Wizard or the Deploy Software Updates Wizard.
Software Update Properties
Each software update has a properties box with tabs that provide configuration settings to enable software updates and configure the update settings on clients:
1. Maximum Run Time Tab This tab allows you to set the maximum amount of time a software update has to complete installing on clients, in minutes. If the maximum runtime value has been reached, a status messages is created and the deployment is no longer monitored. This setting is also used to determine whether the update should be started within a configured maintenance window. If the maximum runtime value is greater than the time left in the maintenance window, the software update installation is not initiated until the start of the next maintenance window.
2. Keep in mind that if a maximum runtime value is set for more time than the configured maintenance window of a collection it targets, it will never run on those clients. This setting can be configured only on the site synchronized with Microsoft Update, which is more than likely the Central Administration Site, and the default is 60 minutes for service packs and 10 minutes for all other types. Values can range from 5 to 9,999 minutes.
3. Custom Severity Tab This is a nice addition to Software Updates that allows you to assign custom severity values for software updates if the default value doesn’t meet your organization’s needs. The custom values are listed in the Custom Severity column in the Configuration Manager console. The software updates can be sorted by custom severity values, the search criteria can be created based on these values, and queries and reports can be made that filter on these values—whatever suits your needs. This setting can be configured only on the site that syncs with Microsoft Update.
Planning for Software Updates Client Settings
The Software Updates client settings in Configuration Manager can be configured sitewide (by default), and you can configure client settings for specific collections. There are Software Updates client agent settings and general settings that affect when updates are scanned for compliance and how and when updates are installed on clients. The client agent settings specific to software updates are configured in the Software Updates Client Agent properties, and the sitewide general or collection-based settings related to software updates are configured within the Computer Client Agent properties. The software update installation schedule can be modified from Configuration Manager Software Center on the client. You may also need to configure Group Policy settings on the client computer depending on your environment.
Computer Client Agent Settings
The properties for this client agent are found in various sections that provide configuration settings that affect the software update reminders and the customization for software update deployments on clients. In Figure 9.4, you see the relevant custom settings categories.
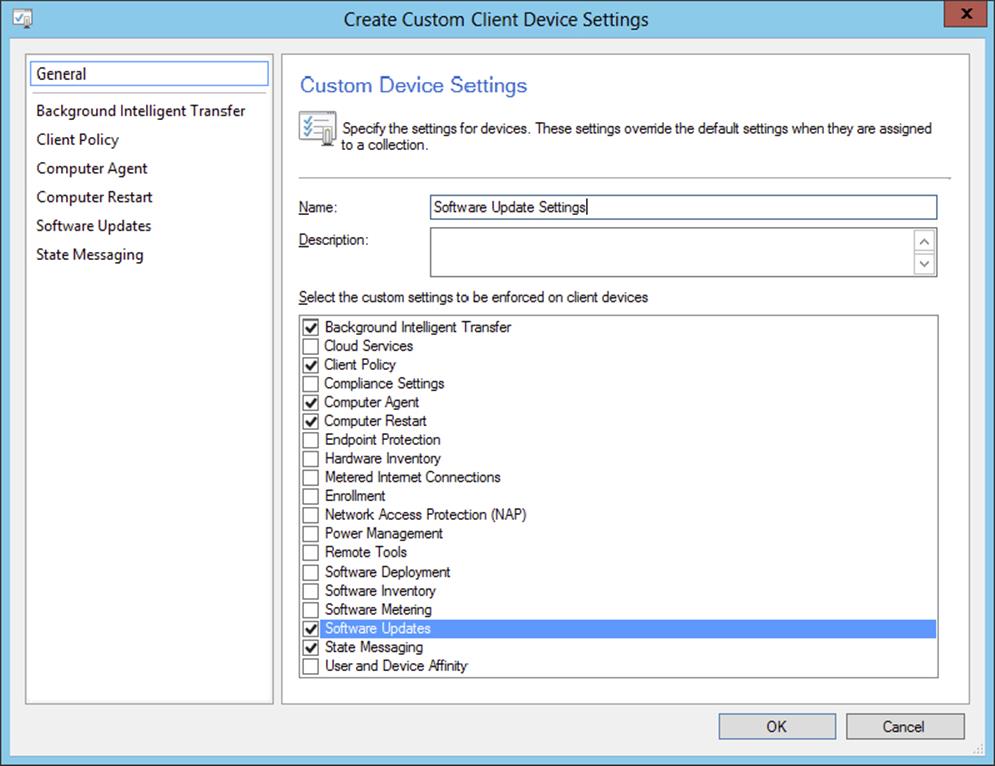
Figure 9.4 Computer client agent settings for software update deployment
Background Intelligent Transfer Section
The settings in this section specify if bandwidth throttling is configured for the site. These settings apply to Configuration Manager clients when they use BITS to download software update files from distribution points.
Client Policy Section
In the Client Policy section you can specify a polling interval, whether user policy should be allowed on clients, or whether to carry out user policy requests from Internet clients. The Policy Polling Interval (Minutes) setting controls how often clients retrieve the machine policy. This setting is relevant to software updates in that when new deployments are created, the machine policy is updated with the deployment information. Clients can take up to the policy polling interval to get those changes, depending on when they last got the policy. The default for this setting is 60 minutes.
Computer Agent Section
On this tab you can provide custom information about the updates that will appear on clients.
1. Reminder Settings The settings specify how often notifications are displayed on client computers when a deployment deadline is approaching for software updates. The reminder intervals can be configured for when the deadline is more than 24 hours away, when the deadline is less than 24 hours away, and when the deadline is less than an hour away.
2. Default Application Catalog Website Point You can configure the default application catalog website point so that the users can define their own working hours when going to the default application catalog website.
3. Organization Name This setting specifies the name of the organization authoring the software update install. By default this text box displays “IT Organization.” The organization name appears in software update display notifications, the Available Software Updates dialog box, and the Restart Countdown dialog box on clients where software updates are deployed. Microsoft recommends that you customize this field with something related to your organization.
Computer Restart Section
These settings configure the start countdown timeframe and restart final notification when a software update is installed on client computers. By default, the initial countdown is 90 minutes, and a final notification is displayed when 15 minutes remain before the restart will occur.
State Messaging Section
In the State Messaging section you can specify a reporting cycle for state messages. The State Message Reporting Cycle (Minutes) setting specifies how often clients send state messages to the management point. The software update client creates state messages for scan, software updates compliance, deployment evaluation, and deployment enforcement. The default setting for this is 15 minutes.
Client Configuration Manager Properties
The Configuration Manager Properties dialog box in the Control Panel of a Configuration Manager client provides software update actions and configuration settings. When you browse to the Actions tab, you can choose the following actions that are applicable for software updates, shown in Figure 9.5:
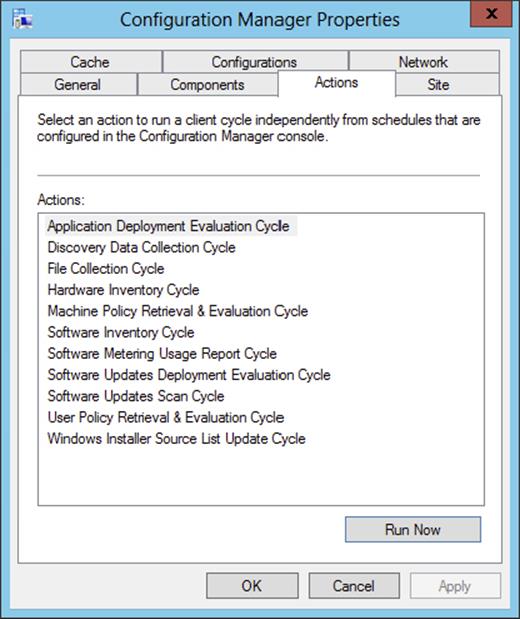
Figure 9.5 The Actions tab of the Configuration Manager client properties
1. Software Updates Deployment Evaluation Cycle When this action is started, active deployments will be evaluated.
2. Software Updates Scan Cycle This starts a software updates scan when run.
Software Settings Options
New in Configuration Manager 2012 is the Software Center, which is part of the Configuration Manager 2012 client. With the Software Center users can install or request software, but the users are also able to configure some settings that allow them to manage your software update deployment. A user can configure the Work Information and Computer Maintenance settings, shown previously in Figure 9.1:
1. Work Information You, as a user, can configure your business hours and business days. Once you define the hours and days, the software updates will be installed outside your work hours. Users can define business hours per hour from 12 a.m. until 11 p.m. and all hours in between, and they can choose the days by selecting a check box per day. You must reserve at least four hours each day for system maintenance tasks.
2. Computer Maintenance For software update installations users are able to choose to automatically install required software only outside of the specified business hours and restart the computer if necessary or suspend Software Center activities when the computer is in a presentation mode.
Group Policy Settings
These settings in Group Policy are required for the Windows Update Agent on client computers to connect to WSUS on the software update point and successfully scan for software update compliance:
1. Specify Intranet Microsoft Update Service Location When the software update point is created for a site, clients receive a machine policy that provides the software update point server name and configures the Specify Intranet Microsoft Update Server Location local policy on the local computer. The WUA retrieves the server name set with Set The Intranet Update Service For Detecting Updates and then connects to that server when it scans for software update compliance. When a domain policy has been created for the Specify Intranet Microsoft Update Service Location setting, it will override local policy, and the WUA might connect to a server other than the software update point. If that happens, the client computer might scan for software update compliance based on different products, classes, and languages. Microsoft recommends that this domain policy not be configured for Configuration Manager clients; as mentioned earlier, you should disable the Group Policy settings when you already use a WSUS infrastructure in your environment.
2. Allow Signed Content From Intranet Microsoft Update Service Location Before the WUA on clients can scan for updates that were created and published with the System Center Updates Publisher, the Allow Signed Content From Intranet Microsoft Update Service Location Group Policy setting must be enabled. When the policy setting is enabled, the WUA will accept updates received through an Internet location if the updates are signed in the Trusted Publishers certificate store on the local computer.
3. Configure Automatic Updates The Automatic Updates feature allows clients to receive security updates and other important downloads. It is configured through the Configure Automatic Updates Group Policy setting of Control Panel on the local computer. When Automatic Updates is enabled, clients will receive update notifications (if you have notifications enabled) and download and install required updates. When Automatic Updates coexists with Configuration Manager 2012 R2 Software Updates, each might display notification icons and pop-up display notifications for the same update. Also, when a restart is required, each might display a Restart dialog box for the same reason.
4. Self-Update During a Configuration Manager client install, the Windows Update Agent is installed on a client computer if it is not already installed. When Automatic Updates is enabled, the WUA on each client automatically does a self-update when a newer version becomes available or when there are problems with the component. When Automatic Updates is not configured or is disabled, the WUA is still installed during Configuration Manager client installs. If the WUA install fails or becomes corrupt, or a new version of WUA is available, you must create a software distribution to update the agent on clients. If the WUA fails on a client, the scan for software update compliance also fails until it is fixed.
Role-Based Administration
For administering software update deployment, a special role is defined in the Role-Based Administration feature within Configuration Manager. An administrator who is added to the Software Update Manager role has the permissions delegated that are shown inTable 9.8.
Table 9.8: Permissions of the Software Update Manager role
|
Object |
Permission |
|
Alerts |
Read, Modify, Delete, Create, Run Report, Modify Report |
|
Boundary |
Read |
|
Boundary groups |
Read |
|
Client Agent Settings |
Read |
|
Collection |
Read, Read Resource, Deploy Client Settings, Deploy Software Updates, Modify Client Status Alert |
|
Deployment template |
Read, Modify, Delete, Create |
|
Distribution point |
Read, Copy to Distribution Point |
|
Distribution point group |
Read, Copy to Distribution Point, Create Association to Collection |
|
Query |
Read |
|
Site |
Read |
|
Software update groups |
Read, Modify, Delete, Set Security Scope, Create |
|
Software update package |
Read, Modify, Delete, Set Security Scope, Create |
|
Software updates |
Read, Modify, Delete, Create, Move Objects, Modify Folder, Network Access, Run Report, Modify Report |
Depending on whether the scope is limited or not, you can deploy the software updates to all Configuration Manager clients or a limited group of Configuration Manager clients. With Role-Based Administration, an administrator who is added to the Software Update Manager role sees only the objects that are related to the role.
System Center Updates Publisher
When planning to implement the current version of System Center Updates Publisher 2011, you need to be able to identify the following items.
Components of System Center Updates Publisher
System Center Updates Publisher 2011 consists of the following components:
1. Software Update Catalog Software Update Catalogs are used to import collections of related software updates into the System Center Updates Publisher repository.
2. Software Update The repository in the System Center Updates Publisher contains software updates that you can publish or export. You can import them via the update catalogs, or you can create them yourself.
3. Publications When publishing a software update to Configuration Manager 2012, you can publish either the full content of the software update or the metadata that describes the software update.
4. Rules When you publish software updates in System Center Updates Publisher, the applicability rules are used to check to see if the computer meets the prerequisites for the software update. It also checks to see if the software update is already installed on the computer.
Which Vendor Updates to Deploy
Currently three third-party custom software update partners publish catalogs that can be used via System Center Updates Publisher. You can import Software Update Catalogs from the following third-party hardware and software vendors: Adobe, Dell, and HP. Check this website for an up-to-date partner list:
http://technet.microsoft.com/en-us/systemcenter/cm/bb892875.aspx
The System Requirements
To be able to install System Center Updates Publisher, you need to be sure that the operating system complies with the following requirements:
· Windows Server Update Services 3.0 Service Pack 2 (WSUS 3.0 SP2)
· Windows Server Update Services 3.0 Service Pack 2 hotfix (KB2530678)
· Microsoft .NET Framework 4
Supported operating systems are these:
· Windows Vista
· Windows 7
· Windows 8.x
· Windows Server 2008
· Windows Server 2008 R2
· Windows Server 2012
· Windows Server 2012 R2
Testing in an Isolated Lab
It is important to understand how software updates will work in your environment, and one way you can do that is to set up a test lab that is as close to your production environment as possible. This section describes a minimum setup of Configuration Manager to use while you are testing or evaluating the software update components and other deployments like applications and operating systems; always test your deployment in a test environment before deploying it in the production environment.
To start, you will need at least one computer for each operating system that you use in your environment. Also, you will need computers that have other crucial line-of-business applications running on them as well.
A single client is adequate for minimum test purposes, but if you want to have a representative sample of how software updates will work with all computers used in your enterprise, then you will need to have a representative of each client configuration in your environment. For example, if you are using Windows Server 2008 R2, Windows Server 2012 R2, Windows 7 SP1, and Windows 8.1 in your organization, then you should have at least one client with each of those operating systems on it for testing. If you can’t get that many machines together, at least try to get one beefed-up computer with lots of RAM. That way, you can use Windows Server 2008/2012 Hyper-V or Windows 8 Hyper-V to set up virtual representations of the computers that you couldn’t procure physically.
By doing this, you will become familiar with how the Software Updates components and the actual software update executables work with the operating systems on your network before you use Software Updates enterprise-wide. By using more than one operating system in your testing you will be able to do the following:
· Review the specific software updates that Microsoft has published for those operating systems.
· Start becoming familiar with software update management practices for each type of computer.
· Learn how software updates work with different operating systems in a controlled environment.
· Learn how to find information about specific software updates for a specific OS when you need it.
Requirements for Testing Software Update Points
When you test software updates, create the software update point site role as it would be in your production site. You will need to decide if a single software update point will be created or if there will be a software update point for connectivity from client computers on the Internet, and if the software update point will be set up with an NLB cluster. The deployment intelligence that you have gathered up to this point will be crucial to helping you plan your test environment.
Configuring Software Updates
Now that we have taken the time to look at the components of Software Updates and how they fit together, and you have taken that information with your deployment intelligence and put together a plan as to how you want to set up Software Updates in your environment, we can examine how to get everything working.
Before Software Updates data can be displayed in the Configuration Manager 2012 console and software updates can be deployed to clients, you must set up and configure the software update point, as well as the rest of the components of Software Updates.
Configuring the Software Updates Client Agent
The Software Updates Agent is enabled in Configuration Manager by default, but you still have to configure the other settings of this client agent to match your plans for using Software Updates in your environment.
To configure the Software Updates Agent, follow these steps:
1. In the Configuration Manager console, choose the Administration Workspace ⇒ Overview ⇒ Client Settings, and select the Default Client Agent Settings policy object.
2. Select the Home tab of the ribbon, and then click Properties.
3. Select Software Updates, and (as shown in Figure 9.6) configure the following settings: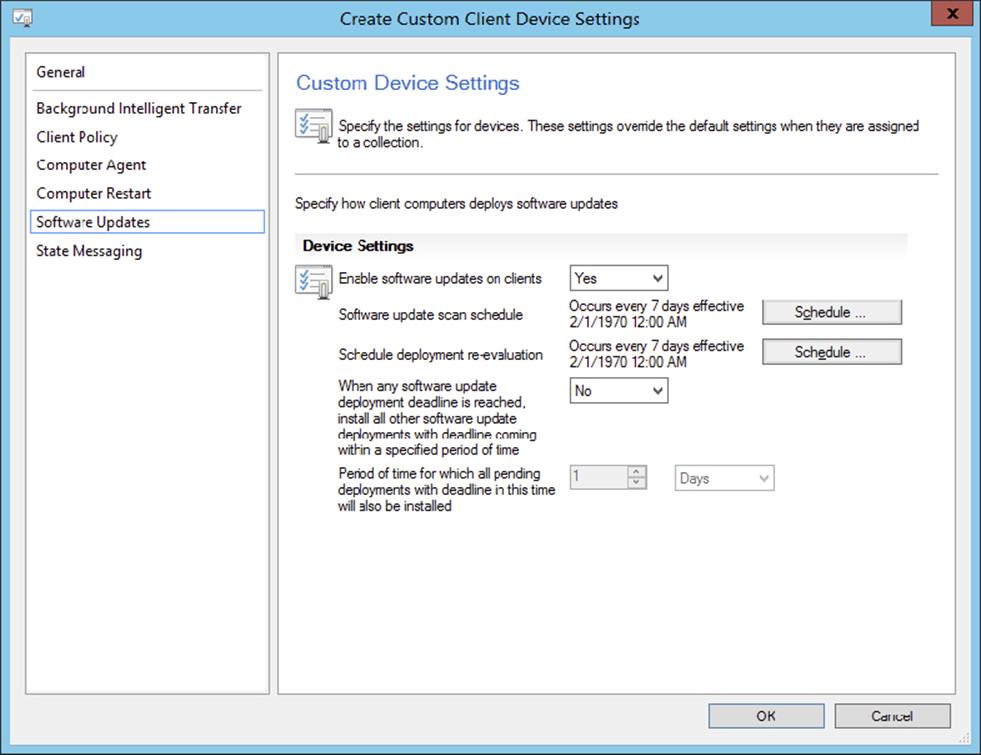
Figure 9.6 The default settings of the Software Updates Client Agent
1. Enable Software Updates On Clients This setting defines whether the Software Updates Agent is enabled for the site; this agent is installed and enabled on Configuration Manager clients by default. Make sure that this setting is enabled. If the client agent is disabled, the client agent components are put into a dormant state but not uninstalled, and existing deployment policies will be removed from clients as well. Re-enabling the client agent starts a policy request that the components on clients be enabled and the deployment metadata be downloaded. With Configuration Manager 2012 you can configure more than one client agent settings package. Chapter 6, “Client Installation,” has more information about client agent settings.
2. Software Update Scan Schedule This setting specifies how often the client computer scans for software update compliance. By default, a simple schedule is configured to run the scan every 7 days, and the site database is updated with any changes since the last scan. The minimum value for the scan is 1 minute and the maximum value is 31 days. This setting can be configured only after a software update point site role has been installed on a site system in the site. When a custom schedule is configured, the actual start time on client computers is the start time plus a random amount of time up to 2 hours. This keeps all the clients from starting a scan and connecting to WSUS at the same time.
3. Schedule Deployment Re-evaluation You can configure how often the Software Updates Agent re-evaluates software updates for installation status. When software updates that have been installed are no longer found on client computers and are still required, they will be reinstalled. This re-evaluation schedule will need to be adjusted based on company policy for update compliance, whether users have the ability to uninstall updates, and similar considerations. You also have to consider that every re-evaluation cycle results in some network and client computer activity. The minimum value allowed for the deployment re-evaluation schedule is 1 minute and the maximum is one month. A simple schedule of every 7 days is set by default.
4. When Any Software Update Deployment Deadline Is Reached, Install All Other Software Update Deployments With Deadline Coming Within A Specified Period Of Time This setting indicates whether to enforce all mandatory software update deployments that have deadlines within a certain timeframe. When a deadline is reached for a mandatory software update deployment, an installation is started on the clients that have been targeted for the mandatory deployment. It also indicates whether to start the install for updates defined in other mandatory deployments that have a configured deadline within a specified timeframe. The benefits of this setting are that it expedites software update installs for mandatory updates and that it might increase security, decrease display notifications, and decrease system restarts on clients. This setting is disabled by default.
5. Period Of Time For Which All Pending Deployments With Deadline In This Time Will Also Be Installed This sets the timeframe for the software updates with a deadline to be installed if the deadline is coming within a specified period of time. The minimum value allowed is 1 to 23 hours, and the maximum is 1 to 365 days. By default, this setting is configured for 1 hour.
4. When you have finished setting things the way you want them, click OK to finish.
Installing Windows Server Update Services 3.0 Server
Windows Server Update Services 3.0 Server (WSUS) SP2 or later is required in order to use Software Updates in Configuration Manager 2012. Installing WSUS for use with Configuration Manager is different from a standard install of WSUS without the Configuration Manager infrastructure.
The WSUS installation procedure that we’re going to use can be used for both the first software update point (the main software update point installed on the Central Administration Site) and all other software update points (those for any other primary Configuration Manager sites) or for installing WSUS on a remote server that is not a Configuration Manager site server. The decision to install WSUS on the same server as your site servers or on another remote server will depend on your server resources and your plans for the software update infrastructure.
Next, you have to go through a series of steps to make a software update point the active one for the Configuration Manager hierarchy. We will detail those steps later on in the chapter.
Depending on the version of your operating system, you need to either add the Windows Server Update Services role though the Server Manager of Windows Server 2008 R2 or Windows Server 2012 or make sure that you have downloaded the latest version of WSUS at the WSUS home page:
http://technet.microsoft.com/windowsserver/bb332157.aspx
Installing WSUS on Windows Server 2012 R2
To add the WSUS role to Windows Server 2012 R2, you need to perform the following steps:
1. Start the Windows Server 2012 R2 Server Manager from the Start screen.
2. In the Dashboard, click Manage and select Add Roles And Features to start the Add Roles and Features Wizard.
3. Click Next twice, select the server on which the WSUS role needs to be installed, and click Next again.
4. Select Windows Server Update Services, click Add Features, and click Next.
5. Click Next after reviewing the features that are automatically added. Click Next at the WSUS step to start the initial configuration of the WSUS role.
6. On the Roles Services step, select WSUS Services and Database and click Next.
7. On the Content step, disable the Store Updates In The Following Location option and click Next.
8. Supply the SQL Server And Instance Name (if necessary) and click Check Connection. Click Next.
9. On the Web Server Role (IIS) page, click Next.
10.On the Role Services page, click Next.
11.Specify an alternate source path if necessary; then click Install to begin the feature and roles installation.
12.After the installation is finished, start the Windows Server Update Services application from the Start screen to configure the WSUS role. Configure the database server where the WSUS database needs to be stored, and click Run to start the post-installation. Click Close when the post-installation is finished.
Installing WSUS on Windows Server 2008 R2
To add the WSUS role to Windows Server 2008 R2, perform the following steps:
1. Start the Windows Server 2008 R2 Server Manager from the Administrative Tools section of the console.
2. Click Roles and select Add Roles, and then click Next at the Before You Begin page.
3. Select Windows Server Update Services, and click Next.
4. Read the introduction to WSUS, and click Next.
5. Confirm the settings, and click Install.
Once the download is finished, you will see the welcome screen of the WSUS 3.0 SP2 Setup Wizard.
6. Click Next.
7. Click the I Accept The Terms Of The License Agreement check box, and then click Next.
If the Microsoft Report Viewer 2008 Redistributable is not installed, the Setup Wizard gives you a warning about it.
8. Click Next.
9. The next screen will ask you to choose if and where you want updates to be stored on the WSUS server, just click Next.
10.The next page lets you choose your database options:
· If you are not installing WSUS on a Configuration Manager site, the default of Install Windows Internal Database On This Computer is probably your best option, because it installs Microsoft SQL Server 2005 Embedded Edition just for the purpose of managing WSUS. This will save you from having to purchase another full SQL Server license for WSUS and managing another instance of SQL as well.
· If you are installing WSUS on a Configuration Manager Central Administration Site or a primary site server and it has the resources to handle it, then we recommend going ahead and using the instance of the SQL Server that is already installed. (If it doesn’t have enough resources, you probably shouldn’t be installing WSUS on this server anyway.) Having two versions of SQL installed on the same server could cause problems in the long run, and they would be competing for the same resources.
Depending on what you choose, WSUS will either create the Windows Internal Database or test the connection to the existing SQL Server instance.
11.After that is done, click Next.
12.On the next page of the wizard, choose how to configure the WSUS website. Microsoft recommends that you choose to make a custom website if you are using WSUS as a software update point, even if the WSUS server is remote from the Configuration Manager site system. You should definitely use the custom site option if you are installing WSUS on a Configuration Manager site so that the install will not interfere with the other Configuration Manager components that use IIS. By default, the custom WSUS website uses HTTP port 8530 and HTTPS port 8531.
13.Click Next.
14.Review the settings, and click Next to install WSUS 3.0 SP2.
15.Click Finish and then Close after the installation.
16.The WSUS configuration wizard will start up after that, but you should close it, because Configuration Manager 2012 will take care of configuring all of the settings for WSUS.
Never Configure WSUS Using the WSUS Console
When you use WSUS in combination with the software update point role, you should never use the WSUS console to configure WSUS. Always use the Configuration Manager 2012 console to configure the software update point.
Installing the Downloaded WSUS Version
To install the downloaded version of WSUS, perform the following steps:
1. Double-click the WSUS install file that you downloaded, WSUSSetup_30SP2_x86.exe (or WSUSSetup_30SP2_x64.exe for the 64-bit version of Windows Server 2003), and you will see the opening page of the Windows Server Update Server 3.0 Setup Wizard.
2. Click Next, and then select Full Server Installation Including Administration Console and click Next again.
3. Click the I Accept The Terms Of The License Agreement check box, and then click Next.
The next screen will ask you to choose if you want updates to be stored on the WSUS server and where you want to store them. You must accept the default and store a copy of these updates locally.
4. Choose where you want to keep these files, and then click Next.
The next page lets you choose your database options.
· If you are not installing WSUS on a Configuration Manager site, the default of Install Windows Internal Database On This Computer is probably your best option, because it installs Microsoft SQL Server 2005 Embedded Edition just for the purpose of managing WSUS. This will save you from having to purchase another full SQL Server license for WSUS and managing another instance of SQL as well.
· If you are installing WSUS on a Configuration Manager primary site server and it has the resources to handle it, then we recommend going ahead and using the instance of the SQL Server that is already installed. (If it doesn’t have the resources, you probably shouldn’t be installing WSUS on this server anyway.) Having two versions of SQL installed on the same server could cause problems in the long run, and they would be competing for the same resources.
Depending on what you choose, WSUS will either create the Windows Internal Database or test the connection to the existing SQL Server instance.
5. Once that is done, click Next.
6. The next page of the wizard, shown in Figure 9.6, lets you choose how to configure the WSUS website.
Microsoft recommends that you choose to make a custom website if you are using WSUS as a software update point, even if the WSUS server is remote from the Configuration Manager site system. You should definitely use the custom site option if you are installing WSUS on a Configuration Manager site, so that the install will not interfere with the other Configuration Manager components that use IIS. By default, the custom WSUS website uses HTTP port 8530 and HTTPS 8531. Click Next.
7. Review the settings and click Next. When the wizard is done, click Finish. The WSUS configuration wizard will start up after that, but you should close it, because Configuration Manager will take care of configuring all of the settings for WSUS.
Installing the Windows Server Update Services 3.0 SP2 Administrative Console
The Windows Server Update Services 3.0 SP2 Administrative Console is required on the Configuration Manager 2012 site server, if WSUS is installed on a remote server, to allow it to communicate with WSUS so it can configure and synchronize software update points. The WSUS Administrative Console can be installed using the WSUS 3.0 Setup Wizard or installed silently from a command line.
To install the WSUS on a Configuration Manager site server, follow one of the procedures discussed in the sections that follow.
Installing the WSUS Administrative Console Using the Setup Wizard
Take the following steps to install the administrative console using the wizard:
1. Double-click the WSUSSetup_30SP2_x86.exe setup file that you downloaded earlier.
2. Click Next to get past the first page of the wizard, and then select Administrator Console Only. Click Next again.
3. Click I Accept The Terms Of The License Agreement, and click Next.
4. If you see the Required Components to Use Administration UI page, click Next.
The Microsoft Report Viewer 2005 Redistributable will have to be installed, because it is required to open the WSUS console. It isn’t needed when you are using WSUS with Configuration Manager, however.
5. When the wizard is done, click Finish.
6. To verify that the install completed, click Start ⇒ All Programs ⇒ Administrative Tools, and then choose Windows Server Update Services. To verify that connectivity, connect to the WSUS server that you are going to use with Configuration Manager.
Installing the WSUS 3.0 Administrative Console from the Command Prompt
Take the following steps to install the administrative console using the command line:
1. In the folder where you have already downloaded the WSUS installer file, open a command prompt.
2. In the command prompt window, type the following command:
WSUS3Setupx86.exe /q CONSOLE_INSTALL=1
The WSUS 3.0 SP2 administrative console will then install silently.
3. Verify the install as in step 6 of the previous procedure.
Setting Up the Software Update Point
There can be several Configuration Manager site systems with the software update point system role, but there can be only one site system server configured as the software update point that synchronizes with a synchronization source like Microsoft Update in a Configuration Manager site. By default this is the first software update point you install in your environment. All other software update points are replicas of the first one you installed and use that one as the synchronization source.
When your Configuration Manager site is in HTTPS mode, you can have an Internet-based software update point assigned to a remote site system server that allows communication from only Internet-based client computers. Also, if the first software update point is on a Network Load Balancing cluster, there should be a software update point installed on every server that is in the NLB cluster. When you have a Central Administration Site in your Configuration Manager 2012 hierarchy, you first need to install and configure a software update point at one of the site servers in your Central Administration Site.
Setting Up the Software Update Point in the Central Administration Site
To set up a software update point in the Central Administration Site, you need to follow these steps.
1. In the Configuration Manager console, choose the Administration Workspace ⇒ Overview ⇒ Site Configuration ⇒ Servers and Site System Roles.
2. Decide whether to create a new site system server or add the software update point role to an existing site system. Depending on which you choose, take the next step:
· To create a new site system with a software update point, click Create Site System Server on the Home tab of the ribbon.
· To add the software update point role to an existing server, do the following:
a. Select the site server on which you want to install the software update point role.
b. Choose Add Site System Roles in the Home tab of the ribbon.
3. Configure the server that is to be used for a site server, and click Next.
See Figure 9.7 for the options for this choice.
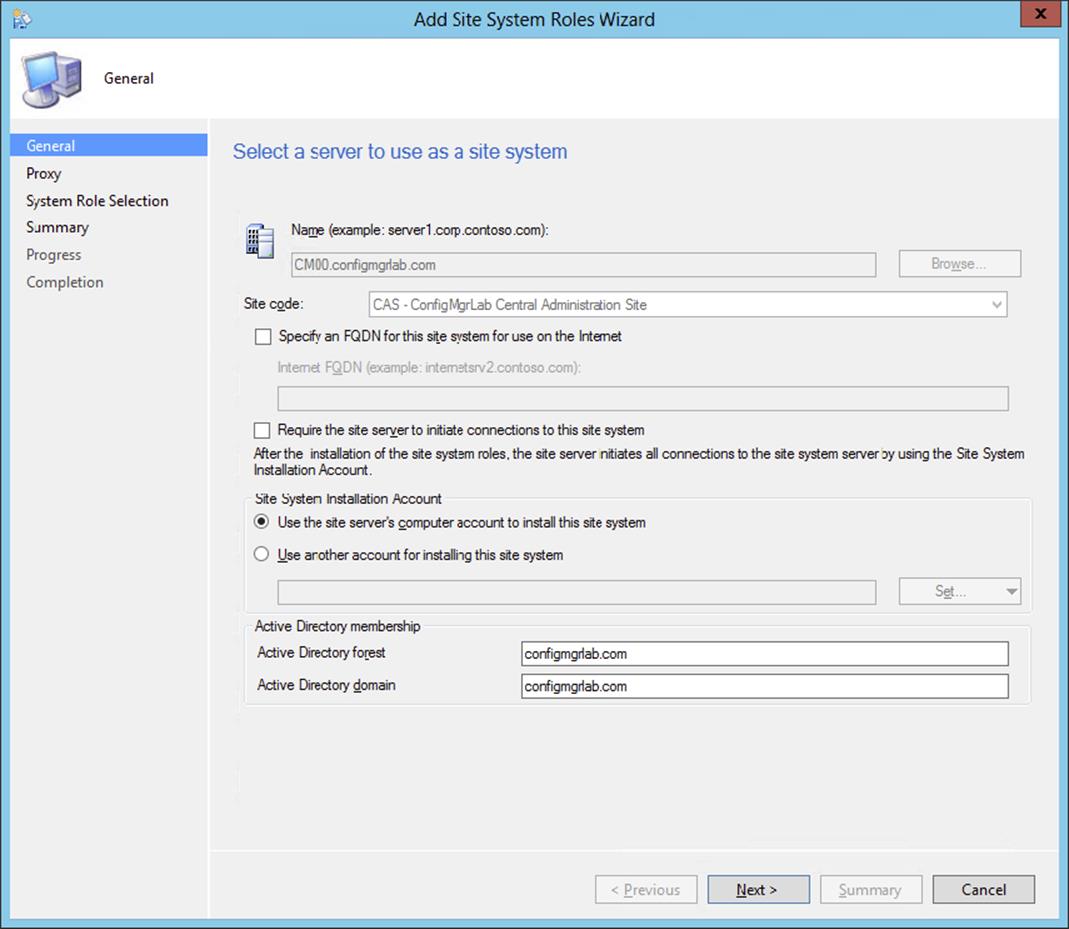
Figure 9.7 Configure the software update point settings.
1. Specify An FQDN For This Site System For Use On The Internet You will have to configure this setting for a software update point when the site server is in secure mode or when it is in mixed mode and using Secure Sockets Layer (SSL).
2. Internet FQDN You must configure this setting if you are setting up a software update point that accepts Internet-based client connections or for the active Internet-based software update point. It is only enabled when selecting the option Specify An FQDN For This Site System For Use On The Internet.
3. Require The Site Server To Initiate Connections To This Site System You must use this setting when the remote software update point doesn’t have access to the inboxes on the site server. This will let a site system from a different domain or forest place files that need to be transferred to the site server. The site server will connect to the remote site system and get the files periodically. The Internet-based software update point might need this setting to be enabled to work.
4. Site System Installation Account Configure this setting when the computer account for the site server doesn’t have access to the remote site system being set up as a software update point.
5. Active Directory Membership Configure the site system membership by supplying the forest and domain FQDNs.
4. If you need to go through a proxy server to get to the Internet, you will need to configure the proxy server and the possible credentials. If you have Internet access without a proxy server, just click Next.
5. Select software update point and click Next.
6. In the software update point page (see Figure 9.8), specify the port settings that are used by the WSUS you are connecting to. By default, the port settings for a WSUS custom website (the recommended settings) are HTTP port 8530 and HTTPS port 8531. If you installed WSUS on the default website, the ports are HTTP port 80 and HTTPS port 443. Click Next.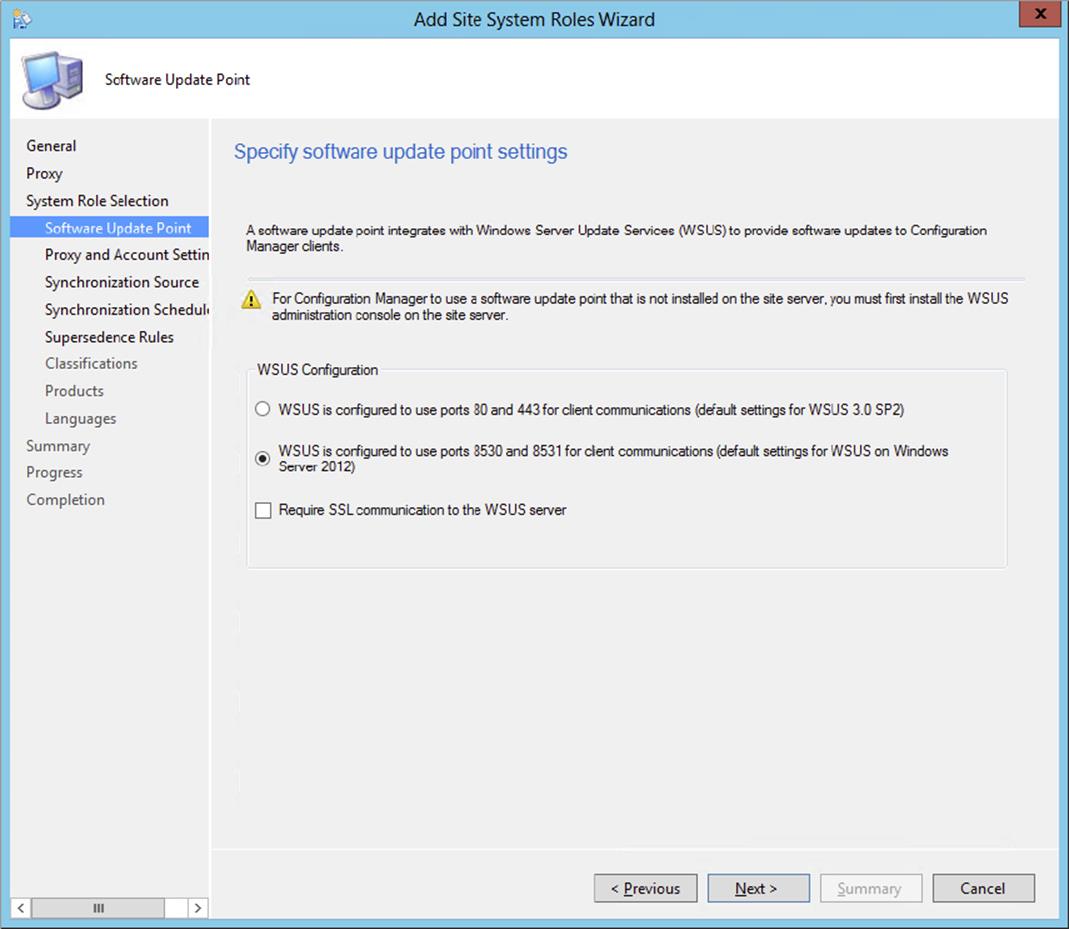
Figure 9.8 Configure the software update point port settings.
7. If your software update point is behind a proxy server on which you need to authenticate, you can enable the earlier configured proxy server access by enabling it by choosing Use A Proxy Server When Synchronizing Software Updates and/or Use A Proxy Server When Downloading Content By Using Automatic Deployment Rules. If authenticated access to the WSUS server is required, you can configure a WSUS Server Connection Account. Click Next when finished configuring the proxy and account settings.
8. Choose the synchronization source for the software update point by selecting one of the following options, and then click Next:
0. Synchronize From Microsoft Update The software update point that is highest in the Configuration Manager hierarchy (usually the Central Administration Site) can use this setting. When an upstream software update point is in place, this option is not available.
1. Synchronize From An Upstream Data Source Location (URL) If you do not want to synchronize directly with Microsoft Update but with another WSUS server, you can configure an upstream data source location. Normally it will be something likehttps://wsusserver:8531 or http://wsusserver:8530.
2. Do Not Synchronize From Microsoft Update Or Upstream Data Source Use this setting when the software update point can’t connect to the upstream update server. This will usually be used by an active Internet-based software update point that doesn’t have access to the software update point. The software update point on the CAS can’t use this setting. Synchronizing a software update point through importing and exporting updates is covered later in the chapter.
9. Configure the synchronization behavior of the software update role by selecting Enable Synchronization On A Schedule.
This is disabled by default, and you can start a manual sync by running the Run Synchronization action in the Configuration Manager console. We recommend that you enable a schedule, because scheduled syncs perform full synchronizations, and manual syncs only do delta synchronizations of software updates.
10.Click Next after configuring the synchronization schedule.
11.Configure the supersedence behavior for updates that are about to expire, as shown in Figure 9.9. Choose one of the following: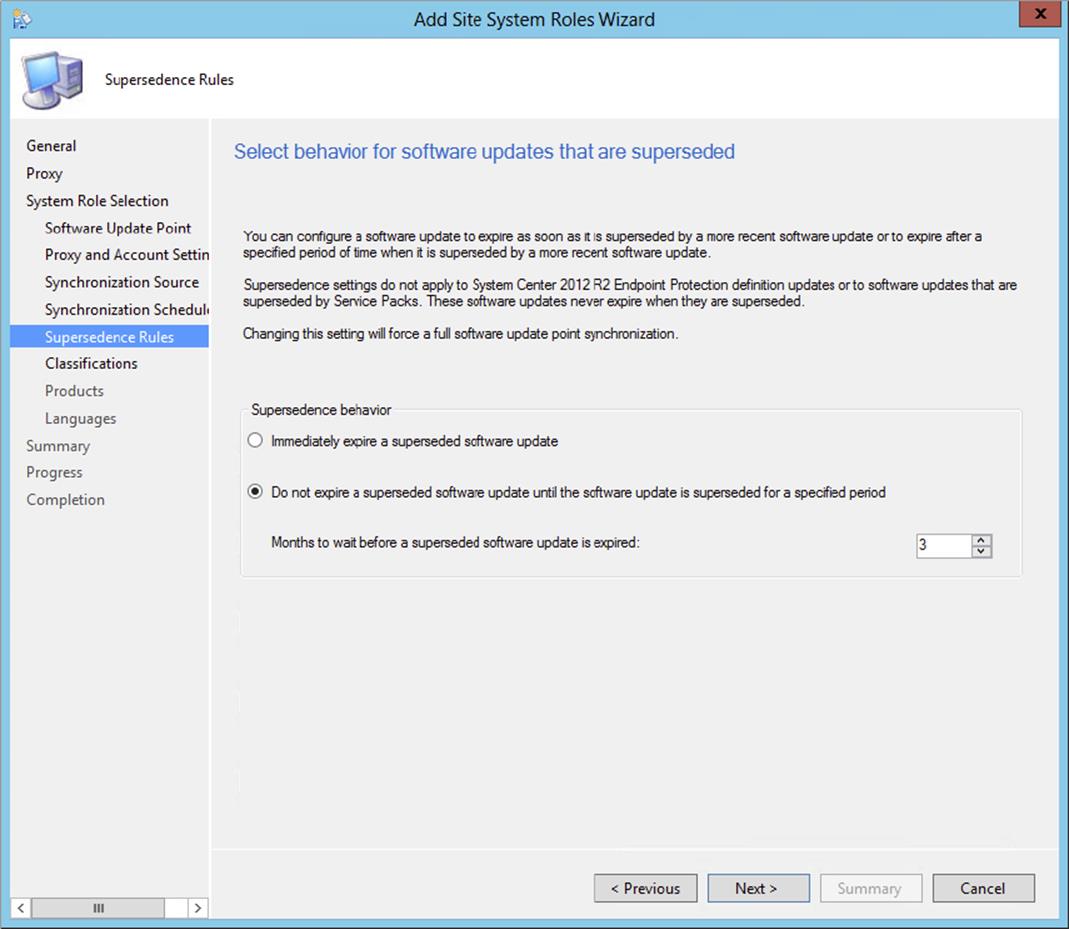
Figure 9.9 Configure behavior for software updates that are superseded.
· Immediately Expire A Superseded Update
· Do Not Expire A Superseded Software Update Until The Software Update Is Superseded For A Specified Period
12.Click Next.
13.Choose the update classifications that you want to deploy with software updates, and then click Next. You can change the classifications in a later stage.
14.Choose the products that you want to synchronize with software updates; you can change the products in a later stage. The number of products will change after the first synchronization with Microsoft Update has finished.
15.Select all the languages that you will be supporting with software updates, and then click Next.
16.Click Next again after reviewing the summary, and click Close after the installation is finished.
Setting Up the Software Update Point in a Primary Site That Is a Child of a CAS
To set up a software update point in a primary site that is a child of a Central Administration Site, follow these steps.
1. In the Configuration Manager console, choose the Administration Workspace ⇒ Overview ⇒ Site Configuration ⇒ Servers And Site System Roles.
2. Decide whether to create a new site system server or add the software update point role to an existing site system. Depending on which you choose, take the next step:
· To create a new site system with software update point, click Create Site System Server on the Home tab of the ribbon.
· To add the software update point role to an existing server, do the following:
a. Select the site server on which you want to install the software update point role.
b. Click Add Site System Roles on the Home tab of the ribbon.
What you do next will depend on your site settings. By default, the computer account for the site server will connect to the site system computer (if you’re installing on a separate site) and install the necessary components. If the computer account of the site server has access to the site system server and the Configuration Manager site is in HTTPS mode, the settings shown previously in Figure 9.7 are optional.
3. When the computer account does not have access to the site system server or when the site is in secure mode, you will have to configure the following settings on the New Site Role page:
a. Specify An FQDN For This Site System For Use On The Internet
By default, you will have to configure this setting for a software update point when the site server is in secure mode or when it is in mixed mode and using Secure Sockets Layer (SSL).
b. Internet FQDN
You must configure this setting if you are setting up a software update point that accepts Internet-based client connections or for the active Internet-based software update point.
c. Require The Site Server To Initiate Connections To This Site System
This setting must be used when the remote software update point doesn’t have access to the inboxes on the site server. This will let a site system from a different domain or forest add files that need to be transferred to the site server. The site server will connect to the remote site system and get the files every so often. The Internet-based software update point might need this setting to be enabled to work.
d. Site System Installation Account
This setting is configured when the computer account for the site server doesn’t have access to the remote site system being set up as a software update point.
e. Active Directory Membership
Configure the site system membership by supplying the Forest and Domain FQDN.
4. After you have configured what you need, click Next.
5. If you need to go through a proxy server to get to the Internet, you will need to configure the proxy server and the possible credentials. If you have Internet access without a proxy server, just click Next.
6. Select software update point from the list of available site roles, and then click Next.
7. In the software update point page (see Figure 9.10), configure the port settings for a WSUS custom website (the recommended settings are HTTP port 8530 and HTTPS port 8531). If you installed WSUS on the default website, the ports are HTTP port 80 and HTTPS port 443.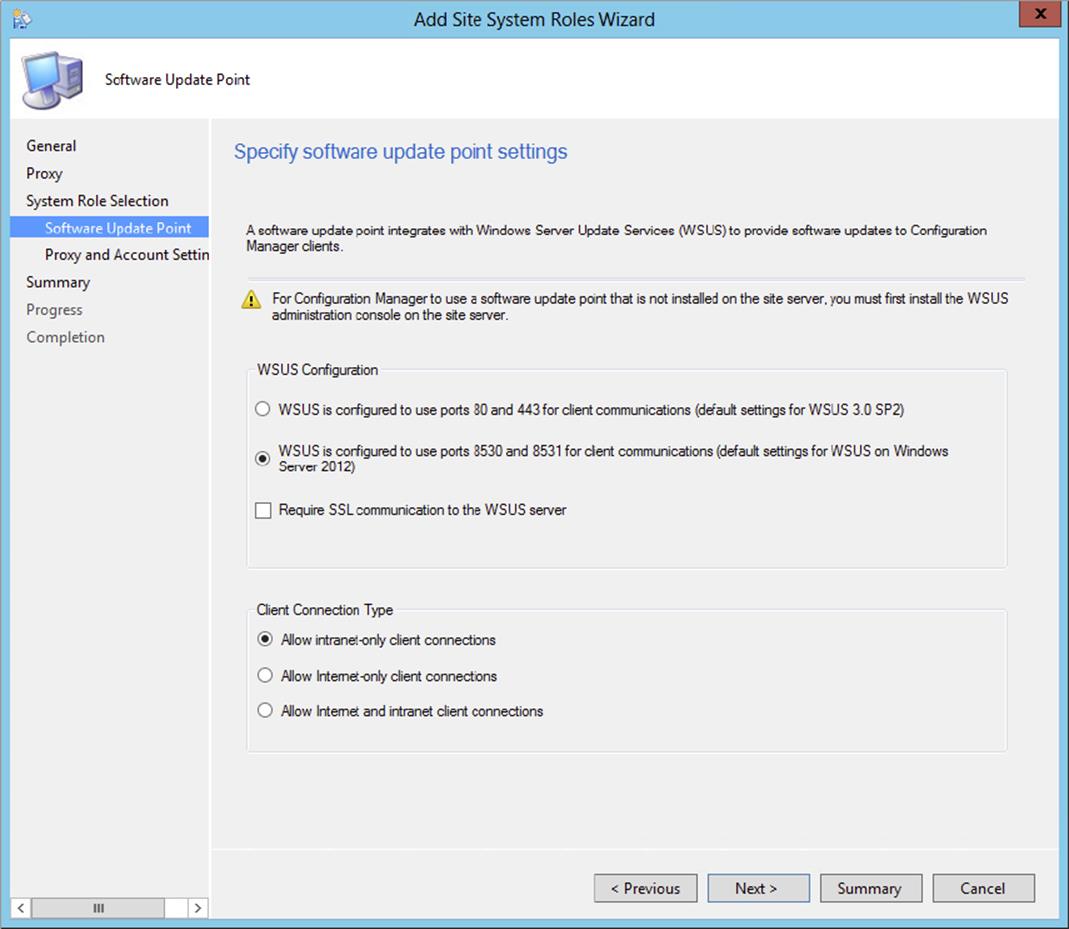
Figure 9.10 Specify software update point settings.
In the Client Connection Type section you need to configure what client connections are allowed for this software update point. Decide, depending on the purpose of the software update point, whether only intranet and/or Internet client connections are allowed.
8. If your software update point is behind a proxy server on which you need to authenticate, you can enable the earlier configured proxy server access by enabling it by choosing Use A Proxy Server When Synchronizing Software Updates and/or Use A Proxy Server When Downloading Content By Using Automatic Deployment Rules. If authenticated access to the WSUS server is required, you can configure a WSUS Server Connection Account. Click Next when finished configuring the proxy and account settings.
9. Review the summary, and click Next to start the installation of the software update point.
10.Click Close when the installation has finished.
11.After finishing the configuration of the software update point in the child primary site, you need to configure the supported languages for this software update point. In the Configuration Manager console, choose the Administration workspace ⇒ Overview ⇒ Site Configuration ⇒ Sites, and select the child primary site in the hierarchy.
12.Choose Configure Site Components on the Settings section of the Home tab of the ribbon, and click software update point. In Figure 9.11 you see that it is recognized as a child site and that the upstream software update point is configured automatically. Select the Languages tab and configure the languages that you need to support. Be sure to configure languages that are available on the upstream software update point. Click OK when finished.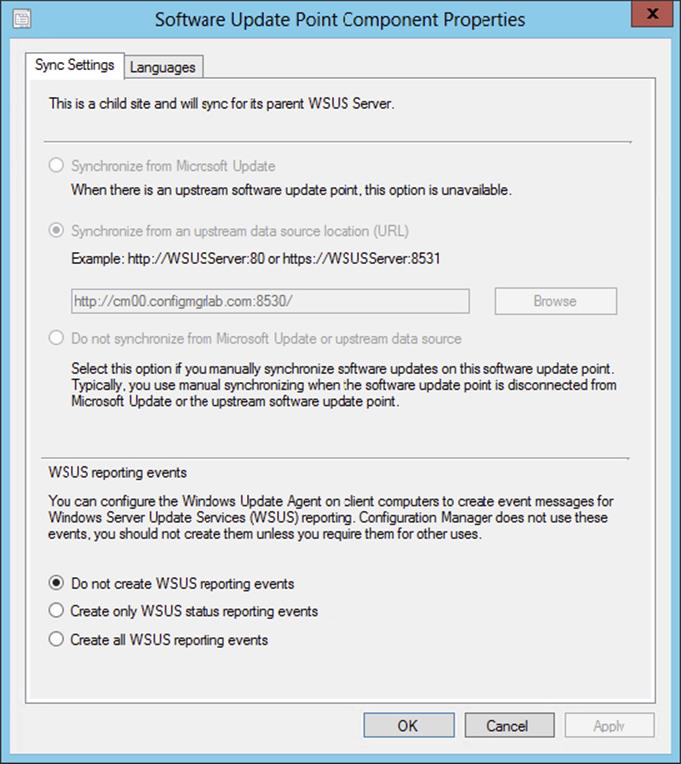
Figure 9.11 Software Updates Point Component Properties
Adding and Removing a Software Update Point with PowerShell
You are also able to add a software update point with the default Configuration Manager cmdlets in PowerShell. Adding a software update point on site server CM01 in the domain configmgrlab.com in primary site PS1 for only Intranet clients is done as follows:
Add-CMSoftwareUpdatePoint -SiteSystemServerName cm01.configmgrlab.com
-SiteCode ps1 -ClientConnectionType Intranet -WsusiisPort 8530 -WsusiissslPort 8531
Removing the same software update point can be done with the following command.
Remove-CMSoftwareUpdatePoint -SiteSystemServerName cm01.configmgrlab.com -SiteCode ps1
Setting Up the Software Update Point in a Stand-alone Primary Site
A software update point can be installed in a hierarchy or at a stand-alone primary site. This section describes the installation steps of a software update point on a stand-alone primary site.
1. In the Configuration Manager console, choose the Administration workspace ⇒ Overview ⇒ Site Configuration ⇒ Servers And Site System Roles.
2. Decide whether to create a new site system server or add the software update point role to an existing site system. Depending on which you choose, take the next step:
· To create a new site system with a software update point, click Create Site System Server on the Home tab of the ribbon.
· To add the software update point role to an existing server, do the following:
a. Select the site server on which you want to install the software update point role.
b. Click Add Site System Role on the Home tab of the ribbon.
What you do next will depend on your site settings. By default, the computer account for the site server will connect to the site system computer (if you’re installing on a separate site) and install the necessary components. If the computer account of the site server has access to the site system server and the Configuration Manager site is in HTTPS mode, the settings shown previously in Figure 9.7 are optional.
3. When the computer account does not have access to the site system server or when the site is in secure mode, you will have to configure the following settings on the New Site Role page:
a. Specify An FQDN For This Site System On The Intranet
By default, you will have to configure this setting for a software update point when the site server is in secure mode or when it is in mixed mode and using SSL.
b. Internet FQDN
You must configure this setting if you are setting up a software update point that accepts Internet-based client connections or for the active Internet-based software update point.
c. Require The Site Server To Initiate Connections To This Site System
This setting must be used when the remote software update point doesn’t have access to the inboxes on the site server. This will let a site system from a different domain or forest add files that need to be transferred to the site server. The site server will connect to the remote site system and get the files every so often. The Internet-based software update point might need this setting to be enabled to work.
d. Site System Installation Account
This setting is configured when the computer account for the site server doesn’t have access to the remote site system being set up as a software update point.
e. Active Directory Membership
Configure the site system membership by supplying the forest and domain FQDNs.
4. When you have configured what you need, click Next.
5. If you need to go through a proxy server to get to the Internet, you will need to configure the proxy server and the possible credentials. If you have Internet access without a proxy server, just click Next.
6. Select software update point from the list of available site roles, and then click Next.
7. In the software update point page (see Figure 9.10), specify the port settings that are used by the WSUS you are connecting to and which clients are allowed to connect to the software update point. Click Next after configuring the software update point server.
By default, the port settings for a WSUS custom website (the recommended settings) are HTTP port 8530 and HTTPS port 8531. If you installed WSUS on the default website, the ports are HTTP port 80 and HTTPS port 443.
Finding the Ports Used by Windows Server Update Services
If someone else installed the WSUS server that is being used for a software update point, you may not know what ports were used during setup. If you input the wrong ports on this page of the wizard, the setup will fail. You can find the ports used by WSUS by following these steps:
1. Under Administrative Tools, click Internet Information Services (IIS) Manager.
2. Expand Sites, right-click the website that is being used for WSUS, and click Edit Bindings. A custom WSUS site is recommended, but the default website might have been used instead. The Port column will contain the number for the TCP port.
3. Look at the Browse Web Site list in the Actions section of the Management console; it will also contain the port list for the website.
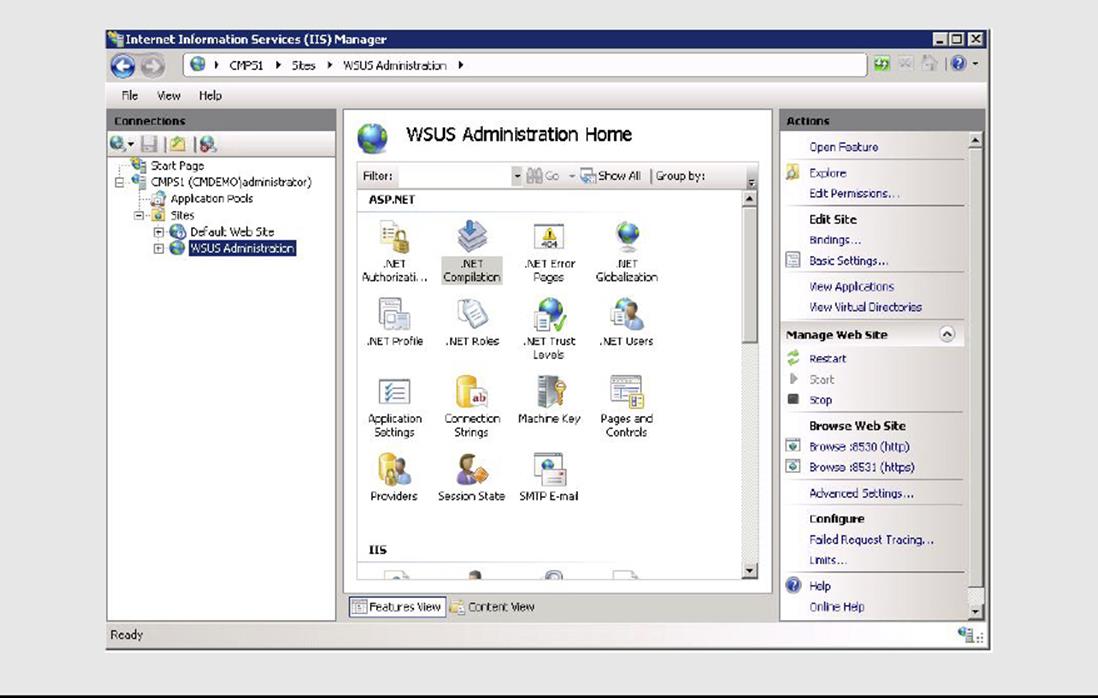
8. If your software update point is behind a proxy server on which you need to authenticate, you can enable the earlier configured proxy server access by enabling it by choosing Use A Proxy Server When Synchronizing Software Updates and/or Use A Proxy Server When Downloading Content By Using Automatic Deployment Rules. If authenticated access to the WSUS server is required, you can configure a WSUS Server Connection Account. Click Next when finished configuring the proxy and account settings. Otherwise, just click Next. Choose the synchronization source for the software update point by selecting one of these options:
1. Synchronize From Microsoft Update The software update point that is highest in the Configuration Manager hierarchy can synchronize from Microsoft Update; since you are installing it in a stand-alone primary site you may use this setting.
2. Synchronize From An Upstream Data Source Location (URL) If you do not want to synchronize directly with Microsoft Update but with another WSUS server, you can configure an upstream data source location. Normally it will be something likehttps://wsusserver:8531 or http://wsusserver:8530.
3. Do Not Synchronize From Microsoft Update Or Upstream Data Source Use this setting when the software update point can’t connect to the upstream update server. This will usually be used by an active Internet-based software update point that doesn’t have access to the software update point. The software update point on the CAS can’t use this setting. Synchronizing a software update point through importing and exporting updates is covered later in the chapter.
9. On that same page, accept the default of Do Not Create WSUS Reporting Events, and then click Next.
10.Always choose to synchronize software updates on a schedule by selecting Enable Synchronization On A Schedule.
This is disabled by default; you can start a manual sync by running the Run Synchronization action in the Configuration Manager console. We recommend that you enable a schedule, because scheduled syncs perform full synchronizations and manual syncs only do delta synchronizations of software updates. Synchronizing a software update point manually is not a best practice.
11.Once you have made your choice, click Next.
12.Configure the supersedence behavior for updates that are about to expire, as shown previously in Figure 9.9. Choose one of the following:
· Immediately Expire A Superseded Update
· Do Not Expire A Superseded Software Update Until The Software Update Is Superseded For A Specified Period
13.Click Next.
14.Choose the update classifications that you want to deploy with software updates, and then click Next. You can change the update classifications in a later stage.
15.Choose the products that you want to synchronize, and then click Next. You can change the products in a later stage. The number of products will change after the first synchronization with Microsoft Update has finished.
16.Select all the languages that you will be supporting with software updates, and then click Next. You can change the supporting languages in a later stage.
17.Click Next again on the following page, and click Close.
Checking the Installation of the Software Update Point
After the installation of the software update point(s) it is a good idea to check some log files to be sure that the software update point(s) are installed correctly.
1. To monitor the install of the software update point, open the SUPSetup.log in the <Configuration Manager Install Path>\Logs or %SMS_LOG_PATH% folder.
When the install has finished, you will see the text “Installation Was Successful.”
2. Open the WCM.log in the same directory to verify that the connection to the WSUS server worked.
When the connection to the WSUS server is made and the WSUS components are checked, you will see
There are no unhealthy WSUS Server components on WSUS Server servername
and
Successfully checked database connection on WSUS server servername
in the log file.
Configuring Software Updates Settings and Synchronization
Software updates in Configuration Manager 2012 must be synchronized with Microsoft Update or an upstream WSUS server before information on those updates will be available to view in the Configuration Manager console. Synchronization starts at the highest level in the hierarchy that has a software update point and either has a configured schedule or is started manually using the Run Synchronization action.
When synchronization is started on a configured schedule, all changes to the Software Updates metadata since the last scheduled sync are inserted into the site database. This will include metadata for new software updates or metadata that has been modified or deleted. When a sync is started manually, only new software updates metadata since the last sync is inserted into the database. The manual sync process is faster since it is not pulling as much Software Updates metadata. A manual sync action is available only on parent sites.
To manually sync the software update point, do the following:
1. In the Configuration Manager console, choose the Software Library workspace ⇒ Overview ⇒ Software Updates ⇒ All Software Updates.
2. Select the Home tab of the ribbon and click Synchronize Software Updates. Click Yes to initiate a sitewide synchronization of software updates.
The synchronization process might take longer than an hour to finish, depending on several factors, including whether a synchronization has been run before and what languages, products, and update classifications have been configured to be synchronized. You can monitor the synchronization process by looking at the log file for WSUS Synchronization Manager, wsyncmgr.log. This is located by default at %Program Files%/Microsoft Configuration Manager/Logs.
When the synchronization is complete, you will see a 6702 status message from SMS_WSUS_SYNC_MANAGER.
New in Configuration Manager 2012 is that you also can monitor the synchronization in the Configuration Manager console.
To monitor the synchronization in the hierarchy do the following:
1. In the Configuration Manager console, choose the Monitoring workspace ⇒ Overview ⇒ software update point Synchronization Status.
2. Look at the synchronization status, the link state, and the catalog versions.
When the synchronization with Microsoft Update is complete (either from a schedule or started manually) at the highest site in the hierarchy, sync requests are sent to all child sites, and they in turn start synchronization with their configured upstream WSUS servers as soon as the request has finished processing.
The Software Updates metadata that is synced from Microsoft Update is based on the update classes, products, and languages that were selected when the software update point was first configured. A child site will synchronize whatever updates have been configured on its parent site.
Although all of the settings for update classes, products, and so on were configured at the setup of the software update point, you can still reconfigure these options if needed. To configure the update properties for software updates, follow these steps.
1. In the Configuration Manager console, choose the Administration workspace ⇒ Overview ⇒ Site Configuration ⇒ Sites, and select the site that is the highest in the hierarchy.
2. Choose Configure Site Components on the Settings section of the Home tab of the ribbon, and click software update point.
3. To configure Update Classifications, click the Classifications tab, as shown in Figure 9.12.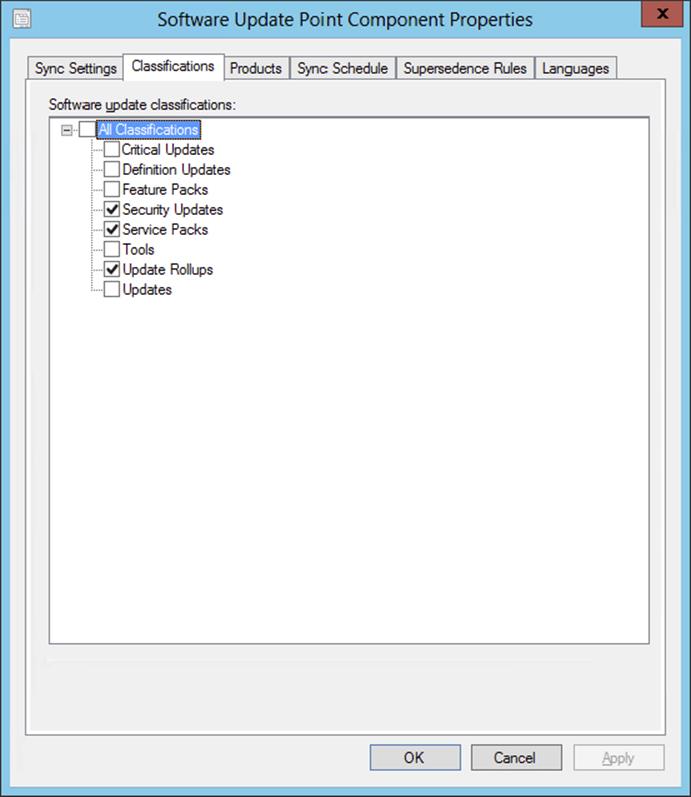
Figure 9.12 Software Update Point Component Properties: Classifications tab
4. To configure products that are being synced, click the Products tab, as shown in Figure 9.13.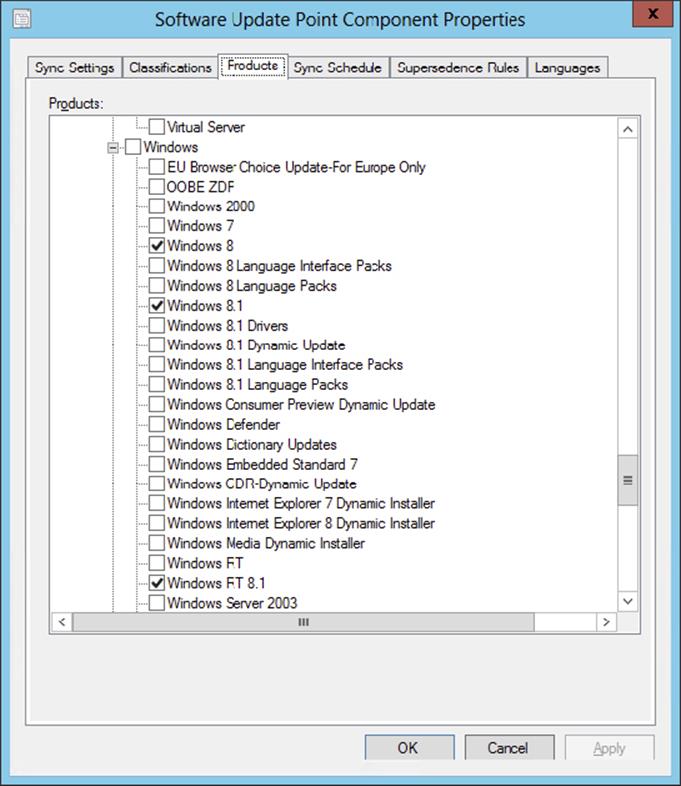
Figure 9.13 Software Update Point Component Properties: Products tab
5. To configure languages that are being synced, click the Languages tab, as shown in Figure 9.14.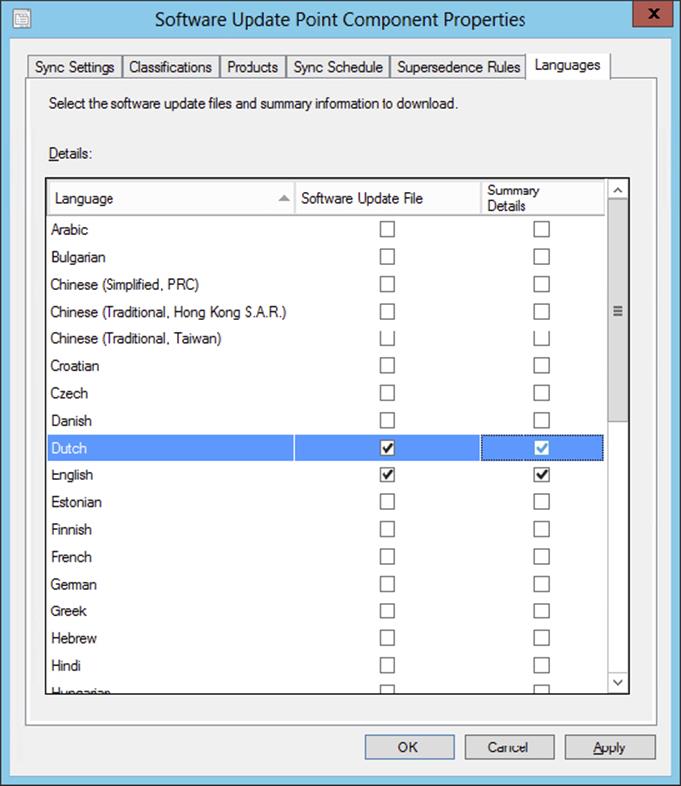
Figure 9.14 Software Update Point Component Properties: Languages tab
6. To reconfigure the supersedence settings, click the Supersedence Rules tab, as shown in Figure 9.15.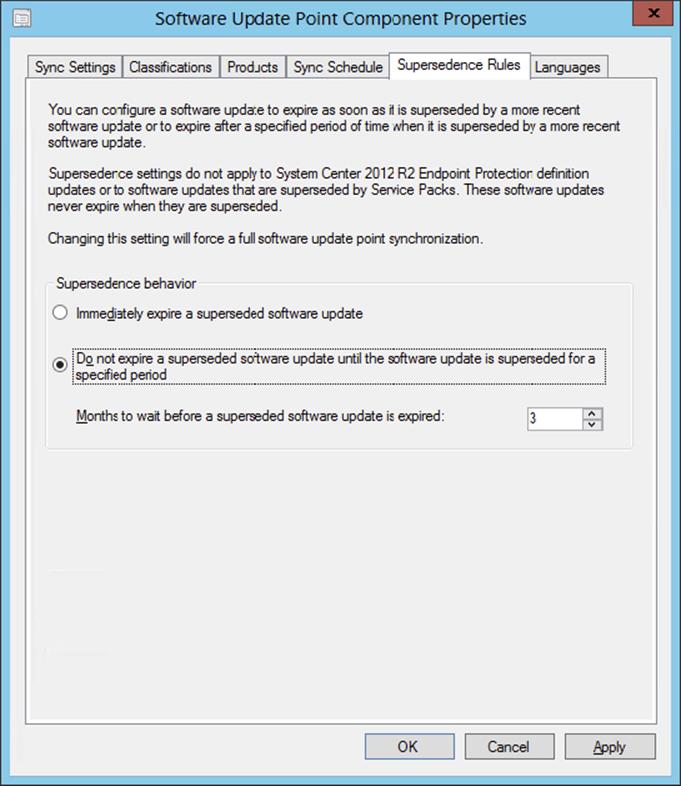
Figure 9.15 Software Update Point Component Properties: Supersedence Rules tab
To configure the software updates synchronization schedule, follow these steps:
1. In the Configuration Manager console choose the Administration workspace ⇒ Overview ⇒ Site Configuration ⇒ Sites, and select the site that is the highest in the hierarchy.
2. Choose Configure Site Components on the Settings section of the Home tab of the ribbon, and click software update point.
3. To configure the synchronization schedule, click the Sync Schedule tab, as shown in Figure 9.16.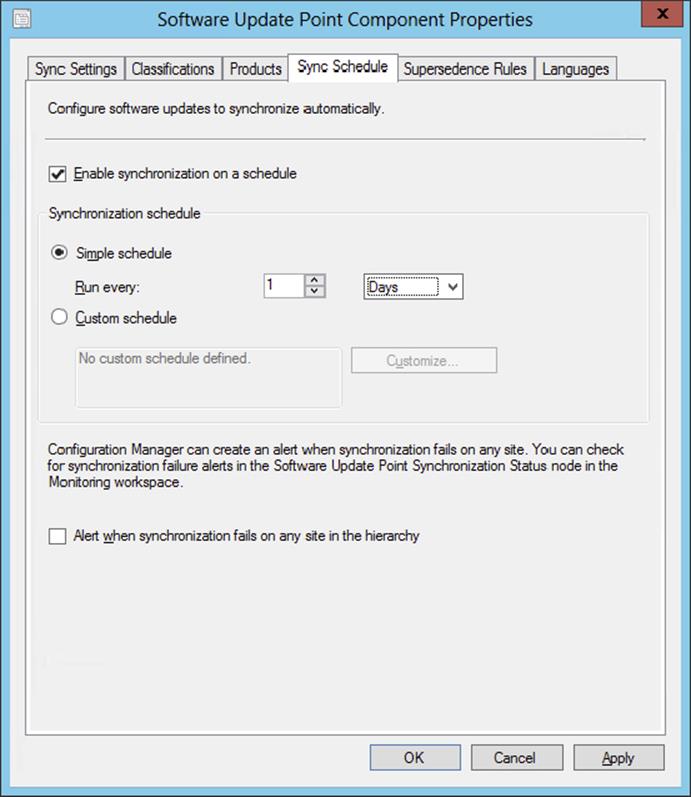
Figure 9.16 Software Update Point Component Properties: Sync Schedule tab
4. To enable synchronization on a schedule, select Enable Synchronization On A Schedule, and set the schedule as you want it.
5. When you have finished, click OK to save the schedule.
Unless you change the Start value in the custom schedule, synchronization will be started as soon as possible and will repeat based on the schedule that you configured.
6. If you want alerts to be reported in the Alerts node of the Configuration Manager 2012 console, enable the Alert When Synchronization Fails On Any Site In The Hierarchy option.
Synchronizing Updates with Export and Import
When a software update point is not configured or cannot synchronize with its upstream server in the Configuration Manager 2012 hierarchy, the export and import functions of the WSUSUtil tool can be used to synchronize Software Updates metadata manually. The user who performs the export/import must be a member of the local Administrators group on the WSUS server, and the tool must be run locally on the WSUS server itself.
The files found in the WSUSContent folder (by default located in <WSUSInstallDrive>\WSUS\WSUSContent) must also be copied from the upstream update server to the software update point so that locally stored updates and the license terms for the updates are available to the import server. This procedure can also be used for migrating the software update content from Configuration Manager 2007 to Configuration Manager 2012.
To export and import software updates from the export WSUS server to the import WSUS server, follow these steps:
1. Copy files from the export server to the import server:
a. On the export server, go to the folder where software updates and the license terms for those software updates are stored. By default, this will be <WSUSInstallDrive>\WSUS\WSUSContent.
b. Copy all of these files to the same folder on the import server.
2. Export metadata from the database of the export server:
a. At a command prompt on the export WSUS server, go to the folder that contains WSUSUtil.exe. By default, this will be located at %ProgramFiles%\Update Service\Tools.
b. Then enter the following:
WSUSUTIL.exe export packagename logfile
The name of packagename doesn’t really matter, as long as it and the log file are unique in that folder. This command will export the Software Updates metadata into a file called packagename.cab.
c. Move the export package that you just made to the folder that contains WSUSUtil.exe on the import WSUS server.
3. Import metadata to the database of the import server:
a. At a command prompt on the WSUS server that you are importing the updates to, go to the folder that contains WSUSUtil.exe, which is %Program Files%\Update Services\Tools.
b. Enter
WSUSUTIL.exe import packagename logfile
with packagename being the name of the export file that you exported in step 2.
This will import all the metadata from the exporting server and create a log file that you can use to review the status.
Preparing Software Updates for Deployment
So far in this chapter, we have planned our implementation of Software Updates and set up and configured Software Updates, and now we are finally ready to deploy Software Updates to Configuration Manager 2012 clients. Well, nearly ready. We still need to find the updates to be deployed (using any of several methods), download them, and optionally create a software update group and/or an automatic deployment rule. These tasks can be done in the sequence shown here or independently of each other.
Before we get into that process, there are a few things you should keep in mind after you have set up all of the Software Updates components.
Give the process a little time to work. Don’t expect to set up everything we have discussed so far and think you are going to be able to do a couple of clicks and deploy updates to your clients. You are going to have a little bit of lead time as updates are synced with Microsoft Update, the metadata is synced with the rest of the Configuration Manager hierarchy, and clients get requests for scans. Depending on the size of your hierarchy and the number and kind of clients you need to be scanned, this might take a while; after all, this is a process.
If you click the Software Updates node in the Configuration Manager console and don’t see any results in your compliance summary, then your clients either haven’t been scanned or they haven’t sent their scan results. Until you see something in those reports, you don’t have enough to work with to do any update deployments.
With that said, we can continue preparing for software update deployment.
Finding the Software Updates to Be Deployed
Before you can deploy any Software Updates to clients, you will need to figure out which ones you want or need to deploy to your clients. Configuration Manager provides several ways to do that, and each allows you to find clients that need the updates you want to focus on installed.
When you are looking for updates to deploy, avoid updates that show up in the Configuration Manager console with a yellow arrow icon. These are updates that have been superseded by another update that contains the same fixes. To avoid installing outdated components to your clients, do not include these updates in your deployments. They are no longer needed.
There are basically three methods to find needed software updates:
· Software Updates reports
· Software Updates search
· All Software Updates node
Using Software Updates Reports to Find Updates
You can gather compliance information on your clients by running reports under the Software Updates - A Compliance category, because they are designed specifically for this purpose.
To use web reports from the Configuration Manager console to find required updates, follow these steps.
1. In the Configuration Manager console, choose the Monitoring workspace ⇒ Overview ⇒ Reporting, expand Reports, and open the Software Updates - A Compliance folder.
This will give you a list of all reports in the right pane of the console.
2. Find the report Compliance 4 - Updates By Vendor Month Year, select it, and click Run on the Home tab of the ribbon.
3. To get an idea of what update data you have collected already, do the following:
a. Click Values for the collection All Systems.
b. Click Values for the vendor Microsoft.
c. Click Values for the update class Security Updates.
d. Click Values for the current year (2013).
e. Click View Report.
You should see a report like the one shown in Figure 9.17.
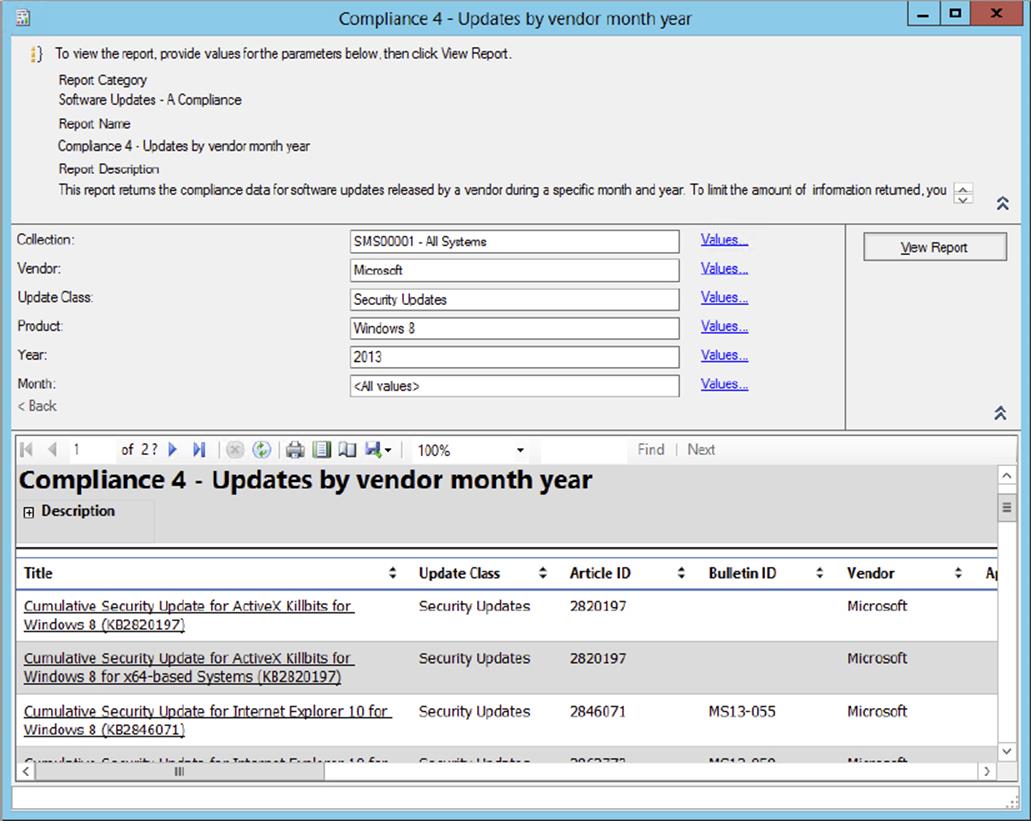
Figure 9.17 A sample compliance report with values entered for Collection ID, Vendor, Update Class, and Year
Any software updates that meet those criteria will be displayed in the report. The Required column gives the number of clients that require each software update in the list. The report also shows all of the updates that have been deployed by listing an asterisk (*) in the Approved column. To get more information about any of the updates, click the information link on the far right of the report (you may have to do some side scrolling to see it), and this will pull up the latest information from Microsoft on this update.
4. To get more details click the drill-down link in the first column of the report.
This will open the Compliance 6 - Specific Software Update States (Secondary) report, and you will see a count of computers for each compliance state for that particular update.
Using the Search Option in the Configuration Manager Console
With the new Configuration Manager 2012 console you also have the ability to use a powerful search engine that comes with the console. Just under the ribbon, you will find the search option.
To use the search option to show software updates, follow these steps:
1. In the Configuration Manager console, choose Software Library ⇒ Overview ⇒ Software Updates ⇒ All Software Updates.
2. Click Add Criteria next to the Search button.
You will then see the Criteria list box, as shown in Figure 9.18.
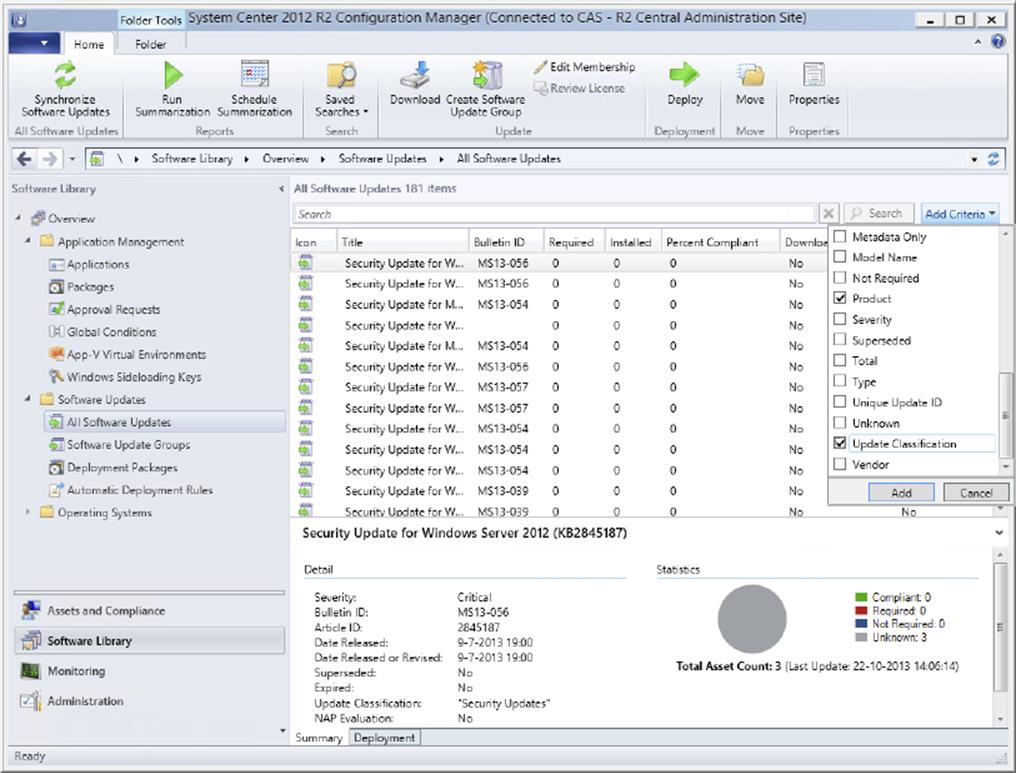
Figure 9.18 Search criteria
3. You want to search for all security updates for Windows Server 2012 R2. So first you scroll down and look for Update Classification (for security updates) and Product (for Windows Server 2012 R2).
4. Click Add to add the criteria to the search box.
5. To select the right product, click the link next to Product and select Windows Server 2012 R2.
6. To select the right update classification, click the link next to Update Classification and select Security Updates, as shown in Figure 9.19.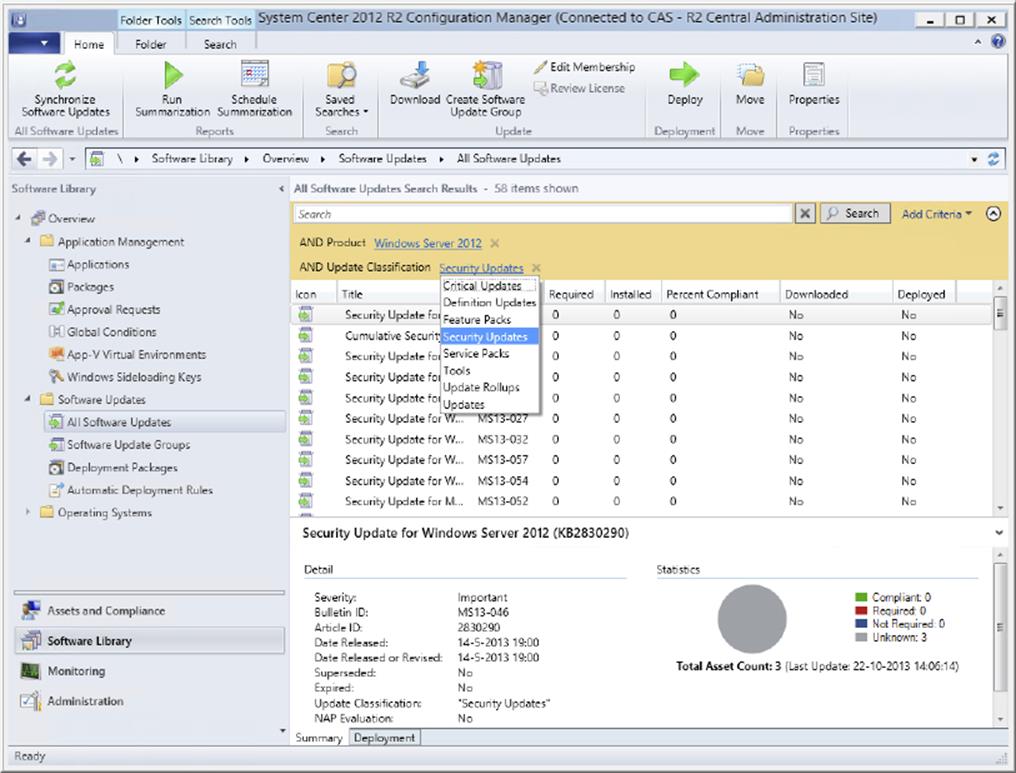
Figure 9.19 Adding search criteria to the search
7. Click Search to activate the criteria.
8. To save the search for future use, you can click either Save Current Search or Save Current Search As in the Home tab of the ribbon of the Configuration Manager console.
You can find all the updates that need to be deployed to Windows Server 2012 R2 computers in this search by looking at the column labeled Required. You can sort by any column by clicking that column. From here you can download these updates, add them to an update group, or deploy them to client computers.
To manage and access saved searches, do the following:
1. In the Configuration Manager console, choose Software Library ⇒ Overview ⇒ Software Updates ⇒ All Software Updates.
2. Choose Saved Searches in the Search or Home tab of the ribbon of the Configuration Manager console, and click Manage Searches For Current Node.
3. Select the search you need, as shown in Figure 9.20, and click OK to make the search active. You can also rename or delete a saved search.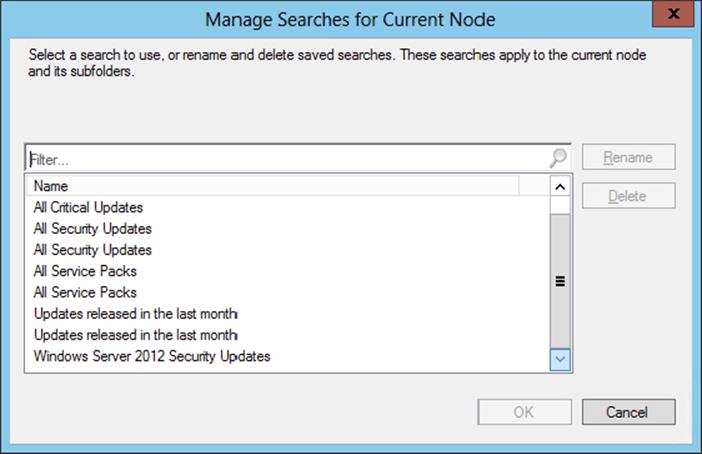
Figure 9.20 Selecting the search you need
Using the All Software Updates Node
When you browse in the Configuration Manager console to the All Software Updates node, you can select the software updates you want without using the search option.
To select the updates you want, do the following:
1. In the Configuration Manager console, choose Software Library ⇒ Overview ⇒ Software Updates ⇒ All Software Updates.
2. Browse to the update you want to deploy, or use the search option without the criteria to filter the updates.
Downloading Software Updates
As you saw in the last section, there are several ways to search for software updates that you want to download in Configuration Manager. The Download Updates Wizard allows you to download selected software updates to a deployment package prior to deploying updates to clients.
Software updates are downloaded from the Internet or from a shared folder on the network that the site server has access to and that can be added to new or existing deployment packages.
To download software updates to a deployment package, follow these steps:
1. In the Configuration Manager console, choose Software Library ⇒ Overview ⇒ Software Updates ⇒ All Software Updates.
2. Choose Saved Searches in the Search section of the Home tab of the ribbon of the Configuration Manager console, and click Manage Searches For Current Node.
3. Select the created Windows Server 2012 R2 Security Updates Search, and click OK.
4. Sort the updates in the list so that the updates required by the most clients are at the top by clicking the Required column twice.
5. Hold down the Shift key and select all the updates that have at least one client requiring that update.
6. Choose the Home tab of the ribbon, and click Download.
This will start up the Download Software Updates Wizard, shown in Figure 9.21.
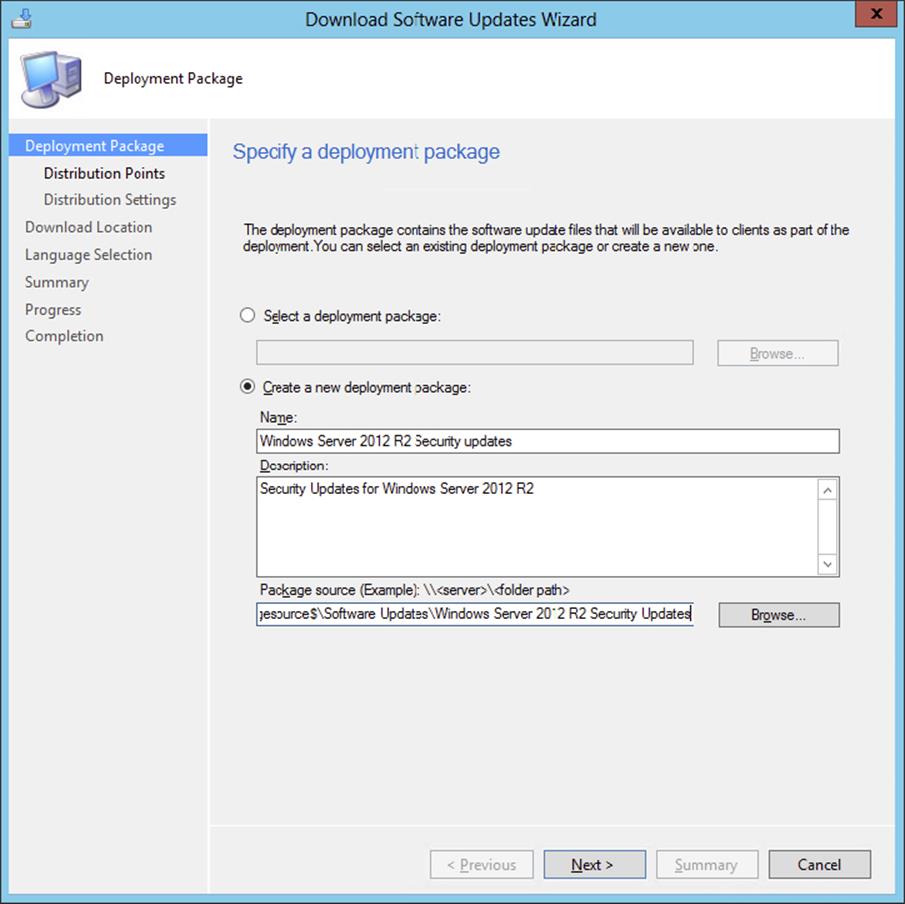
Figure 9.21 The Deployment Package page of the Download Software Updates Wizard
If you already have deployment packages created (as described later in the chapter), you can add these updates to one of them in the first field by selecting Select A Deployment Package. Then click Browse to open a dialog box that will allow you to select a package that is only for hosting software updates, and select one from the list. Otherwise, this option will be grayed out, as in our example.
7. The other option on this first page of the wizard is Create A New Deployment Package. There are three fields to fill out:
1. Name The name of the deployment package. You should pick a unique name that describes the content and limit it to 50 characters or less.
2. Description The description of the package contents up to 512 characters.
3. Package Source The location of the software update source files. You should manually create this share before going any further. When the deployment is created, the source files are compressed and copied to the distribution points that are associated with the deployment package. This location must be entered as a network path (such as \\server\sharename\path), or you can click the Browse button to find the location on the network. This location should not be used by any other deployment or software distribution package.
8. After choosing the deployment package or supplying information for a new deployment package, click Next.
The next step is the Distribution Points page. The Browse button allows you to select from the available distribution points or distribution point groups on your site that you want to use for this software update package. You can leave this blank for now, and the software update files will be downloaded to the source folder. However, the updates will not be available to deploy to clients until you add at least one distribution point.
9. After adding the distribution point(s), click Next to configure the distribution settings.
In the Distribution Settings page, shown in Figure 9.22, the following options can be configured:
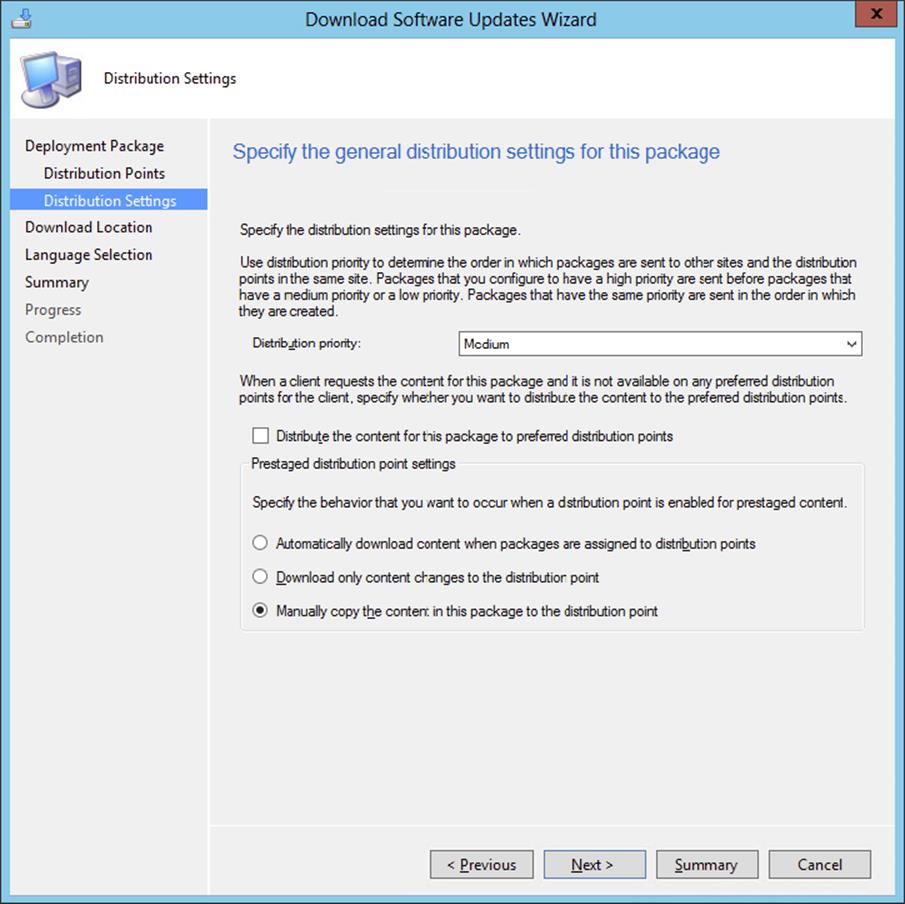
Figure 9.22 The Distribution Settings page of the Download Software Updates Wizard
1. Distribution Priority The distribution priority is used for the deployment package when it is sent to distribution points at child sites. Packages are sent in priority order of High, Medium, or Low. Packages with the same priority are sent in the order in which they are created. Unless there is a backlog, packages should process immediately no matter their priority. Medium is the default priority.
2. Distribute The Content For This Package To Preferred Distribution Points When a client requests the content for this package and it is not available on any preferred distribution points for the client, specify if you want to distribute the content to the preferred distribution points.
3. When you enabled content prestaging on your distribution points, because the scheduling synchronization and throttling of your bandwidth do not work for you, you also need to look at the following settings:
4. Automatically Download Content When Packages Are Assigned To Distribution Points Use this option when smaller software update packages are used and scheduling and throttling settings provide enough control for the distribution of the content.
5. Download Only Content Changes To The Distribution Point This option should be used when you have an initial package that is possibly large but you want to add future software updates to the content of this package.
6. Manually Copy The Content In This Package To The Distribution Point Use this option when you have large packages and you don’t want to use the network for distribution of the content to the distribution point. You need to prestage the content on the distribution point.
10.Click Next when you’ve finished configuring the distribution settings.
Next is the Download Location page, with the following options:
1. Download Software Updates From The Internet This will download the updates from the location on the Internet that is defined in the software update definition. This is the default setting.
2. Download Software Updates From A Location On My Network The software updates are downloaded from a local directory or shared folder that you set in the box. Use this setting when the site server doesn’t have Internet access. The software updates can be downloaded from any computer that does have Internet access and stored in a location on the local network that the site server has access to.
3. After configuring the download location, click Next. The Language Selection page shows the languages in which the software update files will be downloaded. By default, the languages that are configured for the software update point are selected. Adding a selection here does not add it to the software update point settings.
11.Click Next.
12.Review the settings and click Next; the updates will be downloaded.
When the wizard is done, the software updates will show up under Overview ⇒ Software Updates ⇒ Deployment Packages ⇒ <deployment package name> in the Software Library workspace of the Configuration Manager console.
Creating a Software Update Group
As stated earlier in the chapter, a software update group in Configuration Manager contains a set of software updates. A software update group offers several benefits when deploying and monitoring software updates and is part of Microsoft’s recommended Software Updates workflow.
Tracking the compliance state for the software updates in deployments is an important task for Configuration Manager administrators. When update groups are used, you can use the Compliance 1 - Overall Compliance report for the set of updates in the update group or the Compliance 3 - Update Group (Per Update) report to get a list of the updates in an update group and the overall compliance of each. This is a great reason to use the update groups as a part of your software update procedure.
To create a software update group, follow these steps:
1. In the Configuration Manager console, choose Software Library ⇒ Overview ⇒ Software Updates ⇒ All Software Updates.
2. Choose Saved Searches in the Search area of the ribbon of the Configuration Manager console, and click More or use the Recent Searches option.
3. Select the created Windows Server 2012 Security Updates Search and click OK.
4. Sort the updates in the list so that the updates required by the most clients are at the top by clicking the Required column twice.
5. Hold down the Shift key and select all the updates that have at least one client requiring that update.
6. Click Create Software Update Group, and fill in the name and description of the software update group.
7. Click Create, and the software update group will be created.
Your new software update group will appear in the Software Update Group node under Software Updates in the Configuration Manager console.
Deploying Software Updates with the Deploy Software Updates Wizard
Now that all the setup and preparation tasks have been done, you are ready to run the deployment. Before deploying software updates, make sure you’ve considered things like whether the maintenance windows and client restart settings will work for the different clients in your environment, how you are going to handle servers differently than workstations, and which deployments will be delegated.
To ensure the most successful software update deployments, utilize software update groups that fit the needs of your organization, and keep software updates organized so they are easier to keep track of and deploy.
The Deploy Software Updates Wizard in Configuration Manager allows you to create or modify software update deployments. You can select software updates that you want to deploy from several locations, as discussed earlier in this chapter, and you can start the deployment wizard in different ways as well.
To deploy software updates using the Deploy Software Updates Wizard, use the following steps:
1. In the Configuration Manager console, choose Software Library ⇒ Overview ⇒ Software Updates ⇒ Software Update Groups.
2. Decide what updates you want to deploy.
You can use any of the methods that were described in the “Finding the Software Updates to Be Deployed” section earlier in the chapter, or you can just select several updates from any of the Update Repository sections by Ctrl-clicking the updates that you want.
3. Start the Deploy Software Updates Wizard using either of the following methods:
· Right-click some selected updates or a software update group, and then click Deploy.
· Click Deploy on the Home tab of the ribbon of the Configuration Manager console after selecting some updates or a software update group.
For this example, some updates that were not already downloaded were selected before clicking Deploy.
The first page of the Deploy Software Updates Wizard is shown in Figure 9.23.
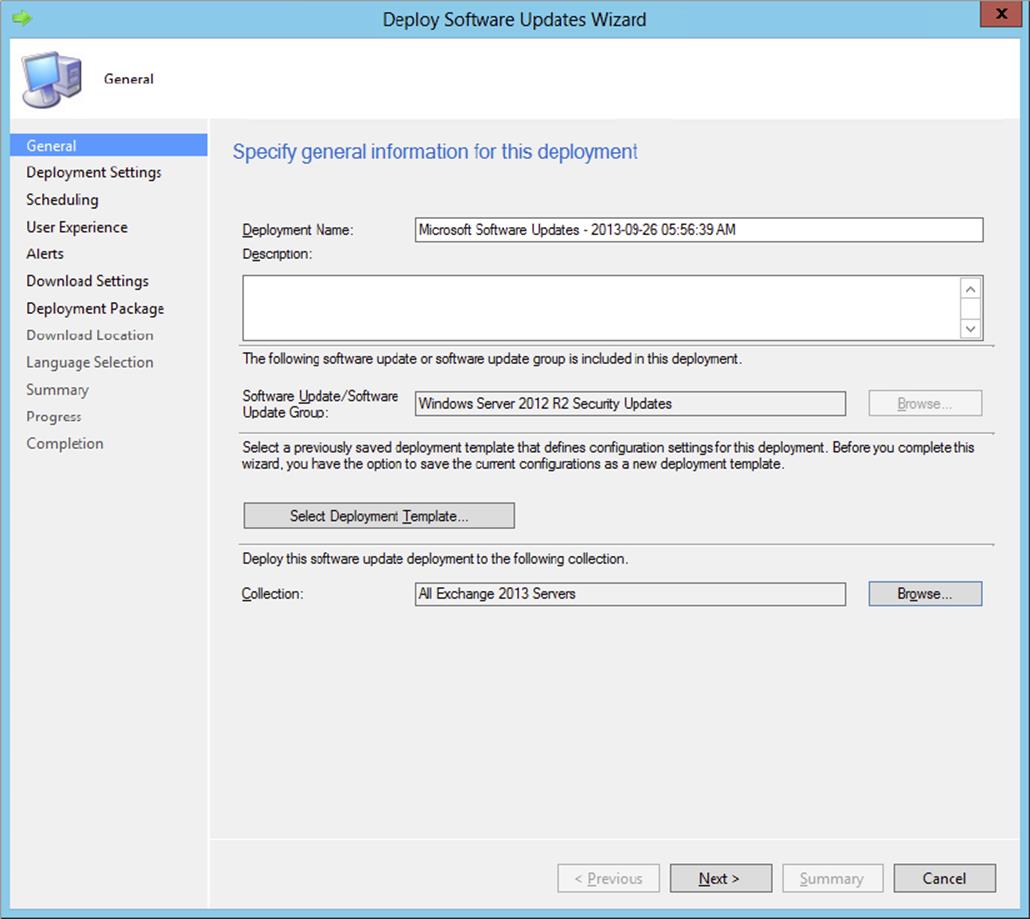
Figure 9.23 The General page
4. Configure the following options.
1. Select Deployment Template If you have already saved a deployment template, you can select a saved deployment template. This template holds the most common settings.
2. Deployment Name Give the deployment a name.
3. Software Update/Software Update Group This option is active only when you select one or more updates instead of an update group.
4. Collection Select the collection to which the deployment must deploy software updates.
5. Click Next.
0. The next step in creating a deployment for deploying software updates is to configure the deployment settings. The configurable settings are as follows:
1. Type Of Deployment Choose whether the deployment is available or required for installation. If the deployment is required, the installation of the software updates will start automatically, depending on the maintenance windows. If a deployment is available, the user is able to install the software updates. For software update deployments it is common practice to configure the deployment as required.
2. Use Wake-On-LAN To Wake Up Clients For Required Deployments Disabled by default, this option specifies whether at deadline Wake On LAN will be used to send wake-up packets to computers that require updates in the deployment. Be sure to configure the support of Wake On LAN in the Configuration Manager environment, your devices, and your network. See Chapter 4 for more information about configuring the support for sending wake-up packets.
3. Detail Level The detail level configures the state-message details that are returned by the clients for deployments. There are three levels that you can configure: All Messages, Only Success And Error Messages, or Only Error Messages.
6. Configure the settings and click Next.
0. The Scheduling page is next and is shown in Figure 9.24. This page has three sections: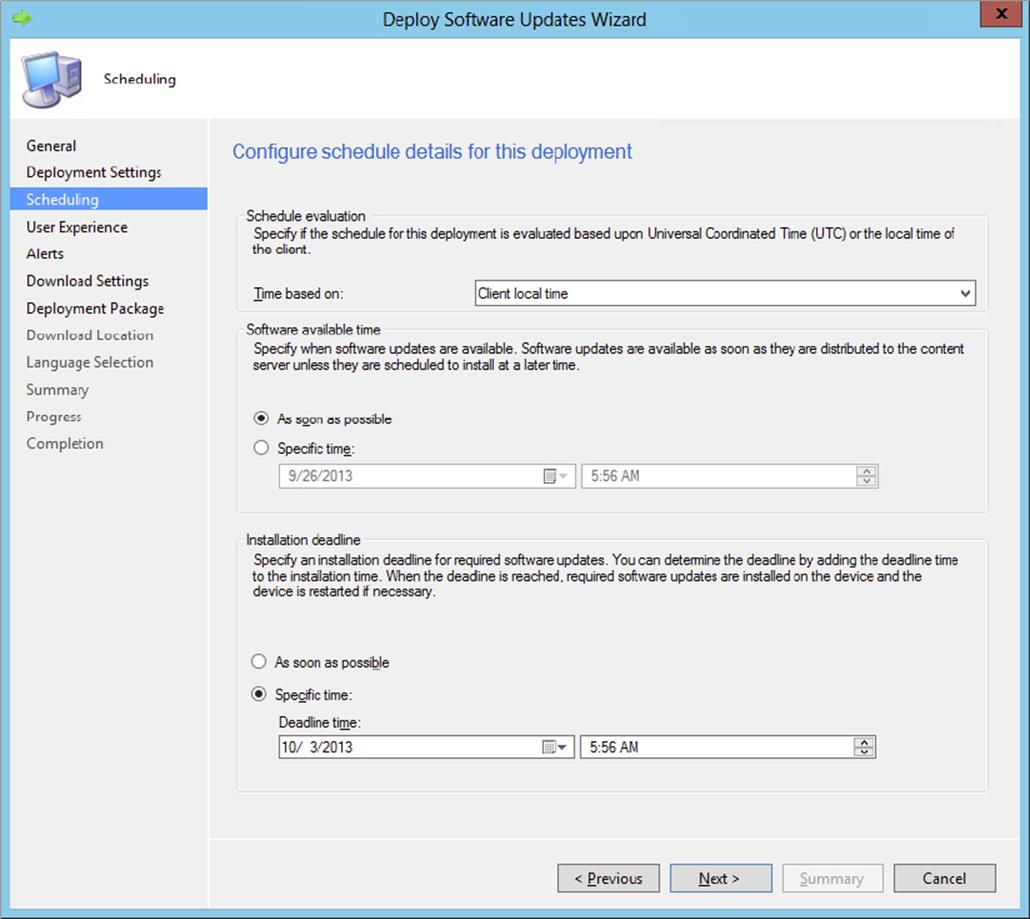
Figure 9.24 The Scheduling page
1. Schedule Evaluation Select what the scheduled time must be based on: Client Local Time (the default) or UTC.
2. Software Available Time Select the date and time when software updates will be made available to clients: As Soon As Possible (the default) or Specific Time, which allows you to set a specific date and time when clients will be able to see the deployment.
3. Installation Deadline Specify whether the software updates should automatically install on clients at a configured deployment deadline:
§ As Soon As Possible
§ Specific Time: Enabled by default, this allows you to set a date and time as a deadline for this deployment to be installed on clients.
7. Once you have made your choices on this page, click Next.
0. The software updates will be available as soon as they have been distributed to the distribution points.
1. The next step that you need to take is to configure the user experience; the options shown in Figure 9.25 can be configured.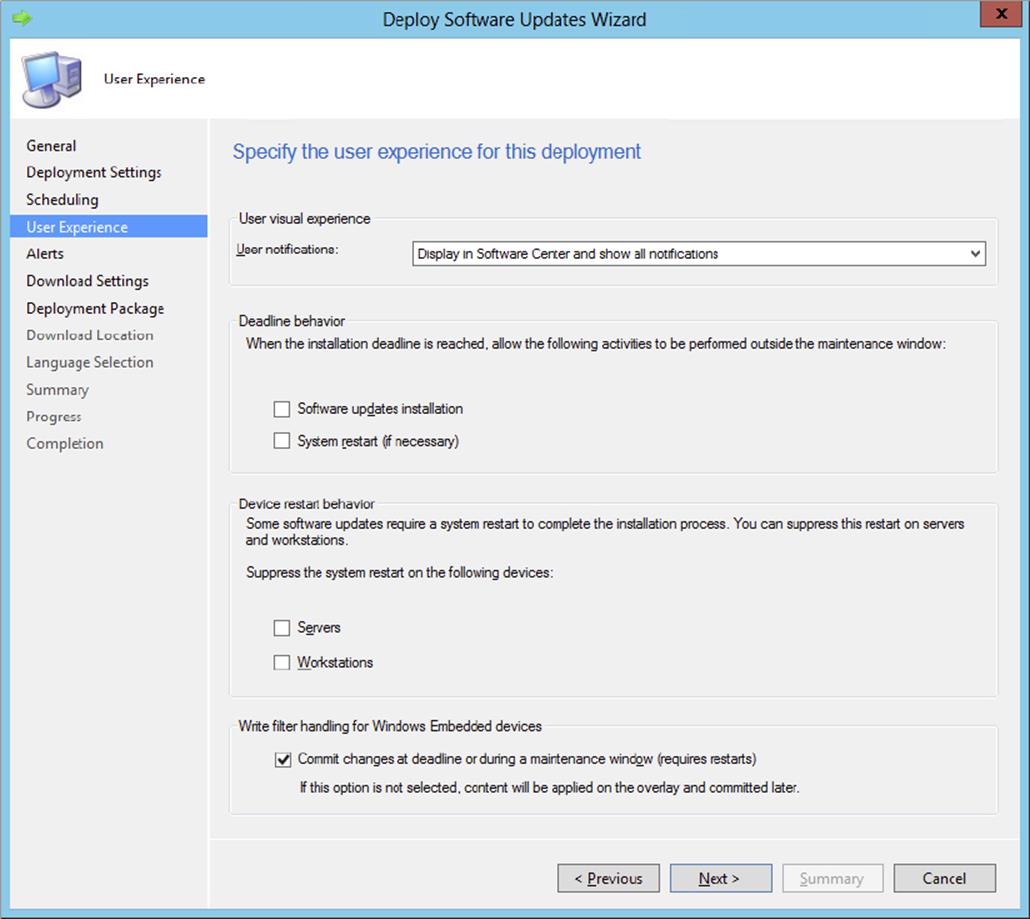
Figure 9.25 The User Experience page
2. User Visual Experience You can set several options to configure the user experience when the software updates are deployed. You can hide software update installations and notifications from your users by selecting Hide In Software Center And All Notifications or choose Display In Software Center And Show All Notifications or Display In Software Center, And Only Show Notifications For Computer Restarts if you want notifications shown to your users.
3. Deadline Behavior When an installation deadline is reached, the installation can be performed outside the maintenance window, if you want. You can configure the actions by allowing an update installation and a system restart (if necessary) outside the maintenance window.
4. Device Restart Behavior Installing software updates on workstations or servers can initiate a system restart. With this setting you can suppress a system restart on workstations and servers.
5. Write Filter Handling For Windows Embedded Devices When using Windows Embedded devices, write filters are in place to prevent the operating system from being changed by software or the users. The software updates agent in the Configuration Manager client is able to control the write filter so that the changes (software updates) are committed at the deadline or during maintenance windows. If this option is not selected, the software updates will be applied on the overlay and committed in a later stage.
8. Click Next when you have finished configuring the user experience.
With the new alerting feature in Configuration Manager 2012, you can retrieve alerts in the Configuration Manager console and take actions when required.
9. Configure the options shown in Figure 9.26 for your organizational needs, and click Next.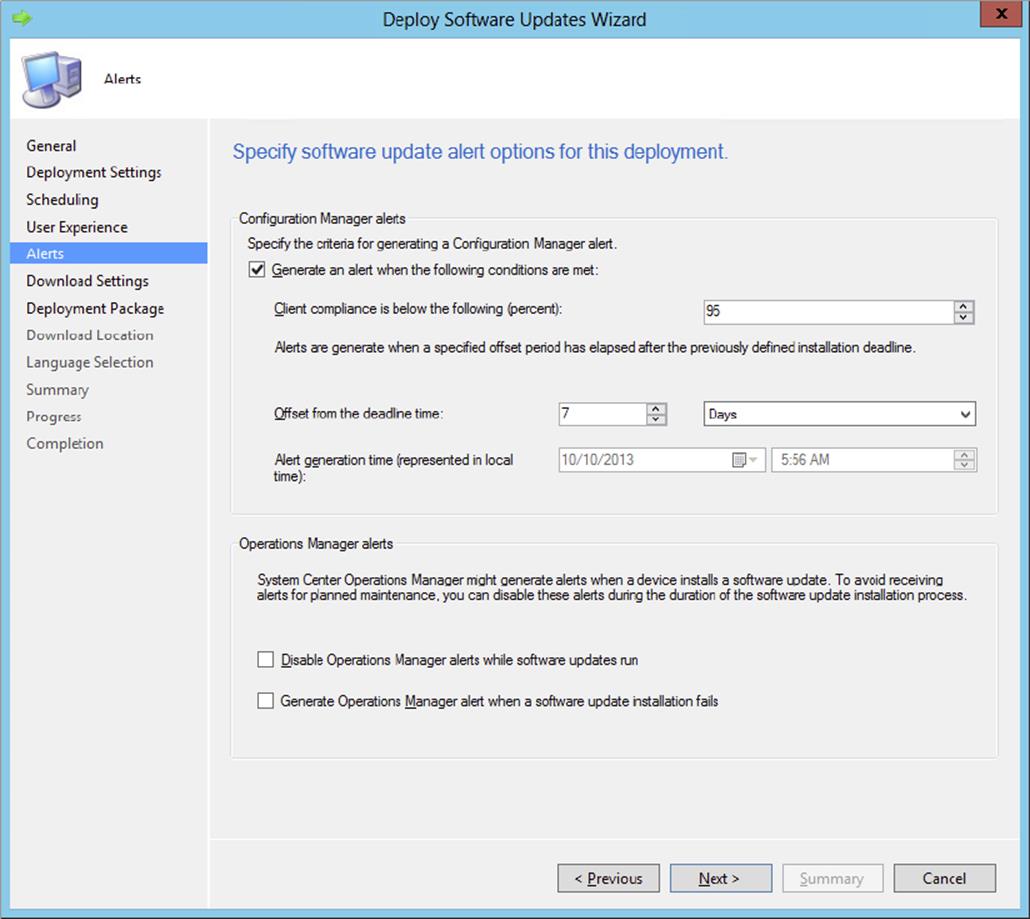
Figure 9.26 The Alerts page
0. Configuration Manager Alerts This option is disabled by default, but it is recommended that you enable this option to get more control over the compliance level of your Configuration Manager clients. When you receive an alert that your compliance level is below a selected percentage, you can proactively take action to get the compliance at the right level.
1. Operations Manager Alerts Besides handling the alerting in the Configuration Manager console, you can retrieve your alerts by using Operations Manager. In this page you can disable the alerts for the duration of the software update installation.
10.Specify the download settings for your deployment. The page is divided into four sections:
0. Download Settings For Slow Or Unreliable Network Define what to do if the Configuration Manager client is connected via a slow or unreliable network boundary. You can choose not to install the software updates or to download them from the distribution point and install them after downloading.
1. Download Settings For Non-preferred Distribution Points Define what to do if the Configuration Manager client is connected via a network boundary with an unprotected distribution point. You can choose not to install the software updates or to download them from the unprotected distribution point and install them after downloading.
2. Allow Clients To Share Content With Other Clients On The Same Subnet Select this option if you want to reduce the load on the WAN by allowing clients to download the Software Update content from other clients in the same subnet that already have downloaded and cached the content. This option uses Windows BranchCache.
3. If Software Updates Are Not Available On Preferred Distribution Point Or Remote Distribution Point, Download Content From Microsoft Updates When the Configuration Manager client has already received a new list of updates that needs to be installed but the updates are not available on the preferred distribution point or a remote one, you can allow the client to download the software updates from Microsoft Update.
4. Allow Clients On A Metered Internet Connection To Download Content After The Installation Deadline, Which Might Incur Additional Costs You can allow clients that are connected via a metered Internet connection (mobile data connection) to download their updates via this metered connection. Be aware if you enable this option that you might have extra costs for mobile data on your phone bill.
11.Click Next after configuring the download settings for the deployment.
The next step is to select an existing deployment package to add the software update to or create a new software update package.
12.Click the first Browse button on the Deployment Package page and select one of the existing packages, or create a new deployment package. Then configure the settings that you need for creating a new deployment package:
0. Name Supply the name of the deployment package; be sure it is descriptive so you can identify the deployment package when you want to add other software updates to it.
1. Description Supply the description of the deployment; be sure it is descriptive so you can identify the deployment package when you want to add other software updates to it.
2. Package Source The package source is a UNC path to a location where the source of the deployment package will be stored. The UNC path must be available for the Configuration Manager site servers.
3. Sending Priority The sending priority is used for the deployment package when it is sent to distribution points at child sites. Packages are sent in priority order from High, Medium, or Low. Packages with the same priority are sent in the order in which they were created. Unless there is a backlog, packages should process immediately no matter their priority. Medium is the default priority.
13.After configuring the deployment package, click Next, add the distribution point from which the deployment package must be available, and click Next again.
The Download Location page appears with the following options:
0. The Internet This will download the updates from the location on the Internet that is defined in the software update definition. This is the default setting.
1. A Network Location The software updates are downloaded from a local directory or shared folder that you set here. Use this setting when the site server doesn’t have Internet access. The software updates can be downloaded from any computer that does have Internet access and can be stored in a location on the local network that the site server has access to.
14.Configure where you want to retrieve the software updates from and click Next.
The Language Selection page shows the languages in which the software update files will be downloaded. By default, the languages that are configured for the software update point are selected. Adding a selection here does not add it to the software update point settings.
15.Click Next.
16.On the Summary page shown in Figure 9.27, review the options you selected.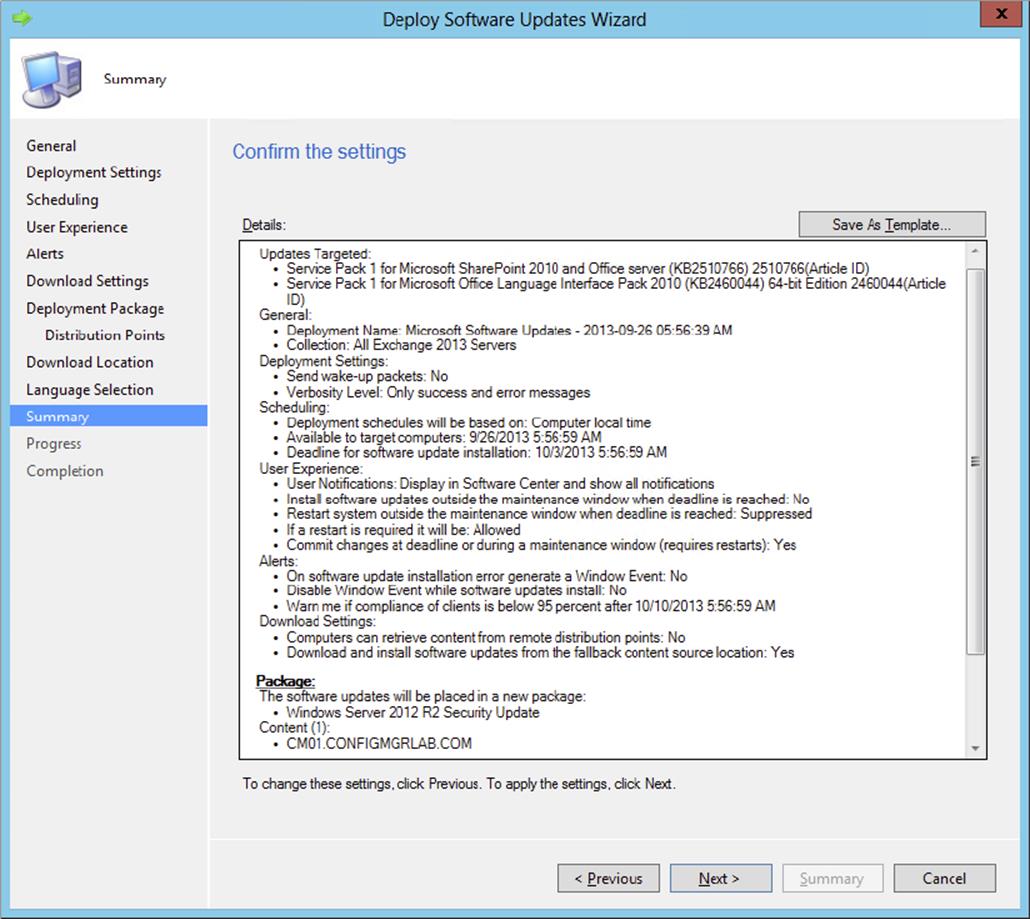
Figure 9.27 The Summary page
17.You can save all settings in a deployment template by clicking Save As Template.
A dialog with all the settings will appear, as shown in Figure 9.28.
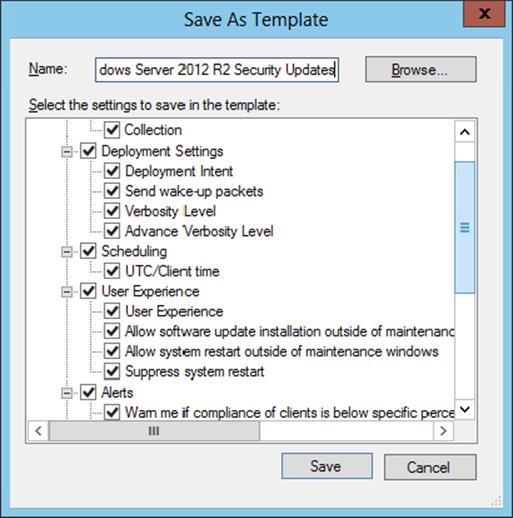
Figure 9.28 Name the deployment template
18.Name the deployment template and click Save.
19.After you have finished reviewing the Summary, click Next, and when the progress bar is done, click Close.
Using System Center Updates Publisher
With System Center Updates Publisher you can deploy software updates from third-party manufacturers. This section describes how to install and use System Center Updates Publisher.
Installing System Center Updates Publisher
After downloading the System Center Updates Publisher software and complying with the requirements, you need to install it. This section describes the installation process:
1. Go to the installation source of the System Center Updates Publisher and start SystemCenterUpdatesPublisher.MSI.
2. Click Next when the Setup Wizard starts.
3. If you are not using Windows Server 2012 and did not install the WSUS 3.0 hotfix (KB2530678), click the Install Microsoft Windows Server Update Services 3.0 SP2 Hotfix button, and download and install the hotfix, as shown in Figure 9.29.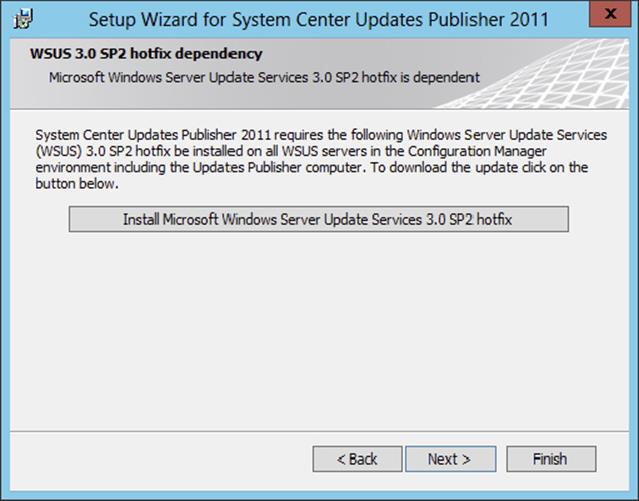
Figure 9.29 Download the WSUS 3.0 SP2 hotfix
4. Click Next.
5. Select I Accept The License Agreement, and click Next.
6. Define the installation location, and click Next twice.
7. Click Finish when the installation is complete.
Configuring System Center Updates Publisher
Next, you must configure System Center Updates Publisher so that it’s able to publish software updates to the WSUS 3.0 SP2 server:
1. Start the System Center Updates Publisher 2011 console from the Start menu within Windows.
The console will start, as shown in Figure 9.30.
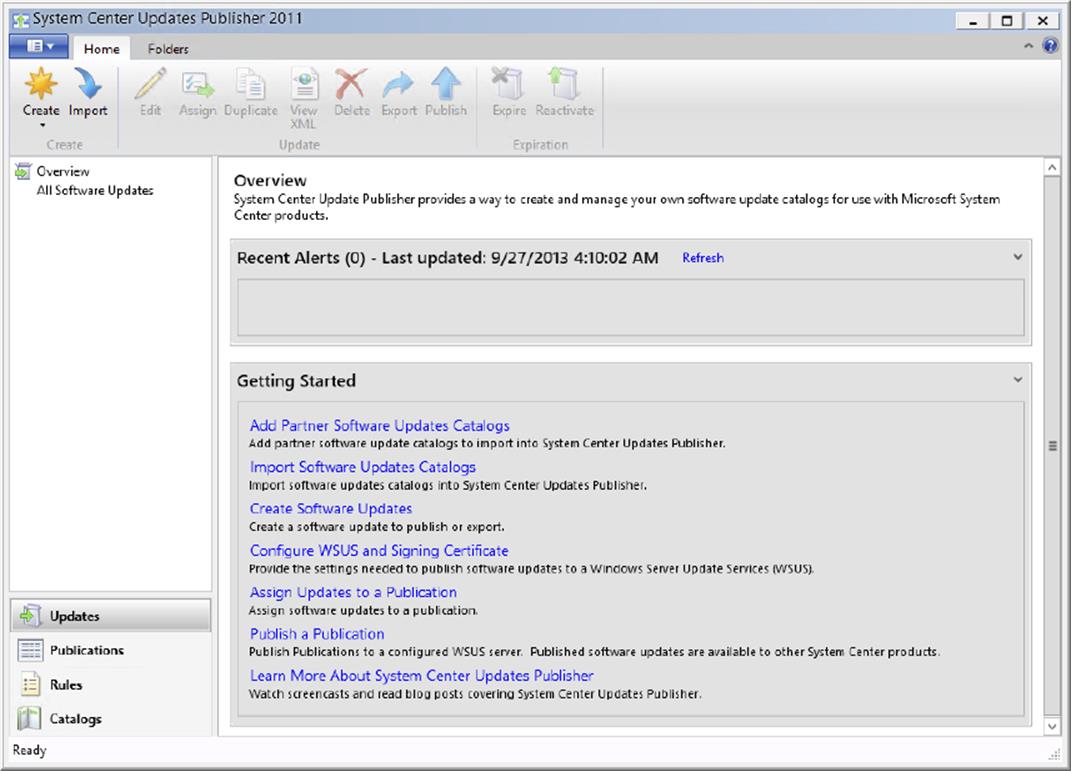
Figure 9.30 The System Center Updates Publisher 2011 console
2. Click Configure WSUS And Signing Certificate to configure the System Center Updates Publisher options, shown in the right column of the console.
1. Update Server Configure an update server by choosing Enable Publishing To An Update Server. Whether your WSUS server is installed locally or remotely, select the appropriate option to configure the WSUS server, as shown in Figure 9.31. Supply a signing certificate or create a self-signed certificate. Be sure that your computers also trust the certificates that are used to sign the software updates.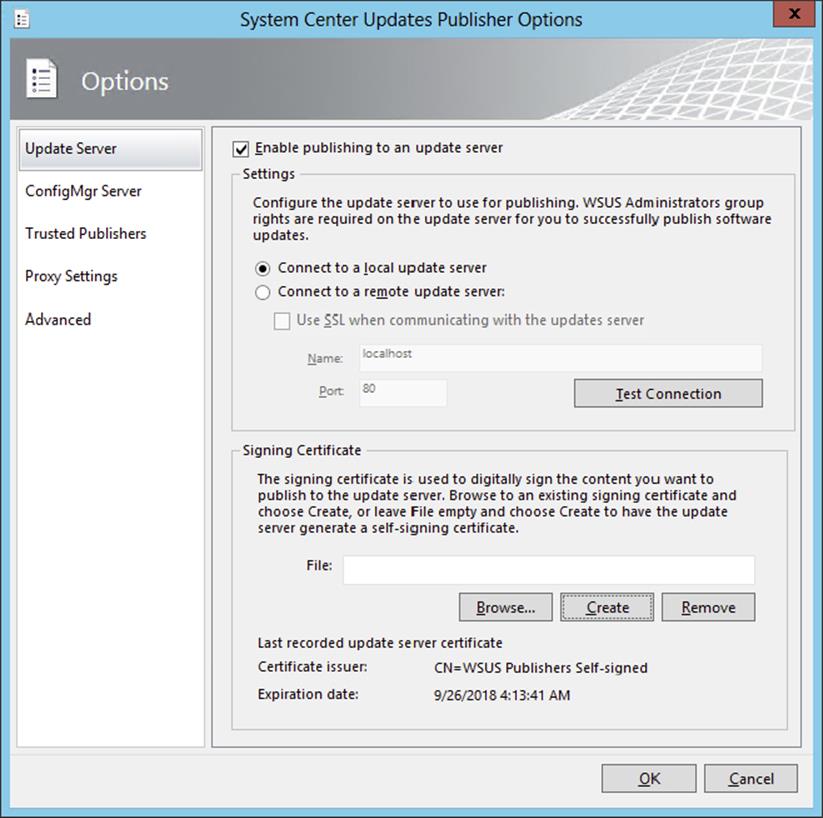
Figure 9.31 Enable publishing to an update server
2. ConfigMgr Server Configure the connection with your Configuration Manager 2012 server and test the connection. If you have installed System Center Updates Publisher on a remote server, also configure the thresholds.
3. Trusted Publishers If you accept the certificates of the publishers while importing catalogs, you can remove or view them here.
4. Proxy Settings Configure the proxy settings if you need to use a proxy to connect to the Internet.
5. Advanced If you are signing updates, you need to choose the Enable Add Timestamp When Signing Updates option. You can also configure security and local source publishing settings.
Using System Center Updates Publisher
When using System Center Updates Publisher you need to go through the following steps:
1. Add partner software updates catalogs.
2. Import updates.
3. Create rules.
4. Publish updates.
Adding Partner Software Updates Catalogs
After configuring System Center Updates Publisher, the next step is to add partner software updates catalogs.
1. Start the System Center Updates Publisher 2011 console from the Start menu within Windows.
2. Click Add Partner Software Updates Catalogs.
3. Select the partner catalogs you want to use, and add them to the Selected Partner Catalogs list, as shown in Figure 9.32.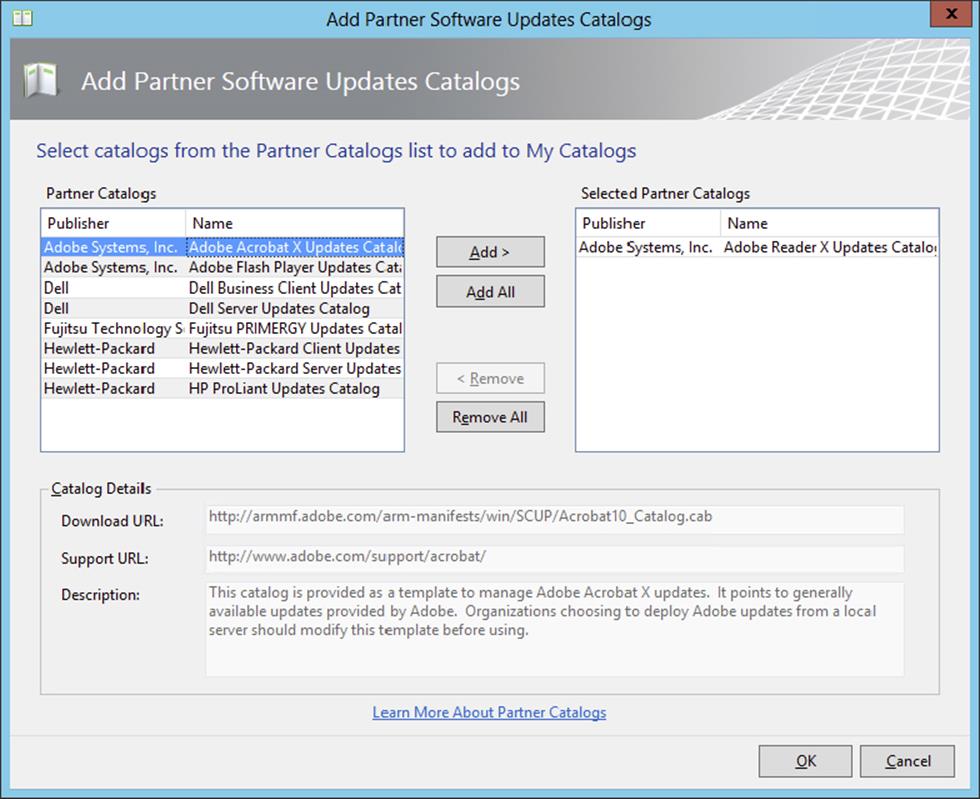
Figure 9.32 Adding partner catalogs
4. Click OK.
Importing Updates
The next step after adding the partner software updates catalogs is importing the updates to System Center Updates Publisher.
1. Start the System Center Updates Publisher 2011 console from the Start menu within Windows.
2. Click Import Software Updates Catalogs, select the update catalogs, as shown in Figure 9.33, and click Next.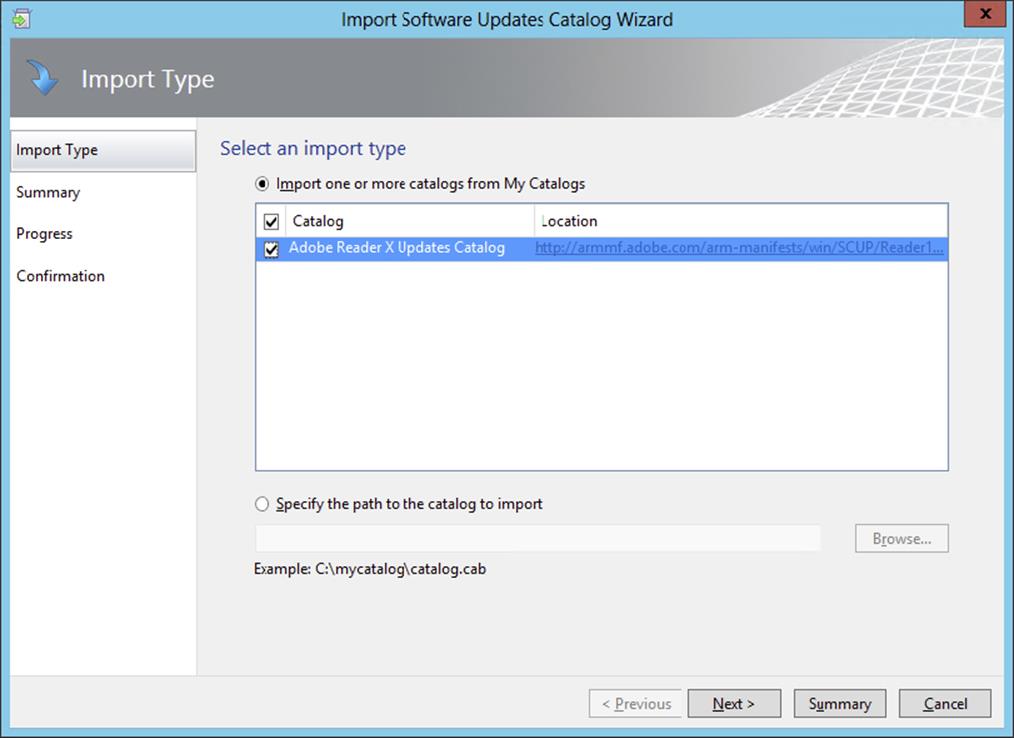
Figure 9.33 Importing the update catalogs
3. Confirm the settings and click Next.
While downloading the catalogs you will see a security warning, as shown in Figure 9.34.
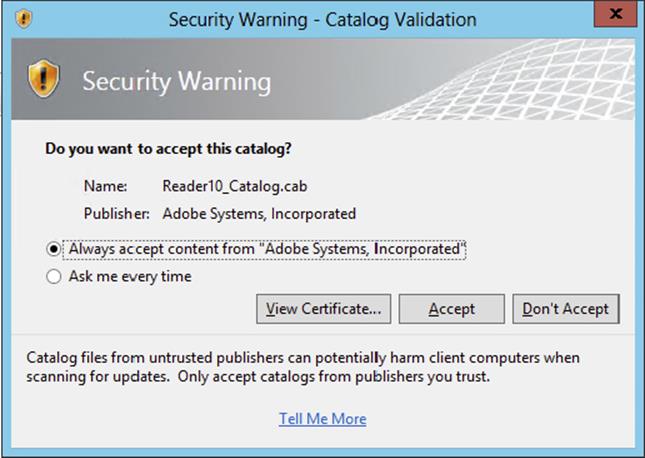
Figure 9.34 Accept the catalogs
4. Review the certificate, select Always Accept Content From “Publisher,” and click Accept.
5. Click Close once the import is ready.
Creating Rules
With applicability rules you can define which updates can be deployed on what kind of operating system.
1. Start the System Center Updates Publisher 2011 console from the Start menu within Windows.
2. Click Create on the Home tab of the ribbon in the Rules workspace.
3. Supply a rule name, and click the yellow star icon to add a rule.
You can configure different kinds of rules based on file, registry, system, or Windows Installer properties.
4. Configure the rule like the example for Windows 8 shown in Figure 9.35.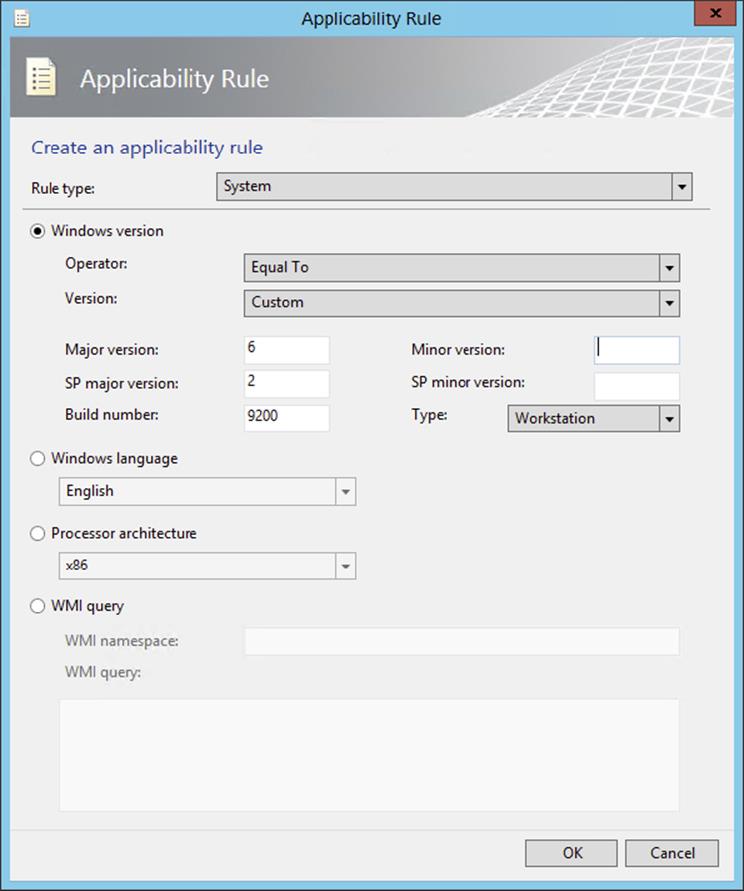
Figure 9.35 Configure the rule like you want.
You can add AND or OR operators to the statement, as shown in Figure 9.36, and click OK.
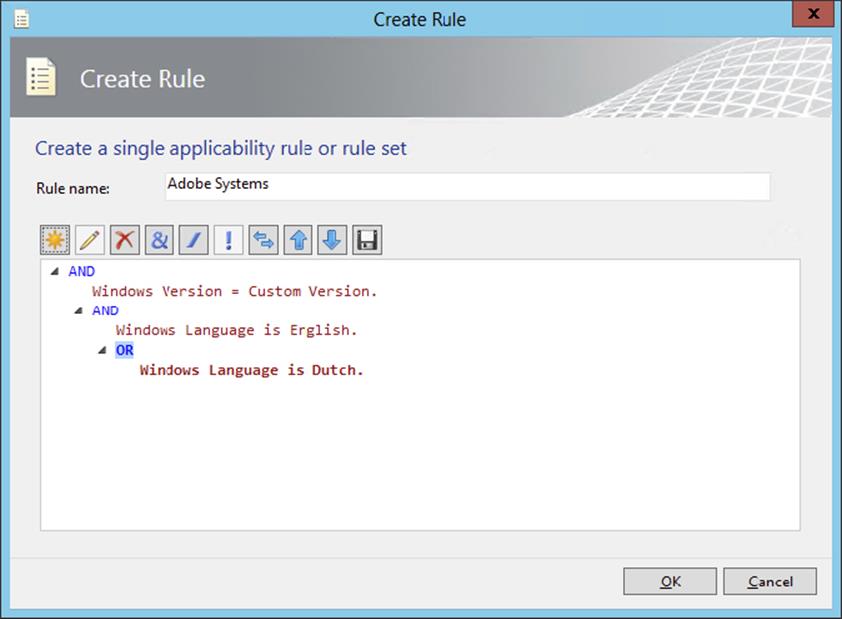
Figure 9.36 Combined rule statement
Publishing Updates
After assigning the update catalogs, importing them, and creating rules, the next step is to publish the updates to Configuration Manager 2012 so that you can deploy the updates.
1. Start the System Center Updates Publisher 2011 console from the Start menu within Windows.
2. Choose the Updates workspace, and select the updates you want to publish.
3. Click Publish on the Home tab of the ribbon.
4. Select the publish option you want, as shown in Figure 9.37.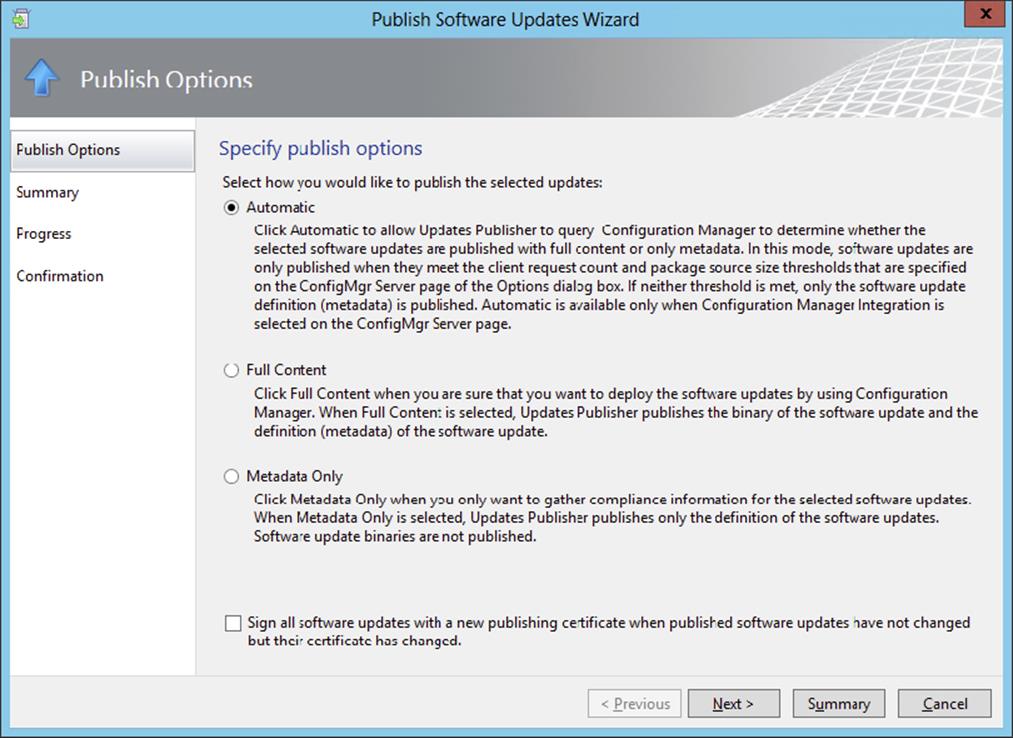
Figure 9.37 Select the appropriate publish option.
1. Automatic This option lets Configuration Manager determine whether the selected software updates are published with full content or metadata only. When you select this option, software updates are published only when they meet the client request count and package source size thresholds that are configured at the Configuration Manager Server section while configuring the connection. If the thresholds are not met, only metadata will be published.
2. Full Content When this option is selected, Updates Publisher publishes the binary and the metadata of the software update.
3. Metadata Only When this option is selected, Updates Publisher publishes the metadata of the software update.
5. Select Sign All Software Updates With A New Publishing Certificate When Published Software Updates Have Not Changed But Their Certificate Has Changed, and click Next.
6. Confirm the settings and click Next.
7. After the updates are published, as shown in Figure 9.38, click Close.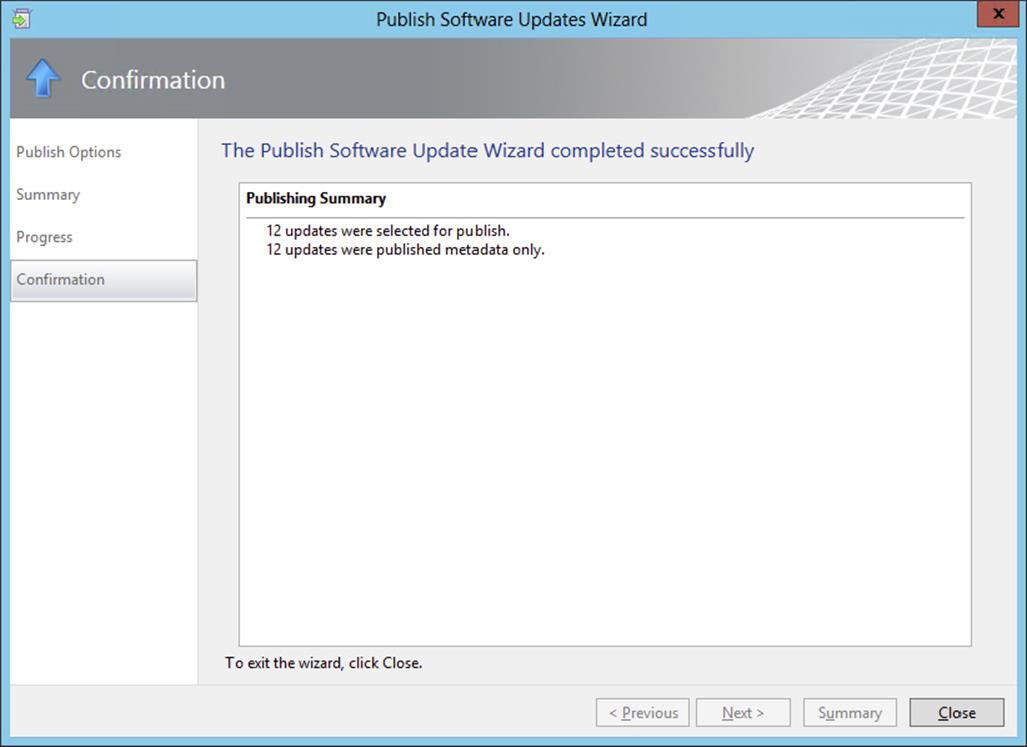
Figure 9.38 Confirmation page of the Publish Software Updates Wizard
Third-Party Updates in Configuration Manager
To be able to deploy the third-party software updates with Configuration Manager, you need to configure the software update point component to also synchronize the software updates:
1. In the Configuration Manager console choose the Administration workspace ⇒ Overview ⇒ Site Configuration ⇒ Sites and select the highest site in the hierarchy.
2. Choose Configure Site Components on the Settings section of the Home tab of the ribbon, and click software update point.
3. To configure the third-party software updates, click the Products tab, as shown in Figure 9.39. If the third-party updates are not yet available, manually synchronize the software updates.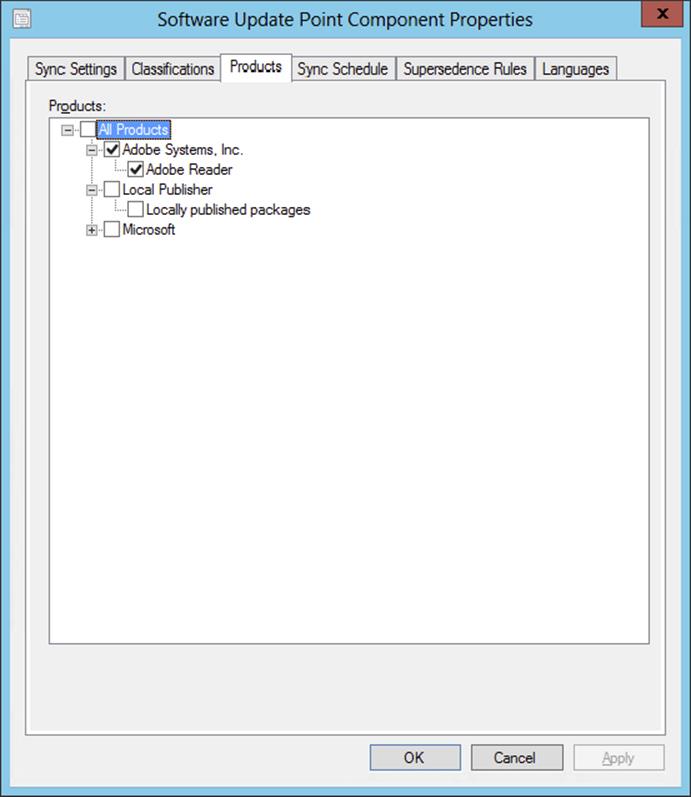
Figure 9.39 Select the third-party updates.
4. After you synchronize the software updates, the third-party updates will become available in Configuration Manager, as shown in Figure 9.40.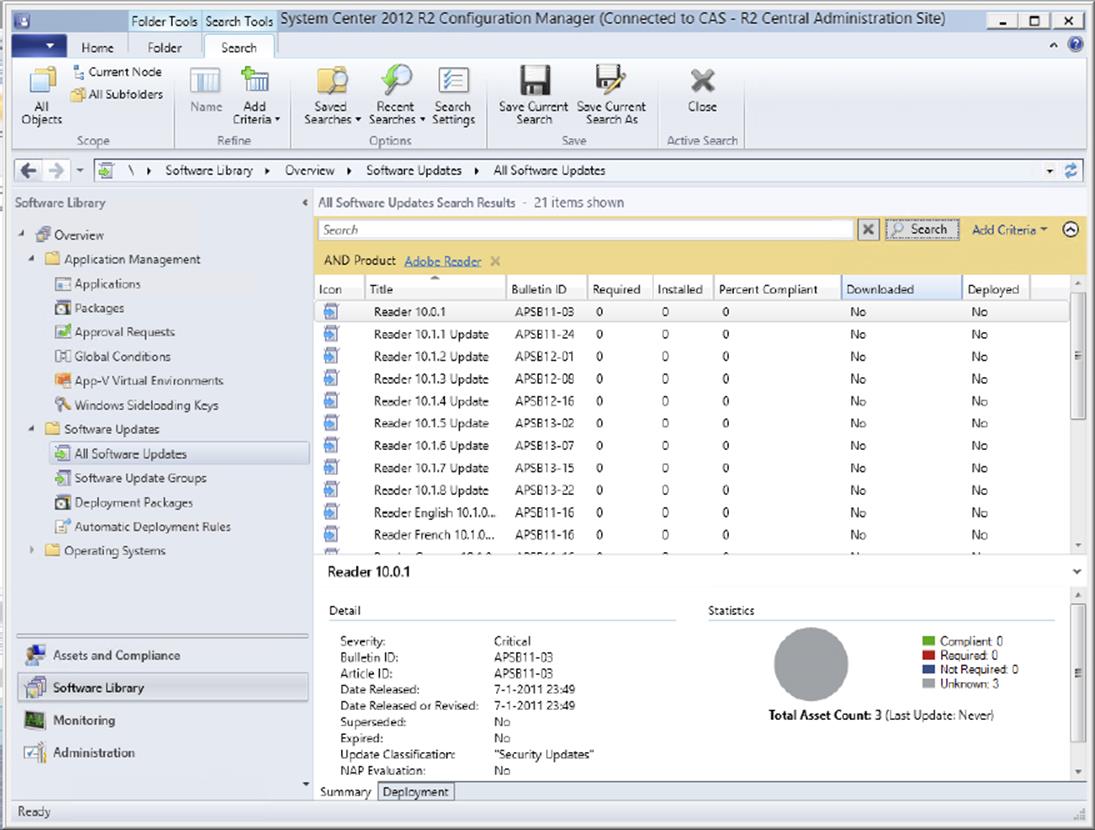
Figure 9.40 The third-party updates are available in Configuration Manager.
These updates can be deployed like every other software update in the Software Updates feature.
Monitoring Software Update Deployments
Configuration Manager 2012 offers in-console monitoring. You can see the compliancy level per deployment.
In-Console Monitoring
You can find in-console monitoring of software update deployment in the Configuration Manager 2012 console at several places. The error codes are explained, so you can find the solution instantly.
Monitoring per Software Update
When you select a software update in the All Software Updates repository, the statistics of the software update appear. In the Statistics part of the summary in Figure 9.41, you are able to see how many systems are compliant, how many systems don’t need the update, where the update is required, and where the status is unknown.
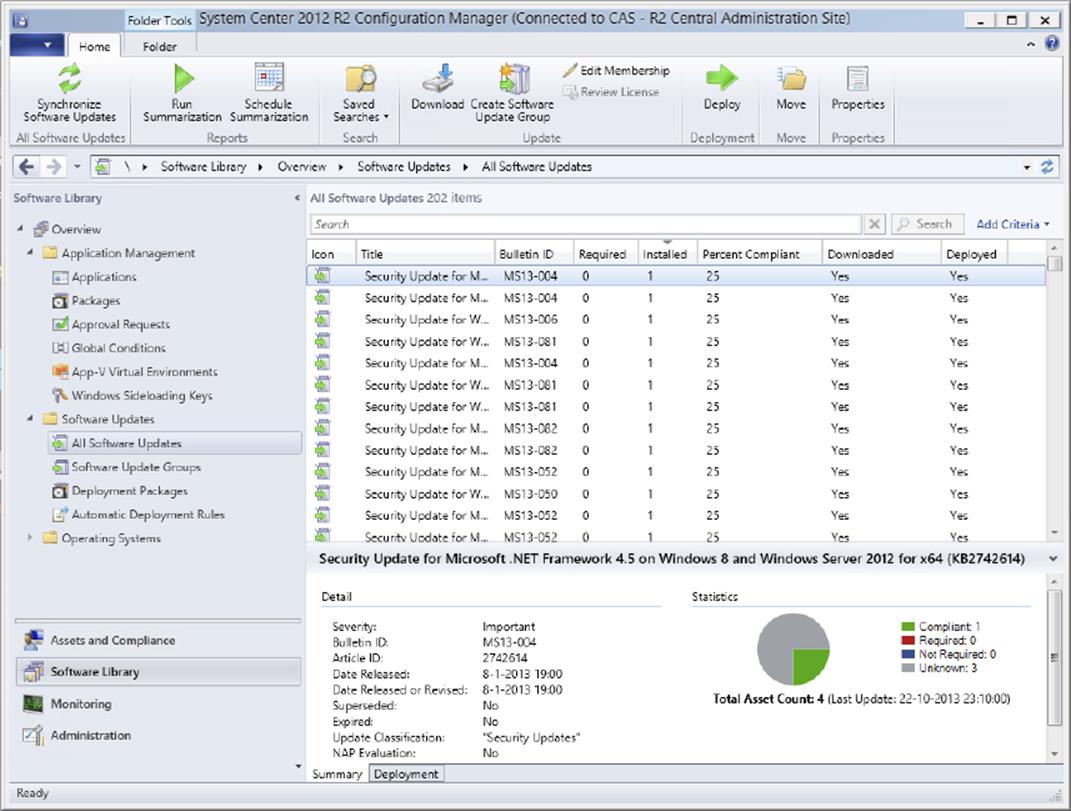
Figure 9.41 In-console statistics per update
Monitoring per Deployment
When you deploy the updates, you can see the deployment status per deployment. The deployment status contains the following categories and subcategories. The deployment status in Figure 9.42 shows how many systems are compliant, how many systems are in the process of installing the updates, how many systems have an error, and where the status is unknown.
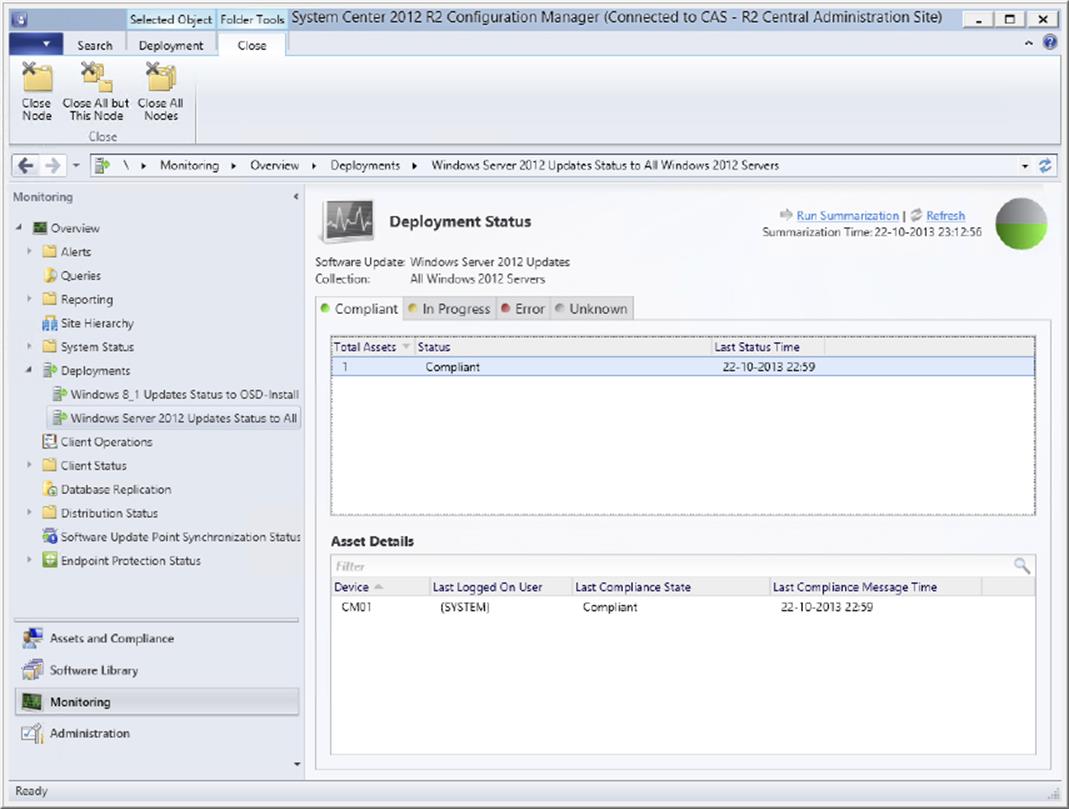
Figure 9.42 In-console statistics per update deployment
1. Status: Unknown This status says that the status messages of the Configuration Manager clients have not yet been received by the management point of the primary site. The following subcategories are available:
· Devices Unhealthy/Active
· Devices Healthy/Inactive
· Devices Healthy/Active
2. Status: Error Errors can occur when you deploy software updates. This category shows all the devices that have had an error while deploying the software updates. The following subcategories and error descriptions are available:
· Scan Tool Policy Not Found.
· Network Connection: Windows Update Agent Encountered An Error.
· Policy Platform Client: Data Is Invalid.
· Fatal Error During Installation.
· Pre Install Scan Failed.
· Software Update Still Detected As Actionable After Apply.
· Unknown Error (-2147012744).
· Class Not Registered.
· Access Is Denied.
· Unspecified Error.
3. Status: In Progress The In Progress status displays all devices that are preparing for the deployment of a software update or are currently receiving a deployment.
4. The following subcategories are available:
· Downloading Update(s)
· Downloaded Update(s)
· Installing Update(s)
5. Compliant When the devices are compliant, you will see all the assets that are compliant.
When selecting a system in the Asset Details part of the Deployment Status screen, you can retrieve additional details about the system by right-clicking the system and choosing More Details. In the Asset Manage dialog shown in Figure 9.43, you can view the information about the deployment.
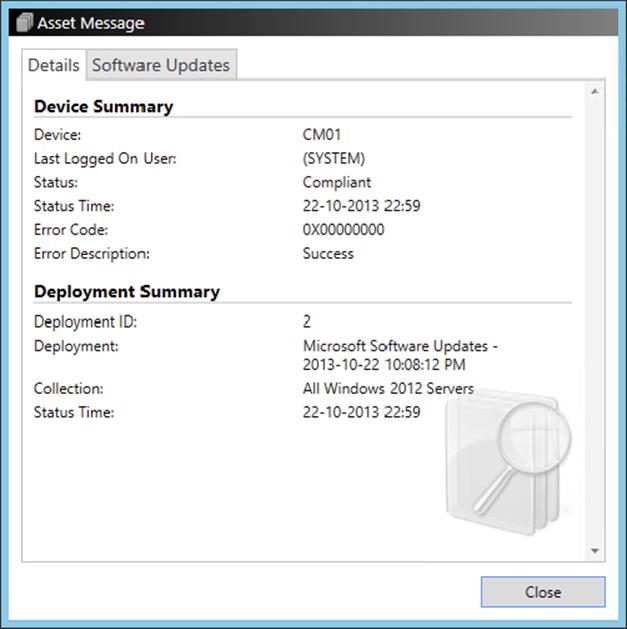
Figure 9.43 Details about the software update deployment
Software Update Point Synchronization Status
Besides examining the log files as described earlier, you can monitor the software update point synchronization status from the console.
To monitor the synchronization in the hierarchy, do the following:
1. In the Configuration Manager console, choose the Monitoring workspace ⇒ Overview ⇒ software update point Synchronization Status.
2. Examine the synchronization status, the link state, and the catalog version, as shown in Figure 9.44.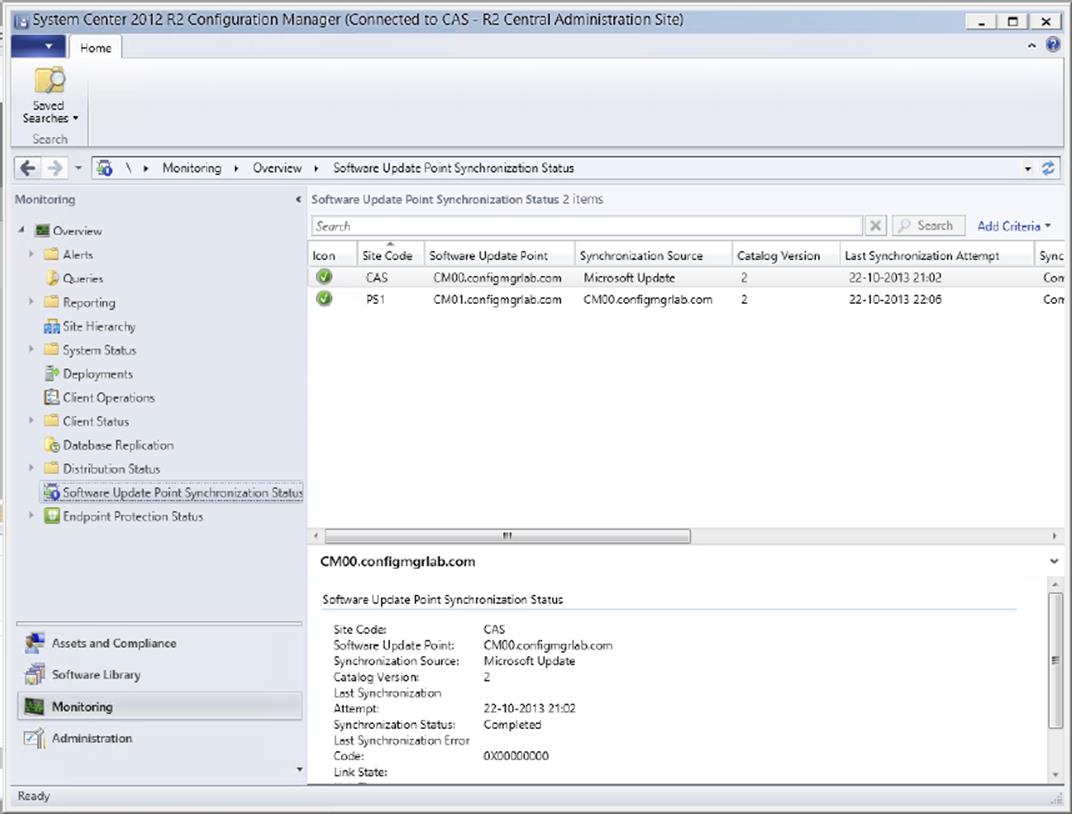
Figure 9.44 Software Update Point Synchronization Status
Reporting
The Configuration Manager client software performs two main phases of the software deployment process:
1. Evaluation Configuration Manager clients determine if the software updates in a deployment are required.
2. Enforcement Clients report their compliance state for the deployment.
Microsoft provides excellent reports to monitor the phases of software update deployments in Configuration Manager 2012, and these reports are considered the best way to monitor the software update deployments. Those reports can be found in the Software Updates - C Deployment States category in the Reports node in the Configuration Manager console.
To monitor the evaluation phase of software update deployments, you should use the following three main reports:
1. States 2 - Evaluation States For A Deployment This report will give you a summary of the evaluation state of clients for a selected deployment and will provide information as to whether clients were able to evaluate a deployment successfully.
2. States 4 - Computers In A Specific State For A Deployment (Secondary) You can drill down into this report to get more information about clients in a specified deployment state.
3. States 7 - Error Status Messages For A Computer (Secondary) You can use this report to get all error message information for a deployment on a specific computer.
To monitor client enforcement for software update deployments, there are also three main reports that you should use:
1. States 1 - Enforcement States For A Deployment This report gives a summary of the enforcement state of clients for a specific deployment. It shows information on the state for installing the updates in the deployment, such as downloading the update, installing the update, successfully installing the update, and so on.
2. States 4 - Computers In A Specific State For A Deployment (Secondary) You can drill down into this report to get more information about clients in a specified deployment state.
3. States 7 - Error Status Messages For A Computer (Secondary) You can use this report to get all error message information for a deployment on a specific computer.
![]()
Become Familiar with What Needs to Be Updated and Implement Software Updates
Now that you have deployed Configuration Manager and have Software Updates up and running, your manager wants you to make a concentrated effort to get clients up to date with critical security patches. He has made it clear that these are to be given priority over other updates until the numbers of required patches are down to a reasonable level, which is not the case now.
To accomplish your new software update initiative, you must first figure out what patches need to be installed on which computers.
One way to do this is to set up search criteria for each operating system that you support, listing all the critical security patches. With those search criteria, you highlight all the security patches that are required by your clients and make an update group out of them.
Once you have done that, you can either download all the updates and put them on your distribution points, or you can start a deployment directly from the update group and configure downloading those updates as part of that update.
The procedures that we have detailed earlier in the chapter for configuring the different elements of Software Updates were made with that method of organization in mind.
The Bottom Line
1. Plan to use Software Updates. You can use the same method of deployment intelligence that was used in Chapter 2 to gather information for planning to implement Software Updates. This will be very helpful in making sure that you get the most out of the Software Updates feature for your organization.
1. Master It What is the first step in gathering deployment intelligence when you are planning to implement Software Updates?
2. Configure Software Updates. Before you can utilize Software Updates in your environment, you must set up and configure the various components of this feature.
1. Master It What is the first thing you have to install before you can use Software Updates?
3. Use the Software Updates feature to manage software updates. The hardest thing to do in SMS 2003 relating to patch management was to programmatically prioritize software updates that are critical so they can be deployed with a higher priority than other updates.
1. Master It What does Configuration Manager provide that can help with prioritizing software updates?
4. Use automatic update deployment to deploy software updates. When you deployed software in Configuration Manager 2007, you deployed software updates through a procedure that consumed a lot of time.
1. Master It Configuration Manager has a new feature called Automatic Deployment Rules. What kinds of updates are suitable to deploy via the automatic deployment rules?
All materials on the site are licensed Creative Commons Attribution-Sharealike 3.0 Unported CC BY-SA 3.0 & GNU Free Documentation License (GFDL)
If you are the copyright holder of any material contained on our site and intend to remove it, please contact our site administrator for approval.
© 2016-2026 All site design rights belong to S.Y.A.