T-SQL Querying (2015)
Chapter 6. Data modification
This chapter covers topics related to data modification. It’s not meant to provide exhaustive coverage of all data modification features in Microsoft SQL Server; rather, it focuses on the more pragmatic and perhaps less trivial aspects of some of the features.
The chapter covers data insertion, focusing mainly on bulk-import tools. It discusses the sequence object, comparing and contrasting it with the identity column property. It covers aspects of deleting, updating, and merging data. It also discusses the OUTPUT clause, demonstrating some of its practical uses.
Inserting data
SQL Server supports a number of tools you can use to insert data into your tables. Some of those tools use bulk-load optimizations, and those tools are the focus of this section.
The section starts with a discussion about the SELECT INTO command. It then continues with a discussion about additional bulk-import tools and the requirements they need to meet to be processed with minimal logging. The section then provides examples for using the flexible bulk rowset provider.
SELECT INTO
The SELECT INTO command creates a new table containing the result set of a query. It copies from the source the base definition (column names, types, collation, nullability, and identity property) and the data. It doesn’t copy constraints, indexes, triggers, and permissions.
Before I demonstrate the use of SELECT INTO, run the following code to make sure the table MyOrders doesn’t exist in the database PerformanceV3:
SET NOCOUNT ON;
USE PerformanceV3;
IF OBJECT_ID(N'dbo.MyOrders', N'U') IS NOT NULL DROP TABLE dbo.MyOrders;
Run the following SELECT INTO statement to create the MyOrders table with a copy of the rows from the Orders table:
SELECT orderid, custid, empid, shipperid, orderdate, filler
INTO dbo.MyOrders
FROM dbo.Orders;
The execution plan for this query is shown in Figure 6-1.

FIGURE 6-1 Parallel SELECT INTO.
Observe that the plan handles SELECT INTO with parallelism. This capability was added in SQL Server 2014.
One of the benefits of SELECT INTO is its efficiency, especially when satisfying the requirements for minimal logging. When the target database-recovery model is full, the operation is processed with full logging. The same applies when the recovery model isn’t full but transactional replication is enabled. However, when the recovery model is simple or bulk-logged, and transactional replication isn’t enabled, the operation is processed with minimal logging. This means that only information required for undo purposes is logged; information for redo and point-in-time recovery purposes is not logged. Because SELECT INTO allocates full extents, changes to allocation bitmaps (GAM, IAM, PFS) are logged, but the actual inserted data is not logged. The difference in the amount of logging between minimal and full logging can be quite dramatic. For example, to populate a table with a gigabyte of data, SQL Server needs to log only a few megabytes under minimal logging versus a whole gigabyte under full logging. See the section “Measuring the amount of logging” for details on how to measure the amount of logging involved in an operation.
If a source column has an identity property, normally the property is copied to the target. If you do not want to copy the property, apply manipulation to the source column, such as ISNULL(col1, 0) AS col1.
If you need to create a new target column with an identity property, use the IDENTITY function. Note, though, that even if you specify an ORDER BY clause in the query, there’s no assurance that the identity values generated will reflect that order. If you need such a guarantee, use the INSERT SELECT statement instead. For details, see http://support.microsoft.com/kb/273586.
If you need a target column to have a different data type than the source column, you can cast the source column to the desired type, as in CAST(col1 AS BIGINT) AS col1. Note that such manipulation will make the result column nullable regardless of the nullability of the source column. You can use the ISNULL function to cause the target column to be defined as NOT NULL, as in ISNULL(CAST(col1 AS BIGINT), 0) AS col1.
I mentioned and demonstrated that SQL Server 2014 introduced parallel processing of SELECT INTO. Another improvement in SQL Server 2014 (also backported to SQL Server 2012 in Service Pack 1 (SP1) Cumulative Update (CU) 10) is in the way eager writes are handled when the target table is a temporary table. You can find details about the improvement here: http://blogs.msdn.com/b/psssql/archive/2014/04/09/sql-server-2014-tempdb-hidden-performance-gem.aspx. Eager writes quickly flush dirty pages associated with bulk operations to disk so that SQL Server won’t have to wait for the entire operation to finish before writing the pages to disk. This helps prevent bulk operations from flooding the memory with new pages, but then again, it causes physical I/Os. The gist of the improvement is that when performing bulk operations in tempdb, like SELECT INTO against a temporary table, the eager-writing behavior is relaxed, not forcing the flushing of dirty pages as quickly as before. This can be beneficial when creating temporary tables, querying them, and dropping them quickly. Now such work can be done with a reduced number of physical I/Os or none at all.
Compared to INSERT SELECT, the SELECT INTO statement is much simpler to use because you don’t need to create the table yourself before copying the data. However, SELECT INTO has its downsides. One drawback is that it doesn’t allow you to specify the target filegroup. It uses the target database’s default filegroup. Another drawback is that because the statement combines both DDL and DML, until the transaction completes, not only is the target table’s data exclusively locked, so is the metadata. This can cause blocking related to metadata access as I will demonstrate.
First, run the following code to drop the MyOrders table if it exists:
USE PerformanceV3;
IF OBJECT_ID(N'dbo.MyOrders', N'U') IS NOT NULL DROP TABLE dbo.MyOrders;
Open two connections. Run the following code in connection 1 to begin a user transaction and to execute a SELECT INTO statement:
USE PerformanceV3;
BEGIN TRAN
SELECT orderid, custid, empid, shipperid, orderdate, filler
INTO dbo.MyOrders
FROM dbo.Orders;
Imagine the source table was really big and it took the statement some time to complete. I’m mimicking a long-running SELECT INTO statement by leaving the transaction open. Until the transaction completes, both the data and metadata generated by the operation are exclusively locked.
In connection 2, run the following query against sys.tables to get the set of tables in the database:
USE PerformanceV3;
SELECT SCHEMA_NAME(schema_id) AS schemaname, name AS tablename FROM sys.tables;
This query is blocked when running under the default isolation level Read Committed. That’s because the session needs a shared lock in order to read a resource (the row in sys.tables in this example), and the request is blocked when another session is holding an exclusive lock on the same resource.
Run the following code in connection 1 to commit the transaction:
COMMIT TRAN
Now that the SELECT INTO transaction committed, it released all locks, so the query in connection 2 completes after the session manages to acquire the shared lock it was waiting for.
The alternative solution is to create the target table in one quick transaction, and then in another transaction use the INSERT SELECT statement to populate it. This way, at least you won’t face long blocking situations related to metadata access.
Bulk import
Besides SELECT INTO, SQL Server supports other tools that can insert data into your tables and benefit from bulk optimizations: the bcp.exe utility, the BULK INSERT command, INSERT SELECT with the bulk rowset provider (more on this in a separate section), and INSERT SELECT with a local query. These tools are collectively referred to as bulk-import tools.
Like SELECT INTO, the remaining bulk-import tools can be processed with minimal logging, albeit with a longer list of requirements that they need to meet. The requirements are as follows:
 The recovery model of the database has to be simple or bulk-logged. Under full recovery, you get full logging.
Transactional replication is not enabled. If transactional replication is enabled, you get full logging even when the recovery model is not full.
If the table is a heap
• The table doesn’t have to be empty.
• You have to specify the TABLOCK option. Note that for bcp.exe, BULK INSERT, and the bulk rowset provider, this option represents a bulk update lock, which allows multiple processes to bulk load data into the same target table simultaneously. For INSERT SELECT with a local query, this option represents a full-blown exclusive table lock, so only one process can insert data into the table at a time.
If the table is a B-tree (clustered), any of the following will do:
• The table is empty, and you specify the TABLOCK option.
• The table is empty, and trace flag 610 is enabled.
• The table is nonempty, trace flag 610 is enabled, and you insert a new key range; the new page allocations are minimally logged.
The requirements for minimal logging are summarized with the following logical expression:
non-FULL recovery model AND transactional replicated not enabled
AND ( Heap AND TABLOCK
OR B-tree
AND ( empty AND ( TABLOCK OR TF-610 )
OR nonempty AND TF-610 AND new key-range ) )
When inserting data using the INSERT EXEC and MERGE statements, you get full logging.
For more information about tuning data-loading operations, see “The Data Loading Performance Guide” at: http://msdn.microsoft.com/en-us/library/dd425070.aspx.
Measuring the amount of logging
I described the requirements that your bulk-import operation needs to meet in order to be processed with minimal logging. But what if you want to know how much logging is involved? For this purpose, I use the undocumented function fn_dblog. This function returns the transaction log records of the current database for the range of log serial numbers (LSNs). If you want to get back all transaction log records, provide two NULLs as inputs.
As an example, the following query returns the count and total size of all log records in the PerformanceV3 database:
USE PerformanceV3;
SELECT COUNT(*) AS numrecords, SUM(CAST([Log Record Length] AS BIGINT)) / 1048576. AS sizemb
FROM sys.fn_dblog(null, null);
To measure the logging caused by a specific operation, you will want to capture the information before and after the operation and capture it in the same transaction to avoid log truncation, and compute the delta between the captures. I also invoke the CHECKPOINT command manually to force writing dirty pages to disk before and after taking the measurement.
I’ll start by demonstrating a fully logged SELECT INTO operation in the PerformanceV3 database. First run the following code to set the database recovery model to full and back up the database to get out of log-truncate mode (make sure the path C:\temp\ exists or alter the path to an existing one on your system):
ALTER DATABASE PerformanceV3 SET RECOVERY FULL;
BACKUP DATABASE PerformanceV3 TO DISK = 'C:\temp\PerfV3Data.BAK' WITH INIT;
BACKUP LOG PerformanceV3 TO DISK = 'C:\temp\PerfV3Log.BAK' WITH INIT;
Run the following code to measure the logging caused by a SELECT INTO statement:
CHECKPOINT;
BEGIN TRAN
DECLARE
@numrecords AS INT, @sizemb AS NUMERIC(12, 2), @starttime AS DATETIME2, @endtime AS DATETIME2;
-- Drop table if exists
IF OBJECT_ID(N'dbo.MyOrders', N'U') IS NOT NULL DROP TABLE dbo.MyOrders;
-- Stats before import
SELECT
@numrecords = COUNT(*),
@sizemb = SUM(CAST([Log Record Length] AS BIGINT)) / 1048576.
FROM sys.fn_dblog(null, null);
SET @starttime = SYSDATETIME();
-- Import data
SELECT orderid, custid, empid, shipperid, orderdate, filler
INTO dbo.MyOrders
FROM dbo.Orders;
-- Stats after import
SET @endtime = SYSDATETIME();
SELECT
COUNT(*) - @numrecords AS numrecords,
SUM(CAST([Log Record Length] AS BIGINT)) / 1048576. - @sizemb AS sizemb,
DATEDIFF(ms, @starttime, @endtime) AS durationms
FROM sys.fn_dblog(null, null);
COMMIT TRAN
-- Cleanup
IF OBJECT_ID(N'dbo.MyOrders', N'U') IS NOT NULL DROP TABLE dbo.MyOrders;
CHECKPOINT;
This code generated the following output in my system:
numrecords sizemb durationms
----------- ------------- -----------
65627 194.84907745 1109
The SELECT INTO statement copied 1,000,000 rows with a length of 195 bytes from the Orders table into the MyOrders table. The size of the data written to the target table is about 195 MB, and as you can see, the size of the data logged is about that much.
To test minimal logging, first set the database recovery model to Simple by running the following code:
ALTER DATABASE PerformanceV3 SET RECOVERY SIMPLE;
Next, rerun the code that tests the SELECT INTO statement. The code generated the following output in my system:
numrecords sizemb durationms
----------- ----------- -----------
41208 2.47408676 957
Notice the significant reduction in the amount of logging.
BULK rowset provider
The bcp.exe utility and the BULK INSERT command are traditional tools used to import data from a file into a table. They do give you a number of options to control the import (terminators, rows per batch, and so on), but they don’t give you the most basic options that a normal query gives you (filter, join, apply calculations, and so on). Fortunately, SQL Server has a feature called bulk rowset provider you can use to import file data and that has support for query-manipulation capabilities.
You use the bulk rowset provider via the OPENROWSET function. You specify the input file, a format file like the one you use with bcp.exe and BULK INSERT, and optionally additional bulk options (rows per batch, error file, and others). The beauty of this feature is that the OPENROWSET function is consumed like a table by a query and, as such, allows the usual query-manipulation capabilities.
To demonstrate the feature, I’ll query and import data from files I placed in my C:\temp\ folder. If you want to run the examples in your environment, download the book’s compressed source code file (available at http://tsql.solidq.com/books/tq3/) and place the files from the source temp folder in your C:\temp\ folder.
The file Shippers.txt contains shipper information that I originally exported from the Sales.Shippers table in the TSQLV3 database. To support future imports, I also created a format file called Shippers.fmt by using the bcp.exe utility with the format option, like so (from a command prompt with the right server and instance names):
bcp TSQLV3.Sales.Shippers format nul -c -f C:\temp\Shippers.fmt -T -S <server\instance_name>
Here’s how you use the OPENROWSET function with the bulk rowset provider to query the Shippers.txt file based on the Shippers.fmt format file:
SELECT shipperid, companyname, phone
FROM OPENROWSET(BULK 'C:\temp\Shippers.txt',
FORMATFILE = 'C:\temp\Shippers.fmt') AS F;
This code generates the following output:
shipperid companyname phone
---------- ----------------- ---------------
1 Shipper GVSUA (503) 555-9831
2 Shipper ETYNR (503) 555-3199
3 Shipper ZHISN (503) 555-9931
That’s just amazingly simple!
Because you consume the OPENROWSET function in the FROM clause like a table, you can apply the usual query-manipulation capabilities. For example, suppose you had a table called TargetTable in your database, and you wanted to import into it only shippers from the file that have a phone number that starts with (503) 555-9. You filter the data using the normal query WHERE clause, like so:
INSERT INTO TargetTable WITH (TABLOCK) (shipperid, companyname, phone)
SELECT shipperid, companyname, phone
FROM OPENROWSET(BULK 'C:\temp\Shippers.txt',
FORMATFILE = 'C:\temp\Shippers.fmt') AS F
WHERE phone LIKE '(503) 555-9%';
Notice the use of the TABLOCK option to enable minimal logging.
You can also use the bulk rowset provider in a single mode to query and return the contents of a file as a rowset with a single row and a single large-object-typed column. You specify one of three options: SINGLE_NCLOB for Unicode character data, SINGLE_CLOB for regular character data, and SINGLE_BLOB for binary data. Placing such a query in parentheses makes it a scalar self-contained subquery; as such, it can be used as a scalar expression in INSERT and UPDATE statements.
To demonstrate the use of the bulk rowset provider in a single mode, I’ll import data from files in the C:\temp\ folder into a table called T1 in the tempdb database. First run the following code to create the table T1:
USE tempdb;
IF OBJECT_ID(N'dbo.T1', N'U') IS NOT NULL DROP TABLE dbo.T1;
CREATE TABLE dbo.T1
(
id INT NOT NULL PRIMARY KEY,
xmlval XML NULL,
textval VARCHAR(MAX) NULL,
ntextval NVARCHAR(MAX) NULL,
binval VARBINARY(MAX) NULL
);
As you can see, the table has a key column, and four large-object-typed columns.
The following code inserts a new row into the table with the key 1, and the value for the XML column xmlval obtained from the XML file xmlfile.xml using the bulk rowset provider:
INSERT INTO dbo.T1(id, xmlval)
VALUES( 1,
(SELECT xmlval FROM OPENROWSET(
BULK 'C:\temp\xmlfile.xml', SINGLE_NCLOB) AS F(xmlval)) );
The SINGLE_NCLOB option was used because xmlfile.xml is a Unicode file.
As mentioned, you can use a similar scalar subquery to set the value of a column in an UPDATE statement. As an example, the following UPDATE statement sets the values of the remaining three columns in the new row to values obtained from three files:
UPDATE dbo.T1
SET textval = (SELECT textval FROM OPENROWSET(
BULK 'C:\temp\textfile.txt', SINGLE_CLOB) AS F(textval)),
ntextval = (SELECT ntextval FROM OPENROWSET(
BULK 'C:\temp\ntextfile.txt', SINGLE_NCLOB) AS F(ntextval)),
binval = (SELECT binval FROM OPENROWSET(
BULK 'C:\temp\binfile.jpg', SINGLE_BLOB) AS F(binval))
WHERE id = 1;
Query the table to see the data that was imported:
SELECT id, xmlval, textval, ntextval, binval
FROM dbo.T1
WHERE id = 1;
You will get the following output (shown here in abbreviated form):
id xmlval textval ntextval binval
--- ---------- ----------- ----------- ----------
1 <ShowPl... This fil... This fil... 0xFFD8F...
Sequences
SQL Server gives you two main built-in tools that help you generate surrogate keys. One is the longstanding identity column property, which you’re probably familiar with, and the other is the sequence object, which was added in SQL Server 2012. The focus of this section is the sequence object and its advantages and disadvantages compared to identity.
Microsoft implemented the sequence object in SQL Server based on standard SQL with a few extensions. The main benefits of the sequence object are realized when you compare it with identity. I’ll start by reminding you of the characteristics and inflexibilities of the identity property; I’ll continue by introducing the sequence object and compare and contrast it with identity; I’ll then discuss performance considerations concerning both features.
Characteristics and inflexibilities of the identity property
The identity property is inflexible in a number of ways. It is a property of a column in a table specified as part of the column definition, as in orderid INT NOT NULL IDENTITY(1, 1). It’s not an independent object in the database. This can be a problem when you need to generate surrogate keys for use across multiple tables—for example, in a custom table-partitioning solution.
You cannot associate an identity property with or disassociate it from an already existing column. The property has to be defined when creating the table or altering it to add a new column. Therefore, achieving such a change might involve significant downtime for the table.
Identity cannot be used with a nullable column.
Sometimes you need to generate a surrogate key before using it. Identity doesn’t support this capability. You have to insert a new row into the target table and then request the newly generated key using the SCOPE_IDENTITY function.
You cannot use identity to generate new keys in a regular SELECT query. You can use the IDENTITY function in a SELECT INTO statement to generate a column with an identity property in the target table. In such a case, there’s no assurance that the identity values will be generated in a particular order, even if the query has an ORDER BY clause. If you need the keys to be generated in a particular order, use an INSERT SELECT statement with an ORDER BY clause. For details, see the following Knowledge Base article: http://support.microsoft.com/kb/273586.
A column with an identity property cannot be updated.
You cannot define minimum and maximum values for the identity property. The workaround is to constrain the column itself using a CHECK constraint.
The identity property cannot be defined to cycle automatically after it reaches the maximum value based on the column’s type. In such a case, an attempt to generate the next value causes an overflow error. You can change the current value manually using the DBCC CHECKIDENT command.
Once defined, you cannot alter the increment of an identity property.
You cannot define your own cache value for the identity property. Prior to SQL Server 2012, identity had no cache; rather, every value generation caused a disk write that was also logged. In SQL Server 2012 and 2014, identity has a predefined cache value that depends on the data type of the target column. Microsoft doesn’t document what cache value it uses because it wants to reserve the right to change it as it sees fit. But you can figure it out through testing, as I will demonstrate later. The caching feature gives you a performance benefit, but it means that if there’s an unclean termination of the SQL Server process—such as in a power failure or a failover in an AlwaysOn availability group—the next identity value generated might be at a gap of up to the cache value compared to the previous value. You can disable caching for identity to get pre-2012 behavior using trace flag 272.
Regardless of caching, identity doesn’t guarantee you won’t have gaps between values. An identity value change isn’t undone if the INSERT statement that caused the change fails or the transaction rolls back. If you need to guarantee no gaps between keys, you have to roll your own solution for generating those.
Identity doesn’t support obtaining a range of sequence values in one request. This could be needed when, in the application, you want to assign an entire range of keys for some purpose and know ahead of time how many keys you are after.
The sequence object
Unlike identity, the sequence object is an independent object in the database. You create it using the CREATE SEQUENCE command, alter its properties using the ALTER SEQUENCE command, and retrieve a new value from it using the NEXT VALUE FOR function. Following is the syntax for creating a sequence:
CREATE SEQUENCE <schema_name>.<sequence_name> AS <type>
START WITH <constant>
INCREMENT BY <constant>
MINVALUE <constant> | NO MINVALUE
MAXVALUE <constant> | NO MAXVALUE
NO CYCLE | CYCLE
CACHE <constant> | NO CACHE;
Like any other object in the database, you place the sequence in a schema. Similar to identity, it supports all numeric types with a scale of zero: TINYINT, SMALLINT, INT, BIGINT, NUMERIC(p, 0)/DECIMAL(p, 0). If you don’t indicate a type, BIGINT is used by default. If the target column where you will eventually store the values has a type different than BIGINT, you want to make sure to create the sequence with the right type. Otherwise, you will pay extra for type conversion. The data type is the one aspect of the sequence that cannot be altered once defined. To change the type, you will basically need to drop and re-create the sequence.
Using the MINVALUE and MAXVALUE properties, you can define the range of values supported by the sequence. The defaults are the minimum and maximum values supported by the type. For example, using the INT type, the sequence will default to MINVALUE –2147483648—not to 1 like many expect.
By default, the sequence is defined not to cycle; however, if you need to support cycling, specify the CYCLE option.
Use the START WITH property to define the first value that the sequence will generate. If unspecified, the START WITH property defaults to MINVALUE when the INCREMENT BY property is positive and to MAXVALUE when it’s negative. Be aware that if the sequence is defined to cycle, after it reaches the MAXVALUE property, it cycles to the value defined by the MINVALUE property (assuming the increment is 1) and not to the original START WITH property. It’s a common mistake when you need to create a cycling sequence that supports only the positive range of values to specify START WITH 1 CYCLE. After reaching the maximum value, the sequence will cycle to the minimum value (for example, –2147483648 for INT) and not 1. The correct thing to do is set MINVALUE to 1, not START WITH; upon sequence creation, the latter is set to the former by default and not the other way around.
Use the INCREMENT BY property to specify the step value. As you might have guessed, it is set to 1 by default.
You can use the CACHE property to control how often a request for a new value will cause a disk write and to use logging rather than a memory-only write. The bigger the value is, the better performance you will get. However, upon an unclean termination of the SQL Server process, the next value generated might be at a gap of up to the cache value compared to the previous value. I discuss performance considerations with the caching feature in the next section.
As an example, the following code creates a sequence called Seqorderids for generating order IDs in the PerformanceV3 database:
USE PerformanceV3;
IF OBJECT_ID(N'dbo.Seqorderids', N'SO') IS NOT NULL DROP SEQUENCE dbo.Seqorderids;
CREATE SEQUENCE dbo.Seqorderids AS INT
MINVALUE 1
CYCLE
CACHE 1000;
The sequence is defined as INT, supports only the positive range of values in the type, allows cycling, and uses a cache value of 1000.
To get a new value from the sequence, invoke the NEXT VALUE FOR function, like so:
SELECT NEXT VALUE FOR dbo.Seqorderids;
You can use the function in many places, such as a DEFAULT constraint, variable assignment, UPDATE and MERGE assignments, single-row and multi-row SELECT statements, single-row and multi-row INSERT VALUES statements, and the INSERT SELECT statement. You cannot use the function in a subquery.
You can alter all sequence properties other than the data type with the ALTER SEQUENCE command using the following syntax:
ALTER SEQUENCE dbo.Seqorderids
RESTART WITH <constant>
INCREMENT BY <constant>
MINVALUE <constant> | NO MINVALUE
MAXVALUE <constant> | NO MAXVALUE
NO CYCLE | CYCLE
CACHE <constant> | NO CACHE;
To get metadata information about existing sequences, query the sys.Sequences view. For example, the following query retrieves the properties of the Seqorderids sequence:
SELECT current_value, start_value, increment, minimum_value, maximum_value, is_cycling,
is_cached, cache_size
FROM sys.Sequences
WHERE object_id = OBJECT_ID(N'dbo.Seqorderids', N'SO');
This query generates the following output:
current_value start_value increment minimum_value maximum_value is_cycling is_cached cache_size
------------- ----------- --------- ------------- ------------- ---------- --------- -----------
1 1 1 1 2147483647 1 1 1000
Recall the inflexibilities of the identity property. In contrast, the sequence object is much more flexible. Interestingly, identity and sequence are internally implemented using the same physical object, but the language surface makes sequence much more flexible. There’s also a critical performance difference between the two that you should be aware of. I’ll discuss it in the next section.
Because sequence is an independent object in the database, you can use the keys you generate with a sequence anywhere you like—for example, across multiple tables in a custom table partitioning solution.
Note that neither sequence nor identity by themselves guarantee uniqueness. Remember that, at any point, you can change the current value, as well as insert values of your own. You want to make sure to use integrity enforcement tools like constraints to guarantee uniqueness in some column.
If you want to automate the creation of keys in some column using a sequence, you can invoke the NEXT VALUE FOR function in a DEFAULT constraint. That’s an extension to the standard. Unlike with the identity property, a DEFAULT constraint can be added to an existing column or removed from one. Say you have a table called Orders with a column called orderid and you want to automate the creation of order IDs using the sequence Seqorderids. Here’s the code to add such a constraint:
ALTER TABLE dbo.Orders
ADD CONSTRAINT DFT_Orders_orderid
DEFAULT(NEXT VALUE FOR dbo.Seqorderids) FOR orderid;
If at any point you want to stop the automation of the generation of order IDs, you drop the constraint, like so:
ALTER TABLE dbo.Orders DROP CONSTRAINT DFT_Orders_orderid;
Because the sequence object is independent of the target table and the column where you store the values generated, nothing prevents you from allowing NULLs in the target column if you want.
If you need to generate a sequence value before using it, you can simply store it somewhere temporarily and use it later when you’re ready. For example, you could store it in a variable, like so:
DECLARE @newkey AS INT = NEXT VALUE FOR dbo.Seqorderids;
SELECT @newkey;
You can even use a sequence to overwrite existing keys with new ones using the UPDATE and MERGE statements. To demonstrate this, I’ll use a table called MyOrders that you create and populate by running the following code:
IF OBJECT_ID(N'dbo.MyOrders', N'U') IS NOT NULL DROP TABLE dbo.MyOrders;
SELECT orderid, custid, empid, shipperid, orderdate, filler
INTO dbo.MyOrders
FROM dbo.Orders
WHERE empid = 1;
ALTER TABLE dbo.MyOrders ADD CONSTRAINT PK_MyOrders PRIMARY KEY(orderid);
Run the following UPDATE statement to overwrite the existing keys with new ones from the Seqorderids sequence:
UPDATE dbo.MyOrders
SET orderid = NEXT VALUE FOR dbo.Seqorderids;
SQL Server supports an extension to the standard NEXT VALUE FOR function in the form of an OVER clause you use to control the order in which sequence values are generated in a multi-row insert. This capability is needed, for example, when you want target keys to be generated based on the order of the source keys. Here’s an example for using this feature when copying orders from the Orders table to the MyOrders table, generating new order IDs from the sequence, while preserving the order of the original keys:
INSERT INTO dbo.MyOrders(orderid, custid, empid, shipperid, orderdate, filler)
SELECT NEXT VALUE FOR dbo.Seqorderids OVER(ORDER BY orderid) AS orderid,
custid, empid, shipperid, orderdate, filler
FROM dbo.Orders
WHERE empid = 2;
Suppose you need your application to request an entire range of keys in one shot and you know ahead of time what the range size is. SQL Server provides you with a stored procedure called sp_sequence_get_range for this purpose. The point is to update the sequence only once and assignthe values in the range that you get as you see fit. You provide as inputs the sequence name and the range size. You collect as output the first value in the range and, optionally, the last value, cycle count, increment, minimum, and maximum. Here’s an example for requesting a range of 1000000 values from the sequence Seqorderids:
DECLARE @first AS SQL_VARIANT;
EXEC sys.sp_sequence_get_range
@sequence_name = N'dbo.Seqorderids',
@range_size = 1000000,
@range_first_value = @first OUTPUT ;
SELECT @first;
The last sequence value generated in my system before issuing this code was 3973, so the range that was just allocated by the command is 3974 through 1003973. The variable @first was assigned with the value 3974, and the current sequence value is 1003973. The next time someone requests a value from the sequence, he will get 1003974.
Remember that, just like with identity, the sequence object doesn’t guarantee you won’t have gaps between values, regardless of the cache size you define. If you request a value from a sequence in a transaction and the transaction is rolled back, the sequence value change is not undone. Here’s a test demonstrating this:
SELECT NEXT VALUE FOR dbo.Seqorderids;
BEGIN TRAN
SELECT NEXT VALUE FOR dbo.Seqorderids;
ROLLBACK TRAN
SELECT NEXT VALUE FOR dbo.Seqorderids;
When I ran this code on my system, I got the following output:
-----------
1003974
-----------
1003975
-----------
1003976
As you can see, the value generated in the transaction that rolled back was not reused. If you need to guarantee no gaps between keys, you shouldn’t use identity or sequence; instead, roll your own custom key generator. I’ll demonstrate how to implement one in the section “Updating data.”
Performance considerations
As mentioned, sequence and identity are implemented internally based on the same physical object. However, there are important differences in the implementation of the two features that could have different performance implications. These differences are especially important when you change an implementation using one feature with an implementation using the other.
The main aspect that affects the performance of identity and sequence is caching. The cache value dictates how often SQL Server writes to disk. For example, say you define a cache value of 1000 for a sequence object. The first time you request a value, SQL Server writes 1000 to disk and, in two memory members, stores the current value 1 and the number of values left, 999. After 999 more requests, the member holding the current value is 1000 and the one holding the number of values left is 0. The next request will write to disk 2000, and to the memory members it will write 1001 as the current value and 999 as the number of values left. And so on. If there’s an unclean termination of the SQL Server process—such as a power failure, crash (you can mimic this by ending the SQL Server process from Task Manager), or failover in an AlwaysOn availability group—upon restart, the current value is set to the on-disk value. So you can lose up to the cache size value in one go. In choosing the cache value, you need to decide how many values you are willing to lose in such an event in favor of improved performance. I’ll provide specific performance numbers shortly. But don’t forget what I mentioned and demonstrated earlier: that neither sequence nor identity give you a guarantee you won’t have gaps, regardless of the cache size.
The first interesting thing about the cache is what SQL Server uses by default. Microsoft doesn’t document this information. More precisely, there’s a note in the documentation explicitly saying the company doesn’t want to publish this information:
“If the cache option is enabled without specifying a cache size, the Database Engine will select a size. However, users should not rely upon the selection being consistent. Microsoft might change the method of calculating the cache size without notice.”
Despite this, you can figure out what the current cache size is through testing. Prior to SQL Server 2012, identity had no cache (tested on SQL Server 2008 R2 SP3). In SQL Server 2012 SP2 and 2014 RTM, sequence has a default cache of 50, regardless of data type, and identity has a cache value that depends on the type, as shown in Table 6-1.
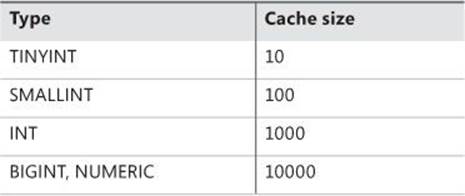
TABLE 6-1 Relationship between type and cache size
You can enable trace flag 272 if you want to disable caching for identity, but other than that you have no control over the cache size.
If you’re running your tests on a different build than the one I used in my testing, be aware, as the documentation says, that the default cache values in your system could be different.
To figure out the default cache values, use the following test. In preparation, you create sequences of different types as well as tables with columns of different types with an identity property. You generate a few values, and then query the current values. You do so by running the following code:
IF DB_ID(N'testdb') IS NULL CREATE DATABASE testdb;
USE testdb;
IF OBJECT_ID(N'dbo.SeqTINYINT' , N'SO') IS NOT NULL DROP SEQUENCE dbo.SeqTINYINT;
IF OBJECT_ID(N'dbo.SeqSMALLINT' , N'SO') IS NOT NULL DROP SEQUENCE dbo.SeqSMALLINT;
IF OBJECT_ID(N'dbo.SeqINT' , N'SO') IS NOT NULL DROP SEQUENCE dbo.SeqINT;
IF OBJECT_ID(N'dbo.SeqBIGINT' , N'SO') IS NOT NULL DROP SEQUENCE dbo.SeqBIGINT;
IF OBJECT_ID(N'dbo.SeqNUMERIC9' , N'SO') IS NOT NULL DROP SEQUENCE dbo.SeqNUMERIC9;
IF OBJECT_ID(N'dbo.SeqNUMERIC38', N'SO') IS NOT NULL DROP SEQUENCE dbo.SeqNUMERIC38;
IF OBJECT_ID(N'dbo.TTINYINT' , N'U') IS NOT NULL DROP TABLE dbo.TTINYINT;
IF OBJECT_ID(N'dbo.TSMALLINT' , N'U') IS NOT NULL DROP TABLE dbo.TSMALLINT;
IF OBJECT_ID(N'dbo.TINT' , N'U') IS NOT NULL DROP TABLE dbo.TINT;
IF OBJECT_ID(N'dbo.TBIGINT' , N'U') IS NOT NULL DROP TABLE dbo.TBIGINT;
IF OBJECT_ID(N'dbo.TNUMERIC9' , N'U') IS NOT NULL DROP TABLE dbo.TNUMERIC9;
IF OBJECT_ID(N'dbo.TNUMERIC38', N'U') IS NOT NULL DROP TABLE dbo.TNUMERIC38;
CREATE SEQUENCE dbo.SeqTINYINT AS TINYINT MINVALUE 1;
CREATE SEQUENCE dbo.SeqSMALLINT AS SMALLINT MINVALUE 1;
CREATE SEQUENCE dbo.SeqINT AS INT MINVALUE 1;
CREATE SEQUENCE dbo.SeqBIGINT AS BIGINT MINVALUE 1;
CREATE SEQUENCE dbo.SeqNUMERIC9 AS NUMERIC( 9, 0) MINVALUE 1;
CREATE SEQUENCE dbo.SeqNUMERIC38 AS NUMERIC(38, 0) MINVALUE 1;
CREATE TABLE dbo.TTINYINT (keycol TINYINT IDENTITY);
CREATE TABLE dbo.TSMALLINT (keycol SMALLINT IDENTITY);
CREATE TABLE dbo.TINT (keycol INT IDENTITY);
CREATE TABLE dbo.TBIGINT (keycol BIGINT IDENTITY);
CREATE TABLE dbo.TNUMERIC9 (keycol NUMERIC( 9, 0) IDENTITY);
CREATE TABLE dbo.TNUMERIC38(keycol NUMERIC(38, 0) IDENTITY);
GO
SELECT
NEXT VALUE FOR dbo.SeqTINYINT ,
NEXT VALUE FOR dbo.SeqSMALLINT ,
NEXT VALUE FOR dbo.SeqINT ,
NEXT VALUE FOR dbo.SeqBIGINT ,
NEXT VALUE FOR dbo.SeqNUMERIC9 ,
NEXT VALUE FOR dbo.SeqNUMERIC38;
GO 5
INSERT INTO dbo.TTINYINT DEFAULT VALUES;
INSERT INTO dbo.TSMALLINT DEFAULT VALUES;
INSERT INTO dbo.TINT DEFAULT VALUES;
INSERT INTO dbo.TBIGINT DEFAULT VALUES;
INSERT INTO dbo.TNUMERIC9 DEFAULT VALUES;
INSERT INTO dbo.TNUMERIC38 DEFAULT VALUES;
GO 5
SELECT name, current_value FROM sys.Sequences
WHERE object_id IN
( OBJECT_ID(N'dbo.SeqTINYINT '),
OBJECT_ID(N'dbo.SeqSMALLINT '),
OBJECT_ID(N'dbo.SeqINT '),
OBJECT_ID(N'dbo.SeqBIGINT '),
OBJECT_ID(N'dbo.SeqNUMERIC9 '),
OBJECT_ID(N'dbo.SeqNUMERIC38') );
SELECT
IDENT_CURRENT(N'dbo.TTINYINT ') AS TTINYINT ,
IDENT_CURRENT(N'dbo.TSMALLINT ') AS TSMALLINT ,
IDENT_CURRENT(N'dbo.TINT ') AS TINT ,
IDENT_CURRENT(N'dbo.TBIGINT ') AS TBIGINT ,
IDENT_CURRENT(N'dbo.TNUMERIC9 ') AS TNUMERIC9 ,
IDENT_CURRENT(N'dbo.TNUMERIC38') AS TNUMERIC38;
Having generated five values, I get the output 5 in all cases:
name current_value
------------- --------------
SeqTINYINT 5
SeqSMALLINT 5
SeqINT 5
SeqBIGINT 5
SeqNUMERIC9 5
SeqNUMERIC38 5
TTINYINT TSMALLINT TINT TBIGINT TNUMERIC9 TNUMERIC38
--------- ---------- ----- -------- ---------- -----------
5 5 5 5 5 5
Next you end the SQL Server service from Task Manager (using Shift+Ctrl+Esc to load it), you restart it, and then you query the current sequence and identity values by running the following code:
USE testdb;
SELECT name, current_value FROM sys.Sequences
WHERE object_id IN
( OBJECT_ID(N'dbo.SeqTINYINT '),
OBJECT_ID(N'dbo.SeqSMALLINT '),
OBJECT_ID(N'dbo.SeqINT '),
OBJECT_ID(N'dbo.SeqBIGINT '),
OBJECT_ID(N'dbo.SeqNUMERIC9 '),
OBJECT_ID(N'dbo.SeqNUMERIC38') );
SELECT
IDENT_CURRENT(N'dbo.TTINYINT ') AS TTINYINT ,
IDENT_CURRENT(N'dbo.TSMALLINT ') AS TSMALLINT ,
IDENT_CURRENT(N'dbo.TINT ') AS TINT ,
IDENT_CURRENT(N'dbo.TBIGINT ') AS TBIGINT ,
IDENT_CURRENT(N'dbo.TNUMERIC9 ') AS TNUMERIC9 ,
IDENT_CURRENT(N'dbo.TNUMERIC38') AS TNUMERIC38;
Here’s the output I got on my system:
name current_value
------------- --------------
SeqTINYINT 50
SeqSMALLINT 50
SeqINT 50
SeqBIGINT 50
SeqNUMERIC9 50
SeqNUMERIC38 50
TTINYINT TSMALLINT TINT TBIGINT TNUMERIC9 TNUMERIC38
--------- ---------- ----- -------- ---------- -----------
11 101 1001 10001 10001 10001
There’s the obvious difference between identity and sequence in the cache sizes. There’s also the curious fact that, in identity’s case, the recovered value is off by 1 from the cache size and in the sequence case it isn’t. From testing, it seems that with identity the first write of the current-plus-cache-size-minus-one value to disk happened after the second request, whereas with sequence it was after the first one.
When I request the next value from the sequence SeqINT, I get 51:
SELECT NEXT VALUE FOR dbo.SeqINT;
When I insert a new row to TINT, the identity value generated is 1002:
INSERT INTO dbo.TINT OUTPUT inserted.$identity DEFAULT VALUES;
When you’re done testing, run the following code for cleanup:
IF OBJECT_ID(N'dbo.SeqTINYINT' , N'SO') IS NOT NULL DROP SEQUENCE dbo.SeqTINYINT;
IF OBJECT_ID(N'dbo.SeqSMALLINT' , N'SO') IS NOT NULL DROP SEQUENCE dbo.SeqSMALLINT;
IF OBJECT_ID(N'dbo.SeqINT' , N'SO') IS NOT NULL DROP SEQUENCE dbo.SeqINT;
IF OBJECT_ID(N'dbo.SeqBIGINT' , N'SO') IS NOT NULL DROP SEQUENCE dbo.SeqBIGINT;
IF OBJECT_ID(N'dbo.SeqNUMERIC9' , N'SO') IS NOT NULL DROP SEQUENCE dbo.SeqNUMERIC9;
IF OBJECT_ID(N'dbo.SeqNUMERIC38', N'SO') IS NOT NULL DROP SEQUENCE dbo.SeqNUMERIC38;
IF OBJECT_ID(N'dbo.TTINYINT' , N'U') IS NOT NULL DROP TABLE dbo.TTINYINT;
IF OBJECT_ID(N'dbo.TSMALLINT' , N'U') IS NOT NULL DROP TABLE dbo.TSMALLINT;
IF OBJECT_ID(N'dbo.TINT' , N'U') IS NOT NULL DROP TABLE dbo.TINT;
IF OBJECT_ID(N'dbo.TBIGINT' , N'U') IS NOT NULL DROP TABLE dbo.TBIGINT;
IF OBJECT_ID(N'dbo.TNUMERIC9' , N'U') IS NOT NULL DROP TABLE dbo.TNUMERIC9;
IF OBJECT_ID(N'dbo.TNUMERIC38', N'U') IS NOT NULL DROP TABLE dbo.TNUMERIC38;
Next I’ll describe the test I used to measure the performance of identity and sequence with different cache values. The test results are eye-opening, showing significant performance differences when generating values in a user database versus tempdb, as well as a very interesting difference between identity and sequence with regards to log buffer flushes.
In preparation for the test, you create a database called testdb and set its recovery model to Simple. You create a sequence called Seq1 in both testdb and tempdb. Here’s the code that handles the preparation part:
IF DB_ID(N'testdb') IS NULL CREATE DATABASE testdb;
ALTER DATABASE testdb SET RECOVERY SIMPLE;
USE testdb;
IF OBJECT_ID(N'dbo.Seq1', N'SO') IS NOT NULL DROP SEQUENCE dbo.Seq1;
CREATE SEQUENCE dbo.Seq1 AS INT MINVALUE 1;
USE tempdb;
IF OBJECT_ID(N'dbo.Seq1', N'SO') IS NOT NULL DROP SEQUENCE dbo.Seq1;
CREATE SEQUENCE dbo.Seq1 AS INT MINVALUE 1;
The actual performance test generates 10,000,000 identity/sequence values by querying the TSQLV3.dbo.GetNums function, and it collects information about logging (the number of log records, their total size in megabytes, the number of log flushes), the duration in milliseconds, and normalized duration (duration minus the duration of the query without generating identity/sequence values). The collection of the statistics about logging and the actual work are done in the same transaction to prevent the log from recycling itself until the statistics are collected. Here’s the code to conduct the test:
-- To enable TF 272: DBCC TRACEON(272, -1), to disable: DBCC TRACEOFF(272, -1)
SET NOCOUNT ON;
--USE tempdb; -- to test in tempdb
USE testdb; -- to test in user database testdb
DECLARE @numrecords AS INT, @sizemb AS NUMERIC(12, 2), @logflushes AS INT,
@starttime AS DATETIME2, @endtime AS DATETIME2;
CHECKPOINT;
BEGIN TRAN
ALTER SEQUENCE dbo.Seq1 CACHE 50; -- try with CACHE 10, 50, 10000, NO CACHE
IF OBJECT_ID(N'dbo.T', N'U') IS NOT NULL DROP TABLE dbo.T;
-- Stats before
SELECT @numrecords = COUNT(*), @sizemb = SUM(CAST([Log Record Length] AS BIGINT)) / 1048576.,
@logflushes = (SELECT cntr_value FROM sys.dm_os_performance_counters
WHERE counter_name = 'Log Flushes/sec'
AND instance_name = 'testdb' -- to test in testdb
-- AND instance_name = 'tempdb' -- to test in tempdb
)
FROM sys.fn_dblog(null, null);
SET @starttime = SYSDATETIME();
-- Actual work
SELECT
-- n -- to test without seq or identity
NEXT VALUE FOR dbo.Seq1 AS n -- to test sequence
-- IDENTITY(INT, 1, 1) AS n -- to test identity
INTO dbo.T
FROM TSQLV3.dbo.GetNums(1, 10000000) AS N
OPTION(MAXDOP 1);
-- Stats after
SET @endtime = SYSDATETIME();
SELECT
COUNT(*) - @numrecords AS numrecords,
SUM(CAST([Log Record Length] AS BIGINT)) / 1048576. - @sizemb AS sizemb,
(SELECT cntr_value FROM sys.dm_os_performance_counters
WHERE counter_name = 'Log Flushes/sec'
AND instance_name = 'testdb' -- to test in testdb
-- AND instance_name = 'tempdb' -- to test in tempdb
) - @logflushes AS logflushes,
DATEDIFF(ms, @starttime, @endtime) AS durationms
FROM sys.fn_dblog(null, null);
COMMIT TRAN
CHECKPOINT;
The code can be customized by commenting and uncommenting sections to test it with the different databases, cache sizes, and features. As is, the code tests the sequence object with a cache size of 50 in testdb.
Here are the results of my performance test on a machine running SQL Server 2014 RTM:
database object cache numrecords sizemb logflushes durationms normdurms
-------- --------- --------- ----------- -------------- ----------- ----------- ----------
tempdb none 8717 0.58334350 42 4468
tempdb identity DFT 6563 0.43955993 13 5969 1501
tempdb identity TF272 6563 0.43945693 9 93933 89465
tempdb sequence 10000 6562 0.43933868 33 4710 242
tempdb sequence 1000 6562 0.43933868 34 4889 421
tempdb sequence DFT- 50 6562 0.43933868 34 6177 1709
tempdb sequence 10 6562 0.43933868 48 11625 7157
tempdb sequence NO CACHE 6562 0.43933868 34 70367 65899
testdb none 29868 1.75932121 32 4743
testdb identity DFT 32751 2.06301689 38 6013 1270
testdb identity TF272 10022862 726.15297889 13444 105341 100598
testdb sequence 10000 23801 1.41382026 1000 5254 511
testdb sequence 1000 32759 2.06282615 10000 10489 5746
testdb sequence DFT- 50 222863 15.85624122 200002 68390 63647
testdb sequence 10 1022872 73.83788490 1000008 292110 287367
testdb sequence NO CACHE 10031030 726.87624200 10000050 2812090 2807347
There are quite a few interesting things to observe in the results, to explain, and to infer best practices from.
Observe that with both identity and sequence, when the target object is in tempdb there’s no correlation between cache size and logging. That’s because there’s no need to log any cache-related disk writes because objects in tempdb do not survive restarts. The minimal numbers you do see for log records, total size, and log flushes are because of the actual insertion to support a rollback if needed. The duration does increase with smaller cache sizes, but that’s not due to logging. You can see that, especially with smaller cache sizes, the performance in tempdb is significantly better than in testdb.
The other interesting observation is that in the user database (testdb), with the same cache value, the number of log records and their total size is similar for identity and sequence, but the number of log flushes and actual performance are quite different. Here’s a subset of the performance results to allow you to more easily see this:
database object cache numrecords sizemb logflushes durationms normdurms
-------- --------- --------- ----------- -------------- ---------- ----------- -----------
tempdb identity DFT 6563 0.43955993 13 5969 1501
tempdb sequence 1000 6562 0.43933868 34 4889 421
testdb identity DFT 32751 2.06301689 38 6013 1270 <--
testdb sequence 1000 32759 2.06282615 10000 10489 5746 <--
tempdb identity TF272 6563 0.43945693 9 93933 89465
tempdb sequence NO CACHE 6562 0.43933868 34 70367 65899
testdb identity TF272 10022862 726.15297889 13444 105341 100598 <--
testdb sequence NO CACHE 10031030 726.87624200 10000050 2812090 2807347 <--
You also have the run time comparison between identity and sequence for some of the cache sizes shown graphically in Figure 6-2.
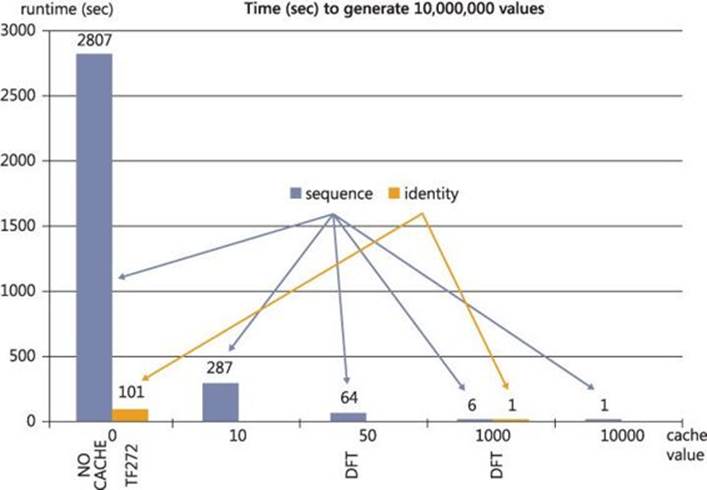
FIGURE 6-2 Sequence and identity performance test.
It’s clear why the number of log records and their total size should be similar for identity and sequence with the same cache sizes—after all, they’re both implemented based on the same object internally. So why the difference in the number of log buffer flushes?
This has to do with the fact that identity is table-specific and sequence isn’t. Say you insert a new row into a table with identity. It so happens that this insert triggers a cache-related disk write. A log record is written to the log buffer, but suppose that the buffer is not full yet. Then there’s a power failure before the log buffer is flushed. It’s not a big deal if the recovered identity value will be an earlier one, because the recovery process will also undo the insert. So it’s not a problem to reuse an older identity value that was generated by an insert that didn’t commit. For this reason, SQL Server doesn’t need to force flushing the log buffer for every identity cache-related disk write.
With the sequence object, the situation is different. An application can request a sequence value and use it for any purpose—not necessarily store it in a row in the database. If SQL Server crashes and then the application asks for a new value, what gives it the guarantee that an older value that it already used won’t be produced again? To guarantee this, SQL Server forces the flushing of the log buffer for every sequence cache-related disk write.
You can see the correlation between the sequence cache size and the number of log flushes in the results of the performance test in the user database. For example, with no cache, when generating 10,000,000 values, the sequence gets about 10,000,000 flushes, whereas identity gets a fraction of those (about 13,000). The performance difference is quite dramatic: almost an hour for sequence and about a couple of minutes for identity.
Another important thing to keep in mind is the default cache sizes and the fact that they are not guaranteed to remain the same. In the versions and builds I tested, with an INT type, identity defaults to a cache size of 1000 and takes about a second to create 10,000,000 values. A sequence object defaults to a cache size of 50 and takes about a minute to create 10,000,000 values. This is especially important to remember when switching from one feature to another. First, you want to make sure that you do some testing. Second, consider using an explicit cache size that is big enough to give you similar performance to what you’re used to.
Summarizing the comparison of identity with sequence
The section about sequences in this chapter compared and contrasted the sequence object with the identity column property. A lot of aspects were discussed. For your convenience and for reference, the information is provided in a summarized form in Table 6-2.
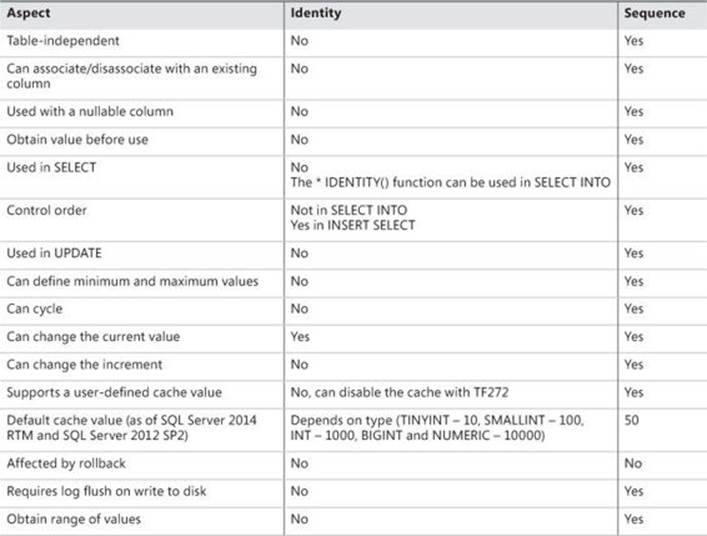
TABLE 6-2 Comparing identity with sequence
Deleting data
This section covers two main aspects of data deletion: the TRUNCATE TABLE statement and deleting duplicates. You can find additional coverage of data deletion in Chapter 5, “TOP and OFFSET-FETCH,” which describes how to split large deletes into chunks in the section “Modifying in chunks.”
TRUNCATE TABLE
The TRUNCATE TABLE statement is a highly efficient statement that deletes all rows from a table and resets an identity property if one exists, but leaves the table definition in place.
The statement has basic syntax. For example, if you had a table called T1, you would truncate it like this:
TRUNCATE TABLE dbo.T1;
Regardless of the database recovery model, the TRUNCATE TABLE statement involves substantially less logging than the DELETE statement; hence, it is significantly faster than it. The former needs to log only which extents or pages were deallocated to support roll-back and roll-forward capabilities. The latter needs to log every row that is deleted.
Because of the significant performance difference, it is generally preferred that you use the TRUNCATE TABLE statement over the DELETE statement. But you should be aware of a few differences besides performance.
The TRUNCATE TABLE statement requires stronger permissions. You need at minimum the ALTER permission on the target table. If you don’t want to grant such permission to the executing user, you can incorporate the statement in a stored procedure that is defined with the EXECUTE AS clause, and ensure that the impersonated user has the right permissions.
As mentioned, unlike the DELETE statement, the TRUNCATE TABLE statement resets an identity property if one exists. If you want to clear a table but leave the current identity value unchanged, you need to take care of this yourself. You do so by applying the following steps:
1. Open a transaction.
2. Lock the table.
3. Capture the current identity value plus 1 in a variable.
4. Issue the TRUNCATE TABLE statement.
5. Reseed the identity property with the value stored in the variable.
6. Commit the transaction.
I’ll use the following sample data to demonstrate this solution:
IF OBJECT_ID(N'dbo.T1', N'U') IS NOT NULL DROP TABLE dbo.T1;
GO
CREATE TABLE dbo.T1
(
keycol INT NOT NULL IDENTITY,
datacol VARCHAR(10) NOT NULL
);
INSERT INTO dbo.T1(datacol) VALUES('A'),('B'),('C');
SELECT keycol, datacol FROM dbo.T1;
Here’s the output of the last query showing the contents of the table T1:
keycol datacol
----------- ----------
1 A
2 B
3 C
The current identity value is 3.
The following code truncates the table and manually reseeds the identity property to the current value plus 1:
IF EXISTS(SELECT * FROM dbo.T1)
BEGIN
BEGIN TRAN
DECLARE @tmp AS INT = (SELECT TOP (1) keycol FROM dbo.T1 WITH (TABLOCKX)); -- lock
DECLARE @reseedval AS INT = IDENT_CURRENT(N'dbo.T1') + 1; -- save
TRUNCATE TABLE dbo.T1; -- truncate
DBCC CHECKIDENT(N'dbo.T1', RESEED, @reseedval); -- reseed
PRINT 'Identity reseeded to ' + CAST(@reseedval AS VARCHAR(10)) + '.';
COMMIT TRAN
END
ELSE
PRINT 'Table is empty, no need to truncate.' ;
This code generates the following output:
Identity reseeded to 4.
Now add new rows into the table and query it:
INSERT INTO dbo.T1(datacol) VALUES('X'),('Y'),('Z');
SELECT keycol, datacol FROM dbo.T1;
You will get the following output, which shows the first identity value generated was 4:
keycol datacol
----------- ----------
4 X
5 Y
6 Z
A table cannot be truncated if there are foreign keys pointing to it, even if the referencing tables are empty. You will have to drop the foreign keys before truncating the table and re-create them after you’re done.
Similarly, a table cannot be truncated if there are indexed views based on the table. Like with foreign keys, one option is to drop the indexed views before truncating the table and re-create them after you’re done.
Another option is to rely on partition switching. With partition switching, you don’t need to drop and re-create the indexed view. SQL Server supports partition switching even when there’s an indexed view based on the table, so long as the partitioning of the indexed view is aligned with the table partition. If you didn’t explicitly partition the table and the indexed view, you satisfy this requirement by definition. The solution involves the following steps:
1. Create a staging table with the same structure as the source.
2. Switch the source table to the stage table.
3. Drop the stage table.
I’ll use the following sample data to demonstrate this solution:
SET NOCOUNT ON;
USE tempdb;
IF OBJECT_ID(N'dbo.V1', N'V') IS NOT NULL DROP VIEW dbo.V1;
IF OBJECT_ID(N'dbo.T1', N'U') IS NOT NULL DROP TABLE dbo.T1;
GO
CREATE TABLE dbo.T1
(
col1 INT NOT NULL PRIMARY KEY,
col2 INT NOT NULL,
col3 NUMERIC(12, 2) NOT NULL
);
INSERT INTO dbo.T1(col1, col2, col3) VALUES
( 2, 10, 200.00),
( 3, 10, 800.00),
( 5, 10, 100.00),
( 7, 20, 300.00),
(11, 20, 500.00),
(13, 20, 1300.00);
GO
CREATE VIEW dbo.V1 WITH SCHEMABINDING
AS
SELECT col2, SUM(col3) AS total , COUNT_BIG(*) AS cnt
FROM dbo.T1
GROUP BY col2;
GO
CREATE UNIQUE CLUSTERED INDEX idx_col2 ON dbo.V1(col2);
GO
SELECT col2, total, cnt FROM dbo.V1;
The sample data has a table called T1 and an indexed view based on it. The last query in the code produces the following output showing the current contents of the table:
col2 total cnt
----- -------- ----
10 1100.00 3
20 2100.00 3
Now attempt to clear the table by truncating it:
TRUNCATE TABLE dbo.T1;
You get the following error saying you cannot truncate the table because it’s referenced by the indexed view:
Msg 3729, Level 16, State 2, Line 1
Cannot TRUNCATE TABLE 'dbo.T1' because it is being referenced by object 'V1'.
Here’s the solution for clearing the table based on partition switching without the need to drop and re-create the indexed view:
CREATE TABLE dbo.T1_STAGE
(
col1 INT NOT NULL PRIMARY KEY,
col2 INT NOT NULL,
col3 NUMERIC(12, 2) NOT NULL
);
ALTER TABLE dbo.T1 SWITCH TO dbo.T1_STAGE;
DROP TABLE dbo.T1_STAGE;
When you’re done testing, run the following code for cleanup:
IF OBJECT_ID(N'dbo.V1', N'V') IS NOT NULL DROP VIEW dbo.V1;
IF OBJECT_ID(N'dbo.T1', N'U') IS NOT NULL DROP TABLE dbo.T1;
It’s common for people to consider the TRUNCATE TABLE statement as a DDL statement and not as a DML one. You can understand the confusion when you consider that, in SQL Server, you need ALTER permissions on the table and not just DELETE permissions, and that the statement resets the identity property. Also, some think of the TRUNCATE TABLE statement as DDL when thinking of the physical processing of the data. Indeed, in physical terms, TRUNCATE TABLE is processed similarly to DROP TABLE in how it deallocates extents or pages and in what it logs. But according to standard SQL, the TRUNCATE TABLE statement is considered a DML statement. That’s because standard SQL isn’t concerned with the physical layer; rather, it is concerned only with the logical one. Logically, the statement deletes all rows from the table—it doesn’t change the table definition.
Deleting duplicates
Suppose you have data that contains duplicate rows and you need to deduplicate the data, keeping only one occurrence of each logical key. This could be a result of not enforcing integrity in your data or importing data from a source that did not enforce integrity.
As an example for a table with duplicates, the following code creates a table called Orders and fills it with duplicate rows:
USE tempdb;
IF OBJECT_ID(N'dbo.Orders', N'U') IS NOT NULL DROP TABLE dbo.Orders;
GO
SELECT
orderid, custid, empid, orderdate, requireddate, shippeddate,
shipperid, freight, shipname, shipaddress, shipcity, shipregion,
shippostalcode, shipcountry
INTO dbo.Orders
FROM TSQLV3.Sales.Orders
CROSS JOIN TSQLV3.dbo.Nums
WHERE n <= 3;
The orderid column is supposed to be unique but currently isn’t. You need to deduplicate the data, resulting in a set that has only one occurrence of each distinct order ID. After deduplicating the data, it is a good idea to enforce uniqueness with a constraint.
The recommended method to use for deduplicating the data varies depending on the number of rows that need to be deleted and on the percentage out of the entire set that the number represents. Suppose that there are 50,000,000 rows in the table. If the number of rows to be deleted is small—for example, 10,000—it’s quite alright to use a single DELETE statement that is fully logged. Here’s the solution you can use in such a case to implement the task:
WITH C AS
(
SELECT *,
ROW_NUMBER()
OVER(PARTITION BY orderid ORDER BY (SELECT NULL)) AS n
FROM dbo.Orders
)
DELETE FROM C
WHERE n > 1;
The inner query computes a row number (call it n) that is partitioned by the logical key (orderid in our case). If it doesn’t matter to you which row you keep as long as you keep only one occurrence of each distinct order ID, use arbitrary ordering in the window order clause as our query does—namely, ORDER BY (SELECT NULL). If different rows with the same order ID value can be distinct from each other and you do have attributes that determine which to prefer, make sure to specify those attributes in the window order clause. The column n represents the duplicate number. So say you have three rows with the order ID 10248; they will get the distinct n values 1, 2, and 3. The code defines a CTE called C based on the query that computes n. The outer query then deletes the rows where n is greater than 1 through the CTE C. The underlying table Orders is the one that is actually affected by the DELETE statement.
If the percentage of rows that need to be deleted is small, but still the number of rows is large—for example, 5,000,000—the preceding solution might not be good. It might cause the log to significantly expand, and it might result in lock escalation. To avoid both, you can split the large delete to a delete in chunks as described in Chapter 5 in the section “Modifying in chunks.” Here’s the implementation of this approach in our case:
WHILE 1 = 1
BEGIN
WITH C AS
(
SELECT *,
ROW_NUMBER()
OVER(PARTITION BY orderid ORDER BY (SELECT NULL)) AS n
FROM dbo.Orders
)
DELETE TOP (3000) FROM C
WHERE n > 1;
IF @@ROWCOUNT < 3000 BREAK;
END;
If both the percentage and number of rows that need to be deleted are large—for example, 25,000,000 rows—a third solution might be optimal. You copy the rows where n equals 1 to a staging table using a minimally logged bulk operation like SELECT INTO. After copying, you drop the original table, rename the staging table to the original table name, and then create anything you need on that table (constraints, indexes, triggers, permissions). Here’s the code implementing this approach:
-- Copy distinct rows to staging table
WITH C AS
(
SELECT *,
ROW_NUMBER()
OVER(PARTITION BY orderid ORDER BY (SELECT NULL)) AS n
FROM dbo.Orders
)
SELECT orderid, custid, empid, orderdate, requireddate, shippeddate, shipperid,
freight, shipname, shipaddress, shipcity, shipregion, shippostalcode, shipcountry
INTO dbo.Orders_Stage
FROM C
WHERE n = 1;
-- Drop original table
DROP TABLE dbo.Orders;
-- Rename staging table to original table name
EXEC sp_rename N'dbo.Orders_Stage', N'Orders';
-- Create constraints, indexes, triggers and permissions on Orders
ALTER TABLE dbo.Orders ADD CONSTRAINT PK_Orders PRIMARY KEY(orderid);
Updating data
This section covers two specialized update capabilities in T-SQL: updating data through table expressions and updating data using variables.
As sample data for use in both the section on updating data and the subsequent section on merging data, I’ll use the tables Customers and CustomersStage, which you create and populate in tempdb using the following code:
USE tempdb;
IF OBJECT_ID(N'dbo.Customers', N'U') IS NOT NULL DROP TABLE dbo.Customers;
CREATE TABLE dbo.Customers
(
custid INT NOT NULL,
companyname VARCHAR(25) NOT NULL,
phone VARCHAR(20) NULL,
address VARCHAR(50) NOT NULL,
CONSTRAINT PK_Customers PRIMARY KEY(custid)
);
GO
INSERT INTO dbo.Customers(custid, companyname, phone, address)
VALUES(1, 'cust 1', '(111) 111-1111', 'address 1'),
(2, 'cust 2', '(222) 222-2222', 'address 2'),
(3, 'cust 3', '(333) 333-3333', 'address 3'),
(4, 'cust 4', '(444) 444-4444', 'address 4'),
(5, 'cust 5', '(555) 555-5555', 'address 5');
GO
IF OBJECT_ID(N'dbo.CustomersStage', N'U') IS NOT NULL DROP TABLE dbo.CustomersStage;
CREATE TABLE dbo.CustomersStage
(
custid INT NOT NULL,
companyname VARCHAR(25) NOT NULL,
phone VARCHAR(20) NULL,
address VARCHAR(50) NOT NULL,
CONSTRAINT PK_CustomersStage PRIMARY KEY(custid)
);
GO
INSERT INTO dbo.CustomersStage(custid, companyname, phone, address)
VALUES(2, 'AAAAA', '(222) 222-2222', 'address 2'),
(3, 'cust 3', '(333) 333-3333', 'address 3'),
(5, 'BBBBB', 'CCCCC', 'DDDDD'),
(6, 'cust 6 (new)', '(666) 666-6666', 'address 6'),
(7, 'cust 7 (new)', '(777) 777-7777', 'address 7');
Update using table expressions
Suppose you need to update the information of existing customers in the Customers table with more recent information from the CustomersStage table. Normally, you do this with an UPDATE statement that is based on a join. Sometimes, though, you need to be able to see what’s supposed to be modified before you actually modify the data.
One solution people use for this purpose is to comment out the UPDATE clause and run the statement with a SELECT clause instead. Then, to run the actual modification, you comment out the SELECT clause and uncomment the UPDATE clause. But this solution is a bit awkward and prone to errors. A more elegant solution is to rely on the fact that T-SQL allows you to modify data in tables through table expressions. You join Customers and CustomersStage using a SELECT statement, returning the pairs of source and target columns that are involved in the modification. You define a CTE based on the SELECT statement, and then modify the data through the CTE, like so:
WITH C AS
(
SELECT
TGT.custid,
SRC.companyname AS src_companyname,
TGT.companyname AS tgt_companyname,
SRC.phone AS src_phone,
TGT.phone AS tgt_phone,
SRC.address AS src_address,
TGT.address AS tgt_address
FROM dbo.Customers AS TGT
INNER JOIN dbo.CustomersStage AS SRC
ON TGT.custid = SRC.custid
)
UPDATE C
SET tgt_companyname = src_companyname,
tgt_phone = src_phone,
tgt_address = src_address;
With this solution, when you just want to see which rows are supposed to be modified and with what, you highlight only the inner query and run it independently. When you’re ready to run the actual modification, you simply run the entire thing.
The rules for modifying data through CTEs that are based on joins are similar to the rules for modifying data through views that are based on joins. You can insert and update data through the CTE, but you’re allowed to modify only one target table at a time.
Update using variables
T-SQL supports a proprietary, specialized, UPDATE syntax you can use to modify data in a table and perform variable assignment at the same time. This capability is handy when you need to roll your own solution for generating surrogate keys with a guarantee that you won’t have a gap between the values. Recall that neither the sequence object nor the identity column property guarantee that you won’t have gaps between values, regardless of the cache value that you use.
An example where you need a custom sequence generator that guarantees no gaps is for invoicing systems. In many countries/regions, legally you’re not allowed to have gaps between invoice numbers.
The typical solution people use for this purpose is to store the last-used value in a table. The following code creates such a table, called MySequence, and populates it with the value 0, assuming that the first value you will need to generate is 1:
USE tempdb;
IF OBJECT_ID(N'dbo.MySequence', N'U') IS NOT NULL DROP TABLE dbo.MySequence;
CREATE TABLE dbo.MySequence(val INT NOT NULL);
INSERT INTO dbo.MySequence(val) VALUES(0);
The natural way to generate a new value is to use separate UPDATE and SELECT statements in an explicit transaction to ensure that no one else uses the value you generated. But this approach results in two visits to the row for every key you generate. A more efficient method is to use the specialized UPDATE syntax to both update the value and assign the updated value to a variable in one visit to the row, like so:
DECLARE @newval AS INT;
UPDATE dbo.MySequence SET @newval = val += 1;
SELECT @newval;
Run this code three times, and notice that the values returned are 1, 2, and 3.
The UPDATE statement requires an exclusive lock on the target row, and an exclusive lock is held until the end of the transaction. So once a transaction generates a key, until it finishes, no other transaction can obtain a new key. If the transaction ends up rolling back, the key change is undone. That’s how you guarantee no gaps.
To demonstrate this approach, open two connections. Run the following code in connection 1 to open a transaction and request a new key, leaving the transaction open:
BEGIN TRAN
DECLARE @newval AS INT;
UPDATE dbo.MySequence SET @newval = val += 1;
SELECT @newval;
You get the new key 4 back, but the row is still exclusively locked. Run the following code in connection 2 to try and obtain a new key:
BEGIN TRAN
DECLARE @newval AS INT;
UPDATE dbo.MySequence SET @newval = val += 1;
SELECT @newval;
Connection 2 is blocked.
Back in connection 1, run the following code to roll back the transaction:
ROLLBACK TRAN
The value in the table is undone to 3, and the lock is released by connection 1. Connection 2 manages to get the exclusive lock it was waiting for, updates the value from 3 to 4, and returns it.
Run the following code in connection 2 to commit the transaction:
COMMIT TRAN
Now that the value change to 4 is committed, the exclusive lock on the row is released by connection 2, and another transaction can request the next value.
You see how this solution guarantees you will not have gaps between values using the normal locking and blocking mechanism that SQL Server uses when updating data.
Merging data
You use the MERGE statement to merge data into some target table using data from some source table. It can be used in data-warehouse scenarios for merging data into summary tables, handling slowly changing dimensions, and more. It can also be used in online transaction processing (OLTP) scenarios when your system is not the one generating the data; instead, you periodically get updates from an external source that you need to merge into a table in your database.
T-SQL implements the MERGE statement based on standard SQL with an extension in the form of a clause called WHEN NOT MATCHED BY SOURCE, which handles a case that the standard statement doesn’t.
To demonstrate the MERGE statement, I’ll use the same Customers and CustomersStage tables you created earlier in the section “Updating data.”
MERGE examples
I’ll explain the MERGE statement through examples. I’ll start with the fundamental clauses that the statement supports.
Suppose you need to merge the data you have in the source CustomersStage table into the target Customers table. For source customers that are matched by a target customer, you want to update the target row with the more recent information from the source row. For source customers that are not matched by a target customer, you want to insert the source customer as a new customer row into the target. Finally, for target customers that are not matched by a source customer, you want to delete the target customer row. You implement such a merge task with the following MERGE statement:
MERGE INTO dbo.Customers AS TGT
USING dbo.CustomersStage AS SRC
ON TGT.custid = SRC.custid
WHEN MATCHED THEN
UPDATE SET
TGT.companyname = SRC.companyname,
TGT.phone = SRC.phone,
TGT.address = SRC.address
WHEN NOT MATCHED THEN
INSERT (custid, companyname, phone, address)
VALUES (SRC.custid, SRC.companyname, SRC.phone, SRC.address)
WHEN NOT MATCHED BY SOURCE THEN
DELETE;
The MERGE INTO clause is where you define the target table and, optionally, alias it. In our case, the target is the Customers table, and it’s aliased as TGT.
The USING clause is where you define the source for the merge task and, optionally, alias it. In our case, the source is the CustomersStage table, and it’s aliased as SRC. An interesting thing about the USING clause is that it’s designed similar to the FROM clause in a SELECT statement. You are not limited to querying a table as the source; rather, you can use sources like table operators, table expressions, and table functions. I’ll say more about this capability shortly.
The next part to define in the MERGE statement is the merge ON predicate. The purpose of the merge predicate is to determine whether a source row is matched by a target row or not, as well as whether a target row is matched by a source row. For us, making such a determination is intuitive, but not for the MERGE statement. Remember the statement doesn’t require the source and target tables to have keys defined in order to work. So, in our case, the merge predicate is TGT.custid = SRC.custid.
With the target and source identified and the merge predicate defined, the remaining clauses define which actions to take against the target in the different cases (INSERT, UPDATE, or DELETE). Using the WHEN MATCHED clause, you define what to do against the target when a source row is matched by a target row. With our sample data, customers 2, 3, and 5 qualify. There are two possible actions you can take against the target row when you have a match: UPDATE and DELETE. If you think about it, an INSERT action doesn’t make sense here because the target row exists. In fact, the MERGE statement doesn’t support an INSERT action in this case. In our MERGE statement example, the action taken in this clause is UPDATE; you update the target row with the more recent information from the source row.
Unlike an UPDATE statement based on a join, if a MERGE statement detects that multiple source rows match one target row, it generates an error. An UPDATE statement simply does a nondeterministic update in such a case; namely, one of the source rows will be used to update the target. The MERGE statement is more robust in such cases, protecting you from bugs. You need to figure out how to prepare the source data to ensure that no more than one source row matches a target row.
Technically, the MERGE statement supports as many occurrences of a clause as the number of valid actions. Because the WHEN MATCHED clause supports two valid actions—UPDATE and DELETE—you are allowed two such clauses. You can specify an additional predicate after an AND operator that indicates the condition in which to apply the action that is associated with that clause. This way, based on different additional conditions, you can apply the different actions. For example, suppose the source table has a column called actiontype that holds the string ‘UPDATE’ or ‘DELETE’ that tells you which action you are supposed to take. In your MERGE statement, you use two WHEN MATCHED clauses with extra predicates that specify when to apply each action, like so:
WHEN MATCHED AND actiontype = 'UPDATE' THEN
UPDATE SET
TGT.companyname = SRC.companyname,
TGT.phone = SRC.phone,
TGT.address = SRC.address
WHEN MATCHED AND actiontype = 'DELETE' THEN
DELETE
If you indicate an additional predicate in the first clause but none in the second clause, the rows that satisfy the additional predicate in the first clause will cause the action associated with the first clause to be activated, and those that don’t will cause the action associated with the second clause to be activated.
The WHEN NOT MATCHED clause (short for WHEN NOT MATCHED BY TARGET) gives you a way to define the action to take when the source row is not matched by a target row. In our sample data, customers 6 and 7 qualify. The only valid action in this clause is INSERT, for an obvious reason—there is no respective target row. You can still add an extra predicate after an AND operator so that the insert takes place only if the extra predicate is true.
The WHEN MATCHED and WHEN NOT MATCHED clauses are standard. But that’s where the standard stops. Microsoft reckoned that there’s a case that the standard doesn’t deal with but which might be important for you to deal with—when a target row is not matched by a source row. Such is the case in our sample data, with customers 1 and 4. So Microsoft introduced an extension to the standard in the form of a clause called WHEN NOT MATCHED BY SOURCE. You can use this clause to define the action to take against the target row when there’s no matching source row. Because the target row exists, the valid actions you can apply are DELETE and UPDATE; INSERT is not supported. In our example MERGE statement, the action taken in this clause is DELETE.
Just like with the WHEN MATCHED clause, because there are two valid actions in the WHEN NOT MATCHED BY SOURCE clause, you are allowed two occurrences of the clause. And by using extra predicates you can control when to apply each action. As an example, suppose that if the current date is an end-of-month date, you need to update an isdeleted flag in the target row to 1; if the current date is not an end-of-month date, you need to actually delete the target row. You achieve this with the following two WHEN NOT MATCHED BY SOURCE clauses:
WHEN NOT MATCHED BY SOURCE AND CAST(SYSDATETIME() AS DATE) = EOMONTH(SYSDATETIME()) THEN
UPDATE SET
TGT.isdeleted = 1
WHEN NOT MATCHED BY SOURCE THEN
DELETE
Back to the WHEN MATCHED clause, suppose you want to apply the update only if at least one of the column values is different between the source rows and the target rows. You do not want to apply the update if they are identical. For one, you don’t want to pay the cost of the update, and two, perhaps you have additional processes triggered when rows are updated and you don’t want those processes to run if there’s no actual change. You can use the extra predicate in the clause to check that at least one column value is different. For columns that do not allow NULLs, you can simply use the predicate TGT.colname <> SRC.colname. But for columns that allow NULLs, you need to use the longer form TGT.colname <> SRC.colname OR TGT.colname IS NULL AND SRC.colname IS NOT NULL OR TGT.colname IS NOT NULL AND SRC.colname IS NULL. In our merge example, the phone column allows NULLs, so for this column you need the longer predicate form. Here’s the last merge example, which is modified to apply the update only if at least one of the column values is different:
MERGE INTO dbo.Customers AS TGT
USING dbo.CustomersStage AS SRC
ON TGT.custid = SRC.custid
WHEN MATCHED AND
( TGT.companyname <> SRC.companyname
OR TGT.phone <> SRC.phone
OR TGT.phone IS NULL AND SRC.phone IS NOT NULL
OR TGT.phone IS NOT NULL AND SRC.phone IS NULL
OR TGT.address <> SRC.address) THEN
UPDATE SET
TGT.companyname = SRC.companyname,
TGT.phone = SRC.phone,
TGT.address = SRC.address
WHEN NOT MATCHED THEN
INSERT (custid, companyname, phone, address)
VALUES (SRC.custid, SRC.companyname, SRC.phone, SRC.address)
WHEN NOT MATCHED BY SOURCE THEN
DELETE;
A much more concise alternative is to use the EXCEPT set operator, like so:
WHEN MATCHED AND EXISTS ( SELECT TGT.* EXCEPT SELECT SRC.* ) THEN
The thing about set operators is that, when comparing rows, they implicitly use the distinct predicate as opposed to the different than (<>) operator. When checking whether a NULL is distinct from a non-NULL, you get true. When checking whether a NULL is different than a non-NULL, you get unknown. This makes it much simpler to compare rows using set operators, because you don’t need special treatment for NULLs. Of course, the assumption here is that the structures of both tables are the same. If they are not, you can always define views to get compatible structures and use the views as the source and target for the MERGE statement.
What could make it easier to phrase conditions that consider a NULL versus non-NULL as different, and NULL versus NULL as the same, is if T-SQL supported the standard distinct predicate. You can find a request to add support for the distinct predicate in SQL Server here:https://connect.microsoft.com/SQLServer/feedback/details/286422/.
Preventing MERGE conflicts
When multiple MERGE statements handle overlapping keys and are executed concurrently, they can run into conflicts that result in primary key violations. That’s because under the default Read Committed isolation level, you are not guaranteed to get serialized access to the data throughout the transaction. It could happen that two or more statements check whether a certain key exists at the same time, all getting false; therefore, all try to insert a new row with that key. One will succeed, and the rest will fail with a primary key violation.
For example, consider the following stored procedure called AddCustomer:
IF OBJECT_ID(N'dbo.AddCustomer', N'P') IS NOT NULL DROP PROC dbo.AddCustomer;
GO
CREATE PROC dbo.AddCustomer
@custid INT, @companyname VARCHAR(25), @phone VARCHAR(20), @address VARCHAR(50)
AS
MERGE INTO dbo.Customers /* WITH (SERIALIZABLE) */ AS TGT
USING (VALUES(@custid, @companyname, @phone, @address))
AS SRC(custid, companyname, phone, address)
ON TGT.custid = SRC.custid
WHEN MATCHED THEN
UPDATE SET
TGT.companyname = SRC.companyname,
TGT.phone = SRC.phone,
TGT.address = SRC.address
WHEN NOT MATCHED THEN
INSERT (custid, companyname, phone, address)
VALUES (SRC.custid, SRC.companyname, SRC.phone, SRC.address);
GO
The procedure accepts information about a customer as input. If the customer ID already exists, it updates the existing customer with the new information; otherwise, it adds a new customer. If multiple sessions execute the procedure concurrently with the same customer ID, and that customer doesn’t exist, one will succeed and the others will get a primary key violation. To demonstrate this, run the following code from multiple sessions:
SET NOCOUNT ON;
USE tempdb;
WHILE 1 = 1
BEGIN
DECLARE @curcustid AS INT = CHECKSUM(CAST(SYSDATETIME() AS DATETIME2(2)));
EXEC dbo.AddCustomer @custid = @curcustid, @companyname = 'A', @phone = 'B', @address = 'C';
END;
After a few iterations, you’ll start getting primary key violations like the following:
Msg 2627, Level 14, State 1, Procedure AddCustomer, Line 5
Violation of PRIMARY KEY constraint 'PK_Customers'. Cannot insert duplicate key in object
'dbo.Customers'. The duplicate key value is (1777624945).
To avoid the conflict, you need to serialize access to the data throughout the transaction. To achieve this, you use the SERIALIZABLE isolation level. In our procedure, remove the block comment delimiters in the MERGE INTO clause after the table name to specify the SERIALIZABLE isolation as a table hint. You can also use the HOLDLOCK hint, which is equivalent. You can then try the test again and see that you don’t get any primary key violation errors anymore.
ON isn’t a filter
It’s a common mistake to think of the MERGE ON predicate as a filter and end up with a bug. The ON predicate defines whether a source row is matched by a target row or not, and then accordingly directs the row to the right clause to apply the respective action. As an example, suppose you need to merge only the source row for customer 2 into the target, updating the existing row if the customer exists and inserting a new row if it doesn’t. Thinking (incorrectly) of the ON predicate as a filter, you write the following MERGE statement:
MERGE INTO dbo.Customers AS TGT
USING dbo.CustomersStage AS SRC
ON TGT.custid = SRC.custid
AND SRC.custid = 2
WHEN MATCHED THEN
UPDATE SET
TGT.companyname = SRC.companyname,
TGT.phone = SRC.phone,
TGT.address = SRC.address
WHEN NOT MATCHED THEN
INSERT (custid, companyname, phone, address)
VALUES (SRC.custid, SRC.companyname, SRC.phone, SRC.address);
What happens in practice is that for all source rows with a customer ID other than 2, the ON predicate evaluates to false; in such a case, the row is directed to the WHEN NOT MATCHED clause, resulting in an insert action. Instead of ignoring all source customers other than 2, the statement applies an insert action for them. If any of those customer IDs exist in the target, you will get a primary key violation. Worse, if none already exist, you will insert them into the target even though you were not supposed to. For example, when I ran this statement, I got the following primary key violation related to customer 3:
Msg 2627, Level 14, State 1, Line 805
Violation of PRIMARY KEY constraint 'PK_Customers'. Cannot insert duplicate key in object
'dbo.Customers'. The duplicate key value is (3).
The statement has been terminated.
The correct solution is to prepare a table expression where you filter only the source row for customer 2 and use that table expression as the source for the MERGE statement, like so:
MERGE INTO dbo.Customers AS TGT
USING (SELECT * FROM dbo.CustomersStage WHERE custid = 2) AS SRC
ON TGT.custid = SRC.custid
WHEN MATCHED THEN
UPDATE SET
TGT.companyname = SRC.companyname,
TGT.phone = SRC.phone,
TGT.address = SRC.address
WHEN NOT MATCHED THEN
INSERT (custid, companyname, phone, address)
VALUES (SRC.custid, SRC.companyname, SRC.phone, SRC.address);
USING is similar to FROM
An interesting fact about the MERGE statement is that the USING clause is designed like the SELECT statement’s FROM clause. This means you’re not limited to referring to a table as the source; rather, you can apply table operators like JOIN, APPLY, PIVOT, and UNPIVOT, as well as refer to table functions.
An example where this capability can be handy is when the source data for a merge process is in a file. You don’t have to first import the data to a staging table and then use the staging table as the source. Instead, you can use the file as the direct source for the MERGE statement by specifying the OPENROWSET function with the BULK provider in the USING clause.
To demonstrate this, I’ll export the data from the Customers table to a file called C:\temp\Customers.txt, and then use that file as the source for a merge example. First run the following bcp command from a command prompt to create a format file called CustomersFmt.xml based on the structure of the Customers table (making sure the folder c:\temp\ exists and changing the server and instance names to yours):
bcp tempdb.dbo.Customers format nul -c -x -f C:\temp\CustomersFmt.xml -T -S <server\instance>
Then run the following bcp command to export the data from the Customers table to the file Customers.txt:
bcp tempdb.dbo.Customers out C:\temp\Customers.txt -c -T -S <server\instance>
Now, suppose you need to merge the data from the Customers.txt file into your existing Customers table, updating customers that exist with the new info and inserting customers that don’t exist. You specify the OPENROWSET function in the USING clause to use the file as the source for the MERGE statement directly, like so:
MERGE INTO dbo.Customers AS TGT
USING OPENROWSET(BULK 'C:\temp\Customers.txt',
FORMATFILE = 'C:\temp\CustomersFmt.xml') AS SRC
ON TGT.custid = SRC.custid
WHEN MATCHED THEN
UPDATE SET
TGT.companyname = SRC.companyname,
TGT.phone = SRC.phone,
TGT.address = SRC.address
WHEN NOT MATCHED THEN
INSERT (custid, companyname, phone, address)
VALUES (SRC.custid, SRC.companyname, SRC.phone, SRC.address);
The OUTPUT clause
The OUTPUT clause is a powerful feature that allows modification statements to return information from the modified rows. You can use it for purposes like auditing, archiving, and others. The syntax for using the clause is
OUTPUT <output_list> [INTO <output_table>]
Without an INTO clause, the output rows are returned to the caller as a result set just like with a SELECT statement. With an INTO clause, they are written to a table. When using INTO, output_table must exist. It cannot have triggers, foreign keys, or check constraints. You are allowed to have two OUTPUT clauses if you like—one with INTO, directing the output rows to a table, and another without INTO, directing the rows to the caller.
When referring to columns from the modified rows, you need to prefix them with the keywords inserted or deleted, depending on whether you need the column from the inserted or deleted row. In INSERT statements, naturally you refer to inserted, and in DELETE statements you refer todeleted. In UPDATE and MERGE statements, you might want to refer to both to get the old and new states of an updated row. In the OUTPUT clause of an INSERT statement, you can refer to elements from the inserted row but not from the source table. Interestingly, in the OUTPUT clause of a MERGE statement you are allowed to refer to elements from the source table. I will demonstrate this capability shortly.
The beauty of the OUTPUT clause is that it’s designed similar to the SELECT clause. You’re not limited to just referring to columns directly; rather, you can apply calculations, call functions, and assign aliases to the result columns. For example, suppose that in an UPDATE statement you wanted to capture the difference between the new and old values of a column called qty; in the OUTPUT clause, you can specify inserted.qty – deleted.qty AS qtydiff.
In the following sections, I’ll provide practical examples for using the OUTPUT clause with different modification statements.
Example with INSERT and identity
Suppose you have a multi-row insert into a table with an identity column and you need to capture the newly generated identity values for further use. SQL Server provides you with the SCOPE_IDENTITY function to capture the last identity value generated in your session and scope, but it doesn’t provide you with a tool to capture multiple generated identity values. The solution is to use the OUTPUT clause.
To demonstrate this, first run the following code, which creates a table called T1 with an identity column:
USE tempdb;
IF OBJECT_ID(N'dbo.T1', N'U') IS NOT NULL DROP TABLE dbo.T1;
GO
CREATE TABLE dbo.T1
(
keycol INT NOT NULL IDENTITY(1, 1) CONSTRAINT PK_T1 PRIMARY KEY,
datacol NVARCHAR(40) NOT NULL
);
The following INSERT statement copies five rows from the table TSQLV3.HR.Employees into the table T1, causing five identity values to be generated:
INSERT INTO dbo.T1(datacol)
OUTPUT inserted.$identity, inserted.datacol
SELECT lastname
FROM TSQLV3.HR.Employees
WHERE country = N'USA';
Using the OUTPUT clause, the statement returns the newly generated identity values along with other information from the inserted rows. Observe the reference to the identity column using the generalized form $identity. SQL Server supports this generalized form because only one identity column is allowed per table. Of course, you can refer to the original column name inserted.keycol directly if you want.
This code generates the following output:
keycol datacol
------- --------
1 Davis
2 Funk
3 Lew
4 Peled
5 Cameron
To direct the output rows to a table variable for further use, add the INTO clause. To demonstrate this, first truncate the table T1:
TRUNCATE TABLE dbo.T1;
Then add to the previous example a declaration of a table variable and an INTO clause, like so:
DECLARE @NewRows TABLE(keycol INT, datacol NVARCHAR(40));
INSERT INTO dbo.T1(datacol)
OUTPUT inserted.$identity, inserted.datacol
INTO @NewRows(keycol, datacol)
SELECT lastname
FROM TSQLV3.HR.Employees
WHERE country = N'USA';
SELECT keycol, datacol FROM @NewRows;
You get the following output showing the contents of the table variable:
keycol datacol
------- --------
1 Davis
2 Funk
3 Lew
4 Peled
5 Cameron
Example for archiving deleted data
To better understand the OUTPUT clause with a DELETE statement, consider a task involving data deletion and a requirement to also archive the rows you’re deleting. The archiving can be achieved using the OUTPUT clause in the DELETE statement.
To demonstrate this, first run the following code, which creates a table called Orders with some sample data in tempdb, as well as a table called Orders in a database called Archive to absorb archived orders:
IF DB_ID(N'Archive') IS NULL CREATE DATABASE Archive;
GO
USE Archive;
IF OBJECT_ID(N'dbo.Orders', N'U') IS NOT NULL DROP TABLE dbo.Orders;
SELECT ISNULL(orderid, 0) AS orderid, orderdate, empid, custid
INTO dbo.Orders
FROM TSQLV3.Sales.Orders WHERE 1 = 2;
ALTER TABLE dbo.Orders ADD CONSTRAINT PK_Orders PRIMARY KEY(orderid);
USE tempdb;
IF OBJECT_ID(N'dbo.Orders', N'U') IS NOT NULL DROP TABLE dbo.Orders;
SELECT orderid, orderdate, empid, custid INTO dbo.Orders FROM TSQLV3.Sales.Orders;
ALTER TABLE dbo.Orders ADD CONSTRAINT PK_Orders PRIMARY KEY(orderid);
-- Before delete
SELECT orderid, orderdate, empid, custid FROM dbo.Orders;
SELECT orderid, orderdate, empid, custid FROM Archive.dbo.Orders;
The last two queries show the contents of the active and archived Orders tables before the deletion.
Suppose you need to delete orders placed prior to 2014 from the active Orders table in tempdb and archive the deleted orders in the Orders table in Archive. You do this with the OUTPUT clause, like so:
DELETE FROM dbo.Orders
OUTPUT
deleted.orderid,
deleted.orderdate,
deleted.empid,
deleted.custid
INTO Archive.dbo.Orders
WHERE orderdate < '20140101';
If the number of rows you need to delete is large, you can apply the modification-in-chunks technique demonstrated earlier, only this time with the added OUTPUT INTO clause, like so:
WHILE 1 = 1
BEGIN
DELETE TOP (3000) FROM dbo.Orders
OUTPUT
deleted.orderid,
deleted.orderdate,
deleted.empid,
deleted.custid
INTO Archive.dbo.Orders
WHERE orderdate < '20140101';
IF @@ROWCOUNT < 3000 BREAK;
END;
Run the following queries to show the contents of the active and archived Orders tables after the deletion:
SELECT orderid, orderdate, empid, custid FROM dbo.Orders;
SELECT orderid, orderdate, empid, custid FROM Archive.dbo.Orders;
Example with the MERGE statement
With the MERGE statement, you have complexity that you don’t have with the other statements: how do you know which action affected each output row? For this, SQL Server provides you with the function $action, which returns a string with the action ‘INSERT’, ‘UPDATE’, or ‘DELETE’.
To demonstrate using this function, first repopulate the Customers and CustomersStage tables with new sample data by running the following code:
TRUNCATE TABLE dbo.Customers;
TRUNCATE TABLE dbo.CustomersStage;
INSERT INTO dbo.Customers(custid, companyname, phone, address)
VALUES(1, 'cust 1', '(111) 111-1111', 'address 1'),
(2, 'cust 2', '(222) 222-2222', 'address 2'),
(3, 'cust 3', '(333) 333-3333', 'address 3'),
(4, 'cust 4', '(444) 444-4444', 'address 4'),
(5, 'cust 5', '(555) 555-5555', 'address 5');
INSERT INTO dbo.CustomersStage(custid, companyname, phone, address)
VALUES(2, 'AAAAA', '(222) 222-2222', 'address 2'),
(3, 'cust 3', '(333) 333-3333', 'address 3'),
(5, 'BBBBB', 'CCCCC', 'DDDDD'),
(6, 'cust 6 (new)', '(666) 666-6666', 'address 6'),
(7, 'cust 7 (new)', '(777) 777-7777', 'address 7');
Then run the following MERGE statement using the OUTPUT clause with the $action function, also returning the old and new keys of the modified rows:
MERGE INTO dbo.Customers AS TGT
USING dbo.CustomersStage AS SRC
ON TGT.custid = SRC.custid
WHEN MATCHED THEN
UPDATE SET
TGT.companyname = SRC.companyname,
TGT.phone = SRC.phone,
TGT.address = SRC.address
WHEN NOT MATCHED THEN
INSERT (custid, companyname, phone, address)
VALUES (SRC.custid, SRC.companyname, SRC.phone, SRC.address)
WHEN NOT MATCHED BY SOURCE THEN
DELETE
OUTPUT
$action AS the_action, deleted.custid AS del_custid, inserted.custid AS ins_custid;
This statement generates the following output:
the_action del_custid ins_custid
---------- ----------- -----------
DELETE 1 NULL
UPDATE 2 2
UPDATE 3 3
DELETE 4 NULL
UPDATE 5 5
INSERT NULL 6
INSERT NULL 7
You can clearly see which action affected the output row. Also observe that with inserted rows deleted columns are NULLs, and with deleted rows inserted columns are NULLs. With updated rows, both inserted and deleted columns have values.
As mentioned earlier, unlike with the INSERT statement, the MERGE statement allows you to refer to the source elements. This capability is beneficial when you need to return elements from the source that were not inserted into the target in the output. To demonstrate this, I’ll use the table T1 from the previous INSERT example. First run the following code to truncate the table:
TRUNCATE TABLE dbo.T1;
Suppose you need to query from the TSQLV3.HR.Employees table lastname values of employees from the US and insert those into T1 as datacol values. You need to return output rows showing the target keycol and datacol values, but you also need to return the source keys (empidvalues). Try to accomplish the task using an INSERT statement by running the following code:
INSERT INTO dbo.T1(datacol)
OUTPUT SRC.empid AS sourcekey, inserted.keycol AS targetkey, inserted.datacol AS targetdatacol
SELECT lastname
FROM TSQLV3.HR.Employees AS SRC
WHERE country = N'USA';
You get the following error:
Msg 4104, Level 16, State 1, Line 1056
The multi-part identifier "SRC.empid" could not be bound.
The attempt fails because the INSERT statement doesn’t support referring to the source table’s elements in the OUTPUT clause. Conversely, the MERGE statement does. So you could implement the task with MERGE by applying an INSERT action; however, an INSERT action is allowed only in the WHEN NOT MATCHED clause, and this clause is applied when the merge predicate is false. So the trick is to use a condition that is always false, like so:
MERGE INTO dbo.T1 AS TGT
USING (SELECT * FROM TSQLV3.HR.Employees WHERE country = N'USA') AS SRC
ON 1 = 2
WHEN NOT MATCHED THEN
INSERT (datacol) VALUES(SRC.lastname)
OUTPUT SRC.empid AS sourcekey, inserted.keycol AS targetkey, inserted.datacol AS targetdatacol;
This statement succeeds, generating the following output:
sourcekey targetkey targetdatacol
----------- ----------- --------------
1 1 Davis
2 2 Funk
3 3 Lew
4 4 Peled
8 5 Cameron
You can find an example for a practical application of this technique in the article “Copying Data with Dependencies” at http://sqlmag.com/t-sql/copying-data-dependencies.
Composable DML
Suppose you need to modify rows in some table and write output information from the modified rows into some target table. Normally, you simply use the OUTPUT INTO clause. But you need to capture only a subset of the output rows—not all of them. As an example, suppose you want to delete all rows representing orders placed prior to 2014 from the Orders table in the tempdb database. You need to archive deleted rows in the Orders table in the Archive database, but only for customers 11 and 42. You don’t want to write the entire set of output rows into a stage and then copy only the interesting subset of rows from the stage because this could represent a lot of unnecessary work.
T-SQL supports nesting a DML statement with an OUTPUT clause in an INSERT SELECT statement—a feature known in some platforms as composable DML. With this feature, you can achieve tasks such as our delete with archive without an intermediate stage, like so:
INSERT INTO Archive.dbo.Orders (orderid, orderdate, empid, custid)
SELECT orderid, orderdate, empid, custid
FROM ( DELETE FROM dbo.Orders
OUTPUT
deleted.orderid,
deleted.orderdate,
deleted.empid,
deleted.custid
WHERE orderdate < '20140101' ) AS D
WHERE custid IN (11, 42);
Composable DML can also be useful to handle slowly changing dimensions (SCD) type 2 in a data warehouse. You can define a derived table based on a MERGE statement that has an OUTPUT clause with a call to the $action function. Then, in the outer query, you can filter the output rows that were updated (the action is ‘UPDATE’), and insert those into the table as the new version of the rows.
Composable DML is implemented currently in T-SQL in a limited form. You can use this feature only in an INSERT SELECT statement. You can specify a WHERE filter, but you cannot apply any further manipulations like joins or other table operators, grouping, and so on.
Finally, this feature has restrictions similar to those for the OUTPUT clause. The target table can be a permanent table, temporary table, or table variable. The target cannot be a table expression (such as a view), have triggers, or participate in primary key–foreign key relationships.
Conclusion
This chapter covered a number of topics related to data modification. It described some of the bulk-import tools SQL Server supports and the requirements they need to meet in order to be processed with minimal logging. It covered the sequence object, comparing and contrasting it with the identity column property and providing important performance considerations. The chapter covered data deletion and updating topics. It also provided a number of tips for working correctly with the MERGE statement and avoiding possible pitfalls. Finally, the chapter covered the OUTPUT clause, describing practical use cases of the feature.
All materials on the site are licensed Creative Commons Attribution-Sharealike 3.0 Unported CC BY-SA 3.0 & GNU Free Documentation License (GFDL)
If you are the copyright holder of any material contained on our site and intend to remove it, please contact our site administrator for approval.
© 2016-2026 All site design rights belong to S.Y.A.