WCF Multi-layer Services Development with Entity Framework Fourth Edition (2014)
Chapter 2. Hosting the HelloWorld WCF Service
In the previous chapter, we built a basic HelloWorld WCF service and hosted it within IIS Express. In this chapter, we will explore more hosting options for WCF services, such as the following:
· Hosting a WCF service in a console application
· Hosting a WCF service in a Windows service application
· Hosting a WCF service in IIS using the HTTP protocol
· Hosting a WCF service in IIS using the TCP protocol
· Testing a WCF service
WCF hosting options
From the previous chapter, we know that a WCF service can be hosted within IIS Express. This method is the most convenient way to host a WCF service during the development stage.
Besides IIS Express, a WCF service can also be hosted in a managed application, such as a command-line application, a Windows service application, or on a website. This method is often referred to as a self-hosting method, as you have to write your own hosting application.
In addition to IIS Express and a managed application, IIS can also be used to host a WCF service. In fact, this is the most popular way to host a WCF service in production and, as we will learn soon in this chapter, you will benefit a lot from this hosting method.
In this chapter, we will explore all these options one by one in detail, except IIS Express, which has been covered in the previous chapter.
However, before we start exploring these options, I would like to point out some more options to host a WCF service:
· In Visual Studio, there is a built-in, general-purpose WCF service host (WcfSvcHost.exe), which makes the WCF host and development much easier. This host will be used by default if you create a WCF service using the WCF Service Library template. We will cover this feature in Chapter 5, Implementing a Three-layer WCF Service.
· Another option is to create a WCF service using the WCF Service Application template, in which case the WCF service project itself is a website and is ready to run within its own project folder. We will not cover this feature in this book as this kind of project is essentially a WCF service plus a WCF hosting website. You can try it and adopt it if it satisfies your needs.
· A WCF service can also be published to, and hosted in, the cloud. Microsoft Azure is such a platform. We will cover this feature in the next chapter.
Hosting the service in a managed application
First, let's create a .NET-managed application and host a WCF service within this application. The hosting application can be, for example, a command-line application, a Windows service application, a Windows Forms application, or a web application. This hosting method gives you full control over the lifetime of the WCF service. It is very easy to debug and deploy and supports all bindings and transports. The major drawbacks of these hosting methods are that you have to start the hosting application manually and that it provides only limited support for high availability, easy manageability, robustness, recoverability, versioning, and deployment scenarios. You could implement a hosting environment that provides all of these. However, it would cost you a lot in terms of effort and money to build something that is comparable to IIS.
Hosting the service in a console application
The following steps are needed to host a HelloWorldService in a command-line application. Note that these steps are very similar to the steps in one of the previous sections where we hosted a WCF service in IIS Express. However, the configuration file is called App.config and notWeb.config.
If you want to host a WCF service in a Windows service application, a Windows Forms application, or a web application, you can follow the same steps that we have listed here, simply by creating the project using the appropriate project template:
1. Add a console application project to the solution:
In the Solution Explorer, right-click on the solution file and go to Add | New Project… from the context menu. The Add New Project dialog box should appear. Select Visual C# | Console Application as the template. Then, change the name from ConsoleApplication1 toHostCmdLineApp and click on the OK button. A new project is added to the solution.
2. Set the HostCmdLineApp project as the startup project:
In the Solution Explorer, right-click on the HostCmdLineApp project and select Set as StartUp Project from the context menu. Alternatively, you can also select the project in the Solution Explorer and then select the menu item PROJECT | Set as StartUp Project.
3. Add a reference to the HelloWorldService project:
In the Solution Explorer, right-click on the HostCmdLineApp project and go to Add | Reference… from the shortcut menu. The Reference Manager dialog box will appear. Click on Projects under the Solution tab, select and check the HelloWorldService project, and then click on OK. Now, HelloWorldService is under the References folder of this project.
4. Add a reference to System.ServiceModel:
This reference is required as we will manually create a service host application and start and stop it in the steps that follow. In the Solution Explorer window, right-click on the HostCmdLineApp project and go to Add | Reference… from the context menu. You can also select the menu item PROJECT | Add Reference… to do this. Check System.ServiceModel from Framework under the Assemblies tab and click on OK.
5. Modify the configuration file to define the behavior of the service. We need to add a serviceModel node to enable the metadata for all services hosted within this application. The following is the full content of the App.config file:
6. <?xml version="1.0" encoding="utf-8" ?>
7. <configuration>
8. <startup>
9. <supportedRuntime version="v4.0" sku=".NETFramework,Version=v4.5" />
10. </startup>
11.
12. <system.serviceModel>
13. <behaviors>
14. <serviceBehaviors>
15. <behavior>
16. <serviceMetadata httpGetEnabled="true"/>
17. </behavior>
18. </serviceBehaviors>
19. </behaviors>
20. </system.serviceModel>
21.
</configuration>
6. Now, we need to modify the Program.cs file by writing some code in it to start and stop the WCF service. First, add a using statement, as follows:
using System.ServiceModel;
7. Then, add the following lines of code within the static Main method:
8. var host =
9. new ServiceHost(typeof(HelloWorldService.HelloWorldService),
10.new Uri("http://localhost:55859/HostCmdLineApp/HelloWorldService.svc"));
11.host.Open();
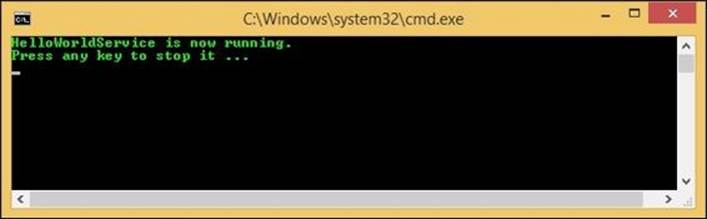
12.Console.WriteLine("HelloWorldService is now running. ");
13.Console.WriteLine("Press any key to stop it ...");
14.Console.ReadKey();
host.Close();
As you can see from the preceding code snippet:
· We get the type of HelloWorldService
· We construct a base address for the WCF service and create a service host, passing the type and base address
· We call the Open method of the host to start the service
· To stop the service, we just call the Close method of the service host
The following code snippet shows the full content of the Program.cs file:
using System;
using System.Collections.Generic;
using System.Linq;
using System.Text;
using System.Threading.Tasks;
using System.ServiceModel;
namespace HostCmdLineApp
{
class Program
{
static void Main(string[] args)
{
var host =
new ServiceHost(typeof(HelloWorldService.HelloWorldService),
new Uri("http://localhost:55859/HostCmdLineApp/HelloWorldService.svc"));
host.Open();
Console.WriteLine("HelloWorldService is now running. ");
Console.WriteLine("Press any key to stop it ...");
Console.ReadKey();
host.Close();
}
}
}
After the project has been successfully built, you can press Ctrl + F5 or just F5 to start the service. You will see a command-line window indicating that HelloWorldService is available and waiting for requests:
Note that when you run the program, you might get an error message such as System.ServiceModel.AddressAccessDeniedException, Your process does not have access rights to this namespace. This is because Visual Studio has to register the namespace for the HelloWorldservice and, by default, Windows runs applications under a limited-rights user account even when you are logged in to the computer as an administrator. You have to run Visual Studio as an administrator to solve this issue. Just right-click on the Visual Studio executable file,devenv.exe, and select Run as administrator, or change the Privilege Level property (from the Compatibility tab) to Run this program as an administrator, so you can always run Visual Studio as an administrator.
Alternatively, if you don't want to run Visual Studio as an administrator, you can manually register the namespace using tools such as HttpSysConfig. You can search for Your process does not have access rights to this namespace on the Internet, using your preferred search provider to see the various solutions for this issue.
Consuming the service hosted in a console application
To consume the service hosted in the previous console application, you can follow the same steps as described in the Creating a client to consume the WCF service section of Chapter 1, Implementing a Basic HelloWorld WCF Service; except here you will passhttp://localhost:55859/HostCmdLineApp/HelloWorldService.svc?wsdl instead of http://localhost:55859/HostExpressServer/HelloWorldService.svc?wsdl to the SvcUtil.exe command when you generate the proxy class and the configuration file.
In fact, you can reuse the same client project because it is the same service, just hosted differently. To reuse the same client inside the App.config file of the HelloWorldClient project, consider the following line of code:
<endpoint address="http://localhost:55859/HostExpressServer/HelloWorldService.svc"
Change this into the following line:
<endpoint address="http://localhost:55859/HostCmdLineApp/HelloWorldService.svc"
Now, when you run the client program, it will use the WCF service hosted in the newly created command-line application and not the previously-created HostExpressServer application. You will get the same result as before when IIS Express was used to host the WCF service.
Hosting the service in a Windows service
If you don't want to manually start the WCF service, you can host it in a Windows service. In addition to the automatic start, the Windows service hosting gives you some other features, such as recovery ability when failures occur, security identity under which the service is running, and some degree of manageability. Just as with the self-hosting method, this hosting method also supports all bindings and transports. However, it also has some limitations. For example, you have to deploy it with an installer and it doesn't fully support high availability, easy manageability, versioning, and deployment scenarios.
The steps to create such a hosting application are very similar to what we did to host a WCF service in a command-line application, except that you have to create an installer to install the Windows service in the service control manager. You can refer to the following page on the Microsoft website in order to know how to create such a Windows service installer (http://msdn.microsoft.com/en-us/library/9k985bc9(v=vs.110).aspx).
Hosting the service in IIS using the HTTP protocol
It is a better option to host a WCF service within the Internet Information Services (IIS) server because IIS provides a robust, efficient, and secure host for WCF services. IIS also has better thread and process execution boundaries handling capability (in addition to many other features) compared to a regular managed application. Actually, web service development on IIS has been the domain of ASP.NET for a long time. When ASP.NET 1.0 was released, a web service framework was part of it. Microsoft leveraged the ASP.NET HTTP pipeline to make web services a reality on the Windows platform.
One thing you need to pay particular attention to when hosting WCF in IIS is that the process and/or application domain might be recycled if certain conditions are met. By default, the WCF service session's state is saved in memory; hence, all information will be lost in each recycle. This will be a big problem if you run a website in a load-balanced or web-farm (web-garden) environment. In this case, you should save the session's state in a SQL server database or in the ASP.NET state server.
Next, we will learn how to host HelloWorldService in IIS using the HTTP protocol. After this section, we will learn how to host it using the TCP protocol so that you can choose the appropriate protocol for your service according to your specific needs.
Preparing the folders and files
First, we need to prepare the folders and files for the host application. Follow the following steps to create the folders and copy the required files:
1. Create the folders:
In Windows Explorer, create a new folder called HostIIS under C:\SOAwithWCFandEF\Projects\HelloWorld and a new subfolder called bin under this HostIIS folder. You should now have the following new folders: C:\SOAwithWCFandEF\Projects\HelloWorld\HostIIS and a binfolder inside the HostIIS folder.
2. Copy the files:
Now copy the HelloWorldService.dll and HelloWorldService.pdb files from the HelloWorldService project folder located at C:\SOAwithWCFandEF\Projects\HelloWorld\HelloWorldService\bin\Debug\ to our new folder, C:\SOAwithWCFandEF\Projects\HelloWorld\HostIIS\bin.
3. Copy the configuration file:
Copy Web.config from the HostExpressServer project folder located at C:\SOAwithWCFandEF\Projects\HelloWorld\ to our new folder, C:\SOAwithWCFandEF\Projects\HelloWorld\HostIIS.
The files under the two new directories should now be something similar to the following (the parent folder here is C:\SOAwithWCFandEF\Projects\HelloWorld\):
Web.config under HostIIS
HelloWorldService.dll and HelloWorldService.pdb under HostIIS\bin
4. Create the Visual Studio solution folder:
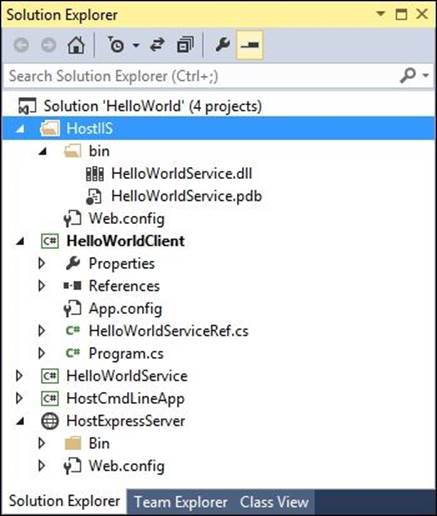
To make it easier to view and manage from the Visual Studio Solution Explorer, you can add a new solution folder, HostIIS, to the solution and add the Web.config file to this folder. Add another new solution folder, bin, under HostIIS and add the HelloWorldService.dll andHelloWorldService.pdb files under this bin folder. Your Solution Explorer should be as shown in the following screenshot:
5. Add the following post-build events to the HelloWorldService project; so next time, all the files will be copied automatically when the service project is built:
6. xcopy "$(AssemblyName).dll" "C:\SOAwithWCFandEF\Projects\HelloWorld\HostIIS\bin" /Y
xcopy "$(AssemblyName).pdb" "C:\SOAwithWCFandEF\Projects\HelloWorld\HostIIS\bin" /Y
6. Modify the Web.config file:
The Web.config file that we have copied from HostExpressServer has a relative address, HostExpressServer/HelloWorldService.svc. For IIS hosting, we need to get rid of HostExpressServer from the path. Just open the Web.config file under the HostIIS folder and change the relative path from HostExpressServer/HelloWorldService.svc to ./HelloWorldService.svc.
Starting IIS
By default, IIS is not running in Windows 7 and Windows 8. You can follow these steps to turn it on:
1. Go to Control Panel | Programs | Turn Windows features on or off.
2. From the Windows Features dialog box, check the checkbox for Internet Information Services.
3. Click on OK.
IIS is now running, but as Visual Studio was installed before IIS was turned on, IIS does not have any ASP.NET features enabled at this point. This means if you create an ASP.NET website within IIS now and try to access it, you will get an error.
There are two ways to enable WCF support from within IIS. The first is to follow these steps:
1. Run aspnet_regiis.exe to enable aspnet_isapi as a web service extension.
2. Run ServiceModelReg.exe to register the required script maps in IIS.
3. Manually create the application extension mapping and managed handlers for SVC files inside IIS.
The second and a much easier way is to reinstall the .NET Framework. After you have turned on the IIS features, as we just did previously in this section, uninstall and then reinstall .NET Framework 4.5.1. ASP.NET 4.5.1 will automatically be supported by IIS, once .NET 4.5.1 is reinstalled. I used this method as it is much easier.
Note
As the .NET Framework 4.5.1 SDK is included in Visual Studio 2013, you might need to repair Visual Studio 2013 to reinstall the .NET Framework 4.5.1 SDK, instead of uninstalling/reinstalling .NET Framework 4.5.1.
If the latest .NET Framework installed on your machine is not 4.5.1 but 4.5.2 or later, uninstall and then reinstall 4.5.2 or later.
Enabling WCF services on Windows 8
On Windows 8, you have to enable WCF services in order to host a WCF service in IIS. You can go to Control Panel | Turn Windows Features on or off, and then check the checkbox for HTTP Activation by going to .NET Framework 4.5 Advanced Features | WCF Services. This will also turn on a few .NET 4.5 development features, including .NET Extensibility 4.5, ASP.NET 4.5, ISAPI Extensions, and ISAPI Filters.
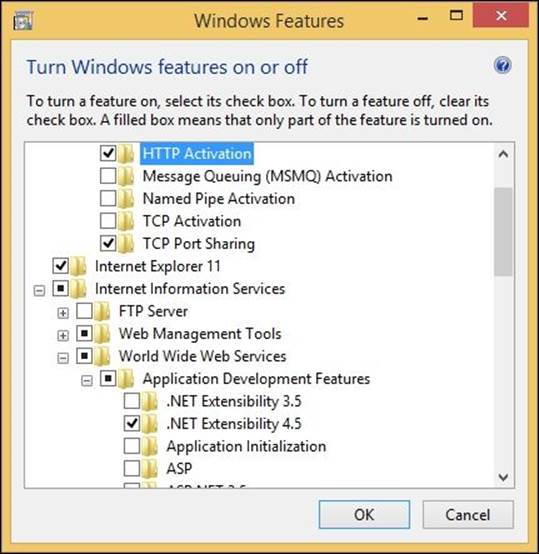
Once you have turned on the HTTP Activation feature, you will be able to host a WCF service in IIS on a Windows 8 machine. In the next section, we will create a similar IIS application to host the HelloWorldService WCF service.
Note
You can explicitly enable WCF services on Windows 7 (Control Panel | Turn Windows Features on or off | Microsoft .NET Framework 3.5.1 | Windows Communication Foundation HTTP Activation), but WCF services will work fine on Windows 7 using the HTTP protocol even if you don't explicitly enable them.
Creating the IIS application
Next, we need to create an IIS application named HelloWorldService. Follow these steps to create an application in IIS:
1. Open the IIS Manager by going to Control Panel | Administrative Tools (or just type start inetmgr in the command prompt).
2. Expand the nodes of the tree in the left-hand side pane until the node named Default Web Site becomes visible.
3. Right-click on this node and select Add Application… from the context menu.
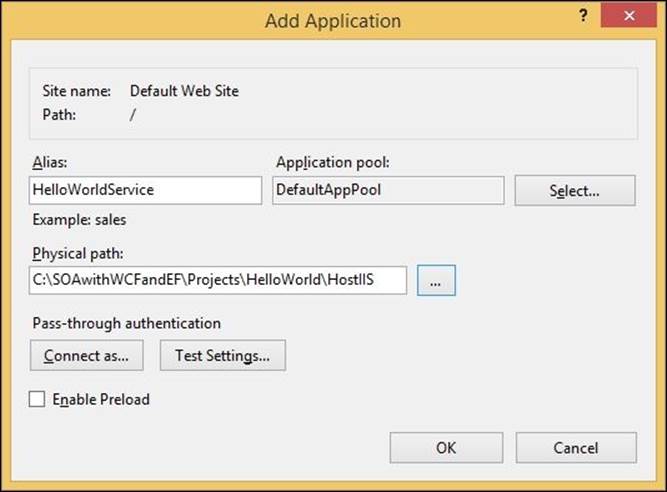
4. In the Add Application window, enter HelloWorldService in the Alias field.
5. Browse to or enter C:\SOAwithWCFandEF\Projects\HelloWorld\HostIIS in the Physical path field.
6. Leave DefaultAppPool as the Application pool. You can click on the Select… button to verify that this application pool is a .NET 4.0.30319 application pool. If it is not, you need to enable IIS to support .NET 4.0.30319, as described in the Starting IIS section. If you create your own application pool, make sure it is a .NET 4.0.30319 pool.
7. Finally, to finish adding the application, click on the OK button.
Starting the WCF service in IIS
Once you have copied the files to the HostIIS folder and have created the IIS application, the WCF service is ready to be called by the clients. When a WCF service is hosted within IIS, we don't need to explicitly start the service. As with other normal web applications, IIS will control the lifetime of the service. As long as the IIS service is started, client programs can access it.
Note
The deployment method we are learning about here is only one of the few deployment options to deploy a WCF service to IIS. We will discuss more deployment methods in the next chapter.
Testing the WCF service hosted in IIS using the HTTP protocol
To test the WCF service, open an Internet browser and enter the following URL in the address bar of the browser. You will get a screen that is almost identical to the one you got previously: http://localhost/HelloWorldService/HelloWorldService.svc.
Instead of the service description page, you may get an error page saying Cannot read configuration file due to insufficient permissions, such as the one shown in the following screenshot:
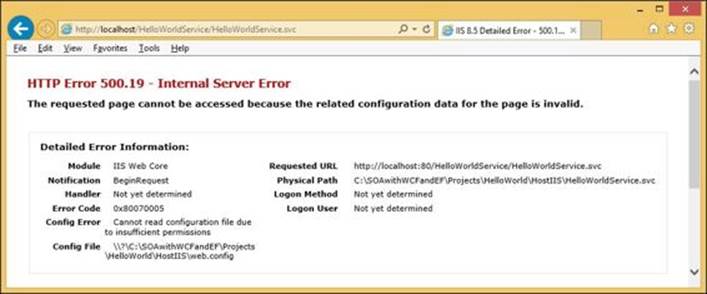
This is because the HelloWorldService hosting folder is not within the usual IIS's default hosting location, C:\inetpub\wwwroot, which by default is accessible to the IIS server. To make the HelloWorldService accessible to the IIS server, you just need to give your default application pool identity, normally applicationPoolIdentity(IIS_IUSRS), read access to the C:\SOAwithWCFandEF\Projects\HelloWorld\HostIIS service folder. Here we will go one step further, that is, we will grant the IIS_IUSRS users read access to the parent folder,C:\SOAwithWCFandEF\Projects\HelloWorld, as later on we will host more services within this folder and we don't want to grant permissions to each subfolder.
The following screenshot shows how the IIS default app pool identity users' read access is given to the parent folder of the service folder:

Different from being hosted within IIS Express, here you don't need to add a port after the host because it is now hosted in IIS with the default HTTP port, 80. This also means that you can access the service using your real computer (host) name or IP address and even outside of your computer if your computer is in a network. Two example URLs are as follows:
· http://[your_pc_name]/HelloWorldService/HelloWorldService.svc
· http://[your_pc_name].[your_company_domain].com/ HelloWorldService/HelloWorldService.svc
We can reuse the client program that we created earlier to consume this WCF service hosted within IIS. Refer to the following endpoint address:
<endpoint address="http://localhost:55859/HostCmdLineapp/HelloWorldService/"
Change this to the following:
<endpoint address="http://localhost/HelloWorldService/HelloWorldService.svc"
Now, when you run this client program, it will use the WCF service hosted within IIS instead of the previously created HostCmdLineApp application. You will get the same result as before, when the service was hosted in our own host application.
Hosting the service in IIS using the TCP protocol
Hosting WCF services in IIS using the HTTP protocol gives the best interoperability to the service, because the HTTP protocol is supported everywhere today. However, sometimes interoperability might not be an issue. For example, the service may be invoked only within your network with all Microsoft clients only. In this case, hosting the service by using the TCP protocol might be a better solution.
Benefits of hosting a WCF service using the TCP protocol
Compared to HTTP, there are a few benefits in hosting a WCF service using the TCP protocol:
· It supports connection-based, stream-oriented delivery services with end-to-end error detection and correction
· It is the fastest WCF binding for scenarios that involve communication between different machines
· It supports duplex communication, so it can be used to implement duplex contracts
· It has a reliable data delivery capability (this is applied between two TCP/IP nodes and is not the same thing as WS-ReliableMessaging, which applies between endpoints)
Preparing the folders and files
First, we need to prepare the folders and files for the host application, just as we did for hosting the service using the HTTP protocol. We will use the previous HTTP hosting application as the base to create the new TCP hosting application:
1. Create the folders:
In Windows Explorer, create a new folder called HostIISTcp under C:\SOAwithWCFandEF\Projects\HelloWorld and a new subfolder called bin under the HostIISTcp folder. You should now have the following new folders: C:\SOAwithWCFandEF\Projects\HelloWorld\HostIISTcpand a bin folder inside the HostIISTcp folder.
2. Copy the files:
Now, copy all the files from the HostIIS hosting application folder at C:\SOAwithWCFandEF\Projects\HelloWorld\HostIIS to the new folder that we created at C:\SOAwithWCFandEF\Projects\HelloWorld\HostIISTcp.
3. Create the Visual Studio solution folder:
To make it easier to be viewed and managed from the Visual Studio Solution Explorer, you can add a new solution folder, HostIISTcp, to the solution and add the Web.config file to this folder. Add another new solution folder, bin, under HostIISTcp and add theHelloWorldService.dll and HelloWorldService.pdb files under this bin folder.
4. Add the following post-build events to the HelloWorldService project, so next time, all the files will be copied automatically when the service project is built:
5. xcopy "$(AssemblyName).dll" "C:\SOAwithWCFandEF\Projects\HelloWorld\HostIISTcp\bin" /Y
xcopy "$(AssemblyName).pdb" "C:\SOAwithWCFandEF\Projects\HelloWorld\HostIISTcp\bin" /Y
5. Modify the Web.config file:
The Web.config file that we have copied from HostIIS is using the default basicHttpBinding as the service binding. To make our service use the TCP binding, we need to change the binding to TCP and add a TCP base address. Open the Web.config file and add the following node to it under the <system.serviceModel> node:
<services>
<service name="HelloWorldService.HelloWorldService">
<endpoint address="" binding="netTcpBinding"
contract="HelloWorldService.IHelloWorldService"/>
<host>
<baseAddresses>
<add baseAddress=
"net.tcp://localhost/HelloWorldServiceTcp/"/>
</baseAddresses>
</host>
</service>
</services>
In this new services node, we have defined one service called HelloWorldService.HelloWorldService. The base address of this service is net.tcp://localhost/HelloWorldServiceTcp/. Remember, we have defined the host activation relative address as ./HelloWorldService.svc, so we can invoke this service from the client application with the following URL: http://localhost/HelloWorldServiceTcp/HelloWorldService.svc.
For the file-less WCF activation, if no endpoint is defined explicitly, HTTP and HTTPS endpoints will be defined by default. In this example, we would like to expose only one TCP endpoint, so we have added an endpoint explicitly (as soon as this endpoint is added explicitly, the default endpoints will not be added). If you don't add this TCP endpoint explicitly here, the TCP client that we will create in the next section will still work, but on the client config file you will see three endpoints instead of one and you will have to specify which endpoint you are using in the client program.
The following is the full content of the Web.config file:
<?xml version="1.0"?>
<!--
For more information on how to configure your ASP.NET application, please visit
http://go.microsoft.com/fwlink/?LinkId=169433
-->
<configuration>
<system.web>
<compilation debug="true" targetFramework="4.5"/>
<httpRuntime targetFramework="4.5" />
</system.web>
<system.serviceModel>
<serviceHostingEnvironment >
<serviceActivations>
<add factory="System.ServiceModel.Activation.ServiceHostFactory"
relativeAddress="./HelloWorldService.svc"
service="HelloWorldService.HelloWorldService"/>
</serviceActivations>
</serviceHostingEnvironment>
<behaviors>
<serviceBehaviors>
<behavior>
<serviceMetadata httpGetEnabled="true"/>
</behavior>
</serviceBehaviors>
</behaviors>
<services>
<service name="HelloWorldService.HelloWorldService">
<endpoint address="" binding="netTcpBinding"
contract="HelloWorldService.IHelloWorldService"/>
<host>
<baseAddresses>
<add baseAddress=
"net.tcp://localhost/HelloWorldServiceTcp/"/>
</baseAddresses>
</host>
</service>
</services>
</system.serviceModel>
</configuration>
Enabling the TCP WCF activation for the host machine
By default, the TCP WCF activation service is not enabled on your machine. This means your IIS server won't be able to host a WCF service with the TCP protocol. You can follow these steps to enable the TCP activation for WCF services:
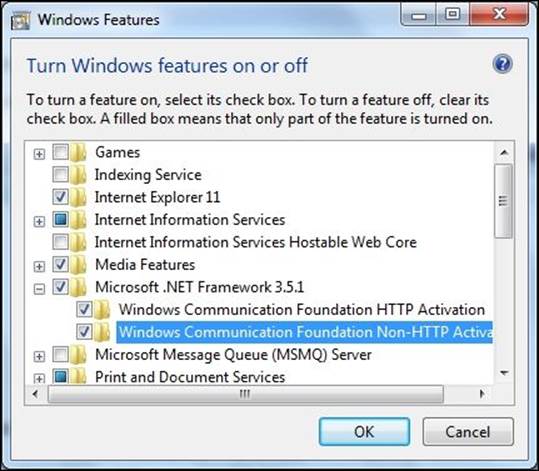
1. Go to Control Panel | Programs | Turn Windows features on or off.
2. Expand the Microsoft .Net Framework 3.5.1 node on Windows 7 or .Net Framework 4.5 Advanced Services on Windows 8.
3. Check the checkbox for Windows Communication Foundation Non-HTTP Activation on Windows 7 or TCP Activation on Windows 8.
The following screenshot depicts the options required to enable WCF activation on Windows 7:
The following screenshot depicts the options required to enable TCP WCF activation on Windows 8:

4. Repair the .NET Framework:
After you have turned on the TCP WCF activation, you have to repair .NET. Just go to Control Panel, click on Uninstall a Program, select Microsoft .NET Framework 4.5.1, and then click on Repair.
Creating the IIS application
Next, we need to create an IIS application named HelloWorldServiceTcp to host the WCF service, using the TCP protocol. Follow these steps to create this application in IIS:
1. Open IIS Manager.
2. Add a new IIS application, HelloWorldServiceTcp, pointing to the HostIISTcp physical folder under your project's folder.
3. Choose DefaultAppPool as the application pool for the new application. Again, make sure your default app pool is a .NET 4.0.30319 application pool.
4. Enable the TCP protocol for the application. Right-click on HelloWorldServiceTcp, select Manage Application | Advanced Settings, and then add net.tcp to Enabled Protocols. Make sure you use all lowercase letters and separate it from the existing HTTP protocol with a comma.

Now the service is hosted in IIS using the TCP protocol. To view the WSDL of the service, browse to http://localhost/HelloWorldServiceTcp/HelloWorldService.svc and you should see the service description and a link to the WSDL of the service.
Testing the WCF service hosted in IIS using the TCP protocol
Now, we have the service hosted in IIS using the TCP protocol; let's create a new test client to test it:
1. Add a new console application project to the solution, named HelloWorldClientTcp.
2. Add a reference to System.ServiceModel in the new project.
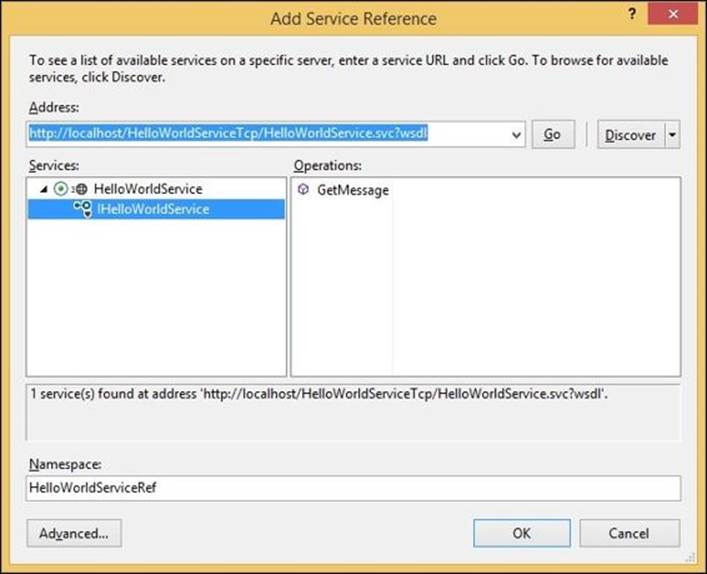
3. Add a service reference to the WCF service in the new project, naming the reference HelloWorldServiceRef and use the URL http://localhost/HelloWorldServiceTcp/HelloWorldService.svc?wsdl.
4. You can still use the SvcUtil.exe command-line tool to generate the proxy and config files for the service hosted with TCP, just as we did in previous sections. Actually, behind the scenes Visual Studio is also calling SvcUtil.exe to generate the proxy and config files.
5. Add the following code to the Main method of the new project:
6. var client = new HelloWorldServiceRef.HelloWorldServiceClient ();
Console.WriteLine(client.GetMessage("Mike Liu"));
6. Finally, set the new project as the startup project.
Now, if you run the program, you will get the same result as before; however, this time the service is hosted in IIS using the TCP protocol.
Summary
In this chapter, we hosted the HelloWorld WCF service in several different ways. We created a console application to host the service so that we can have full control of the hosting process. We also created two IIS applications to host the service, one with the HTTP protocol and another with the TCP protocol.
In the next chapter, we will learn how to publish a WCF service so that you know how to deploy a WCF service to a production environment.
All materials on the site are licensed Creative Commons Attribution-Sharealike 3.0 Unported CC BY-SA 3.0 & GNU Free Documentation License (GFDL)
If you are the copyright holder of any material contained on our site and intend to remove it, please contact our site administrator for approval.
© 2016-2026 All site design rights belong to S.Y.A.