Windows 8.1 Administration Pocket Consultant: Storage, Security, & Networking (2014)
Chapter 3. Managing Disk Drives and File Systems
§ Disk management essentials
§ Improving disk performance
§ Working with basic and dynamic disks
§ Preparing basic and dynamic disks
§ Working with disks, partitions, and volumes
§ Partitioning disks and preparing them for use
§ Using disk mirroring
§ Moving a dynamic disk to a new system
§ Using storage spaces
§ Working with storage pools
Most computers have several types of drives, including internal hard drives and removable media drives. An internal hard drive is typically the primary storage device. In most cases, the first hard drive installed is designated Disk 0. If additional hard drives are installed, they are designated Disk 1, Disk 2, and so on. This chapter discusses tools and techniques for managing hard drives and file systems. You’ll learn how to partition and format disks and how to convert disks from one disk type to another. You’ll also learn about features of Windows 8.1 that affect how drives are used, including Windows ReadyBoost, Windows ReadyDrive, and Windows SuperFetch.
Disk management essentials
Windows 8.1 enables you to designate a physical hard drive as a basic disk or a dynamic disk.
§ Basic disks The disk type used most often in the past, a basic disk can be divided into one or more partitions on Windows 8.1. A partition is a logical section of a disk that operates as if it were a physically separate disk. To use a partition, you must format it to use a particular file system and assign it a drive designator. The formatted partition is then referred to as a basic volume, and you can access it as a local disk on the computer. Windows 8.1 supports both primary and extended partitions on basic disks. A primary partition is used to start the operating system. You access a primary partition directly by its drive designator. You cannot subdivide a primary partition. An extended partition, on the other hand, is accessed indirectly. After you create an extended partition, you must divide it into one or more logical drives. You can then access the logical drives independently of each other.
§ Dynamic disks Dynamic disks enable you to perform most common disk maintenance tasks without having to restart the computer. Like a basic disk, a dynamic disk can be divided; however, dynamic disks are divided into volumes rather than partitions. A volume is very similar to a partition. The most commonly used type of volume is a simple volume. A simple volume is a volume on a single disk that can be used to start the operating system and for general data storage. Other types of volumes can also be used, including those that enable you to extend a single volume across several disks (a spanned volume). As with a partition or a logical drive, you must format a volume on a dynamic disk and assign it a drive designator before you can use it. The formatted volume is referred to as a dynamic volume, and you can access it as a local disk on the computer. When a dynamic volume combines space from multiple physical drives, it still appears as a single local disk and is accessed by a single drive designator.
You can change storage types from basic to dynamic and from dynamic to basic. When you convert a basic disk to a dynamic disk, partitions are changed to volumes of the appropriate type automatically and data is not lost. Converting a dynamic disk to a basic disk isn’t so easy. You need to delete the volumes on the dynamic disk before you can change the disk type to a basic disk. Deleting the volumes destroys the information they contain, and the only way to get it back is to restore the data from a backup.
All computers running Windows 8.1 use Unified Extensible Firmware Interface (UEFI), which can be wrapped around BIOS or Extensible Firmware Interface (EFI). In addition to a disk type, all disks have a partition style, which is either master boot record (MBR) or GUID partition table (GPT). Although both 32-bit and 64-bit editions of Windows 8.1 support MBR and GPT partitions, the GPT partition style is not recognized by early releases of Windows.
The MBR contains a partition table that describes where the partitions are located on the disk. In this partition style, the first sector on a hard disk contains the MBR and a binary code file called the master boot code, which is used to boot the system. This sector is not partitioned and is hidden from view to protect the system.
With the MBR partitioning style, disks support volumes of up to 4 terabytes (TB) and use one of two types of partitions—primary or extended. Each MBR drive can have up to four primary partitions or three primary partitions and one extended partition. Primary partitions are drive sections that you can access directly for file storage. You make a primary partition accessible to users by creating a file system on it. Unlike primary partitions, extended partitions cannot be accessed directly. Instead, you can configure extended partitions with one or more logical drives that are used to store files. Being able to divide extended partitions into logical drives enables you to divide a physical drive into more than four sections.
GPT was originally developed for high-performance Itanium-based computers. GPT is recommended for disks larger than 2 TB on x86 and x64. The key difference between the GPT partition style and the MBR partition style is how partition data is stored. With GPT, critical partition data is stored in the individual partitions, and redundant primary and backup partition tables are used for improved structural integrity.
Although underlying differences exist between the GPT and MBR partitioning styles, most disk-related tasks are performed in the same way. This means that after you set up and configure your drives it usually doesn’t matter whether the disk is using MBR or GPT. That said, keep the following in mind:
§ Basic MBR disks can have up to four primary partitions—or three primary partitions and one extended partition, with one or more logical drives in the extended partition—and dynamic MBR disks can have an unlimited number of volumes.
§ GPT disks support partitions of up to 18 exabytes (EB) in size and up to 128 partitions. Computers using GPT disks for boot have two required partitions and one or more optional OEM or data partitions. The required partitions are the EFI system partition and the Microsoft Reserved partition. Although the optional partitions that you encounter depend on the system configuration, the optional partition type encountered most often is the primary partition. Primary partitions are used to store user data on GPT disks.
§ On a BIOS-based computer, you can use MBR for booting or for data disks and GPT only for data disks. On an EFI-based computer, you can have both GPT and MBR disks, but you must have at least one GPT disk that contains the ESP, MSR, and either a primary partition or a simple volume that contains the operating system for booting.
Windows 8.1 supports FAT, FAT32, exFAT, NTFS, and ReFS. With FAT, the number of bits used with the file allocation table determines the variant you are working with and the maximum volume size. FAT16, also known just as FAT, defines its file allocation tables by using 16 bits. Volumes that are 4 gigabytes (GB) or less in size are formatted with FAT16. There’s also a 32-bit version of FAT, known as FAT32. FAT32 defines its file allocation tables by using 32 bits, and you can create FAT32 volumes that are 32 GB or less by using the Windows format tools. Although Windows can mount larger FAT32 volumes created with third-party tools, you should use NTFS for volumes larger than 32 GB.
In a significant change from earlier releases of Windows, NTFS and exFAT are the preferred formats for large internal and external hard disks. Extended FAT, or exFAT, is an enhanced version of FAT. Technically, exFAT could have been called FAT64 (and is called that by some). TheexFAT file system defines its file allocation tables by using 64 bits, which enables exFAT to overcome the 4-GB file size limit and the 32-GB volume size limit of FAT32 file systems. The exFAT format supports allocation unit sizes of up to 128 KB for volumes up to 256 TB. The exFAT format is designed so that it can be used with and easily moved between any compliant operating system or device. This gives exFAT an advantage over FAT.
With exFAT, you can have more than 1,024 files in a single directory, and exFAT supports access control lists and transactions. Additionally, exFAT uses a cluster bitmap for fast allocation and a per-file contiguous bit for fast file access, improving overall performance. Improved contiguous on-disk layout enhances performances for media tasks, such as recording and playing back digital media.
Resilient File System (ReFS) can be thought of as the next generation of NTFS. As such, ReFS remains compatible with core NTFS features while cutting noncore features to focus on reliability. Thus, ReFS does not support disk quotas, Encrypting File System (EFS), compression, file screening, or storage reporting but does include built-in reliability features, including a data integrity scanner that eliminates the need to use the Check Disk utility to analyze and repair ReFS volumes.
Windows 8.1 provides several tools for working with a computer’s disks. The first and most often overlooked tool is the This PC console. Other tools include Disk Management, FSUtil, and DiskPart. Partitions and volumes on MBR and GPT disks can be formatted by using exFAT and NTFS. When you create partitions or volumes in Disk Management, you have the opportunity to format the disk and assign it a drive letter or a mount point as part of the volume creation process. Although Disk Management lets you format the partitions and volumes on MBR disks by using exFAT and NTFS, only NTFS can be used to format partitions and volumes on GPT disks. If you want to format GPT disks by using FAT or FAT32, you must use either the Format or DiskPart command at the command prompt.
You can change partition table styles from MBR to GPT or from GPT to MBR. Changing partition table styles is useful when you want to move disks between BIOS-based and EFI-based computers or when you receive new disks that are formatted for the wrong partition table style. You can convert partition table styles only on empty disks, however. This means that the disks must be either new or newly formatted. You could, of course, empty a disk by removing its partitions or volumes.
As discussed in the section Hardware encryption, secure boot, and network unlock in Chapter 2, Windows 8.1 adds support for hard drives with hardware encryption (referred to as encrypted hard drives). Encrypted hard drives have built-in processors that shift the encryption-decryption activities from the operating system to the hardware, freeing up operating system resources. Windows 8.1 will use hardware encryption with BitLocker when available.
Windows 8.1 supports both Standard Format and Advanced Format hard drives. Standard Format drives have 512 bytes per physical sector and are also referred to as 512b drives. Advanced Format drives have 4,096 bytes per physical sector and are referred to as 512e drives. 512e represents a significant shift for the hard drive industry, and it allows for large, multiterabyte drives.
NOTE
REAL WORLD Disks perform physical media updates in the granularity of their physical sector size. 512b drives work with data 512 bytes at a time; 512e drives work with data 4,096 bytes at a time. At an administrator command prompt, you can use FSUtil to determine bytes per physical sector by entering:
Fsutil fsinfo ntfsinfo DriveDesignator
DriveDesignator is the designator of the drive to check, such as
Fsutil fsinfo ntfsinfo c:
Having a larger physical sector size is what makes it possible for drive capacities to jump well beyond previous physical capacity limits. When there is only a 512-byte write, hard disks must perform additional work to complete the sector write. For best performance, applications must be updated to read and write data properly in this new level of granularity (4,096 bytes).
Using the This PC console
To access the This PC console, on the Start screen, tap or click File Explorer. In File Explorer, tap or click the location path selection button, and then tap or click This PC.
NOTE
In File Explorer, the Address Path shows the absolute or relative path that you are currently accessing and provides options for working with this path. From left to right, it has four interface elements: a Location Indicator icon, a Location Path Selection list button, Location Path entries, and a Previous Locations button.
You can use the This PC console to quickly determine the available storage devices on a computer. Whenever you are working with the This PC window, shown in Figure 3-1, the Computer option on the menu bar has the following location, network, and system options:
§ Properties Displays the Properties dialog box for the currently selected item
§ Open Opens the currently selected item in the same File Explorer window
§ Rename Enables you to rename the currently selected item
§ Access Media Enables you to connect or disconnect from a media server
§ Map Network Drive Enables you to map or disconnect a network drive
§ Add A Network Location Enables you to create a shortcut to a website, FTP site, a storage space, or other network locations
§ Open Control Panel Opens the Control Panel view in the current window
§ Uninstall Or Change A Program Opens the Programs And Features page in Control Panel
§ System Properties Opens the System page in Control Panel
§ Manage Opens Computer Management in a new window
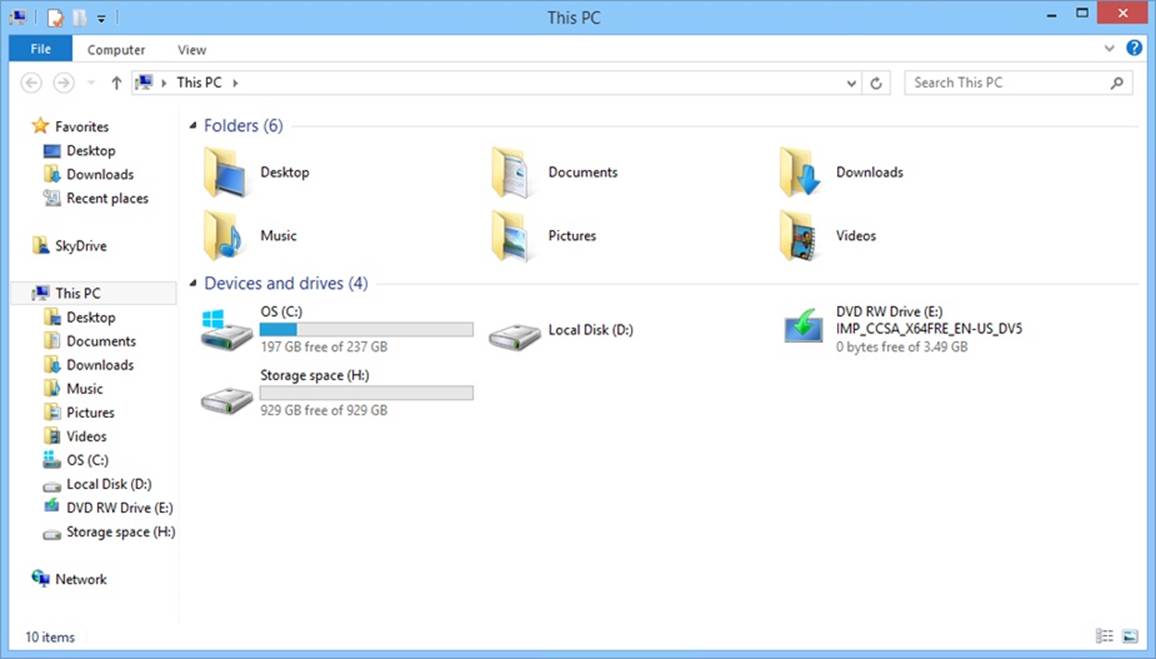
Figure 3-1. The This PC console provides easy access to a computer’s storage devices.
The This PC console provides the following details:
§ Hard disk drives Local disks available on the computer are listed under Devices And Drives. Press and hold or right-click a disk to display available management options, including Open, which opens the disk in File Explorer. To view important disk tools, tap or click the Drive Tools Manage option on the menu bar.
§ Devices with removable storage Removable storage devices on the computer also are listed, including CD, DVD, USB flash drives, and floppy disk drives. Press and hold or right-click a device to display available management options, including Eject, which is convenient for ejecting current media so that new media can be inserted.
TIP
USB flash drives, eSATA, and FireWire/USB-attached external hard drives are being used more and more in place of floppy disks and other types of removable media. If a computer has a USB, eSATA, or FireWire port, you can easily connect or disconnect a drive. Before you disconnect a USB, eSATA, or FireWire drive, you should ensure that it is in a safe state. The Eject option provides one way to do this. Tap or click the disk designator in File Explorer or any related view to display the Drive option on the menu bar. Tap or click Drive, and then tap or click Eject. As long as the drive is not in use, you should be able to safely disconnect the drive.
§ Network Location Lists any mapped network drives. A network drive provides access to a shared folder or a disk on another computer. In the This PC window, start the Map Network Drive Wizard by tapping or clicking Computer on the menu bar, tapping or clicking Map Network Drive, and then tapping or clicking Map Network Drive. To disconnect a network drive, press and hold or right-click the network location, and then tap or click Disconnect.
Using Disk Management
When you want to configure drives, the tool of choice is Disk Management. Disk Management provides the tools you need to manage disks, partitions, volumes, logical drives, and their related file systems. Disk Management is a Microsoft Management Console (MMC) snap-in that can be accessed through a preconfigured console included with Windows or added to any custom console you’ve created. By using Disk Management, you can perform the following tasks:
§ Determine the capacity, free space, status, and other properties of disks
§ Create partitions and logical drives on basic disks
§ Create volumes on dynamic disks
§ Extend volumes to increase their size
§ Format volumes and specify the file system to use
§ Assign drive letters and paths to volumes
§ Convert basic disks to dynamic disks, and vice versa
Disk Management is included in the Computer Management console. You can start Computer Management at a prompt by entering compmgmt.msc. Alternatively, enter compmgmt.msc in the Apps Search box.
When you start Computer Management, you are automatically connected to the local computer. To examine drives on another computer, press and hold or right-click the Computer Management entry in the console tree, and then tap or click Connect To Another Computer on the shortcut menu. You can now choose the system whose drives you want to examine. From the command line, you can connect to another computer when starting Computer Management by entering compmgmt.msc /computer=ComputerName, where ComputerName is the name of the remote computer to which you want to connect.
In the default configuration, shown in Figure 3-2, Disk Management displays the Volume List view in its upper panel and the Graphical view in its lower panel. Although only two views can be shown at any one time, three views are available:
§ Volume List view Provides a detailed summary of the drives on the computer. Tapping or clicking a column label, such as Layout or Status, sorts the disk information based on that column.
§ Graphical view Provides a graphical overview of the physical and logical drives available. Summary information for the physical disk devices includes the disk number and device type, such as basic, removable, or DVD; the disk capacity; and the status of the disk device, such as online or offline. Additional details are also provided for each logical disk on the physical disk, including the drive letter and text label for the associated partition or volume; the file system type, such as exFAT or NTFS; the size of the drive section; and the local disk status, such as healthy or unhealthy.
§ Disk List view Provides summary information about physical drives. This information includes the disk number and device type, such as basic, removable, or DVD; the disk capacity; the size of unallocated space on the disk (if any); the status of the disk device, such as online or offline; and the device interface type, such as integrated device electronics (IDE) or Advanced Technology Attachment (ATA).
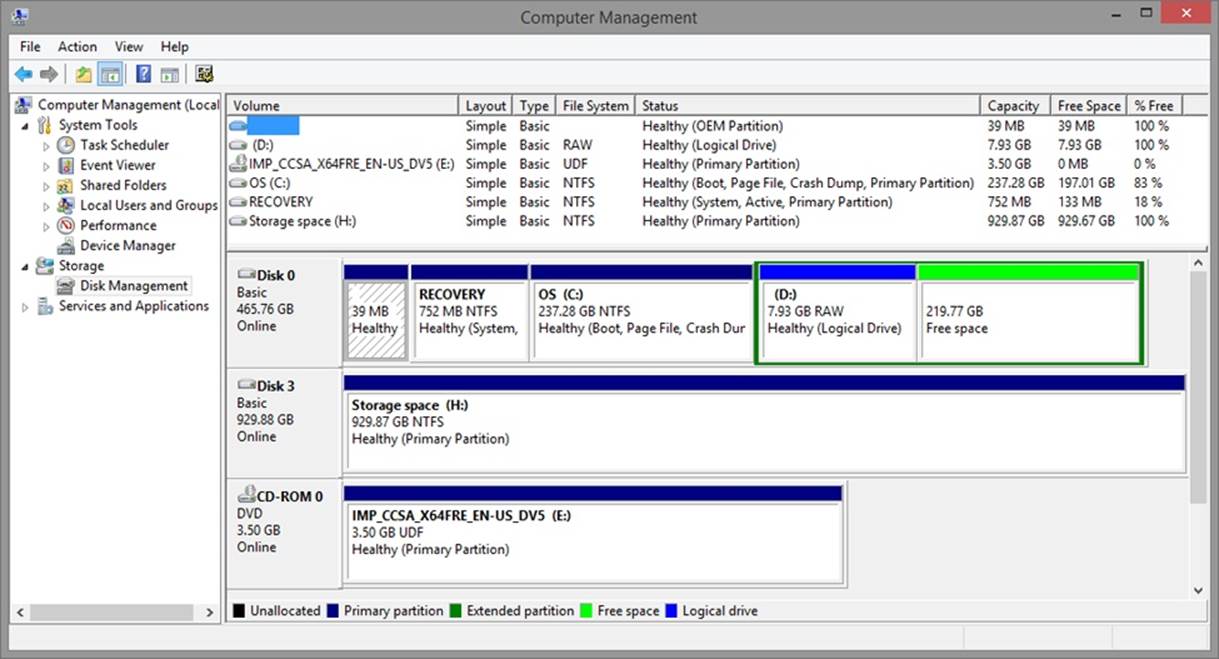
Figure 3-2. Use Disk Management to manage disk configurations.
You can change the view for the top or bottom pane by using options on the View menu. To change the top view, tap or click View, choose Top, and then select the view you want to use. To change the bottom view, tap or click View, choose Bottom, and then select the view you want to use.
As you can tell, the available views provide overviews of available disks. To get more detailed information on a local disk, press and hold or right-click it in the Volume List view, and then tap or click Properties. You’ll get a dialog box much like the one shown in Figure 3-3. This is the same dialog box that you can access from File Explorer (by pressing and holding or right-clicking the top-level icon for the drive, and then tapping or clicking Properties). If it is available, you can use the Customize tab to select a view template to determine what folders look like in File Explorer’s Contents pane.
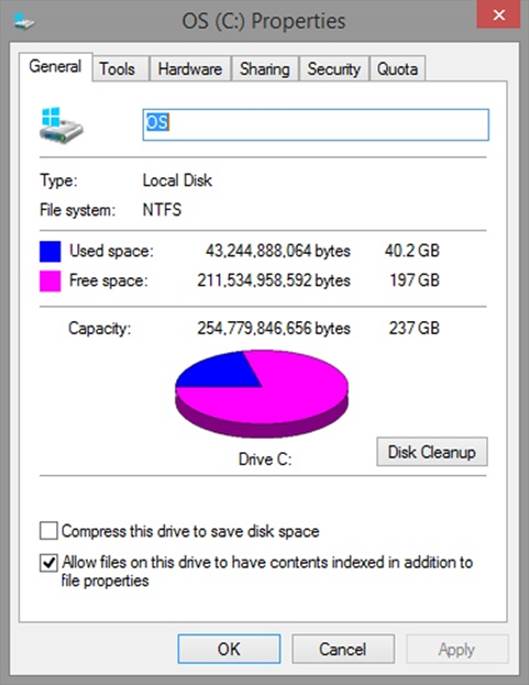
Figure 3-3. Examine detailed information for a drive in the Properties dialog box.
Using FSUtil and DiskPart
Windows 8.1 provides several command-line tools for working with disks, including the following:
§ FSUtil Meant to be used by support professionals who need to manage disks at a fairly low level. By using FSUtil, you can examine and work with metadata and other information related to disks, including update sequence number (USN) change journals, reparse points, and hard links. You can also obtain detailed sector and cluster information, such as the number of free or reserved sectors on a disk. To view a list of commands available in FSUtil, enter fsutil at an elevated command prompt. To learn more about a specific command, enter fsutil CommandName help.
§ DiskPart A text-mode command interpreter that you can use to manage disks, partitions, and volumes from the command prompt. Not only can DiskPart perform many of the same operations as Disk Management, but it can also be used with scripts to automate disk management processes. You start DiskPart by entering diskpart at an elevated command prompt. You will then be at the DISKPART> prompt. If you type help and then press Enter, you will get a list of available commands and a description of their usage.
NOTE
Unlike Disk Management, which provides a friendly interface and is fairly easy to use, FSUtil and DiskPart are complex tools meant for advanced administrators. Their use is covered in detail in Windows Command-Line Administrator’s Pocket Consultant, Second Edition by William R. Stanek (Microsoft Press, 2008). You’ll find a detailed example of using DiskPart in theMarking a partition as active section, later in this chapter.
Improving disk performance
Windows 8.1 has several features that affect how disks are used. These include:
§ Windows ReadyBoost Boosts system performance by using USB flash drives as additional sources for caching
§ Windows ReadyDrive Boosts system performance on mobile computers equipped with hybrid drives
§ Windows SuperFetch Boosts system performance by using a modified memory management algorithm
Each of these features is discussed in the sections that follow.
Understanding and using Windows ReadyBoost
A computer’s hard drives aren’t used just for reading and writing application data and user documents. The operating system makes extensive use of a computer’s hard drives for paging files and for the system cache. Because reading from and writing to a disk is significantly slower than reading from and writing to physical memory (RAM), these operations can cause a bottleneck that degrades performance. Windows 8.1 includes Windows ReadyBoost as a way to reduce the impact related to reading and writing the system cache.
With Windows ReadyBoost, USB flash drives with sufficiently fast memory are used to extend the disk-caching capabilities of the computer’s main memory. By using flash drives for caching, Windows 8.1 can make random reads faster by caching data on the USB flash drive instead of a disk drive. Because this caching is applied to all disk content, not just the page file or system dynamic-link libraries (DLLs), the computer’s overall performance is boosted because flash devices can be read up to 10 times faster than physical disk drives.
USB flash drives that can be used with Windows ReadyBoost include USB 2.0 or later flash drives, Secure Digital (SD) cards, and CompactFlash cards. These drives must have sufficiently fast flash memory and be at least 256 MB or larger in size. To enhance performance, I recommend purchasing USB flash drives with high-speed memory. If the flash drive has both slow and fast flash memory, only the fast flash memory portion will be used for boosting performance. From 230 MB to 15,196 MB of flash memory can be reserved on a USB flash drive for Windows ReadyBoost. A recommended amount of memory to use is from one to three times the available system memory. However, keep in mind that as of the time of this writing, the most you can reserve is 15,196 MB.
Memory on USB flash drives is primarily used for random I/O because most flash devices are slower than a disk drive for sequential I/O. Windows ReadyBoost maximizes performance by automatically passing large, sequential read requests to the computer’s disk drive for servicing. To make it possible for a USB flash drive to be removed at any time, all data writes are made to the hard disk before being copied to the flash device. This means all data stored on the flash drive is duplicated on the hard disk, and there is no potential for data loss when removing the flash drive. Additionally, because the flash device’s memory might contain sensitive information, Windows ReadyBoost encrypts the data so that it can be used only with the computer on which it was originally written.
Enabling and configuring Windows ReadyBoost
With Windows ReadyBoost, USB flash drives with sufficiently fast flash memory can be used as additional sources of system cache. When you insert a USB flash drive into a USB 2.0 or later port, Windows 8.1 analyzes the speed of the flash memory on the device. If the flash memory performs at a sufficiently high speed, the computer’s physical memory can be extended to the USB flash drive. In most cases, you’ll want the flash memory to be at least as fast as the computer’s bus speed.
TIP
Windows can incorrectly flag a device as failing to meet the performance requirements. If a device fails the initial performance test, you can retest the device by using the ReadyBoost tab. In File Explorer, press and hold or right-click the device, and then tap or click Properties. In the Properties dialog box, tap or click the ReadyBoost tab, and then tap or click Test Again.
The following steps show how you can enable and configure how Windows ReadyBoost works the first time you use a USB flash drive with a computer:
1. Insert a USB flash drive into a USB 2.0 or later port. The AutoPlay dialog box should be displayed automatically (unless you’ve changed the AutoPlay defaults in Control Panel).
2. When you tap or click Speed Up My System–Windows ReadyBoost, the device’s Properties dialog box opens to the ReadyBoost tab, shown in Figure 3-4. Do one of the following, and then tap or click OK:
o If you want the device to automatically reserve the maximum amount of space for Windows ReadyBoost, select Dedicate This Device To Ready-Boost. Choosing this setting prevents a user from writing files to the device. It just configures Windows ReadyBoost to use as much space as can be reserved.
o If you want to use less space than the maximum possible, select Use This Device, and then use the Space To Reserve For System Speed slider or combo box to set the amount of space to use with Windows ReadyBoost. If you reserve less than the total amount of space available, the free space can be used for files and data.
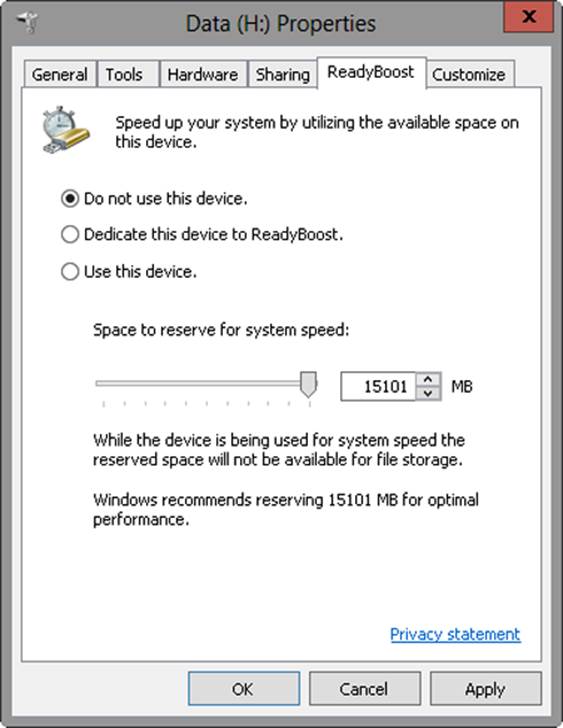
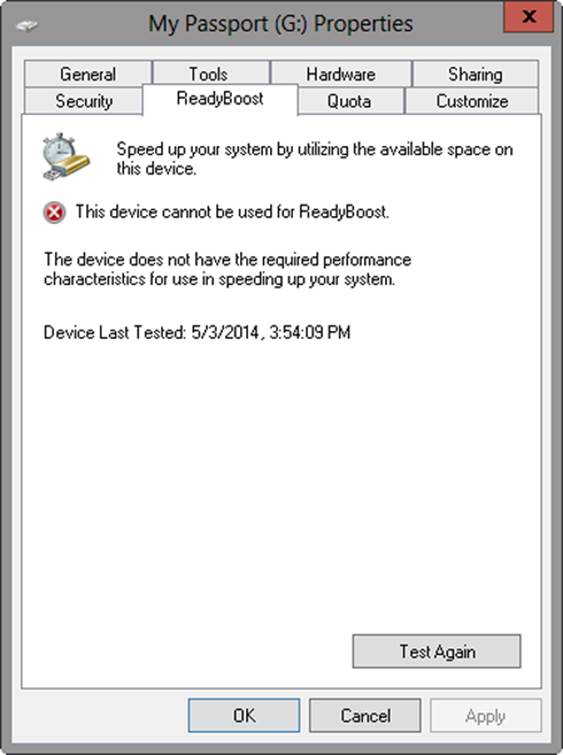
Figure 3-4. Configure Windows ReadyBoost settings.
Windows 8.1 extends the computer’s physical memory to the device. The default configuration enables Windows ReadyBoost to reserve all available space on the device for boosting system speed.
NOTE
REAL WORLD To use a USB flash drive with Windows ReadyBoost, the drive must have at least 2.5 megabits per second (Mbps) throughput for 4-kilobyte (KB) random reads and 1.75 Mbps throughput for 512-KB random writes. Although you can enable Windows ReadyBoost on a device you’ve encrypted with BitLocker To Go, keep in mind that encryption and decryption processes can affect read/write performance. If you use BitLocker To Go and Windows ReadyBoost, I recommend that you also automatically unlock the device when the device is inserted. Otherwise, the user has to validate the device prior to getting the performance benefits of Windows ReadyBoost.
To use Windows ReadyBoost with a USB flash drive that you have already inserted or that you previously declined to use with Windows ReadyBoost, follow these steps:
1. Open File Explorer or another Explorer view, such as This PC.
2. Press and hold or right-click the USB flash drive in the list, and then tap or click Properties.
3. On the ReadyBoost tab, configure the options as discussed in step 2 of the previous procedure. Tap or click OK.
For USB flash drives that do not support Windows ReadyBoost, you cannot enable the drive. You can safely remove a USB flash drive that uses the entire drive for Windows ReadyBoost at any time without losing data or negatively impacting the system. However, when the drive is removed, system performance returns to its usual level—the performance level experienced without the device. To safely remove a device containing both reserved Windows ReadyBoost space and data files, follow these steps:
1. Open File Explorer or another Explorer view, such as This PC.
2. Press and hold or right-click the device, and then tap or click Eject. If you’ve opened files on the device or opened the device for viewing in File Explorer, you might need to close files and File Explorer windows before you can eject the device.
Understanding and using Windows ReadyDrive
Windows ReadyDrive improves performance on mobile computers equipped with hybrid drives. A hybrid drive is a drive that uses both flash RAM and a physical drive for storage. Because flash RAM is much faster than a physical disk, mobile computers running Windows 8.1 write data and changes to data to the flash memory first and periodically sync these writes and changes to the physical disk. This approach reduces the spinning of the physical drive and thus saves battery power.
The flash RAM on hybrid drives can be used to provide faster startup and resume from sleep or hibernation. In this case, the information needed for starting or resuming the operating system is written to the flash RAM prior to shutting down, entering sleep, or going into hibernation. When you start or wake the computer, this information is read from the flash RAM.
You do not need to enable Windows ReadyDrive because it’s enabled for use automatically on mobile computers with hybrid drives.
Understanding and using Windows SuperFetch
Windows 8.1 improves performance and responsiveness by changing the way user processes and background processes are used. In early releases of Windows, user processes and background processes had the same memory-use prioritization: user processes and background processes are both loaded into memory as they are used. Because there is no prioritization, there is often contention for memory, and performance lags also often occur because background processes remain resident in memory after they run. Therefore, data for user processes must be loaded into memory when it is requested. Windows 8.1 corrects this issue by ensuring that background processes are unloaded after they run and when data for user processes is reloading into memory.
In early releases of Windows, user processes and background processes have the same I/O priority, which often results in conflicts and poor read/write performance. Windows 8.1 corrects this by implementing high-priority I/O and low-priority I/O queues. High-priority I/O is used by user processes for read and write operations to physical drives. Low-priority I/O is used by background process read and write operations to physical drives.
NOTE
With Windows 8.1, many services and routine housekeeping tasks run as background processes. For example, on Windows 8.1, Disk Defragmenter is scheduled to run automatically to periodically defragment disks. When Disk Defragmenter runs, it runs as a background process and uses low-priority I/O.
The key feature that makes memory and I/O prioritization work is Windows SuperFetch. Windows SuperFetch improves system performance by using a modified memory-management algorithm. Unlike the memory-management algorithm in early versions of Windows, SuperFetch optimizes memory usage based on the way the current user is using the computer. SuperFetch does this by performing the following tasks:
§ Differentiating between user applications and background services running on the computer SuperFetch makes the computer more responsive to user requests by prioritizing the current user’s processes over background tasks. Because user processes always have priority over background tasks, background tasks do not take up all the processor time and the system remains responsive to user requests.
§ Optimizing memory for users after running background tasks Housekeeping tasks on Windows 8.1 make better use of process idle time than they did on earlier versions of Windows. More system and maintenance tasks, such as Disk Defragmenter and Disk Backup, run during idle time. When the computer is idle, background processes run as they typically would. However, when background processes end, SuperFetch repopulates memory to the state that it was in prior to running the background processes. This ensures that memory is optimized for user processes and that the computer is responsive to user requests.
§ Tracking the most frequently used applications and anticipating user needs SuperFetch keeps track of which applications users run most frequently and also tracks when those applications are typically used. Super-Fetch then uses the tracking information to preload the application and ready it for use when it expects that the user will need the application. This ensures faster startup for applications and faster user switching over time.
§ Taking advantage of the low-priority I/O designation SuperFetch takes advantage of the high-priority I/O and low-priority I/O queues in Windows 8.1 to improve read/write times for user processes and improve a computer’s overall responsiveness. When multiple processes are competing for I/O, high-priority processes always get more I/O time than do low-priority processes. As a result, user processes and applications have better performance, and there is less contention for I/O time when both user processes and background processes are running.
All versions of Windows 8.1 support SuperFetch. As an administrator, you should understand how SuperFetch works and the way it is configured. Some basic characteristics of SuperFetch follow:
§ Runs as a service named SuperFetch. This service runs automatically at startup and logs on using the LocalSystem account.
§ Uses the Svchost.exe executable, running in a network-restricted mode. This means SuperFetch can access only the local computer and doesn’t have access to any networks to which the computer might be connected.
§ Depends on the Filter Manager component for proper operations. Filter Manager provides file information and file-system information needed by SuperFetch, and it is installed automatically with the operating system.
§ Writes prefetch data to the %SystemRoot%\Prefetch folder. The prefetch data is used to quickly start applications. Within the Prefetch folder, you’ll also find several database files used to track application usage history and speed up application performance. Application faults are also tracked in a database history file.
NOTE
The Prefetch folder is self-maintaining. There’s no need to delete it or empty its contents.
When you make major changes to the operating system, install service packs or updates, or install or reconfigure applications, users might occasionally experience slow startup. The extent to which this occurs depends on how extensive the changes are and how much memory-usage information SuperFetch has to rebuild. Occasionally, such as when you install a new service pack, several restarts are required over time to normalize the startup speed.
Working with basic and dynamic disks
Not that long ago, all Windows-based computers shipped with their hard disks configured as basic disks. Now, because people want larger or more robust disks, computer manufacturers have responded by shipping more computers with their hard disks configured as dynamic disks. Instead of having a single 500-GB drive, a new computer might have a spanned disk with 1,000 GB, where two 500-GB physical drives act as a single logical disk. In this scenario, disk spanning is used to make multiple disks appear to be a single disk. One way to implement this on Windows 8.1 is to use dynamic disks.
As more and more computers are shipped with dynamic disks, you might wonder whether your computers that use basic disks should be converted to dynamic disks. In some cases, the need for standardization might prompt your decision. For example, for better manageability, you might want all desktops in a particular department to have the same configuration. In other cases, IT management might direct the change because the conversion from basic disks to dynamic disks can be considered an upgrade process. (That is, you are moving computers from an older disk type to a newer disk type.) However, before you decide to move from one disk type to another, you should understand what is involved, what features are supported, and what features are not supported.
A basic disk is a physical disk that has one or more basic volumes that can be configured as primary partitions, plus an optional extended partition consisting of logical drives. A primary partition is a drive section that you can access directly for file storage. Each physical drive can have up to four primary partitions. You make a primary partition accessible to users by creating a file system on it. In place of one of the four permitted primary partitions, you can create an extended partition (meaning that the basic disk could have up to three primary partitions and one extended partition). Unlike with primary partitions, you can’t access extended partitions directly. Instead, you can configure extended partitions with one or more logical drives that are used to store files. Being able to divide extended partitions into logical drives enables you to divide a physical drive into more than four sections. For example, you could create logical drives F, G, and H in a single extended partition.
A dynamic disk is a physical disk that has one or more dynamic volumes. Unlike a basic disk, a dynamic disk can have an unlimited number of volumes—any one of which can be extended or used as a system volume.
A key advantage of dynamic disks used to be their ability to combine physical disks by using the spanning, striping, or mirroring features of Windows. However, Windows 8.1 also allows you to span, stripe, or mirror basic disks. When you span or stripe drives, you create a single volume that extends from one disk to other disks by using all or part of each disk in the set. The difference between spanning and striping is how data is written. Windows 8.1 recognizes spanned disks in the same way it would a single partition, and write operations to the spanned disk are made to the entire partition randomly. With striping, Windows 8.1 writes a portion of the data to each of the underlying disks that make up the volume. In most cases, striping gives you faster read/write access to data because data is read from and written to multiple disks. With mirroring, two drives are combined to create a single fault-tolerant volume. If any one volume fails, the other volume in the set is still available, and the volume can be recovered.
CAUTION
Technically, disk striping is a redundant array of independent disks (RAID) level 0 (RAID-0), and disk mirroring is RAID level 1 (RAID-1). Although disk mirroring is fault-tolerant, neither disk striping nor spanning provides fault tolerance, and the failure of any disk in the set causes the volume to fail.
Now, because you can span, stripe, and mirror drives by using the basic disk type, the key features that distinguish dynamic disks from basic disks are enhanced error correction and detection and the ability to modify disks without having to restart the computer. Other features available on a disk depend on the disk formatting, such as whether you are using exFAT or NTFS.
When you format a disk with a file system, the file system structures the disk by using clusters, which are logical groupings of sectors. With 512b drives, FAT, FAT32, exFAT, and NTFS use a fixed sector size of 512 bytes but allow the cluster size to be variable. For example, the cluster size might be 4,096 bytes, so if there are 512 bytes per sector, each cluster is made up of eight sectors.
Table 3-1 provides a summary of the default cluster sizes for FAT16, FAT32, exFAT, and NTFS. You have the option of specifying the cluster size when you create a file system on a disk, or you can accept the default cluster-size setting. Either way, the cluster sizes available depend on the type of file system you are using.
NOTE
REAL WORLD Four FAT file systems are used by Windows platforms: FAT12, FAT16, FAT32, and exFAT. The difference between FAT12, FAT16, and FAT32 is the number of bits used for entries in their file allocation tables, namely 12, 16, or 32 bits. From a user’s perspective, the main difference in these file systems is the theoretical maximum volume size, which is 16 MB for a FAT12 volume, 4 GB for FAT16, and 2 TB for FAT32. When the term FAT is used without an appended number, it generally refers to both FAT16 and FAT32. Extended FAT, or exFAT, is an enhanced version of FAT32. Although exFAT retains the ease-of-use advantages of FAT32, it overcomes the 4-GB file size limit and the 32-GB volume size limit of FAT32 file systems. The exFAT format also supports allocation unit sizes of up to 32,768 KB. The exFAT format is designed so that it can be used with and easily moved between any compliant operating system or device. This gives exFAT an advantage over FAT32.
Table 3-1. Default cluster sizes for FAT16, FAT32, exFAT, and NTFS
|
CLUSTER SIZE |
||||
|
VOLUME SIZE |
FAT16 |
FAT32 |
EXFAT |
NTFS |
|
7 MB to 16 MB |
512 bytes (as FAT12) |
Not supported |
4 KB |
512 bytes |
|
17 MB to 32 MB |
512 bytes |
Not supported |
4 KB |
512 bytes |
|
33 MB to 64 MB |
1 KB |
512 bytes |
4 KB |
512 bytes |
|
65 MB to 128 MB |
2 KB |
1 KB |
4 KB |
512 bytes |
|
129 MB to 256 MB |
4 KB |
2 KB |
4 KB |
512 bytes |
|
257 MB to 512 MB |
8 KB |
4 KB |
32 KB |
512 bytes |
|
513 MB to 1,024 MB |
16 KB |
4 KB |
32 KB |
1 KB |
|
1,025 MB to 2 GB |
32 KB |
4 KB |
32 KB |
4 KB |
|
2 GB to 4 GB |
64 KB |
4 KB |
32 KB |
4 KB |
|
4 GB to 8 GB |
Not supported |
4 KB |
32 KB |
4 KB |
|
8 GB to 16 GB |
Not supported |
8 KB |
32 KB |
4 KB |
|
16 GB to 32 GB |
Not supported |
16 KB |
32 KB |
4 KB |
|
32 GB to 2 TB |
Not supported |
[a] |
128 KB |
4 KB |
|
2 TB to 16 TB |
Not supported |
[b] |
128 KB |
4 KB |
|
16 TB to 32 TB |
Not supported |
[c] |
128 KB |
8 KB |
|
32 TB to 64 TB |
Not supported |
[d] |
128 KB |
16 KB |
|
64 TB to 128 TB |
Not supported |
[e] |
128 KB |
32 KB |
|
128 TB to 256 TB |
Not supported |
[f] |
128 KB |
64 KB |
|
[a] If you are using the Windows formatting tools, you are limited to 32 GB. Larger volumes can be created by using third-party tools. [b] If you are using the Windows formatting tools, you are limited to 32 GB. Larger volumes can be created by using third-party tools. [c] If you are using the Windows formatting tools, you are limited to 32 GB. Larger volumes can be created by using third-party tools. [d] If you are using the Windows formatting tools, you are limited to 32 GB. Larger volumes can be created by using third-party tools. [e] If you are using the Windows formatting tools, you are limited to 32 GB. Larger volumes can be created by using third-party tools. [f] If you are using the Windows formatting tools, you are limited to 32 GB. Larger volumes can be created by using third-party tools. |
||||
The important thing to know about clusters is that they are the smallest unit in which disk space is allocated. Each cluster can hold one file at most. So, if you create a 1-KB file and the cluster size is 4 KB, there will be 3 KB of empty space in the cluster that isn’t available to other files. That’s just the way it is. If a single cluster isn’t big enough to hold an entire file, the remaining file data goes into the next available cluster and then the next, until the file is completely stored. For FAT, for example, the first cluster used by the file has a pointer to the second cluster, and the second cluster has a pointer to the next, and so on until you get to the final cluster used by the file, which has an end-of-file (EOF) marker.
The disk I/O subsystem manages the physical structure of disks. Windows manages the logical disk structure at the file system level. The logical structure of a disk relates to the basic or dynamic volumes you create on a disk and the file systems with which those volumes are formatted. You can format both basic volumes and dynamic volumes by using FAT or NTFS. Each file system type has a different structure, and there are advantages and disadvantages of each.
Although you can use both basic and dynamic disks on the same computer, the disks that make up a volume must use the same disk type. Converting from basic to dynamic and vice versa is covered in the Converting a basic disk to a dynamic disk or vice versa section, later in this chapter. Remember that although you can convert the disk type from basic to dynamic and preserve the data on the disk, you must delete any existing partitioning on a dynamic disk before you can convert from dynamic to basic. Deleting the partitioning destroys any data on the associated disks. Finally, dynamic disks cannot be created on any removable-media drives or on any disk on a portable computer. Laptops, Tablet PCs, and other types of portable computers can have only basic disks.
CAUTION
Be careful when working with laptops. Some laptop configurations might make Disk Management think that you can convert a basic disk to a dynamic disk. This can occur on computers that do not support Advanced Power Management (APM) or Advanced Configuration and Power Interface (ACPI). Although support for dynamic disks might seem to be enabled, this is an error, and trying to convert a basic disk to a dynamic disk on one of these laptops could corrupt the entire disk.
NOTE
External hard drives attached via FireWire, USB, or eSATA can in some cases be converted to dynamic disks. Microsoft Knowledge Base article 299598, “How To: Convert an IEEE 1394 Disk Drive to a Dynamic Disk Drive,” details how this can be done. However, this article doesn’t provide enough cautions. The external hard drive must be used only with a single computer. If you think you will need to move the drive to another computer in the future, you shouldn’t convert it to a dynamic disk. Further, before attempting to convert any external hard drive attached via FireWire or USB, you should back up the data. If possible, perform the conversion on an identical but nonessential drive in a development or testing environment and then test the drive operation.
Preparing basic and dynamic disks
When it comes to using basic and dynamic disks, you perform several related tasks, such as initializing new disks, setting a drive as active, or changing the drive type. Before performing these tasks, however, you should understand what the active, boot, system, and other drive designations mean.
Understanding drive designations
Basic disks can have both primary and extended partitions. A primary partition can be used to start the operating system. Although you cannot subdivide a primary partition, you divide extended partitions into one or more logical drives and then access the logical drives independently of each other.
Dynamic disks are divided into volumes, with the simple volume being the most common volume type. A simple volume is a volume on a single disk, which can be used to start the operating system. Dynamic volumes, on the other hand, combine space from multiple physical drives.
Whether working with basic or dynamic disks, you should pay particular attention to five special types of drive sections on MBR disks:
§ Active The active partition or volume is the drive section from which a computer starts. If the computer uses multiple operating systems, the active drive section must contain the startup files for the operating system you want to start and it must be a primary partition on a basic disk or a simple volume on a dynamic disk. The active partition is not typically marked as such in Disk Management. In most cases, it is the primary partition or the first simple volume on Disk 0. However, if you change the default configuration, you will find an Active label.
CAUTION
With removable media disks, you might observe an Active status, which shouldn’t be confused with the Active label associated with an active partition. Specifically, USB and FireWire card readers that use CompactFlash or other types of cards are displayed as having an Active status when media is inserted and the related drive is online. It’s also important to note that in some cases, a removable media drive might be listed as Disk 0. In this case, you need to look for the active partition on the first physical hard disk according to its disk number. For example, if the computer has Disk 0, Disk 1, and Disk 2, and the first physical disk in sequence is Disk 1, the active partition is most likely on the first primary partition or simple volume on Disk 1.
§ System The system partition or volume contains the hardware-specific (bootstrap) files needed to load the operating system. The system partition or volume can be mirrored but can’t be part of a striped or spanned volume. The system partition is labeled as such in the Status column in Disk Management’s Volume List and Graphical views.
§ Boot The boot partition or volume contains the operating system and its support files. The boot partition or volume can be mirrored but can’t be part of a striped or spanned volume. On most systems, system and boot are the same partition or volume. Although it seems that the boot and system partitions are named backward, this convention has been used since the earliest days of Windows and has not changed. Like the active partition, the boot partition is not typically marked as such in Disk Management. In most cases, it is the primary partition or the first simple volume on Disk 0. However, if the operating system is installed on a different partition or volume, you might find a Boot label.
§ Page file A page file partition or volume contains a paging file used by the operating system. Because a computer can page memory to multiple disks, according to the way virtual memory is configured, a computer can have multiple page file partitions or volumes. However, depending on the service packs configured, the computer might only report the primary volume being used as a paging file.
§ Crash dump The crash dump partition or volume is the one to which the computer attempts to write dump files in the event of a system crash. Dump files can be used to diagnose the causes of system failure. By default, dump files are written to the %SystemRoot% folder, but they can be located on any partition or volume.
Each computer has one active, one system, one boot, and one crash dump partition or volume, and these partitions or volumes can be combined. The page file designation is the only drive designation that you might observe on multiple partitions or volumes.
Installing and initializing new physical disks
Windows 8.1 makes it much easier to add new physical disks to a computer. After you install the disks following the disk manufacturer’s instructions, you need to log on and start Disk Management. If the new disks have already been initialized, meaning they already have disk signatures enabling them to be read and written to, they should be brought online automatically if you choose Rescan Disks from the Action menu. If you are working with new disks that have not been initialized, meaning they don’t have disk signatures, Disk Management will start the Initialize And Convert Disk Wizard as soon as Disk Management starts and detects the new disks.
You can use the Initialize And Convert Disk Wizard to initialize the disks by completing the following steps:
1. Tap or click Next to exit the Welcome page. On the Select Disks To Initialize page, the disks you added are selected for initialization automatically, but if you don’t want to initialize a particular disk, you can clear the related option.
2. Tap or click Next to display the Select Disks To Convert page. This page lists the new disks, in addition to any nonsystem or boot disks that can be converted to dynamic disks. The new disks aren’t selected by default. If you want to convert the disks, select them, and then tap or click Next.
3. The final page shows you the options you’ve selected and the actions that will be performed on each disk. If the options are correct, tap or click Finish. The wizard then performs the designated actions. If you’ve elected to initialize a disk, the wizard writes a disk signature to the disk. If you’ve elected to convert a disk, the wizard converts the disk to a dynamic disk after writing the disk signature.
If you don’t want to use the wizard, you can close it and use Disk Management instead to view and work with the disk. In the Disk List view, the disk is marked with a red icon that has an exclamation point, and the disk’s status is listed as Not Initialized. Press and hold or right-click the disk’s icon, and then tap or click Initialize Disk. Confirm the selection (or add to the selection if more than one disk is available for initializing), and then tap or click OK to start the initialization of the disk. Conversion to a dynamic disk would proceed as discussed in the section Converting a basic disk to a dynamic disk or vice versa, later in this chapter.
Changing a disk’s partition table style
You can change partition table styles from MBR to GPT or from GPT to MBR. Changing partition table styles is useful when you want to move disks between computers that have different processor architectures or you receive new disks that are formatted for the wrong partition table style. You can convert partition table styles only on empty disks, however. This means the disks must be either new or newly formatted. You could, of course, empty a disk by removing its partitions or volumes.
You can use both Disk Management and DiskPart to change the partition table style. To use Disk Management to change the partition style of an empty disk, start Computer Management from the Administrative Tools in Control Panel or enter compmgmt.msc in the Apps Search box, and then press Enter. In Computer Management, expand the Storage node, and then select Disk Management. All available disks are displayed. Press and hold or right-click the disk to convert in the left pane of the Graphical view, and then tap or click Convert To GPT Disk or Convert To MBR Disk, as appropriate.
To use DiskPart to change the partition style of an empty disk, invoke DiskPart by entering diskpart at an elevated command prompt, and then select the disk you want to convert. For example, if you want to convert Disk 2, enter select disk 2. After you select the disk, you can convert it from MBR to GPT by entering convert gpt. To convert a disk from GPT to MBR, enter convert mbr.
Marking a partition as active
You don’t typically need to change a partition’s designation. If you are using only Windows 8.1 or if you are multibooting to Windows 8.1 and any other version of Windows, you do not have to change the active partition. With MBR disks, the active partition is typically the primary partition or the first simple volume on Disk 0. If you install Windows 8.1 on drive C and another version of Windows on a different partition, such as drive D, you don’t need to change the active partition to boot Windows 8.1 or the other operating system. However, if you want to boot an operating system that is not based on Windows, you usually have to mark its operating system partition as active and then reboot to use that operating system.
NOTE
Only primary partitions can be marked as active. You can’t mark logical drives as active and you can’t mark volumes as active. When you upgrade a basic disk containing the active partition to a dynamic disk, this partition becomes a simple volume that’s active automatically.
To mark a partition as active, complete the following steps:
1. Start Disk Management by entering diskmgmt.msc at a prompt or in the Apps Search box.
2. Press and hold or right-click the primary partition you want to mark as active, and then tap or click Mark Partition As Active.
CAUTION
If you mark a partition or volume as active, Disk Management might not let you change the designation. As a result, if you restart the computer, the operating system might fail to load. The only workaround I’ve found is to use DiskPart to make the appropriate changes either before rebooting or before using the Startup Repair tool following a failed start.
Example 3-1 shows a sample DiskPart session for setting the active partition. As you can tell, when you first start DiskPart, it shows the DiskPart program name and the version you are using, in addition to the name of the computer. You then select the disk with which you want to work and list its partitions. In this example, you select Disk 0, list its partitions, and then select Partition 1. After you’ve selected a disk and a partition on that disk, you can work with that partition. Just type the Active command at this point, and press Enter to set the partition as active. When you have finished, quit DiskPart by using the Exit command.
NOTE
This example uses Disk 0. On your system, Disk 0 might not be the one with which you want to work. You can use the List Disk command to list the available disks and then use the information provided to determine the disk with which to work.
Example 3-1. Using DiskPart to set the active partition
C:>diskpart
Microsoft DiskPart version 6.3.9431
Copyright (C) 1999-2013 Microsoft Corporation.
On computer: ENGPC85
DISKPART> select disk 0
Disk 0 is now the selected disk.
DISKPART> list partition
Partition ### Type Size Offset
--------------- ---------------- ------- ---------
Partition 1 Primary 932 GB 1024 KB
DISKPART> select partition 1
Partition 1 is now the selected partition.
DISKPART> active
DiskPart marked the current partition as active.
DISKPART> exit
Converting a basic disk to a dynamic disk or vice versa
The easiest way to convert a basic disk to a dynamic disk or vice versa is to use Disk Management. When you upgrade to a dynamic disk, partitions are automatically changed to volumes of the appropriate type. Any primary partitions become simple volumes. Any logical drives in an extended partition become simple volumes. Any unused (free) space in an extended partition is marked as Unallocated. You can’t change these volumes back to partitions. Instead, you must delete the volumes on the dynamic disk and then change the disk back to a basic disk. Deleting the volumes destroys all the information on the disk.
Before you convert a basic disk to a dynamic disk, you should be sure that you don’t need to boot the computer to a previous version of Windows. You should also be sure that the disk has 1 MB of free space at the end of the disk. Although Disk Management reserves this free space when creating partitions and volumes, disk management tools on other operating systems might not; as a result, the conversion will fail. It’s also important to note the following restrictions:
§ You can’t convert removable media to dynamic disks. You can configure removable media drives only as basic drives with primary partitions.
§ You can convert disks’ non-system and non-boot partitions that are part of spanned or striped volumes. These volumes become dynamic volumes of the same type; however, you must convert all drives in the set together.
To convert a basic disk to a dynamic disk, complete the following steps:
1. In Disk Management, either in the Disk List view or in the left pane of the Graphical view, press and hold or right-click a basic disk that you want to convert, and then tap or click Convert To Dynamic Disk.
2. In the Convert To Dynamic Disk dialog box, select the check boxes for the disks you want to convert, as shown in Figure 3-5.
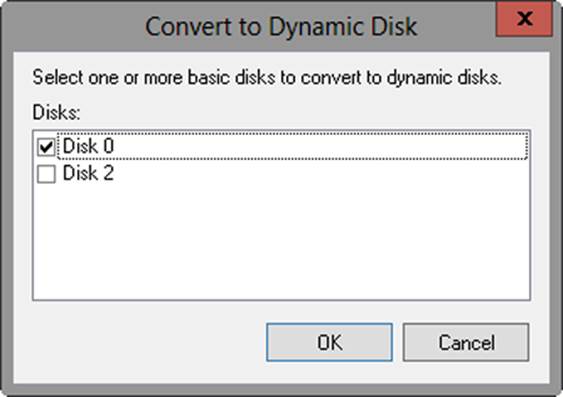
Figure 3-5. Select the basic disk to convert.
3. If the disk you are converting has no formatted volumes, tapping or clicking OK converts the disk, and you do not need to perform the remaining steps. If the disk you are converting has formatted volumes, tapping or clicking OK displays the Disks To Convert dialog box. Follow the remaining steps to complete the conversion.
4. The Disks To Convert dialog box shows the disks you’re converting so that you can confirm the conversion. Notice the value in the Will Convert column, which should be Yes so long as the disk meets the conversion criteria, and then tap or click Details to view the volumes on the selected drive. When you are ready to continue, tap or click OK to close the Convert Details dialog box.
5. To begin the conversion, tap or click Convert. Disk Management warns you that after you convert the disk, you won’t be able to boot previous versions of Windows from volumes on the selected disks. Tap or click Yes to continue.
6. Next, you are warned that file systems on the disks to be converted will be dismounted, meaning they will be taken offline and be inaccessible temporarily. Tap or click Yes to continue. If a selected drive contains the boot partition, the system partition, or a partition in use, Disk Management will need to restart the computer, and you will get another prompt.
To convert a dynamic disk to a basic disk, complete the following steps:
1. Before you can change a dynamic disk to a basic disk, you must delete all dynamic volumes on the disk. Because this destroys all the data on the volumes, you should back up the volumes, and then verify the backups before making the change.
2. When you are ready to start the conversion process, start Disk Management. In Disk Management, press and hold or right-click the disk you want to convert, and then tap or click Convert To Basic Disk. This changes the dynamic disk to a basic disk, and you can then create new partitions and logical drives on the disk.
Working with disks, partitions, and volumes
Before you can store data on a physical disk, you must prepare the disk by setting a disk type, partitioning its space, assigning a drive designator, and formatting its partitions or volumes.
After partitioning a disk, you must assign each partition or volume a drive designator. The drive designator can be a letter or a path. You use drive letters to access file systems in various partitions on physical drives. Generally speaking, the drive letters A through Z are available. However, the drive letter A is usually assigned to a system’s floppy drive. If the system has a second floppy drive or another removable-media drive, the letter B is usually assigned to it (or unassigned otherwise). The drive letter C is usually assigned to the first partition or volume created on Disk 0. The drive letter D is usually assigned to the first CD-ROM or DVD-ROM drive. Thus, on most systems, the drive letters E through Z are available. If you need additional volumes, you can create them by using drive paths.
A drive path is set as a folder location on an existing local disk. For example, you could mount additional drives as C:\Docs1, C:\Docs2, and C:\Docs3. Drive paths can be used with basic and dynamic disks. The only restriction for drive paths is that you mount them on empty folders that are on NTFS-formatted local disks.
Formatting a partition or a volume sets the file system that will be used and creates the necessary file structures. In general, you can format a partition or a volume as FAT, FAT32, exFAT or NTFS. There are restrictions and requirements for the use of each, however.
FAT, also referred to as FAT16, is a 16-bit file system designed to be used with volume sizes of up to 4 GB. FAT uses a boot sector that stores information about the disk type, the starting and ending sectors, and the active partition. FAT gets its name from the file allocation table it uses to track the cluster locations of files and folders. There is a primary table and a duplicate table. The duplicate is used to restore the primary table if it becomes corrupted. FAT also has the capability to mark clusters (sections of disk containing data) as unused, in use, bad, or reserved. This helps to make FAT a fairly robust file system. FAT is best with volumes of 2 GB or less, and it has a maximum file size of 2 GB. FAT can also be used with floppy disks and removable disks.
FAT32 is a 32-bit version of FAT16, with some additional features and capabilities. Like FAT16, FAT32 uses a primary and a duplicate file allocation table. FAT32 can also mark clusters as unused, in use, bad, or reserved, and it too can be used with removable disks. FAT32 has a minimum volume size of 33 MB, a maximum volume size of 32 GB, and a maximum file size of 4 GB.
ExFAT is an enhanced, 64-bit version of FAT. To retain the speed and other advantages of FAT, use exFAT for volumes larger than 32 GB. Windows 8.1 supports exFAT on both internal and external volumes.
NOTE
The 4-GB maximum file size limitation for FAT32 is specific to Windows. With FAT32, some other operating systems can create larger volumes.
NTFS is very different from FAT. Instead of using a file allocation table, NTFS uses a relational database to store information about files and folders. This database is called the master file table (MFT); it stores a record of each file and folder on a volume, and additional information that helps to maintain the volume. Overall, the MFT makes NTFS much more reliable and recoverable than FAT16 or FAT32. NTFS can recover from disk errors more readily than can FAT16 and FAT32, and NTFS generally has fewer disk problems.
Some, but not all, of this resiliency is built into exFAT, which uses transactions to improve reliability and recoverability. Both NTFS and exFAT have a maximum volume size of 256 TB with standard format disks and a maximum file size that is limited only by the volume size.
Although you can’t use NTFS or exFAT with floppy disks, you can use NTFS and exFAT with removable disks. Additionally, unlike FAT16 and FAT32, which have limited security features (namely that you can mark a file only as read-only, hidden, or system), exFAT supports basic access controls. Only NTFS has advanced security that lets you use permissions to set specific file and folder access, however, and only NTFS supports other advanced features like compression, encryption, and disk quotas.
NOTE
Several versions of NTFS have been implemented. Because most current computers have NTFS 5 or later, I focus on NTFS 5 and later in this book. Also, if you upgrade a system with an early version of Windows, you are given the opportunity to convert existing NTFS volumes to the latest version during installation. In most cases, you should do this because it ensures support for the latest NTFS features. If you’re curious about the actual NTFS version for a volume, enter the following at an elevated administrator prompt:
fsutil fsinfo ntfsinfo c:
c: is the designator of the drive with which you want to work. If the internal NTFS version is listed as 3.1, you’re actually working with NTFS 5.1.
Partitioning disks and preparing them for use
Disk Management is the primary tool that you use to partition disks and prepare them for use. By using Disk Management, you can partition disks, assign drive designators, and format partitions and volumes. Disk Management’s command-line counterparts include DiskPart for partitioning and drive-designator assignment and Format for formatting.
Creating partitions, logical drives, and simple volumes
Windows 8.1 simplifies the Disk Management user interface by using one set of dialog boxes and wizards for both partitions and volumes. The first three volumes on a basic drive are created automatically as primary partitions. If you try to create a fourth volume on a basic drive, the remaining free space on the drive is converted automatically to an extended partition with a logical drive of the size you designate. You designate the size by using the new volume feature it created in the extended partition. Any subsequent volumes are created in the extended partition andlogical drives automatically.
NOTE
As discussed previously, an MBR drive can have four primary partitions. However, if you create a fourth primary partition, you are unable to further divide the drive, and this is why Windows 8.1 automatically creates an extended partition. The extended partition enables you to create multiple logical drives within the partition.
In Disk Management, you create partitions, logical drives, and simple volumes by completing the following steps:
1. In Disk Management’s Graphical view, press and hold or right-click an unallocated or free area, and then tap or click New Simple Volume. This starts the New Simple Volume Wizard. Read the Welcome page, and then tap or click Next.
2. The Specify Volume Size page, shown in Figure 3-6, specifies the minimum and maximum size for the volume in megabytes and lets you size the volume within these limits. Size the partition in megabytes by using the Simple Volume Size box, and then tap or click Next.
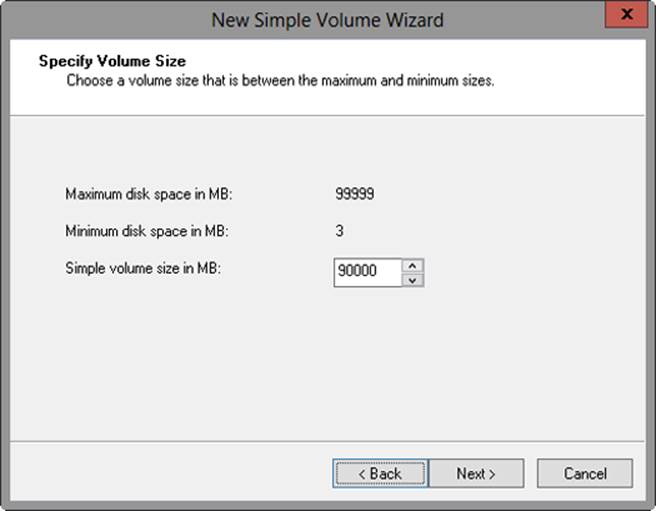
Figure 3-6. Set the size of the volume.
3. On the Assign Drive Letter Or Path page, shown in Figure 3-7, specify whether you want to assign a drive letter or path, and then tap or click Next. The available options are as follows:
o Assign The Following Drive Letter Select an available drive letter in the selection list provided. By default, Windows 8.1 selects the lowest available drive letter and excludes reserved drive letters, in addition to those assigned to local disks or network drives.
o Mount In The Following Empty NTFS Folder Choose this option to mount the partition in an empty NTFS folder. You must then enter the path to an existing folder or tap or click Browse to search for or create a folder to use.
o Do Not Assign A Drive Letter Or Drive Path Choose this option if you want to create the partition without assigning a drive letter or path. Later, if you want the partition to be available for storage, you can assign a drive letter or path at that time.
NOTE
Volumes don’t have to be assigned a drive letter or a path. A volume with no designators is considered to be unmounted and is for the most part unusable. An unmounted volume can be mounted by assigning a drive letter or a path at a later date. See the section Assigning, changing, or removing drive letters and paths, later in this chapter.
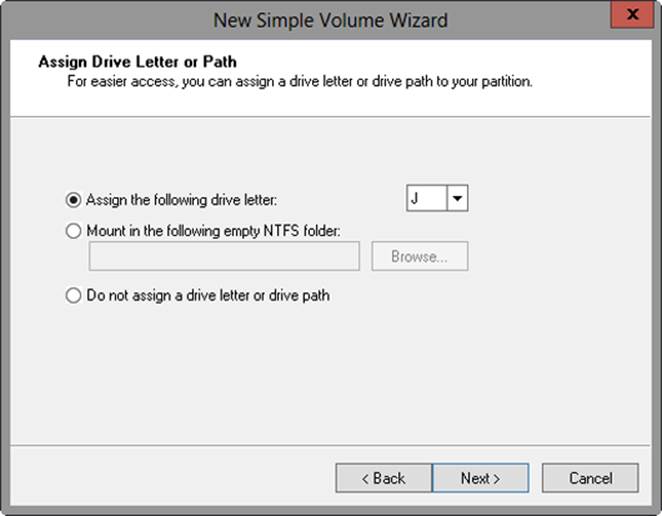
Figure 3-7. Assign the drive designator or choose to wait until later.
4. Use the Format Partition page, shown in Figure 3-8, to determine whether and how the volume should be formatted. If you want to format the volume, choose Format This Volume With The Following Settings, and then configure the following options:
o File System Sets the file system type as FAT, FAT32, exFAT, or NTFS. NTFS is selected by default in most cases. If you create a file system as FAT or FAT32, you can later convert it to NTFS by using the Convert utility; however, you can’t convert NTFS partitions to FAT or FAT32.
o Allocation Unit Size Sets the cluster size for the file system. This is the basic unit in which disk space is allocated. The default allocation unit size is based on the selected file system and the size of the volume and, by default, is set dynamically prior to formatting. To override this feature, you can set the allocation unit size to a specific value. If you use many small files, you might want to use a smaller cluster size, such as 512 or 1,024 bytes. With these settings, small files use less disk space.
o Volume Label Sets a text label for the partition. This label is the partition’s volume name and by default is set to New Volume. You can change the volume label at any time by pressing and holding or right-clicking the volume in File Explorer, choosing Properties, and entering a new value in the Label box provided on the General tab.
o Perform A Quick Format Tells Windows 8.1 to format without checking the partition for errors. With large partitions, this option can save you a few minutes. However, it’s usually better to check for errors, which enables Disk Management to mark bad sectors on the disk and lock them out.
o Enable File And Folder Compression Turns on compression for the disk. Built-in compression is available only for NTFS. Under NTFS, compression is transparent to users and compressed files can be accessed just like regular files. If you select this option, files and directories on this drive are compressed automatically. For more information on compressing drives, files, and directories, see the section Compressing drives and data in Chapter 4.
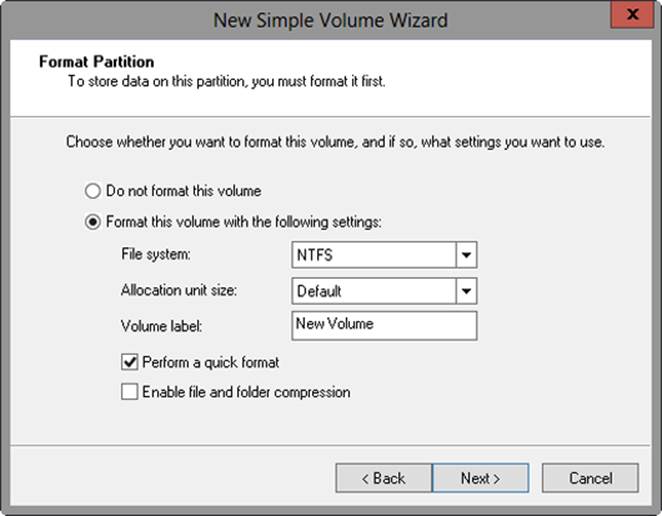
Figure 3-8. Set the formatting options for the partition.
5. Tap or click Next, confirm your options, and then tap or click Finish.
Creating spanned and striped volumes
With spanning and striping, you create a single volume that extends across multiple disks. When working with spanning and striping, keep the following in mind:
§ A spanned volume uses free space on multiple disks of the same type. If you have unallocated space on two or more disks of the same type, you can combine this space to create a spanned volume. A spanned volume has no fault tolerance and has average read/write performance. Files are written to the entire spanned volume randomly. If any one of the disks fails, the entire volume fails, and all data is lost.
§ A striped volume uses free space on multiple disks and stripes the data as it is written. Striping gives you faster read/write access to data because data is read from and written to multiple disks. For example, with a three-disk striped volume, data from a file will be written to Disk 1, then to Disk 2, and then to Disk 3 in 64-KB blocks. Like a spanned volume, a striped volume has no fault tolerance, so if any one of the disks fails, the entire volume fails, and all data is lost. This approach also is referred to as RAID 0.
§ A striped with parity volume uses three or more volumes, each on a separate drive, to create a striped set with parity error checking. In the case of failure, data can be recovered. This approach, also referred to as RAID 5, gives fault tolerance with less overhead than mirroring and better read performance than disk mirroring.
NOTE
If you have only one disk available, you will not be able to create a spanned or striped volume. Also note that simple and spanned volumes can be extended to increase their volume size. RAID 0 and RAID 5 volumes, however, cannot be extended. When you create a RAID 0 or RAID 5 volume, you should be very certain that the volume size is what you want to use. Otherwise, you might have to delete and then re-create the striped volume. Additionally, the boot and system volumes shouldn’t be part of a RAID 0 or RAID 5 set. Don’t use RAID 0 or RAID 5 with these volumes.
NOTE
MORE INFO To allow for fault tolerance, RAID 5 writes parity checksums with the blocks of data. If any of the drives in the striped set fails, you can use the parity information to recover the data. If two disks fail, however, the parity information isn’t sufficient to recover the data, and you’ll need to rebuild the striped set from backup.
In Disk Management, you create spanned or striped volumes on disks by completing the following steps:
1. In Disk Management’s Graphical view, press and hold or right-click an unallocated area, and then tap or click New Spanned Volume, New Striped Volume, or New RAID-5 Volume, as appropriate. Read the Welcome page, and then tap or click Next. Keep in mind that although Windows 8.1 supports spanning and striping on basic disks, some basic disks cannot be spanned or striped.
2. On the Select Disks page, select the disks that will be part of the volume and specify the size of the volume segments on those disks. The disks must be the same disk type, either basic or dynamic. Tap or click Next.
Available disks are shown in the Available list. Select a disk in this list, and then tap or click Add to add the disk to the Selected list. If you make a mistake, you can remove a disk from the Selected list by selecting the disk, and then tapping or clicking Remove.
Specify the space that you want to use on each disk by selecting each disk in the Selected list, and then by using Select The Amount Of Space In MB to specify the amount of space to use. Keep in mind that the Maximum box shows you the largest area of free space available on the selected disk, and the Total Volume Size box shows the total disk space currently allocated to the volume.
TIP
There’s a quick way to use the same amount of space on all selected disks. To do this, highlight each disk by pressing Shift and then tapping or clicking the first disk and the last disk in the Selected list. Now, when you set the amount of space to use, you’ll set the amount for all selected disks.
3. Follow steps 3–5 in the previous section, Creating partitions, logical drives, and simple volumes.
Shrinking or extending volumes
Windows 8.1 doesn’t use Ntldr and Boot.ini to load the operating system. Instead, Windows 8.1 has a preboot environment in which Windows Boot Manager is used to control startup and load the boot application you’ve selected. The Windows Boot Manager also frees the Windows operating system from its reliance on MS-DOS, enabling you to use drives in ways you couldn’t before. Windows 8.1 enables you to extend and shrink both basic and dynamic disks. You can use Disk Management or DiskPart to extend and shrink volumes. You cannot shrink or extend striped volumes.
In extending a volume, you convert areas of unallocated space and add them to the existing volume. For spanned volumes on dynamic disks, the space can come from any available dynamic disk, not only those on which the volume was originally created. This enables you to combine areas of free space on multiple dynamic disks and use those areas to increase the size of an existing volume.
CAUTION
Before you try to extend a volume, you should know about several limitations. First, simple and spanned volumes can be extended only if they are formatted and the file system is NTFS. You can’t extend striped volumes. You can’t extend volumes that aren’t formatted or that are formatted with FAT, FAT32, or exFAT. Additionally, you can’t extend a system or boot volume, regardless of its configuration.
You can shrink a basic volume, simple volume, or spanned volume by completing the following steps:
1. In Disk Management, press and hold or right-click the volume that you want to shrink, and then tap or click Shrink Volume. This option is available only if the volume meets the previously discussed criteria.
2. In the Shrink dialog box, shown in Figure 3-9, enter the amount of space by which to shrink the disk. The Shrink dialog box provides the following information:
o Total Size Before Shrink In MB Lists the total capacity of the volume in megabytes. This is the formatted size of the volume.
o Size Of Available Shrink Space In MB Lists the maximum amount by which you can shrink the volume. This doesn’t represent the total amount of free space on the volume; rather, it represents the amount of space that can be removed, not including any data reserved for the master file table, volume snapshots, page files, and temporary files.
o Enter The Amount of Space To Shrink In MB Lists the total amount of space that will be removed from the volume. The initial value defaults to the maximum amount of space that can be removed from the volume. For optimal drive performance, you should ensure that the volume has at least 10 percent of free space after the shrink operation.
o Total Size After Shrink In MB Lists what the total capacity of the volume in megabytes will be after you shrink the volume. This is the new formatted size of the volume.
3. Tap or click Shrink.
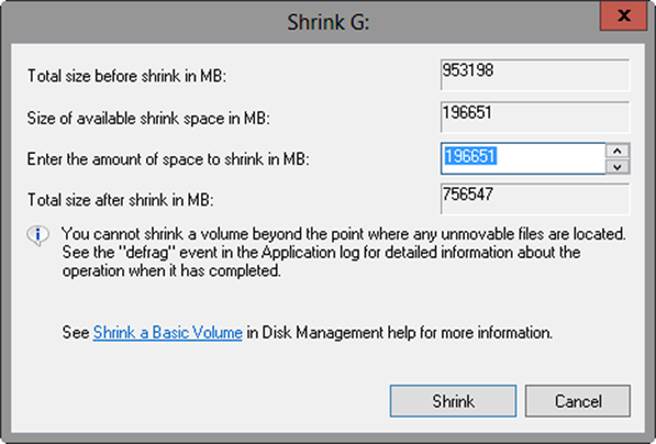
Figure 3-9. Specify the amount of space by which to shrink a volume.
You can extend a basic volume, simple volume, or a spanned volume by completing the following steps:
1. In Disk Management, press and hold or right-click the volume that you want to extend, and then tap or click Extend Volume. This option is available only if the volume meets the previously discussed criteria and free space is available on one or more of the system’s disks.
2. In the Extend Volume Wizard, read the introductory message, and then tap or click Next.
3. On the Select Disks page, select the disk or disks from which you want to allocate free space. Any disks currently being used by the volume will automatically be selected. By default, all remaining free space on those disks will be selected for use.
4. You can specify the additional space that you want to use on other disks by performing the following tasks:
o In the Available list, tap or click the disk, and then tap or click Add to add the disk to the Selected list.
o Select each disk in the Selected list, and then use Select The Amount Of Space In MB to specify the amount of unallocated space to use on the selected disk.
5. Tap or click Next, confirm your options, and then tap or click Finish.
Formatting partitions and volumes
When you format a partition or a volume, you create a file system that can be used to store data and that permanently deletes any existing data in the associated section of the physical disk. This is high-level formatting that creates the file system structure rather than low-level formatting that initializes a drive for use. (New drives are initialized when you connect them, if they haven’t already been prepared by the manufacturer.) To format a partition or a volume, press and hold or right-click the volume in Disk Management, and then tap or click Format. This opens the Format dialog box, shown in Figure 3-10. If you compare Figure 3-10 with Figure 3-8, you’ll find that the available options are essentially the same.
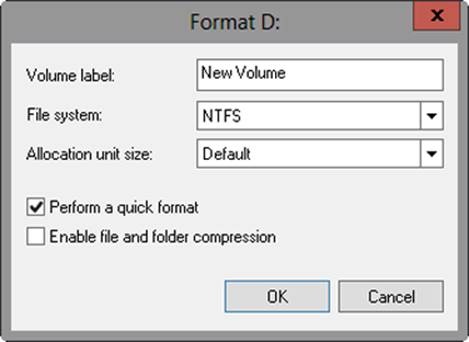
Figure 3-10. Use the Format dialog box to format a partition or a volume by specifying its file system type and volume label.
After selecting the appropriate options, tap or click OK. Because formatting a partition destroys any existing data, Disk Management gives you one last chance to stop the procedure. Tap or click OK to start formatting the partition. Disk Management then changes the status of the drive to reflect the formatting and, unless you are using the Perform A Quick Format option, the percentage of completion. When formatting is complete, the drive status will change to indicate that formatting is complete.
Assigning, changing, or removing drive letters and paths
Each primary partition, logical drive, or volume on a computer can be assigned one drive letter and one or more drive paths if the drive paths are mounted on empty NTFS folders. After it is assigned, the drive letter or path remains the same each time you start the computer. Except on partitions or volumes that are designated as system or boot, you can change the drive letter or path assignment at any time. You can also remove a drive letter or path assignment, except on partitions or volumes that are designated as system or boot.
To manage a partition’s or a volume’s drive letters or paths, go to Disk Management. In either the Volume List view or the Graphical view, press and hold or right-click the partition or volume you want to configure, and then tap or click Change Drive Letter And Paths. This opens the dialog box shown in Figure 3-11. You can now perform the following actions:
§ Add a drive path Tap or click Add, select Mount In The Following Empty NTFS Folder, and then enter the path to an existing folder. You can also tap or click Browse to search for or create a folder.
§ Remove a drive path Select the drive path to remove, tap or click Remove, and then tap or click Yes.
§ Assign a drive letter Tap or click Add, select Assign The Following Drive Letter, and then choose an available letter to assign to the drive.
§ Change the drive letter Select the current drive letter, and then tap or click Change. Select Assign The Following Drive Letter, and then choose a different letter to assign to the drive.
§ Remove a drive letter Select the current drive letter, tap or click Remove, and then tap or click Yes.
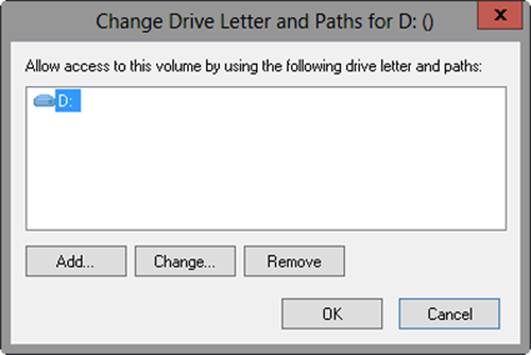
Figure 3-11. Use this dialog box to add, change, or remove drive letter and path assignments.
NOTE
If you try to change the letter of a drive that’s in use, Windows 8.1 displays a warning. You need to exit programs that are using the drive and try again or enable Disk Management to force the change by tapping or clicking Yes when prompted.
NOTE
REAL WORLD If the drive letter you want to use isn’t available, it means that it is in use or reserved for another purpose. Sometimes, you can resolve this problem by swapping drive letters. For example, if drive D is being used by the DVD-RW drive and drive E is a local disk, you might want to swap these letters so that D is used by the local disk and E is used by the DVD-RW drive. To do this, you must remove the drive letter assigned to the DVD-RW drive and free drive letter D for use. Next, set the drive letter assignment for the local disk to D. This frees up E, which you can assign to the DVD-RW drive. Keep in mind that changing the letter of a drive can have unintended consequences. For example, the path to an application might be stored in the registry with the drive letter. This path would no longer be valid if you change the drive letter. Shortcuts to files or programs on the drive would also be affected by the drive letter change and would need to be modified or re-created.
Assigning, changing, or deleting a volume label
A volume label is a text descriptor for a partition or a volume. The volume label is displayed when the drive is accessed in various Windows 8.1 utilities, such as File Explorer, and is designed to provide additional descriptive information about the contents of a drive.
NOTE
With FAT and FAT32, the volume label can be up to 11 characters in length and can include spaces. With NTFS, the volume label can be up to 32 characters in length. FAT and FAT32 don’t allow you to use some special characters, including * / \ [ ] : ; | = , . + “ ? < >, that NTFS does allow.
You can assign, change, or delete a volume label by using either Computer Management or the This PC console. In Computer Management, you can assign, change, or delete a label by completing the following steps:
1. Open Computer Management. Expand the Storage node, and then select the Disk Management node.
2. In the Volume List view, press and hold or right-click the drive icon, and then tap or click Properties.
3. On the General tab of the Properties dialog box, use the label box to enter a new label for the volume or to delete the existing label. Tap or click OK.
In the This PC console, you can assign, change, or delete a label by completing these steps:
1. To access the This PC console, tap or click File Explorer on the Start screen. In File Explorer, tap or click the location path selection button, and then tap or click This PC.
2. Press and hold or right-click the drive icon, and then tap or click Properties.
3. On the General tab of the Properties dialog box, use the label box to enter a new label or to delete the existing label. Tap or click OK.
Deleting partitions, volumes, and logical drives
To change the configuration of an existing drive that’s fully allocated, you might need to delete existing partitions, logical drives, or volumes. Because this deletion is irreversible, you should always back up and verify any important files and folders before deleting a partition, a logical drive, or a volume. If a computer has spanned or striped volumes, be careful when deleting volumes. Deleting any volume in a set erases the entire volume set, meaning the entire volume and all its data are lost.
CAUTION
Deleting a partition, a logical drive, or a volume is a drastic step that cannot be reversed. It removes the associated file system, and all data in the file system is lost.
NOTE
To protect the integrity of the system, you can’t delete the system or boot partition. However, Windows 8.1 lets you delete the active partition or volume if it is not designated as boot or system. Always check to be sure that the partition or volume you are deleting doesn’t contain important data or files.
You can delete a primary partition, a volume, or a logical drive by completing the following steps:
1. In Disk Management, press and hold or right-click the partition, volume, or drive you want to delete, and then tap or click Explore. Using File Explorer, move all the data to another volume or verify an existing backup to ensure that the data was properly saved.
2. In Disk Management, press and hold or right-click the partition, volume, or drive again, and then tap or click Delete Partition, Delete Volume, or Delete Logical Drive, as appropriate.
3. Tap or click Yes to confirm that you want to delete the selected item.
Deleting an extended partition is a slightly different operation from deleting a primary partition or a logical drive. To delete an extended partition, you must first delete all the logical drives on the partition by following the steps in the preceding procedure. You can then select the extended partition area itself and delete it.
Converting a volume to NTFS
Windows 8.1 provides a command-line utility for converting FAT or FAT32 volumes to NTFS. This utility, named Convert (Convert.exe), is located in the %SystemRoot%\System32 folder. When you convert a volume by using this tool, the file and directory structure is preserved and no data is lost.
CAUTION
Windows 8.1 doesn’t provide a utility for converting NTFS to FAT or FAT32. The only way to go from NTFS to FAT or FAT32 is to delete the partition by following the steps outlined in the previous section, and then re-create the partition as a FAT or FAT32 volume. Deleting a partition deletes its data. Note also that Convert doesn’t convert exFAT volumes to NTFS.
If you want to convert a drive, use the following syntax at an elevated command prompt:
convert volume /FS:NTFS
volume is the drive letter followed by a colon (:), a drive path, or a volume name. For example, if you want to convert drive D to NTFS, you would use the following command:
convert D: /FS:NTFs
The complete syntax for the Convert command is
Convert volume /FS:NTFS [/V] [/X] [/CvtArea:
filename] [/NoSecurity]
These options and switches are used as follows:
§ volume Sets the volume to work with and must include the full drive designator (the drive letter followed by a colon). You also can specify a mount point or volume name.
§ /FS:NTFS Converts the designated volume to NTFS. This is the only file system option.
§ /V Sets verbose mode, which provides more detail in the output.
§ /X Forces the volume to dismount before the conversion (if necessary).
§ /CvtArea:filename Specifies a contiguous file in the root directory to be the placeholder for the NTFS system files stored on the MFT. If you omit a file name, Convert uses the default configuration and reserves 12.5 percent of the partition or volume size. This helps to prevent fragmentation of the MFT.
§ /NoSecurity Sets the NTFS security settings on all files and folders so that the Everyone group can access them. This effectively makes the entire file system accessible to anyone who can access the system locally or remotely.
Before starting the conversion, the Convert command checks whether the drive has enough free space to perform the conversion. Generally, Convert needs a block of free space that’s equal to roughly 25 percent of the total space used on the drive. For example, if the drive stores 100 GB of data, Convert needs about 25 GB of free space. If there isn’t enough free space, Convert cancels the operation and tells you that you need to free up some space. On the other hand, if there is enough free space, Convert initiates the conversion. Be patient. The conversion process takes several minutes (longer for large drives). Don’t access files or applications on the drive while the conversion is in progress.
NOTE
Before using the Convert command, double-check whether the partition is being used as the active boot partition or a system partition containing the operating system. With MBR disks, you can convert the active boot partition to NTFS. Doing so requires that the system gain exclusive access to this partition, which can be obtained only during startup. Thus, if you try to convert the active boot partition to NTFS, Windows 8.1 displays a prompt asking if you want to schedule the drive to be converted the next time the system starts. If you tap or click Yes, you can restart the system to begin the conversion process. Often, several restarts of a system are required to completely convert the active boot partition. Don’t panic. Let the system proceed with the conversion.
NOTE
REAL WORLD You can improve performance on the volume by using the /CvtArea option so that space for the MFT is reserved. This option helps prevent fragmentation of the MFT. How? Over time, the MFT might grow larger than the space allocated to it. The operating system must then expand the MFT into other areas of the disk. Although the Windows 8.1 Disk Defragmenter utility can defragment the MFT, it cannot move the first section of the MFT, and it is very unlikely that there will be space after the MFT because the space will be filled by file data.
To help prevent fragmentation in some cases, you might want to reserve more space than the default (12.5 percent of the partition or volume size). For example, you might want to increase the size of the MFT if the volume will have many small or average-size files rather than a few large files. To specify the amount of space to reserve, you can use FSUtil to create a placeholder file equal in size to that of the MFT you want to create. You can then convert the volume to NTFS and specify the name of the placeholder file to use with the /CvtArea option.
Here, I use FSUtil to create a 1.5-GB (1,500,000,000 bytes) placeholder file named Temp.txt:
fsutil file createnew c:\temp.txt 1500000000
To use this placeholder file for the MFT when converting drive C to NTFS, you would enter the following command:
convert c: /fs:ntfs /cvtarea:temp.txt
Notice that the placeholder file is created on the partition or volume that is being converted. During the conversion process, the file is overwritten with NTFS metadata and any unused space in the file is reserved for future use by the MFT.
Recovering a failed simple, spanned, or striped volume
Basic partitions and simple volumes are fairly easy to troubleshoot and recover because only one disk is involved. Spanned or striped volumes, on the other hand, might have multiple disks. If disks don’t have striping with parity, the failure of any one disk makes the entire volume unusable. The drive status might show that the drive is Missing, Failed, Online (Errors), Offline, or Unreadable.
You might encounter the Missing (and sometimes Offline) status if drives have been disconnected or turned off. If the drives are part of an external storage device, check the storage device to ensure that it is connected properly and has power. Reconnecting the storage device or turning on the power should make the drives accessible. You then must start Disk Management and rescan the missing drive. Press and hold or right-click the missing drive, and then tap or click Rescan Disks. When Disk Management finishes, press and hold or right-click the drive, and then tap or click Reactivate.
You might get the Failed, Online (Errors), and Unreadable status notifications if a drive has I/O problems. As before, try rescanning the drive, and then try to reactivate it. If the drive doesn’t come back to the Healthy state, you might need to replace it.
TIP
Sometimes you might need to reboot the computer to get a disk back online. If this still doesn’t resolve the problem, check for problems with the drive, its controller, and the cables. Also, make sure that the drive has power and is connected properly.
Regenerating a striped set with parity
With RAID 5, you can recover the striped set with parity if a single drive fails. You’ll know that a striped set with parity drive has failed because the set’s status changes to Failed Redundancy and the individual volume’s status changes to Missing, Offline, or Online (Errors).
You can repair RAID-5 disks, but you must rebuild the set by using disks with the same partition style—either MBR or GPT. You need to get all drives in the RAID-5 set online. The set’s status should read Failed Redundancy. The corrective action you take depends on the failed volume’s status:
§ If the status is Missing or Offline, make sure that the drive has power and is connected properly. Then open Disk Management, press and hold or right-click the failed volume, and select Reactivate Volume. The drive’s status should change to Regenerating and then to Healthy. If the drive’s status doesn’t return to Healthy, press and hold or right-click the volume and select Regenerate Parity.
§ If the status is Online (Errors), press and hold or right-click the failed volume and select Reactivate Volume. The drive’s status should change to Regenerating and then to Healthy. If the drive’s status doesn’t return to Healthy, press and hold or right-click the volume and select Regenerate Parity.
§ If one of the drives shows as Unreadable, you might need to rescan the drives on the system by choosing Rescan Disks from the Action menu of Disk Management. If the drive status doesn’t change, you might need to reboot the computer.
§ If one of the drives still won’t come back online, you will need to repair the failed region of the RAID-5 set. Press and hold or right-click the failed volume, and then select Remove Volume. You now need to select an unallocated space on a separate dynamic disk for the RAID-5 set. This space must be at least as large as the region to repair, and it can’t be on a drive that the RAID-5 set is already using. If you don’t have enough space, the Repair Volume command is unavailable, and you need to free up space by deleting other volumes or by replacing the failed drive.
NOTE
BEST PRACTICES If possible, you should back up the data before you perform this procedure to ensure that if you have problems, you can recover your data.
Using disk mirroring
With disk mirroring, you use identically sized volumes on two different drives to create a redundant data set. The drives are written with identical sets of information, and if one of the drives fails, you can still obtain the data from the other drive.
Although disk mirroring offers fault tolerance, the major drawback to disk mirroring is that it effectively cuts the amount of storage space in half. For example, to mirror a 500-GB drive, you need another 500-GB drive. That means you use 1,000 GB of space to store 500 GB of information.
Creating mirrored volumes
You create a mirror set by following these steps:
1. In the Disk Management Graphical view, press and hold or right-click an area marked Unallocated on a disk, and then tap or click New Mirrored Volume. This starts the New Mirrored Volume Wizard. Read the Welcome page, and then tap or click Next.
2. Create the volume as described in the section Creating spanned and striped volumes, earlier in the chapter. The key difference is that you must create two volumes of identical size, and these volumes must be on separate drives. You won’t be able to continue past the Selected Disks window until you select the two disks with which you want to work.
3. As with other RAID techniques, mirroring is transparent to users. Users view the mirrored set as a single drive that they can access and use like any other drive.
NOTE
The status of a normal mirror is Healthy. During the creation of a mirror, you’ll get a status of Resynching, which tells you that Disk Management is creating the mirror.
Rather than create a new mirrored volume, you can use an existing volume to create a mirrored set. To do this, the volume you want to mirror must be a basic partition or simple volume, and you must have an area of unallocated space on a second drive of equal or larger size than the existing volume.
In Disk Management, you can mirror an existing volume by following these steps:
1. Press and hold or right-click the basic partition or simple volume you want to mirror, and then tap or click Add Mirror. This displays the Add Mirror dialog box.
2. In the Disks list, select a location for the mirror, and then tap or click Add Mirror. Windows 8.1 begins the mirror creation process. In Disk Management, you’ll get a status of Resynching on both volumes. The disk on which the mirrored volume is being created has a warning icon.
Breaking a mirrored set
You might want to or need to break a mirrored set. For example, if you no longer want to mirror your drives, you can break a mirror, which enables you to use the disk space for other purposes. If one of the mirrored drives in a set fails, disk operations can continue, but at some point you’ll need to fix the mirror, and to do this you must break the mirror and then reestablish it. Although breaking a mirror doesn’t delete the data in the set, you should always back up the data before you perform this procedure. This ensures that if you have problems, you can recover your data.
In Disk Management, you can break a mirrored set by following these steps:
1. Press and hold or right-click one of the volumes in the mirrored set, and then tap or click Break Mirrored Volume.
2. Confirm that you want to break the mirror by tapping or clicking Yes. If the volume is in use, you’ll receive another warning dialog box. Tap or click Yes to confirm that it’s okay to continue.
Windows 8.1 then breaks the mirror, creating two independent volumes. (You don’t need to break a mirror before you remove mirroring; Windows breaks the mirrored set as part of the removal process.)
Removing a mirrored set
In Disk Management, you can remove one of the volumes from a mirrored set. When you do this, all data on the mirror you remove is deleted, and the space it used is marked as Unallocated.
To remove a mirror, follow these steps:
1. In Disk Management, press and hold or right-click one of the volumes in the mirrored set, and then tap or click Remove Mirror. This displays the Remove Mirror dialog box.
2. In the Remove Mirror dialog box, select the disk from which to remove the mirror.
3. Confirm the action when prompted. All data on the removed mirror is deleted.
Moving a dynamic disk to a new system
An important advantage of dynamic disks over basic disks is that you can easily move dynamic disks from one computer to another. For example, after setting up a computer, if you decide that you don’t really need an additional hard disk, you can move it to another computer where it can be better used. Before moving disks, you should complete the following steps:
1. Open Disk Management on the computer where the dynamic disks are currently installed and check their status. The status should be Healthy. If it isn’t, you should fix any problems before moving the disks.
CAUTION
Drives with BitLocker Drive Encryption cannot be moved by using this technique. Windows 8.1 Enterprise and Ultimate editions include BitLocker Drive Encryption, which wraps drives in a protected seal so that any offline tampering is detected and results in the disk being unavailable until an administrator unlocks it. For more information about BitLocker Drive Encryption, see Chapter 2.
2. Check the hard disk subsystems on the original computer and on the computer to which you want to transfer the disk. Both computers should have identical hard disk subsystems. If they don’t, the Plug and Play ID on the system disk from the original computer won’t match what the destination computer is expecting. As a result, the destination computer won’t be able to load the right drivers, and boot might fail.
3. Check whether any dynamic disks that you want to move are part of a spanned, extended, or striped set. If they are, you should make a note of which disks are part of which set and plan on moving all disks in a set together. If you move only part of a disk set, be aware of the consequences. For spanned, extended, or striped volumes, moving only part of the set makes the related volumes unusable on the current computer and on the computer to which you are planning to move the disks.
When you are ready to move the disks, complete the following steps:
1. On the original computer, start Computer Management. Then, in the left pane, select Device Manager. In the Device list, expand Disk Drives. This shows a list of all the physical disk drives on the computer. In turn, press and hold or right-click each disk that you want to move, and then tap or click Uninstall. If you are unsure which disks to uninstall, press and hold or right-click each disk in turn, and then tap or click Properties. In the Properties dialog box, tap or click the Volumes tab, and then tap or click Populate. This shows you the volumes on the selected disk.
2. Next, select the Disk Management node in Computer Management on the original computer. Press and hold or right-click each disk that you want to move, and then tap or click Remove Disk.
3. After you perform these procedures, you can move the dynamic disks. If the disks are hot-swappable and this feature is supported on both computers, remove the disks from the original computer and then install them on the destination computer. Otherwise, turn off both computers, remove the drives from the original computer, and then install them on the destination computer. When you have finished, restart the computers.
4. On the destination computer, open Disk Management, and then tap or click Rescan Disks on the Action menu. When Disk Management finishes scanning the disks, press and hold or right-click any disk marked Foreign, and then tap or click Import. You should now be able to access the disks and their volumes on the destination computer.
NOTE
The volumes on the dynamic disks should retain the drive letters that they had on the original computer. If a drive letter is already used on the destination computer, a volume receives the next available drive letter. If a dynamic volume previously did not have a drive letter, it does not receive a drive letter when it is moved to another computer. Additionally, if automounting is disabled, the volumes aren’t automatically mounted, and you must manually mount volumes and assign drive letters.
Using storage spaces
Storage technologies are in transition from traditional approaches to standards-based approaches. As a result, storage spaces are replacing software RAID as the preferred approach for spanning disks and achieving data redundancy. Storage spaces make it possible for you to group drives together in a storage pool that can be used to allocate storage.
Getting started with storage spaces
To use storage spaces, a computer must have one or more extra hard drives in addition to the hard drive on which Windows is installed. The drives can be internal drives, external drives, or allocated from network-attached storage.
With storage spaces, the physical layout of disks is abstracted. Here, a “disk” can be a logical reference to a virtual disk in network-attached storage or an actual physical disk. This means a disk just becomes a unit of storage and volumes can be created to allocate space within disks for file systems.
Taking this concept a few steps further, you can pool available space on disks so that units of storage (virtual disks) can be allocated from this pool on an as-needed basis. These units of storage, in turn, are apportioned with volumes to allocate space and create usable file systems.
Technically, the pooled storage is referred to as a storage pool and the virtual disks created within the pool are referred to as storages spaces. Given a set of “disks,” you can create a single storage pool by allocating all the disks to the pool, or create multiple storage pools by allocating disks separately to each pool.
Creating redundant data sets
You manage storage spaces by using the Storage Spaces console, which can be accessed in Control Panel. In Control Panel, select System And Security, and then select Storage Spaces. By default, when you access Storage Spaces, you have view-only access to the available storage. To manage storage, you must select Change Settings, which requires administrator privileges on the computer.
Figure 3-12 shows a computer with an allocated storage space called Primary Storage. Here, the storage space has 4 TB of available capacity but is using only 4.75 GB of that capacity. Storage is allocated by using two simple volumes: a G: volume with 2 TB of storage and an H: volume with 2 TB of storage.
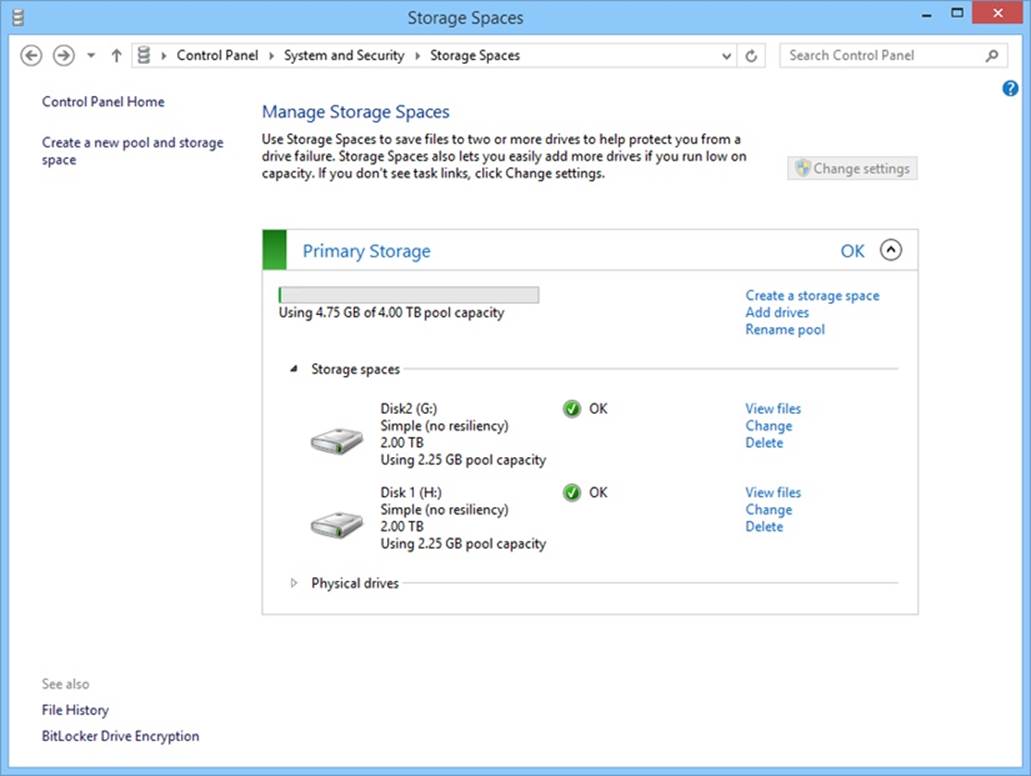
Figure 3-12. Use the Storage Spaces console to allocate and manage storage.
You can use Storage Spaces to create many types of volumes, including:
§ Simple volumes Creates a simple volume by writing one copy of your data to one or more drives. With simple volumes there is no redundancy and no associated overhead. As an example, you can create a single volume that spans two 1-TB drives, making 2 TB of storage available. However, because there is no resiliency, a failure of any drive in a simple volume causes the entire volume to fail.
§ Two-way mirrors Creates a mirrored set by writing two copies of a computer’s data, helping to protect against a single drive failure. Two-way mirrors require at least two drives. With two-way mirrors there is a one-half (50 percent) overhead for redundancy. As an example, you could allocate two 1-TB drives as a two-way mirror, giving you 1 TB of mirrored storage.
§ Three-way mirrors Creates a mirrored set by writing three copies of a computer’s data and by using disk striping with mirroring, helping to protect against two simultaneous drive failures. Three-way mirrors require at least five drives. With three-way mirrors there is a two-thirds (66.66 percent) overhead for redundancy. As an example, you could allocate six 2-TB drives as a three-way mirror, giving you 4 TB of mirrored storage.
§ Parity volumes Creates a volume that uses disk striping with parity, helping to provide fault tolerance with less overhead than mirroring. With parity volumes there is a one-third (33.33 percent) overhead for redundancy. As an example, you could allocate three 2-TB drives as a parity volume, giving you 4 TB of protected storage.
When a computer has extra hard drives in addition to the hard drive on which Windows is installed, you can allocate one or more of the additional drives to a storage pool. However, keep in mind that if you use a formatted drive with a storage pool, Windows permanently deletes all the files on that drive.
Working with storage pools
Working with storage pools is a multistep process:
1. You create a storage pool to pool available space on one or more disks.
2. You allocate space from this pool to create one or more virtual disks.
3. You create one or more volumes on each virtual disk to allocate storage for file systems.
The sections that follow examine procedures related to each of these steps. Also discussed are procedures for managing existing storage pools.
Creating a storage pool and allocating storage
You must create a storage pool before you can allocate storage. When you create a storage pool, you allocate one or more drives to the storage pool and then create a storage space within the storage pool. This initial storage space can use all or part of the available capacity in the storage pool. If there is unused capacity in the pool, that unused capacity can be allocated to the same storage space or another storage space later. Keep in mind that if you use a formatted drive with a storage pool, Windows permanently deletes all the files on that drive.
To create a storage pool and allocate storage, complete the following steps:
1. In Control Panel, select System And Security, and then select Storage Spaces.
2. Select Create A New Pool And Storage Space. On the Create A Storage Pool page, shown in Figure 3-13, additional drives that are available to the computer but have not yet been assigned are listed as available drives.
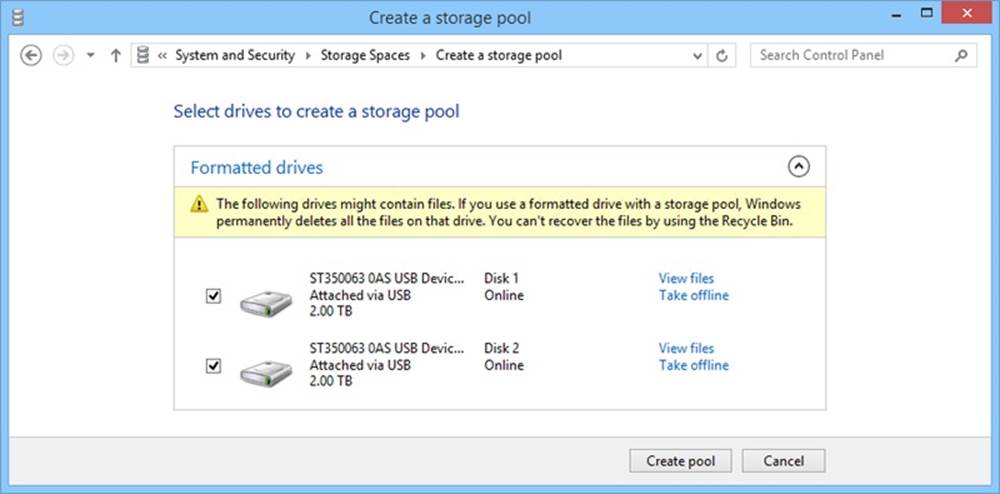
Figure 3-13. Select one or more drives to be part of the storage pool.
3. Select the drives that should be allocated to the storage pool. If you are unsure whether a drive has files that shouldn’t be permanently deleted, select View Files and then review the available files to confirm whether you should allocate the drive to the storage space. If you selected a drive that shouldn’t be formatted for use with the storage pool, be sure to clear the selection before continuing.
IMPORTANT
If you open a window to view a drive, you must close this window before continuing (in addition to any other windows where you might be viewing the drive’s contents). Failure to do this might prevent Windows from gaining exclusive access to the drive, which in turn will cause storage space creation to fail.
4. When you select Create Pool, Windows will prepare the drives and allocate them to the storage pool.
5. Next, you are prompted to create the associated storage space (see Figure 3-14). Configure the storage space by using the following options:
o Name Sets a text label for the storage space. This label is used as the volume name.
o Drive Letter Selects an available drive letter for the storage space, such as F.
o File System Sets the file system type, such as NTFS or ReFS.
o Resiliency Type Sets the type of storage space to create as Simple, Two-way Mirror, Three-way Mirror, or Parity.
IMPORTANT
When you create a storage space, you can modify the name, drive letter and storage space size at any time. However, after the resiliency type is set, you cannot change it without deleting and then recreating the storage space.
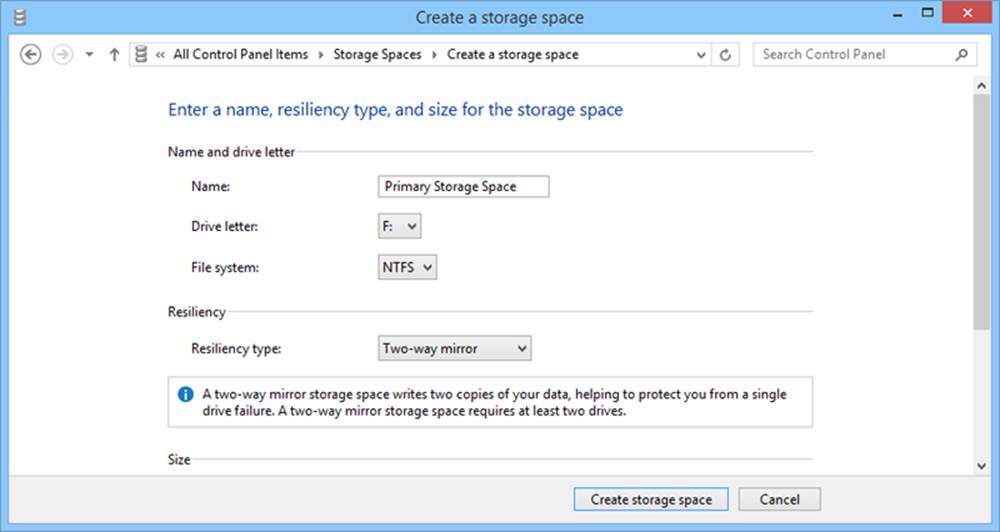
Figure 3-14. Configure the storage space for use.
6. Use the Size options to specify the maximum size of the storage space. Keep the following in mind:
o Before you allocate space, note the total pool capacity and the available pool capacity. Rather than allocate all available pool capacity to a single storage space, you can allocate part of the available storage to one storage space and part of the available storage to other storagespaces.
o When you specify a maximum size for the storage space, note the size including overhead for any resiliency. This is the maximum total size of the storage space. For example, if you are creating a two-way mirror and enter 930 GB as the maximum size, the size including resiliency is 1.81 TB.
o Because you can add drives to a pool at any time, you can allocate more space than is currently available. For example, if you have three 1-TB drives, you could allocate 6 TB to the storage pool. When the computer runs low on capacity in the pool, you would then need to add more drives.
7. Before you create the storage space, you should close any open windows where the drive is selected or displayed.
8. When you select Create Storage Space, Windows will format and create the storage space in the selected storage pool.
If there is a problem creating the storage space, Windows will display a warning and automatically try creating the pool again. In the example shown in Figure 3-15, Windows was able to allocate one of the selected drives to the storage pool but was not able to allocate the second drive. Because of this, Windows displayed a “Waiting to retry” warning. After waiting at least 90 seconds, you can determine whether Windows was able to successfully allocate space by selecting the Refresh button. Alternatively, you can close and then open the Storage Spaces console.

Figure 3-15. Windows displays a warning if there is a problem allocating storage.
If Windows isn’t able to complete the storage space configuration successfully within 30 minutes, you might want to remove the drives from the storage space and then try to create the storage space again. To remove a drive, complete the following steps:
1. On the Storage Spaces page in Control Panel, select the Remove option for the drive you want to remove.
2. On the Remove A Drive page, select View Files and then review the available files to confirm that you are removing the correct storage space. If you selected the wrong storage space, select the Back button and then select the correct storage space before continuing.
3. On the Remove A Drive page, select Remove Drive.
Adding drives to a storage space
You can add extra drives to a storage space at any time by completing the following steps:
1. In Control Panel, select System And Security, and then select Storage Spaces.
2. Select Change Settings. On the management panel for the storage space you want to configure, select Add Drives.
3. Select the drive or drives that should be allocated to the storage pool. Keep in mind that if you use a formatted drive with a storage pool, Windows permanently deletes all the files on that drive.
4. When you select Add Drives, Windows will prepare the drive or drives and allocate them to the storage pool. If there is a problem adding drives, Windows will display a warning and automatically try to add the drives again.
Changing the storage configuration
You can change the configuration of a storage space at any time by completing the following steps:
1. In Control Panel, select System And Security, and then select Storage Spaces.
2. Select Change Settings. On the management panel for the storage space you want to configure, select Change for the storage space you want to configure.
3. As necessary, use the options provided to modify the name of the storage space, the associated drive letter, and the size of the storage space.
4. Select Change Storage Space. If there is a problem modifying the storage space, Windows will display a warning and automatically try to modify the storage space again later. Because Windows needs exclusive access to the storage space to change the configuration, Windows will close any open windows using the drive in addition to any open connections to the drive.
Deleting a storage space
If you no longer need a storage space, you can delete it. Deleting a storage space permanently removes all the files that it contains.
To delete a storage space, complete the following steps:
1. In Control Panel, select System And Security, and then select Storage Spaces.
2. Select Change Settings. On the Storage Spaces panel, each allocated storage space is listed. Select the Delete option for the storage space you want to remove.
3. On the Delete A Storage Space page, shown in Figure 3-16, select View Files and then review the available files to confirm that you are removing the correct storage space. If you selected the wrong storage space, select the Back button, and then select the correct storage space before continuing.
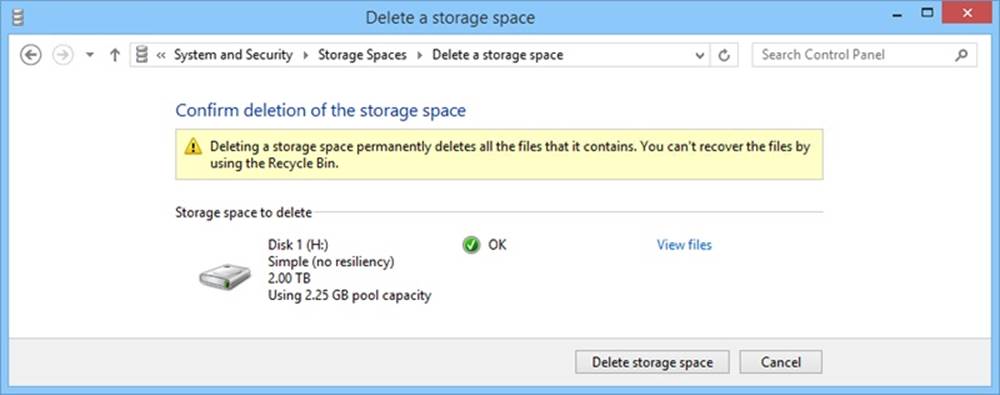
Figure 3-16. Delete a storage space when it is no longer needed.
4. On the Delete A Storage Space page, select Delete Storage Space.
Deleting a storage pool
Before you can delete a storage pool, you must delete any associated storage spaces as discussed in the Deleting a storage space section earlier in the chapter. Deleting a storage pool permanently removes all the files that it contains and causes any drives currently allocated to the pool to be reformatted.
To delete a storage pool, complete the following steps:
1. In Control Panel, select System And Security, and then select Storage Spaces.
2. Select Change Settings. Select the Delete Pool option for the storage pool you want to remove. This option is only available if the pool doesn’t have any currently allocated storage spaces.
3. On the Delete A Storage Pool page, select Delete Storage Pool.
Troubleshooting storage spaces
Typical problems creating storage spaces and allocating storage were discussed previously. Other problems you might experience with storage spaces relate to drive failures and a loss of resiliency. When a storage space uses two-way mirroring, three-way mirroring, or parity, you can recover resiliency by reconnecting a disconnected drive or replacing a failed drive. When a storage space uses a simple volume and drives were disconnected, you can recover the volume by reconnecting the drives.
Selecting the notification icon for Action Center displays the related notifications. If there is a problem with storage spaces, Action Center updates the related notification panel in the desktop notification area with a message stating “Check Storage Spaces for issues,” as shown in Figure 3-17. Selecting the notification icon and then selecting the link provided opens the Storage Spaces console in Control Panel.
Figure 3-17. View Action Center notifications to start troubleshooting storage space problems.
As shown in Figure 3-18, the Storage Spaces console provides warnings that show exactly what is wrong. In this example, a storage space using two-way mirroring has reduced resiliency because one of the drives is missing, failed, or disconnected.
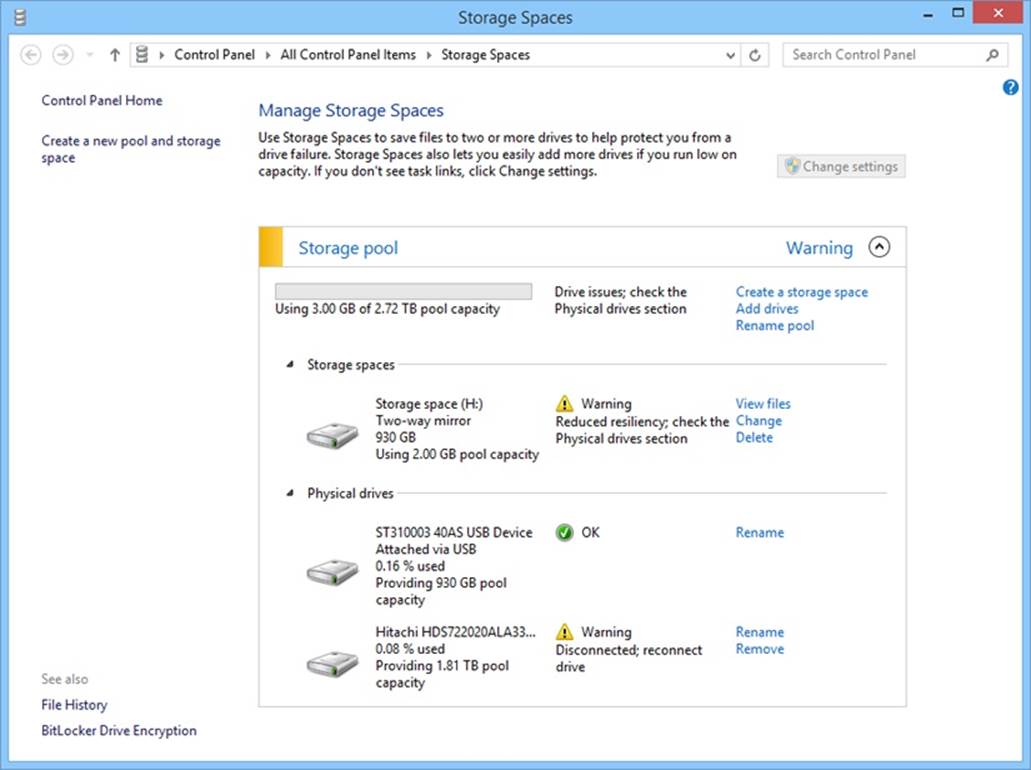
Figure 3-18. Check the Storage Spaces console for errors.
When storage spaces use external drives, a missing drive might be a common problem you encounter. In this case, users can continue to work and redundancy will be restored when you reconnect the drive. On the other hand, if a drive failed, you’ll need to complete the following steps to restore redundancy:
1. Physically remove the failed drive. If the drive is connected internally, you’ll need to shut down and unplug the computer before you can remove the drive. Otherwise, just disconnect an externally connected drive.
2. Physically add or connect a replacement drive. Next, add the drive to the storage space by doing the following:
a. On the Storage Spaces page in Control Panel, select Change Settings. On the management panel for the storage space you want to configure, select Add Drives.
b. Select the drive that should be allocated to the storage pool. Keep in mind that if you use a formatted drive with a storage pool, Windows permanently deletes all the files on that drive.
c. When you select Add Drives, Windows will prepare the drive and allocate it to the storage pool.
3. At this point, the failed drive should be listed as “Retired.” Remove the failed drive from the storage space by selecting the related Remove option and then confirming that you want to remove the drive by selecting Remove Drive.
Windows restores redundancy by copying data as necessary to the new disk. During this process, the status of the storage space is typically listed as “Repairing.” You’ll also notice a value depicting how much of the repair task is completed. When this value reaches 100 percent, the repair is complete.
All materials on the site are licensed Creative Commons Attribution-Sharealike 3.0 Unported CC BY-SA 3.0 & GNU Free Documentation License (GFDL)
If you are the copyright holder of any material contained on our site and intend to remove it, please contact our site administrator for approval.
© 2016-2026 All site design rights belong to S.Y.A.