Word 2016 For Dummies (2016)
Part III
Fun with Formatting
Chapter 13
Page Formatting
In This Chapter
![]() Choosing the page size
Choosing the page size
![]() Switching the page orientation
Switching the page orientation
![]() Setting margins
Setting margins
![]() Automatically numbering your pages
Automatically numbering your pages
![]() Changing page numbers
Changing page numbers
![]() Creating a new page
Creating a new page
![]() Coloring the page background
Coloring the page background
![]() Including a watermark
Including a watermark
Word is only mildly interested in the concept of a page. Unlike the real world, where a page is a physical sheet of paper, Word conjures new pages when needed, pulling them in from the electronic ether. That makes the concept of a page ethereal. To root things in reality, Word lets you define the page format, which includes the page size, orientation, margins, as well as other page formats and attributes.
Describe That Page
Word begins its page-formatting adventure by defining exactly what a page looks like. That includes the page’s physical dimensions and which portion of the page contains text.
Setting page size
You probably assume that each new document starts with a page size reflecting a typical sheet of paper.
Such foolishness.
Word’s Normal template does specify a page size equivalent to a standard sheet of paper. In the US, that’s 8½-by-11 inches. In Europe, the A4 size is used. You’re not stuck with either size, because the page size is part of the page format, and you can change it. Follow these steps:
1. Click the Layout tab on the Ribbon.
2. ![]() In the Page Setup group, click the Size button.
In the Page Setup group, click the Size button.
The Size button icon is shown in the margin.
3. Choose a page size from the list.
For example, if you want to print on that tall, legal-size paper, choose Legal from the list.
Your entire document is updated to reflect the new page size, from first page to last.
· To select a size not shown on the menu (refer to Step 3), choose the More Paper Sizes menu item. The Page Setup dialog box appears. Use the controls on the Paper tab to manually specify the paper size.
· Page size can be changed at any time, whether the document is empty or full of text. Obviously page size affects layout, so such a major change is probably something you don’t want to do at the last minute.
· Your document can sport multiple page sizes. To do so, split the document into sections and apply the page size to one section at a time. See Chapter 14 for information on sections. Applying page formats one section at a time is done in the Page Setup dialog box, as described later in this chapter.
·  Page size definitely plays a role when a document is printed. Despite your zeal to choose an oddball page size, unless the printer can handle that size paper, the document can‘t be printed. It can, however, be published electronically. That process is covered in Chapter 9.
Changing orientation (landscape or portrait)
An aspect of page size is whether the page is oriented vertically or horizontally. (I’m assuming it’s no longer the fashion to print on square paper.) Page orientation could be set by adjusting the page size, but it’s much easier to change the page orientation. Follow these steps:
1. Click the Layout tab.
2.  Click the Orientation button.
The Orientation button is illustrated in the margin. It has two items on its menu: Portrait and Landscape.
3. Choose Portrait to set the page vertically or Landscape to set the page horizontally.
Word shifts the orientation for every page in your document. This doesn't mean that the text is sideways, but rather that the text prints wide on a page (though I suppose you could look at it as printing sideways).
·  Make the decision to have your document in landscape orientation before you do any extensive formatting. This orientation affects paragraph formatting, which may require you to adjust the document’s margins; see the next section.
· Page-orientation changes affect the entire document unless you split your document into sections. In this case, the change applies to only the current section. Read Chapter 14 for details on sections, including directions on how to stick a single landscape page into a document that’s otherwise portrait oriented.
· Scientists who study such things have determined that human reading speed slows drastically when people must scan a long line of text, which happens when you use landscape orientation. Reserve landscape orientation for printing lists, graphics, and tables for which portrait page orientation is too narrow.
· Landscape printing is ideal for using multiple columns of text. See Chapter 20.
· If you just want sideways text without turning the page, use a text box. See Chapter 23 for information on text boxes.
Setting the page margins
Margins create the text area on a page, left, right, top, and bottom. They provide room between the text and the page’s edge, which keeps the text from leaking out of a document and all over the computer.
Word automatically sets page margins at 1 inch from every page edge. Most English teachers and book editors want margins of this size because these people love to scribble in margins. (They even write that way on blank paper.)
To adjust page margins in Word, obey these steps:
1. Click the Layout tab.
2.  Click the Margins button.
It’s found in the Page Setup group and shown in the margin.
Clicking the Margins button displays a menu full of common margin options.
3. Pluck a proper margin setting from the menu.
The new margins affect all pages in your document — unless you split your document into sections, in which case the changes apply to only the current section. See Chapter 14 for information on sections.
The choices available on the Margins menu list settings for the top, left, bottom, and right margins. Yes, all four margins are set at one time. When you want to set specific margins, choose the Custom Margins item from the bottom of the menu, and then use the Margins tab in the Page Setup dialog box to set each margin. Refer to the next section for more information.
· The Layout tab’s Margins button sets page margins. To set margins for one or more paragraphs, refer to Chapter 11.
· The orange stars appearing on the Margins menu's icons represent popular or recent margin choices you've made.
·  Many printers cannot print on the outside half inch of a piece of paper, usually on one side — top, bottom, left, or right. This space is an absolute margin; although you can tell Word to set a margin of 0 inches, text may not print there. Instead, choose a minimum of 0.5 inches for all margins.
Using the Page Setup dialog box
When you want more control over page formatting, you must beckon forth the Page Setup dialog box, as shown in Figure 13-1. Specifically, you use the Margins tab in that dialog box, which is shown in the figure.
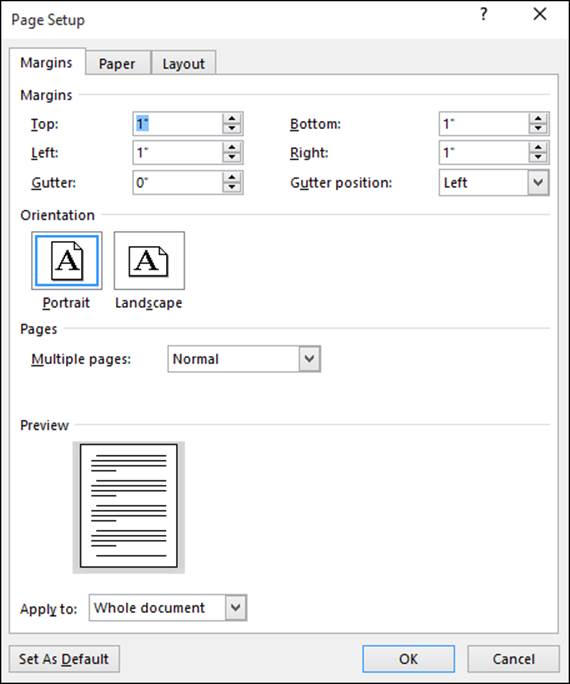
Figure 13-1: The Margins tab in the Page Setup dialog box.
To use the Page Setup dialog box to specifically set page margins, obey these steps:
1. Click the Layout tab.
2. Click the dialog box launcher in the lower-right corner of the Page Setup group.
The Page Setup dialog box appears, Margins tab forward.
3. Type the margin offsets in the Top, Bottom, Left, and Right boxes.
Or you can use the spinner gizmo to set the values.
Use the Preview to check the margins as they relate to page size.
4. Ensure that Whole Document is chosen from the Apply To menu button.
You can reset margins for only a section or selected text if you instead choose those options from the menu. See Chapter 14 for information on sections.
5. Click the OK button to confirm your new settings and close the Page Setup dialog box.
The Gutter settings help set margins when you need extra space on one edge of the page for binding. For example, if you plan on using a 3-hole punch on the left side of a page, choose Left from the Gutter Position menu. Then increase the Gutter margin to accommodate for the three holes in the page without affecting the left margin setting.
· The keyboard shortcut to summon the Page Setup dialog box is Alt+P, S, P.
· The Page Setup dialog box sports three tabs: Margins, for setting margins, Paper, for selecting the page size, and Layout, for dealing with other page-formatting issues.
 Nutty multiple page options
In the Page Setup dialog box, nestled on the Margins tab, is the Pages area (refer to Figure 13-1). The Multiple Pages drop-down list tells Word how to use a single sheet of paper for printing complex documents. This is something you can avoid at all costs, yet I’m compelled by the Computer Book Writers Union to describe the various settings:
Normal means one page per sheet of paper. You can't get more normal than that.
Mirror Margins is used when the printer is smart enough to print on both sides of a sheet of paper. That way, every other page is flip-flopped so that their margins always line up. For example, the gutter may be on the left side of one page but on the right for the page's back side.
2 Pages per Sheet splits the paper right down the center and forces Word to print two “pages” per sheet of paper. Note that this option works best when the pages are in landscape orientation.
Book Fold is Word's attempt to create a multiple-page booklet by printing the proper pages on both sides of a sheet of paper. The Sheets Per Booklet option that appears tells Word how long your booklet is.
Despite these options, Word is a poor bookbinding program. If you're into document publishing, consider getting a desktop-publishing program, such as Adobe InDesign or Microsoft Publisher, which are far better equipped to deal with this topic.
Page Numbering
I remain puzzled by people who manually number their pages in Word. Such a thing is silly beyond belief. That’s because
Your word processor numbers your pages for you!
Memorize it. Live it. Be it.
Adding an automatic page number
Word can not only automatically number your pages, but it also lets you place the page number just about anywhere on the page and in a variety of fun and useful formats. Heed these directions:
1. Click the Insert tab.
2. In the Header & Footer area, click the Page Number command button.
A menu drops down, showing various page-numbering options. The first three are locations: Top of Page, Bottom of Page, and Page Margins (the sides of the page).
3. Choose where to place the page numbers.
I want my page numbers on the bottom of the page, so I regularly choose the Bottom of Page option.
4. Pluck a page-numbering style from the list.
You see oodles of samples, so don't cut yourself short by not scrolling through the menu. You can even choose those famous page X of Y formats.
Dutifully, Word numbers each page in your document, starting with 1 on the first page, up to however many pages long the thing grows.
Here’s the good part: If you delete a page, Word renumbers everything for you. Insert a page? Word renumbers everything for you again, automatically. As long as you insert the page number as described in this section, Word handles everything.
· To change the page number format, simply choose a new one from the Page Number menu.
· If you merely need to reference the current page number in your document’s text, choose the Current Position item in Step 3. Word inserts the current page number at the insertion pointer’s location.
· The page numbers are placed in the document’s header or footer. See Chapter 14 for information on headers and footers.
· Page numbers can be removed just as easily: See the section “Removing page numbers,” later in this chapter.
· See Chapter 23 for information on inserting a page number in your document’s text, as opposed to in a header or footer.
Starting with a different page number
You and I know that the first page of a document is page 1, but Word doesn't care. It lets you start numbering your document at whichever page number you want. If you want to start numbering your document at page 42, you can do so, if you follow these instructions:
1. Click the Insert tab.
2. In the Header & Footer area, choose Page Number ⇒ Format Page Numbers.
The Page Number Format dialog box materializes, as shown in Figure 13-2.
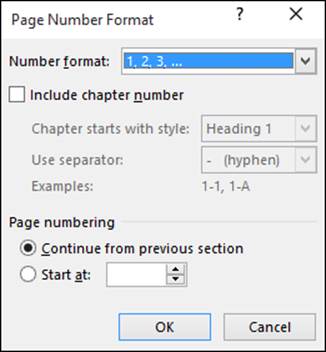
Figure 13-2: Gain more control over page numbers.
3. Click the Start At radio button.
4. Type the starting page number in the box.
5. Click OK.
Word starts numbering your document at the specified page number. So if you enter 42 in Step 4, the first page of the document is now page 42, the next page is 43, and so on.
Of course, this trick works best when page numbers are already set for your document, as described in the preceding section.
· For more page number control, split your document into sections. Different page-numbering styles or sequences can be set for individual sections. You can even suppress page numbers for a section, such as not numbering the first (cover) page of a document. See Chapter 14 for more information on sections.
· If you are working on a novel, don’t worry about setting page numbers for each chapter. That’s insane. Instead, use Word’s Master Document feature to set page numbering when you’re finished. See Chapter 25.
Numbering with Roman numerals
When the urge hits you to regress a few centuries and use Roman numerals to tally a document's pages, Word is happy to oblige. Sic facite:
1. Set the location for page numbers in your document.
Refer to the section “Adding an automatic page number.” Once page numbers are established, you can set a different format.
2. Click the Insert tab.
3. Click the Page Number command button and choose Format Page Numbers.
The Page Number Format dialog box appears.
4. Choose a style from the Number Format menu.
Two Roman numeral styles are available, lowercase and uppercase.
5. Click OK.
Hail Caesar!
Removing page numbers
To banish automatic page numbers from above, below, or anywhere around your text, follow these steps:
1. Click the Insert tab.
2. Click the Page Number command button.
3. Choose Remove Page Numbers.
And they’re gone.
These steps remove only the page numbers set by using the Page Number command button, as described earlier in this chapter. Page numbers you’ve inserted in the text are unaffected, as are any page numbers you’ve manually added to a document’s header or footer.
To remove a manually inserted page number, use the Backspace key. Such page numbers are actually document fields. See Chapter 23 for information on fields.
New Pages from Nowhere
With Word, you’ll never have the excuse “I need more pages” when writing text. That’s because Word adds new, blank pages as needed. These pages are appended to the end of the document, so even if you're typing in the midst of a chapter, the extra pages keep appearing so that no text is lost and nothing falls off the edge. That's refreshing, but it’s not the end of Word’s capability to add new pages into your document.
Starting text on a new page
You have two choices when it comes to starting text at the top of a page in the middle of a document.
The first choice is to keep whacking the Enter key until that new page shows up. This approach is horribly wrong. It works, but it leads to trouble later as you edit your document.
The second, and preferred, choice is to insert a hard page break:
1. Position the insertion pointer where you want one page to end and the next page to start.
I recommend splitting the page at the start of a new paragraph.
2. Click the Insert tab.
3. In the Pages group, click the Page Break command button.
Text before the insertion pointer is on the previous page, and text after the insertion pointer is on the next page.
The hard page break stays with your text. No matter how you edit or add text, the split between pages remains.
· The keyboard shortcut to split pages is Ctrl+Enter.
· To remove a hard page break, position the insertion pointer at the top of the page just after the break. Press the Backspace key. If you goof up, use Ctrl+Z to undo.
· Use the Show/Hide command to view the hard page-break character. See Chapter 2 for information on the Show/Hide command
· The hard page break is easier to see in Draft view.
Inserting a blank page
Suddenly, you need a blank page in the middle of a document. Follow these steps:
1. Click the Insert tab.
2. In the Pages group, click the Blank Page command button.
A new blank page appears at the insertion pointer’s position.
Any text before the insertion pointer appears before the blank page. Any text after the insertion pointer appears after the new page.
· The Blank Page command inserts two hard page breaks in the document.
·  Be mindful of the material you place on the new, blank page. Because two hard page breaks produce the page, its best suited for single-page items, such as graphics or a table. Anything longer than a page makes the rest of the document formatting look funky.
· You don’t need to use this command to add a new page at the end of your document. Just keep typing.
Page Background Froufrou
A page is also a canvas, a background upon which your document rests. That background sports a few formatting options of its own, items that dwell outside a document but remain part of the page formatting.
Coloring pages
The simple way to print colored pages is to choose color paper. When the price of printer ink isn’t an option, you can direct Word to format each page in a document with a different background color. Follow these steps:
1. Click the Design tab.
2. In the Page Background group, click the Page color button.
You see a menu full of colors.
3. Choose a color from the palette.
Or choose the More Colors menu item to pluck out your own favorite page background color.
The color chosen in Step 3 is applied to the document’s pages.
To remove the color, choose the item No Color in Step 3.
· The colors displayed in the Page Color menu are based on the document theme. See Chapter 16 for information on document themes.
· Page color is independent of text foreground and background color. See Chapter 10.
· Unlike page size, orientation, and numbering, page background color is unaffected by document sections. The color is applied to every page in every section. See Chapter 14 for more information on document sections.
· Choose the Fill Effects menu item in Step 3 to view the Fill Effects dialog box. Click the Gradient tab to set gradients, or multiple colors, as the page background. Use the Picture tab to apply an image to each page’s background.
Printing colored pages
Viewing a colored page on the screen is one thing. Seeing it printed is another. In Word, you must direct the printer to print page background color by following these steps:
1. Click the File tab and choose Options.
The Word Options dialog box appears.
2. Choose Display from the left side of the Word Options dialog box.
3. In the Printing Options area, put a check mark by the item labeled Print Background Colors and Images.
4. Click OK.
The page background color now appears when the document is printed — well, assuming that you have a color printer.
 Because the color isn’t part of the paper, it doesn’t cover the entire printed page. That's because your printer cannot mechanically access the outside edge of a page, so a white border (or whatever other color the paper is) appears around your colored page. At this point, ask yourself whether it's easier to use colored paper rather than all that expensive printer ink or toner.
Adding a watermark
When fine paper is held up to the light, it shows a watermark — an image embedded into the paper. The image is impressive but faint. Word lets you fake a watermark by inserting faint text or graphics behind every page in your document. Here's how:
1. Click the Design tab.
2. In the Page Background group, click the Watermark button.
A menu plops down with a host of predefined watermarks that you can safely duck behind the text on your document's pages.
3. Choose a watermark from the menu.
The watermark is applied to every page in your document.
To rid your document's pages of the watermark, choose the Remove Watermark command in Step 3.
· To customize the watermark, choose the Custom Watermark command from the Watermark menu. Use the Printed Watermark dialog box to create your own watermark text, or import an image, such as your company logo.
· The watermark appears on all pages in a document. It’s unaffected by section breaks. See Chapter 14 for information on section breaks.
· If the watermark doesn't show up in the printed document, you may need to enable the Print Background Colors and Images setting. Refer to the preceding section.
All materials on the site are licensed Creative Commons Attribution-Sharealike 3.0 Unported CC BY-SA 3.0 & GNU Free Documentation License (GFDL)
If you are the copyright holder of any material contained on our site and intend to remove it, please contact our site administrator for approval.
© 2016-2026 All site design rights belong to S.Y.A.