Word 2016 For Dummies (2016)
Part IV
Spruce Up a Dull Document
 See how to assign a shortcut key to a symbol at www.dummies.com/extras/word2016.
In this part …
![]() Learn how to use borders, draw lines, and add color to a document's background.
Learn how to use borders, draw lines, and add color to a document's background.
![]() Use tables in your documents.
Use tables in your documents.
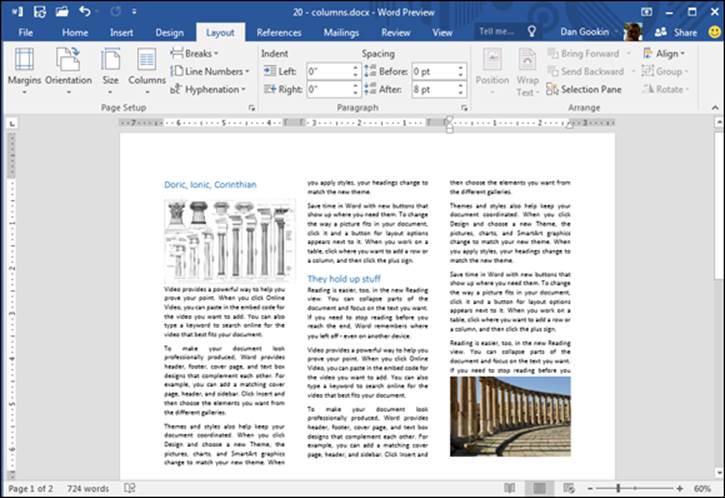
![]() Split your text into multiple columns.
Split your text into multiple columns.
![]() Discover how to make several types of lists, including bulleted lists, numbered lists, and indexes.
Discover how to make several types of lists, including bulleted lists, numbered lists, and indexes.
![]() Learn how you can insert images and captions into a document.
Learn how you can insert images and captions into a document.
Chapter 18
Borders and Lines
In This Chapter
![]() Understanding borders
Understanding borders
![]() Drawing lines around paragraphs
Drawing lines around paragraphs
![]() Inserting a horizontal line
Inserting a horizontal line
![]() Putting paragraphs in boxes
Putting paragraphs in boxes
![]() Creating a fancy document title
Creating a fancy document title
![]() Adding a box around words
Adding a box around words
![]() Putting a border around a page
Putting a border around a page
Seriously: Alarms sound at Microsoft headquarters when you attempt to use the hyphen or underline characters to draw a line in your document. It’s just wrong.
Despite the array of interesting keys festooning the PC keyboard, avoid the temptation to use those characters to draw boxes, lines, or otherwise decorate your text. To sate that desire, I recommend exploring Word’s broad basket of border commands.
The Basics of Borders
When it comes to understanding lines in Word, your topmost goal is to keep from pulling out your hair. To keep your luscious locks (or what’s left of them), know two keys:
· Borders are a paragraph-level format.
· Borders and lines are two different things in Word.
When you apply a border to a paragraph — top, bottom, left, right, or all sides — that format sticks to the paragraph. It’s echoed in subsequent paragraphs you type, just like any other paragraph-level format. (See Chapter 11 for paragraph format options.)
Unlike a border, a line is a drawing object. To add lines to your document, use the drawing tools described in Chapter 22. These objects are graphics, not text formats.
![]() To set borders for a paragraph, click the Home tab. In the Paragraph group look for the Borders button.
To set borders for a paragraph, click the Home tab. In the Paragraph group look for the Borders button.
The Borders button shows the paragraph’s current border format, such as Bottom Border, shown in the margin. Click that button to apply the format, or click the triangle next to the button to display the Borders menu to choose another format. The Borders menu is shown in Figure 18-1.
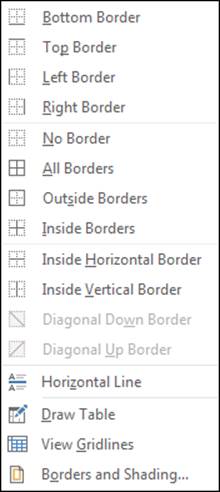
Figure 18-1: The Border and Shading menus.
The last item in the Borders menu displays the Borders and Shading dialog box, covered in the later section, “The Borders and Shading Dialog Box.” Use that dialog box to get more flexibility when formatting paragraph borders.
Other sections in this chapter describe how to use the Borders button to apply borders (lines) to paragraphs in a document.
·  A line around a paragraph is a border. It’s a style applied to the paragraph and it sticks to any subsequent paragraphs you type.
· Another way to call out text on a page is to create a text box. Unlike a border, which is a paragraph style, a text box is a graphical element. See Chapter 23.
·  Not all lines in Word are borders. For example, an underline is a character-level format. Red and blue underlines indicate spelling and grammatical errors. A vertical red line in the left margin, as well as solid red underlines, are used by Word’s Revision Marks commands.
Putting borders around a paragraph
To apply a border to any or all sides of a paragraph, follow these steps:
1. Place the insertion pointer in a paragraph.
2. Click the Home tab.
3. In the Paragraphs group, click the triangle next to the Borders command button.
The Borders menu appears.
4. Choose a border style from the menu.
 For example, to place a line atop the paragraph, choose Top Border. Its icon is shown in the margin.
The border is applied using the line style, thickness, and color set in the Borders and Shading dialog box. See the later section, “The Borders and Shading Dialog Box,” for details.
 To apply multiple lines, choose both border styles sequentially. For example, to add rules to a paragraph (a line above and below), first choose the Top Border command, and then click the Borders command again and choose Bottom Border.
· Horizontal borders stretch between the paragraph’s left and right margins. These margins are different from the page margins. See Chapter 11 for information on setting a paragraph’s left and right margins.
· A common use of paragraph borders is to set off a document title or heading. See the later section, “Creating a fancy title,” for formatting tips.
· When multiple paragraphs are selected, the border is applied to all paragraphs as a group. Therefore, a top or bottom border appears on only the first or last paragraph in the selected block.
· To place lines between paragraphs, see the section, “Boxing multiple paragraphs.”
· If you press Enter to end the paragraph, the border formatting is applied to the following paragraph. For top and bottom borders, the effect is that only the first or last paragraph displays the border line.
Drawing a thick line between paragraphs
A handy border tool to break up paragraphs of text is the Horizontal Line. It’s not a paragraph format, so unlike a border it doesn’t stick to a paragraph. Instead, it works like a quasi-graphical element inserted into the text.
To add a horizontal line between paragraphs, follow these steps:
1. Position the insertion pointer at the start or end of a paragraph, where you want the horizontal line to appear.
2. Click the Home tab.
3. In the Paragraph Group, click the Borders button.
4. Choose Horizontal Line.
Word inserts a line stretching from the left to right margins.
Click the line to adjust its size. Use the mouse to drag one of the six handles (top and bottom and the four corners) to set the line's width or thickness.
To format the horizontal line, double-click it. Use the Format Horizontal Line dialog box to set the width (as a percentage), height, color, and alignment.
To remove the horizontal line, click once to select it and then press the Delete key.
Boxing multiple paragraphs
 To stick a box around a paragraph, use the Outside Borders command, found on the Borders menu and shown in the margin. When multiple paragraphs are selected, the box wraps around the group.
 If you desire to box several paragraphs in a row and keep lines between the paragraphs, use the All Borders command instead of Outside Borders. The All Borders icon is shown in the margin.
· More and fancy options for boxing paragraphs can be found in the Borders and Shading dialog box. See the section, “The Borders and Shading Dialog Box.”
· Before you go paragraph-boxing crazy, what you might need in your document is really a table. See Chapter 19 for information on tables.
Removing borders
 To peel away the border format from one or more paragraphs of text, apply the No Border format: Select the paragraph(s), click the Borders button, and then choose No Border, as shown in the margin.
To remove specific parts of a border, use the Borders and Shading dialog box, as covered next in this chapter.
The Borders and Shading Dialog Box
To fully flex Word’s border bravado, summon the Borders and Shading dialog box:
1. Click the Home tab.
2. In the Paragraph group, click the triangle by the Borders button to display the Borders menu.
3. Choose the Borders and Shading command.
The Borders and Shading dialog box appears, as shown in Figure 18-2.
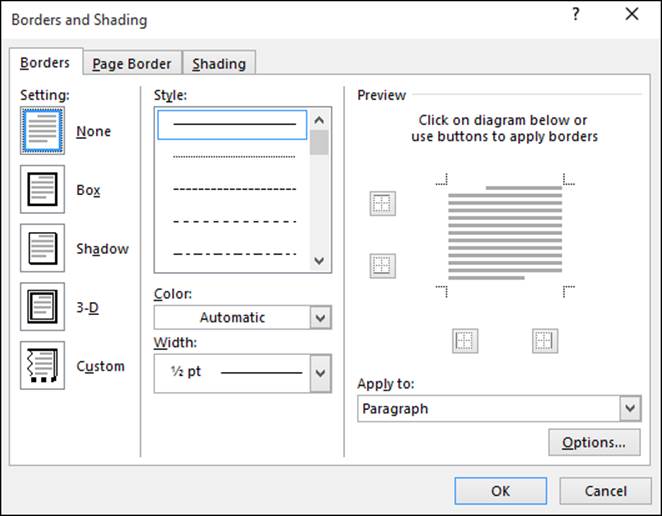
Figure 18-2: The Borders and Shading dialog box.
Unlike the Border menu, additional and custom border-setting options are available in the Borders and Shading dialog box. Most notably, you can set the border line style, thickness, and color.
· The Borders and Shading dialog box also allows you to place a border around a page, which is covered in the section, “Applying a page border.”
· You can use the commands in the Borders and Shading dialog box to format a table. See Chapter 19 for information on tables in Word.
Creating a fancy title
To create custom titles for newsletters, documents, or anything you want to pretend is super important, click to select a paragraph and then go nuts in the Borders and Shading dialog box. You may end up with results similar to what’s shown in Figure 18-3.

Figure 18-3: Fancy borders.
To properly apply a special border, follow these general steps in the Borders and Shading dialog box:
1. Choose a line style in the Style list.
Scroll the list to view the full variety of styles (refer to Figure 18-2).
2. Set the color in the Color list.
The Automatic color uses black, or the standard color as set by the document’s theme (usually black).
3. Choose a width in the Width list.
4. Click in the Preview part of the dialog box to place the line: top, bottom, right, or left.
To remove a line, click it in the Preview window.
To start out quickly, select a preset design from the list of icons on the right side of the dialog box (refer to Figure 18-2).
Click the OK button to apply the customized border to your document’s text.
Boxing text
Although applying a border is a paragraph-level format, you can also wrap borders around tiny tidbits of text. To do so, follow these steps:
1. Select the text.
2. Summon the Borders and Shading dialog box.
Directions are found earlier in this chapter.
3. Set the border style you desire.
Only the Box and Shadow options are available, although you can set the color and line thickness.
4. Ensure that the Apply To menu shows Text and not Paragraph.
5. Click OK.
Also see Chapter 10 for information on shading text. From a design point of view, I believe shading text is a better option than wrapping it in a box.
Applying a page border
One gem hidden in the Borders and Shading dialog box is the tool required to place a border around an entire page of text. The border sits at the page’s margins, and is in addition to any paragraph borders you might apply.
Here’s how to set a page border:
1. Put the insertion pointer on the page you want to border.
For example, you might put it on the first page in your document.
2. Summon the Borders and Shading dialog box.
3. Click the Page Border tab.
4. Set the border style.
Choose a preset style, line style, color, thickness.
Use the Art drop-down list to choose a funky pattern for the border.
5. Click the Apply To menu button to select which pages you want bordered.
Choose Whole Document to put borders on every page. To select the first page, choose the This Section-First Page Only item. Other options let you choose other pages and groups, as shown in the drop-down list.
And now, the secret:
6. Click the Options button.
The Border and Shading Options dialog box appears.
7. In the Measure From drop-down list, choose the Text option.
The Edge of Page option just doesn't work with most printers. Text does.
To add more “air” between your text and the border, increase the values in the Margin area.
8. Click OK.
9. Click OK to close the Borders and Shading dialog box.
To remove the page border, choose None under Settings in Step 4 and then click OK.
A page border is a page-level format. If you desire borders to sit on only certain pages, split your document into sections. Use the Apply To drop-down menu (Step 5) to select the current section for your page borders. See Chapter 14 for more information on section formatting.
All materials on the site are licensed Creative Commons Attribution-Sharealike 3.0 Unported CC BY-SA 3.0 & GNU Free Documentation License (GFDL)
If you are the copyright holder of any material contained on our site and intend to remove it, please contact our site administrator for approval.
© 2016-2026 All site design rights belong to S.Y.A.