Word 2016 For Dummies (2016)
Part IV
Spruce Up a Dull Document
Chapter 19
Able Tables
In This Chapter
![]() Understanding tables in Word
Understanding tables in Word
![]() Building a table
Building a table
![]() Converting between text and a table
Converting between text and a table
![]() Selecting items in a table
Selecting items in a table
![]() Setting text alignment
Setting text alignment
![]() Adding or inserting rows and columns
Adding or inserting rows and columns
![]() Applying table quick styles
Applying table quick styles
![]() Putting a caption on the table
Putting a caption on the table
Writing is a linear task. Characters flow into words, which flow into sentences, which form paragraphs. You start reading here and end up there. That’s how it works, up until the information you’re trying to organize is best presented in a grid. That’s when you need to summon a table.
Put a Table in Your Document
A table presents information organized into rows and columns — a grid. You can use the Tab key to build such a thing, setting various and clever tab stops and formatting your text accordingly. That works, but it’s not the best solution.
The best way to add a table in your document is to use one of Word’s table creation commands. The commands build a custom grid of rows and columns. Within the gird are cells, into which you can place text or graphics. You can format each cell with its own margins, spacing, or paragraph style. Lines and background colors format the table itself. These feats are beyond the capabilities of the silly old Tab key.
 The Tab key gets its name from the same root as the word table. Its original purpose was to format tabular data. In fact, on some early typewriters, the Tab key was named Tabulator.
Working with tables in Word
To begin your table-making journey, click the Ribbon’s Insert tab. In the Tablets group, the only item is the Table button. Click that button to see the Table menu, as illustrated in Figure 19-1.

Figure 19-1: The Table menu.
The Table menu features multiple ways to slap down a table in your document, each of which is illustrated in the following sections.
Once the table is created, start filling it in. See the later section, “Typing text in a table” for details. Or, if you already used the Tab key to create the text, see the section, “Convert tab-formatted text into a table.”
When a table is selected, or the toothpick cursor blinks inside the table, two new tabs appear on the Ribbon: Table Tools Design and Table Tools Layout. These tabs contain the specific commands to format and modify the table. Details are offered later in this chapter.
Creating a table
Word offers multiple ways to create a table, from right brain to left brain to options between. The choices allow for more flexibility, but also make this chapter longer than it would be otherwise.
·  I recommend placing the table on a blank line by itself. Furthermore, add a second blank line after the table. That makes it easier to continue typing text below the table.
· Don’t fret if you’ve already used tab stops to create a table. Word deftly converts tab-formatted text into a table, which is described in the section “Convert tab-formatted text into a table,” later in this chapter.
·  Don’t worry about getting the table dimensions wrong. You can easily add rows or columns to or remove them from a table. See the later section, “Adding or removing rows or columns.”
The quick way to create a table
The best way to make a table in Word is to use the grid on the Table button’s menu, as shown in Figure 19-1. Follow these steps:
1. Click where you want the table in your document.
2. Click the Insert tab.
3. Click the Table button.
4. Drag through the grid to set the desired number of rows and columns.
You don’t need to be precise; you can always add or remove rows or columns later; see the later section, “Adding or removing rows or columns.”
In Figure 19-2, a four-column-by-three-row table is created. As you drag the mouse pointer on the menu, the table's grid magically appears in the document.
5. Release the mouse button to begin working on the table.
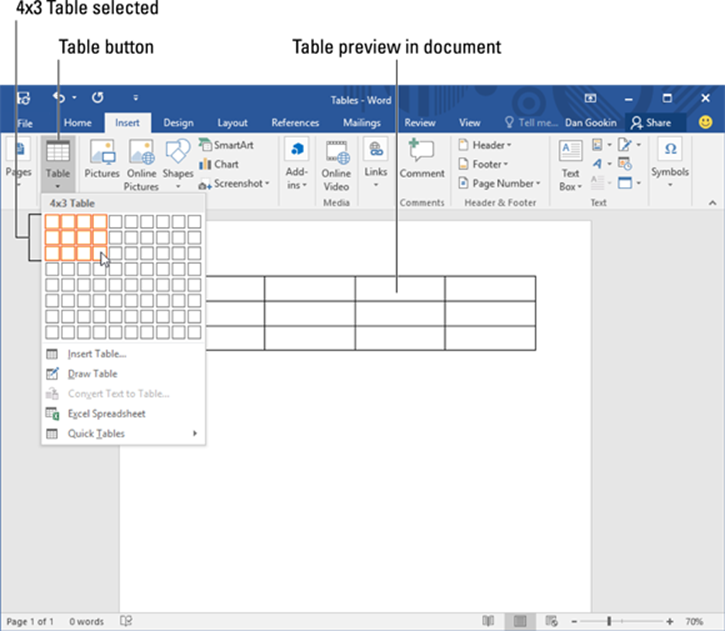
Figure 19-2: Creating a four-by-three table.
See the later section, “Text in Tables,” to continue your table task.
The right-brain way to create a table
When dialog boxes make more sense than using menus and graphical goobers, follow these steps:
1. On the Insert tab, click the Table button.
2. From the Table menu, choose the Insert Table command.
The Insert Table dialog box appears.
3. Enter the number of rows and columns.
4. Click the OK button to plop down your table.
The left-brain way to create a table
Free your mind from the constraints of conventionalism, clutch a crystal, and use the mouse to draw a table inside your document:
1. Click the Table button and choose Draw Table.
![]() The mouse pointer changes to a pencil, as shown in the margin.
The mouse pointer changes to a pencil, as shown in the margin.
2. Drag to draw the table’s outline in your document.
Start in the upper-left corner and drag to the lower-right corner, which tells Word where to insert the table. You see an outline of the table as you drag down and to the right, as shown in Figure 19-3.
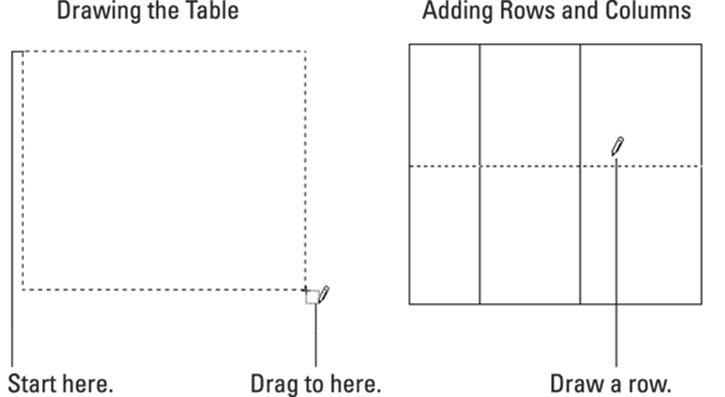
Figure 19-3: Drawing a table in a document.
3. Draw horizontal lines to create rows; draw vertical lines to create columns.
Refer to Figure 19-3 (on the right) for an example of drawing a row.
As long as the mouse pointer looks like a pencil, you can use it to draw the rows and columns in your table.
4. Press the Esc key when you’ve finished drawing the table.
Convert tab-formatted text into a table
If you’ve used the Tab key to create rows and columns of text, you can quickly snap that part of your document into an official Word table. Follow these steps:
1. Select the tab-formatted text.
If columns are separated by tabs, great. If not, each paragraph you select becomes a row in a single-column table.
2. Click the Insert tab.
3. Choose Table ⇒ Convert Text to Table.
4. Confirm the guesses made in the Convert Text to Table dialog box.
Ensure that the values for columns and rows are correct. If the columns are separated by tabs, ensure that Tabs is chosen at the bottom of the dialog box. Generally speaking, Word does a good job of guessing the conversion settings.
Drag around the Convert Text to Table dialog box so that you can better see the text in your document.
5. Click OK.
A table is born.
See the later section, “Table Modification” for information on fixing the freshly-created table.
The “I can’t do anything — please help” approach to creating a table
Word comes with an assortment of spiffy predefined tables. Plopping one down in your document is as easy as using the Quick Tables submenu: Click the Table button and from the menu choose Quick Tables. Select a table type from the submenu.
Once the table is inserted, you can add or edit the existing text, add more rows or columns, or otherwise modify the table. Refer to directions elsewhere in this Chapter for specifics.
Un-creating a table
At some point, you may surrender the notion of needing a table, and desire the text to be freed from the table’s confines. To perform such a jailbreak, you convert the table back into plain text or even tab-formatted text. Obey these steps:
1. Click inside the table you want to convert.
Don’t select anything — just click the mouse.
2. Click the Table Tools Layout tab.
3. From the Table group, choose Select ⇒ Select Table.
4. From the Data group, choose Convert to Text.
The Convert to Text dialog box appears. It guesses how you want the table converted, such as using tabs or paragraphs.
5. Click OK.
Bye-bye, table. Hello, ugly text.
Some post-table-destruction cleanup might be necessary, but generally the conversion goes well. The only issue you may have is when a cell contains multiple paragraphs of text. In that case, undo the operation (press Ctrl+Z) and choose Paragraph Marks from the Convert to Text dialog box (before Step 5).
Deleting a table
To utterly remove the table from your document, text and all, heed these destruction directions:
1. Click inside the table.
2. Click the Table Tools Layout tab.
3. In the Rows & Columns group, choose Delete ⇒ Delete Table.
The table is blown to smithereens.
Deleting the table deletes its contents as well. If you need to save the contents, I recommend converting the table instead of deleting it. See the preceding section.
Text in Tables
Text fills a table on a cell-by-cell basis. A cell can be empty or contain anything from a single letter to multiple paragraphs. The cell changes size to accommodate larger quantities of text.
· Within a cell, text is formatted just as it is elsewhere in Word, including margins and tabs.
· Although a single cell can deftly handle vast quantities of text, graphic artists don’t put a lot of text into a single cell. Consider another way to present such information.
· I don’t recommend formatting text inside a cell with first-line indents. Although it’s possible, such formatting can be a pain to manipulate.
· Show the ruler when you work with formatting text in a table: Click the View tab, and in the Show group, place a check mark by the Ruler item.
Typing text in a table
Text appears in whichever cell the insertion pointer is blinking. Type your text and it wraps to fill the cell. Don’t worry if it doesn’t look right; you can adjust the cell size after you type the text, as described in the later section, “Adjusting row and column size.”
· To move to the next cell, press the Tab key.
· To move back one cell, press Shift+Tab.
· Pressing Tab at the end of a row moves the insertion pointer to the first cell in the next row.
· Pressing the Tab key while the insertion pointer is in the table’s bottom-right cell adds a new row to the table.
· To produce a tab character within a cell, press Ctrl+Tab. Even so:
· I don’t recommend putting tabs into table cells. It makes the cell formatting all funky.
· When you press the Enter key in a cell, you create a new paragraph in the cell, which probably isn’t what you want.
· The Shift+Enter key combination (a soft return) can be used break up long lines of text in a cell.
Selecting in a table
Two things you can select in a table are the text inside the cells or the cells themselves. You can also select rows, columns, or the entire table. Here are my suggestions:
· Triple-click in a cell to select all text in that cell.
· ![]() Select a single cell by positioning the mouse pointer in the cell's lower-left corner. The pointer changes to a northeastward-pointing arrow, as shown in the margin. Click to select the cell, which includes the cell’s text but primarily the cell itself.
Select a single cell by positioning the mouse pointer in the cell's lower-left corner. The pointer changes to a northeastward-pointing arrow, as shown in the margin. Click to select the cell, which includes the cell’s text but primarily the cell itself.
· Move the mouse pointer into the left margin and click to select a row of cells.
· ![]() Move the mouse pointer above a column, and click to select that column. When the pointer is in the sweet spot, it changes to a downward-pointing arrow (shown in the margin).
Move the mouse pointer above a column, and click to select that column. When the pointer is in the sweet spot, it changes to a downward-pointing arrow (shown in the margin).
· ![]() Clicking the table’s handle selects the entire table. The handle is visible whenever the mouse points at the table or when the insertion pointer is placed inside the table.
Clicking the table’s handle selects the entire table. The handle is visible whenever the mouse points at the table or when the insertion pointer is placed inside the table.
If you have trouble selecting any part of a cell, click the Table Tools Layout tab. In the Table group, the Select button’s menu provides commands to select the entire table, a row, a column, or a single cell.
Aligning text in a cell
Text in a cell sports some special, table-specific alignment options. To adjust the position of text in a cell, follow these steps:
1. Click in the cell’s text.
2. Click the Table Tools Layout tab.
3. In the Alignment group, click an icon representing the desired alignment.
The nine icons represent all alignment combinations: left, center, and right, with top, middle, and bottom.
 Click the Alignment group’s Text Direction button (shown in the margin) to change the way text reads in a cell. Keep clicking the button to reset the orientation.
 Doing math in a table
Just to keep the Excel program on its toes, Word lets you insert formulas into a table cell. These formulas aren’t as sophisticated as those used in Excel, which some would consider a blessing.
To insert a formula into a table, click in a given cell. Click the Table Tools Layout tab. In the Data group, click the Formula button. (You may have to choose Data ⇒ Formula, depending on the size of Word’s window.) You see the Formula dialog box, along with a suggested calculation in the Formula text box.
The problem at this point is that Word offers no help on how to use the functions, what they do, or how to reference cells in a table. My advice is to use Excel to create such complex tables, and then copy and paste that part of the Excel worksheet into your Word document.
Table Modification
No table is perfect. You may need to add or remove a row or column, adjust the width or height, or otherwise fine tune and format the table. The tools to help you are found on two special tabs on the Ribbon: Table Tools Design and Table Tools Layout. To summon these tabs, click anywhere in a table. Then start making your adjustments.
The best time to format and fix a table is after you’ve added its text.
Adding or removing rows or columns
Not only can you add rows and columns to any of a table’s four sides, you can squeeze new rows and columns inside a table. The secret is to click the Table Tools Layout tab. In the Rows & Columns group, use the Insert buttons to add new rows and columns.
To remove a row or column, click to position the mouse, and then click the Table Tools Layout tab. In the Rows & Columns group, choose the proper command from the Delete button menu.
· Rows and columns are added relative to the insertion pointer’s position: First click to select a cell, and then choose the proper Insert command to add a row or column relative to that cell.
· Refer to the earlier section, “Selecting in a table,” for information on selecting a row or column. Make that selection before choosing a Delete command to ensure that the proper row or column is removed.
· When you choose the Delete ⇒ Delete Cells command, you see a dialog box asking what to do with the other cells in the row or column: Move them up or to the left. Also see the later sections, “Merging cells” and “Splitting cells.”
· ![]() A mousey way to add a new row is to position the mouse pointer outside the table’s left edge. A + (plus) button appears, as shown in the margin. Click that button to insert a new row.
A mousey way to add a new row is to position the mouse pointer outside the table’s left edge. A + (plus) button appears, as shown in the margin. Click that button to insert a new row.
· ![]() Likewise, if you position the mouse pointer at the table’s top edge, click the + (plus) button, shown in the margin, to insert a new column.
Likewise, if you position the mouse pointer at the table’s top edge, click the + (plus) button, shown in the margin, to insert a new column.
Adjusting row and column size
After text is in the table, you should adjust row height and column width to best present the information. This process works best after you’ve added text.
 To automatically adjust the column width, position the mouse pointer at the left side of the column, just on the vertical border. The mouse pointer changes to the icon shown in the margin. Double-click and the column width is adjusted.
To adjust all column widths, put the mouse pointer at the far left vertical border in the table. Double-click.
To evenly distribute row and column sizes, click the Table Tools Layout tab. In the Cell Size group, click the Distribute Rows and Distribute Columns command buttons.
To oddly distribute row and column sizes, click the Auto Fit button, also found in the Cell Size group on the Table Tools Layout tab. Use the commands on the Auto Fit menu to choose how to adjust a table’s row and column size.
The most common way to adjust rows and columns in a table is to use the mouse: Position the mouse pointer at the vertical or horizontal border within a table. When the pointer changes to a left-right or up-down pointy thing, drag left, right, up, or down to change the border’s position.
Merging cells
The completely rational way to combine two cells into one or to split one cell into two is to use the table drawing tools. Heaven have mercy on you should you decide to merge or split cells in any other fashion.
To combine two cells, erase the line that separates them. Follow these steps:
1. Click the Table Tools Layout tab.
2. In the Draw group, click the Eraser tool.
![]() The mouse pointer changes to a bar of soap, shown in the margin, but it's supposed to be an eraser.
The mouse pointer changes to a bar of soap, shown in the margin, but it's supposed to be an eraser.
3. Click the line between the two cells.
The line is gone.
4. Click the Eraser tool again to quit merging.
5. Or you can tap the Esc key.
To merge a clutch of cells, select them and click the Merge Cells button. That button is found on the Table Tools Layout tab, in the Merge group.
Splitting cells
The easy way to turn one cell into two is to draw a line separating the cell. Follow these steps:
1. Click the Table Tools Layout tab.
2. In the Draw group, click the Draw Table button.
![]() The mouse pointer changes to the pencil pointer.
The mouse pointer changes to the pencil pointer.
3. Draw a line in the table to split a cell.
You can draw horizontally or vertically.
4. Click the Draw Table button again when you’re done.
Any text in the cell you split goes to one side of the drawn line.
You can split cells also by selecting a single cell, and then choosing the Split Cells command from the Table Tools Layout tab’s Merge group. Use the Split Cells dialog box to determine how to best mince up the cell.
Making the table pretty
Unless you want your table to look like it was designed using hog wire, I recommend applying some table formatting. You can set the line's thickness, color, and style, and apply color to the various rows and columns. The commands necessary are found on the Table Tools Design tab; click anywhere with a table to summon that tab on the Ribbon.
Rather than get bogged down with details, you should know that the spiffiest way to spruce up a table is to choose a preset format from the Table Styles gallery: Click inside the table, and then position the mouse pointer at a thumbnail in the gallery to see a preview. Click the thumbnail to apply that format to your table.
· More thumbnails are available in the Table Styles gallery than are shown on the Ribbon: Scroll through the list or click the down-pointing arrow (below the scroll bar on the left) to view the lot.
· If you’d rather format your table in a more painful manner, use the Shading button as well as the commands located in the Borders group.
· To remove the table's gridlines, select the table and choose No Border from the Borders menu. If you choose that format, I recommend that you still show the tablet’s gridlines, which aren’t printed. To do that, select the table and choose the View Gridlines command from the Borders menu.
Adding a table caption
The best way to stick a title or caption on your table is to use Word’s Insert Caption command. Don’t bother trying to find that command on any of the Table Tools tabs. Instead, follow these steps:
1. Click in the table you want to caption.
2. Click the References tab.
3. Click the Insert Caption button.
The Caption dialog box appears.
4. Type the table’s caption in the Caption text box.
Don’t worry about the text Figure 1, not yet.
5. Click the Label menu and choose Table.
The text in the Caption box changes from Figure 1 (or whatever number) to Table 1. You might need to edit the caption to add some space between the number and your text.
6. Click the Position menu and choose whether to place the caption above or below the table.
7. If you prefer a reference other than Table 1, click the new Label button and type the desired format.
Word supplies a sequential caption number after whatever text you type. The change is reflected in the Caption text box.
8. Click OK to set the caption.
An advantage of using Word's Insert Caption command is that you can easily create a list of tables for your document. See Chapter 21 for details on building such a list.