Word 2016 For Dummies (2016)
Part IV
Spruce Up a Dull Document
Chapter 23
Insert Tab Insanity
In This Chapter
![]() Typing nonbreaking spaces and hyphens
Typing nonbreaking spaces and hyphens
![]() Inserting foreign language characters
Inserting foreign language characters
![]() Getting at special symbols
Getting at special symbols
![]() Breaking up text with a text box
Breaking up text with a text box
![]() Creating dynamic text with fields
Creating dynamic text with fields
![]() Inserting the date and time into your text
Inserting the date and time into your text
Aside from formatting, pretty much anything you put into a Word document is inserted. That makes me curious as to why the magicians at Microsoft sought to dedicate a tab on the Ribbon to the topic of Insert. What weird, wonderful, and wanted buttons could crowd that tab’s various groups — especially those items not covered elsewhere in this book.
Characters Foreign and Funky
The computer’s keyboard lets you type all 26 letters of the alphabet — plus numbers, a smattering of symbols, and punctuation thingies. That’s a lot to type, and some authors spend their entire lives weaving those characters into a tapestry of text heretofore unseen in literary history. As if that weren’t enough, you can sprinkle even more characters into your document, spicing it up like garlic in a salad. Foreign language letters, symbols — all sorts of fun stuff is covered in this section.
Nonbreaking spaces and hyphens
The space and the hyphen characters are special because Word uses either of them to wrap a line of text: The space splits a line between two words, and the hyphen (using hyphenation) splits a line between a word’s syllables.
Sometimes, however, you don’t want a line to be split by a space or a hyphen. For example, splitting a phone number is bad because you want the number to stay intact. And you may desire to have two words that are separated by a space to be stuck together like glue. For those times, you need unbreakable characters.
· To prevent the hyphen character from breaking a line, press Ctrl+Shift+ - (hyphen).
· To prevent the space character from breaking a line, press Ctrl+Shift+spacebar.
Both commands insert a nonbreaking character into the text. Word utterly refuses to use an unbreakable hyphen or space to split a line of text.
Typing characters such as Ü, Ç, and Ñ
You can be boring and type deja vu or be all fancy and type déjà vu or café or résumé. Such tricks make your readers think that you know your stuff, but what you really know is how to use Word's diacritical mark keys.
Diacritical is not an urgent medical situation involving elimination. Instead, it’s a term that refers to symbols appearing over certain letters. Foreign languages and words use diacritical marks, such as the examples used in the preceding paragraph.
To create a diacritical mark in Word, you press a special Control-key combination. The key combination you press somewhat represents the diacritical mark you need, such as Ctrl+’ to produce the ’ diacritical mark. The Ctrl-key combination is followed by the character that needs the new “hat,” as shown in Table 23-1.
Table 23-1 Those Pesky Foreign Language Characters
|
Prefix Key |
Characters Produced |
|
Ctrl+’ |
á é í ó ú |
|
Ctrl+` |
à è ì ò ù |
|
Ctrl+, |
ç |
|
Ctrl+@ |
å |
|
Ctrl+: |
ä ë ï ö ü |
|
Ctrl+^ |
â ê î ô û |
|
Ctrl+~ |
ã õ ñ |
|
Ctrl+/ |
ø |
For example, to insert an é into your document, press Ctrl+’ and then type the letter E. Uppercase E gives you É, and lowercase e gives you é. It makes sense because the’ (apostrophe) is essentially the diacritical mark you’re adding to the vowel.
Be sure to note the difference between the apostrophe (or tick) and the accent grave (or back tick). The apostrophe (’) is next to your keyboard’s Enter key. The accent grave (`) is below the Esc key.
 For the Ctrl+@, Ctrl+:, Ctrl+^, and Ctrl+~ key combinations, you also need to press the Shift key, which is required anyway to produce the @, :, ^, or ~ symbols on the keyboard. Therefore, Ctrl+~ is really Ctrl+Shift+`. Keep that in mind.
Word's AutoCorrect feature has been trained to know some special characters. For example, when you’re typing café, Word automatically sticks that whoopty-doop over the e.
Inserting special characters and symbols
On the far right of the Insert tab dwells the Symbols group. Two items are found in that group: Equation and Symbol. (If the window is too narrow, you see the Symbols button, from which you can choose Equation or Symbol.) Click the Symbol button see some popular or recently used symbols. Choose a symbol from the menu to insert the special symbol directly into your text.
To see a hoard of symbols and characters, click the Symbol button and choose the More Symbols command. The Symbol dialog box appears, as shown in Figure 23-1. Choose a decorative font, such as Wingdings, from the Font menu to see strange and unusual characters. To see the gamut of what's possible with normal text, choose (normal text) from the Font drop-down list. Use the Subset drop-down list to see specific symbols and such.
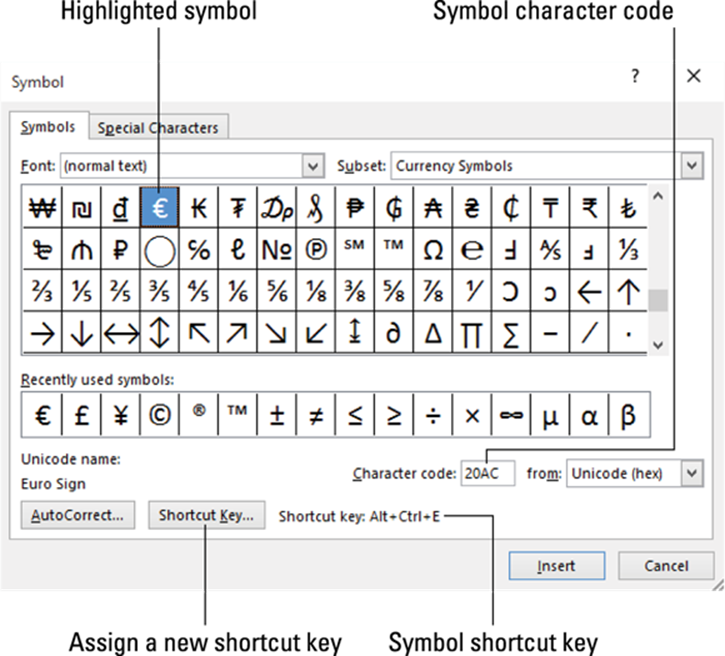
Figure 23-1: The Symbol dialog box.
To stick a character into your document from the Symbol dialog box, select the symbol and click the Insert button.
You need to click the Cancel button when you're done using the Symbol dialog box.
· Click the Insert button once for each symbol you want to insert. For example, when you’re putting three Σ (sigma) symbols into your document, you must locate that symbol on the grid and then click the Insert button three times.
· Some symbols have shortcut keys. They appear at the bottom of the Symbol dialog box (refer to Figure 23-1). For example, the shortcut for the degree symbol (°) is Ctrl+@, spacebar — press Ctrl+@ (actually, Ctrl+Shift+2) and then type a space.
·  You can insert symbols by typing the symbol’s character code and then pressing the Alt+X key combination. For example, the character code for Σ (sigma) is 2211: Type 2211 in your document and then press Alt+X. The number 2211 is magically transformed into the Σ character.
Spice Up Your Document with a Text Box
A text box is a graphical element that contains — hold your breath, wait for it, wait — text. The text is used as a decorative element (commonly called a pull quote or callout) to highlight a passage of text on the page, or it can be simply an information box or an aside, such as those elements that litter the pages of USA Today. The primary purpose of the text box is to prevent your document from becoming what graphic designers refer to as the dreaded Great Wall of Text.
To shove a text box into a document, follow these steps:
1. Click the Insert tab.
2. In the Text group, choose Text Box.
3. Choose a preformatted text box from the list.
The text box is splashed onto the current page in your document.
4. Rewrite the text in the box.
La-di-da.
Even though it contains text, a text box is a graphical element. As such, when it first appears in your document, or any time it’s selected, the Drawing Tools Format tab appears on the Ribbon. This tab hosts a garrison of text box formatting and style commands.
Other text in your document wraps around the text box. As such, you can drag the text box (by its edge) to any position on the page. You can set the layout options for the text box just as you would for any picture or graphical goober in your document. These options are covered inChapter 22, which also covers formatting commands available on the Drawing Tools Format tab.
·  It’s common to copy and paste text from the document into the box, which is how pull quotes work.
· To change text orientation within the text box, click the box, and then click the Drawing Tools Format tab. In the Text group, click the Text Direction button to peruse orientation options.
· To delete a text box, click its edge and press the Delete key.
Fun with Fields
The phrase “carved in stone” refers to text that doesn’t change. What you write in Word isn’t carved in stone — well, unless you have a cool printer I’ve not heard of. Still, the text you scribble remains static until you change it or until the computer screws up.
To liven things up a tad, Word lets you add dynamic elements to a document. Unlike the text you normally compose, dynamic text changes to reflect a number of factors. To add these dynamic elements to a document, you use a Word feature called fields.
Understanding fields
![]() Word’s dynamic field feature is part of the Quick Parts tools. To add a field to a document, click the Insert tab and in the Text group, click the Quick Parts button, shown in the margin. Choose the Field command from the Quick Parts menu to behold the Field dialog box, shown in Figure 23-2.
Word’s dynamic field feature is part of the Quick Parts tools. To add a field to a document, click the Insert tab and in the Text group, click the Quick Parts button, shown in the margin. Choose the Field command from the Quick Parts menu to behold the Field dialog box, shown in Figure 23-2.

Figure 23-2: The Field dialog box.
The scrolling list on the left side of the Field dialog box shows field categories. These represent various dynamic nuggets you can insert in a document. Choose a specific category to narrow the list of Field Names.
The center and right part of the dialog box contain formats, options, and other details for a selected field.
To insert the field, click the OK button. The field appears just like other text, complete with formatting and such, but the information displayed changes to reflect whatever the field represents. For example, a page number field always shows the current page.
When the insertion pointer is placed inside a field, the text is highlighted with a dark gray background. That’s your clue that the text is a field and not plain text. Also see the later section, “Deleting fields.”
Adding some useful fields
Word offers an abundance of fields you can thrust into a document. Of the lot, you might use only a smattering. My favorites are listed in this section.
These subsections assume that the Fields dialog box is open, as described in the preceding section.
Page numbers
To ensure that the document accurately reflects the current page number, insert a current page number field:
1. In the Field dialog box, select Numbering from the Categories drop-down list.
2. Select Page from the Field Names list.
3. In the Field Properties section of the Field dialog box, select a format for the page number.
4. Click OK.
The current page number dynamically appears in your document. No matter how you edit or modify the document, that number reflects the current page number.
Total number of pages
To insert the total number of pages in your document, heed these directions:
1. Select Document Information from the Categories drop-down list.
2. Select NumPages from the Field Names list.
3. Select a format.
4. Click OK.
Word count
Getting paid by the word? Stick an automatic word count at the end of your document:
1. From the Categories list, select Document Information.
2. Select NumWords from the Field Names list.
3. Click OK.
Document filename
Many organizations place the document’s filename into a document header or footer. Rather than guess, why not use a field that contains the document’s exact name? Do this:
1. From the Categories list, select Document Information.
2. Select FileName from the Field Names list.
3. In the field properties list, choose a text case format.
4. Optionally (though recommended), put a check mark by the option Add Path to Filename.
5. Click OK.
The FileName field always reflects the name of the file, even when you change it.
Updating a field
Just because a field contains dynamic text doesn’t mean that the field is always accurate. Occasionally, fields need updating.
Many fields are updated automatically when you open a document. Printing fields update when you print the document. For fields that don’t update, right-click the field in your document and choose the Update Field command. The field’s text is refreshed.
Changing a field
Although you can’t edit a file, you can modify the way it displays information. To do so, right-click the field and choose Edit Field from the pop-up menu. The Field dialog box is displayed, allowing you to make whatever modifications you deem necessary.
 Just as those mutants at the end of Beneath the Planet of the Apes removed their human masks, you can remove a field's mask by right-clicking it and choosing the Toggle Field Codes command. For example, the FileSize field looks like this:
{ FILESIZE \* MERGEFORMAT }
To restore the field to human-readable form, right-click it again and choose the Toggle Field Codes command. All praise be to the bomb.
Deleting fields
Removing a field works almost like deleting text. Almost. The main difference is that you have to press the Delete or Backspace key twice.
For example, when you press Backspace to erase a field, the entire field is highlighted. That’s your clue that you're about to erase a field, not regular text. Press Backspace again to remove the field.
The mystery of content controls
Word’s fields aren’t the only dynamic text gizmos you can stick into a document. Another changing goober is the content control. It’s not really a field, though it can be inserted and updated in a similar manner. The primary difference is how a content control looks, which is something like this:
![]()
Content controls are usually inserted by Word commands, such as those that automatically create headers or footers or insert page numbers. On the Insert tab, in the Text group, you can choose Quick Parts ⇒ Document Property to insert a property control. The Equation menu, found in the Insert tab’s Symbols group, also inserts content controls.
As with a field, you might not be able to edit text in a content control, although some controls are designed that way.
To update a time-sensitive content control, press the F9 key. Some Date content controls have a pick-the-date button, displaying a tiny calendar from which you can set the property's date.
The Date and Time
With few exceptions, time travelers are the only ones who bother asking for the current year. Otherwise, people merely want to know the month and day or just the day of the week. Word understands those people (but not time travelers), so it offers a slate of tools and tricks to insert date and time information into a document.
Adding the current date or time
Instead of looking at a calendar and typing a date, follow these steps:
1. Click the Insert tab.
2. In the Text group, click the Date and Time button.
 The button may say Date & Time or you may see only the icon, shown in the margin.
3. Use the Date and Time dialog box to choose a format.
4. If desired, click the Update Automatically option so that the date-and-time text remains current with the document.
Setting the Update Automatically option inserts a content control into the text, which is updated when you open or print the document.
5. Click the OK button to insert the current date or time into your document.
The keyboard shortcut to insert the current date is Alt+Shift+D. To insert the current time, press Alt+Shift+T. The date is inserted as a content control; the time is inserted as a field.
See the nearby sidebar “The mystery of content controls” for information on content controls.
Using the PrintDate field
The date field I use most often is PrintDate. This field reflects the current date (and time, if you like) that a document is printed. It’s marvelous for including in a letterhead template or other document you reuse or print frequently. Here’s how it’s done:
1. Click the Insert tab.
2. In the Text group, click Quick Parts ⇒ Field.
The Field dialog box, which is covered earlier in this chapter, appears.
3. Select Date and Time from the Categories drop-down list.
4. Select PrintDate from the Field Names list.
5. Choose a date-and-time format from the Field Properties area.
6. Click OK.
The field looks gross until you print the document, which makes sense. Also, the field reflects the last day you printed the document. It’s updated once you print again.
All materials on the site are licensed Creative Commons Attribution-Sharealike 3.0 Unported CC BY-SA 3.0 & GNU Free Documentation License (GFDL)
If you are the copyright holder of any material contained on our site and intend to remove it, please contact our site administrator for approval.
© 2016-2026 All site design rights belong to S.Y.A.