Word 2016 For Dummies (2016)
Part IV
Spruce Up a Dull Document
Chapter 22
Here Come the Graphics
In This Chapter
![]() Inserting a graphic or an image into a document
Inserting a graphic or an image into a document
![]() Playing with WordArt
Playing with WordArt
![]() Adding an image caption
Adding an image caption
![]() Removing images
Removing images
![]() Making text wrap around an image
Making text wrap around an image
![]() Changing the size of an image
Changing the size of an image
![]() Cropping an image
Cropping an image
![]() Modifying an image’s appearance
Modifying an image’s appearance
![]() Working with multiple images
Working with multiple images
It’s sacrilege, of course. Word processing is about words. Images and words mix and mingle in the software realm of desktop publishing. Regardless, the mighty Microsoft Word allows you to slap down a picture, insert an object, edit images, and otherwise pretend it’s some sort of graphics program. This trick might just save you 1,000 words, providing that you know how it works.
Graphical Goobers in Your Text
The door to Word’s graphical closet is found on the Insert tab. The command buttons nestled in the Illustrations group place various graphical goobers into your text. Here’s how the process works for pictures in the text:
1. Click the mouse at the spot in your text where you desire the image to appear.
You don’t need to be precise because you can always move the image later.
2. Click the Insert tab.
3. Use one of the command buttons to choose which type of image to add.
4. You can also paste a previously copied image, as described in the next section.
Figure 22-1 illustrates how a freshly added image looks, highlighting some of its features.

Figure 22-1: An image in a document.
While the image is selected, a new tab appears on the Ribbon. For pictures, it’s the Picture Tools Format tab; for other types of graphics, the Drawing Tools Format tab appears. Both tabs offer tools that help you perfect the recently inserted graphic. Later sections in this chapter cover using those tools, as well as the controls illustrated in Figure 22-1.
Some images, specifically shapes, are drawn on the page. In that case, they appear in front of or behind your text. Refer to the “Image Layout” section for information on precise image placement.
· To remove an image, click to select it and then tap the Delete key. If the graphical object, such as a shape, contains text, ensure that you’ve clicked the object’s border before you tap the Delete key.
·  The more graphics you add in Word, the more sluggish it becomes. My advice: Write first. Add graphics last. Save frequently.
Copying and pasting an image
One of the simplest ways to stick an image into your document is to copy an image from elsewhere: Select the image, press Ctrl+C to copy it, and then switch to Word and press Ctrl+V to paste the image into your document.
· The image you copy can come from any other program in Windows.
· Some image formats might not be allowed in Word. If you’re unable to use the Paste button (found on the Home tab in the Clipboard group), or pressing Ctrl+V doesn’t work, the image format is incompatible.
·  Images found on web pages are the easiest type of image to copy and paste into your document. While dutifully remaining aware of various copyright laws around the world, right-click the image and choose the Copy Image (or similar) command from the pop-up menu. Switch to your document’s window and press Ctrl+V to paste.
Plopping down a picture
Your computer is most likely littered with picture files. No matter how the image was created, as long as it’s found somewhere on your PC, you can stick it into your document. Follow these steps:
1. Click the mouse in your text where you want the image to appear.
2. Click the Insert tab; in the Illustrations group, click the Pictures button.
The Insert Picture dialog box appears.
3. Locate the image file on your PC’s storage system.
4. Click to select the image.
5. Click the Insert button.
The image is slapped down in your document.
A nifty picture to stick at the end of a letter is your signature. Use a desktop scanner to digitize your John Hancock. Save your signature as an image file on your computer, and then follow the steps in this section to insert that signature picture in the proper place in your document.
Stealing images from the Internet
It’s easy to obtain an image from the web by copying and pasting that image, as covered in the earlier section, “Copying and pasting an image.” To perform a web image search from Word, click the Insert tab and then click the Online Pictures button in the Illustrations group. The Insert Pictures window appears.
Use options in the Insert Pictures window to help locate an online image. For example, click the text box next to Bing Image Search and type a description of the image you want. Press the Enter key and then choose an image. Click the Insert button to download the image from the Internet and thrust it into your document.
Refer to the later section “Image Layout” for information on properly positioning the image. If the image needed to be adjusted, see the “Image Editing” section.
Slapping down a shape
Word comes with a library of common shapes ready to insert in your document. These include basic shapes, such as squares, circles, geometric figures, lines, and arrows, plus popular symbols. Graphics professionals call these types of images line art.
To place some line art into your document, follow these steps:
1. Click the Insert tab.
2. In the Illustrations group, click the Shapes button.
The button is a menu, which lists shapes organized by type.
3. Choose a predefined shape.
The mouse pointer changes to a plus sign (+).
4. Drag to create the shape.
The shape is placed into the document, floating on top of the text.
At this point you can adjust the shape: Change its size, location, or colors. Use the Drawing Tools Format tab, conveniently shown on the Ribbon while the shape is selected, to affect those changes.
· Drag the image to another location. See the “Image Layout” section for specifics on image placement and text-wrapping options.
· Instantly change the image by using the Shape Styles group on the Ribbon’s Drawing Tools Format tab. Choose a new style from the Shape Gallery. Styles are related to the document’s theme; see Chapter 16 for information on themes.
· To set the shape’s color style, click the Shape Fill button.
· Use the Shape Outline button to set the shape’s outline color.
· To set the shape’s outline thickness, click the Shape Outline button and choose a thickness from the Weight submenu.
· The Shape Effects button lets you quickly apply 3D effects, shadows, and other fancy formatting to the shape.
· To more effectively format a shape, click the Launcher in the lower-right corner of the Shape Styles group. Use the Format Shape pane to manipulate settings for any selected shape in your document.
Sticking things into a shape
Shapes need not be clunky, colorful distractions. You can use a shape to hold text or a picture, which makes them one of the more flexible items to add to a document.
To add to a shape a smidgen of text, which the graphic layout artists refer to as a callout, right-click the shape and choose Add Text. The blinking toothpick cursor appears in the shape. Type and format the text.
To stick a picture into a shape, click to select the shape. Click the Drawing Tools Format tab. Click the Shape Fill button and choose the Picture menu item. Use the Insert Pictures window to hunt down an image to place in the shape.
· Yes, it’s possible to have both a picture and text inside a shape.
· To further deal with text in a shape, click the shape, and then click the Drawing Tools Format tab on the Ribbon. The Text group contains buttons that manipulate the text.
· To remove text from a shape, select and delete the text.
· To remove a picture, select a solid color from the Shape Fill menu.
· Also see Chapter 23 for information on text boxes, which are similar to shapes with text inserted.
Using WordArt
Perhaps the most overused graphic that’s stuck into any Word document is WordArt. This feature is almost too popular. If you haven’t used it yourself, you’ve probably seen it in a thousand documents, fliers, and international treaties. Here’s how it works:
1. Click the Insert tab.
2. ![]() In the Text group, click the WordArt button to display the WordArt menu.
In the Text group, click the WordArt button to display the WordArt menu.
The Word Art button is shown in the margin.
3. Choose a style from the WordArt gallery.
A WordArt graphic placeholder appears in your document.
4. Type the (short and sweet) text that you want WordArt-ified.
Use the Word Art Styles group on the Drawing Tools Format tab to customize the WordArt appearance. If you don’t see the Drawing Tools Format tab, first click the WordArt graphic.
Adding a caption
Some images work best when they have a caption. For example, that picture of the exploding watermelon is far more significant with the caption, “Never buy fruit from a guy who also sells ammunition.”
In Word, captions aren’t attached to an image. Instead, the caption is its own image, a separate graphical element on the page. As such, it helps to align and group the image with its caption. Follow these steps:
1. Click to select the graphic.
The graphic you want to caption must already be in the document. It’s also best to choose an image layout for the graphic, as described in the later section, “Wrapping text around an image.”
2. Click the References tab.
3. In the Captions group, click the Insert Caption button.
The Captions dialog box appears.
4. Type the caption’s text in the Caption text box.
Windows supplies the figure number as a suggestion. You cannot remove that preset text, but you can place a check mark in the Exclude Label from Caption box to reduce the text to just a number.
5. Choose a position for the caption from the Position drop-down list.
The caption position is relative to the figure. Most commonly, captions appear below the selected item.
6. Click the OK button.
The caption is applied to the figure. The caption uses the same text wrapping and horizontal dimensions as the figure.
7. Press and hold down the Shift key and click the image.
The caption is already selected. When you Shift+Click its image, both the image and caption are selected.
8. Click the Drawing Tools Format tab.
9. In the Arrange group, click the Group button and choose Group.
![]() The Group icon is shown in the margin. Refer to the later section, “Grouping images,” for more information on what the icon does.
The Group icon is shown in the margin. Refer to the later section, “Grouping images,” for more information on what the icon does.
Both the image and its caption are now placed in your document. Because you grouped them, they will work as a single unit.
· To change the caption, click the caption text. Type or edit something new.
· To remove the caption, ungroup it from its image. Refer to the later section, “Grouping images,” for details. Once ungrouped, click the caption to select it. Press the Delete key.
·  An advantage to applying captions this way is that you can create a list of captions or figures for your document, summarizing them along with their page references. To do so, click the References tab and then click the Insert Table of Figures button in the Captions group. Also see Chapter 21 for information on automatic lists and references.
Image Layout
Graphics in a Word document must cohabit well with the text. To keep both happy, you must understand Word’s image layout options. These options fall into three general categories:
· Inline: The image is inserted directly into the text, just like a large, single character. It stays with the text, so you can press Enter to place it on a line by itself or press Tab to indent the image, for example.
· Wrapped: Text flows around the graphic, avoiding the image like all the girls at a high school dance avoid the guys from the chess club.
· Floating: The image appears in front of or behind the text. Shapes (or line art) inserted in the document originally appear floating in front of the text.
When set properly, these layout options allow you to place images into your document in a clean, professional manner.
 To set image layout options, click to select an image and then click the Layout Options button, as shown in the margin. The Layout Options menu lists various layout settings, as illustrated in Table 22-1.
Table 22-1 Image Layout Options
|
Icon |
Setting |
What It Does |
|
|
Inline |
The image acts like a character in the text, moving with other text on the page. |
|
|
Square |
Text flows around the image in a square pattern, regardless of the image's shape. |
|
|
Tight |
Text flows around the image and hugs its shape. |
|
|
Through |
Text flows around the image but also inside the image (depending on the image’s shape). |
|
|
Top and Bottom |
Text stops at the top of the image and continues below the image. |
|
|
Behind Text |
The image floats behind the text, looking almost like the image is part of the paper. |
|
|
In Front of Text |
The image floats on top of your text, like a photograph dropped on the paper. |


Wrapping text around an image
For smaller images, or images that otherwise break up a document in an inelegant manner, choose one of the text-wrapping layout options. Heed these steps:
1. Click to select the image.
A selected image appears with eight handles, as shown earlier, in Figure 22-1.
2. Click the Layout Options button.
Word features four text-wrapping options, found in the With Text Wrapping area of the Layout Options menu. These options are Square, Tight, Through, and Top and Bottom, described in Table 22-1.
3. Choose a text-wrapping option.
Examine your image and the text to see whether it wraps the way you like. If it doesn’t, repeat these steps and choose another setting in Step 3.
 To remove text wrapping, choose the Inline option from Step 3.
Floating an image
When you want an image to be placed in your document independently of the text, you float the image. The image can be in front of the text, like some little kid pasted a sticker on the page, or behind the text, as if the image were part of the paper.
To float an image, select it and then click the Layout Options button, as shown in the margin. Choose Behind Text or In Front of Text. Refer to Table 22-1 for the appropriate icons.
After choosing either Behind Text or In Front of Text, you see the image released from the confines of the text. The image floats freely, either behind or in front of your text.
· See the next section for information on moving a floating image.
· Also see the later section, “Keeping an image with text,” if you want the floating picture to stay close to a specific paragraph in the document.
Keeping an image with text
Inline images always stay with the text that surrounds them. For images with other layout options, you can choose where the image attaches to the text or whether it attaches at all.
 To keep an image associated with a specific paragraph of text, use the Anchor icon, as shown in the margin. Drag that icon to the paragraph that references the image. That way, if the paragraph moves to another page, the image moves with it.
To keep an image pasted to the same spot on a page, select the image and then click the Layout Options button. Choose the setting Fix Position on Page. The image becomes stuck on the page at a specific location regardless of how the text flows around it.
Image Editing
Word is not an image-editing program. It does feature a handful of commands that let you manipulate pictures and images in a document but only in a simple way. For anything else, you need an image-editing program, such as Photoshop or one of its less-expensive relatives.
· Use Word’s Undo command, Ctrl+Z, to undo any image editing boo-boos.
·  When you're using a document theme, theme effects are automatically applied to any graphic inserted into your document. Refer to Chapter 16 for more information on themes.
Resizing an image
To make an image larger or smaller, heed these steps:
1. Select the image.
The image grows handles, as shown earlier in Figure 22-1.
2. Drag one of the image's four corner handles inward or outward to make the image smaller or larger, respectively.
If you hold down the Shift key as you drag, the image is proportionally resized.
You can use the buttons in the Picture Tools Format tab’s Size area to nudge the image size vertically or horizontally or to type specific values for the image’s size.
Cropping an image
In graphics lingo, cropping works like taking a pair of scissors to the image: You make the image smaller, but by doing so, you eliminate some content, just as an angry, sullen teen would use shears to remove his cheating scumbag former girlfriend from a prom picture. Figure 22-2 shows an example.
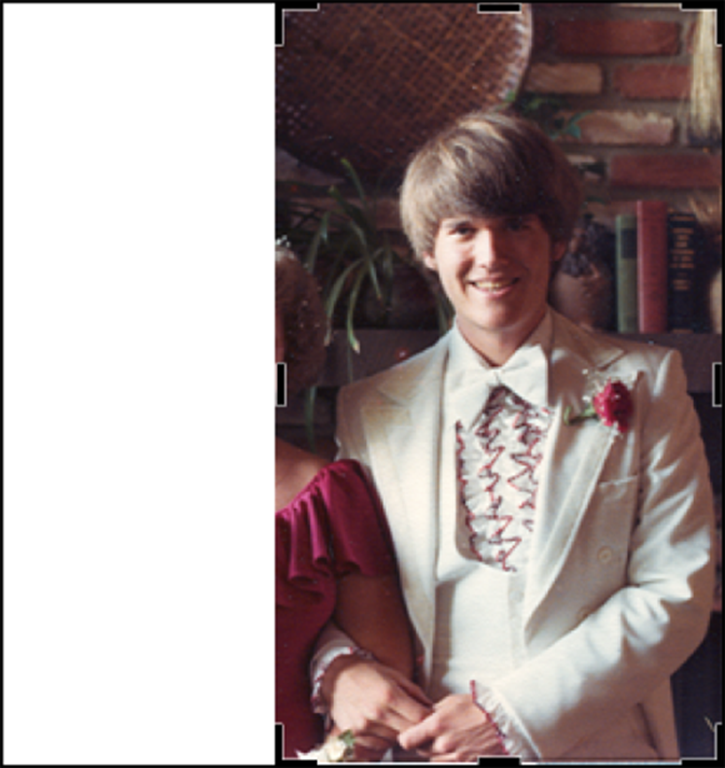
Figure 22-2: Cropping an image.
 To crop, click the image once to select it. Click the Picture Tools Format tab, and then click the Crop button in the Size group. Adjust the image by dragging one of the crop handles in or out. Press the Enter key to crop the image.
I use the edge (left, right, top, or bottom) handles to crop. The corner handles never crop quite the way I want them to.
Rotating an image
You have two handy ways to rotate an image, neither of which involves turning the computer’s monitor or craning your neck to the point of chiropractic necessity.
To freely rotate an image, use the mouse to grab the rotation handle at the top of the image. (Refer to Figure 22-1.) Drag the mouse to orient the image to any angle.
![]() For more precise rotation, click the Picture Tools Format tab and in the Arrange group use the Rotate command button. From its menu, you can choose to rotate the image 90 degrees to the left or right or to flip the image horizontally or vertically.
For more precise rotation, click the Picture Tools Format tab and in the Arrange group use the Rotate command button. From its menu, you can choose to rotate the image 90 degrees to the left or right or to flip the image horizontally or vertically.
Changing an image’s appearance
To manipulate an image, click the Picture Tools Format tab, and use the tools in the Adjust group. Specifically, use the tools Corrections, Color, and Artistic Effects. As a bonus, each tool’s button shows a menu full of options previewing how the image will be affected. To make the change, simply choose an option from the appropriate button’s menu. Here are some suggestions:
· Brightness and contrast settings are made from the Corrections button menu.
· To wash out a picture you placed behind your text, click the Color button and choose the Washout color from the Recolor area.
· To convert a color image to monochrome (black and white), click the Color button and choose the first item in the menu, Saturation 0%.
· A slew of interesting, artistic brushstrokes and other effects are found on the aptly named Artistic Effects button menu.
Image Arrangement
Word’s image arrangement commands help you manage multiple images on a page. Using these commands, you can group similar shapes or an image and its caption. You can also line up shapes to keep them even, or place one image in front of or behind another.
· To arrange images, click a graphic to summon the Picture Tools or Drawing Tools Format tab. For either tab, the tools you need are located in the Arrange group.
· To select multiple images, press and hold down the Shift key as you click each one.
Moving an image hither and thither
 To relocate an image to a better spot, point the mouse at the image. The mouse pointer changes to a four-way arrow, similar to what’s shown in the margin. Now you can drag the image nigh and yon.
· Point the mouse at the center of the image to drag. If you accidentally point at one of the image’s handles, you resize the image.
· How the graphic sits with your text (covered elsewhere in this chapter) determines where and how you can move it. When an image floats behind your text, you may need to open up a spot so that you can grab the image. To do so, position the mouse pointer by or on the same line as the image, and then whack the Enter key a few times. After moving the image, delete the extra blank paragraphs you created when you pressed the Enter key.
Aligning graphics
Image alignment is necessary to keep two or more graphical objects looking neat and tidy on the page. Especially when the images use a floating or wrapped layout, you want to ensure that they line up by the top edges, side-to-side, or centered.
To align graphics, follow these steps:
1. Click the first image to select it.
2. Hold down the Shift key and click the rest of the images.
3. ![]() On the Picture Tools Format tab, in the Arrange group, click the Align Object button.
On the Picture Tools Format tab, in the Arrange group, click the Align Object button.
The button is shown in the margin. Click that button to display a menu of alignment choices.
4. Choose an alignment command.
For example, choose Align Top to ensure that the top edge of both pictures will be aligned on the page.
If you’d rather eyeball the arrangement, activate Grid: Click the Align Object button, and choose View Gridlines from the menu. Instantly, the page looks like it’s a sheet of graph paper. Use the grid to help you position multiple images. Choose the View Gridlines command again to hide the grid.
The Distribute commands on the Align Object menu help you organize multiple images evenly across a page. For example, if you have three images left-to-right and want to space them evenly, first align the images by choosing Align Middle. Then choose Distribute Horizontally to evenly space the images.
Shuffling images front or back
Graphics are plunked down on a page one atop the other. This arrangement is difficult to notice unless two images overlap, as shown in Figure 22-3. To change the order, and shuffle images in front of or behind each other, click the Picture Tools Format tab, and in the Arrange group, use the Bring Forward or Send Backward commands.
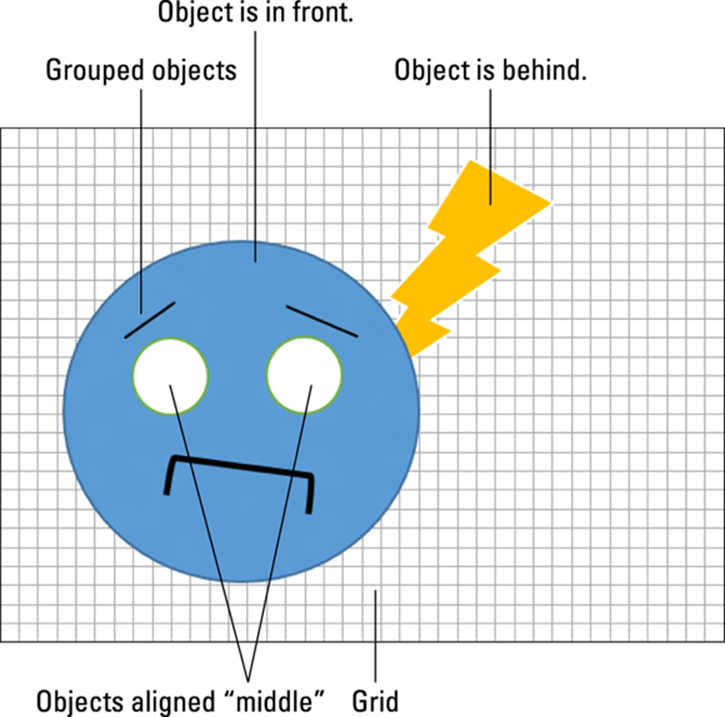
Figure 22-3: Working with multiple images.
To move one image in front of another, first click that image. Choose Bring Forward ⇒ Bring Forward to shuffle that image forward one position. To bring the image in front of all other images, choose Bring Forward ⇒ Bring to Front.
Likewise, use the Send Backward ⇒ Send Backward or Send Backward ⇒ Send to Back commands to shuffle an image to the background.
Grouping images
When you cobble together a complex image using smaller shapes, or when you arrange an image and its caption, use the Group command to keep those items together. That way, you can move them as a single unit, copy and paste them, and apply image effects to the entire group.
![]() To group two or more graphical objects in your document, select the images. Click the Picture Tools Format tab, and in the Arrange Group, click the Group button and choose the Group command. The images are then treated as a unit, such as the face shown in Figure 22-3, which is a collection of individual shapes.
To group two or more graphical objects in your document, select the images. Click the Picture Tools Format tab, and in the Arrange Group, click the Group button and choose the Group command. The images are then treated as a unit, such as the face shown in Figure 22-3, which is a collection of individual shapes.
To ungroup, click the grouped images and then choose the Ungroup command from the Group menu.
All materials on the site are licensed Creative Commons Attribution-Sharealike 3.0 Unported CC BY-SA 3.0 & GNU Free Documentation License (GFDL)
If you are the copyright holder of any material contained on our site and intend to remove it, please contact our site administrator for approval.
© 2016-2026 All site design rights belong to S.Y.A.