Word 2016 For Dummies (2016)
Part V
The Rest of Word
Chapter 27
Mail Merge Mania
In This Chapter
![]() Understanding mail merge
Understanding mail merge
![]() Building the main document
Building the main document
![]() Conjuring up a recipient list
Conjuring up a recipient list
![]() Making a recipient list
Making a recipient list
![]() Inserting fields into the main document
Inserting fields into the main document
![]() Previewing the results
Previewing the results
![]() Merging (the final act)
Merging (the final act)
Here’s a little quiz: What do these things have in common? Rocket science. Quantum mechanics. Brain surgery. Levitation. The answer: They’re all a lot easier to accomplish than attempting mail merge in Word.
I’m not saying that mastering mail merge is impossible. True, it’s an ancient word-processing tradition — something that just about everyone toys with at one time or another. Yet the way Word handles mail merge has been consistently frustrating. That’s why I wrote this chapter.
About Mail Merge
The term mail merge is given to the process of opening a single document, stirring in a list of names and other information, and then combining (merging) everything. The result is a sheaf of personalized documents. Sounds useful, right? Peruse this section before attempting the process on your own.
Understanding Word’s mail merge jargon
Although you may have your own delightful, descriptive terms for the steps required and pieces necessary to complete a mail merge, Word's terms are different. Before taking the mail merge plunge, I recommend that you review the terms Word uses:
Main document: This document is just like any other document in Word, complete with formatting, layout, and all the fancy stuff that goes into a document. The document also contains various fill-in-the-blank items, which is what makes it the main document.
Recipient list: This list contains the information that creates the customized documents. It’s a type of database, with rows and columns of information used to fill in the form letters.
Field: Each of these fill-in-the-blanks items inside the main document is a placeholder that will be filled in by information from the recipient list. Fields are what make the mail merge possible.
Getting these three elements to work together is the essence of mail merge. All the commands necessary are located on the Mailings tab. In fact, the command groups are organized left-to-right in the order you use them. The remainder of this chapter describes the details.
Mail merge document types
In addition to a form letter, the main document in a mail merge can be an email message, an envelope, a set of labels, or anything else that can be mass-produced. Here are the official Word mail merge document types:
Letter: The traditional mail merge document is a letter, a document in Word.
Email messages: Word can produce customized email messages, which are sent electronically rather than printed.
Envelopes: You can use mail merge to create a batch of customized envelopes, each printed with its own address.
Labels: Word lets you print sheets of labels, each of which is customized with specific information from the mail merge. See Chapter 28 for specifics.
Directory: A directory is a list of information, such as a catalog or an address book.
·  The key to mail merging is the recipient list. If you plan to create a mail merge as part of your regular routine, build a recipient list that you can use again and again.
· A mail merge document can have as many fields as it needs. In fact, any item you want to change can be a field: the greeting, a banal pleasantry, gossip, whatever.
· Fields are also known as merge fields.
·  You can use information from the Outlook program, also a part of Microsoft Office, as a recipient list for a mail merge in Word. This trick works best, however, when you’re in a computer environment that features Microsoft Exchange Server. Otherwise, making Outlook and Word cooperate can be a frustrating endeavor.
Reviewing the mail merge process
The typical mail merge involves five steps. These steps are presented in more detail throughout this chapter:
I. Build the main document.
Choose the document type, usually a letter, although other document types are listed in the nearby sidebar, “Mail merge document types.” As you create the document, you decide which fields are needed. That way, you can build a recipient list.
II. Create the recipient list — the data for the mail merge.
The recipient list is a table, consisting of rows and columns. Each column is a field, a fill-in-the-blanks part of the document. Each row is like a record in a database, representing a person who receives his own, custom copy of the document.
III. Insert fields into the main document.
The fields are placeholders for information that is eventually supplied from the recipient list.
IV. Preview the merge results.
You don’t just merge; first you must preview how the documents will look. That way, you can clean up any formatting, check for errors, and do other corrections.
V. Merge the information from the recipient list into the main document.
VI. The final mail merge process creates the customized documents. They can then be saved, printed, emailed, or dealt with however you like.
The rest of this chapter covers the specifics.
Using the Mail Merge Wizard
If all this mail merge malarkey is just too intense for you, consider an alternative: Word offers the Mail Merge Wizard, which guides you through the entire ordeal one step at a time.
To run the wizard, click the Mailings tab, and choose Start Mail Merge ⇒ Step-by-Step Mail Merge Wizard. You see the Mail Merge pane on the right side of the document’s window. Answer the questions, choose options, and click the Next link to proceed.
The rest of this chapter assumes that you’re crazy enough to do mail merge the macho way.
I. The Main Document
Mail merge begins with a document, or what I call the main document. It’s the prototype for all the individualized documents you eventually create, so it contains only common elements.
The following sections discuss different types of main documents. Read the section that relates to the type of mail merge you’re attempting, and then proceed with the section, “II. The Recipient List.”
Creating a mail merge form letter
The most common thing to mail merge is the standard, annoying form letter. Here’s how you start that journey:
1. Start a new, blank document.
Press Ctrl+N.
2. Click the Mailings tab.
3. In the Start Mail Merge group, choose Start Mail Merge ⇒ Letters.
4. Type the letter.
You’re typing only the common parts of the letter, the text that doesn’t change for each copy you print.
5. Type the fields you need in ALL CAPS.
This step is my idea, not Word’s. For text that changes for each letter, type in ALL CAPS. For example, FIRST NAME or HAT SIZE. Use short, descriptive terms. Figure 27-1 shows an example.
6. Save the main document.
If you already saved the document as you were writing it, give yourself a cookie.
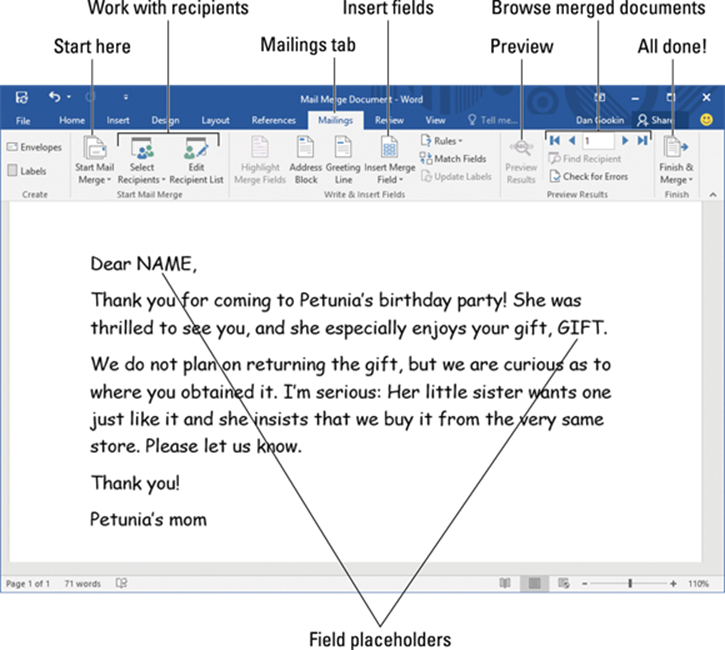
Figure 27-1: A mail-merge main document.
After you create your letter, the next step is to create or use a recipient list. Continue with the section “II. The Recipient List,” a little later in this chapter.
Creating mail merge email messages
Word lets you spew out custom email messages by using the E-Mail option for mail merge. This option works only when you configure the Microsoft Outlook program on your computer. After that’s done, you start the main document for your email merge by obeying these steps:
1. Press Ctrl+N to create a fresh document.
2. On the Mailings tab, choose Start Mail Merge ⇒ E-Mail Messages.
Word changes to Web Layout view, used for creating Internet documents in Word.
3. Create your mail message.
4. If you anticipate inserting fields in the message, type them in ALL CAPS.
Normally, an email mail merge doesn’t have fields in the document. Instead, email addresses are used to send out multiple copies of the message. Even so, you can insert fields just as you would for a form letter. See Step 5 in the preceding section for details.
5. Save your document.
The primary field you use when merging an email document is the recipient’s email address. You can’t email-merge without it. Continue your mail merge adventure in the later section, “II. The Recipient List.”
Creating mail merge envelopes
To create a stack of mail merge envelopes, which is far classier than using peel-and-stick mailing labels, abide by these steps:
1. Start a new document.
2. On the Mailings tab, choose Start Mail Merge ⇒ Envelopes.
The Envelope Options dialog box appears. You can set the envelope size and font options, if necessary.
3. Click OK.
Word’s window changes to reflect a typical envelope, a size specified in the Envelope Options dialog box (Step 2).
4. Type the return address.
Normally, an envelope mail merge doesn’t use different return addresses for each envelope. So type the return address where the insertion pointer is blinking in the upper-left corner of the envelope.
 Press Shift+Enter to place a soft return at the end of a line in the return address. The soft return keeps the lines in the return address tightly together.
5. Save the envelope.
That’s pretty much it for a mail merge envelope. Word has placed a text box at the center, lower portion of the envelope. That’s where fields for the recipient’s name are inserted. You could type text in that box, but it’s not really necessary.
Your next task is to use the recipient list to gather the information for your mailing. Keep reading in the next section.
II. The Recipient List
To make mail merge work, you need a list of items to merge, rows and columns as in a database. This information, called the recipient list, contains the items used to create the individual documents, email messages, envelopes, and so on.
Your options including building a new, custom recipient list, as covered in the next section. Once created, you can use a recipient list again. You can also pull in information from the Outlook program.
Building a new recipient list
Unless you already have recipient lists built and saved, you need to make one from scratch. This process involves setting up the list by adding fields you want and discarding fields you don’t need. Once that chore is over, you fill in the data.
Because creating the recipient list can be involved, I’ve divided the task into four subsections.
Create the new recipient list
Before you can create a new recipient list, you must have created and saved the main document. Specific steps are provided in the earlier section, “I. The Main Document.” Creating the recipient list works the same no matter which mail merge document type you created.
1. Click the Mailings tab.
2. In the Start Mail Merge group, choose Select Recipients ⇒ Type a New List.
You see the New Address List dialog box.
Add any new fields you need
The New Address List dialog box comes pre-stocked with fields. If you can use some, great! Otherwise, you must add fields not already present.
Follow these steps in the New Address List dialog box:
1. Click the Add button.
The teeny Add Field dialog box pops into view.
2. Type the field name and click the OK button.
Follow these rules for naming fields:
· Name the field to reflect the kind of information in it; for example, Snake Bite Location.
· No two fields can have the same name.
· Field names can contain spaces but cannot start with a space.
· Field names can be quite long, though shorter is best.
· The following characters are forbidden in a field name: . ! ` [ ].
3. Repeat Steps 1 and 2 for each new field you need in the main document.
The list of fields should match with the list of ALL CAPS text in the main document (if you chose to create them). Don’t worry if it doesn’t — you can add fields later, though it takes more time.
4. Click OK.
You now see customized fields as column headings in the New Address List dialog box.
Remove any fields you don’t need
Removing unnecessary fields is optional, but I include it out of spite: The New Address List dialog box comes with a basic assortment of fields. If you don’t need them, remove them. Or you can skip ahead to the next subsection, “Add recipient data.”
To remove extra fields from the New Address list dialog box, heed these steps:
1. Click the Customize Columns button.
The Customize Address List dialog box appears, displaying fields that Word assumes you need. Such foolishness cannot be tolerated.
2. Click to select a field that you do not need.
When you’re merging an email message, you need the Email_Address field, whether it appears in the message body or not Word uses this field so that it knows where to send the message. Don’t delete the field!
3. Click the Delete button.
4. Click Yes in the confirmation dialog box.
The keyboard shortcut for the Yes button is the Y key.
5. Repeat Steps 2 through 4 for each field you don’t need.
Be careful not to remove any fields you added!
When you’re done, the New Address List dialog box should contain only those fields you need.
Rather than delete all fields, you can rename some fields to match what you need: Select a field and click the Rename button. For example, I renamed First Name to First; Last Name to Last; and so on.
Add recipient data
After customizing the fields, your final job is to fill in the recipient list. You need to input records, one for each document you plan to create:
1. Type the first record’s data.
Type the information that’s appropriate to each field shown in the New Address List dialog box: name, title, evil nickname, planet of origin, and so on.
2. Press Tab to enter the next field.
After filling in the last field, you’ll probably want to add another record:
3. To add a new record, press the Tab key after typing in the last field.
When you press the Tab key in the last field in a record, a new record is automatically created and added on the next line. Keep filling in data!
4. Review your work when you're done.
Figure 27-2 shows a completed recipient list.
You can edit any field in any record by selecting it
If you accidentally add a blank record at the end of the list, click to select it and then click the Delete Entry button. You do this because blank records are still processed in a mail merge, which can result in wasted paper.
5. Click OK.
The Save Address List dialog box pops up, allowing you to save the recipient list.
The recipient lists dwell in the folder named My Data Sources, found in the Documents or My Documents folder. Word automatically chooses (or creates) this folder.
6. Type a name for the address list.
Descriptive names are best. After all, you might use the same recipient list again.
7. Click the Save button.
You return to the document.
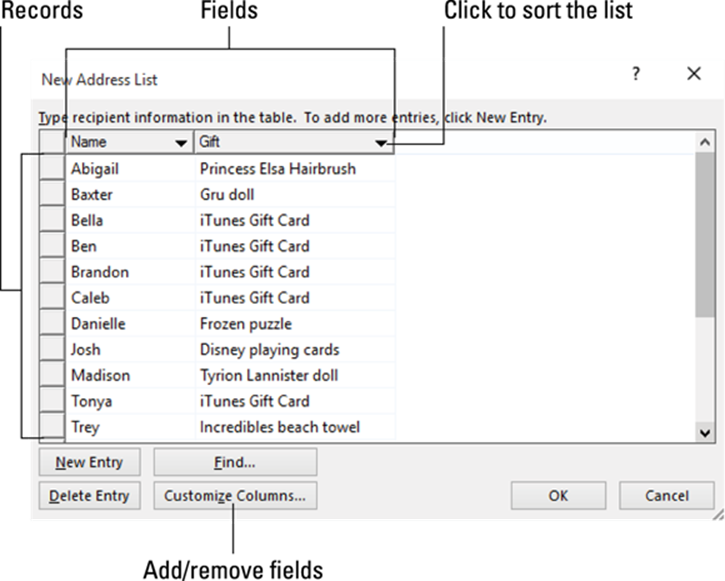
Figure 27-2: Making a recipient list.
The next step in your mail merge agony is to stir the fields from the recipient list into the main document. Refer to the section “III. Fold in the Fields,” later in this chapter.
 Making a recipient list document
Here’s a secret: You can create a document in Word and use it as a data source for a mail merge. The document contains a single element: a table. The table must have a header row, formatted in bold text, which identifies all the fields. Every row after that becomes a record in the recipient list database.
Using a table as a recipient list provides an easy way to import information into Word and use it for a mail merge. For example, you can copy information from the Internet or a PDF file and then paste that information into Word. Edit the information into a typical Word table, add a table heading row, and save the thing — and then you have a recipient list.
Follow the steps outlined in the nearby section, “Using an already created recipient list,” to use the table document as your recipient list. Also see Chapter 19 for more information on tables in Word.
Using an already created recipient list
To use an existing recipient list for your mail merge, follow these steps after creating the main document:
1. From the Mailings tab, choose Select Recipients ⇒ Use an Existing List.
The Select Data Source dialog box appears. It works like the Open dialog box, though it’s designed to display recipient lists that Word can use or that you previously created and saved.
Look for recipient lists in the My Documents folder, My Data Sources subfolder.
2. Choose an existing recipient list from the displayed files.
I hope you used a descriptive name when you first saved the recipient list, which I recommend in the preceding section.
3. Click the Open button.
That’s it: The recipient list is now associated with the main document.
Refer to the later section, “III. Fold in the Fields,” for information on inserting fields into your document, which is the next step in the mail merge nightmare.
 You can tell when a recipient list is associated with the main document because the Insert Merge Field button is available. Look on the Mailings tab in the Write & Insert Fields group for that button.
Grabbing a recipient list from Outlook
Assuming that you use Microsoft Outlook, and further that you have access to Exchange Server, you can follow these steps to create a recipient list:
1. On the Mailings tab, in the Start Mail Merge group, choose Select Recipients ⇒ Choose from Outlook Contacts.
2. If necessary, select your profile from the Choose Profile dialog box.
3. Click OK.
4. In the Select Contacts dialog box, choose a contact folder.
Contact folders are created in Outlook, not in Word.
5. Click OK.
6. Use the Mail Merge Recipients dialog box to filter the recipient list.
If the list isn’t too long, remove the check marks by the names of the individuals you don’t want in the list. You can also click the Filter link in the dialog box to do more advanced filtering, which I’m loathe to describe right now.
7. Click OK when you’re done culling the recipient list.
The next step in the painful experience known as Word mail merge is to insert fields into the master document. Keep reading in the later section, “III. Fold in the Fields.”
Editing a recipient list
Although you can’t add or remove fields from a recipient list, you can add or remove records. To do so, follow these steps:
1. On the Mailing tab, in the Start Mail Merge group, click the Edit Recipient List button.
The button isn’t available unless you’re working on a main document and it has been associated with a recipient list.
2. Select the data source.
In the lower-left corner of the Mail Merge Recipients dialog box, click the data source filename.
3. Click the Edit button.
You can now use the Data Form dialog box to edit each record in the recipient list or to add or remove fields and perform other chaos:
· Click the Delete button to remove the current record.
· Click the Add New button to create a new record.
4. Click the Close button when you’re done editing.
5. Click the OK button to dismiss the Mail Merge Recipients dialog box.
If you need to add fields, you must edit the recipient list directly. The files are saved in the Microsoft Access file format, so if you don’t have Access or software that can read that format, you’re out of luck — unless you created your own recipients list as a table in Word document. In that case, you can edit the fields by adding new columns to the table.
III. Fold in the Fields
To make a mail merge work, the main document must be peppered with fields. The fields are placeholders, into which data from the recipient list is pulled and placed. Before this process takes place, ensure that you’ve created the main document and assigned a recipient list, as described earlier in this chapter.
If you’ve followed my advice in the section, “I. The Main Document,” you can easily add fields by replacing the ALL CAPS text with the proper fields. Here’s how it works:
1. Position the mouse pointer where you want the field to appear in the main document.
If you followed my advice from the earlier section, “Creating a mail merge form letter,” select a placeholder, such as FIRST NAME.
2. On the Mailings tab, click the Insert Merge Field button.
3. Choose the field to add to the main document.
For example, choose the First Name field to stick it into the document.
After the field is inserted, you see its name hugged by angle brackets, such as <<First Name>>.
4. Repeat Steps 1 through 3 to add fields to the document.
When adding fields to an address, press Shift+Enter to end each line.
5. Save the main document.
Always save! Save! Save! Save!
The next step in your journey is to preview the results and fix any mistakes. Keep reading and continue with the next section.
· When the Insert Merge Field button isn’t available, a recipient list isn’t associated with the document. See the earlier section, “II. The Recipient List.”
· To delete an unwanted field, select it with the mouse and press the Delete key.
IV. Preview the Merged Documents
Rather than just plow ahead with the merge, take advantage of the buttons in the Mailing tab’s Preview Results group. That way, you can peruse the merged documents without wasting a lot of paper.
To preview, click the Mailings tab, and in the Preview Results group, click the Preview Results command button. The fields in the main document vanish! They’re replaced by information from the first record in the recipient list. What you see on the screen is how the first customized mail-merge document appears. I hope everything looks spiffy.
Use the left and right triangles in the Preview Results group to page through each document. As you page, look for these problems:
· Formatting mistakes, such as text that obviously looks pasted in or not part of the surrounding text
· Punctuation errors and missing commas or periods
· Missing spaces between or around fields
· Double fields or unwanted fields, which happen when you believe that you’ve deleted a field but haven't
· Awkward text layouts, strange line breaks, or margins caused by missing or long fields
To fix any boo-boos, leave Preview mode: Click the Preview Results button again. Edit the main document to correct any mistakes. Then repeat the preview process.
Once everything looks up to part, you’re ready to perform the merge, covered in the next section.
V. Mail Merge Ho!
The final step in the mail merge nightmare is to create personalized documents. The gizmo that handles this task is the Finish & Merge command button, the sole item in the Finish group on the Mailings tab. This section describes how to use that button to complete the mail merge.
Merging to a new set of documents
When you want to save merged documents and print them, follow these steps:
1. Choose Finish & Merge ⇒ Edit Individual Documents.
The Merge to New Document dialog box appears.
2. Ensure that the All option is selected.
3. Click OK.
Word creates a new document — a huge one that contains all merged documents, one after the other. Each document copy is separated by a Next Page section break. (See Chapter 14 for more information on section breaks.)
4. Save the document.
At this point, you can print the document, close it and edit it later, or do anything else you like.
Merging to the printer
The most common destination for merged documents is the printer. Here’s how it works:
1. Choose Finish & Merge ⇒ Print Documents.
A dialog box appears, from which you can choose records to print.
2. Choose All from the Merge to Printer dialog box to print the entire document.
Or specify which records to print.
3. Click OK.
The traditional Print dialog box appears.
4. Click the OK button to print your documents.
5. Save and close the main document.
See Chapter 9 for more information on printing documents in Word.
When merging and printing envelopes, use the printer’s envelope slot or other special feeding mechanism. You may have to monitor the printer to insert the envelopes.
Merging to email
To send out multiple email messages, abide by these steps:
1. Choose Finish & Merge ⇒ Send Email Messages.
The Merge to E-mail dialog box appears.
2. Choose the e-mail address field from the To drop-down list.
Your document’s recipient list must include an email address field, whether the field is used in the document or not. If not, go back and edit the recipient list to include the address.
3. Type a message subject line.
4. Fill in any other fields in the Merge to E-mail dialog box.
5. Click OK.
It looks like nothing has happened, but the messages have been placed in the Outlook outbox.
6. Open Outlook.
After you open Outlook, the queued messages are sent, or they sit ready to be sent when you give the command. (Whether the messages are sent right away depends on how you configured Outlook.)
Yes, this trick works only with Outlook, not with any other email programs.
 Unsolicited email is considered spam. Sending spam may violate the terms of your Internet service provider’s agreement and they can terminate your account. Send mass email only to people who have cheerfully agreed to receive such things from you.