Word 2016 For Dummies (2016)
Part V
The Rest of Word
Chapter 28
Labels and Envelopes
In This Chapter
![]() Printing a sheet of identical labels
Printing a sheet of identical labels
![]() Merging an address list onto mail labels
Merging an address list onto mail labels
![]() Printing a single envelope
Printing a single envelope
Stretching the notion of what a word processor is capable of doing, Word features commands that let you print labels and envelopes. After all, a sheet of labels or an envelope is simply a different type of paper. Rather than conjure a hack to perform the task, Word offers ready-made label- and envelope-printing commands.
Labels Everywhere
Word’s label powers include printing sheets of identical labels or creating individual labels for a mass mailing. This process works because the labels are, at their core, merely cells in a table. So to create a batch of labels in Word, you use special commands to muster a specially formatted table, and then print that document on a sheet of sticky labels.
· Label printer paper can be found wherever office supplies are sold. Avery is considered the top brand. Other brands use the Avery numbering scheme to describe different types of labels (size, rows, and columns).
· Buy label paper that’s compatible with your printer. Laser printers need special laser printer labels. Some inkjet printers require special, high-quality paper to soak up the ink.
Printing sheets of identical labels
It might seem impractical to print a sheet of identical labels, yet I use such a sheet for my return address. This peel-and-stick trick comes in handy for other types of labels as well. Word deftly handles the chore. Just follow these steps:
1. Click the Mailings tab.
2. In the Create group, click the Labels button.
The Envelopes and Labels dialog box appears, with the Labels tab ready for action, as shown in Figure 28-1.
3. In the Address box, type the text you want printed on the label.
Press the Enter key at the end of each line.
You can apply some simple formatting at this stage: Ctrl+B for bold, Ctrl+I for italic, or Ctrl+U for underline, for example. If you right-click in the Address box, you can choose Font or Paragraph from the pop-up menu to further format the label.
4. Click the Full Page of the Same Label radio button.
5. To choose a new label type, click in the Label area.
Use the Label Options dialog box to choose a label vendor, such as Avery, and then the proper stock number. For example, Avery US Letter 5160 (shown in Figure 28-1) is the standard address sticky label most folks use.
6. Click the New Document button.
By placing the labels in a new document, you can further edit them, if you like.
 Save the document so that you can print the same batch of labels again.
7. Print the labels.
Ensure that the sheet of label paper is loaded into your printer, proper side up. Use the Ctrl+P command to print the labels as you do for any document. See Chapter 9 for details on printing in Word.
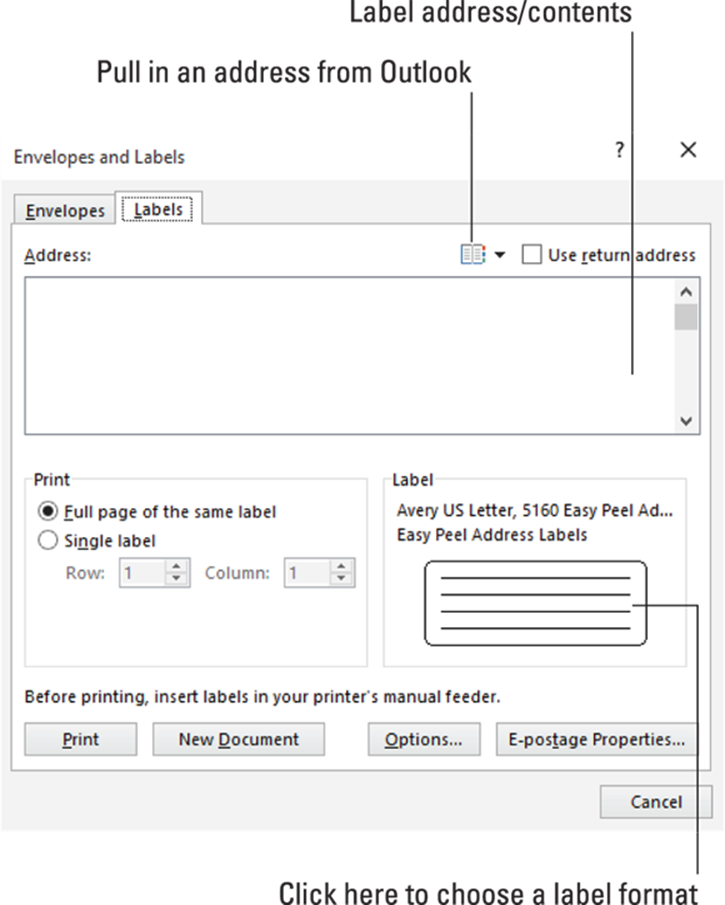
Figure 28-1: The Labels side of the Envelopes and Labels dialog box.
On my PC I have a folder full of label documents I print from time to time. For example, one document holds my return address, one is for the IRS, and another has my lawyer’s address. They all come in quite handy.
Printing an address list
To print a sheet of different labels, such as an address list, you encroach upon the terrifying territory of mail merge. That topic is covered in Chapter 27, so refer to that chapter for specific information. This section deals specifically with printing different labels.
Before getting started, you must have available a recipient list file. Refer to Chapter 27 for information on creating a recipient list. If you’re fortunate enough to use the Outlook program as your digital address book, you can use it instead.
To print a list of names on a sheet of labels, follow these steps:
1. Start a new document in Word.
2. Click the Mailings tab.
All commands and buttons mentioned in the remaining steps are found on the Mailings tab.
3. Click the Start Mail Merge button, and from the menu, choose Labels.
The Label Options dialog box appears.
4. Choose the label vendor and product number representing the sheet of labels on which you're printing.
For example, to print on a sheet of standard Avery address labels, use Avery catalog number 5160.
5. Click OK.
Word builds a table in your document, one with cells perfectly aligned to match the labels on the sheet you selected. (The gridlines may be hidden, but the table is still there.)
 Do not edit or format the table! It's perfect.
6. Click the Select Recipients button and choose Use an Existing List.
If you don’t have such a list, you must build one. Refer to Chapter 27.
7. Use the Select Data Source dialog box to choose the list.
8. Click OK.
The document is updated with all cells filled in except the first. The remaining cells feature the field titled <<Next Record>>. Your job is to create the first record, which sets the pattern for all the labels.
The mouse pointer should be blinking in the first cell. If not, click that cell.
9. Click the Insert Merge Field button.
10. Choose a field to place into the document.
For example, choose the First Name field to set the placeholder for the label’s first name.
11. Repeat Steps 9 and 10 to continue adding fields.
You can type text as well: Type a space to separate the First Name and Last Name fields. Press Shift+Enter to start a new line. Type a comma to separate the city and state.
When you’re finished adding fields, the document should look similar to what’s shown in Figure 28-2.
12. In the Write & Insert Fields group, click the Update Labels button.
Word populates the remaining cells in the table with the same fields and text placed into the first cell.
If you made a mistake, press Ctrl+Z to undo. Fix the first cell. Repeat Step 12.
13. Ensure that the proper label sheet is in the printer.
And that you have enough of them.
14. Click the Finish & Merge button and choose Print Documents.
15. Ensure that the All radio button is chosen in the Merge to Printer dialog box.
16. Click the OK button.
The traditional Print dialog box appears. Check that you have enough of the proper label paper in the printer, and that the labels are correctly oriented.
17. Click the OK button in the Print dialog box.
The address labels print.
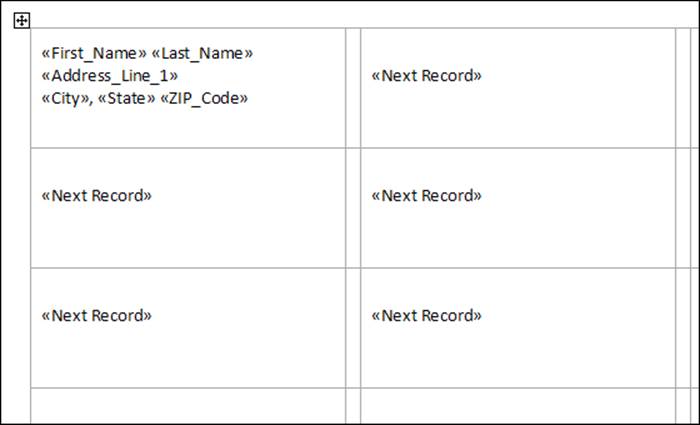
Figure 28-2: The first label dictates how other labels are formatted.
I recommend saving the document when you’re done. That way, you can more easily preform the merge again or use the same document over to print a fresh batch of labels.
Instant Envelope
Suddenly you need an envelope! Don’t revert to the last century and use your fist to scribble text on that envelope. Join the digital realm and let Word do the task for you. Obey these steps:
1. Click the Mailings tab.
2. Click the Envelopes button.
The Envelopes and Labels dialog box appears with the Envelopes tab forward, as shown in Figure 28-3.
3. Type the recipient’s address in the Delivery Address box.
Press Enter to separate the lines in the address. Word stacks each line atop the other, so don’t fret over weird line spacing on the envelope.
If you use Outlook as your computer’s address book, click the Address Book button to fetch the delivery address info.
4. Ensure that an envelope is queued and ready to print.
Most printers prompt you to manually enter envelopes. A guide on the printer’s paper feed mechanism describes how to orient and insert the envelope.
5. Click the Print button.
You might have to press the printer’s OK or Ready button to print, although some printers may instantly gobble up the envelope.
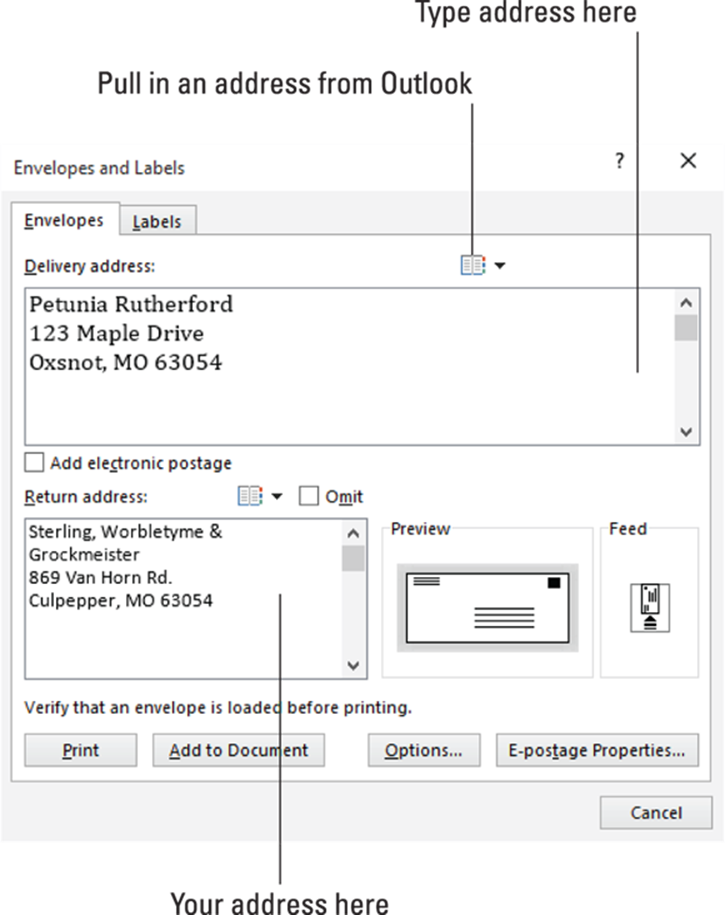
Figure 28-3: The Envelopes side of the Envelopes and Labels dialog box.
If you think you'll want to print the envelope again, save it: Before Step 5, click the Add to Document button. Word inserts a new first page into your document, which is the formatted letter. (The page size is specific to the type of envelope.) Once that’s done, you can save the document so that you can reuse the envelope.
The Add to Document button’s official purpose is to add an envelope to a letter. If you haven’t written a letter in Word, you don’t need the second (blank) page. To delete it, click on that page and press the Backspace key. The page is removed, leaving only the envelope.
· The return address is supplied by Word. If the field is blank, type your address. Word asks if you want to save the return address when the Envelopes and Letters dialog box closes. Click Yes.
· If the delivery address is already typed in your document, select it. When you summon the Envelopes and Labels dialog box, that selected text is automatically supplied as the delivery address.
· If you have trouble remembering which way the envelope feeds into your printer, draw a picture of the proper way and tape it to the top of your printer for reference.
· In the US, Size 10 is the common envelope paper size.
· To change the envelope size, click the envelope icon in the Preview area of the Envelopes and Labels dialog box. (Refer to Figure 28-3.) Use the Envelope Options dialog box to choose the proper envelope size.
·  The Envelopes button merely creates a special Word document (or a single page). The paper size is set to an envelope. A text box is placed in the center of the page, into which you type the delivery address. The return address is text typed at the start of the page. You can use various Word commands to create such a page, but the Envelopes command saves you that trouble.