Word 2016 For Dummies (2016)
Part VI
The Part of Tens
Chapter 31
Ten Cool Tricks
In This Chapter
![]() Saving automatically
Saving automatically
![]() Accessing Ribbon commands
Accessing Ribbon commands
![]() Exploring old keyboard shortcuts
Exploring old keyboard shortcuts
![]() Creating fractions
Creating fractions
![]() Setting electronic bookmarks
Setting electronic bookmarks
![]() Restricting document access
Restricting document access
![]() Creating a drop cap
Creating a drop cap
![]() Seeing the document map
Seeing the document map
![]() Sorting paragraphs
Sorting paragraphs
![]() Mapping Ctrl+F to Advanced Find
Mapping Ctrl+F to Advanced Find
When it comes down to it, just about everything Word does can be considered a cool trick. I still marvel at how word-wrap works and how you can change margins after a document is written and all the text instantly jiggles into place. Everything in this book can be considered a cool trick, but when it came down to the wire, I found ten cool tricks barely (or not) mentioned anywhere else and then listed them here.
Automatic Save with AutoRecover
Someday you will sing the praises of Word's AutoRecover feature. What it does is periodically save your document, even when you neglect to do so. That way, in the event of a computer crash, Word recovers your document from a safety copy that it has secretly made for you. That's very kind of Word, don’t you think?
Ensure that AutoRecover is active. Heed these directions:
1. Click the File tab.
2. On the File screen, choose Options.
The Word Options dialog box appears.
3. Choose Save.
4. On the right side of the dialog box, ensure that a check mark appears by the item Save AutoRecover Information Every 10 Minutes.
You can change the time, although 10 minutes seems good.
5. Click OK to close the window.
Whew! You're safe.
Most of the time, you never notice AutoRecover. On that rare, frightening occasion when the computer crashes, go ahead and start Word. If any unsaved documents can be recovered, you’ll see them listed in the Document Recovery pane. To recover a document, point the mouse pointer at its name. Use the menu button that appears to open and recover the document.
 The best way to avoid accidentally losing your stuff is to save now and save often!
Accelerate the Ribbon
Word has always been a mouse-based program, even when it ran in text mode on old DOS PCs. Still, the keyboard remains a fast and effective way to access commands, especially given that in a word processor you’re fingers are hovering over the keyboard most of the time.
If you’re willing to learn, eschew the mouse and instead use some keyboard accelerators to access commands on the Ribbon.
The secret is to use the Alt key: Tap Alt and you see letters in boxes appear on the Ribbon, like tiny square freckles. Within each box are one or two letters, which are the accelerator keys. Tap a letter or the two letters in sequence to “click” a specific part of the Ribbon.
For example, to change the page orientation to landscape mode, you press Alt, P, O to display the Orientation menu. Press the down-arrow key to choose Landscape. Press Enter to choose that menu item.
· If you accidentally tap the Alt key, press it again to exit accelerator mode.
· You can also press the F10 key to access the Ribbon accelerators.
Ancient Word Keyboard Shortcuts
While on the topic of keyboard shortcuts, Word once relied upon keyboard commands before the Ribbon rode into town, and even before the first “Word for Windows” version appeared decades ago. These ancient Word keyboard shortcuts used the function keys to carry out their duties, and they still work in Word today.
F4. The F4 key is the Repeat key, exactly the same as Ctrl+Y, the Repeat key.
Shift+F4. Another repeat key, but this one is the Repeat Find command. It works whether or not the Find dialog box (or Navigation pane) is visible.
Shift+F5. This key combo is the Go Back command, which returns to the spot you last edited. See Chapter 3 for details.
Shift+F8. The Shrink Selection key is the opposite of the Selection key, F8. I cover F8 in detail in Chapter 6. The Shift+F8 key is the opposite: When the entire document is selected, press Shift+F8 to select only the current paragraph. Press Shift+F8 again to select only the current sentence. Press it again to select only the current word. Press Shift+F8 one more time to unselect the word.
F12. Tap this key to quickly summon the Save As dialog box. I use this key a lot because it’s quicker than wading through the Backstage to summon the Save As dialog box.
Ctrl+F12. This key does for the Open dialog box what F12 does for the Save As dialog box. It’s not redundant to the Ctrl+O command, which conjures the Backstage. Ctrl+F12 always brings up the familiar, friendly Open dialog box.
Build Your Own Fractions
Word's AutoCorrect feature can build common fractions for you. Actually, it doesn't build them as much as it pulls them from a set of existing fraction characters. Sadly, Word has only a few of these fraction characters. When you need your own specific fraction, such as ![]() , you can create it this way:
, you can create it this way:
1. Press Ctrl+Shift+= (the equal sign).
This keyboard is the shortcut for the superscript command.
2. Type the numerator — the top part of the fraction.
For example, type 3 for ![]() .
.
3. Press Ctrl+Shift+= again to turn off superscripting.
4. Type the slash character ( / ).
5. Press Ctrl+= to turn on subscripting.
6. Type the denominator — the bottom part of the fraction.
For example, type 64 for ![]() .
.
7. Press Ctrl+= to turn off subscripting.
There’s your fraction.
Electronic Bookmarks
They sure do make those LCD monitors tough! Try as you might, you can’t dog-ear the corner of your document. When you have to find your place in a document, you can write text like WORK HERE or you can take advantage of Word’s Bookmark command.
To set a bookmark in your document, follow these steps:
1. Place the insertion pointer where you want to insert the bookmark.
2. Click the Insert tab.
3. In the Links group, click the Bookmark button.
The Bookmarks dialog box appears.
4. Type a name for the bookmark in the Bookmark dialog box.
Try to keep the bookmark name to one word, letters only.
5. Click the Add button.
The bookmark is created — but it’s invisible. You don’t see any sign of it in your document.
To visit bookmarks in a document, use the Go To command: Press Ctrl+G. You see the Find and Replace dialog box, Go To tab forward. Choose Bookmark from the Go To What list. Select the bookmark name from the list on the right side of the dialog box. Click the Go To button to visit that bookmark's location. Click the Close button to dismiss the dialog box.
Lock Your Document
When you really, really don’t want anyone messing with your document, you can lock the document. Several levels of protection are available, but you start the journey by following these steps:
1. Click the File tab.
2. Choose Info.
3. Click the Protect Document button.
Of the several choices, I recommend these options:
Mark as Final: The document is flagged as final, which means that further editing is disabled. Still, you can easily override it by clicking the Edit Anyway button that appears.
Encrypt with Password: The document is encrypted and a password is applied. To open the document in Word, you must enter the password. You cannot remove a password after it’s applied.
Restrict Editing: You can limit whether a user can edit a document or whether all changes are tracked or restrict that person to make only comments.
4. Choose an option and answer the questions in the dialog boxes that appear.
5. Click OK.
The document protection you’ve chosen is applied.
 Locking your document is a serious decision! I cannot help, nor can anyone else, if you forget a password or are otherwise unable to remove the restrictions you’ve applied to your document.
The Drop Cap
A drop cap is the first letter of a report, an article, a chapter, or a story that appears in a larger and more interesting font than the other characters. Figure 31-1 shows an example.
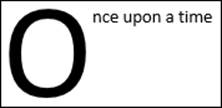
Figure 31-1: A drop cap.
To add a drop cap to your document, follow these steps:
1. Select the first character of the first word at the start of your text.
For example, select the O in Once upon a time, as shown in Figure 31-1.
2. Click the Insert tab.
3. In the Text group, click the Drop Cap button.
4. Choose a drop cap style.
And there’s your drop cap.
It helps if the drop cap’s paragraph is left justified and not indented with a tab or any of the tricky formatting operations discussed in Part III.
 You can undo a drop cap by repeating the steps in this section, but choose None in Step 4.
Map Your Document
The Navigation pane can not only find text in your document but also help you see the big picture. Follow these steps:
1. Click the View tab.
2. In the Show group, click to put a check mark by the Navigation Pane item.
You see a document summary listed by heading style, as shown in Figure 31-2.
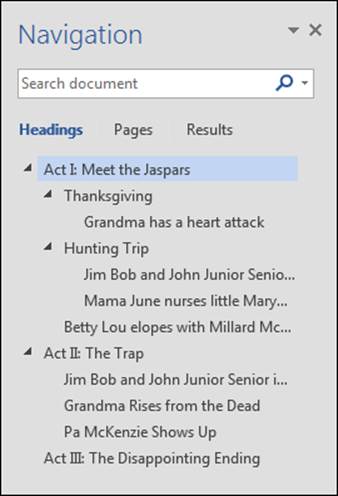
Figure 31-2: The Navigation pane document map.
Click a heading inside the map to instantly jump to that part of your document.
To close the Navigation pane, click its X close button.
 The Navigation pane replaces a popular but now gone Word feature called the Document Map.
Sort Your Text
Sorting is one of Word’s better tricks, although it’s surprising how few people know about it. You can use the Sort command to arrange text alphabetically or numerically. You can sort paragraphs, table rows and columns, and more.
Save your document before sorting. It's just a good idea.
Sorting isn’t difficult. First, arrange whatever needs to be sorted into several rows of text, such as:
Lemon
Banana cream
Apple
Cherry
Rhubarb
Tortilla
After you know what you’re going to sort, follow these steps:
1. Select the lines of text (or parts of a table) as a block.
2. Click the Home tab.
3.  In the Paragraph group, click the Sort button.
The Sort Text dialog box appears. It’s most useful when sorting multicolumn items, which is where the Then By parts of the dialog box are most useful.
4. Choose Ascending or Descending to sort your text A-to-Z or Z-to-A, respectively.
5. Click the OK button.
As if by magic, the selected text is sorted.
Map Ctrl+F to the Advanced Find Command
If you’re like me, and you demand that the Ctrl+F keyboard shortcut bring up the traditional Find and Replace dialog box and not that silly Navigation pane, you can correct Word’s heinous mistake. Follow these steps to reassign the Ctrl+F keyboard shortcut:
1. Click the File tab.
2. Choose Options to bring up the Word Options dialog box.
3. Choose the Customize Ribbon item.
The Customize Ribbon item is found on the left side of the dialog box.
4. Click the Customize button, found at the bottom of the dialog box.
The Customize Keyboard dialog box appears.
5. From the list of Categories, choose Home Tab.
6. From the list of Commands, choose EditFind.
7. Click the mouse in the Press New Shortcut Key text box.
8. Press the Ctrl+F key combination on the computer’s keyboard.
You may notice that Ctr+F is already assigned to the NavPaneSearch command. That assignment is about to change.
9. Click the Assign button.
10. Click OK.
Go ahead: Press Ctrl+F. You see the Find and Replace dialog box with the Find tab upfront. Congratulations!
The Navigation pane can still be accessed as described earlier in the section, “Map Your Document.”