Word 2016 For Dummies (2016)
Part II
Your Basic Word
Chapter 7
Spell It Write
In This Chapter
![]() Dealing with typos and spelling errors
Dealing with typos and spelling errors
![]() Adding or ignoring unknown words
Adding or ignoring unknown words
![]() Correcting words automatically
Correcting words automatically
![]() Checking AutoCorrect settings
Checking AutoCorrect settings
![]() Fixing grammatical boo-boos
Fixing grammatical boo-boos
![]() Reviewing your document
Reviewing your document
![]() Customizing proofing options
Customizing proofing options
Spell checking is a feature forced upon Word, and I know who to blame. Historically, the notion of proper English spelling wasn’t considered a necessity. That was, until Noah Webster developed the dictionary. Thanks, pal.
Actually, I’m doing Webster a disservice. He fixed a lot of English spelling that would truly drive you batty. So he’s not to blame. Regardless, Word offers kind and subtle spell and grammar checking. Use it or suffer the consekwensis.
Check Your Spelling
Word’s spell-check feature works the second you start typing. Offending or unknown words are immediately underlined with the red zigzag of shame. Leave the word be, correct it, or add it to your own dictionary just to spite Mr. Webster.
· Spell checking works thanks to a digital dictionary stocked with zillions of words, all spelled correctly. Every time you type a word, it’s checked against that dictionary. When the word isn’t found, it’s marked as suspect in your document.
·  Don’t let the red zigzag of a failed elementary education perturb you. My advice is to keep typing. Focus on getting your thoughts on the page. Go back later to fix the inevitable typos.
· The spell-check feature also flags repeated words by underlining them with a red zigzag. Your choice is to either delete the repeated word or just ignore it.
· Word doesn’t spell-check certain types of words, such as words with numbers in them or words written in all capitals, which are usually abbreviations.
· To disable automatic spell checking, see the section, “Spell-check and grammar settings.”
· An alternative to on-the-fly spell checking is to perform a manual spell check. See the section, “All-at-Once Document Proofing.”
Fixing a misspelled word
Don’t let that red zigzag of shame vex you any longer! Follow these steps:
1. Right-click the misspelled word.
Up pops a shortcut menu, as shown in Figure 7-1.
2. Choose from the list the word you intended to type.
In Figure 7-1, the word laugh fits the bill. Click that word and it replaces the spurious word.
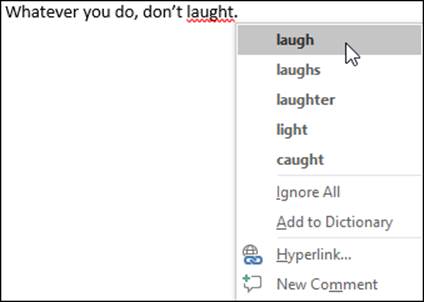
Figure 7-1: Deal with that typo.
If the word you intended to type isn’t on the list, don’t fret: Just take another stab at spelling the word phonetically and then correct it again. Or, what the hey: Use a traditional dictionary (the paper kind).
 Yew right grate
Word’s document-proofing tools are as technologically advanced as the programmers at Microsoft can make them. As the title of this sidebar suggests, however, there’s something to be said about context.
Just because your document appears to contain no errors doesn't mean that everything is perfect. You have no better way to proof a document than to read it with human eyes.
Dealing with incorrectly flagged words
Occasionally, Word's spell checker bumps into a word it doesn't recognize, such as your last name or perhaps your city. Word dutifully casts doubt on the word by underlining it with the notorious red zigzag. Yes, this is one of those cases where the computer is wrong.
To correct the incorrect spell check, right-click the word. Choose one of two options on the shortcut menu (shown earlier in Figure 7-1):
Ignore All: Select this command when the word is properly spelled and you don’t want Word to keep flagging it as misspelled in the current document.
Add to Dictionary: This command adds the word to a custom dictionary. The word is no longer flagged as misspelled in the current document or any other documents.
If the word is intentionally misspelled and you don’t want to ignore all instances or add it to the custom dictionary, just leave it be.
· See the section, “Undoing the Ignore All command,” later in this chapter, for information on reversing your decision to ignore a spelling error.
· For information on viewing or editing the custom dictionary, see the section, “Customizing the custom dictionary.”
 The 25 most frequently misspelled words
a lot
accidentally
acquire
amateur
argument
atheist
collectible
consensus
definite
embarrass
gauge
grammar
independent
kernel
liaison
maneuver
no one
occurrence
realize
receive
ridiculous
separate
supersede
their
weird
AutoCorrect in Action
Sometimes you may never see the embarrassing red zigzag. That's because Word quickly fixes hundreds of common typos and spelling errors on-the-fly. The AutoCorrect feature is responsible, and you have to be quick to see it.
For example, in Word you can’t type the word mispell (with only one s). That’s because AutoCorrect fixes that typo the split second that you press the spacebar.
AutoCorrect also converts common text shortcuts into their proper characters. For example, type (C) and AutoCorrect properly inserts the © copyright symbol. Ditto for (TM) for the trademark. Typing - -> is translated into an arrow, and even :) becomes a happy face.
Beyond spelling, AutoCorrect fixes common punctuation. It automatically capitalizes the first letter of a sentence. AutoCorrect capitalizes I when you forget to, properly capitalizes the names of days, fixes the iNVERSE cAPS lOCK pROBLEM, plus other common typos.
Undoing an AutoCorrect correction
You can reverse AutoCorrect instant changes, but only when you're quick. The secret is to press Ctrl+Z (the Undo command) immediately after AutoCorrect makes its correction. The change is gone.
Even when you’re not quick with the Undo command, you can peruse AutoCorrect changes. These are flagged by a blue rectangle that appears under the corrected text’s first letter, as shown in Figure 7-2. Position the mouse pointer at that rectangle, and click to see various AutoCorrect options, also illustrated in Figure 7-2.
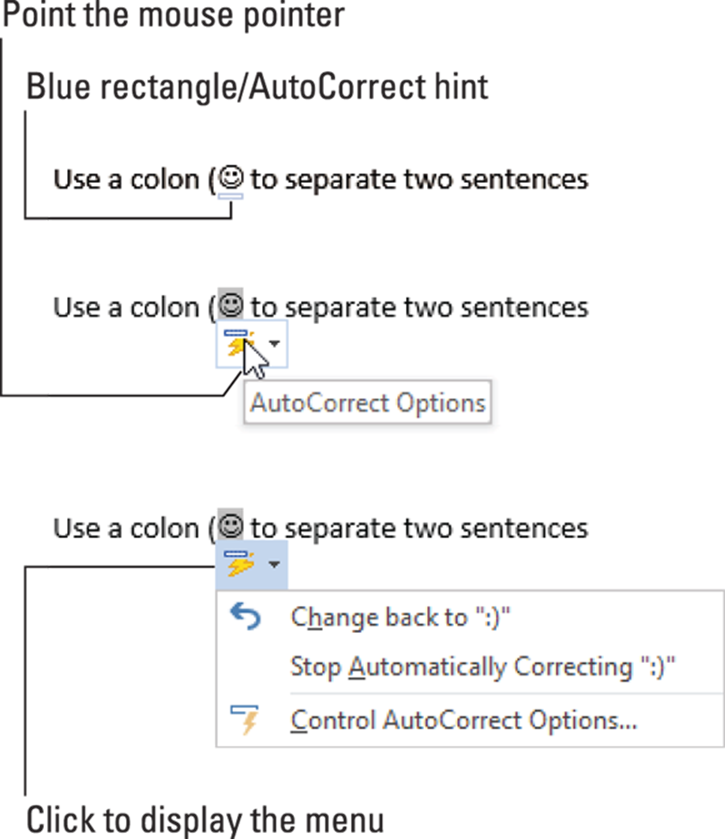
Figure 7-2: Adjusting an AutoCorrection.
To restore the text to how it was typed originally, choose the option Change Back to whatever, where whatever is the original text, such as :) shown in Figure 7-2.
To prevent AutoCorrect from ever making the change again, choose the option Stop Automatically Correcting whatever. Although the text won’t be corrected, it may still show up as a typo or a spelling error.
See the next section for information on the final option, Control AutoCorrect Options.
Adjusting AutoCorrect settings
To control how AutoCorrect behaves, as well as review — or even add — words it corrects, follow these steps:
1. Click the File tab.
2. Choose Options.
The Word Options dialog box appears.
3. Click the Proofing category on the left side of the window.
4. Click the AutoCorrect Options button.
The AutoCorrect dialog box appears, with the AutoCorrect tab forward.
The AutoCorrect tab lists all problems that AutoCorrect fixes for you, plus common typo corrections. That’s also where you can remove the AutoCorrect entries you detest:
To remove an entry in the AutoCorrect list, scroll to find that item, such as :) for the happy face. Click to select the entry, and then click the Delete button.
To add an entry, use the Replace and With text boxes. For example, to replace kludge with kluge, type kludge in the Replace box and kluge in the With box.
Click the OK button when you’re done making adjustments, and then close the Word Options dialog box.
Also see Chapter 33 for information on disabling various AutoCorrect and AutoFormat features.
Grammar Be Good
Mark Twain once referred to English spelling as “drunken.” If that’s true, English grammar must be a hallucination. To help you to detox, Word offers on-the-fly grammar checking. It’s just like having your eighth-grade English teacher inside your computer — only it’s all the time and not just during third period.
Word’s grammar checker works like the spell checker. The main difference is that offenses are underlined with a blue zigzag, such as the one shown in Figure 7-3 (although the zigzag looks gray in this book). That’s your hint of Word’s sense of grammatical justice. Even then, the offense is most likely mild and, given the illusionary nature of English grammar, can probably be ignored.
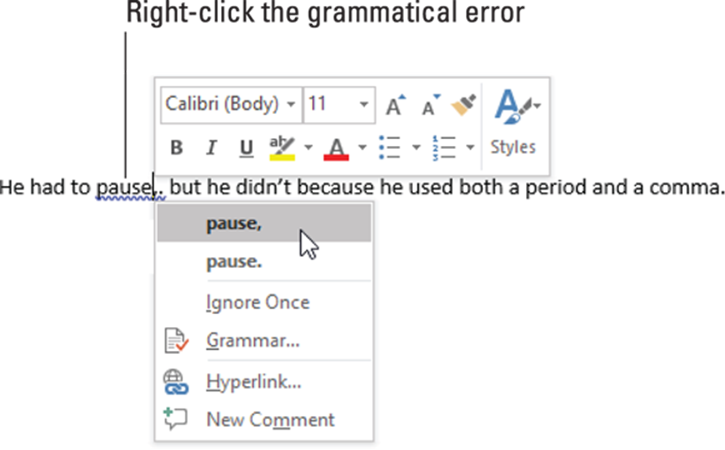
Figure 7-3: A grammatical error is flagged.
To address a grammar issue, right-click the blue-underlined text, as shown in Figure 7-3. Use the pop-up menu to discover what’s wrong or to choose an alternative suggestion. You also have the option to ignore the error, which I find myself using quite often.
· The most common source of grammatical woe in English is verb agreement, or matching the subject to the correct verb.
· The grammar checker is excellent at spotting two spaces between words when you need only one space. It’s not so good at spotting fragments.
· You may see false grammar errors when using Word’s revision-tracking feature while the No Markup setting is enabled. Reveal all the revision marks to see what’s up. Refer to Chapter 26 for details.
· You can customize or even turn off grammar checking. Refer to the sections “Disabling automatic spell check” and “Curtailing grammar checking,” later in this chapter.
All-at-Once Document Proofing
If you prefer to ignore the red zigzag underline of shame, or perhaps you’ve disabled that feature, you can resort to performing a final document proof. It’s an all-in-one spelling- and grammar-checking process, which is how spell check worked before it became an on-the-fly feature.
To perform all-at-once document proofing, follow these steps:
1. Click the Review tab.
2. In the Proofing group, click the Spelling & Grammar button.
Errors are shown one at a time as they occur in your document. You must deal with them sequentially.
3. Deal with the offense.
Depending on the offense, either the Spelling pane or Grammar pane appears. Options presented let you deal with each offense:
· Ignore: Click this button to ignore the error once. You will be reminded of the same spelling error or similar grammatical errors again.
· Ignore All: Use this button to direct Word to merrily skip the spelling error through the entire document.
· Add: Use this button to thrust the word into the custom dictionary. It won’t be flagged as incorrect ever again. Well, unless you edit the dictionary, as described elsewhere in this chapter.
· Change: For spelling boo-boos and grammatical flubs, click to select a correct option from the list presented and then click the Change button to replace the offending text.
· Change All. For spelling errors only, click the correct word and then click Change All to replace all instances of your spelling mistake.
4. Continue checking your document.
5. Click the OK button once the checking is done.
 You can easily enter a trancelike state while you’re document proofing. You might find yourself clicking the Ignore button too quickly. My advice: Use the Undo command, Ctrl+Z. It lets you go back and change text that you may not have paid attention to.
·  Another way to sequentially peruse spelling and grammar errors is to use the Spelling and Grammar Check button on the status bar (shown in the margin). To proof your document, click that button to hop from one spelling or grammar error to the next.
·  Word disables its on-the-fly proofing when your document grows larger than a certain size, say 100 pages. You’ll see a warning message when this change happens. At that point, you must perform an all-at-once document check, as described in this section.
Spell Check and Grammar Settings
Whether you adore or detest Word’s capability to ridicule your language abilities, you have the final say-so. Plenty of settings and options are available to control Word’s spelling- and grammar-checking tools.
Undoing the Ignore All command
Whoops! I’ve done it too: Clicked that Ignore All command when, in fact, Word was correct and my spelling was all wrong. Now that horribly misspelled word litters my document like the pox.
Fret not, gentle reader. You can undo the Ignore All spelling directive. Follow these steps:
1. Click the File tab.
2. Choose the Options command.
The Word Options dialog box appears.
3. Choose Proofing on the left side of the dialog box.
4. Click the Recheck Document button.
A warning dialog box appears, reminding you of what you're about to do.
5. Click the Yes button.
Everything you've told Word to ignore while proofing your document is now ignored.
6. Click the OK button to close the Word Options dialog box and return to your document.
The Ignore All command affects only the current document. If you’ve accidentally added a word to the custom dictionary, see the next section.
Customizing the custom dictionary
You build the custom dictionary by adding properly spelled words that are flagged as misspelled. You can also manually add words, remove words, or just browse the dictionary to see whether or not you’re making old Noah Webster jealous. Follow these steps:
1. Click the File tab.
2. Choose Options to display the Word Options dialog box.
3. Choose Proofing.
4. Click the Custom Dictionaries button.
The Custom Dictionaries dialog box appears.
Word 2016 uses the RoamingCustom.dic file as the custom dictionary. You may see other files in the list, especially if you’ve upgraded from older versions of Microsoft Word.
5. Select the item RoamingCustom.dic (Default).
6. Click the button labeled Edit Word List.
You see a scrolling list of words you’ve added to the custom dictionary.
To add a word to the custom dictionary, type it in the Word(s) text box. Click the Add button.
To remove a word from the custom dictionary, select the word from the scrolling list. Click the Delete button.
Click the OK button when you’re done with the custom dictionary. Then click the OK button to close the Word Options dialog box.
Disabling automatic spell check
To banish the red zigzag underline from your document, which effectively disables on-the-fly spell checking, follow these steps:
1. Click the File tab and choose Options.
The Word Options dialog box appears.
2. On the left side of the dialog box, choose Proofing.
3. Remove the check mark by the item Check Spelling as You Type.
4. Click the OK button.
If you also want to banish the blue zigzag of messed-up grammar, repeat these steps but in Step 3 remove the check mark by the item Mark Grammar Errors as You Type.
Curtailing grammar checking
I find Word’s grammar checker to be insistently incorrect. After all, English is fluid. Especially if you’re writing poetry or you just know the rules and prefer to bend them or toss them asunder, consider throttling back some of Word’s more aggressive grammar flags.
To adjust grammar settings, follow these steps:
1. Click the File tab.
2. Choose Options to display the Word Options dialog box.
3. Choose Proofing.
4. By the Writing Style item, click the Settings button.
The Grammar Settings dialog box appears.
5. Uncheck those items you no longer desire Word to mark as offensive.
The categories are pretty general, which makes deselecting a rule difficult. That’s because when Word flags a grammar error, you see a specific rule and not the general ones listed in the Grammar Settings dialog box.
6. Click the OK button to dismiss the Grammar Settings dialog box.
7. Click OK to close the Word Options dialog box.
If you prefer to disable all the rules, instead deactivate grammar checking altogether. See the preceding section.
All materials on the site are licensed Creative Commons Attribution-Sharealike 3.0 Unported CC BY-SA 3.0 & GNU Free Documentation License (GFDL)
If you are the copyright holder of any material contained on our site and intend to remove it, please contact our site administrator for approval.
© 2016-2026 All site design rights belong to S.Y.A.