Word 2016 For Dummies (2016)
Part II
Your Basic Word
Chapter 6
Blocks o’ Text
In This Chapter
![]() Understanding blocks of text
Understanding blocks of text
![]() Marking a block with the keyboard
Marking a block with the keyboard
![]() Selecting text with the mouse
Selecting text with the mouse
![]() Using the F8 key to mark text
Using the F8 key to mark text
![]() Unblocking text
Unblocking text
![]() Copying and moving blocks of text
Copying and moving blocks of text
![]() Pasting text in various ways
Pasting text in various ways
Writing is about blocks. From the moveable blocks used by the ancient Chinese for printing to the inevitable writer’s block. In Word, blocks refer to selected chunks of text in a document, which I believe you’ll find more useful than the other types of blocks.
Meet Mr. Block
“Hello, Mr. Block! How do you do?”
“Well! I’m a block of text. I have a beginning and an end. I can be any size, from a single character to the entire document.”
To create Mr. Block, you select text. You can use the keyboard. You can use the mouse. You can use both at once, or employ some of Word’s more esoteric text-selection commands.
A block of selected text appears highlighted in a document, similar to what’s shown in Figure 6-1.
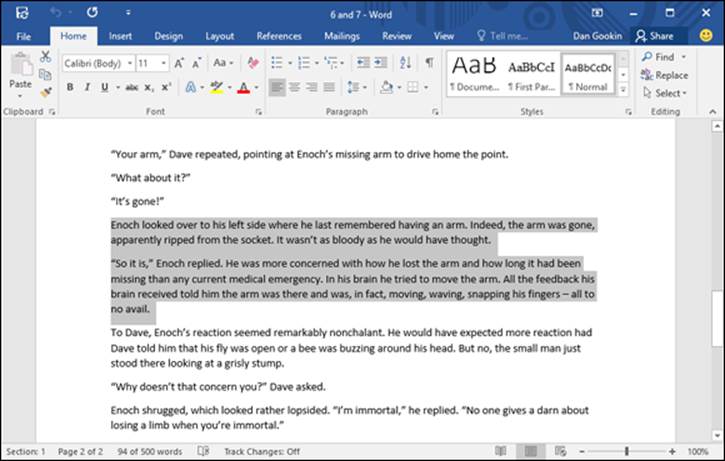
Figure 6-1: A block of text is selected.
Once a block of text is selected, you can perform certain actions that affect only the text in that block. You can also copy, move, or delete the block.
To help format a selected block of text, the mini toolbar appears, as shown in Figure 6-2.
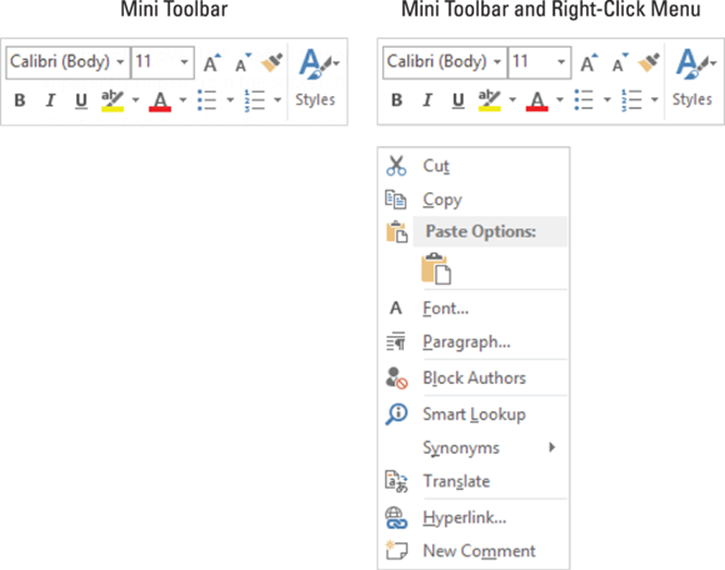
Figure 6-2: The mini toolbar and block pop-up menu.
The mini toolbar hosts popular commands found on the Ribbon, allowing you to quickly format the block of text. You can also right-click the selected text, in which case you see both the mini toolbar as well as a shortcut menu, also shown in Figure 6-2.
· A block of text in Word includes text and the text formatting.
· Graphics and other nontext elements can also be selected as a block. In fact, you can select graphics along with text in the same block.
· When the status bar is displaying a word count, the number of words selected in the block of text is displayed, next to the total number of words in the document. (Refer to Figure 6-1.)
· When the Find command locates text, the found text is selected as a block. Refer to Chapter 5 for more information on the Find command.
· The mini toolbar disappears after a few moments of neglect. Refer to Chapter 33 for information on disabling the mini toolbar.
·  Selecting text also means selecting characters such as tabs and the Enter character that marks the end of a paragraph. Word shows the Enter character as an extra blank space at the end of a paragraph. When you select that blank, you select the whole paragraph as a paragraph. To avoid selecting the Enter character, don't select the blank space at the end of a paragraph.
Mark a Block of Text
Before you can work with a block of text, you must tell Word where the block starts and where it ends. The process is known as marking a block of text or selecting text.
Using the keyboard to select text
The keyboard’s cursor keys are used to select text, but only when you know the secret: Press and hold down the Shift key as you move the cursor. When the Shift key is down, Word’s standard cursor key commands not only move the insertion pointer but also select chunks of text. Table 6-1 lists common key combinations.
Table 6-1 Keyboard Selection Wizardry
|
To Select This |
Press This |
|
A character at a time to the right of the insertion pointer |
Shift+→ |
|
A character at a time to the left of the insertion pointer |
Shift+← |
|
A block of text from the insertion pointer to the end of the line |
Shift+End |
|
A block of text from the insertion pointer to the beginning of the line |
Shift+Home |
|
A block of text from the insertion pointer to a line above |
Shift+↑ |
|
A block of text from the insertion pointer to a line below |
Shift+↓ |
 Although you can use any keyboard cursor-movement command, including some that move the insertion pointer a great distance, I recommend using this Shift key technique for selecting only small chunks of text. Otherwise, you may end up tying your fingers into knots.
· See Chapter 3 for the full list of Word’s cursor key commands.
· Either Shift key works, although I prefer to use the left Shift key and then work the arrow keys on the right side of the keyboard.
Marking a block with the mouse
Mickey may rule a kingdom, but your computer’s mouse rules over text selection in your computer.
Drag over text to select it
Position the mouse pointer at the start of the text block, and then drag the mouse over the text you want to select. As you drag, the text becomes highlighted or selected.
· This technique works best when you use the mouse to drag over only the text you can see on the screen. When you try to select text beyond what you see on the screen, you have to select and scroll, which can be unwieldy.
· Also see Chapter 33, which covers how to adjust Word so that you can use the mouse to select individual letters instead of entire words at a time.
Click the mouse to select text
A speedy way to select specific sizes of chunks of text is to match the power of the mouse with the dexterity of your index finger. Table 6-2 explains some clicking-and-selecting techniques worth noting.
Table 6-2 Mouse-Selection Arcana
|
To Select This Chunk of Text |
Click the Mouse Thusly |
|
A single word |
Double-click the word. |
|
A line |
Move the mouse pointer into the left margin beside the line you want to select. The mouse pointer changes to an arrow pointing northeastward. Click the mouse to select a line of text. Drag the mouse up or down to select several lines. |
|
A sentence |
Position the insertion pointer over the sentence and Ctrl+click. (Press the Ctrl key and click the mouse.) |
|
A paragraph |
Point the mouse somewhere in the paragraph’s midst and click thrice (triple-click). |
Select text with the old poke-and-point
Here’s the best way to select a chunk of text of any size, especially when that chunk of text is larger than what you can see on the screen at one time:
1. Click the mouse to set the insertion pointer wherever you want the block to start.
I call this location the anchor point.
2. Scroll through your document.
You must use the scroll bar or the mouse wheel to scroll through your document. If you use the cursor-movement keys, you reposition the insertion pointer, which isn’t what you want.
3. Hold down the Shift key and click the mouse where you want the block to end.
The text from the insertion pointer to wherever you clicked the mouse is selected as a block.
Using the F8 key to mark a block
 A relic from the old days, the F8 key is known as Word’s Extend Selection command. Press that key to activate this feature: Word drops anchor at the insertion pointer's location. Use either the mouse or the cursor keys to select text. In fact, you cannot do anything but select text in extend selection mode.
You exit extend selection mode by either doing something with the block of text or pressing the Esc key.
· To help you with the F8 key and extend selection mode, right-click the status bar and choose the item Selection Mode. The text Extend Selection appears on the status bar when this mode is active.
· Not only can you use the cursor keys while in extend selection mode, any of the character keys work as well; text is selected from the anchor point to the character you type. Type an N, for example, and all text between the insertion pointer and the next letter N is selected.
· You can also use the Find command to locate a specific bit of text in extend selection mode. Word marks all text between the anchor and the text that the Find command locates.
· Press the F8 key twice to select the current word.
· Press the F8 key thrice (three times) to select the current sentence.
· Press the F8 key four times to select the current paragraph as a block of text.
· Press the F8 key five times to select the entire document, from top to bottom.
· No matter how many times you press F8, be aware that it always drops anchor. So pressing F8 once or five times means that Word is still in Extend Selection mode. Do something with the block or press Esc to cancel that mode.
Blocking the whole dang-doodle document
The biggest block you can mark is an entire document. Word has a specific command to do it. Follow these steps:
1. Click the Home tab.
2. In the Editing group, choose Select ⇒ Select All.
The entire document is marked as a single block o’ text.
And now, the keyboard shortcut: Press Ctrl+A to select an entire document as a block.
Deselecting a block
When you mark a block of text and change your mind, you must unmark, or deselect, the text. Here are a few handy ways to do it:
· Move the insertion pointer. It doesn't matter how you move the insertion pointer, with the keyboard or with the mouse, but doing so deselects the block.
· Press the Esc key and then the ← key. This method works to end Extend Selection mode.
· Press Shift+F5. The Shift+F5 key combo is the “go back” command (see Chapter 3), but it also deselects a block of text and returns you to the text you were editing before making the selection.
Manipulate the Block of Text
You can block punches, block hats, block and tackle, play with building blocks and engine blocks, take nerve blocks, suffer from mental blocks, jog for blocks, and, naturally, block text. But what can you do with those marked blocks of text?
Why, plenty of things! You can apply a format to all text in the block, copy a block, move a block, search through a block, proof a block, print a block, and even delete a block. The information in this section explains a few of those tricks.
· Blocks must be selected before you can manipulate them. See the first half of this chapter.
·  When a block of text is marked, various Word commands affect only the text in that block.
· To replace a block, type some text. The new text (actually, the initial character) replaces the entire block.
· To delete a block, press the Delete or Backspace key. Thwoop! The block is gone.
· Formatting commands can be applied to any marked block of text — specifically, character and paragraph formatting. See Part III of this book.
· Also see Chapter 32 for information on Word’s bizarre yet potentially useful Collect and Paste feature.
Copying a block
After a block is marked, you can copy it to another part of your document to duplicate the text. The original block remains untouched by this operation. Follow these steps to copy a block of text from one place to another:
1. Mark the block.
Detailed instructions about doing this task are offered in the first part of this chapter.
2. Click the Home tab.
3.  In the Clipboard group, click the Copy command button.
You get no visual clue that the text has been copied; it remains selected.
4. Click to set the insertion pointer at the position where you want to place the block’s copy.
Don’t worry if there’s no room! Word inserts the block into your text.
5.  Click the Paste command button.
The block of text is inserted into your text just as though you had typed it there by yourself.
The keyboard shortcuts for copy and paste are Ctrl+C and Ctrl+V, respectively. You’ll probably use those keyboard shortcuts more than the command buttons in the Home tab’s Clipboard group.
· See the later section, "Setting the pasted text format," to find out what to do about the wee li'l clipboard icon that appears by the pasted text.
· The Paste command continues to paste the copied text, over and over — that is, until new text is selected and copied (or cut). Pasting text again simply pastes down a second copy of the block, spit-spot (as Mary Poppins would say).
· You can paste the block into another document you’re working on or even into another application. This is a Windows trick that works in any program that can accept text as input.
Moving a block
 To move a block of text, you select the text and then cut and paste. This process is almost the same as copying a block, described in the preceding section, although in Step 3 you choose the Cut tool (shown in the margin) or press Ctrl+X rather than choose the Copy tool. Otherwise, all steps are the same.
Don't be alarmed when the block of text vanishes! That's cutting in action; the block of text is being moved, not copied. You see the block of text again when you paste it.
 If you screw up, the Ctrl+Z Undo shortcut undoes a block move.
Setting the pasted text format
![]() When you paste text in Word, you see the Paste Options icon shown in the margin. It appears near the pasted block of text. Don’t let it annoy you! That button allows you to select formatting for the pasted block because occasionally the block may contain formatting that, well, looks quite ugly after it's pasted.
When you paste text in Word, you see the Paste Options icon shown in the margin. It appears near the pasted block of text. Don’t let it annoy you! That button allows you to select formatting for the pasted block because occasionally the block may contain formatting that, well, looks quite ugly after it's pasted.
To work the Paste Options button, click it with the mouse or press and release the Ctrl key on the keyboard. You see a menu of options, illustrated in Figure 6-3.
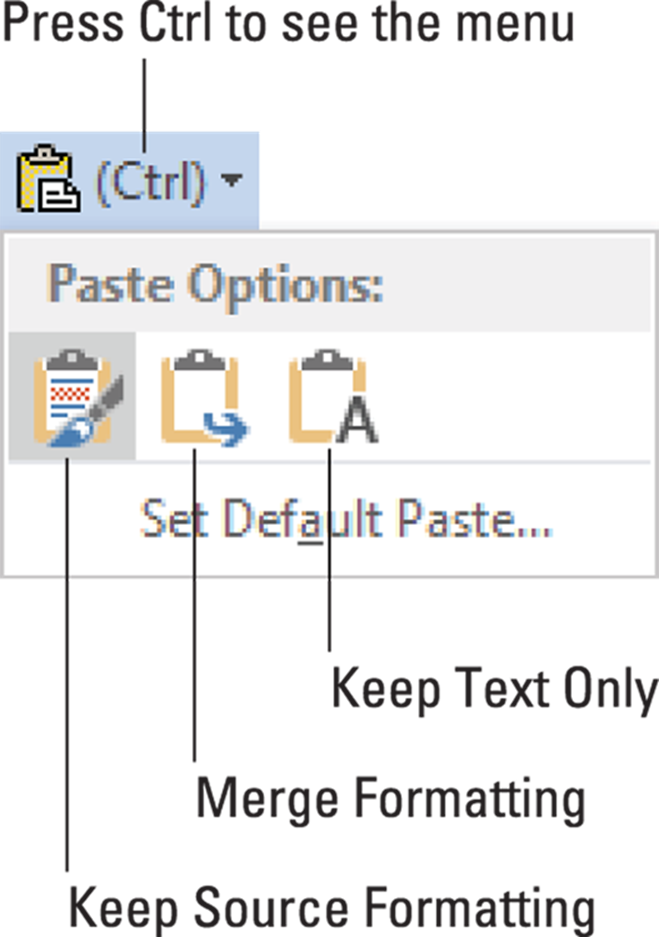
Figure 6-3: Pasting options.
Table 6-3 summarizes the available paste options.
Table 6-3 Paste Option Options
|
Icon |
Keyboard Shortcut |
Name |
Description |
|
|
K |
Keep Source Formatting |
The formatting is okay; don’t do a thing. |
|
|
M |
Merge Formatting |
Reformat the pasted block so that it matches the text it’s being pasted into. |
|
|
T |
Keep Text Only |
Just paste in the text — no formatting. |


To keep only text with a copied or cut block (no formatting), press the Ctrl key and then the T key after pasting. That’s two separate keys, not Ctrl+T.
Using the Paste Options icon is utterly optional. In fact, you can continue typing or working in Word and the icon bows out, fading away like some nebbish who boldly asked a power blonde to go out with him and she utterly failed to recognize his existence. Like that.
 Click the Set Default Paste text to direct Word to permanently deal with pasted text. It’s a handy trick, especially when you find yourself repeatedly choosing the same Paste Options format.
Copying or moving a blockwith the mouse
When you have to move a block only a short distance, you can use the mouse to drag-move or drag-copy the block.
 To move any selected block of text, hover the mouse pointer anywhere in the blocked text, and then drag the block to its new location. As you drag the block, the mouse pointer changes, as shown in the margin. That means you’re moving a block of text.
 To copy a block of text, point the mouse pointer at the block — just as if you were going to move the block — but press and hold down the Ctrl key as you drag. When you drag the block, the mouse pointer changes to resemble the icon shown in the margin. That’s your clue that the block is being copied and not just moved.
 This trick works best when you’re moving or copying a block to a location that you can see right on the screen. Otherwise, you’re scrolling your document with the mouse while you're playing with blocks, which is like trying to grab an angry snake.
· When you drag a block of text with the mouse, you’re not copying or cutting it to the Clipboard. You cannot use the Paste (Ctrl+V) command to paste in the block again.
·  To create a linked copy of the block, drag the mouse and hold down both the Shift and Ctrl keys. When you release the mouse button, the copied block plops down into your document with a dark highlight. It's your clue that the copy is linked to the original; changes in the original are reflected in the copy and vice versa. If the linked copy doesn’t update, right-click the text and choose the Update Link command.
Viewing the Clipboard
All text you copy or cut is stored in a location called the Clipboard. That’s the standard cut/copy/paste holding bin for text, but in Word the Clipboard is more powerful than in other Windows programs. Specifically, you can use the Clipboard task pane to examine items cut or copied, and paste them again in your document in any order.
To copy a chunk of text from the task pane to your document, heed these steps:
1. Place the insertion pointer in your document where you want the pasted text to appear.
2. Click the Home tab.
3. In the Clipboard group, click the dialog box launcher.
You see the Clipboard task pane, along with all text cut or copied since you’ve started the Word program, similar to what’s shown in Figure 6-4.
4. Position the mouse pointer at an item in the task pane.
A menu button appears to the right of the item.
5. Click the menu button and choose the Paste command.
The text is pasted into your document.
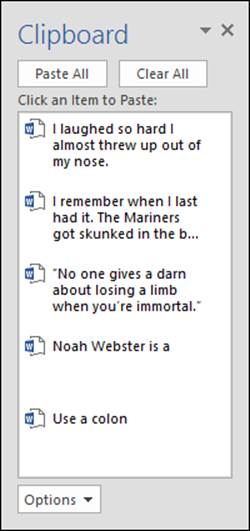
Figure 6-4: The Clipboard task pane.
Unlike using the Ctrl+V keyboard shortcut, or the Paste button on the Ribbon, you can paste text from the Clipboard in any order, and even summon text you copied or cut hours ago or text you copied or cut from other Microsoft Office programs.
Also see Chapter 32 for information on using the Collect and Paste feature, which takes advantage of the Clipboard task pane.
All materials on the site are licensed Creative Commons Attribution-Sharealike 3.0 Unported CC BY-SA 3.0 & GNU Free Documentation License (GFDL)
If you are the copyright holder of any material contained on our site and intend to remove it, please contact our site administrator for approval.
© 2016-2026 All site design rights belong to S.Y.A.