CCNA Wireless 200-355 Official Cert Guide (2016)
Chapter 17. Configuring Client Connectivity
This chapter covers the following topics:
![]() Configuring Common Wireless Clients—This section provides an overview of several common client device platforms and how Wi-Fi is configured on them.
Configuring Common Wireless Clients—This section provides an overview of several common client device platforms and how Wi-Fi is configured on them.
![]() Cisco Compatible Extensions (CCX)—This section describes the CCX program and how it is used to certify compatibility with sets of Cisco features and extensions.
Cisco Compatible Extensions (CCX)—This section describes the CCX program and how it is used to certify compatibility with sets of Cisco features and extensions.
This chapter covers the following exam topics:
![]() 1.2—Interpret RF signal measurements
1.2—Interpret RF signal measurements
![]() 1.2c—Device capabilities (smartphones, laptops, tablets)
1.2c—Device capabilities (smartphones, laptops, tablets)
![]() 5.3—Configure client connectivity in different operating systems
5.3—Configure client connectivity in different operating systems
![]() 5.3a—Android, MacOS, iOS, Windows
5.3a—Android, MacOS, iOS, Windows
![]() 6.3—Validate client settings
6.3—Validate client settings
![]() 6.3a—SSID
6.3a—SSID
![]() 6.3b—Security
6.3b—Security
![]() 6.3c—Device driver version
6.3c—Device driver version
![]() 7.4—Describe the requirements of client real-time and non-real-time applications
7.4—Describe the requirements of client real-time and non-real-time applications
A Cisco wireless network consists of wireless LAN controllers (WLCs), lightweight access points (LAPs), and wireless client devices. Even though the majority of this book is devoted to the controllers and access points (APs), the CCNA Wireless exam also includes client configuration. Why? When you build and support a wireless network, you often need to help your users configure and troubleshoot their devices so that they can use your network.
Wireless networks suffer from the bring-your-own-devices (BYOD) syndrome, where users often carry all sorts of wireless devices with them. Each device might use a different operating system, different wireless adapter hardware, and have different capabilities. This chapter covers the most common types of wireless clients.
Tip
Exam topic 5.3a lists “MacOS” as a client operating system. In reality, this means Mac OS X.
“Do I Know This Already?” Quiz
The “Do I Know This Already?” quiz allows you to assess whether you should read this entire chapter thoroughly or jump to the “Exam Preparation Tasks” section. If you are in doubt about your answers to these questions or your own assessment of your knowledge of the topics, read the entire chapter. Table 17-1 lists the major headings in this chapter and their corresponding “Do I Know This Already?” quiz questions. You can find the answers in Appendix A, “Answers to the ‘Do I Know This Already?’ Quizzes.”

Table 17-1 “Do I Know This Already?” Section-to-Question Mapping
Caution
The goal of self-assessment is to gauge your mastery of the topics in this chapter. If you do not know the answer to a question or are only partially sure of the answer, you should mark that question as wrong for purposes of the self-assessment. Giving yourself credit for an answer you correctly guess skews your self-assessment results and might provide you with a false sense of security.
1. Which one of the following does a Windows 7 machine use to find a wireless network to join?
a. WLAN Chooser
b. WLAN AutoConfig Service
c. WLAN Scanner
d. ZeroScan Service
2. When a Windows 7 machine scans for available wireless networks, which one of the following does it do first?
a. Scans by sending ad hoc advertisements
b. Scans by sending probes for a specific SSID name
c. Scans by sending probes with a null SSID name
d. Scans by sending association requests to a list of known BSSIDs
3. CCX is used to certify which one of the following?
a. Interoperability between wireless hardware manufacturers
b. Compatibility with Cisco wireless features
c. RF coverage
d. Wireless networking professionals
4. To date, how many versions of CCX have been defined?
a. 1
b. 4
c. 5
d. 10
5. Someone has purchased a new 802.11 wireless device to use in an enterprise that has a Cisco unified wireless network. After reading through the device specifications, you realize that it is not certified for any CCX version at all. Which one of the following most correctly describes the outcome?
a. The device will not work on the network.
b. The device will likely work fine.
c. The device must support at least one CCX version to associate with the network.
d. The device is compatible with all CCX versions because CCX is part of the 802.11 standard.
6. A wireless device is certified for CCXv1. Which one of the following is a correct statement?
a. The device is compatible with all Cisco features.
b. The device is compatible with WPA.
c. The device can support MFP.
d. The device is compatible with 802.11.
7. WPA2 with 802.1x and AES was introduced in which one of the following CCX versions?
a. CCXv1
b. CCXv2
c. CCXv3
d. CCXv4
e. CCXv5
8. Which one of the following is a CCX Lite module?
a. CCXv1
b. Voice
c. Crypto
d. Video
9. A device is certified as CCX Lite. Which one of the following modules is mandatory for that certification?
a. CCXv5
b. Foundation
c. Mobility
d. Survey
Foundation Topics
Configuring Common Wireless Clients
As you work through this chapter, keep in mind that the CCNA Wireless exam blueprint covers configuration of four common wireless client device platforms and validation of their settings. Each of the platforms is described in the sections that follow. You should become familiar with the basic Wi-Fi configuration of each platform, along with simple ways to verify a wireless connection. The device’s MAC address is often useful when you need to troubleshoot further from the WLC or a management platform. The Wi-Fi driver software version number can be important too, as newer wireless features and bug fixes might require newer driver releases.
Considering Wireless Client Requirements
![]()
You might be familiar with the term bring your own device (BYOD), where any sort of mobile device might be brought into an environment that has a wireless network. The users who bring the devices simply expect them to work and have good connectivity. As a wireless network administrator, would it be easy to satisfy all users? That is a difficult question to answer because you really need to know more about the devices and what they do so that you can design your wireless network to support them properly.
To approach such a problem, you should consider the wireless client requirements. The wireless clients that are covered in this chapter are common mobile devices, such as laptops and smartphones. What sort of requirements do they have? All you really know is the type of device and what operating system it runs. You might also find out some information about the wireless radio inside—perhaps which bands it supports, which wireless security schemes it can use, the receiver sensitivity of the radio, and so on. These specifications are important, but they all revolve around the 802.11 operability and not really around performance or the quality of the user experience.
A better approach is to consider what types of applications are being used on the wireless devices. Think about how an application is using its data and what the end user is expecting from it. If the application must send and receive data in a timely manner, it is known as a real-time application. Examples include voice over IP (VoIP), videoconferencing, collaboration, and Citrix remote desktop. Non-real-time applications are not so dependent upon immediate response or timely data exchange. Such applications include email, web browsing, and social media.
You might have noticed a pattern—real-time applications involve voice and video; non-real-time applications include ordinary data. Real-time applications require special consideration as you design, configure, and operate a wireless network. The following effects need to be minimized so that voice and video sessions can be heard and seen consistently, without interruption or corruption.
![]() Latency—The amount of time required to deliver a packet or frame from a transmitter to a receiver
Latency—The amount of time required to deliver a packet or frame from a transmitter to a receiver
![]() Jitter—The variance of the end-to-end latency experienced as consecutive packets arrive at a receiver
Jitter—The variance of the end-to-end latency experienced as consecutive packets arrive at a receiver
![]() Packet loss—The percentage of packets sent that do not arrive at the receiver
Packet loss—The percentage of packets sent that do not arrive at the receiver
To keep these factors minimized, the adverse conditions in a wireless environment must be controlled. For example, a source of interference can cause packet errors that interrupt a voice or video stream. As packets are lost, they can be retransmitted and delayed, increasing latency and jitter. Other factors like poor radio frequency (RF) coverage, high channel utilization, and excessive collisions can also impede good data throughput and integrity.
As you look closely at client devices and their applications, think about the many wireless features and mechanisms that you can use to make improvements to your network. A good AP layout can address RF coverage, expected client density, efficient roaming, and so on. Disabling lower data rates, enabling transmit beamforming, and load balancing clients across APs are some examples of ways to improve efficiency and throughput. Leveraging CleanAir can detect and help mitigate interfering sources and rogue APs.
The following sections provide an overview of a few client types that you will encounter. You should know how to configure the clients to join a wireless network and how to verify proper operation. There are many other types of client devices too—wireless phones, voice communication badges, asset location tags, tablets, printers, bar code scanners, cameras, and even specialized items such as hospital beds and IV pumps. All of these devices need to coexist and work properly, and you will need to figure out how to best accomplish that.
Understanding Windows Wi-Fi
Microsoft Windows 7, 8.1, and 10 all include a stock wireless client that offers basic connectivity options. The configuration is very similar in each operating system, with only slight differences in the GUI. To access the wireless client, first use the actions in Table 17-2 to look for the wireless icon that indicates the current network status. If the machine is currently connected, the icon shows a sequence of bars or arcs to indicate the received signal strength indicator (RSSI) from the AP. If it is not connected, the icon will show gray bars and a star or asterisk instead.
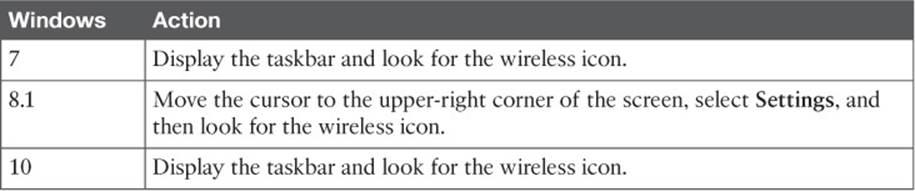
Table 17-2 How to Find the Wireless Status Icon on Windows Machines
You can click the wireless network icon to see a list of service set identifiers (SSIDs) that have been broadcast and discovered, as shown in Figure 17-1. SSIDs that use open authentication and no other security method are marked by a wireless icon with a gold shield with an exclamation mark. SSIDs that use a wireless security method with encryption are marked by a regular wireless icon.
Figure 17-1 Displaying a List of Available SSIDs
By default, a Windows PC does not have a prepopulated list of SSIDs to use. Over time, it maintains a list of “preferred” network names from SSIDs that you manually connect to or manually define. Windows 7, 8.1, and 10 machines use a process called WLAN AutoConfig Service to scan for a network, using the following sequence of steps:
1. Scan for available networks by transmitting probe requests with a null or empty SSID name. If a preferred network is found, connect to it.
2. Scan for each preferred network with specific probe requests; if one is found, connect to it.
3. Scan for any preferred network that is an ad hoc (peer-to-peer) network; if one is found, connect to it.
4. No known networks are found; present a list of available networks for manual connection.
To connect to one of the listed networks, click its name and then click the Connect button that appears. If the wireless LAN uses a security mechanism, enter the security key or credential when you are prompted to do so. You can configure the machine to automatically connect to the SSID in the future by checking the Connect Automatically check box.
You can manually populate a list of preferred wireless networks or edit their properties. You will need to open the Network and Sharing Center, then add or make changes to a network profile. The procedure in each version of Windows is slightly different, so you should perform the appropriate actions listed in Table 17-3.
![]()
Table 17-3 How to Open the Network and Sharing Center in Windows
Tip
You can follow the same sequence of steps to create an ad hoc wireless network, where client devices can communicate directly with each other in an independent basic service set (IBSS). Rather than selecting Manually Create a Network Profile, select Create an Ad Hoc Network. Then you can complete the ad hoc network parameters described in the rest of this section. Be aware that an ad hoc network is not the same as Wi-Fi Direct.
As shown in Figure 17-2, you can enter the network name (SSID) and security and encryption types. You can also specify whether the PC should automatically connect to the network each time the SSID is detected, even if the SSID is not broadcast in any beacon frames.
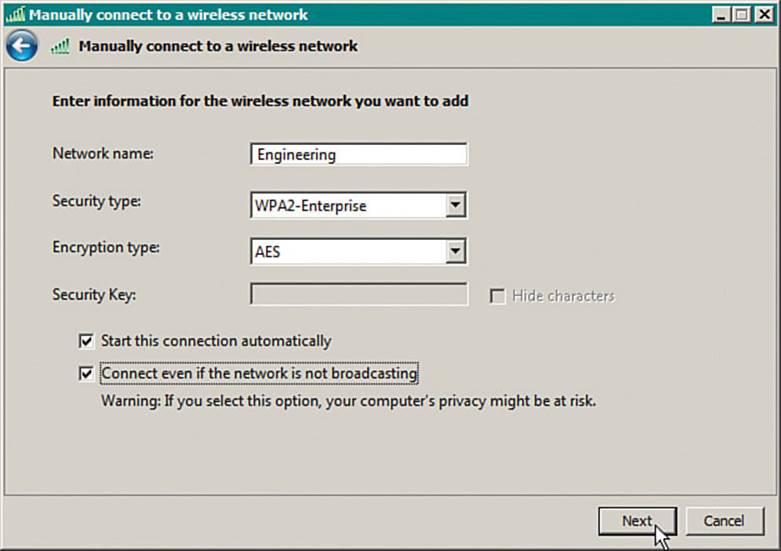
Figure 17-2 Manually Configuring a New Wireless Network
The built-in Windows wireless client does not offer many specific configuration options; however, you might find more options by configuring the wireless adapter. From the Network and Sharing Center, select Change Adapter Settings to display a list of installed adapters. Right-click a wireless adapter and select Properties to display the adapter properties and a list of installed protocols, as shown in Figure 17-3. Click the Configure button to bring up a window of adapter driver properties. Finally, display the Advanced tab to display a list of parameters and values, as shown in Figure 17-4. The list of parameters varies from one adapter to another, depending on what settings the manufacturer offers.
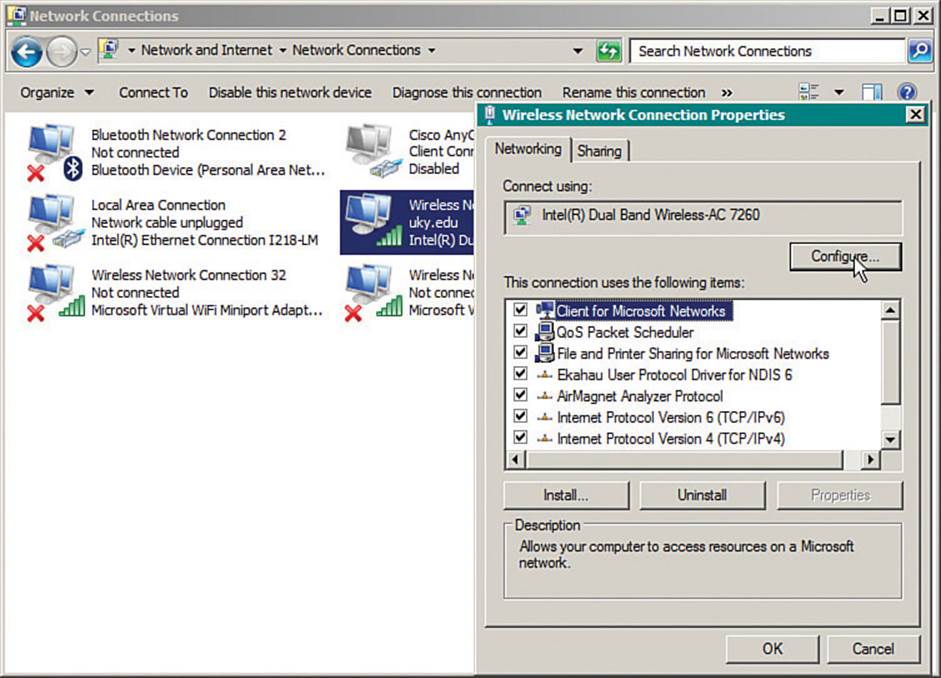
Figure 17-3 Configuring Wireless Adapter Properties
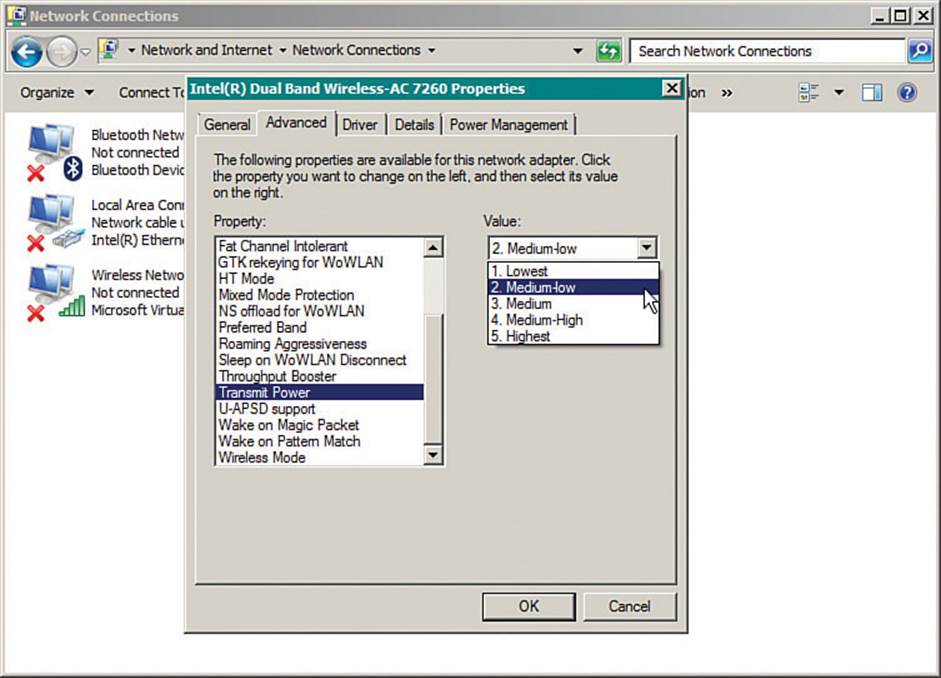
Figure 17-4 Configuring Advanced Wireless Adapter Settings
You can verify the status of a wireless connection by right-clicking the wireless icon, then selecting Open Network and Sharing Center. If the machine is connected to a wireless network, you can click the Internet connection as shown in Figure 17-5. A new window will display the current network state, including IPv4 and IPv6 connectivity, the SSID, the wireless data rate offered, the signal quality, and a count of bytes sent and received. You can click the Details button to see more detailed information, as shown in Figure 17-6.
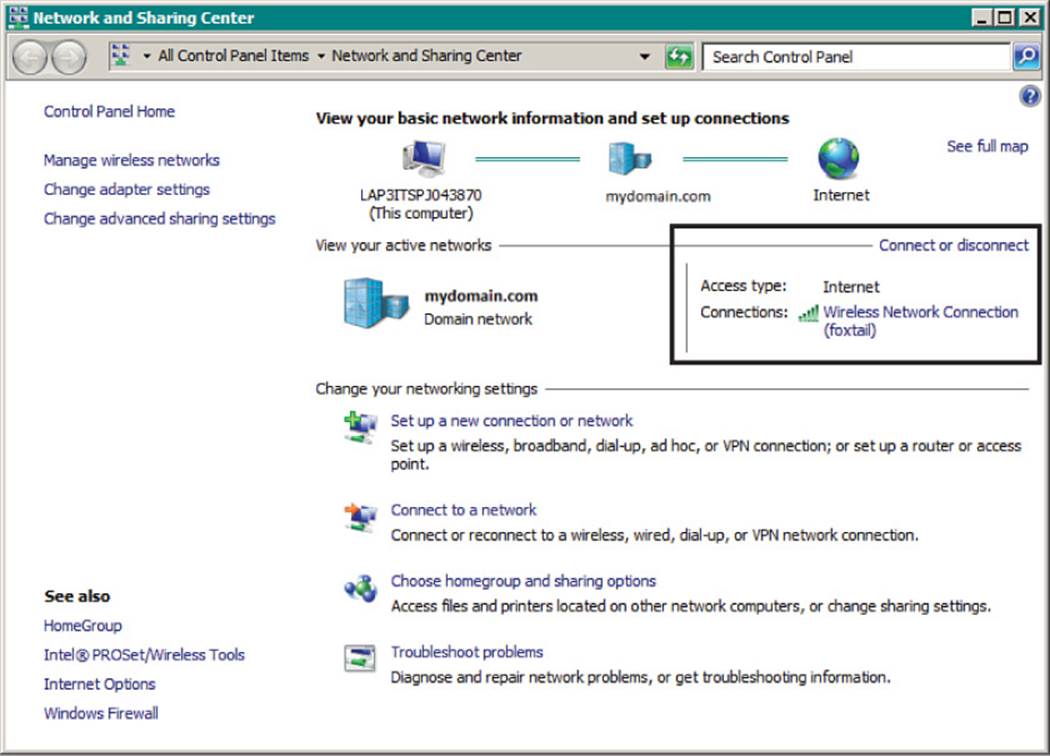
Figure 17-5 Displaying the Wireless Connection Screen
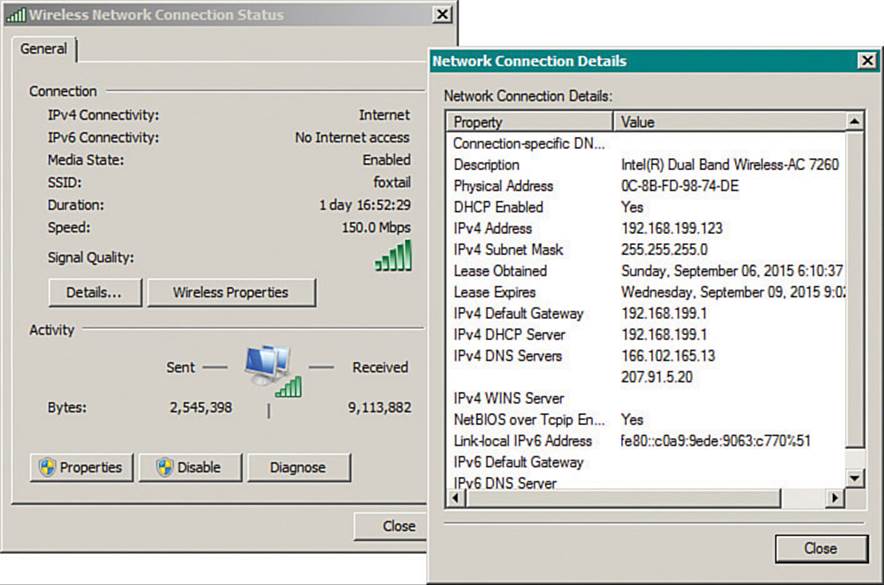
Figure 17-6 Displaying Detailed Connection Status Information
From the Wireless Network Connection Status window shown on the left side of Figure 17-6, you can click the Wireless Properties button to access configuration information about the wireless network profile that is in use. The Disable button can be used to disable the wireless network adapter, while the Diagnose button runs a series of tests that can be helpful in troubleshooting connection issues.
Usually it is a good practice to keep the wireless network adapter updated with a current driver version. You can verify the driver version in use by clicking the Properties button, then selecting the Driver tab as shown in Figure 17-7.
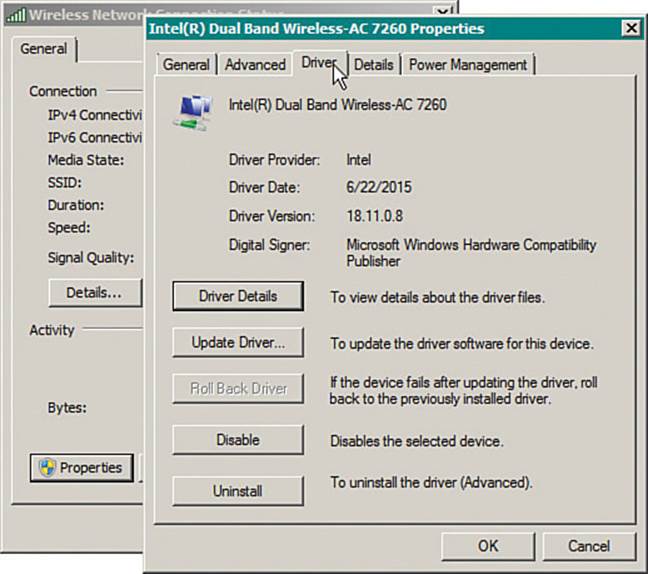
Figure 17-7 Verifying the Network Adapter Driver Version
Understanding Android Wi-Fi
Devices based on the Android operating system use a built-in driver and utility to manage connections to wireless networks. Android devices can discover a list of available networks and can manage manually configured networks too.
First, you should enable the wireless adapter by selecting Settings > Wi-Fi and then sliding the Wi-Fi switch to the on position, as shown in Figure 17-8. You can manage individual wireless connections from the same screen. The list shows the SSIDs of networks that have been discovered, in addition to those that are locally configured. After a network has been learned and connected to at least once, the device will automatically try to use it again in the future.
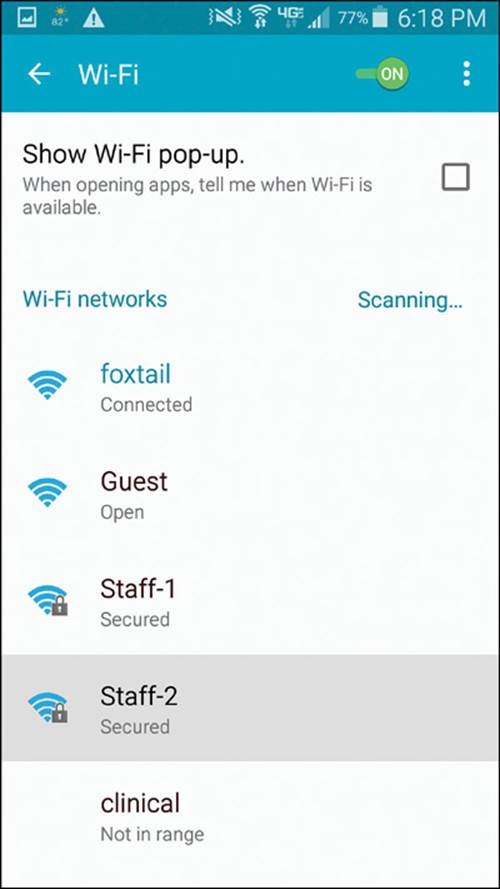
Figure 17-8 Displaying a List of Wireless Networks on an Android Device
![]()
You can manually add a new network by selecting the Add Wi-Fi Network link at the bottom of the network list. Enter the SSID and security parameters as shown in Figure 17-9, and then select the Save button. After a network has been learned, you can edit its properties by selecting the network from the list with a long-press and then selecting Modify Network Config. You can also delete a network profile by selecting it with a long-press and then selecting Forget Network.
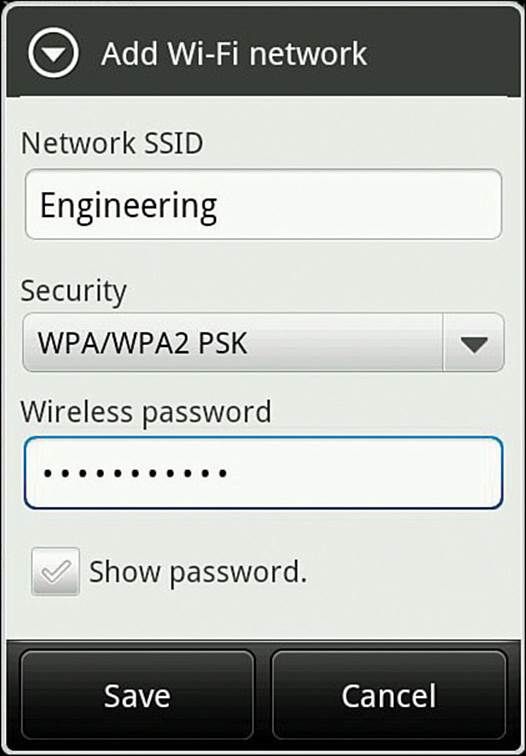
Figure 17-9 Adding a Wireless Network on an Android Device
Android natively supports both WPA and WPA2 Personal and Enterprise security. Enterprise security commonly includes Transport Layer Security (TLS), Protected Extensible Authentication Protocol (PEAP), and Tunneled TLS (TTLS). Also, Android devices support Wi-Fi Direct, allowing direct communication with a small number of other devices in a peer-to-peer fashion, without requiring an AP. Although Wi-Fi Direct is derived from 802.11 ad hoc networks, it is incompatible with ad hoc networking because it supports additional negotiation and security features.
You can verify the status of a wireless connection by going to Settings > Wi-Fi. One of the Wi-Fi network names should be listed as “Connected.” You can display more information about it by selecting it, as shown in Figure 17-10.
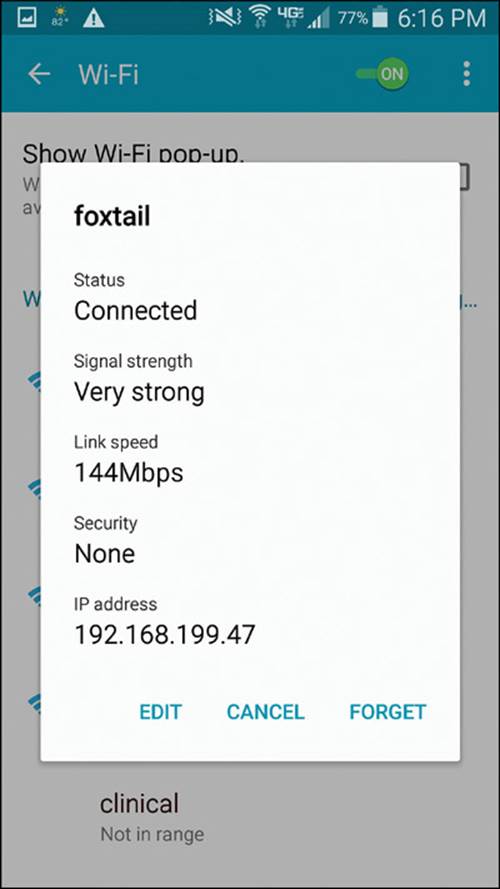
Figure 17-10 Displaying the Wireless Status on an Android Device
Understanding MacOS X Wi-Fi
Apple devices use a built-in wireless adapter and a configuration utility to manage networks that are discovered and manually defined. You can view a list of discovered networks by clicking the wireless icon at the top of the screen, as shown in Figure 17-11. To connect to one of the networks, click its name. You can also turn the Wi-Fi adapter off and on from the links at the top of the list.
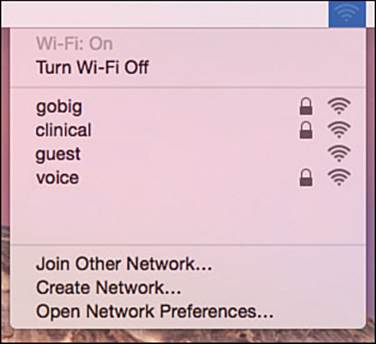
Figure 17-11 Displaying Discovered Wireless Networks in MacOS X
To access the wireless configuration utility, select System Preferences, and then select Network. Figure 17-12 shows an example, with all available network adapters listed down the left side. From this window, you can enable or disable the wireless adapter.
![]()
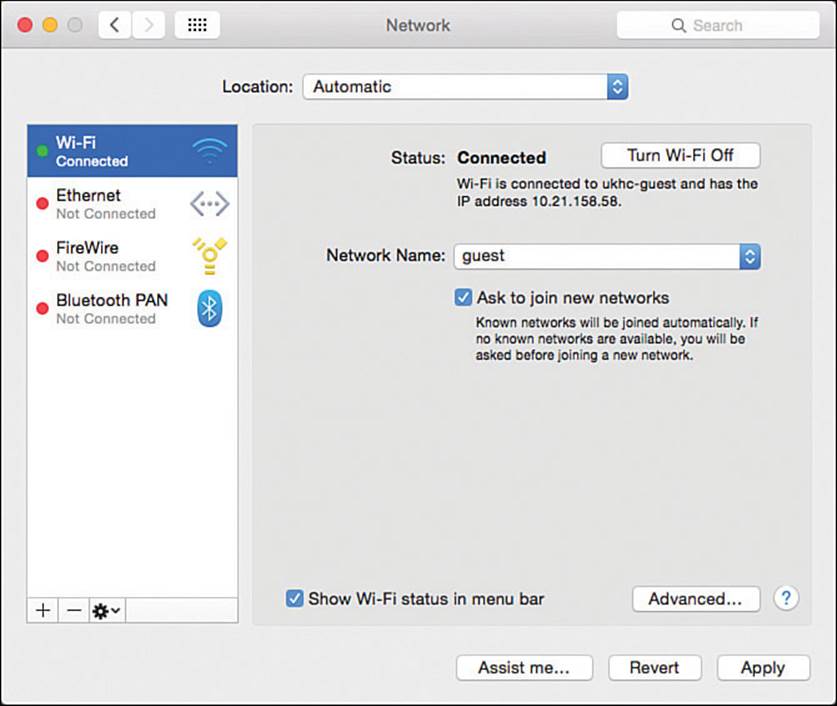
Figure 17-12 Accessing the MacOS X Network Properties
You can also select Wi-Fi and then click the Advanced button to display and edit the network connection configurations. The advanced settings window, as shown in Figure 17-13, has seven tabs across the top. The Wi-Fi tab contains a list of preferred networks—SSIDs that have already been configured. The networks will be tried in sequential order; you can change the order by dragging networks up or down in the list.
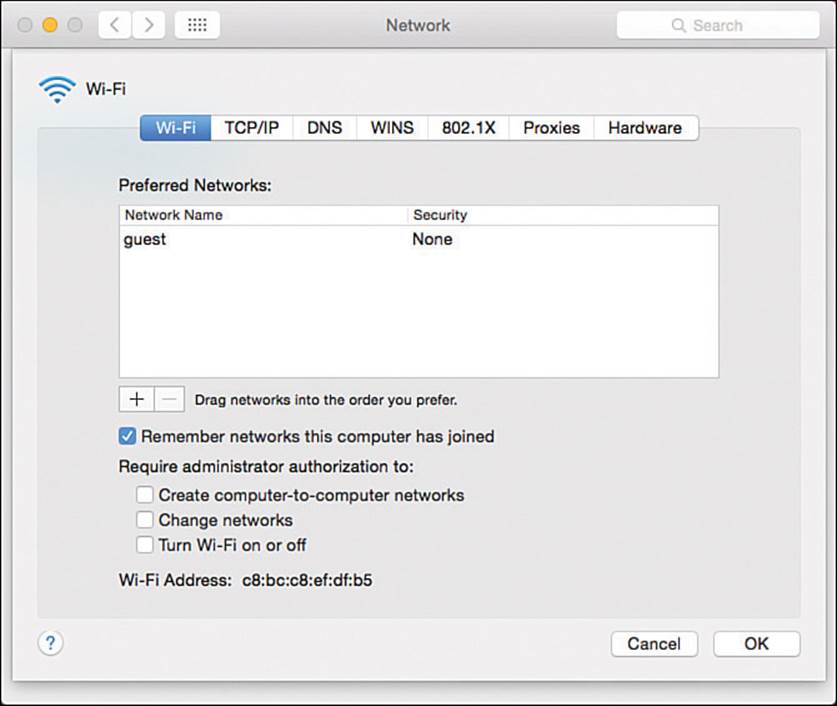
Figure 17-13 Displaying a List of Preferred Wireless Networks
You can create a new wireless network by clicking the + (plus sign) button. As shown in Figure 17-14, you can enter an SSID and security parameters for the new network profile.
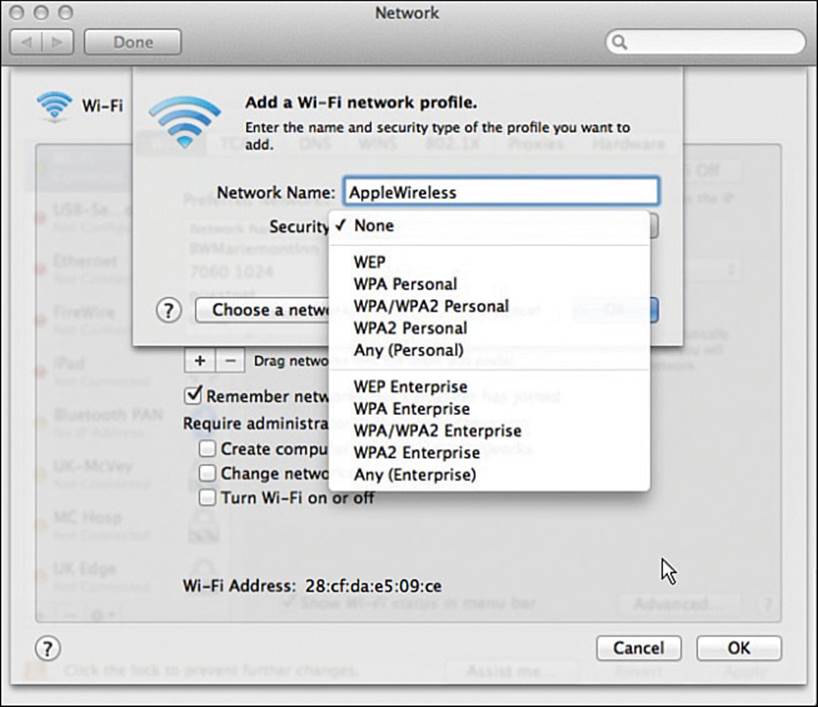
Figure 17-14 Creating a New Wireless Network Profile
Sometimes you might need to verify the network adapter software version or wireless capabilities. You can do that by clicking the Apple logo in the upper-left corner of the screen. Next, select About This Mac and the Overview tab, as shown in Figure 17-15. Detailed wireless information can be displayed by clicking the System Report button. In the report output, select Network > Wi-Fi, as shown in the example report in Figure 17-16.
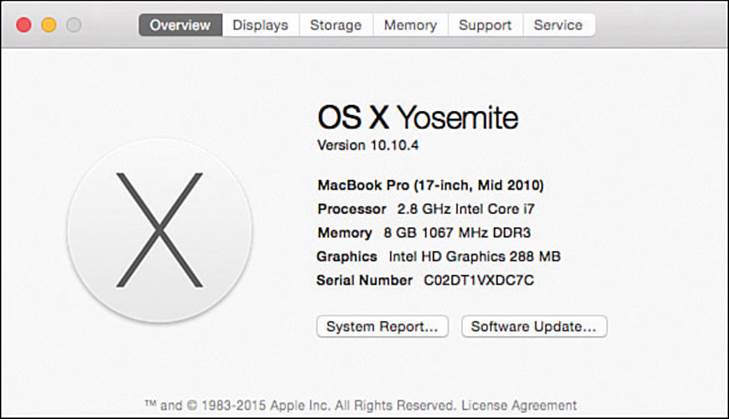
Figure 17-15 Displaying System Information in MacOS X
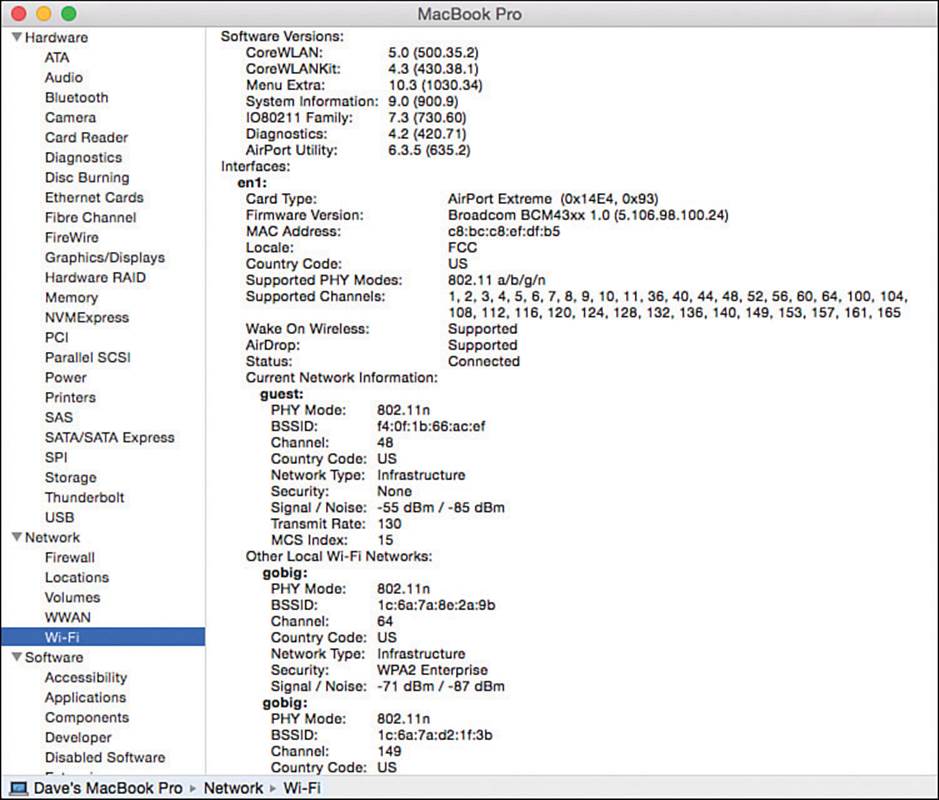
Figure 17-16 Displaying a Report of Wi-Fi Network Parameters
Understanding Apple iOS Wi-Fi
Apple iPhones running iOS can connect to Wi-Fi networks using a built-in network adapter and driver. You can view and control the Wi-Fi connectivity by pressing the home button and selecting Settings, as shown in Figure 17-17. Select Wi-Fi to manage the connections.
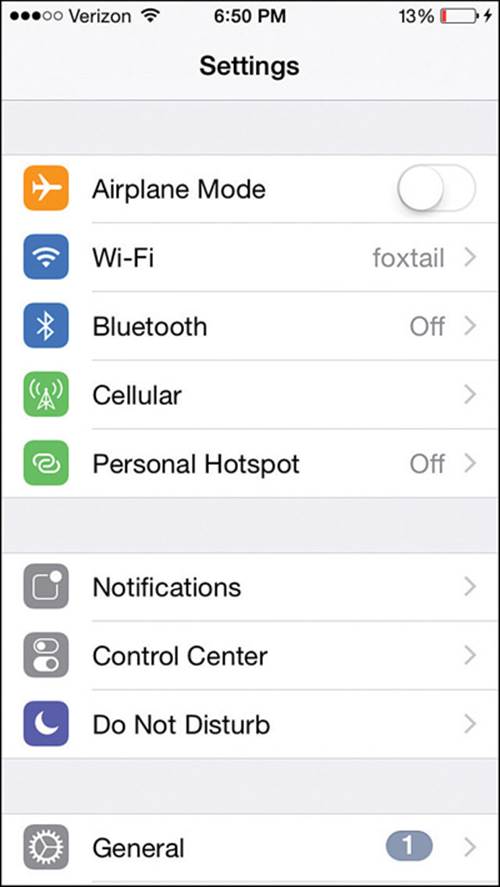
Figure 17-17 Accessing Wireless Settings on an iOS Device
Figure 17-18 shows an example list of wireless networks that have been discovered. If the device is connected to a network, a check mark will be shown to the left of the network name. You can select a network name and then select the Join or Forget link to connect or disconnect from the SSID. You can also manually define a network by selecting Other at the bottom of the network list. Enter the network name and security parameters as shown in Figure 17-19, then select Join to connect.
![]()
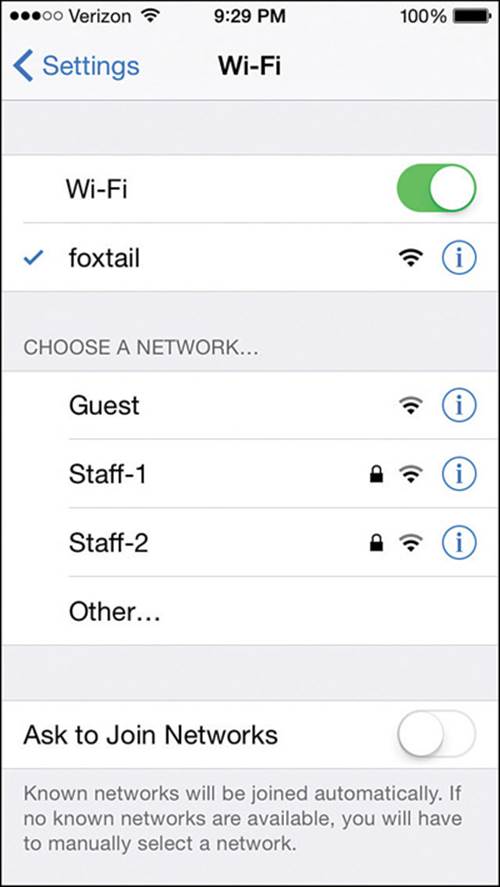
Figure 17-18 Displaying a List of Wireless Networks on an iOS Device
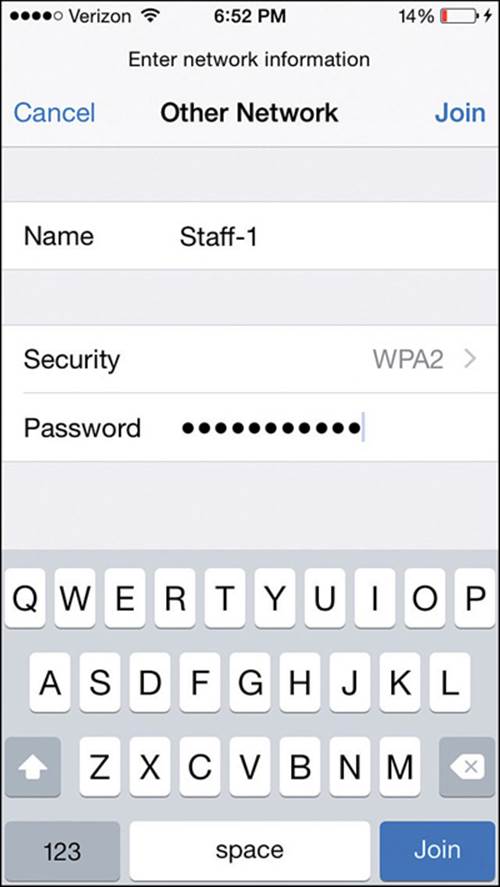
Figure 17-19 Manually Defining a New Network on an iOS Device
When the iOS device is connected to a network, you can display basic information about it by selecting the network name in the Wi-Fi settings screen. Figure 17-20 shows the IP addressing parameters for the connection named “foxtail.” The device will not display detailed information about the wireless adapter and the current RF parameters natively; you have to install a third-party application to do that.
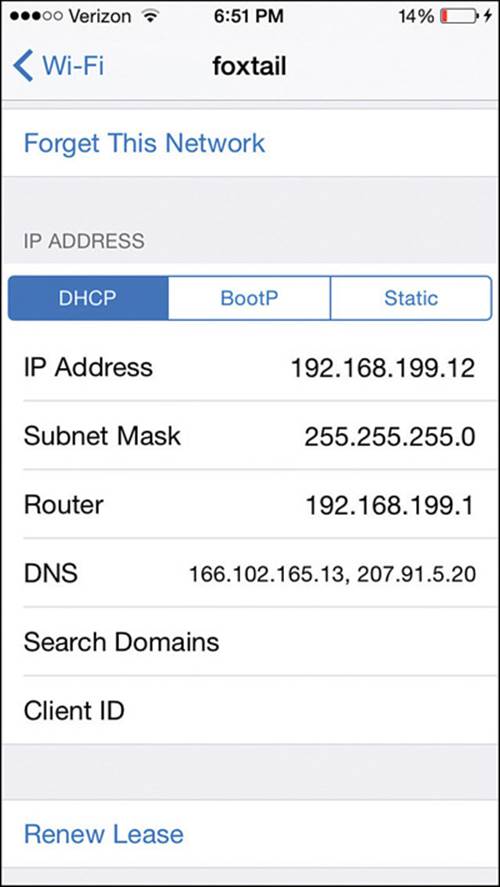
Figure 17-20 Displaying Connection Information on an iOS Device
iOS devices support WPA and WPA2 Personal and Enterprise security and EAP-TLS. Wi-Fi Direct is also supported for impromptu peer-to-peer communication with other devices, without the need for an AP.
Cisco Compatibility Extensions
The wireless clients described in the previous sections are fairly straightforward; the client has a wireless network adapter and controls the SSID and wireless security that are used to associate with an AP. Beyond that, the AP can make a safe assumption that the client complies with the 802.11 standard and supports certain data rates, but it knows little else about the client and its capabilities. Just like the AP, the client device is likely certified by the Wi-Fi Alliance for one of the 802.11 rate protocols (as in 802.11b/a/n/ac), making them compatible.
For example, without thorough testing, how do you know whether a wireless client and its driver software release support Wi-Fi Protected Access Version 2 (WPA2) with EAP Transport Layer Security (EAP-TLS) or some other security scheme? How do you know whether a client can optimally transport audio and video over wireless? Suppose that your enterprise just purchased several hundred wireless communication or medical devices. How can you be certain which wireless functions and security features the devices support?
To remove some of the unknowns, Cisco created the Cisco Compatibility Extensions (CCX) program. Cisco defines a set of features as part of a specific CCX version. Wireless device manufacturers can implement the features in their devices and then submit their devices for testing and validation. If a device passes the interoperability tests, it receives a “Cisco Certified Compatibility” designation.
The CCX program really has two goals:
![]() Take advantage of Cisco enhancements and innovations above what is defined in the 802.11 standard
Take advantage of Cisco enhancements and innovations above what is defined in the 802.11 standard
![]() Verify that a client supports each enhancement correctly
Verify that a client supports each enhancement correctly
Over time, Cisco has developed CCX in phases or versions. To date, there are five versions, each building on its predecessor with an increasing set of features. Table 17-4 lists some of the 70 features, along with the CCX versions that support them. Notice how the more traditional and general features such as 802.11 are supported in all versions, essentially over a long period of time as WLAN technology has evolved. Features available only in v4 and v5 tend to be interactive, where the client works with the wireless infrastructure to report information about itself.
![]()
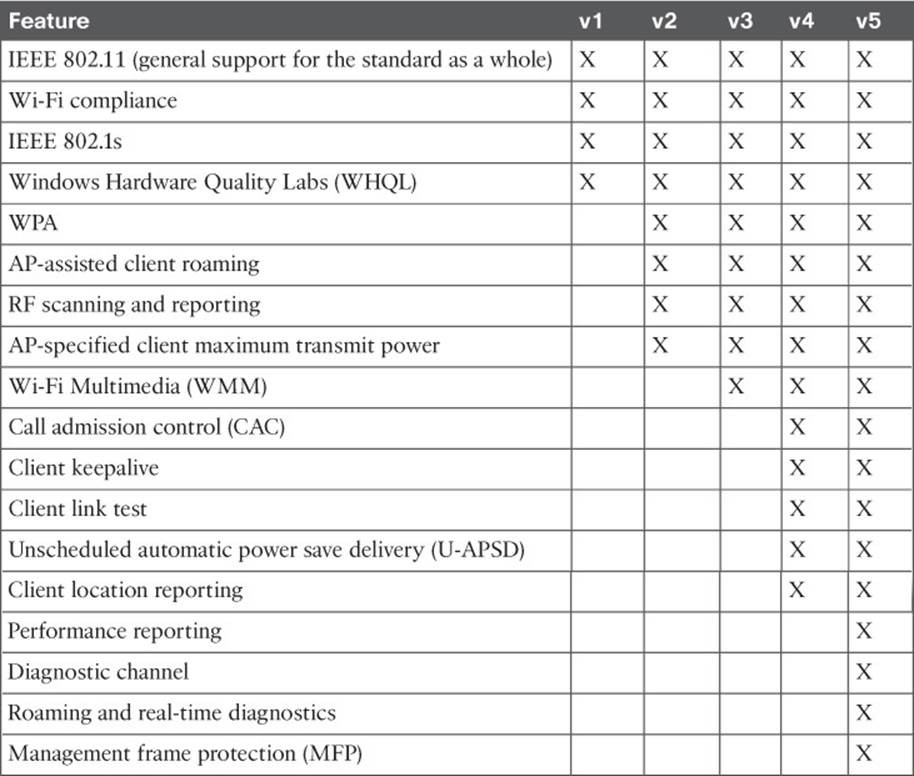
Table 17-4 Feature Support in CCX Versions 1–5
For example, management frame protection (MFP) addresses an inherent weakness in the management frames that an AP transmits. When a client receives a management frame, it implicitly trusts that the frame came from an AP and that the frame contents have not been tampered with. To secure management frames, both the AP and the client must participate to encrypt and authenticate each frame. Only CCXv5 clients are equipped to use frames protected with MFP.
Tip
What if a device is not certified for any CCX version? Chances are that it will work just fine on a Cisco wireless infrastructure. CCX certifies extended features that are specific to Cisco networks—not features that are needed for basic wireless operation.
Each CCX version contains more complex and interactive features than the version before it, but the features are organized more by the version number than by function. Some devices that are designed for a specific application, such as a wireless phone or a locator tag, do not have a need to support the entire list of features in a CCX version. To simplify the compatibility process for these devices, Cisco introduced the CCX Lite designation.
CCX Lite is organized into four basic categories or modules, according to device function:
![]()
![]() Foundation—The core set of features that are common to most general-purpose devices
Foundation—The core set of features that are common to most general-purpose devices
![]() Voice—Features specific to voice communication devices, such as WMM, CAC, expedited bandwidth request, and voice metrics
Voice—Features specific to voice communication devices, such as WMM, CAC, expedited bandwidth request, and voice metrics
![]() Location—Features specific to near-real-time location reporting, usually used with RFID tags
Location—Features specific to near-real-time location reporting, usually used with RFID tags
![]() Management—Features specific to client management, such as link test, diagnostic channel, client reporting, and roaming and real-time diagnostics
Management—Features specific to client management, such as link test, diagnostic channel, client reporting, and roaming and real-time diagnostics
A device must be compliant with the Foundation module to achieve CCX Lite certification. The other modules are optional for application-specific devices.
For the CCNA Wireless exam, be familiar with the CCX basics and know the CCX Lite modules. Understand the general principles without memorizing when specific CCX features were incorporated into which CCX version. As the 802.11 standard has evolved and rolled in various amendments over time, the standard has also solved many of the problems that some CCX features were meant to solve. For your reference, Table 17-5 lists the wireless security and authentication schemes along with the CCX versions.
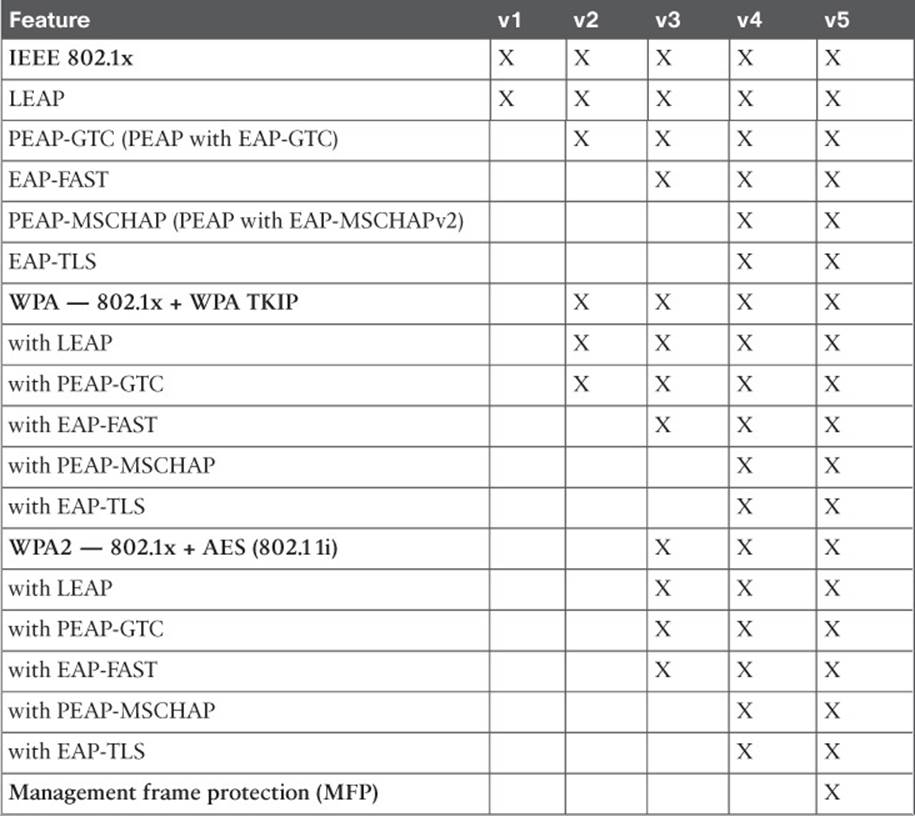
Table 17-5 Wireless Security Support in CCX Versions 1–5
Table 17-5 might seem daunting, especially if you have to remember which CCX versions correspond to one of the many security features listed. Notice that the table can be broken down into four main divisions: 802.1x, WPA, WPA2, and MFP. Within each division, the same set of LEAP, PEAP-GTC, EAP-FAST, PEAP-MSCHAP, and EAP-TLS schemes are repeated. Therefore, you might benefit from memorizing the following rules of thumb:
![]() 802.1x is covered in all versions.
802.1x is covered in all versions.
![]() WPA and its schemes were all introduced in CCXv2.
WPA and its schemes were all introduced in CCXv2.
![]() WPA2 and its schemes were all introduced in CCXv3.
WPA2 and its schemes were all introduced in CCXv3.
Except:
![]() EAP-FAST was introduced in CCXv3.
EAP-FAST was introduced in CCXv3.
![]() PEAP-MSCHAP and EAP-TLS were introduced in CCXv4.
PEAP-MSCHAP and EAP-TLS were introduced in CCXv4.
![]() MFP was introduced in CCXv5.
MFP was introduced in CCXv5.
For example, without looking at the table, which CCX versions support WPA2 with EAP-TLS? From the third rule, you know that WPA2 is supported in Versions 3 and later, except that EAP-TLS is Version 4 and later. Therefore, your answer should be CCXv4 and CCXv5.
Exam Preparation Tasks
As mentioned in the section, “How to Use This Book,” in the Introduction, you have a couple of choices for exam preparation: the exercises here, Chapter 21, “Final Review,” and the exam simulation questions on the DVD.
Review All Key Topics
Review the most important topics in this chapter, noted with the Key Topic icon in the outer margin of the page. Table 17-6 lists a reference of these key topics and the page numbers on which each is found.
![]()
Table 17-6 Key Topics for Chapter 17
Define Key Terms
Define the following key terms from this chapter and check your answers in the glossary:
Cisco Compatibility Extensions (CCX)
CCX Lite
All materials on the site are licensed Creative Commons Attribution-Sharealike 3.0 Unported CC BY-SA 3.0 & GNU Free Documentation License (GFDL)
If you are the copyright holder of any material contained on our site and intend to remove it, please contact our site administrator for approval.
© 2016-2026 All site design rights belong to S.Y.A.