CCNP Routing and Switching SWITCH 300-115 Official Cert Guide (2015)
Part VII. Securing Switched Networks
Chapter 19. Securing Switch Access
This chapter covers the following topics that you need to master for the CCNP SWITCH exam:
![]() Port Security: This section explains how to configure switch ports to allow network access to only hosts with specific or learned MAC addresses.
Port Security: This section explains how to configure switch ports to allow network access to only hosts with specific or learned MAC addresses.
![]() Port-Based Authentication: This section discusses a method you can use to require user authentication before network access is offered to a client host.
Port-Based Authentication: This section discusses a method you can use to require user authentication before network access is offered to a client host.
![]() Using Storm Control: This section explains how you can configure a method to limit the effects of traffic storms coming from devices that are connected to a switch.
Using Storm Control: This section explains how you can configure a method to limit the effects of traffic storms coming from devices that are connected to a switch.
![]() Best Practices for Securing Switches: This section provides several guidelines for tightening control over Catalyst switches and the protocols they use for switch communication and maintenance.
Best Practices for Securing Switches: This section provides several guidelines for tightening control over Catalyst switches and the protocols they use for switch communication and maintenance.
Traditionally, users have been able to connect a PC to a switched network and gain immediate access to enterprise resources. As networks grow and as more confidential data and restricted resources become available, it is important to limit the access that users receive.
Catalyst switches have a variety of methods that can secure or control user access. Users can be authenticated as they connect to or through a switch and can be authorized to perform certain actions on a switch. User access can be recorded as switch accounting information. The physical switch port access also can be controlled based on the user’s MAC address or authentication.
In addition, Catalyst switches can detect and prevent certain types of attacks. Several features can be used to validate information passing through a switch so that spoofed addresses cannot be used to compromise hosts.
“Do I Know This Already?” Quiz
The “Do I Know This Already?” quiz allows you to assess whether you should read this entire chapter thoroughly or jump to the “Exam Preparation Tasks” section. If you are in doubt based on your answers to these questions or your own assessment of your knowledge of the topics, read the entire chapter. Table 19-1 outlines the major headings in this chapter and the “Do I Know This Already?” quiz questions that go with them. You can find the answers in Appendix A, “Answers to the ‘Do I Know This Already?’ Quizzes.”

Table 19-1 “Do I Know This Already?” Foundation Topics Section-to-Question Mapping
1. Which switch feature can grant access through a port only if the host with MAC address 0005.0004.0003 is connected?
a. SPAN
b. MAC address ACL
c. Port security
d. Port-based authentication
2. Port security is being used to control access to a switch port. Which one of these commands will put the port into the errdisable state if an unauthorized station connects?
a. switchport port-security violation protect
b. switchport port-security violation restrict
c. switchport port-security violation errdisable
d. switchport port-security violation shutdown
3. If port security is enabled and left to its default configuration, how many different MAC addresses can be learned at one time on a switch port?
a. 0
b. 1
c. 16
d. 256
4. The following commands are configured on a Catalyst switch port. What happens when the host with MAC address 0001.0002.0003 tries to connect?
switchport port-security
switchport port-security maximum 3
switchport port-security mac-address 0002.0002.0002
switchport port-security violation shutdown
a. The port shuts down.
b. The host is allowed to connect.
c. The host is denied a connection.
d. The host can connect only when 0002.0002.0002 is not connected.
5. What protocol is used for port-based authentication?
a. 802.1D
b. 802.1Q
c. 802.1X
d. 802.1w
6. When 802.1X802.1X is used for a switch port, where must it be configured?
a. Switch port and client PC
b. Switch port only
c. Client PC only
d. Switch port and a RADIUS server
7. When port-based authentication is enabled globally, what is the default behavior for all switch ports?
a. Authenticate users before enabling the port.
b. Allow all connections without authentication.
c. Do not allow any connections.
d. There is no default behavior.
8. When port-based authentication is enabled, what method is available for a user to authenticate?
a. Web browser
b. Telnet session
c. 802.1X client
d. DHCP
9. The users in a department are using a variety of host platforms, some old and some new. All of them have been approved with a user ID in a RADIUS server database. Which one of these features should be used to restrict access to the switch ports in the building?
a. AAA authentication
b. AAA authorization
c. Port security
d. Port-based authentication
10. Which of the following are types of frames that Storm Control can limit before they can cause problems for hosts that are connected to a switch? (Choose all that apply.)
a. Unicast frames
b. Broadcast frames
c. Multicast frames
d. Unknown unicast frames
11. Suppose that an interface receives the following configuration command:
storm-control broadcast level 10
Storm control will be triggered when which one of the following rising thresholds is reached?
a. At least 10 broadcast frames are received
b. At least 10 hosts are connected to a VLAN that will receive a flooded broadcast frame
c. Broadcast frames exceed 10 percent of the interface bandwidth
d. Broadcast frames exceed 10 percent of the interface MTU size
12. Which two of the following methods should you use to secure inbound CLI sessions to a switch?
a. Disable all inbound CLI connections.
b. Use SSH only.
c. Use Telnet only.
d. Apply an access list to the vty lines.
13. Suppose that you need to disable CDP and LLDP advertisements on a switch port so that untrusted devices cannot learn anything about your switch. Which one of the following answers contains the interface configuration commands that should be used?
a. cdp disable
lldp disable
b. no cdp
no lldp
c. no cdp enable
no lldp transmit
d. no cdp transmit
no lldp transmit
Foundation Topics
Port Security
In some environments, a network must be secured by controlling what stations can gain access to the network itself. Where user workstations are stationary, their MAC addresses always can be expected to connect to the same access layer switch ports. If stations are mobile, their MAC addresses can be learned dynamically or added to a list of addresses to expect on a switch port.
Catalyst switches offer the port security feature to control port access based on MAC addresses. To configure port security on an access layer switch port, begin by enabling it on a per-interface basis with the following interface-configuration command:
Switch(config-if)# switchport port-security
Next, you must identify a set of allowed MAC addresses so that the port can grant them access. You can explicitly configure addresses or they can be learned dynamically from port traffic. On each interface that uses port security, specify the maximum number of MAC addresses that will be allowed access using the following interface configuration command:
Switch(config-if)# switchport port-security maximum max-addr
By default, port security will make sure that only one MAC address will be allowed access on each switch port. You can set the maximum number of addresses in the range of 1 to 1024.

Each interface using port security dynamically learns MAC addresses by default and expects those addresses to appear on that interface in the future. MAC addresses are learned as hosts transmit frames on an interface. The interface learns up to the maximum number of addresses allowed. Learned addresses also can be aged out of the table if those hosts are silent for a period of time. By default, no aging occurs.
For example, to set the maximum number of MAC addresses that can be active on a switch port at any time to two, you could use the following command:
Switch(config-if)# switchport port-security maximum 2
By default, port security learns MAC addresses dynamically and stores them in the CAM table and also in the running configuration. If the switch reboots for some reason, port security will have to relearn a new set of MAC addresses. To make the learned addresses persistent across a switch reboot, you can enable “sticky” MAC address learning with the following command:
Switch(config-if)# switchport port-security mac-address sticky
You also can statically define one or more MAC addresses on an interface. Any of these addresses are allowed to access the network through the port. Use the following interface configuration command to define a static address:
Switch(config-if)# switchport port-security mac-address mac-addr
The MAC address is given in dotted-triplet format. If the number of static addresses configured is less than the maximum number of addresses secured on a port, the remaining addresses are learned dynamically. Be sure to set the maximum number appropriately.
As an example, you could use the following command to configure a static address entry on an interface, so that 0006.5b02.a841 will be expected:
Switch(config-if)# switchport port-security mac-address 0006.5b02.a841
Finally, you must define how each interface using port security should react if a MAC address is in violation by using the following interface-configuration command:
Switch(config-if)# switchport port-security violation {shutdown | restrict |
protect}
A violation occurs if more than the maximum number of MAC addresses are learned or if an unknown (not statically defined) MAC address attempts to transmit on the port. The switch port takes one of the following configured actions when a violation is detected:
![]() Shutdown: The port immediately is put into the errdisable state, which effectively shuts it down. It must be reenabled manually or through errdisable recovery to be used again.
Shutdown: The port immediately is put into the errdisable state, which effectively shuts it down. It must be reenabled manually or through errdisable recovery to be used again.
![]() Restrict: The port is allowed to stay up, but all packets from violating MAC addresses are dropped. The switch keeps a running count of the number of violating packets and can send an SNMP trap and a syslog message as an alert of the violation.
Restrict: The port is allowed to stay up, but all packets from violating MAC addresses are dropped. The switch keeps a running count of the number of violating packets and can send an SNMP trap and a syslog message as an alert of the violation.
![]() Protect: The port is allowed to stay up, as in the restrict mode. Although packets from violating addresses are dropped, no record of the violation is kept.
Protect: The port is allowed to stay up, as in the restrict mode. Although packets from violating addresses are dropped, no record of the violation is kept.
As an example of the restrict mode, a switch interface has received the following configuration commands:
interface GigabitEthernet1/0/11
switchport access vlan 991
switchport mode access
switchport port-security
switchport port-security violation restrict
spanning-tree portfast
When the default maximum of one MAC address is exceeded on this interface, the condition is logged but the interface stays up. This is shown by the following syslog message:
Jun 3 17:18:41.888 EDT: %PORT_SECURITY-2-PSECURE_VIOLATION: Security violation
occurred, caused by MAC address 0000.5e00.0101 on port GigabitEthernet1/0/11.
Tip
If an interface is undergoing the restrict or protect condition, you might need to clear the learned MAC addresses so that a specific host can use the switch port. You can clear a MAC address or the complete port cache with the following command:
Switch# clear port-security {all | configured | dynamic | sticky}
[address mac-addr | interface type member/mod/num]
In the shutdown mode, the port security action is much more drastic. When the maximum number of MAC addresses is exceeded, the following syslog messages indicate that the port has been shut down in the errdisable state:
Jun 3 17:14:19.018 EDT: %PM-4-ERR_DISABLE: psecure-violation error detected on
Gi1/0/11, putting Gi1/0/11 in err-disable state
Jun 3 17:14:19.022 EDT: %PORT_SECURITY-2-PSECURE_VIOLATION: Security violation
occurred, caused by MAC address 0003.a089.efc5 on port GigabitEthernet1/0/11.
Jun 3 17:14:20.022 EDT: %LINEPROTO-5-UPDOWN: Line protocol on Interface
GigabitEthernet1/0/11, changed state to down
Jun 3 17:14:21.023 EDT: %LINK-3-UPDOWN: Interface GigabitEthernet1/0/11, changed
state to down
You also can show the port status with the show port-security interface command, as demonstrated in Example 19-1.
Example 19-1 Displaying Port Security Port Status
Switch# show port-security interface gigabitethernet 1/0/11
Port Security : Enabled
Port Status : Secure-shutdown
Violation Mode : Shutdown
Aging Time : 0 mins
Aging Type : Absolute
SecureStatic Address Aging : Disabled
Maximum MAC Addresses : 1
Total MAC Addresses : 0
Configured MAC Addresses : 0
Sticky MAC Addresses : 0
Last Source Address : 0003.a089.efc5
Security Violation Count : 1
Switch#
To see a quick summary of only ports in the errdisable state, along with the reason for errdisable, you can use the show interfaces status err-disabled command, as demonstrated in Example 19-2.
Example 19-2 Displaying Summary Information for Ports in the Errdisable State
Switch# show interfaces status err-disabled
Port Name Status Reason
Gi1/0/11 Test port err-disabled psecure-violation
Switch#
Tip
When a port is moved to the errdisable state, you must either manually cycle it or configure the switch to automatically re-enable ports after a prescribed delay. To manually cycle a port and return it to service, use the following commands:
Switch(config)# interface type member/mod/num
Switch(config-if)# shutdown
Switch(config-if)# no shutdown
Finally, you can display a summary of the port-security status with the show port-security command, as demonstrated in Example 19-3.
Example 19-3 Displaying Port Security Status Summary Information
Switch# show port-security
Secure Port MaxSecureAddr CurrentAddr SecurityViolation Security Action
(Count) (Count) (Count)
---------------------------------------------------------------------------
Gi1/0/11 5 1 0 Restrict
Gi1/0/12 1 0 0 Shutdown
---------------------------------------------------------------------------
Total Addresses in System (excluding one mac per port) : 0
Max Addresses limit in System (excluding one mac per port) : 6176
Switch#
Port-Based Authentication
Catalyst switches can support port-based authentication, a combination of AAA authentication and port security. This feature is based on the IEEE 802.1X standard. When it is enabled, a switch port will not pass any traffic until a user has authenticated with the switch. If the authentication is successful, the user can use the port normally.

For port-based authentication, both the switch and the end user’s PC must support the 802.1X standard, using the Extensible Authentication Protocol over LANs (EAPOL). The 802.1X standard is a cooperative effort between the client and the switch offering network service. If the client PC is configured to use 802.lx but the switch does not support it, the PC abandons the protocol and communicates normally. However, if the switch is configured for 802.1X but the PC does not support it, the switch port remains in the unauthorized state so that it will not forward any traffic to the client PC.
Note
802.1X EAPOL is a Layer 2 protocol. At the point that a switch detects the presence of a device on a port, the port remains in the unauthorized state. Therefore, the client PC cannot communicate with anything other than the switch by using EAPOL. If the PC does not already have an IP address, it cannot request one. The PC also has no knowledge of the switch or its IP address, so any means other than a Layer 2 protocol is not possible. This is why the PC must also have an 802.1X-capable application or client software.
An 802.1X switch port begins in the unauthorized state so that no data other than the 802.1X protocol itself is allowed through the port. Either the client or the switch can initiate an 802.1X session. The authorized state of the port ends when the user logs out, causing the 802.1X client to inform the switch to revert back to the unauthorized state. The switch can also time out the user’s authorized session. If this happens, the client must reauthenticate to continue using the switch port.
802.1X Configuration
Port-based authentication can be handled by one or more external Remote Authentication Dial-In User Service (RADIUS) servers. Although many Cisco switch platforms allow other authentication methods to be configured, only RADIUS is supported for 802.1X.
The actual RADIUS authentication method must be configured first, followed by 802.1X, as shown in the following steps:
Step 1. Enable AAA on the switch. By default, AAA is disabled. You can enable AAA for port-based authentication by using the following global configuration command:
Switch(config)# aaa new-model
The new-model keyword refers to the use of method lists, by which authentication methods and sources can be grouped or organized. The new model is much more scalable than the “old model,” in which the authentication source was explicitly configured.
Step 2. Define external RADIUS servers.
First, define each server along with its secret shared password. This string is known only to the switch and the server, and provides a key for encrypting the authentication session. Use the following global configuration command:
Switch(config)# radius-server host {hostname | ip-address} [key string]
This command can be repeated to define additional RADIUS servers.
Step 3. Define the authentication method for 802.1X.
Using the following command causes all RADIUS authentication servers that are defined on the switch to be used for 802.1X authentication:
Switch(config)# aaa authentication dot1x default group radius
Step 4. Enable 802.1X on the switch:
Switch(config)# dot1x system-auth-control
Step 5. Configure each switch port that will use 802.1X:
Switch(config)# interface type mod/num
Switch(config-if)# dot1x port-control {force-authorized | force-
unauthorized | auto}
Here, the 802.1X state is one of the following:
![]() force-authorized: The port is forced to always authorize any connected client. No authentication is necessary. This is the default state for all switch ports when 802.1X is enabled.
force-authorized: The port is forced to always authorize any connected client. No authentication is necessary. This is the default state for all switch ports when 802.1X is enabled.
![]() force-unauthorized: The port is forced to never authorize any connected client. As a result, the port cannot move to the authorized state to pass traffic to a connected client.
force-unauthorized: The port is forced to never authorize any connected client. As a result, the port cannot move to the authorized state to pass traffic to a connected client.
![]() Auto: The port uses an 802.1X exchange to move from the unauthorized to the authorized state, if successful. This requires an 802.1X-capable application on the client PC.
Auto: The port uses an 802.1X exchange to move from the unauthorized to the authorized state, if successful. This requires an 802.1X-capable application on the client PC.
Tip
After 802.1X is globally enabled on a switch, all switch ports default to the force-authorized state. This means that any PC connected to a switch port can immediately start accessing the network. Ideally, you should explicitly configure each port to use the auto state so that connected PCs are forced to authenticate through the 802.1X exchange.
Step 6. Allow multiple hosts on a switch port.
It might be obvious that port-based authentication is tailored to controlling access to a single host PC that is connected to a switch port. However, 802.1X also supports cases in which multiple hosts are attached to a single switch port through an Ethernet hub or another access layer switch.
If the switch should expect to find multiple hosts present on the switch port, use the following interface configuration command:
Switch(config-if)# dot1x host-mode multi-host
Tip
You can use the show dot1x all command to verify the 802.1X operation on each switch port that is configured to use port-based authentication.
802.1X Port-Based Authentication Example
In Example 19-4, two RADIUS servers are located at 10.1.1.1 and 10.1.1.2. Switch ports Gigabit Ethernet 1/0/1 through 1/0/40 will use 802.1X for port-based authentication. When authenticated, the end users will be associated with VLAN 10.
Example 19-4 Configuring 802.1X Port-Based Authentication
Switch(config)# aaa new-model
Switch(config)# radius-server host 10.1.1.1 key BigSecret
Switch(config)# radius-server host 10.1.1.2 key AnotherBigSecret
Switch(config)# aaa authentication dot1x default group radius
Switch(config)# dot1x system-auth-control
Switch(config)# interface range gigabitethernet1/0/1 - 40
Switch(config-if)# switchport access vlan 10
Switch(config-if)# switchport mode access
Switch(config-if)# dot1x port-control auto
Using Storm Control
Recall from Chapter 2, “Switch Operation,” that a LAN switch makes a network operate more efficiently by breaking it up into many isolated portions. A single host can connect to a single switch port, forming a tiny collision domain. More importantly, a switch uses a destination MAC address to deliver a frame to the switch port where the corresponding host is connected. For the most part, each host receives only the frames that are meant to reach it. Frame delivery is streamlined and hosts are spared spending their resources receiving and discarding unnecessary and unrelated frames.
Three exceptions apply to this idealized scenario:
![]() Broadcast frames
Broadcast frames
![]() Multicast frames
Multicast frames
![]() Unknown unicast frames
Unknown unicast frames
In each of these cases, frames have a destination MAC address that is not specific or one that cannot be located. Therefore, the frames must be flooded or delivered to multiple hosts over multiple switch ports. Some amount of flooded traffic is normal and should be expected. After all, hosts must rely on broadcasts like ARP requests to find other hosts. Until a host transmits a frame and the switch learns its MAC address, the switch must flood frames destined for the host.
However, it is entirely possible to have an excessive amount of flooded traffic on a network. For example, a host might have a runaway process or malicious software that sends a broadcast storm into its local VLAN. Another host might set aside one network interface card (NIC) to receive traffic and another one to transmit traffic. The receiving NIC will never send a frame, so the switch will never learn its MAC address. As a result, all traffic destined for the receiving NIC will be flooded to all hosts on the VLAN as unknown unicast frames.
By default, frames will be flooded at the same rate they are received by a switch. Under normal conditions, the volume of flooded frames should not be too great for hosts to handle. Under extreme conditions, flooded frames can overwhelm many hosts. You can leverage the Storm Control feature to set limits on flooded traffic before it can cause problems on your network.
Storm Control is configured on a per-interface basis to monitor traffic that is arriving or being received at the interface, as shown in Figure 19-1. The idea is to take action on frames as they enter the switch and arrive at the internal switching bus, before they are flooded to multiple switch ports. You can configure thresholds for the amount of broadcast, multicast, or unknown unicast traffic and an action to be taken when the thresholds are exceeded.
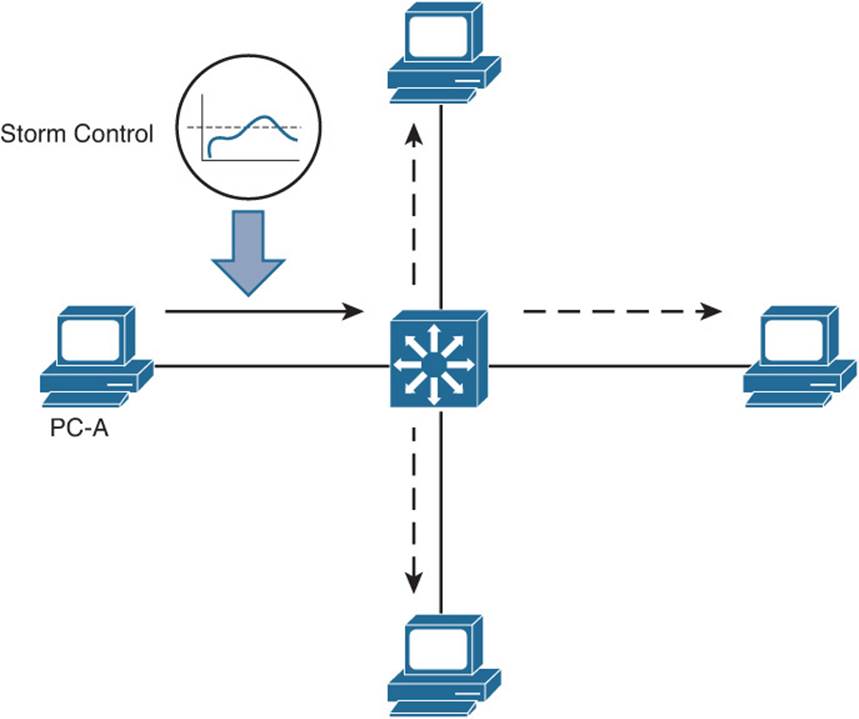
Figure 19-1 Using Storm Control to Limit Received Frames Before They Are Flooded
First, select an interface where frames might be received and flooded. Then configure a threshold using the following interface configuration command:
Switch(config-if)# storm-control {broadcast | multicast | unicast}
level {level [level-low] | bps bps [bps-low] | pps pps [pps-low]}
Select the type of threshold with the broadcast, multicast, or unicast keyword. Keep in mind that “unicast” actually means unknown unicast; otherwise, the threshold would limit the volume of normal unicast frames passing through the interface.
You can set the traffic threshold with the level keyword and one of the following keywords and values:
![]() level [level-low]: The threshold is set to a percentage of the interface bandwidth. The level and level-low percentages can be a value with two decimal places from 0.00 to 100.00.
level [level-low]: The threshold is set to a percentage of the interface bandwidth. The level and level-low percentages can be a value with two decimal places from 0.00 to 100.00.
![]() bps bps [bps-low]: The threshold is set to a specific bits per second rate. The bps and bps-low values can range from 0.0 to 10000000000.0 (10 Gbps), with one decimal place.
bps bps [bps-low]: The threshold is set to a specific bits per second rate. The bps and bps-low values can range from 0.0 to 10000000000.0 (10 Gbps), with one decimal place.
![]() pps pps [pps-low]: The threshold is set to a specific packets per second rate. The pps and pps-low values can range from 0.0 to 10000000000.0 (10 Gbps), with one decimal place.
pps pps [pps-low]: The threshold is set to a specific packets per second rate. The pps and pps-low values can range from 0.0 to 10000000000.0 (10 Gbps), with one decimal place.
Storm Control will take action when the flooded traffic rises to the first value, then will stop the action when the traffic falls below that value. You can set a different falling threshold by specifying the second -low value.
Tip
Rather than counting zeroes for large bps and pps values, you can use k, m, and g to designate kilo-, mega-, and giga- units.
You can repeat the storm control command to define separate thresholds for broadcast, multicast, and unknown unicast traffic.
Next, specify the action to be taken when the threshold is exceeded. By default, the excessive frames are simply dropped as they are received. In addition, you can use the following interface configuration command to shut down the interface in errdisable mode or to send an SNMP trap as an alert of a storm condition in progress:
Switch(config-if)# storm-control action {shutdown | trap}
In Example 19-5, Storm Control is enabled for traffic received on interface Gigabit Ethernet 1/0/1. Because there is no storm control action command entered, the default action to drop excessive frames will be taken. When broadcast frames exceed 50 percent of the interface bandwidth, they will be dropped. When the rate of multicast frames exceeds 50,000 packets per second, they will be dropped. Finally, when the volume of unknown unicast frames rises above 20 percent and then stays above 10 percent of the interface bandwidth, they will be dropped.
Example 19-5 Enabling Storm Control
Switch(config)# interface gigabitethernet1/0/1
Switch(config-if)# storm control broadcast level 50
Switch(config-if)# storm control multicast level pps 50k
Switch(config-if)# storm control unicast level 20 10
You can display the rising and falling Storm Control thresholds, in addition to the current rate, with the following EXEC command:
Switch# show storm-control [interface-id] [broadcast | multicast | unicast]
Best Practices for Securing Switches
Although you can configure and use many different features on Cisco Catalyst switches, you should be aware of some common weaknesses that can be exploited. In other words, do not become complacent and assume that everyone connected to your network will be good citizens and play by the rules. Think ahead and try to prevent as many things as possible that might be leveraged to assist an attacker.
This section presents a brief overview of many best-practice suggestions that can help secure your switched network:
![]() Configure secure passwords: Whenever possible, you should use the enable secret command to set the privileged-level password on a switch. This command uses a stronger encryption than the normal enable password command.
Configure secure passwords: Whenever possible, you should use the enable secret command to set the privileged-level password on a switch. This command uses a stronger encryption than the normal enable password command.
You also should use external AAA servers to authenticate administrative users whenever possible. The usernames and passwords are maintained externally, so they are not stored or managed directly on the switch. In addition, having a centralized user management is much more scalable than configuring and changing user credentials on many individual switches and routers.
Finally, you always should use the service password-encryption configuration command to automatically encrypt password strings that are stored in the switch configuration. Although the encryption is not excessively strong, it can prevent casual observers from seeing passwords in the clear.
![]() Use system banners: When users successfully access a switch, they should be aware of any specific access or acceptable use policies that are pertinent to your organization. You should configure system banners so that this type of information is displayed when users log in to a switch. The idea is to warn unauthorized users (if they gain access) that their activities could be grounds for prosecution—or that they are unwelcome, at the very least.
Use system banners: When users successfully access a switch, they should be aware of any specific access or acceptable use policies that are pertinent to your organization. You should configure system banners so that this type of information is displayed when users log in to a switch. The idea is to warn unauthorized users (if they gain access) that their activities could be grounds for prosecution—or that they are unwelcome, at the very least.
You should use the banner motd command to define the text that is displayed to authenticated users. Try to avoid using other banner types that display information about your organization or the switch before users actually log in. Never divulge any extra information about your network that malicious users could use.
![]() Secure the web interface: Decide whether you will use the web interface to manage or monitor a switch. Some network professionals use the command line interface exclusively, so the web interface is not needed in a production environment. In this case, you should disable the web interface with the no ip http server global configuration command.
Secure the web interface: Decide whether you will use the web interface to manage or monitor a switch. Some network professionals use the command line interface exclusively, so the web interface is not needed in a production environment. In this case, you should disable the web interface with the no ip http server global configuration command.
If you do decide to use the web interface, be sure to use the HTTPS interface, if it is supported on the switch platform. The standard HTTP web interface has some glaring weaknesses, mainly because none of the traffic is encrypted or protected. Enable the HTTPS interface with the ip http secure server global configuration command instead of the ip http server command.
In addition, try to limit the source addresses that can access the HTTPS interface. First, create an access list that permits only approved source addresses; then apply the access list to the HTTPS interface with the ip http access-class configuration command. As an example, the following configuration commands permit HTTPS connections that are sourced from the 10.100.50.0/24 network:
Switch(config)# ip http secure server
Switch(config)# access-list 1 permit 10.100.50.0 0.0.0.255
Switch(config)# ip http access-class 1
![]() Secure the switch console: In many environments, switches are locked away in wiring closets where physical security is used to keep people from connecting to the switch console. Even so, you always should configure authentication on any switch console. It is usually appropriate to use the same authentication configuration on the console as the virtual terminal (vty) lines.
Secure the switch console: In many environments, switches are locked away in wiring closets where physical security is used to keep people from connecting to the switch console. Even so, you always should configure authentication on any switch console. It is usually appropriate to use the same authentication configuration on the console as the virtual terminal (vty) lines.
![]() Secure virtual terminal access: You always should configure user authentication on all the vty lines on a switch. In addition, you should use access lists to limit the source IP addresses of potential administrative users who try to use Telnet or Secure Shell (SSH) to access a switch.
Secure virtual terminal access: You always should configure user authentication on all the vty lines on a switch. In addition, you should use access lists to limit the source IP addresses of potential administrative users who try to use Telnet or Secure Shell (SSH) to access a switch.
You can use a simple IP access list to permit inbound connections only from known source addresses, as in the following example:
Switch(config)# access-list 10 permit 192.168.199.10
Switch(config)# access-list 10 permit 192.168.201.100
Switch(config)# line vty 0 15
Switch(config-line)# access-class 10 in
Be sure you apply the access list to all the line vty entries in the switch configuration. Many times, the vty lines are separated into groups in the configuration. You can use the show user all command to see every possible line that can be used to access a switch.
![]() Use SSH whenever possible: Although Telnet access is easy to configure and use, Telnet is not secure. Every character you type in a Telnet session is sent to and echoed from a switch in the clear, with no encryption. Therefore, it is very easy to eavesdrop on Telnet sessions to overhear usernames and passwords.
Use SSH whenever possible: Although Telnet access is easy to configure and use, Telnet is not secure. Every character you type in a Telnet session is sent to and echoed from a switch in the clear, with no encryption. Therefore, it is very easy to eavesdrop on Telnet sessions to overhear usernames and passwords.
Instead, you should use SSH whenever possible. SSH uses strong encryption to secure session data. Therefore, you need a strong-encryption IOS image running on a switch before SSH can be configured and used. You should use the highest SSH version that is available on a switch. The early SSHv1 and SSHv1.5 have some weaknesses, so you should choose SSHv2 with the ip ssh version 2 global configuration command whenever possible.
![]() Secure SNMP access: As a best practice, you should always leverage the secure features of SNMPv3. You should also prevent unauthorized users from making changes to a switch configuration by disabling any SNMPv1 or SNMPv2C read-write SNMP access. These are commands of the form snmp-server community string rw.
Secure SNMP access: As a best practice, you should always leverage the secure features of SNMPv3. You should also prevent unauthorized users from making changes to a switch configuration by disabling any SNMPv1 or SNMPv2C read-write SNMP access. These are commands of the form snmp-server community string rw.
Instead, you should have only read-only commands in the configuration. In addition, you should use access lists to limit the source addresses that have read-only access. Do not depend on the SNMPv1 or SNMPv2c community strings for security because these are passed in the clear in SNMP packets.
![]() Secure unused switch ports: Every unused switch port should be disabled so that unexpected users cannot connect and use them without your knowledge. You can do this with the shutdown interface configuration command.
Secure unused switch ports: Every unused switch port should be disabled so that unexpected users cannot connect and use them without your knowledge. You can do this with the shutdown interface configuration command.
In addition, you should configure every user port as an access port with the switchport mode access interface configuration command. Otherwise, a malicious user might connect and attempt to negotiate trunking mode on a port. You also should consider associating every unused access port with a bogus or isolated VLAN. If an unexpected user does gain access to a port, he will have access only to a VLAN that is isolated from every other resource on your network.
Tip
You might consider using the switchport host interface configuration command as a quick way to force a port to support only a single PC. This command is actually a macro, as shown in the following example:
Switch(config)# interface gigabitethernet 1/0/1
Switch(config-if)# switchport host
switchport mode will be set to access
spanning-tree portfast will be enabled
channel group will be disabled
Switch(config-if)#
![]() Secure STP operation: A malicious user can inject STP bridge protocol data units (BPDUs) into switch ports or VLANs, and can disrupt a stable, loop-free topology. You always should enable the BPDU Guard feature so that access switch ports automatically are disabled if unexpected BPDUs are received.
Secure STP operation: A malicious user can inject STP bridge protocol data units (BPDUs) into switch ports or VLANs, and can disrupt a stable, loop-free topology. You always should enable the BPDU Guard feature so that access switch ports automatically are disabled if unexpected BPDUs are received.
![]() Secure the use of CDP and LLDP: By default, Cisco Discovery Protocol (CDP) advertisements are sent on every switch port at 60-second intervals. If Link Layer Discovery Protocol (LLDP) is enabled, its advertisements are sent at 30-second intervals. Although CDP and LLDP are very handy tools for discovering neighboring network devices, you should not allow those protocols to advertise unnecessary information about your switch to listening attackers.
Secure the use of CDP and LLDP: By default, Cisco Discovery Protocol (CDP) advertisements are sent on every switch port at 60-second intervals. If Link Layer Discovery Protocol (LLDP) is enabled, its advertisements are sent at 30-second intervals. Although CDP and LLDP are very handy tools for discovering neighboring network devices, you should not allow those protocols to advertise unnecessary information about your switch to listening attackers.
For example, the following information is sent in a CDP advertisement in the clear. An attacker might use the device ID to physically locate the switch, its IP address to target Telnet, SSH, or Simple Network Management Protocol (SNMP) attacks, or the native VLAN and switch port ID to attempt a VLAN hopping attack:
Device ID: nyc-bldgA-dist1.mycompany.com
Entry address(es):
IP address: 10.1.76.2
Platform: cisco WS-C6509-E, Capabilities: Router Switch IGMP
Interface: TenGigabitEthernet1/1/1, Port ID (outgoing port): TenGigabitEthernet1/5
Holdtime : 137 sec
Version :
Cisco IOS Software, s72033_rp Software (s72033_rp-ADVIPSERVICESK9_WAN-M), Version 12.2(33)SXI4, RELEASE SOFTWARE (fc3)
Technical Support: http://www.cisco.com/techsupport
Copyright (c) 1986-2010 by Cisco Systems, Inc.
Compiled Sat 29-May-10 17:54 by prod_rel_team
advertisement version: 2
VTP Management Domain: 'MyCompany'
Native VLAN: 101
Duplex: full
Management address(es):
IP address: 10.1.76.2
CDP should be enabled only on switch ports that connect to other trusted Cisco devices. Do not forget that CDP must be enabled on access switch ports where Cisco IP phones are connected. When the CDP messages reach the IP phone, they will not be relayed on to a PC connected to the phone’s data port. You can disable CDP on a port-by-port basis with the no cdp enable interface configuration command.
Exam Preparation Tasks
Review All Key Topics
Review the most important topics in the chapter, noted with the Key Topic icon in the outer margin of the page. Table 19-2 lists a reference of these key topics and the page numbers on which each is found.
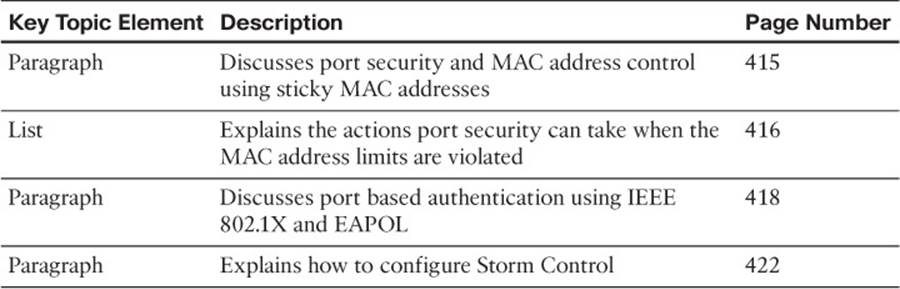
Table 19-2 Key Topics for Chapter 19
Complete Tables and Lists from Memory
There are no memory tables in this chapter.
Define Key Terms
Define the following key terms from this chapter, and check your answers in the glossary:
sticky MAC address
IEEE 802.1X
Use Command Reference to Check Your Memory
This section includes the most important configuration and EXEC commands covered in this chapter. It might not be necessary to memorize the complete syntax of every command, but you should remember the basic keywords that are needed.
To test your memory of the STP configuration commands, cover the right side of Tables 19-3 through 19-5 with a piece of paper, read the description on the left side, and then see how much of the command you can remember.
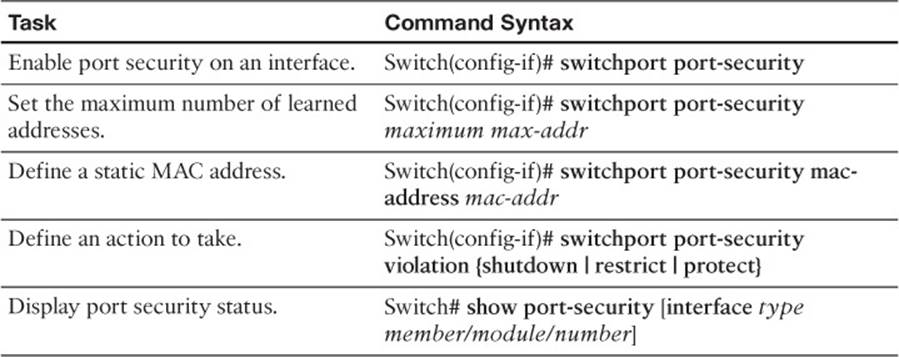
Table 19-3 Port Security Configuration Commands
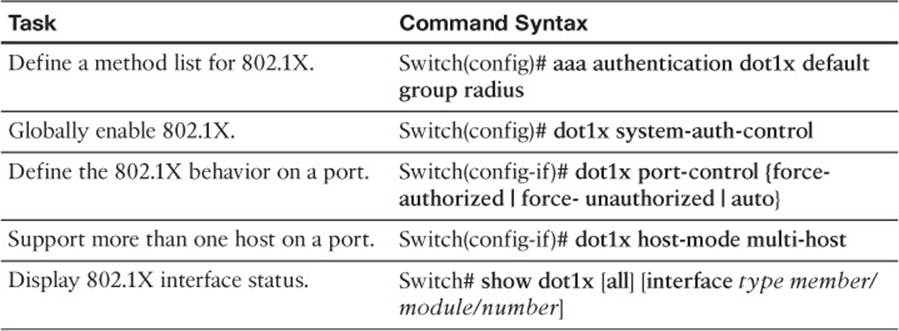
Table 19-4 Port-Based Authentication Configuration Commands
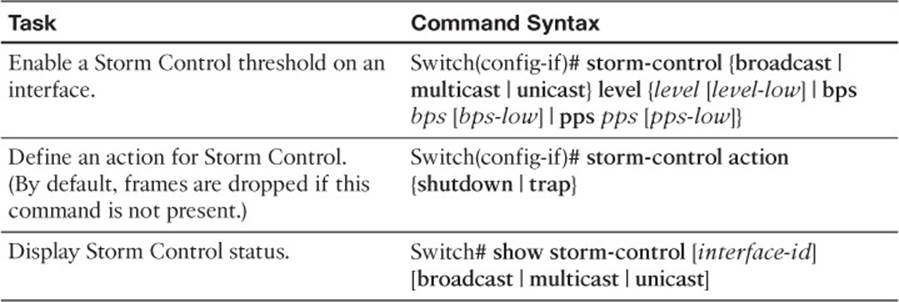
Table 19-5 Storm Control Configuration Commands