PHP, MySQL, JavaScript & HTML5 All-in-One For Dummies (2013)
Book III: JavaScript
Chapter 3: Adding jQuery
In This Chapter
![]() Understanding what jQuery is
Understanding what jQuery is
![]() Installing jQuery
Installing jQuery
![]() Adding jQuery to a page
Adding jQuery to a page
![]() Adding HTML with jQuery
Adding HTML with jQuery
![]() Changing styles with jQuery
Changing styles with jQuery
jQuery is a JavaScript library. Okay, that might not make much sense. What’s a JavaScript library? A JavaScript library is a collection of code that you use when you want to get access to additional functionality or make life easier. jQuery does both.
jQuery is simply JavaScript that you add to your web page to make writing JavaScript easier. You still use JavaScript with jQuery, so everything you learn in Chapter 2 is not wasted. However, there are certain things that jQuery does much better than plain old JavaScript. Working with web pages is one such thing. For instance, where you might use getElementById, jQuery has things called selectors that enable much more powerful ways to access things on a web page for JavaScript to use.
This chapter explains how to get started with jQuery and then shows some examples using jQuery. Subsequent chapters in this minibook and indeed in the entire book assume that you’re using jQuery in certain places, as will become obvious as you progress.
jQuery Introduced
jQuery is quite popular. Although there are no accurate statistics to show how often jQuery is used, cursory glances at popular sites show that jQuery is all over the web.
jQuery also makes cross-browser development easier. Though you haven’t seen much of it so far (especially if you’ve been reading this book in linear order), support for JavaScript differs widely from browser to browser and from version to version. What works in Firefox might not work at all in Internet Explorer or might work completely the opposite.
A favorite example of how JavaScript support differs from browser to browser involves the handling of dates. There is a certain JavaScript function that returns the year. For example, assuming it’s 2008 when you call the function, JavaScript is supposed to return 2008 — but that isn’t always the case, depending on which browser you’re using. When that function is used in Firefox or Safari, you receive the full year, 2008, as you’d expect. When you use JavaScript in Internet Explorer, you receive the number of years that have elapsed since 1900. When the year is 2008, you’d receive 108 back from Internet Explorer. Obviously if you’re trying to do any sort of date calculation with that value, it’s going to be wildly askew.
Which browser is right? It doesn’t really matter. What’s important is that the browser manufacturers read the JavaScript specification differently and in the end return different things for the same function.
Unfortunately, the date example is but one of many such examples (some much more serious than that) where browsers differ in how they implement JavaScript. The good news is that jQuery takes that complication away. jQuery’s functions figure out what browser is being used in an accurate way and then account for it in order to make the browser behave in a consistent manner.
Installing jQuery
There are two ways to use jQuery, either downloaded locally or on a Content Delivery Network (CDN). The local copy is just that, a file that sits within your document root on your server’s hard drive. A CDN-hosted version means that the jQuery file sits on someone else’s server and you just reference it in your code.
Whether you use a local copy of a CDN is up to you. For production websites, we strongly recommend using a local copy of jQuery for speed and reliability. However, in development, like when you’re following along in this book, it’s okay to use the CDN version of jQuery. The book’s examples use a CDN-hosted jQuery, but this section shows how to use both local and CDN.
Installing jQuery locally
jQuery is available as a download from www.jquery.com. Once there, select the Production version and click Download. Depending on your browser's settings you may end up with a page full of JavaScript code. If that's the case, select Save As from the File menu. In other cases, you'll simply be prompted to download a file. In the end, you want to end up with a file named like jquery-1.8.1.min.js, regardless of whether you save the file or download it.
The file should be placed into your document root. Remember the filename; you’ll need it later.
That’s all there is to installing jQuery — download it and put the file into your document root.
Using CDN-hosted jQuery
The CDN-hosted option for jQuery is great for development. You don't have to worry about downloading the file or putting it in the right place; it's always available (as long as the CDN is up). CDN-hosted versions are available from many of the big-time players on the web, like Google and Microsoft. You don't need to download anything in order to use a CDN-hosted jQuery, so this section is short and sweet. You can find the links for the CDN-hosted versions at www.jquery.com/download.
The next section shows how to add CDN-hosted jQuery to your page.
Adding jQuery to a Page
Now that you have jQuery downloaded or know where to find the CDN-hosted version, you need to reference it in your page. jQuery is just like any external JavaScript file which you see in Chapter 1 of this minibook. This section shows how to add jQuery to your page both for locally hosted jQuery and CDN-hosted jQuery.
Adding local jQuery to a page
In the preceding section, we instruct you to download jQuery and place it in the web server's document root. If you don't remember the filename, locate it in your document root. It'll be named like jquery-1.8.1.min.js. (Note that the version number will almost certainly be different by the time you read this.)
Adding jQuery to a page means adding an external script reference, like this:
<script type="text/javascript" src="jquery-1.8.1-min.js"></script>
That reference is usually added in the <head> portion of a page. Listing 3-1 shows a page with the jQuery script referenced in the <head> section.
Listing 3-1: Adding jQuery to a Page
<!doctype html>
<html>
<head>
<title>jQuery</title>
<script type="text/javascript"
src="jquery-1.8.1.min.js"></script>
</head>
<body>
<h1>Adding jQuery</h1>
</body>
</html>
That’s all there is to adding jQuery. Later in this chapter, you find out what to do now that it’s loaded.
Adding CDN jQuery to a page
Loading CDN-hosted jQuery is just like loading it locally, minus the part where you have jQuery stored on your hard drive, of course. Other than that detail, you simply add jQuery like any other external JavaScript file. Here’s an example:
<script type="text/javascript"
src=" http://ajax.aspnetcdn.com/ajax/jQuery/jquery-1.8.1.min.js">
</script>
But how do you find out the secret location where jQuery is hosted for public use? Go to http://jquery.com/download and you can find a CDN-hosted jQuery.
Within the Download page, you see a section for CDN-hosted jQuery. When you find one you want to use, right-click and select the Copy Link Location option or similar from the context menu in your browser. That will copy the URL to your clipboard for later use.
A full page example with CDN-hosted jQuery looks strikingly similar to the page for the locally hosted copy, only the src attribute has changed. Listing 3-2 shows the HTML and JavaScript; note specifically the <script> tag in the <head> section.
Listing 3-2: CDN-hosted jQuery
<!doctype html>
<html>
<head>
<title>jQuery</title>
<script type="text/javascript"
src="http://ajax.aspnetcdn.com/ajax/jQuery/jquery-1.8.1.min.js">
</script>
</head>
<body>
<h1>Adding jQuery</h1>
</body>
</html>
Incorporating the jQuery ready() Function
A common problem when programming JavaScript is that the JavaScript program will run before the page is loaded. The preceding chapter explains that you can access HTML elements on a page. This means you can also access things like images, forms, and whatever else you want, on a web page. The problem comes in when you try to access something on the page before the browser has it loaded. jQuery offers ways around this, which you see in this section.
jQuery has a function called ready() that waits for the page to be, well, ready. Not quite everything is available (for example, some images still may be loading), but the HTML elements are ready to be worked with when the ready() function is called.
When you program with jQuery, it's typical to place your code inside of the ready() function so that you can ensure that all the stuff on the page is ready for you to use in your program. Really, there's not that much to this, so try not to overthink it.
An example would help illustrate! Listing 3-3 shows an HTML page with JavaScript inside of the jQuery ready() function.
Listing 3-3: Using the jQuery ready() Function
<!doctype html>
<html>
<head>
<title>jQuery</title>
<script type="text/javascript"
src="http://ajax.aspnetcdn.com/ajax/jQuery/jquery-1.8.1.min.js">
</script>
</head>
<body>
<h1>Adding jQuery</h1>
<script type="text/javascript">
$(document).ready(function() {
alert("hi");
});
</script>
</body>
</html>
When viewed through a browser, the result is an alert like the one in Figure 3-1.
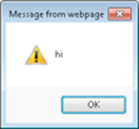
Figure 3-1: An alert produced by the jQuery ready() function.
This code has two areas of interest. The first is the <script> element itself:
<script type="text/javascript"
src="http://ajax.aspnetcdn.com/ajax/jQuery/jquery-1.8.1.min.js">
</script>
This includes jQuery from Microsoft’s CDN into the page.
The next area of interest is within the <body>, specifically, the <script> within the body:
<script type="text/javascript">
$(document).ready(function() {
alert("hi");
});
</script>
This code calls the jQuery ready() function, part of the document object. Notice the special syntax with the dollar sign and parentheses. This is what tells the browser and JavaScript that what follows is going to be jQuery, so processing is handed over to jQuery. And because jQuery has a function called ready(), it knows what to do.
 You use $() all over the place with jQuery; it's what tells jQuery that it should pay attention.
Inside of the jQuery ready() function there's this code:
function() {
alert("hi");
}
You know all about functions already so this isn’t anything new. Or is it? If this is a function, where’s the function name? For most uses of jQuery, you’ll see similar syntax to what you see here, with a function with no name like this one and then code within it.
 When you see this syntax, function(), with no name, it's called an anonymous function. For the most part, you don't need to know much about anonymous functions until you get much deeper into JavaScript programming. For what you're doing here, just know that this is the typical syntax that you use when you use jQuery.
Within the function an alert is displayed. No surprise here — it's the standard alert() function you've been using throughout the book. But what's happening here is important: You're using jQuery together with JavaScript inside of the same script.
Selecting Elements with jQuery
The preceding section explains how to select the document object. It also provides a great deal of how jQuery works. When you use the code $(document), you use something called a selector. Most of what you'll do in jQuery happens through selectors. For instance, you'll frequently select a piece of a web page and then have jQuery perform an action on that piece of the page. That action could be anything from adding text, changing HTML, changing CSS or, well, just about anything you can think of!
The basic flow for JavaScript programming with jQuery is this:
1. Select an element on the web page (or the entire page itself).
2. Do something interesting with that element.
Okay, what you do with the element doesn’t have to be interesting, but you will do something with the selected element. That something can be anything from removing the element to adding or changing it or simply getting information from the element, like its text or current CSS styles.
jQuery selectors up close
There are three primary or basic selectors in jQuery. We call them primary or basic because they’re the ones you’ll use most frequently. You can set up very complex selectors based on the structure of the page, but most often you’ll use one of these three selectors:
![]() By class
By class
![]() By ID
By ID
![]() By element
By element
If you had some HTML that looked like this:
<p id="bookTitle">My Book</p>
You could access that with jQuery like this:
$("#bookTitle")
It's important to note that things in jQuery (and JavaScript) are case sensitive. So booktitle is not the same as BOOKTITLE and not the same as bookTitle. It doesn't matter what case you use, as long as it matches between the HTML and the JavaScript and jQuery.
Now take a look at this bit of HTML:
<p class="titleClass">This is some text</p>
The jQuery selector looks like this:
$(".titleClass")
If you think that these selectors look like their CSS counterparts, you’re right. Don’t worry if you weren’t thinking that; there won’t be a quiz.
In CSS, you access items by their ID with a pound sign (#) and you access classes with a single dot (.):
#bookTitle
.titleClass
All you're doing for jQuery is wrapping it in the $() construct and using some quotes too. So you get this:
$("#bookTitle")
$(".titleClass")
The other frequently used selector grabs all the elements of a certain type. The following selector selects all <div> elements on the entire page:
$("div")
There are more advanced selectors. For example, you can select by an element’s position on the page and, well, just about any combination that you can think of. But you’ll use these three most often and where you need more, we’ll show them to you.
Filtering
One additional thing you should know about jQuery selectors is that you can filter them. This is particularly handy when it comes to working with forms and events. With that in mind, we save the discussion of filtering until we get to forms and events in the upcoming chapters.
Working with HTML Using jQuery
You can use jQuery to do all kinds of fun things with the HTML on a page and we hint at some of those things, like adding HTML to a page or changing text, and so on. It’s time to learn how to do it!
Adding HTML to a page
jQuery can be used to add HTML to a page. You can add all sorts of HTML, images, just about anything, and completely change the layout of the page using jQuery. Doing so isn’t really a good idea, though, because it can get really, really confusing to figure out what’s coming from where and also can be more difficult to maintain in the future when you need to change the page.
In any event, adding HTML for things like error messages or in order to add data to a page is quite common. Think about a travel site that looks up flight information. You click a button and it builds the results dynamically, right on the same page. Those sites use JavaScript, many times jQuery, to accomplish this feat. But before you go changing HTML you should learn how to add HTML to a page.
Listing 3-4 shows a simple HTML page that creates a list of items.
Listing 3-4: HTML with a List
<!doctype html>
<html>
<head>
<title>jQuery</title>
</head>
<body>
<h1>Adding HTML</h1>
<ul id="theList">
<li>Here's 1</li>
<li>Here's 2</li>
</ul>
</body>
</html>
A page viewed in a web browser looks like the one in Figure 3-2.
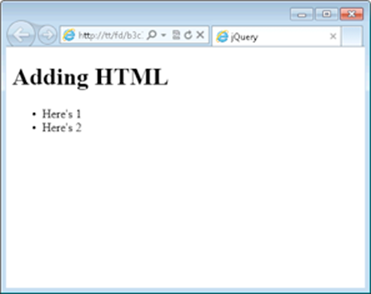
Figure 3-2: A simple page with a list.
The page uses an unordered list with two items. You can add another item to that list with the jQuery append() function. Doing so means selecting the <ul> element, which you already know how to do, and then calling the append() function. Here's an example to add a third item to the list:
$("#theList").append("<li>Here's 3</li>");
As you can see, you select the <ul> element using an ID selector and then call the append() function with the HTML to add. Doesn't get much simpler than that.
Listing 3-5 shows the final code. Note that jQuery has been added to it in the <head> section and the append() function is within the ready() function, as discussed earlier.
Listing 3-5: Adding an Item with jQuery
<!doctype html>
<html>
<head>
<title>jQuery</title>
<script type="text/javascript"
src="http://ajax.aspnetcdn.com/ajax/jQuery/jquery-1.8.1.min.js">
</script>
</head>
<body>
<h1>Adding HTML</h1>
<ul id="theList">
<li>Here's 1</li>
<li>Here's 2</li>
</ul>
<script type="text/javascript">
$(document).ready(function() {
$("#theList").append("<li>Here's 3</li>");
});
</script>
</body>
</html>
When viewed in a browser, the result looks like Figure 3-3.
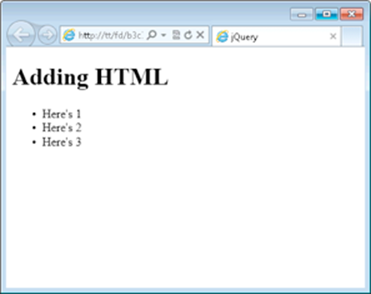
Figure 3-3: Adding HTML with jQuery’s append() function.
Changing elements
Adding with append() makes sense; you select the element that you want and then append more HTML onto it. But what about when you want to change something that already exists? There are a few ways to do it, depending on what you want to change. For example, say you wanted to change the text of the elements in the page that you just worked on.
Instead of having each element say "Here's," you want it to say "Item." You could add an ID to each element and then change the HTML with the html() or the text() function. But that seems like a lot of work. And it creates another problem if the HTML changes somewhere along the way.
Another way, and the way that we show, is to loop through each of the list items and change them. The preceding chapter explains loops. jQuery has its own way to loop, called each(). The each() loop method has an advantage over the while and for loops: The each() function can be used with jQuery so you get the full advantage of all the jQuery functions and you can chain the each() function with other jQuery functions.
Chaining is the term used with jQuery to describe what you do when you connect functions with dots in order to make the function apply to the chain.
We start this example with the HTML from Listing 3-5. In fact, we leave the append() function in there to show that the change you'll make applies not only to the HTML that was originally on the page, but also to HTML that you add.
Granted, with just two elements to change, you’d just do this in the HTML itself, but this example shows the process and functions for changing HTML so that you can use it when you really need it.
Listing 3-6 shows the HTML and JavaScript for this example.
Listing 3-6: Changing Text with each()
<!doctype html>
<html>
<head>
<title>jQuery</title>
<script type="text/javascript"
src="http://ajax.aspnetcdn.com/ajax/jQuery/jquery-1.8.1.min.js">
</script>
</head>
<body>
<h1>Adding HTML</h1>
<ul id="theList">
<li>Here's 1</li>
<li>Here's 2</li>
</ul>
<script type="text/javascript">
$(document).ready(function() {
$("#theList").append("<li>Here's 3</li>");
$("#theList li").each(function() {
var existingText = $(this).text().substr(7,1);
$(this).text("Item " + existingText);
});
});
</script>
</body>
</html>
The JavaScript and jQuery here shows a few new things, so look a bit closer at the code.
The first line of the new code is this:
$("#theList li").each(function() {
That line uses a selector to find all <li> elements within the ID of theList. That's a little different than the other selectors you see in the chapter and represents how jQuery can use the page's hierarchy to access only the items that you want.
The each() function is changed onto the selector and sets up an anonymous function. At this point, you know that the code will begin looping through each <li> element within the ID of theList.
The next line of code looks like this:
var existingText = $(this).text().substr(7,1);
This code sets up a plain JavaScript variable, existingText, and sets it equal to the result of $(this).text().substr(7,1). But what's this, or more appropriately, $(this)? The special selector $(this) refers to the current element being worked on. JavaScript has an equivalent called this, but you want the jQuery version, so you wrap it in the dollar sign/parentheses notation.
The $(this) selector is chained to the jQuery text() function, which retrieves the elements text, with no HTML markup, just the text. The text() function is then chained to the substr() function. The substr() function grabs a substring, or portion of a string, and returns it. In this case, you want substr() to return to you one single character beginning at the seventh position. You can do this because you know that every element begins with the word Here's followed by a space, like this:
Here's 1
Counting characters from the left, there are six characters in Here's plus one character for the space. That makes seven, so you end up with substr(7,1). Granted, this breaks when you get to ten items because you're only returning a single character. You could fancy this up by using a regular expression, which you haven't really spent time on yet, so for this example, leave it as is. Okay, if you must know, you could replace the substr() function with the match() function, and it would look like this:
var existingText = $(this).text().match(/[\d]/);
Back to reality and the example, the final line of code looks like this:
$(this).text("Item " + existingText);
That line simply calls the text() function, but instead of returning text, this time you set it to "Item " + existingText. Because you have the number of the item in the variable existingText, it's like you're appending it.
A page viewed in a browser looks like that in Figure 3-4.
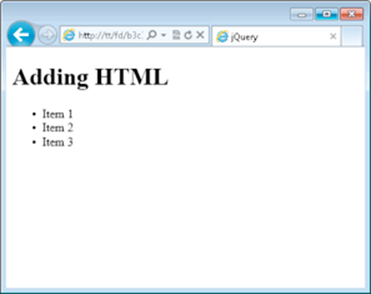
Figure 3-4: Changing text in a web page with jQuery.
Changing Attributes and Styles
jQuery makes retrieving and setting HTML attributes and CSS styles easy. This means you can change things like an image source or a CSS class or even CSS styles themselves. This section looks at how to do just that.
Reading attributes
Remember from way, way earlier in this book (provided you read earlier chapters before this one), you learned that the descriptive stuff contained inside of an HTML element is called an attribute. For example:
<a id="exLink" class="link" href="http://www.example.com">Web site</a>
The id, class, and href parts that you see in that <a> element are all attributes. Using jQuery, you can find out the values for all those attributes, and as you see later, you can set them too.
Reading an attribute with jQuery means using the attr() function. Listing 3-7 shows code using attr to read the href attribute from the link you just saw.
Listing 3-7: Using the attr() Function
<!doctype html>
<html>
<head>
<title>jQuery</title>
<script type="text/javascript"
src="http://ajax.aspnetcdn.com/ajax/jQuery/jquery-1.8.1.min.js">
</script>
</head>
<body>
<h1>Attributes</h1>
<a id="exLink" class="link" href="http://www.example.com">Web site</a>
<script type="text/javascript">
$(document).ready(function() {
alert($("#exLink").attr("href"));
});
</script>
</body>
</html>
The bulk of the work is done on one line:
alert($("#exLink").attr("href"));
That line uses a selector to select the element with the ID of exLink and then calls the attr() function with "href" as the argument. The result is returned and placed in an alert(), shown in Figure 3-5.
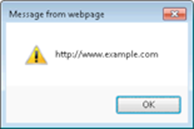
Figure 3-5: Accessing the href attribute.
Writing attributes
Just like the text() and html() functions, you can also set the value of an attribute using the attr() function. For example, to change the value of the href attribute from the code in Listing 3-7, you'd do this:
$("#exLink").attr("href", "http://www.braingia.org");
Images are added to a page by using the src attribute. This means that you can change the src attribute to change the image, on the fly, through JavaScript. Listing 3-8 contains HTML for a page. The HTML contains an image that loads square.jpg.
Listing 3-8: A Page with an Image
<!doctype html>
<html>
<head>
<title>jQuery</title>
</head>
<body>
<h1>Attributes</h1>
<img alt="square" id="theImage" src="square.jpg" />
</body>
</html>
When viewed in a browser, the page looks like Figure 3-6.
You can change that image to a different one using the attr() function. Listing 3-9 shows the code to achieve such a feat.
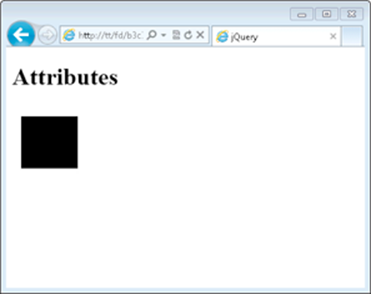
Figure 3-6: A page with a square image.
Listing 3-9: Changing an Image’s Source
<!doctype html>
<html>
<head>
<title>jQuery</title>
<script type="text/javascript"
src="http://ajax.aspnetcdn.com/ajax/jQuery/jquery-1.8.1.min.js">
</script>
</head>
<body>
<h1>Attributes</h1>
<img alt="square" id="theImage" src="square.jpg" />
<script type="text/javascript">
$(document).ready(function() {
$("#theImage").attr("src","heart.jpg");
});
</script>
</body>
</html>
Figure 3-7 shows the result.
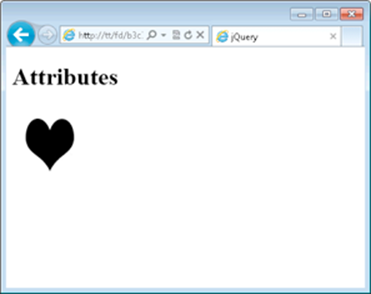
Figure 3-7: Changing the image through jQuery.
Look closely at the HTML and you'll see a problem. You've successfully changed the src attribute, but the alt attribute still says that the image is a square. You should change the alt attribute to match the image. Doing so is as simple as calling attr() again, this time to set the altattribute.
$("#theImage").attr("alt","heart");
Because you never see the change, the code in Listing 3-9 might not seem all that interesting. Do something to change that. Add a timer to delay the switch. For this timer, use the native JavaScript function called setTimeout.
The setTimeout() function takes two arguments, the function to call when the timer expires and how long to wait. The time value that you use is in milliseconds, so 2 seconds is 2000 milliseconds.
Listing 3-10 shows the new code.
Listing 3-10: Delaying the Image Change
<!doctype html>
<html>
<head>
<title>jQuery</title>
<script type="text/javascript"
src="http://ajax.aspnetcdn.com/ajax/jQuery/jquery-1.8.1.min.js">
</script>
</head>
<body>
<h1>Attributes</h1>
<img alt="square" id="theImage" src="square.jpg" />
<script type="text/javascript">
function changeImage() {
$("#theImage").attr("src","heart.jpg");
$("#theImage").attr("alt","heart");
}
$(document).ready(function() {
setTimeout(changeImage,2000);
});
</script>
</body>
</html>
This code builds a function called changeImage(). Inside of that function is the same line of jQuery that you had in the preceding example (Listing 3-9). Inside of the ready() function, there's now a call to setTimeout with the two function arguments we already mentioned, the changeImagefunction, and 2000, for a delay of 2 seconds.
When you view this in a browser, you first receive a page like that in Figure 3-6 and then, two seconds later, receive a page like Figure 3-7.
Changing CSS
You can also change the styling information on a page, either by setting the styles directly or by changing the CSS class applied to an element. Class is just another attribute on an element, so changing CSS means using the attr() function again.
Adding a class
Listing 3-11 contains basic HTML with some styling information in the <head> section.
Listing 3-11: HTML with CSS
<!doctype html>
<html>
<head>
<title>jQuery</title>
<script type="text/javascript"
src="http://ajax.aspnetcdn.com/ajax/jQuery/jquery-1.8.1.min.js">
</script>
<style type="text/css">
.borderClass {
border: 3px solid black;
}
</style>
</head>
<body>
<h1>Styles</h1>
<img alt="heart" id="theImage" src="heart.jpg" />
</body>
</html>
When you view the page in a browser, you end up with a page like that from Figure 3-7, with a simple heart image on the page. However, by adding a call to the attr() function to add the borderClass defined on the page, you end up with code like that in Listing 3-12.
Listing 3-12: Adding a Class Using attr().
<!doctype html>
<html>
<head>
<title>jQuery</title>
<script type="text/javascript"
src="http://ajax.aspnetcdn.com/ajax/jQuery/jquery-1.8.1.min.js">
</script>
<style type="text/css">
.borderClass {
border: 3px solid black;
}
</style>
</head>
<body>
<h1>Styles</h1>
<img alt="heart" id="theImage" src="heart.jpg" />
<script type="text/javascript">
$(document).ready(function() {
$("#theImage").attr("class","borderClass");
});
</script>
</body>
</html>
The code simply calls attr() to change the class attribute to borderClass. In this case, there actually isn't a class attribute on the element yet, so jQuery is smart enough to just add one for you. The result ends up like Figure 3-8.
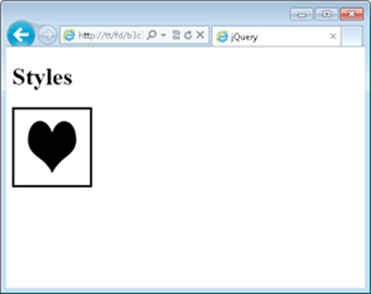
Figure 3-8: Adding a class through the attr() function.
But what to do if there's already a class on the element? You could first retrieve the classes using attr and then append another one. Or you could use the jQuery function for adding a class, called addClass(). The addClass() function doesn't interfere with any other classes that are already applied to an element; it just adds another class to it.
Making the change to the code from Listing 3-12 is as simple as changing the line:
$("#theImage").attr("class","borderClass");
to:
$("#theImage").addClass("borderClass");
With that simple change, the class borderClass will be added and you don't have to worry about removing other classes that are applied to the element.
Removing a class
A companion to the addClass() function, called removeClass, takes the class away from an element. Like addClass(), removeClass() doesn't affect other classes that are on the element; it removes only the specified class.
The syntax for removeClass is like the addClass syntax:
$("#theImage").removeClass("borderClass");
In the next chapter, you see another related function called toggleClass that adds or removes the class, depending on whether it's already applied to an element.