Sams Teach Yourself PHP, MySQL and Apache All in One (2012)
Part V. Basic Projects
Chapter 26. Logging and Monitoring Web Server Activity
In this chapter, you learn the following:
• How to understand Apache log formats and logging levels
• How to rotate and analyze Apache logs
• How to interpret common errors that might appear in your logs
• How to create scripts that log specific items to database tables
• How to create custom reports based on these logging tables
This chapter describes how the logging system in Apache works and how you can customize it (which information to store and where). In addition, you learn a quick way to use PHP and MySQL to log specific items of interest to you outside the realm of the Apache log files.
Standard Apache Access Logging
Using Apache’s basic logging features, you can keep track of who visits your websites by logging accesses to the servers hosting them. You can log every aspect of the browser requests and server responses, including the IP address of the client, user, and resource accessed. You need to take three steps to create a request log:
1. Define what you want to log—your log format.
2. Define where you want to log it—your log files, a database, an external program.
3. Define whether to log—conditional logging rules.
The next few sections take a closer look at these steps.
Defining What to Log
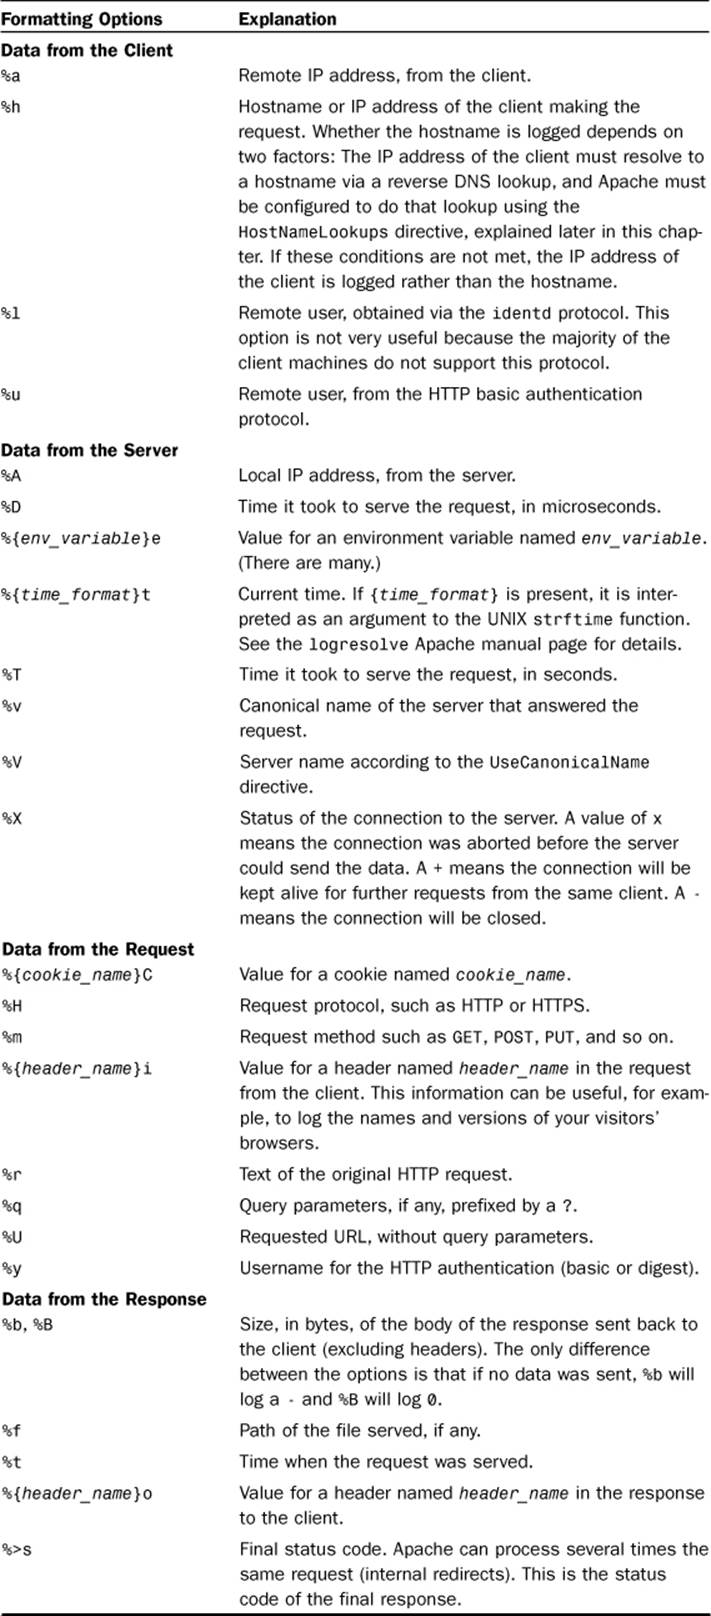
As well as logging nearly every aspect associated with the request, you can define how your log entries appear by creating a log format. A log format is a string that contains text mixed with log-formatting directives. Log-formatting directives start with a % followed by a directive name or identifier, usually a letter indicating the piece of information to be logged.
When Apache logs a request, it scans the string and substitutes the value for each directive. For example, if the log format is This is the client address %a, the log entry is something like This is the client address 10.0.0.2. That is, the logging directive %a replaces the IP address of the client making the request. Table 26.1 provides a comprehensive list of all formatting directives.
Table 26.1 Log Formatting Directives
The Common Log Format (CLF) is a standard log format. Most websites can log requests using this format, and many log processing and reporting tools understand the format. Its format is the following:
"%h %l %u %t \"%r\" %>s %b"
That is, it includes the hostname or IP address of the client, remote user via identd, remote user via HTTP authentication, time when the request was served, text of the request, status code, and size in bytes of the content served.
Note
You can read the Common Log Format documentation of the original W3C server at http://www.w3.org/Daemon/User/Config/Logging.html.
The following is a CLF entry example:
10.0.0.1 - - [19/Jan/2012:17:32:43 -0500] "GET / HTTP/1.0" 200 1101
You are now ready to learn how to define log formats using the LogFormat directive. This directive takes two arguments: The first argument is a logging string, and the second is a nickname that will be associated with that logging string.
For example, the following directive from the default Apache configuration file defines the CLF and assigns it the nickname common:
LogFormat "%h %l %u %t \"%r\" %>s %b" common
You can also use the LogFormat directive with only one argument, either a log format string or a nickname. This has the effect of setting the default value for the logging format used by the TransferLog directive, explained in “Defining Where to Log” later in this chapter.
The HostNameLookups Directive
When a client makes a request, Apache knows only the IP address of the client. Apache must perform what is called a reverse DNS lookup to find out the hostname associated with the IP address. This operation can be time-consuming and can introduce a noticeable lag in the request processing. The HostNameLookups directive enables you to control whether to perform the reverse DNS lookup.
The HostNameLookups directive can take one of the following arguments: on, off, or double. The default is off. The double lookup argument means that Apache finds out the hostname from the IP and then tries to find the IP from the hostname. This process is necessary if you are really concerned with security, as described in http://httpd.apache.org/docs-2.2/dns-caveats.html. If you are using hostnames as part of your Allow and Deny rules, a double DNS lookup is performed regardless of the HostNameLookups settings.
If HostNameLookups is enabled (on or double), Apache logs the hostname. This causes extra load on your server, which you should be aware of when making the decision to turn HostNameLookups on or off. If you choose to keep HostNameLookups off, which is recommended for medium- to high-traffic sites, Apache logs only the associated IP address. There are plenty of tools to resolve the IP addresses in the logs later. See the “Managing Apache Logs” section later in this chapter. In addition, the result is passed to CGI scripts via the environment variable REMOTE_HOST.
The IdentityCheck Directive
At the beginning of the chapter, you learned how to log the remote username via the identd protocol using the %l log formatting directive. The IdentityCheck directive takes a value of on or off to enable or disable checking for that value and making it available for inclusion in the logs. Because the information is not reliable and takes a long time to check, it is switched off by default and should probably never be enabled. %l was mentioned only because it is part of the CLF. For more information on the identd protocol, see RFC 1413 at http://www.rfc-editor.org/rfc/rfc1413.txt.
Status Code
You can specify whether to log specific elements in a log entry. At the beginning of the chapter, you learned that log directives start with a %, followed by a directive identifier. In between, you can insert a list of status codes, separated by commas. If the request status is one of the listed codes, the parameter is logged; otherwise, a - is logged.
For example, the following directive identifier logs the browser name and version for malformed requests (status code 400) and requests with methods not implemented (status code 501). This information can prove useful for tracking which clients are being used to access your website.
%400,501{User-agent}i
You can precede the method list with an ! to log the parameter if the methods are implemented:
%!400,501{User-agent}i
Defining Where to Log
Logging to files is the default way of logging requests in Apache. You can define the name of the file using the TransferLog and CustomLog directives.
The TransferLog directive takes a file argument and uses the latest log format defined by a LogFormat directive with a single argument (the nickname or the format string). If no log format is present, it defaults to the CLF.
The following example shows how to use the LogFormat and TransferLog directives to define a log format that is based on the CLF but that also includes the browser name:
LogFormat "%h %l %u %t \"%r\" %>s %b \"%{User-agent}i\""
TransferLog logs/access_log
The CustomLog directive enables you to specify the logging format explicitly. It takes at least two arguments: a logging format and a destination file. The logging format can be specified as a nickname or as a logging string directly.
For example, the directives
LogFormat "%h %l %u %t \"%r\" %>s %b \"%{User-agent}i\"" myformat
CustomLog logs/access_log myformat
and
CustomLog logs/access_log "%h %l %u %t \"%r\" %>s %b \"%{User-agent}i\""
are equivalent.
The CustomLog directive accepts an environment variable as a third argument. If the environment variable is present, the entry is logged; otherwise, it is not. If the environment variable is negated by prefixing an ! to it, the entry is logged if the variable is not present.
The following example shows how to avoid logging images in GIF and JPEG format in your logs:
SetEnvIf Request_URI "(\.gif|\.jpg)$" image
CustomLog logs/access_log common env=!image
Note
The regular expression used for pattern matching in this and other areas of the httpd.conf file follows the same format for regular expressions in PHP and other programming languages.
Both TransferLog and CustomLog directives can accept an executable program, prefixed by a pipe sign, |, as an argument. Apache writes the log entries to the standard input of this program. The program, in turn, processes the input by logging the entries to a database, transmitting them to another system, and so on.
If the program dies for some reason, the server makes sure that it restarts. If the server stops, the program also stops. The rotatelogs utility, bundled with Apache and explained later in this chapter, is an example of a logging program.
As a general rule, unless you have a specific requirement for using a particular program, it is easier and more reliable to log to a file on disk and do the processing, merging, analysis of logs, and so on, at a later time, possibly on a different machine.
Note
Make sure that the program you use for logging requests is secure, because it runs as the user Apache was started with. On UNIX, this usually means root because the external program is started before the server changes its user ID to the value of the User directive, typicallynobody or www.
Standard Apache Error Logging
Apache can be configured to log error messages and debugging information, in addition to client requests. In addition to errors generated by Apache itself, CGI errors can be logged.
Each error log entry is prefixed by the time the error occurred and the client IP address or hostname, if available. As with HTTP request logging, you can log error information to a file or program. On UNIX systems, you can also log to the syslog daemon. On Windows, errors can be logged in the Windows event log and are then viewable via the Windows Event Viewer. Use the ErrorLog directive to define where you want your logs to go.
Logging Errors to a File
A file argument indicates the path to the error log file. If the path is relative, it is assumed to be relative to the server root. By default, the error log file is located in the logs directory and is named error_log on UNIX and error.log on Windows. The following is an example:
ErrorLog logs/my_error_log
Logging Errors to a Program
You can specify the path to a program, prefixed by a pipe |. Apache logs errors to the standard input of the program, and the program further processes them. The following is an example:
ErrorLog "|/usr/local/bin/someprogram"
The syslog Daemon Argument
On a UNIX system, if you specify syslog as an argument, you can log error messages to the UNIX system log daemon syslogd. By default, log errors are logged to the syslog facility local7. The facility is the part of the system generating the error. You can specify a facility by providingsyslog:facility as an argument. Examples of syslog facilities are mail, uucp, local0, local1, and so on. For a complete list, look at the documentation for syslog included with your system. (Try man syslogd or man syslogd.conf at the command line.) The following is an example of logging tosyslog:
ErrorLog syslog:local6
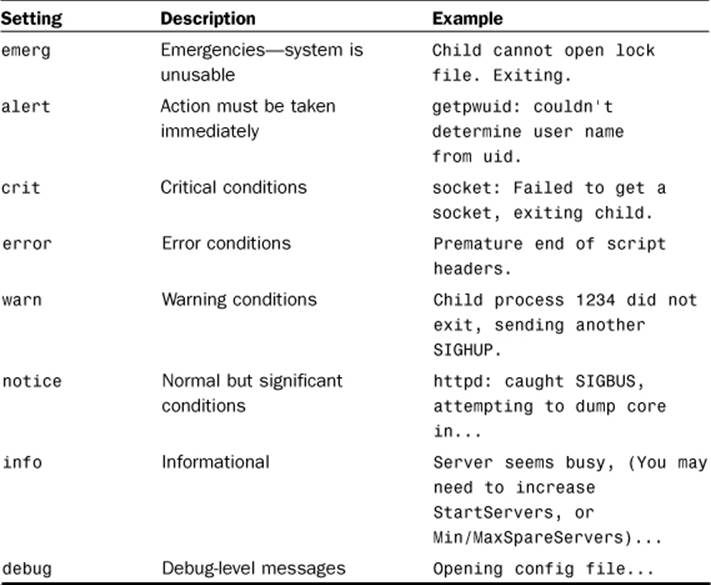
The LogLevel Directive
The error information provided by Apache has several degrees of importance. You can choose to log only important messages and disregard informational or trivial warning messages. The LogLevel directive takes an error-level argument. Only errors of that level of importance or higher are logged.
Table 26.2 specifies the valid values for the LogLevel directive, as specified by the Apache documentation. By default, the LogLevel value is warn. That should be enough for most Apache installations. If you are trying to troubleshoot a specific configuration, you can alter the level to debug.
Table 26.2 LogLevel Options as Described in the Apache Documentation
Managing Apache Logs
Apache provides several tools for managing your logs. Other Apache-specific third-party tools are available and mentioned here. Because Apache can log requests in the CLF, you can use most generic log-processing tools with Apache as well.
Resolving Hostnames
Earlier in the chapter, you learned how to use the HostNameLookups directive to enable or disable hostname resolution at the time the request is made. If HostName-Lookups is set to off (the default), the log file contains only IP addresses. Later, you can use the command-line logresolve utility on UNIX or logresolve.exe on Windows to process the log file and convert the IP addresses to hostnames.
The logresolve utility reads log entries from standard input and outputs the result to its standard output. To read to and from a file, you can use redirection on both UNIX and Windows:
logresolve < access.log > resolved.log
Log-resolving tools are efficient because they can cache results and do not cause any delay when serving requests to clients.
Log Rotation
In websites with high traffic, access log files can quickly grow in size. You should have a mechanism to rotate logs periodically, archiving and compressing older logs at defined intervals.
Log files should not be removed while Apache is running because the server is writing directly to them. A solution would be to use an intermediate program to log the requests. The program, in turn, takes care of rotating the logs.
Apache provides the rotatelogs program on UNIX and rotatelogs.exe on Windows for this purpose. It accepts three arguments: a filename, a rotate interval in seconds, and an optional offset in minutes against UTC (coordinated universal time).
For example
TransferLog "|bin/rotatelogs /var/logs/apachelog 86400"
creates a new log file and moves the current log to the /var/logs directory daily. (At the end of the command, 86400 is the number of seconds in 1 day.)
Note
If the path to the program includes spaces, you might need to escape them by prefixing them with a \ (backslash)—for example, My\ Documents. This is especially common in the Windows platform.
If the name of the file includes % prefixed options, the name is treated as input to the strftime function that converts the % options to time values. The manual page for the rotatelogs utility contains a complete listing of options, but here’s an example:
TransferLog "|bin/rotatelogs /var/logs/apachelog%m_%d_%y 86400"
This command adds the current month, day, and year to the log filename.
If the name does not include any %-formatted options, the current time in seconds is added to the name of the archived file.
Log Analysis
Whether you have a single server and log files, or a cluster of servers producing their own log files, after you collect the logs you can analyze them and gain information about traffic and visitor behavior.
Many commercial, shareware, and freeware applications are available for server-side log analysis and reporting. Two popular open source applications are Webalizer (http://www.mrunix.net/webalizer/) and awstats (http://awstats.sourceforge.net/).
Wusage is a nice, inexpensive commercial alternative at http://www.boutell.com/wusage/.
Monitoring Error Logs
If you run Apache on a UNIX system, you can use the tail command-line utility to monitor in real-time log entries to both your access and error logs. The syntax is
tail -f logname
where logname is the path to the Apache log file. It prints onscreen the last few lines of the log file and continues to print entries as they are added to the file.
You can find additional programs that enable you to identify problems quickly by scanning your error log files for specific errors, malformed requests, and so on and reporting on them. ScanErrLog is one such program; you can find it at http://www.librelogiciel.com/software/.
Logging Custom Information to a Database
Creating your own logging tables in MySQL, matched up with snippets of PHP code, can help you to capture access-related information for specific pages of your site. Using this information, you can create customized reports. This method can be much less cumbersome than wading through Apache log files, especially when you are just searching for a subset of access information. The following sections outline a simple version of this process.
Creating the Database Table
The first step in your custom logging method is to create the database table. The following table-creation command creates a table called access_tracker in your MySQL database, with fields for an ID, page title, user agent, and date of access:
CREATE TABLE access_tracker (
id INT NOT NULL PRIMARY KEY AUTO_INCREMENT,
page_title VARCHAR(50),
user_agent TEXT,
date_accessed DATE
);
Next you create the code snippet that writes to this table.
Creating the PHP Code Snippet
As you might have gathered already, code snippet simply means a little bit of code. In other words, something that doesn’t qualify as a long script but just serves a simple purpose. In this case, the code snippet in Listing 26.1 writes some basic information to the access_tracker table.
Listing 26.1 Code Snippet for Access Tracking
1: <?php
2: //set up static variables
3: $page_title = "sample page A";
4: $user_agent = getenv('HTTP_USER_AGENT');
5:
6: //connect to server and select database
7: $mysqli = mysqli_connect("localhost", "joeuser", "somepass", "testDB")
8: or die(mysql_error());
9:
10: //create and issue query
11: $sql = "INSERT INTO access_tracker (page_title,user_agent,date_accessed)
12: VALUES ('$page_title', '$user_agent', now())";
13: $result = mysqli_query($mysqli, $sql) or die(mysqli_error($mysqli));
14:
15: //close connection to MySQL
16: mysqli_close($mysqli);
17: ?>
What you do with this snippet is simple, for purposes of illustration here: Place it at the beginning of every page you want to track. For each page, change the value of $page_title in the snippet to represent the actual title of the page.
Now create a script called sample1.php, containing the contents of Listing 26.1 and then the contents in Listing 26.2.
Listing 26.2 HTML Page Example
1: <!DOCTYPE html>
2: <html>
3: <head>
4: <title>Sample Page A</title>
5: </head>
6: <body>
7: <h1>Sample Page A</h1>
8: <p>blah blah blah.</p>
9: </body>
10: </html>
Create a few copies of this file with different filenames and values for $page_title. Then access these different pages with your web browser to fill up your logging table.
Creating Sample Reports
When you have the data in your access_tracker table, you can create a simple report screen to disseminate this information. The code in Listing 26.3 creates a report that issues queries to count total results as well as the breakdown of browsers in use. Each of these blocks is explained after the code listing.
Listing 26.3 Creating an Access Report
1: <?php
2: //connect to server and select database
3: $mysqli = mysqli_connect("localhost", "joeuser", "somepass", "testDB")
4: or die(mysqli_error());
5:
6: //issue query and select results for counts
7: $count_sql = "SELECT count(page_title) AS p_count FROM access_tracker";
8: $count_res = mysqli_query($mysqli, $count_sql) or die(mysqli_error($mysqli));
9:
10: while ($count_info = mysqli_fetch_array($count_res)) {
11: $all_count = $count_info['p_count'];
12: }
13:
14: //issue query and select results for user agents
15: $user_agent_sql = "SELECT DISTINCT user_agent, count(user_agent) AS
16: ua_count FROM access_tracker GROUP BY user_agent
17: ORDER BY ua_count desc";
18: $user_agent_res = mysqli_query($mysqli, $user_agent_sql)
19: or die(mysqli_error($mysqli));
20:
21: //start user agent display block
22: $user_agent_block = "<ul>";
23:
24: //loop through user agent results
25: while ($row_ua = mysqli_fetch_array($user_agent_res)) {
26: $user_agent = $row_ua['user_agent'];
27: $user_agent_count = $row_ua['ua_count'];
28: $user_agent_block .= "
29: <li>".$user_agent."
30: <ul>
31: <li><em>accesses per browser: ".$user_agent_count."</em>
32: </ul>
33: </li>";
34: }
35:
36: //finish up the user agent block
37: $user_agent_block .= "</ul>";
38:
39: //issue query and select results for pages
40: $page_title_sql = "SELECT DISTINCT page_title, count(page_title) AS
41: pt_count FROM access_tracker GROUP BY page_title
42: ORDER BY pt_count desc";
43: $page_title_res = mysqli_query($mysqli, $page_title_sql)
44: or die(mysqli_error($mysqli));
45:
46: //start page title display block
47: $page_title_block = "<ul>";
48:
49: //loop through results
50: while ($row_pt = mysqli_fetch_array($page_title_res)) {
51: $page_title = $row_pt['page_title'];
52: $page_count = $row_pt['pt_count'];
53: $page_title_block .= "
54: <li>".$page_title."
55: <ul>
56: <li><em>accesses per page: ".$page_count."</em>
57: </ul>
58: </li>";
59: }
60:
61: //finish up the page title block
62: $page_title_block .= "</ul>";
63:
64: //close connection to MySQL
65: mysqli_close($mysqli);
66: ?>
67: <!DOCTYPE html>
68: <html>
69: <head>
70: <title>Access Report</title>
71: </head>
72: <body>
73: <h1>Access Report</h1>
74: <p><strong>Total Accesses Tracked:</strong>
75: <?php echo "$all_count"; ?></p>
76: <p><strong>Web Browsers Used:</strong>
77: <?php echo "$user_agent_block"; ?></p>
78: <p><strong>Individual Pages:</strong>
79: <?php echo "$page_title_block"; ?></p>
80: </body>
81: </html>
Line 3 connects to the database so that you can issue the queries against the access_tracker table. Lines 7–8 issue the query to select the count of all pages, and lines 15–19 count the user agent accesses. Line 22 starts an unordered list block for the results of the user agent query, and lines 25–34 loop through the results and create the list, which is closed in line 37.
Lines 40–44 create and issue the query to count the individual pages. Line 47 starts an unordered list block for the results of this query, and lines 50–59 loop through the results and create the list of accessed pages, which is closed in line 62.
Put these lines into a text file called accessreport.php, and place this file in your web server document root. When you access this report, you will see something like Figure 26.1. Your page names, counts, and browsers will differ, but you get the idea.
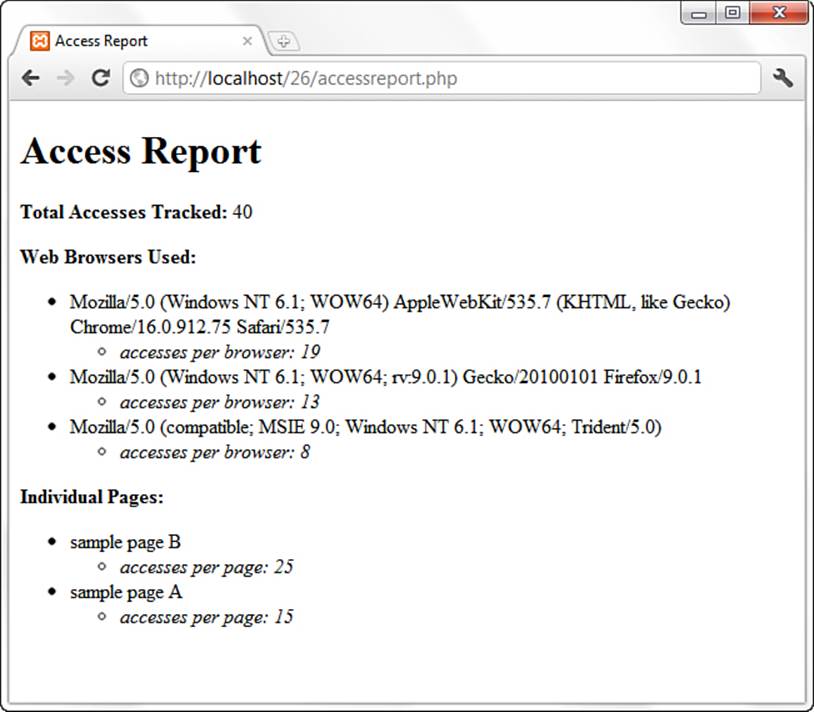
Figure 26.1 Custom access report for tracked pages.
This sort of tracking is a lot easier than wading through Apache access logs, but I do not recommend completely replacing your access logs with a database-driven system. That’s a bit too much database-connection overhead, even if MySQL is particularly nice on your system. Instead, target your page tracking to something particularly important.
Summary
This chapter explained how to log specific information about the requests and errors generated by Apache. You can store the logs in files or databases or pass them to external programs. You learned about the different utilities available for managing, processing, and analyzing logs, both the ones included with Apache and those available from third parties.
In this chapter, you also learned an easy method for using PHP code snippets and a MySQL database to perform simple access tracking of specific pages. This information was displayed in an easy-to-understand access report built with PHP.
Q&A
Q. Why wouldn’t I want to log images?
A. In heavily loaded servers, logging can become a bottleneck. If the purpose of logging is to count the number of visitors and analyze their usage of the website, you can achieve this result by logging only the HTML pages, not the images contained in them. This reduces the number of hits stored in the logs and the time spent writing them.
Workshop
The workshop is designed to help you review what you’ve learned and begin putting your knowledge into practice.
Quiz
1. How can you avoid logging hits from a client accessing your website from a particular network?
2. How can you log images to a different file?
3. Why would you want to turn HostNameLookups off in your Apache configuration?
Answers
1. In some situations, you might want to ignore requests coming from a particular network, such as your own, so that they do not skew the results. You can do this either by post-processing the logs and removing them or by using the SetEnvIf directive:
SetEnvIf Remote_Addr 10\.0\.0\. intranet
CustomLog logs/access_log "%h %l %u %t \"%r\" %>s %b" !intranet
2. Earlier in the chapter, you learned how to avoid logging images. Instead of ignoring images altogether, you can easily log them to a separate file, using the same environment variable mechanism:
SetEnvIf Request_URI "(\.gif|\.jpeg)$" image
CustomLog logs/access_log common env=!image
CustomLog logs/images_log common env=image
3. Having HostNameLookups on causes extra load on the server because it looks up the IP of the user accessing the site and writes that to the log file. You can still get the information at a later date by using a hostname resolver when generating usage reports, and the server load is then minimized for the user.
Activities
1. Create a tracking script that logs accesses to a database via PHP. Using the list of possible environment variables, log more than just the page title, user agent, and date accessed.
2. Create a report of the access data you have stored, only this time add a date range selector and only produce results that fall within the selected range.