Professional Microsoft SQL Server 2014 Integration Services (Wrox Programmer to Programmer), 1st Edition (2014)
Chapter 11. Incremental Loads in SSIS
WHAT’S IN THIS CHAPTER?
· Using the Control Table pattern for incrementally loading data
· Working with Change Data Capture
WROX.COM CODE DOWNLOADS FOR THIS CHAPTER
You can find the wrox.com code downloads for this chapter at http://www.wrox.com/go/prossis2014 on the Download Code tab.
So far, most of the data loading procedures that have been explained in this book have done a full load or a truncate and load. While this is fine for smaller amounts of rows, it would be unfeasible to do with millions of rows. In this chapter, you’re going to learn how to take the knowledge you’ve gained and apply the practices to an incremental load of data.
The first pattern will be a control table pattern. In this pattern, you’ll use a table to determine when the last load of the data was. Then the package will determine which rows to load based on the last load date. The other alternative used in this chapter is a Change Data Capture (CDC) pattern. This pattern will require that you have Enterprise Edition of SQL Server and will automatically identify the rows to be transferred based on a given date.
CONTROL TABLE PATTERN
The most conventional incremental load pattern is the control table pattern. The pattern uses a table that the developer creates to store operational data about the last load. A sample table looks like this:
CREATE TABLE [dbo].[ControlTable](
[SourceTable] [varchar](50) NOT NULL,
[LastLoadID] [int] NOT NULL,
[LastLoadDate] [datetime] NOT NULL,
[RowsInserted] [int] NOT NULL,
CONSTRAINT [PK_ControlTable] PRIMARY KEY CLUSTERED
(
[SourceTable] ASC
)
) ON [PRIMARY]
In this pattern, you would have a row in the control table for each table that you wish to create a load process for. This table is not only used by your SSIS package to determine how much data to load but it also becomes an audit table to see which tables have and have not been loaded. Each of the incremental load patterns in this chapter follow these steps:
1. An Execute SQL Task reads the last load data from the control table into a variable.
2. A Data Flow Task reads from the source table where they were modified or created after the date in the variable.
3. An Execute SQL Task sets the last load date in the control table to the time when the package began.
To start the example, run the Control Table Example Creation.sql file in the chapter’s accompanying material (which you can download from http://www.wrox.com/go/prossis2014). This will create a table to read from called SourceTable and a table to load called DestTable. It will also create and load the control table. Notice the ControlTable table shows a LastLoadDate column of 1900-01-01, meaning the SourceTable has never been read from. The TableName column holds a record for each table you wish to read from. Optionally, there’s a LastLoadID that could be used for identity columns.
Querying the Control Table
Querying the control table you created is simply done through an Execute SQL Task. Start by creating an OLE DB connection manager to whichever database you ran the setup script in. For the purpose of this example, we’ll assume you created the tables in a variant of the AdventureWorks database.
To configure the Execute SQL Task, direct the task to use the previously created connection manager. Then, use a query similar to the one that follows for your SQLStatement property. This query will find out the last time you retrieved data from the table called SourceTable.
SELECT LastLoadDate from
ControlTable where SourceTable = 'SourceTable'
The answer to the query should be stored into a variable to be used later. To do this, set the ResultSet property (shown in Figure 11-1) to Single Row. Doing this will allow you to use the ResultSet tab. Go to that tab, and click the Add button to create a new resultset. Then change the ResultName property from NewResultName to 0. This stores the result from the first column into the variable of your choosing. You could have also typed the column name from the query as well (LastLoadDate) into the property.
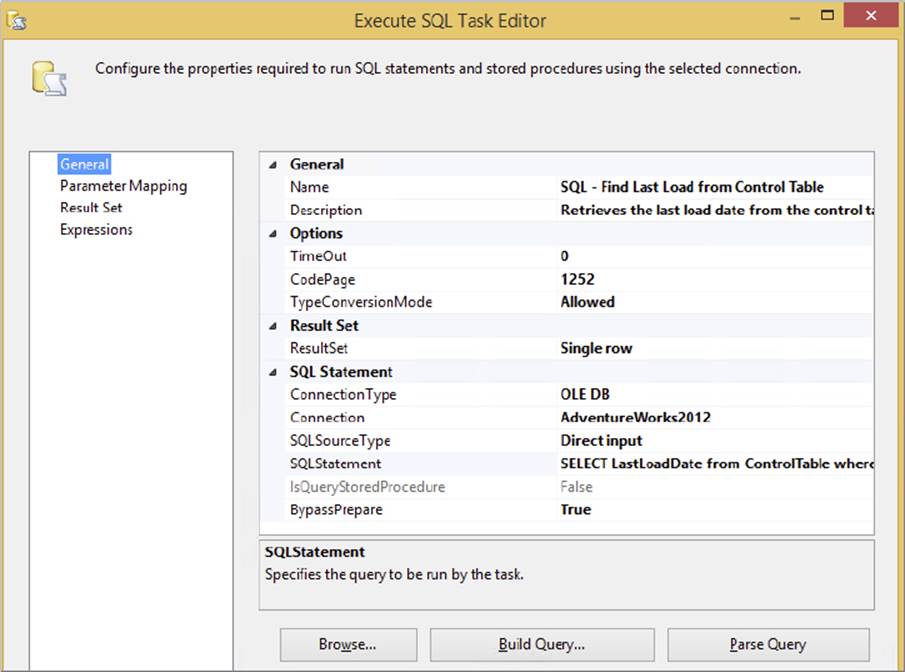
FIGURE 11-1
Next, select New Variable from the drop-down box in the ResultSet tab. This will open the Add Variable dialog box (shown in Figure 11-2). Ensure the variable is scoped to the package and call it SourceTableLoadDate. Define the data type of the variable as a DateTime and set the default value to 2099-01-01. This ensures that if someone were to run the package without running this Execute SQL Task, that no date will be retrieved.
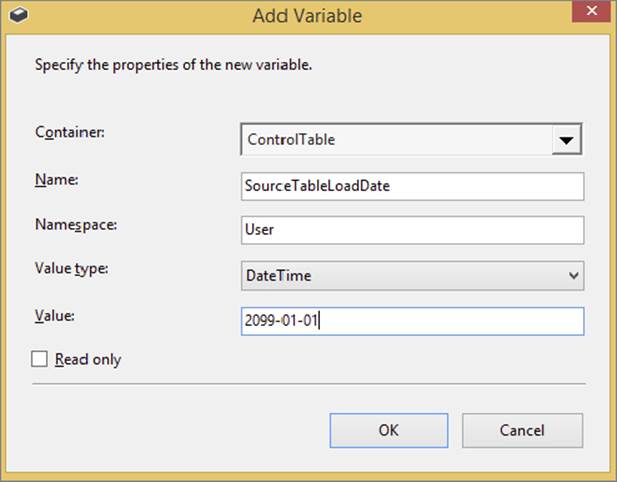
FIGURE 11-2
Querying the Source Table
With the date now set in the variable, you’re ready to retrieve any new data from your table called SourceTable. You’ll do this with a Data Flow Task that you connect to the Execute SQL Task. Create an OLE DB Source in the Data Flow and have it use the connection manager you created earlier. Then, set the Data Access Mode property to SQL Command and type the following query in the query window below:
SELECT * from SourceTable WHERE CreatedDate BETWEEN ? and ?
The two question marks represent input parameters that will be passed into the query. To set the values for the placeholders click Parameters, which opens the Set Query Parameters dialog box (shown in Figure 11-3). Set the first parameter to User::SourceTableLoadDate and the second parameter to System::StartTime. The StartTime variable represents the start time of the package. When both parameters are passed into the query, it essentially requests all the rows that have not been loaded since the last load until the time the package started.
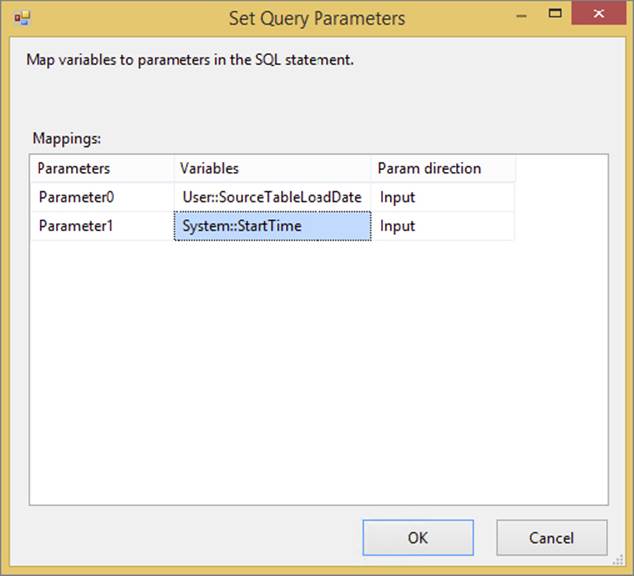
FIGURE 11-3
With the OLE DB Source now configured, drag an OLE DB Destination over to the Data Flow and connect it to the OLE DB Source. Configure the OLE DB Destination to use the same connection manager and load the table called DestTable. After configuring the mappings, the simple Data Flow is complete and the final Data Flow should resemble Figure 11-4.
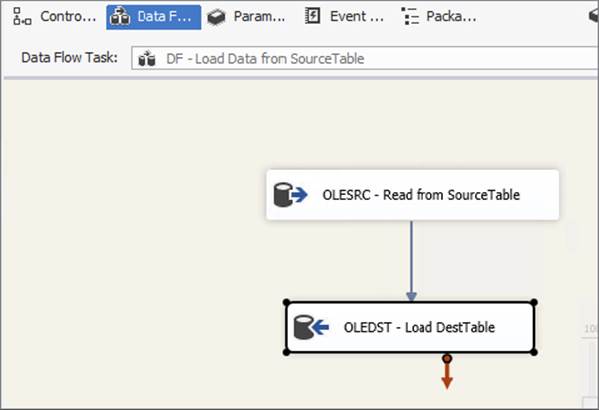
FIGURE 11-4
Updating the Control Table
Back in the Control Flow you need one more Execute SQL Task to update the control table. Connect it to the Data Flow Task. To configure the Execute SQL Task, connect it to the same connection manager you have been using and type the following query into the SQLStatement property.
UPDATE ControlTable
SET LastLoadDate = ?
WHERE SourceTable = 'SourceTable'
The question mark in this case represents the time the package began, and to pass it in, go to the Parameter Mapping page and configure it as shown in Figure 11-5. Click the Add button and set the variable name being passed in as System::StartTime, the Data Type as Date, and the Parameter Name as 0.
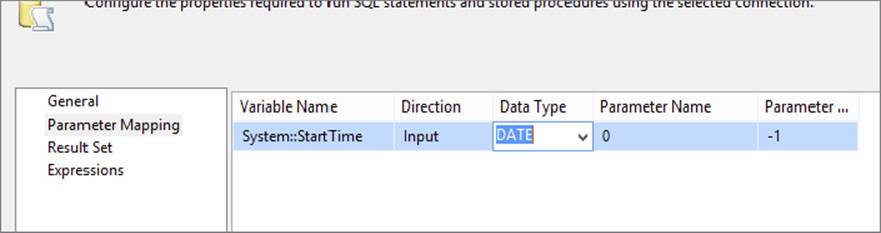
FIGURE 11-5
Once you’re done configuring this, your package is ready to run (shown in Figure 11-6). This task is going to update the Control Table and set the last load date as the time the package started, so the next time the package runs it will only get current values. The first time you run the package, you should see three rows go through the data flow. Subsequent runs should show zero rows but try also adding a row to the SourceTable table and running the package over again. If configured correctly, only the single row will go through. You’ll also see that the control table is constantly being updated with a new LastLoadDate column.
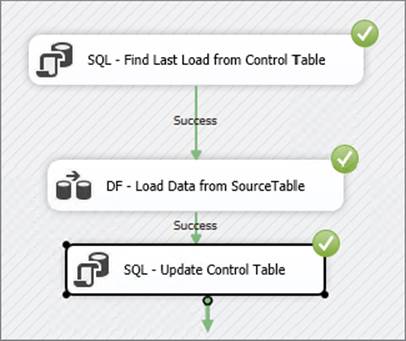
FIGURE 11-6
SQL SERVER CHANGE DATA CAPTURE
The advantage to the control table pattern you saw previously is it works across any database platform you may use. The negative is it requires a date or identity column to hook into it. It also doesn’t handle deleted records. The alternative is using the Change Data Capture (CDC) feature built into SQL Server. This feature works only in the Enterprise Edition of SQL Server but handles deletes and is easier to configure than the previous control table example. This section is focused on how to configure CDC for SSIS but if you want more information on CDC, it is covered extensively in Books Online (by the actual developer of CDC) and demonstrated in more detail in the related CodePlex samples (www.codeplex.com).
In most nightly batches for your ETL, you want to ensure that you are processing only the most recent data — for instance, just the data from the preceding day’s operations. Obviously, you don’t want to process every transaction from the last five years during each night’s batch. However, that’s the ideal world, and sometimes the source system is not able to tell you which rows belong to the time window you need.
This problem space is typically called Change Data Capture, or CDC. The term refers to the fact that you want to capture just the changed data from the source system within a specified window of time.
The changes may include inserts, updates, and deletes, and the required window of time may vary, anything from “all the changes from the last few minutes” all the way through to “all the changes from the last day/week/year,” and so on. The key requisite for a CDC solution is that it needs to identify the rows that were affected since a specific, granular point in time.
Following are some common techniques to handle this problem:
· Adding new date/time columns to the source system: This isn’t usually feasible, either because it is a legacy system and no one knows how to add new functionality, or it is possible but the risk and change management cost is too high, or simply because the DBA or data steward won’t let you! On some systems, such as ERP applications, this change is impossible because of the sheer number and size of tables and the prohibitive cost thereof.
· Adding triggers to the source system: Such triggers may watch for any data changes and then write an audit record to a separate logging table that the ETL then uses as a source. Though this is less invasive than the previous method, the same challenges apply. An issue here is that every database operation now incurs more I/O cost — when a row is inserted or updated, the original table is updated, and then the new log table is updated too in a synchronous manner. This can lead to decreased performance in the application.
· Complex queries: It is academically possible to write long complex queries that compare every source row/column to every destination row/column, but practically, this is usually not an alternative because the development and performance costs are too high.
· Dump and reload: Sometimes there is no way around the problem, and you are forced to delete and recopy the complete set of data every night. For small data sets, this may not be a problem, but once you start getting into the terabyte range you are in trouble. This is the worst possible situation and one of the biggest drivers for non-intrusive, low-impact CDC solutions.
· Third-party solutions: Some software vendors specialize in CDC solutions for many different databases and applications. This is a good option to look into, because the vendors have the experience and expertise to build robust and high-performance tools.
· Other solutions: Besides the preceding options, there are solutions such as using queues and application events, but some of these are nongeneric and tightly coupled.
· Change Data Capture: Last, but not least — and the subject of this section — is the functionality called Change Data Capture, which provides CDC right out of the box. This technology is delivered by the SQL Replication team, but it was designed in concert with the SSIS team. Note that there is another similarly named technology called Change Tracking, which is a synchronous technique that can also be used in some CDC scenarios.
Benefits of SQL Server CDC
Here are some of the benefits that SQL Server 2014 CDC (hereafter referred to as CDC) provides:
· Low impact: You do not need to change your source schema tables in order to support CDC. Other techniques for Change Data Capture, such as triggers and replication, require you to add new columns (such as timestamps and GUIDs) to the tables you want to track. With CDC, you can be up and running immediately without changing the schema. Obviously, your source system needs to be hosted on SQL Server 2008 or higher in order to take advantage of the CDC functionality.
· Low overhead: The CDC process is a job that runs asynchronously in the background and reads the changes off the SQL Server transaction log. What this means in plain English is that, unlike triggers, any updates to the source data do not incur a synchronous write to a logging table. Rather, the writes are delayed until the server is idle, or the writes can be delayed until a time that you specify (for instance, 2:00 a.m. every day).
· Granular configuration: The CDC process allows you to configure the feature on a per-table basis, which means it is not an all-or-nothing proposition. You can try it out on one table, and once you iron out any issues, you can slowly start using it on more tables.
· High fidelity capture: The technology flags which rows were inserted, updated, and deleted. It can also tell you exactly which columns changed during updates. Other auditing details such as the event timestamp, as well as the specific transaction ID, are also provided.
· High fidelity requests: The CDC infrastructure allows you to make very granular requests to the CDC store, so that you can find out exactly when certain operations occurred. For instance, you can ask for changes within any batch window, ranging from a few minutes (near real time) to hours, days, weeks, or more. You can ask for the final aggregated image of the rows, and you can ask for the intermediate changes too.
· Ease of use: The APIs that you use to request the data are based on the same SQL semantics you are already used to — SELECT statements, user-defined functions, and stored procedures.
· Resilient to change: The replication team built the technology with change management in mind, meaning that if you set up CDC to work on a certain table, and someone adds or deletes a column in that table, the process is robust enough in most cases to continue running while you make the appropriate fixes. This means you don’t lose data (or sleep!).
· Transactional consistency: The operations enable you to request changes in a transactionally consistent manner. For instance, if two tables in the source were updated within the context of the same source transaction, you have the means to establish that fact and retrieve the related changes together.
· SSIS CDC components: CDC and SSIS work hand in hand in the 2014 version of SQL Server because of the components added to the SSIS toolbox. These tools make it easier to query your CDC solution.
Preparing CDC
There are a few steps you need to take to get CDC working. CDC is intended for sources that reside on a SQL Server 2008 or later database. If your data resides on an earlier version of SQL Server or another vendor’s solution, unless you migrate the data, this solution is probably not for you. However, you may still want to test the waters and see what benefits you can gain from the functionality — in which case find yourself a test server and follow these same steps.
First, the DBA or a member of the SQL sysadmin fixed server role needs to enable CDC on the SQL Server database. This is a very important point; there should be a clear separation of roles and duties, and open dialog between the DBA and the ETL developer. The ETL developer may be tempted to turn CDC on for every single table, but that is a bad idea. Although CDC has low overhead, it does not have zero overhead. DBAs, conversely, may be protective of their data store and not want anyone to touch it.
Whether the DBA and the ETL developer are different individuals or the same person, the respective parties should consider the pros and cons of the solution from all angles. Books Online has more details about these considerations, so this section will forge ahead with the understanding that much of this may be prototypical.
The rest of this discussion assumes that you are using a variant of the AdventureWorks on a SQL Server 2014 installation. In the below script, you will need Enterprise or Developer edition and you may have to change the AdventureWorks database to your own flavor or AdventureWorks. Here is how to enable the functionality at a database level:
USE AdventureWorks;
GO
EXEC sp_changedbowner 'sa'
GO
--Enable CDC on the database
EXEC sys.sp_cdc_enable_db;
GO
--Check CDC is enabled on the database
SELECT name, is_cdc_enabled
FROM sys.databases WHERE database_id = DB_ID();
When you flip this switch at the database level, SQL Server sets up some of the required infrastructure that you will need later. For instance, it creates a database schema called cdc, as well as the appropriate security, functions, and procedures.
The next step is to ensure that SQL Server Agent is running on the same server on which you just enabled CDC. Agent allows you to schedule when the CDC process will crawl the database logs and write entries to the capture instance tables (also known as shadow tables; the two terms are used interchangeably here). If these terms don’t make sense to you right now, don’t worry; they soon will. The important thing to do at this point is to use SQL Server 2014 Configuration Manager to ensure that Agent is running. Because this chapter is focused not on the deep technical details of CDC itself but rather on how to use its functionality within the context of ETL, you should visit Books Online if you are not sure how to get Agent running.
Next, you can enable CDC functionality on the tables of your choice. Run the following command in order to enable CDC on the HumanResources.Employee table:
USE AdventureWorks;
GO
--Enable CDC on a specific table
EXECUTE sys.sp_cdc_enable_table
@source_schema = N'HumanResources'
,@source_name = N'Employee'
,@role_name = N'cdc_Admin'
,@capture_instance = N'HumanResources_Employee'
,@supports_net_changes = 1;
The supports_net_changes option enables you to retrieve only the final image of a row, even if it was updated multiple times within the time window you specified. If there were no problems, then you should see the following message displayed in the output of the query editor:
Job 'cdc.AdventureWorks_capture' started successfully.
Job 'cdc.AdventureWorks_cleanup' started successfully.
If you want to verify that CDC is enabled for any particular table, you can issue a command of the following form:
--Check CDC is enabled on the table
SELECT [name], is_tracked_by_cdc FROM sys.tables
WHERE [object_id] = OBJECT_ID(N'HumanResources.Employee');
--Alternatively, use the built-in CDC help procedure
EXECUTE sys.sp_cdc_help_change_data_capture
@source_schema = N'HumanResources',
@source_name = N'Employee';
GO
If all has gone well, the CDC process is now alive and well and watching the source table for any changes.
You used the default configuration for setting up CDC on a table, but there are optional parameters that give you much more power. For instance, you can configure exactly which columns should and shouldn’t be tracked, and the filegroup where the shadow table should live, and you can enable other modes. For now, simple is good, so the next step is to have a look at what SQL Server has done for you.
Capture Instance Tables
Capture instance tables — also known as shadow tables and change tables — are the tables that SQL Server creates behind the scenes to help the magic of CDC happen. Here is how the CDC process works:
1. The end user makes a data change in the source system table you are tracking. SQL Server writes the changes to the database log, and then writes the changes to the database. Note that SQL Server always does the log-write (and always has) regardless of whether or not CDC is enabled — in other words, the database log is not a new feature of CDC, but CDC makes good use of it.
2. CDC includes a process that runs on server idle time, or on a scheduled interval (controlled by SQL Server Agent) that reads the changes back out of the log and writes them to a separate change tracking (shadow) table with a special schema. In other words, the user wrote the change to the database; the change was implicitly written to the SQL log; the CDC process read it back out of the log and wrote it to a separate table. Why not write it to the second table in the first place? The reason is that synchronous writes impact the source system; users may experience slow application performance if their updates cause two separate writes to two separate tables. By using an asynchronous log reader, the DBA can amortize the writes to the shadow table over a longer period. Of course, you may decide to schedule the Agent job to run on a more frequent basis, in which case the experience may be almost synchronous, but that is an ETL implementation decision. Normally, the log reader runs during idle time or when users are not using the system, so there is little to no application performance overhead.
3. The ETL process then reads the data out of the change table and uses it to populate the destination. You will learn more about that later; for now let’s continue our look at the SQL change tables.
4. There is a default schedule that prunes the data in the change tables to keep the contents down to three days’ worth of data to prevent the amount of CDC data from becoming unwieldy. You should change this default configuration to suit your specific needs.
When you enabled CDC on the HumanResources.Employee table, SQL used a default naming convention to create a shadow table in the same database called cdc.HumanResources_Employee_CT. This table has the same schema as the source table, but it also has several extra metadata columns that CDC needs to do its magic. Issue the following command to see what the shadow table looks like. There should be no rows in the table right now, so you will get back an empty result set.
SELECT * FROM cdc.HumanResources_Employee_CT;
Here is a brief overview of the main metadata columns:
· The __$start_lsn and __$seqval columns identify the original transaction and order in which the operations occurred. These are important values — the API (which you will look at later) operates purely in terms of the LSNs (commit log sequence numbers), but you can easily map date/time values to and from LSNs to make things simpler.
· The __$operation column shows the source operation that caused the change (1 = delete, 2 = insert, 3 = update [before image], 4 = update [after image], and 5 = merge).
· The __$update_mask column contains a bit mask indicating which specific columns changed during an update. It specifies what columns changed on a row-by-row basis; however, the mask is just a bitmap, so you need to map the ordinal position of each bit to the column name that it represents. CDC provides functions such as sys.fn_cdc_has_column_changed to help you make sense of these masks.
Okay, now for the exciting part. Make a data change in the source table and then look at the shadow table again to see what happened. To keep it simple, update one specific field on the source table using the following command. Remember that the process runs asynchronously, so you may have to wait a few seconds before the changes appear in the shadow table. Therefore, after running the following statement, wait a few seconds and then run the preceding SELECT statement again.
--Make an update to the source table
UPDATE HumanResources.Employee
SET HireDate = DATEADD(day, 1, HireDate)
WHERE [BusinessEntityID] IN (1, 2, 3);
Rather than wait for the asynchronous log reader process to occur, you can also force the process to happen on demand by issuing this command:
--Force CDC log crawl
EXEC sys.sp_cdc_start_job;
The shadow table should contain two rows for every source row you updated. Why two rows, when you performed only one update per row? The reason is because for updates, the change table contains the before and after images of the affected rows. Now try inserting or deleting a row in the source and note what rows are added to the shadow table.
The CDC API
The previous section was just academic background on what is happening; you don’t actually need all this knowledge in order to apply the solution to the problem at hand. CDC provides a set of functions and procedures that abstract away the details of the technology and make it very simple to use. When you enabled CDC on the table, SQL automatically generated several function wrappers for you so that you can query the shadow table with ease. Here is an example:
USE AdventureWorks;
GO
--Let's check for all changes since the same time yesterday
DECLARE @begin_time AS DATETIME = GETDATE() - 1;
--Let's check for changes up to right now
DECLARE @end_time AS DATETIME = GETDATE();
--Map the time intervals to a CDC query range (using LSNs)
DECLARE @from_lsn AS BINARY(10)
= sys.fn_cdc_map_time_to_lsn('smallest greater than or equal', @begin_time);
DECLARE @to_lsn AS BINARY(10)
= sys.fn_cdc_map_time_to_lsn('largest less than or equal', @end_time);
--Validate @from_lsn using the minimum LSN available in the capture instance
DECLARE @min_lsn AS BINARY(10)
= sys.fn_cdc_get_min_lsn('HumanResources_Employee');
IF @from_lsn < @min_lsn SET @from_lsn = @min_lsn;
--Return the NET changes that occurred within the specified time
SELECT * FROM
cdc.fn_cdc_get_net_changes_HumanResources_Employee(@from_lsn, @to_lsn,
N'all with mask');
The CDC functions understand only LSNs. Therefore, you first need to map the date/time values to LSN numbers, being careful to check the minimum and maximum extents. You then call a wrapper function for the table called cdc.fn_cdc_get_net_changes_<table name>(), which returns the rows that have changed. You specify all with mask, which means that the __$update_mask column is populated to tell you which columns changed. If you don’t need the mask, just specify all, because calculating the mask is expensive. Theall and all with mask options both populate the __$operation column accordingly.
If you had used the parameter value all with merge, the same results would come back, but the __$operation flag would contain only either 1 (delete) or 5 (merge). This is useful if you only need to know whether the row was deleted or changed, but you don’t care what the specific change was. This option is computationally cheaper for SQL to execute.
The function you used in this example returns the net changes for the table — meaning if any specific row had multiple updates applied against it in the source system, the result returned would be the net combined result of those changes. For instance, if someone inserted a row and then later (within the same batch window) updated that same row twice, the function would return a row marked as Inserted (__$operation 5 2), but the data columns would reflect the latest values after the second update. Net changes are most likely what you will use for loading your warehouse, because they give you the final image of the row at the end of the specified window, and do not encumber you with any interim values the row might have had. Some near-real-time scenarios, and applications such as auditing and compliance tracking, may require the interim values too.
Instead of asking for only the net changes to the source table, you can also ask for the granular (interim) changes. To do this you use another function that CDC automatically generated for you, in this case called cdc.fn_cdc_get_all_changes_<table name>(). Here is an example that uses the update mask and the all-changes mode together (note that the BusinessEntityID column may be called EmployeeID in previous versions of AdventureWorks):
USE AdventureWorks;
GO
--First update another column besides the HireDate so you can
--test the difference in behavior
UPDATE HumanResources.Employee
SET VacationHours = VacationHours + 1
WHERE BusinessEntityID IN (3, 4, 5);
WAITFOR DELAY '00:00:10'; --Wait 10s to let the log reader catch up
--Map times to LSNs as you did previously
DECLARE @begin_time AS DATETIME = GETDATE() - 1;
DECLARE @end_time AS DATETIME = GETDATE();
DECLARE @from_lsn AS BINARY(10)
= sys.fn_cdc_map_time_to_lsn('smallest greater than or equal', @begin_time);
DECLARE @to_lsn AS BINARY(10)
= sys.fn_cdc_map_time_to_lsn('largest less than or equal', @end_time);
DECLARE @min_lsn AS BINARY(10)
= sys.fn_cdc_get_min_lsn('HumanResources_Employee');
IF @from_lsn <@min_lsn SET @from_lsn = @min_lsn;
--Get the ordinal position(s) of the column(s) you want to track
DECLARE @hiredate_ord INT
= sys.fn_cdc_get_column_ordinal(N'HumanResources_Employee', N'HireDate');
DECLARE @vac_hr_ord INT
= sys.fn_cdc_get_column_ordinal(N'HumanResources_Employee', N'VacationHours');
--Return ALL the changes and a flag to tell us if the HireDate changed
SELECT
BusinessEntityID,
--Boolean value to indicate whether hire date was changed
sys.fn_cdc_is_bit_set(@hiredate_ord, __$update_mask) AS [HireDateChg],
--Boolean value to indicate whether vacation hours was changed in the source
sys.fn_cdc_is_bit_set(@vac_hr_ord, __$update_mask) AS [VacHoursChg]
FROM cdc.fn_cdc_get_all_changes_HumanResources_Employee(@from_lsn, @to_lsn,
N'all');
This call should return every row from the shadow table without aggregating them into a net-changes view. This is useful if your destination system needs to track everything that happened to a source table, including interim values. It includes two BIT fields that indicate whether specific columns were changed. If you want to disable CDC on a table, use a command of the following form. Be careful, though; this command will drop the shadow table and any data it contains:
EXECUTE sys.sp_cdc_disable_table
@source_schema = N'HumanResources',
@source_name = N'Employee',
@capture_instance = N'HumanResources_Employee';
Using the SSIS CDC Tools
Now that you know how to set up CDC in your relational database engine, it is time to use SSIS to pull the data you need. Three tools in the SSIS toolbox work hand in hand with CDC.
· CDC Control Task: Used to control the CDC sequence of events in CDC packages. It controls the CDC package synchronization with the initial load package. It also governs the LSN ranges in a CDC package. It can also deal with errors and recovery.
· CDC Source: Used to query the CDC change tables.
· CDC Splitter: Sends data down different data paths for Inserts, Updates, and Deletions.
In the CDC Control Task there are several options for control operations:
· Mark Initial Load Start: Records the first load starting point
· Mark Initial Load End: Records the first load ending point
· Mark CDC Start: Records the beginning of the CDC range
· Get Processing Range: Retrieves the range for the CDC values
· Mark Processed Range: Records the range of values processed
These tools make it much easier for you to control CDC packages in SSIS. The CDC Control Task creates a new table in a database of your choosing that holds the CDC state. This state can then be retrieved using the same CDC Control Task. The CDC state is the place at which your CDC data is in at this time. This could mean the database needs to be queried back one hour, one week, or one year from now. The CDC state tells your SSIS package where to gather data. It also can tell if the data is already up-to-date.
After determining the CDC state, a Data Flow is then used to move the data. The CDC Source is used to query the data and push it down the Data Flow path. The CDC Splitter is then used to send the data down the appropriate paths for updating, deleting, or inserting. After the Data Flow is done loading the data, another CDC Control Task can update the CDC state.
The first steps to getting these CDC tools to work is to set up the CDC state table and create an ADO.NET connection to the database where the CDC state table is found. You can use the CDC Control Task itself to help with these steps. Open the CDC Control Task and you will see a screen like Figure 11-7.
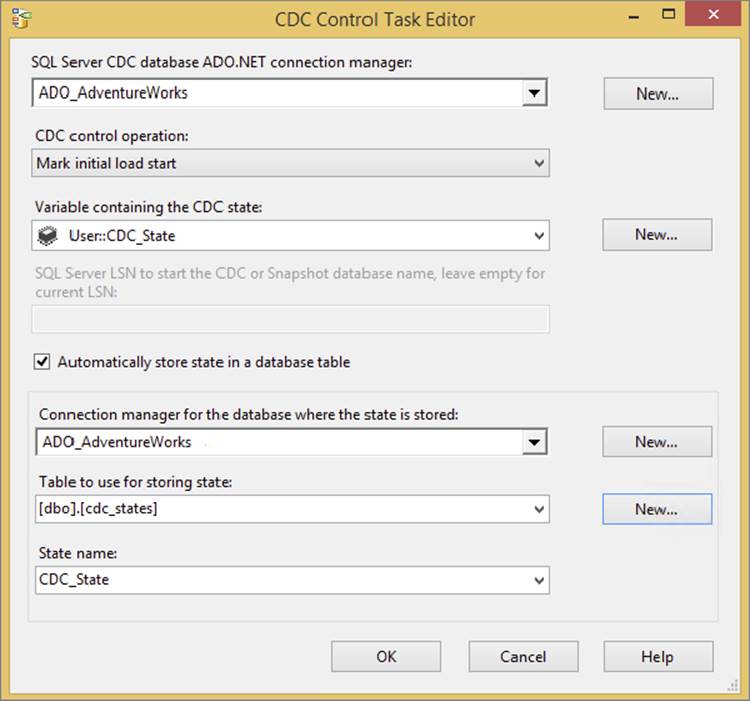
FIGURE 11-7
Click on the New button next to the first Connection Manager option and create an ADO.NET connection to the AdventureWorks database. Then click the New button next to the Tables to use for storing state option. This will open a window as seen in Figure 11-8. The SQL command for creating the table and the index it automatically generated is shown in this window. Clicking the run button will create the table for the CDC state in the AdventureWorks database. You will also need a variable in the SSIS package to hold the CDC state. Click the New button next to the Variable containing the CDC state option to create this variable (shown in Figure 11-7). The default name of this variable is CDC_State.
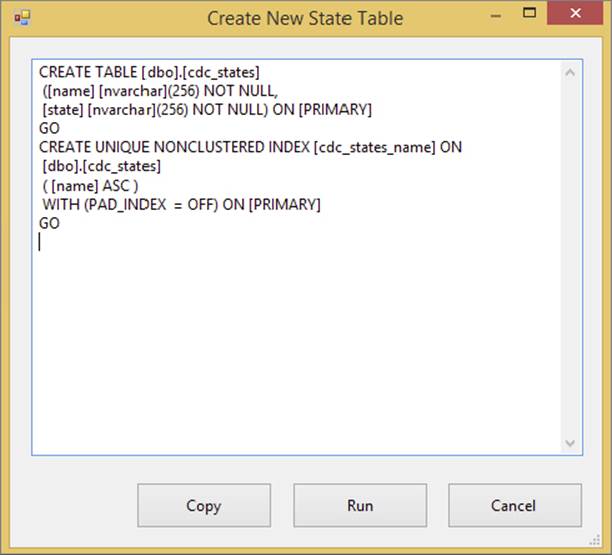
FIGURE 11-8
Now that you have the CDC state table created with a connection to it and a variable to hold the state, you are ready to create a package to load the CDC data. In most situations you will have a CDC package that will do the initial load. This means you will have a package that runs one time to dump all of the data from the source into your data warehouse or any destination you are trying to keep updated. This initial load will consists of a package with a CDC Control Task to set the initial load start, then a Data Flow, and then a CDC Control Task to set to the initial load end. The following example is building the package that will be used on a schedule to update the data in your destination after the initial load has been done. To set the initial load end, just run a CDC Control Task set to “Mark Initial Load End.” Afterward you can query the CDC table to ensure you have a value set.
NOTE The State Name in the CDC Control Task must match the name in the initial load CDC package.
The incremental package will start with a CDC Control Task that gets the processing range. A Data Flow is then used with the CDC Source and CDC Splitter. Then another CDC Control Task is used to mark the processed range. This ensures that the package is ready to run again and pick up the next batch of changes in the CDC.
In the following example we will not write the records to a destination, but you can use Data Viewers to see the CDC data.
1. Create a package named CDC Demo. Drag in a CDC Control Task and set up the options to match Figure 11-9. This will get the process range from the CDC state table and save it in the CDC_State variable in the SSIS package.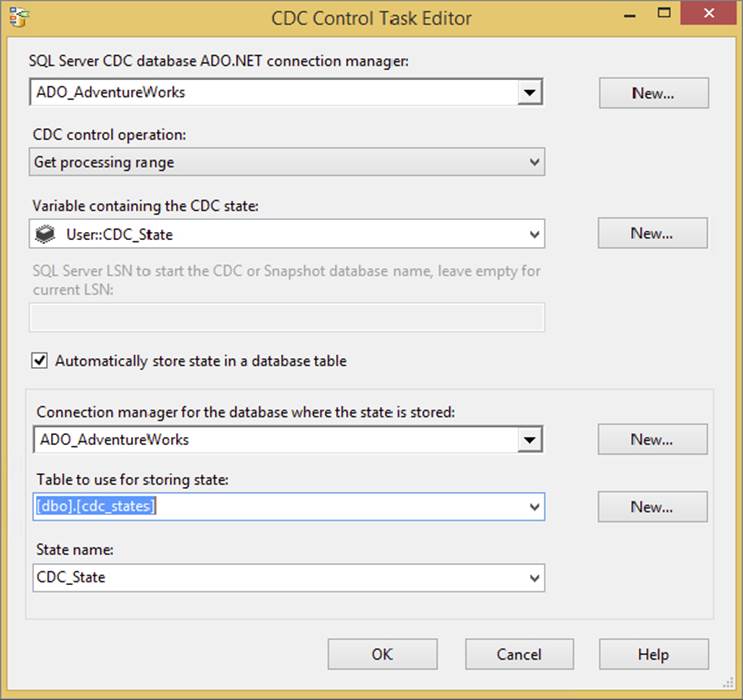
FIGURE 11-9
NOTE If you have been following along with the examples in the chapter then you have CDC enabled on the Employee table in the AdventureWorks database. If not then you will need to go back and run the code in this chapter to see the expected results in this package.
2. Now drag in a Data Flow and connect the CDC Control Task to the Data Flow. The package should look like Figure 11-10.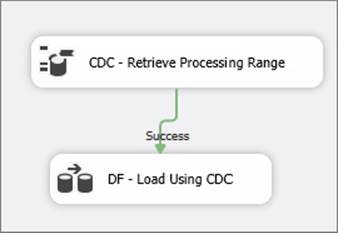
FIGURE 11-10
3. Open the Data Flow and drag in the CDC Source and set the options in the source to match Figure 11-11. You are selecting the Employee table as the source and the All option to get all of the changes from the table. The CDC_State variable also needs to be set in the source.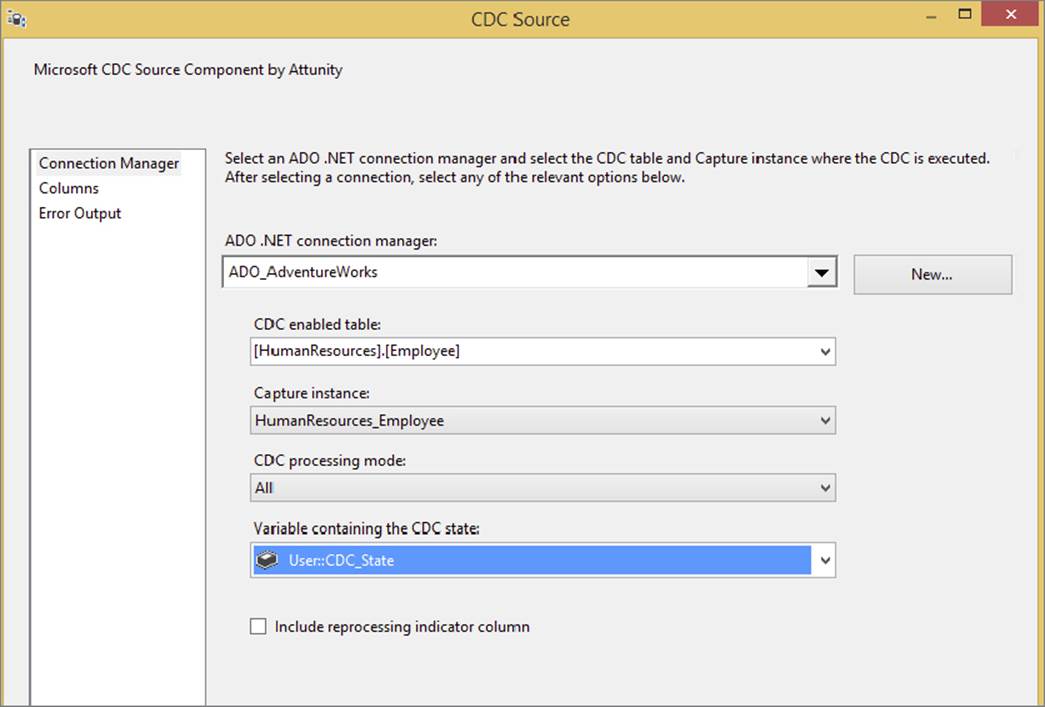
FIGURE 11-11
4. Once you have the source configured, drag in the CDC Splitter Transformation. Connect the CDC Source to the CDC Splitter. Drag in three Union All Transformations and connect each of the CDC Splitter outputs to the Union All Transformations. Once complete, your Data Flow should look like Figure 11-12.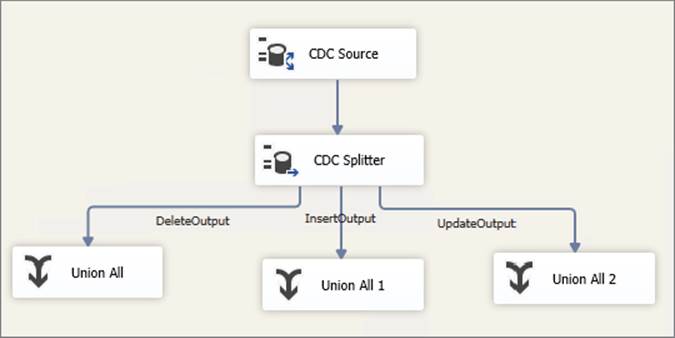
FIGURE 11-12
5. You can now place a Data Viewer on each on the CDC Splitter outputs and see the rows that have been updated, deleted, and inserted. If you want to test this further, go back to the Employee table and perform some SQL commands to add rows, delete rows, and perform some updates. These changes will show in the Data Viewers.
6. To complete this package you will need to add in three destinations in the Data Flow, one for each of the CDC Splitter outputs. You will also need to add another CDC Control Task after the Data Flow Tasks to mark the processed range. This ensures the package will not pick up the same rows twice.
7. Back in the Control Flow, add one more CDC Control Task. Configure it the same way you configured the first, but change the CDC Control Operation to Mark Processed Range. Attach this task to the Data Flow Task. This task writes back to the state table what transactions have already been transferred.
This example shows you the functionality of the CDC tools in SQL Server Integration Services. These tools should make CDC work much easier inside of SSIS. As you can see though, the steps that are done in this resemble the same steps with a control table.
NOTE There is also a SSIS Oracle CDC option now, too, though it is not specifically covered in this book.
SUMMARY
As this chapter has shown, you can take advantage of many opportunities to use CDC in concert with SSIS in your ETL solution to incrementally load data into your database. You can also use the control table pattern to load data in a very similar pattern. While it requires more work to implement, it won’t require Enterprise Edition of SQL Server.
All materials on the site are licensed Creative Commons Attribution-Sharealike 3.0 Unported CC BY-SA 3.0 & GNU Free Documentation License (GFDL)
If you are the copyright holder of any material contained on our site and intend to remove it, please contact our site administrator for approval.
© 2016-2026 All site design rights belong to S.Y.A.