Professional Microsoft SQL Server 2014 Integration Services (Wrox Programmer to Programmer), 1st Edition (2014)
Chapter 18. Error and Event Handling
WHAT’S IN THIS CHAPTER?
· Working with precedence constraints
· Creating failure flows with expressions
· Defining SSIS events
· Handling events in a package
· Troubleshooting with breakpoints and logging
WROX.COM CODE DOWNLOADS FOR THIS CHAPTER
You can find the wrox.com code downloads for this chapter at www.wrox.com/go/prossis2014 on the Download Code tab.
SQL Server Integration Services provides some valuable features that enable you to control the workflow of your SSIS packages at a very granular level. Functionality that you might expect to be available only by scripting can often be accomplished by setting a few properties of a component. In addition, SSIS comes with powerful error-handling capabilities, the capability to log detailed information as the package runs, and debugging functionality that speeds up troubleshooting and design.
This chapter walks you through controlling the package workflow, beginning at the highest level using precedence constraints and then drilling down to event handling. You’ll see how trappable events play a role in breakpoints, and how to perform exception handling for incorrect data in the Data Flow. Finally, you learn how these features can be used for troubleshooting, debugging, and building robust SSIS packages.
USING PRECEDENCE CONSTRAINTS
Precedence constraints are the green, red, and grey connectors in the Control Flow that link the tasks together and can be used to manage the workflow of a package and handle error conditions.
NOTE Be aware that grey precedence constraints look a lot like data paths in the Data Flow, but they are much different. On the one hand, precedence constraints define what tasks should be executed in which order; on the other hand, Data Flow paths define to which transformations and destinations data should be routed. Data Flow paths deal with moving data; precedence constraints deal with workflow handling.
Precedence Constraint Basics
The main purpose of precedence constraints is to control when tasks and containers should run in relation to one another. This revolves around whether tasks succeed (green), fail (red), or just complete with either a success or a failure (grey). Precedence constraints can also be more granularly controlled through advanced properties, which are addressed in the next section.
Figure 18-1 shows a typical example. If the Initial Data Flow Task completes successfully, the Success Data Flow Task will execute. A green arrow (on the left) points to the Success Data Flow Task. If the Initial Data Flow Task fails, the Failure Send Mail Task executes, sending notification of the failure. A red arrow (in the middle) points to the Failure Send Mail Task. No matter what happens, the Completion Script Task will always execute. A grey arrow (on the right) points to the Completion Script Task.
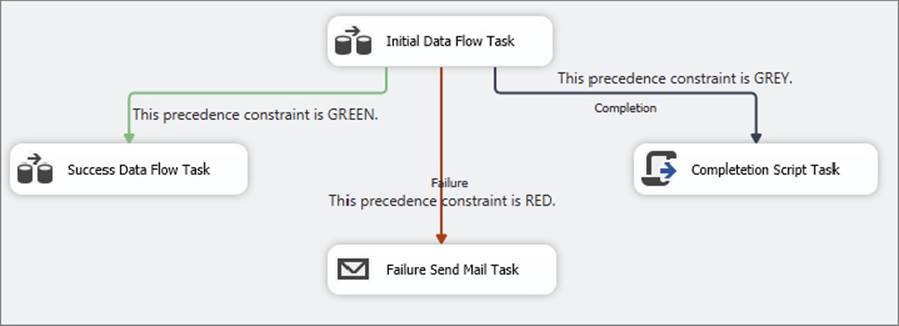
FIGURE 18-1
When you are initially connecting two tasks, you’ll see that the default precedence constraint is a green arrow designating success. To change how the precedence constraint is evaluated, you can right-click the arrow and choose a different outcome from the pop-up menu, as shown in Figure 18-2.
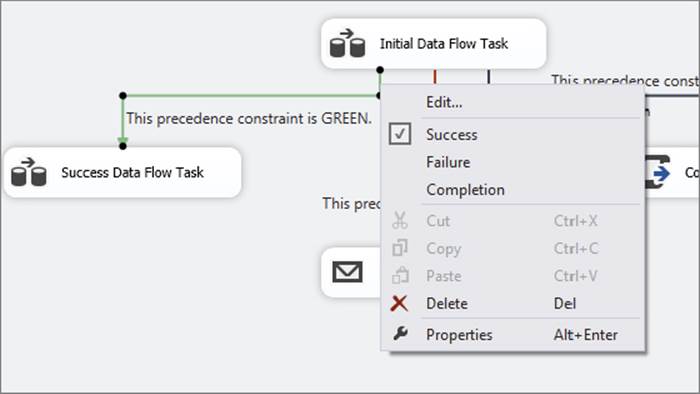
FIGURE 18-2
You can also combine tasks into groups by using containers, in which case the workflow can be controlled by the success or failure of the container. For example, a package may have several Data Flow Tasks that run in parallel, each loading data from a different source. All tasks must complete successfully for the container to determine success and allow the flow to continue to the next step. A Sequence Container contains the tasks, and the precedence constraint is drawn from the container to the next step. The example shown in Figure 18-3 illustrates how a Sequence Container might be used. After the Initialization Script runs, the Import Data Container executes. Within it, three Data Flow processes run in parallel. A failure of any of the Data Flow Tasks will cause the Import Data Container to fail, and the failure message will be sent. If all three complete successfully, the Clean Up Script will run.
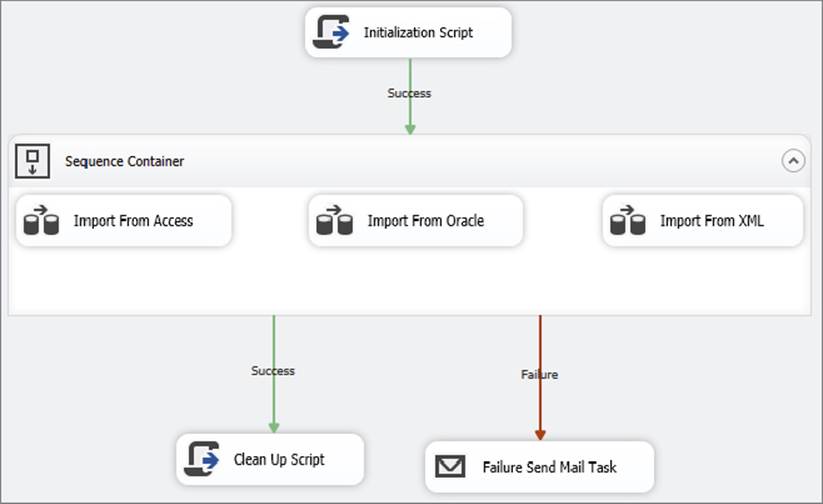
FIGURE 18-3
Advanced Precedence Constraints and Expressions
While using a standard constraint evaluation in a precedence constraint provides an impressive way of managing the execution of certain tasks, the precedence constraint provides even more flexibility to manage the flow of the package. Using the advanced functionality of SSIS expressions inside of the precedence constraint, you can dynamically determine whether the next task or container should run at package runtime. You can use the dynamic functionality to run certain tasks based on different criteria, such as running only on Sundays, not running after 2:00 a.m., or running if an external parameter flag is set to True. This allows you to modify the Control Flow in any way required.
Not only can precedence constraints be configured to evaluate Boolean expressions, they can also be combined with other precedence constraints through a logical OR evaluation. The advanced precedence constraints are defined through the Precedence Constraint Editor dialog, shown in Figure 18-4. To pull up the editor, either double-click the precedence constraint arrow or right-click the arrow and choose Edit.
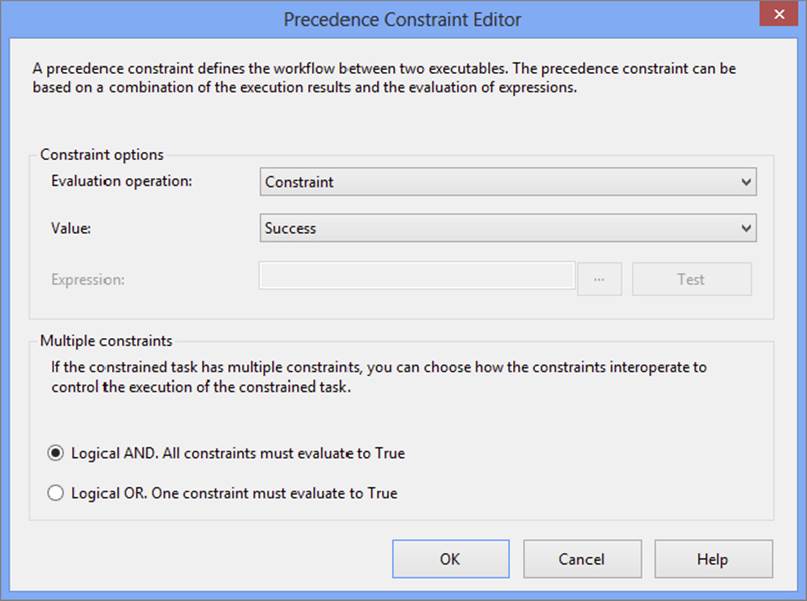
FIGURE 18-4
Using Boolean Expressions with Precedence Constraints
With the editor, you can control the workflow within a package by using Boolean expressions in place of, or in addition to, the outcome of the initial task or container. Any expression that can be evaluated to True or False can be used. For example, the value of a variable that changes as the package executes can be compared to a constant. If the comparison resolves to True, then the connected task executes. You can base the evaluation of a precedence constraint on both the outcome of the initial task and an expression. This enables the SSIS developer to finely tune the workflow of a package. The following table shows the four Evaluation Operation options contained in the dropdown menu for configuring a precedence constraint:
|
EVALUATION OPERATION |
DEFINITION |
|
Constraint |
The execution result is applied to the constraint (success, failure, or completion) without the use of an expression. |
|
Expression |
Any expression that evaluates to True or False is used to evaluate the constraint without the consideration of the execution result. |
|
Expression and Constraint |
Both the specified execution result and an expression condition must be satisfied for the constraint to allow the next task to run. |
|
Expression or Constraint |
Either the specified execution result or an expression condition must be satisfied for the constraint to allow the next task to run. |
In the precedence constraint configuration, you can choose which type of Evaluation Operation to use and set the value of the constraint and/or supply the expression.
In the following example, you will simulate flipping a coin to learn more about using expressions with precedence constraints. The Coin Toss example uses Execute SQL Tasks, Script Tasks, and For Loop Containers, as well as advanced precedence constraint logic, to create the replica. The final package you will create is shown in Figure 18-5.
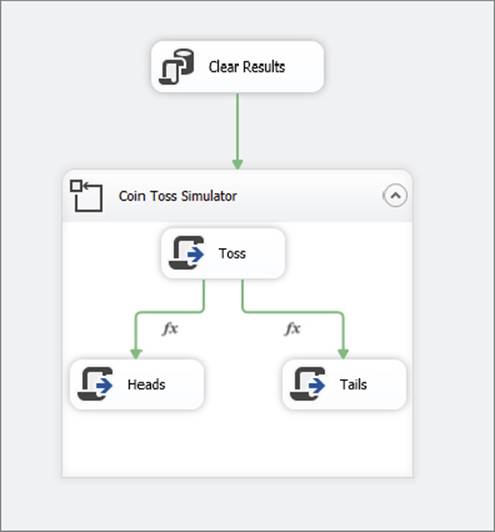
FIGURE 18-5
1. To start the process, create a new table to hold the results using this script (ProSSIS\Scripts\Ch18_ProSSIS\Scripts.sql) in the AdventureWorks database:
2. CREATE TABLE CoinToss (
3. Heads INT NULL,
4. Tails INT NULL )
5. GO
INSERT INTO CoinToss SELECT 0,0
6. Create a new SSIS project in SQL Server Data Tools and create a new package.
7. Create an OLE DB Connection Manager pointing to the AdventureWorks database where the CoinToss table was created. The steps for creating a Connection Manager are covered in Chapter 3.
8. To reset the value of the coin toss each time you run the package, add an Execute SQL Task named Clear Results to the Control Flow design area.
9. Double-click the Clear Results Task to open the Execute SQL Task Editor.
10.Set the Connection property to point to the AdventureWorks Connection Manager and type the following code in the SQLStatement field:
11. UPDATE CoinToss
SET Tails = 0, Heads = 0
Now that the package is prepared, it is time to set up the simulator.
12.Right-click the Control Flow design area and select Variables from the pop-up menu to open the Variables window.
13.Create a new package level variable called Result with a data type of Int32 to hold the “result” of the coin toss.
14.To toss the coin multiple times, you will use a For Loop Container. Add the container to the design area, and name it Coin Toss Simulator. Connect the precedence constraint from the Clear Results Task to the Coin Toss Simulator.
15.With the Coin Toss Simulator selected, open the Variables window to add a variable called Count with a data type of Int32. In this case, the variable will be used only by the For Loop Container, so the scope can be the Coin Toss Simulator.
16.You can set the properties of the Coin Toss Simulator Container by opening the editor. Set the properties as shown in the following table and click OK:
|
PROPERTY |
VALUE |
|
InitExpression |
@Count = 0 |
|
EvalExpression |
@Count <100 |
|
AssignExpression |
@Count = @Count + 1 |
17. This should look familiar to you if you have programmed in almost any language: The For Loop Container will execute whatever is inside of it 100 times.
18.In this case, drag a Script Task named Toss into the Coin Toss Simulator to perform the coin toss.
19.To set up the code to simulate the coin toss, double-click the Toss Script Task to open the Script Task Editor.
20.In the Script pane, select the ScriptLanguage of Microsoft Visual Basic 2012 and select the variable User::Result in the ReadWriteVariables property. The script will have access only to variables set up in this way.
21.Click Edit Script to open the Visual Studio Tools for Applications design environment. Each time this script runs, it will randomly pick a value of one or two and store the value in the Result variable. Replace Public Sub Main with this code:
22. Public Sub Main()
23. Randomize()
24. Dts.Variables("User::Result").Value = CInt(Int((2 * Rnd()) + 1))
25. Dts.TaskResult = ScriptResults.Success
End Sub
Close out of the script editor and then click OK in the Script Task editor to close it and return to SSDT.
26.Set up the outcome tasks for the coin toss. Drag two Execute SQL Tasks into the Coin Toss Simulator Container, with one named Heads and the other Tails. Connect the Toss Script Task to each of the Execute SQL Tasks.
27.Now you need to change the precedence constraints so that the control will pass to the appropriate tasks.
28.Double-click the precedence constraint pointing to Heads to bring up the Precedence Constraint Editor. Change the Evaluation Operation from Constraint to Expression. As shown in Figure 18-6, the Expression text box will become available, enabling you to type the following into the Expression property: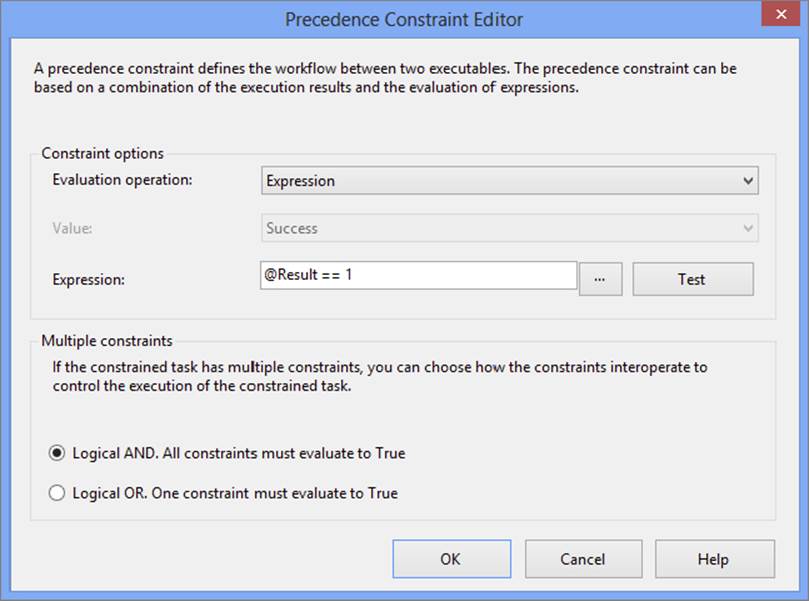
FIGURE 18-6
@Result == 1
The precedence constraint will have an fx symbol next to it specifying that it uses an expression.
NOTE When evaluating two values in an SSIS Boolean expression, you need to use two equals signs (==). This indicates that the expression returns TRUE or FALSE depending on whether the values are equal. NULL values do not evaluate, so be sure to ensure that both sides of the == return an actual value. The only time you use a single equals sign is when you are using an SSIS expression or the Expression Task to set the value of a variable, such as inside of a For Loop Container.
29.To continue with the example, open the properties of the precedence constraint that is connected to Tails. Change the Evaluation Operation from Constraint to Expression, and type this in the Expression property:
@Result == 2
30.Click OK to accept the properties. Just a couple more details and you’ll be ready to run the package!
31.Double-click Heads to open the Execute SQL Task Editor. In the Connection property, set the value to the AdventureWorks Connection Manager. Type the following code in the SQLStatement property to increment the count in the CoinToss table:
UPDATE CoinToss SET Heads = Heads + 1
32.Click OK to accept the changes.
33.Bring up the Execute SQL Task Editor for the Tails object. Set the Connection property to the AdventureWorks Connection Manager. Type this code in the SQLStatement property:
UPDATE CoinToss SET Tails = Tails + 1
34.Click OK to accept the configuration and run the package.
As the package runs, you can see that sometimes Heads will execute, and sometimes Tails will execute.
35.Once the package execution completes, return to SQL Server Management Studio to view the results by running this query:
SELECT * FROM CoinToss
Similar to a real coin toss, Heads will come up approximately 50 out of 100 times.
This simple example demonstrates how to use an expression to control the package workflow, instead of or combined with the outcome of a task. In a business application, the precedence constraint might be used to ensure that the number of rows affected by a previous step is less than a certain value, or maybe a task should execute only if it is a particular day of the week. Any variable within scope can be used, and several functions and operators are available to build the expression. Any valid expression will work as long as it evaluates to True or False. See Chapter 5 to learn more about building and using expressions.
Working with Multiple Precedence Constraints
In your package workflow, you can have multiple precedence constraints pointing to the same task. By default, the conditions of both must be True to enable execution of the constrained task. You also have the option of running a task if at least one of the conditions is True by setting the Multiple constraints option to “Logical OR. One constraint must evaluate to True,” as shown in Figure 18-7.
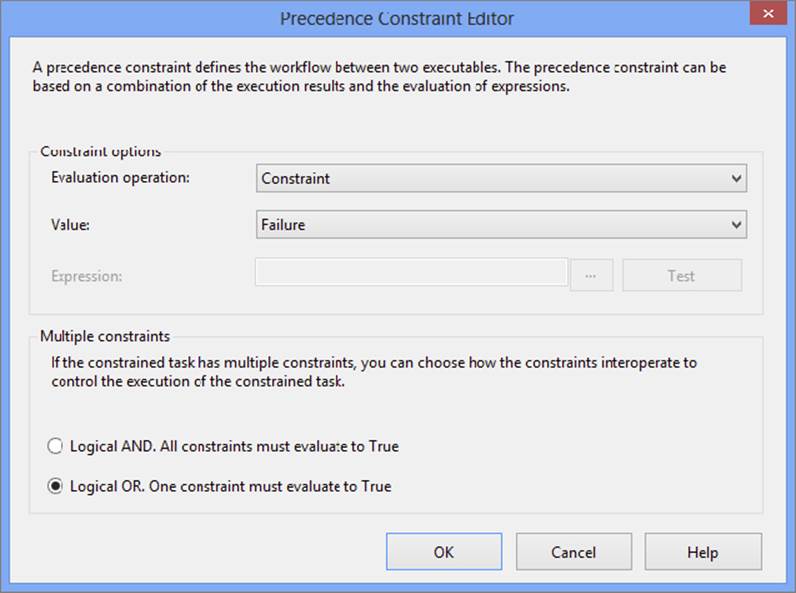
FIGURE 18-7
The solid precedence constraints change to dashed precedence constraints when the Logical OR option is chosen. You only need to select Logical OR for one constraint, as all other constraints that point to the same task or container will also change to Logical OR. Figure 18-8 shows how the Send Mail Task named Error Message will execute if either of the Import Data Flow Tasks fails. In this example, both precedence constraints are configured to fail but the Logical OR has been set instead of the Logical AND. Because the Logical OR has been enabled, the precedence constraints are dashed lines. Figure 18-8 shows the Import Customers Data Flow is successful (the circle with a check mark), but the Import Orders Data Flow failed (the circle with an X). Although not shown in the picture, the successful circle will be green and the failure circle will be red. Because one of the Data Flows failed, the Error Message Send Mail Task is executing. If both Data Flows had been successful, the Error Message Task would not have run.
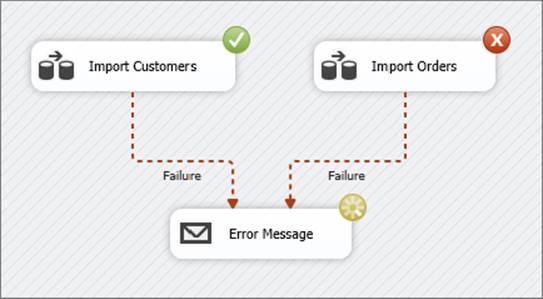
FIGURE 18-8
Combining Expressions and Multiple Precedence Constraints
In the next example, an expression is evaluated in addition to using multiple constraints. This workflow loads data from a series of files into a SQL database. The business rules require that no file can be loaded into the database more than once, and the files must be archived, whether they have been loaded previously or not. Figure 18-9 shows the workflow with the required business rules implemented.
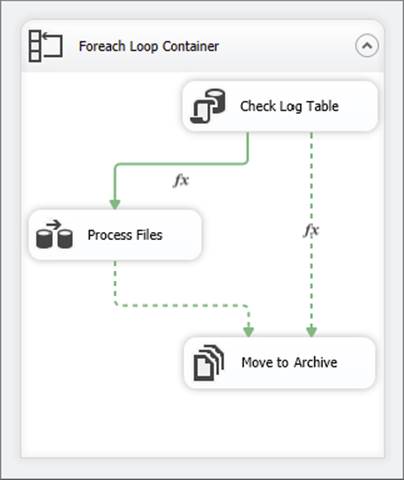
FIGURE 18-9
In this workflow, a Foreach Loop Container is used to loop through the files you want to load into the database. With each iteration of the loop, the filename is assigned to a variable, which is then used in the first task (the Execute SQL Task) to determine whether it has been previously loaded. The Execute SQL Task called Check Log Table will use the variable that holds the current filename as an input parameter to a SQL statement to determine whether it does in fact exist in the table. The result of the query will return either true or false, to be stored in a variable that is called User::blnFlag. This task is pivotal in that it is the basis for the evaluation within the precedence constraints. Double-clicking the precedence constraint connecting the Check Log Table Execute SQL Task to the Process Files Data Flow Task will display the dialog shown in Figure 18-10.
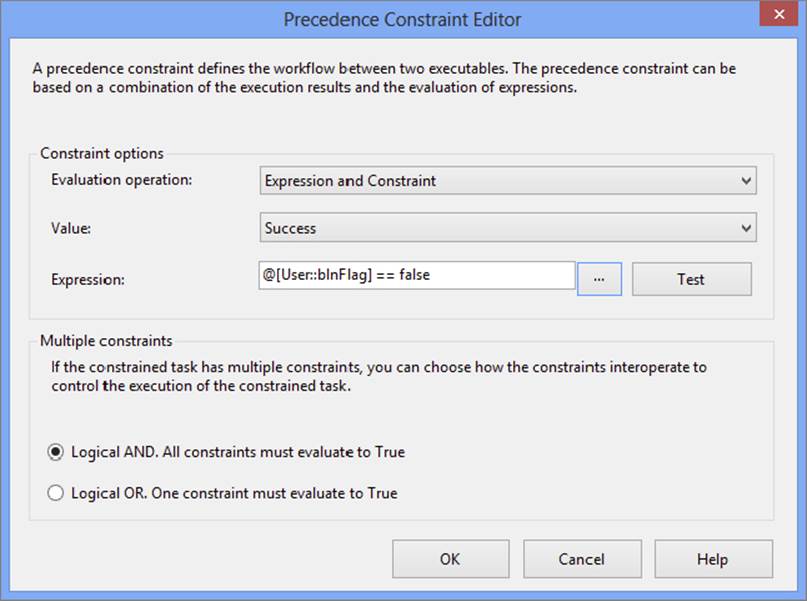
FIGURE 18-10
The properties of the precedence constraint in Figure 18-10 are set to allow the workflow to pass through to the next task (the Process Files Data Flow Task) if the previous step succeeded and the expression has evaluated to false. This constraint is essentially asking, “Was the previous step successful and is this a new file that has not been previously loaded?”
Now that you have determined the business rule behind that constraint, double-click the dashed precedence constraint that connects the Check Log Table Execute SQL Task and the Move to Archive File System Task. The dialog presented for this constraint is shown in Figure 18-11.
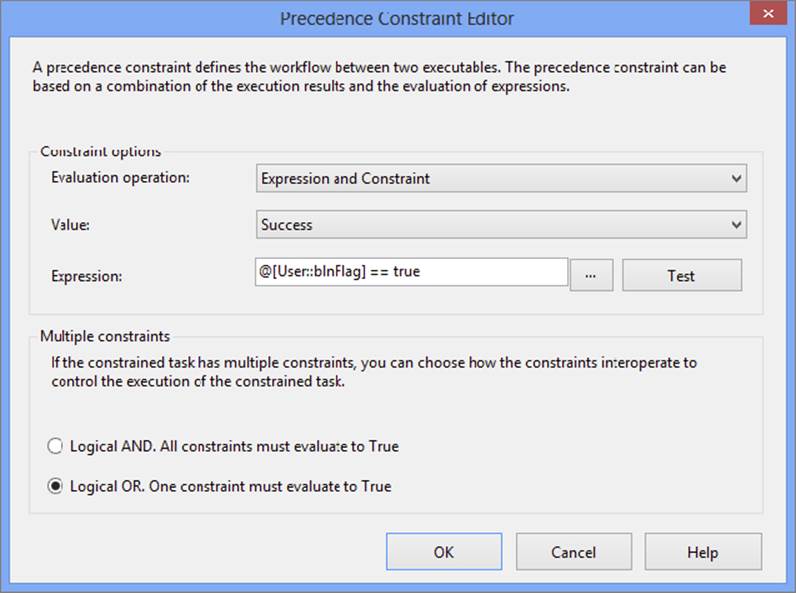
FIGURE 18-11
The properties of the precedence constraint in Figure 18-11 represent a couple of pieces of business rule logic. First, the evaluation operation is set to Expression and Constraint. Second, the expression is testing whether your variable @[User::blnFlag] is true. The interpretation of this expression is asking, “Has the current file been previously loaded?” Lastly, the Logical OR radio button is selected to facilitate an OR condition between your two precedence constraints. In plain English, the properties that are defined for the two precedence constraints will allow the file to be processed and archived if it has or has not been previously loaded.
By using precedence constraints, you control the order of events within a package. After a task or container executes, and depending on how the precedence constraint between the two components was evaluated, the second task or container runs. With all of these options, you can control the workflow of your package at a very granular level. The great thing about precedence constraints in SSIS is that they give you the flexibility to implement complex business rules like the scenario previously demonstrated. Drilling down a bit more, you will next learn another way to control package execution: event handling.
EVENT HANDLING
Each task and container raises events as it runs, such as an OnError event, among several others that are discussed shortly. SSIS enables you to trap and handle these events by setting up workflows that will run when particular events fire. This functionality in SSIS is called event handlers.
You can set up event handlers by navigating to the Event Handlers tab in the SSIS package design environment (see Figure 18-12). The Event Handler design area is just like the Control Flow area — you can use the same component types and do anything that is possible at the Control Flow level.
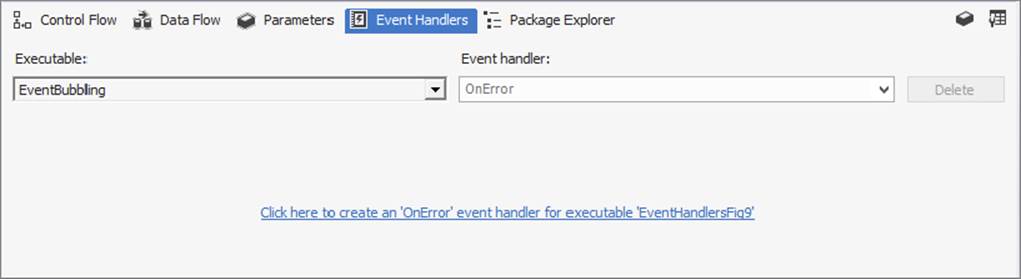
FIGURE 18-12
After adding several event handlers to a package, the workflow can become very complicated, which could be difficult to understand if you had to view it all at once, so separating event handlers from the Control Flow makes sense.
NOTE Make sure your packages are well designed and documented because an event handler that was set up and then forgotten can be the source of a hard-to-troubleshoot problem within the package.
As shown in Figure 18-12, the event handler functionality is driven by two dropdown menus. The first, Executable, is used to set the task or container in the package with which the event handler is associated. The highest-level executable is the package itself, followed by the hierarchical list of tasks and containers contained in the Control Flow.
The second dropdown, called Event handler, defines what event the event handler will listen for in the defined executable. Events are described next.
Events
As the package and each task or container executes, a dozen different events are raised. You can capture the events by adding event handlers that will run when the event fires. The OnError event may be the event most frequently handled, but some of the other events will be useful in complex ETL packages. Events can also be used to set breakpoints and control logging, which are all covered later in the chapter.
The following table describes the events available in SSIS at the package level:
|
EVENT |
DESCRIPTION |
|
OnError |
This event is raised whenever an error occurs. You can use this event to capture errors instead of using the failure precedence constraint to redirect the workflow. |
|
OnExecStatusChanged |
Each time the execution status changes on a task or container, this event fires. |
|
OnInformation |
During the validation and execution events of the tasks and containers, this event reports information. This is the information displayed in the Progress tab. |
|
OnPostExecute |
Just after task or container execution completes, this event fires. You could use this event to clean up work tables or delete files no longer needed. |
|
OnPostValidate |
This event fires after validation of the task is complete. |
|
OnPreExecute |
Just before a task or container runs, this event fires. This event could be used to check the value of a variable before the task executes. |
|
OnPreValidate |
Before validation of a task begins, this event fires. |
|
OnProgress |
As measurable progress is made, this event fires. Information about the progress of an event can be viewed in the Progress tab. |
|
OnQueryCancel |
This event is raised when an executable checks to see if it should stop or continue running. |
|
OnTaskFailed |
It’s possible for a task or container to fail without actual errors. You can trap that condition with this event. |
|
OnVariableValueChanged |
Anytime a variable value changes, this event fires. Setting the RaiseChangeEvent property to False prevents this event from firing. This event is very useful when debugging a package. |
|
OnWarning |
Warnings are less critical than errors. This event fires when a warning occurs. Warnings are displayed in the Progress tab. |
|
Diagnostic |
This event is included only if the logging level is set to Verbose mode. This event fires on the package level if there is specific information that could be helpful to debug the package, such as the number of maximum concurrent executables. |
|
DiagnosticEx |
This event is included only if the logging level is set to Verbose mode. This event fires at the package level to share information about the execution of the package, such as how much memory is used during processing. |
In addition to the events fired at the package level, some tasks fire events as well. The following table lists the tasks that have custom events.
|
Bulk Insert Task |
Transfer Error Messages Task |
|
Data Flow Task |
Transfer Jobs Task |
|
Execute Process Task |
Transfer Logins Task |
|
Execute SQL Task |
Transfer Master Stored Procedures Task |
|
File System Task |
Transfer SQL Server Objects Task |
|
FTP Task |
Web Services Task |
|
Message Queue Task |
WMI Data Reader Task |
|
Script Task |
WMI Event Watcher Task |
|
Send Mail Task |
XML Task |
|
Transfer Database Task |
Using Event Handlers
Now that you know what each event is and when you may be interested in each event, you need to know how to work with them. As you learned earlier, event handlers provide the means to interact with events. This interaction can be used to log information, perform additional steps, or even pass information to other package items.
The following example demonstrates how to use event handlers by simulating a scenario of checking the inventory status of some random products from AdventureWorks. For this example, you set up a new SSIS package that performs several steps, you define anOnError event handler event to fire when an error occurs, and then you use the OnPreExecute event to capture execution details of the package.
1. Begin by running the following script (ProSSIS\Scripts\Ch18_ProSSIS\Scripts.sql) against the AdventureWorks database to create the tables and stored procedure used:
2. CREATE TABLE InventoryCheck (
3. ProductID INT )
4. GO
5. CREATE TABLE InventoryWarning (
6. ProductID INT, ReorderQuantity INT )
7. GO
8. CREATE TABLE MissingProductID (
9. ProductID INT )
10. GO
11. CREATE PROC usp_GetReorderQuantity @ProductID INT,
12. @ReorderQuantity INT OUTPUT AS
13. IF NOT EXISTS(SELECT ProductID FROM Production.ProductInventory
14. WHERE ProductID = @ProductID) BEGIN
15. RAISERROR('InvalidID',16,1)
16. RETURN 1
17. END
18. SELECT @ReorderQuantity = SafetyStockLevel - SUM(Quantity)
19. FROM Production.Product AS p
20. INNER JOIN Production.ProductInventory AS i
21. ON p.ProductID = i.ProductID
22. WHERE p.ProductID = @ProductID
23. GROUP BY p.ProductID, SafetyStockLevel
24. RETURN 0
GO
25.Next, you can put the SSIS package together. In a new package, add an OLE DB Connection Manager pointing to the AdventureWorks database. Because this example uses an Execute SQL Task with parameters, you need to be particular about which provider you use. The parameters work differently depending on which provider is being used. For example, parameters used with the OLE DB provider are numerically named starting with zero. Parameters used with ADO.NET providers use names beginning with the @ symbol.
26.Set up the variables in the following table. (Click the Control Flow area right before opening the Variables window so that the scope of the variables will be at the Package level.)
|
NAME |
SCOPE |
DATA TYPE |
VALUE |
|
Count |
Package |
Int32 |
0 |
|
ProductID |
Package |
Int32 |
0 |
|
ReorderQuantity |
Package |
Int32 |
0 |
27.Drag a Sequence Container to the Control Flow design area and name it Inventory Check. You can use a Sequence Container to group tasks, treating the tasks as a unit in the package’s workflow. In this case, you use it to experiment with the event handlers.
28.Set the MaximumErrorCount property of Inventory Check to 9999 in the Property window. This example raises errors by design, and setting the MaximumErrorCount property will allow the simulation to continue running after the errors fire.
29.Drag an Execute SQL Task into the Inventory Check Container, and name it Empty Tables.
30.Double-click the task to open the Execute SQL Task Editor. Ensure that the ConnectionType property is set to OLE DB, and set the Connection property to the AdventureWorks Connection Manager.
31.Click the ellipsis button next to the SQLStatement property and type the following into the Enter SQL Query window to complete the Execute SQL Task configuration:
32. DELETE FROM MissingProductID
33. DELETE FROM InventoryWarning
DELETE FROM InventoryCheck
34.Drag a For Loop Container into the Inventory Check Container and name it Inventory Query Simulator.
35.Double-click the Inventory Query Simulator and fill in the properties as shown in the following table:
|
PROPERTY |
VALUE |
|
InitExpression |
@Count =1 |
|
EvalExpression |
@Count <= 50 |
|
AssignExpression |
@Count = @Count + 1 |
36.Click OK to accept the configuration, and complete the container’s setup by changing the MaximumErrorCount property of the Inventory Query Simulator to 9999 in the Properties window.
37.Drag a precedence constraint from the Empty Tables Task to the Inventory Query Simulator, and add a Script Task to the Inventory Query Simulator Container named Generate ProductID.
38.Double-click the Script Task to open the Script Task Editor.
39.Select the Script pane, setting the ReadWriteVariables property to User::ProductID, as shown in Figure 18-13.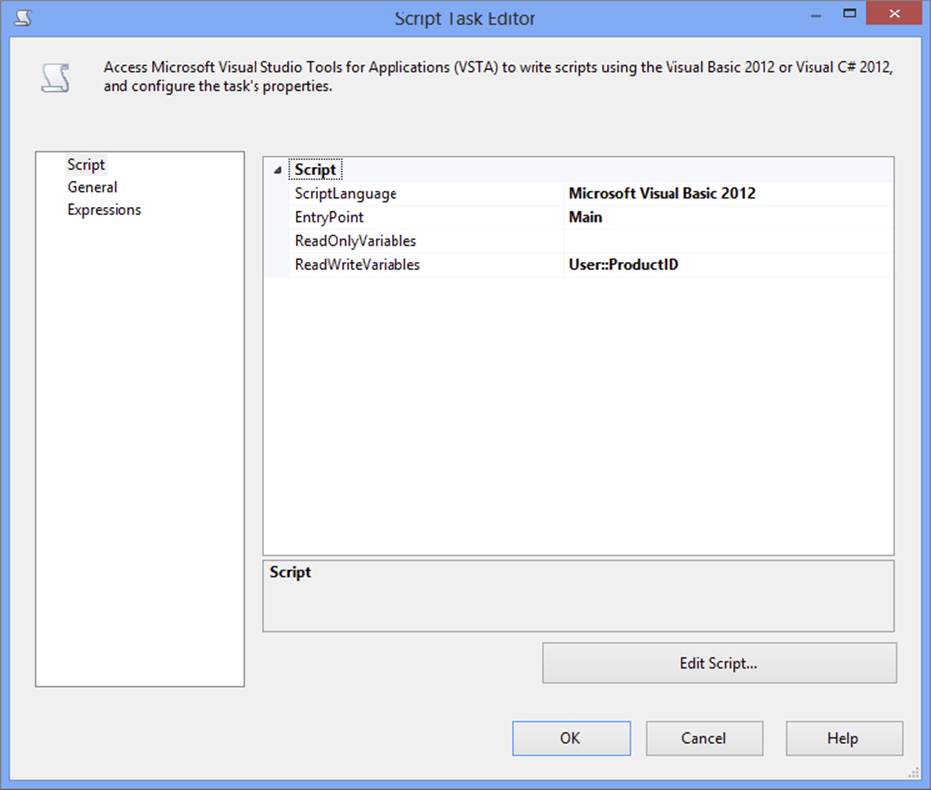
FIGURE 18-13
40.Check the ScriptLanguage property. If this property is set to Microsoft Visual C# 2012 or 2013, change the dropdown to Microsoft Visual Basic 2012 or 2013, based on what version of Visual Studio you’re using the edit packages.
41.Click Edit Script to open the Visual Studio Tools for Applications design environment. You will use this Script Task to generate a random product identifier.
42.Replace Public Sub Main with the following code:
43. Public Sub Main()
44. Randomize()
45. Dts.Variables("User::ProductID").Value = _
46. CInt(Int((900 * Rnd()) + 1))
47. Dts.TaskResult = ScriptResults.Success
End Sub
48.Close the Visual Studio script design environment and then click OK to accept the changes to the Script Task.
49.After setting up the script to get the inventory level, you need to check that value. Do this by adding an Execute SQL Task named Check Inventory Level to the Inventory Query Simulator.
50.Drag a Precedence Constraint from Generate ProductID to Check Inventory Level.
51.Double-click the Check Inventory Level Task to open the Execute SQL Task Editor.
52.Find the Connection Manager for the AdventureWorks database in the list of connections and change the SQLStatement property to usp_GetReorderQuantity. This task will call the usp_GetReorderQuantity with two parameters, set on the Parameter Mapping window:ProductID and ReorderQuantity as described in the following table. The ResultSet property should be set to None because you are using an output parameter to get the ReorderQuantity value from the stored procedure. The General pane of the Execute SQL Task Editor should now look like Figure 18-14.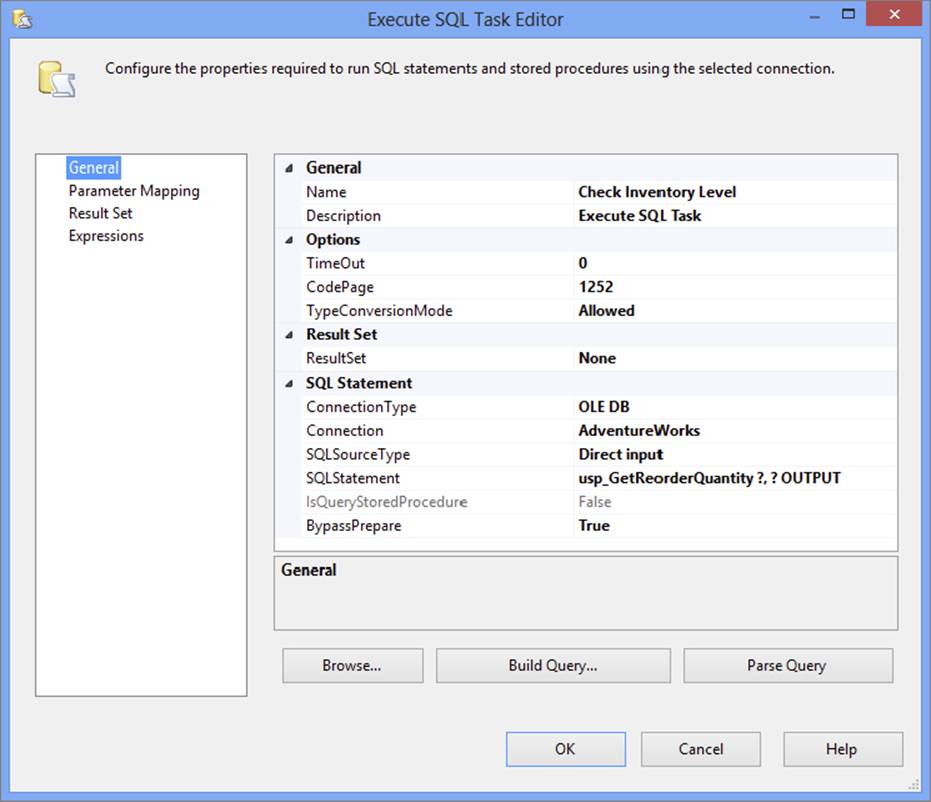
FIGURE 18-14
53.On the Parameter Mapping pane, set up the parameters, as shown in the following table:
|
VARIABLE NAME |
DIRECTION |
DATA TYPE |
PARAMETER NAME |
|
User::ProductID |
Input |
LONG |
0 |
|
User::ReorderQuantity |
Output |
LONG |
1 |
54.Click OK to accept the configuration. As described earlier, set the MaximumErrorCount property of the Check Inventory Level Task to 9999 using the Properties window.
55.Add another Execute SQL Task and name it Insert Warning. This task will be used to insert a row into the InventoryWarning table whenever the current inventory is less than the established reorder point for a particular product. Connect Check Inventory Level to Insert Warning.
56.Double-click the precedence constraint and set the Evaluation operation property to Expression and Constraint. The Expression property should be @ReorderQuantity > 0 and the Value property should be left at Success, as shown in see Figure 18-15.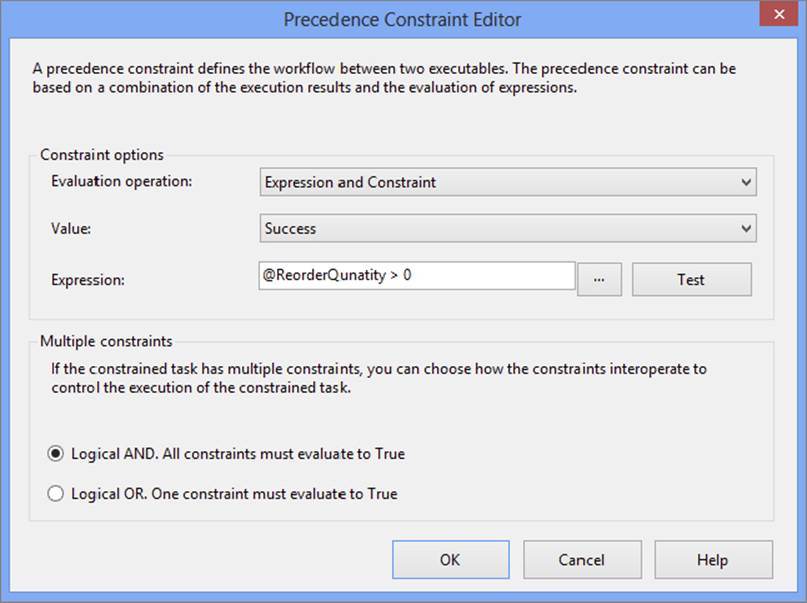
FIGURE 18-15
57.Once configured, click OK to accept the changes to the precedence constraint.
58.Next, you will set up the Warning task. Double-click the Insert Warning Task and set the ConnectionType to OLE DB. Choose the AdventureWorks Connection Manager from the Connection list, and click the ellipsis next to SQLStatement to add the following query to the Enter SQL Query dialog:
59. INSERT INTO InventoryWarning (ProductID, ReorderQuantity)
SELECT ?, ? OUTPUT
60.Click OK to accept the command. On the Parameter Mapping pane, set up two parameters, as shown in the following table. In this case they will both be input parameters.
|
VARIABLE NAME |
DIRECTION |
DATA TYPE |
PARAMETER NAME |
|
User::ProductID |
Input |
LONG |
0 |
|
User::ReorderQuantity |
Input |
LONG |
1 |
61.Click OK to accept the configuration. The package should now resemble Figure 18-16.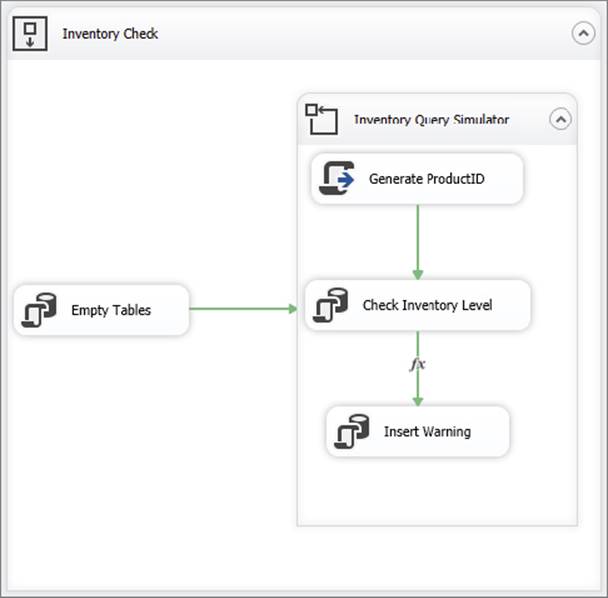
FIGURE 18-16
When you run the package, sometimes the Check Inventory Level Task will fail. The Generate ProductID script will not always result in a valid ProductID. When that happens, the stored procedure will raise an error and cause the Check Inventory Level Task to fail. Because the FailParentOnFailure and FailPackageOnFailure properties are set to False by default and the MaximumErrorCount property is set to 9999 on the task and parent containers, the package will continue to run through the simulation even after a failure of this task.
Notice that when the Check Inventory Level Task fails, it will be marked with a red circle with an “X”; but the simulation will continue running and the loop will cause the icon to change between the red circle and a green circle with a check mark. To view what is going on as the package runs, click the Progress tab. This is also a fantastic troubleshooting tool, providing detailed information about each step. Once the package completes and debugging is stopped, you can continue to view the information on the Execution Results tab.
After running the package, you can view the results by querying the InventoryWarning table to see the rows that were inserted when the User::ReorderQuantity variable was greater than 0. Run the following query in SQL Server Management Studio:
SELECT * FROM InventoryWarning
Using the OnError Event Handler Event
The package you just created is almost guaranteed to generate some errors at the Check Inventory Level Task every time it runs. You could add a task connected to the Check Inventory Level Task with the precedence constraint set to Failure, but in this case you will create an event handler to add a row to the MissingProductID table each time the Check Inventory Level Task fails.
1. Click the Event Handlers tab. Because you can have a large number of event handlers in a package, you must select the object and the event from the dropdown lists. Clicking the Executable dropdown enables you to see the package objects in a hierarchy. An example is shown in Figure 18-17, where the package has a child, Inventory Check, which has children Empty Tables, Inventory Query Simulator, and so on.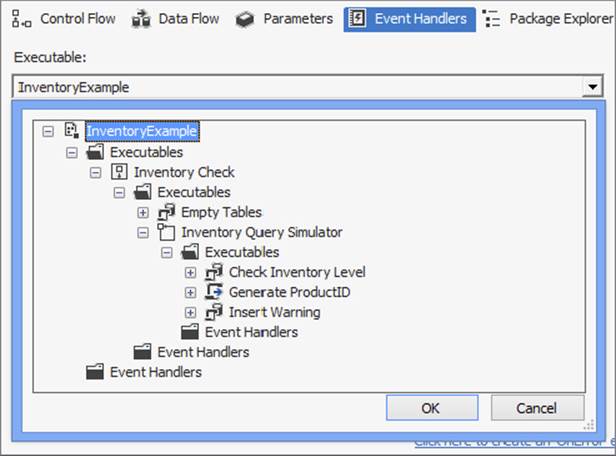
FIGURE 18-17
2. Select Check Inventory Level and click OK to close the list.
3. Choose OnError in the Event Handler list if it isn’t there by default. You must click the link “Click here to create an ‘OnError’ event handler for executable ‘Check Inventory Level’” to create the new event handler. The screen will change to a design area very much like the Control Flow tab. You can now drag any Control Flow Level Task or Container to the design area. In this case, you will add an Execute SQL Task that adds a row to the MissingProductID table whenever the Check Inventory Level Task fails.
Event handlers can be as simple or as complex as needed. All functionality available at the Control Flow level is available at the Event Handler level, including the capability to add an event handler to an event handler.
4. Drag an Execute SQL Task to the Event Handler design area and name it Insert Missing ProductID.
5. In the properties of the task, set the Connection Type to OLE DB and select the AdventureWorks Connection Manager.
6. Enter the following statement into the Enter SQL Query window under the SQLStatement property:
INSERT INTO MissingProductID (ProductID) SELECT ?
7. Click OK to accept the query and then switch to the Parameter Mapping pane.
8. Add one parameter with the properties shown in the following table:
|
VARIABLE NAME |
DIRECTION |
DATA TYPE |
PARAMETER NAME |
|
User::ProductID |
Input |
Long |
0 |
9. Click OK to accept the configuration.
Now, when you run the package, the new event handler will fire whenever the Check Inventory Level Task raises an error. You can query the MissingProductID table to see the results by running the following query in SQL Server Management Studio:
SELECT * from MissingProductID
Using the OnPreExecute Event Handler Event
Suppose you want to keep a record of all the ProductID numbers that were tested. You can do this using the OnPreExecute event handler. To do so, follow these steps:
1. Working from the previous package, add another event handler to the Check Inventory Level Task. With Check Inventory Level selected in the Executable list, select OnPreExecute under Event Handler.
2. Click the link to create the handler, and add an Execute SQL Task to the Event Handler design area and name it Record ProductID.
The Execute SQL Task Editor will store the ProductID numbers.
3. Double-click the Execute SQL Task to open the Execute SQL Task Editor. Use the OLE DB AdventureWorks Connection Manager, and add this statement to the SQLStatement property by typing in the property text box or using the Enter SQL Query dialog:
INSERT INTO InventoryCheck (ProductID) SELECT ?
4. Add one parameter on the Parameter Mapping pane with exactly the same properties as the one added to the OnError event task, as the following table shows.
|
VARIABLE NAME |
DIRECTION |
DATA TYPE |
PARAMETER NAME |
|
User::ProductID |
Input |
LONG |
0 |
5. Click OK to accept the configuration and run the package.
6. Once execution of the package has completed, go back to SQL Server Management Studio to see the results by running the following queries:
7. SELECT * FROM InventoryCheck
8. SELECT * FROM MissingProductID
SELECT * FROM InventoryWarning
The InventoryCheck table should have one row for each ProductID that was generated. This row was entered at the Check Inventory Level OnPreExecute event — in other words, before the task actually executed. The MissingProductID table should have several rows, one for each ProductID that caused the usp_GetReorderQuantity stored procedure to raise an error. These rows were added at the Check Inventory Level OnError event. Finally, the InventoryWarning table will have some rows if the inventory level of any of the products was low. These rows were added at the Control Flow level.
Event Handler Inheritance
Events handlers will inherit the events of their children. This means that if you have a container, and the container has an event handler OnError event defined on it, then if a child task that exists in the container errors, the event handler of the container will fire. This is sometimes referred to as the event “bubbling” or traveling up from child task to parent container. As mentioned already, the highest level executable is the package itself. Therefore, if you define an event handler event at the package level, then whenever that event occurs in the package, the event handler will fire.
The same inheritance occurs if a parent package executes a child package using the Execute Package Task. It will appear as though duplicated events are fired, but it is simply the event handler for both the child package and the parent package handling the event. You can prevent this phenomenon by setting the Propagate variable to false in the child package.
To demonstrate this with the example inventory package, you’ll move the OnError event handler from the task to a parent container:
1. Using the package created in the previous section, navigate to the Check Inventory Level OnError event handler.
2. Copy the Insert Missing ProductID Task, and paste it into a new OnError event handler for the Inventory Check Container.
3. You can delete the original event handler and run your package again. You can see that the errors are now trapped at the Inventory Check Container level by viewing the error handler as the package runs. The OnError event bubbled up from the task to the For Loop Container to the Inventory Check Container.
What would happen if you had an OnError event handler on both the Check Inventory Level Task and the Sequence Container? Surprisingly, both will fire when an error is raised at the Check Inventory Level Task. This could cause some unexpected results. For example, suppose you had an error handler at the parent container to perform a particular task, such as sending an e-mail message. An error in a child container that you expected to be handled at that level would also cause the parent’s OnError handler to execute. To prevent this from happening, you can set a system variable, Propagate, to False at the child task’s Error Handler level. To demonstrate this, follow the steps:
1. Add the OnError event handler back to the Check Inventory Level Task.
2. Once again, create an event handler for the Check Inventory Level OnError event. You can copy and paste the Insert Missing ProductID Task from the Inventory Check OnError event handler.
3. While still working in the Check Inventory Level OnError Event design area, click the design area and open the Variables window.
4. If the system variables are not visible, click the Grid Options icon and check the Show system variables property. As shown in Figure 18-18, make sure that the Propagate property is set to True, the default.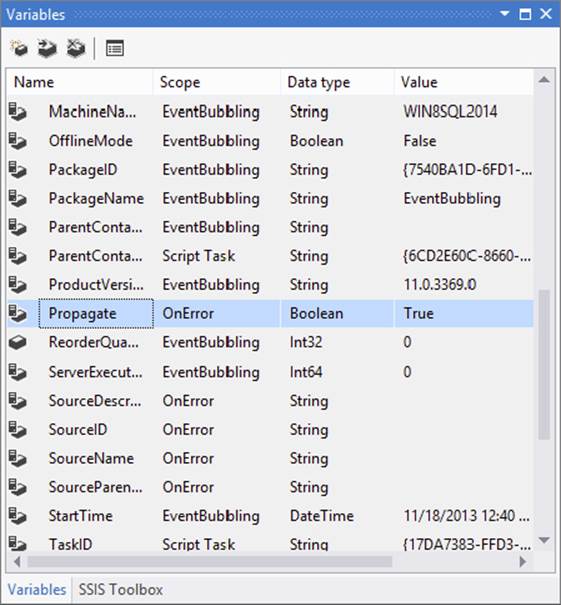
FIGURE 18-18
5. Run the package. While it is running, navigate to each of the error handlers to watch as they execute. Notice that both OnError events will fire and the MissingProductID table ends up with two rows for every invalid ProductID.
6. After execution of the package is complete, change the Propagate property to False (use the Variables window). Now only the Check Inventory Level OnError event handler will execute. The OnError event will no longer bubble to the parent containers.
7. Run the package again. This time, you should find the expected behavior; the error is handled only at the Check Inventory Level Task.
NOTE When the Propagate property is set to False on an OnEvent handler, you no longer need to modify the MaximumErrorCount property of the parent containers from the default setting of 1 to keep the package running after the error.
BREAKPOINTS
Many programmers use breakpoints to debug programs, viewing the value of variables and following the flow of the logic as they step through the source code. SSIS enables you to set breakpoints on the package or any Control Flow Task or Container. You can also set breakpoints in Script Task code just like most programming environments.
Using the Inventory Example package created in the previous section, follow these steps to enable and use breakpoints.
1. Right-click the Inventory Query Simulator For Loop Container, and choose Edit Breakpoints from the pop-up menu. The Set Breakpoints dialog opens, displaying a list of possible events at which you can set a breakpoint, as shown in Figure 18-19.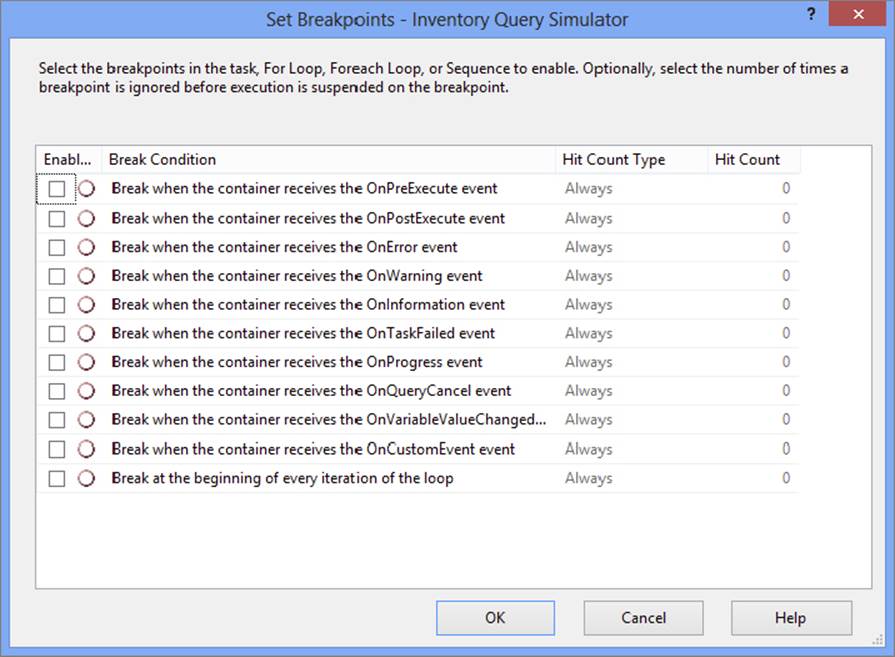
FIGURE 18-19
2. Enable the last item, “Break at the beginning of every iteration of the loop,” which is available only for looping containers. Hit Count Type has the following options:
· Always
· Hit Count Equals
· Hit Count Greater Than or Equal To
· Hit Count Multiple.
The last item will suspend execution when the hit count is equal to a multiple of the value set for Hit Count. For example, setting the Hit Count Type to Hit Count Multiple and the Hit Count to 5 will cause the execution to be suspended every fifth time through the loop.
3. Go ahead and set the type to Hit Count Multiple and the Hit Count to 5, as in Figure 18-20.
FIGURE 18-20
4. Click OK. The container will now have a red circle in its top-right corner specifying that a breakpoint has been set (see Figure 18-21, though you can’t see the color of the circle in the figure here).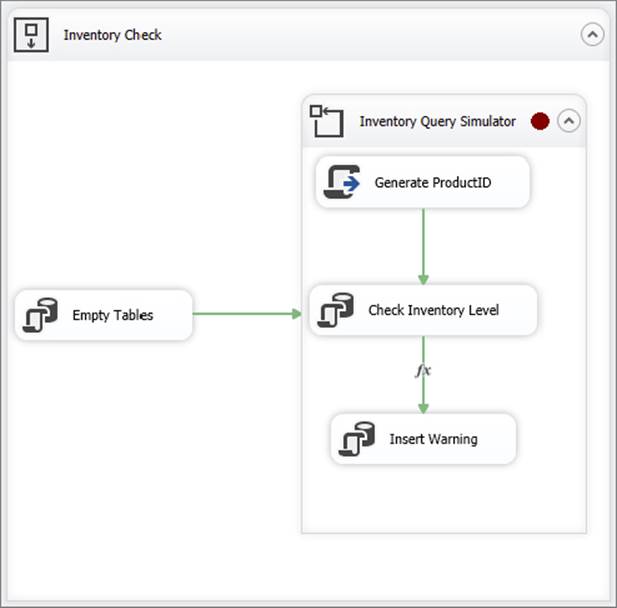
FIGURE 18-21
5. Run the package. When the Hit Count reaches 5, the execution will stop and the red dot will change to a red circle with an arrow. You can now view the values of the variables in the Locals window. If the Locals window is not visible, select it by choosing Debug ⇒ Windows ⇒ Locals. Expand Variables, and look for the User variables that were set up for the package (see Figure 18-22). User::Count should have a value of 5. If the value of a variable cannot be completely viewed in the window, such as a long string, you can mouse over it to see the entire value in a tooltip.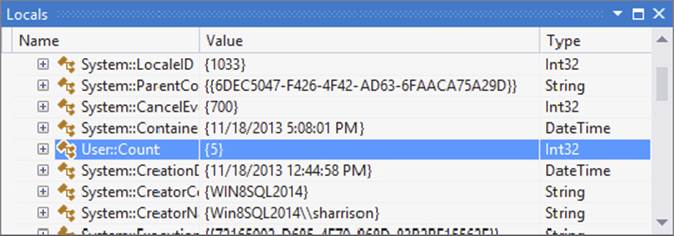
FIGURE 18-22
6. Restart the package, and it will run until the Hit Count reaches 10.
There are also watch windows to make it easier to view the variables you are interested in viewing. Open the Locals watch window by selecting Debug ⇒ Windows ⇒ Watch ⇒ WatchLocals. In the first row of the Watch 1 window, type User::Count in the Name field, as shown in Figure 18-23. You can view the values of all system and user variables from the Locals window. You can also add variables to the watch windows by right-clicking the variables you want to add in the Locals window and choosing Add Watch.
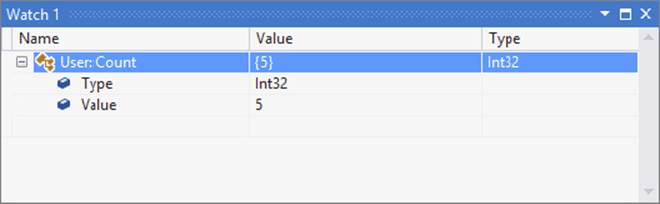
FIGURE 18-23
Another very helpful feature is the capability to change the value of variables on the fly. In the watch window, expand User::Count. Right-click and choose Edit Value. Change the value to 40 and restart the package. The next time the execution is suspended, the value should be at 45.
The value of some system variables may also be interesting to view and change. For example, you might modify the value of a task property as the package executes. You can use breakpoints and the watch windows to view the value to confirm it is what you expected or to change the value manually to correct it.
An additional debugging window known as the Call Stack window may also help troubleshoot packages. This window shows a list of the tasks that have executed up to the breakpoint. This can be very useful when trying to figure out a very complex workflow.
The capability to set breakpoints on the tasks and containers will save you a lot of time while troubleshooting your packages.
NOTE Data Viewers are similar to breakpoints, but they are used to view data as the package executes. See Chapter 4 for more information on how you can use Data Viewers in your packages.
ERROR ROWS
Error rows have been briefly touched upon in several chapters, including Chapter 4, Chapter 14, and Chapter 16. However, a chapter on SSIS error and event handling would be only partially complete without a further discussion on handling errors.
Error rows are handled in the Data Flow through the use of the Error Row Configuration properties. These properties tell the Data Flow Components what to do when a row fails an operation, such as a data conversion, a missing lookup, or a truncation. The properties are found in sources, transformations, and destinations, depending on whether an error can occur or not.
The basic error properties window allows errors to be handled in one of three ways: failure of the Data Flow Task, ignoring the failure, or redirecting the row. Furthermore, truncation errors can be handled separately from conversion errors. Figure 18-24 shows the Error Output property page of an OLE DB Source.
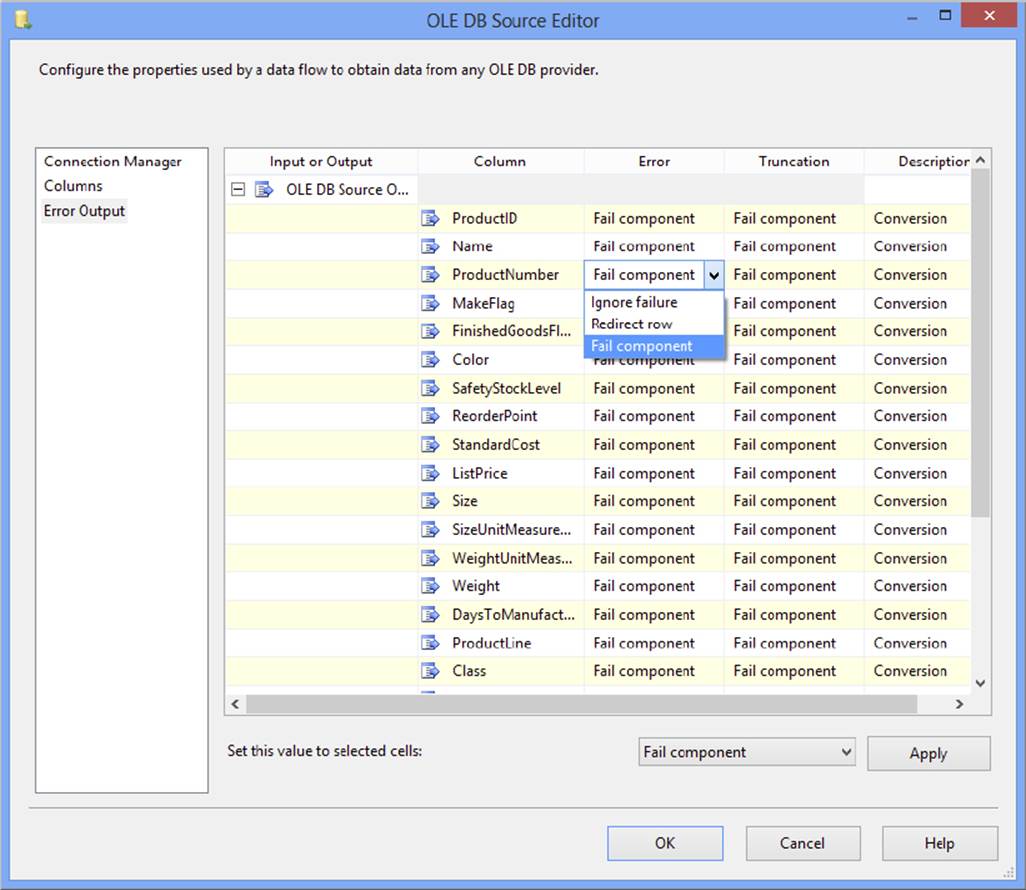
FIGURE 18-24
Figure 18-24 also shows the dropdown selection of the ProductNumber column that defines how the SSIS Data Flow engine should handle an error row for the selected column. The following table clarifies the implications of the error handling section.
|
ERROR HANDLER |
DESCRIPTION |
|
Fail Component |
When Fail Component is chosen for a column or the component and an error occurs (such as a conversion from a source to the Data Flow pipeline), the Data Flow will stop and fail, and any OnError events will fire for the Data Flow Task. |
|
Redirect Row |
Redirect Row means that when a row reaches an error for any column marked to be redirected, the entire row is sent out the red error path output and the Data Flow will not fail. If the red error path output is not used, then the row will be tossed out of the Data Flow. When Redirect Row is selected for any column (error or truncation), be aware that when the condition is met, the entire row will be redirected out the red error path output. |
|
Ignore Failure |
Ignore Failure simply means that the error will be ignored. If the error is in a source or transformation such as a conversion or a missing lookup record, then the error column values will be set to NULL. If the error is a truncation, then the value will be sent downstream with just the partially truncated value. Be aware that when you are dealing with destinations, an ignore failure for a truncation or other error will ignore the entire row, not just the error column. |
To demonstrate how to use the error row handling, create a new package in SQL Server Data Tools (SSDT) with an OLE DB connection to the AdventureWorks database. In a new Data Flow Task, follow these steps:
1. Begin by running the following script (ProSSIS\Scripts\Ch18_ProSSIS\Scripts.sql) against the AdventureWorks database to create the tables used later by this package:
2. CREATE TABLE [UpdatedProducts] (
3. [ProductID] int,
4. [Name] nvarchar(50),
5. [ProductNumber] nvarchar(25),
6. [MakeFlag] bit,
7. [FinishedGoodsFlag] bit,
8. [Color] nvarchar(15),
9. [SafetyStockLevel] smallint,
10. [ReorderPoint] smallint,
11. [StandardCost] money,
12. [ListPrice] money,
13. [Size] nvarchar(5),
14. [SizeUnitMeasureCode] nvarchar(3),
15. [WeightUnitMeasureCode] nvarchar(3),
16. [Weight] numeric(8,2),
17. [DaysToManufacture] int,
18. [ProductLine] nvarchar(2),
19. [Class] nvarchar(2),
20. [Style] nvarchar(2),
21. [ProductSubcategoryID] int,
22. [ProductModelID] int,
23. [SellStartDate] datetime,
24. [SellEndDate] datetime,
25. [DiscontinuedDate] datetime,
26. [rowguid] uniqueidentifier,
27. [ModifiedDate] datetime,
28. [Size_Numeric] numeric(18,0)
29. )
GO
30.Drag an OLE DB Source to the Data Flow and configure it to use the AdventureWorks connection for the OLE DB Connection Manager. Keep the default Data access mode option of “Table or view”; in the “Name of the table or the view” dropdown, choose the [Production].[Product] table from the list.
31.Drag a Data Conversion Component onto the Data Flow region, and then connect the OLE DB Source to the Data Conversion.
32.Edit the Data Conversion Component and add a new row based on the input column Size. Name the output alias Size_Numeric and configure the new data type to be numeric [DT_NUMERIC], as shown in Figure 18-25.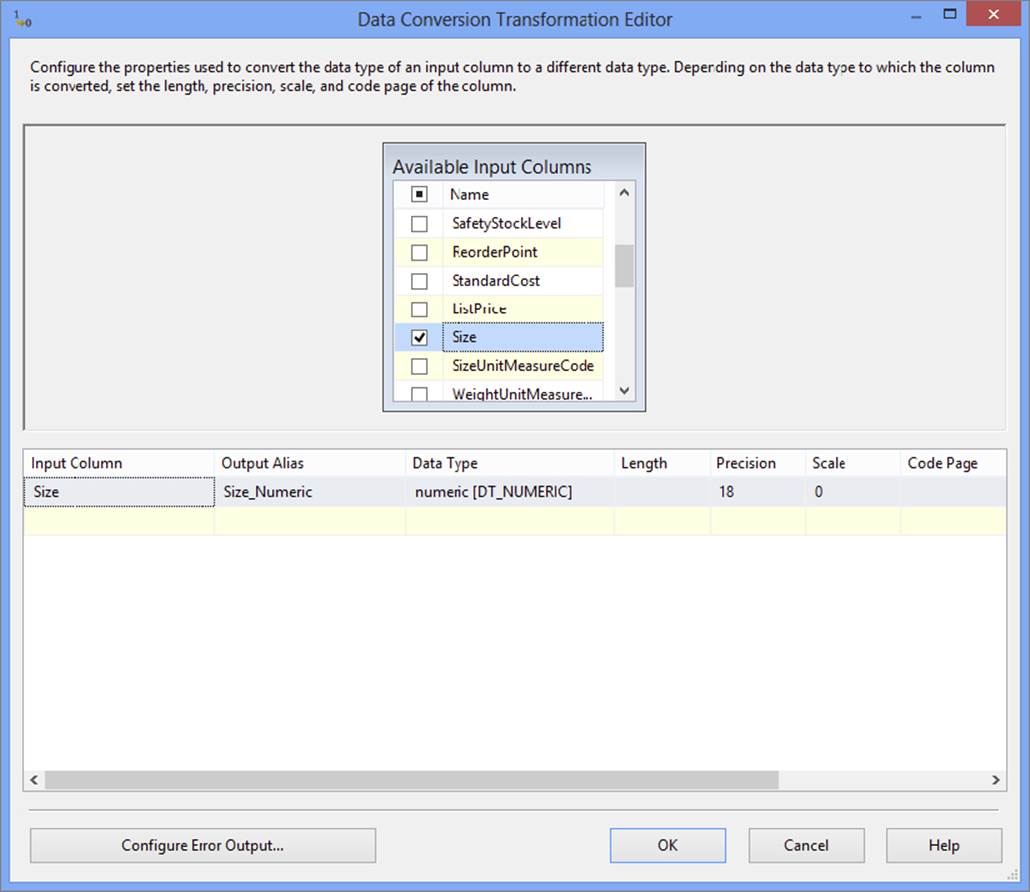
FIGURE 18-25
The Data Conversion Component will create a new column in the Data Flow called Size_Numeric with a numeric data type, but the original Size column will remain, with the Unicode String data type with a length of 5.
33.Within the Data Conversion Component, click the Configure Error Output button in the bottom-left corner of the transformation, which will bring up the Configure Error Output window. Because only one column is defined in the Data Conversion Transformation, only one column is displayed for changing the error settings.
34.Change the Error value to Redirect Row for the Size_Numeric column, as Figure 18-26 demonstrates.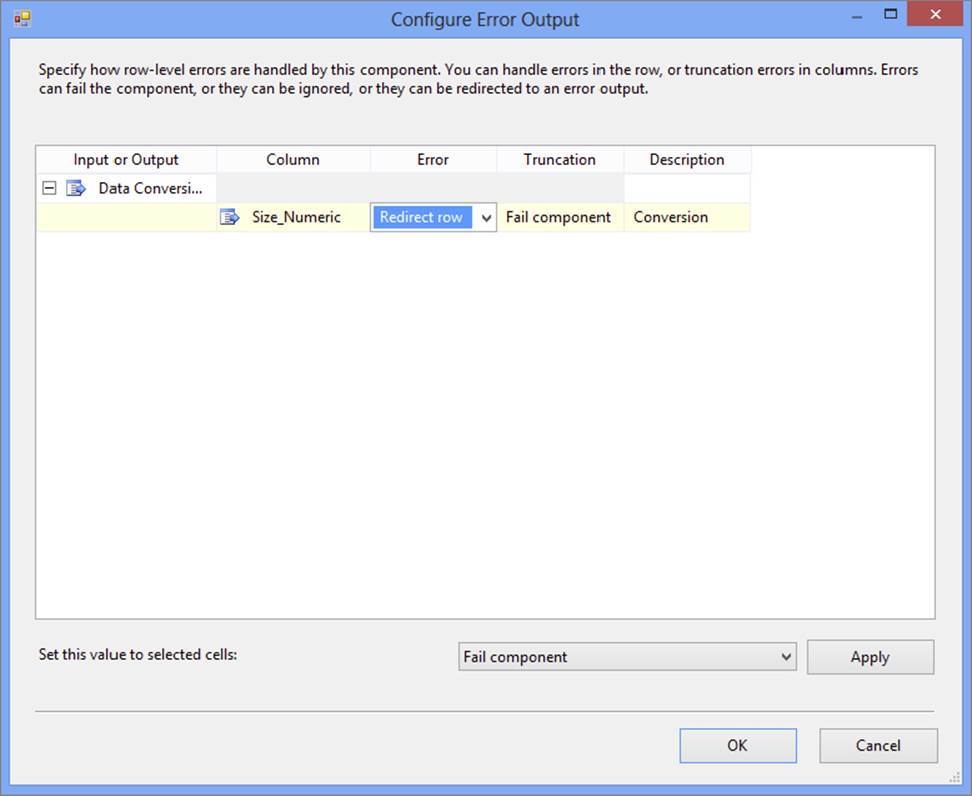
FIGURE 18-26
35.Return to the Data Flow by selecting OK in both the Configure Error Output and the Data Conversion Transformation Editor.
The Data Conversion Component now has a yellow exclamation mark on it, indicating that an error row was configured to be redirected, but the red error path has not yet been used.
36.To fix this warning, you will set up an alternative path to direct those rows. Drag a Derived Column Transformation to the Data Flow and then connect the red error path from the Data Conversion to the new Derived Column Transformation. When you do this, the Configure Error Output window will automatically pop up for the Data Conversion Transformation. This is an alternate method to set the error handling for a failure. Click OK to return to the Data Flow.
37.Edit the Derived Column Transformation and add a new column named Size_Numeric. For the Expression field, type in the following code to add a 0 value to the records that failed the conversion in the prior transformation:
(DT_NUMERIC,18,0)0
38.After saving the Derived Column Transformation, drag a Union All Transformation to the Data Flow and then connect both the blue data path output from the Data Conversion Transformation and the blue data path output from the Derived Column Transformation to the Union All Transformation.
39.Double-click the Union All Transformation to bring up its editor, and scroll down to the bottom of the column list. Multi-select both the ErrorCode and the ErrorColumn columns if they exist in the list, and then press Delete on your keyboard. Click OK to save the changes.
40.A useful tool in testing your package is the Multicast Transformation, which can be used as a placeholder destination as you are developing and testing your package. Before testing your package, add a Multicast Transformation to the Data Flow connected to the output of the Union All.
41.Run your package and observe the results. Your Data Flow execution will look similar to Figure 18-27.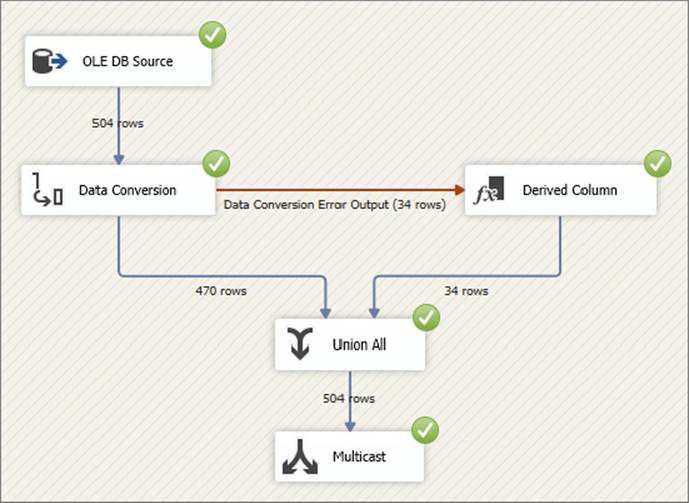
FIGURE 18-27
Note that some of the rows are sent to the Derived Column Transformation but are brought back together with the main Data Flow rows through the Union All Transformation. At this point you have not added a destination, so the next step in this example is to land the data to a new destination table, where you can also handle errors.
42.Stop the package execution and replace the Multicast Transformation with an OLE DB Destination. In the editor, confirm that the AdventureWorks connection is listed in the OLE DB Connection Manager dropdown and change the data access mode to “Table or view.” Assign the data to load into the table UpdatedProducts that you created at the beginning of this exercise. On the Mappings property page, ensure that the default map of all the input columns from the Data Flow to the destination table columns based on name and data type looks accurate. Click OK to save the changes.
In the Data Flow designer, notice that the OLE DB Destination has a yellow exclamation point on it, and when you hover the mouse over it (or display the error window), it indicates that there may be a truncation error for the Name column going from a length of 50 to a length of 21. To finish this example, you will now redirect the error rows to a flat file.
43.Drag a Flat File Destination onto the Data Flow and connect the red error path output from the OLE DB Destination onto the Flat File Destination. When the Configure Error Output window pops up, change the Error handling dropdown to Redirect Row and click OK to save your changes.
44.Edit the Flat File Destination and click the New button next to the Flat File Connection Manager dropdown. When prompted, leave the Flat File Format selected on Delimited and click OK, which will bring up the Flat File Connection Manager Editor.
45.Type C:\ProSSIS\Files\Truncated_Names.txt in the File name text box and then click OK to save the connection properties. You will be returned to the Flat File Destination Editor.
46.To finish, click the Mappings page in the Flat File Destination Editor, which will automatically map the columns from the error path to the flat file. Click OK to close the Destination Editor.
When you run your package, your results should look like what is shown in Figure 18-28.
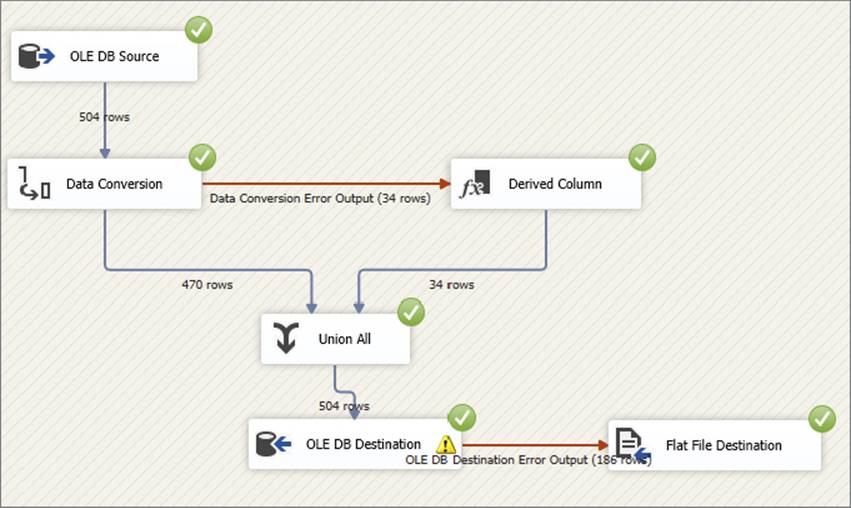
FIGURE 18-28
The rows with the Name column truncation were sent to the flat file. You can check your results by opening the flat file in your C:\ProSSIS\Files folder, which will show that the full names were added to the flat file. As noted earlier, if you had set the OLE DB Destination error to Ignore Failure, the entire error row would be ignored, not just the column value.
LOGGING
Logging is an important part of any data process, because it gives administrators and developers insight into what transpired during a process, with the following benefits:
· Error triage to help identify as quickly as possible what was the point and cause of the failure, such as the failure of a Lookup Component to match a record
· Root cause analysis so that a solution can be put in place to prevent a failure situation in the future
· Performance metrics such as package and execution times so that negative performance trends can be observed and addressed before the performance impact causes an ETL failure
SSIS contains built-in logging features that capture execution details about your packages. Logging enables you to record information about events you are interested in as the package runs. The logging information can be stored in a text or XML file, to a SQL Server table, to the Windows event log, or to a file suitable for Profiler.
Logging can be enabled for all or some tasks and containers and for all or any events. Tasks and containers can inherit the settings from parent containers. Multiple logs can be set up, and a task or event can log to any or all logs configured. You can also control which pieces of information are recorded for any event.
Logging Providers
SSIS includes several default log providers. These providers are selected in the Provider type combo box and are defined as follows:
· SSIS Log Provider for Text Files: This provider is used to store log information to a CSV file on the file system. It requires you to configure a File Connection object that defines the location of the file. Storing log information in a text file is the easiest way to persist a package’s execution. Text files are portable, and the CSV format is a simple-to-use industry-wide standard.
· SSIS Log Provider for SQL Server Profiler: This provider produces a SQL Profiler trace file. The file must be specified with a trc file extension so that you can open it using the SQL Profiler diagnostic tool. Using SQL Profiler trace files is an easy way for DBAs to view log information. Using Profiler, you can view the execution of the package step by step, even replaying the steps in a test environment.
· SSIS Log Provider for SQL Server: This provider sends package log events to a table in the specified SQL Server database. The database is defined using an OLE DB Connection. The first time this package is executed, a table called sysssislog is created automatically. Storing log information in a SQL Server database inherits the benefits of persisting information in a relational database system. You can easily retrieve log information for analysis across multiple package executions.
· SSIS Log Provider for Windows Event Log: This provider sends log information to the Application event store. The entries created are under the Source name SQLISPackage110. No additional configuration is required for this provider. Logging package execution to the Windows event log is possibly the easiest way to store log events. The Windows event log is easy to view and can be viewed remotely if required.
· SSIS Log Provider for XML files: This provider stores log information in a specified XML file on the file system. The file is specified through a File Connection object. Make sure you save the file with an xml file extension. Logging events to XML inherits the advantages of the XML specification. XML files are very portable across systems and can be validated against a schema definition.
Log Events
Once you have configured the log providers you wish to employ, you must define what events in the package to log. This is done in the Details tab of the Configure SSIS Logs dialog, shown in Figure 18-29. To enable an event to be logged, check the box next to its name. For instance, in Figure 18-29, the OnError event for the package has been selected for logging. By selecting other containers on the left side of the dialog, you can select additional events down to an individual task or Data Flow event level. To select all events at once, check the box in the header row of the table. By selecting individual containers in the tree view on the left, you can configure the logging of events on an individual task level. When you configure logging at the task level, the special events exposed by a task can additionally be included in the log.
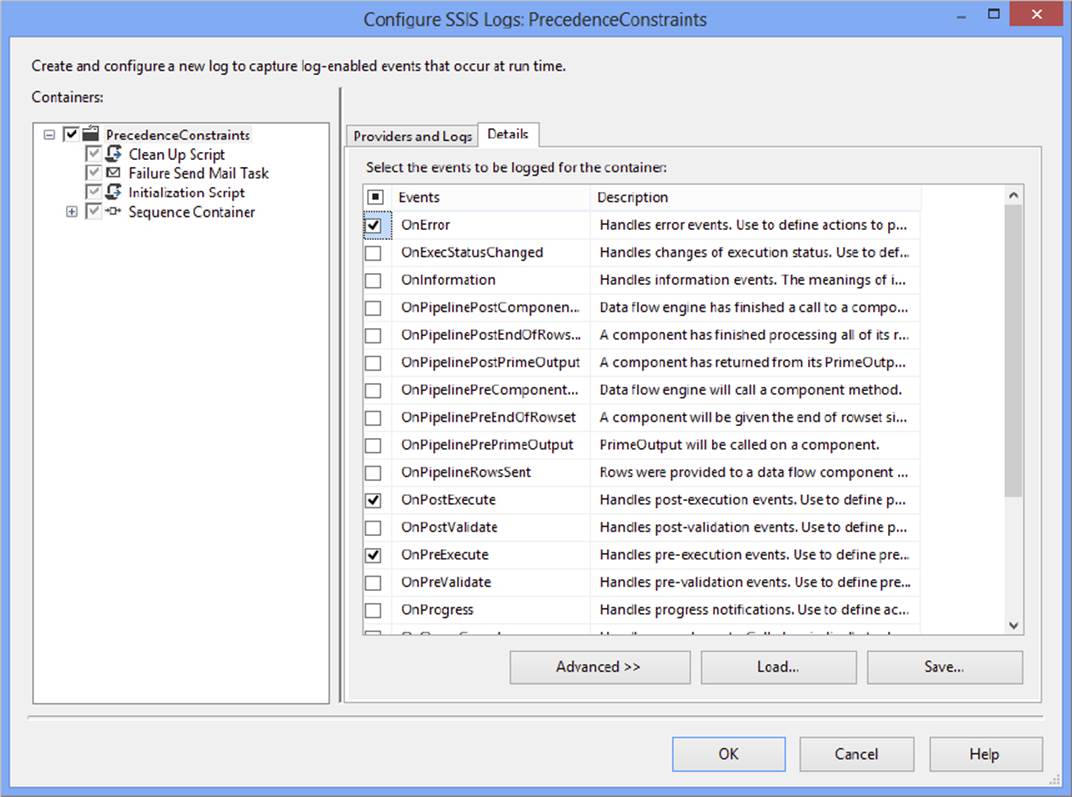
FIGURE 18-29
You can see how SSIS logging works by working with a previously created package.
1. Open one of the packages you created earlier in this chapter or any package with several Control Flow Tasks.
2. From the menu, navigate to SSIS ⇒ Logging to open the Configure SSIS Logs dialog. To enable logging, you must first check the box next to the package name in the left pane (see Figure 18-30); in this case, the package is named “10Logging.”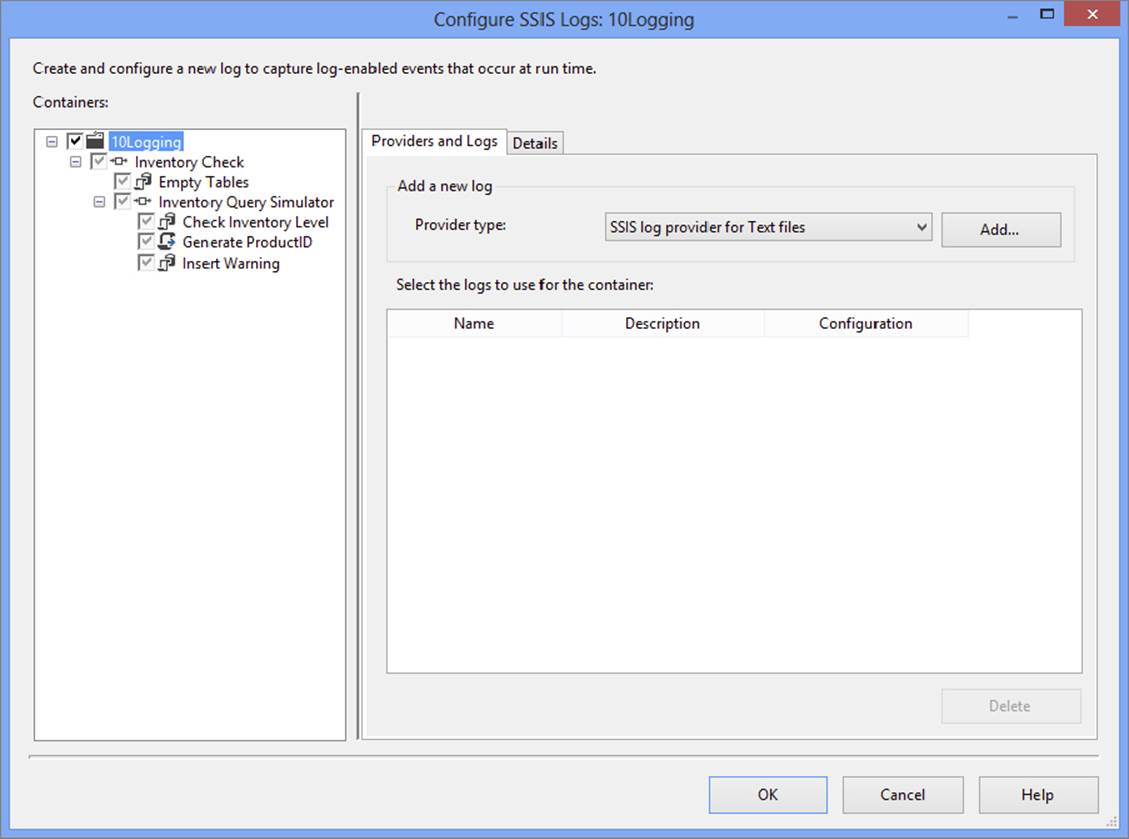
FIGURE 18-30
NOTE Notice that the checkboxes for the child objects in the package are greyed out. This means that they will inherit the logging properties of the package. You can click in any checkbox to uncheck an object. Clicking again to check the box enables you to set up logging properties specific to that task or container.
3. To get started, the log providers must be defined at the package level. Select package in the TreeView control on the left (the top level) so that the package is highlighted.
4. In the Provider type dropdown list, choose which type of provider you would like to configure; as an example, choose SSIS Log Provider for XML files. Click Add to add the provider to the list. Click the dropdown under Configuration and choose <New Connection>.
5. Once the File Connection Manager Editor opens, set the Usage Type property to Create File. Type C:\ProSSIS\Files\Log.xml as the path for the XML file or click Browse to find the path for the XML file location (see Figure 18-31).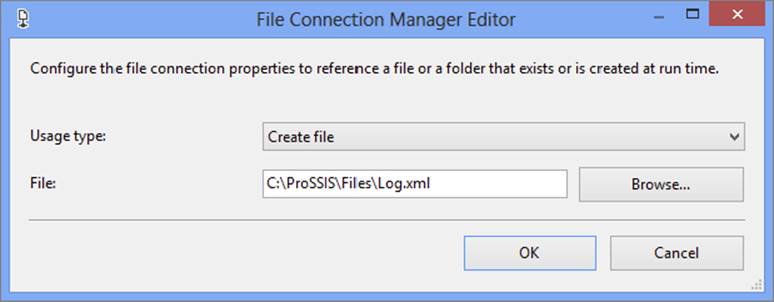
FIGURE 18-31
6. Click OK to accept the configuration and dismiss the dialog. In the Configure SSIS Logs dialog, you should now see the new log provider and its properties. Check the box next to the new logging provider to enable it at the package level. At this point, you can give the log provider a descriptive name if you want, as shown in Figure 18-32.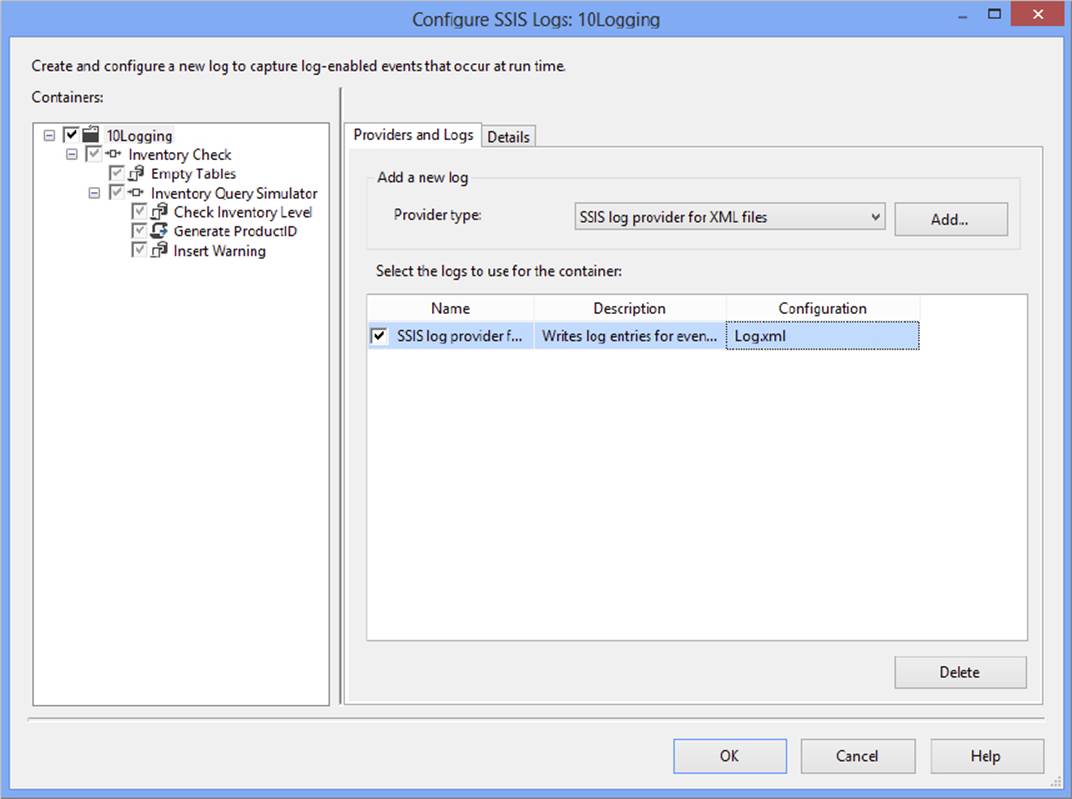
FIGURE 18-32
7. Click the Details tab to view a list of events you can log. If you click Advanced, you will also see a list of possible fields (see Figure 18-33).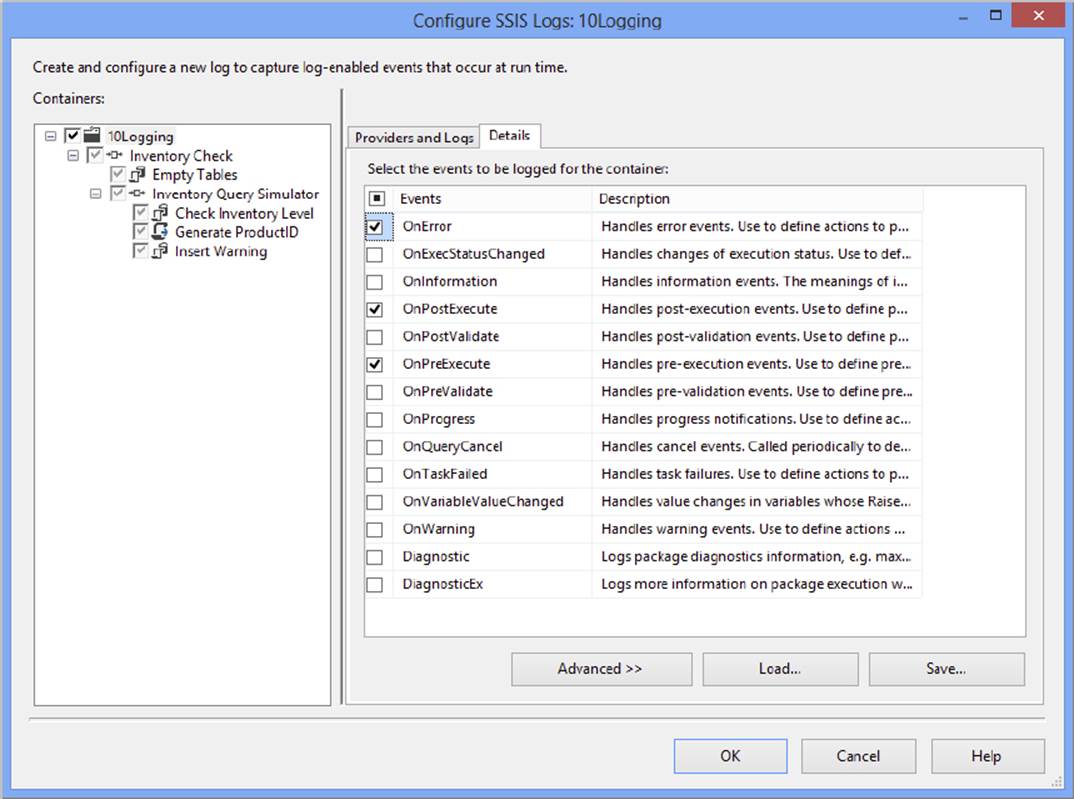
FIGURE 18-33
8. Choose the OnPreExecute, OnPostExecute, and OnError events. Notice that all of the fields are automatically chosen. You can uncheck any fields for which you don’t think the information will be useful.
9. Move back to the Providers and Logs tab. When you checked the log provider at the package level (by checking the checkbox at the highest level in the tree view of the left pane), you enabled that log for all components in the package that are set to inherit settings from their parent container. Even if that log provider is chosen for an object that does not inherit the log settings, you can use it to select different events and fields. Once you modify the logging on a parent container, such as a For Loop Container, the child objects will inherit from the container, not the package.
10.When you are satisfied with the logging settings, click OK to close the dialog. If you view the Properties window of a task or container, you will find the LoggingMode property. This property can be set to UseParentSetting, Enabled, or Disabled and will match the settings you just configured.
11.Run the package. Once the package execution has completed, open the log file to view the XML (see Figure 18-34).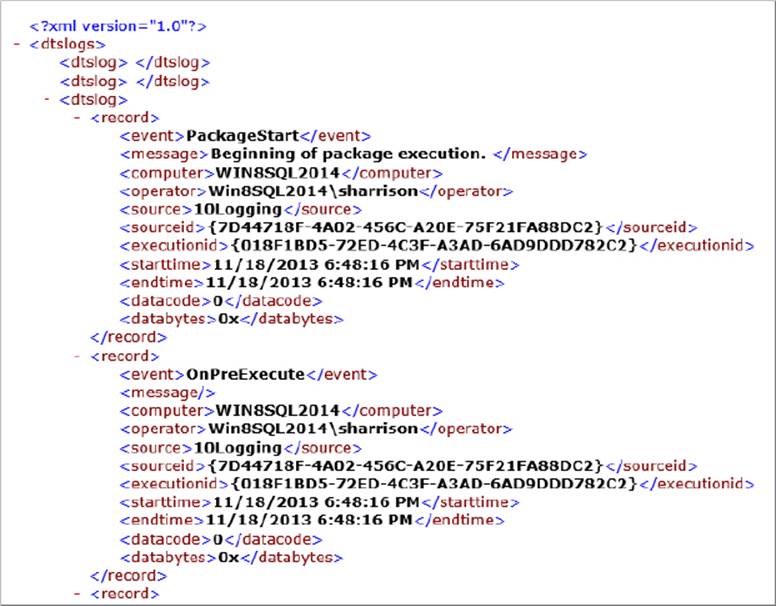
FIGURE 18-34
Setting up logging for a package can be as complicated or as simple as required. It’s possible that you may want to log similar information, such as the OnError event, for all packages. If so, you can save the settings as a template by clicking Save on the Details tab of the Configure SSIS Logs dialog. Alternatively, you can load a previously saved template by clicking the Load button.
Catalog Logging
In addition to logging that can be turned on at a package level, SSIS 2014 introduces another layer of logging as part of the Integration Services catalog. If your SSIS project is set to Project Deployment Model, your deployed packages can utilize the SSIS service. This is especially handy when the package encounters a problem while running in production, rather than during development. In comparison to traditional logging, you do not need to add a logging provider to the package and can apply the catalog logging after the fact. Catalog logging also provides additional information for the administrator after the package has been deployed.
Once your project has been deployed to the server, it will automatically participate in the catalog logging. You can modify the amount of logging that occurs by changing the logging level at execution time. The logging can be set to four levels, as described in the following table.
|
LOGGING LEVEL |
DESCRIPTION |
|
None |
Includes minimal logging of executions, tasks, and parameters |
|
Basic |
Includes standard logging, as well as execution statistics and messages for specific events, including pre- and post-executions and pre- and post-validations |
|
Performance |
Includes standard logging and error and warning events and event contexts for performance tuning purposes |
|
Verbose |
Includes all prior logging categories, as well as additional performance tuning and custom task entries |
A variety of tables, views, stored procedures, and built-in reports are set up as part of the SSISDB database on whichever database server your Integration Services catalog is created. If you open Management Studio and go to the Integration Services Catalogs node, you can view the available reports by following these steps:
1. Under the Integration Services Catalogs node, right-click the SSISDB node. If you named your catalog differently, that name will appear here instead.
2. Select Reports ⇒ Standard Reports to see the reports that are available to you, as shown in Figure 18-35.
FIGURE 18-35
These reports enable you to see which packages have succeeded or failed or are still running. They break a package down to a more granular level and even show the task or component that could have a problem. For more detailed information on additional reports, please read Chapter 22.
3. If you select the All Execution report, and then click the Overview link on a package you’ve just run, you will see this granular detail.
By running the last package you created and following these steps, you can see the successes and failures of the package, as shown in Figure 18-36.
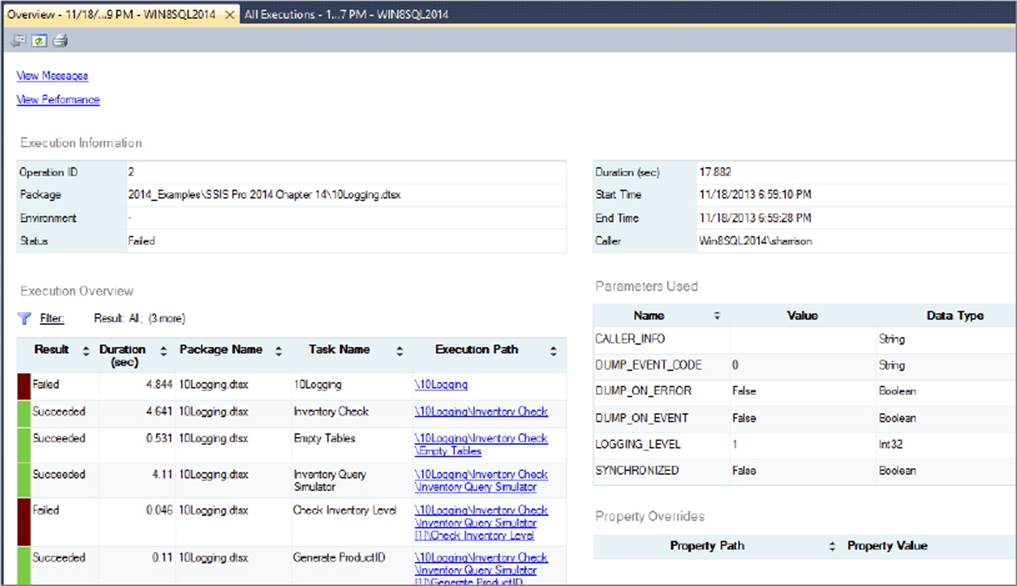
FIGURE 18-36
If you need to see information that is not readily available on the provided reports, you can create your own reports or write your own queries by using the SSISDB database. Figure 18-37 shows a sample of the views that can be used. By utilizing these views, you can investigate the executions of the packages. For example, the catalog.executions view provides information on the server’s memory information at the start of execution.
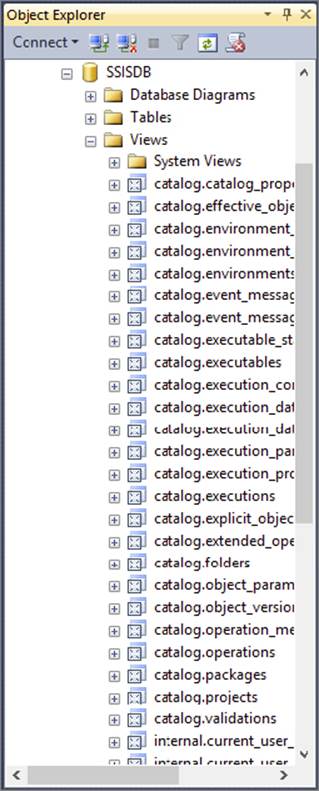
FIGURE 18-37
4. To create a query that will show you the longest-running objects in your package, you can use the catalog.executable_statistics and catalog.executables views. Always be sure to filter the query on an execution identifier to limit the amount of information returned.Figure 18-38 shows the final query that returns the top five longest-running objects in the package.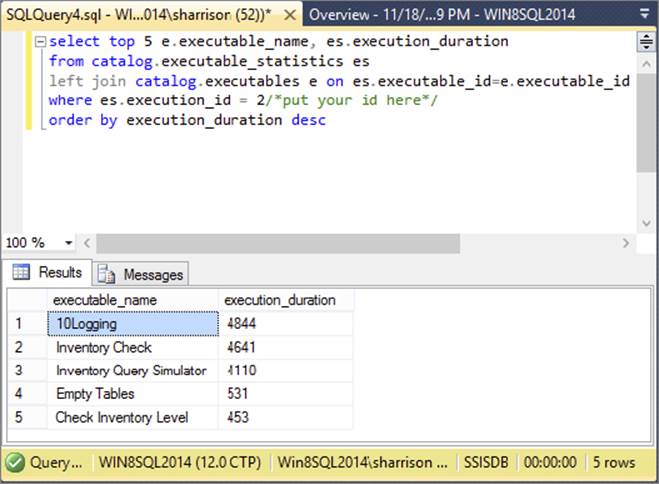
FIGURE 18-38
The addition of catalog logging combined with the package logging previously discussed makes knowing what happened in your package a breeze. You can pull out any set of information you require to help you make your existing or future packages perform better and succeed more often.
SUMMARY
SSIS provides strong support for handling errors during execution and while troubleshooting:
· During execution you can handle errors gracefully by using the precedence constraints to control what tasks execute when errors occur, by using the event handlers to trap specific events in the package at different levels and run code to perform cleanup and alerting, and by configuring the Data Flow error paths to handle data exceptions gracefully without failing the package.
· While troubleshooting and developing, you can use the breakpoint functionality to pause execution and monitor variable values and package state information, and you can turn on SSIS package logging to capture execution information that provides insight about details such as errors, warnings, and execution times.
· You can determine performance issues or error causes after deploying a package in Project Deployment mode without setting up a logging provider within the package itself. The information logged in the SSIS catalog provides even more information than in prior releases.
Now that the core features of SSIS have been covered, the final chapters focus on advanced topics, including building custom components, integrating SSIS with applications, and managing SSIS externally.
All materials on the site are licensed Creative Commons Attribution-Sharealike 3.0 Unported CC BY-SA 3.0 & GNU Free Documentation License (GFDL)
If you are the copyright holder of any material contained on our site and intend to remove it, please contact our site administrator for approval.
© 2016-2026 All site design rights belong to S.Y.A.