Professional Microsoft SQL Server 2014 Integration Services (Wrox Programmer to Programmer), 1st Edition (2014)
Chapter 3. SSIS Tasks
WHAT’S IN THIS CHAPTER?
· Working with the Task Editor
· Extending SSIS with scripting tasks
· Using data preparation tasks
· Integration into the database with the RDMS tasks
· Performing common DBA tasks with the DBA tasks in SSIS
WROX.COM CODE DOWNLOADS FOR THIS CHAPTER
You can find the wrox.com code downloads for this chapter at http://www.wrox.com/go/prossis2014 on the Download Code tab.
SSIS tasks are the foundation of the Control Flow in SSIS. When you are on the Control Flow design surface in SSDT, the SSIS Toolbox is populated with a set of task components that can be connected together to represent a workflow for your package. You’ll also learn later in Chapter 18 how tasks can also react to failures in the package in the Event Handler tab.
A task is a discrete unit of work that can perform typical actions required by an ETL process, from moving a file and preparing data sources to sending e-mail confirmations when everything is complete. This is most evident in the fact that the Data Flow is tied to the Control Flow with a specific Data Flow Task. More advanced tasks enable you to perform actions like executing SQL commands, sending mail, running VB or C# code, and accessing web services. The SSIS Toolbox contains a large list of out-of-the-box tasks that you can use for ETL package development. Most of the tasks are covered in this chapter, with some in less detail because they are covered in other chapters. Two exceptions are the Looping and Sequence Containers, which are covered separately in Chapter 6. This chapter introduces you to most of the tasks you’ll be using on a frequent basis and provides some examples that demonstrate how to use them. This material is reinforced as you read through the rest of the book, because each of these tasks is used in at least one further example in subsequent chapters.
SSIS TASK OBJECTS
Tasks are component-based, small units of work that can be sequenced in an SSIS package Control Flow or in the Event Handlers tab. To add a task to a package, click and drag it from the SSIS Toolbox onto the design surface. If you don’t see the SSIS Toolbox, you can open it by clicking SSIS Toolbox under the SSIS menu in SSDT. Once you drag the task over, you can then double-click the task’s icon in the design pane to configure it. You may immediately see a red or yellow warning on the task until you configure any required properties. Setup requirements vary depending upon the task. You may also need to provide a database connection, external mail server connection, or the name of an external package to complete the task’s configuration.
Using the Task Editor
To configure a task you need to access the Task Editor. To do so, double-click directly on the task’s icon in the Control Flow design surface or right-click the task and select the Edit option in the pop-up menu. In either case, generally you’ll see a Task Editor dialog appear (generally, because not all tasks have a Task Editor to configure). The Task Editor provides a specialized interface that enables configuration of the task’s properties. Each task has different property and setup requirements, but the Task Editor always employs a consistent design that makes it easy to follow. Figure 3-1 shows an example of a typical Task Editor dialog to help get you oriented.
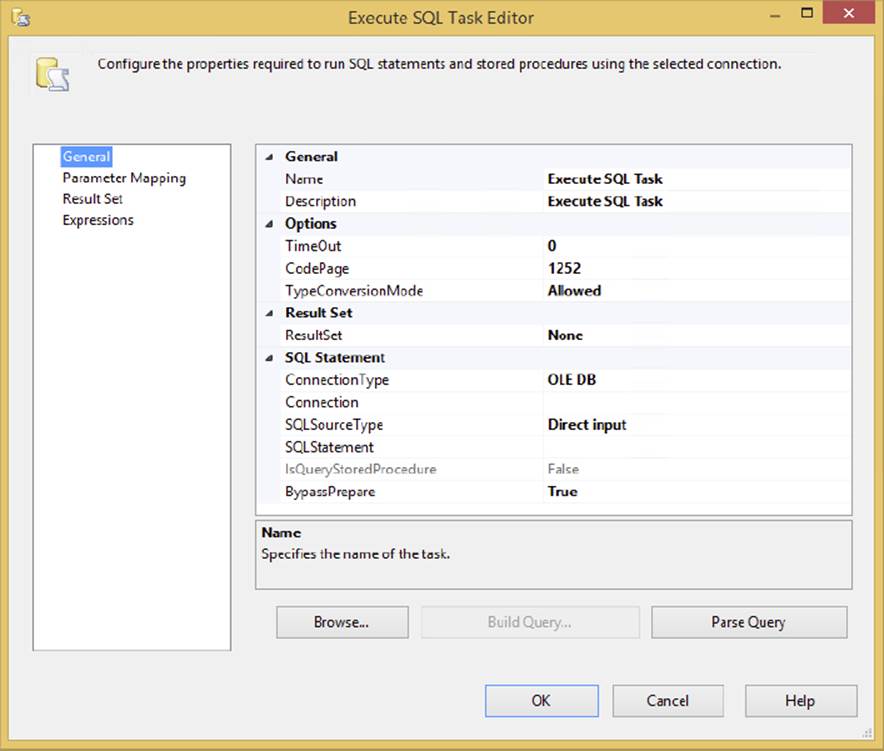
FIGURE 3-1
Each Task Editor contains a few generic properties such as its Name and Description. Try to select a meaningful name that best represents what the task is doing. Otherwise, your error log will be tough to read later. Each tab of the Task Editor varies according to what you select in the previous tab. Familiarizing yourself with this dialog will make configuring new tasks much easier.
The Task Editor Expressions Tab
SSIS uses a concept of setting the value of most task properties to a dynamic expression that is evaluated at runtime. This way, you can dynamically configure packages at runtime, replacing the Dynamic Properties Task and scripting-based configuration of the legacy DTS object model. Common to all the tasks is an Expressions tab in each of the editors that exposes the properties you can set dynamically at runtime with an expression. The expression can be a constant value, an expression, or an SSIS variable that is either a scalar constant or an expression. With this capability, you could read a series of variables from a configuration file (these are discussed later) and then dynamically set properties of any SSIS task. We provide many examples of using expressions throughout this book. Chapter 5 is dedicated to variables and expressions, and explains how to use them in SSIS.
For a basic understanding of the Expressions tab within each task, click the ellipsis (...) button next to the Expressions option in the Expressions tab of any of the Task Editors. This will take you to the Property Expressions Editor, where you can set properties within a task — either directly by providing the actual expression or indirectly by providing the variable that evaluates to the result of an expression. To create a new one, select the property you wish to set from the Property column and then type the expression into the Expression column. Optionally, you can also select the ellipsis button in the Expression column to open Expression Builder, where you can create an expression using a visual UI. You’ll see this capability in most of the SSIS tasks.
LOOPING AND SEQUENCE TASKS
First up in the SSIS Toolbox are three container tasks: For Loop, Foreach, and Sequence. These are all Control Flow Tasks that simplify the process of repeated processing of a set of logic. In legacy DTS, looping constructs were not intuitive. If you wanted this type of Control Flow logic, you had to set properties on the tasks directly using code in the ActiveX Scripting Tasks. To achieve the same thing in SSIS, you only need to add one of these containers to your Control Flow and define what is being used to enumerate the loop. Again, these containers are covered in detail in Chapter 6, so they are only briefly covered here.
SCRIPT TASK (.NET)
The Script Task enables you to access the Microsoft Visual Studio Tools for Applications (VSTA) environment to write and execute scripts using the VB and C# languages. Using this task, you can create additional logic that the canned SSIS tasks can’t accomplish.
Scripting now is almost a misnomer because the latest SSIS edition solidifies the connection to the full .NET 4.0 libraries for both VB and C#. The latest addition to SSIS of the VSTA environment and the Script Task, in general, also offer these extra functional advantages:
· A coding environment with the advantage of IntelliSense
· An integrated Visual Studio design environment within SSIS
· An easy-to-use methodology for passing parameters into the script
· The capability to add breakpoints to your code for testing and debugging purposes
· The automatic compiling of your script into binary format for increased speed
The Script Task is configured through the Script tab in the Script Task Editor (shown in Figure 3-2). The ScriptLanguage property is where you select the .NET language you want to use in the task. Notice that the default language is set to C#, so if you are coding in VB.NET, don’t whiz through these settings when setting up your Script Tasks.
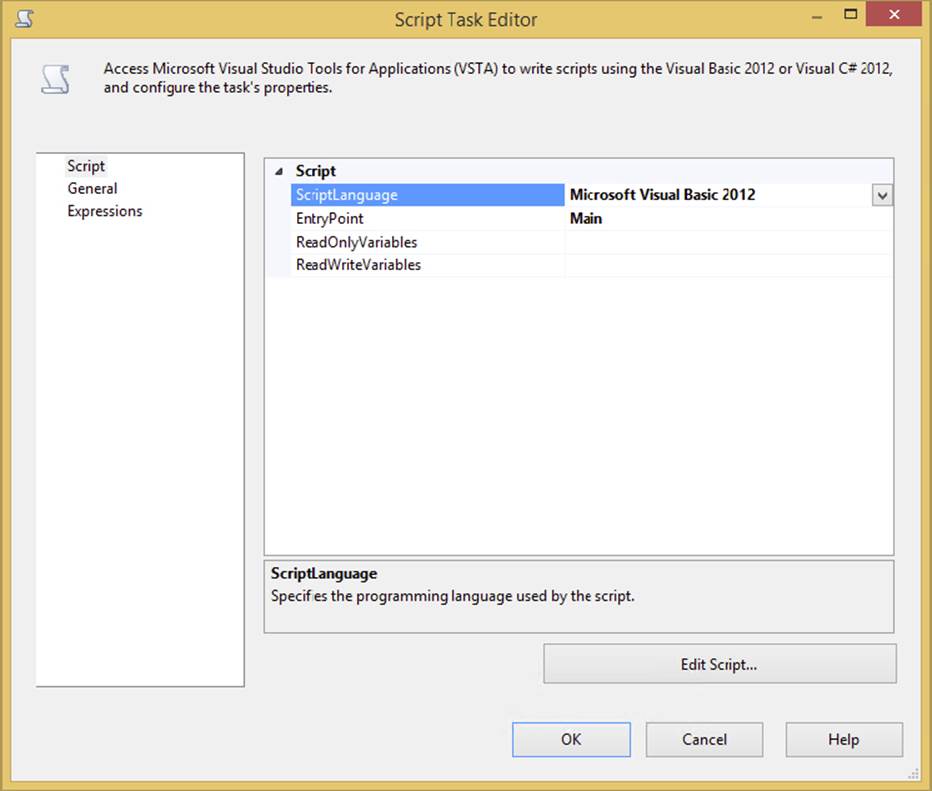
FIGURE 3-2
The EntryPoint property enables you to provide an alternative function to call initially when the ScriptMain class is instantiated. Typically, you’ll leave this set to the default Main() function. The ReadOnlyVariables and ReadWriteVariables properties enable you to pass SSIS variables into the script as a listing of variable names separated by commas. While this is not the only way to pass variables into a script, it is the easiest. Having these variables provides a significant advantage when coding. You only need to refer to them by ordinal position or by name in the Variable collection to be able to access their values without worrying about locking, unlocking, or blocking variables during read and write actions. Just make sure that any variables you wish to write back to in the script code are listed in the ReadWriteVariables property; otherwise, you’ll get an error in the script. There are alternative methods for altering variables that aren’t provided in these collections during setup; these are demonstrated in Chapter 9, which covers scripting.
When you click the actionable Edit Script button, the Visual Studio Tools for Applications environment opens to allow coding directly in the class ScriptMain. In this IDE, you have access to all the advanced debugging tactics, breakpoints, and IntelliSense found in the Visual Studio environment. If you create a package with a variable named myValue containing the string "Hello World", and set up the Script Task as shown in Figure 3-3, the following example shows you how to write code that uses the passed-in myValue variable:
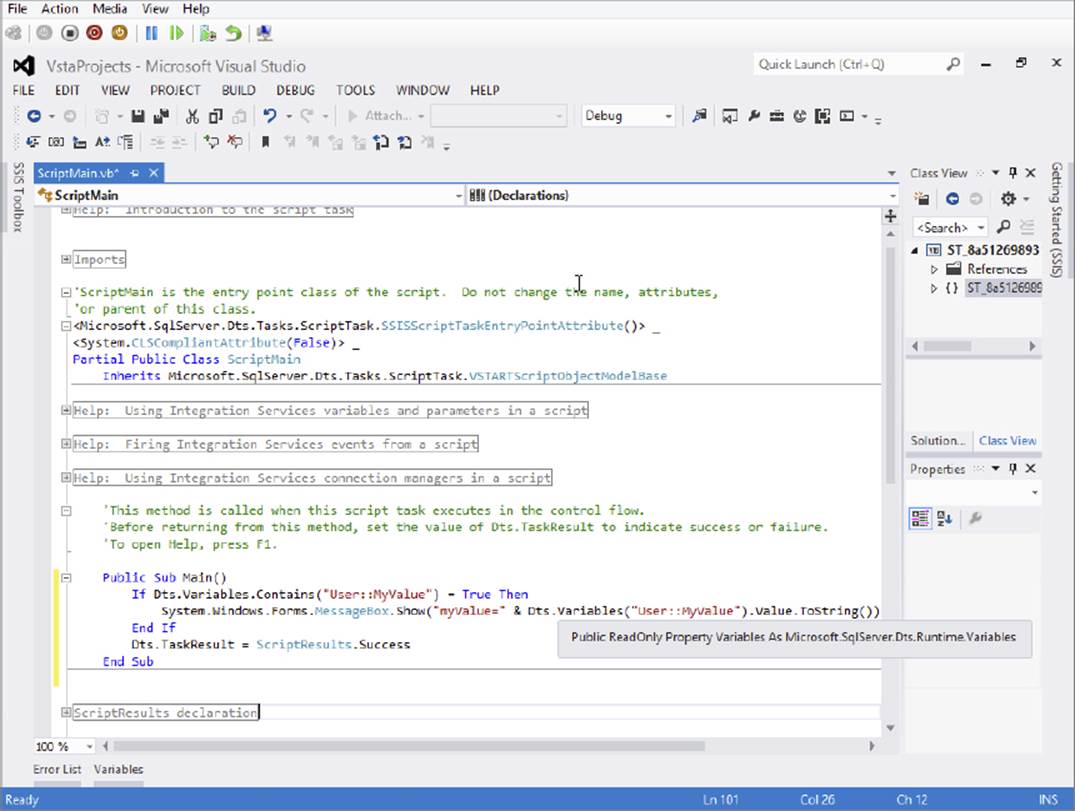
FIGURE 3-3
C#
public void Main()
{
if(Dts.Variables.Contains("User::MyValue"))
{
System.Windows.Forms.MessageBox.Show("MyValue=" + Dts.Variables
["User::MyValue"].Value.ToString());
}
Dts.TaskResult = (int)ScriptResults.Success;
}
VB
Public Sub Main()
If Dts.Variables.Contains("User::MyValue") = True Then
System.Windows.Forms.MessageBox.Show("myValue=" & Dts.Variables
("User::MyValue").Value.ToString())
End If
Dts.TaskResult = ScriptResults.Success
End Sub
First, the script (Figure 3-3) checks for the existence of the variable, and then pops up a message box with the famous message “Hello World.”
This is just a very simple example of the Script Task in action. We’ve created an entire chapter to dive into the details and provide specific use cases for both the Script Task and the Data Flow version called the Script Component, so see Chapter 9 for more information.
ANALYSIS SERVICES TASKS
The Analysis Services tasks are provided in the SSIS environment to deal with generating and updating cubes and working with data mining projects in SQL Server Analysis Services only. Three tasks can be used for Analysis Services in SSIS: the Analysis Services Execute DDL Task, the Processing Task, and the Data Mining Task. To review the tasks in this section, you need to have installed the sample Analysis Services databases from Microsoft SQL Server.
Analysis Services Execute DDL Task
The SQL Server Analysis Services Execute DDL Task is the Analysis Services equivalent of the Execute SQL Task, but it is limited in scope to issuing Data Definition Language statements. The task simply executes a DDL statement against an Analysis Services system. Typically, you would use DDL statements to create a cube, a dimension, or any other online analytical processing (OLAP) object.
To configure the task, go to the DDL tab and select the Connection Manager that you wish to execute the DDL statement against in the Connection option. Then in the SourceType property, select whether the DDL statement will be directly inputted, pulled from a file, or pulled from a variable option. Essentially, the source type option determines whether you need to key in the DDL statement directly, provide a variable, or point to a file where the DDL statement is stored. Figure 3-4 shows an example of the DDL being directly entered into the SourceDirect property, which deletes a given dimension.
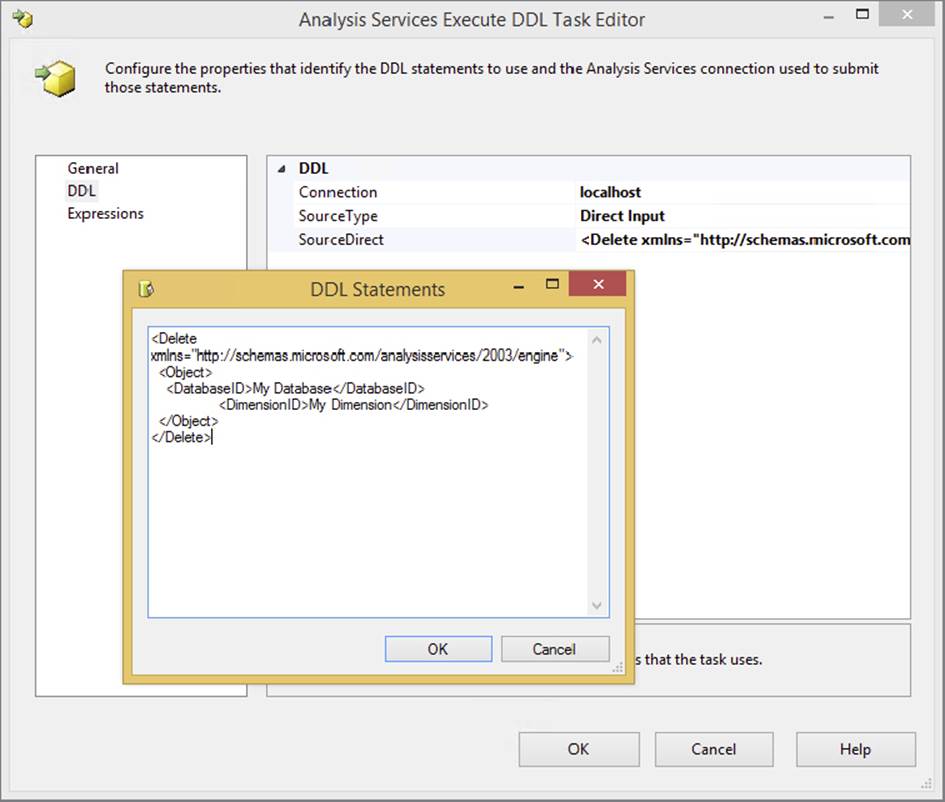
FIGURE 3-4
Note that this task can be used only to submit DDL statements. If you wish to query cubes to retrieve data, you need to use the Analysis Services Processing or Data Mining Tasks.
NOTE You can easily find XMLA statements by going to Management Studio and scripting a given action. In the example just mentioned, you can open Management Studio and delete the dimension, but instead of clicking OK, click the Script icon.
Analysis Services Processing Task
The SQL Server Analysis Services Processing Task takes care of the processing of Analysis Services objects. If you are familiar with using the Analysis Service projects in SSDT, then you’ll be familiar with the task of processing a cube, dimension, or mining object. Configuration of the task is done in the Analysis Services Processing Task Editor in the Processing Settings tab. First, select the Analysis Services Connection Manager that you wish to process. Next, click the Add button and select the Analysis Services objects you want to process. After clicking OK, you are taken back to the Processing Settings tab, where you can change the type of processing you will be performing. To do this, right-click each object and select the process option you want. The options vary according to the type of object.
If you click Impact Analysis, analysis is performed on the selected objects, showing you the objects that will be affected by the processing. The Change Settings button enables you to configure the batch settings for the task. For example, here you can specify whether you want the objects to be processed in sequential order or in parallel and how you want errors handled.
To get a feel for how this SSIS task works, you need to download and deploy the AdventureWorks Analysis Services SSAS project from www.wrox.com. This will deploy the cube and a set of dimensions that you’ll want to process periodically as new data is loaded into the warehouse. In SSIS, you can process the deployed cube using the Analysis Services Processing Task. Connect to the Analysis Services server that you deployed to, and in the Processing Settings tab select the Employee Cube and the Sales Territory dimension to process.
The Analysis Services Processing Task can then be run to reprocess the existing dimension and employee cube. These SSIS tasks enable you to periodically update your warehouse structures based on events that can be processed using an event captured by the Message Queue Task, which we cover later in the “Message Queue Task” section of this chapter.
Data Mining Query Task
The Data Mining Query Task enables you to run predictive queries against your Analysis Services data-mining models and output the results to a data source. The Data Mining Query Task is similar to the Analysis Service Execute DDL Task in that you can execute subsequent mining queries against a processed mining model in Analysis Server. The Task Editor enables configuration to a source Analysis Services server and can output the results in any ADO.NET or OLE DB Data Source. An example of the Data Mining Task configured to run a mining query against a predefined Employee Dimensional Mining model is shown in Figure 3-5.
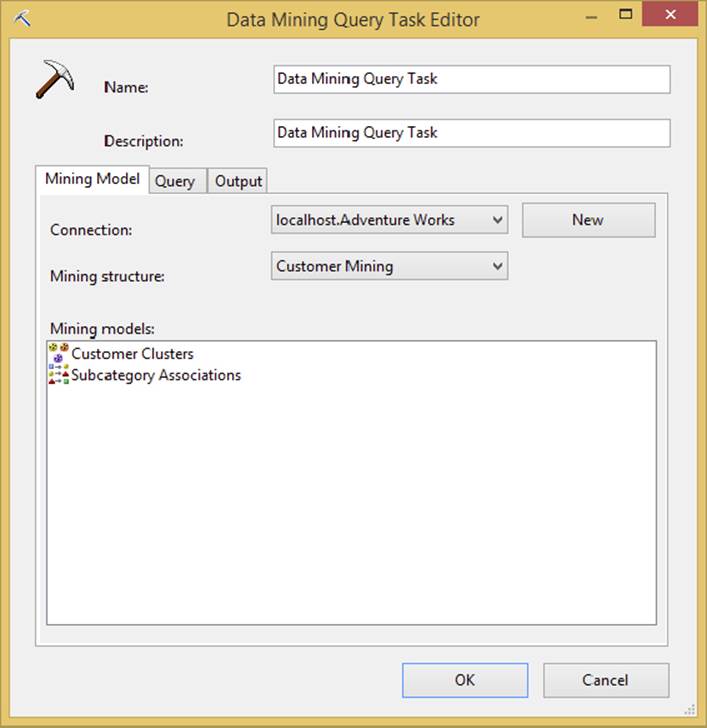
FIGURE 3-5
This task would be used to run predictive queries based on built-in prediction models in Analysis Services. The query uses a Data Mining Extension to T-SQL called DMX. If you are not fluent in DMX, don’t worry, the Query tab in this task will walk you through building one. However, first you need a mining structure to query against. In the Analysis Service server, a deployed data mining model would look like the highlighted decision tree model in Figure 3-6.
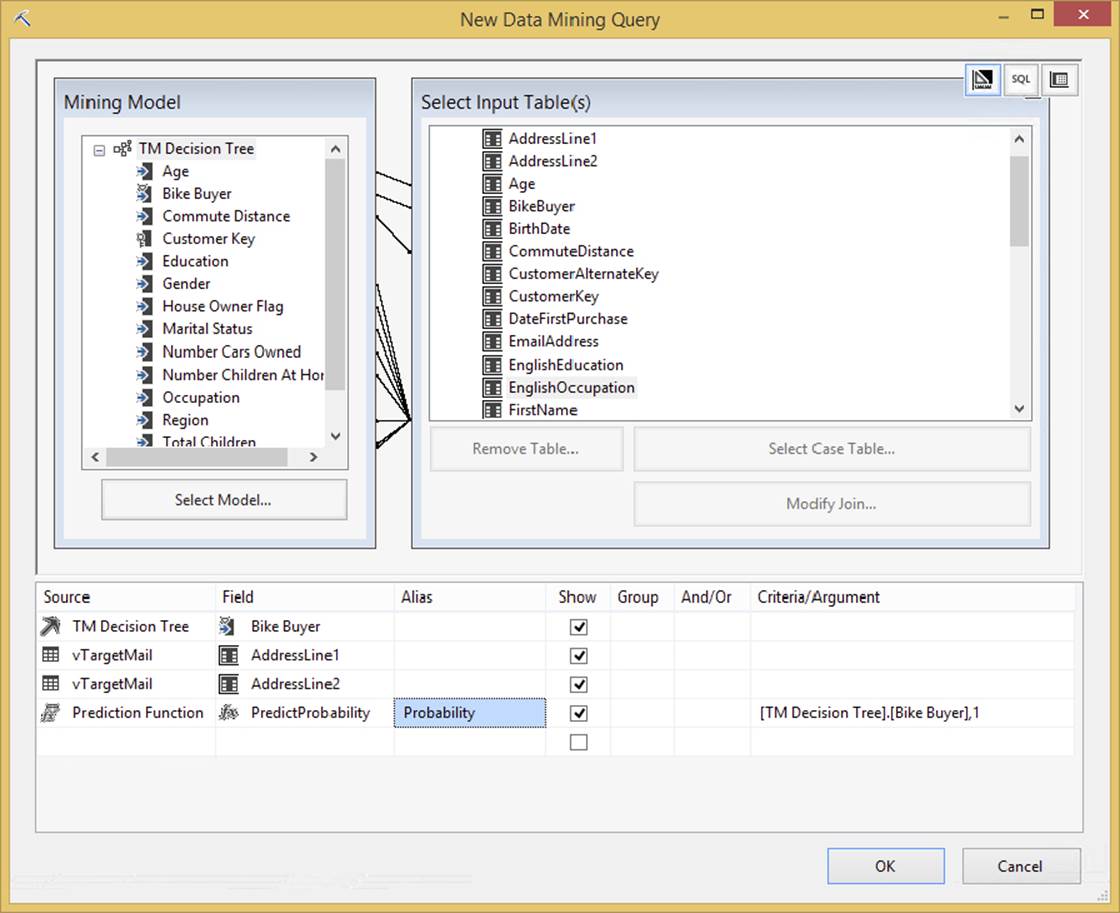
FIGURE 3-6
The results of the prediction query can be set to return single or multi-row results and can be saved to table structures for further analysis. These results can be useful for additional SSIS packages that can integrate the predictive results into further Data Flows, but before we can step any further into these capabilities, let’s first go over the Data Flow Task itself.
DATA FLOW TASK
The most important task in SSIS is the Data Flow Task. The SSIS Data Flow Task can be selected directly from the SSDT Toolbox, and then the source and destinations are defined within the task. The Data Flow Task isn’t merely a mapping transform for input and output columns. This task has its own design surface like the Control Flow, where you can arrange task-like components called transforms to manipulate data as it flows in a pipeline from the source to a destination. The Data Flow, as you can imagine, is the heart of SSIS, because it encapsulates all the data transformation aspects of ETL.
Data Flows can split the data in the pipeline based on a data element and handle each stream separately. In the Data Flow, the header line of the file can be split off and examined separately from the detail lines. As the pipeline exits the data-cleansing process, the streams can be sent to separate destinations or converged to a final combined destination. Note that you may have several different Data Flows within an SSIS package. For each of the Data Flow Tasks you add to the control surface, you’ll have a corresponding Data Flow surface. This task is so important and such an integral part of moving data in SSIS that it is covered in detail in Chapter 4.
DATA PREPARATION TASKS
Before processing data from other systems, you sometimes have to first retrieve it or validate the content to determine your level of confidence in the data’s quality. SSIS provides a set of tasks that can be used to retrieve data files using the files and folders available in the file system, or it can reach out using FTP and web service protocols. The following sections explore these tasks in SSIS.
Data Profiler
Data profiling is the process of examining data and collecting metadata about the quality of the data, about frequency of statistical patterns, interdependencies, uniqueness, and redundancy. This type of analytical activity is important for the overall quality and health of an operational data store (ODS) or data warehouse. In fact, you’ve most likely been doing this activity whether or not you actually have a defined tool to perform it. Now, rather than use a set of complicated queries or rely on a third-party product, you have a Data Profiling Task as part of the SSIS development environment.
The Data Profiling Task is located in the SSIS Toolbox, but you probably shouldn’t attempt to use the results to make an automated workflow decision in the SSIS package Control Flow. Rather, it is more of an ad hoc tool for placement in a design-time package that will be run manually outside of a scheduled process. In fact, the task doesn’t have built-in conditional workflow logic, but technically you can use XPath queries on the results. The profiler can only report on statistics in the data; you still need to make judgments about these statistics. For example, a column may contain an overwhelming amount of NULL values, but the profiler doesn’t know whether this reflects a valid business scenario.
You can view the structured output file that is produced by the Data Profiling Task in a special Data Profiler Viewer that provides drill-downs back to the detail level. To access this viewer, select SQL Server ⇒ Integration Services from the Start menu. Once the tool is loaded, use the Open button to browse to the output file that will be generated by the Data Profiling Task. Figure 3-7 shows an example of an analysis of the DimCustomer table in the AdventureWorksDW database. You can see here that the majority of the rows in the MiddleName column are null.
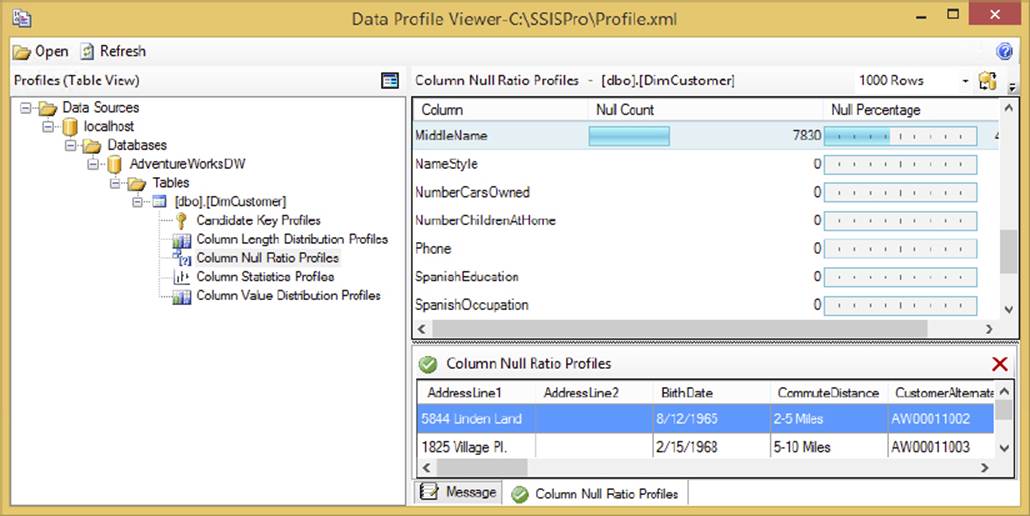
FIGURE 3-7
The task provides a set of defined profile request types that can be modified like the other tasks in specific properties. The following list describes the different request types and how you can use them to profile your data:
· Candidate Key Profile Request: The profile request will examine a column or set of columns to determine the likelihood of there being a unique candidate key for the data set. Use this to determine whether you have duplicate key values or whether it is possible to build a natural key with the data.
· Column Length Distribution Profile: This profile request enables you to analyze the statistical profile of all the data in a column, with the percentage of incidence for each length. You can use this to help you determine whether your data column length settings are set correctly or to look for bad data in attributes that are known to be one fixed size.
· Column Null Ratio Profile Request: This profile request looks at the ratio of NULL values in a column. Use this to determine whether you have a data quality problem in your source system for critical data elements.
· Column Pattern Profile Request: This profile request enables you to apply regular expressions to a string column to determine the pass/fail ratio across all the rows. Use this to evaluate business data using business formatting rules.
· Column Statistics Profile Request: This profile request can analyze all the rows and provide statistical information about the unique values across the entire source. This can help you find low incidence values that may indicate bad data. For example, a finding of only one color type in a set of 1 million rows may indicate that you have a bad color attribute value.
· Functional Dependency Profile Request: This is one of two profile requests that enable you to examine relationships between tables and columns to look for discrepancies within a known dependency. For example, you can use this request to find countries with incorrect currency codes.
· Value Inclusion Profile Request: This profile request tests to determine whether the values in one column are all included in a separate lookup or dimension table. Use this to test foreign key relationships.
There are two ways to activate these profiles. The first is to click the Quick Profile button on the Data Profiling Task Editor. This creates a set of profiles to run against the same table. You can also skip the quick profile option and create the profiles one by one. Either way you can navigate to the Profile Requests table to configure the request and add regular expressions or other parameter values to the task properties. Figure 3-8 shows the Data Profiling Task Editor with all the requests defined for the DimCustomer table.
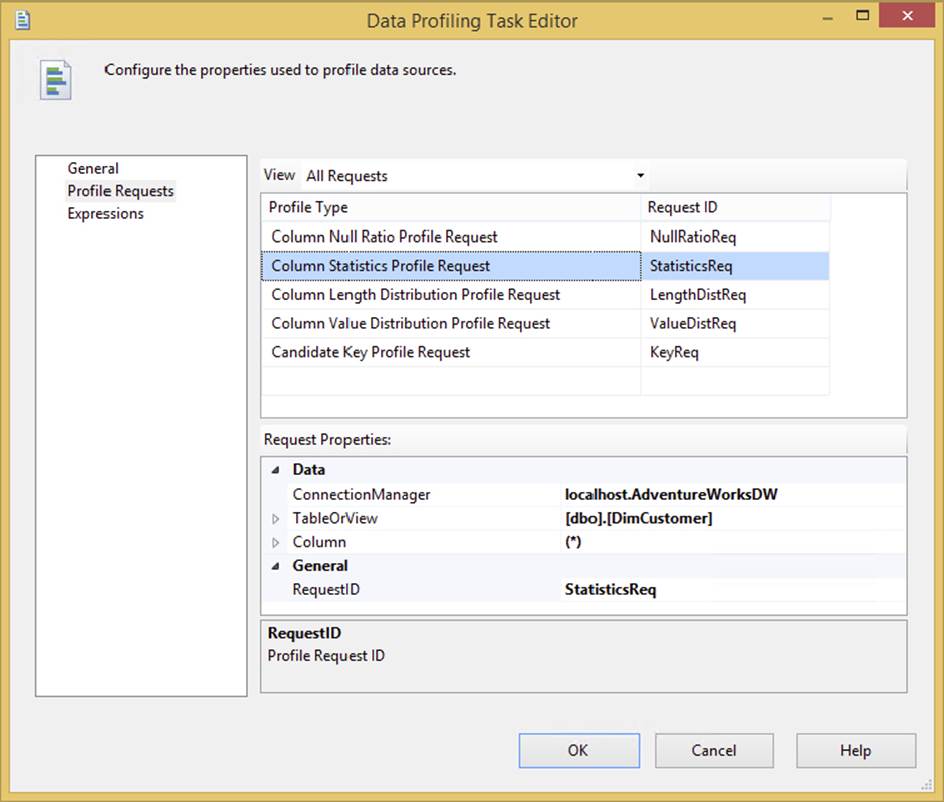
FIGURE 3-8
For each profile request type, the lower section of the editor for the Request Properties will change to accept the configurable values. Note that the ConnectionManager property must be set to an ADO.NET-based Connection Manager, like the one here connected to AdventureWorksDW. Moreover, you must create this connection prior to attempting to configure this task, but this is a minor inconvenience for such a powerful and welcome addition to the SSIS toolset, which rivals more expensive ETL tools.
File System Task
The File System Task is a configurable GUI component that performs file operations available in the System.IO.File .NET class. If you are used to coding in VBScript, this is an out-of-the-box replacement for the VBScript utility classes that you used to write using the COM-based FileSystemObject. In either case, the File System Task can perform basic file operations such as the following:
· Copy Directory: Copies all files from one directory to another. You must provide the source and destination directories.
· Copy File: Copies a specific file. You must provide the source and destination filename.
· Create Directory: Creates a directory. You must provide the source directory name and indicate whether the task should fail if the destination directory already exists.
· Delete Directory: Deletes a directory. You must provide the source directory to delete.
· Delete Directory Content: Deletes all files in a source directory
· Delete File: Deletes a specifically provided source file
· Move Directory: Moves a provided source directory to a destination directory. You must indicate whether the task should fail if the destination directory already exists.
· Move File: Moves a specific provided source file to a destination. You must indicate whether the task should fail if the destination file already exists.
· Rename File: Moves a specific provided source file to a destination by changing the name. You must indicate whether the task should fail if the destination file already exists.
· Set Attributes: Sets Hidden, Read-Only, Archive, or System attributes on a provided source file.
One benefit that may not be apparent in these functional descriptions is that the creation of directory structures does not have to be made recursively. For example, you may create the path named c:\ssis\tasks\my file system task\ using the Create Directory form of the File System Task by simply providing the path. You don’t have to create each part of the directory separately, as you did in the DTS legacy product. This capability greatly reduces the typical file operation coding to a simple configuration task for directory operations. However, don’t assume that you can do the same with a file-level operation. If you attempt to rename a file from c:\ssis\ to c:\ssis\my archive\ and the folder \my archive\ doesn’t exist, you will get an error that the path is not found.
Another feature of this task that may not be apparent is that it is written for a single operation. This is by design. If you need to iterate over a series of files or directories, the File System Task can be simply placed within a Looping Container. By keeping the task granular and singularly focused, it is simplified and easily reused.
Most of the properties in this task are set in the General tab of the File System Task Editor (see Figure 3-9). The contents of this tab may vary widely according to what you set in the Operation property. These options correspond to specific file operations that the task can perform. Once the option is set, you may be prompted to complete other properties not shown in this figure.
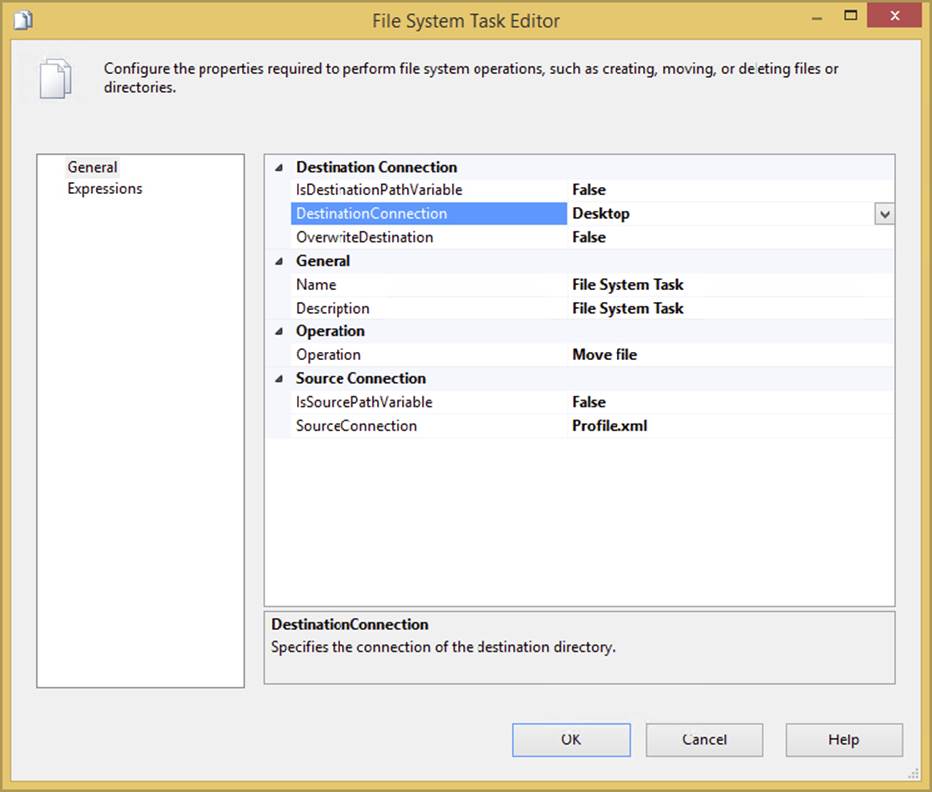
FIGURE 3-9
In this case, the Operation property is set to Move file, which should move a file from a working source path to an archive destination path. The IsDestinationPathVariable property enables you to specify whether the destination path will be set to an SSIS variable or use a Connection Manager. If this is set to true, the dynamic property DestinationVariable sets the destination path to a variable. If it is set to false, then the DestinationConnection option will be available so you can select the Connection Manager that contains your file or directory. These same properties exist for the source connection in the bottom of the tab. The OverwriteDestination option, set to false by default, specifies whether the task will overwrite the destination file or directory if it already exists. To get an idea of how you configure this task, see the example in the next section.
Archiving a File
Consider a typical use of the File System Task for an ETL process from a mainframe system. To automate a nightly data load, the process would look like this:
1. A file or series of similar files would be generated from a mainframe or other source system and dumped to a network drive.
2. An SSIS package would start on a schedule to poll a directory looking for files to process. If any files were found, they would be moved into a staging or working directory.
3. The data would be extracted out of the file(s).
4. The file(s) would then be archived to another directory.
In legacy DTS packages, each of these steps would require some coding in the ActiveX Script Task. You would have to write one task in VBScript to poll the directory to determine whether the file arrived. Another script would pick up the file and move it to another directory. The last script would archive the file. Even worse, the ActiveX scripts had to use the code-and-paste method of code reuse to perform the same function in other packages. Typically, this led to various states of unfinished code that was better in some packages than others and most certainly a nightmare to maintain.
In SSIS, the File System Task can simplify the creation of a package by performing these ETL file-based requirements. We’ll postpone the task of polling until later in this chapter when we get to the WMI Event Watcher Task. The iteration of files is also discussed in detail in Chapter 6. However, you can use what you know about the File System Task to move the file to an archive directory.
1. Create a new project named Tasks and a package in c:\ProSSIS\Tasks\FileSystemTask or download the complete code from www.wrox.com/go/prossis2014.
2. Create a subdirectory called c:\ProSSIS\Tasks\FileSystemTask\Archive, and create a dummy file called myfile.txt in c:\ProSSIS\Tasks\FileSystemTask.
3. Add a File System Task into the Control Flow.
4. In the new task, change the operation to Move File. Select <New Connection> from the SourceConnection dropdown.
5. When the File Connection Manager Editor opens, select Existing File and type C:\ProSSIS\Tasks\FileSystemTask\MyFile.txt for your file.
6. For the DestinationConnection property, select the <New Connection> option and choose Existing Folder when the File Connection Manager Editor reopens. This time type C:\ProSSIS\Tasks\FileSystemTask\Archive for the path name.
7. Now run the SSIS package. You’ll see the file myfile.txt move into the archive directory.
8. If you want to rename the file as you move it to a date-based filename, you need to specify the full filename in the variable and use the Rename File option of the File System Task. That achieves the movement of the file and a new filename in one task. The filename can also be dynamically set using a variable as an expression.
For examples of how you can rename this file using a dynamically generated name as you archive, see Chapter 5.
FTP Task
The SSIS FTP Task enables the use of the File Transfer Protocol (FTP) in your package development tasks. This task now exposes more FTP command capability, enabling you to create or remove local and remote directories and files. Another change from the legacy DTS FTP Task is the capability to use FTP in passive mode. This solves the problem that DTS had in communicating with FTP servers when the firewalls filtered the incoming data port connection to the server.
The General tab in the FTP Task Editor is where you specify the FTP Connection Manager for the FTP site you wish to access. If you haven’t specified one, follow these steps:
1. Select <New Connection...> under the FTPConnection property. This will open the FTP Connection Manager, where you can configure the FTP connection. In Figure 3-10, the Server Name property contains the FTP address for the FTP server. The Server Port property is set to 21, which is the default port for most FTP sites. You can change this if necessary. The other important option to note here is the “Use passive mode” checkbox.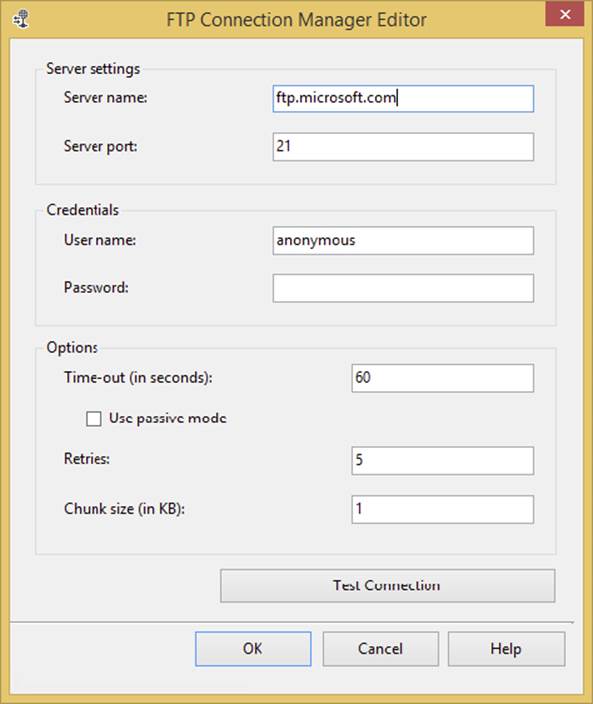
FIGURE 3-10
2. Once you have the FTP connection configured, move to the File Transfer tab. The IsRemotePathVariable and IsLocalPathVariable properties allow the paths to be set to an optional variable. Using variables enables you to set these values dynamically at runtime. The RemotePath property sets the directory or files for the remote FTP system.
3. Once the FTPConnection property from the General tab has been selected, you can browse to the actual remote file system to select the remote path or file by clicking the ellipsis in the Remote Path property. You’ll see a dialog similar to the one shown in Figure 3-11 for browsing the FTP remote paths (and files if you choose Receive files for the Operation property).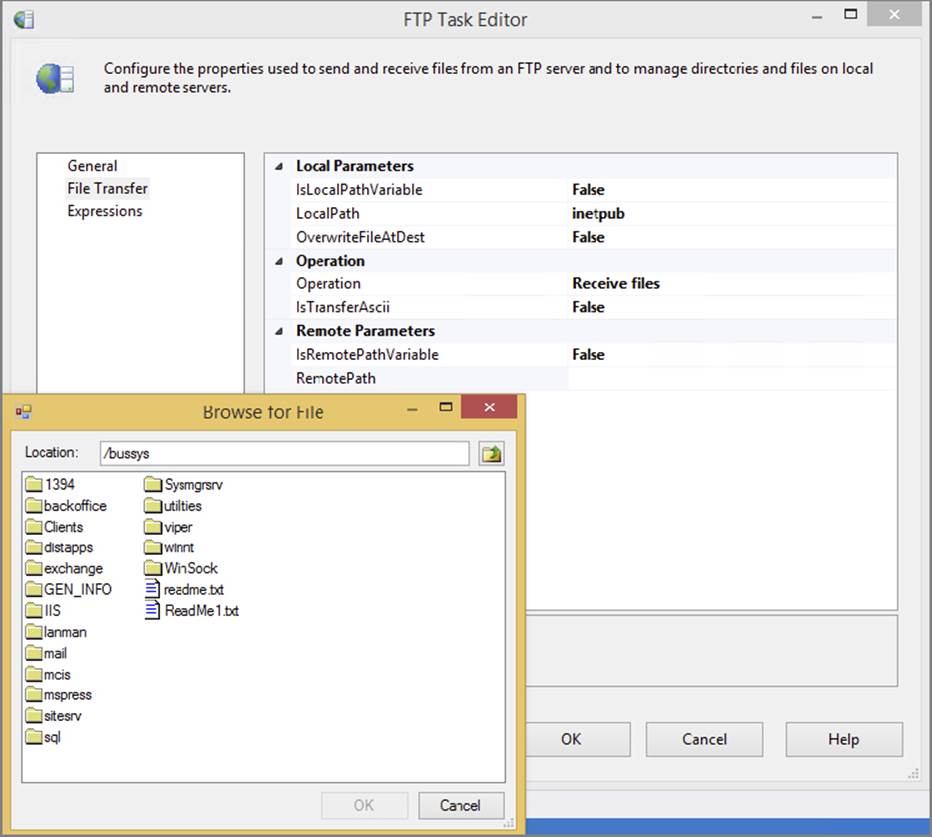
FIGURE 3-11
The LocalPath property is the Connection Manager that contains a directory on the SSIS side that is going to receive or send the files via FTP. The OverwriteFileAtDest option specifies whether the file at the destination will be overwritten if a conflict exists. Like many FTP clients, you can specify transporting the files in ASCII format by setting the IsTransferAscii option to true. If you set this option to false, the files will be transported in a default binary format. The most important option, of course, is the Operation option, which specifies what type of action you want to perform. In the next section, you’ll set up an SSIS FTP Task to get a file from an FTP server like Microsoft.com.
Getting a File Using FTP
To build an SSIS package that can use FTP to retrieve a file from an FTP server, follow these steps:
1. Create a directory called c:\prossis\tasks\ftptask\ or copy the code from www.wrox.com/go/prossis2014.
2. Create a new project and package in this folder and add an FTP Task to the Control Flow work surface.
3. Double-click the FTP Task to open the editor, and set it up.
4. In the General tab, select <New connection...> for the FTPConnection dropdown. This will open the FTP Connection Editor. Set the Server Name option to ftp.microsoft.com and click Test Connection (refer to Figure 3-10).
5. Click OK to go back to the FTP Task Editor.
6. Go to the File Transfer tab and set it up to resemble Figure 3-12. Select Receive files for the operation.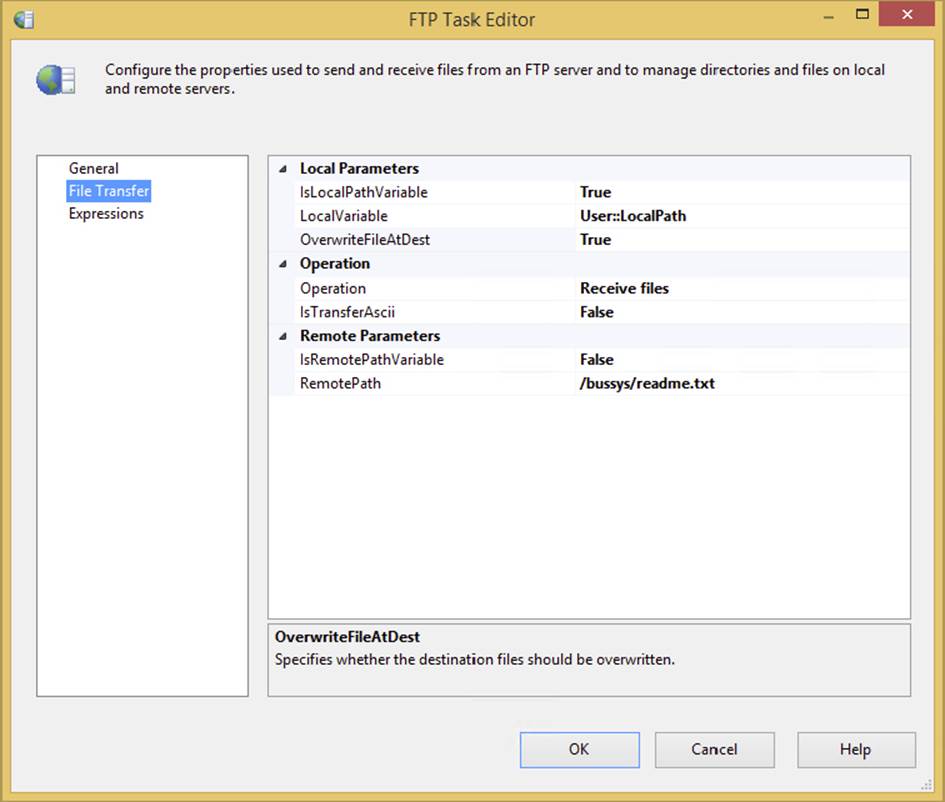
FIGURE 3-12
7. For the RemotePath property, click the ellipsis to browse to the /bussys/readme.txt folder on the remote path.
8. For the Local Path option, set the IsLocalPathVariable property to true and select <New Variable ...> to create a new variable named LocalPath that is set to the value of c:\Prossis\Tasks\ftptask\.
9. For the OverwriteFileAtDest property, select True. The final task should look like Figure 3-12.
If you run the package, you’ll see that the file is downloaded from the FTP site at Microsoft to your local file system. In a real-world scenario, you would probably download the file, load it into a SQL Server, and then archive it. This complete scenario is discussed in detail in Chapter 8.
Web Service Task
The Web Service Task in SSIS is used to retrieve XML-based result sets by executing a method on a web service. Just like the other tasks we’ve separated out into the Data Preparation Task category for this chapter, this task only retrieves the data; it doesn’t yet address the need to navigate through the data, or extract sections of the resulting documents. Web services are a big part of advancing service-oriented architectures, and they can be used in SSIS to provide real-time validation of data in your ETL processes or to maintain lookup or dimensional data.
The task requires creation of an HTTP Connection Manager to a specific HTTP endpoint on a website or to a specific Web Services Description Language (WSDL) file on a website. Because of this HTTP connection, keep in mind that the task may not work for some locked-down server environments. If the HTTP Connection Manager doesn’t point to a WSDL file on the site, a local version must be provided. The WSDL file provides a standard XML-formatted list of available methods that can be called in the web service. The WSDL file also provides information about what type of parameters can be used and what results can be expected in return. Figure 3-13 shows how you can configure the HTTP Connection Manager to access a web service called USZIP atwww.webservicex.net/uszip.asmx.
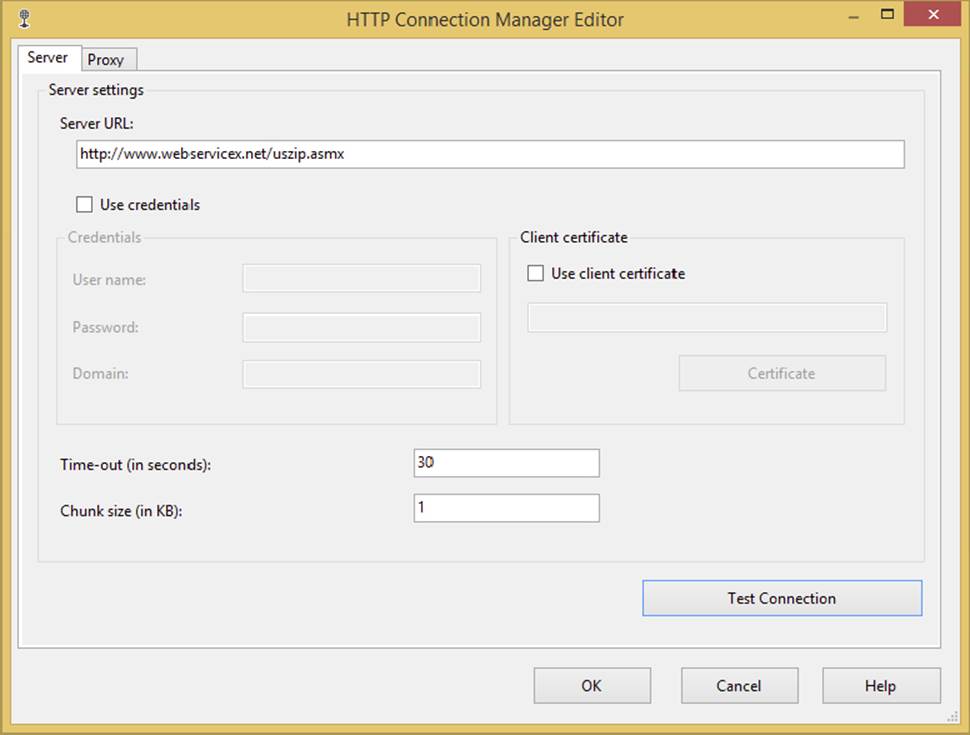
FIGURE 3-13
This is a simplistic HTTP Connection Manager setup. In this case, no special proxy, credentials, or certificate setup is required. If you are using secure, corporate web services, this undoubtedly will not be the case.
The General Tab
The General tab on the Web Service Task is where you set the HttpConnection property of the task to the HTTP Connection Manager that you have already created or alternatively create at the same time by selecting the <New Connection...> option in the property. In Figure 3-14, the value for the WSDL parameter file has been provided. This indicates to the Connection Manager that the definitions of the web service can be obtained remotely. In this case, you are not required to provide a local version of the WSDL file as well. This property is required only if you don’t provide the WSDL parameter in the Connection Manager. If this is the case, simply provide the local filename and click the Download WSDL button to have the task, at design time, reach out to the HTTP endpoint and retrieve a copy of the WSDL file for you.
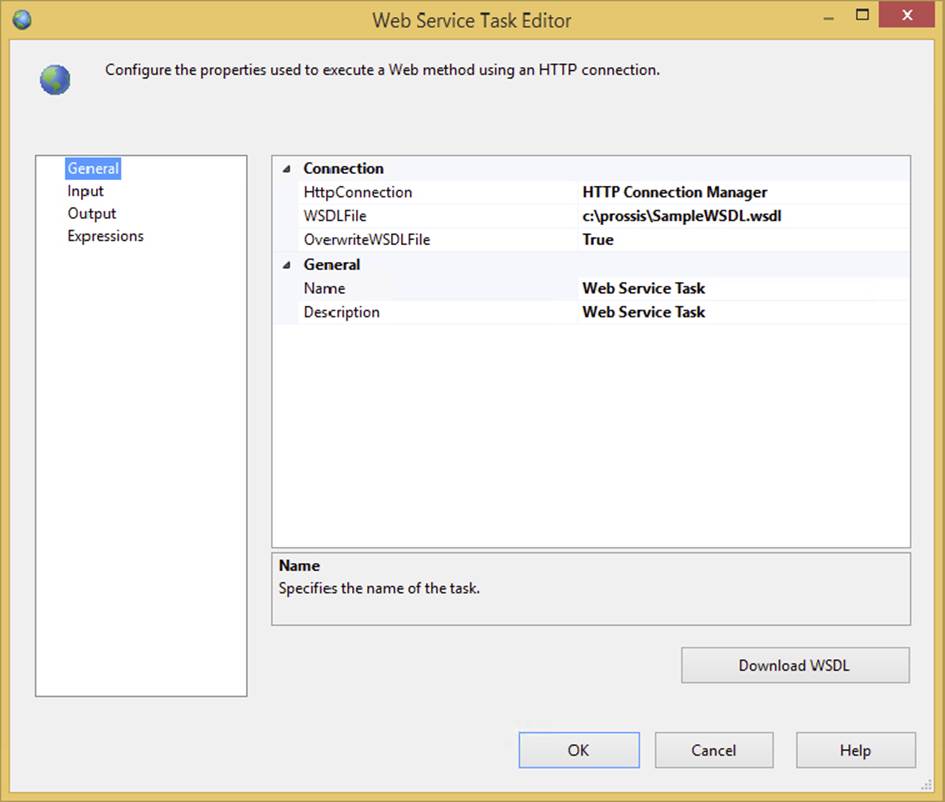
FIGURE 3-14
The Input Tab
The next step is to define the input that you want to retrieve from the web service. It makes sense that if you have defined the web service in the General tab, you now need to specify the web method that you want to access for the input to the task. The Web Service Task makes this easy by using the WSDL file to provide a dropdown in the Input tab where you can specify the method, as shown in Figure 3-15. If you get an error trying to access the Input tab, consider downloading the WSDL file directly onto your computer.
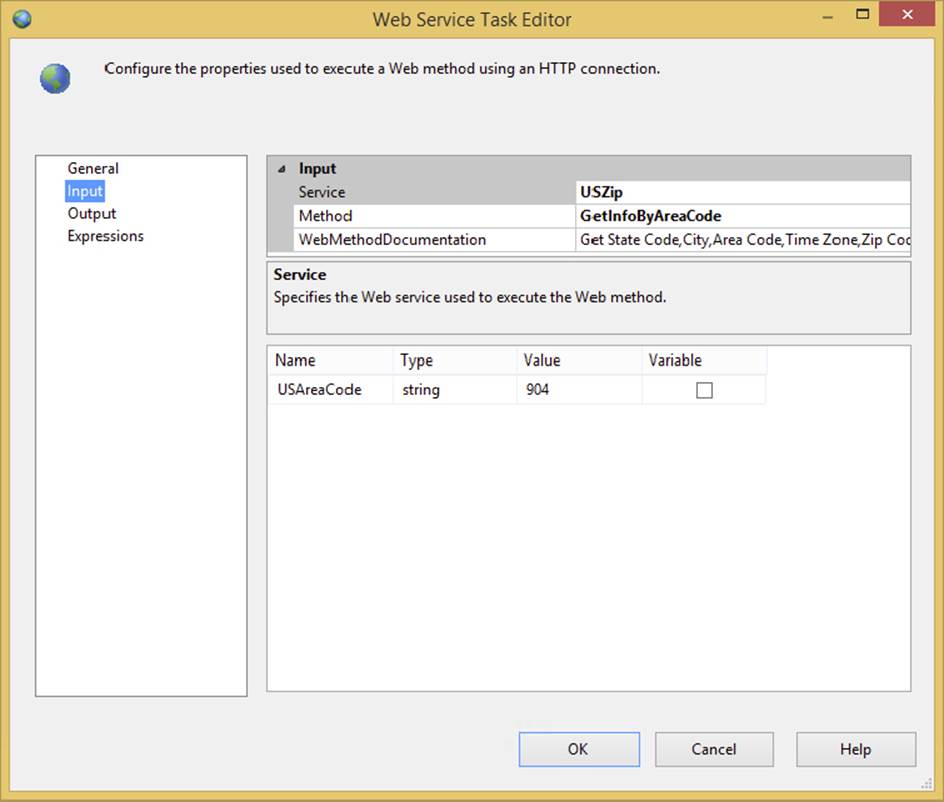
FIGURE 3-15
After you select a web method, such as GetInfoByAreaCode, the Web Service Task uses the WSDL to set up the interface for you to provide how the input parameters will be fed into the task. You can choose to set up hardcoded values as shown in Figure 3-15 or you can fill these parameters with variables.
You can see here that all the named parameters, in this case only USAreaCode, are provided with the expected data types. If you select the Variable option here, the Value column would morph into a dropdown list to allow the selection of a variable. Using variables gives you the flexibility to send something into the Web Service Task dynamically at runtime.
The Output Tab
The remaining tab is the Output tab. Here you have only two options in this task. The resulting retrieval from the web service method can be stored in a file or in a variable. The output is in XML format, so if you choose to save in a variable, select a data type of string. In this example, we’ll set the OutputType property to a file connection, and then set the location of the file to a spot on the local file system.
Running the Web Service Task using this configuration will result in calling the web method GetInfoByZipCode on the web service USZip and retrieving data into an XML file that looks like this:
<?xml version="1.0" encoding="utf-16"?>
<NewDataSet xmlns="">
<Table>
<CITY>Saint Augustine</CITY>
<STATE>FL</STATE>
<ZIP>32084</ZIP>
<AREA_CODE>904</AREA_CODE>
<TIME_ZONE>E</TIME_ZONE>
</Table>
<Table>
<CITY>Jacksonville</CITY>
<STATE>FL</STATE>
<ZIP>32226</ZIP>
<AREA_CODE>904</AREA_CODE>
<TIME_ZONE>E</TIME_ZONE>
</Table>
<Table>
<CITY>Macclenny</CITY>
<STATE>FL</STATE>
<ZIP>32063</ZIP>
<AREA_CODE>904</AREA_CODE>
<TIME_ZONE>E</TIME_ZONE>
</Table>
</NewDataSet>
Retrieving data into a file is good, but using it in an SSIS package is even better. The next example demonstrates how you would use the XML Task to retrieve this same zip code data and use it in a Data Flow.
Retrieving Data Using the Web Service Task and XML Source Component
In this example, you’ll configure the data retrieved from the Web Service Task to be read through the XML source in the Data Flow. Don’t worry if the Data Flow is a little confusing at this time. You’ll see much more about it in the next chapter.
1. Set up a project and package in the directory c:\ProSSIS\tasks\websvc or download the complete package from www.wrox.com/go/prossis2014.
2. Drop a Web Service Task onto the Control Flow design surface and configure the task to use the GetInfoByZipCode method on the web service USZip as shown in the preceding section.
3. Go to the Output tab and set the OutputType to store the results of the web service method to a file of your choosing, such as C:\ProSSIS\Tasks\WebSVC\Output.xml.
4. Drop a Data Flow Task onto the Control Flow design surface and connect the Web Service Task to the Data Flow.
5. In the Data Flow, drop an XML source component on the design surface.
If the XML source contained schema information, you could select the Use Inline Schema option — the Data Access Mode should be set to “XML file location” — and you’d be done. However, you’ve seen the data we are getting from the web service, and no schema is provided. Therefore, you need to generate an XML Schema Definition language file so that SSIS can predict and validate data types and lengths.
NOTE Here’s a little trick that will save you some time. To demonstrate the Web Service Task initially, you set the XML output to go to a file. This was not by accident. Having a concrete file gives you a basis to create an XSD, and you can do it right from the design-time XML Source Component. Just provide the path to the physical XML file you downloaded earlier and click the Generate XSD button. Now you should have an XSD file that looks similar to this:
<?xml version="1.0"?>
<xs:schema attributeFormDefault="unqualified" elementFormDefault=
"qualified"
xmlns:xs="http://www.w3.org/2001/XMLSchema">
<xs:element name="NewDataSet">
<xs:complexType>
<xs:sequence>
<xs:element minOccurs="0" maxOccurs="unbounded" name="Table">
<xs:complexType>
<xs:sequence>
<xs:element minOccurs="0" name="CITY" type="xs:string" />
<xs:element minOccurs="0" name="STATE" type="xs:string" />
<xs:element minOccurs="0" name="ZIP" type="xs:unsignedShort" />
<xs:element minOccurs="0" name="AREA_CODE" type=
"xs:unsignedShort" />
<xs:element minOccurs="0" name="TIME_ZONE" type="xs:string" />
</xs:sequence>
</xs:complexType>
</xs:element>
</xs:sequence>
</xs:complexType>
</xs:element>
</xs:schema>
Notice that the XSD generator is not perfect. It can only predict a data type based on what it sees in the data. Not to give the generator anthropomorphic qualities, but the ZIP and AREA_CODE data elements “look” like numeric values to the generator. You should always examine the XSD that is created and edit it accordingly. Change the sequence element lines for ZIP and AREA_CODE to look like this:
<xs:element minOccurs="0" name="ZIP" type="xs:string " />
<xs:element minOccurs="0" name="AREA_CODE" type=" xs:string" />
Now if you refresh the XML Source and select the Columns tab, as shown in Figure 3-16, you should be able to see the columns extracted from the physical XML file.
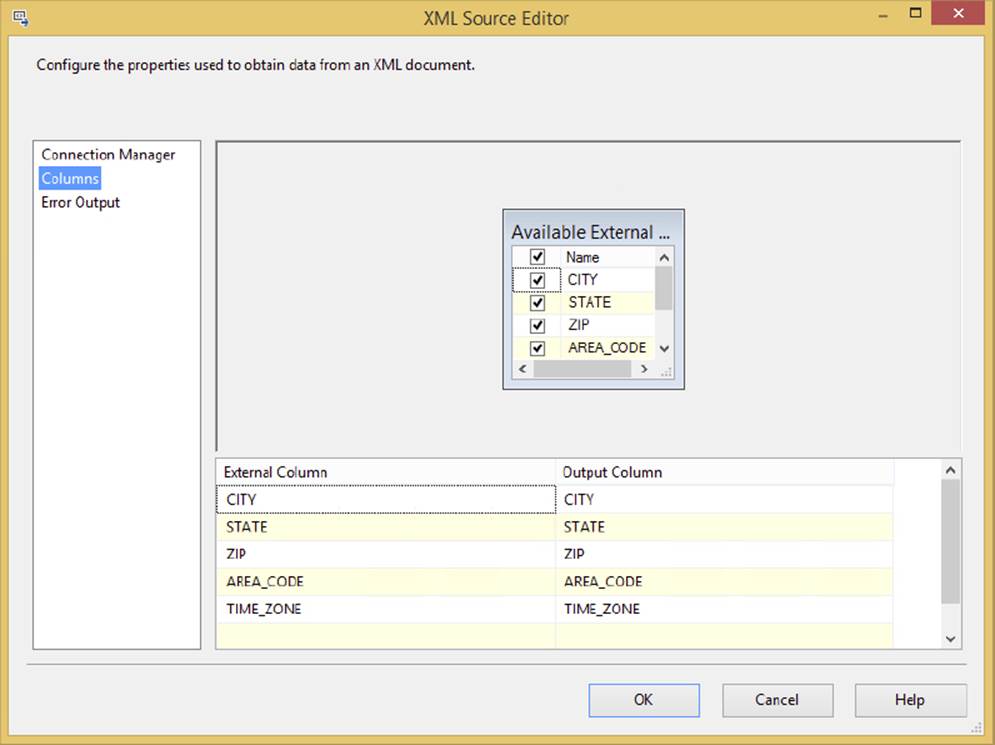
FIGURE 3-16
6. To complete the package, add a Flat File Destination to dump the data into a comma-separated file (CSV file).
7. Connect the output pipeline of the XML source to the Flat File Destination.
8. Click the New button next to the Connection Manager dropdown box to create a new Flat File Connection Manager. Place the file somewhere in the C:\ProSSIS\Tasks\WebSVC directory and call it whatever you’d like, as shown in Figure 3-17.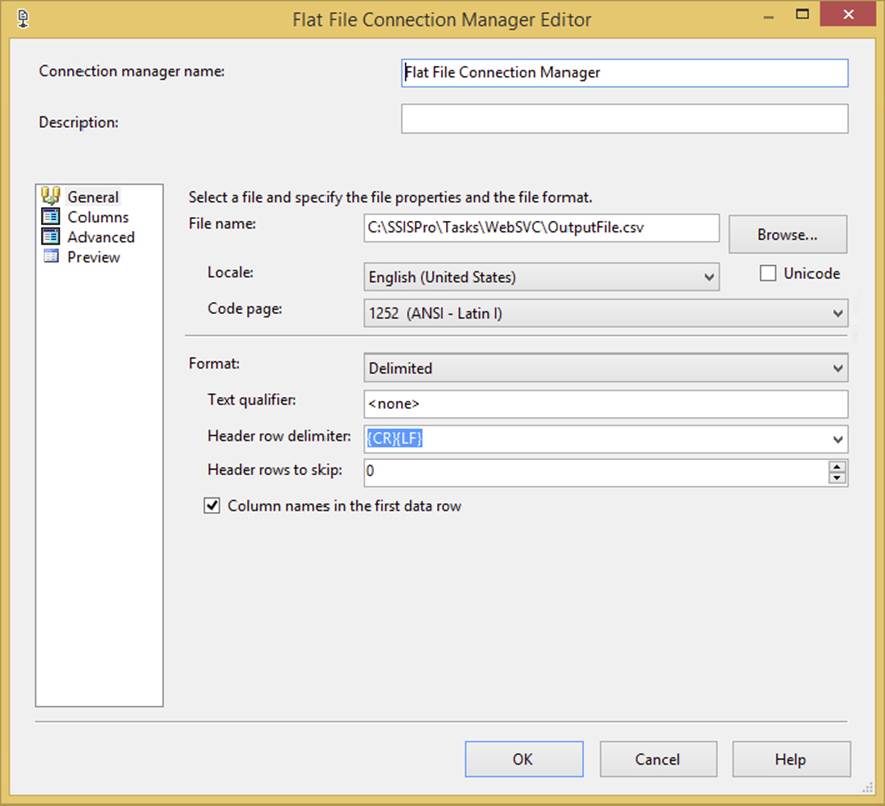
FIGURE 3-17
9. Click OK to go back to the Flat File Destination and then click the Mappings tab to confirm that the columns map appropriately (straight arrows between the left and right). If you save and run the package, it will download the XML file into a variable, and then export the columns and rows to a flat file.
This is hardly a robust example, but it demonstrates that the Web Service Task makes retrieving data from a web service a very simple point-and-click task. However, the Web Service Task can retrieve only the results of a web service call. You may find that you need to prepare, extract, or validate your XML files before running them through your ETL processes. This is where the XML Task comes in.
XML Task
The XML Task is used when you need to validate, modify, extract, or even create files in an XML format. Earlier we used a Web Service Task to retrieve data in an XML-formatted web service response. In terms of validating this type of XML result, the WSDL that you copy down locally is your contract with the web service, which will break if the XML contents of the results change. In other situations, you may be provided with XML data from a third-party source outside of a contractual relationship. In these cases, it is a good practice to validate the XML file against the schema definition before processing the file. This provides an opportunity to handle the issue programmatically.
If you look at the task in Figure 3-18, the editor looks simple. There are two tabs: only one for General configuration and the obligatory Expressions tab.
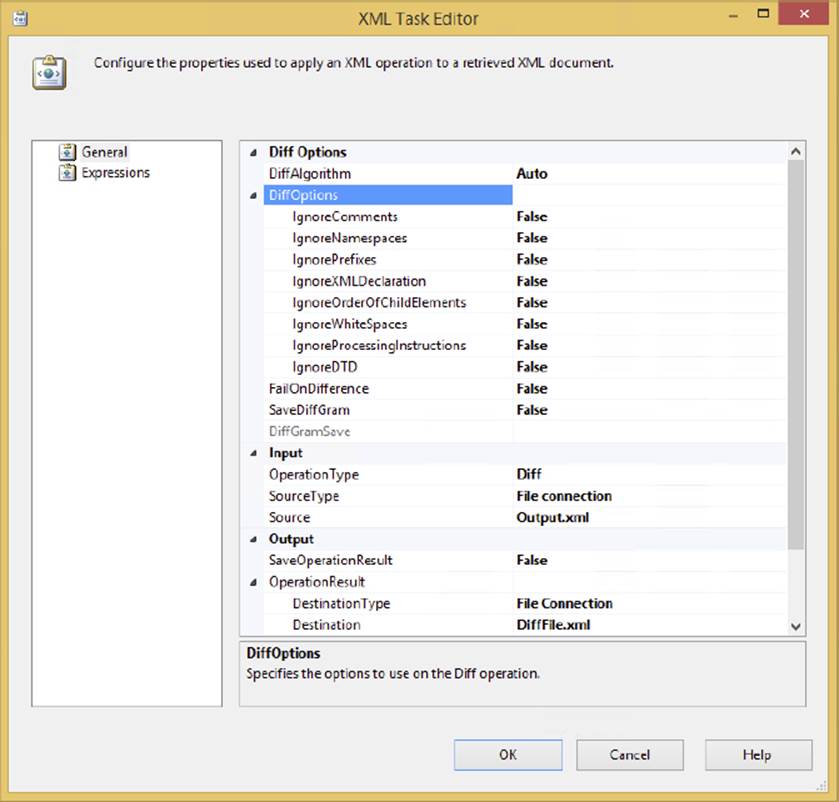
FIGURE 3-18
The current OperationType is set in this example to the Diff operation. This option is one of the more involved operations and requires two XML sources, one as the Input and the other as the Second Operand. However, these properties change based on the selection you make for the OperationType property. The options are as follows:
· Validate: This option allows for the schema validation of an XML file against Document Type Definition (DTD) or XML Schema Definition (XSD) binding control documents. You can use this option to ensure that a provided XML file adheres to your expected document format.
· XSLT: The Extensible Stylesheet Language Transformations (XSLT) are a subset of the XML language that enables transformation of XML data. You might use this operation at the end of an ETL process to take the resulting data and transform it to meet a presentation format.
· XPATH: This option uses the XML Path Language and allows the extraction of sections or specific nodes from the structure of the XML document. You might use this option to extract data from the XML document prior to using the content. For example, you might want to pull out only the orders for a specific customer from an XML file.
· Merge: This option allows for the merging of two XML documents with the same structure. You might use this option to combine the results of two extracts from disparate systems into one document.
· Diff: This option uses difference algorithms to compare two XML documents to produce a third document called an XML Diffgram that contains the differences between them. Use this option with another XML Task using the Patch option to produce a smaller subset of data to insert into your data store. An example use of this task is extracting only the prices that have changed from a new price sheet in XML format.
· Patch: This option applies the results of a Diff operation to an XML document to create a new XML document.
As you might expect, you can configure the task to use either a file source or a variable. The option to input the XML directly is also available, but it’s not as practical. The best way to get an idea of how this task can be used is to look at a few examples.
Validating an XML File
First up is a basic use case that demonstrates how to validate the internal schema format of an XML file. To make sure you are clear on what the XML Task does for you, the validation is not about whether the XML file is properly formed but about whether it contains the proper internal elements. If an XML file is malformed, then simply attempting to load the XML file in the task will generate an error. However, if a missing node is defined within the XSD contract, the XML Task Validation option will inform you that the XML file provided doesn’t meet the conditions of the XSD validation.
For this example, we’ll borrow the information from the XML and XSD files in the Web Service Task example. Recall that we had an XSD that validated a string node for City, State, Zip, Area_Code, and Time_Zone. (See the Web Service Task example to view the XSD format.) You can download this complete example at www.wrox.com/go/prossis2014.
We’ll use three files to exercise this task. The first is a valid XML file named MyGetZipsData.xml that looks like this:
<?xml version="1.0" encoding="utf-16"?>
<NewDataSet xmlns="">
<Table>
<CITY>Saint Augustine</CITY>
<STATE>FL</STATE>
<ZIP>32084</ZIP>
<AREA_CODE>904</AREA_CODE>
<TIME_ZONE>E</TIME_ZONE>
</Table>
</NewDataSet>
The second file is an invalid XML file named MyGetZipsData_Bad.xml. This file has an improperly named node <CITYZ> that doesn’t match the XSD specification:
<?xml version="1.0" encoding="utf-16"?>
<NewDataSet xmlns="">
<Table>
<CITYZ>Saint Augustine</CITYZ>
<STATE>FL</STATE>
<ZIP>32084</ZIP>
<AREA_CODE>904</AREA_CODE>
<TIME_ZONE>E</TIME_ZONE>
</Table>
</NewDataSet>
The last file is a malformed XML file named MyGetZipsData_ReallyBad.xml. This file has an empty <Table> node and is not a valid XML format:
<?xml version="1.0" encoding="utf-16"?>
<NewDataSet xmlns="">
<Table></Table>
<CITY>Saint Augustine</CITY>
<STATE>FL</STATE>
<ZIP>32084</ZIP>
<AREA_CODE>904</AREA_CODE>
<TIME_ZONE>E</TIME_ZONE>
</Table>
</NewDataSet>
For this example, follow these steps:
1. Create a package and add a new XML Task to the Control Flow surface.
2. Select the OperationType of Validate, set the Input Source Type to a new file connection, and browse to select the MyGetZipsData.xml file.
3. Expand the OperationResult property in the Output section to configure an additional text file to capture the results of the validation. The result values are only true or false, so you only need a simple text file to see how this works. Typically, you store the result in a variable, so you can test the results to determine the next action to take after validation.
4. Set the OverwriteDestination property to True to allow the result to be overwritten in each run of the task.
5. In the Second Operand, you’ll need to create another file connection to the XSD file. This will be used for validation of the schema.
6. Create another file connection using an existing file that points to this XSD file.
7. Finally, set the validation type to XSD, as we are using an XSD file to validate the XML. The editor at this point should look like Figure 3-19.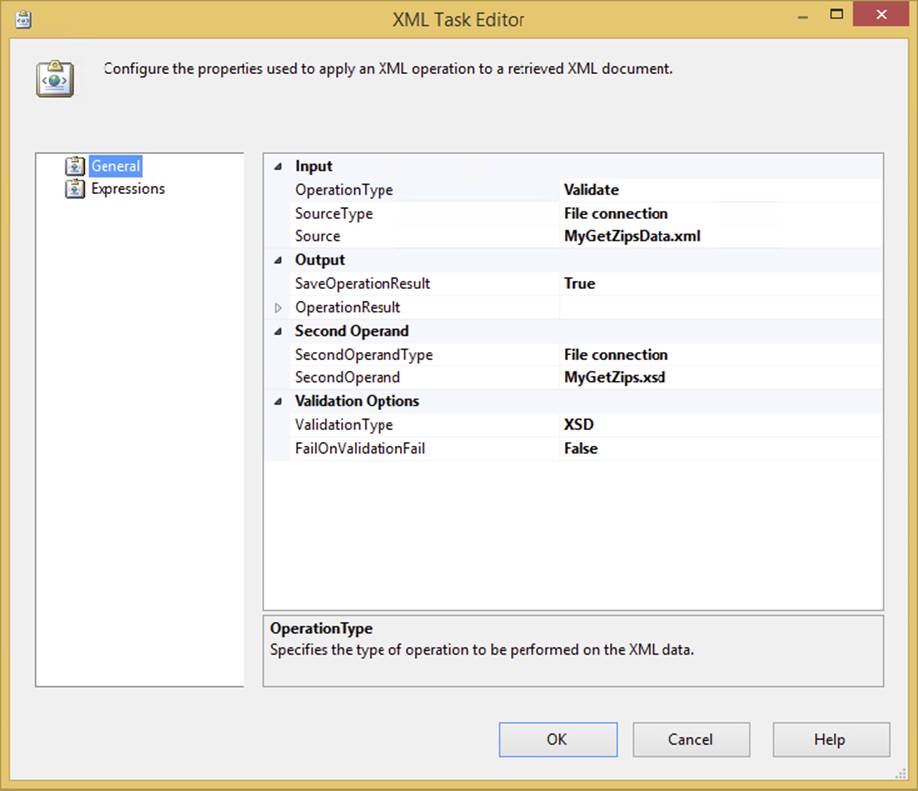
FIGURE 3-19
This completes the happy path use case. If you execute this task, it should execute successfully, and the results file should contain the value of true to indicate that the XML file contains the correct schema as defined by the XSD file. Now on to the true test:
8. Change the source to a new connection for the MyGetZipsData_Bad.xml file.
9. Execute the task again. This time, although the task completes successfully, the result file contains the value of false to indicate a bad schema. This is really the whole point of the Validation option.
10.Finally, change the source to create a new connection to the poorly formatted XML file MyGetZipsData_ReallyBad.xml to see what happens. In this case, the task actually fails — even though the Validation option’s FailOnValidationFail property is set to False. This is because the validation didn’t fail — the loading of the XML file failed. The error message indicates the problem accurately:
11. [XML Task] Error: An error occurred with the following error message:
12. "The 'NewDataSet' start tag on line 2 does not match the end tag of
13. 'Table'. Line 9, position 5.".
14. [XML Task] Error: An error occurred with the following error message: "Root
element is missing.".
Just be aware of the difference between validating the schema and validating the XML file itself when designing your package Control Flows, and set up accordingly. You need to have a Control Flow for the failure of the task and for the successful completion with a failure result.
This is just one example demonstrating how you can use the XML Task for SSIS development. There are obviously several other uses for this task that are highly legitimate and useful for preparing data to feed into your SSIS ETL package Data Flows. The next section turns to another set of data preparation tasks, which we have separated into their own category, as they deal specifically with retrieval and preparation of RDBMS data.
RDBMS SERVER TASKS
These tasks could also be considered data preparation tasks, as they are responsible for bringing data sources into the ETL processes, but we have separated the Bulk Insert Task and the Execute SQL Task into this separate category because of the expectation that you will be working with data from relational database management systems (RDBMS) like SQL Server, Oracle, and DB2. The exception to this is the Bulk Insert Task, which is a wrapper for the SQL Server bulk-copy process.
Bulk Insert Task
The Bulk Insert Task enables you to insert data from a text or flat file into a SQL Server database table in the same high-octane manner as using a BULK INSERT statement or the bcp.exe command-line tool. In fact, the task is basically just a wizard to store the information needed to create and execute a bulk copying command at runtime (similar to BCP from a command line). If you aren’t familiar with using BCP, you can research the topic in detail in Books Online. The downside of the Bulk Insert Task is its strict data format, and it precludes being able to work with data in a Data Flow within one action. This can be seen as a disadvantage in that it does not allow any transformations to occur to the data in flight, but not all ETL processes are efficiently modified in the Data Flow. In high-volume extracts, you may be better served by loading the initial extract down in a staging table and extracting data in discrete chunks for processing within specific Data Flows. The Bulk Insert Task has no ability to transform data, and this trade-off in functionality gives you the fastest way to load data from a text file into a SQL Server database.
When you add a Bulk Insert Task to your Control Flow, follow these steps:
1. Open the Bulk Insert Task Editor to configure it. As in most tasks, use the General tab to name and describe the task. Make sure you name it something that describes its unit of work, like Prepare Staging. This will be helpful later when you deploy the package and troubleshoot problems.
The next tab, Connection, is the most important. This tab enables you to specify the source and destination for the data.
2. Select the destination from the Connection dropdown in the Destination Connection group.
3. Specify a destination table from the next dropdown, below the destination connection.
4. While you’re specifying connections, go to the bottom to specify the source connection’s filename in the File dropdown. Both the source and the destination connections use the Connection Manager. If you haven’t already created the shared connections, you’ll be prompted to create them in either case by selecting <New Connection ...>.
NOTE Both the source and the optional format file must be relative to the destination SQL Server, because the operation occurs there when a Bulk Insert Task is used. If you are using a network file location, use the UNC path(\MachineName\ShareName\FileName.csv) to the source or format file.
5. After you specify the connections, you need to provide file specifications for the format of file you’re importing. If you created the file using the BCP utility, you can use the -f option to create a format file as well. The Bulk Insert Task can then use the BCP format file to determine how the file is formatted, or you can select the column and row delimiters in the Format property of the task. The two options are:
· Use File: This uses the BCP format (.fmt) file.
· Specify: This enables you to select the file delimiters. The available delimiters are New Line ({CR}{LF}), Carriage Return ({CR}), Line Feed ({LF}), Semicolon (;), Comma (,), Tab, or Vertical Bar (|). Note that the defaults are for the row to be {CR}{LF} delimited, and the column tab-delimited.
6. In the Options tab of the Bulk Insert Task Editor, you can use some lesser-known options:
· Code page: You can specify the code page for the source file. You will rarely want to change the code page from RAW, which is the default. Using RAW is the fastest data-loading option because no code page conversion takes place.
· OEM: You should use this when copying from one SQL Server to another.
· ACP: This converts non-Unicode data to the ANSI code page of the SQL Server you are loading the data into, or you can specify a specific code page mapping.
· DataFileType: Specifies the type of the source file. Options here include char, native, widechar, and widenative. Generally, files you receive will be the default option, char, but in some cases, you may see a file with a native format.
A file (myzips_native.txt) in native format was created from SQL Server by using the bcp.exe program with the –n (native) switch and supplied with the download from www.wrox.com/go/prossis2014. You’ll see how to import it later in an example.
You can also use the Options tab to specify the first and last row to copy if you want only a sampling of the rows. This is commonly used to set the first row to two (2) when you want to skip a header row. The BatchSize option indicates how many records will be written to SQL Server before committing the batch. A BatchSize of 0 (the default) means that all the records will be written to SQL Server in a single batch. If you have more than 100,000 records, then you may want to adjust this setting to 50,000 or another number based on how many you want to commit at a time. The adjustment may vary based on the width of your file.
The Options dropdown contains five options that you can enable/disable:
· Check Constraints: This option checks table and column constraints before committing the record. It is the only option enabled by default.
· Keep Nulls: By selecting this option, the Bulk Insert Task will replace any empty columns in the source file with NULLs in SQL Server.
· Enable Identity Insert: Enable this option if your destination table has an identity column into which you’re inserting. Otherwise, you will receive an error.
· Table Lock: This option creates a SQL Server lock on the target table, preventing inserts and updates other than the records you are inserting. This option speeds up your process but may cause a production outage, as others are blocked from modifying the table. If you check this option, SSIS will not have to compete for locks to insert massive amounts of data into the target table. Set this option only if you’re certain that no other process will be competing with your task for table access.
· Fire Triggers: By default, the Bulk Insert Task ignores triggers for maximum speed. When you check this option, the task will no longer ignore triggers and will instead fire the insert triggers for the table into which you’re inserting.
There are a few other options you can set in the Options tab. The SortedData option specifies what column you wish to sort by while inserting the data. This option defaults to sort nothing, which equals false. If you need to set this option, type the column name that you wish to sort. The MaxErrors option specifies how many errors are acceptable before the task is stopped with an error. Each row that does not insert is considered an error; by default, if a single row has a problem, the entire task fails.
NOTE The Bulk Insert Task does not log error-causing rows. If you want bad records to be written to an error file or table, it’s better to use the Data Flow Task.
Using the Bulk Insert Task
Take time out briefly to exercise the Bulk Insert Task with a typical data load by following these steps:
1. Create a new package called BulkInsertTask.dtsx. If you haven’t already downloaded the code files for this chapter from www.wrox.com/go/prossis2014, do so. Then extract the file for this chapter named myzips.csv.
2. Create a table in the AdventureWorksDW database using SQL Management Studio or the tool of your choice to store postal code information (code file Ch03SQL.txt):
3. CREATE TABLE PROSSIS_ZIPCODE (
4. ZipCode CHAR(5),
5. State CHAR(2),
6. ZipName VARCHAR(16)
)
7. Back in your new package, drag the Bulk Insert Task onto the Control Flow design pane. Notice that the task has a red icon on it, indicating that it hasn’t been configured yet.
8. Double-click the task to open the editor. In the General tab, provide the name Load Zip Codes for the Name option and Loads zip codes from a flat file for the description.
9. Click the Connection tab. From the Connection dropdown box, select<New connection ...>. This will open the Configure OLE DB Connection Manager dialog.
10.Now, you’re going to create a connection to the AdventureWorksDW database that can be reused throughout this chapter. Click New to add a new Connection Manager. For the Server Name option, select the server that contains your AdventureWorksDW database. For the database, select the AdventureWorksDW database.
11.Click OK to go back to the previous screen, and click OK again to return to the Bulk Insert Task Editor.
You’ll now see that the Connection Manager you just created has been transposed into the Connection dropdown box.
12.Now you need to define the destination. For the DestinationTable option, select the [dbo].[PROSSIS_ZIPCODE] table. For the first attempt, you’ll import a comma-delimited version of the zip codes. This simulates importing a file that would have been dumped out of another SQL Server (with the same table name) using this bcp command:
13. bcp AdventureWorksDW.dbo.prossis_zipcode out
14. c:\ProSSIS\tasks\bulkInsertTask\myzips.csv
-c -t, -T
15.Leave the remaining options set to the defaults. The RowDelimiter property option will be {CR}{LF} (a carriage return) and the ColumnDelimiter property should be set to Comma {,}.
16.For the File option, again select <New connection ...> to create a new Connection Manager. This will open the File Connection Manager Editor.
17.For the Usage Type, select Existing File. Then point to myZips.csv for the File option. Click OK to return to the editor. Your final Bulk Insert Task Editor screen should look similar to Figure 3-20.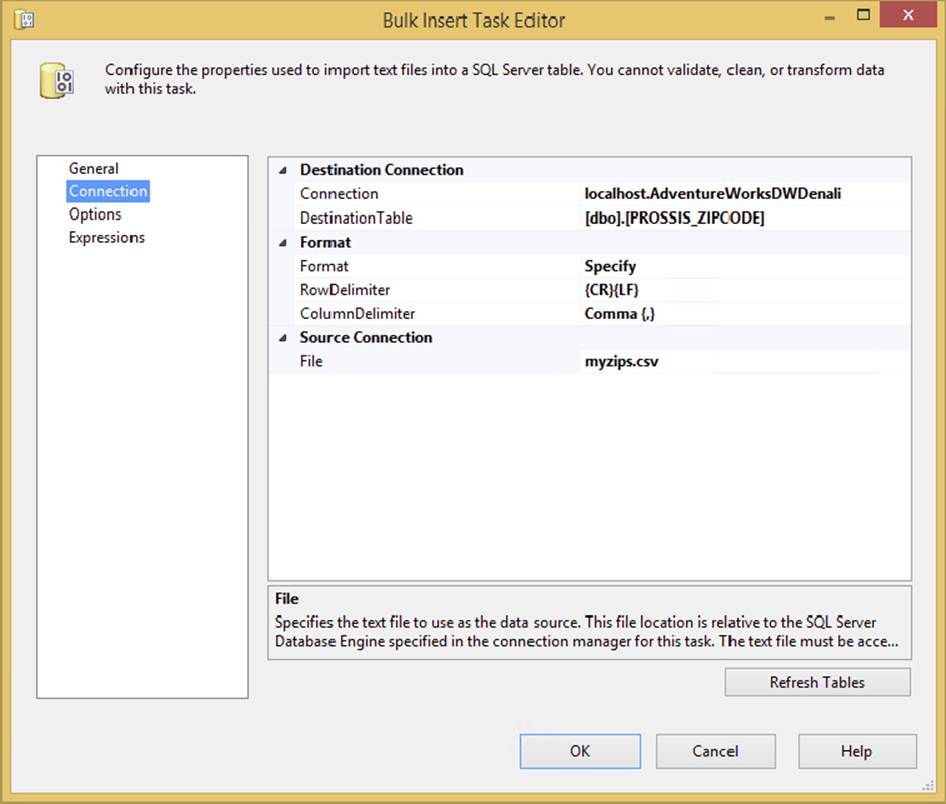
FIGURE 3-20
If you open the myzips.csv file, you’ll notice there is no header row with the column names before the data. If you had a column header and needed to skip it, you would go to the Options tab and change the FirstRow option to 2. This would start the import process on the second row, instead of the first, which is the default.
18.You should be able to run the package now. When it executes, the table will be populated with all the postal codes from the import file. You can verify this by selecting all the rows from the PROSSIS_ZIPS table.
As you can see, the Bulk Insert Task is a useful tool to load staging files quickly, but you may need to further process the file. One reason is because this task provides no opportunity to divert the data into a transformation workflow to examine the quality of the data. Another reason is that you have to import character-based data to avoid raising errors during the loading process. The Bulk Insert Task handles errors in an all-or-nothing manner. If a single row fails to insert, then your task may fail (based on your setting for the maximum number of allowed errors). These problems can be easily solved by using a Data Flow Task if the data is unreliable.
Execute SQL Task
The Execute SQL Task is one of the most widely used tasks in SSIS for interacting with an RDBMS Data Source. The Execute SQL Task is used for all sorts of things, including truncating a staging data table prior to importing, retrieving row counts to determine the next step in a workflow, or calling stored procedures to perform business logic against sets of staged data. This task is also used to retrieve information from a database repository. The Execute SQL Task is also found in the legacy DTS product, but the SSIS version provides a better configuration editor and methods to map stored procedure parameters to read back result and output values.
This section introduces you to all the possible ways to configure this task by working through the different ways you can use it. You’ll work through how to execute parameterized SQL statements or execute batches of SQL statements, how to capture single-row and multiple-row results, and how to execute stored procedures.
Executing a Parameterized SQL Statement
The task can execute a SQL command in two basic ways: by executing inline SQL statements or by executing stored procedures. The resulting action can also result in the need to perform one of two options: accepting return values in parameters or a result set. You can get an idea of how the task can be configured to do these combinations in the General tab of the Execute SQL Task Editor, shown in Figure 3-21. Here, the Execute SQL Task is set to perform an Update operation on the DimProduct table using an inline SQL statement with a variable-based parameter. This is the easiest use of the Execute SQL Task because you don’t need to configure the Result Set tab properties.
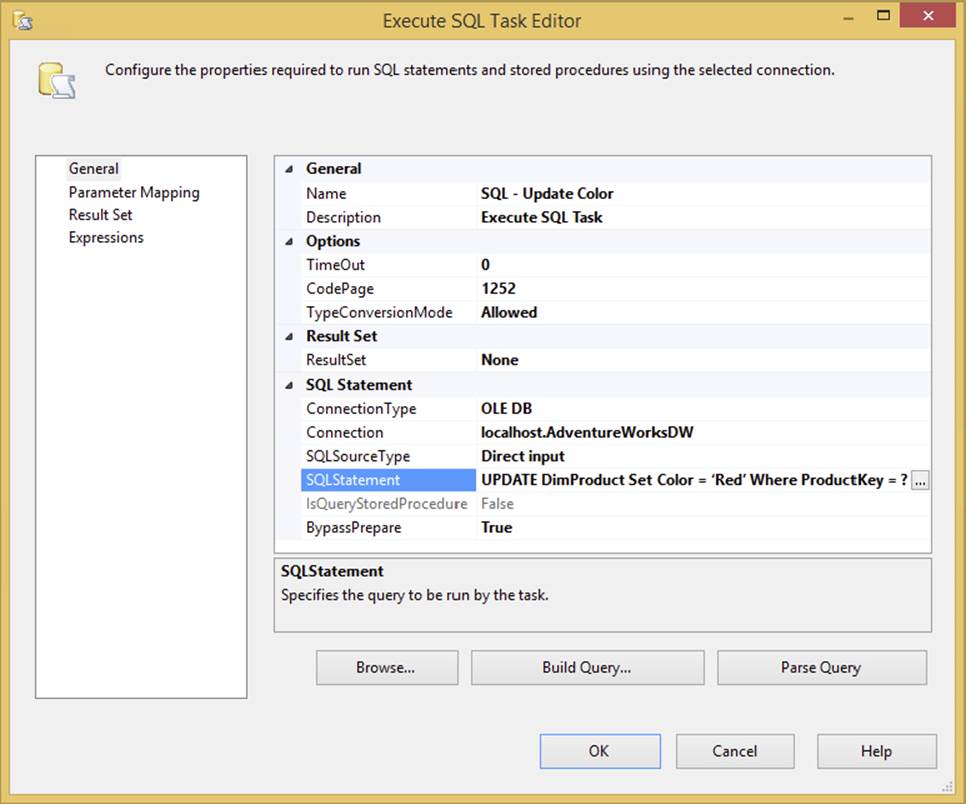
FIGURE 3-21
Notice in Figure 3-21 that the General tab contains the core properties of the task. Here the task is configured to point to an OLE DB connection. The other options for the ConnectionType include ODBC, ADO, ADO.NET, SQLMOBILE, and even EXCEL connections. The catch to all this connection flexibility is that the Execute SQL Task behaves differently depending upon the underlying data provider. For example, the SQLStatement property in Figure 3-21 shows a directly inputted T-SQL statement with a question mark in the statement. The full statement is here:
UPDATE DimProduct Set Color = 'Red' Where ProductKey = ?
This ?, which indicates that a parameter is required, is classic ODBC parameter marking and is used in most of the other providers — with the exception of the ADO.NET provider, which uses named parameters. This matters, because in the task, you need to configure the parameters to the SQL statement in the Parameter Mapping tab, as shown in Figure 3-22.
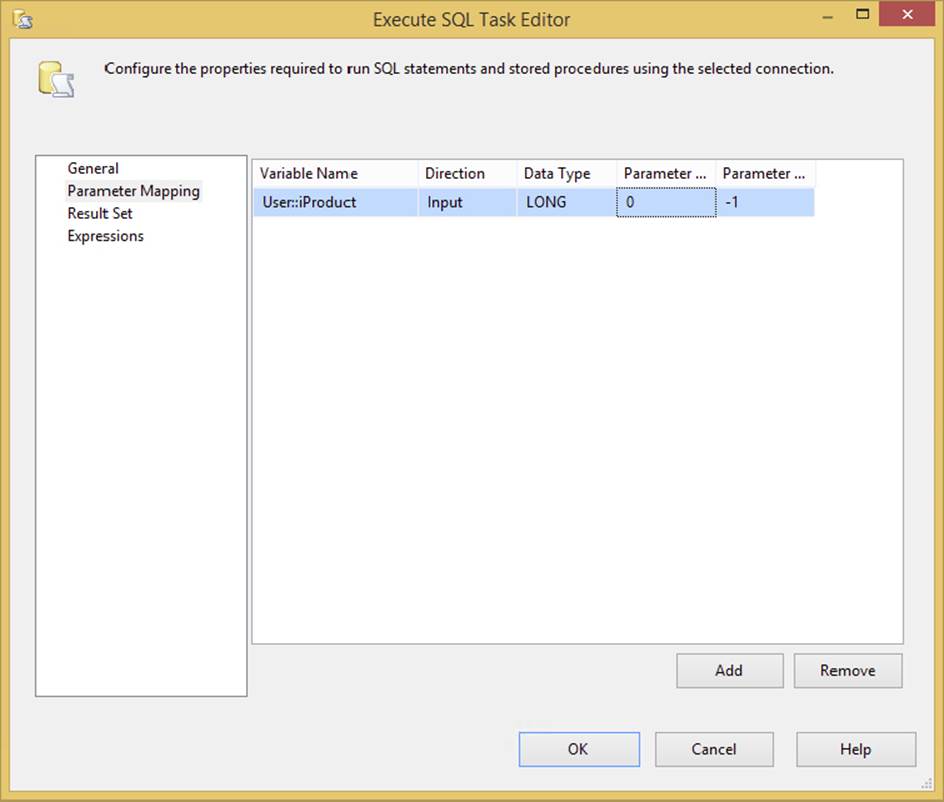
FIGURE 3-22
Here the parameter mapping collection maps the first parameter [ordinal position of zero (0)] to a user variable. When mapping parameters to connections and underlying providers, use the following table to set up this tab in the Task Editor:
|
IF USING CONNECTION OF TYPE |
PARAMETER MARKER TO USE |
PARAMETER NAME TO USE |
|
ADO |
? |
Param1, Param2, ... |
|
ADO.NET |
@<Real Param Name> |
@<Real Param Name> |
|
ODBC |
? |
1, 2, 3 (note ordinal starts at 1) |
|
OLEDB and EXCEL |
? |
0, 1, 2, 3 (note ordinal starts at 0) |
Because we are using an OLE DB provider here, the parameter marker is ?, and the parameter is using the zero-based ordinal position. The other mapping you would have needed to do here is for the data type of the parameter. These data types also vary according to your underlying provider. SSIS is very specific about how you map data types, so you may need to experiment or check Books Online for the mapping equivalents for your parameters and provider. We’ll cover many of the common issues in this regard throughout this section, but for this initial example, we mapped the System::ContainerStartTime to the OLE DB data type of DATE. At this point, the Execute SQL Task with this simple update statement could be executed, and the ModifyDate would be updated in the database with a current datetime value.
A variation of this example would be a case in which the statement can be dynamically generated at runtime and simply fired into the Connection Manager. The SQLSourceType property on the General tab allows for three different types of SQL statement resolution: either directly input (as we did), via a variable, or from a file connection. Another way to build the SQL statement is to use the Build Query action button. This brings up a Query-By-Example (QBE) tool that helps you build a query by clicking the tables and establishing the relationships. The variable-based option is also straightforward. Typically, you define a variable that is resolved from an expression. Setting the SQLSourceType property in the Execute SQL Task to Variable enables you to select the variable that will resolve to the SQL statement that you want the task to execute.
The other option, using a file connection, warrants a little more discussion.
Executing a Batch of SQL Statements
If you use the File Connection option of the Execute SQL Task’s SQLSourceType property, typically you are doing so to execute a batch of SQL statements. All you need to do is have the file that contains the batch of SQL statements available to the SSIS package during runtime. Set up a File Connection to point to the batch file you need to run. Make sure that your SQL batch follows a few rules. Some of these rules are typical SQL rules, like using a GO command between statements, but others are specific to the SSIS Execute SQL Task. Use these rules as a guide for executing a batch of SQL statements:
· Use GO statements between each distinct command. Note that some providers allow you to use the semicolon (;) as a command delimiter.
· If there are multiple parameterized statements in the batch, all parameters must match in type and order.
· Only one statement can return a result, and it must be the first statement.
· If the batch returns a result, then the columns must match the same number and properly named result columns for the Execute SQL Task. If the two don’t match and you have subsequent UPDATE or DELETE statements in the batch, these will execute even though the results don’t bind, and an error results. The batch is sent to SQL Server to execute and behaves the same way.
Returning results is something that we haven’t explored in the Execute SQL Task, so let’s look at some examples that do this in SSIS.
Capturing Singleton Results
On the General tab of the Execute SQL Task, you can set up the task to capture the type of result that you expect to have returned by configuring the ResultSet property. This property can be set to return nothing, or None, a singleton result set, a multi-line result, or an XML-formatted string. Any setting other than None requires configuration of the Result Set tab on the editor. In the Result Set tab, you are defining the binding of returned values into a finite set of SSIS variables. For most data type bindings, this is not an issue. You select the SSIS variable data type that most closely matches that of your provider. The issues that arise from this activity are caused by invalid casting that occurs as data in the Tabular Data Stream (TDS) from the underlying provider collides with the variable data types to which they are being assigned. This casting happens internally within the Execute SQL Task, and you don’t have control over it as you would in a Script Task. Before you assume that it is just a simple data type–assignment issue, you need to understand that SSIS is the lowest common denominator when it comes to being able to bind to data types from all the possible data providers. For example, SSIS doesn’t have a currency or decimal data type. The only thing close is the double data type, which is the type that must be used for real, numeric, current, decimal, float, and other similar data types.
The next example sets up a simple inline SQL statement that returns a single row (or singleton result) to show both the normal cases and the exception cases for configuring the Execute SQL Task and handling these binding issues. First, we’ll use a simple T-SQL statement against the AdventureWorks database that looks like this (code file Ch03SQL.txt):
SELECT TOP 1
CarrierTrackingNumber,
LineTotal,
OrderQty,
UnitPrice
From Sales.SalesOrderDetail
We’ve chosen this odd result set because of the multiple data types in the SalesOrderDetail table. These data types provide an opportunity to highlight some of the solutions to difficulties with mapping these data types in the Execute SQL Task that we’ve been helping folks with since the first release of SSIS.
To capture these columns from this table, you need to create some variables in the package. Then these variables will be mapped one-for-one to the result columns. Some of the mappings are simple. The CarrierTrackingNumber can be easily mapped to a string variable data type with either nvarchar or varchar data types in the Execute SQL Task. The OrderQty field, which is using the smallint SQL Server data type, needs to be mapped to an int16 SSIS data type. Failure to map the data type correctly will result in an error like this:
[Execute SQL Task] Error: An error occurred while assigning a value to variable
"OrderQty": "The type of the value being assigned to variable "User::OrderQty"
differs from the current variable type. Variables may not change type during
execution. Variable types are strict, except for variables of type Object."
The other two values, for the SQL Server UnitPrice (money) and LineTotal (numeric) columns, are more difficult. The closest equivalent variable data type in SSIS is a double data type.
Now the parameters can simply be mapped in the Execute SQL Task Result Set tab, as shown in Figure 3-23. The Result Name property maps to the column name in your SQL statement or its ordinal position (starting at 0).
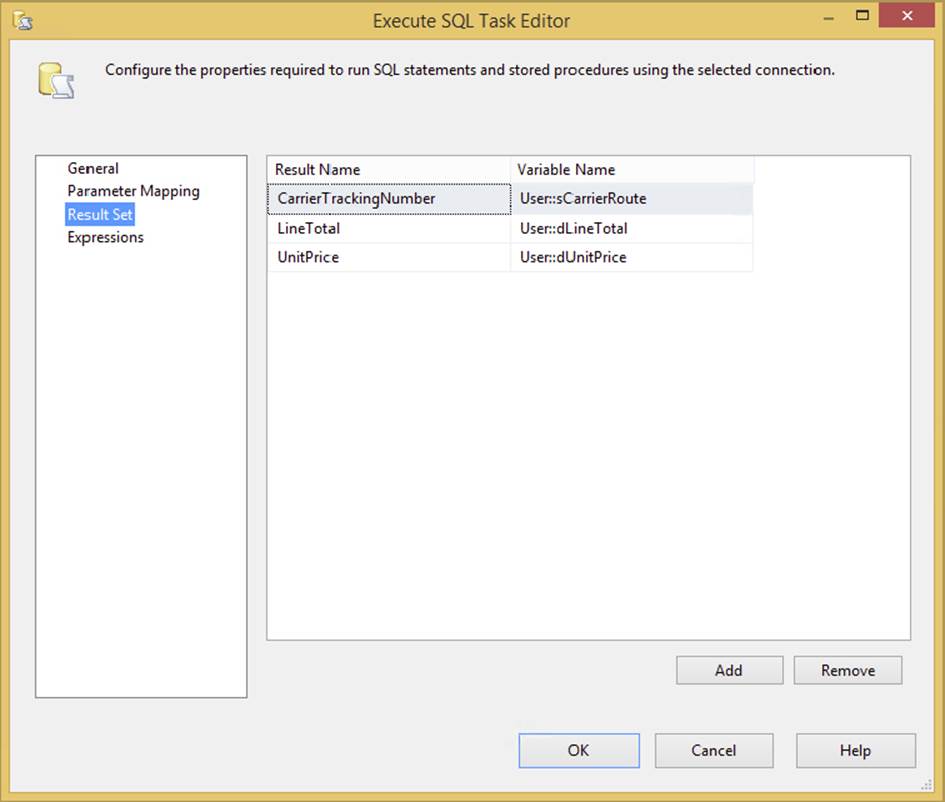
FIGURE 3-23
Just use the Add and Remove buttons to put the result elements in the order that they should be returned, name them according to the provider requirements, and get the right data types, and you’ll be fine. If these are in the incorrect order, or if the data types can’t be cast by the Execute SQL Task from the TDS into the corresponding variable data type, you will get a binding error. This should give you a general guide to using the Execute SQL Task for capturing singleton results.
Multi-Row Results
Typically, you capture multi-row results from a database as a recordset or an XML file (particularly between SQL Server Data Sources) to use in another Script Task for analysis or decision-making purposes, to provide an enumerator in a Foreach or Looping Task, or to feed into a Data Flow Task for processing. Set up the SQLSourceType and SQLStatement properties to call either an inline SQL statement or a stored procedure. In either case, you would set the ResultSet property in the General tab to Full Result Set, and the Result Set tab is set up to capture the results. The only difference from capturing a singleton result is that you need to capture the entire result into a variable, rather than map each column. The data type you should use to capture the results varies according to what you are capturing. The XML file can be captured in either a string or an object data type. The recordset can only be captured in a variable with the object data type. An example of the Execute SQL Task configured to create an object data type to store the results of a selection of rows from the Sales. SalesOrderDetail table is shown in Figure 3-24. Note that the Result Set tab shows the capturing of these rows with the required zero-ordinal position.
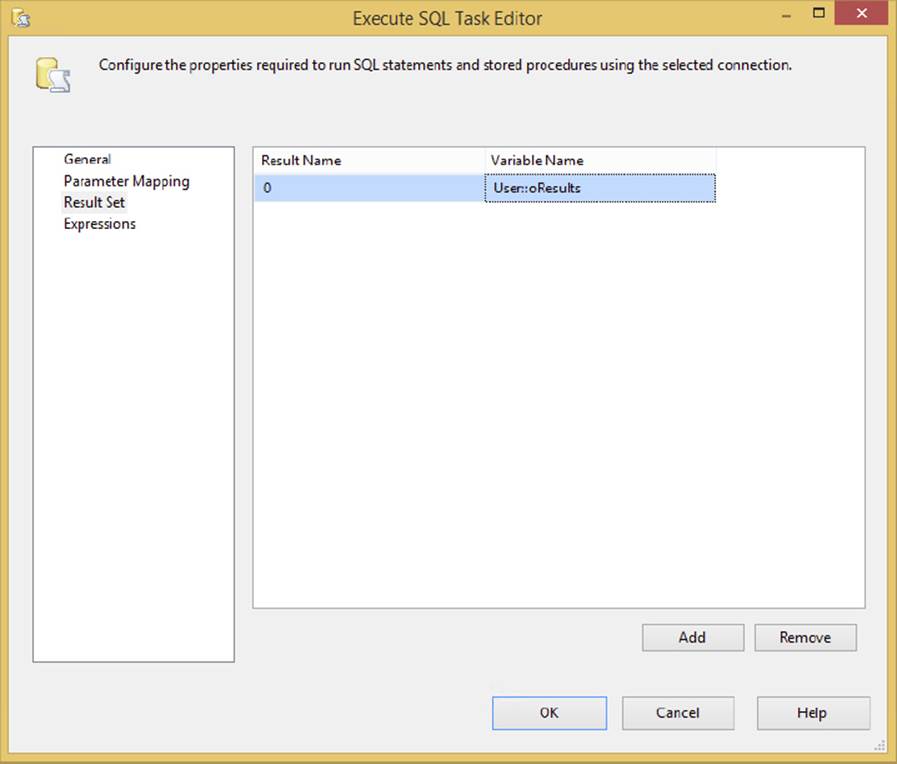
FIGURE 3-24
Once the recordset is stored as a variable, you can do things like “shred” the recordset. The term shredding means iterating through the recordset one row at a time in a Foreach Loop operation. For each iteration, you can capture the variables from, and perform an operation on, each row. Figure 3-25 shows how the Foreach Loop Container would look using the variable-based recordset. This container is covered in detail in Chapter 6.
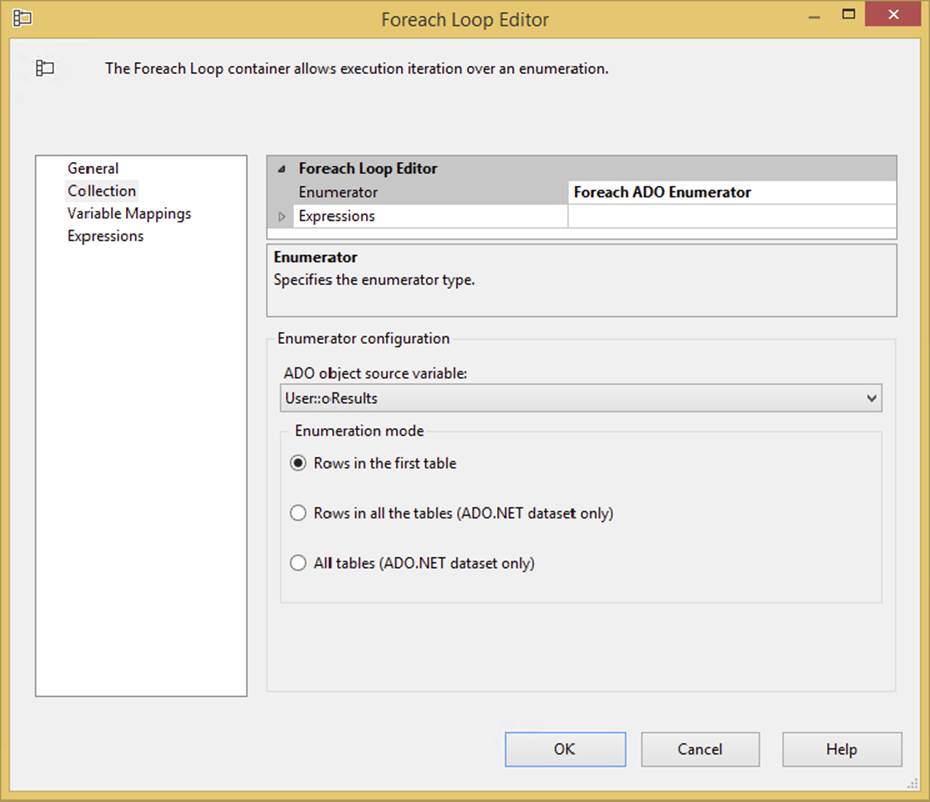
FIGURE 3-25
Another way to use the variable-based recordset is to use it to feed a data transform. To do this, just create a Source Script Transform in a Data Flow and add to it the columns that you want to realize from the stored recordset and pass in the recordset variable. Then add code (code file Ch03SQL.txt) similar to the following to turn the column data from the recordset into the output stream (to save time and space, only two columns are being realized in the recordset):
C#
public override void CreateNewOutputRows()
{
System.Data.OleDb.OleDbDataAdapter oleDA =
new System.Data.OleDb.OleDbDataAdapter();
System.Data.DataTable dT = new System.Data.DataTable();
oleDA.Fill(dT, Variables.RecordSetResult);
foreach (DataRow dr in dT.Rows)
{
Output0Buffer.AddRow();
//by Name
Output0Buffer.CarrierTrackingNumber =
dr["CarrierTrackingNumber"].ToString();
//by Ordinal
Output0Buffer.UnitPrice = System.Convert.ToDecimal(dr[6]);
}
}
VB
Public Overrides Sub CreateNewOutputRows()
Dim oleDA As New System.Data.OleDb.OleDbDataAdapter()
Dim dT As New System.Data.DataTable()
Dim row As System.Data.DataRow
oleDA.Fill(dt, Variables.RecordSetResult)
For Each row In dT.Rows
Output0Buffer.AddRow()
Output0Buffer.CarrierTrackingNumber = _
row("CarrierTrackingNumber").ToString()
Output0Buffer.UnitPrice = System.Convert.ToDecimal(row(6))
Next
End Sub
The XML version of capturing the result in a string is even easier. You don’t need to use the Script Component to turn the XML string back into a source of data. Instead, use the out-of-the-box component called the XML Source in the Data Flow. It can accept a variable as the source of the data. (Review the example demonstrating how to do this in the “Web Service Task” section of this chapter.)
You can see that the Execute SQL Task is really quite useful at executing inline SQL statements and retrieving results, so now take a look at how you can use stored procedures as well in this task.
Executing a Stored Procedure
Another way to interact with an RDBMS is to execute stored procedures that can perform operations on a data source to return values, output parameters, or results. Set up the SSIS Execute SQL Task to execute stored procedures by providing the call to the proc name in the General tab’s SQLStatement property. The catch is the same as before. Because the Execute SQL Task sits on top of several different data providers, you need to pay attention to the way each provider handles the stored procedure call. The following table provides a reference to how you should code the SQLStatement property in the Execute SQL Task:
|
IF USING CONNECTION TYPE |
AND ISQUERYSTOREDPROCEDURE |
CODE THE SQL STATEMENT PROPERTY LIKE THIS |
|
OLEDB and EXCEL |
N/A |
EXEC usp_StoredProc ?, ? |
|
ODBC |
N/A |
{call usp_StoredProc (?, ?)} |
|
ADO |
false |
EXEC usp_StoredProc ?, ? |
|
ADO |
true |
usp_StoredProc |
|
ADO.NET |
false |
EXEC usp_StoredProc @Parm1, @Parm2 |
|
ADO.NET |
true |
usp_StoredProc @Parm1, @Parm2 |
Returning to the earlier example in which you used an inline SQL statement to update the modified date in the sales order detail, create a T-SQL stored procedure that does the same thing (code file Ch03SQL.txt):
CREATE PROCEDURE usp_UpdatePersonAddressModifyDate(
@MODIFIED_DATE DATETIME
)
AS
BEGIN
Update Person.Address
Set ModifiedDate = @MODIFIED_DATE
where AddressId = 1
END
In the online downloads for this chapter, we’ve created a package that demonstrates how to call this procedure using both the OLE DB and the ADO.NET Connection Managers. In the General tab (shown in Figure 3-26), the SQLStatement property is set up as prescribed earlier in the guide, with the ? parameter markers for the one input parameter. Note also that the IsQueryStoredProcedure property is not enabled. You can’t set this property for the OLE DB provider. However, this property would be enabled in the ADO.NET version of the Execute SQL Task to execute this same procedure. If you set the IsQueryStoredProcedure for the ADO.NET version to true, the SQLStatement property would also need to change. Remove the execute command and the parameter markers to look like this: Usp_UpdatePersonAddressModifyDate. In this mode, the Execute SQL Task will actually build the complete execution statement using the parameter listing that you’d provide in the Parameter Mapping tab of the Task Editor.

FIGURE 3-26
The Parameter Mapping tab of the Task Editor varies according to the underlying provider set on the Execute SQL Task, as shown in Figure 3-27.
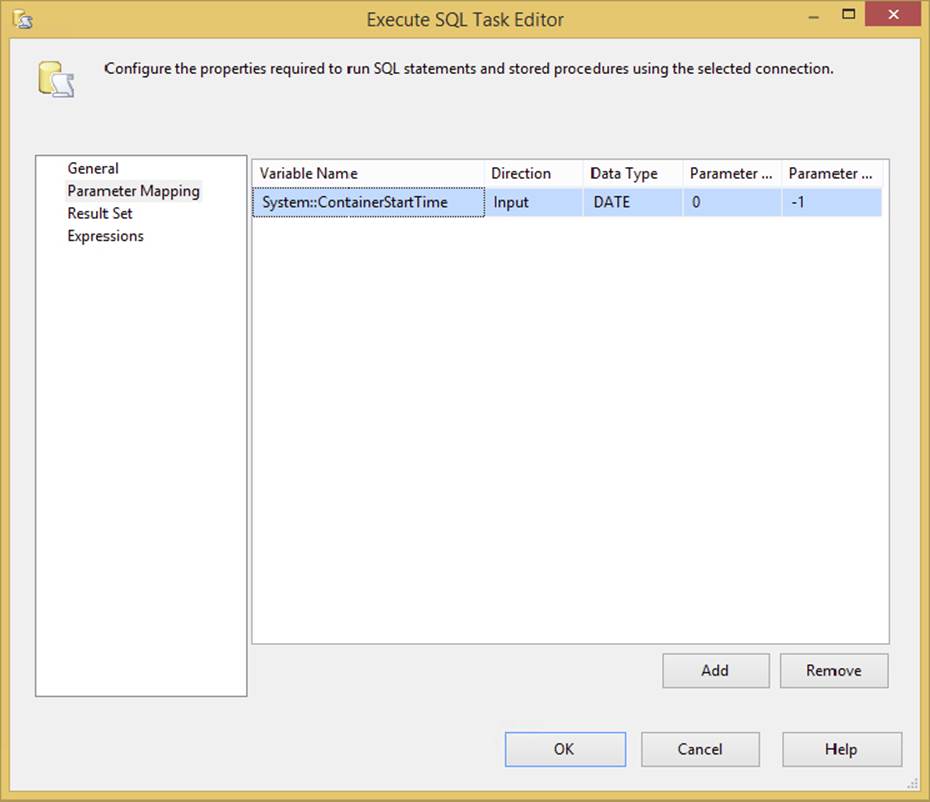
FIGURE 3-27
For brevity, this figure just shows an OLE DB connection with parameters. With ADO.NET connections though, the parameter names follow the same rules you used when applying parameters to inline SQL statements earlier in this chapter by changing the Parameter Name option to @MODIFIED_DATE, for example.
Retrieving Output Parameters from a Stored Procedure
Mapping input parameters for SQL statements is one thing, but there are some issues to consider when handling output parameters from stored procedures. The main thing to remember is that all retrieved output or return parameters have to be pushed into variables to have any downstream use. The variable types are defined within SSIS, and you have the same issues that we covered in the section “Capturing Singleton Results” for this task. In short, you have to be able to choose the correct variables when you bind the resulting provider output parameters to the SSIS variables, so that you can get a successful type conversion.
As an example, we’ll duplicate the same type of SQL query we used earlier with the inline SQL statement to capture a singleton result, but here you’ll use a stored procedure object instead. Put the following stored procedure in the AdventureWorks database (code file Ch03SQL.txt):
CREATE PROCEDURE usp_GetTop1SalesOrderDetail
(
@CARRIER_TRACKING_NUMBER nvarchar(25) OUTPUT,
@LINE_TOTAL numeric(38,6) OUTPUT,
@ORDER_QTY smallint OUTPUT,
@UNIT_PRICE money OUTPUT
)
AS
BEGIN
SELECT TOP 1
@CARRIER_TRACKING_NUMBER = CarrierTrackingNumber,
@LINE_TOTAL = LineTotal,
@ORDER_QTY = OrderQty,
@UNIT_PRICE = UnitPrice
From Sales.SalesOrderDetail
END
In this contrived example, the stored procedure will provide four different output parameters that you can use to learn how to set up the output parameter bindings. (Integer values are consistent and easy to map across almost all providers, so there is no need to demonstrate that in this example.) One difference between returning singleton output parameters and a singleton row is that in the General tab of the Execute SQL Task, the ResultSet property is set to None, as no row should be returned to capture. Instead, the Parameters in the Parameter Mapping tab will be set to the Direction of Output and the Data Types mapped based on the provider.
To get the defined SQL Server data type parameters to match the SSIS variables, you need to set up the parameters with these mappings:
|
PARAMETER NAME |
SQL SERVER DATA TYPE |
SSIS DATA TYPE |
|
@CARRIER_TRACKING_NUMBER |
nvarchar |
string |
|
@LINE_TOTAL |
numeric |
double |
|
@ORDER_QTY |
smallint |
int16 |
|
@UNIT_PRICE |
money |
double |
You might assume that you would still have an issue with this binding, because, if you recall, you attempted to return a single-rowset from an inline SQL statement with these same data types and ended up with all types of binding and casting errors. You had to change your inline statement to cast these values to get them to bind. You don’t have to do this when binding to parameters, because this casting occurs outside of the Tabular Data Stream. When binding parameters (as opposed to columns in a data stream), the numeric data type will bind directly to the double, so you won’t get the error that you would get if the same data were being bound from a rowset. We’re not quite sure why this is the case, but fortunately stored procedures don’t have to be altered in order to use them in SSIS because of output parameter binding issues.
The remaining task to complete the parameter setup is to provide the correct placeholder for the parameter. Figure 3-28 is an example of the completed parameter setup for the procedure in OLE DB.
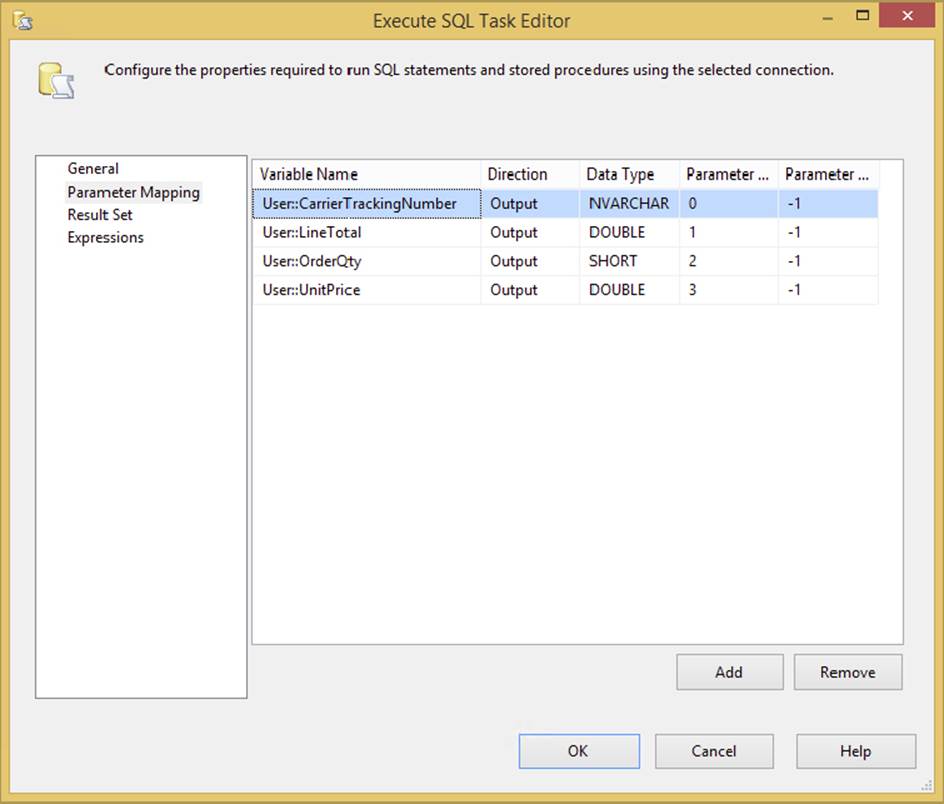
FIGURE 3-28
At this point, you have looked at every scenario concerning binding to parameters and result sets. Stored procedures can also return multi-row results, but there is really no difference in how you handle these rows from a stored procedure and an inline SQL statement. We covered multi-row scenarios earlier in this section on the Execute SQL Task. Now we will move away from tasks in the RDBMS world and into tasks that involve other controlling external processes such as other packages or applications in the operating system.
WORKFLOW TASKS
So far, we’ve been focused on tasks that are occurring within the immediate realm of ETL processing. You’ve looked at tasks for creating control structures, preparing data, and performing RDBMS operations. This section looks at being able to control other processes and applications in the operating system. Here we sidestep a bit from typical ETL definitions into things that can be more enterprise application integration (EAI) oriented. SSIS packages can also be organized to execute other packages or to call external programs that zip up files or send e-mail alerts, and even put messages directly into application queues for processing.
Execute Package Task
The Execute Package Task enables you to build SSIS solutions called parent packages that execute other packages called child packages. You’ll find that this capability is an indispensable part of your SSIS development as your packages begin to grow. Separating packages into discrete functional workflows enables shorter development and testing cycles and facilitates best development practices. Though the Execute Package Task has been around since the legacy DTS, several improvements have simplified the task:
· The child packages can be run as either in-process or out-of-process executables. In the Package tab of the Execute Package Task Editor is the ExecuteOutOfProcess property; set to the default value of false, it will execute the package in its own process and memory space. A big difference in this release of the task compared to its 2008 or 2005 predecessor is that you execute packages within a project to make migrating the code from development to QA much easier.
· The task enables you to easily map parameters in the parent package to the child packages now too.
The majority of configurable properties are in the Package tab of the Execute Package Task Editor. The first option provides the location of the child package. The ReferenceType option can be either External or Project References. This means you can point to a package inside your current project or outside the project to a SQL Server or file system. The best (easiest) option is to refer to a package in a project, as this option will easily “repoint” the reference as you migrate to production. If you point to an External Reference, you’ll need to create a Connection Manager that won’t automatically repoint as you migrate your packages from development to production. The configured tab will look like Figure 3-29.
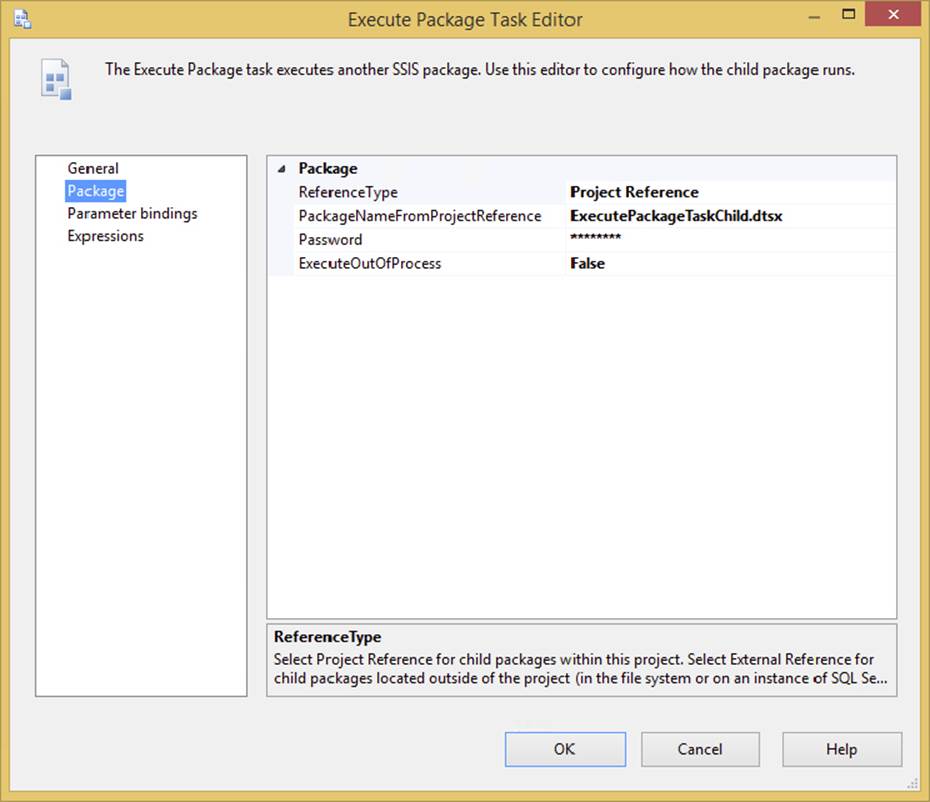
FIGURE 3-29
Next, go to the Parameter Bindings tab to pass parameters into the child package. First, select any parameters in the child package from its dropdown box, and then map them to a parameter or variable in the parent package. Parameters will only work here with Project Referenced packages. You can see an example of this in Figure 3-30, or download the entire example from www.wrox.com/go/prossis2014.
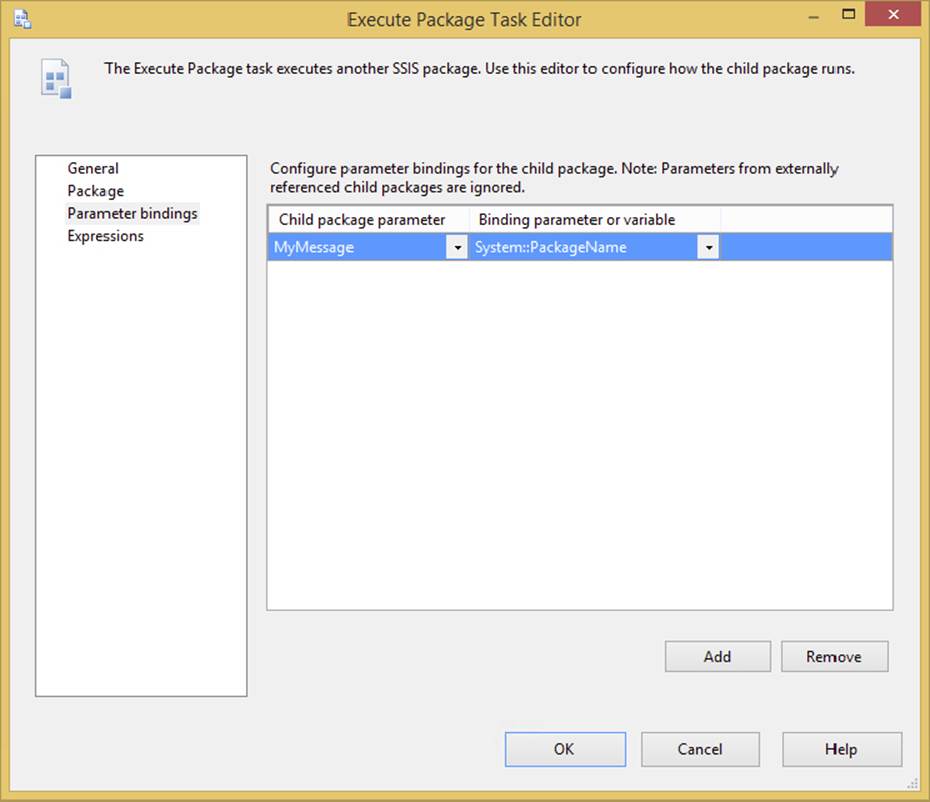
FIGURE 3-30
Execute Process Task
The Execute Process Task will execute a Windows or console application inside of the Control Flow. You’ll find great uses for this task to run command-line-based programs and utilities prior to performing other ETL tasks. The most common example would have to be unzipping packed or encrypted data files with a command-line tool.
You can store any errors resulting from the execution of the task into a variable that can be read later and logged. In addition, any output from the command file can also be written to a variable for logging purposes. Figure 3-31 shows a sample of using the Execute Process Task to expand a compressed customers.zip file.
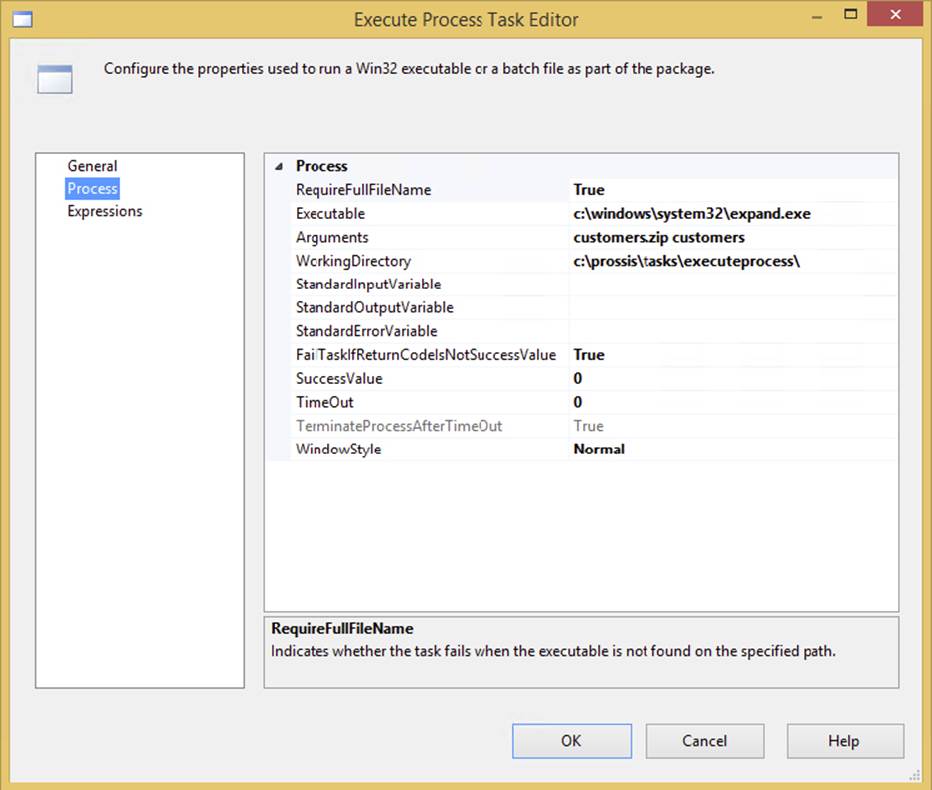
FIGURE 3-31
The Process tab in the Execute Process Task Editor contains most of the important configuration items for this task:
· RequireFullFileName property: Tells the task whether it needs the full path to execute the command. If the file is not found at the full path or in the PATH environment variables of the machine, the task will fail. Typically, a full path is used only if you want to explicitly identify the executable you want to run. However, if the file exists in the System32 directory, you wouldn’t normally have to type the full path to the file because this path is automatically known to a typical Windows system.
· Executable property: Identifies the path and filename for the executable you want to run. Be careful not to provide any parameters or optional switches in this property that would be passed to the executable. Use the Arguments property to set these types of options separately. For example, Figure 3-31 shows that the task will execute expand.exe and pass in the cabinet from which you want to extract and where you’d like it to be extracted.
· WorkingDirectory option: Contains the path from which the executable or command file will work.
· StandardInputVariable parameter: This is the variable you want to pass into the process as an argument. Use this property if you want to dynamically provide a parameter to the executable based on a variable.
· StandardOutputVariable parameter: You can also capture the result of the execution by setting the property StandardOutputVariable to a variable.
· StandardErrorVariable property: Any errors that occurred from the execution can be captured in the variable you provide in this property.
These variable values can be used to send back to a scripting component to log or can be used in a precedence constraint that checks the length of the variables to determine whether you should go to the next task. This provides the logical functionality of looping back and trying again if the result of the execution of the expand.exe program was a sharing violation or another similar error.
Other options in the Process tab include:
· FailTaskIfReturnCodeIsNotSuccessValue property: Another option for validating the task.
· SuccessValue option: The Execute Process Task will fail if the exit code passed from the program is different from the value provided in the SuccessValue option. The default value of 0 indicates that the task was successful in executing the process.
· Timeout/TerminateProcessAfterTimeOut properties: The Timeout property determines the number of seconds that must elapse before the program is considered a runaway process. A value of 0, which is the default, means the process can run for an infinite amount of time. This property is used in conjunction with the TerminateProcessAfterTimeOut property, which, if set to true, terminates the process after the timeout has been exceeded.
· WindowStyle option: This can set the executable to be run minimized, maximized, hidden, or normal. If this is set to any option other than hidden, users will be able to see any windows that potentially pop up and may interact with them during runtime. Typically, these are set to hidden once a package is fully tested.
With the Execute Process Task, you can continue to use command-line or out-of-processes executables to organize work for ETL tasks. Now it’s time to take a look at how SSIS can interact and integrate with your enterprise messaging bus.
Message Queue Task
The Message Queue Task enables you to send or receive messages from Microsoft Message Queuing (MSMQ) right out of the box. For integration with other messaging systems like IBM’s MQ Series or Tibco’s Rendezveus, you need to either code to a library within a Script Task, create a custom component, or execute T-SQL statements to a SQL Server Service Broker queue. Messaging architectures are created to ensure reliable communication between two disparate subsystems.
A message can be a string, a file, or a variable. The main benefit to using this task is the capability to make packages communicate with each other at runtime. You can use this to scale out your packages, having multiple packages executing in parallel, with each loading a subset of the data, and then checking in with the parent package after they reach certain checkpoints. You can also use this task for enterprise-level information integration to do things like deliver dashboard-level information using XML files to an enterprise bus or distribute report content files across your network. Satellite offices or any other subscriber to those services could pull content from the queue for application-level processing.
The task is straightforward. In the General tab, shown in Figure 3-32, you specify the MSMQ Connection Manager under the MSMQConnection property. Then, you specify whether you want to send or receive a message under the Message option. In this tab, you can also specify whether you want to use the legacy Windows 2000 version of MSMQ; this option is set to false by default.
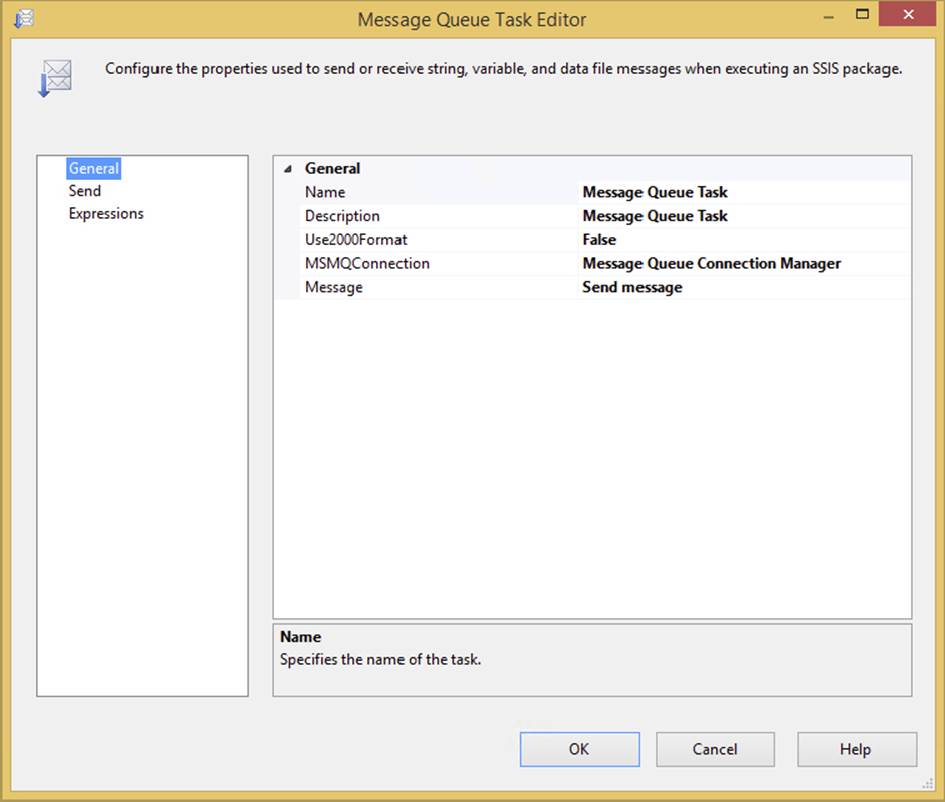
FIGURE 3-32
The bulk of the configuration is under the Send or Receive tab (the one you see varies according to the Message option you selected in the General tab). If you’re on the Receive tab, you can configure the task to remove the message from the queue after it has been read. You can also set the timeout properties here, to control whether the task will produce an error if it experiences a timeout.
Regardless of whether you’re sending or receiving messages, you can select the type of the message under the MessageType option. You can either send or receive a string message, a variable, or a data file. Additionally, if you’re receiving a message, you can immediately store the message you receive in a package variable by setting String Message to Variable and then specifying a variable in the Variable option.
Send Mail Task
The Send Mail Task provides a configurable SSIS task for sending e-mail messages via SMTP. In legacy DTS packages, you had to send messages out through MAPI, which meant installing Outlook on the server on which the package was running. That is now no longer a requirement. Most of the configuration options are set in the Mail tab (shown in Figure 3-33) of the Send Mail Task Editor. The SmtpConnection property is where you either create a new or select an existing SMTP Connection Manager.
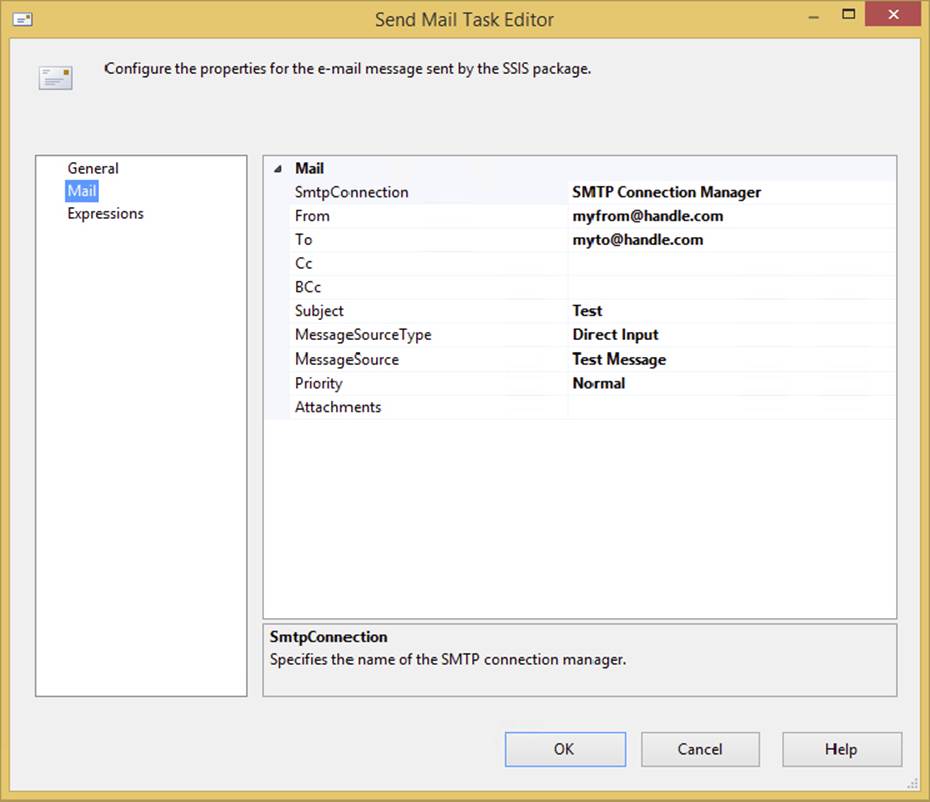
FIGURE 3-33
Most of the configuration options will depend upon your specific SMTP connection. One option of special interest is the MessageSourceType property, which specifies whether the message source will be provided from a file or a variable or be directly inputted into the MessageSource property. Typically, the best practice is to use a variable-based approach to set the MessageSource property.
WMI Data Reader Task
Windows Management Instrumentation (WMI) is one of the best-kept secrets in Windows. WMI enables you to manage Windows servers and workstations through a scripting interface similar to running a T-SQL query. The WMI Data Reader Task enables you to interface with this environment by writing WQL queries (the query language for WMI) against the server or workstation (to look at the Application event log, for example). The output of this query can be written to a file or variable for later consumption. Following are some applications for which you could use the WMI Data Reader Task:
· Read the event log looking for a given error.
· Query the list of applications that are running.
· Query to see how much RAM is available at package execution for debugging.
· Determine the amount of free space on a hard drive.
To get started, you first need to set up a WMI Connection Manager in the Connection Manager Editor. Connection requirements vary, but Figure 3-34 shows an example of a WMI connection for a typical standalone workstation.
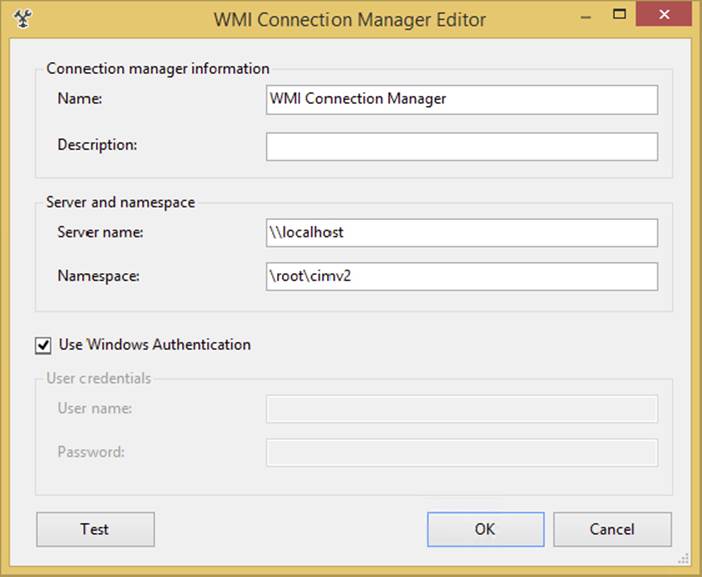
FIGURE 3-34
Notice here that the Use Windows Authentication option has been set. WMI typically requires a higher level of security authorization because you are able to query OS-level data. With a WMI connection, you can configure the WMI Data Reader Task Editor using the WMI Options tab shown in Figure 3-35.
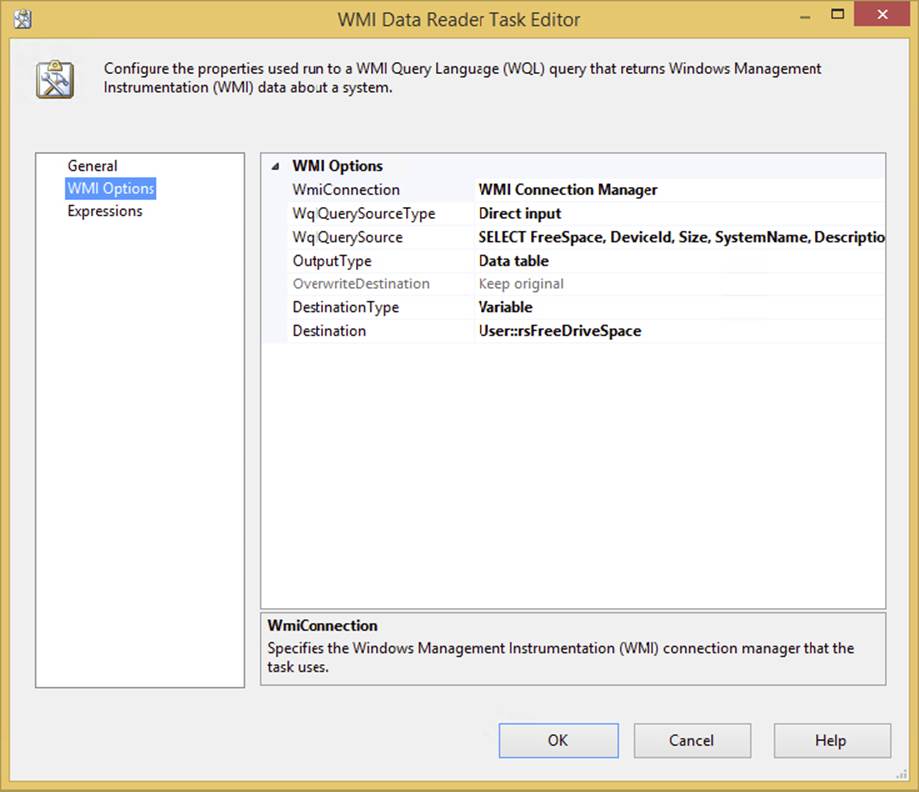
FIGURE 3-35
· WmiConnection/WqlQuerySourceType: First, you set the WMIConnection, and then determine whether the WMI query will be directly inputted, retrieved from a variable, or retrieved from a file, and set the WqlQuerySourceType.
· WqlQuerySource: Specifies the source for the query that you wish to run against the connection. This may be a variable name, a text filename, or a hardcoded query itself.
· OutputType: This option specifies whether you want the output of the query to retrieve just the values from the query or also the column names along with the values.
· OverwriteDestination: This option specifies whether you want the destination to be overwritten each time it is run, or whether you want it to just append to any configured destination. If you save the output to an object variable, you can use the same technique of shredding a recordset that you learned earlier in the Execute SQL Task.
WQL queries look like SQL queries, and for all practical purposes they are, with the difference that you are retrieving data sets from the operating systems. For example, the following query selects the free space, the name, and a few other metrics about the C: drive (see code file Ch03SQL.txt):
SELECT FreeSpace, DeviceId, Size, SystemName, Description FROM Win32_LogicalDisk
WHERE DeviceID = 'C:'
The output of this type of query would look like this in a table:
Description, Local Fixed Disk
DeviceID, C:
FreeSpace, 32110985216
Size, 60003381248
SystemName, BKNIGHT
The following example of a WQL query selects information written to the Application event log after a certain date about the SQL Server and SSIS services (code file Ch03SQL.txt):
SELECT * FROM Win32_NTLogEvent WHERE LogFile = 'Application' AND
(SourceName='SQLISService' OR SourceName='SQLISPackage') AND TimeGenerated>
'20050117'
The results would look like this:
0
BKNIGHT
12289
1073819649
3
System.String[]
Application
3738
SQLISPackage
20050430174924.000000-240
20050430174924.000000-240
Information
BKNIGHT\Brian Knight
0
Typically, the WMI Data Reader Task is used in SQL Server administration packages to gather operational-type data from the SQL Server environments. However, the WMI Event Watcher Task has some interesting uses for ETL processes that you’ll look at next.
WMI Event Watcher Task
The WMI Event Watcher Task empowers SSIS to wait for and respond to certain WMI events that occur in the operating system. The task operates in much the same way as the WMI Data Reader Task operates. The following are some of the useful things you can do with this task:
· Watch a directory for a certain file to be written.
· Wait for a given service to start.
· Wait for the memory of a server to reach a certain level before executing the rest of the package or before transferring files to the server.
· Watch for the CPU to be free.
To illustrate the last example of polling to determine when the CPU is less than 50 percent utilized, you could have the WMI Event Watcher Task look for an event with this WQL code:
SELECT * from __InstanceModificationEvent WITHIN 2 WHERE TargetInstance ISA
'Win32_Processor' and TargetInstance.LoadPercentage < 50
The next section looks at a direct application of this WMI Event Watcher Task to give you a better idea of how to configure it and what it can do.
Polling a Directory for the Delivery of a File
One very practical use of the WMI Event Watcher for ETL processing is to provide a buffer between the time when an SSIS job starts and the time when a file is actually delivered to a folder location. If there is a window of variability in file delivery and an SSIS package starts on a onetime schedule, then it is possible to miss processing the file for the day. By using a WMI Event Watcher, you can set up your SSIS packages to poll a folder location for a set period of time until a file is detected. If you have this type of challenge, a better solution may be a ForEach Loop Container scheduled to run periodically, but you’ll learn more about that in Chapter 6. To set up a task to perform this automated action, open the WMI Options tab of the WMI Event Watcher Task Editor (see Figure 3-36). Notice that this WMI Task is completely different from the WMI Data Reader Task.
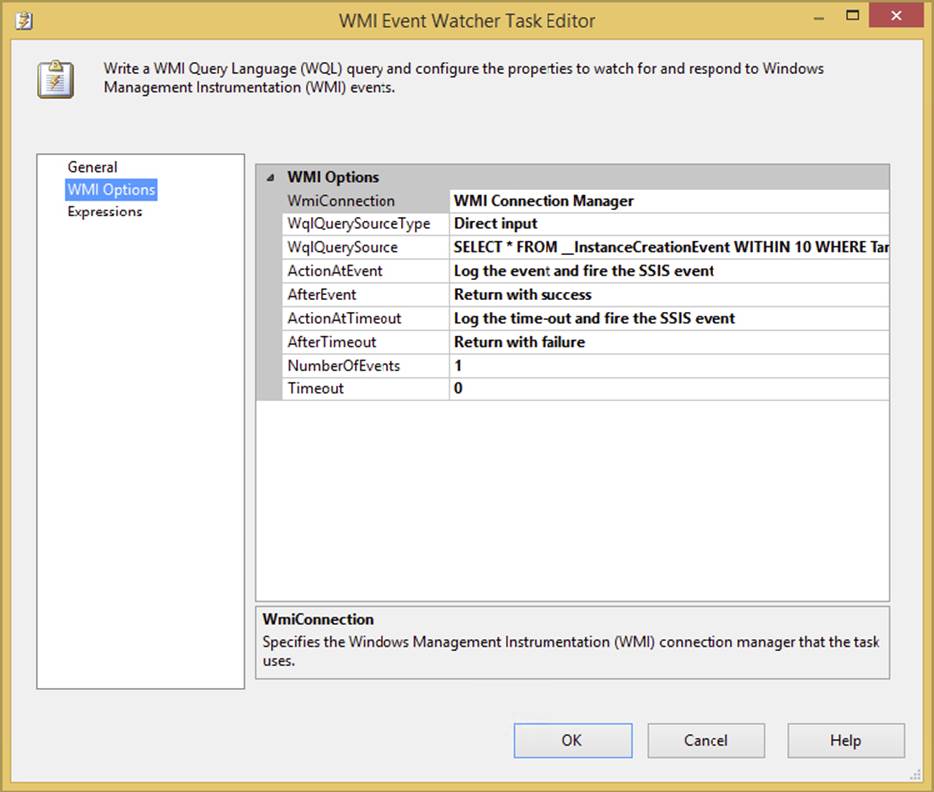
FIGURE 3-36
This WMI Event Watcher Task provides properties such as the AfterEvent option, which specifies whether the task should succeed, fail, or keep querying if the condition is met. You also need to provide a length of time after which the WMI Event Watcher stops watching by setting the Timeout property. The timeout value is in seconds. The default of zero (0) indicates that there is no timeout. Outside of your development activities, be very careful with leaving this setting on zero (0). The WMI Event Watcher could leave your SSIS package running indefinitely.
You can also configure what happens when a timeout occurs under the ActionAtTimeout and AfterTimeout settings. The NumberOfEvents option configures the number of events to watch for. You can use this setting to look for more than one file before you start processing.
The WqlQuerySource for the File Watcher Configuration for this WMI Task would look like this code:
SELECT * FROM __InstanceCreationEvent WITHIN 10
WHERE TargetInstance ISA "CIM_DirectoryContainsFile"
AND TargetInstance.GroupComponent = "Win32_Directory.Name=\"c:\\\\ProSSIS\""
If you run this task with no files in the C:\ProSSIS\ directory, the task will remain yellow as the watcher continuously waits for an event to be raised. If you copy a file into the directory, the task will turn green and complete successfully. This is a great addition that is less resource-intensive than the legacy DTS version of iterating in a For loop until the file is found. As you can see, there are some major improvements in the capabilities to control workflow in SSIS.
SMO ADMINISTRATION TASKS
The last section of this chapter is reserved for a set of tasks that are convenient for copying or moving schema and data-level information. The SQL Management Objects (SMO) model allows developers to interact with DBA functions programmatically. These rarely used tasks are used by DBAs to synchronize systems. Because they aren’t used as often, they’re covered only at a high level. These tasks can do the following:
· Move or copy entire databases. This can be accomplished by detaching the database and moving the files (faster) or by moving the schema and content (slower).
· Transfer error messages from one server to another.
· Move or copy selected or entire SQL Agent jobs.
· Move or copy server-level or database-level logins.
· Move or copy objects such as tables, views, stored procedures, functions, defaults, user-defined data types, partition functions, partition schemas, schemas (or roles), SQL assemblies, user-defined aggregates, user-defined types, and XML schemas. These objects can be copied over by selecting all, by individually selecting each desired object type, or even by selecting individual objects themselves.
· Move or copy master stored procedures between two servers.
Transfer Database Task
The Transfer Database Task has, as you would expect, a source and destination connection and a database property. The other properties address how the transfer should take place. Figure 3-37 is an example of the Transfer Database Task filled out to copy a development database on the same server as a QA instance.

FIGURE 3-37
Notice that the destination and source are set to the same server. For this copy to work, the DestinationDatabaseFiles property has to be set to new mdf and ldf filenames. The property is set by default to the SourceDatabaseFiles property. To set the new destination database filenames, click the ellipsis, and then change the Destination File or Destination Folder properties.
You can set the Method property to DatabaseOnline or DatabaseOffline. If the option is set to DatabaseOffline, the database is detached copied over and then reattached to both systems. This is a much faster process than with DatabaseOnline, but it comes at a cost of making the database inaccessible.
The Action property controls whether the task should copy or move the source database. The Method property controls whether the database should be copied while the source database is kept online, using SQL Server Management Objects (SMO), or by detaching the database, moving the files, and then reattaching the database. The DestinationOverwrite property controls whether the creation of the destination database should be allowed to overwrite. This includes deleting the database in the destination if it is found. This is useful in cases where you want to copy a database from production into a quality-control or production test environment, and the new database should replace any existing similar database. The last property is the ReattachSourceDatabase, which specifies what action should be taken upon failure of the copy. Use this property if you have a package running on a schedule that takes a production database offline to copy it, and you need to guarantee that the database goes back online even if the copy fails.
What’s really great about the Transfer Database Task is that the logins, roles, object permissions, and even the data can be transferred as well. This task may in some instances be too big of a hammer. You may find it more advantageous to just transfer specific sets of objects from one database to another. The next five tasks give you that capability.
Transfer Error Messages Task
If you are using custom error messages in the sys.messages table, you need to remember to copy these over when you move a database from one server to another. In the past, you needed to code a cursor-based script to fire the sp_addmessage system stored procedure to move these messages around — and you needed to remember to do it. Now you can create a package that moves your database with the Transfer Database Task and add this Transfer Error Messages Task to move the messages as well.
One thing you’ll find in this task that you’ll see in the rest of the SMO administration tasks is the opportunity to select the specific things that you want to transfer. The properties ErrorMessagesList and ErrorMessageLanguagesList in the Messages tab are examples of this selective-type UI. If you click the ellipsis, you’ll get a dialog in which you can select specific messages to transfer.
Generally, unless you are performing a one-off update, you should set the TransferAllErrorMessages property to true, and then set the IfObjectExists property to skip messages that already exist in the destination database.
Transfer Logins Task
The Transfer Logins Task (shown in Figure 3-38) focuses only on the security aspects of your databases. With this task you can transfer the logins from one database and have them corrected at the destination.
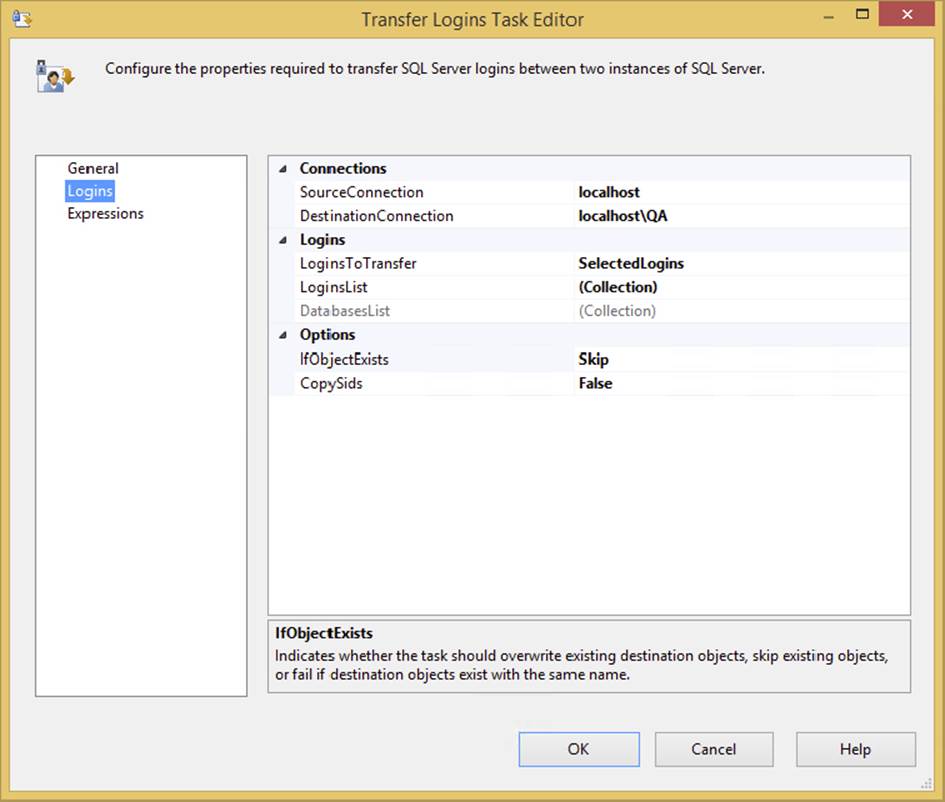
FIGURE 3-38
Of course, you’ll have your obligatory source and destination connection properties in this editor. You also have the option to move logins from all databases or selected databases, or you can select individual logins to transfer. Make this choice in the LoginsToTransfer property; the default is SelectedLogins. The partner properties to LoginsToTransfer are LoginsList and DatabasesList. One will be activated based on your choice of logins to transfer.
Two last properties to cover relate to what you want the transfer logins process to do if it encounters an existing login in the destination. If you want the login to be replaced, set the IfObjectExists property to Overwrite. Other options are to fail the task or to skip that login. The long-awaited option to resolve unmatched user security IDs is found in the property CopySids, and can be true or false.
Transfer Master Stored Procedures Task
This task is used to transfer master stored procedures. If you need to transfer your own stored procedure, use the Transfer SQL Server Objects Task instead. To use this task, set the source and destination connections, and then set the property TransferAllStoredProcedures to true or false. If you set this property to false, you’ll be able to select individual master stored procedures to transfer. The remaining property, IfObjectExists, enables you to select what action should take place if a transferring object exists in the destination. The options are to Overwrite, FailTask, or Skip.
Transfer Jobs Task
The Transfer Jobs Task (shown in Figure 3-39) aids you in transferring any of the existing SQL Server Agent jobs between SQL Server instances. Just like the other SMO tasks, you can either select to transfer all jobs to synchronize two instances or use the task to selectively pick which jobs you want to move to another instance. You can also select in the IfObjectExists property how the task should react if the job is already there. One important option is the EnableJobsAtDestination property, which turns the jobs after they’ve been transferred. This default property is false by default, meaning the jobs transfer but will not be functioning until enabled.
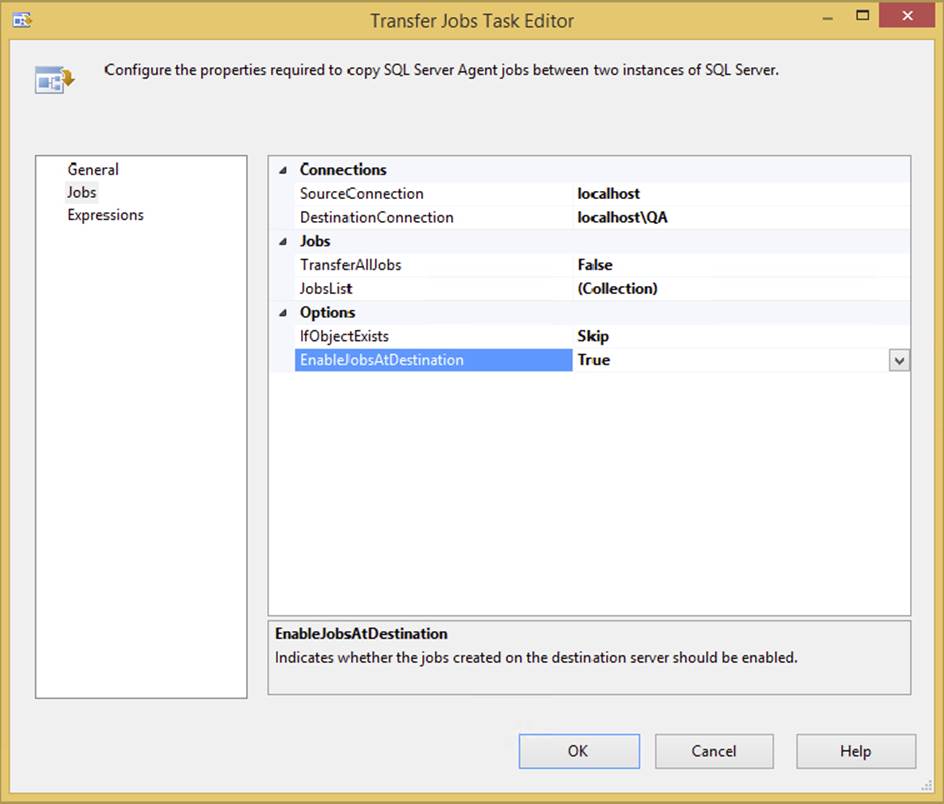
FIGURE 3-39
Transfer SQL Server Objects Task
The Transfer SQL Server Objects Task is the most flexible of the Transfer tasks. This task is capable of transferring all types of database objects. To use this task, set the properties to connect to a source and destination database; if the properties aren’t visible, expand the Connection category. Some may be hidden until categories are expanded.
This task exists for those instances when selective object copying is needed, which is why this is not called the Transfer Database Task. You specifically have to set the property CopyData to true to get the bulk transfers of data. The property CopyAllObjects means that only the tables, views, stored procedures, defaults, rules, and UDFs will be transferred. If you want the table indexes, triggers, primary keys, foreign keys, full-text indexes, or extended properties, you have to select these individually. By expanding the ObjectsToCopy category, you expose properties that allow individual selection of tables, views, and other programmable objects. The security options give you some of the same capabilities as the Transfer Database Task. You can transfer database users, roles, logins, and object-level permissions by selecting true for these properties.
The power of this task lies in its flexibility, as it can be customized and used in packages to move only specific items, for example, during the promotion of objects from one environment to another, or to be less discriminate and copy all tables, views, and other database objects, with or without the data.
SUMMARY
This chapter attempted to stick with the everyday nuts-and-bolts uses of the SSIS tasks. Throughout the chapter, you looked at each task, learned how to configure it, and looked at an example of the task in action. In fact, you saw a number of examples that demonstrated how to use these tasks in real-world ETL and EAI applications. In Chapter 6, you’ll circle back to look at the Control Flow again to explore containers, which enable you to loop through tasks. In the next chapter, you’ll cover the Data Flow Task and dive deeper into configuring Data Flow, and learn about all the transformations that are available in this task.
All materials on the site are licensed Creative Commons Attribution-Sharealike 3.0 Unported CC BY-SA 3.0 & GNU Free Documentation License (GFDL)
If you are the copyright holder of any material contained on our site and intend to remove it, please contact our site administrator for approval.
© 2016-2026 All site design rights belong to S.Y.A.