Professional Microsoft SQL Server 2014 Integration Services (Wrox Programmer to Programmer), 1st Edition (2014)
Chapter 9. Scripting in SSIS
WHAT’S IN THIS CHAPTER?
· Selecting your scripting language and getting started
· Adding assemblies to SSIS Script objects
· Understanding Script Task usage
· Understanding Script Component usage
· Using external SSIS objects from within a script
· Using events and logging in debugging scripts
WROX.COM DOWNLOADS FOR THIS CHAPTER
You can find the wrox.com code downloads for this chapter at www.wrox.com/go/prossis2014 on the Download Code tab.
Scripting is the Swiss Army knife of SSIS. As shown in previous chapters, many different SSIS features are available out-of-the-box. If you need to do something that you just can’t find anywhere else, you will find additional functionality in three features: the Script Task, the Script Component, and expressions. Expressions, covered in Chapter 5, are small scripts that set properties. The other two scripting concepts provide access into a scripting development environment using Microsoft Visual Studio Tools for Applications (VSTA) that enables SSIS developers to script logic into packages using Microsoft Visual Basic 2012 or Microsoft Visual C# 2012 .NET code.
In this chapter, you will learn the differences between these script components and when you should use one over the other. You’ll also learn all about the various scripting options available and how to use them in your package development tasks to control execution flow, perform custom transformations, manage variables, and provide runtime feedback.
INTRODUCING SSIS SCRIPTING
If you think of scripting as something that compiles at runtime and contains unstructured or unmanaged coding languages, then scripting in SSIS does not conform to your idea of scripting. Conversely, if you think of scripting as using small bits of code in specialized places to execute specific tasks, then SSIS scripting won’t be an alien concept. It is helpful to understand why scripting is separated according to functional usage. In this chapter, you will examine the differences and look into the scripting IDE environment, walking through the mechanics of applying programmatic logic into these components — including how to add your own classes and compiled assemblies.
ETL developers have had creative ways of handling logic in their packages. Specifically, digging into what developers were doing, the functional activities can be divided into the following categories:
· Retrieving or setting the value of package variables
· Retrieving or setting properties within the package
· Applying business logic to validate or format data
· Controlling workflow in a package
Retrieving and setting the value of variables and package properties is so prevalent an activity that the SSIS team creates a completely separate feature that enabled this to be less of a programmatic task. Using the Expression Builder, you can easily alter package components by setting component properties to an expression or a variable that represents an expression.
NOTE Refer to Chapter 5 for detailed information about how to use expressions, parameters, and variables.
To modify properties that connect to, manipulate, or define data, you can use the Data Flow Task to visually represent this activity. However, to achieve functionality not provided out of the box, you still need scripting, so the Script Component was added. The primary role of the Script Component is to extend the Data Flow capabilities and allow programmatic data manipulation within the context of the Data Flow. However, it can do more, as you’ll learn later in this chapter.
To continue to enable the numerous miscellaneous tasks that are needed in ETL development, use the Script Task, which can be used only in the Control Flow design surface. In this task, you can perform various manipulations within the managed code framework of .NET.
The Script Task and Script Component use the Visual Studio Tools for Applications (VSTA) environment. VSTA is essentially a scaled-down version of Visual Studio that can be added to an application that allows coding extensions using managed code and .NET languages. Even though SSIS packages are built inside of Visual Studio, when you are in the context of a Script Task or Script Component, you are actually coding in the VSTA environment that is, in fact, a mini-project within the package. The VSTA IDE provides IntelliSense, full edit-and-continue capabilities, and the ability to code in either Visual Basic or C#. You can even access some of the .NET assemblies and use web references for advanced scripting.
NOTE To gain the most from this scripting chapter, you need a basic understanding of programming in either C# or Visual Basic. If you don’t already have it, you can obtain this knowledge from either Beginning Visual C# 2012 Programming by Karli Watson and colleagues (Wrox; ISBN: 978-1-118-31441-8) or Beginning Visual Basic 2012 by Bryan Newsome (Wrox; ISBN: 978-1-118-31181-3).
GETTING STARTED IN SSIS SCRIPTING
The Script Task and Script Component have greatly increased your possibilities when it comes to script-based ETL development in SSIS. However, it is important to know when to use which component and what things can be done in each.
The following matrix explains when to use each component:
|
COMPONENT |
WHEN TO USE |
|
Script Task |
This task is used in the Control Flow. Use this task when you need to program logic that either controls package execution or performs a task of retrieving or setting variables within a package during runtime. |
|
Script Component |
This component is used in the Data Flow. Use this component when moving data using the Data Flow Task. Here you can apply programmatic logic to massage, create, or consume data in the pipeline. |
To get a good look at the scripting model, the next example walks through a simple “Hello World” coding project in SSIS. Although this is not a typical example of ETL programming, it serves as a good introduction to the scripting paradigm in SSIS, followed by the specific applications of the Script Task and Script Component.
Selecting the Scripting Language
SSIS allows the developer to choose between two different scripting languages: C# or Visual Basic (VB). To see where you can make this choice, drop a Script Task onto the Control Flow design surface. Right-click the Script Task and click Edit from the context menu. The first thing you’ll notice is the availability of two scripting languages: Microsoft Visual C# 2012 and Microsoft Visual Basic 2012 in the ScriptLanguage property of the task. Figure 9-1 shows these options in the Script Task Editor.
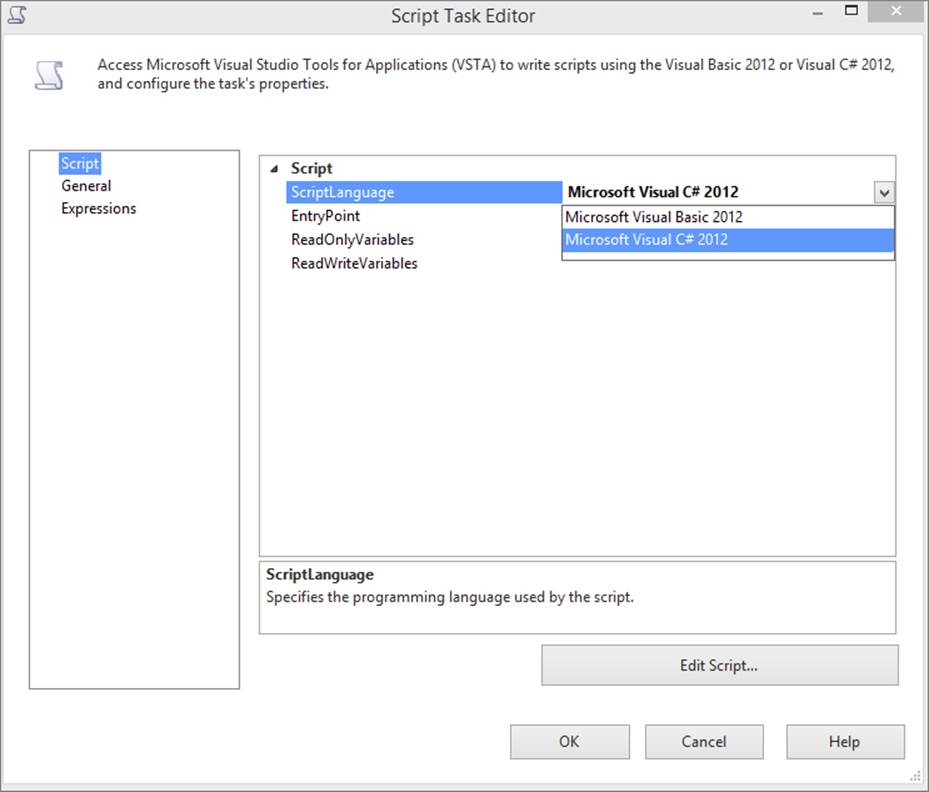
FIGURE 9-1
After clicking the Edit Script button, you’ll be locked into the script language that you chose and you won’t be able to change it without deleting and recreating the Script Task or Script Component. This is because each Script item contains its own internal Visual Studio project in VB or C#. You can create separate Script items whereby each one uses a different language within a package. However, using Script items in both languages within the same package is not recommended, as it makes maintenance of the package more complex. Anyone maintaining the package would have to be competent in both languages.
Using the VSTA Scripting IDE
Clicking the Edit Script button on the editor allows you to add programmatic code to a Script Task or Script Component. Although the Script Task and Script Component editors look different, they both provide an Edit Script button to access the development IDE for scripting, as shown in Figure 9-2.
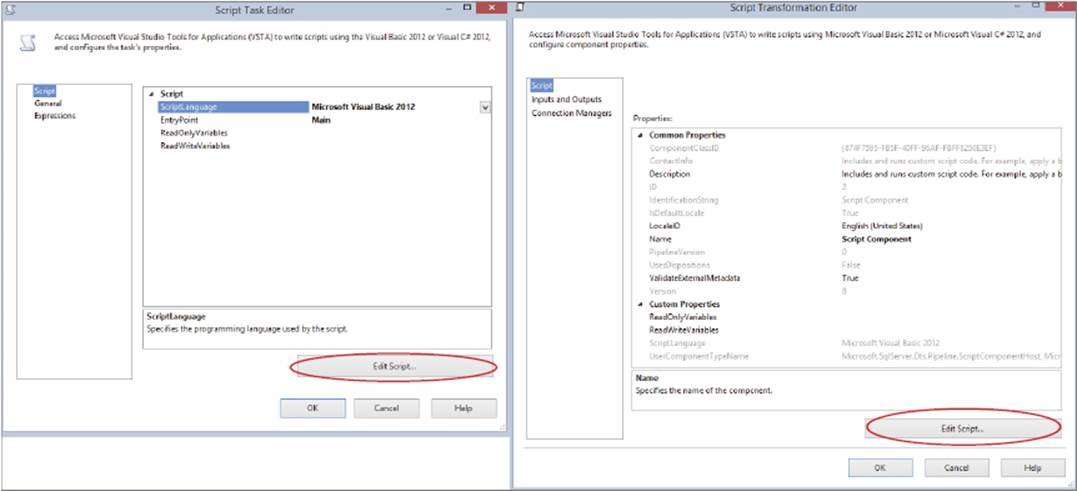
FIGURE 9-2
Once you are in the IDE, notice that it looks and feels just like Visual Studio. Figure 9-3 shows an example of how this IDE looks after opening the Script Task for the VB scripting language.
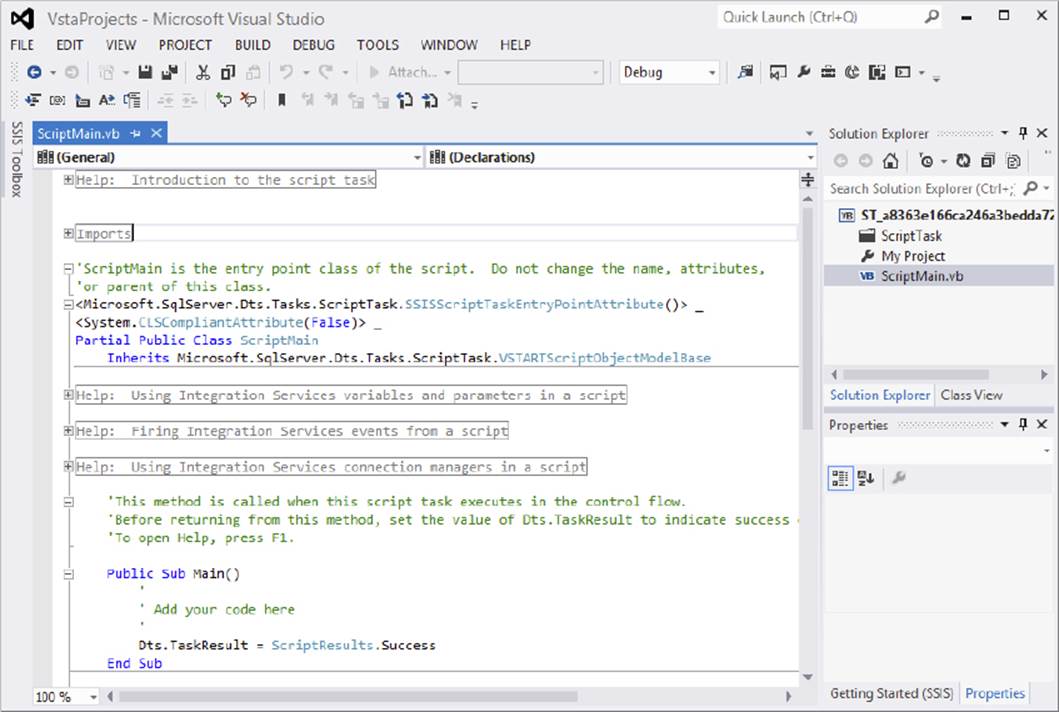
FIGURE 9-3
The code window on the left side of the IDE contains the code for the item selected in the Solution Explorer on the top-right window. The Solution Explorer shows the structure for the project that is being used within the Scripting Task. A complete .NET project is created for each Script Task or Component and is temporarily written to a project file on the local drive where it can be altered in the Visual Studio IDE. This persistence of the project is the reason why once you pick a scripting language, and generate code in the project, you are locked into that language for that Scripting item. Notice in Figure 9-3 that a project has been created with the namespace of ST_a8363e166ca246a3bedda7. However, you can’t open this project directly, nor need you worry about the project during deployment. These project files are extracted from stored package metadata. With the project created and opened, it is ready for coding.
Example: Hello World
In the IDE, the Script Task contains only a class named ScriptMain. In the entry-point function, Main(), you’ll put the code that you want executed. Part of that code can make calls to additional functions or classes. However, if you want to change the name of the entry-point function for some reason, type the new name in the property called EntryPoint on the Script page of the editor. (Alternatively, you could change the name of the entry point at runtime using an expression.)
In the VSTA co-generated class ScriptMain, you’ll also see a set of assembly references already added to your project, and namespaces set up in the class. Depending upon whether you chose VB or C# as your scripting language, you’ll see either:
C#
using System;
using System.Data;
using Microsoft.SqlServer.Dts.Runtime;
using System.Windows.Forms;
or
VB
Imports System
Imports System.Data
Imports System.Math
Imports Microsoft.SqlServer.Dts.Runtime
These assemblies are needed to provide base functionality as a jump-start to your coding. The remainder of the class includes VSTA co-generated methods for startup and shutdown operations, and finally the entry-point Main() function, shown here in both languages:
C#
public void Main()
{
// TODO: Add your code here
Dts.TaskResult = (int)ScriptResults.Success;
}
VB
Public Sub Main()
'
' Add your code here
'
Dts.TaskResult = ScriptResults.Success
End Sub
Note that the Script Task must return a result to notify the runtime of whether the script completed successfully or not. The result is passed using the Dts.TaskResult property. By your setting the result to ScriptResults.Success, the script informs the package that the task completed successfully.
NOTE The Script Component does not have to do this, since it runs in the context of a Data Flow with many rows. Other differences pertaining to each component are discussed separately later in the chapter.
To get a message box to pop up with the phrase “Hello World!” you need access to a class called MessageBox in a namespace called System.Windows.Forms. This namespace can be called directly by its complete name, or it can be added after theMicrosoft.SqlServer.Dts.Runtime namespace to shorten the coding required in the class. Both of these methods are shown in the following code (ProSSIS\Code\Ch09_ProSSIS\02HelloWorld.dtsx) to insert the MessageBox code into the Main() function:
C#
using System.Windows.Forms;
...
MessageBox.Show("Hello World!");
Or
System.Windows.Forms.MessageBox.Show("Hello World!");
VB
Imports System.Windows.Forms
...
MessageBox.Show("Hello World!")
Or
System.Windows.Forms.MessageBox.Show("Hello World!")
Get in the habit now of building the project after adding this code. The Build option is directly on the menu when you are coding. Previous versions of SSIS gave you the opportunity to run in precompile or compiled modes. SSIS now will automatically compile your code prior to executing the package at runtime. Compiling gives you an opportunity to find any errors before the package finds them. Once the build is successful, close the IDE and the editor, and right-click and execute the Script Task. A pop-up message box should appear with the words “Hello World!” (see Figure 9-4).
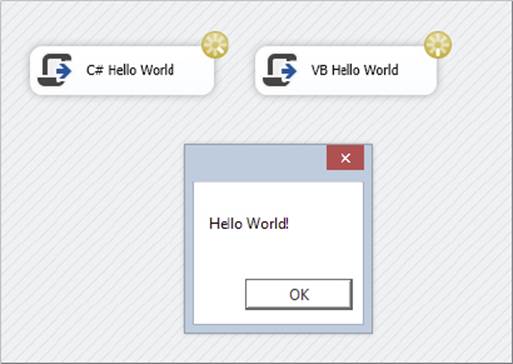
FIGURE 9-4
Adding Code and Classes
Using modal message boxes is obviously not the type of typical coding desired in production SSIS package development. Message boxes are synchronous and block until a click event is received, so they can stop a production job dead in its tracks. However, this is a basic debugging technique to demonstrate the capabilities in the scripting environments before getting into some of the details of passing values in and out using variables. You also don’t want to always put the main blocks of code in the Main() function. With just a little more work, you can get some code reuse from previously written code using some cut-and-paste development techniques. At the very least, code can be structured in a less procedural way. As an example, consider the common task of generating a unique filename for a file you want to archive.
Typically, the filename might be generated by appending a prefix and an extension to a variable like a guid. These functions can be added within the ScriptMain class bodies to look like this (ProSSIS\Code\Ch09_ProSSIS\03BasicScript.dtsx):
C#
Public partial class ScriptMain
{
...
public void Main()
{
System.Windows.Forms.MessageBox.Show(GetFileName("bankfile", "txt"));
Dts.TaskResult = (int)ScriptResults.Success;
}
public string GetFileName(string Prefix, string Extension)
{
return Prefix + "-" + Guid.NewGuid().ToString() + "." + Extension;
}
}
VB
Partial Class ScriptMain
...
Public Sub Main()
System.Windows.Forms.MessageBox.Show(GetFileName("bankfile", "txt"))
Dts.TaskResult = ScriptResults.Success
End Sub
Public Function GetFileName(ByVal Prefix As String, _
ByVal Extension As String) As String
GetFileName = Prefix + "-" + Guid.NewGuid.ToString + _
"." + Extension
End Function
End Class
Instead of all the code residing in the Main() function, structured programming techniques can separate and organize SSIS scripting. In this example, the GetFileName function builds the filename and then returns the value, which is shown in a message box, as shown in Figure 9-5.
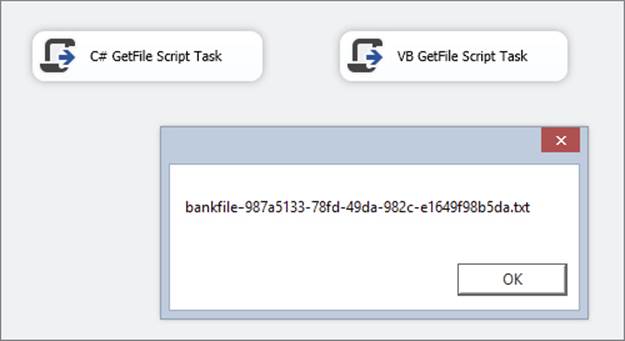
FIGURE 9-5
Of course, copying and pasting the same code into multiple Script Tasks is pretty inefficient and produces solutions that are difficult to maintain. If you have preexisting compiled code, shouldn’t you be able to reuse this code without finding the original source for the copy-and-paste operation? What a great question! You can, with some caveats.
Using Managed Assemblies
Reusing code, no matter what language it was written in, increases the maintainability and supportability of an application. While you can only write SSIS scripts using Visual Basic and C#, SSIS provides the capability to reuse code by reusing assemblies that are part of the .NET Framework or any assembly created using a .NET-compliant language, including C#, J#, and even Delphi, but there are some important qualifications:
· For a managed assembly to be used in an Integration Service, you must install the assembly in the global assembly cache (GAC).
· All dependent or referenced assemblies must also be registered in the GAC. This implies that the assemblies must be strongly named.
· For development purposes only, VSTA can use managed assemblies anywhere on the local machine.
If you think about this it makes sense, but within SSIS, it might seem confusing at first. On the one hand, a subproject is created for the Script Task, but it is deployed as part of the metadata of the package; there is no separate physical DLL file for the assembly. In this case, you don’t have to worry about deployment of individual script projects. However, when you use an external assembly, it is not part of the package metadata, and here you do have to worry about deployment of the assembly. Where then do you deploy the assembly you want to use? Because SSIS packages are typically deployed within SQL Server, the most universal place to find the assembly would be in the GAC.
If you are using any of the standard .NET assemblies, they are already loaded and stored in the GAC and the .NET Framework folders. As long as you are using the same framework for your development and production locations, using standard .NET assemblies requires no additional work in your environment. To use a standard .NET assembly in your script, you must reference it. To add a reference in a scripting project, open the VSTA environment for editing your script code — not the SSIS package itself. Right-click the project name in the Solution Explorer or go to the Project menu and select the Add Reference option. The new Reference Manager dialog will appear, as in Figure 9-6.

FIGURE 9-6
Select the assemblies from the list that you wish to reference and click the OK button to add the references to your project. Now you can use any objects located in the referenced assemblies either by directly referencing the full assembly or by adding the namespaces to your ScriptMain classes for shorter references, similar to the Windows Forms assembly used in the Hello World example. References can be removed from the project References screen. Find this screen by double-clicking the My Project node of the Solution Explorer. Select the References menu to see all references included in your project. To remove a reference, select the name and click the Delete key.
Example: Using Custom .NET Assemblies
Although using standard .NET assemblies is interesting, being able to use your own compiled .NET assemblies really extends the capabilities of your SSIS development. Using code already developed and compiled means not having to copy-and-paste code into each Script Task, enabling you to reuse code already developed and tested. To examine how this works, in this section you’ll create an external custom .NET library that can validate a postal code and learn how to integrate this simple validator into a Script Task. (To do this, you need the standard class library project templates that are part of Visual Studio. If you installed only SQL Server Data Tools, these templates are not installed by default.) You can also download the precompiled versions of these classes, as well as any code from this chapter, at www.wrox.com/go/prossis2014.
To start, open a standard class library project in the language of your choice, and create a standard utility class in the project that looks something like this (proSSIS\Code\Ch09_ProSSIS\SSISUtilityLib_VB\SSISUtilityLib_VB\DataUtilities.vb):
C#
using System.Text.RegularExpressions;
namespace SSISUtilityLib_CSharp
{
public static class DataUtilities
{
public static bool isValidUSPostalCode(string PostalCode)
{
return Regex.IsMatch(PostalCode, "^[0-9]{5}(-[0-9]{4})?$");
}
}
}
VB
Imports System.Text.RegularExpressions
Public Class DataUtilities
Public Shared Function isValidUSPostalCode
(ByVal PostalCode As String) As Boolean
isValidUSPostalCode = Regex.IsMatch(PostalCode, "^[0-9]{5}(-[0-9]{4})?$")
End Function
End Class
Because you are creating projects for both languages, the projects (and assemblies) are named SSISUtilityLib_VB and SSISUtilityLib_Csharp. Notice the use of static or shared methods. This isn’t required, but it’s useful because you are simulating the development of what could later be a utility library loaded with many stateless data validation functions. A static or shared method allows the utility functions to be called without instantiating the class for each evaluation.
Now sign the assembly by right-clicking the project to access the Properties menu option. In the Signing tab, note the option to “Sign the assembly,” as shown in Figure 9-7. Click New on the dropdown and name the assembly to have a strong name key added to it.
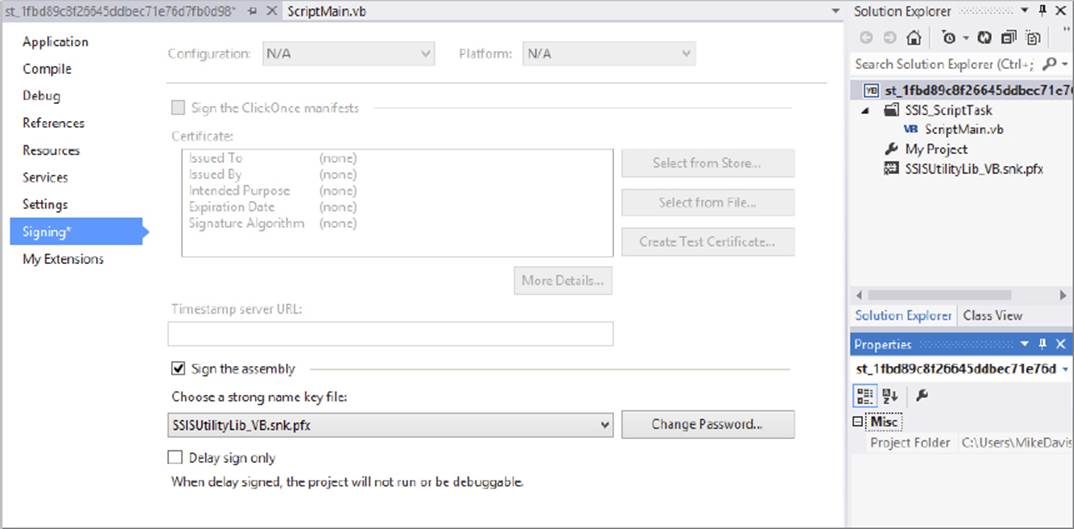
FIGURE 9-7
In this example, the VB version of the SSISUtilityLib project is being signed. Now you can compile the assembly by clicking the Build option in the Visual Studio menu. The in-process DLL will be built with a strong name, enabling it to be registered in the GAC.
On the target development machine, open a command-line prompt window to register your assembly with a command similar to this:
C:\Program Files (x86)\Microsoft SDKs\Windows\v7.0A\bin\NETFX 4.0 Tools>
Gacutil /i C:\ProSSIS\Code\SSISUtilityLib_CSharp\SSISUtilityLib_CSharp\
bin\Release\SSISUtilityLib_CSharp.dll
NOTE Note that you may have to run the command line as administrator or have the User Access Control feature turned off to register the assembly.
If you are running on a development machine, you also need to copy the assembly into the appropriate .NET Framework directory so that you can use the assembly in the Visual Studio IDE. Using the Microsoft .NET Framework Configuration tool, select Manage the Assembly Cache. Then select Add an Assembly to the Assembly Cache to copy an assembly file into the global cache.
NOTE For a detailed step-by-step guide to the deployment, see the SSIS Developer’s Guide on Custom Objects located at http://msdn.microsoft.com/en-us/library/ms403356(v=SQL.110).aspx.
To use the compiled assembly in an SSIS package, open a new SSIS package and add a new Script Task to the Control Flow surface. Select the scripting language you wish and click Edit Script. You’ll need to right-click the Solution Explorer node for references and find the reference for SSISUtilityLib_VB.dll or SSISUtilityLib_CSharp.dll depending on which one you built. If you have registered the assembly in the GAC, you can find it in the .NET tab. If you are in a development environment, you can simply browse to the .dll to select it.
Add the namespace into the ScriptMain class. Then add these namespaces to the ScriptMain class:
C#
using SSISUtilityLib_CSharp;
VB
Imports SSISUtilityLib_VB
Note that the SSIS C# Script Task in the sample packages you’ll see if you download the chapter materials from www.wrox.com/go/prossis2014 use both the C# and the VB versions of the utility library. However, this is not required. The compiled .NET class libraries may be intermixed within the SSIS Script Task or Components regardless of the scripting language you choose.
Now you just need to code a call to the utility function in the Main() function like this (ProSSIS\Code\Ch09_ProSSIS\04SSISPackageUsingAssembly.dtsx):
C#
public void Main()
{
string postalCode = "12345-1111";
string msg = string.Format(
"Validating PostalCode {0}\nResult..{1}", postalCode,
DataUtilities.isValidUSPostalCode(postalCode));
MessageBox.Show(msg);
Dts.TaskResult = (int)ScriptResults.Success;
}
VB
Public Sub Main()
Dim postalCode As String = "12345-1111"
Dim msg As String = String.Format("Validating PostalCode {0}" + _
vbCrLf + "Result..{1}", postalCode, _
DataUtilities.isValidUSPostalCode(postalCode))
MessageBox.Show(msg)
Dts.TaskResult = ScriptResults.Success
End Sub
Compile the Script Task and execute it. The result should be a message box displaying a string to validate the postal code 12345-1111. The postal code format is validated by the DataUtility function IsValidUSPostalCode. There was no need to copy the function in the script project. The logic of validating the format of a U.S. postal code is stored in the shared DataUtility function and can easily be used in both Script Tasks and Components with minimal coding and maximum consistency. The only downside to this is that there is now an external dependency in the SSIS package upon this assembly. If the assembly changes version numbers, you’ll need to open and recompile all the script projects for each SSIS package using this. Otherwise, you could get an error if you aren’t following backward compatibility guidelines to ensure that existing interfaces are not broken. If you have a set of well-tested business functions that rarely change, using external assemblies may be a good idea for your SSIS development.
USING THE SCRIPT TASK
Now that you have a good overview of the scripting environment in SSIS, it’s time to dig into the Script Task and give it a spin. The Script Task was used heavily to demonstrate how the SSIS scripting environment works with Visual Studio and during the execution of a package. Generally, anything that you can script in the .NET managed environment that should run once per package or code loop belongs in the Script Task. The Script Task is used in the Control Flow of a package. Script Tasks are extremely useful and end up being the general-purpose utility component if the desired functionality is not available in the out-of-the-box Control Flow tasks.
Configuring the Script Task Editor
An earlier look at the Script Task Editor pointed out that two selections are available for the scripting language, but there are other options as well. Drop a Script Task on the Control Flow surface to display the Script Task Editor shown in Figure 9-8.
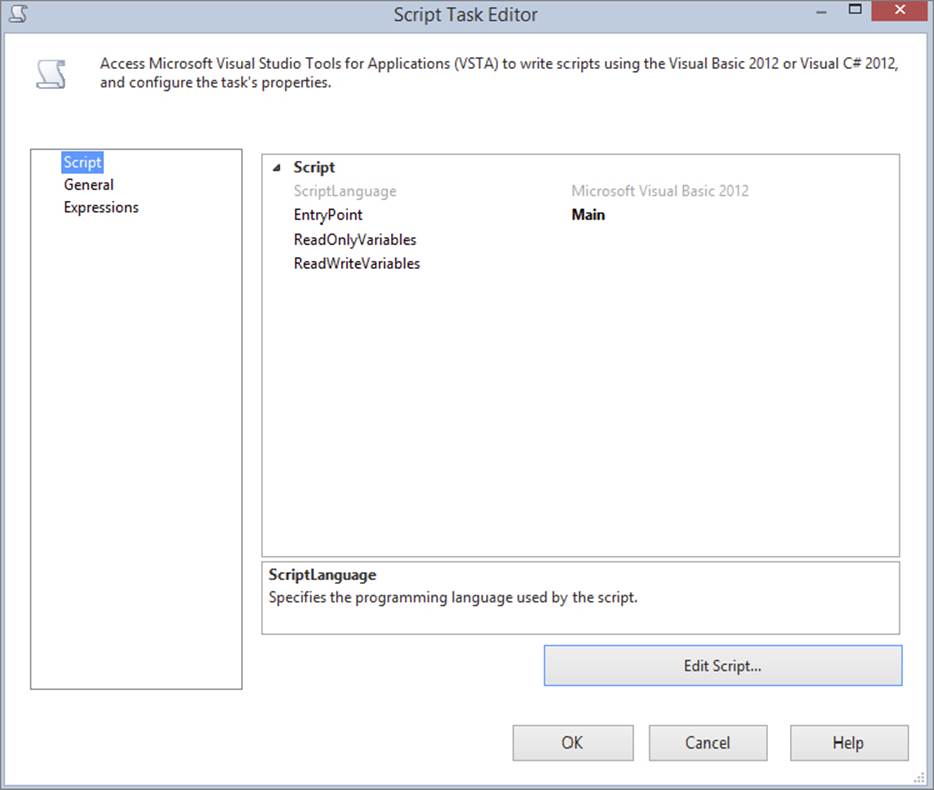
FIGURE 9-8
Here are the four properties on the Script tab to configure the Script Task:
· ScriptLanguage: This property defines the .NET language that will be used for the script. As demonstrated earlier, VB and C# are your two options.
· EntryPoint: This is the name of the method that will be called inside your script to begin execution.
· ReadOnlyVariables: This property enumerates a case-sensitive, comma-separated list of SSIS variables to which you allow explicit rights to be read by the Script Task.
· ReadWriteVariables: This property enumerates a case-sensitive, comma-separated list of SSIS variables to which you allow the script to read from and write to.
All scripts are precompiled by default, which improves performance and reduces the overhead of loading the language engine when running a package.
The second tab on the left, General, contains the task name and description properties.
The final page available on the left of this dialog is the Expressions tab. The Expressions tab provides access to the properties that can be set using an expression or expression-based variable. (See Chapter 5 for details about how to use expressions and variables.) Keep in mind that changing the ScriptLanguage property at runtime is neither possible nor desirable even though it is listed as a possibility in the Expression Editor.
Once the script language is set and the script accessed, a project file with a class named ScriptMain and a default entry point named Main() is created. As a reminder, an example of the Main() function is provided here (ProSSIS\Code\Ch09_ProSSIS\01EmptyPackage.dtsx), without the supporting class:
C#
public void Main()
{
Dts.TaskResult = (int)ScriptResults.Success;
}
VB
Public Sub Main()
Dts.TaskResult = ScriptResults.Success
End Try
The code provided includes the statement to set the TaskResult of the Dts object to the enumerated value for success. The Script Task itself is a task in the collection of tasks for the package. Setting the TaskResult property of the task sets the return value for the Script Task and tells the package whether the result was a success or a failure.
By now, you have probably noticed all the references to Dts. What is this object and what can you do with it? This question is answered in the next section, as you peel back the layers of the Dts object.
The Script Task Dts Object
The Dts object is actually a property on your package that is an instance of the Microsoft.SqlServer.Dts.Tasks.ScriptTask.ScriptObjectModel class. The Dts object provides a window into the package in which your script executes. Although you can’t change properties of the package as it executes, the Dts object has seven properties and one method that allow you to interact with the package. The following is an explanation of these members:
· Connections: A collection of Connection Managers defined in the package. You can use these connections in your script to retrieve any extra data you may need.
· Events: A collection of events that are defined for the package. You can use this interface to fire off these predefined events and any custom events.
· ExecutionValue: A read-write property that enables you to specify additional information about your task’s execution using a user-defined object. This can be any information you want.
· TaskResult: This property enables you to return the success or failure status of your Script Task to the package. This is the main way of communicating processing status or controlling flow in your package. This property must be set before exiting your script.
· Transaction: Obtains the transaction associated with the container in which your script is running.
· VariableDispenser: Gets the VariableDispenser object, which you can use to retrieve variables when using the Script Task.
· Variables: A collection of all the variables available to any script.
· Log: You can use this method to write to any log providers that have been enabled.
The next few sections describe some of the common things that the Script Task can be employed to accomplish.
Accessing Variables in the Script Task
Variables and expressions are an important feature of the SSIS road map. In the following scenario, “variables” describe objects that serve as intermediate communication mediums between your Script Task and the rest of your package. As discussed in Chapter 5, variables are used to drive the runtime changes within a package by allowing properties to infer their values at runtime from variables, which can be static or defined through the expression language.
The common method of using variables is to send them into a Script Task as decision-making elements or to drive downstream decisions by setting the value of the variable in the script based on some business rules. To use a variable in a script, the variable must be locked, accessed, and then unlocked. There are two ways of doing this: explicitly and implicitly.
The explicit method uses the VariableDispenser object, which provides methods for locking variables for read-only or read-write access and then retrieving them. At one time, this was the standard way of accessing variables in scripts. The explicit locking mechanism allows control in the Script Task to keep two processes from competing for accessing and changing a variable. This will also reduce the amount of time the variable is locked, but forces the developer to write code.
To retrieve a variable using the VariableDispenser object, you have to deal with the implementation details of locking semantics, and write code like the following (ProSSIS\Code\Ch09_ProSSIS\13VarsScriptTask.dtsx):
C#
Variables vars = null;
String myval = null;
Dts.VariableDispenser.LockForRead("User::SomeStringVariable");
Dts.VariableDispenser.GetVariables(ref vars);
myval = vars[0].Value.ToString;
vars.Unlock(); //Needed to unlock the variables
System.Windows.Forms.MessageBox.Show(myval);
VB
Dim vars As Variables
Dim myval As String
Dts.VariableDispenser.LockForRead("User::SomeStringVariable")
Dts.VariableDispenser.GetVariables(vars)
myval = vars(0).Value.ToString
vars.Unlock() 'Needed to unlock the variables
MsgBox(myval)
The implicit option of handling variables is the alternative to manually locking, using, and unlocking the variable. This option is best when you simply want the variables that you are using in a Script Task to be locked when you are reading and writing; you don’t want to worry about the locking implementation details. The Variables collection on the Dts object and the ReadOnlyVariables and ReadWriteVariables properties for the Script Task allow you to set up the implicit variable locking. The only constraint is that you have to define up front which variables going into the Script Task can be read but not written to versus both readable and writable.
The ReadOnlyVariables and ReadWriteVariables properties tell the Script Task which variables to lock and how. The Variables collection in the Dts object is then populated with these variables. This simplifies the code to retrieve a variable, and the complexities of locking are abstracted, so you have to worry about only one line of code to read a variable (ProSSIS\Code\Ch09_ProSSIS\13VarsScriptTask.dtsx):
C#
Dts.Variables["User::SomeStringVariable"].Value = "MyValue";
VB
Dts.Variables("User::SomeStringVariable").Value = "MyValue"
It is safest to use the fully qualified variable name, such as User::SomeStringVariable. Attempting to read a variable from the Variables collection that hasn’t been specified in one of the variable properties of the task will throw an exception. Likewise, attempting to write to a variable not included in the ReadWriteVariables property also throws an exception. The biggest frustration for new SSIS developers writing VB script is dealing with the following error message:
Error: 0xc0914054 at VB Script Task: Failed to lock variable "SomestringVariable"
for read access with error 0xc0910001 "The variable cannot be found. This occurs
when an attempt is made to retrieve a variable from the Variables collection on a
container during execution of the package, and the variable is not there. The
variable name may have changed or the variable is not being created."
The resolution is simple. Either the variable name listed in the Script Task Editor or the variable name in the script doesn’t match, so one must be changed to match the other. It is more confusing for the VB developers because this language is not case sensitive. However, the SSIS variables are case sensitive, even within the VB script.
NOTE Although Visual Basic .NET is not case sensitive, SSIS variables are.
Another issue that happens occasionally is that a developer can create more than one variable with the same name with different scopes. When this happens, you have to ensure that you explicitly refer to the variable by the fully qualified variable name. SSIS provides a Select Variables dialog, shown in Figure 9-9, that enables selection of the variables.
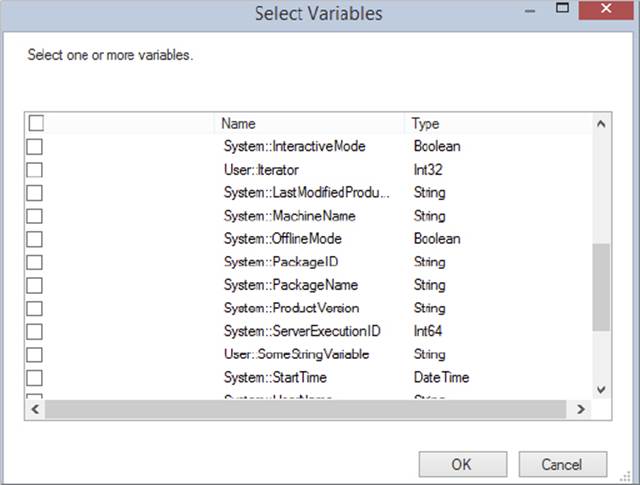
FIGURE 9-9
Fortunately, the Script Task property for the ReadOnlyVariables or ReadWriteVariables is auto-filled with the fully qualified names: User::DecisionIntVar and User::DecisionStrVar. This reduces most of the common issues that can occur when passing variables into the Script Task. All this information will now come in handy as you walk through an example using the Script Task and variables to control SSIS package flow.
Example: Using Script Task Variables to Control Package Flow
This example sets up a Script Task that uses two variables to determine which one of two branches of Control Flow logic should be taken when the package executes. First, create a new SSIS package and set up these three variables:
|
VARIABLE |
TYPE |
VALUE |
|
DecisionIntVar |
Int32 |
45 |
|
DecisionStrVar |
String |
txt |
|
HappyPathEnum |
Int32 |
0 |
Then drop three Script Tasks on the Control Flow design surface so that the package looks like Figure 9-10.
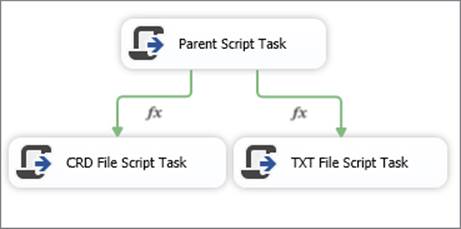
FIGURE 9-10
There are two variables, DecisionIntVar and DecisionStrVar, that represent the number of rows determined to be in a file and the file extension, respectively. These variables are fed into the Script Task. Assume that these values have been set by another process. Logic in the Script Task will determine whether the package should execute the CRD File Path Script Task or the TXT File Script Task. The control of the package is handled by the other external variable named HappyPathEnum. If the value of this variable is equal to 1, then the TXT File Script Task will be executed. If the value of the variable is equal to 2, then the CRD File Path Script Task will be executed. Open the Script Task Editor for the Parent Script Task to set up the properties (see Figure 9-11).
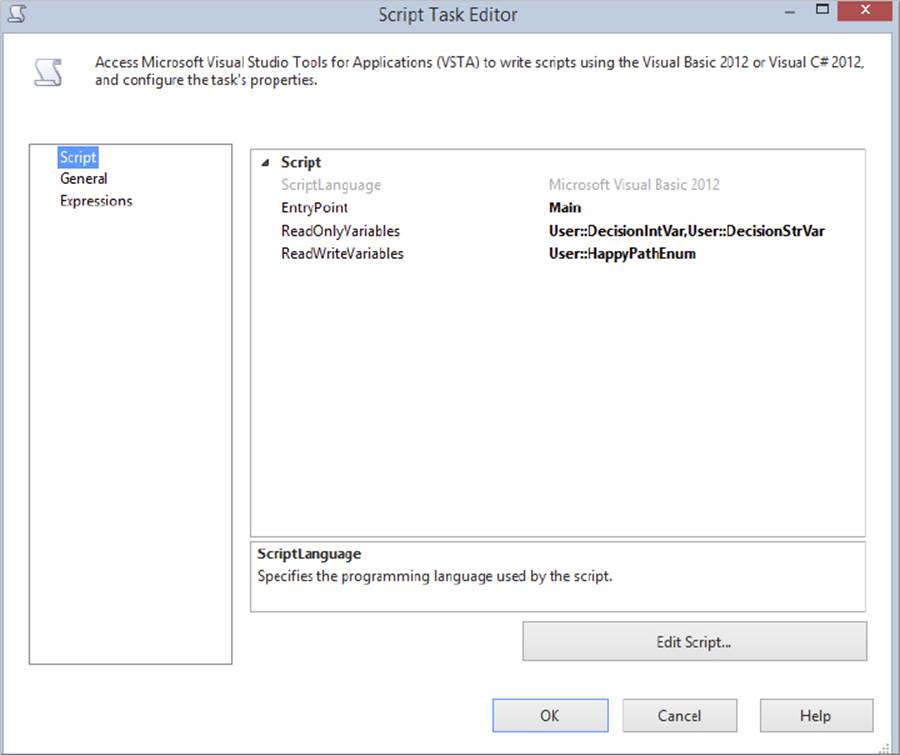
FIGURE 9-11
Set the Script Language and then use the ellipsis button to bring up the variable selection user interface (refer to Figure 9-9). Select the variables for ReadOnlyVariables and ReadWriteVariables separately if you are using this dialog. You can also type these variables in, but remember that the variable names are case sensitive. As shown in Figure 9-12, note the ordinal positions of the variables for this example.
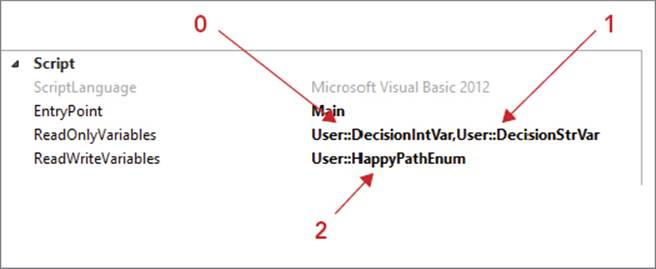
FIGURE 9-12
Keep this script simple for demonstration purposes. The most important parts are the retrieving and setting of the variables. This code uses the named references for the variables for the retrieval of the variable values:
C#
int rowCnt = (int)Dts.Variables["User::DecisionIntVar"].Value;
VB
Dim rowCnt As Integer = Dts.Variables("User::DecisionIntVar").Value
The setting of variables uses the same syntax but reverses the assignment. The code that should be pasted into the Main() function of the ScriptMain class will evaluate the two variables and set the HappyPathEnum variable(ProSSIS\Code\Ch09_ProSSIS\05STVarControlFlow.dtsx):
C#
//Retrieving the value of Variables
int rowCnt = (int)Dts.Variables["User::DecisionIntVar"].Value;
string fileExt = (string)Dts.Variables["User::DecisionStrVar"].Value;
if (fileExt.Equals("txt") && rowCnt > 0)
{
Dts.Variables["User::HappyPathEnum"].Value = 1;
}
else if (fileExt.Equals("crd") && rowCnt > 0)
{
Dts.Variables["User::HappyPathEnum"].Value = 2;
}
Dts.TaskResult = (int)ScriptResults.Success;
VB
'Retrieving the value of Variables
Dim rowCnt As Integer = Dts.Variables("User::DecisionIntVar").Value
Dim fileExt As String = Dts.Variables("User::DecisionStrVar").Value
If (fileExt.Equals("txt") And rowCnt > 0) Then
Dts.Variables("User::HappyPathEnum").Value = 1
ElseIf (fileExt.Equals("crd") And rowCnt > 0) Then
Dts.Variables("User::HappyPathEnum").Value = 2
End If
Dts.TaskResult = ScriptResults.Success
To alter the flow of the package, set the two precedence constraints in the package hierarchy to be based on a successful completion of the previous Script Task and an expression that tests the expected values of the HappyPathEnum variable. This precedence specifies that the Control Flow should go in a direction only if the value of an expression tests true. Set the precedence between each Script Task to one of these expressions going to the TXT and CRD tasks, respectively:
@HappyPathEnum == 1
Or
@HappyPathEnum == 2
A sample of the precedence between the Script Task and the TXT File Script Task should look like Figure 9-13.
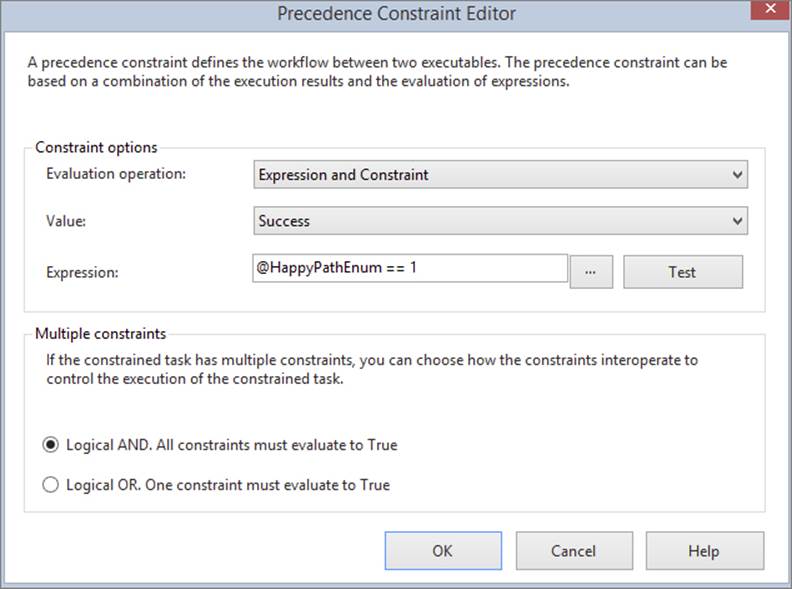
FIGURE 9-13
Now, to give the package something to do, simply retrieve the value of the set variable in each child Script Task to provide visual proof that the HappyPathEnum variable was properly set. Add this code into the Main() function of each child Script Task (make sure you set the message to display TXT or CRD for each associated Script Task) (ProSSIS\Code\Ch09_ProSSIS\05STVarControlFlow.dtsx):
C#
int ival = (int)Dts.Variables[0].
Value;
string msg = string.Format("TXT File
Found\nHappyPathEnum Value = {0}",
Dts.Variables[0].Value.ToString());
System.Windows.Forms.MessageBox.Show(msg);
Dts.TaskResult = (int)ScriptResults.Success;
VB
Dim ival As Integer = Dts.Variables(0).Value
Dim msg As String = _
String.Format("TXT File Found" + vbCrLf + "HappyPathEnum Value = {0}", _
Dts.Variables(0).Value.ToString())
System.Windows.Forms.MessageBox.Show(msg)
Dts.TaskResult = ScriptResults.Success
To see how this works, set the value of the User::DecisionIntVar variable to a positive integer number value, and the User::DecisionStrVar variable to either txt or crd, and watch the package switch from one Control Flow to the other. If you provide a value other thantxt or crd (even "txt" with quotes will cause this), the package will not run either leg, as designed. This is a simple example that you can refer back to as your packages get more complicated and you want to update variables within a Script Task. Later in this chapter, you’ll see how the Script Component accesses variables in a slightly different way.
Connecting to Data Sources in a Script Task
A common use of an ETL package is to grab a connection to retrieve decision-making data from various data sources, such as Excel files, INI files, flat files, or databases like Oracle or Access. This capability allows other data sources to configure the package or to retrieve data for objects that can’t use a direct connection object. In SSIS, with the Script Task you can make connections using any of the .NET libraries directly, or you can use connections that are defined in a package. Connections in SSIS are abstractions for connection strings that can be copied, passed around, and easily configured.
The Connections collection is a property of the Dts object in the Script Task. To retrieve a connection, you call the AcquireConnection method on a specific named (or ordinal position) connection in the collection. The only thing you really should know ahead of time is what type of connection you are going to be retrieving, because you need to cast the returned connection to the proper connection type. In .NET, connections are not generic. Examples of concrete connections are SqlConnection, OleDbConnection, OdbcConnection, and the OracleConnection managers that connect using SqlClient, OLE DB, ODBC, and even Oracle data access libraries, respectively. There are some things you can do to query the Connection Manager to determine what is in the connection string or whether it supports transactions, but you shouldn’t expect to use one connection in SSIS for everything, especially with the additional Connection Managers for FTP, HTTP, and WMI.
Assuming that you’re up to speed on the different types of connections covered earlier in this book, it’s time to look at how you can use them in everyday SSIS Script Tasks.
Example: Retrieving Data into Variables from a Database
Although SSIS provides configurable abilities to set package-level values, there are use cases that require you to retrieve actionable values from a database that can be used for package Control Flow or other functional purposes. While this example could be designed using other components, we’ll use this to show how to access variables from a script.
For example, some variable aspect of the application may change, like an e-mail address for events to use for notification. In this example, you’ll retrieve a log file path for a package at runtime using a connection within a Script Task. The database that contains the settings for the log file path stores this data using the package ID. You first need a table in the AdventureWorks database called SSIS_SETTING. Create the table with three fields, PACKAGE_ID, SETTING, and VALUE, or use this script(ProSSIS\Scripts\Ch09_ProSSIS\Ch09_Table_Create_Script.sql):
CREATE TABLE [dbo].[SSIS_SETTING](
[PACKAGE_ID] [uniqueidentifier] NOT NULL,
[SETTING] [nvarchar](2080) NOT NULL,
[VALUE] [nvarchar](2080) NOT NULL
) ON [PRIMARY]
GO
INSERT INTO SSIS_SETTING
SELECT '{INSERT YOUR PACKAGE ID HERE}', 'LOGFILEPATH', 'c:\myLogFile.txt'
You can find the package identifier in the properties of the package.
Then create an SSIS package with one ADO.NET Connection Manager to the AdventureWorks database called AdventureWorks and add a package-level variable named LOGFILEPATH of type String. Add a Script Task to the project and send in two variables: a read-only variable System::PackageID and a read-write variable User::LOGFILEPATH. Click the Edit Script button to open the Script project and add the namespace System.Data.SqlClient in the top of the class. Then add the following code to the Main() method(ProSSIS\Code\Ch09_ProSSIS\06aScriptDataIntoVariable.dtsx):
C#
public void Main()
{
string myPackageId = Dts.Variables["System::PackageID"].Value.ToString();
string myValue = string.Empty;
string cmdString = "SELECT VALUE FROM SSIS_SETTING " +
"WHERE PACKAGE_ID= @PACKAGEID And SETTING= @SETTINGID";
try
{
SqlConnection mySqlConn =
(SqlConnection)Dts.Connections[0].AcquireConnection(null);
mySqlConn = new SqlConnection(mySqlConn.ConnectionString);
mySqlConn.Open();
SqlCommand cmd = new SqlCommand();
cmd.CommandText = cmdString;
SqlParameter parm = new SqlParameter("@PACKAGEID", SqlDbType.UniqueIdentifier);
parm.Value = new Guid(myPackageId);
cmd.Parameters.Add(parm); parm = new SqlParameter("@SETTINGID",
SqlDbType.NVarChar);
parm.Value = "LOGFILEPATH";
cmd.Parameters.Add(parm);
cmd.Connection = mySqlConn;
cmd.CommandText = cmdString;
SqlDataReader reader = cmd.ExecuteReader();
while (reader.Read())
{
myValue = reader["value"].ToString();
}
Dts.Variables["User::LOGFILEPATH"].Value = myValue;
reader.Close();
mySqlConn.Close();
mySqlConn.Dispose();
}
catch
{
Dts.TaskResult = (int)ScriptResults.Failure;
throw;
}
System.Windows.Forms.MessageBox.Show(myValue);
Dts.TaskResult = (int)ScriptResults.Success;
}
VB
Public Sub Main()
Dim myPackageId As String = _ Dts.Variables("System::PackageID").Value.ToString()
Dim myValue As String = String.Empty
Dim cmdString As String = "SELECT VALUE FROM SSIS_SETTING " + _ "WHERE PACKAGE_ID=
@PACKAGEID And SETTING= @SETTINGID" Try
Dim mySqlConn As SqlClient.SqlConnection
mySqlConn = DirectCast(Dts.Connections(0).AcquireConnection(Nothing),
SqlClient.SqlConnection)
mySqlConn = New SqlClient.SqlConnection(mySqlConn.ConnectionString)
mySqlConn.Open()
Dim cmd = New SqlClient.SqlCommand()
cmd.CommandText = cmdString
Dim parm As New SqlClient.SqlParameter("@PACKAGEID", _ SqlDbType.UniqueIdentifier)
parm.Value = New Guid(myPackageId)
cmd.Parameters.Add(parm)
parm = New SqlClient.SqlParameter("@SETTINGID", SqlDbType.NVarChar) parm.Value =
"LOGFILEPATH"
cmd.Parameters.Add(parm)
cmd.Connection = mySqlConn
cmd.CommandText = cmdString
Dim reader As SqlClient.SqlDataReader = cmd.ExecuteReader()
Do While (reader.Read())
myValue = reader("value").ToString()
Loop
Dts.Variables("User::LOGFILEPATH").Value = myValue
reader.Close()
mySqlConn.Close()
mySqlConn.Dispose()
Catch ex As Exception
Dts.TaskResult = ScriptResults.Failure Throw
End Try
System.Windows.Forms.MessageBox.Show(myValue)
Dts.TaskResult = ScriptResults.Success
End Sub
In this code, the package ID is passed into the Script Task as a read-only variable and is used to build a T-SQL statement to retrieve the value of the LOGFILEPATH setting from the SSIS_SETTING table. The AcquireConnection method creates an instance of a connection to the AdventureWorks database managed by the Connection Manager and allows other SqlClient objects to access the data source. The retrieved setting from the SSIS_SETTING table is then stored in the writable variable LOGFILEPATH. This is a basic example, but you use this exact same technique to retrieve a recordset into an object variable that can be iterated within your package as well. Let’s do that now.
Example: Retrieving Files from an FTP Server
A frequent source of data to use in a solution is files retrieved from an FTP server. SSIS provides an FTP Connection Manager and FTP Task to assist in this function. To use these objects, you need to know what file you want to retrieve from the FTP server. But what do you do if you don’t know what the file name is, and you just want to pull everything from the server? This is a perfect use for a Script Task. The final package that we will create can be seen in Figure 9-14.

FIGURE 9-14
Begin by adding an FTP Connection Manager that points to your FTP server and a Script Task to your package. The Script Task will use one read/write variable, named FileList, to pass back the list of files to be transferred from the FTP server. We can then add the following code inside the script (ProSSIS\Code\Ch09_ProSSIS\06bSTVariableForEachLoop.dtsx):
VB
Dim conn As ConnectionManager
Dim ftp As FtpClientConnection
Dim folderNames As String()
Dim fileNames As String()
Dim fileArray As New ArrayList
conn = Dts.Connections("FTPServer")
ftp = New FtpClientConnection(conn.AcquireConnection(Nothing))
ftp.Connect()
ftp.GetListing(folderNames, fileNames)
For Each s As String In fileNames
fileArray.Add(s)
Next
Dts.Variables("FileList").Value = fileArray
ftp.Close()
Dts.TaskResult = ScriptResults.Success
C#
ConnectionManager conn = default(ConnectionManager);
FtpClientConnection ftp = default(FtpClientConnection);
string[] folderNames = null;
string[] fileNames = null;
ArrayList fileArray = new ArrayList();
conn = Dts.Connections("FTPServer");
ftp = new FtpClientConnection(conn.AcquireConnection(null));
ftp.Connect();
ftp.GetListing(folderNames, fileNames);
foreach (string s in fileNames) {
fileArray.Add(s);
}
Dts.Variables("FileList").Value = fileArray;
ftp.Close();
Dts.TaskResult = ScriptResults.Success;
This code connects to the FTP server and returns a list of the files available for download. To allow the information to be used in a Foreach Loop Container, the file names are put into an ArrayList and then into the FileList variable.
Our next step is to add the Foreach Loop Container, which will enumerate over the variable FileList. Each iteration will store the name of the file in the FileName variable. Finally, an FTP Task placed inside of the container will use the FileName variable as the source variable to retrieve the file.
With just a few steps, we were able to find out what files are available on the server and download all of them. Next we will look at saving information to an XML file.
Example: Saving Data to an XML File
Another common requirement is to generate data of a certain output format. When the output is a common format like Flat File, Excel, CSV, or other database format, you can simply pump the data stream into one of the Data Flow Destinations. If you want to save data to an XML file, the structure is not homogeneous and not as easy to transform from a column-based data stream into an XML structure without some logic or structure around it. This is where the Script Task comes in handy.
NOTE If you want to parse out the XML file and put the data into a destination, a Script Component could also be used here.
The easiest way to get data into an XML file is to load and save the contents of a data set using the method WriteXML on the data set. With a new Script Task in a package with an ADO.NET connection to AdventureWorks, add a reference to System.Xml.dll and then add the namespaces for System.Data.SqlClient, System.IO, and System.Xml. Code the following (ProSSIS\Code\Ch09_ProSSIS\07ScriptDataintoXMLFile.dtsx) into the Script Task to open a connection and get all the SSIS_SETTING rows and store them as XML:
NOTE See the previous example for the DDL to create this table in the AdventureWorks database.
C#
public void Main()
{
SqlConnection sqlConn;
string cmdString = "SELECT * FROM SSIS_SETTING ";
try
{
sqlConn = (SqlConnection)(Dts.Connections["AdventureWorks"])
.AcquireConnection(Dts.Transaction
);
sqlConn = new SqlConnection(sqlConn.ConnectionString);
sqlConn.Open();
SqlCommand cmd = new SqlCommand(cmdString, sqlConn);
SqlDataAdapter da = new SqlDataAdapter(cmd);
DataSet ds = new DataSet();
da.Fill(ds);
ds.WriteXml(new System.IO.StreamWriter
("C:\\ProSSIS\\Files\\myPackageSettings.xml"));
sqlConn.Close();
}
catch
{
Dts.TaskResult = (int)ScriptResults.Failure;
throw;
}
Dts.TaskResult = (int)ScriptResults.Success;
}
VB
Public Sub Main()
Dim sqlConn As New SqlConnection
Dim cmdString As String = "SELECT * FROM SSIS_SETTING "
Try
sqlConn = DirectCast(Dts.Connections("AdventureWorks")
.AcquireConnection(Dts.Transaction), SqlConnection)
sqlConn = New SqlConnection(sqlConn.ConnectionString)
sqlConn.Open()
Dim cmd = New SqlCommand(cmdString, sqlConn)
Dim da = New SqlDataAdapter(cmd)
Dim ds = New DataSet
da.Fill(ds)
ds.WriteXml(New StreamWriter("C:\\ProSSIS\\Files\\myPackageSettings.xml" ))
sqlConn.Close()
Catch
Dts.TaskResult = ScriptResults.Failure
Throw
End Try
Dts.TaskResult = ScriptResults.Success
End Sub
There is not much to note about these results, except that the file is in XML format:
<NewDataSet>
<Table>
<PACKAGE_ID>a5cf0c2f-8d85-42eb-91b9-cbd1fd47e5b1</PACKAGE_ID>
<SETTING>LOGFILEPATH</SETTING>
<VALUE>c:\myLogFile.txt</VALUE>
</Table>
</NewDataSet>
If you need more control of the data you are exporting, or you need to serialize data, you need to use the Script Task in a different way. The next example provides some tips on how to do this.
Example: Serializing Data to XML
In the last example, you looked at simply dumping database data into an XML format by loading data into a DataSet and using the WriteToXML method to push the XML out to a file stream. If you need more control over the format, or the data is hierarchical, using .NET XML object-based serialization can be helpful. Imagine implementations that pull data from flat-file mainframe feeds and fill fully hierarchical object models. Alternatively, imagine serializing data into an object structure to pop an entry into an MSMQ application queue. This is easy to do using some of the same concepts.
Create another package with a connection to the AdventureWorks database; add a Script Task with a reference to the System.Data.SqlClient namespace. Use the data from the previous example and create a class structure within your ScriptMain to hold the values for each row of settings that looks like this (ProSSIS\Code\Ch09_ProSSIS\08ScriptDataintoSerializableObject.dtsx):
C#
[Serializable()]
public class SSISSetting
{
public string PackageId { get; set; }
public string Setting { get; set; }
public string Value { get; set; }
}
VB
<Serializable()> Public Class SSISSetting
Private m_PackageId As String
Private m_Setting As String
Private m_Value As String
Public Property PackageId() As String
Get
PackageId = m_PackageId
End Get
Set(ByVal Value As String)
m_PackageId = Value
End Set
End Property
Public Property Setting() As String
Get
PackageId = m_Setting
End Get
Set(ByVal Value As String)
m_Setting = Value
End Set
End Property
Public Property Value() As String
Get
Value = m_Value
End Get
Set(ByVal Value As String)
m_Value = Value
End Set
End Property
End Class
This class will be filled based on the data set shown in the last example. It is still a flat model, but more complex class structures would have collections within the class. An example would be a student object with a collection of classes, or an invoice with a collection of line items. To persist this type of data, you need to traverse multiple paths to fill the model. Once the model is filled, the rest is easy.
First, add the namespaces System.Xml.Serialization, System.Collections.Generic, System.IO, and System.Data.SqlClient to your Script Task project. A simple example with the SSIS_SETTING table would look like this(ProSSIS\Code\Ch09_ProSSIS\08ScriptDataintoSerializableObject.dtsx):
C#
public void Main()
{
SqlConnection sqlConn;
string cmdString = "SELECT * FROM SSIS_SETTING ";
try
{
sqlConn = (SqlConnection)(Dts.Connections["AdventureWorks"])
.AcquireConnection(Dts.Transaction);
sqlConn = new SqlConnection(sqlConn.ConnectionString);
sqlConn.Open();
SqlCommand cmd = new SqlCommand(cmdString, sqlConn);
SqlDataReader dR = cmd.ExecuteReader();
List<SSISSetting> arrayListSettings = new List<SSISSetting>();
while (dR.Read())
{
SSISSetting oSet = new SSISSetting();
oSet.PackageId = dR["PACKAGE_ID"].ToString();
oSet.Setting = dR["SETTING"].ToString();
oSet.Value = dR["VALUE"].ToString();
arrayListSettings.Add(oSet);
}
StreamWriter outfile = new StreamWriter
("C:\\ProSSIS\\Files\\myObjectXmlSettings.xml");
XmlSerializer ser = new XmlSerializer(typeof(List<SSISSetting>));
ser.Serialize(outfile, arrayListSettings);
outfile.Close();
outfile.Dispose();
sqlConn.Close();
}
catch
{
Dts.TaskResult = (int)ScriptResults.Failure;
throw;
}
Dts.TaskResult = (int)ScriptResults.Success;
}
VB
Public Sub Main()
Dim sqlConn As SqlConnection
Dim cmdString As String = "SELECT * FROM SSIS_SETTING "
Try
sqlConn = DirectCast(Dts.Connections("AdventureWorks")
.AcquireConnection(Dts.Transaction), SqlConnection)
sqlConn = New SqlConnection(sqlConn.ConnectionString)
sqlConn.Open()
Dim cmd As SqlCommand = New SqlCommand(cmdString, sqlConn)
Dim dR As SqlDataReader = cmd.ExecuteReader()
Dim arrayListSettings As New List(Of SSISSetting)
Do While (dR.Read())
Dim oSet As New SSISSetting()
oSet.PackageId = dR("PACKAGE_ID").ToString()
oSet.Setting = dR("SETTING").ToString()
oSet.Value = dR("VALUE").ToString()
arrayListSettings.Add(oSet)
Loop
Dim outfile As New StreamWriter("C:\\ProSSIS\\Files\\myObjectXmlSettings.xml")
Dim ser As New XmlSerializer(GetType(List(Of SSISSetting)))
ser.Serialize(outfile, arrayListSettings)
outfile.Close()
outfile.Dispose()
sqlConn.Close()
Catch
Dts.TaskResult = ScriptResults.Failure
Throw
End Try
Dts.TaskResult = ScriptResults.Success
End Sub
NOTE Keep in mind that while this example uses a connection directly in the code, you can also use an SSIS Connection Manager, as shown in the FTP example. Using a connection manager will make your package more portable to a production environment if you use parameters or configurations.
The StreamWriter here just gets an I/O stream from the file system to use for data output. The XmlSerializer does the heavy lifting and converts the data from the object format into an XML format.
The only trick here is understanding how to deal with the Generic List or the collection of SSISSetting objects. This is handled by using the override, whereby you can add the specific types to the serializer along with the List. The resulting XML payload will now look like this:
<?xml version="1.0" encoding="utf-8"?>
<ArrayOfSSISSetting xmlns:xsi="http://www.w3.org/2001/XMLSchema-instance"
xmlns:xsd="http://www.w3.org/2001/XMLSchema">
<SSISSetting>
<PackageId>34050406-2e0f-423a-8af3-1ec95399a6c2</PackageId>
<Setting>LOGFILEPATH</Setting>
<Value>c:\myLogFile.txt</Value>
</SSISSetting>
</ArrayOfSSISSetting>
Although the XML content looks a little bit different from dumping the content of the recordset directly to XML as shown in the earlier example, it is optimized for object serialization. This is the type of content that you could push into application queues or share with external applications.
Raising an Event in a Script Task
All existing SSIS Tasks and Components raise events that can be captured and displayed by the Execution Results tab by default. Optionally, these events can also be captured and logged into SSIS logging or event handlers. Event handlers are Control Flows that you set up and define to respond to specific events. They are literally Control Flow workflows within a package, and they enable you to customize the diagnostic information that the packages can provide at runtime.
If you have done any Windows GUI programming, you are familiar with events. An event is simply a message sent from some object saying that something just happened or is about to happen. To raise or fire an event within a Script Task, you use the Events property of the Dts object. More information about events can be found in Chapter 18. The Events property on the Dts object is really an instance of the IDTSComponentEvents interface. This interface specifies seven methods for firing events:
· FireBreakpointHit: Supports the SQL Server infrastructure and is not intended to be used directly in code.
· FireError: Fires an event when an error occurs.
· FireInformation: Fires an event with information. You can fire this event when you want a set of information to be logged, possibly for auditing later.
· FireProgress: Fires an event when a certain progress level has been met.
· FireQueryCancel: Fires an event to determine if package execution should stop.
· FireWarning: Fires an event that is less serious than an error but more than just information.
· FireCustomEvent: Fires a custom-defined event.
In SSIS, any events you fire are written to all enabled log handlers that are set to log that event. Logging enables you to check what happened with your script when you’re not there to watch it run. Using events is a best practice for troubleshooting and auditing purposes, as you’ll see in the following example.
Example: Raising Some Events
The default way to view events while designing your package is to use the Execution Results tab at the top of your package in the SQL Server Data Tools design environment. To fire off some sample events and view them in this Execution Results tab, create a new package with a Script Task and add the System variable System::TaskName as a read-only variable. Then add the following code to the Main() function (ProSSIS\Code\Ch09_ProSSIS\09RaisingEvents.dtsx):
C#
public void Main()
{
string taskName = Dts.Variables["System::TaskName"].Value.ToString();
bool retVal = false;
Dts.Events.FireInformation(0, taskName, String.Format
("Starting Loop Operation at {0} ",
DateTime.Now.ToString("MM/dd/yyyy hh:mm:ss")), "", 0,
ref retVal);
for(int i=0; i <= 10; i++)
{
Dts.Events.FireProgress(String.Format("Loop in iteration {0}", i),
i * 10, 0, 10, taskName, ref retVal);
}
Dts.Events.FireInformation(0, taskName, String.Format("Completion Loop Operation
at {0} ", DateTime.Now.ToString("mm/dd/yyyy hh:mm:ss")), "", 0, ref retVal);
Dts.Events.FireWarning(1, taskName, "This is a warning we want to pay attention
to...", "", 0);
Dts.Events.FireWarning(2, taskName, "This is a warning for debugging only...",
"", 0);
Dts.Events.FireError(0, taskName, "If we had an error it would be here", "", 0);
}
VB
Public Sub Main()
Dim i As Integer = 0
Dim taskName As String = Dts.Variables("System::TaskName").Value.ToString()
Dim retVal As Boolean = False
Dts.Events.FireInformation(0, taskName, _
String.Format("Starting Loop Operation at {0} ", _ DateTime.Now.ToString
("MM/dd/yyyy hh:mm:ss")), "", 0, _
True)
For i = 0 To 10
Dts.Events.FireProgress( _
String.Format("Loop in iteration {0}", i), _
i * 10, 0, 10, taskName, True)
Next
Dts.Events.FireInformation(0, taskName,
_ String.Format("Completion Loop Operation at {0} ", _ DateTime.Now.ToString
("mm/dd/yyyy hh:mm:ss")), "", 0, False)
Dts.Events.FireWarning(1, taskName, _
"This is a warning we want to pay attention to ...", _
"", 0)
Dts.Events.FireWarning(2, taskName, _
"This is a warning for debugging only ...", _
"", 0)
Dts.Events.FireError(0, taskName, _
"If we had an error it would be here", "", 0)
End Sub
This code will perform a simple loop operation that demonstrates firing the information, progress, warning, and error events. If you run the package, you can view the information embedded in these fire event statements in the final tab, either named Execution Results or Progress, depending on whether the designer is in Debug mode or not. These events are shown in Figure 9-15. Note that raising the error event results in the Script Task’s failure. You can comment out the FireError event to see the task complete successfully.
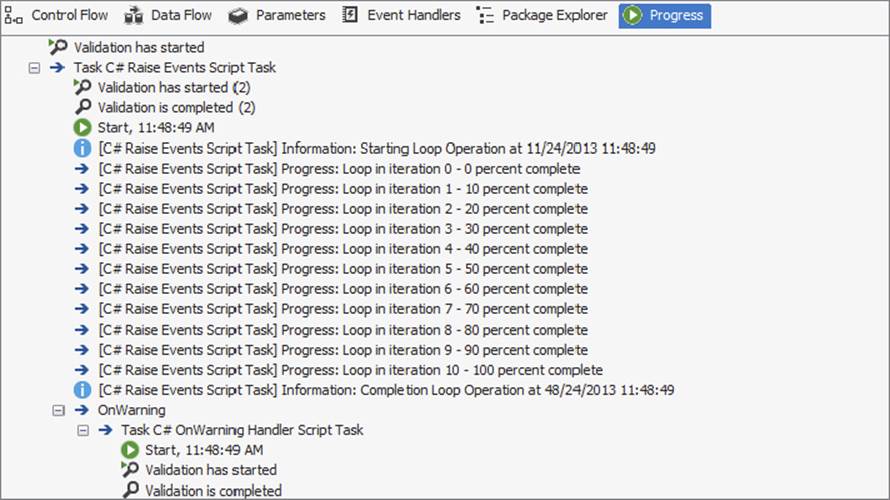
FIGURE 9-15
All the statements prefixed with the string [Script Task] were generated using these events fired from the Script Task. You can comment out the Dts.Events.FireError method calls to demonstrate to yourself that the task can complete successfully for warnings and informational events. Note that with the firing of an error, you can also force the task to generate a custom error with an error code and description. In fact, each of the events has a placeholder as the first parameter to store a custom information code. Continue to the next example to see how you can create an error handler to respond to the warning events that are fired from this Script Task.
Example: Responding to an Event
If you have already created a package for the preceding example, navigate to the Event Handlers tab. Event handlers are separate Control Flows that can be executed in response to an event. In the Raising Some Events example, you generated two warning events. One had an information code of one (1) and the other had the value of two (2). In this example, you are going to add an event handler to respond to those warning events and add some logic to respond to the event if the information code is equal to one (1). Select the Script Task executable and then select the OnWarning event handler. Click the hot link that states the following:
Click here to create an 'OnWarning' event handler for executable 'Script Task'
This will create a Control Flow surface onto which you can drop SSIS Control Tasks that will execute if an OnWarning event is thrown from the Script Task you added to the package earlier. Drop a new Script Task into the Event Handler Control Flow surface and name it OnWarning Script Task. Your designer should look like Figure 9-16.
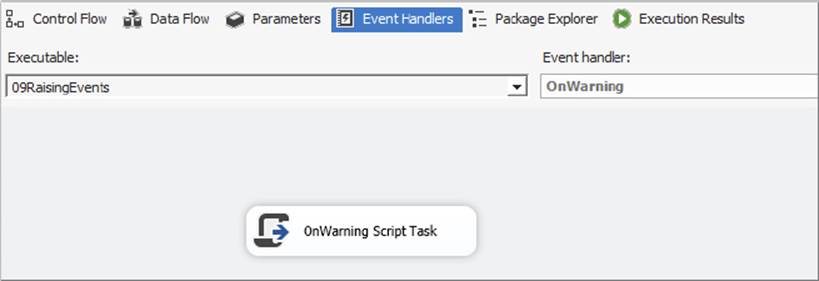
FIGURE 9-16
To retrieve the information code sent in the Dts.Events.FireWarning method call, add two system-level variables, System::ErrorCode and System::ErrorDescription, to the Read-Only Variables collection of the OnWarning Script Task. These variables will contain the values of the InformationCode and Description parameters in the Dts.Events() methods. You can then retrieve and evaluate these values when an event is raised by adding the following code (ProSSIS\Code\Ch09_ProSSIS\09RaisingEvents.dtsx):
C#
long lWarningCode = long.Parse(Dts.Variables[0].Value.ToString());
String sMsg = string.Empty;
if(lWarningCode == 1)
{
sMsg = String.Format(
"Would do something with this warning:\n{0}: {1}", lWarningCode.ToString(),
Dts.Variables(1).ToString());
System.Windows.Forms.MessageBox.Show(sMsg);
}
Dts.TaskResult = (int)ScriptResults.Success;
VB
Dim lWarningCode As Long = _
Long.Parse(Dts.Variables(0).Value.ToString())
Dim sMsg As String
If lWarningCode = 1 Then
sMsg = String.Format("Would do something with this warning: " _
+ vbCrLf + "{0}: {1}", _
lWarningCode.ToString(), Dts.Variables(1).ToString())
System.Windows.Forms.MessageBox.Show(sMsg)
End If
Dts.TaskResult = ScriptResults.Success
The code checks the value of the first parameter, which is the value of the System::ErrorCode and the value raised in the Dts.Events.FireWarning method. If the value is equivalent to one (1), an action is taken to show a message box. This action could just as well be logging an entry to a database or sending an e-mail. If you rerun the package now, you’ll see that the first FireWarning event will be handled in your event handler and generate a message box warning. The second FireWarning event will also be captured by the event handler, but no response is made.
The event handler counter in the Progress or Execution Results tab is incremented to two (2). Raising events in the Script Tasks is a great way to get good diagnostic information without resorting to message boxes in your packages. See Chapter 18 for more details about handling errors and events in SSIS.
Example: Logging Event Information
Scripts can also be used to fire custom event information, which can then be logged as described previously. To configure the previous example events SSIS package to log event information, go to SSIS ⇒ Logging in the SQL Server Data Tools application. The Configure SSIS Logs dialog will appear. Select “SSIS log provider for XML files” in the Provider Type dropdown and click Add. Click the Configuration column and then select <New Connection> from the list to create an XML File Editor. For Usage type, select Create File and specify a path to a filename similar to C:\ProSSIS\Files\myLogFile.xml.
NOTE In a production package you would set this value using an expression or parameter during runtime.
Click OK to close the File Connection Manager Editor dialog box. Your screen should look something like Figure 9-17.
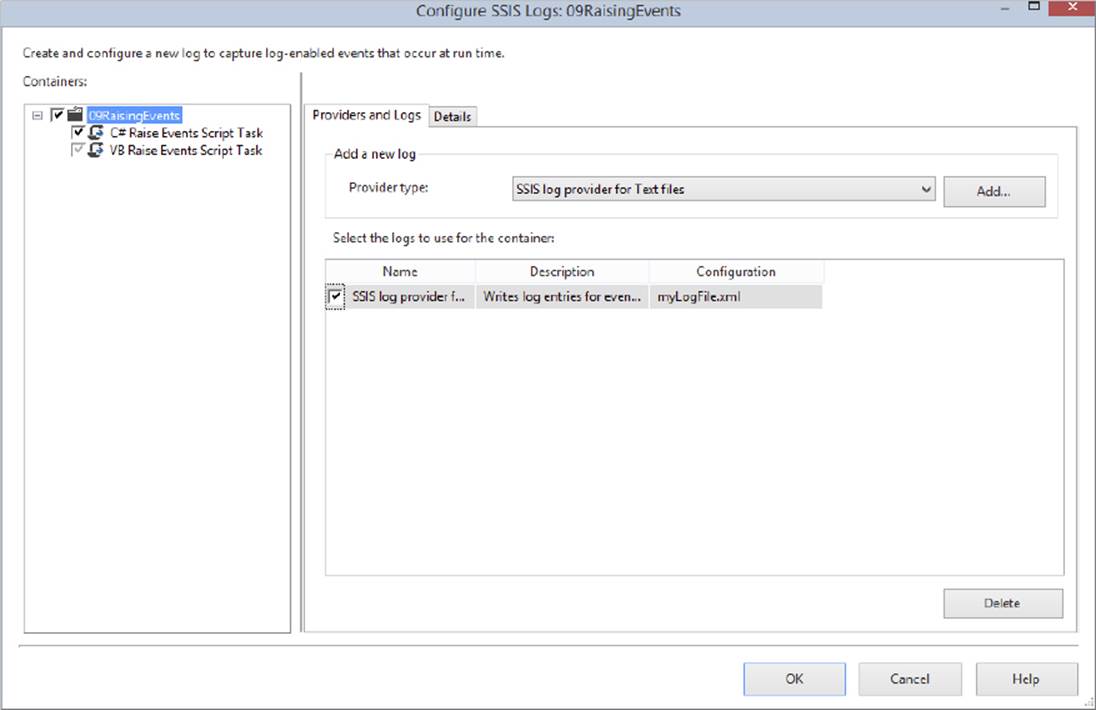
FIGURE 9-17
Now click the Package Node to start selecting what tasks in the package should log to the new provider, and check the box next to the provider name so that the log will be used. In the Details tab, select the specific OnWarning events to log. You can choose to log any of the available event types to the providers by also selecting them in the Details tab. Now your provider configuration should look like Figure 9-18.
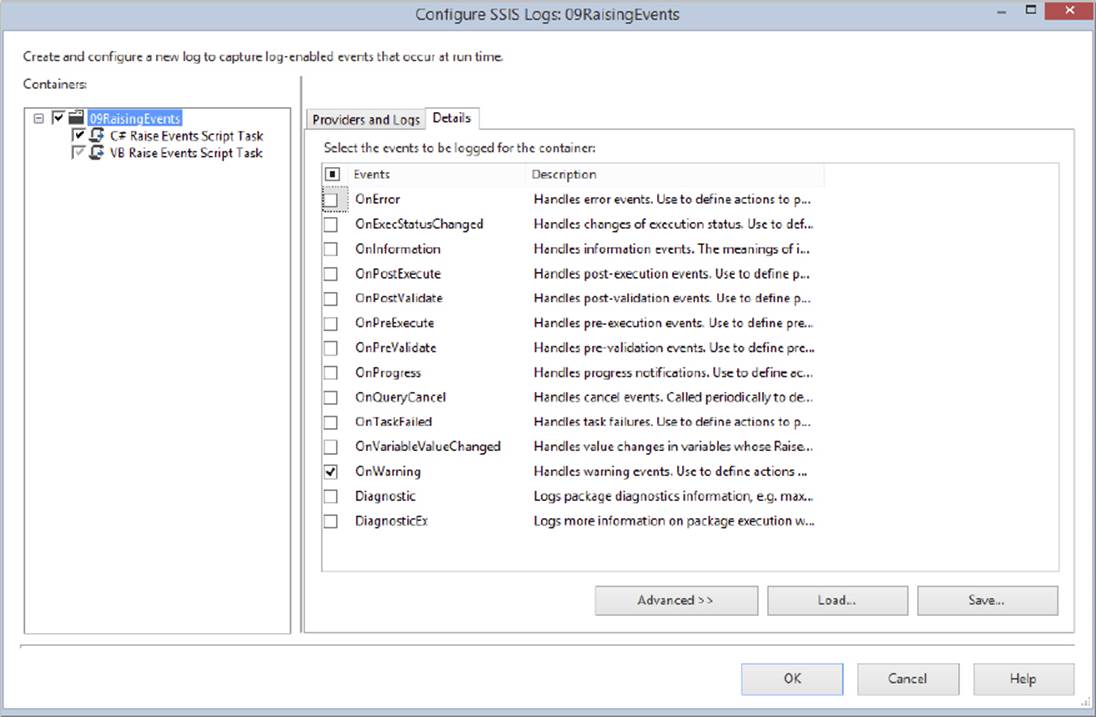
FIGURE 9-18
You can also use the Advanced tab for each selected event to control exactly what properties of the event are logged as well. If you run the package again, the file specified in the logging provider will be created with content similar to the following:
<record>
<event>OnWarning</event>
<message>This is a warning we want to pay attention to ...</message>
<computer>MYCOMPUTER</computer>
<operator>MYCOMPUTER\ADMIN</operator>
<source>Package</source>
<sourceid>{D86FF397-6C9B-4AD9-BACF-B4D41AC89ECB}</sourceid>
<executionid>{8B6F6392-1818-4EE5-87BF-EDCB5DC37ACB}</executionid>
<starttime>1/22/2012 9:30:08 PM</starttime>
<endtime>1/22/2012 9:30:08 PM</endtime>
<datacode>2</datacode>
<databytes>0x</databytes>
</record>
You’ll have other events in the file too, such as Package Start and Package End, but the preceding code snippet focuses on the event that your code fired. This record contains basic information about the event, including the message, event execution time, and the computer and user that raised the event.
Using the Script Task to raise an event is just one way to get more diagnostic information into your SSIS log files. Read on to get a brief look at generating simple log entries.
Writing a Log Entry in a Script Task
Within a Script Task, the Log method of the Dts object writes a message to all enabled log providers. The Log method is simple and has three arguments:
· messageText: The message to log
· dataCode: A field for logging a message code
· dataBytes: A field for logging binary data
The Log method is similar to the FireInformation method of the Events property, but it is easier to use and more efficient — and you don’t need to create a specialized event handler to respond to the method call. All you need to do is set up a log provider within the package. In the previous section, you learned how to add a log provider to a package. The code in the next section logs a simple message with some binary data to all available log providers. This is quite useful for troubleshooting and auditing purposes. You can write out information at important steps in your script and even print out variable values to help you track down a problem.
Example: Scripting a Log Entry
This example demonstrates how to script a log entry by adding a few lines of code to the package in the previous examples that you used to raise events. First, add the following lines to the appropriate Script Task that matches the language you chose in the previous example (ProSSIS\Code\Ch09_ProSSIS\09RaisingEvents.dtsx):
C#
Byte[] myByteArray[] = new byte[0];
Dts.Log("Called procedure: usp_Upsert with return code 4", 0, myByteArray);
VB
Dim myByteArray(0) As Byte
Dts.Log("Called procedure: usp_Upsert with return code 4", 0, myByteArray)
Next, select the events for the ScriptTaskLogEntry event in the Details tab of the logging configuration. This tells the SSIS package logger to handle any custom logging instructions such as the one you just coded. Then run the package. You’ll see a set of additional logging instructions that look like this:
<record>
<event>User:ScriptTaskLogEntry</event>
<message>Called Procedure: usp_Upsert with return code 4</message>
<computer>MYCOMPUTER</computer>
<operator>MYCOMPUTER\ADMIN</operator>
<source>Raise Events C# Script Task</source>
<sourceid>{CE53C1BB-7757-47FF-B173-E6088DA0A2A3}</sourceid>
<executionid>{B7828A35-C236-451E-99DE-F679CF808D91}</executionid>
<starttime>4/27/2008 2:54:04 PM</starttime>
<endtime>4/27/2008 2:54:04 PM</endtime>
<datacode>0</datacode>
<databytes>0x</databytes>
</record>
As you can see, the Script Task is highly flexible with the inclusion of the .NET-based VSTA capabilities. As far as controlling package flow or one-off activities, the Script Task is clearly very important. However, the Script Task doesn’t do all things well. If you want to apply programmatic logic to the Data Flow in an SSIS package, then you need to add to your knowledge of scripting in SSIS with the Script Component.
USING THE SCRIPT COMPONENT
The Script Component provides another area where programming logic can be applied in an SSIS package. This component, which can be used only in the Data Flow portion of an SSIS package, allows programmatic tasks to occur in the data stream. This component exists to provide, consume, or transform data using .NET code. To differentiate between the various uses of the Script Component, when you create one you have to choose one of the following three types:
· Source Type Component: The role of this Script Component is to provide data to your Data Flow Task. You can define outputs and their types and use script code to populate them. An example would be reading in a complex file format, possibly XML or something that requires custom coding to read, like HTTP or RSS Sources.
· Destination Type Component: This type of Script Component consumes data much like an Excel or Flat File Destination. This component is the end of the line for the data in your data stream. Here, you’ll typically put the data into a DataSet variable to pass back to the Control Flow for further processing, or send the stream to custom output destinations not supported by built-in SSIS components. Examples of these output destinations can be web service calls, custom XML formats, and multi-record formats for mainframe systems. You can even programmatically connect and send a stream to a printer object.
· Transformation Type Component: This type of Script Component can perform custom transformations on data. It consumes input columns and produces output columns. You would use this component when one of the built-in transformations just isn’t flexible enough.
In this section, you’ll get up to speed on all the specifics of the Script Component, starting first with an explanation of the differences between the Script Task and the Script Component, and then looking at the coding differences in the two models. Finally, you’ll see an example of each implementation type of the Script Component to put all of this information to use.
Differences from a Script Task
You might ask, “Why are there two controls, both the Script Task and the Script Component?” Well, underlying the SSIS architecture are two different implementations that define how the VSTA environment is used for performance. Each Script Task is called only once within a Control Flow, unless it is in a looping control. The Script Component has to be higher octane because it is going to be called per row of data in the data stream. You are also in the context of being able to access the data buffers directly, so you will be able to perform more tasks.
When you are working with these two controls, the bottom line is that there are slightly different ways of doing the same types of things in each. This section of the chapter cycles back through some of the things you did with the Script Task and points out the differences. First you’ll look at the differences in configuring the editor. Then you’ll see what changes when performing programmatic tasks such as accessing variables, using connections, raising events, and logging. Finally, you’ll look at an example that ties everything together.
Configuring the Script Component Editor
You’ll notice the differences starting with the item editor. Adding a Script Component to the Data Flow designer brings up the editor shown in Figure 9-19, requesting the component type.
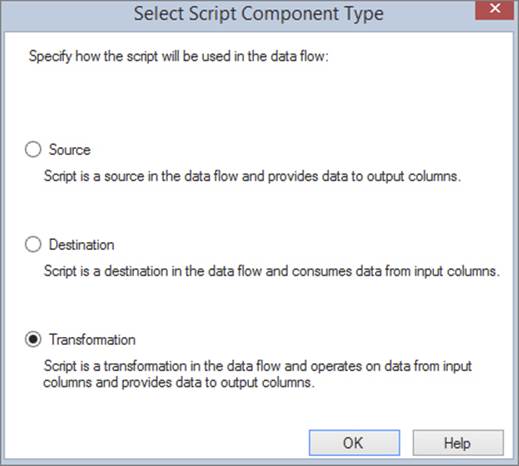
FIGURE 9-19
NOTE In order to add the Script Component, you must first add a Data Flow Task to a package.
Selecting one of these options changes how the editor is displayed to configure the control. Essentially, you are choosing whether the control has input buffers, output buffers, or both. Figure 9-20 shows an example of a Script Component Transformation that has both buffers.
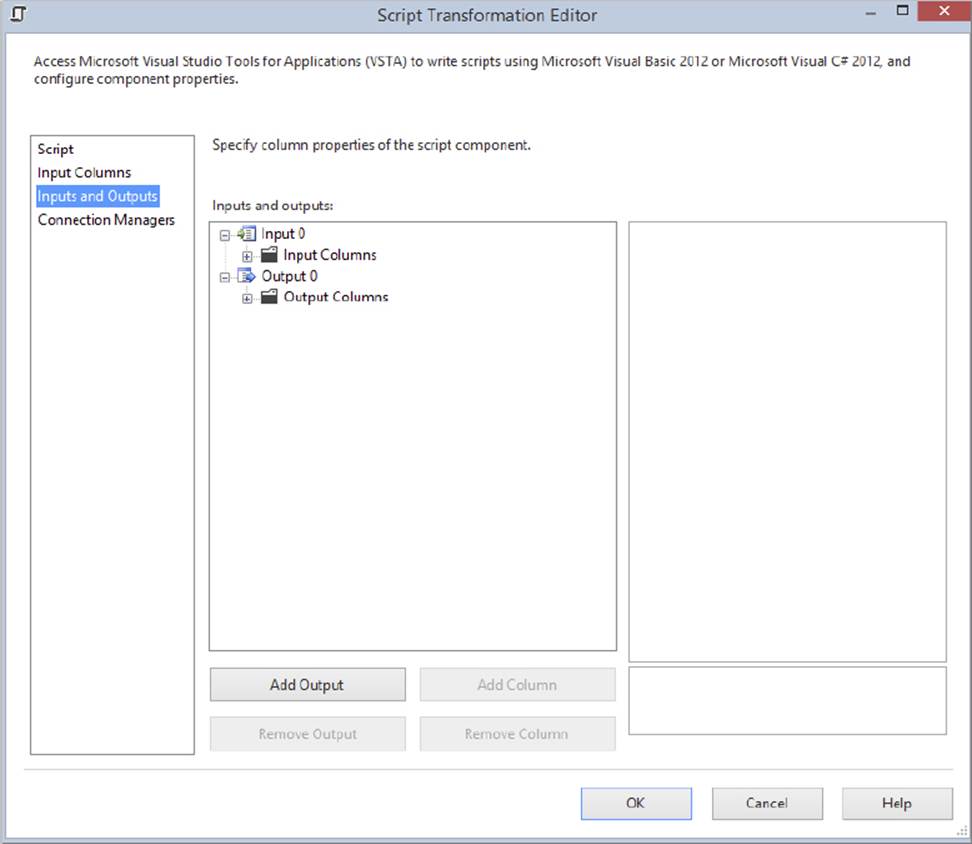
FIGURE 9-20
The Script Component Source has only output buffers available, and the Script Component Destination has only input buffers available. You are responsible for defining these buffers by providing the set of typed columns for either the input or outputs. If the data is being fed into the component, the editor can set these up for you. Otherwise, you have to define them yourself. You can do this programmatically in the code, or ahead of time using the editor. Just select the input or output columns collection on the user interface, and click the Add Column button to add a column, as shown in Figure 9-21.

FIGURE 9-21
A helpful tip is to select the Output Columns node on the tree view, so that the new column is added to the bottom of the collection. Once you add a column, you can’t move it up or down. After adding the column, you need to set the Data Type, Length, Precision, and Scale. For details about the SSIS data types, see Chapter 5.
When you access the scripting environment, you’ll notice some additional differences between the Script Component and the Script Task. Namely, some new classes have been added to the Solution Explorer, as shown in Figure 9-22.
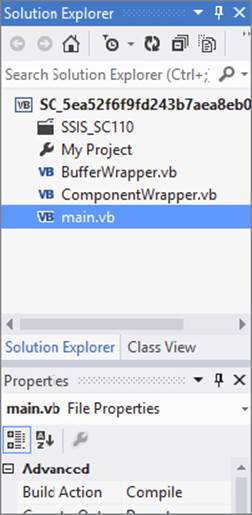
FIGURE 9-22
The name of the class that is used to host custom code is different from that used for the Script Task. Rather than ScriptMain, the class is called main. Internally there are also some differences. The primary difference is the existence of more than one entry point method. The methods you’ll see in the main class depend upon the Script Component type. At least three of the following methods are typically coded and can be used as entry points in the Script Component:
· PreExecute is used for preprocessing tasks like creating expensive connections or file streams.
· PostExecute is used for cleanup tasks or setting variables at the completion of each processed row.
· CreateNewOutputRows is the method to manage the output buffers.
· Input0_ProcessInputRow is the method to manage anything coming from the input buffers. Note that the Input0 part of the name will differ based on the name of the input set in the editor.
The remaining classes are generated automatically based on your input and output columns when you enter into the script environment, so don’t make any changes to these; otherwise, they will be overwritten when you reenter the script environment.
One problem you might encounter in the Script Component Editor and the generation of the BufferWrapper class is that you can name columns in the editor that use keywords or are otherwise invalid when the BufferWrapper class is generated. An example would be an output column named 125K_AMOUNT. If you create such a column, you’ll get an error in the BufferWrapper class stating the following:
Invalid Token 125 in class, struct, or interface member declaration
Don’t attempt to change the property in the buffer class to something like _125K_AMOUNT, because this property is rebuilt the next time you edit the script. Change the name of the output column to _125K_AMOUNT, and the buffer class will change automatically. The biggest difference that you need to pay attention to with the Script Component is that if you make any changes to this editor, you’ll need to open the script environment so that all these base classes can be generated.
Last, but not least, you’ll notice a Connection Managers tab that is not available in the Script Task Editor. This enables you to name specifically the connections that you want to be able to access within the Script Component. Although you are not required to name these connections up front, it is extremely helpful to do so. You’ll see why later, when you connect to a data source. Figure 9-23 shows an example of the AdventureWorks connection added to a Script Component.
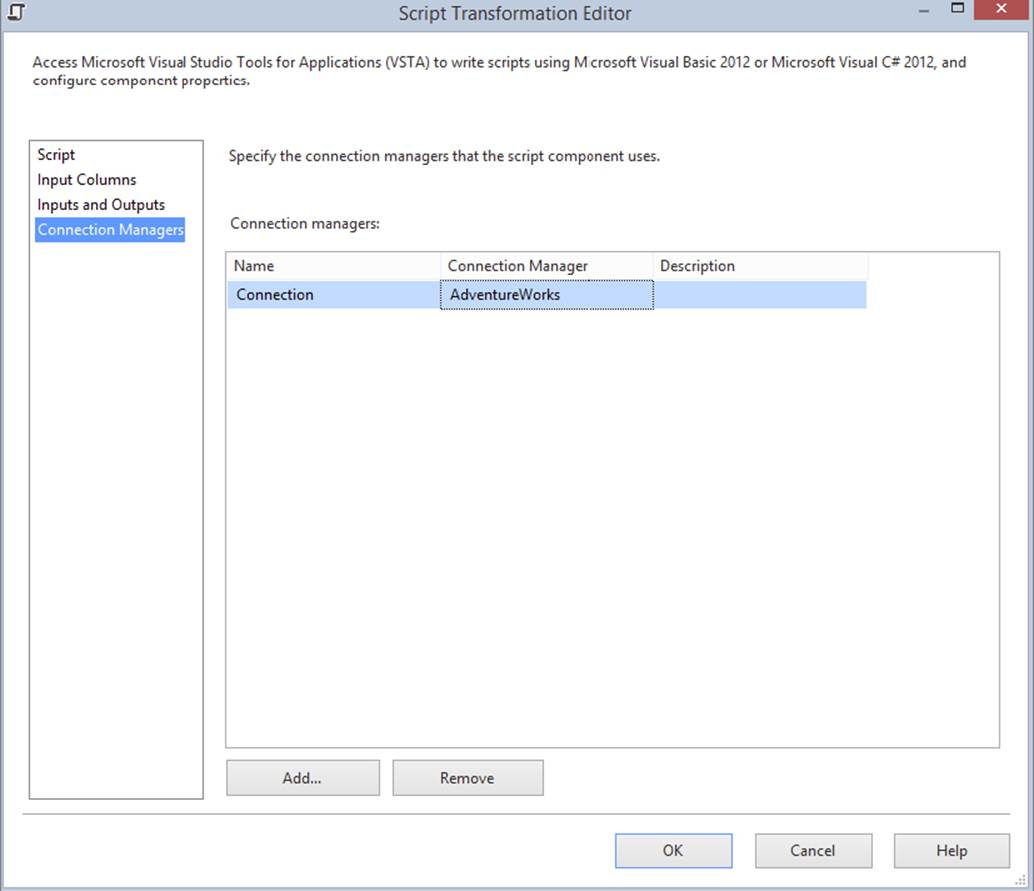
FIGURE 9-23
Now that you understand the differences between the Script Task and Script Component from a setup perspective, you can examine how the coding differs.
Accessing Variables in a Script Component
The same concepts behind accessing variables also apply to the Script Component. You can send the variables into the control by adding them to the ReadOnlyVariables or ReadWriteVariables properties of the editor. You can also choose not to specify them up front and just use the variable dispenser within your Script Component to access, lock, and manipulate variables. We recommend using the properties in the editor for this component because the variables provided in the editor are added to the auto-generated base class variables collection as strongly typed variables. In this control, adding variables to the editor not only removes the need to lock and unlock the variables but also means you don’t have to remember the variable name within the component. Keep in mind that variables can’t be modified in all aspects of the Script Component. Here’s an example of setting the variable ValidationErrors within a Script Component:
C#
this.Variables.ValidationErrors = 1;
VB
me.Variables.ValidationErrors = 1
As you can see, using variables is easier and more maintainable than in the Script Task because the variable names are available in IntelliSense and checked at compile time. However, if you don’t want to add a variable to each Script Component for some reason, you can still use the variable dispenser in this component. It is located on the base class and can be accessed using the base class, instead of the Dts object. Other than these differences, the variable examples in the Script Task section of this chapter are still applicable. The remaining tasks of connecting to data sources, raising events, and logging follow a similar pattern. The methods for performing the tasks are more strongly named, which makes sense because any late binding (or runtime type checking) within a high-performing Data Flow Task would slow it down.
Connecting to Data Sources in a Script Component
A typical use of a connection is in the Source type of the Script Component, because in these types of Data Flow Tasks, the mission is to create a data stream. The origination of that data is usually another external source. If you had a defined SSIS Source Component, then it would be used and you wouldn’t need the Script Component to connect to it.
The coding to connect to a Connection Manager is very simple. You can instantiate a specific Connection Manager and assign the reference to a connection in the component’s collection. Using the connections collection in the Script Component is very similar to using the variables collection. The collection of strongly typed Connection Managers is created every time the script editor is opened. Again, this is helpful because you don’t have to remember the names, and you get compile-time verification and checking.
For example, if you had a package with an OLE DB Connection Manager named myOracleServer and added it to the Script Component with the name OracleConnection, you’d have access to the connection using this code:
C#
ConnectionManagerOleDb oracleConnection =
(ConnectionManagerOleDb)base.Connections.OracleConnection;
VB
Dim oracleConnection as ConnectionManagerOleDb
oracleConnection = Connections.OracleConnection
Raising Events
For the Script Task, you’ve looked at SSIS’s ability to raise events, and you walked through some examples that demonstrated its scripting capabilities for managing how the package can respond to these events. These same capabilities exist in Script Components, although you need to keep in mind that Script Components run in a data pipeline or stream, so the potential for repeated calls is highly likely. You should fire events sparingly within a Script Component that is generating or processing data in the pipeline to reduce overhead and increase performance. The methods are essentially the same, but without the static Dts object.
NOTE Event handling is covered in more detail in Chapter 18.
Here is the code to raise an informational event in a Script Component (ProSSIS\Code\Ch09_ProSSIS\09RaisingEvents.dtsx):
C#
Boolean myBool=false;
this.ComponentMetaData.FireInformation(0, "myScriptComponent",
"Removed non-ASCII Character", "", 0, ref myBool);
VB
Dim myBool As Boolean
Me.ComponentMetaData.FireInformation(0, _
"myScriptComponent", "Removed non-ASCII Character", "", 0, myBool)
Either version of code will generate an event in the Progress Tab that looks like this:
[myScriptComponent] Information: Removed non-ASCII Character
Raising an event is preferred to logging because it enables you to develop a separate workflow for handling the event, but in some instances logging may be preferred.
Logging
Like the Script Task, logging in the Script Component writes a message to all enabled log providers. It has the same interface as the Script Task, but it is exposed on the base class. Remember that Script Components run in a data pipeline or stream, so the potential for repeated calls is highly likely. Follow the same rules as those for raising events, and log sparingly within a Script Component that is generating or processing data in the pipeline to reduce overhead and increase performance. If you need to log a message within a Data Flow, you can improve performance by logging only in the PostExecute method, so that the results are logged only once.
Example: Scripting a Log Entry
This example shows how to log one informational entry to the log file providers at the end of a Data Flow Task. To use this code, create a package with a Data Flow Task and add a Script Component as a source with one output column named NewOutputColumn. Create these integer variables as private variables to the main.cs class: validationBadChars, validationLength, and validationInvalidFormat. Then add the following code to the CreateNewOutputRows() method in the main.cs class(ProSSIS\Code\Ch09_ProSSIS\11aSCBasicLogging.dtsx):
C#
int validationLengthErrors = 0;
int validationCharErrors = 0;
int validationFormatErrors = 0;
//..in the CreateNewOutputRows() Method
string validationMsg = string.Format("Validation Errors:\nBad Chars {0}\nInvalid
Length " + "{1}\nInvalid Format {2}", validationCharErrors,
validationLengthErrors, validationFormatErrors);
this.Log(validationMsg, 0, new byte[0]);
//This is how to add rows to the outputrows Output0Buffer collection.
Output0Buffer.AddRow();
Output0Buffer.NewOutputColumn = 1;
VB
Dim validationLengthErrors As Integer = 0
Dim validationCharErrors As Integer = 0
Dim validationFormatErrors As Integer = 0
'..in the CreateNewOutputRows() Method
Dim validationMsg As String
validationMsg = String.Format("Validation Errors:" + _
vbCrLf + "Bad Chars {0}" + _
vbCrLf + "Invalid Length {1}" + _
vbCrLf + "Invalid Format {2}", _
validationCharErrors, validationLengthErrors, _ validationFormatErrors)
Dim myByteArray(0) As Byte
Me.Log(validationMsg, 0, myByteArray)
Output0Buffer.AddRow()
Output0Buffer.AddNewOutputColumn = 1
In order for this sample to produce a log entry, remember that you have to set up a logging provider (use the menu option SSIS ⇒ Logging). Make sure you specifically select the Data Flow Task in which the Script Component is hosted within SSIS and the logging events specifically for the Script Component. Running the package will produce logging similar to this:
User:ScriptComponentLogEntry,MYPC,MYPC\ADMIN,"CSharp Basic Logging Script
Component" (1),{00000001-0000-0000-0000-000000000000},
{3651D743-D7F6-43F8- 8DE2-F7B40423CC28},
4/27/2012 10:38:56 PM,4/27/2008 10:38:56 PM,0,0x, Validation Errors:
Bad Chars 0
Invalid Length 0
Invalid Format 0
OnPipelinePostPrimeOutput, MYPC,MYPC\ADMIN,Data Flow Task,
{D2118DFD-DAEE-470B- 9AC3-9B01DFAA993E},
{3651D743-D7F6-43F8-8DE2-F7B40423CC28},4/27/2008 10:38:55 PM,
4/27/2008 10:38:55 PM,0,0x,A component has returned from its
PrimeOutput call. : 1 : CSharp Basic Logging Script Component
Example: Data Validation
Compared to the Script Task, the Script Component has a steeper learning curve. The example presented in this section is more comprehensive and should enable you to get the bigger picture of how you can use this component in your everyday package development.
A typical use of the Script Component is to validate data within a Data Flow. In this example, contact information from a custom application did not validate its data entry, resulting in poor data quality. Because the destination database has a strict set of requirements for the data, your task is to validate the contact information from a Flat File Source and separate valid from invalid records into two streams: the good stream and the error stream. The good records can continue to another Data Flow; the error records will be sent to an error table for manual cleansing.
Create the contacts table with the following script (ProSSIS\Scripts\Ch09_ProSSIS\Ch09_Table_Create_Script.sql):
CREATE TABLE [dbo].[Contacts](
[ContactID] [int] IDENTITY(1,1) NOT NULL,
[FirstName] [varchar](50) NOT NULL,
[LastName] [varchar](50) NOT NULL,
[City] [varchar](25) NOT NULL,
[State] [varchar](15) NOT NULL,
[Zip] [char](11) NULL
) ON [PRIMARY]
The error queue table is virtually identical except it has no strict requirements and a column has been added to capture the rejection reason. All data fields are nullable and set to the maximum known size (ProSSIS\Scripts\Ch09_ProSSIS\Ch09_Table_Create_Script.sql):
CREATE TABLE dbo.ContactsErrorQueue
(
ContactErrorID int NOT NULL IDENTITY (1, 1),
FirstName varchar(50) NULL,
LastName varchar(50) NULL,
City varchar(50) NULL,
State varchar(50) NULL,
Zip varchar(50) NULL,
RejectReason varchar(50) NULL
) ON [PRIMARY]
Finally, the incoming data format is fixed-width and is defined as follows:
|
FIELD |
STARTING POSITION |
NEW FIELD NAME |
|
First Name |
1 |
FirstName |
|
Last Name |
11 |
LastName |
|
City |
26 |
City |
|
State |
44 |
State |
|
Zip |
52 |
Zip |
The data file provided as a test sample looks like this (ProSSIS\Files\Ch09_ProSSIS\contacts.dat):
Jason Gerard Jacksonville FL 32276-1911
Joseph McClung JACKSONVILLE FLORIDA 322763939
Andrei Ranga Jax fl 32276
Chad Crisostomo Orlando FL 32746
Andrew Ranger Jax fl
Create a sample of this data file or download a copy from www.wrox.com/go/prossis2014. Create a new package and add a Data Flow Task. Click on the Data Flow design surface and add a Connection Manager to the Connection Managers tab. Name the Connection Manager “Contacts Mainframe Extract,” browse to the data file, and set the file format to Ragged Right. Flat files with spaces at the end of the specifications are typically difficult to process in some ETL platforms. The Ragged Right option in SSIS provides a way to handle these easily without having to run the file through a Script Task to put a character into a consistent spot or without having the origination system reformat its extract files. Use the Columns tab to visually define the columns. Flip to the Advanced tab to define each of the column names, types, and widths to match the desired values and the new database field name. (You may need to delete an unused column if this is added by the designer.) The designer at this point looks like Figure 9-24.
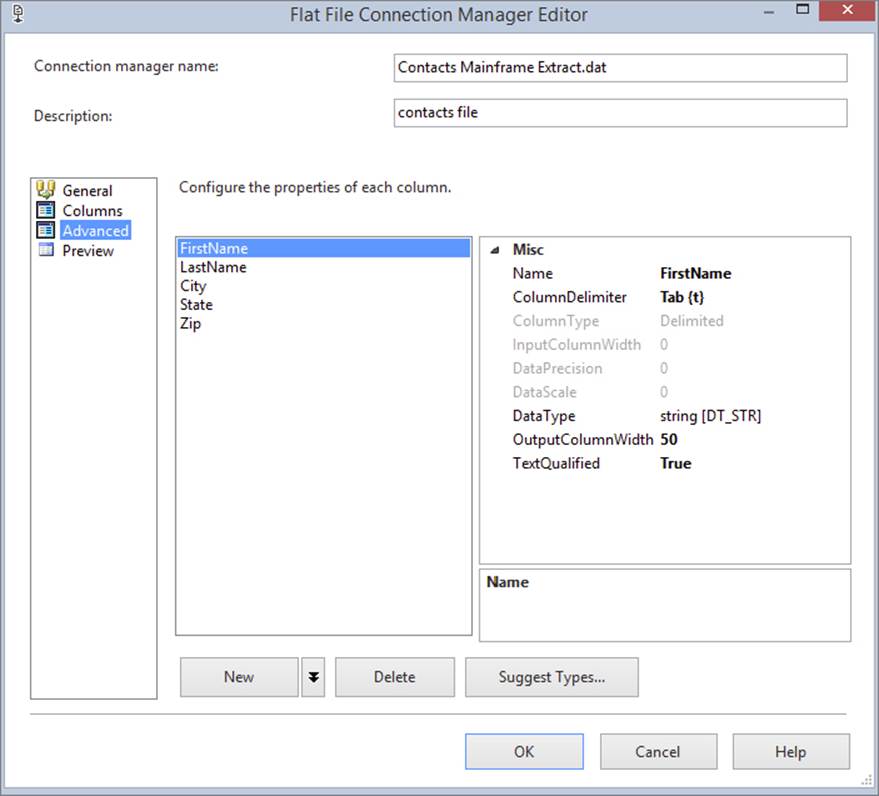
FIGURE 9-24
Typically, you may want to define some data with strong types. You can decide to do that here in the Connection Manager or you can do so later using a derived column depending on how confident you are in the source of the data. If the data source is completely unreliable, import data using Unicode strings and use your Data Flow Tasks to validate the data. Then move good data into a strong data type using the Derived Column Transformation.
On the Data Flow surface, drag a Flat File Source to the Data Flow editor pane. Edit the Flat File Source and set the Connection Manager to the Contract Mainframe Extract Connection Manager. This sets up the origination of the data to stream into the Data Flow Task. Check the box labeled “Retain null values from the source as null values in the Data Flow.” This feature provides the consistent testing of null values later.
Now add a Script Component to the Data Flow. When you drop the Script Component, you will be prompted to pick the type of component to create. Select Transformation and click OK. Connect the output of the Flat File Source to the Script Component to pipe the data into this component, where you can program some validation on the data.
Open the Script Component and set the ScriptLanguage property to the language of your choice. On the Input Columns tab, you will notice that Input Name is a dropdown with the name Input 0. It is possible to have more than one source pointed to this Script Component. If so, this dropdown would allow you to individually configure the inputs and select the columns from each input. For this example, select all the input columns. Set the Usage Type for the State and Zip columns to ReadWrite. The reason will be clear later.
Select the Inputs and Outputs tab to see the collection of inputs and outputs and the input columns defined previously. Here you can create additional input and output buffers and columns within each. Expand all the nodes and add these two output columns:
|
COLUMN NAME |
TYPE |
SIZE |
|
GoodFlag |
DT_BOOL |
N/A |
|
RejectReason |
DT_STR |
50 |
You’ll use the flag to separate the data from the data stream. The rejection reason will be useful to the person who has to perform any manual work on the data later. The designer with all nodes expanded should look like Figure 9-25.
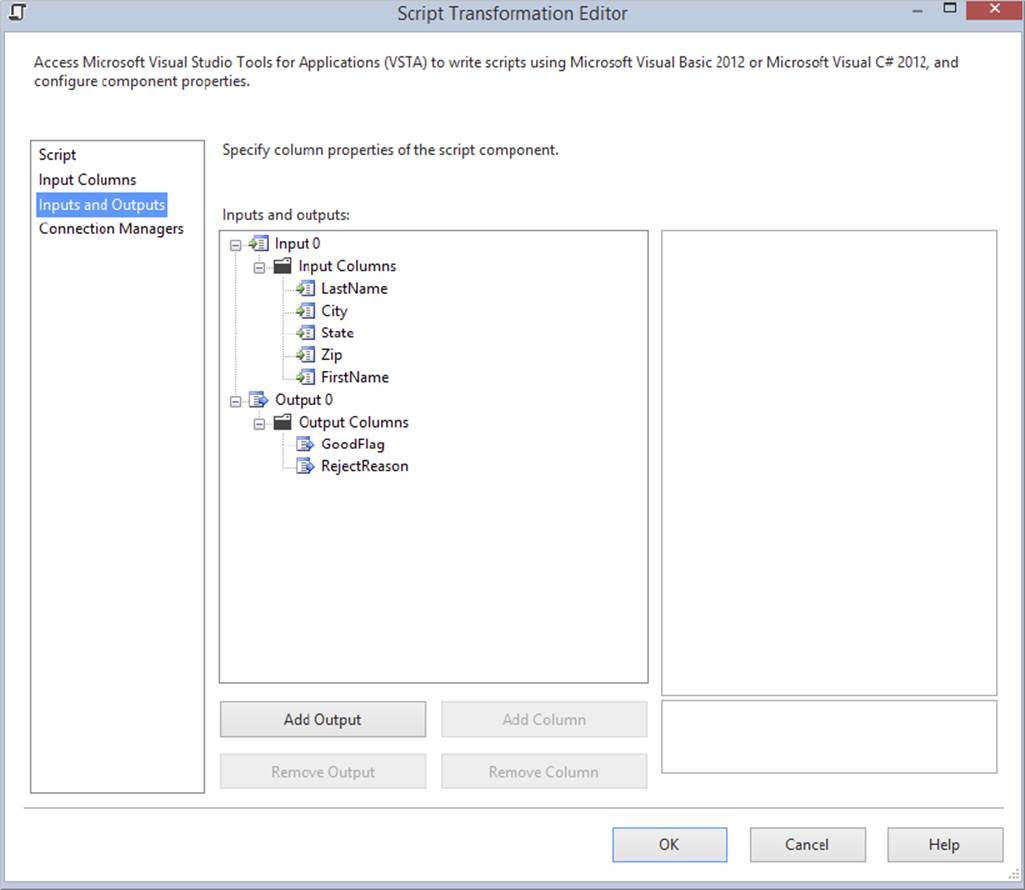
FIGURE 9-25
Back on the Script tab, click the Edit Script button to enter the VSTA scripting IDE. In the main class, the rules for validation need to be programmatically applied to each data row. In the Input0_ProcessInputRow method that was co-generated by SSIS using the Script Component designer, add the rules for data validation:
· All fields are required except for the zip code.
· The zip code must be in the format #####-#### or ##### and use numeric digits from 0 through 9. If the zip code is valid for the first five characters but the whole string is not, strip the trailing records and use the first five.
· The state must be two uppercase characters.
Here’s the overall plan: the contents of the file will be sent into the Script Component. This is where programmatic control will be applied to each row processed. The incoming row has three data fields that need to be validated to determine whether all necessary data is present. The State and Zip columns need to be validated additionally by rule, and even cleaned up if possible. The need to fix the data in the stream is why the Zip and State column usage types had to be set to ReadWrite in the designer earlier.
To aid in accomplishing these rules, the data will be validated using regular expressions. Regular expressions are a powerful utility that should be in every developer’s tool belt. They enable you to perform powerful string matching and replacement routines. You can find an excellent tutorial on regular expressions at www.regular-expressions.info. The regular expressions for matching the data are shown here:
|
REGULAR EXPRESSION |
VALIDATION DESCRIPTION |
|
^\d{5}([\-]\d{4})?$ |
Matches a five-digit or nine-digit zip code with dashes |
|
\b([A-Z]{2})\b |
Ensures that the state is only two capital characters |
To use the regular expression library, add the .NET System.Text.RegularExpressions namespace to the top of the main class. For performance reasons, create the instances of the RegEx class to validate the ZipCode and the State in the PreExecute() method of the Script Component. This method and the private instances of the Regex classes should look like this (ProSSIS\Code\Ch09_ProSSIS\10SCContactsExample.dtsx):
C#
private Regex zipRegex;
private Regex stateRegex;
public override void PreExecute()
{
base.PreExecute();
zipRegex = new Regex("^\d{5}([\-]\d{4})?$", RegexOptions.None);
stateRegex = new Regex("\b([A-Z]{2})\b", RegexOptions.None);
}
VB
Private zipRegex As Regex
Private stateRegex As Regex
Public Overrides Sub PreExecute()
MyBase.PreExecute()
zipRegex = New Regex("^\d{5}([\-]\d{4})?$", RegexOptions.None)
stateRegex = New Regex("\b([A-Z]{2})\b", RegexOptions.None)
End Sub
To break up the tasks, create two new private functions to validate the ZipCode and State. Using byRef arguments for the reason and the ZipCode enables the data to be cleaned and the encapsulated logic to return both a true or false and the reason. The ZipCodevalidation functions should look like this (ProSSIS\Code\Ch09_ProSSIS\10SCContactsExample.dtsx):
C#
private bool ZipIsValid(ref string zip, ref string reason)
{
zip = zip.Trim();
if (zipRegex.IsMatch(zip))
{
return true;
}
Else
{
if (zip.Length > 5)
{
zip = zip.Substring(0, 5);
if (zipRegex.IsMatch(zip))
{
return true;
}
Else
{
reason = "Zip larger than 5 Chars, " + "Retested at 5 Chars and Failed";
return false;
}
}
Else
{
reason = "Zip Failed Initial Format Rule";
return false;
}
}
}
VB
Private Function ZipIsValid(ByRef zip As String, _
ByRef reason As String) As Boolean zip = zip.Trim()
If (zipRegex.IsMatch(zip)) Then
Return True
Else
If (zip.Length> 5) Then
zip = zip.Substring(0, 5)
If (zipRegex.IsMatch(zip)) Then
Return True
Else
reason = "Zip larger than 5 Chars, " + _
"Retested at 5 Chars and Failed"
Return False
End If
Else
reason = "Zip Failed Initial Format Rule"
Return False
End If
End If
End Function
The state validation functions look like this (ProSSIS\Code\Ch09_ProSSIS \10SCContactsExample.dtsx):
C#
private bool StateIsValid(ref string state, ref string reason)
{
state = state.Trim().ToUpper();
if (stateRegex.IsMatch(state))
{
return true;
}
Else
{
reason = "Failed State Validation";
return false;
}
}
VB
Private Function StateIsValid(ByRef state As String, _
ByRef reason As String) As Boolean state = state.Trim().ToUpper()
If (stateRegex.IsMatch(state)) Then Return True
Else
reason = "Failed State Validation"
Return False
End If
End Function
Now, to put it all together, add the driver method Input0_ProcessInputRow() that is fired upon each row of the flat file (ProSSIS\Code\Ch09_ProSSIS\10SCContactsExample.dtsx):
C#
public override void Input0_ProcessInputRow(Input0Buffer Row)
{
Row.GoodFlag = false;
string myZip = string.Empty;
string myState = string.Empty;
string reason = string.Empty;
if (!Row.FirstName_IsNull && !Row.LastName_IsNull && !Row.City_IsNull &&
!Row.State_IsNull && !Row.Zip_IsNull)
{
myZip = Row.Zip;
myState = Row.State;
if (ZipIsValid(ref myZip, ref reason) && StateIsValid(ref myState, ref reason))
{
Row.Zip = myZip;
Row.State = myState;
Row.GoodFlag = true;
}
Else
{
Row.RejectReason = reason;
}
}
Else
{
Row.RejectReason = "All Required Fields not completed";
}
}
VB
Public Overrides Sub Input0_ProcessInputRow(ByVal Row As Input0Buffer)
Dim myZip As String = String.Empty
Dim myState As String = String.Empty
Dim reason As String = String.Empty
If (Row.FirstName_IsNull = False And _
Row.LastName_IsNull = False And _
Row.City_IsNull = False And _
Row.State_IsNull = False And _
Row.Zip_IsNull = False) Then
myZip = Row.Zip
myState = Row.State
If (ZipIsValid(myZip, reason) And _
StateIsValid(myState, reason)) Then
Row.Zip = myZip
Row.State = myState
Row.GoodFlag = True
Else
Row.RejectReason = reason
End If
Else
Row.RejectReason = "All Required Fields not completed"
End If
End Sub
Notice that all fields are checked for null values using a property on the Row class that is the field name and an additional tag _IsNull. This is a property code generated by SSIS when you set up the input and output columns on the Script Component. Properties likeZip_IsNull explicitly allow the checking of a null value without encountering a null exception. This is handy as the property returns true if the particular column is NULL.
Next, if the Zip column is not NULL, its value is matched against the regular expression to determine whether it’s in the correct format. If it is, the value is assigned back to the Zip column as a cleaned data element. If the value of the Zip column doesn’t match the regular expression, the script checks whether it is at least five characters long. If true, then the first five characters are retested for a valid ZipCode pattern. Nonmatching values result in a GoodFlag in the output columns being set to False.
The state is trimmed of any leading or trailing white space, and then converted to uppercase and matched against the regular expression. The expression simply checks to see if it contains two uppercase letters between A and Z. If it does, the GoodFlag is set to True and the state value is updated; otherwise, the GoodFlag is set to False.
To send the data to the appropriate table based on the GoodFlag, you must use the Conditional Split Transformation. Add this task to the Data Flow designer and connect the output of the Script Component Task to the Conditional Split Transformation. Edit the Conditional Split Transformation, and add an output named Good with the condition GoodFlag == TRUE and name the default output Bad. This separates the data rows coming out of the Script Component Task into two separate streams. The Conditional Split Transformation Editor should look like Figure 9-26.
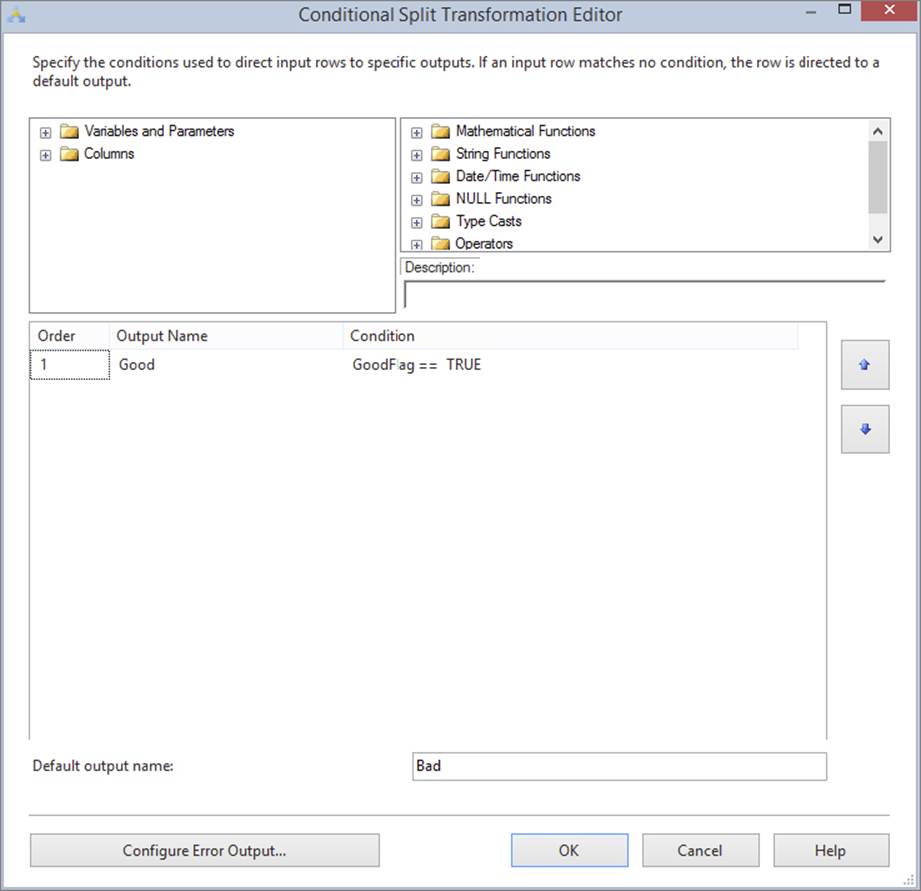
FIGURE 9-26
Add an OLE DB Connection Manager that uses the database you created for the Contacts and ContactsErrorQueue tables. Add two SQL Server Destinations to the Data Flow designer. One, named Validated Contacts SQL Server Destination, should point to the Contacts table; the other, named Error Contacts SQL Server Destination, should point to the ContactsErrorQueue table. Drag the output of the Conditional Split Transformation to the Validated Destination. Set the output stream named Good to the destination. Then open the Mappings tab in the Destination to map the input stream to the columns in the Contacts table. Repeat this for the other Bad output of the Conditional Split Transformation to the Error Destination.
Your final Data Flow should look something like Figure 9-27. If you run this package with the Contacts.dat file described at the top of the use case, three contacts will validate, and two will fail with these rejection reasons:
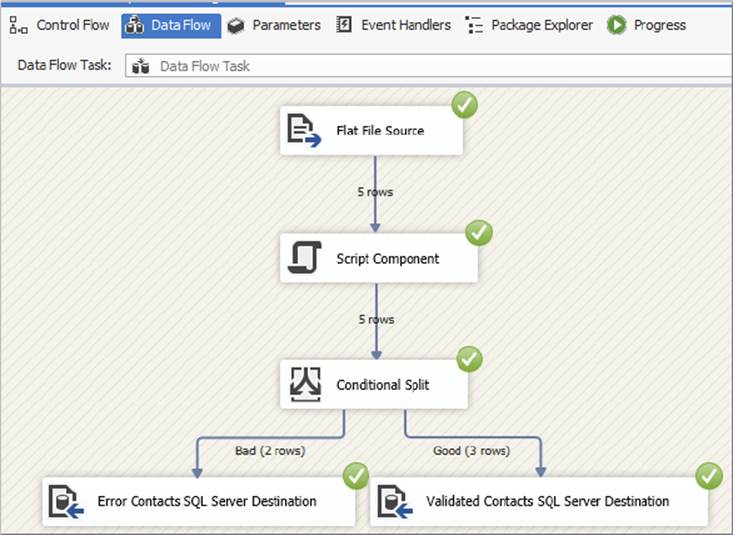
FIGURE 9-27
Failed State Validation
Joseph McClung JACKSONVILLE FLORIDA 322763939
Zip Failed Initial Format Rule
Andrew Ranger Jax fl
Synchronous versus Asynchronous
Data Flow transformations can handle data rows in one of two ways: synchronously or asynchronously.
· A synchronous component performs its stated operation for every row in the buffer of rows. It does not need to copy the buffer to a new memory space, and does not need to look at multiple rows to create its output. Examples of synchronous components include the Derived Column Transformation and the Row Count Transformation.
· The second type of transformation, an asynchronous component, creates another buffer for the output. It typically used multiple (or all) of the input rows to create a new output. The output usually looks quite different from the input, and the component tends to be slower because of the copying of memory. Asynchronous component examples include the Aggregate Transformation and Sort Transformation.
Script Components can be written to act synchronously or asynchronously. The Data Validation example previously discussed is an example of a synchronous component. Let’s create an asynchronous example for comparison. This example will show how to derive the median value from a set of source values.
Example: Creating a Median Value Asynchronously
As a starting point, use the AdventureWorks database to pull a set of values using an OLE DB Source, such as the TotalDue column from the Sales.SalesOrderHeader table. Similar to when you create a synchronous component, you can use a Script Component from the SSIS Toolbox as a transformation object and select the appropriate input columns, which in this case is the TotalDue column.
The Input and Outputs menu is where you veer off the same path that you would have followed with the synchronous component. The output property named SynchronousInputID needs to be set to None, which lets the component know that it should create a new buffer. The inputs and outputs created can be seen in Figure 9-28.
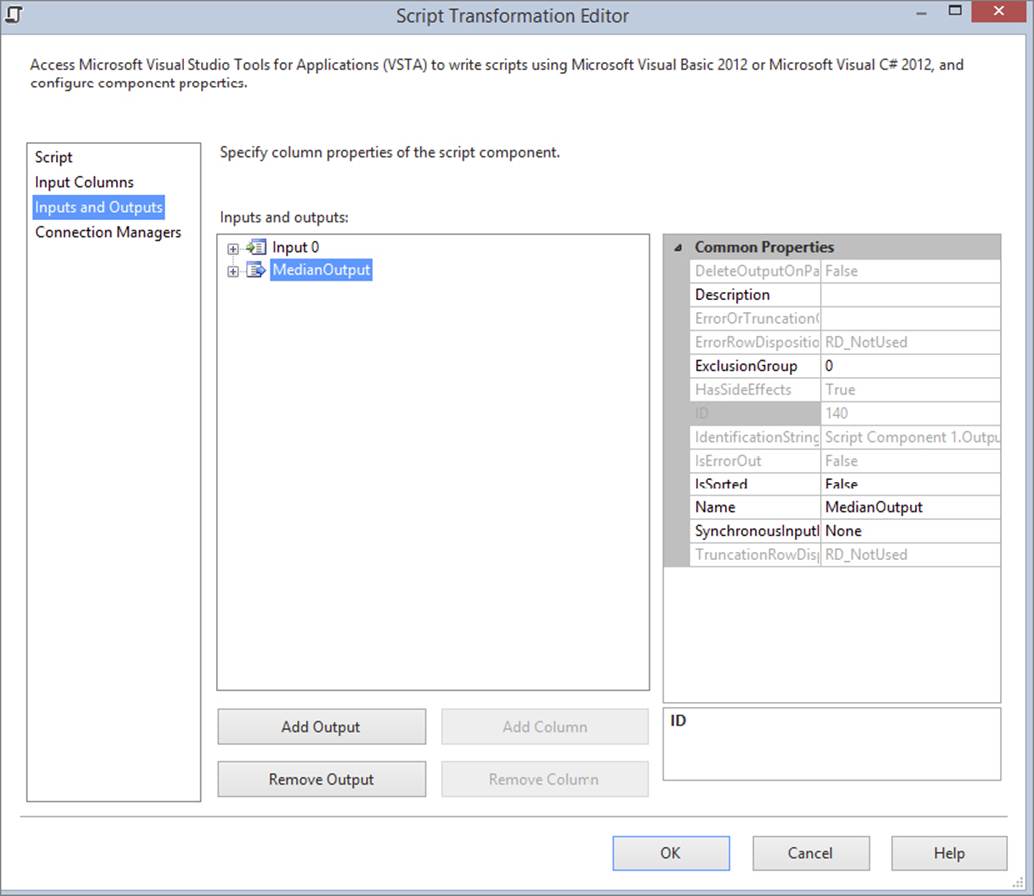
FIGURE 9-28
Once the inputs and outputs are prepared, it is time to write the script to perform the median calculation. The full script can be seen here in both languages (ProSSIS\Code\Ch09_ProSSIS\11bSCAsync.dtsx):
VB
Private valueArray As ArrayList
Public Overrides Sub PreExecute()
MyBase.PreExecute()
valueArray = New ArrayList
End Sub
Public Overrides Sub CreateNewOutputRows()
MedianOutputBuffer.AddRow()
End Sub
Public Overrides Sub Input0_ProcessInputRow(ByVal Row As Input0Buffer)
valueArray.Add(Row.TotalDue)
End Sub
Public Overrides Sub FinishOutputs()
valueArray.Sort()
If valueArray.Count Mod 2 = 0 Then
MedianOutputBuffer.Value = (CDec(valueArray(valueArray.Count / 2 - 1)) + _
CDec(valueArray(valueArray.Count / 2))) / 2
Else
MedianOutputBuffer.Value = CDec(valueArray(Floor(valueArray.Count / 2)))
End If
End Sub
C#
private ArrayList valueArray;
public override void PreExecute()
{
base.PreExecute();
valueArray = new ArrayList();
}
public override void CreateNewOutputRows()
{
MedianOutputBuffer.AddRow();
}
public override void Input0_ProcessInputRow(Input0Buffer Row)
{
valueArray.Add(Row.TotalDue);
}
public override void FinishOutputs()
{
base.FinishOutputs();
valueArray.Sort();
if (valueArray.Count % 2 == 0)
{
MedianOutputBuffer.Value =
(Convert.ToDecimal(valueArray[valueArray.Count / 2 - 1]) +
Convert.ToDecimal(valueArray[valueArray.Count / 2])) / 2;
}
else
{
MedianOutputBuffer.Value =
Convert.ToDecimal(valueArray[Convert.ToInt32(
Math.Floor(valueArray.Count / 2.0))]);
}
}
Note that there is an ArrayList that sits outside of the methods. This variable is accessed by multiple functions throughout the execution of the component, so it needs to be accessible by all. When then component runs its pre-execute phase, it will initialize theArrayList and prepare it to be used. Then as each input row is processed, the value will be added to the ArrayList. Finally, in the FinishOutputs method, the median is calculated by sorting the values and pulling the middle value. This value is added to the output buffer and can be inserted into a file or database. The finished and executed package is shown in Figure 9-29.

FIGURE 9-29
At this point, you have a good overview of how scripting works in SSIS and the difference between the Script Task and the Script Component, but as with any programming environment, you need to know how to troubleshoot and debug your code to ensure that everything works correctly. The next section describes some techniques you can use for more advanced SSIS scripting development.
ESSENTIAL CODING, DEBUGGING, AND TROUBLESHOOTING TECHNIQUES
You have now been all over the VSTA development environment and have been introduced to the different languages that move SSIS development into the managed code arena. Now, it is time to dig into some of the techniques for hardening your code for unexpected issues that may occur during runtime, and to look at some ways to troubleshoot SSIS packages. Any differences between the Script Task and the Script Component for some of these techniques are highlighted.
Structured Exception Handling
Structured exception handling (SEH) enables you to catch specific errors as they occur and perform any appropriate action needed. In many cases, you just want to log the error and stop execution, but in some cases you may want to try a different plan of action, depending on the error.
Here is an example of exception handling in SSIS scripting code in both languages (ProSSIS\Code\Ch09_ProSSIS\12ScriptErrorSEH.dtsx):
C#
public void Main()
{
Try
{
string fileText = string.Empty;
fileText = System.IO.File.ReadAllText("c:\\data.csv");
}
catch (System.IO.FileNotFoundException ex)
{
//Log Error Here
//MessageBox here for demo purposes only System.Windows.Forms.MessageBox.Show
(ex.ToString());
Dts.TaskResult = (int)ScriptResults.Failure;
}
Dts.TaskResult = (int)ScriptResults.Success;
}
VB
Public Sub Main()
Try
Dim fileText As String fileText = FileIO.FileSystem.ReadAllText("C:\data.csv")
Catch ex As System.IO.FileNotFoundException
'Log Error Here
'MessageBox here for demo purposes only System.Windows.Forms.MessageBox.Show
(ex.ToString())
Dts.TaskResult = ScriptResults.Failure
Return
End Try
Dts.TaskResult = ScriptResults.Success
End Sub
This trivial example attempts to read the contents of the file at C:\data.csv into a string variable. The code makes some assumptions that might not be true. An obvious assumption is that the file exists. That is why this code was placed in a Try block. It is trying to perform an action that has the potential for failure. If the file isn’t there, a System.IO.FileNotFoundException is thrown. A Try block marks a section of code that contains function calls with potentially known exceptions. In this case, the FileSystem ReadAllText function has the potentia l to throw a concrete exception.
The Catch block is the error handler for this specific exception. You would probably want to add some code to log the error inside the Catch block. For now, the exception is sent to the message box as a string so that it can be viewed. This code obviously originates from a Scripting Task, as it returns a result. The result is set to Failure, and the script is exited with the Return statement if the exception occurs. If the file is found, no exception is thrown, and the next line of code is executed. In this case, it would go to the line that sets theTaskResult to the value of the Success enumeration, right after the End Try statement.
If an exception is not caught, it propagates up the call stack until an appropriate handler is found. If none is found, the exception stops execution. You can have as many Catch blocks associated with a Try block as you wish. When an exception is raised, the Catch blocks are walked from top to bottom until an appropriate one is found that fits the context of the exception. Only the first block that matches is executed. Execution does not fall through to the next block, so it’s important to place the most specific Catch block first and descend to the least specific. A Catch block specified with no filter will catch all exceptions. Typically, the coarsest Catch block is listed last. The previous code was written to anticipate the error of a file not being found, so not only does the developer have an opportunity to add some recovery code, but the framework assumes that you will handle the details of the error itself. If the same code contained only a generic Catch statement, the error would simply be written to the package output. To see what this looks like, replace the Catch statement in the preceding code snippet with these:
C#
Catch()
VB
Catch
In this case, the error would simply be written to the package output like this:
SSIS package "Package.dtsx" starting.
Error: 0x1 at VB Script Task: System.Reflection.TargetInvocationException, mscorlib
System.IO.FileNotFoundException, mscorlib
System.Reflection.TargetInvocationException: Exception has been thrown by the
target of an invocation. ---> System.IO.FileNotFoundException: Could
not find file 'C:\data.csv'.
File name: 'C:\data.csv'
at System.IO.__Error.WinIOError(Int32 errorCode, String maybeFullPath)
at System.IO.FileStream.Init(String path, FileMode mode, FileAccess access, Int32
rights, Boolean useRights, FileShare share, Int32 bufferSize, FileOptions
options, SECURITY_ATTRIBUTES secAttrs, String msgPath, Boolean bFromProxy)
...
Task failed: VB Script Task
SSIS package "Package.dtsx" finished: Success.
The full stack is omitted for brevity and to point out that the task status shows that it failed.
Another feature of structured error handling is the Finally block. The Finally block exists inside a Try block and executes after any code in the Try block and any Catch blocks that were entered. Code in the Finally block is always executed, regardless of what happens in the Try block and in any Catch blocks. You would put code to dispose of any resources, such as open files or database connections, in the Finally block. Following is an example of using the Finally block to free up a connection resource:
C#
public void OpenConnection(string myConStr)
{
SqlConnection con = new SqlConnection(myConStr);
Try
{
con.Open();
//do stuff with con
}
catch (SqlException ex)
{
//log error here
}
Finally
{
if (con != null)
{
con.Dispose();
}
}
}
VB
Public Sub OpenConnection(myConStr as String)
Dim con As SqlConnection = New SqlConnection(myConStr)
Try
con.Open()
'do stuff with con
Catch ex As SqlException
'Log Error Here
Dts.TaskResult = Dts.Results.Failure
Return
Finally
If Not con Is Nothing Then con.Dispose()
End Try
End Sub
In this example, the Finally block is hit regardless of whether the connection is open or not. A logical If statement checks whether the connection is open and closes it to conserve resources. Typically, you want to follow this pattern if you are doing anything resource intensive like using the System.IO or System.Data assemblies.
NOTE For a full explanation of the Try/Catch/Finally structure in Visual Basic or C#, see the language reference in MSDN or Books Online.
Script Debugging and Troubleshooting
Debugging is an important feature of scripting in SSIS. You can still use the technique of popping up a message box function to see the value of variables, but there are more sophisticated techniques that will help you pinpoint the problem. Using the Visual Studio Tools for Applications environment, you now have the capability to set breakpoints, examine variables, and even evaluate expressions interactively.
Breakpoints
Breakpoints enable you to flag a line of code where execution pauses while debugging. Breakpoints are invaluable for determining what’s going on inside your code, as they enable you to step into it to see what’s happening as it executes.
NOTE A new feature since Integration Services 2012 is the ability to debug Script Components, which includes breakpoints and step abilities.
You can set a breakpoint in several ways. One way is to click in the gray margin at the left of the text editor at the line where you wish to stop execution. Another way is to move the cursor to the line you wish to break on and press F9. Yet another way is to select Debug ⇒ Toggle Breakpoint.
To continue execution from a breakpoint, press F10 to step to the next line, or F5 to run all the way through to the next breakpoint. When you have a breakpoint set on a line, the line has a red highlight like the one shown in Figure 9-30 (though you can’t see the color in this figure).
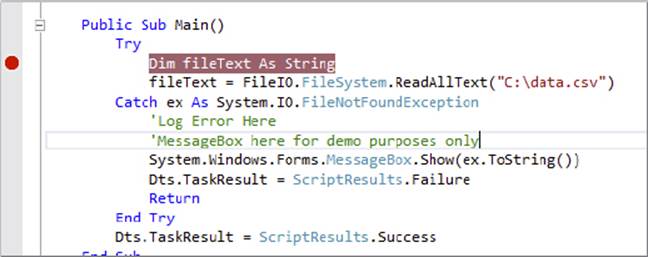
FIGURE 9-30
When a Script Task has a breakpoint set somewhere in the code, it will have a red dot on it similar to the one in Figure 9-31.
FIGURE 9-31
Row Count Component and Data Viewers
Previously, you looked at using the Visual Studio Tools for Applications environment to debug a Script Task or Script Component using breakpoints and other tools. Alternatively, you can inspect the data as it moves through the Data Flow using the Row Count Component or a Data Viewer.
The Row Count Component is very straightforward; it simply states how many rows passed through it. The Data Viewer contains additional information if desired. To add a Data Viewer, select the connector arrow that leaves the component for which you want to see data. In the previous example, this would be the connector from the Script Component to the Conditional Split Task. Right-click this connection, and select Enable Data Viewer. This automatically adds a Data Viewer that will show all columns on the stream. To remove any columns, double click the connector and select the Data Viewer menu. Figure 9-32 shows how to turn on the Data Viewer on the Data Flow Path.
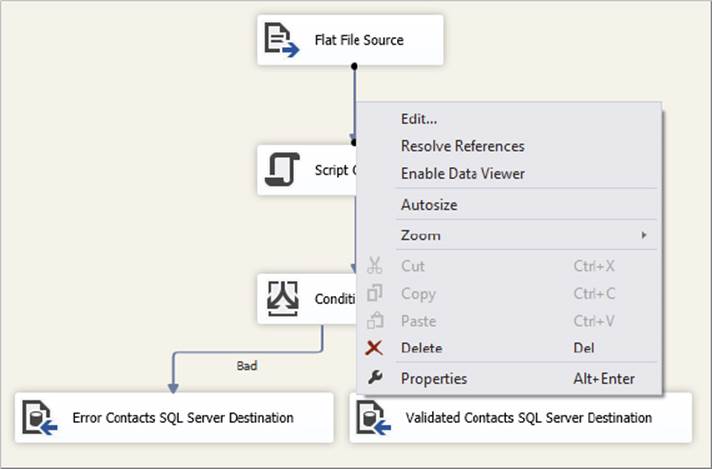
FIGURE 9-32
Now when you run this package again, you will get a Data Viewer window after the Script Component has executed. This view will show the data output by the Script Component. Figure 9-33 shows an example. Click the play button to continue package execution, or simply close the window.
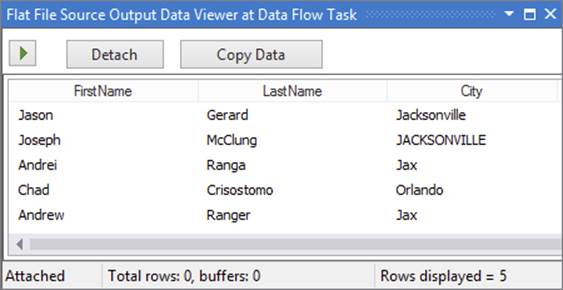
FIGURE 9-33
While using the Data Viewer certainly helps with debugging, it is no replacement for being able to step into the code. An alternative is to use the FireInformation event on the ComponentMetaData class in the Script Component. It is like the message box but without the modal effect.
Autos, Locals, and Watches
The SQL Server Data Tools environment provides you with some powerful views into what is happening with the execution of your code. These views consist of three windows: the Autos window, the Locals window, and the Watch window. These windows share a similar layout and display the value of expressions and variables, though each has a distinct method determining what data to display.
The Locals window displays variables that are local to the current statement, as well as three statements behind and in front of the current statement. For a running example, the Locals window would appear (see Figure 9-34).
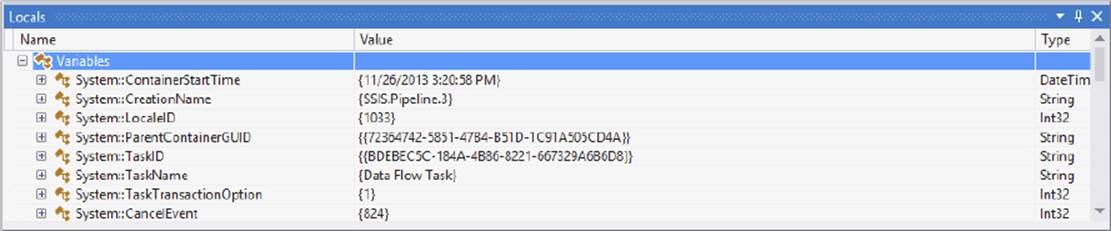
FIGURE 9-34
Watches are another very important feature of debugging. Watches enable you to specify a variable to watch. You can set up a watch to break execution when a variable’s value changes or some other condition is met. This enables you to see exactly when something is happening, such as a variable that has an unexpected value.
To add a watch, select the variable you want to watch inside the script, right-click it, and select Add Watch. This will add an entry to the Watch window.
You can also use the Quick Watch window, accessible from the Debug menu, or through the Ctrl+Alt+Q key combination. The Watch window shown in Figure 9-35 is in the middle of a breakpoint, and you can see the value of Iterator as it is being assigned the variable value of 2.

FIGURE 9-35
This window enables you to evaluate an expression at runtime and see the result in the window. You can then click the Add Watch button to move it to the Watch window.
The Immediate Window
The Immediate window enables you to evaluate expressions, execute procedures, and print out variable values. It is really a mode of the Command window, which enables you to issue commands to the IDE. Unfortunately, this too is useful only when you are within a breakpoint, and this can be done only within a Script Task.
NOTE If you can’t find the Immediate window but see the Command window, just type the command immed and press Enter.
The Immediate window is very useful while testing. You can see the outcome of several different scenarios. Suppose you have an object obj of type MyType, and MyType declares a method called DoMyStuff() that takes a single integer as an argument. Using the Immediate window, you could pass different values into the DoMyStuff() method and see the results. To evaluate an expression in the Immediate window and see its results, you must start the command with a question mark (?):
?obj.DoMyStuff(2)
"Hello"
Commands are terminated by pressing the Enter key. The results of the execution are printed on the next line. In this case, calling DoMyStuff() with a value of 2 returns the string “Hello.”
You can also use the Immediate window to change the value of variables. If you have a variable defined in your script and you want to change its value, perhaps for negative error testing, you can use this window, shown in Figure 9-36.
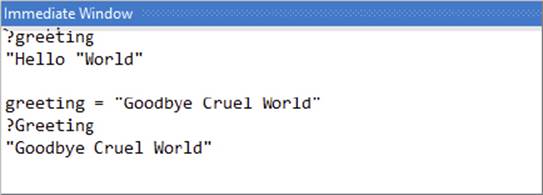
FIGURE 9-36
In this case, the value of the variable greeting is printed out on the line directly below the expression. After the value is printed, it is changed to “Goodbye Cruel World.” The value is then queried again, and the new value is printed. If you are in a Script Task and need to get additional information, this is a useful way to do it.
SUMMARY
In this chapter, you learned about the available scripting options in SSIS, including those that support managed code development and a robust IDE development environment. You used the Visual Studio Tools for Applications IDE to develop some basic Script Tasks. Then, to see how all this fits together in SSIS, you dove right in to using the Script Task to retrieve data into variables and to save data into external XML files, and used some .NET serialization techniques that enable custom serialization into MSMQ queues or web services. To understand how to leverage existing code libraries, you even created a utility class, registered it into the GAC, and accessed it in an SSIS script to validate data.
SSIS scripting is powerful, but it has been difficult for some developers to differentiate between when to use a Script Task and when a Script Component is appropriate. You have now examined both of these in detail in this chapter and should be able to use them with confidence in your daily development.
Experiment with the scripting features of SSIS using the examples in this chapter, and you will find all kinds of uses for them. Don’t forget to review Chapter 5, which covers expressions, to learn about the capabilities of controlling properties within the SSIS model at runtime. Now you are going to take what you have learned so far about SSIS’s capabilities — from Control Flow and Data Flow Tasks to expressions and Scripting Tasks and Components — and put it to work. In the next chapter, you’ll learn all about the techniques you have at your disposal to do a typical job of loading a data warehouse using SSIS.
All materials on the site are licensed Creative Commons Attribution-Sharealike 3.0 Unported CC BY-SA 3.0 & GNU Free Documentation License (GFDL)
If you are the copyright holder of any material contained on our site and intend to remove it, please contact our site administrator for approval.
© 2016-2026 All site design rights belong to S.Y.A.