PHP Solutions: Dynamic Web Design Made Easy, Third Edition (2014)
Chapter 10. Getting Started with a Database
Dynamic websites take on a whole new meaning in combination with a database. Drawing content from a database allows you to present material in ways that would be impractical—if not impossible—with a static website. Examples that spring to mind are online stores, such asAmazon.com; news sites, such as the BBC (www.bbcnews.com); and the big search engines, including Google and Yahoo! Database technology allows these websites to present thousands, sometimes millions, of unique pages. Even if your ambitions are nowhere near as grandiose, a database can increase your website’s richness of content with relatively little effort.
PHP supports all major databases, including Microsoft SQL Server, Oracle, and PostgreSQL, but it’s most frequently used in conjunction with the open source MySQL database. According to DB-Engines (http://db-engines.com/en/ranking), in late 2014 MySQL ranked as the second most widely used database. However, controversy surrounds the future of MySQL, which Google and Wikimedia have abandoned in favor of MariaDB (https://mariadb.org/). Several leading Linux distributions have also replaced MySQL with MariaDB. This chapter begins with a brief discussion of the implications of the rivalry between these two databases.
In this chapter, you’ll learn about the following:
· How a database stores information
· Choosing a graphical interface to interact with a database
· Creating user accounts
· Defining a database table with the appropriate data types
· Backing up and transferring data to another server
Which Database Should You Choose?
In the first two editions of this book, there was no question about which database to use. MariaDB either didn’t exist or had a tiny user base, and MySQL offered the following advantages:
· Cost: The MySQL Community Edition is free under the open source GPL license (www.gnu.org/licenses/old-licenses/gpl-2.0.html).
· Powerful: MySQL is used by leading organizations such as NASA, the White House, DaimlerChrysler, and BBC News. It’s feature-rich and fast.
· Widespread availability: MySQL is the most popular open source database. Most hosting companies automatically offer MySQL in combination with PHP.
· Cross-platform compatibility: MySQL runs on Windows, Mac OS X, and Linux. A database requires no conversion when transferred from one system to another.
· Open source: The code and features in the Community Edition are identical to the commercial version.
MySQL was originally developed by MySQL AB in Sweden, but the company was sold to Sun Microsystems in 2008. Sun was acquired two years later by Oracle, a major commercial database supplier. Many regarded this as a threat to MySQL’s continued survival as a free, open source database. However, Oracle is on record as saying “MySQL is integral to Oracle's complete, open and integrated strategy.” This did little to impress one of MySQL’s original creators, Michael “Monty” Widenius, who has accused Oracle of removing features from MySQL and of being slow to fix security issues.
Because the MySQL code is open source, Widenius has forked it to create MariaDB, which is described as “an enhanced, drop-in replacement for MySQL.” Originally, MariaDB followed the same version numbering as MySQL, so MariaDB 5.1 was a replacement for MySQL 5.1. This continued until version 5.5. Thereafter, MariaDB jumped to version 10.0. This change was made to make it clear that not all features in MySQL 5.6 will be imported into MariaDB.
![]() Tip The official pronunciation of MySQL is “my-ess-queue-ell.”
Tip The official pronunciation of MySQL is “my-ess-queue-ell.”
Compatibility of MariaDB and MySQL
In spite of the break between MariaDB 10.0 and MySQL 5.6, the two database systems are virtually interchangeable. The MariaDB executable uses the same name as MySQL (mysqld on Mac OS X and Linux, mysqld.exe on Windows). The main privileges table is also called mysql, and the default storage engine identifies itself as InnoDB, even though it’s actually a fork of InnoDB called Percona XtraDB.
As far as the code in this book is concerned, it should make no difference whether you use MariaDB or MySQL. MariaDB understands all the MySQL-specific PHP code. It’s also supported by the phpMyAdmin graphical interface for MySQL that I’ll be using in the remaining chapters.
I don’t have a crystal ball to predict how the rivalry between MariaDB and MySQL will play out in the coming years. At the time of this writing, MariaDB ranked 27th in the monthly survey conducted by DB-Engines, with only a fraction of the score achieved by MySQL. But with big names like Google and Wikimedia migrating to MariaDB, the situation could change rapidly. Nevertheless, to make this book readable, I have decided to stick with the current market leader, MySQL. Except where I make a specific reference to MariaDB, you should assume that all references to MySQL apply equally to MariaDB.
![]() Note All of the code in this book has been tested on the current stable versions of MySQL (5.6) and MariaDB (10.0). The code should also work in versions 5.1 through 5.5 of both.
Note All of the code in this book has been tested on the current stable versions of MySQL (5.6) and MariaDB (10.0). The code should also work in versions 5.1 through 5.5 of both.
How a Database Stores Information
All the data in a relational database, such as MySQL, is stored in tables, very much in the same way as in a spreadsheet, with information organized into rows and columns. Figure 10-1 shows the database table that you will build later in this chapter, as displayed in phpMyAdmin.
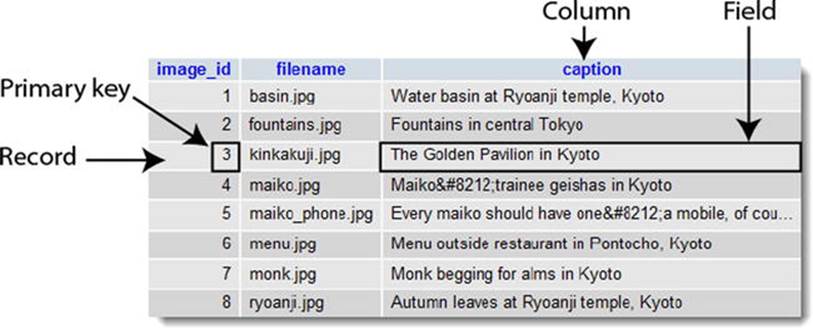
Figure 10-1. A database table stores information in rows and columns like in a spreadsheet
Each column has a name (image_id, filename, and caption) indicating what it stores.
The rows aren’t labeled, but the first column (image_id) contains a unique value known as a primary key, which identifies the data associated with the row. Each row contains an individual record of related data.
The intersection of a row and a column, where the data is stored, is called a field. For instance, the caption field for the third record in Figure 10-1 contains the value “The Golden Pavilion in Kyoto,” and the primary key for that record is 3.
![]() Note The terms “field” and “column” are often used interchangeably, particularly in older versions of phpMyAdmin. A field holds one piece of information for a single record, whereas a column contains the same field for all records.
Note The terms “field” and “column” are often used interchangeably, particularly in older versions of phpMyAdmin. A field holds one piece of information for a single record, whereas a column contains the same field for all records.
How primary keys work
Although Figure 10-1 shows image_id as a consecutive sequence from 1 to 8, they’re not row numbers. Figure 10-2 shows the same table with the captions sorted in alphabetical order. The field highlighted in Figure 10-1 has moved to the seventh row, but it still has the same image_idand filename.
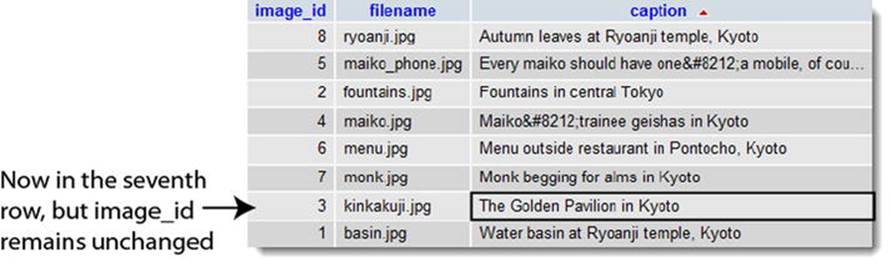
Figure 10-2. The primary key identifies the row even when the table is sorted in a different order
Although the primary key is rarely displayed, it identifies the record and all the data stored in it. Once you know the primary key of a record, you can update it, delete it, or use it to display data in a separate page. Don’t worry about how you find the primary key. It’s easily done usingStructured Query Language (SQL), the standard means of communicating with all major databases. The important thing to remember is to assign a primary key to every record.
![]() Tip Some people pronounce SQL like the word “sequel.” Others spell it out as “ess-queue-ell.”
Tip Some people pronounce SQL like the word “sequel.” Others spell it out as “ess-queue-ell.”
· A primary key doesn’t need to be a number, but it must be unique.
· Social Security, staff ID, or product numbers make good primary keys. They may consist of numbers, letters, and other characters, but are always unique.
· MySQL can generate a primary key for you automatically.
· Once a primary key has been assigned, it should never repeat, and never be changed.
Because a primary key must be unique, MySQL doesn’t normally reuse the number when a record is deleted. This leaves holes in the sequence. Don’t even think about renumbering. Gaps in the sequence are of no importance whatsoever. The purpose of the primary key is to identify the record, and by changing the numbers to close the gaps, you put the integrity of your database at serious risk.
![]() Tip Some people want to remove gaps in the sequence to keep track of the number of records in a table. It’s not necessary, as you’ll discover in the next chapter.
Tip Some people want to remove gaps in the sequence to keep track of the number of records in a table. It’s not necessary, as you’ll discover in the next chapter.
Linking tables with primary and foreign keys
Unlike a spreadsheet, most databases store data in several smaller tables, rather than in one huge table. This prevents duplication and inconsistency. Let’s say you’re building a database of your favorite quotations. Instead of typing out the name of the author each time, it’s more efficient to put the authors’ names in a separate table, and store a reference to an author’s primary key with each quotation. As you can see in Figure 10-3, every record in the left-hand table identified by author_id 32 is a quotation from William Shakespeare.
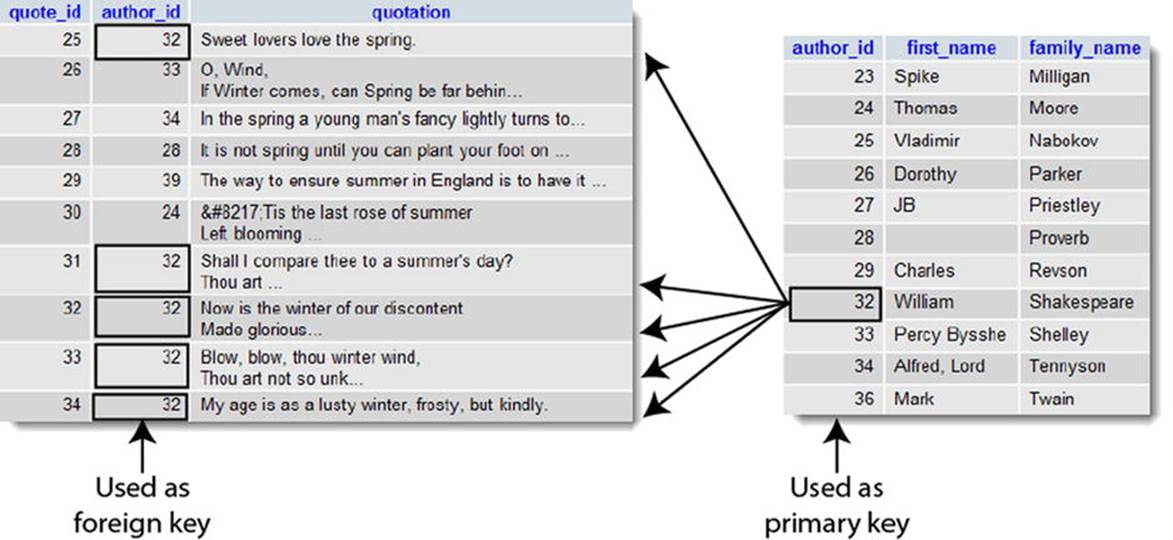
Figure 10-3. Foreign keys are used to link information stored in separate tables
Because the name is stored in only one place, it guarantees that it’s always spelled correctly. And if you do make a spelling mistake, just a single correction is all that’s needed to ensure that the change is reflected throughout the database.
Storing a primary key from one table within another table is known as creating a foreign key. Using foreign keys to link information in different tables is one of the most powerful aspects of a relational database. It can also be difficult to grasp in the early stages, so we’ll work with single tables until Chapters 15 and 16, which cover foreign keys in detail. In the meantime, bear the following points in mind:
· When used as the primary key of a table, the value must be unique within the column. So each author_id in the table on the right of Figure 10-3 is used only once.
· When used as a foreign key, there can be multiple references to the same value. So 32 appears several times in the author_id column in the table on the left.
![]() Tip As long as author_id remains unique in the table where it’s the primary key, you know that it always refers to the same person.
Tip As long as author_id remains unique in the table where it’s the primary key, you know that it always refers to the same person.
Breaking down information into small chunks
You may have noticed that the table on the right in Figure 10-3 has separate columns for each author’s first name and family name. This is an important principle of a relational database: break down complex information into its component parts, and store each part separately.
It’s not always easy to decide how far to go with this process. In addition to first and last name, you might want separate columns for title (Mr., Mrs., Ms., Dr., and so on) and for middle names or initials. Addresses are best broken down into street, town, county, state, zip code, and so on. Although it may be a nuisance to break down information into small chunks, you can always use SQL and/or PHP to join them together again. However, once you have more than a handful of records, it’s a major undertaking to try to separate complex information that is stored in a single field.
Checkpoints for good database design
There is no right way to design a database—each one is different. However, the following guidelines should point you in the right direction:
· Give each record in a table a unique identifier (primary key).
· Put each group of associated data in a table of its own.
· Cross-reference related information by using the primary key from one table as the foreign key in other tables.
· Store only one item of information in each field.
· Stay DRY (don’t repeat yourself).
In the early stages you are likely to make design mistakes that you later come to regret. Try to anticipate future needs, and make your table structure flexible. You can add new tables at any time to respond to new requirements.
That’s enough theory for the moment. Let’s move on to something more practical by building a database for the Japan Journey website from Chapters 4 and 5.
Using a Graphical Interface
The traditional way to interact with MySQL databases is through a Command Prompt window or Terminal. But it’s a lot easier to use a third-party graphic interface, such as phpMyAdmin, a browser-based front end to MySQL (see Figure 10-4).
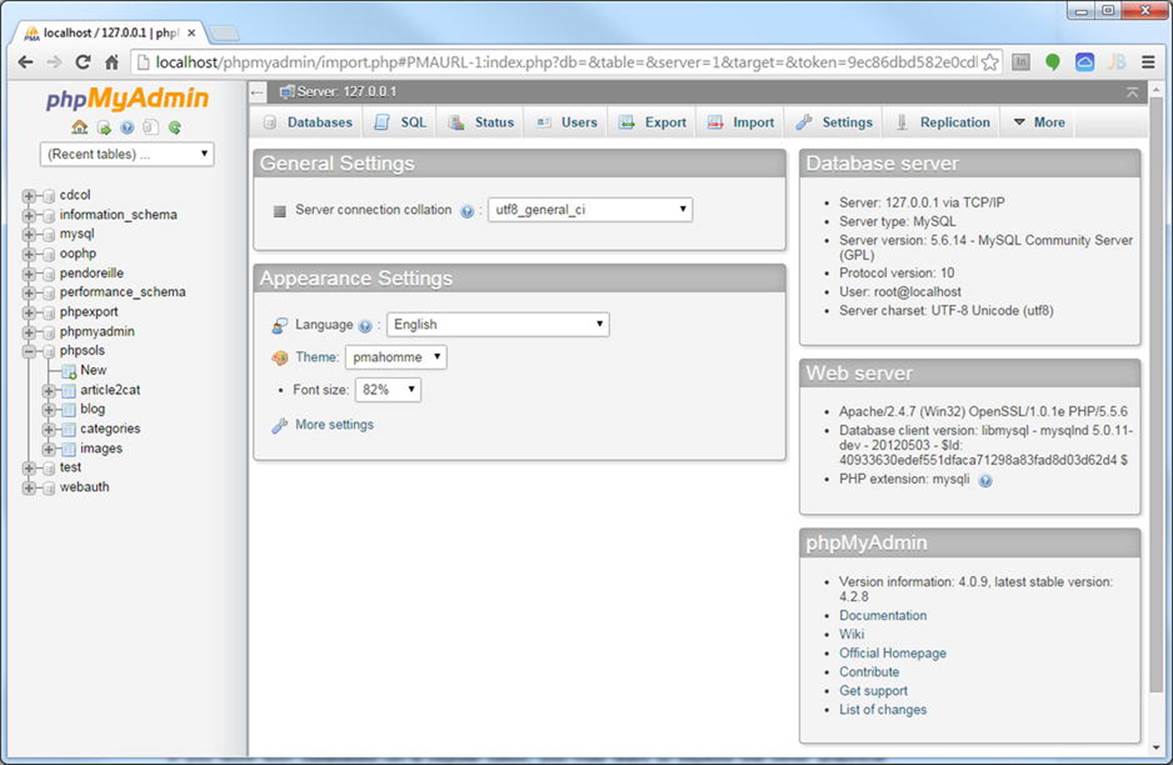
Figure 10-4. phpMyAdmin is a free graphical interface to MySQL that runs in your browser
Because phpMyAdmin (www.phpmyadmin.net) is installed automatically with XAMPP, MAMP, and most other free all-in-one packages, it’s the UI chosen for this book. It’s easy to use and has all the basic functionality required for setting up and administering MySQL databases. It works on Windows, Mac OS X, and Linux. Many hosting companies provide it as the standard interface to MySQL.
If you work with databases on a regular basis, you may want to eventually explore the other graphical interfaces. One that’s worthy of note is Navicat (www.navicat.com), a paid-for product available for Windows, Mac OS X, and Linux. The Navicat Cloud service also lets you administer databases from an iPhone or iPad. Navicat is particularly popular among web developers because it’s capable of performing scheduled backups of databases from a remote server to your local computer. It also helps you build SQL queries in a visual and intuitive manner (see Figure 10-5).
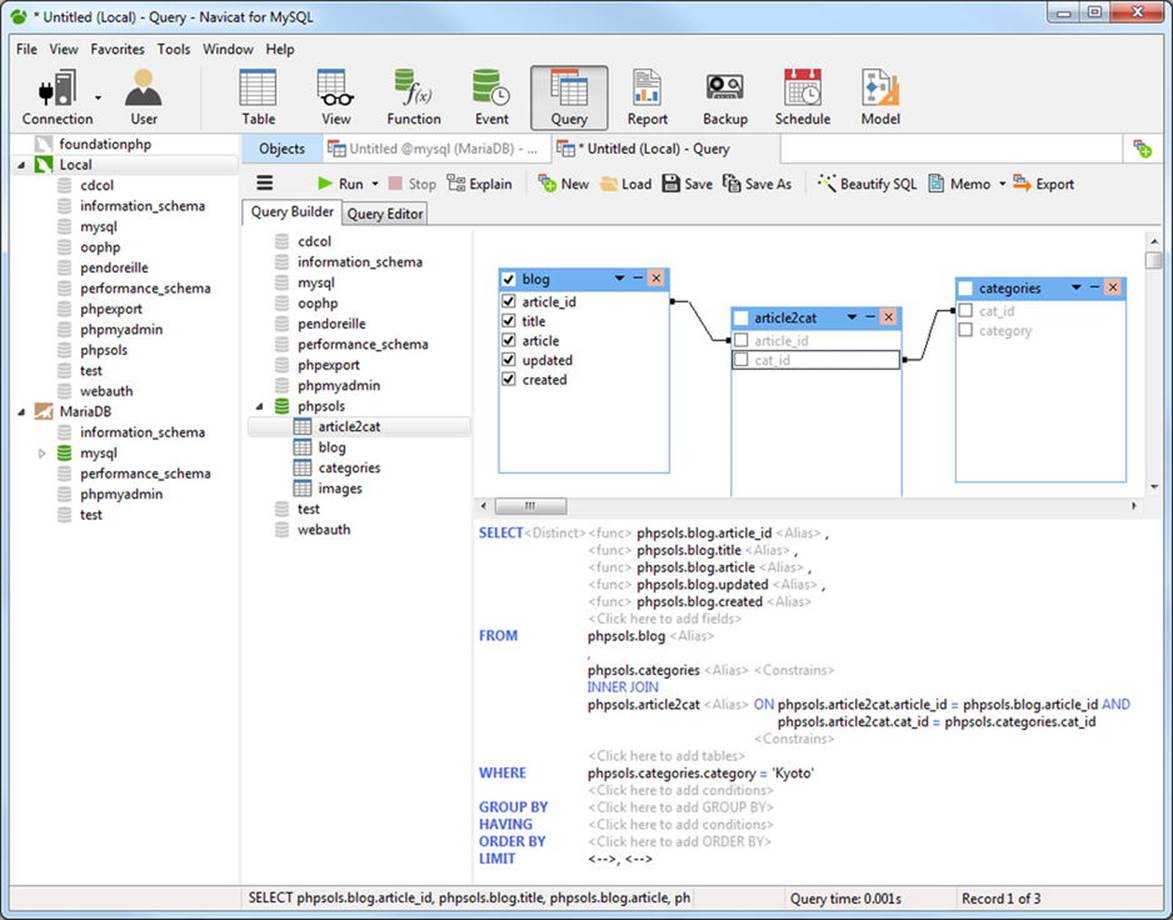
Figure 10-5. Navicat is one of the most popular graphical UIs for MySQL
![]() Note There are separate versions of Navicat for MySQL and MariaDB, but the MySQL version also supports MariaDB.
Note There are separate versions of Navicat for MySQL and MariaDB, but the MySQL version also supports MariaDB.
Launching phpMyAdmin
If you’re running XAMPP on Windows, there are three ways to launch phpMyAdmin:
· Enter http://localhost/phpMyAdmin/ in the browser address bar.
· Click the MySQL Admin button in the XAMPP Control Panel.
· Click the phpMyAdmin link under Tools in the XAMPP administration page (http://localhost/xampp/).
If you installed MAMP on Mac OS X, click the phpMyAdmin tab in the menu at the top of the MAMP start page (click Open start page in the MAMP control widget).
If you installed phpMyAdmin manually or are using a different all-in-one package, follow the package’s instructions or enter the appropriate address in your browser address bar (normally http://localhost/phpmyadmin/).
![]() Tip If you get a message saying that the server is not responding or that the socket is not correctly configured, make sure that the MySQL server is running.
Tip If you get a message saying that the server is not responding or that the socket is not correctly configured, make sure that the MySQL server is running.
If you installed XAMPP, you might be presented with a screen asking for a username and password. If so, log into phpMyAdmin as the root superuser. Enter root as the username and use the password you created for root when setting up XAMPP.
Setting Up the phpsols Database
In a local testing environment, there’s no limit to the number of databases that you can create in MySQL, and you can call them whatever you like. I am going to assume that you are working in a local testing environment and so will show you how to set up a database called phpsols, together with two user accounts called psread and pswrite.
![]() Note On shared hosting, you may be limited to just one database set up by the hosting company. If you’re testing on a remote server and don’t have the freedom to set up a new database and user accounts, substitute the name and username allocated by your hosting company for phpsolsand pswrite, respectively.
Note On shared hosting, you may be limited to just one database set up by the hosting company. If you’re testing on a remote server and don’t have the freedom to set up a new database and user accounts, substitute the name and username allocated by your hosting company for phpsolsand pswrite, respectively.
MySQL naming rules
The basic MySQL naming rules for databases, tables, and columns are as follows:
· Names can be up to 64 characters long.
· Legal characters are numbers, letters, the underscore, and $.
· Names can begin with a number but cannot consist exclusively of numbers.
Some hosting companies seem blissfully ignorant of these rules and assign clients databases that contain one or more hyphens (an illegal character) in their name. If a database, table, or column name contains spaces or illegal characters, you must always surround it by backticks (`) in SQL queries. Note that this is not a single quote ('), but rather is a separate character. On my Windows keyboard, it’s directly above the Tab key. On my Mac keyboard, it’s next to the left Shift key on the same key as the tilde (~).
When choosing names, you might accidentally choose one of MySQL’s many reserved words (http://dev.mysql.com/doc/refman/5.6/en/reserved-words.html), such as date or time. One technique to avoid this is to use compound words, such asarrival_date, arrival_time, and so on. Alternatively, surround all names with backticks. phpMyAdmin does this automatically, but you need to do this manually when writing your own SQL in a PHP script.
![]() Note Because so many people have used date, text, time, and timestamp as column names, MySQL permits their use without backticks. However, you should avoid using them. It’s bad practice and is unlikely to work if you migrate your data to a different database system.
Note Because so many people have used date, text, time, and timestamp as column names, MySQL permits their use without backticks. However, you should avoid using them. It’s bad practice and is unlikely to work if you migrate your data to a different database system.
Case sensitivity of names
Windows and Mac OS X treat MySQL names as case-insensitive. However, Linux and Unix servers respect case sensitivity. To avoid problems when transferring databases and PHP code from your local computer to a remote server, I strongly recommend that you use lowercase exclusively in database, table, and column names. When building names from more than one word, join them with an underscore.
Using phpMyAdmin to create a new database
Creating a new database in phpMyAdmin is easy.
1. Launch phpMyAdmin and select the Databases tab at the top of the main window.
2. Type the name of the new database (phpsols) into the field labeled Create new database. Leave the Collation drop-down menu at its default setting and click Create, as shown in the following screenshot:
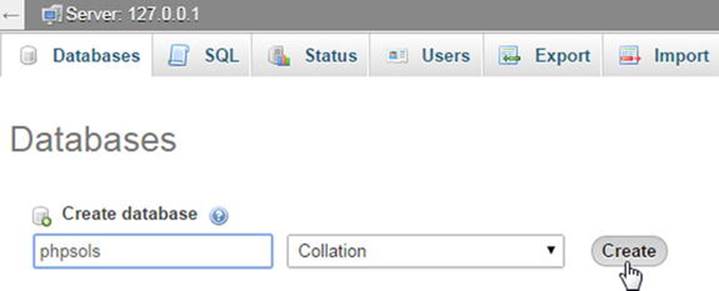
![]() Note Collation determines the sort order of records according to the rules of the language being used. Unless you are using a language other than English, Swedish, or Finnish, you never need to change its value.
Note Collation determines the sort order of records according to the rules of the language being used. Unless you are using a language other than English, Swedish, or Finnish, you never need to change its value.
3. You should see confirmation that the database has been created.

4. Before creating tables in a new database, it’s a good idea to create user accounts for it. Leave phpMyAdmin open, as you’ll continue using it in the next section.
Creating database-specific user accounts
A new installation of MySQL normally has only one registered user—the superuser account called “root,” which has complete control over everything. (XAMPP also creates a user account called “pma,” which phpMyAdmin uses for advanced features not covered by this book.) The root user should never be used for anything other than top-level administration, such as the creation and removal of databases, creating user accounts, and exporting and importing data. Each individual database should have at least one—preferably two—dedicated user accounts with limited privileges.
When you put a database online, you should grant users the fewest privileges they need, and no more. There are four important privileges—all named after the equivalent SQL commands:
· SELECT: Retrieves records from database tables
· INSERT: Inserts records into a database
· UPDATE: Changes existing records
· DELETE: Deletes records but not tables or databases (the command for that is DROP)
Most of the time, visitors only need to retrieve information, so the psread user account will have just the SELECT privilege and will be read-only. However, for user registration or site administration, you need all four privileges. These will be made available to the pswrite account.
Granting user privileges
1. In phpMyAdmin, click the Users tab at the top of the screen.
![]() Tip If you can’t see the Users tab, return to the main screen by clicking the little house icon at the top left of the screen. The Users tab should now be visible.
Tip If you can’t see the Users tab, return to the main screen by clicking the little house icon at the top left of the screen. The Users tab should now be visible.
2. On the Users overview page, click the Add a new User link halfway down the page.
3. On the page that opens, enter pswrite (or the name of the user account that you want to create) in the User name field. Select Local from the Host drop-down menu. This automatically enters localhost in the field alongside. Selecting this option allows the pswriteuser to connect to MySQL only from the same computer. Then enter a password in the Password field, and type it again for confirmation in the Re-type field.
![]() Note In the example files for this book, I’ve used 0Ch@Nom1$u as the password. MySQL passwords are case-sensitive.
Note In the example files for this book, I’ve used 0Ch@Nom1$u as the password. MySQL passwords are case-sensitive.
4. Beneath the Login Information table are sections labeled Database for user and Global privileges. Ignore both of them. Scroll down to the bottom of the page and click the Go button. This returns you to the Users overview page with confirmation that the user has been created.
5. In the Users overview table, click the Edit Privileges link in the row that lists the new user, as shown in the following screenshot:

6. This opens a page with the Global privileges table again. If you see four buttons at the top of the page, click the Database button, as shown in the following screenshot.
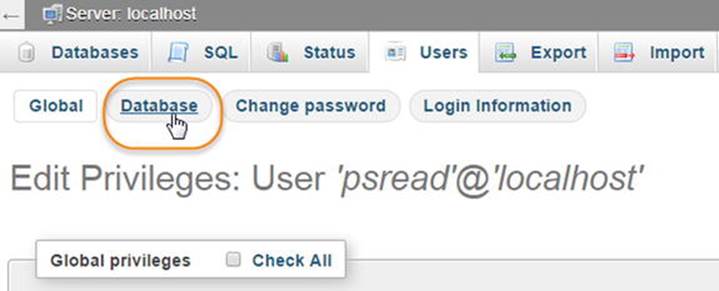
This displays a section labeled Database-specific privileges. In older versions of phpMyAdmin that don’t have the buttons at the top of the page, scroll down to the Database-specific privileges section below Global privileges.
7. Activate the drop-down menu labeled Add privileges on the following database and select phpsols.
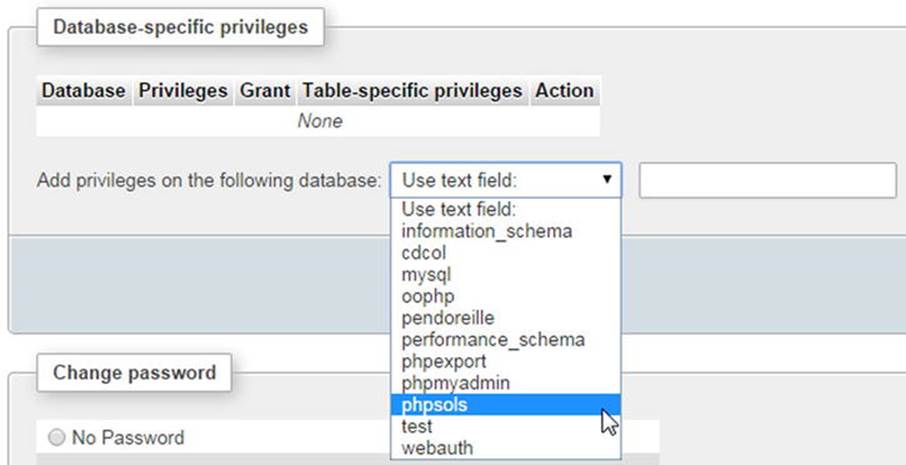
![]() Note MySQL has three default databases: information_schema, a read-only, virtual database that contains details of all other databases on the same server; mysql, which contains details of all user accounts and privileges; and test, which is empty. You should never edit the mysql database directly unless you’re sure what you’re doing.
Note MySQL has three default databases: information_schema, a read-only, virtual database that contains details of all other databases on the same server; mysql, which contains details of all user accounts and privileges; and test, which is empty. You should never edit the mysql database directly unless you’re sure what you’re doing.
8. The next screen allows you to set the privileges for this user on just the phpsols database. You want pswrite to have all four privileges listed earlier, so click the check boxes next to SELECT, INSERT, UPDATE, and DELETE.
If you hover your mouse pointer over each option, phpMyAdmin displays a tooltip describing what the option is for, as shown. After selecting the four privileges, click the top Go button.
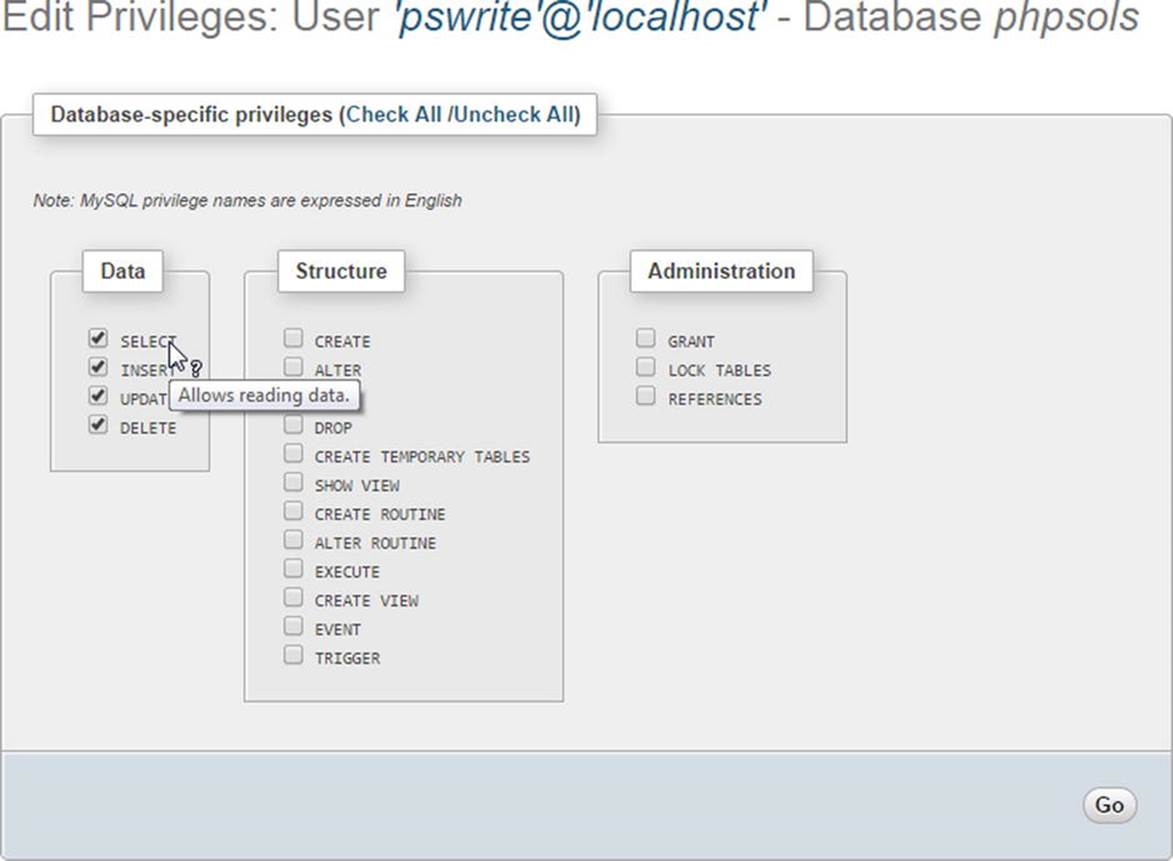
![]() Caution Many screens in phpMyAdmin have more than one Go button. Always click the button at the foot of or alongside the section with the options you want to set.
Caution Many screens in phpMyAdmin have more than one Go button. Always click the button at the foot of or alongside the section with the options you want to set.
9. phpMyAdmin presents you with confirmation that the privileges have been updated for the pswrite user account; the page displays the Database-specific privileges table again, in case you need to change anything. Click the Users tab at the top of the page to return to the Users overview.
10.Click Add a new User and repeat steps 3 through 8 to create a second user account called psread. This user will have much more restricted privileges, so when you get to step 7, check only the SELECT option. The password used for psread in the example files isK1y0mi$u.
Creating a database table
Now that you have a database and dedicated user accounts, you can begin creating tables. Let’s begin by creating a table to hold the details of images, as shown in Figure 10-1 at the beginning of this chapter. Before you can start entering data, you need to define the table structure. This involves deciding the following:
· The name of the table
· How many columns it will have
· The name of each column
· What type of data will be stored in each column
· Whether the column must always have data in each field
· Which column contains the table’s primary key
If you look at Figure 10-1, you can see that the table contains three columns: image_id (primary key), filename, and caption. Because it contains details of images, that’s a good name to use for the table. There’s not much point in storing a filename without a caption, so every column must contain data. Great! Apart from the data type, all the decisions have been made. I’ll explain the data types as we go along.
Defining the images table
These instructions show how to define a table in phpMyAdmin. If you prefer to use Navicat or a different UI for MySQL, use the settings in Table 10-1.
1. Launch phpMyAdmin, if it’s not already open, and select phpsols from the list of databases on the left of the screen. This opens the Structure tab, which reports that no tables have been found in the database.
2. In the Create table section, type the name of the new table (images) in the Name field and enter 3 in the Number of columns field. Then click the Go button.
3. The next screen is where you define the table. There are a lot of options, but not all of them need to be filled in. Table 10-1 lists the settings for the images table.
Table 10-1. Settings for the images table

The first column, image_id, is defined as type INT, which stands for integer. Its attribute is set to UNSIGNED, which means that only positive numbers are allowed. Its index is declared as PRIMARY, and the A_I (AUTO_INCREMENT) check box is selected, so MySQL automatically inserts in this column the next available number (starting at 1) whenever a new record is inserted.
The next column, filename, is defined as type VARCHAR with a length of 25. This means it accepts up to 25 characters of text.
The final column, caption, is also VARCHAR with a length of 120, so it accepts up to 120 characters of text.
The Null check box for all columns is deselected, so they must always contain something. However, that “something” can be as little as an empty string. I’ll describe the column types in more detail in the “Choosing the right column type” section later in this chapter.
The following screenshot shows the options after they have been set in phpMyAdmin (the columns to the right of A_I have been left out because they don’t need to be filled in):
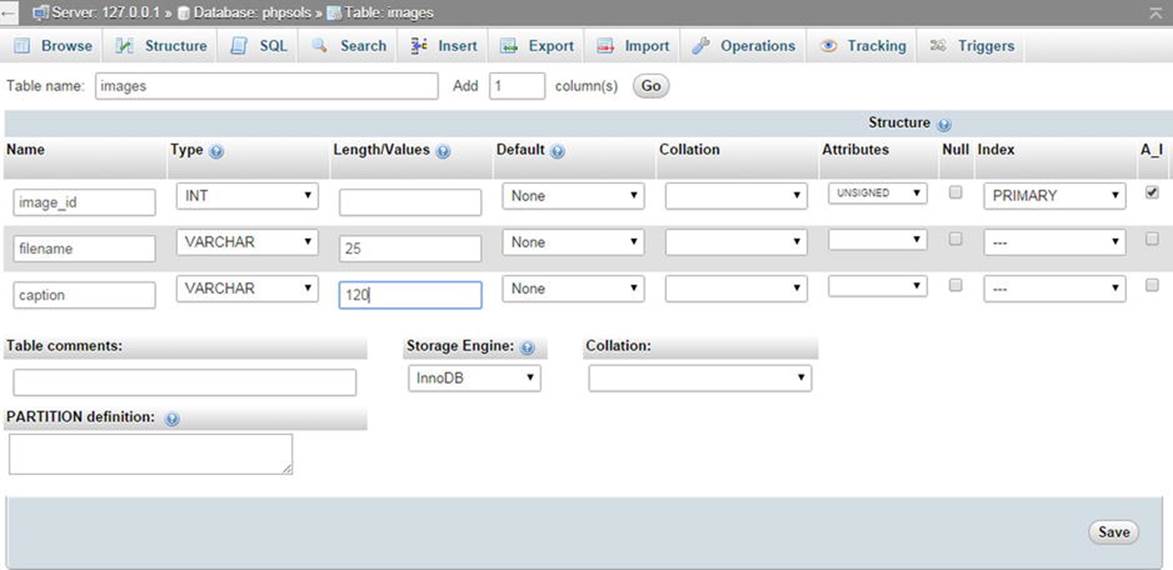
Toward the bottom of the screen is an option for Storage Engine. This determines the format used internally to store the database files. InnoDB became the default in MySQL 5.5. Prior to that MyISAM was the default. I’ll explain the differences between these storage engines in Chapter 15. In the meantime, use InnoDB. Converting from one storage engine to another is very simple.
When you have finished, click the Save button at the bottom of the screen.
![]() Tip If you click Go instead of Save, phpMyAdmin adds an extra column for you to define. If this happens, just click Save. As long as you don’t enter values into the fields, phpMyAdmin ignores the extra column.
Tip If you click Go instead of Save, phpMyAdmin adds an extra column for you to define. If this happens, just click Save. As long as you don’t enter values into the fields, phpMyAdmin ignores the extra column.
4. The next screen lists the images table with a series of actions you can perform on the table. Under Action, click Structure, or click the Structure tab at the top of the screen. This displays the details of the table you have just created.

Don’t be alarmed by the fact that Collation displays latin1_swedish_ci. MySQL was originally developed in Sweden, and Swedish uses the same sort order as English (and Finnish). The underlining of image_id indicates that it’s the table’s primary key. To edit any settings, click Change in the appropriate row. This opens the previous screen and allows you to change the values.
![]() Tip If you made a complete mess and want to start again, click the Operations tab at the top of the screen. Then, in the Delete data or table section, click Delete the table (DROP) and confirm that you want to drop the table. (In SQL, delete refers only to records. You drop a table or a database.)
Tip If you made a complete mess and want to start again, click the Operations tab at the top of the screen. Then, in the Delete data or table section, click Delete the table (DROP) and confirm that you want to drop the table. (In SQL, delete refers only to records. You drop a table or a database.)
Inserting records into a table
Now that you have a table, you need to put some data into it. Eventually, you’ll need to build your own content management system using HTML forms, PHP, and SQL, but the quick and easy way to do it is with phpMyAdmin.
Using phpMyAdmin to insert records manually
These instructions show how to add records to the images table through the phpMyAdmin interface.
1. If phpMyAdmin is still displaying the structure of the images table as at the end of the previous section, skip to step 2. Otherwise, launch phpMyAdmin and select the phpsols database from the list on the left. Then click Structure to the right of images, as shown in the following screenshot:

![]() Tip The breadcrumb trail at the top of the main frame provides the context for the tabs across the head of the page. The Structure tab at the top left of the preceding screenshot refers to the structure of the phpsols database. To access the structure of an individual table, click the Structure link alongside the table’s name.
Tip The breadcrumb trail at the top of the main frame provides the context for the tabs across the head of the page. The Structure tab at the top left of the preceding screenshot refers to the structure of the phpsols database. To access the structure of an individual table, click the Structure link alongside the table’s name.
2. Click the Insert tab in the center top of the page. This displays the following screen, ready for you to insert up to two records:
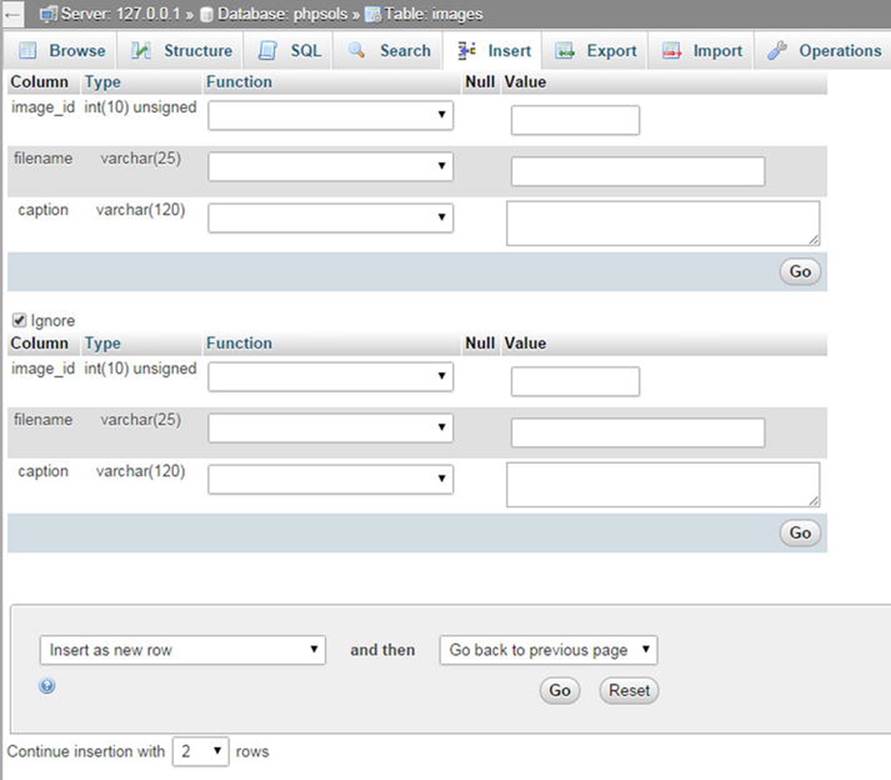
3. The forms display the names and details of each column. You can ignore the Function fields. MySQL has a large number of functions that you can apply to the values being stored in your table. You’ll learn more about them in the following chapters. The Value field is where you enter the data you want to insert in the table.
Because you have defined image_id as AUTO_INCREMENT, MySQL inserts the next available number automatically. So you must leave the image_id Value field blank. Fill in the next two Value fields as follows:
· filename: basin.jpg
· caption: Water basin at Ryoanji temple, Kyoto
4. In the second form, leave the Value field for image_id blank and fill in the next two fields like this:
· filename: fountains.jpg
· caption: Fountains in central Tokyo
Normally, the Ignore check box is automatically deselected when you add values to the second form, but deselect it if necessary.
5. Click the Go button at the bottom of the second form. The SQL used to insert the records is displayed at the top of the page. I’ll explain the basic SQL commands in the remaining chapters, but studying the SQL that phpMyAdmin displays is a good way to learn how to build your own queries. SQL is closely based on human language, so it isn’t all that difficult to learn.
6. Click the Browse tab at the top left of the page. You should now see the first two entries in the images table, as shown here:

As you can see, MySQL has inserted 1 and 2 in the image_id fields.
You could continue typing out the details of the remaining six images, but let’s speed things up a bit by using an SQL file that contains all the necessary data.
Loading the images records from an SQL file
Because the primary key of the images table has been set to AUTO_INCREMENT, it’s necessary to drop the table and all its data. The SQL file does this automatically and builds the table from scratch. These instructions assume that phpMyAdmin is open to the page in step 6 of the previous section.
1. If you’re happy to overwrite the data in the images table, skip to step 2. However, if you have entered data that you don’t want to lose, copy your data to a different table. Click the Operations tab at the top of the page, type the name of the new table in the blank field in the section titled Copy table to (database.table), and click Go. The following screenshot shows the settings for copying the structure and data of the images table to images_backup within the phpsols database.
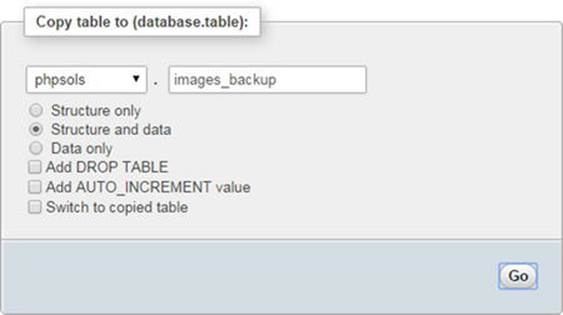
After clicking Go you should see confirmation that the table has been copied. The breadcrumb trail at the top of the page indicates that phpMyAdmin is still in the images table, so you can proceed to step 2, even though you have a different page onscreen.
2. Click the Import tab at the top of the page. In the next screen, click the Browse (or Choose File) button in File to import, then navigate to images.sql in the ch10 folder. Leave all options at their default setting, and click Go at the foot of the page.
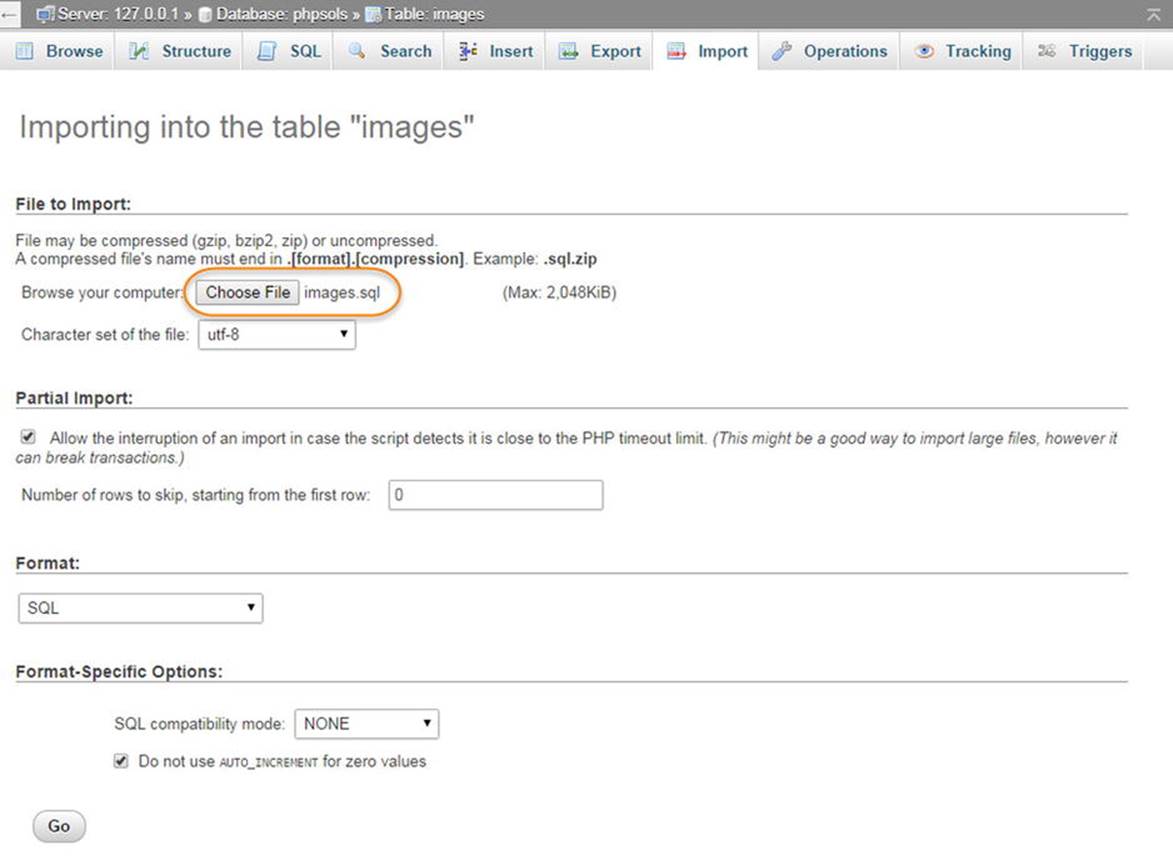
3. phpMyAdmin drops the original table, creates a new version, and inserts all the records. When you see confirmation that the file has been imported, click the Browse button at the top left of the page. You should now see the same data as shown in Figure 10-1 at the beginning of the chapter.
If you open images.sql in a text editor, you’ll see that it contains the SQL commands that create the images table and populate it with data. This is how the table is built:
DROP TABLE IF EXISTS `images`;
CREATE TABLE `images` (
`image_id` int(10) unsigned NOT NULL AUTO_INCREMENT,
`filename` varchar(25) NOT NULL,
`caption` varchar(120) NOT NULL,
PRIMARY KEY (`image_id`)
) ENGINE=InnoDB DEFAULT CHARSET=latin1 AUTO_INCREMENT=9 ;
Importing data from an SQL file like this is how you transfer data from your local testing environment to the remote server where your website is located. Assuming that your hosting company provides phpMyAdmin for you to administer your remote database, all you need to do to transfer the data is to launch the version of phpMyAdmin on your remote server, click the Import tab, select the SQL file on your local computer, and click Go.
The next section describes how to create the SQL file.
Creating an SQL file for backup and data transfer
MySQL doesn’t store your database in a single file that you can simply upload to your website. Even if you find the right files, you’re likely to damage them unless the MySQL server is turned off. Anyway, most hosting companies won’t permit you to upload the raw files because it would also involve shutting down their server, causing a great deal of inconvenience for everyone.
Nevertheless, moving a database from one server to another is easy. All it involves is creating a backup dump of the data and loading it into the other database using phpMyAdmin or any other database administration program. The dump is a text file that contains all the SQL commands needed to populate an individual table, or even an entire database. phpMyAdmin can create backups of your entire MySQL server, individual databases, selected tables, or individual tables.
![]() Tip You don’t need to read the details of how to create a dump file until you’re ready to transfer data to another server or create a backup.
Tip You don’t need to read the details of how to create a dump file until you’re ready to transfer data to another server or create a backup.
To keep things simple, these instructions show how to back up only a single database.
1. In phpMyAdmin, select the phpsols database from the list on the left. If the database was already selected, click the Database: phpsols breadcrumb at the top of the screen, as shown here:

2. Select Export from the tabs along the top of the screen.
3. There are two export methods: Quick and Custom. The Quick method has only one option for the format of the export file. The default is SQL, so all you have to do is click Go, and phpMyAdmin creates the SQL dump file and saves it to your browser’s defaultDownloads folder. The file has the same name as the database, so for the phpsols database, it’s called phpsols.sql.
4. The Quick method is okay for exporting a small amount of data, but you normally need more control over the export options; select the Custom radio button. There are a lot of options, so let’s take a look at them section by section.
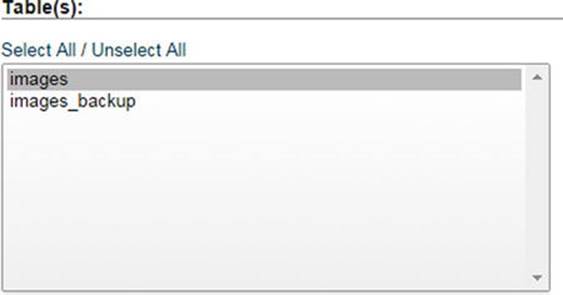
5. The Table(s) section lists all the tables in your database. By default all are selected, but you can choose which to export by clicking Unselect All, then holding down the Control key on Windows or the Command key on a Mac and selecting those that you want. In the following screenshot only the images table has been selected, so images_backup won’t be exported.
![]() Tip It’s often a good idea to back up individual tables rather than an entire database because most PHP servers are configured to limit uploads to 2 MB. Compressing dump files, as described in the next step, also helps get around size restrictions.
Tip It’s often a good idea to back up individual tables rather than an entire database because most PHP servers are configured to limit uploads to 2 MB. Compressing dump files, as described in the next step, also helps get around size restrictions.
6. The Output section has radio buttons that give you the option of either saving the SQL dump to a file (this is the default) or viewing the output as text. Viewing as text can be useful if you want to check the SQL that’s being generated before you create the file.
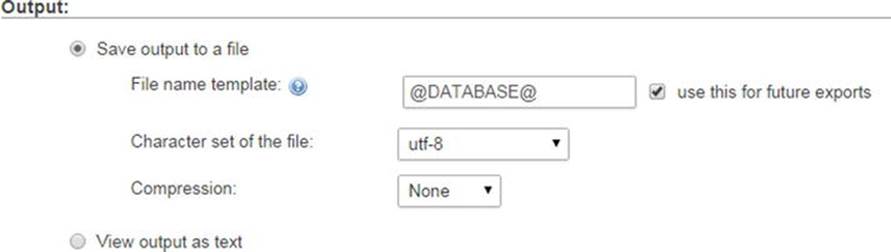
The File name template contains a value between @ marks. This automatically generates the filename from the server, database, or table, depending on what you’re exporting. A really cool feature of the template is that you can enhance it with PHP strftime()formatting characters (see http://php.net/manual/en/function.strftime.php). For example, you can add the current date automatically to the filename just before the filename extension, like this:
@DATABASE@_%Y-%m-%d
The default value of Character set of the file is utf-8. You need to change this only if your data is stored in a specific regional format.
Compression is a really useful option. By default dump files are not compressed, but the drop-down menu offers the option to use zip, gzip, or bzip compression. This can greatly reduce the size of the dump file, speeding up the transfer of data to another server. When importing a compressed file, phpMyAdmin automatically detects the compression type and unzips it.
7. The Format section defaults to SQL but offers a range of other formats, including CSV, JSON, and XML.
8. In Format-specific options, you have the option to maximize output compatibility with different database systems or older versions of MySQL. Normally, the value should be set to the default: NONE.

The radio buttons give you the option to export only the structure, only the data, or both structure and data. Exporting both is the default.
If you select either the structure or data radio button, some of the remaining options are removed from the page.
9. The Object creation options section lets you fine-tune the SQL for creating databases and tables. The following screenshot shows the default settings.
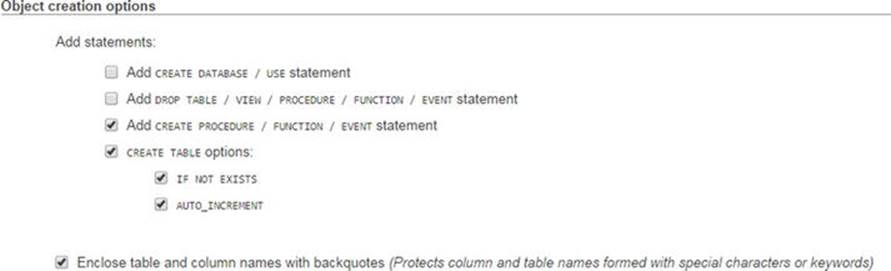
When creating a backup, it’s usually a good idea to select the Add DROP TABLE / VIEW / PROCEDURE / FUNCTION / EVENT statement check box, because a backup is normally used to replace existing data that has become corrupted.
The final check box, which is selected by default, wraps table and column names in backquotes (backticks) to avoid problems with names that contain invalid characters or use reserved words. I suggest always leaving this selected.
10.The Data creation options section controls how data is inserted into tables. In most cases, the default settings are fine. However, you may be interested in changing the first four, which are shown in the following screenshot.
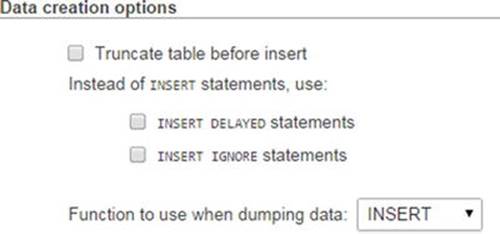
The first check box allows you to truncate the table before inserting the data. This is useful if you want to replace the existing data, perhaps if it has been corrupted.
The other two check boxes affect how INSERT commands are executed. INSERT DELAYED doesn’t work with the default InnoDB tables. Moreover, it is deprecated as of MySQL 5.6.6, so it’s probably best to avoid it.
INSERT IGNORE skips errors, such as duplicate primary keys. Personally, I think it’s best to be alerted to errors, so I don’t recommend using it.
The drop-down menu labeled Function to use when dumping data lets you choose INSERT, UPDATE, or REPLACE. The default is to insert new records with INSERT. If you select UPDATE, only existing records are updated. REPLACE updates where necessary, and inserts new records if they don’t already exist.
11.When you have made all your selections, click Go at the bottom of the page. You now have a backup that can be used to transfer the contents of your database to another server.
![]() Tip By default, the file created by phpMyAdmin contains the SQL commands only to create and populate the database tables. It does not include the command to create the database unless you select the custom option to do so. This means you can import the tables into any database. It does not need to have the same name as the one in your local testing environment.
Tip By default, the file created by phpMyAdmin contains the SQL commands only to create and populate the database tables. It does not include the command to create the database unless you select the custom option to do so. This means you can import the tables into any database. It does not need to have the same name as the one in your local testing environment.
Choosing the Right Data Type in MySQL
You may have received a bit of a shock when selecting Type for the image_id column. phpMyAdmin lists all available data types—there are nearly 40 in MySQL 5.6. Rather than confuse you with unnecessary details, I’ll explain just those most commonly used.
You can find full details of all data types in the MySQL documentation at http://dev.mysql.com/doc/refman/5.6/en/data-types.html.
Storing text
The difference between the main text data types boils down to the maximum number of characters that can be stored in an individual field, the treatment of trailing spaces, and whether you can set a default value.
· CHAR: A fixed-length string. You must specify the required length in the Length/Values field. The maximum permitted value is 255. Internally, strings are right-padded with spaces to the specified length, but the trailing spaces are stripped when you retrieve the value. You can define a default.
· VARCHAR: A variable-length string. You must specify the maximum number of characters you plan to use (in phpMyAdmin, enter the number in the Length/Values field). Prior to MySQL 5.0, the limit was 255. This was increased to 65,535 in MySQL 5.0. If a string is stored with trailing spaces, they are preserved on retrieval. Accepts a default value.
· TEXT: Stores text up to a maximum of 65,535 characters (approximately 50% longer than this chapter). Cannot define a default value.
TEXT is convenient because you don’t need to specify a maximum size (in fact, you can’t). Although the maximum length of VARCHAR is the same as TEXT in MySQL 5.0 and later, other factors may limit the actual amount that can be stored.
![]() Tip Keep it simple: use VARCHAR for short text items and TEXT for longer ones.
Tip Keep it simple: use VARCHAR for short text items and TEXT for longer ones.
Storing numbers
The most frequently used numeric column types are as follows:
· INT: Any whole number (integer) between –2,147,483,648 and 2,147,483,647. If the column is declared as UNSIGNED, the range is from 0 to 4,294,967,295.
· FLOAT: A floating-point number. You can optionally specify two comma-separated numbers to limit the range. The first number specifies the maximum number of digits, and the second specifies how many of those digits should come after the decimal point. Since PHP will format numbers after calculation, I recommend that you use FLOAT without the optional parameters.
· DECIMAL: A number with a fraction; contains a fixed number of digits after the decimal point. When defining the table, you need to specify the maximum number of digits and how many of those digits should come after the decimal point. In phpMyAdmin, enter the numbers separated by a comma in the Length/Values field. For example, 6,2 permits numbers in the range from –9999.99 to 9999.99. If you don’t specify the size, the decimal fraction is truncated when values are stored in this type of column.
The difference between FLOAT and DECIMAL is accuracy. Floating-point numbers are treated as approximate values and are subject to rounding errors (for a detailed explanation, see
http://dev.mysql.com/doc/refman/5.6/en/problems-with-float.html).
Use DECIMAL to store currencies. However, it’s important to note that prior to MySQL 5.0.3, the DECIMAL data type was stored as a string, so it could not be used with SQL functions, such as SUM(), to perform calculations inside the database. If your remote server is running an older version of MySQL, store currencies in an INT column as cents; for pounds, use pence. Then use PHP to divide the result by 100 and format the currency as desired. Better still, move to a server that runs MySQL 5.0 or higher.
![]() Caution Don’t use commas or spaces as the thousands separator. Apart from numerals, the only characters permitted in numbers are the negative operator (-) and the decimal point (.).
Caution Don’t use commas or spaces as the thousands separator. Apart from numerals, the only characters permitted in numbers are the negative operator (-) and the decimal point (.).
Storing dates and times
MySQL stores dates in one format only: YYYY-MM-DD. It’s the standard approved by the ISO (International Organization for Standardization) and avoids the ambiguity inherent in different national conventions. I’ll return to the subject of dates in Chapter 14. The most important column types for dates and times are as follows:
· DATE: A date stored as YYYY-MM-DD. The range is 1000-01-01 to 9999-12-31.
· DATETIME: A combined date and time displayed in the format YYYY-MM-DD HH:MM:SS.
· TIMESTAMP: A timestamp (normally generated automatically by the computer). Legal values range from the beginning of 1970 to partway through January 2038.
![]() Caution MySQL timestamps are based on a human-readable date and, since MySQL 4.1, use the same format as DATETIME. As a result, they are incompatible with Unix and PHP timestamps, which are based on the number of seconds elapsed since January 1, 1970. Don’t mix them.
Caution MySQL timestamps are based on a human-readable date and, since MySQL 4.1, use the same format as DATETIME. As a result, they are incompatible with Unix and PHP timestamps, which are based on the number of seconds elapsed since January 1, 1970. Don’t mix them.
Storing predefined lists
MySQL lets you store two types of predefined lists that could be regarded as the database equivalents of radio-button and check-box states:
· ENUM: This column type stores a single choice from a predefined list, such as “yes, no, don’t know” or “male, female.” The maximum number of items that can be stored in the predefined list is a mind-boggling 65,535—some radio-button group!
· SET: This column type stores zero or more choices from a predefined list. The list can hold a maximum of 64 choices.
While ENUM is quite useful, SET tends to be less so, mainly because it violates the principle of storing only one piece of information in each field. The type of situation in which it can be useful is when recording optional extras on a car or multiple choices in a survey.
Storing binary data
Storing binary data, such as images, isn’t a good idea. It bloats your database, and you can’t display images directly from a database. However, the following column types are designed for binary data:
· TINYBLOB: Up to 255 bytes
· BLOB: Up to 64 KB
· MEDIUMBLOB: Up to 16 MB
· LONGBLOB: Up to 4 GB
With such whimsical names, it’s a bit of a letdown to discover that BLOB stands for binary large object.
Chapter Review
Much of this chapter has been devoted to theory, explaining the basic principles of good database design. Instead of putting all the information you want to store in a single, large table like a spreadsheet, you need to plan the structure of your database carefully, moving repetitive information into separate tables. As long as you give each record in a table a unique identifier—its primary key—you can keep track of information and link it to related records in other tables through the use of foreign keys. The concept of using foreign keys can be difficult to understand at the outset, but it should become clearer by the end of this book.
You have also learned how to create MySQL user accounts with limited privileges, as well as how to define a table and import and export data using an SQL file. In the next chapter, you’ll use PHP to connect to the phpsols database in order to display the data stored in the imagestable.