PHP Solutions: Dynamic Web Design Made Easy, Third Edition (2014)
Chapter 11. Connecting to a Database with PHP and SQL
PHP offers three different ways to connect to and interact with a MySQL database: the original MySQL extension, MySQL Improved (MySQLi), or PHP Data Objects (PDO). Which one you choose is an important decision, because they use incompatible code. You can’t mix them in the same script. The original MySQL extension was deprecated in PHP 5.5 and will be removed at some unspecified date in the future. It’s not covered in this book.
If you plan to use only MySQL (or its drop-in replacement, MariaDB), I recommend that you use MySQLi. It’s designed specifically to work with MySQL and is fully compatible with MariaDB.
On the other hand, if database flexibility is important to you, choose PDO. The advantage of PDO is that it’s software-neutral. In theory, at least, you can switch your website from MySQL to Microsoft SQL Server or a different database system by changing only a couple of lines of PHP code. In practice, you normally need to rewrite at least some of your SQL queries because each database vendor adds custom functions on top of the standard SQL.
The remaining chapters of this book cover both MySQLi and PDO. If you want to concentrate on only one of them, just ignore the sections that relate to the other.
Although PHP connects to the database and stores any results, the database queries need to be written in SQL. This chapter teaches you the basics of retrieving information stored in a table.
In this chapter, we’ll cover the following:
· Connecting to MySQL and MariaDB with MySQLi and PDO
· Counting the number of records in a table
· Using SELECT queries to retrieve data and display it in a webpage
· Keeping data secure with prepared statements and other techniques
Checking Your Remote Server Setup
XAMPP and MAMP support both MySQLi and PDO, but you need to check the PHP configuration of your remote server to verify the degree of support it offers. Run phpinfo() on your remote server, scroll down the configuration page, and look for the following sections. They’re listed alphabetically, so you’ll need to scroll down a long way to find them.
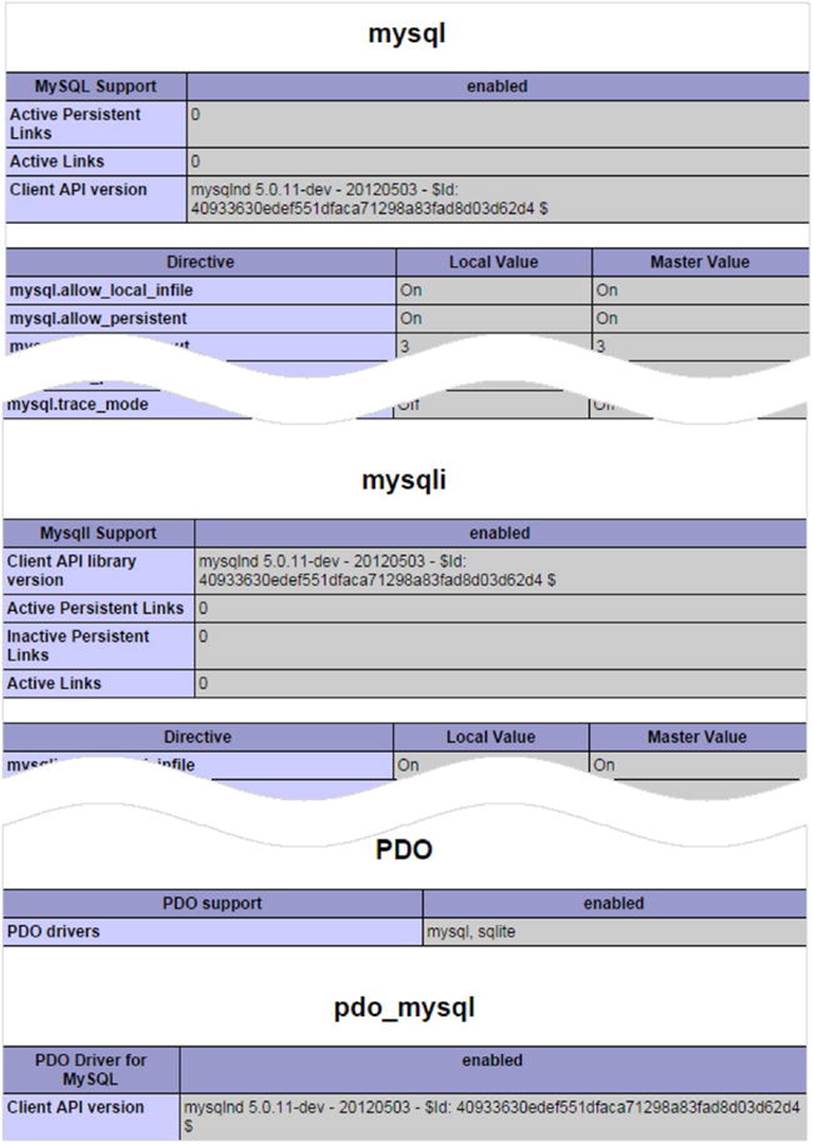
All hosting companies should have the first two sections (mysql and mysqli). If only the first one is listed, you’re on a server that’s dangerously out of date. Your host should have at least mysqli listed. If you plan to use PDO, you not only need to check that PDO is enabled, but you must also make sure that pdo_mysql is listed. PDO requires a different driver for each type of database.
CUTTING THROUGH THE CONFUSION
PHP’s decision to deprecate the original MySQL extension along with uncertainty about Oracle’s plans for MySQL have led some people to declare that MySQL is dead. It’s not. As mentioned in the previous chapter, MySQL ranked as the number two database in late 2014. The number one database was Oracle. A company that owns the top two databases is hardly likely to kill such a successful product. Even if it does, MariaDB is a seamless replacement for MySQL.
Most of the code that runs MariaDB is identical because MySQL is an open source project. Many of the engineers working on MariaDB came from the original MySQL team, so they’re eminently qualified to maintain and develop it. MariaDB has started adding new features while maintaining all of MySQL’s core functionality. Unless you need MariaDB’s new features, MySQL and MariaDB are interchangeable.
PHP’s decision to drop the original MySQL extension is completely unrelated. MySQL Improved (MySQLi) was introduced in PHP 5.0 in 2004 as a replacement for the original MySQL extension, but the slow adoption of PHP 5 made it impossible to phase out the old functions.
Although this book doesn’t use the original MySQL extension, you need to be aware of its existence and know how to identify scripts that use it. All functions in the original MySQL extension begin with mysql_. Avoid all scripts, articles, and books that use them. They’re now hopelessly out of date.
MySQLi can be written two ways: using ordinary functions (procedural code) or using objects. In this book, I use MySQLi objects because they involve less typing. However, if you come across other sources that use MySQLi functions, you can recognize them because they begin with mysqli_. However, beware: most of them have mysql_ equivalents. For example, mysql_connect() and mysqli_connect(), mysql_query() and mysqli_query(), and so on. At first glance, they’re easy to mix up. The only difference in name is the letter “i” before the underscore. In spite of their similarity, conversion from the old function to the new one isn’t simply a question of inserting that “i.” The arguments taken by the functions are usually slightly different.
Finally, if you’re concerned about the future of MySQL, the simple answer is to learn how to use PDO. There are PDO drivers for more than 10 major databases. You might need to make some changes to the SQL so as to work with a different database, but all the PHP code taught in this book will be exactly the same.
How PHP Communicates with a Database
Regardless of whether you use MySQLi or PDO, the process always follows this sequence:
1. Connect to the database using the hostname, username, password, and database name.
2. Prepare an SQL query.
3. Execute the query and save the result.
4. Extract the data from the result (usually with a loop).
Username and password are the usernames and passwords of the accounts you have just created or of the account given to you by your hosting company. But what about hostname? In a local testing environment it’s localhost. What comes as a surprise is that it’s often localhosteven on a remote server. This is because in many cases the database server is located on the same server as your website. In other words, the web server that displays your pages and the database server are local to each other. However, if the database server is on a separate machine, your hosting company will tell you the address to use. The important thing to understand is that the hostname is not the same as your website’s domain name.
Let’s take a quick look at how you connect to a database with each of the methods.
Connecting with the MySQL Improved extension
MySQLi has two interfaces: procedural and object-oriented. The procedural interface is designed to ease the transition from the original MySQL functions. Since the object-oriented version is more compact, that’s the version adopted here.
To connect to MySQL or MariaDB, you create a mysqli object by passing four arguments to the constructor method: the hostname, username, password, and name of the database. This is how you connect to the phpsols database:
$conn = new mysqli($hostname, $username, $password, 'phpsols');
This stores the connection object as $conn.
If your database server uses a nonstandard port, you need to pass the port number as a fifth argument to the mysqli constructor.
![]() Tip MAMP uses a socket connection to MySQL, so there’s no need to add the port number even if MySQL is listening on port 8889. This applies to both MySQLi and PDO.
Tip MAMP uses a socket connection to MySQL, so there’s no need to add the port number even if MySQL is listening on port 8889. This applies to both MySQLi and PDO.
Connecting with PDO
PDO requires a slightly different approach. The most important difference is that PDO throws an exception if the connection fails. If you don’t catch the exception, the debugging information displays all the connection details, including your username and password. Consequently, you need to wrap the code in a try block and catch the exception to prevent sensitive information from being displayed.
The first argument to the PDO constructor method is a data source name (DSN). This is a string that consists of the PDO driver name followed by a colon, followed by PDO driver-specific connection details.
To connect to MySQL or MariaDB, the DSN needs to be in the following format:
'mysql:host=hostname;dbname=databaseName'
If your database server is using a nonstandard port, the DSN should also contain the port number, like this:
'mysql:host=hostname;port=portNumber;dbname=databaseName'
After the DSN, you pass the username and password to the PDO() constructor method. So the code to connect to the phpsols database looks like this:
try {
$conn = new PDO("mysql:host=$hostname;dbname=phpsols", $username, $password);
} catch (PDOException $e) {
echo $e->getMessage();
}
Using echo to display the message generated by the exception is acceptable during testing, but when you deploy the script on a live website, you need to redirect the user to an error page, as described in PHP Solution 4-8.
![]() Tip The DSN is the only part of the PHP code that you need to change in order to connect to a different database system. All the remaining PDO code is completely database-neutral. Details of how to create the DSN for PostgreSQL, Microsoft SQL Server, SQLite, and other database systems can be found at http://php.net/manual/en/pdo.drivers.php.
Tip The DSN is the only part of the PHP code that you need to change in order to connect to a different database system. All the remaining PDO code is completely database-neutral. Details of how to create the DSN for PostgreSQL, Microsoft SQL Server, SQLite, and other database systems can be found at http://php.net/manual/en/pdo.drivers.php.
PHP Solution 11-1: Making a reusable database connector
Connecting to a database is a routine chore that needs to be performed in every page from now on. This PHP solution creates a simple function stored in an external file that connects to the database. It’s designed mainly for testing the different MySQLi and PDO scripts in the remaining chapters without the need to retype the connection details each time or to switch between different connection files.
1. Create a file called connection.php in the includes folder and insert the following code (there’s a copy of the completed script in the ch11 folder):
<?php
function dbConnect($usertype, $connectionType = 'mysqli') {
$host = 'localhost';
$db = 'phpsols';
if ($usertype == 'read') {
$user = 'psread';
$pwd = 'K1y0mi$u';
} elseif ($usertype == 'write') {
$user = 'pswrite';
$pwd = '0Ch@Nom1$u';
} else {
exit('Unrecognized user');
}
// Connection code goes here
}
The function takes two arguments: the user type and the connection type. The second argument defaults to mysqli. If you want to concentrate on using PDO, set the default value of the second argument to pdo.
The first two lines inside the function store the names of the host server and the database that you want to connect to.
The conditional statement checks the value of the first argument and switches between the psread and pswrite username and password as appropriate. If the user account is unrecognized, the exit() function halts the script and displays Unrecognized user.
2. Replace the Connection code goes here comment with the following:
if ($connectionType == 'mysqli') {
$conn = @ new mysqli($host, $user, $pwd, $db);
if ($conn->connect_error) {
exit($conn->connect_error);
}
return $conn;
} else {
try {
return new PDO("mysql:host=$host;dbname=$db", $user, $pwd);
} catch (PDOException $e) {
echo $e->getMessage();
}
}
If the second argument is set to mysqli, a MySQLi connection object called $conn is created. The error control operator (@) prevents the constructor method from displaying error messages. If the connection fails, the reason is stored in the object’sconnect_error property. If it’s empty, it’s treated as false, so the next line is skipped, and the $conn object is returned. But if there’s a problem, exit() displays the value of connect_error and brings the script to a halt.
Otherwise, the function returns a PDO connection object. There’s no need to use the error control operator with the PDO constructor because it throws a PDOException if there’s a problem. The catch block uses the exception’s getMessage() method to display the cause of the problem.
![]() Tip If your database server uses a nonstandard port, don’t forget to add the port number as the fifth argument to the mysqli() constructor and to include it in the PDO DSN, as described in the preceding sections. This isn’t necessary if the database uses a socket connection, which is common on Mac OS X and Linux.
Tip If your database server uses a nonstandard port, don’t forget to add the port number as the fifth argument to the mysqli() constructor and to include it in the PDO DSN, as described in the preceding sections. This isn’t necessary if the database uses a socket connection, which is common on Mac OS X and Linux.
3. Create a file called connection_test.php in the phpsols site root folder and insert the following code:
<?php
require_once './includes/connection.php';
if ($conn = dbConnect('read')) {
echo 'Connection successful';
}
This includes the connection script, and tests it with the psread user account and MySQLi.
4. Save the page and load it in a browser. If you see Connection successful, all is well. If you get an error message, consult the troubleshooting hints in the next section.
5. Test the connection with the pswrite user and MySQLi:
if ($conn = dbConnect('write')) {
echo 'Connection successful';
}
6. Test both user accounts with PDO by adding 'pdo' as the second argument to dbConnect().
7. Assuming all went well, you’re ready to start interacting with the phpsols database. If you ran into problems, check out the next section.
Troubleshooting database connection problems
The most common cause of failure when connecting to a database is getting the username or password wrong. Passwords and usernames are case-sensitive. Check the spelling carefully. For example, the following screenshot shows what happens if you change psread to Psread.
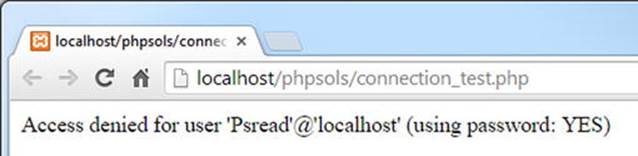
Access has been denied because there’s no such user. The initial cap in the username makes all the difference. But even if the username is right, you may get the same error message, like this:
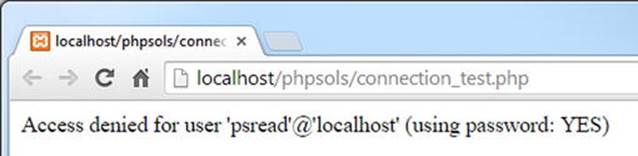
This totally confuses many people. The error message confirms that you’re using a password. So why is access denied? It’s the wrong password, that’s why.
If the error message says using password: NO, it means you’ve forgotten to supply the password. The phrase using password is a clue that the problem is related to login credentials.
When the phrase is missing, it indicates a different problem, as shown in the next screenshot.
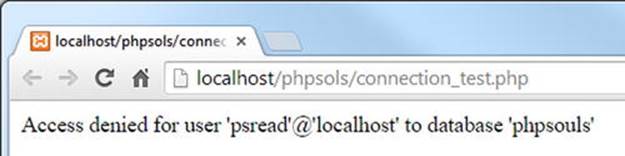
The problem here is that the name of the database is incorrect. If you misspell the host, you’ll get a message that no such host is known.
The screenshots in this section were generated by MySQLi. PDO generates the same messages, but includes error numbers and codes as well.
Querying the database and displaying the results
Before you attempt to display the results of a database query, it’s a good idea to find out how many results there are. If there aren’t any results, you’ll have nothing to display. It’s also necessary for creating a navigation system for paging through a long set of results (you’ll learn how to do that in the next chapter). In user authentication (covered in Chapter 17), no results when searching for a username and password mean that the login should fail.
MySQLi and PDO use different approaches to counting and displaying results. The next two PHP solutions show how to do it with MySQLi. For PDO, skip ahead to PHP Solution 11-4.
PHP Solution 11-2: Counting records in a result set (MySQLi)
This PHP solution shows how to submit an SQL query that selects all the records in the images table and stores the result in a MySQLi_Result object. The object’s num_rows property contains the number of records retrieved by the query.
1. Create a new folder called mysqli in the phpsols site root, then create a new file called mysqli.php inside the folder. The page will eventually be used to display a table, so it should have a DOCTYPE declaration and an HTML skeleton.
2. Include the connection file in a PHP block above the DOCTYPE declaration, and connect to the phpsols database using the account with read-only privileges like this:
require_once '../includes/connection.php';
$conn = dbConnect('read');
3. Next, prepare the SQL query. Add this code immediately after the previous step (but before the closing PHP tag):
$sql = 'SELECT * FROM images';
This means “select everything from the images table.” The asterisk (*) is shorthand for “all columns.”
4. Now execute the query by calling the query() method on the connection object and passing the SQL query as an argument, like this:
$result = $conn->query($sql);
The result is stored in a variable, which I have imaginatively named $result.
5. If there’s a problem, $result will be false. To find out what the problem is, we need get the error message, which is stored as the error property of the mysqli connection object. Add the following conditional statement after the previous line:
if (!$result) {
$error = $conn->error;
}
6. Assuming there’s no problem, $result now holds a MySQLi_Result object, which has a property called num_rows. To get the number of records found by the query, add an else block to the conditional statement and assign the value to a variable, like this:
if (!$result) {
$error = $conn->error;
} else {
$numRows = $result->num_rows;
}
7. You can now display the result in the body of the page like this:
<?php
if (isset($error)) {
echo "<p>$error</p>";
} else {
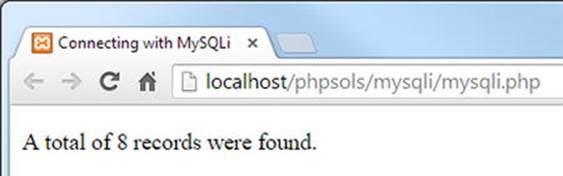
echo "<p>A total of $numRows records were found.</p>";
}
?>
If there’s a problem, $error will have been set, so it’s displayed. Otherwise, the else block shows the number of records found. Both strings embed variables, so they’re enclosed in double quotes.
8. Save mysqli.php and load it into a browser. You should see the following result:
Check your code, if necessary, with mysqli_01.php in the ch11 folder.
PHP Solution 11-3: Displaying the images table using MySQLi
The most common way to display the results of a SELECT query is to use a loop to extract one row from the result set at a time. MySQLi_Result has a method called fetch_assoc() that retrieves the current row as an associative array ready for display in the webpage. Each element in the array is named after the corresponding column in the table.
This PHP solution shows how to loop through a MySQLi_Result object to display the results of a SELECT query. Continue using the file from PHP Solution 11-2.
1. Remove the closing curly brace at the end of the else block in the body of the page (it should be around line 25). Although most of the code to display the images table is HTML, it needs to be inside the else block.
2. Insert a blank line after the closing PHP tag and add the closing brace on the next line in a separate PHP block. The revised code should look like this:
} else {
echo "<p>A total of $numRows records were found.</p>";
?>
<?php } ?>
</body>
3. Add the following table between the two PHP blocks in the main body of mysqli.php so that it’s controlled by the else block. The reason for doing this is to prevent errors if the SQL query fails. The PHP code that displays the result set is highlighted in bold.
<table>
<tr>
<th>image_id</th>
<th>filename</th>
<th>caption</th>
</tr>
<?php while ($row = $result->fetch_assoc()) { ?>
<tr>
<td><?= $row['image_id']; ?></td>
<td><?= $row['filename']; ?></td>
<td><?= $row['caption']; ?></td>
</tr>
<?php } ?>
</table>
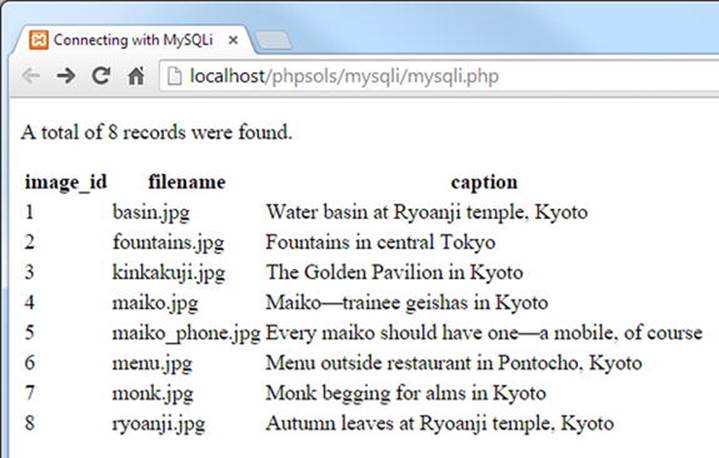
The while loop iterates through the database result, using the fetch_assoc() method to extract each record into $row. Each element of $row is displayed in a table cell. The loop continues until fetch_assoc() comes to the end of the result set.
4. Save mysqli.php and view it in a browser. You should see the contents of the images table displayed as shown in the following screenshot:
You can compare your code, if necessary, with mysql_02.php in the ch11 folder.
MySQLi connection crib sheet
Table 11-1 summarizes the basic details of connection and database queries for MySQLi.
Table 11-1. Connection to MySQL/MariaDB with the MySQL Improved object-oriented interface
|
Action |
Usage |
Comments |
|
Connect |
$conn = new mysqli($h,$u,$p,$d); |
All arguments optional; first four always needed in practice: hostname, username, password, database name. Creates connection object. |
|
Choose DB |
$conn->select_db('dbName'); |
Use to select a different database. |
|
Submit query |
$result = $conn->query($sql); |
Returns result object. |
|
Count results |
$numRows = $result->num_rows; |
Returns number of rows in result object. |
|
Extract record |
$row = $result->fetch_assoc(); |
Extracts current row from result object as associative array. |
|
Extract record |
$row = $result->fetch_row(); |
Extracts current row from result object as indexed (numbered) array. |
PHP Solution 11-4: Counting records in a result set (PDO)
PDO doesn’t have a direct equivalent to the MySQLi num_rows property. With most databases you need to execute an SQL query to count the number of items in the table and then fetch the result. However, the PDO rowCount() method fulfills a dual purpose with both MySQL and MariaDB. Normally, it reports only the number of rows affected by inserting, updating, or deleting records, but with MySQL and MariaDB, it also reports the number of records found by a SELECT query.
1. Create a new folder called pdo in the phpsols site. Then create a file called pdo.php in the folder you have just created. The page will eventually be used to display a table, so it should have a DOCTYPE declaration and an HTML skeleton.
2. Include the connection file in a PHP block above the DOCTYPE declaration, then create a PDO connection to the phpsols database using the read-only account, like this:
require_once '../includes/connection.php';
$conn = dbConnect('read', 'pdo');
3. Next, prepare the SQL query:
$sql = 'SELECT * FROM images';
This means “select every record in the images table.” The asterisk (*) is shorthand for “all columns.”
4. Now execute the query and store the result in a variable, like this:
$result = $conn->query($sql);
5. To check if there’s a problem with the query, you can get an array of error messages from the database using the connection object’s errorInfo() method. The third element of the array is created only if something goes wrong. Add the following code to the script:
$errorInfo = $conn->errorInfo();
if (isset($errorInfo[2])) {
$error = $errorInfo[2];
}
The array generated by $conn->errorInfo() is stored as $errorInfo, so you can tell if anything went wrong by using isset() to check whether $errorInfo[2] has been defined. If it has, the error message is assigned to $error.
6. To get the number of rows in the result set, create an else block and call the rowCount() method on the $result object, like this:
if (isset($errorInfo[2])) {
$error = $errorInfo[2];
} else {
$numRows = $result->rowCount();
}
7. You can now display the outcome of the query in the body of the page, as follows:
<?php
if (isset($error)) {
echo "<p>$error</p>";
} else {
echo "<p>A total of $numRows records were found.</p>";
}
?>
8. Save the page and load it into a browser. You should see the same result as shown in step 8 of PHP Solution 11-2. Check your code, if necessary, with pdo_01.php.
Counting records with PDO in other databases
Using the PDO rowCount() to report the number of items found by a SELECT query works with both MySQL and MariaDB, but it cannot be guaranteed to work on all other databases. If rowCount() doesn’t work, use the following code instead:
// prepare the SQL query
$sql = 'SELECT COUNT(*) FROM images';
// submit the query and capture the result
$result = $conn->query($sql);
$errorInfo = $conn->errorInfo();
if (isset($errorInfo[2])) {
$error = $errorInfo[2];
} else {
// find out how many records were retrieved
$numRows = $result->fetchColumn();
// free the database resource
$result->closeCursor();
}
This uses the SQL COUNT() function with an asterisk to count all items in the table. There’s only one result, so it can be retrieved with the fetchColumn() method, which gets the first column from a database result. After storing the result in $numRows, you must call thecloseCursor() method to free the database resource for any further queries.
PHP Solution 11-5: Displaying the images table using PDO
To display the results of a SELECT query with PDO, you can use the query() method in a foreach loop to extract the current row as an associative array. Each element in the array is named after the corresponding column in the table.
Continue working with the same file as in the previous PHP solution.
1. Remove the closing curly brace at the end of the else block in the body of the page (it should be around line 26). Although most of the code to display the images table is HTML, it needs to be inside the else block.
2. Insert a blank line after the closing PHP tag, then add the closing brace on the next line in a separate PHP block. The revised code should look like this:
} else {
echo "<p>A total of $numRows records were found.</p>";
?>
<?php } ?>
</body>
3. Add the following table between the two PHP blocks in the main body of pdo.php so that it’s controlled by the else block. This is to prevent errors if the SQL query fails. The PHP code that displays the result set is displayed in bold.
<table>
<tr>
<th>image_id</th>
<th>filename</th>
<th>caption</th>
</tr>
<?php foreach ($conn->query($sql) as $row) { ?>
<tr>
<td><?php echo $row['image_id']; ?></td>
<td><?php echo $row['filename']; ?></td>
<td><?php echo $row['caption']; ?></td>
</tr>
<?php } ?>
</table>
4. Save the page and view it in a browser. It should look like the screenshot in PHP Solution 11-3. You can compare your code against pdo_02.php in the ch11 folder.
PDO connection crib sheet
Table 11-2 summarizes the basic details of connection and database queries with PDO. Some commands will be used in later chapters, but are included here for ease of reference.
Table 11-2. Database connection with PDO
|
Action |
Usage |
Comments |
|
Connect |
$conn = new PDO($DSN,$u,$p); |
In practice, requires three arguments: data source name (DSN), username, password. Must be wrapped in try/catch block. |
|
Submit SELECT query |
$result = $conn->query($sql); |
Returns results as a PDOStatement object. |
|
Extract records |
foreach($conn->query($sql) as $row) { |
Submits SELECT query and gets current row as associative array in a single operation. |
|
Count results |
$numRows = $result->rowCount() |
In MySQL/MariaDB, returns number of results from SELECT. Not supported in most other databases. |
|
Get single result |
$item = $result->fetchColumn(); |
Gets first record in first column of result. To get result from other columns, use column number (counting from 0) as argument. |
|
Get next record |
$row = $result->fetch(); |
Gets next row from result set as associative array. |
|
Release DB resources |
$result->closeCursor(); |
Frees up connection to allow new query. |
|
Submit non-SELECT query |
$affected = $conn->exec($sql); |
Although query() can be used for non-SELECT queries, exec() returns the number of affected rows. |
Using SQL to Interact with a Database
As you have just seen, PHP connects to the database, sends the query, and receives the results, but the query itself needs to be written in SQL. Although SQL is a common standard, there are many dialects of SQL. Each database vendor, including MySQL, has added extensions to the standard language. These improve efficiency and functionality, but are usually incompatible with other databases. The SQL in this book works with MySQL 5.1 or later, but it won’t necessarily transfer to Microsoft SQL Server, Oracle, or another database.
Writing SQL queries
SQL syntax doesn’t have many rules, and all of them are quite simple.
SQL is case-insensitive
The query that retrieves all records from the images table looks like this:
SELECT * FROM images
The words in uppercase are SQL keywords. This is purely a convention. The following are all equally correct:
SELECT * FROM images
select * from images
SeLEcT * fRoM images
Although SQL keywords are case-insensitive, the same doesn’t apply to database column names. The advantage of using uppercase for keywords is that it makes SQL queries easier to read. You’re free to choose whichever style suits you best, but the ransom-note style of the last example is probably best avoided.
Whitespace is ignored
This allows you to spread SQL queries over several lines for increased readability. The one place where whitespace is not allowed is between a function name and the opening parenthesis. The following generates an error:
SELECT COUNT (*) FROM images /* BAD EXAMPLE */
The space needs to be closed up like this:
SELECT COUNT(*) FROM images /* CORRECT */
As you probably gathered from these examples, you can add comments to SQL queries by putting them between /* and */.
Strings must be quoted
All strings must be quoted in an SQL query. It doesn’t matter whether you use single or double quotes, as long as they are in matching pairs. However, it’s normally better to use MySQLi- or PDO prepared statements, as explained later in this chapter.
Handling numbers
As a general rule, numbers should not be quoted, as anything in quotes is a string. However, MySQL accepts numbers enclosed in quotes and treats them as their numeric equivalent. Be careful to distinguish between a real number and any other data type made up of numbers. For instance, a date is made up of numbers but should be enclosed in quotes and stored in a date-related column type. Similarly, telephone numbers should be enclosed in quotes and stored in a text-related column type.
![]() Note SQL queries normally end with a semicolon, which is an instruction to the database to execute the query. When using PHP, the semicolon must be omitted from the SQL. Consequently, standalone examples of SQL are presented throughout this book without a concluding semicolon.
Note SQL queries normally end with a semicolon, which is an instruction to the database to execute the query. When using PHP, the semicolon must be omitted from the SQL. Consequently, standalone examples of SQL are presented throughout this book without a concluding semicolon.
Refining the data retrieved by a SELECT query
The only SQL query you have run so far retrieves all records from the images table. Much of the time, you want to be more selective.
Selecting specific columns
Using an asterisk to select all columns is a convenient shortcut, but you should normally specify only those columns you need. List the column names separated by commas after the SELECT keyword. For example, this query selects only the filename and caption fields for each record:
SELECT filename, caption FROM images
You can test this in mysqli_03.php and pdo_03.php in the ch11 folder.
Changing the order of results
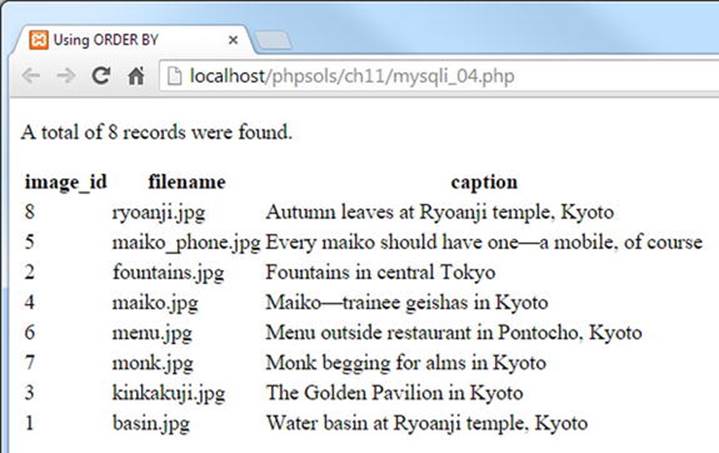
To control the sort order, add an ORDER BY clause with the name(s) of the column(s) in order of precedence. Separate multiple columns by commas. The following query sorts the captions from the images table in alphabetical order (the code is in mysqli_04.php and pdo_04.php):
$sql = 'SELECT * FROM images ORDER BY caption';
![]() Note This semicolon is part of the PHP statement, not part of the SQL query.
Note This semicolon is part of the PHP statement, not part of the SQL query.
The preceding query produces this output:
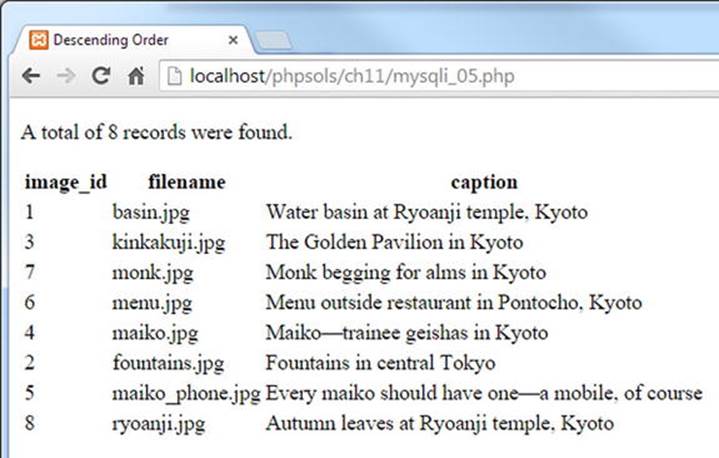
To reverse the sort order, add the DESC (for “descending”) keyword like this (there are examples in mysqli_05.php and pdo_05.php):
$sql = 'SELECT * FROM images ORDER BY caption DESC';
There is also an ASC (for “ascending”) keyword. It’s the default sort order, so is normally omitted.
However, specifying ASC increases clarity when columns in the same table are sorted in a different order. For example, if you publish multiple articles every day, you could use the following query to display titles in alphabetical order, but ordered by the date of publication with the most recent ones first:
SELECT * FROM articles
ORDER BY published DESC, title ASC
Searching for specific values
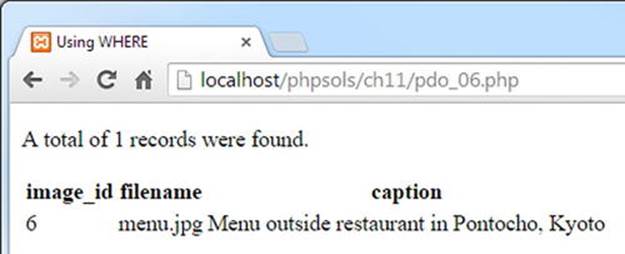
To search for specific values, add a WHERE clause to the SELECT query. The WHERE clause follows the name of the table. For example, the query in mysqli_06.php and pdo_06.php looks like this:
$sql = 'SELECT * FROM images
WHERE image_id = 6';
![]() Note SQL uses one equal sign to test for equality, unlike PHP, which uses two.
Note SQL uses one equal sign to test for equality, unlike PHP, which uses two.
It produces the following result:
In addition to testing for equality, a WHERE clause can use comparison operators, such as greater than (>) and less than (<). Rather than go through all the options now, I’ll introduce others as needed. Chapter 13 has a comprehensive roundup of the four main SQL commands: SELECT,INSERT, UPDATE, and DELETE, including a list of the main comparison operators used with WHERE.
If used in combination with ORDER BY, the WHERE clause must come first. For example (the code is in mysqli_07.php and pdo_07.php):
$sql = 'SELECT * FROM images
WHERE image_id > 5
ORDER BY caption DESC';
This selects the three images that have an image_id greater than 5 and sorts them by their captions in reverse order.
Searching for text with wildcard characters
In SQL, the percentage sign (%) is a wildcard character that matches anything or nothing. It’s used in a WHERE clause in conjunction with the LIKE keyword.
The query in mysqli_08.php and pdo_08.php looks like this:
$sql = 'SELECT * FROM images
WHERE caption LIKE "%Kyoto%"';
It searches for all records in the images table where the caption column contains “Kyoto,” and produces the following result:
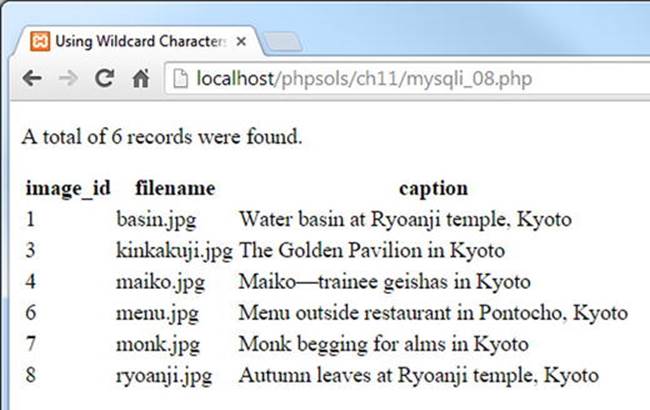
As the preceding screenshot shows, it finds six records out of the eight in the images table. All the captions end with “Kyoto,” so the wildcard character at the end is matching nothing, whereas the wildcard at the beginning matches the rest of each caption.
If you omit the leading wildcard ("Kyoto%"), the query searches for captions that begin with “Kyoto.” None of them do, so you get no results from the search.
The query in mysqli_09.php and pdo_09.php looks like this:
$sql = 'SELECT * FROM images
WHERE caption LIKE "%maiko%"';
It produces the following result:
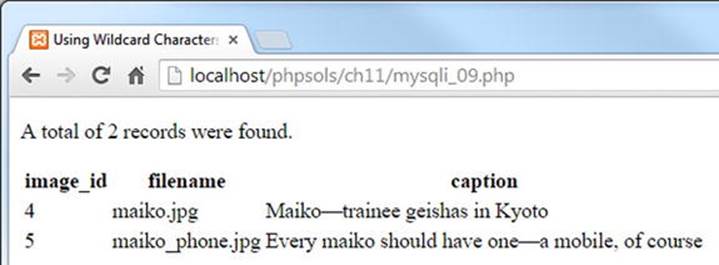
The query spells “maiko” all in lowercase, but the query also finds it with an initial capital. Wildcard searches with LIKE are case-insensitive.
To perform a case-sensitive search, you need to add the BINARY keyword like this (the code is in mysqli_10.php and pdo_10.php):
$sql = 'SELECT * FROM images
WHERE caption LIKE BINARY "%maiko%"';
All the examples you have seen so far have been hard-coded, but most of the time, the values used in SQL queries need to come from user input. Unless you’re careful, this puts you at risk of a malicious exploit known as SQL injection. The rest of this chapter explains this danger and how to avoid it.
Understanding the Danger of SQL Injection
SQL injection is very similar to the email header injection I warned you about in Chapter 5. An injection attack tries to insert spurious conditions into an SQL query in an attempt to expose or corrupt your data. The meaning of the following query should be easy to understand:
SELECT * FROM users WHERE username = 'xyz' AND pwd = 'abc'
It’s the basic pattern for a login application. If the query finds a record where username is xyz and pwd is abc, you know that a correct combination of username and password have been submitted, so the login succeeds. All an attacker needs to do is inject an extra condition like this:
SELECT * FROM users WHERE username = 'xyz' AND pwd = 'abc' OR 1 = 1
The OR means that only one of the conditions needs to be true, so the login succeeds even without a correct username and password. SQL injection relies on quotes and other control characters not being properly escaped when part of the query is derived from a variable or user input.
There are several strategies you can adopt to prevent SQL injection, depending on the situation:
· If the variable is an integer (for example, the primary key of a record), use is_numeric() and the (int) casting operator to ensure it’s safe to insert in the query.
· If you are using MySQLi, pass each variable to the real_escape_string() method before inserting it in the query.
· The PDO equivalent of real_escape_string() is the quote() method, but it doesn’t work with all databases. The PDO documentation advises against using quote(), strongly recommending the use of prepared statements instead.
· Use a prepared statement. In a prepared statement, placeholders in the SQL query represent values that come from user input. The PHP code automatically wraps strings in quotes and escapes embedded quotes and other control characters. The syntax is different for MySQLi and PDO.
· None of the preceding strategies is suitable for column names, which must not be enclosed in quotes. To use a variable for column names, create an array of acceptable values and check that the submitted value is in the array before inserting it into the query.
With the exception of quote(), let’s take a look at using each of these techniques.
PHP Solution 11-6: Inserting an integer from user input into a query
This PHP solution shows how to sanitize a variable from user input to make sure it contains only an integer before inserting the value into an SQL query. The technique is the same for both MySQLi and PDO.
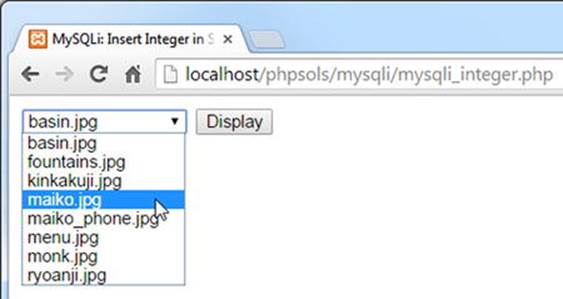
1. Copy either mysqli_integer_01.php or pdo_integer_01.php from the ch11 folder to the mysqli or pdo folder. Each file contains an SQL query that selects the image_id and filename columns from the images table. In the body of the page, there’s a form with a drop-down menu that is populated by a loop that runs through the results of the SQL query. The MySQLi version looks like this:
<form action="" method="get">
<select name="image_id">
<?php while ($row = $images->fetch_assoc()) { ?>
<option value="<?= $row['image_id']; ?>"
<?php if (isset($_GET['image_id']) &&
$_GET['image_id'] == $row['image_id']) {
echo 'selected';
} ?>
><?= $row['filename']; ?></option>
<?php } ?>
</select>
<input type="submit" name="go" value="Display">
</form>
The form uses the get method and assigns the image_id to the value attribute of the <option> tags. If $_GET['image_id'] has the same value as $row['image_id'], the current image_id is the same as that passed through the page’s query string, so the selected attribute is added to the opening <option> tag. The value of $row['filename'] is inserted between the opening and closing <option> tags.
The PDO version is identical apart from the fact that it runs the query directly in a foreach loop using the PDO fetch() method.
If you load the page into a browser, you’ll see a drop-down menu that lists the files in the images folder like this:
2. Insert the following code immediately after the closing </form> tag. The code is the same for both MySQLi and PDO, apart from one line.
<?php
if (isset($_GET['image_id'])) {
if (!is_numeric($_GET['image_id'])) {
$image_id = 1;
} else {
$image_id = (int) $_GET['image_id'];
}
$sql = "SELECT filename, caption FROM images
WHERE image_id = $image_id";
$result = $conn->query($sql);
$row = $result->fetch_assoc();
?>
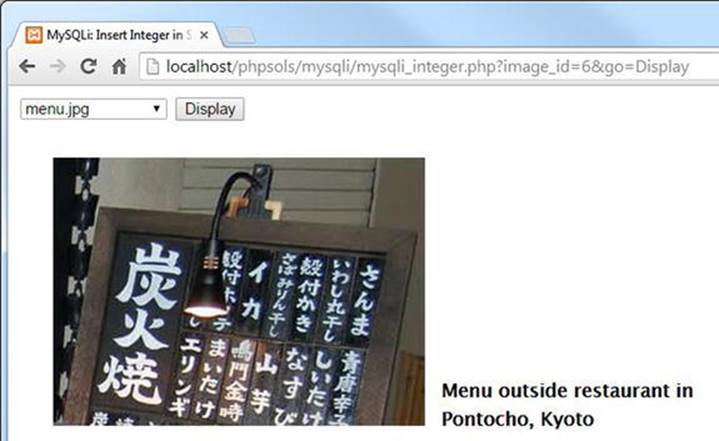
<figure><img src="../images/<?= $row['filename']; ?>">
<figcaption><?= $row['caption']; ?></figcaption>
</figure>
<?php } ?>
The conditional statement checks whether image_id has been sent through the $_GET array. If it has been, the next conditional statement uses the logical Not operator with is_numeric() to check if it’s not numeric. The is_numeric() function applies a strict test, accepting only numbers or numeric strings. It doesn’t attempt to convert the value to a number if it begins with a digit.
If the value submitted through the query string isn’t numeric, a default value is assigned to a new variable called $image_id. However, if $_GET['image_id'] is numeric, it’s assigned to $image_id using the (int) casting operator. Using the casting operator is an extra precaution in case someone tries to probe your script for error messages by submitting a floating point number.
Since you know $image_id is an integer, it’s safe to insert directly in the SQL query. Because it’s a number, it doesn’t need to be wrapped in quotes, but the string assigned to $sql needs to use double quotes to ensure the value of $image_id is inserted into the query.
The new query is submitted to MySQL by the query() method, and the result is stored in $row. Finally, $row['filename'] and $row['caption'] are used to display the image and its caption in the page.
3. If you are using the PDO version, locate this line:
$row = $result->fetch_assoc();
Change it to this:
$row = $result->fetch();
4. Save the page and load it into a browser. When the page first loads, only the drop-down menu is displayed.
5. Select a filename from the drop-down menu and click Display. The image of your choice should be displayed, as shown in the following screenshot:
If you encounter problems, check your code against mysqli_integer_02.php or pdo_integer_02.php in the ch11 folder.
6. Edit the query string in the browser, changing the value of image_id to a string or to a string that begins with a number. You should see basin.jpg, which has image_id 1.
7. Try a floating point number between 1.0 and 8.9. The relevant image is displayed normally.
8. Try a number outside the range of 1 to 8. No error messages are displayed because there’s nothing wrong with the query. It’s simply looking for a value that doesn’t exist. In this example, it doesn’t matter, but you should normally check the number of rows returned by the query, using the num_rows property with MySQLi or the rowCount() method with PDO.
Change the code like this for MySQLi:
$result = $conn->query($sql);
if ($result->num_rows) {
$row = $result->fetch_assoc();
?>
<figure><img src="../images/<?= $row['filename']; ?>">
<figcaption><?= $row['caption']; ?></figcaption>
</figure>
<?php } else { ?>
<p>Image not found</p>
<?php }
}?>
For PDO, use $result->rowCount() in place of $result->num_rows.
If no rows are returned by the query, 0 is treated by PHP as implicitly false, so the condition fails, and the else clause is executed instead.
9. Test the page again. When you select an image from the drop-down menu, it displays normally as before. But if you try entering an out-of-range value in the query string, you see the following message instead:
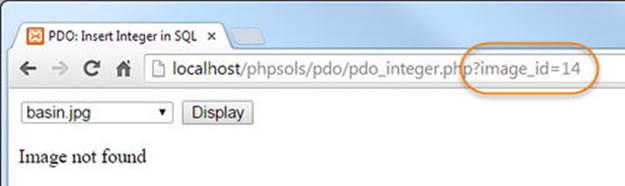
The amended code is in mysqli_integer_03.php and pdo_integer_03.php in the ch11 folder.
PHP Solution 11-7: Inserting a string in MySQLi with real_escape_string()
This PHP solution shows how to insert a value from a search form into an SQL query using the MySQLi real_escape_string() method. In addition to handling single and double quotes, it also escapes other control characters, such as newlines and carriage returns.
![]() Tip This MySQLi-only technique is useful when only one or two string values from external sources need to be inserted into a query, or if the query will be used only once. For more complex queries, use a prepared statement, as described in the next section. To embed strings in PDO, it’s always recommended to use a prepared statement.
Tip This MySQLi-only technique is useful when only one or two string values from external sources need to be inserted into a query, or if the query will be used only once. For more complex queries, use a prepared statement, as described in the next section. To embed strings in PDO, it’s always recommended to use a prepared statement.
1. Copy mysqli_real_escape_01.php from the ch11 folder and save it in the mysqli folder as mysql_real_escape.php. The file contains a search form and a table for displaying the results.
2. Add the following code in a PHP block above the DOCTYPE declaration:
if (isset($_GET['go'])) {
require_once '../includes/connection.php';
$conn = dbConnect('read');
$searchterm = '%' . $conn->real_escape_string($_GET['search']) . '%';
}
This includes the connection file and establishes a connection for the read-only user account if the form has been submitted. Then, $_GET['search'] is passed to the connection object’s real_escape_string() method to make it safe to incorporate into an SQL query, and the % wildcard character is concatenated to both ends before the result is assigned to $searchterm. So, if the value submitted through the search form is “hello,” $searchterm becomes %hello%.
3. Add the SELECT query on the next line (before the closing curly brace):
$sql = "SELECT * FROM images WHERE caption LIKE '$searchterm'";
The whole query is wrapped in double quotes so that the value of $searchterm is incorporated. However, $searchterm contains a string, so it also needs to be wrapped in quotes. To avoid a clash, use single quotes around $searchterm.
4. Execute the query and get the number of rows returned by adding the following code after the previous line:
$result = $conn->query($sql);
if (!$result) {
$error = $conn->error;
} else {
$numRows = $result->num_rows;
}
5. Insert a PHP block above the form to display the error message if there’s a problem with the query:
<body>
<?php
if (isset($error)) {
echo "<p>$error</p>";
}
?>
<form method="get" action="">
6. After the form, add the PHP code to display the results:
</form>
<?php if (isset($numRows)) { ?>
<p>Number of results for <b><?= htmlentities($_GET['search']); ?></b>:
<?= $numRows; ?></p>
<?php if ($numRows) { ?>
<table>
<tr>
<th>image_id</th>
<th>filename</th>
<th>caption</th>
</tr>
<?php while ($row = $result->fetch_assoc()) { ?>
<tr>
<td><?= $row['image_id']; ?></td>
<td><?= $row['filename']; ?></td>
<td><?= $row['caption']; ?></td>
</tr>
<?php } ?>
</table>
<?php }
} ?>
</body>
The first conditional statement is wrapped around the paragraph and table, preventing them from being displayed if $numRows doesn’t exist, which happens when the page is first loaded. If the form has been submitted, $numRows will have been set, so the search term is redisplayed using htmlentities() (see Chapter 5), and the value of $numRows reports the number of matches.
If the query returns no results, $numRows is 0, which is treated as false, so the table is not displayed. If $numRows contains anything other than 0, the table is displayed, and the while loop displays the results of the query.
7. Save the page and load it into a browser. Enter some text in the search field and click Search. The number of results is displayed, together with any captions that contain the search term, as shown in the following screenshot:
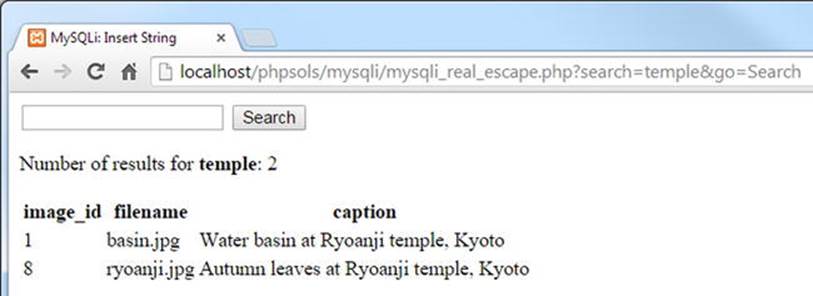
You can check your code against mysqli_real_escape_02.php in the ch11 folder.
![]() Note If you click the Search button without entering anything into the search field, all the records are displayed. This is because the search term becomes %%, which matches anything. If you don’t want that to happen, you can use the empty() function to test whether$_GET['search'] has a value.
Note If you click the Search button without entering anything into the search field, all the records are displayed. This is because the search term becomes %%, which matches anything. If you don’t want that to happen, you can use the empty() function to test whether$_GET['search'] has a value.
Although real_escape_string() escapes quotes and other control characters in the submitted value, you still need to wrap strings in quotes in the SQL query. The LIKE keyword must always be followed by a string, even if the search term is limited to numbers.
Using Prepared Statements for User Input
Both MySQLi and PDO support prepared statements, which offer important security features. A prepared statement is a template for an SQL query that contains a placeholder for each value that is changeable. This not only makes it easier to embed variables in your PHP code, but also prevents SQL injection attacks as quotes and other characters are automatically escaped before the query is executed.
Other advantages of using prepared statements are that they’re more efficient when the same query is used more than once. Also, you can bind the results from each column of a SELECT query to named variables, making it easier to display the output.
Both MySQLi and PDO use question marks as anonymous placeholders, like this:
$sql = 'SELECT image_id, filename, caption FROM images WHERE caption LIKE ?';
PDO also supports the use of named placeholders. A named placeholder begins with a colon followed by an identifier, like this:
$sql = 'SELECT image_id, filename, caption FROM images WHERE caption LIKE :search';
![]() Note Placeholders are not wrapped in quotes, even when the value they represent is a string. This makes it a lot easier to build an SQL query because there’s no need to worry about getting the correct combination of single and double quotes.
Note Placeholders are not wrapped in quotes, even when the value they represent is a string. This makes it a lot easier to build an SQL query because there’s no need to worry about getting the correct combination of single and double quotes.
Placeholders can be used only for column values. They can’t be used for other parts of an SQL query, such as column names or operators. This is because values that contain non-numeric characters are automatically escaped and wrapped in quotes when the SQL is executed. Column names and operators cannot be in quotes.
Prepared statements involve slightly more code than just submitting the query directly, but placeholders make the SQL easier to read and write, and the process is more secure.
The syntax for MySQLi and PDO is different, so the following sections deal with them separately.
Embedding variables in MySQLi prepared statements
Using a MySQLi prepared statement involves several stages.
Initialize the statement
To initialize the prepared statement, call the stmt_init() method on the database connection and store it in a variable, as follows:
$stmt = $conn->stmt_init();
Prepare the statement
You then pass the SQL query to the statement’s prepare() method. This checks that you haven’t used question mark placeholders in the wrong place, and that when everything is put together, the query is valid SQL.
If there are any mistakes, the prepare() method returns false, so it’s common to enclose the next steps in a conditional statement to ensure they run only if everything is still okay.
Error messages can be accessed through the statement’s error property.
Bind values to the placeholders
Replacing the question marks with the actual values held in the variables is technically known as binding the parameters. It’s this step that protects your database from SQL injection.
Pass the variables to the statement’s bind_param() method in the same order as you want them inserted into the SQL query, together with a first argument specifying the data type of each variable, again in the same order as the variables. The data type must be specified by one of the following four characters:
· b: Binary (such as an image, Word document, or PDF file)
· d: Double (floating point number)
· i: Integer (whole number)
· s: String (text)
The number of variables passed to bind_param() must be exactly the same as the number of question mark placeholders. For example, to pass a single value as a string, use this:
$stmt->bind_param('s', $_GET['words']);
To pass two values, the SELECT query needs two question marks as placeholders, and both variables need to be bound with bind_param(), like this:
$sql = 'SELECT * FROM products WHERE price < ? AND type = ?';
$stmt = $conn->stmt_init();
$stmt->prepare($sql);
$stmt->bind_param('ds', $_GET['price'], $_GET['type']);
The first argument to bind_param(), 'ds', specifies $_GET['price'] as a floating point number and $_GET['type'] as a string.
Execute the statement
Once the statement has been prepared and the values have been bound to the placeholders, call the statement’s execute() method. The result of a SELECT query can then be fetched from the statement object. With other types of queries, this is the end of the process.
Binding the results (optional)
Optionally, you can bind the results of a SELECT query to variables with the bind_result() method. This avoids the need to extract each row and then access the results as $row['column_name'].
To bind the results, you must name each column specifically in the SELECT query. List the variables you want to use in the same order and pass them as arguments to bind_result(). For example, let’s say your SQL looks like this:
$sql = 'SELECT image_id, filename, caption FROM images WHERE caption LIKE ?';
To bind the results of the query, use this code:
$stmt->bind_result($image_id, $filename, $caption);
This allows you to access the results directly as $image_id, $filename, and $caption.
Store the result (optional)
When you use a prepared statement for a SELECT query, the results are unbuffered. This means that they remain on the database server until you fetch them. This has the advantage of requiring less memory, particularly if the result set contains a large number of rows. However, unbuffered results impose the following restrictions:
· Once the results are fetched, they’re no longer stored in memory. Consequently, you can’t use the same result set more than once.
· You can’t run another query on the same database connection until all of the results have been fetched or cleared.
· You can’t use the num_rows property to find out how many rows are in the result set.
· You can’t use data_seek() to move to a specific row in the result set.
To avoid these restrictions, you can optionally store the result set using the statement’s store_result() method. However, if you simply want to display the result immediately without reusing later, there’s no need to store it first.
![]() Note To clear an unbuffered result, call the statement’s free_result() method.
Note To clear an unbuffered result, call the statement’s free_result() method.
Fetch the result
To loop through the results of a SELECT query that has been executed with a prepared statement, use the fetch() method. If you have bound the results to variables, do it like this:
while ($stmt->fetch()) {
// display the bound variables for each row
}
If you haven’t bound the results to variables, use $row = $stmt->fetch() and access each variable as $row['column_name'].
Close the statement
When you have finished with a prepared statement, the close() method frees the memory used.
PHP Solution 11-8: Using a MySQLi prepared statement in a search
This PHP solution shows how to use a MySQLi prepared statement with a SELECT query; it also demonstrates binding the result to named variables.
1. Copy mysqli_prepared_01.php from the ch11 folder and save it in the mysqli folder as mysqli_prepared.php. It contains the same search form and results table as that used in PHP Solution 11-7.
2. In a PHP code block above the DOCTYPE declaration, create a conditional statement to include connection.php and create a read-only connection when the search form is submitted. The code looks like this:
if (isset($_GET['go'])) {
require_once '../includes/connection.php';
$conn = dbConnect('read');
}
3. Next, add the SQL query inside the conditional statement. The query needs to name the three columns you want to retrieve from the images table. Use a question mark as the placeholder for the search term, like this:
$sql = 'SELECT image_id, filename, caption FROM images
WHERE caption LIKE ?';
4. Before passing the user-submitted search term to the bind_param() method, you need to add the wildcard characters to it and assign it to a new variable, like this:
$searchterm = '%'. $_GET['search'] .'%';
5. You can now create the prepared statement. The finished code in the PHP block above the DOCTYPE declaration looks like this:
if (isset($_GET['go'])) {
require_once '../includes/connection.inc.php';
$conn = dbConnect('read');
$sql = 'SELECT image_id, filename, caption FROM images
WHERE caption LIKE ?';
$searchterm = '%'. $_GET['search'] .'%';
$stmt = $conn->stmt_init();
if ($stmt->prepare($sql)) {
$stmt->bind_param('s', $searchterm);
$stmt->execute();
$stmt->bind_result($image_id, $filename, $caption);
$stmt->store_result();
$numRows = $stmt->num_rows;
} else {
$error = $stmt->error;
}
}
This initializes the prepared statement and assigns it to $stmt. The SQL query is then passed to the prepare() method, which checks the validity of the query’s syntax. If there’s a problem with the syntax, the else block assigns the error message to $error. If there are no mistakes in the syntax, the rest of the script inside the conditional statement is executed.
The first line inside the conditional statement binds $searchterm to the SELECT query, replacing the question mark placeholder. The first argument tells the prepared statement to treat it as a string.
After the prepared statement is executed, the next line binds the results of the SELECT query to $image_id, $filename, and $caption. These need to be in the same order as in the query. I have named the variables after the columns they represent, but you can use any variables you want.
Then the result is stored. Note that you store the result simply by calling the statement object’s store_result() method. Unlike using query(), you don’t assign the return value of store_result() to a variable. If you do, it’s simply true or false, depending on whether the result was stored successfully.
Finally, the number of rows retrieved by the query is obtained from the statement object’s num_rows property and stored in $numRows.
6. Add a conditional statement after the opening <body> tag to display the error message if a problem has occurred:
<?php
if (isset($error)) {
echo "<p>$error</p>";
}
?>
7. Add the following code after the search form to display the result:
<?php if (isset($numRows)) { ?>
<p>Number of results for <b><?= htmlentities($_GET['search']); ?></b>:
<?= $numRows; ?></p>
<?php if ($numRows) { ?>
<table>
<tr>
<th>image_id</th>
<th>filename</th>
<th>caption</th>
</tr>
<?php while ($stmt->fetch()) { ?>
<tr>
<td><?= $image_id; ?></td>
<td><?= $filename; ?></td>
<td><?= $caption; ?></td>
</tr>
<?php } ?>
</table>
<?php }
} ?>
Most of this code is the same as was used in PHP Solution 11-7. The difference lies in the while loop that displays the results. Instead of using the fetch_assoc() method on a result object and storing the result in $row, it simply calls the fetch() method on the prepared statement. There’s no need to store the current record as $row, because the values from each column have been bound to $image_id, $filename, and $caption.
You can compare your code with mysqli_prepared_02.php in the ch11 folder.
Embedding variables in PDO prepared statements
PDO prepared statements offer the choice of anonymous and named placeholders.
Using anonymous placeholders
Anonymous placeholders use question marks in exactly the same way as MySQLi:
$sql = 'SELECT image_id, filename, caption FROM images WHERE caption LIKE ?';
Using named placeholders
Named placeholders begin with a colon, like this:
$sql = 'SELECT image_id, filename, caption FROM images WHERE caption LIKE :search';
Using named placeholders makes the code a lot easier to understand, particularly if you choose names that are based on the variables that contain the values to be embedded in the SQL.
Preparing the statement
Preparing and initializing a statement is done in a single step (unlike with MySQLi, which requires two). You pass the SQL with placeholders directly to the connection object’s prepare() method, which returns the prepared statement, like this:
$stmt = $conn->prepare($sql);
Binding values to the placeholders
There are several different ways to bind values to placeholders. When using anonymous placeholders, the simplest way is to create an array of values in the same order as the placeholders, then to pass the array to the statement’s execute() method. Even if there’s only one placeholder, you must use an array. For example, to bind $searchterm to a single anonymous placeholder, you must enclose it in a pair of square brackets, like this:
$stmt->execute([$searchterm]);
You can also bind values to named placeholders in a similar way, but the argument passed to the execute() method must be an associative array, using the named placeholder as the key of each value. So, the following binds $searchterm to the :search named placeholder:
$stmt->execute([':search' => $searchterm]);
Alternatively, you can use the statement’s bindParam() and bindValue() methods to bind the values before calling the execute() method. When used with anonymous placeholders, the first argument to both methods is a number, counting from 1, representing the placeholder’s position in the SQL. With named placeholders, the first argument is the named placeholder as a string. The second argument is the value you want to insert in the query.
However, there’s a subtle difference between the two methods.
· With bindParam(), the second argument must be a variable. It cannot be a string, number, or any other type of expression.
· With bindValue(), the second argument should be a string, number, or expression. But it can also be a variable.
Because bindValue() accepts any type of value, bindParam() might seem redundant. The difference is that the value of the argument passed to bindValue() must already be known because it binds the actual value, whereas bindParam() binds only the variable. Consequently, the value can be assigned to the variable later.
To illustrate the difference, let’s use the SELECT query in “Using named placeholders.” The :search placeholder follows the LIKE keyword, so the value needs to be combined with wildcard characters. Trying to do the following generates an error:
// This will NOT work
$stmt->bindParam(':search', '%'. $_GET['search'] .'%');
You cannot concatenate the wildcard characters to the variable with bindParam(). The wildcard characters need to be added before the variable is passed as an argument, like this:
$searchterm = '%'. $_GET['search'] .'%';
$stmt->bindParam(':search', $searchterm);
Alternatively, you can build the expression as an argument to bindValue().
// This WILL work
$stmt->bindValue(':search', '%'. $_GET['search'] .'%');
The bindParam() and bindValue() methods accept an optional third argument: a constant specifying the data type. The main constants are as follows:
· PDO::PARAM_INT: Integer (whole number)
· PDO::PARAM_LOB: Binary (such as an image, Word document, or PDF file)
· PDO::PARAM_STR: String (text)
· PDO::PARAM_BOOL: Boolean (true or false)
· PDO::PARAM_NULL: Null
PDO::PARAM_NULL is useful if you want to set the value of a database column to null. For example, if a primary key is auto-incremented, you need to pass null as the value when inserting new records. This is how you set a named parameter called :id to null withbindValue():
$stmt->bindValue(':id', NULL, PDO::PARAM_NULL);
![]() Note There isn’t a PDO constant for floating point numbers.
Note There isn’t a PDO constant for floating point numbers.
Executing the statement
If you bind the values to placeholders using bindParam() or bindValue(), you simply call the execute() method without arguments:
$stmt->execute();
Otherwise, pass an array of values as described in the previous section. In both cases, the result of the query is stored in $stmt.
Error messages can be accessed in the same way as with a PDO connection. However, instead of calling the errorInfo() method on the connection object, use it on the PDO statement, like this:
$errorInfo = $stmt->errorInfo();
if (isset($errorInfo[2])) {
$error = $errorInfo[2];
}
Binding the results (optional)
To bind the results of a SELECT query to variables, each column needs to be bound separately using the bindColumn() method, which takes two arguments. The first argument can be either the name of the column or its number counting from 1. The number comes from its position in theSELECT query, not the order in which it appears in the database table. So, to bind the result from the filename column to $filename in the SQL example we’ve been using, either of the following is acceptable:
$stmt->bindColumn('filename', $filename);
$stmt->bindColumn(2, $filename);
Because each column is bound separately, you don’t need to bind all of them. However, it’s more convenient to do so because it avoids the need to assign the result of the fetch() method to an array.
Fetching the result
To fetch the results of a SELECT query, call the statement’s fetch() method. If you have used bindColumn() to bind the output to variables, you can use the variables directly. Otherwise, it returns an array of the current row indexed both by column name and a zero-indexed column number.
![]() Note You can control the PDO fetch() method’s type of output by passing it a constant as an argument. See http://php.net/manual/en/pdostatement.fetch.php.
Note You can control the PDO fetch() method’s type of output by passing it a constant as an argument. See http://php.net/manual/en/pdostatement.fetch.php.
PHP Solution 11-9: Using a PDO prepared statement in a search
This PHP solution shows how to embed the user-submitted value from a search form into a SELECT query with a PDO prepared statement. It uses the same search form as that in the MySQLi versions in PHP Solutions 11-7 and 11-8.
1. Copy pdo_prepared_01.php from the ch11 folder and save it in the pdo folder as pdo_prepared.php.
2. Add the following code in a PHP block above the DOCTYPE declaration:
if (isset($_GET['go'])) {
require_once '../includes/connection.php';
$conn = dbConnect('read', 'pdo');
$sql = 'SELECT image_id, filename, caption FROM images
WHERE caption LIKE :search';
$stmt = $conn->prepare($sql);
$stmt->bindValue(':search', '%' . $_GET['search'] . '%');
$stmt->execute();
$errorInfo = $stmt->errorInfo();
if (isset($errorInfo[2])) {
$error = $errorInfo[2];
} else {
$stmt->bindColumn('image_id', $image_id);
$stmt->bindColumn('filename', $filename);
$stmt->bindColumn(3, $caption);
$numRows = $stmt->rowCount();
}
}
When the form is submitted, this includes the connection file and creates a PDO read-only connection. The prepared statement uses :search as a named parameter in place of the user-submitted value.
The % wildcard characters are concatenated with the search term at the same time as binding it to the prepared statement. So, bindValue() is used instead of bindParam().
After the statement is executed, the statement’s errorInfo() method is called to see if an error message has been generated and stored in $errorInfo[2].
If there are no problems, the else block binds the results to $image_id, $filename, and $caption using the bindColumn() method. The first two use the column names, but the caption column is referred to by its position (counting from 1) in theSELECT query.
3. The code that displays the results is identical to that in steps 6 and 7 in PHP Solution 11-8. You can check the finished code in pdo_prepared_02.php in the ch11 folder.
PHP Solution 11-10: Changing column options through user input
This PHP solution shows how to change the name of SQL keywords in a SELECT query through user input. SQL keywords cannot be wrapped in quotes, so using prepared statements or the MySQLi real_escape_string() method won’t work. Instead, you need to ensure that the user input matches an array of expected values. If no match is found, use a default value instead. The technique is identical for MySQLi and PDO.
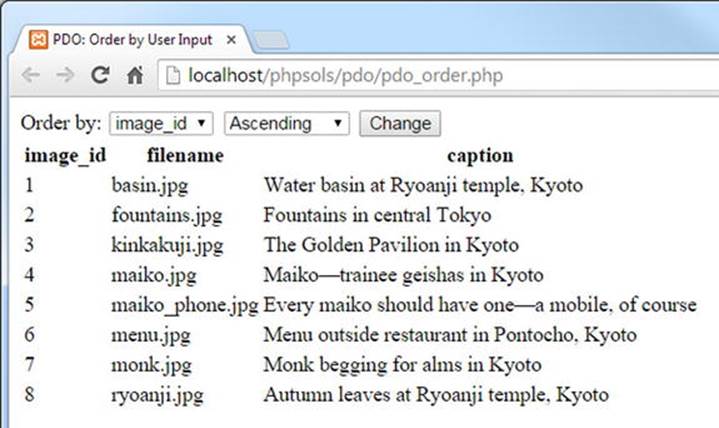
1. Copy either mysqli_order_01.php or pdo_order_01.php from the ch11 folder and save it in the mysqli or pdo folder. Both versions select all records from the images table and display the results in table. The pages also contain a form that allows the user to select the name of a column by which to sort the results in either ascending or descending order. In its initial state, the form is inactive. The pages display the details sorted by image_id in ascending order, like this:
2. Amend the code in the PHP block above the DOCTYPE declaration like this (the following listing shows the PDO version, but the changes highlighted in bold type are the same for MySQLi):
require_once '../includes/connection.php';
// connect to database
$conn = dbConnect('read', 'pdo');
// set default values
$col = 'image_id';
$dir = 'ASC';
// create arrays of permitted values
$columns = ['image_id', 'filename', 'caption'];
$direction = ['ASC', 'DESC'];
// if the form has been submitted, use only expected values
if (isset($_GET['column']) && in_array($_GET['column'], $columns)) {
$col = $_GET['column'];
}
if (isset($_GET['direction']) && in_array($_GET['direction'], $direction)) {
$dir = $_GET['direction'];
}
// prepare the SQL query using sanitized variables
$sql = "SELECT * FROM images
ORDER BY $col $dir";
// submit the query and capture the result
$result = $conn->query($sql);
$errorInfo = $conn->errorInfo();
if (isset($errorInfo[2])) {
$error = $errorInfo[2];
}
The new code defines two variables, $col and $dir, that are embedded directly in the SELECT query. Because they have been assigned default values, the query displays the results sorted by the image_id column in ascending order when the page first loads.
Two arrays, $columns and $direction, then define permitted values: the column names and the ASC and DESC keywords. These arrays are used by the conditional statements that check the $_GET array for column and direction. The submitted values are reassigned to $col and $dir only if they match a value in the $columns and $direction arrays, respectively. This prevents any attempt to inject illegal values into the SQL query.
3. Edit the <option> tags in the drop-down menus so they display the selected values for $col and $dir, like this:
<select name="column" id="column">
<option <?php if ($col == 'image_id') echo 'selected'; ?>
>image_id</option>
<option <?php if ($col == 'filename') echo 'selected'; ?>
>filename</option>
<option <?php if ($col == 'caption') echo 'selected'; ?>
>caption</option>
</select>
<select name="direction" id="direction">
<option value="ASC" <?php if ($dir == 'ASC') echo 'selected'; ?>
>Ascending</option>
<option value="DESC" <?php if ($dir == 'DESC') echo 'selected'; ?>
>Descending</option>
</select>
4. Save the page and test it in a browser. You can change the sort order of the display by selecting the values in the drop-down menus and clicking Change. However, if you try to inject an illegal value through the query string, the page uses the default values of $coland $dir to display the results sorted by image_id in ascending order.
You can check your code against mysqli_order_02.php and pdo_order_02.php in the ch11 folder.
Chapter Review
PHP provides three methods of communicating with MySQL:
· The original MySQL extension, which is deprecated: It should not be used for new projects. If you maintain an existing site, you can easily recognize whether it uses the original MySQL extension, because all functions begin with mysql_. You need to plan immediately to convert the site to using one of the other methods. The original MySQL functions will stop working in a future version of PHP.
· The MySQL Improved (MySQLi) extension: This is recommended for all new MySQL projects. It requires PHP 5.0 and MySQL 4.1 or higher. It’s more efficient and has the added safety of prepared statements. It’s also fully compatible with MariaDB.
· The PHP Data Objects (PDO) abstraction layer, which is database-neutral: You should choose this option if your projects are likely to need to be adapted for use with other databases. Although the code is database-neutral, PDO requires the correct driver to be installed for your chosen database. The driver for MySQL is fully compatible with MariaDB, and is commonly installed. Other drivers are less common. However, if the correct driver is installed, only the data source name (DSN) in the connection string needs to be changed to switch from one database to another.
Although PHP communicates with the database and stores the results, queries need to be written in SQL, the standard language used to query a relational database. This chapter showed how to retrieve information stored in a database table using a SELECT statement, refining the search with a WHERE clause, and changing the sort order with ORDER BY. You also learned several techniques to protect queries from SQL injection, including prepared statements, which use placeholders instead of embedding variables directly in a query.
In the next chapter, you’ll put this knowledge to practical use by creating an online photo gallery.
All materials on the site are licensed Creative Commons Attribution-Sharealike 3.0 Unported CC BY-SA 3.0 & GNU Free Documentation License (GFDL)
If you are the copyright holder of any material contained on our site and intend to remove it, please contact our site administrator for approval.
© 2016-2026 All site design rights belong to S.Y.A.