PHP Solutions: Dynamic Web Design Made Easy, Third Edition (2014)
Chapter 15. Pulling Data from Multiple Tables
As I explained in Chapter 11, one of the major strengths of a relational database is the ability to link data in different tables by using the primary key from one table as a foreign key in another table. The phpsols database has two tables: images and blog. It’s time to add some more and join them, so that you can assign categories to blog entries and associate images with individual articles.
You don’t physically join multiple tables, but rather do so through SQL. Often, you can join tables by identifying a direct relationship between primary and foreign keys. In some cases, though, the relationship is more complex and needs to go through a third table that acts as a cross-reference between the other two.
In this chapter, you’ll learn how to establish the relationship between tables and how to insert the primary key from one table as a foreign key in another table. Although it sounds difficult conceptually, it’s actually quite easy—you use a database query to look up the primary key in the first table, save the result, and use that result in another query to insert it in the second table.
In particular, you’ll learn about the following:
· Understanding the different types of table relationships
· Using a cross-reference table for many-to-many relationships
· Altering a table’s structure to add new columns or an index
· Storing a primary key as a foreign key in another table
· Linking tables with INNER JOIN and LEFT JOIN
Understanding Table Relationships
The simplest type of relationship is one-to-one (often represented as 1:1). This type of relationship is often found in databases that contain information only certain people should see. For example, companies often store details of employees’ salaries and other confidential information in a table separate from the more widely accessible staff list. Storing the primary key of each staff member’s record as a foreign key in the salaries table establishes a direct relationship between the tables, allowing the accounts department to see the full range of information, while restricting others to only the public information.
There’s no confidential information in the phpsols database, but you might create a one-to-one relationship between a single photo in the images table with an article in the blog table, as illustrated by Figure 15-1.
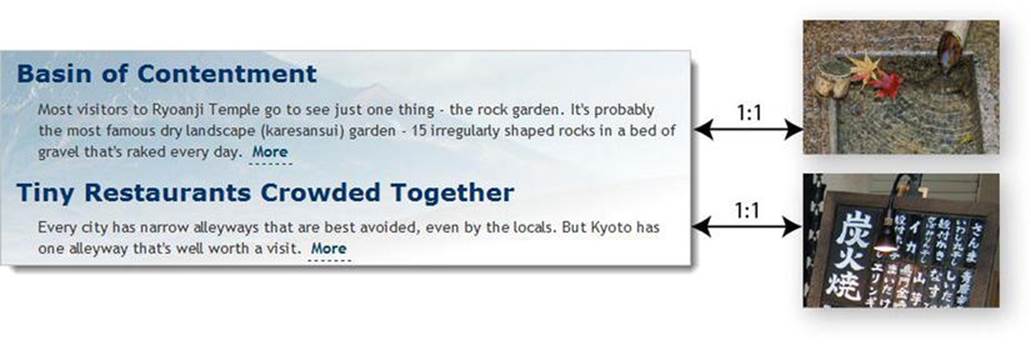
Figure 15-1. A one-to-one relationship links one record directly with another
This is the simplest way of creating a relationship between the two tables, but it’s not ideal. As more articles are added, the nature of the relationship is likely to change. The photo associated with the first article in Figure 15-1 shows maple leaves floating on the water, so it might be suitable for illustrating an article about the changing seasons or autumn hues. The crystal-clear water, bamboo water scoop, and bamboo pipe also suggest other themes that the photo could be used to illustrate. So you could easily end up with the same photo being used for several articles, or aone-to-many (or 1:n) relationship, as represented by Figure 15-2.
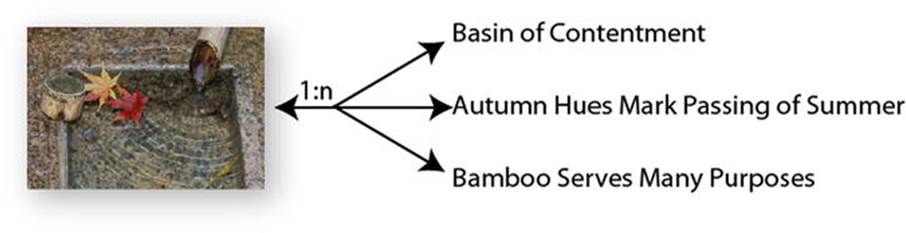
Figure 15-2. A one-to-many relationship links one record with several others
As you have already learned, a primary key must be unique. So, in a 1:n relationship, you store the primary key from the table on the 1 side of the relationship (the primary or parent table) as a foreign key in the table on the n side (the secondary or child table). In this case, theimage_id from the images table needs to be stored as a foreign key in the blog table. What’s important to understand about a 1:n relationship is that it’s also a collection of 1:1 relationships. Reading Figure 15-2 from right to left, each article has a relationship with a single image. Without this one-on-one relationship, you wouldn’t be able to identify which image is associated with a particular article.
What happens if you want to associate more than one image to each article? You could create several columns in the blog table to hold the foreign keys, but this rapidly becomes unwieldy. You might start off with image1, image2, and image3, but if most articles have only one image, two columns are redundant much of the time. And are you going add an extra column for that extra-special article that requires four images?
When faced with the need to accommodate many-to-many (or n:m) relationships, you need a different approach. The images and blog tables don’t contain sufficient records to demonstrate n:m relationships, but you could add a categories table to tag individual articles. Most articles are likely to belong to multiple categories, and each category will be related with several articles.
The way to resolve complex relationships is through a cross-reference table (sometimes called a linking table), which establishes a series of one-to-one relationships between related records. This is a special table containing just two columns, both of which are declared a joint primary key. Figure 15-3 shows how this works. Each record in the cross-reference table stores details of the relationship between individual articles in the blog and categories tables. To find all articles that belong to the Kyoto category, you match cat_id 1 in the categories table withcat_id 1 in the cross-reference table. This identifies the records in the blog table with the article_id 2, 3, and 4 as being associated with Kyoto.
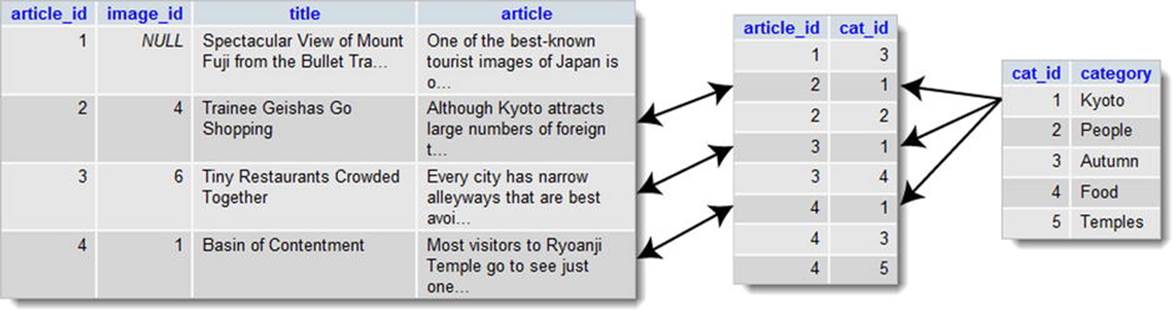
Figure 15-3. A cross-reference table resolves many-to-many relationships as 1:1
Establishing relationships between tables through foreign keys has important implications for how you update and delete records. If you’re not careful, you end up with broken links. Ensuring that dependencies aren’t broken is known as maintaining referential integrity. We’ll tackle this important subject in the next chapter. First, let’s concentrate on retrieving information stored in separate tables linked through a foreign-key relationship.
Linking an Image to an Article
To demonstrate how to work with multiple tables, let’s begin with the straightforward scenarios outlined in Figures 15-1 and 15-2: relations that can be resolved as 1:1 through the storage of the primary key from one table (the parent table) as a foreign key in a second table (the child or dependent table). This involves adding an extra column in the child table to store the foreign key.
Altering the Structure of an Existing Table
Ideally, you should design your database structure before populating it with data. However, relational databases, such as MySQL, are flexible enough to let you add, remove, or change columns in tables even when they already contain records. To associate an image with individual articles in the phpsols database, you need to add an extra column to the blog table to store image_id as a foreign key.
PHP Solution 15-1: Adding an Extra Column to a Table
This PHP solution shows how to add an extra column to an existing table using phpMyAdmin. It assumes that you created the blog table in the phpsols database in Chapter 13.
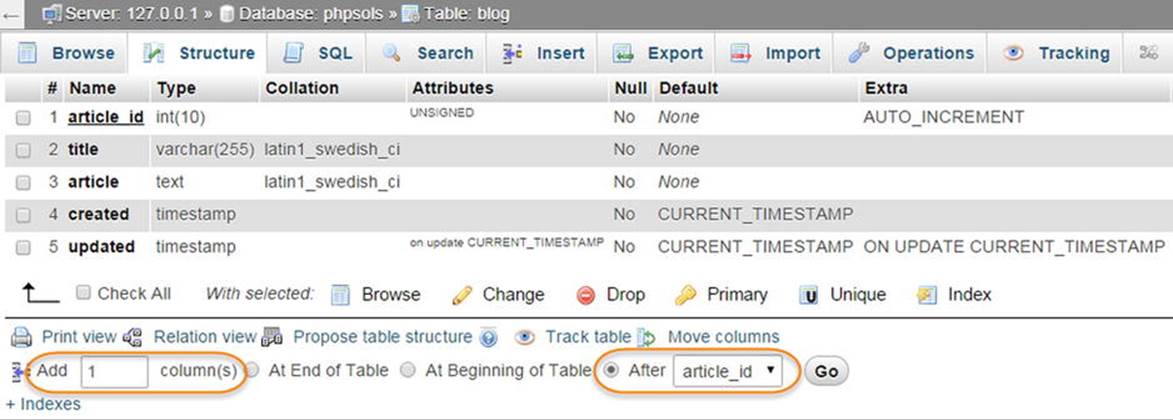
1. In phpMyAdmin, select the phpsols database and click the Structure link for the blog table.
2. Below the blog table structure is a form that allows you to add extra columns. You want to add only one column, so the default value in the Add field(s) text box is fine. It’s normal practice to put foreign keys immediately after the table’s primary key, so select the After radio button and check that the drop-down menu is set to article_id, as shown in the following screenshot. Then click Go.
3. This opens the screen for you to define column attributes. Use the following settings:
· Name: image_id
· Type: INT
· Attributes: UNSIGNED
· Null: Selected
· Index: INDEX
Do not select the A_I (AUTO_INCREMENT) check box. You don’t want image_id to be incremented automatically. Its value will be inserted from the images table.
The Null check box has been selected because not all articles will be associated with an image. Click Save.
4. Select the Structure tab and check that the blog table structure now looks like this:
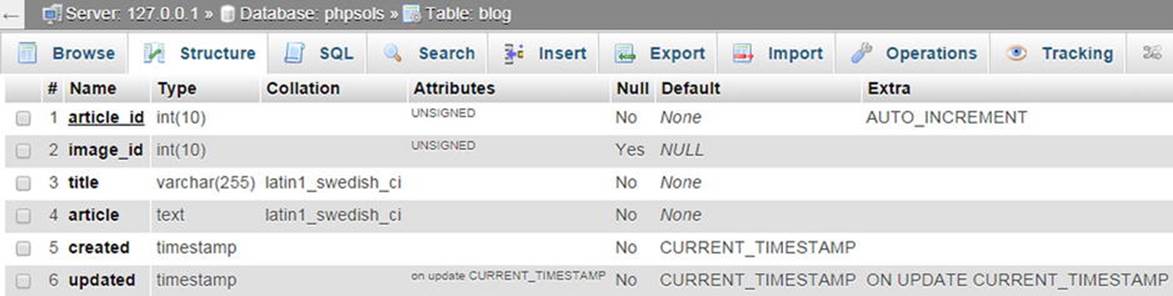
5. If you click the Browse tab at the top left of the screen, you will see that the value of image_id is NULL in each record. The challenge now is to insert the correct foreign keys without the need to look up the numbers manually. We’ll tackle that next.
Inserting a Foreign Key in a Table
The basic principle behind inserting a foreign key in another table is quite simple: you query the database to find the primary key of the record that you want to link to the other table. You can then use an INSERT or UPDATE query to add the foreign key to the target record.
To demonstrate the basic principle, you’ll adapt the update form from Chapter 13 to add a drop-down menu that lists images already registered in the images table (see Figure 15-4).
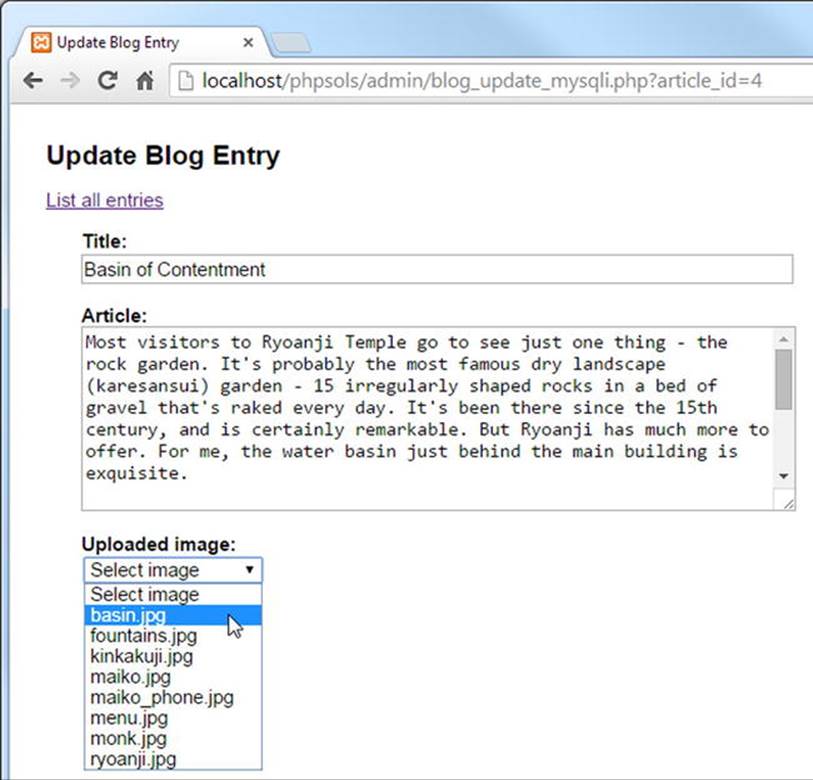
Figure 15-4. A dynamically generated drop-down menu inserts the appropriate foreign key
The menu is dynamically generated by a loop that displays the results of a SELECT query. Each image’s primary key is stored in the value attribute of the <option> tag. When the form is submitted, the selected value is incorporated into the UPDATE query as the foreign key.
PHP Solution 15-2: Adding the Image Foreign Key (MySQLi)
This PHP solution shows how to update records in the blog table by adding the primary key of a selected image as a foreign key. It adapts admin/blog_update_mysqli.php from Chapter 13. Use the version that you created in Chapter 13. Alternatively, copyblog_update_mysqli_03.php from the ch13 folder to the admin folder and remove _03 from the filename.
1. The existing SELECT query that retrieves details of the article to be updated needs to be amended so that it includes the foreign key, image_id, and the result needs to be bound to a new result variable, $image_id. You then need to run a second SELECT query to get the details of the images table. Before you can do so, you need to free the database resources by calling the prepared statement’s free_result() method. Add the following code highlighted in bold to the existing script:
if (isset($_GET['article_id']) && !$_POST) {
// prepare SQL query
$sql = 'SELECT article_id, image_id, title, article FROM blog
WHERE article_id = ?';
if ($stmt->prepare($sql)) {
// bind the query parameter
$stmt->bind_param('i', $_GET['article_id']);
// execute the query
$OK = $stmt->execute();
// bind the results to variables and fetch
$stmt->bind_result($article_id, $image_id, $title, $article);
$stmt->fetch();
// free the database resources for the second query
$stmt->free_result();
}
}
You can free the result immediately after calling the fetch() method because there’s only one record in the result set, and the value in each column has been bound to a variable.
2. Inside the form, you need to display the filenames stored in the images table. Since the second SELECT statement doesn’t rely on external data, it’s simpler to use the query() method instead of a prepared statement. Add the following code after the article text area (it’s all new code, but the PHP sections are highlighted in bold for ease of reference):
<p>
<label for="image_id">Uploaded image:</label>
<select name="image_id" id="image_id">
<option value="">Select image</option>
<?php
// get the list images
$getImages = 'SELECT image_id, filename
FROM images ORDER BY filename';
$images = $conn->query($getImages);
while ($row = $images->fetch_assoc()) {
?>
<option value="<?= $row['image_id']; ?>"
<?php
if ($row['image_id'] == $image_id) {
echo 'selected';
}
?>><?= $row['filename']; ?></option>
<?php } ?>
</select>
</p>
The first <option> tag is hard-coded with the label Select image, and its value is set to an empty string. The remaining <option> tags are populated by a while loop that extracts each record to an array called $row.
A conditional statement checks whether the current image_id is the same as the one already stored in the articles table. If it is, selected is inserted into the <option> tag so that it displays the correct value in the drop-down menu.
Make sure you don’t omit the third character in the following line:
?>><?= $row['filename']; ?></option>
It’s the closing angle bracket of the <option> tag, sandwiched between two PHP tags.
3. Save the page and load it into a browser. You should be automatically redirected to blog_list_mysqli.php. Select one of the EDIT links and make sure that your page looks like Figure 15-4. Check the browser source-code view to verify that the valueattributes of the <option> tags contain the primary key of each image.
![]() Tip If the <select> menu doesn’t list the images, there’s almost certainly an error with the SELECT query in step 2. Add echo $conn->error; immediately after the call to the query() method, and reload the page. You’ll need to view the browser source code to see the error message. If the message is “Commands out of sync; you can’t run this command now,” the problem lies with failing to free the database resources with free_result() in step 1.
Tip If the <select> menu doesn’t list the images, there’s almost certainly an error with the SELECT query in step 2. Add echo $conn->error; immediately after the call to the query() method, and reload the page. You’ll need to view the browser source code to see the error message. If the message is “Commands out of sync; you can’t run this command now,” the problem lies with failing to free the database resources with free_result() in step 1.
4. The final stage is to add the image_id to the UPDATE query. Because some blog entries might not be associated with an image, you need to create alternative prepared statements, like this:
// if form has been submitted, update record
if (isset($_POST ['update'])) {
// prepare update query
if (!empty($_POST['image_id'])) {
$sql = 'UPDATE blog SET image_id = ?, title = ?, article = ?
WHERE article_id = ?';
if ($stmt->prepare($sql)) {
$stmt->bind_param('issi', $_POST['image_id'], $_POST['title'],
$_POST['article'], $_POST['article_id']);
$done = $stmt->execute();
}
} else {
$sql = 'UPDATE blog SET image_id = NULL, title = ?, article = ?
WHERE article_id = ?';
if ($stmt->prepare($sql)) {
$stmt->bind_param('ssi', $_POST['title'], $_POST['article'],
$_POST['article_id']);
$done = $stmt->execute();
}
}
}
If $_POST['image_id'] has a value, you add it to the SQL as the first parameter with a placeholder question mark. Since it must be an integer, you add i to the beginning of the first argument of bind_param().
However, if $_POST['image_id'] doesn’t contain a value, you need to create a different prepared statement to set the value of image_id to NULL in the SQL query. Because it has an explicit value, you don’t add it to bind_param().
5. Test the page again, select a filename from the drop-down menu, and click Update Entry. You can verify whether the foreign key has been inserted into the articles table by refreshing Browse in phpMyAdmin or by selecting the same article for updating. This time, the correct filename should be displayed in the drop-down menu.
Check your code against blog_update_mysqli_04.php in the ch15 folder, if necessary.
PHP Solution 15-3: Adding the Image Foreign Key (PDO)
This PHP solution uses PDO to update records in the blog table by adding the primary key of a selected image as a foreign key. The main difference from MySQLi is that PDO can bind a null value to a placeholder using the bindValue() method. These instructions adaptadmin/blog_update_pdo.php from Chapter 13. Use the version that you created in Chapter 13. Alternatively, copy blog_update_pdo_03.php from the ch13 folder to the admin folder and remove _03 from the filename.
1. Add image_id to the SELECT query that retrieves details of the article to be updated, and bind the result to $image_id. This involves renumbering the columns passed as the first argument to bindColumn() for $title and $article. The revised code looks like this:
if (isset($_GET['article_id']) && !$_POST) {
// prepare SQL query
$sql = 'SELECT article_id, image_id, title, article FROM blog
WHERE article_id = ?';
$stmt = $conn->prepare($sql);
// pass the placeholder value to execute() as a single-element array
$OK = $stmt->execute([$_GET['article_id']]);
// bind the results
$stmt->bindColumn(1, $article_id);
$stmt->bindColumn(2, $image_id);
$stmt->bindColumn(3, $title);
$stmt->bindColumn(4, $article);
$stmt->fetch();
}
2. Inside the form, you need to display the filenames stored in the images table. Since the second SELECT statement doesn’t rely on external data, it’s simpler to use the query() method instead of a prepared statement. Add the following code after the article text area (it’s all new code, but the PHP sections are highlighted in bold for ease of reference):
<p>
<label for="image_id">Uploaded image:</label>
<select name="image_id" id="image_id">
<option value="">Select image</option>
<?php
// get the list images
$getImages = 'SELECT image_id, filename
FROM images ORDER BY filename';
foreach ($conn->query($getImages) as $row) {
?>
<option value="<?= $row['image_id']; ?>"
<?php
if ($row['image_id'] == $image_id) {
echo 'selected';
}
?>><?= $row['filename']; ?></option>
<?php } ?>
</select>
</p>
The first <option> tag is hard-coded with the label Select image, and its value is set to an empty string. The remaining <option> tags are populated by a foreach loop that executes the $getImages SELECT query and extracts each record to an array called $row.
A conditional statement checks whether the current image_id is the same as the one already stored in the articles table. If it is, selected is inserted into the <option> tag so that it displays the correct value in the drop-down menu.
Make sure you don’t omit the third character in the following line:
?>><?= $row['filename']; ?></option>
It’s the closing angle bracket of the <option> tag, sandwiched between two PHP tags.
3. Save the page and load it into a browser. You should be automatically redirected to blog_list_pdo.php. Select one of the EDIT links, and make sure that your page looks like Figure 15-4. Check the browser source-code view to verify that the value attributes of the <option> tags contain the primary key of each image.
4. The final stage is to add the image_id to the UPDATE query. When a blog entry isn’t associated with an image, you need to enter null in the image_id column. This involves changing the way the values are bound to the anonymous placeholders in the prepared statement. Instead of passing them as an array to the execute() method, you need to use bindValue()and bindParam(). The revised code looks like this:
// if form has been submitted, update record
if (isset($_POST['update'])) {
// prepare update query
$sql = 'UPDATE blog SET image_id = ?, title = ?, article = ?
WHERE article_id = ?';
$stmt = $conn->prepare($sql);
if (empty($_POST['image_id'])) {
$stmt->bindValue(1, NULL, PDO::PARAM_NULL);
} else {
$stmt->bindParam(1, $_POST['image_id'], PDO::PARAM_INT);
}
$stmt->bindParam(2, $_POST['title'], PDO::PARAM_STR);
$stmt->bindParam(3, $_POST['article'], PDO::PARAM_STR);
$stmt->bindParam(4, $_POST['article_id'], PDO::PARAM_INT);
// execute query
$done = $stmt->execute();
}
The values are bound to the anonymous placeholders using numbers, counting from 1, to identify which placeholder they should be applied to. A conditional statement checks whether $_POST['image_id'] is empty. If it is, bindValue() sets the value to null, using the keyword NULL as the second argument and a PDO constant as the third argument. As explained in “Embedding variables in PDO prepared statements” in Chapter 11, you need to use bindValue() when the value being bound is anything other than a variable.
The remaining values are all variables, so they’re bound using bindParam(). I’ve used the PDO constants for integer and string for the remaining values. This isn’t strictly necessary, but it makes the code clearer.
Finally, the array of values has been removed from between the parentheses of the execute() method.
5. Test the page again, select a filename from the drop-down menu, and click Update Entry. You can verify whether the foreign key has been inserted into the articles table by refreshing Browse in phpMyAdmin or by selecting the same article for updating. This time, the correct filename should be displayed in the drop-down menu.
Check your code against blog_update_pdo_04.php in the ch15 folder, if necessary.
Selecting Records from Multiple Tables
There are several ways to link tables in a SELECT query, but the most common is to list the table names, separated by INNER JOIN. On its own, INNER JOIN produces all possible combinations of rows (a Cartesian join). To select only related values, you need to specify the primary-key/foreign-key relationship. For example, to select articles and their related images from the blog and images tables, you can use a WHERE clause, like this:
SELECT title, article, filename, caption
FROM blog INNER JOIN images
WHERE blog.image_id = images.image_id
The title and article columns exist only in the blog table. Likewise, filename and caption exist only in the images table. They’re unambiguous and don’t need to be qualified. However, image_id exists in both tables, so you need to prefix each reference with the table name and a period.
For many years, it was common practice to use a comma in place of INNER JOIN, like this:
SELECT title, article, filename, caption
FROM blog, images
WHERE blog.image_id = images.image_id
![]() Caution Using a comma to join tables can result in SQL syntax errors because of changes made to the way joins are handled since MySQL 5.0.12. Use INNER JOIN instead.
Caution Using a comma to join tables can result in SQL syntax errors because of changes made to the way joins are handled since MySQL 5.0.12. Use INNER JOIN instead.
Instead of a WHERE clause, you can use ON, like this:
SELECT title, article, filename, caption
FROM blog INNER JOIN images ON blog.image_id = images.image_id
When both columns have the same name, you can use the following syntax, which is my personal preference:
SELECT title, article, filename, caption
FROM blog INNER JOIN images USING (image_id)
![]() Note The column name after USING must be in parentheses.
Note The column name after USING must be in parentheses.
PHP Solution 15-4: Building the Details Page
This PHP solution shows how to join the blog and images tables to display a selected article with its associated photo. The code for MySQLi and PDO is almost identical, so this solution covers both.
1. Copy details_01.php from the ch15 folder to the phpsols site root and rename it details.php. Do not update the links if your editing environment prompts you to do so. Make sure that footer.php and menu.php are in the includes folder, and load the page in a browser. It should look like Figure 15-5.

Figure 15-5. The details page contains a placeholder image and text
2. Load blog_list_mysqli.php or blog_list_pdo.php into a browser and update the following three articles by assigning the image filename as indicated:
· Basin of Contentment: basin.jpg
· Tiny Restaurants Crowded Together: menu.jpg
· Trainee Geishas Go Shopping: maiko.jpg
3. Navigate to the blog table in phpMyAdmin and click the Browse tab to check that the foreign keys have been registered. At least one article should have NULL as the value for image_id, as shown in Figure 15-6.
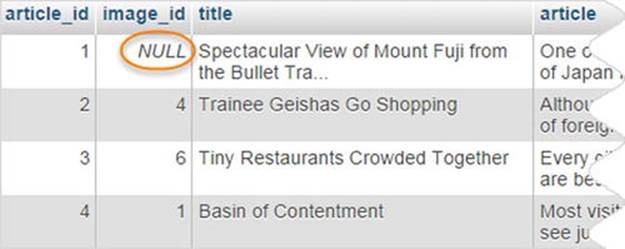
Figure 15-6. The foreign key of the article not associated with an image is set to NULL
4. In details.php, include utility_funcs.php from the previous chapter (if necessary, copy it from the ch14 folder to the includes folder). Then include the database connection file, create a read-only connection, and prepare the SQL query inside a PHP code block above the DOCTYPE declaration, like this:
require_once './includes/utility_funcs.php';
require_once './includes/connection.php';
// connect to the database
$conn = dbConnect('read'); // add 'pdo' if necessary
// check for article_id in query string
if (isset($_GET['article_id']) && is_numeric($_GET['article_id'])) {
$article_id = (int) $_GET['article_id'];
} else {
$article_id = 0;
}
$sql = "SELECT title, article,DATE_FORMAT(updated, '%W, %M %D, %Y') AS updated,
filename, caption
FROM blog INNER JOIN images USING (image_id)
WHERE blog.article_id = $article_id";
$result = $conn->query($sql);
$row = $result->fetch_assoc(); // for PDO use $result->fetch();
The code checks for article_id in the URL query string. If it exists and is numeric, it’s assigned to $article_id using the (int) casting operator to make sure it’s an integer. Otherwise, $article_id is set to 0. You could choose a default article instead, but leave it at 0 for the moment because I want to illustrate an important point.
The SELECT query retrieves the title, article, and updated columns from the blog table, and the filename and caption columns from the images table. The value of updated is formatted using the DATE_FORMAT() function and an alias, as described in Chapter 14. Because only one record is being retrieved, using the original column name as the alias doesn’t cause a problem with the sort order.
The tables are joined using INNER JOIN and a USING clause that matches the values in the image_id columns in both tables. The WHERE clause selects the article identified by $article_id. Since the data type of $article_id has been checked, it’s safe to use in the query. There’s no need to use a prepared statement.
Note that the query is wrapped in double quotes so that the value of $article_id is interpreted. To avoid conflicts with the outer pair of quotes, single quotes are used around the format string passed as an argument to DATE_FORMAT().
5. The rest of the code displays the results of the SQL query in the main body of the page. Replace the placeholder text in the <h2> tags like this:
<h2><?php if ($row) {
echo $row['title'];
} else {
echo 'No record found';
}
?>
</h2>
If the SELECT query finds no results, $row will be empty, which PHP interprets as false. So this displays the title, or “No record found” if the result set is empty.
6. Replace the placeholder date like this:
<p><?php if ($row) { echo $row['updated']; } ?></p>
7. Immediately following the date paragraph is a <figure> element containing a placeholder image. Not all articles are associated with an image, so the <figure> needs to be wrapped in a conditional statement that also checks that $row['filename'] contains a value. Amend the <figure> like this:
<?php
if ($row && !empty($row['filename'])) {
$filename = "images/{$row['filename']}";
$imageSize = getimagesize($filename)[3];
?>
<figure>
<img src="<?= $filename; ?>" alt="<?= $row['caption']; ?>" <?= $imageSize;?>>
</figure>
<?php } ?>
This uses code that was described in Chapter 12, so I won’t go into it again.
8. Finally, you need to display the article. Delete the paragraph of placeholder text, and add the following code between the closing curly brace and closing PHP tag at the end of the final code block in the previous step:
<?php } if ($row) { echo convertToParas($row['article']); } ?>
This uses the convertToParas() function in utility_funcs.php to wrap the blog entry in <p> tags and replace sequences of newline characters with closing and opening tags (see “Displaying paragraphs” in Chapter 14).
9. Save the page and load blog.php into a browser. Click the More link for an article that has an image assigned through a foreign key. You should see details.php with the full article and image laid out as shown in Figure 15-7.
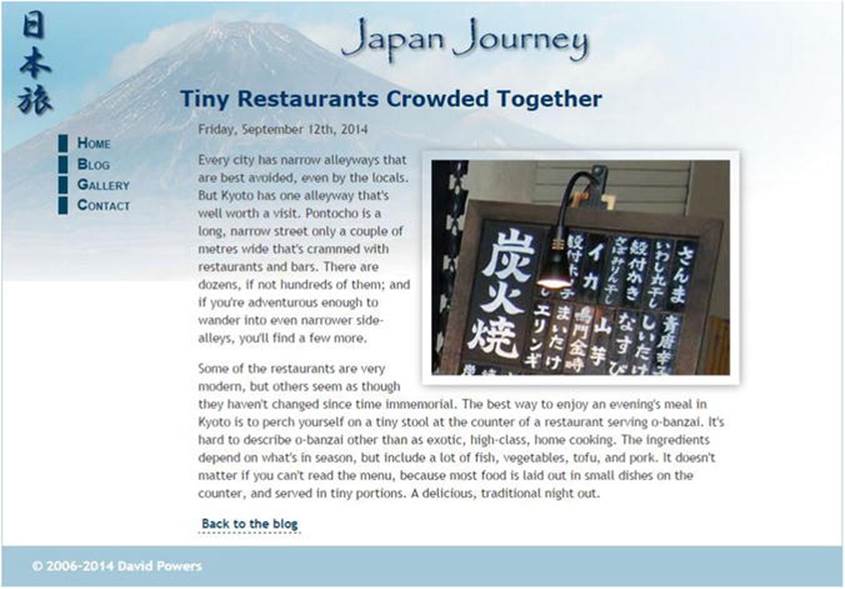
Figure 15-7. The details page pulls the article from one table and the image from another
Check your code, if necessary, with details_mysqli_01.php or details_pdo_01.php in the ch15 folder.
10.Click the link back to blog.php and test the other items. Each article that has an image associated with it should display correctly. Click the More link for the article that doesn’t have an image. This time you should see the result shown in Figure 15-8.

Figure 15-8. The lack of an associated image causes the SELECT query to fail
You know that the article is in the database because the first two sentences wouldn’t be displayed in blog.php otherwise. To understand this sudden “disappearance,” refer to Figure 15-6. The value of image_id is NULL for the record that doesn’t have an image associated with it. Because all the records in the images table have a primary key, the USING clause can’t find a match. The next section explains how to deal with this type of situation.
Finding Records that don’t have a Matching Foreign Key
Take the SELECT query from PHP Solution 15-4 and remove the condition that searches for a specific article, which leaves this:
SELECT title, article, DATE_FORMAT(updated, '%W, %M %D, %Y') AS updated, filename, caption
FROM blog INNER JOIN images USING (image_id)
If you run this query in the SQL tab of phpMyAdmin, it produces the result shown in Figure 15-9.

Figure 15-9. INNER JOIN finds only records that have a match in both tables
With INNER JOIN, the SELECT query succeeds in finding only those records where there’s a complete match. One of the articles doesn’t have an image associated with it, so value of image_id in the articles table is NULL, which doesn’t match anything in the images table.
In this type of situation, you need to use LEFT JOIN instead of INNER JOIN. With LEFT JOIN, the result includes records that have a match in the left table, but not in the right one. Left and right refer to the order in which you perform the join. Rewrite the SELECT query like this:
SELECT title, article, DATE_FORMAT(updated, '%W, %M %D, %Y') AS updated, filename, caption
FROM blog LEFT JOIN images USING (image_id)
When you run it in phpMyAdmin, you get all four articles, as shown in Figure 15-10.
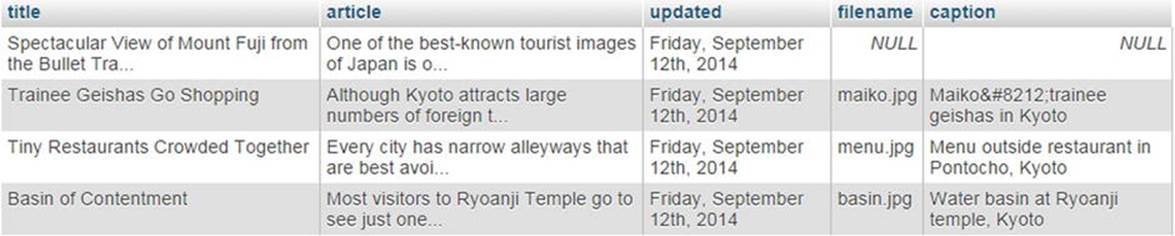
Figure 15-10. LEFT JOIN includes records that don't have a match in the right table
As you can see, the empty fields from the right table (images) are displayed as NULL.
If the column names are not the same in both tables, use ON like this:
FROM table_1 LEFT JOIN table_2 ON table_1.col_name = table_2.col_name
So, now you can rewrite the SQL query in details.php like this:
$sql = "SELECT title, article, DATE_FORMAT(updated, '%W, %M %D, %Y') AS updated,
filename, caption
FROM blog LEFT JOIN images USING (image_id)
WHERE blog.article_id = $article_id";
If you click the More link to view the article that doesn’t have an associated image, you should now see the article correctly displayed as shown in Figure 15-11. The other articles should still display correctly, too. The finished code can be found in details_mysqli_02.php anddetails_pdo_02.php.

Figure 15-11. LEFT JOIN also retrieves articles that don't have a matching foreign key
Creating an Intelligent Link
The link at the bottom of details.php goes straight back to blog.php. That’s fine with only four items in the blog table, but once you start getting more records in a database, you need to build a navigation system, as I showed you in Chapter 12. The problem with a navigation system is that you need a way to return visitors to the same point in the result set that they came from.
PHP Solution 15-5: Returning to the Same Point in a Navigation System
This PHP solution checks whether the visitor arrived from an internal or an external link. If the referring page was within the same site, the link returns the visitor to the same place. If the referring page was an external site, or if the server doesn’t support the necessary superglobal variables, the script substitutes a standard link. It is shown here in the context of details.php, but it can be used on any page.
The code is not database-dependent, so it’s identical for both MySQLi and PDO.
1. Locate the back link in the main body of details.php. It looks like this:
<p><a href="blog.php">Back to the blog</a></p>
2. Place your cursor immediately to the right of the first quotation mark, and insert the following code highlighted in bold:
<p><a href="
<?php
// check that browser supports $_SERVER variables
if (isset($_SERVER['HTTP_REFERER']) && isset($_SERVER['HTTP_HOST'])) {
$url = parse_url($_SERVER['HTTP_REFERER']);
// find if visitor was referred from a different domain
if ($url['host'] == $_SERVER['HTTP_HOST']) {
// if same domain, use referring URL
echo $_SERVER['HTTP_REFERER'];
}
} else {
// otherwise, send to main page
echo 'blog.php';
} ?>">Back to the blog</a></p>
$_SERVER['HTTP_REFERER'] and $_SERVER['HTTP_HOST'] are superglobal variables that contain the URL of the referring page and the current hostname. You need to check their existence with isset() because not all servers support them. Also, the browser might block the URL of the referring page.
The parse_url() function creates an array containing each part of a URL, so $url['host'] contains the hostname. If it matches $_SERVER['HTTP_HOST'], you know that the visitor was referred by an internal link, so the full URL of the internal link is inserted in the href attribute. This includes any query string, so the link sends the visitor back to the same position in a navigation system. Otherwise, an ordinary link is created to the target page.
The finished code is in details_mysqli_03.php and details_pdo_3.php in the ch15 folder.
Chapter Review
Retrieving information stored in multiple tables is relatively simple with INNER JOIN and LEFT JOIN. The key to working successfully with multiple tables lies in structuring the relationship between them so that complex relationships can always be resolved as 1:1, if necessary through a cross-reference (or linking) table. The next chapter continues the exploration of working with multiple tables, showing you how to deal with foreign-key relationships when inserting, updating, and deleting records.
All materials on the site are licensed Creative Commons Attribution-Sharealike 3.0 Unported CC BY-SA 3.0 & GNU Free Documentation License (GFDL)
If you are the copyright holder of any material contained on our site and intend to remove it, please contact our site administrator for approval.
© 2016-2026 All site design rights belong to S.Y.A.