PHP Solutions: Dynamic Web Design Made Easy, Third Edition (2014)
Chapter 6. Uploading Files
PHP’s ability to handle forms isn’t restricted to text. It can also be used to upload files to a server. For instance, you could build a real estate website for clients to upload pictures of their properties or a site for all your friends and relatives to upload their holiday photos. However, just because you can do it, doesn’t necessarily mean that you should. Allowing others to upload material to your website could expose you to all sorts of problems. You need to make sure that images are the right size, that they’re of suitable quality, and that they don’t contain any illegal material. You also need to ensure that uploads don’t contain malicious scripts. In other words, you need to protect your website just as carefully as your own computer.
PHP makes it relatively simple to restrict the type and size of files accepted. What it cannot do is check the suitability of the content. Think carefully about security measures, such as restricting uploads to registered and trusted users by placing the upload form in a password-protected area.
Until you learn how to restrict access to pages with PHP in Chapters 9 and 17, use the PHP solutions in this chapter only in a password-protected directory if deployed on a public website. Most hosting companies provide simple password protection through the site’s control panel.
The first part of this chapter is devoted to understanding the mechanics of file uploads, which will make it easier to understand the code that follows. This is a fairly intense chapter, not a collection of quick solutions. But by the end of the chapter, you will have built a PHP class capable of handling single and multiple file uploads. You can then use the class in any form by writing only a few lines of code.
You’ll learn about the following:
· Understanding the $_FILES array
· Restricting the size and type of uploads
· Preventing files from being overwritten
· Handling multiple uploads
How PHP Handles File Uploads
The term upload means moving a file from one computer to another, but as far as PHP is concerned, all that’s happening is that a file is being moved from one location to another. This means you can test all the scripts in this chapter on your local computer without the need to upload files to a remote server.
PHP supports file uploads by default, but hosting companies can restrict the size of uploads or disable them altogether. Before going any further, it’s a good idea to check the settings on your remote server.
Checking whether your server supports uploads
All the information you need is displayed in the main PHP configuration page that you can display by running phpinfo() on your remote server, as described in Chapter 2. Scroll down until you find file_uploads in the Core section.
If the Local Value is On, you’re ready to go, but you should also check the other configuration settings listed in Table 6-1.
Table 6-1. PHP configuration settings that affect file uploads
|
Directive |
Default value |
Description |
|
max_execution_time |
30 |
The maximum number of seconds that a PHP script can run. If the script takes longer, PHP generates a fatal error. |
|
max_file_uploads |
20 |
The maximum number of files that can be uploaded simultaneously. If the limit is exceeded, excess files are silently ignored. |
|
max_input_time |
60 |
The maximum number of seconds that a PHP script is allowed to parse the $_POST and $_GET arrays and file uploads. Very large uploads are likely to run out of time. |
|
post_max_size |
8M |
The maximum permitted size of all $_POST data, including file uploads. Although the default is 8 MB, hosting companies may impose a smaller limit. |
|
upload_tmp_dir |
This is where PHP stores uploaded files until your script moves them to a permanent location. If no value is defined in php.ini, PHP uses the system default temporary directory (C:\Windows\Temp or /tmp on Mac/Linux). |
|
|
upload_max_filesize |
2M |
The maximum permitted size of a single upload file. Although the default is 2 MB, hosting companies may impose a smaller limit. A number on its own indicates the number of bytes permitted. A number followed by K indicates the number of kilobytes permitted. |
As of PHP 5.6, PHP can handle uploads of individual files larger than 2 gigabytes, but the actual limits are determined by the settings in Table 6-1. The default 8 MB value of post_max_size includes the content of the $_POST array, so the total size of files that can be uploaded simultaneously on a typical server is less than 8 MB, with no single file greater than 2 MB. The server administrator can change these defaults, so it’s important to check the limits set by your hosting company. If you exceed those limits, an otherwise perfect script will fail.
If the Local Value of file_uploads is Off, uploads have been disabled. There is nothing you can do about it, other than ask your hosting company if it offers a package with file uploading enabled. Your only alternatives are to move to a different host or to use a different solution, such as uploading files by FTP.
![]() Tip After using phpinfo() to check your remote server’s settings, it’s a good idea to remove the script or put it in a password-protected directory.
Tip After using phpinfo() to check your remote server’s settings, it’s a good idea to remove the script or put it in a password-protected directory.
Adding a file upload field to a form
Adding a file upload field to an HTML form is easy. Just add enctype="multipart/form-data" to the opening <form> tag and set the type attribute of an <input> element to file. The following code is a simple example of an upload form (it’s in file_upload_01.php in the ch06 folder):
<form action="" method="post" enctype="multipart/form-data" id="uploadImage">
<p>
<label for="image">Upload image:</label>
<input type="file" name="image" id="image">
</p>
<p>
<input type="submit" name="upload" id="upload" value="Upload">
</p>
</form>
Although this is standard HTML, how it’s rendered in a webpage depends on the browser (see Figure 6-1). Most modern browsers display a Choose File or Browse button with a status message or the name of the selected file on the right. Internet Explorer displays a text input field with aBrowse button on the right. Recent versions of Internet Explorer make it read-only and launch a file-selection panel as soon as you click inside the field. These differences don’t affect the operation of an upload form, but you need to take them into account when designing the layout.
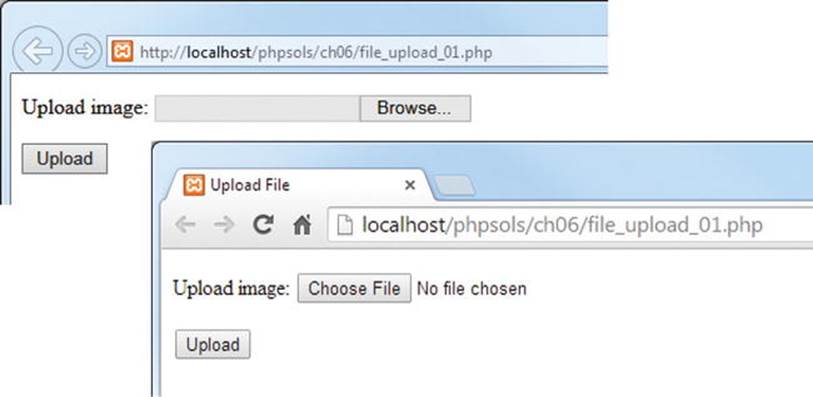
Figure 6-1. The look of a file input field depends on the browser
Understanding the $_FILES array
What confuses many people is that their file seems to vanish after it has been uploaded. This is because you can’t refer to an uploaded file in the $_POST array in the same way you do with text input. PHP transmits the details of uploaded files in a separate superglobal array called, not unreasonably, $_FILES. Moreover, files are uploaded to a temporary folder and are deleted unless you explicitly move them to the desired location. Although this sounds like a nuisance, it’s done for a very good reason: you can subject the file to security checks before accepting the upload.
Inspecting the $_FILES array
The best way to understand how the $_FILES array works is to see it in action. If you have installed a local test environment, you can test everything on your computer. It works in exactly the same way as uploading a file to a remote server.
1. Create a new folder called uploads in the phpsols site root. Create a new PHP file called file_upload.php in the uploads folder and insert the code from the previous section. Alternatively, copy file_upload_01.php from the ch06 folder and rename the file file_upload.php.
2. Insert the following code right after the closing </form> tag (it’s also in file_upload_02.php):
</form>
<pre>
<?php
if (isset($_POST['upload'])) {
print_r($_FILES);
}
?>
</pre>
</body>
This uses isset() to check whether the $_POST array contains upload, the name attribute of the Submit button. If it does, you know the form has been submitted, so you can use print_r() to inspect the $_FILES array. The <pre> tags make the output easier to read.
3. Save file_upload.php and load it into a browser.
4. Click the Browse (or Choose File) button and select a file on your hard disk. Click Open (or Choose on a Mac) to close the file selection dialog box, and then click Upload. You should see something similar to Figure 6-2.
You can see that the $_FILES array is actually a multidimensional array—an array of arrays. The top-level array contains just one element, which gets its key (or index) from the name attribute of the file input field, in this case, image.
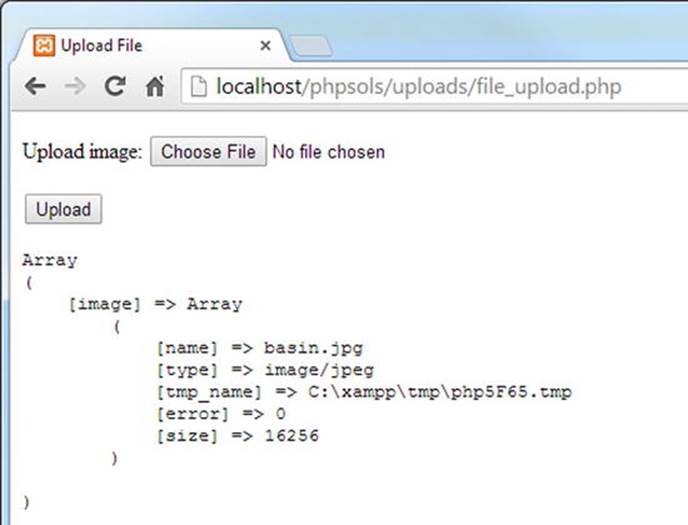
Figure 6-2. The $_FILES array contains the details of an uploaded file
The image element contains another array (or subarray) that consists of five elements, namely:
· name: The original name of the uploaded file
· type: The uploaded file’s MIME type
· tmp_name: The location of the uploaded file
· error: An integer indicating the status of the upload
· size: The size of the uploaded file in bytes
Don’t waste time searching for the temporary file indicated by tmp_name: it won’t be there. If you don’t save it immediately, PHP discards it.
5. Click Upload without selecting a file. The $_FILES array should look like Figure 6-3.
An error level of 4 indicates that no file was uploaded; 0 means the upload succeeded. Table 6-2 later in this chapter lists all the error codes.
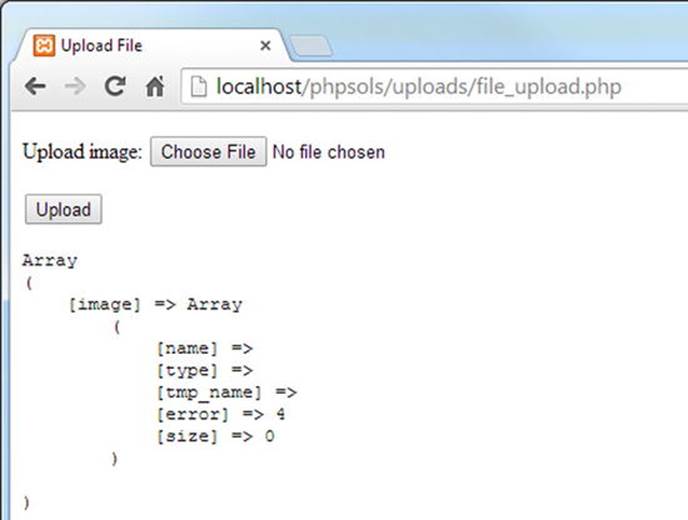
Figure 6-3. The $_FILES array still exists when no file is uploaded
6. Select a program file and click the Upload button. In many cases, the form will happily try to upload the program and will display its type as application/zip, application/octet-stream, or something similar. This is a warning that it’s important to check the MIME type of uploaded files.
Establishing an upload directory
Another source of confusion is the question of permissions. An upload script that works perfectly locally may confront you with a message like this when you transfer it to your remote server:
Warning: move_uploaded_file(/home/user/htdocs/testarea/kinkakuji.jpg)
[function.move-uploaded-file]: failed to open stream: Permission denied in
/home/user/htdocs/testarea/upload_test.php on line 3
Why is permission denied? Most hosting companies use Linux servers, which impose strict rules about the ownership of files and directories. In most cases, PHP doesn’t run in your name, but as the web server—usually nobody or apache. Unless PHP has been configured to run in your name, you need to give global access (chmod 777) to every directory to which you want to upload files.
Since 777 is the least secure setting, begin by testing uploads with a setting of 700. If that doesn’t work, try 770, and use 777 only as a last resort. The upload directory doesn’t need to be within your site root. If your hosting company gives you a private directory outside the site root, create a subdirectory for uploads inside the private one. Alternatively, create a directory inside your site root, but don’t link to it from any webpages. Give it an innocuous name, such as lastyear.
Creating an upload folder for local testing on Windows
For the following exercises, I suggest you create a folder called upload_test at the top level of the C drive. There are no permissions issues on Windows, so that’s all that you need to do.
Creating an upload folder for local testing on Mac OS X
Mac users might need to do a little more preparation because file permissions are similar to Linux. Create a folder called upload_test in your home folder and follow the instructions in PHP Solution 6-1.
If everything goes smoothly, you won’t need to do anything extra. But if you get a warning that PHP “failed to open stream,” change the permissions for the upload_test folder like this:
1. Select upload_test in the Mac Finder and select File ![]() Get Info (Cmd-I) to open its info panel.
Get Info (Cmd-I) to open its info panel.
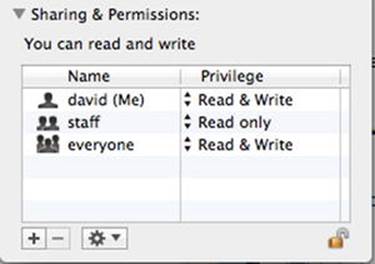
2. In Sharing & Permissions click the padlock icon at the bottom right to unlock the settings, then change the setting for everyone from Read only to Read & Write, as shown in the following screenshot.
3. Click the padlock icon again to preserve the new settings and close the info panel. You should now be able to use the upload_test folder to continue with the rest of the chapter.
Uploading Files
Before building the file upload class it’s a good idea to create a simple file upload script to make sure that your system handles uploads correctly.
Moving the temporary file to the upload folder
The temporary version of an uploaded file has only a fleeting existence. If you don’t do anything with the file, it’s discarded immediately. You need to tell PHP where to move it and what to call it. You do this with the move_uploaded_file() function, which takes the following two arguments:
· The name of the temporary file
· The full path name of the file’s new location, including the filename itself
Obtaining the name of the temporary file itself is easy: it’s stored in the $_FILES array as tmp_name. Because the second argument requires a full path name, it gives you the opportunity to rename the file. For the moment, let’s keep things simple and use the original filename, which is stored in the $_FILES array as name.
PHP Solution 6-1: Creating a basic file upload script
Continue working with the same file as in the previous exercise. Alternatively, use file_upload_03.php from the ch06 folder. The final script for this PHP solution is in file_upload_04.php.
1. If you are using the file from the previous exercise, delete the code highlighted in bold between the closing </form> and </body> tags:
</form>
<pre>
<?php
if (isset($_POST['upload'])) {
print_r($_FILES);
}
?>
</pre>
</body>
2. In addition to the automatic limits set in the PHP configuration (see Table 6-1), you can specify a maximum size for an upload file in your HTML form. Add the following line highlighted in bold immediately before the file input field:
<label for="image">Upload image:</label>
<input type="hidden" name="MAX_FILE_SIZE" value="<?= $max; ?>">
<input type="file" name="image" id="image">
This is a hidden form field, so it won’t be displayed onscreen. However, it’s vital to place it before the file input field, otherwise it won’t work. The name attribute, MAX_FILE_SIZE, is fixed and case-sensitive. The value attribute sets the maximum size of the upload file in bytes.
Instead of specifying a numeric value, I have used a variable called $max. This value will also be used in the server-side validation of the file upload, so it makes sense to define it once, avoiding the possibility of changing it in one place but forgetting to change it elsewhere.
3. Define the value of $max in a PHP block above the DOCTYPE declaration, like this:
<?php
// set the maximum upload size in bytes
$max = 51200;
?>
<!DOCTYPE HTML>
This sets the maximum upload size to 50 KB (51,200 bytes).
4. The code that moves the uploaded file from its temporary location to its permanent one needs to be run after the form has been submitted. Insert the following code in the PHP block you have just created at the top of the page:
$max = 51200;
if (isset($_POST['upload'])) {
// define the path to the upload folder
$destination = '/path/to/upload_test/';
// move the file to the upload folder and rename it
move_uploaded_file($_FILES['image']['tmp_name'],
$destination . $_FILES['image']['name']);
}
?>
Although the code is quite short, there’s a lot going on. The conditional statement executes the code only if the Upload button has been clicked by checking to see if its key is in the $_POST array.
The value of $destination depends on your operating system and the location of the upload_test folder.
· If you are using Windows and you created the upload_test folder at the top level of the C drive, it should look like this:
$destination = 'C:/upload_test/';
Note that I have used forward slashes instead of the Windows convention of backslashes. You can use either, but if you use backslashes, the final one needs to be escaped by another backslash, like this (otherwise the backslash escapes the quote):
$destination = 'C:\upload_test\\';
· On a Mac, if you created the upload_test folder in your home folder, it should look like this (replace username with your Mac username):
$destination = '/Users/username/upload_test/';
· On a remote server, you need the fully qualified file path as the second argument. On Linux, it will probably be something like this:
$destination = '/home/user/private/upload_test/';
The final line inside the if statement moves the file with the move_uploaded_file() function. The function takes two arguments: the name of the temporary file and the full path to where the file is to be saved.
$_FILES is a multidimensional array that takes its name from the file input field. So, $_FILES ['image']['tmp_name'] is the temporary file, and $_FILES['image']['name'] contains the name of the original file. The second argument,$destination . $_FILES['image']['name'], stores the uploaded file under its original name inside the upload folder.
![]() Caution You may come across scripts that use copy() instead of move_uploaded_file(). Without other checks in place, copy() can expose your website to serious security risks. For example, a malicious user could try to trick your script into copying files that it should not have access to, such as password files. Always use move_uploaded_file(); it’s much more secure.
Caution You may come across scripts that use copy() instead of move_uploaded_file(). Without other checks in place, copy() can expose your website to serious security risks. For example, a malicious user could try to trick your script into copying files that it should not have access to, such as password files. Always use move_uploaded_file(); it’s much more secure.
5. Save file_upload.php, and load it into your browser. Click the Browse or Choose File button and select a file from the images folder in the phpsols site. If you choose one from elsewhere, make sure it’s less than 50 KB. Click Open (Choose on a Mac) to display the filename in the form. In browsers that display a file input field, you might not be able to see the full path. That’s a cosmetic matter that I’ll leave you to sort out yourself with CSS. Click the Upload button. If you’re testing locally, the form input field should clear almost instantly.
6. Navigate to the upload_test folder and confirm that a copy of the image you selected is there. If it isn’t, check your code against file_upload_04.php. Also check that the correct permissions have been set on the upload folder, if necessary.
![]() Note The download files use C:/upload_test/. Adjust this to your own setup.
Note The download files use C:/upload_test/. Adjust this to your own setup.
If you get no error messages and cannot find the file, make sure that the image didn’t exceed upload_max_filesize (see Table 6-1). Also check that you didn’t leave the trailing slash off the end of $destination. Instead of myfile.jpg in theupload_test folder, you may find upload_testmyfile.jpg one level higher in your disk structure.
7. Change the value of $max to 3000, save file_upload.php, and test it again by selecting a file bigger than 2.9 KB to upload (any file in the images folder will do). Click the Upload button and check the upload_test folder. The file shouldn’t be there.
8. If you’re in the mood for experimentation, move the MAX_FILE_SIZE hidden field below the file input field, and try it again. Make sure you choose a different file from the one you used in step 6, because move_uploaded_file() overwrites existing files of the same name. You’ll learn later how to give files unique names.
This time the file should be copied to your upload folder. Move the hidden field back to its original position before continuing.
The advantage of using MAX_FILE_SIZE is that PHP abandons the upload if the file is bigger than the stipulated value, avoiding unnecessary delays if the file is too big. Unfortunately, users can get around this restriction by faking the value submitted by the hidden field, so the script you’ll develop in the rest of this chapter will check the size on the server side, too.
Creating a PHP File Upload Class
As you have just seen, it takes just a few lines of code to upload a file, but this is not enough on its own to call the job complete. You need to make the process more secure by implementing the following steps:
· Check the error level.
· Verify on the server that the file doesn’t exceed the maximum permitted size.
· Check that the file is of an acceptable type.
· Remove spaces from the filename.
· Rename files that have the same name as an existing one to prevent overwriting.
· Handle multiple file uploads automatically.
· Inform the user of the outcome.
You need to implement these steps every time you want to upload files, so it makes sense to build a script that can be easily reused. That’s why I have chosen to use a custom class. Building PHP classes is generally regarded as an advanced subject, but don’t let that put you off.
A class is a collection of functions designed to work together. That’s an oversimplification, but it’s sufficiently accurate to give you the basic idea. Each function inside a class should normally focus on a single task, so you’ll build separate functions to implement the steps outlined in the previous list. The code should also be generic so it isn’t tied to a specific webpage. Once you have built the class, you can reuse it in any form. Although the class definition is long, using the class involves writing only a few lines of code.
If you’re in a hurry, the finished class is in the ch06/PhpSolutions folder. Even if you don’t build the script yourself, read through the descriptions so you have a clear understanding of how it works.
Defining a PHP class
Defining a PHP class is very easy. You use the class keyword followed by the class name and then put all the code for the class between a pair of curly braces. By convention, class names begin with an uppercase letter and are stored in a separate file with the same name as the class.
Using a namespace to avoid naming conflicts
If you’re writing your own scripts, you rarely need to worry about naming conflicts. We’re going to create a class to upload files, so Upload or FileUpload seems like a logical name. But once you start using scripts and classes created by others (including those in this book), there’s a danger of multiple classes having the same name.
The original strategy to avoid conflicts with common names was to store class definitions in a folder structure that described their functionality, and to give the top-level folder a unique name based on a domain or company name. The class name was then created from the folder structure using underscores instead of slashes. This frequently led to unwieldy class names such as Zend_File_Transfer_Adapter_Http.
![]() Note Storing class definitions in files and folders based on the class name and namespace makes it easy to load classes automatically using an autoloader script. We won’t be using an autoloader because there’s only one class definition to include in the file that contains the upload form. An autoloader mainly comes in handy when working with multiple classes.
Note Storing class definitions in files and folders based on the class name and namespace makes it easy to load classes automatically using an autoloader script. We won’t be using an autoloader because there’s only one class definition to include in the file that contains the upload form. An autoloader mainly comes in handy when working with multiple classes.
PHP 5.3 introduced a less cumbersome system using namespaces. PHP namespaces are still based on the folder structure, but they use backslashes instead of underscores. The namespace is also declared separately, allowing you to use simple class names.
The class we’re going to build is called Upload, but to avoid naming conflicts, it will be created in a namespace called PhpSolutions\File.
You declare a namespace at the top of a file using the namespace keyword followed by the namespace like this:
namespace PhpSolutions\File;
![]() Caution PHP uses a backslash as the namespace separator on all operating systems. Don’t be tempted to change it to forward slashes on Linux or Mac OS X.
Caution PHP uses a backslash as the namespace separator on all operating systems. Don’t be tempted to change it to forward slashes on Linux or Mac OS X.
So, if we create a class called Upload in this namespace, its fully qualified name is PhpSolutions\File\Upload. On the face of it, this hardly seems like progress. The class still has an unwieldy name that uses backslashes instead of underscores. The difference is that you can import a namespaced class and use a shorter name.
Importing a namespaced class
To avoid having to use the fully qualified name every time you refer to a namespaced class, you can import the class at the start of a script with the use keyword like this:
use PhpSolutions\File\Upload;
After importing the class, you can then refer to it as Upload rather than using the fully qualified name. Importing a namespaced class is not the same as including it. It’s simply a declaration that you want to use the class with a shorter name. In fact, you can assign an alias to the imported class with the as keyword, like this:
use PhpSolutions\File\Upload as FileUploader;
The class can then be referred to as FileUploader. Using an alias is mainly useful in large applications where two classes from different frameworks have the same name.
![]() Caution You still need to include the class definition separately. In fact, it’s common to import a namespaced class before the class definition is loaded, because the use keyword must be declared at the top level of a script. It cannot be nested inside a conditional statement.
Caution You still need to include the class definition separately. In fact, it’s common to import a namespaced class before the class definition is loaded, because the use keyword must be declared at the top level of a script. It cannot be nested inside a conditional statement.
PHP Solution 6-2: Creating the basic file upload class
In this PHP solution, you’ll create the basic definition for a class called Upload to handle file uploads. You’ll also create an instance of the class (an Upload object) and use it to upload an image. Give yourself plenty of time to go through the following steps. They’re not difficult, but they introduce concepts that might be unfamiliar if you have never worked with PHP classes.
1. Create a subfolder called PhpSolutions in the phpsols site root folder. Use the same combination of uppercase and lowercase letters in the folder name.
2. Create a subfolder called File (with an uppercase F) in the PhpSolutions folder.
3. In the new PhpSolutions/File folder, create a file called Upload.php. Again, use the same combination of uppercase and lowercase letters in the filename. Then insert the following code:
<?php
namespace PhpSolutions\File;
class Upload {
}
All the remaining code goes between the curly braces. This file will contain only PHP code, so you don’t need a closing PHP tag.
4. PHP classes hide their inner workings by declaring some variables and functions as protected. If you prefix a variable or function with the keyword protected, it can be accessed only inside the class or a subclass. This prevents values from being changed accidentally.
The Upload class needs protected variables for the following items:
· Path to the upload folder
· Maximum file size
· Messages to report the status of uploads
· Permitted MIME types
Create the variables by adding them inside the curly braces, like this:
class Upload {
protected $destination;
protected $max = 51200;
protected $messages = [];
protected $permitted = [
'image/gif',
'image/jpeg',
'image/pjpeg',
'image/png'
];
}
These properties can be accessed elsewhere in the class using $this->, which refers to the current object. For example, inside the class definition, you access $destination as $this->destination.
![]() Note When you first declare a property inside a class, it begins with a dollar sign like any other variable. However, you omit the dollar sign from the property name after the -> operator.
Note When you first declare a property inside a class, it begins with a dollar sign like any other variable. However, you omit the dollar sign from the property name after the -> operator.
With the exception of $destination, each protected property has been given a default value:
· $max sets the maximum file size to 50 KB (51200 bytes).
· $messages is an empty array.
· $permitted contains an array of image MIME types.
The value of $destination will be set when an instance of the class is created. The other values will be controlled internally by the class, but you’ll also create functions (or methods, as they’re called in classes) to change the values of $max and $permitted.
5. When you create an instance of a class (an object), the class definition file automatically calls the class’s constructor method, which initializes the object. The constructor method for all classes is called __construct() (with two underscores). Unlike the properties you defined in the previous step, the constructor needs to be accessible outside the class, so you precede its definition with the public keyword.
![]() Note The public and protected keywords control the visibility of properties and methods. Public properties and methods can be accessed anywhere. Any attempt to access protected properties or methods outside the class definition or a subclass triggers a fatal error.
Note The public and protected keywords control the visibility of properties and methods. Public properties and methods can be accessed anywhere. Any attempt to access protected properties or methods outside the class definition or a subclass triggers a fatal error.
The constructor for the Upload class takes as an argument the path to the folder where you want to upload the file and assigns it to $destination. Add the following code after the list of protected properties, making sure it’s before the closing curly brace of the class definition:
public function __construct($path) {
if (!is_dir($path) || !is_writable($path)) {
throw new \Exception("$path must be a valid,writable directory.");
}
$this->destination = $path;
}
The conditional statement inside the constructor passes $path to the is_dir() and is_writable() functions, which check that the value submitted is a valid directory (folder) that is writable. If either condition fails, the constructor throws an exception with a message indicating the problem.
![]() Note The backslash in front of Exception indicates that a core PHP command is to be used rather than one defined within the namespace. You only need to prefix core commands with a backslash if there’s any ambiguity. Classes can define their own exceptions, so it’s necessary here.
Note The backslash in front of Exception indicates that a core PHP command is to be used rather than one defined within the namespace. You only need to prefix core commands with a backslash if there’s any ambiguity. Classes can define their own exceptions, so it’s necessary here.
If $path is okay, it’s assigned the $destination property of the current object.
6. Next, create a public method called upload(). This will initiate a series of tests on the file before uploading it. Insert this code immediately after the constructor method that you defined in the previous step:
public function upload() {
$uploaded = current($_FILES);
if ($this->checkFile($uploaded)) {
$this->moveFile($uploaded);
}
}
To access the file in the $_FILES array in PHP Solution 6-1, you needed to know the name attribute of the file input field. The form in file_upload.php uses image, so you accessed the filename as $_FILES['image']['name']. But if the field had a different name, such as upload, you would need to use $_FILES['upload']['name']. To make the script more flexible, the first line of the upload() method passes the $_FILES array to the current() function, which returns the current element of an array. As a result, $uploaded holds a reference to the first element in the $_FILES array regardless of the name used in the form. This is the first benefit of building generic code. It takes more effort initially, but saves time in the end.
![]() Tip $_FILES is one of PHP’s superglobal arrays, so it’s available in all parts of a script. That’s why there’s no need to pass it as an argument to the class constructor method.
Tip $_FILES is one of PHP’s superglobal arrays, so it’s available in all parts of a script. That’s why there’s no need to pass it as an argument to the class constructor method.
7. The conditional statement in the upload() method calls checkFile() using the $this keyword. The $this keyword is also used to call functions (methods) defined within the class. We need to define checkFile() next. For the time being, we’ll assume that the file is okay, so checkFile() will simply return true. Add the following code to the class definition:
protected function checkFile($file) {
return true;
}
Preceding the definition with the protected keyword means this method can be accessed only inside the class. We’ll return to checkFile() in PHP Solution 6-3 to add a series of tests before uploading the file.
![]() Tip The order of function (method) definitions inside a class doesn’t matter, as long as they’re within the curly braces that enclose the class. However, it’s common practice to keep all public methods together at the top, with protected methods at the bottom.
Tip The order of function (method) definitions inside a class doesn’t matter, as long as they’re within the curly braces that enclose the class. However, it’s common practice to keep all public methods together at the top, with protected methods at the bottom.
8. If the file passes the series of tests, the conditional statement in the upload() method passes the file to another internal method called moveFile(), which is basically a wrapper for the move_uploaded_file() function that we used in PHP Solution 6-1. The code looks like this:
protected function moveFile($file) {
$success = move_uploaded_file($file['tmp_name'],
$this->destination . $file['name']);
if ($success) {
$result = $file['name'] . ' was uploaded successfully';
$this->messages[] = $result;
} else {
$this->messages[] = 'Could not upload ' . $file['name'];
}
}
If the upload succeeds, move_uploaded_file() returns true. Otherwise, it returns false. By storing the return value in success, an appropriate message is stored in the $messages array.
9. Since $messages is a protected property, you need to create a public method to retrieve the contents of the array.
public function getMessages() {
return $this->messages;
}
This simply returns the contents of the $messages array. Since that’s all it does, why not make the array public in the first place? Public properties can be accessed—and changed—outside the class definition. Protecting $messages ensures that the contents of the array cannot be altered, so you know the message has been generated by the class. This might not seem like such a big deal with a message like this, but it becomes very important when you start working with more complex scripts or in a team.
10.Save Upload.php and switch to file_upload.php.
11.At the top of file_upload.php, import the Upload class by adding the following line immediately after the opening PHP tag:
use PhpSolutions\File\Upload;
![]() Caution You must import namespaced classes in the top level of a script, even if the class definition is loaded later. Putting use inside a conditional statement generates a parse error.
Caution You must import namespaced classes in the top level of a script, even if the class definition is loaded later. Putting use inside a conditional statement generates a parse error.
12.Inside the conditional statement, delete the code that calls the move_uploaded_file() function, then use require_once to include the Upload class definition:
if (isset($_POST['upload'])) {
// define the path to the upload folder
$destination = 'C:/upload_test/';
require_once '../PhpSolutions/File/Upload.php';
}
13.We can now create an instance of the Upload class, but because we’re using a class that might throw an exception, it’s best to create a try/catch block (see “Handling exceptions” in Chapter 3). Add the following code immediately after the code you inserted in the previous step:
try {
$loader = new Upload($destination);
$loader->upload();
$result = $loader->getMessages();
} catch (Exception $e) {
echo $e->getMessage();
}
This creates an instance of the Upload class, called $loader, by passing it the path to the upload_test folder. It then calls the $loader object’s upload() and getMessages() methods, storing the result of getMessages() in $result.
The catch block doesn’t need to prefix Exception with a backslash because the script in file_upload.php is not in a namespace. Only the class definition is in a namespace
![]() Caution The Upload class has a getMessages() method, while the exception uses getMessage(). That extra “s” makes a difference.
Caution The Upload class has a getMessages() method, while the exception uses getMessage(). That extra “s” makes a difference.
14.Add the following PHP code block above the form to display any messages returned by the $loader object:
<body>
<?php
if (isset($result)) {
echo '<ul>';
foreach ($result as $message) {
echo "<li>$message</li>";
}
echo '</ul>';
}
?>
<form action="" method="post" enctype="multipart/form-data" id="uploadImage">
This is a simple foreach loop that displays the contents of $result as an unordered list. When the page first loads, $result isn’t set, so this code runs only after the form has been submitted.
15.Save file_upload.php and test it in a browser. As long as you choose an image that’s less than 50 KB, you should see confirmation that the file was uploaded successfully, as shown in Figure 6-4.
You can compare your code with file_upload_05.php and PhpSolutions/File/Upload_01.php in the ch06 folder.
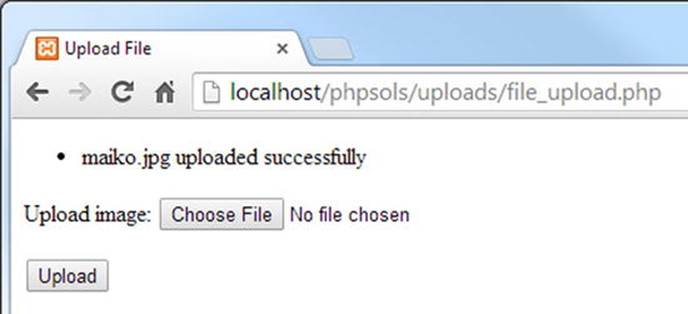
Figure 6-4. The Upload class reports a successful upload
The class does exactly the same as PHP Solution 6-1: it uploads a file, but it requires a lot more code to do so. However, you have laid the foundation for a class that’s going to perform a series of security checks on uploaded files. This is code that you’ll write once. When you use the class, you won’t need to write this code again.
If you haven’t worked with objects and classes before, some of the concepts might seem strange. Think of the $loader object simply as a way of accessing the functions (methods) you have defined in the Upload class. You often create separate objects to store different values, for example, when working with DateTime objects. In this case, a single object is sufficient to handle the file upload.
Checking upload errors
As it stands, the Upload class uploads any type of file indiscriminately. Even the 50 KB limit can be circumvented, because the only check is made in the browser. Before handing the file to the moveFile() method, the checkFile() method needs to run a series of tests. One of the most important is to inspect the error level reported by the $_FILES array. Table 6-2 shows a full list of error levels.
Error level 8 is the least helpful, because PHP has no way of detecting which PHP extension was responsible for stopping the upload. Fortunately, it’s rarely encountered.
Table 6-2. Meaning of the different error levels in the $_FILES array
|
Error level |
Meaning |
|
0 |
Upload successful |
|
1 |
File exceeds maximum upload size specified in php.ini (default 2 MB) |
|
2 |
File exceeds size specified by MAX_FILE_SIZE (see PHP Solution 6-1) |
|
3 |
File only partially uploaded |
|
4 |
Form submitted with no file specified |
|
6 |
No temporary folder |
|
7 |
Cannot write file to disk |
|
8 |
Upload stopped by an unspecified PHP extension |
Error level 5 is currently not defined.
PHP Solution 6-3: Testing the error level, file size, and MIME type
This PHP solution updates the checkFile() method to call a series of internal (protected) methods to verify that the file is okay to accept. If a file fails for any reason, an error message reports the reason to the user.
Continue working with Upload.php. Alternatively, use Upload_01.php in the ch06/PhpSolutions/File folder, move it to PhpSolutions/File at the top level of the phpsols site, and rename it Upload.php. (Always remove the underscore and number from partially completed files.)
1. The checkFile() method needs to run three tests: on the error level, the size of the file, and the file’s MIME type. Update the method definition like this:
protected function checkFile($file) {
$accept = true;
if ($file['error'] != 0) {
$this->getErrorMessage($file);
// stop checking if no file submitted
if ($file['error'] == 4) {
return false;
} else {
$accept = false;
}
}
if (!$this->checkSize($file)) {
$accept = false;
}
if (!$this->checkType($file)) {
$accept = false;
}
return $accept;
}
Originally, checkFile() simply returned true. Now, a variable called $accept is used as the method’s return value, and is initialized to true. Three conditional statements conduct a series of tests, which are carried out by protected methods that will be defined shortly. If the file fails any of the tests, $accept is set to false. The method returns true only if all three tests are passed.
Using $accept as the return value makes it possible to generate error messages detailing all problems with a file. This avoids the annoying situation in which an upload is rejected for one reason only for it to be rejected for a different reason once the first problem is resolved.
The argument passed to the checkFile() method is the top-level element in the $_FILES array. The upload field in the form we’re using is called image, so $file is the equivalent of $_FILES ['image']. That means you can access $_FILES ['image'] ['error'] as $file ['error'].
![]() Note As explained in PHP Solution 6-2, the name of the upload field is unimportant, because the upload() method automatically gets the current element from the $_FILES array.
Note As explained in PHP Solution 6-2, the name of the upload field is unimportant, because the upload() method automatically gets the current element from the $_FILES array.
The first conditional statement checks the error level. If it’s not zero, there’s a problem with the upload; $file is passed as an argument to the getErrorMessage() method, which you’ll define next.
If the error level is 4, no file was selected. There’s no point in checking any further, so the method immediately returns false. Otherwise, $accept is set to false, and the next two conditional statements carry out checks on the file’s size and MIME type.
2. The getErrorMessage() method is a switch statement (see “Using the switch statement for decision chains” in Chapter 3) that uses the error levels listed in Table 6-2 to add a suitable message to the $messages array. The code looks like this:
protected function getErrorMessage($file) {
switch($file['error']) {
case 1:
case 2:
$this->messages[] = $file['name'] . ' is too big: (max: ' .
$this->getMaxSize() . ').';
break;
case 3:
$this->messages[] = $file['name'] . ' was only partially
uploaded.';
break;
case 4:
$this->messages[] = 'No file submitted.';
break;
default:
$this->messages[] = 'Sorry, there was a problem uploading ' .
$file['name'];
break;
}
}
Part of the message for error levels 1 and 2 is created by a method called getMaxSize(), which converts the value of $max from bytes to kilobytes. You’ll define getMaxSize() shortly.
Only the first four error levels have descriptive messages. The default keyword catches other error levels, including any that might be added in future, and adds a generic reason.
3. Before defining getMaxSize(), let’s deal with the other tests. The checkSize() method looks like this:
protected function checkSize($file) {
if ($file['error'] == 1 || $file['error'] == 2 ) {
return false;
} elseif ($file['size'] == 0) {
$this->messages[] = $file['name'] . ' is an empty file.';
return false;
} elseif ($file['size'] > $this->max) {
$this->messages[] = $file['name'] . ' exceeds the maximum size
for a file (' . $this->getMaxSize() . ').';
return false;
} else {
return true;
}
}
The conditional statement starts by checking the error level. If it’s 1 or 2, the file is too big, so the method simply returns false. The appropriate error message has already been set by the getErrorMessage() method.
The next condition checks if the reported size is zero. Although this happens if the file is too big or no file was selected, those scenarios have already been covered by the getErrorMessage() method. So, the assumption is that the file is empty.
Next, the reported size is compared with the value stored in the $max property. Although files that are too big should trigger error level 2, you still need to make this comparison in case the user has managed to sidestep MAX_FILE_SIZE. The error message also usesgetMaxSize() to display the maximum size.
If the size is okay, the method returns true.
4. The third test checks the MIME type. Add the following code to the class definition:
protected function checkType($file) {
if (in_array($file['type'], $this->permitted)) {
return true;
} else {
$this->messages[] = $file['name'] . ' is not permitted type of file.';
return false;
}
}
The conditional statement checks the type reported by the $_FILES array against the array stored in the $permitted property. If it’s in the array, the method returns true. Otherwise, the reason for rejection is added to the $messages array, and the method returns false.
5. The getMaxSize() method used by getErrorMessages() and checkSize() converts the raw number of bytes stored in $max into a friendlier format. Add the following definition to the class file:
public function getMaxSize() {
return number_format($this->max/1024, 1) . ' KB';
}
This uses the number_format() function, which normally takes two arguments: the value you want to format and the number of decimal places you want the number to have. The first argument is $this->max/1024, which divides $max by 1024 (the number of bytes in a kilobyte). The second argument is 1, so the number is formatted to one decimal place. The . ' KB' at the end concatenates KB to the formatted number.
The getMaxSize() method has been declared public in case you want to display the value in another part of a script that uses the Upload class.
6. Save Upload.php and test it again with file_upload.php. With images smaller than 50 KB, it works the same as before. But if you try uploading a file that’s too big and of the wrong MIME type, you get a result similar to Figure 6-5.
You can check your code against Upload_02.php in the ch06/PhpSolutions/File folder.
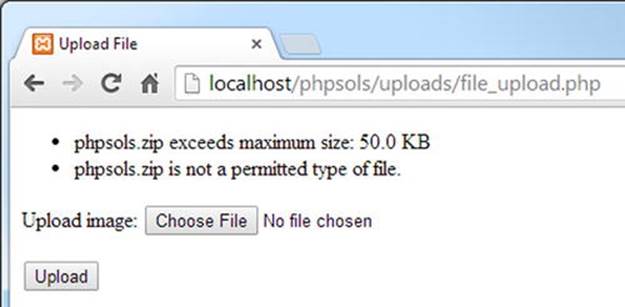
Figure 6-5. The class now reports errors with invalid size and MIME types
Changing protected properties
The $permitted property allows only images to be uploaded, and the $max property limits files to no more than 50 KB, but these limits might be too restrictive. Instead of diving into the class definition file every time you have different requirements, you can create public methods that allow you to make changes to protected properties on the fly.
A problem with using the MIME type to filter permitted types of files is that there are hundreds of different MIME types. What’s more, the value reported in the $_FILES array is dependent on the browser. MIME types work well for images, but the values reported for other types of files are often inconsistent. For example, Firefox reports the MIME type of Microsoft Word documents as application/vnd.ms-word.document.12, whereas Internet Explorer and Chrome use application/vnd.openxmlformats-officedocument.wordprocessingml.document.
To make the Upload class more flexible, we’ll create a public method to turn off MIME-type checking. This will permit any type of file to be uploaded. Removing all restrictions on the type of upload is risky, so we’ll need a strategy later to neutralize potentially dangerous files. We’ll also create a public method to change the maximum permitted size of file.
PHP Solution 6-4: Allowing different types and sizes to be uploaded
This PHP solution shows you how to allow all types of files to be uploaded by skipping the MIME-types check. You’ll also add a public method to change the maximum permitted size.
Continue working with Upload.php from the previous PHP solution. Alternatively, use Upload_02.php in the ch06/PhpSolutions/File folder.
1. To control whether the MIME type should be checked, create a protected property called $typeCheckingOn and set its value to true. Add the following line of code to the list of properties at the top of the class definition in Upload.php:
protected $typeCheckingOn = true;
2. Next, create a public method called allowAllTypes() to set the value of $typeCheckingOn to false:
public function allowAllTypes() {
$this->typeCheckingOn = false;
}
$typeCheckingOn is a class property, so you need to access it using $this->.
3. You can now control type checking by using the $typeCheckingOn property as a condition in the checkFile() method. Amend the method definition like this:
protected function checkFile($file) {
$accept = true;
if ($file['error'] != 0) {
$this->getErrorMessage($file);
// stop checking if no file submitted
if ($file['error'] == 4) {
return false;
} else {
$accept = false;
}
}
if (!$this->checkSize($file)) {
$accept = false;
}
if ($this->typeCheckingOn) {
if (!$this->checkType($file)) {
$accept = false;
}
}
return $accept;
}
This simply nests the final conditional statement in checkFile() in another condition. By default, $typeCheckingOn is true, so the MIME type will be checked by checkType(). But if you call the Upload object’s allowAllTypes() method before theupload() method, $typeCheckingOn will be false, and any type of file can be uploaded. You’ll see how to do this shortly, but first let’s create a public method to adjust the maximum size of a file that can be uploaded.
4. The method for changing the maximum permitted size needs to check that the submitted value is a number and assign it to the $max property. Add the following method definition to the class file:
public function setMaxSize($num) {
if (is_numeric($num) && $num > 0) {
$this->max = (int) $num;
}
}
The conditional statement passes the submitted value to the is_numeric() function, which checks that it’s a number. It also checks that $num is greater than zero.
If both conditions are true, $num is assigned to the $max property using what’s known as a casting operator, which forces the value to be an integer (see “Explicitly changing a data type” at the end of this PHP solution for a detailed explanation). The is_numeric()function accepts any type of number, including a hexadecimal one or a string containing a numeric value. This ensures that the value is converted to an integer.
![]() Caution PHP also has a function called is_int() that checks for an integer. However, the value cannot be anything else. For example, it rejects '102400' even though it’s a numeric value because the quotes make it a string.
Caution PHP also has a function called is_int() that checks for an integer. However, the value cannot be anything else. For example, it rejects '102400' even though it’s a numeric value because the quotes make it a string.
5. Save Upload.php and test file_upload.php again. It should continue to upload images smaller than 50 KB, as before.
6. Amend file_upload.php to change the maximum permitted size to 3000 bytes, like this (the code is just before the conditional statement that processes the upload):
$max = 3000;
7. You also need to invoke the setMaxSize() method on the $loader object in the try block, like this:
$loader = new Upload($destination);
$loader->setMaxSize($max);
$loader->upload();
$result = $loader->getMessages();
By changing the value of $max and passing it as the argument to setMaxSize(), you affect both MAX_FILE_SIZE in the form’s hidden field and the maximum value stored inside the class.
![]() Caution The call to setMaxSize() must come before you use the upload() method. There’s no point changing the maximum size in the class after the file has already been saved.
Caution The call to setMaxSize() must come before you use the upload() method. There’s no point changing the maximum size in the class after the file has already been saved.
8. Save file_upload_php and test it again. Select an image you haven’t used before, or delete the contents of the upload_test folder. The first time you try it, you might see only a message that the file is too big. Check the upload_test folder to confirm that it hasn’t been transferred.
Try it again. This time, you should see a result similar to Figure 6-6.
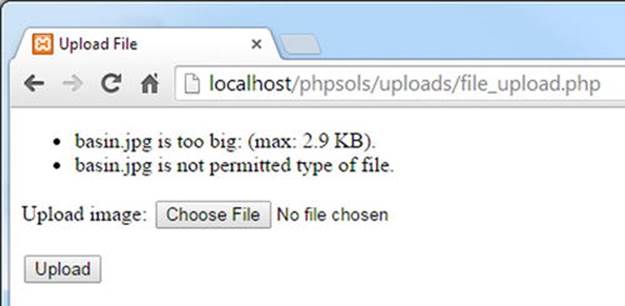
Figure 6-6. The size restriction is working, but there’s an error in checking the MIME type
What’s going on? The reason you probably didn’t see the message about the permitted type of file the first time is because the value of MAX_FILE_SIZE in the hidden field isn’t refreshed until you reload the form in the browser. The error message appears the second time because the updated value of MAX_FILE_SIZE prevents the file from being uploaded. As a result, the type element of the $_FILES array is empty. You need to tweak the checkType() method to fix this problem.
9. In Upload.php, amend the checkType() definition like this:
protected function checkType($file) {
if (in_array($file['type'], $this->permitted)) {
return true;
} else {
if (!empty($file['type'])) {
$this->messages[] = $file['name'] . ' is not permitted
type of file.';
}
return false;
}
}
If a file is bigger than the limit specified by MAX_FILE_SIZE in the form’s hidden field, nothing is uploaded, so the type element of the $_FILES array is empty. The code highlighted in bold adds a new condition that creates an error message only if$file['type'] is not empty.
![]() Note This has the disadvantage that it doesn’t warn the user if the file type isn’t acceptable. However, it’s preferable to displaying a false warning about permitted types simply because the file is too big.
Note This has the disadvantage that it doesn’t warn the user if the file type isn’t acceptable. However, it’s preferable to displaying a false warning about permitted types simply because the file is too big.
10.Save the class definition and test file_upload.php again. This time you should see only the message about the file being too big.
11.Reset the value of $max at the top of file_upload.php to 51200. You should now be able to upload the image. If it fails the first time, it’s because MAX_FILE_SIZE hasn’t been refreshed in the form.
12.Test the allowAllTypes() method by calling it on the Upload object like this (the new line of code must go before you call the upload() method):
$loader = new Upload($destination);
$loader->setMaxSize($max);
$loader->allowAllTypes();
$loader->upload();
$result = $loader->getMessages();
Try uploading any type of file. As long as it’s smaller than 50 KB, it should be uploaded. Change the value of $max to a suitably large number, if necessary.
![]() Tip Use a calculation to set the value of $max. For example, $max = 600 * 1024; // 600 KB.
Tip Use a calculation to set the value of $max. For example, $max = 600 * 1024; // 600 KB.
You can check your class definition against Upload_03.php in the ch06/PhpSolutions/File folder. There’s an updated version of the upload form in file_upload_06.php in the ch06 folder.
By now I hope you’re getting the idea of how a PHP class is built from functions (methods) dedicated to doing a single job. Fixing the incorrect error message about the image not being a permitted type was made easier by the fact that the message could only have come from thecheckType() method. Most of the code used in the method definitions relies on built-in PHP functions. Once you learn which functions are best suited to the task in hand, building a class—or any other PHP script—becomes much easier.
Explicitly changing a data type
Most of the time you don’t need to worry about the data type of a variable or value. Strictly speaking, all values submitted through a form are strings, but PHP silently converts numbers to the appropriate data type. This automatic type juggling, as it’s called, is very convenient. There are times, though, when you want to make sure a value is a specific data type. In such cases, you can cast (or change) a value to the desired type by preceding it with the name of the data type in parentheses. You saw an example of this in PHP Solution 6-4, which casts a numeric value to an integer, like this:
$this->max = (int) $num;
If the value is already of the desired type, it remains unchanged. Table 6-4 lists the casting operators used in PHP.
Table 6-4. PHP casting operators
|
Operator |
Alternatives |
Converts to |
|
(array) |
Array |
|
|
(bool) |
(boolean) |
Boolean (true or false) |
|
(float) |
(double), (real) |
Floating-point number |
|
(int) |
(integer) |
Integer |
|
(object) |
Object |
|
|
(string) |
String |
|
|
(unset) |
Null |
To learn more about what happens when casting between certain types, see the online documentation at http://php.net/manual/en/language.types.type-juggling.php.
Neutralizing potentially dangerous files
The allowAllTypes() method added in PHP Solution 6-4 makes the Upload class more flexible, but it exposes your server to the danger of someone uploading an executable file and then trying to run it. To mitigate these risks, you can automatically append a suffix to the filename of certain types of files. If someone uploads dosomedamage.php to your site, you can render it harmless by changing the name to dosomedamage.php.upload.
PHP Solution 6-5: Checking and amending filenames
This PHP solution demonstrates how to neutralize potentially dangerous files by optionally appending .upload to the filename of files that don’t have a filename extension or that have an extension that’s not trusted. It also checks filenames to replace spaces with underscores.
Continue working with Upload.php from the previous PHP solution. Alternatively, use Upload_03.php in the ch06/PhpSolutions/File folder.
1. Add the following three new protected properties to the existing ones at the top of the class definition in Upload.php:
protected $notTrusted = ['bin', 'cgi', 'exe', 'js', 'pl', 'php', 'py', 'sh'];
protected $suffix = '.upload';
protected $newName;
The first property defines an array of filename extensions that are potentially unsafe. The second one sets the default suffix that will be appended to the filename of risky files. The third one will be used to store the file’s new name if it is changed.
![]() Note The filename extensions in the $notTrusted array don’t have a preceding dot. This is because the built-in PHP function that detects the filename extension strips off the leading dot.
Note The filename extensions in the $notTrusted array don’t have a preceding dot. This is because the built-in PHP function that detects the filename extension strips off the leading dot.
2. By default, the class will append the .upload suffix to files with extensions in the not trusted list. But you don’t want that to happen if only registered (and trusted) users can upload files. To make the suffix optional, amend the definition of the allowAllTypes()method, like this:
public function allowAllTypes($suffix = true) {
$this->typeCheckingOn = false;
if (!$suffix) {
$this->suffix = ''; // empty string
}
}
This adds $suffix as an argument to the allowAllTypes() method and sets its value to true. Assigning a value to an argument in a function (method) definition makes it optional.
The conditional statement that has been added to the method definition uses the negation operator (!). So, if the argument passed to allowAllTypes() is false, the value of the class’s $suffix property is set to an empty string (a pair of quotes with nothing in between). In effect, this turns off appending a suffix to the filename. Instead of adding .upload, it adds nothing.
3. We need to add another check to the series of tests a file undergoes before it’s uploaded. Amend the checkFile() method like this (part of the existing code has been omitted to save space):
protected function checkFile($file) {
$accept = true;
// error and size checking code omitted
if ($this->typeCheckingOn) {
if (!$this->checkType($file)) {
$accept = false;
}
}
if ($accept) {
$this->checkName($file);
}
return $accept;
}
You don’t need to check the filename if the file has failed any of the previous tests, so the code highlighted in bold uses a conditional statement to call a new method checkName() only if $accept is true.
4. Define checkName() as a protected method. The first part of the code looks like this:
protected function checkName($file) {
$this->newName = null;
$nospaces = str_replace(' ', '_', $file['name']);
if ($nospaces != $file['name']) {
$this->newName = $nospaces;
}
}
The method begins by setting the $newName property to null (in other words, no value). The class will eventually be capable of handling multiple file uploads. Consequently, the property needs to be reset each time.
Then, the str_replace() function replaces spaces in the filename with underscores and assigns the result to $nospaces. The str_replace() function was described in PHP Solution 4-4.
The value of $nospaces is compared with $file['name']. If they’re not the same, $nospaces is assigned as the value of the $newName property.
That deals with spaces in filenames. Next, you need to add the suffix to the names of potentially unsafe files.
5. To determine if a file is potentially unsafe, you need to extract the filename extension. You can do that with the pathinfo() function. Add the following line of code to the checkName() method just before the closing curly brace:
$extension = pathinfo($nospaces, PATHINFO_EXTENSION);
The first argument to pathinfo() is the filename with the space removed. The second argument is a PHP constant that tells the function to return only the filename extension.
![]() Caution PHP constants are case-sensitive. PATHINFO_EXTENSION must be all uppercase.
Caution PHP constants are case-sensitive. PATHINFO_EXTENSION must be all uppercase.
6. You need to add the suffix only if the $typeCheckingOn property is false and the $suffix property is not an empty string. So, the code to add the suffix needs to be enclosed in a conditional statement that checks for both conditions.
Then, a second conditional statement nested inside the first one needs to check if the filename extension is in the $notTrusted array. It’s also a good idea to add the suffix to files that don’t have an extension, as they’re frequently used as executable files on Linux servers. Add the following code to the checkName() method after the line you inserted in the previous step:
if (!$this->typeCheckingOn && !empty($this->suffix)) {
if (in_array($extension, $this->notTrusted) || empty($extension)) {
$this->newName = $nospaces . $this->suffix;
}
}
The code inside the nested conditional statement concatenates the suffix onto the version of the filename without spaces and assigns the result to the $newName property.
7. If the name has been changed by removing spaces, adding a suffix, or both, the moveFile() method needs to use the amended name when saving the file to its destination. Update the beginning of the moveFile() method like this:
protected function moveFile($file) {
$filename = isset($this->newName) ? $this->newName : $file['name'];
$success = move_uploaded_file($file['tmp_name'],
$this->destination . $filename);
if ($success) {
The new first line uses the ternary operator (see “Using the ternary operator” in Chapter 3) to assign a value to $filename. The condition before the question mark checks if the $newName property has been set by the checkName() method. If it has, the new name is used. Otherwise, $file['name'], which contains the original value from the $_FILES array, is assigned to $filename.
In the second line, $filename replaces the value concatenated to the $destination property. So, if the name has been changed, the new name is used to store the file. But if no change has been made, the original name is used.
8. It’s a good idea to let the user know if the filename has been changed. Make the following change to the conditional statement in moveFile() that creates the message if the file has been successfully uploaded:
if ($success) {
$result = $file['name'] . ' was uploaded successfully';
if (!is_null($this->newName)) {
$result .= ', and was renamed ' . $this->newName;
}
$this->messages[] = $result;
}
If the $newName property is not null, you know the file has been renamed, and that information is added to the message stored in $result using the combined concatenation operator (.=).
9. Save Upload.php and test uploading files that have spaces in their names and/or have filename extensions listed in the $notTrusted array. The spaces should be replaced by underscores, and a suffix should be added to potentially risky file types, as shown inFigure 6-7.
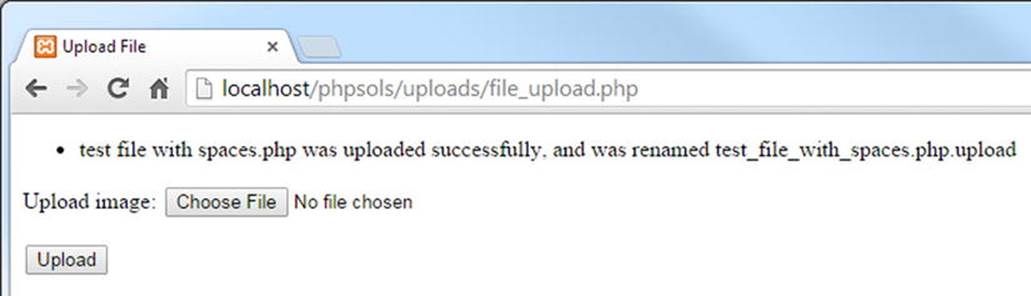
Figure 6-7. The spaces have been replaced, and a suffix has been added to the filename
10.In file_upload.php, pass false as an argument to allowAllTypes(), like this:
$loader->allowAllTypes(false);
11.Save file_upload.php and test the upload form again with a file that has an extension listed in the $notTrusted array. This time, only spaces will be replaced in the filename. The .upload suffix won’t be added (see Figure 6-8).
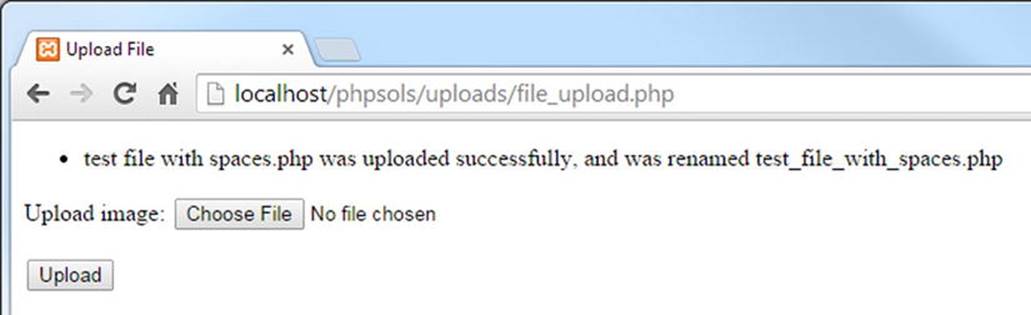
Figure 6-8. This time, the suffix hasn’t been appended to the filename
You can check your code against Upload_04.php in the ch06/PhpSolutions/File folder.
Preventing files from being overwritten
As the script stands, PHP automatically overwrites existing files without warning. That may be exactly what you want. On the other hand, it may be your worst nightmare. The class needs to offer a choice of whether to overwrite an existing file or to give it a unique name.
PHP Solution 6-6: Renaming duplicate files
This PHP solution improves the Upload class by adding the option to insert a number before the filename extension of an uploaded file to avoid overwriting an existing file of the same name. By default, this option is turned on.
Continue working with the same class definition file as before. Alternatively, use Upload_04.php in the ch06/PhpSolutions/File folder.
1. Renaming duplicate files needs to be optional, so add a new property to the list at the top of the class definition:
protected $renameDuplicates;
2. Rather than create a public method to set the value of this property, let’s make it an optional argument to the upload() method. Amend the method definition like this:
public function upload($renameDuplicates = true) {
$this->renameDuplicates = $renameDuplicates;
$uploaded = current($_FILES);
if ($this->checkFile($uploaded)) {
$this->moveFile($uploaded);
}
}
As explained in the previous PHP solution, you can make an argument optional by assigning it a value in the function (method) definition. This automatically sets the $renameDuplicates property to true unless you pass false as an argument to theupload() method.
3. All the code for renaming duplicate files needs to be added to the checkName() method, which you created in the previous PHP solution. Add the following code just before the method’s closing curly brace:
if ($this->renameDuplicates) {
$name = isset($this->newName) ? $this->newName : $file['name'];
$existing = scandir($this->destination);
if (in_array($name, $existing)) {
// rename file
}
}
The conditional statement checks whether the $renameDuplicates property is true or false. The code inside the braces is executed only if it’s true.
The first line of code inside the conditional block uses the ternary operator to set the value of $name. This is the same technique used in the moveFile() method. If the $newName property has a value, that value is assigned to $name. Otherwise, the original name is used.
The next line uses the scandir() function, which returns an array of all the files and folders in a directory. The argument passed to scandir() is the upload_folder, so $existing contains an array of files already in that folder.
The conditional statement on the next line passes $name to the in_array() function to determine if the $existing array contains a file with the same name. If there’s no match, nothing remains to be done.
4. If $name is found the $existing array, a new name needs to be generated. Add the following code under the “rename file” comment inside the nested conditional statement:
// rename file
$basename = pathinfo($name, PATHINFO_FILENAME);
$extension = pathinfo($name, PATHINFO_EXTENSION);
$i = 1;
do {
$this->newName = $basename . '_' . $i++;
if (!empty($extension)) {
$this->newName .= ".$extension";
}
} while (in_array($this->newName, $existing));
In the previous PHP solution, we used pathinfo() to get the filename extension. This time, you need to get both the file’s base name and the extension. You need to get the extension again because a suffix might have been appended to the filename if the file is of a type that’s not trusted.
To get the base name, the second argument passed to pathinfo() is PATHINFO_FILENAME. Now that we’ve got both the base name and the extension stored in separate variables, it’s easy to build a new name by inserting a number between the base name and the extension.
A counter variable, $i, is initialized at 1, and then a do . . . while loop builds the new name from $basename, an underscore, and the counter $i, which is incremented each time the loop runs. The conditional statement adds a dot and the extension if$extension isn’t an empty string. The loop’s condition keeps checking if the new name is in the $existing array.
![]() Note See “Using loops with while and do . . . while” in Chapter 3 for an explanation of how the loop works.
Note See “Using loops with while and do . . . while” in Chapter 3 for an explanation of how the loop works.
Let’s say you’re uploading a file called menu.jpg and there’s already a file with the same name in the upload folder. The loop rebuilds the name as menu_1.jpg and assigns the result to the $newName property. The loop’s condition then uses in_array() to check whether menu_1.jpg is in the $existing array.
If menu_1.jpg already exists, the loop continues, but the increment operator (++) has increased $i to 2, so $newName becomes menu_2.jpg, which is again checked by in_array(). The loop continues until in_array() no longer finds a match. Whatever value remains in the $newName property is used as the new filename.
5. Save Upload.php and test the revised class in file_upload.php. Start by passing false as an argument to the upload() method, like this:
$loader->upload(false);
6. Upload the same file several times. You should receive a message that the upload has been successful, but when you check the contents of the upload_test folder, there should be only one copy of the file. It has been overwritten each time.
7. Remove the argument from the call to upload():
$loader->upload();
8. Save file_upload.php and repeat the test, uploading the same file several times. Each time you upload the file, you should see a message that it has been renamed.
9. Try it also with a file that has an extension in the $notTrusted array. By default, the number is inserted before the suffix. If you pass false as an argument to allowAllTypes(), no suffix is added, and the number is inserted before the file’s normal extension.
10.Check the results by inspecting the contents of the upload_test folder. You should see something similar to Figure 6-9.
You can check your code, if necessary, against Upload_05.php in the ch06/PhpSolutions/File folder.
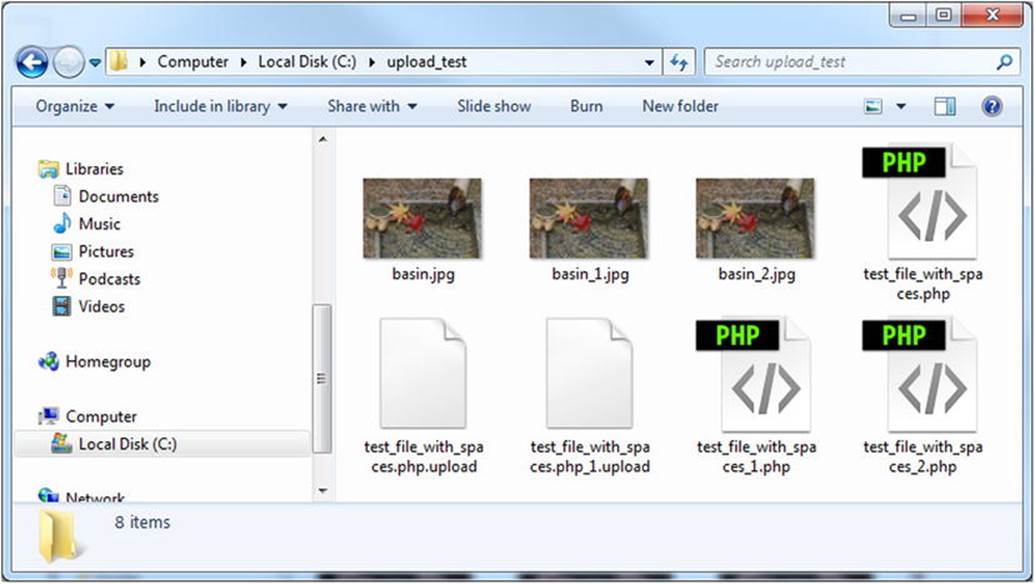
Figure 6-9. The class removes spaces from filenames and prevents files from being overwritten
Uploading Multiple Files
You now have a flexible class for file uploads, but it can handle only one file at a time. Adding the multiple attribute to the file field’s <input> tag permits the selection of multiple files in an HTML5-compliant browser. Older browsers also support multiple uploads if you add extra file fields to your form.
The final stage in building the Upload class is to adapt it to handle multiple files. To understand how the code works, you need to see what happens to the $_FILES array when a form allows for multiple uploads.
How the $_FILES array handles multiple files
Since $_FILES is a multidimensional array, it’s capable of handling multiple uploads. In addition to adding the multiple attribute to the <input> tag, you need to add an empty pair of square brackets to the name attribute, like this:
<input type="file" name="image[]" id="image" multiple>
As you learned in Chapter 5, adding square brackets to the name attribute submits multiple values as an array. You can examine how this affects the $_FILES array by using multi_upload_01.php or multi_upload_02.php in the ch06 folder. Figure 6-10 shows the result of selecting four files in a modern desktop browser that supports the multiple attribute.
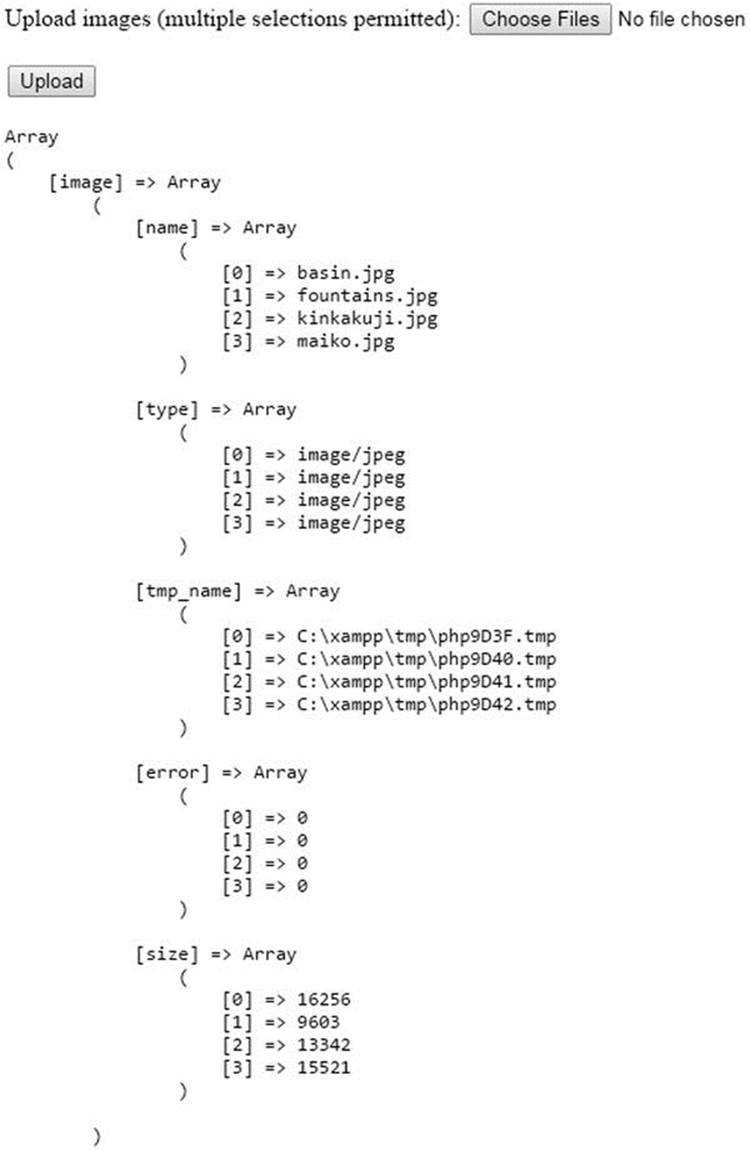
Figure 6-10. The $_FILES array can upload multiple files in a single operation
Although this structure is not as convenient as having the details of each file stored in a separate subarray, the numeric keys keep track of the details that refer to each file. For example, $_FILES['image']['name'][2] relates directly to $_FILES['image']['tmp_name'][2], and so on.
At the time of this writing, all modern desktop browsers support the multiple attribute, as does Safari on iOS (since version 6.1). This attribute is not supported in Internet Explorer 9 or earlier, nor in Android (the current version is 4.4).
Browsers that don’t support the multiple attribute upload a single file using the same structure, so the name of the file is stored as $_FILES['image']['name'][0].
![]() Tip If you need to support multiple file uploads on older browsers, omit the multiple attribute and create separate file input fields for however many files you want to upload simultaneously. Give each <input> tag the same name attribute followed by square brackets. The resulting structure of the $_FILES array is the same as in Figure 6-10.
Tip If you need to support multiple file uploads on older browsers, omit the multiple attribute and create separate file input fields for however many files you want to upload simultaneously. Give each <input> tag the same name attribute followed by square brackets. The resulting structure of the $_FILES array is the same as in Figure 6-10.
PHP Solution 6-7: Adapting the class to handle multiple uploads
This PHP solution shows how to adapt the upload() method of the Upload class to handle multiple file uploads. The class automatically detects when the $_FILES array is structured as in Figure 6-10 and uses a loop to handle however many files are uploaded.
When you upload a file from a form designed to handle only single uploads, the $_FILES array stores the filename as a string in $_FILES['image']['name']. But when you upload from a form capable of handling multiple uploads, $_FILES['image']['name'] is an array. Even if only one file is uploaded, its name is stored as $_FILES['image']['name'][0].
So, by detecting if the name element is an array, you can decide how to process the $_FILES array. If the name element is an array, you need to loop through it, using its index to extract the current file’s other details, and then storing them in a variable that can be passed to thecheckFile() method.
With that in mind, continue working with your existing class file. Alternatively, use Upload_05.php in the ch06/PhpSolutions/File folder.
1. Amend the upload() method by adding a conditional statement to check if the name element of $uploaded is an array:
public function upload($renameDuplicates = true) {
$this->renameDuplicates = $renameDuplicates;
$uploaded = current($_FILES);
if (is_array($uploaded['name'])) {
// deal with multiple uploads
} else {
if ($this->checkFile($uploaded)) {
$this->moveFile($uploaded);
}
}
}
The conditional statement checks if $uploaded['name'] is an array. If it is, it needs special handling. The existing call to checkFile() now goes inside the else block.
![]() Note Refer to PHP Solution 6-2 if you need reminding how $uploaded contains the reference to the first element in the $_FILES array.
Note Refer to PHP Solution 6-2 if you need reminding how $uploaded contains the reference to the first element in the $_FILES array.
2. In order to deal with multiple uploads, the challenge is to gather the five values associated with a single file (name, type, and so on) before passing them to the checkFile() and moveFile() methods.
If you refer to Figure 6-10, $uploaded['name'] is an indexed array that contains the names of the uploaded files. By running that array through a foreach loop, you can access both the key and value, like this:
foreach ($uploaded['name'] as $key => $value) { }
The first time the loop runs, $key is 0. Using the key, you can get access to the other elements in the $_FILES array for the first file and assign them to a new array called $currentFile. The second time it runs, you get the details of the second file, and so on.
The revised code for the upload() method looks like this:
public function upload($renameDuplicates = true) {
$this->renameDuplicates = $renameDuplicates;
$uploaded = current($_FILES);
if (is_array($uploaded['name'])) {
// deal with multiple uploads
foreach ($uploaded['name'] as $key => $value) {
$currentFile['name'] = $uploaded['name'][$key];
$currentFile['type'] = $uploaded['type'][$key];
$currentFile['tmp_name'] = $uploaded['tmp_name'][$key];
$currentFile['error'] = $uploaded['error'][$key];
$currentFile['size'] = $uploaded['size'][$key];
if ($this->checkFile($currentFile)) {
$this->moveFile($currentFile);
}
}
} else {
if ($this->checkFile($uploaded)) {
$this->moveFile($uploaded);
}
}
}
All you’re interested in is $key, so $value is never used. The first time the loop runs, $uploaded['name'][$key] accesses the value stored in $uploaded['name'][0] and assigns it to $currentFile['name']; $uploaded['type'][$key]accesses $uploaded['type'][0] and assigns it to $currentFile['type'], and so on. You never loop through the arrays for type, tmp_name, error, and size. Their values are accessible through the key thanks to the predictable nature of the$_FILES array.
Each time the loop runs, $currentFile contains the details of a single file, which are then passed to the checkFile() and moveFile() methods exactly as before.
3. Save Upload.php and test it with file_upload.php. It should work the same as before, uploading only one file at a time.
4. Add a pair of square brackets at the end of the name attribute in the file field and insert the multiple attribute, like this:
<input type="file" name="image[]" id="image" multiple>
You don’t need to make any changes to the PHP code above the DOCTYPE declaration. The code is the same for both single and multiple uploads.
![]() Note Internet Explorer prior to IE 10 will upload only the last file selected.
Note Internet Explorer prior to IE 10 will upload only the last file selected.
5. Save file_upload.php and reload it in your browser. Test it by selecting multiple files. When you click Upload, you should see messages relating to each file. Files that meet your criteria are uploaded. Those that are too big or of the wrong type are rejected.
You can check your code against Upload_06.php in the ch06/PhpSolutions/File folder.
Using the Upload Class
The Upload class is simple to use—just import the namespace as described in “Using a namespaced class” earlier in this chapter. Include the class definition in your script and create an Upload object by passing the file path to the upload_test folder as an argument, like this:
$destination = 'C:/upload_test/';
$loader = new Upload($destination);
![]() Caution The path to the upload folder must end in a trailing slash.
Caution The path to the upload folder must end in a trailing slash.
By default, the class permits only images to be uploaded, but this can be overridden. The class has the following public methods:
· setMaxSize(): Takes an integer and sets the maximum size for each upload file, overriding the default 51200 bytes (50 KB). The value must be expressed as bytes.
· getMaxSize(): Reports the maximum size in KB formatted to one decimal place.
· allowAllTypes(): Allows any type of file to be uploaded. By default, .upload is appended as a suffix to files with filename extensions listed in the $notTrusted property. To prevent the suffix from being appended, pass false as an argument to this method.
· upload(): Saves the file(s) to the destination folder. Spaces in filenames are replaced by underscores. By default, files with the same name as an existing file are renamed by inserting a number in front of the filename extension. To overwrite files, pass false as an argument to this method.
· getMessages(): Returns an array of messages reporting the status of uploads.
Points to Watch with File Uploads
Uploading files from a web form is fairly straightforward with PHP. The main causes of failure are not setting the correct permissions on the upload directory or folder, and forgetting to move the uploaded file to its target destination before the end of the script. Letting other people upload files to your server, however, exposes you to risk. In effect, you’re allowing visitors the freedom to write to your server’s hard disk. It’s not something you would allow strangers to do on your own computer, so you should guard access to your upload directory with the same degree of vigilance.
Ideally, uploads should be restricted to registered and trusted users, so the upload form should be in a password-protected part of your site. Also, the upload folder does not need to be inside your site root, so locate it in a private directory whenever possible unless you want uploaded material to be displayed immediately in your webpages. Remember, though, there is no way PHP can check that material is legal or decent, so immediate public display entails risks that go beyond the merely technical. You should also bear the following security points in mind:
· Set a maximum size for uploads both in the web form and on the server side.
· Restrict the types of uploaded files by inspecting the MIME type in the $_FILES array. Alternatively, add a suffix to the name of executable files to prevent them from being run remotely.
· Replace spaces in filenames with underscores or hyphens.
· Inspect your upload folder on a regular basis. Make sure there’s nothing in there that shouldn’t be, and do some housekeeping from time to time. Even if you limit file upload sizes, you may run out of your allocated space without realizing it.
Chapter Review
This chapter has introduced you to creating a PHP class. If you’re new to PHP or programming, you might have found it tough going. Don’t be disheartened. The Upload class contains more than 180 lines of code, some of it complex, although I hope the descriptions have explained what the code is doing at each stage. Even if you don’t understand all the code, the Upload class will save you a lot of time. It implements the main security measures necessary for file uploads, yet using it involves as little as a dozen lines of code:
use PhpSolutions\File\Upload;
if (isset($_POST['upload'])) {
require_once 'PhpSolutions/File/Upload.php');
try {
$loader = new Upload('C:/upload_test/');
$loader->upload();
$result = $loader->getMessages();
} catch (Exception $e) {
echo $e->getMessage();
}
}
If you found this chapter to be a struggle, come back to it later when you have more experience, and you should find the code easier to understand.
In the next chapter, you’ll learn some techniques for inspecting the contents of files and folders, including how to use PHP to read and write text files.
All materials on the site are licensed Creative Commons Attribution-Sharealike 3.0 Unported CC BY-SA 3.0 & GNU Free Documentation License (GFDL)
If you are the copyright holder of any material contained on our site and intend to remove it, please contact our site administrator for approval.
© 2016-2026 All site design rights belong to S.Y.A.