PHP Solutions: Dynamic Web Design Made Easy, Third Edition (2014)
Chapter 8. Generating Thumbnail Images
PHP has an extensive range of functions designed to work with images. You’ve already met one of them, getimagesize(), in Chapter 4. As well as providing useful information about an image’s dimensions, PHP can manipulate images by resizing or rotating them. It can also add text dynamically without affecting the original and can even create images on the fly.
To give you just a taste of PHP image manipulation, I’m going to show you how to generate a smaller copy of an uploaded image. Most of the time you’ll want to use a dedicated graphics program, such as Adobe Photoshop, to generate thumbnail images because it will give you much better quality control. However, automatic thumbnail generation with PHP can be very useful if you want to allow registered users to upload images while ensuring they conform to a maximum size. You can save just the resized copy or the copy along with the original.
In Chapter 6 you built a PHP class to handle file uploads. In this chapter you’ll create two classes: one to generate thumbnail images, the other to upload and resize images in a single operation. Rather than build the second class from scratch, you’ll base it on the Upload class fromChapter 6. A great advantage of using classes is that they’re extensible—a class based on another can inherit the functionality of its parent class. Building the classes to upload images and generate thumbnails from them involves a lot of code. But once you have defined the classes, using them involves only a few lines of script. If you’re in a rush or if writing a lot of code makes you break out in a cold sweat, you can just use the finished classes. Come back later to learn how the code works. It uses many basic PHP functions that you’ll find useful in other situations.
In this chapter, you’ll learn about the following:
· Scaling an image
· Saving a rescaled image
· Automatically resizing and renaming uploaded images
· Creating a subclass by extending an existing one
Checking Your Server’s Capabilities
Working with images in PHP relies on the GD extension. Originally, GD stood for GIF Draw, but problems with the GIF patent led to support for GIF files being dropped in 1999, but the name GD stuck. The problematic patent expired in 2004, and GIF is once again supported. The all-in-one PHP packages recommended in Chapter 2 support GD by default, but you need to make sure the GD extension has also been enabled on your remote web server.
As in previous chapters, run phpinfo() on your website to check the server’s configuration. Scroll down until you reach the section shown in the following screenshot (it should be about halfway down the page):
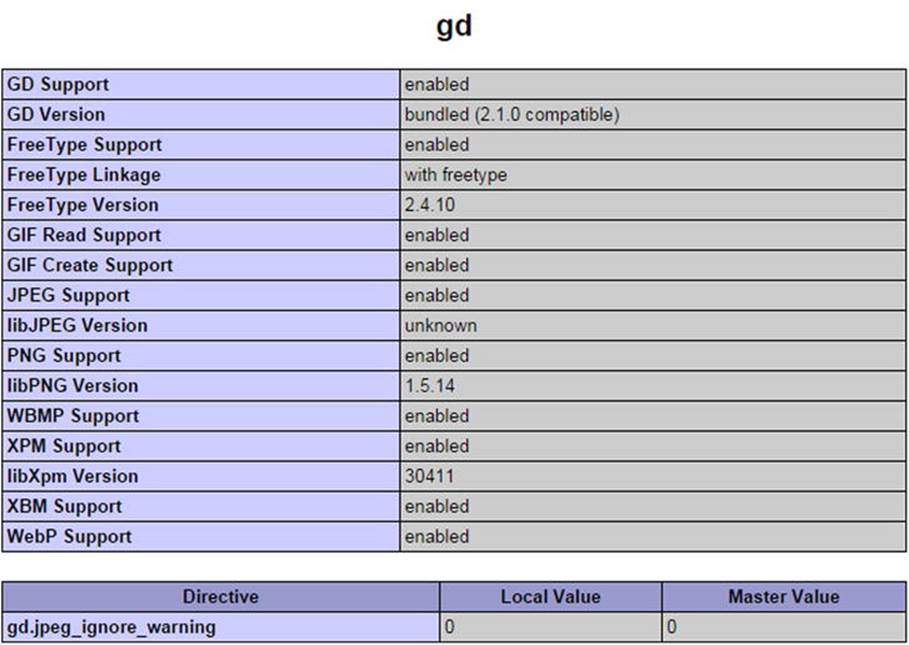
If you can’t find this section, the GD extension isn’t enabled, so you won’t be able to use any of the scripts in this chapter on your website. Ask for it to be enabled or move to a different host.
![]() Note Strictly for abbreviation/acronym freaks: GIF stands for Graphics Interchange Format. JPEG is the standard created by the Joint Photographic Experts Group, and PNG is short for Portable Network Graphics. Although JPEG is the correct name for the standard, the “E” is frequently dropped, particularly when used as a filename extension.
Note Strictly for abbreviation/acronym freaks: GIF stands for Graphics Interchange Format. JPEG is the standard created by the Joint Photographic Experts Group, and PNG is short for Portable Network Graphics. Although JPEG is the correct name for the standard, the “E” is frequently dropped, particularly when used as a filename extension.
Manipulating Images Dynamically
The GD extension allows you to generate images entirely from scratch or work with existing images. Either way, the underlying process always follows four basic steps:
1. Create a resource for the image in the server’s memory while it’s being processed.
2. Process the image.
3. Display and/or save the image.
4. Remove the image resource from the server’s memory.
This process means that you are always working on an image in memory only and not on the original. Unless you save the image to disk before the script terminates, any changes are discarded. Working with images requires a lot of memory, so it’s vital to destroy the image resource as soon as it’s no longer needed. If a script runs very slowly or crashes, it probably indicates that the original image is too large.
Making a Smaller Copy of an Image
The aim of this chapter is to show you how to resize images automatically on upload. This involves extending the Upload class from Chapter 6. However, to make it easier to understand how to work with PHP’s image manipulation functions, I propose to start by using images already on the server and then create a separate class to generate the thumbnail images.
Getting Ready
The starting point is the following simple form, which uses PHP Solution 7-3 to create a drop-down menu of the photos in the images folder. You can find the code in create_thumb_01.php in the ch08 folder. Copy it to a new folder called gd in the phpsols site root and rename itcreate_thumb.php.
At the top of the page is a PHP block that assigns to a variable called $folder the fully qualified path to the images folder in the phpsols site in XAMPP on Windows. The default location for MAMP on Mac OS X is commented out on the next line. Make any adjustments to match your own setup.
The form in the body of the page looks like this:
<form method="post" action="">
<p>
<select name="pix" id="pix">
<option value="">Select an image</option>
<?php
$files = new FilesystemIterator('../images');
$images = new RegexIterator($files, '/\.(?:jpg|png|gif)$/i');
foreach ($images as $image) {
$filename = $image->getFilename();
?>
<option value="<?= $folder . $filename; ?>"><?= $filename; ?></option>
<?php } ?>
</select>
</p>
<p>
<input type="submit" name="create" value="Create Thumbnail">
</p>
</form>
When loaded into a browser, the drop-down menu should display the names of the photos in the images folder. This makes it easier to pick images quickly for testing.
Inside the upload_test folder that you created in Chapter 6, create a new folder called thumbs, making sure it has the necessary permissions for PHP to write to it. Refer to “Establishing an upload directory” in Chapter 6 if you need to refresh your memory.
Building the Thumbnail Class
To generate a thumbnail image, the class needs to execute the following steps:
1. Get the dimensions of the original image.
2. Get the image’s MIME type.
3. Calculate the scaling ratio.
4. Create an image resource of the correct MIME type for the original image.
5. Create an image resource for the thumbnail.
6. Create the resized copy.
7. Save the resized copy to the destination folder using the correct MIME type.
8. Destroy the image resources to free memory.
In addition to generating a thumbnail image, the class automatically inserts _thb before the filename extension, but a public method allows you to alter this value. The class also needs public methods to set the destination folder and the maximum size of the thumbnail, as well as to retrieve messages generated by the class. To keep the calculations simple, the maximum size controls only the larger of the thumbnail’s dimensions.
To avoid naming conflicts, the Thumbnail class will use a namespace. Because it’s exclusively for images, we’ll create a new folder called Image in the PhpSolutions folder and use PhpSolutions\Image as the namespace.
There’s a lot to do, so I’ll break up the code into sections. They’re all part of the same class definition, but presenting the script this way should make it easier to understand, particularly if you want to use some of the code in a different context.
PHP Solution 8-1: Getting the Image Details
This PHP solution describes how to get the dimensions and MIME type of the original image.
1. Create a new folder called Image in the PhpSolutions folder. Then create a page called Thumbnail.php inside the folder. The file will contain only PHP, so strip out any HTML code inserted by your editing program.
2. Declare the namespace at the top of the new file:
namespace PhpSolutions\Image;
3. The class needs to keep track of quite a few properties. Begin the class definition by listing them, like this:
class Thumbnail {
protected $original;
protected $originalwidth;
protected $originalheight;
protected $basename;
protected $thumbwidth;
protected $thumbheight;
protected $maxSize = 120;
protected $canProcess = false;
protected $imageType;
protected $destination;
protected $suffix = '_thb';
protected $messages = [];
}
As in the Upload class, all the properties have been declared as protected, which means they can’t be changed accidentally outside the class definition. The names are descriptive, so they need little explanation. The $maxSize property has been given a default value of 120 (pixels). This determines the maximum size of the thumbnail’s longer dimension.
The $canProcess Boolean is initially set to false. This is to prevent the script from attempting to process a file that isn’t an image. The value will be reset to true if the MIME type matches that of an image. You can also use it to prevent the generation of a thumbnail if another error occurs.
4. The constructor takes one argument, the path to an image. Add the constructor definition after the list of protected properties, but inside the closing curly brace:
public function __construct($image) {
if (is_file($image) && is_readable($image)) {
$details = getimagesize($image);
} else {
$details = null;
$this->messages[] = "Cannot open $image.";
}
// if getimagesize() returns an array, it looks like an image
if (is_array($details)) {
$this->original = $image;
$this->originalwidth = $details[0];
$this->originalheight = $details[1];
$this->basename = pathinfo($image, PATHINFO_FILENAME);
// check the MIME type
$this->checkType($details['mime']);
} else {
$this->messages[] = "$image doesn't appear to be an image.";
}
}
The constructor begins with a conditional statement that checks that $image is a file and is readable. If it is, it’s passed to getimagesize(), and the result is stored in $details. Otherwise, $details is set to null, and an error message is added to the$messages property.
When you pass an image to getimagesize(), it returns an array containing the following elements:
· 0: Width (in pixels)
· 1: Height
· 2: An integer indicating the type of image
· 3: A string containing the correct width and height attributes ready for insertion in an <img> tag
· mime: The image’s MIME type
· channels: 3 for RGB and 4 for CMYK images
· bits: The number of bits for each color
If the value passed as an argument to getimagesize() isn’t an image, it returns false. Consequently, if $details is an array, you know you’re dealing with an image. The image’s path is stored in the $original property, and its width and height are stored in$originalWidth and $originalHeight, respectively.
The file’s name without the filename extension is extracted using pathinfo() with the PATHINFO_FILENAME constant in the same way as in PHP Solution 6-6. This is stored in the $basename property and will be used to build the thumbnail’s name with the suffix.
However, the image might not be a suitable type, so the final check is to pass its MIME type to an internal method called checkType(), which you’ll define next.
5. The checkType() method compares the MIME type with an array of acceptable image types. If it finds a match, it resets the $canProcess property to true and stores the type in the $imageType property. The method is used internally, so it needs to be declared as protected. Add the following code to the class definition:
protected function checkType($mime) {
$mimetypes = ['image/jpeg', 'image/png', 'image/gif'];
if (in_array($mime, $mimetypes)) {
$this->canProcess = true;
// extract the characters after 'image/'
$this->imageType = substr($mime, 6);
}
}
There are many types of images, but JPEG, PNG, and GIF are the only ones universally supported by browsers; the $canProcess property is set to true only if the image’s MIME type matches one of those listed in the $mimetypes array. If the MIME type isn’t in the list, $canProcess remains false, which later prevents the class from attempting to create a thumbnail.
All image MIME types begin with image/. To make the value easier to use later, the substr() function extracts the characters after the slash and stores them in the $imageType property. When used with two arguments, substr() starts at the position (counting from 0) specified in the second argument and returns the rest of the string.
![]() Note Although PHP 5.5 and later can process WebP images, I decided against including them in the Thumbnail class because of limited browser support. At the time of this writing, the WebP image format is supported by only Google Chrome, Opera, and Android 4.
Note Although PHP 5.5 and later can process WebP images, I decided against including them in the Thumbnail class because of limited browser support. At the time of this writing, the WebP image format is supported by only Google Chrome, Opera, and Android 4.
6. It’s a good idea to test your code as you build the class. Catching errors early is much easier than hunting for a problem in a long script. To test the code, create a new public method called test() inside the class definition.
It doesn’t matter in which order your methods appear inside the class definition, but it’s common practice to keep all public methods together after the constructor and to put protected methods at the bottom of the file. This makes the code easier to maintain.
Insert the following definition between the constructor and the checkType() definition:
public function test() {
echo 'File: ' . $this->original . '<br>';
echo 'Original width: ' . $this->originalwidth . '<br>';
echo 'Original height: ' . $this->originalheight . '<br>';
echo 'Base name: ' . $this->basename . '<br>';
echo 'Image type: ' . $this->imageType . '<br>';
if ($this->messages) {
print_r($this->messages);
}
}
This uses echo and print_r() to display the value of the properties.
7. To test the class definition so far, save Thumbnail.php and add the following code to the PHP block above the DOCTYPE declaration in create_thumb.php (the code can be found in create_thumb_02.php in the ch08 folder):
use PhpSolutions\Image\Thumbnail;
if (isset($_POST['create'])) {
require_once('../PhpSolutions/Image/Thumbnail.php');
try {
$thumb = new Thumbnail($_POST['pix']);
$thumb->test();
} catch (Exception $e) {
echo $e->getMessage();
}
}
This imports the Thumbnail class from the PhpSolutions\Image namespace, then adds the code that is to be executed when the form is submitted.
The name attribute of the submit button in create_thumb.php is create, so this code runs only when the form has been submitted. It includes the Thumbnail class definition, creates an instance of the class, passing the selected value from the form as an argument, and calls the test() method.
8. Save create_thumb.php and load it into a browser. Select an image and click Create Thumbnail. This produces output similar to Figure 8-1.
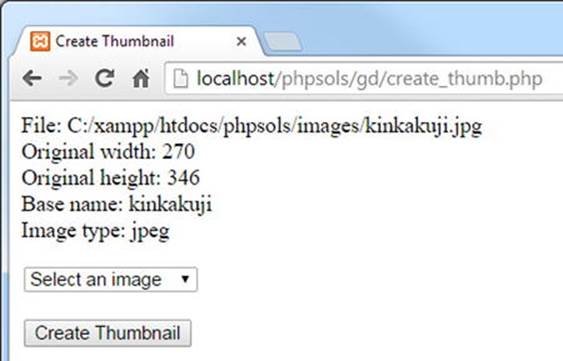
Figure 8-1. Displaying the details of the selected image confirms the code is working
If necessary, check your code against Thumbnail_01.php in the ch08/PhpSolutions/Images folder.
Although some properties have default values, you need to provide the option to change them by creating public methods to set the maximum size of the thumbnail image, and the suffix applied to the base of the filename. You also need to tell the class where to create the thumbnail. The formal term for this type of method is a mutator method. However, because it sets a value, it’s commonly referred to as a setter method. The next step is to create the setter methods.
PHP Solution 8-2: Creating the Setter Methods
In addition to setting the value of protected properties, setter methods play an important role in ensuring the validity of the value being assigned. Continue working with the same class definition. Alternatively, use Thumbnail_01.php in the ch08/PhpSolutions/Image folder.
1. Begin by creating the setter method for the folder where the thumbnail is to be created. Add the following code to Thumbnail.php after the constructor definition:
public function setDestination($destination) {
if (is_dir($destination) && is_writable($destination)) {
// get last character
$last = substr($destination, -1);
// add a trailing slash if missing
if ($last == '/' || $last == '\\') {
$this->destination = $destination;
} else {
$this->destination = $destination . DIRECTORY_SEPARATOR;
}
} else {
$this->messages[] = "Cannot write to $destination.";
}
}
This begins by checking that $destination is a folder (directory) and that it’s writable. If it isn’t, the error message in the else clause at the end of the method definition is added to the $messages property. Otherwise, the rest of the code is executed.
Before assigning the value of $destination to the $destination property, the code checks whether the value submitted ends in a forward slash or backslash. It does this by extracting the final character in $destination using the substr() function. The second argument to substr() determines the position from which to start the extract. A negative number counts from the end of the string. If the third argument is omitted, the function returns the rest of the string. So, $last = substr($destination, -1)has the effect of extracting the last character and storing it in $last.
The conditional statement checks whether $last is a forward slash or a backslash. Two backslashes are needed because PHP uses a backslash to escape quotes (see “Understanding when to use quotes” and “Using escape sequences” in Chapter 3).
It’s necessary to check for both forward slashes and backslashes in $destination because a Windows user might use backslashes out of habit. If the conditional statement confirms that the final character is a forward slash or a backslash, $destination is assigned to the $destination property. Otherwise, the else block concatenates the PHP constant DIRECTORY_SEPARATOR to the end of $destination before assigning it to the $destination property. The DIRECTORY_SEPARATOR constant automatically chooses the right type of slash depending on the operating system.
![]() Tip PHP treats forward slashes or backslashes equally in a path. Even if this results in adding the opposite type of slash, the path remains valid as far as PHP is concerned.
Tip PHP treats forward slashes or backslashes equally in a path. Even if this results in adding the opposite type of slash, the path remains valid as far as PHP is concerned.
2. The setter method for the maximum size of the thumbnail simply needs to check that the value is a number. Add the following code to the class definition:
public function setMaxSize($size) {
if (is_numeric($size)) {
$this->maxSize = abs($size);
}
}
The is_numeric() function checks that the submitted value is a number. If it is, it’s assigned to the $maxSize property. As a precaution, the value is passed to the abs() function, which converts a number to its absolute value. In other words, a negative number is converted into a positive one.
If the submitted value isn’t a number, nothing happens. The property’s default value remains unchanged.
3. The setter function for the suffix inserted in the filename needs to make sure the value doesn’t contain any special characters. The code looks like this:
public function setSuffix($suffix) {
if (preg_match('/^\w+$/', $suffix)) {
if (strpos($suffix, '_') !== 0) {
$this->suffix = '_' . $suffix;
} else {
$this->suffix = $suffix;
}
} else {
$this->suffix = '';
}
}
This uses preg_match(), which takes a regular expression as its first argument and searches for a match in the value passed as the second argument. Regular expressions need to be wrapped in a pair of matching delimiter characters—normally forward slashes, as used here. Stripped of the delimiters, the regex looks like this:
^\w+$
In this context, the caret (^) tells the regex to start at the beginning of the string. The \w is a regex token that matches any alphanumeric character or an underscore. The + means match the preceding token or character one or more times, and the $ means match the end of the string. In other words, the regex matches a string that contains only alphanumeric characters and underscores. If the string contains spaces or special characters, it won’t match.
If the match fails, the else clause at the end of the method definition sets the $suffix property to an empty string. Otherwise, this conditional statement is executed:
if (strpos($suffix, '_') !== 0) {
The condition equates to true if the first character of $suffix is not an underscore. It uses the strpos() function to find the position of the first underscore. If the first character is an underscore, the value returned by strpos() is 0. However, if $suffixdoesn’t contain an underscore, strpos() returns false. As explained in Chapter 3, 0 is treated by PHP as false, so the condition needs to use the “not identical” operator (with two equal signs). So, if the suffix doesn’t begin with an underscore, one is added. Otherwise, the original value is preserved.
![]() Caution Don’t confuse strpos() and strrpos(). The former finds the position of the first matching character. The latter searches the string in reverse.
Caution Don’t confuse strpos() and strrpos(). The former finds the position of the first matching character. The latter searches the string in reverse.
4. Update the test() method to display the values of the properties for which you have just created setter methods. The revised code looks like this:
public function test() {
echo 'File: ' . $this->original . '<br>';
echo 'Original width: ' . $this->originalwidth . '<br>';
echo 'Original height: ' . $this->originalheight . '<br>';
echo 'Base name: ' . $this->basename . '<br>';
echo 'Image type: ' . $this->imageType . '<br>';
echo 'Destination: ' . $this->destination . '<br>';
echo 'Max size: ' . $this->maxSize . '<br>';
echo 'Suffix: ' . $this->suffix . '<br>';
if ($this->messages) {
print_r($this->messages);
}
}
5. Test the updated class by using the new setter methods in create_thumb.php, like this:
$thumb = new Thumbnail($_POST['pix']);
$thumb->setDestination('C:/upload_test/thumbs/');
$thumb->setMaxSize(100);
$thumb->setSuffix('small');
$thumb->test();
Adjust the path to upload_test/thumbs to match your setup.
6. Save both pages and select an image from the list in create_thumb.php. You should see results similar to those in Figure 8-2.
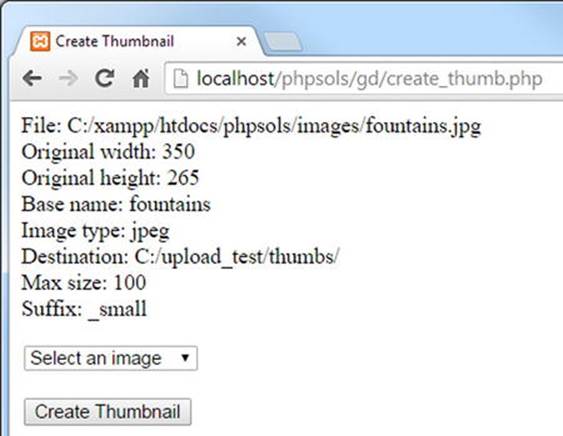
Figure 8-2. Verifying that the setter methods work
7. Try a number of tests, omitting the trailing slash from the value passed to setDestination() or selecting a nonexistent folder. Also pass invalid values to the setters for the maximum size and suffix. An invalid destination folder produces an error message, but the others fail silently, using the default value for the maximum size or an empty string for the suffix.
If necessary, compare your code with Thumbnail_02.php in ch08/PhpSolutions/Image and create_thumb_03.php in the ch08 folder.
You might not agree with my decision to fail silently when the values passed as arguments are invalid. By now, though, you should have sufficient experience of conditional statements to adapt the code to your own requirements. For example, if you want the setter method for the thumbnail’s maximum size to return an error message instead of failing silently, check that the value is greater than zero and add an else block to generate the error message. The else block should also set the $canProcess property to false to prevent the class from attempting to create a thumbnail image. This is how you would adapt the setMaxSize() method:
public function setMaxSize($size) {
if (is_numeric($size) && $size > 0) {
$this->maxSize = $size;
} else {
$this->messages[] = 'The value for setMaxSize() must be a positive number.';
$this->canProcess = false;
}
}
PHP Solution 8-3: Calculating the thumbnail’s dimensions
This PHP solution adds a protected method to the Thumbnail class that will calculate the thumbnail’s dimensions. The value set in the $maxSize property determines the width or height, depending on which is larger. To avoid distorting the thumbnail, you need to calculate the scaling ratio for the shorter dimension. The ratio is calculated by dividing the maximum thumbnail size by the larger dimension of the original image.
For example, the original image of the Golden Pavilion (kinkakuji.jpg) is 270 × 346 pixels. If the maximum size is set at 120, dividing 120 by 346 produces a scaling ratio of 0.3468. Multiplying the width of the original image by this ratio fixes the thumbnail’s width at 94 pixels (rounded up to the nearest whole number), maintaining the correct proportions. Figure 8-3 shows how the scaling ratio works.
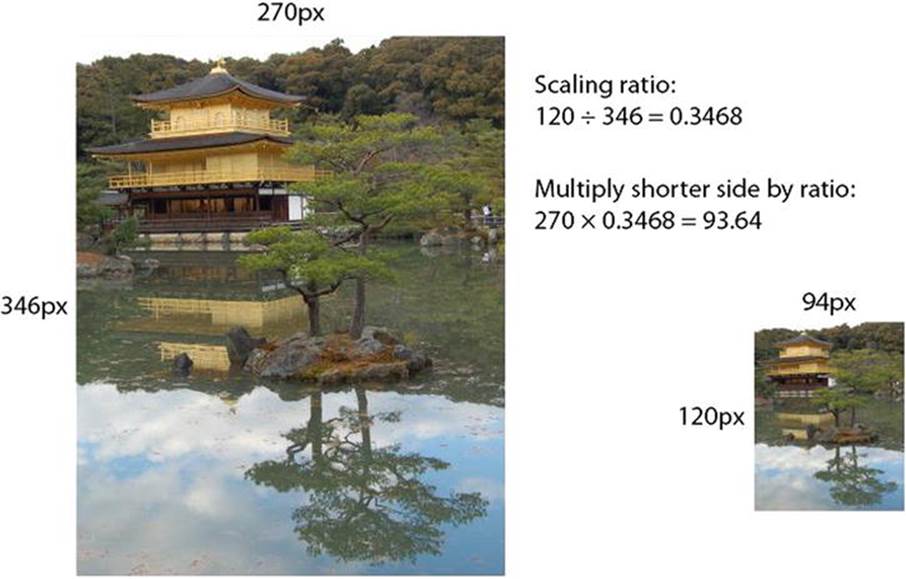
Figure 8-3. Working out the scaling ratio for a thumbnail image
Continue working with your existing class definition. Alternatively, use Thumbnail_02.php in the ch08/PhpSolutions/Image folder.
1. Calculating the thumbnail dimensions doesn’t require any further user input, so it can be handled by a protected method. Add the following code to the class definition. Put it at the end of the file, just inside the closing curly brace.
protected function calculateSize($width, $height) {
if ($width <= $this->maxSize && $height <= $this->maxSize) {
$ratio = 1;
} elseif ($width > $height) {
$ratio = $this->maxSize/$width;
} else {
$ratio = $this->maxSize/$height;
}
$this->thumbwidth = round($width * $ratio);
$this->thumbheight = round($height * $ratio);
}
The dimensions of the original image are stored as properties of the Thumbnail object, so you could refer to them directly as $this->originalWidth and $this->originalHeight. However, the method needs to refer to these values often, so I decided to pass them as arguments to make the code easier to read and type.
The conditional statement begins by checking if the width and height of the original image are less than or equal to the maximum size. If they are, the image doesn’t need to be resized, so the scaling ratio is set to 1.
The elseif block checks if the width is greater than the height. If it is, the width is used to calculate the scaling ratio. The else block is invoked if the height is greater or both sides are equal. In either case, the height is used to calculate the scaling ratio.
The last two lines multiply the original width and height by the scaling ratio and assign the results to the $thumbwidth and $thumbheight properties. The calculation is wrapped in the round() function, which rounds the result to the nearest whole number.
2. This method needs to be called by the method that creates the thumbnail image. Add the following public method to the class definition above the protected methods:
public function create() {
if ($this->canProcess && $this->originalwidth != 0) {
$this->calculateSize($this->originalwidth, $this->originalheight);
} elseif ($this->originalwidth == 0) {
$this->messages[] = 'Cannot determine size of ' . $this->original;
}
}
This checks that $canProcess is true and that the width of the original image is not 0. The second test is necessary because getimagesize() sets the width and height to 0 if it can’t determine the size. This usually happens if the image format contains multiple images. If the $originalwidth property is 0, an error message is added to the $messages array.
3. To test the new method, amend the test() method like this:
public function test() {
echo 'File: ' . $this->original . '<br>';
echo 'Original width: ' . $this->originalwidth . '<br>';
echo 'Original height: ' . $this->originalheight . '<br>';
echo 'Base name: ' . $this->basename . '<br>';
echo 'Image type: ' . $this->imageType . '<br>';
echo 'Destination: ' . $this->destination . '<br>';
echo 'Max size: ' . $this->maxSize . '<br>';
echo 'Suffix: ' . $this->suffix . '<br>';
echo 'Thumb width: ' . $this->thumbwidth . '<br>';
echo 'Thumb height: ' . $this->thumbheight . '<br>';
if ($this->messages) {
print_r($this->messages);
}
}
4. Update the code in create_thumb.php to call the create() method. It must come before the test() method. Otherwise, the width and height of the thumbnail won’t be calculated. The revised code looks like this:
$thumb = new Thumbnail($_POST['pix']);
$thumb->setDestination('C:/upload_test/thumbs/');
$thumb->setMaxSize(100);
$thumb->setSuffix('small');
$thumb->create();
$thumb->test();
5. Test the updated class by selecting an image in create_thumb.php and clicking Create Thumbnail. You should see the values displayed onscreen, as shown in Figure 8-4.
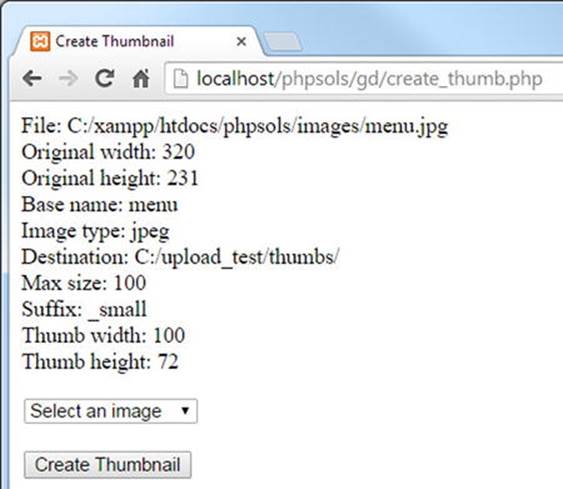
Figure 8-4. The class is now generating all the values needed to create the thumbnail image
If necessary, check your code against Thumbnail_03.php in the ch08 folder.
Using GD Functions to Create a Scaled Copy of an Image
After you have gathered all the necessary information, you can generate a thumbnail image from a larger one. This involves creating image resources for both the original image and the thumbnail. For the original image, you need to use a function that matches the image’s MIME type. Each of the following functions takes a single argument: the path to the file.
· imagecreatefromjpeg()
· imagecreatefrompng()
· imagecreatefromgif()
Because the thumbnail doesn’t yet exist, you use a different function, imagecreatetruecolor(), which takes two arguments—the width and height (in pixels).
Yet another function creates a resized copy of an image: imagecopyresampled(). This takes no fewer than ten arguments—all of them required. The arguments fall into five pairs, as follows:
· References to the two image resources—copy first, original second
· The x and y coordinates of where to position the top-left corner of the copied image
· The x and y coordinates of the top-left corner of the original
· The width and height of the copy
· The width and height of the area to copy from the original
Figure 8-5 shows how the last four pairs of arguments can be used to extract a specific area, using the following arguments to imagecopyresampled():
imagecopyresampled($thumb, $source, 0, 0, 170, 20, $thbwidth,$thbheight, 170, 102);
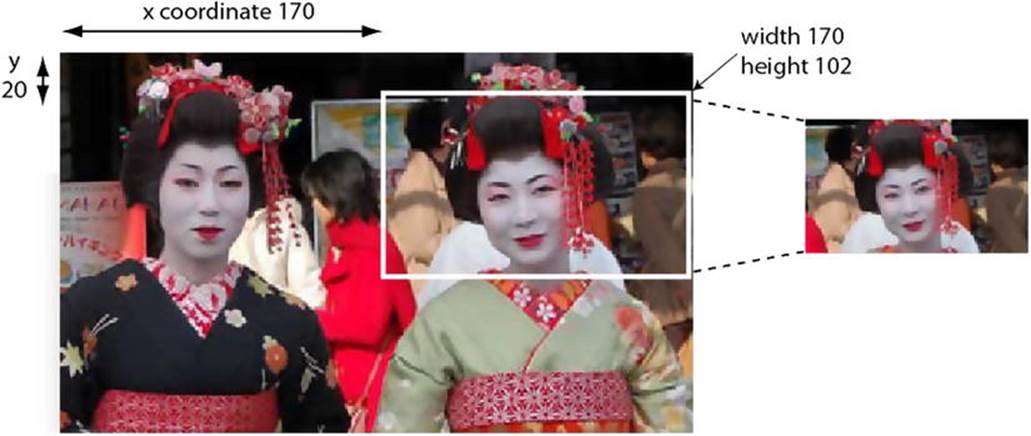
Figure 8-5. The imagecopyresampled() function allows you to copy part of an image
The x and y coordinates of the area to copy are measured in pixels from the top left of the image. The x and y axes begin at 0 at the top left, and increase to the right and down. By setting the width and height of the area to copy to 170 and 102, respectively, PHP extracts the area outlined in white.
So now you know how websites manage to crop uploaded images. They calculate the coordinates dynamically using JavaScript or some other technology. For the Thumbnail class, you’ll use the whole of the original image to generate the thumbnail.
After creating the copy with imagecopyresampled(), you need to save it, again using a function specific to the MIME type, namely:
· imagejpeg()
· imagepng()
· imagegif()
Each function takes as its first two arguments the image resource and the path to where you want to save it.
The imagejpeg() and imagepng() functions take an optional third argument to set the image quality. For imagejpeg(), you set the quality by specifying a number in the range of 0 (worst) to 100 (best). If you omit the argument, the default is 75. For imagepng(), the range is 0 to 9. Confusingly, 0 produces the best quality (no compression).
Finally, once you have saved the thumbnail you need to destroy the image resources by passing them to imagedestroy(). In spite of its destructive name, this function has no effect on the original image or the thumbnail. It simply frees the server memory by destroying the image resources required during processing.
PHP Solution 8-4: Generating the thumbnail image
This PHP solution completes the Thumbnail class by creating the image resources, copying the thumbnail, and saving it in the destination folder.
Continue working with your existing class definition. Alternatively, use Thumbnail_03.php in the ch08/PhpSolutions/Image folder.
1. The image resource for the original image needs to be specific to its MIME type, so start by creating an internal method to select the correct type. Add the following code to the class definition. It’s a protected method, so put it at the bottom of the page (but inside the class’s closing curly brace).
protected function createImageResource() {
if ($this->imageType == 'jpeg') {
return imagecreatefromjpeg($this->original);
} elseif ($this->imageType == 'png') {
return imagecreatefrompng($this->original);
} elseif ($this->imageType == 'gif') {
return imagecreatefromgif($this->original);
}
}
The checkType() method that you created in PHP Solution 8-1 stores the MIME type as jpeg, png, or gif. So, the conditional statement checks the MIME type, matches it to the appropriate function, and passes the original image as an argument. The method then returns the resulting image resource.
2. Now it’s time to define the internal method that does all the hard work. It contains a lot of code, so I’ll break it into sections. Start by defining the createThumbnail() method, like this:
protected function createThumbnail() {
$resource = $this->createImageResource();
$thumb = imagecreatetruecolor($this->thumbwidth, $this->thumbheight);
}
This calls the createImageResource() method that you created in step 1 and then creates an image resource for the thumbnail, passing the thumbnail’s width and height to imagecreatetruecolor().
3. The next stage in creating the thumbnail involves passing both image resources to imagecopyresampled() and setting the coordinates and dimensions. Amend the createThumbnail() method like this:
protected function createThumbnail() {
$resource = $this->createImageResource();
$thumb = imagecreatetruecolor($this->thumbwidth, $this->thumbheight);
imagecopyresampled($thumb, $resource, 0, 0, 0, 0, $this->thumbwidth,
$this->thumbheight, $this->originalwidth, $this->originalheight);
}
The first two arguments are the image resources you have just created for the thumbnail and original image. The next four arguments set the x and y coordinates for both the copy and the original to the top-left corner. Next come the width and height calculated for the thumbnail, followed by the original image’s width and height. Setting arguments 3–6 to the top-left corner and both sets of dimensions to the full amounts copies the whole original image to the whole of the thumbnail. In other words, it creates a smaller copy of the original.
You don’t need to assign the result of imagecopyresampled() to a variable. The scaled-down image is now stored in $thumb, but you still need to save it.
4. Complete the definition of createThumbnail() like this:
protected function createThumbnail() {
$resource = $this->createImageResource();
$thumb = imagecreatetruecolor($this->thumbwidth, $this->thumbheight);
imagecopyresampled($thumb, $resource, 0, 0, 0, 0, $this->thumbwidth,
$this->thumbheight, $this->originalwidth, $this->originalheight);
$newname = $this->basename . $this->suffix;
if ($this->imageType == 'jpeg') {
$newname .= '.jpg';
$success = imagejpeg($thumb, $this->destination . $newname, 100);
} elseif ($this->imageType == 'png') {
$newname .= '.png';
$success = imagepng($thumb, $this->destination . $newname, 0);
} elseif ($this->imageType == 'gif') {
$newname .= '.gif';
$success = imagegif($thumb, $this->destination . $newname);
}
if ($success) {
$this->messages[] = "$newname created successfully.";
} else {
$this->messages[] = "Couldn't create a thumbnail for " .
basename($this->original);
}
imagedestroy($resource);
imagedestroy($thumb);
}
The first line of new code concatenates the suffix to the filename stripped of its filename extension. So, if the original file is called menu.jpg and the default _thb suffix is used, $newname becomes menu_thb.
The conditional statement checks the image’s MIME type and appends the appropriate filename extension. In the case of menu.jpg, $newname becomes menu_thb.jpg. The scaled-down image is then passed to the appropriate function to save it, using the destination folder and $newname as the path for where it is saved. For JPEG and PNG images, the optional quality argument is set to the highest level: 100 for JPEG and 0 for PNG.
The result of the save operation is stored in $success. Depending on the outcome, $success is either true or false, and an appropriate message is added to the $messages property. The message is created using the basename() function rather than the$basename property because the filename extension has been stripped from the property, whereas the function preserves it.
Finally, imagedestroy() frees the server memory by destroying the resources used to create the thumbnail image.
5. Update the definition of the create() method to call the createThumbnail() method:
public function create() {
if ($this->canProcess && $this->originalwidth != 0) {
$this->calculateSize($this->originalwidth, $this->originalheight);
$this->createThumbnail();
} elseif ($this->originalwidth == 0) {
$this->messages[] = 'Cannot determine size of ' . $this->original;
}
}
6. You no longer need the test() method. You can either delete it from the class definition or comment it out. If you plan to experiment further or make enhancements to the class, commenting it out saves the effort of creating it again from scratch.
7. Up to now, you have used the test() method to display error messages. Create a public method to get the messages:
public function getMessages() {
return $this->messages;
}
8. Save Thumbnail.php. In create_thumb.php, replace the call to the test() method with a call to getMessages() and assign the result to a variable, like this:
$thumb->create();
$messages = $thumb->getMessages();
9. Add a PHP code block just after the opening <body> tag to display any messages:
<?php
if (isset($messages) && !empty($messages)) {
echo '<ul>';
foreach ($messages as $message) {
echo "<li>$message</li>";
}
echo '</ul>';
}
?>
You’ve seen this code in previous chapters, so it needs no explanation.
10.Save create_thumb.php, load it in a browser, and test it by selecting an image from the list and clicking Create Thumbnail. If all goes well, you should see a message reporting the creation of the thumbnail and you can confirm its existence in the thumbssubfolder of upload_test, as shown in Figure 8-6.

Figure 8-6. The thumbnail has been successfully created in the destination folder
11.If the thumbnail isn’t created, the error message generated by the Thumbnail class should help you detect the source of the problem. Also, check your code carefully against Thumbnail_04.php in the ch08/PhpSolutions/Image folder. If the tests in the previous PHP solutions worked, the error is likely in the create(), createImageResource(),or createThumbnail() method definitions. The other place to check is, of course, your PHP configuration. The class depends on the GD extension being enabled. Although GD is widely supported, it’s not always on by default.
Resizing an Image Automatically on Upload
Now that you have a class that creates a thumbnail from a larger image, it’s relatively simple to adapt the Upload class from Chapter 6 to generate a thumbnail from an uploaded image—in fact, not only from a single image but also from multiple images.
Instead of changing the code in the Upload class, it’s more efficient to extend the class and create a subclass. You then have the choice of using the original class to perform uploads of any type of file, or the subclass to create thumbnail images on upload. The subclass also needs to provide the option to save or discard the larger image after the thumbnail has been created.
Before diving into the code, let’s take a quick look at how you create a subclass.
Extending a Class
A major advantage of using classes is that they’re extensible. To extend a class, you simply include the original class definition and define the subclass using the extends keyword, like this:
require_once 'OriginalClass.php';
class MyNewClass extends OriginalClass {
// subclass definition
}
This creates a new subclass or child class called MyNewClass from the original or parent class, OriginalClass. The parent-child analogy is apposite, because the child inherits all the features of its parent but can adapt some of them and acquire new ones of its own. This means thatMyNewClass shares the same properties and methods as OriginalClass, but you can add new properties and methods. You can also redefine (or override) some of the parent’s methods and properties. This simplifies the process of creating a class to perform a more specialized task. TheUpload class you created in Chapter 6 performs basic file uploads. In this chapter, you’ll extend it to create a child class called ThumbnailUpload that uses the basic upload features of its parent but adds specialized features that create thumbnail images. The subclass will be created in the PhpSolutions/Image folder, so it will use PhpSolutions\Image as its namespace.
Like all children, a child class often needs to borrow from its parent. This frequently happens when you override a method in the child class but need to use the original version as well. To refer to the parent version, you prefix it with the parent keyword followed by two colons, like this:
parent::originalMethod();
You’ll see how this works in PHP Solution 8-5, because the child class defines its own constructor to add an extra argument but also needs to use the parent constructor.
![]() Note This description of inheritance covers only the bare minimum you need to understand PHP Solution 8-5. For a more detailed insight into PHP classes, see my PHP Object-Oriented Solutions (friends of ED, 2008, ISBN: 978-1-4302-1011-5).
Note This description of inheritance covers only the bare minimum you need to understand PHP Solution 8-5. For a more detailed insight into PHP classes, see my PHP Object-Oriented Solutions (friends of ED, 2008, ISBN: 978-1-4302-1011-5).
Let’s create a class capable of uploading images and generating thumbnails at the same time.
PHP Solution 8-5: Creating the ThumbnailUpload Class
This PHP solution extends the Upload class from Chapter 6 and uses it in conjunction with the Thumbnail class to upload and resize images. It demonstrates how to create a child class and override parent methods. To create the child class, you need Upload.php from Chapter 6 andThumbnail.php from this chapter. There’s a copy of these files in the ch06/PhpSolutions/File and ch08/PhpSolutions/Image folders, respectively.
1. Create a new file called ThumbnailUpload.php in the PhpSolutions/Image folder. It will contain only PHP code, so strip out any HTML inserted by your script editor and add the following code:
<?php
namespace PhpSolutions\Image;
use PhpSolutions\File\Upload;
require_once __DIR__ . '/../File/Upload.php';
require_once 'Thumbnail.php';
class ThumbnailUpload extends Upload {
}
This declares the PhpSolutions\Image namespace and imports the Upload class from the PhpSolutions\File namespace before including the definitions of the Upload and Thumbnail classes.
![]() Note When used in an include file, __DIR__ returns the directory of the included file without a trailing slash. Adding the slash at the beginning of the relative path to Upload.php allows PHP to build a complete path, moving back up one level to find it in thePhpSolutions/File folder. Thumbnail.php is in the same folder as ThumbnailUpload.php, so it’s included using only the filename. See “Nesting include files” in Chapter 4.
Note When used in an include file, __DIR__ returns the directory of the included file without a trailing slash. Adding the slash at the beginning of the relative path to Upload.php allows PHP to build a complete path, moving back up one level to find it in thePhpSolutions/File folder. Thumbnail.php is in the same folder as ThumbnailUpload.php, so it’s included using only the filename. See “Nesting include files” in Chapter 4.
The ThumbnailUpload class then declares that it extends Upload. Although Upload is in a different namespace, you can refer to it simply as Upload because it has been imported. All subsequent code needs to be inserted between the curly braces of the class definition.
2. The child class needs three properties: the folder where the thumbnail is to be saved, a Boolean that determines whether to delete the original image, and the suffix to be added to the thumbnail. The last of these is required in case you don’t want to use the default suffix defined in Thumbnail. Add the following property definitions inside the curly braces:
protected $thumbDestination;
protected $deleteOriginal;
protected $suffix = '_thb';
3. When you extend a class, the only time you need to define a constructor method is when you want to change how the constructor works. The ThumbnailUpload class takes an extra argument that determines whether to delete the original image, giving you the option to retain only the thumbnail or to keep both versions of the image. When testing locally, a Thumbnail object can access the original image on your own hard drive. However, generating the thumbnail is a server-side operation, so it won’t work on a website without first uploading the original image to the server.
The constructor also needs to call the parent constructor to define the path to the upload folder. Add the following definition to the class:
public function __construct($path, $deleteOriginal = false) {
parent::__construct($path);
$this->thumbDestination = $path;
$this->deleteOriginal = $deleteOriginal;
}
The constructor takes two arguments: the path to the upload folder and a Boolean variable that determines whether to delete the original image. The second argument is set to false in the constructor signature, making it optional.
![]() Note When defining a function or a class method, the arguments (strictly speaking, parameters) passed to the function (method) are known as its signature.
Note When defining a function or a class method, the arguments (strictly speaking, parameters) passed to the function (method) are known as its signature.
The first line of code inside the constructor passes $path to the parent constructor in order to set the destination folder for the file uploads. The second line also assigns $path to the $thumbDestination property, making the same folder the default for both images.
The final line assigns the value of the second argument to the $deleteOriginal property. Because the second argument is optional, it’s automatically set to false, and both images are retained unless you set it explicitly to true.
4. Create the setter method for the thumbnail destination folder like this:
public function setThumbDestination($path) {
if (!is_dir($path) || !is_writable($path)) {
throw new \Exception("$path must be a valid, writable directory.");
}
$this->thumbDestination = $path;
}
This takes a path as its only argument, checks that it’s a folder (directory) and is writable, and assigns the value to the $thumbDestination property. If the value passed as an argument is invalid, the class throws an exception. Exception is preceded by a backslash to indicate you’re using the core Exception class, not one specific to this namespace.
![]() Tip Instead of creating a setter method for the thumbnail destination folder, I could have added an extra argument to the constructor. However, my choice simplifies the constructor for occasions when you want to save the thumbnail and original image in the same folder. Also, I could have silently used the original upload folder instead of throwing an exception if there’s a problem with the thumbnail destination. I decided that a problem with the destination folder is too serious to ignore. Decisions like this are an integral part of writing any script, not just of designing a class.
Tip Instead of creating a setter method for the thumbnail destination folder, I could have added an extra argument to the constructor. However, my choice simplifies the constructor for occasions when you want to save the thumbnail and original image in the same folder. Also, I could have silently used the original upload folder instead of throwing an exception if there’s a problem with the thumbnail destination. I decided that a problem with the destination folder is too serious to ignore. Decisions like this are an integral part of writing any script, not just of designing a class.
5. Apart from the name, the setter method for the thumbnail suffix is identical to the one in Thumbnail.php. It looks like this:
public function setThumbSuffix($suffix) {
if (preg_match('/\w+/', $suffix)) {
if (strpos($suffix, '_') !== 0) {
$this->suffix = '_' . $suffix;
} else {
$this->suffix = $suffix;
}
} else {
$this->suffix = '';
}
}
You need to define the method here because the class inherits from Upload, not Thumbnail. A PHP class can have only a single parent.
![]() Note To solve the problem of single inheritance, PHP 5.4 introduced a feature called traits. A trait defines methods intended to be used by multiple classes. The structure of a trait is the same as a class, except that it’s declared using the keyword trait instead ofclass. You import traits into a class definition with the use keyword. I decided against moving setThumbSuffix() to a trait because it’s so short and is used by only two classes. To learn more about traits, seehttp://php.net/manual/en/language.oop5.traits.php.
Note To solve the problem of single inheritance, PHP 5.4 introduced a feature called traits. A trait defines methods intended to be used by multiple classes. The structure of a trait is the same as a class, except that it’s declared using the keyword trait instead ofclass. You import traits into a class definition with the use keyword. I decided against moving setThumbSuffix() to a trait because it’s so short and is used by only two classes. To learn more about traits, seehttp://php.net/manual/en/language.oop5.traits.php.
6. The parent Upload class has an allowAllTypes() method that removes restrictions on the MIME types of files that can be uploaded. The ThumbnailUpload class is for image types only. To prevent this inherited method from allowing other types of files to be uploaded, add the following code to override it:
public function allowAllTypes() {
$this->typeCheckingOn = true;
}
Unlike the parent method, this sets the $typeCheckingOn property to true, enforcing MIME-type checking. In other words, calling allowAllTypes() on a ThumbnailUpload object will have no effect.
7. Next, create a protected method to generate the thumbnail using the following code:
protected function createThumbnail($image) {
$thumb = new Thumbnail($image);
$thumb->setDestination($this->thumbDestination);
$thumb->setSuffix($this->suffix);
$thumb->create();
$messages = $thumb->getMessages();
$this->messages = array_merge($this->messages, $messages);
}
This takes a single argument, the path to an image, and creates a Thumbnail object. The code is similar to create_thumb.php so it shouldn’t need explanation.
The final line uses array_merge() to merge any messages generated by the Thumbnail object with the $messages property of the ThumbnailUpload class. Although the properties you defined in step 2 don’t include a $messages property, the child class automatically inherits it from its parent.
8. In the parent class, the moveFile() method saves an uploaded file to its target destination. The thumbnail needs to be generated from the original image, so you need to override the parent’s moveFile() method and use it to call the createThumbnail()method that you have just defined. Copy the moveFile() method from Upload.php and amend it by adding the code highlighted in bold.
protected function moveFile($file) {
$filename = isset($this->newName) ? $this->newName : $file['name'];
$success = move_uploaded_file($file['tmp_name'],
$this->destination . $filename);
if ($success) {
// add a message only if the original image is not deleted
if (!$this->deleteOriginal) {
$result = $file['name'] . ' was uploaded successfully';
if (!is_null($this->newName)) {
$result .= ', and was renamed ' . $this->newName;
}
$this->messages[] = $result;
}
// create a thumbnail from the uploaded image
$this->createThumbnail($this->destination . $filename);
// delete the uploaded image if required
if ($this->deleteOriginal) {
unlink($this->destination . $filename);
}
} else {
$this->messages[] = 'Could not upload ' . $file['name'];
}
}
If the original image has been uploaded successfully, the new code adds a conditional statement to generate the message only if $deleteOriginal is false. It then calls the createThumbnail() method, passing it the uploaded image as the argument. Finally, if $deleteOriginal has been set to true, it uses unlink() to delete the uploaded image, leaving only the thumbnail.
9. Save ThumbnailUpload.php. To test it, copy create_thumb_upload_01.php from the ch08 folder to the gd folder and save it as create_thumb_upload.php. The file contains a simple form with a file field and a PHP block that displays messages. Add the following PHP code block above the DOCTYPE declaration:
<?php
use PhpSolutions\Image\ThumbnailUpload;
if (isset($_POST['upload'])) {
require_once('../PhpSolutions/Image/ThumbnailUpload.php');
try {
$loader = new ThumbnailUpload('C:/upload_test/');
$loader->setThumbDestination('C:/upload_test/thumbs/');
$loader->upload();
$messages = $loader->getMessages();
} catch (Exception $e) {
echo $e->getMessage();
}
}
?>
Adjust the paths in the constructor and setThumbDestination() method, if necessary.
10.Save create_thumb_upload.php and load it in a browser. Click the Browse or Choose Files button and select multiple images. When you click the Upload button, you should see messages informing you of the successful upload and creation of the thumbnails. Check the destination folders, as shown in Figure 8-7.
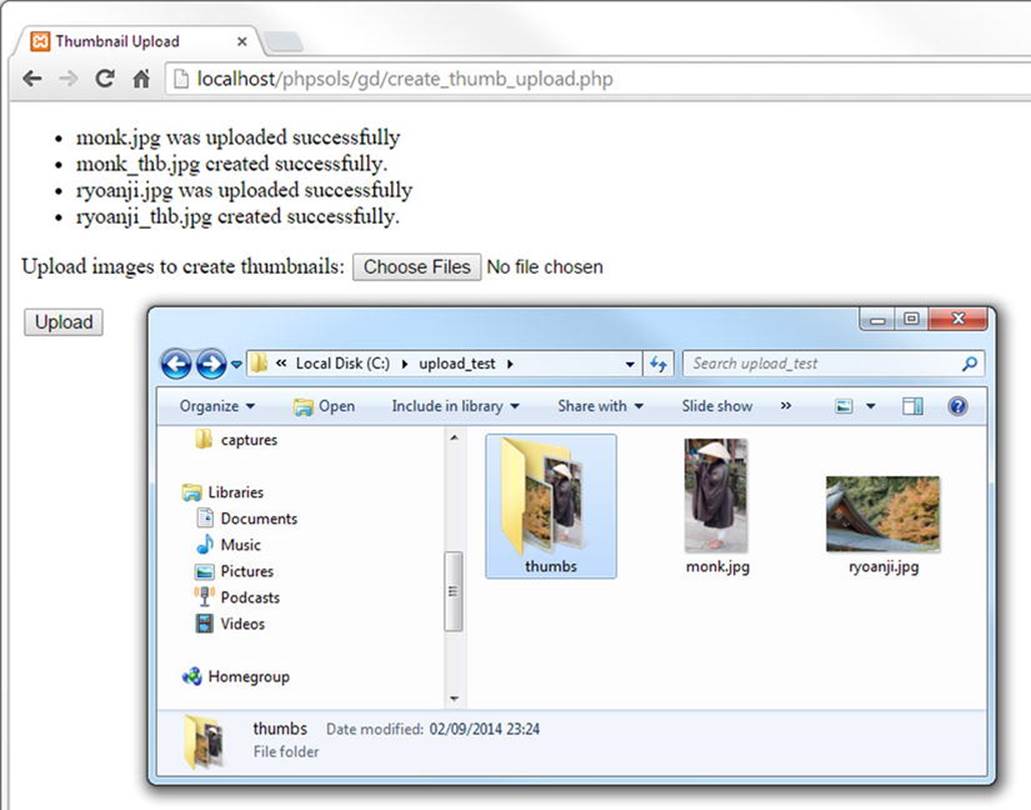
Figure 8-7. The thumbnails are created at the same time as the images are uploaded
11.Test the ThumbnailUpload class by uploading the same images again. This time, the original images and thumbnails should be renamed in the same way as in Chapter 6 through the addition of a number before the filename extension.
12.Try different tests, changing the suffix inserted into the thumbnail names or deleting the original image after the thumbnail has been created. If you run into problems, check your code against ThumbnailUpload.php in the ch08/PhpSolutions/Image folder.
![]() Tip In older browsers that don’t support the multiple attribute on form fields, the class uploads a single image and creates a thumbnail from it. To support multiple uploads from older browsers, create multiple file fields in the form and give them all the same name attribute followed by an empty pair of square brackets, like this: name="image[]".
Tip In older browsers that don’t support the multiple attribute on form fields, the class uploads a single image and creates a thumbnail from it. To support multiple uploads from older browsers, create multiple file fields in the form and give them all the same name attribute followed by an empty pair of square brackets, like this: name="image[]".
Using the ThumbnailUpload Class
The ThumbnailUpload class is easy to use. Because it uses a namespace, import the class at the top level of your file like this:
use PhpSolutions\Image\ThumbnailUpload;
Then include the class definition and pass the path for the upload folder to the class constructor method:
$loader = new ThumbnailUpload('C:/upload_test/');
If you want to delete the original image after the thumbnail has been created, pass true as the second argument to the constructor, as follows:
$loader = new ThumbnailUpload('C:/upload_test/', true);
The class has the following public methods:
· setThumbDestination(): This sets the path to the folder where the thumbnail images are to be saved. If you don’t call this method, the thumbnails are stored in the same folder as the original images.
· setThumbSuffix(): Use this to change the suffix inserted into the thumbnail names. The default is _thb.
· upload(): This uploads the original image(s) and generates the thumbnail(s). By default, images that have the same name as an existing one are renamed. To overwrite existing images, pass false as an argument to this method.
The class also inherits the following methods from the parent Upload class:
· getMessages(): Retrieves messages generated by the upload and the thumbnail.
· getMaxSize(): Gets the maximum upload size for an individual image. The default is 50 KB.
· setMaxSize(): Changes the maximum upload size. The argument should be expressed as the number of bytes permitted.
Because the ThumbnailUpload class is dependent on the Upload and Thumbnail classes, you need to upload all three class definition files to your remote web server when using this class on a live website.
Chapter Review
This has been another intense chapter, showing not only how to generate thumbnails from larger images, but also introducing you to extending an existing class and overriding inherited methods. Designing and extending classes can be confusing at first, but it becomes less intimidating if you concentrate on what each method is doing. A key principle of class design is to break large tasks down into small, manageable units. Ideally, a method should perform a single task, such as creating the image resource for the original image.
The real advantage of using classes is the time and effort they save once you have defined them. Instead of typing dozens of lines of code each time you want to add file or thumbnail upload functionality to a website, calling the class involves just a few simple lines. Also, don’t think of the code in this chapter as being exclusively for creating and uploading thumbnail images. Many of the subroutines in the class files could be adapted for use in other situations.
In the next chapter, you’ll learn all about PHP sessions, which preserve information related to a specific user and play a vital role in password-protecting webpages.
All materials on the site are licensed Creative Commons Attribution-Sharealike 3.0 Unported CC BY-SA 3.0 & GNU Free Documentation License (GFDL)
If you are the copyright holder of any material contained on our site and intend to remove it, please contact our site administrator for approval.
© 2016-2026 All site design rights belong to S.Y.A.