Real-time Analytics with Storm and Cassandra (2015)
Chapter 5. Storm High Availability and Failover
This chapter takes you to the next level in your journey through Storm, where we get you acquainted with the integration of Storm with other necessary components in the ecosystem. We will cover the concepts of high availability and reliability, practically.
This chapter is the next step in understanding the clustered mode setup of Storm and its associated components. We will understand the various configurations in Storm and Zookeeper and the concept behind them.
The topics that will be covered in this chapter are as follows:
· Setting up RabbitMQ (single instance and clustered mode)
· Developing the AMQP spout to integrate Storm and RabbitMQ
· Creating a RabbitMQ feeder component
· Building high availability for RabbitMQ and the Storm cluster
· The Storm schedulers
By the end of this chapter, you will be able to set up and understand RabbitMQ and integrate Storm with RabbitMQ. Also, you will be able to test high availability and guaranteed processing of the Storm cluster.
An overview of RabbitMQ
The punch line that goes for RabbitMQ is Messaging that just works.
RabbitMQ is one of the most widely used implementations of the AMQP messaging protocol that provides a platform for message receipt and delivery. This in-memory queue also has the capacity to hold and retain messages till they are consumed by a consumer. This flexible brokering system is very easy to use and works on most of the operating systems such as windows, UNIX, and so on.
RabbitMQ is an implementation of the Advanced Message Queuing Protocol (AMQP). As depicted in the following figure, the vital components of RabbitMQ are exchange and Queue:
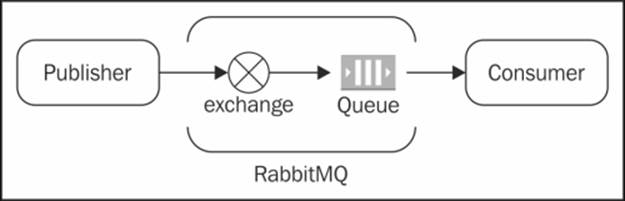
The publisher and the consumer are two essential actors; the former generates the messages and publishes them to the exchange, which in turn (depending upon its type) publishes the message from the publisher to the queue and from the queue to the consumer, who picks up the message.
The point to note is that here the publisher interacts with the exchange and not the queue. There are various kinds of exchanges that RabbitMQ supports such as direct, fanout, topic, and so on. The task of the exchange is to route the message to one or more queues depending upon the type of exchange and the routing key associated with the message. So if it's a direct exchange, the message will be delivered to one queue bound to the exchange with the routing key matching the one in the message. If it's a fanout exchange, then the message is delivered to all the queues bound to the exchange, and the routing is totally ignored.
Installing the RabbitMQ cluster
RabbitMQ is a messaging broker—an intermediary for messaging. It gives your applications a common platform to send and receive messages, and your messages a safe place to live until they are received.
Prerequisites for the setup of RabbitMQ
Make sure you have taken care of the fact that short names are also included in the /etc/hosts file as shown in the following code:
<ip address1> <hostname1> <shortname1>
<ip address2> <hostname2> <shortname2>
Note
Short names in /etc/hosts are mandatory because in a RabbitMQ cluster, the internode communication happens using these short names.
For example, we have two machines in our cluster with the following mentioned IPs and hostnames; this information is used by the RabbitMQ daemons while starting the cluster:
10.191.206.83 rmq-flc-1.mydomain.net rmq-flc-1
10.73.10.63 rmq-flc-2.mydomain.net rmq-flc-2
If the short names are not set, you will see this error: System NOT running to use fully qualified hostnames.
Setting up a RabbitMQ server
Ubuntu ships with RabbitMQ but it's often not the latest version. The latest version can be retrieved from RabbitMQ's Debian repository. The following shell script should be run for the RabbitMQ installation on Ubuntu:
#!/bin/sh
sudo cat <<EOF > /etc/apt/sources.list.d/rabbitmq.list
sudo deb http://www.rabbitmq.com/debian/ testing main
EOF
sudo curl http://www.rabbitmq.com/rabbitmq-signing-key-public.asc -o /tmp/rabbitmq-signing-key-public.asc
sudo apt-key add /tmp/rabbitmq-signing-key-public.asc
sudo rm /tmp/rabbitmq-signing-key-public.asc
sudo apt-get -qy update
sudo apt-get -qy install rabbitmq-server
Testing the RabbitMQ server
The following steps will get you the commands that are to be executed on the Ubuntu terminal to start the RabbitMQ server and test it. They are as follows:
1. Start the RabbitMQ server by running the following command on the shell:
2. sudo service rabbitmq-server start

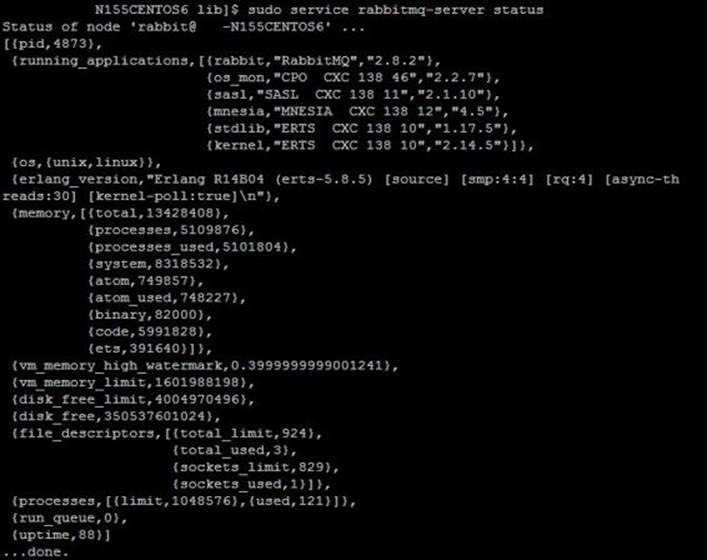
2. Check the server status by running the following command:
3. sudo service rabbitmq-server status
3. On each RabbitMQ instance, to enable the RabbitMQ management console, execute the following command and restart the RabbitMQ server running on that instance, by using the following command:
4. sudo rabbitmq-plugins enable rabbitmq_management
4. To enable the RabbitMQ plugins, navigate to /usr/lib/rabbitmq/bin and execute the following command on both nodes and restart them:
5. sudo rabbitmq-plugins enable rabbitmq_management
5. Startup, shutdown, and error logs are created under the /var/log/rabbitmq directory.
Creating a RabbitMQ cluster
Here are the steps that you need to execute to set up a two (or more) node RabbitMQ cluster:
1. Considering rmq-flc-1 and rmq-flc-2 are the short hostnames of the two instances, we will start standalone RabbitMQ servers on both instances using the command:
2. sudo service rabbitmq-server start
2. On rmq-flc-2, we will stop the RabbitMQ application, reset the node, join the cluster, and restart the RabbitMQ application using the following commands (all this is being done while the RabbitMQ server is up and running on rmq-flc-1):
3. sudo rabbitmqctl stop_app
4. sudo rabbitmqctl join_cluster rabbit@rmq-flc-1
5. sudo rabbitmqctl start_app
3. Check the cluster status by running the following command on any of the machines:
4. sudo service rabbitmq-server status
4. The following output should be seen:
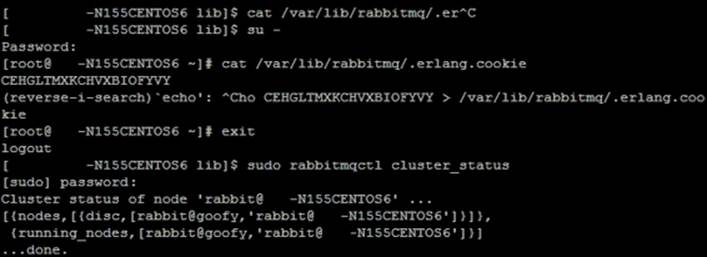
5. The cluster is set up successfully.
The cluster can be accessed at http:/ /<hostip>:15672 (username: guest, password: guest), if the UI is enabled.
Enabling the RabbitMQ UI
Perform the following steps to enable the RabbitMQ UI:
1. Execute the following command:
2. sudo /usr/lib/rabbitmq/bin/rabbitmq-plugins enable rabbitmq_management
2. The preceding command will result in the following output:
3. The following plugins have been enabled:
4. mochiweb
5. webmachine
6. rabbitmq_mochiweb
7. amqp_client
8. rabbitmq_management_agent
9. rabbitmq_management
10.Plugin configuration has changed. Restart RabbitMQ for changes to take effect.
3. Repeat the preceding steps on all nodes of the cluster.
4. Restart each node using the following command:
5. sudo service rabbitmq-server restart
5. Access the UI using the http://<hostip>:15672 link. The default username and password is guest.
Creating mirror queues for high availability
In this section, we talk about a special kind of queues that guarantee high availability over the RabbitMQ default queues. By default, the queues that we create are located on a single node based on the order in which they are declared, and this can become the single point of failure. Let's look at an example. I have a cluster of two RabbitMQ nodes, rabbit1 and rabbit2, and I declare one exchange over my cluster, say, myrabbitxchange. Let's say by the order of execution, the queue is created in rabbit1. Now if rabbit1 goes down, then the queue is gone and the clients will not be able to publish to it.
Thus to avoid situations, we need highly available queues; they are called mirrored queues, which are replicated on all the nodes in the cluster. Mirrored queues have one master and multiple slaves, the oldest one is the master and if it's not available, the oldest amongst the available nodes becomes the master. Messages are published to all slaves. This enhances the availability but doesn't distribute the load. To create the mirror queues, use the following steps:
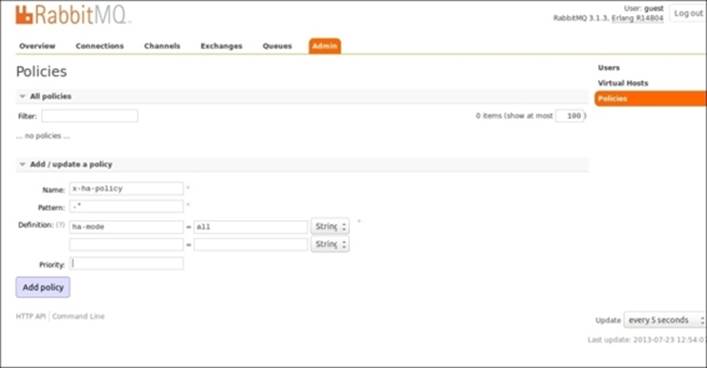
1. Mirroring can be enabled by adding a policy using the web UI. Go to the Admin tab and select Policies and click on Add policy.
2. Specify policy Name, Pattern, Definition, and click on Add Policy, as shown in the following screenshot:
Integrating Storm with RabbitMQ
Now that we have installed Storm, the next step will be to integrate RabbitMQ with Storm, for which we will have to create a custom spout called the RabbitMQ spout. This spout will read the messages from the specified queue; thus, it will furnish the role of a consumer, and then push these messages to a downstream topology.
Here is how the spout code will look:
public class AMQPRecvSpout implements IRichSpout{
//The constructor where we set initialize all properties
public AMQPRecvSpout(String host, int port, String username, String password, String vhost, boolean requeueOnFail, boolean autoAck) {
this.amqpHost = host;
this.amqpPort = port;
this.amqpUsername = username;
this.amqpPasswd = password;
this.amqpVhost = vhost;
this.requeueOnFail = requeueOnFail;
this.autoAck = autoAck;
}
/*
Open method of the spout , here we initialize the prefetch count , this parameter specified how many messages would be prefetched from the queue by the spout – to increase the efficiency of the solution */
public void open(@SuppressWarnings("rawtypes") Map conf, TopologyContext context, SpoutOutputCollector collector) {
Long prefetchCount = (Long) conf.get(CONFIG_PREFETCH_COUNT);
if (prefetchCount == null) {
log.info("Using default prefetch-count");
prefetchCount = DEFAULT_PREFETCH_COUNT;
} else if (prefetchCount < 1) {
throw new IllegalArgumentException(CONFIG_PREFETCH_COUNT + " must be at least 1");
}
this.prefetchCount = prefetchCount.intValue();
try {
this.collector = collector;
setupAMQP();
} catch (IOException e) {
log.error("AMQP setup failed", e);
log.warn("AMQP setup failed, will attempt to reconnect...");
Utils.sleep(WAIT_AFTER_SHUTDOWN_SIGNAL);
reconnect();
}
}
/**
* Reconnect to an AMQP broker.in case the connection breaks at some point
*/
private void reconnect() {
log.info("Reconnecting to AMQP broker...");
try {
setupAMQP();
} catch (IOException e) {
log.warn("Failed to reconnect to AMQP broker", e);
}
}
/**
* Set up a connection with an AMQP broker.
* @throws IOException
*This is the method where we actually connect to the queue using AMQP client APIs
*/
private void setupAMQP() throws IOException{
final int prefetchCount = this.prefetchCount;
final ConnectionFactory connectionFactory = new ConnectionFactory() {
public void configureSocket(Socket socket)
throws IOException {
socket.setTcpNoDelay(false);
socket.setReceiveBufferSize(20*1024);
socket.setSendBufferSize(20*1024);
}
};
connectionFactory.setHost(amqpHost);
connectionFactory.setPort(amqpPort);
connectionFactory.setUsername(amqpUsername);
connectionFactory.setPassword(amqpPasswd);
connectionFactory.setVirtualHost(amqpVhost);
this.amqpConnection = connectionFactory.newConnection();
this.amqpChannel = amqpConnection.createChannel();
log.info("Setting basic.qos prefetch-count to " + prefetchCount);
amqpChannel.basicQos(prefetchCount);
amqpChannel.exchangeDeclare(Constants.EXCHANGE_NAME, "direct");
amqpChannel.queueDeclare(Constants.QUEUE_NAME, true, false, false, null);
amqpChannel.queueBind(Constants.QUEUE_NAME, Constants.EXCHANGE_NAME, "");
this.amqpConsumer = new QueueingConsumer(amqpChannel);
assert this.amqpConsumer != null;
this.amqpConsumerTag = amqpChannel.basicConsume(Constants.QUEUE_NAME, this.autoAck, amqpConsumer);
}
/*
* Cancels the queue subscription, and disconnects from the AMQP broker.
*/
public void close() {
try {
if (amqpChannel != null) {
if (amqpConsumerTag != null) {
amqpChannel.basicCancel(amqpConsumerTag);
}
amqpChannel.close();
}
} catch (IOException e) {
log.warn("Error closing AMQP channel", e);
}
try {
if (amqpConnection != null) {
amqpConnection.close();
}
} catch (IOException e) {
log.warn("Error closing AMQP connection", e);
}
}
/*
* Emit message received from queue into collector
*/
public void nextTuple() {
if (spoutActive && amqpConsumer != null) {
try {
final QueueingConsumer.Delivery delivery = amqpConsumer.nextDelivery(WAIT_FOR_NEXT_MESSAGE);
if (delivery == null) return;
final long deliveryTag = delivery.getEnvelope().getDeliveryTag();
String message = new String(delivery.getBody());
if (message != null && message.length() > 0) {
collector.emit(new Values(message), deliveryTag);
} else {
log.debug("Malformed deserialized message, null or zero- length. " + deliveryTag);
if (!this.autoAck) {
ack(deliveryTag);
}
}
} catch (ShutdownSignalException e) {
log.warn("AMQP connection dropped, will attempt to reconnect...");
Utils.sleep(WAIT_AFTER_SHUTDOWN_SIGNAL);
reconnect();
} catch (ConsumerCancelledException e) {
log.warn("AMQP consumer cancelled, will attempt to reconnect...");
Utils.sleep(WAIT_AFTER_SHUTDOWN_SIGNAL);
reconnect();
} catch (InterruptedException e) {
log.error("Interrupted while reading a message, with Exception : " +e);
}
}
}
/*
* ack method to acknowledge the message that is successfully processed
*/
public void ack(Object msgId) {
if (msgId instanceof Long) {
final long deliveryTag = (Long) msgId;
if (amqpChannel != null) {
try {
amqpChannel.basicAck(deliveryTag, false);
} catch (IOException e) {
log.warn("Failed to ack delivery-tag " + deliveryTag, e);
} catch (ShutdownSignalException e) {
log.warn("AMQP connection failed. Failed to ack delivery-tag " + deliveryTag, e);
}
}
} else {
log.warn(String.format("don't know how to ack(%s: %s)", msgId.getClass().getName(), msgId));
}
}
public void fail(Object msgId) {
if (msgId instanceof Long) {
final long deliveryTag = (Long) msgId;
if (amqpChannel != null) {
try {
if (amqpChannel.isOpen()) {
if (!this.autoAck) {
amqpChannel.basicReject(deliveryTag, requeueOnFail);
}
} else {
reconnect();
}
} catch (IOException e) {
log.warn("Failed to reject delivery-tag " + deliveryTag, e);
}
}
} else {
log.warn(String.format("don't know how to reject(%s: %s)", msgId.getClass().getName(), msgId));
}
}
public void declareOutputFields(OutputFieldsDeclarer declarer) {
declarer.declare(new Fields("messages"));
}
}
AMQP Maven dependency that will be required to be introduced in the project pom.xml, as shown in the following code:
<dependency>
<groupId>com.rabbitmq</groupId>
<artifactId>amqp-client</artifactId>
<version>3.2.1</version>
</dependency>
Creating a RabbitMQ feeder component
Now that we have installed the RabbitMQ cluster, all we need is to develop a publisher component that will publish the messages to RabbitMQ. This will be a simple Java component that will mimic the live feed to RabbitMQ. The basic code snippet for this is as follows:
public class FixedEmitter {
private static final String EXCHANGE_NAME = "MYExchange";
public static void main(String[] argv) throws Exception {
/*we are creating a new connection factory for builing connections with exchange*/
ConnectionFactory factory = new ConnectionFactory();
/* we are specifying the RabbitMQ host address and port here in */
Address[] addressArr = {
new Address("localhost", 5672)
}; //specify the IP if the queue is not on local node where this program would execute
Connection connection = factory.newConnection(addressArr);
//creating a channel for rabbitMQ
Channel channel = connection.createChannel();
//Declaring the queue and routing key
String queueName = "MYQueue";
String routingKey = "MYQueue";
//Declaring the Exchange
channel.exchangeDeclare(EXCHANGE_NAME, "direct", false);
Map < String, Object > args = new HashMap < String, Object > ();
//defining the queue policy
args.put("x-ha-policy", "all");
//declaring and binding the queue to the exchange
channel.queueDeclare(queueName, true, false, false, args);
channel.queueBind(queueName, EXCHANGE_NAME, routingKey);
String stoppedRecord;
int i = 0;
//emitting sample records
while (i < 1) {
try {
myRecord = "MY Sample record";
channel.basicPublish(EXCHANGE_NAME, routingKey,
MessageProperties.PERSISTENT_TEXT_PLAIN,
myRecord.getBytes());
System.out.println(" [x] Sent '" + myRecord + "' sent at " + new Date());
i++;
Thread.sleep(2);
} catch (Exception e) {
e.printStackTrace();
}
}
channel.close();
connection.close();
}
}
Wiring the topology for the AMQP spout
Now we have the clustered queue setup ready, the AMQP spout in place, and the feeder component in place; let's put the last and final piece in place, that's the overall integration of the Storm topology.
Let's use our WordCount topology again and instead of RandomSentenceSpout we will use AMQPRecvSpout, which we designed in the previous section, Integrating Storm with RabbitMQ.
The following code chunk needs to be modified:
builder.setSpout("spout", new RandomSentenceSpout(), 5);
builder.setBolt("split", new SplitSentence(), 8).shuffleGrouping("spout");
We will use the new spout instead, as follows:
builder.setSpout("queue_reader", new AMQPRecvSpout(Constants.RMQ_ADDRESS, 5672, "guest", "guest", "/"));
Building high availability of components
Now we are at an opportune juncture to look for high availability of various components in the cluster. We will do this as a series of exercises wherein we assume that each component is installed in the clustered mode and more than one instance of it exists in the ecosystem.
The high availability of RabbitMQ can be checked only after you have a mirrored queue in place. Let's assume:
· We have two nodes in the RabbitMQ cluster: node1 and node2
· MyExchange is the name of the exchange that is created for the purpose of this exercise
· MyQueue is a mirrored queue that is created for this exercise
Next, we will just run the fixedEmitter code we created in the Creating a RabbitMQ feeder component section. Now perform the Litmus test:
· Let's assume the queue MyQueue has 100 messages
· Now bring down node2 (this means, one node on the cluster is down)
· All the 100 messages will be retained and will be visible on the console; node1 fills in when there is an absence of node2
This behavior ensures that services are not disrupted even if a node in the cluster goes down.
High availability of the Storm cluster
Now let's see the demonstration of a failover or high availability in Storm. The Storm framework is built in such a way that it can continue to execute as long as:
· It has the required number of Zookeeper connections
· It has the required number of workers on one or more supervisors
So what do the preceding statements actually mean? Well, let's understand this with an example. Let's say I am executing the WordCount topology on a Storm cluster. This cluster has the following configuration:
· There are two Storm supervisors with four workers on each Storm supervisor, so a total eight workers in the cluster
· There are three Zookeeper nodes (max connections 30), so in total 30*2*3=180 connections
· A topology is allocated with three workers
Let's assume when we submit this topology onto the cluster, the tasks and processes are spawned as shown in the following screenshot:
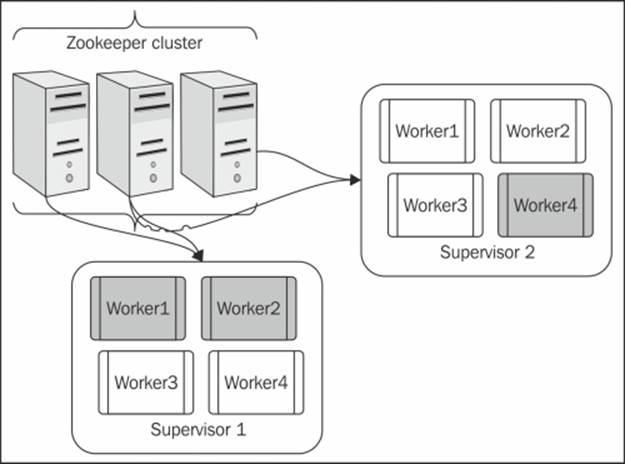
The preceding figure depicts the cluster diagrammatically and the gray workers are the ones that are allocated to the topology. Now we are all set to try out the high availability test for Storm and Zookeeper. The tests for Storm and Zookeeper are as follows:
· Test 1 (all components are up and the topology is running): Kill the Nimbus node after the topology is submitted; you will notice that the topology will continue to execute normally.
· Test 2 (all components are up and the topology is running): Kill one Zookeeper node and you will notice that the topology will continue to execute normally, because two of the other available Zookeepers have sufficient resources in terms of connections that can keep the Storm cluster up and running.
· Test 3 (all components are up and the topology is running): Kill two Zookeeper nodes and you will notice that the topology will continue to execute normally, because one of the other two available Zookeepers have sufficient resources in terms of connections that they can keep the Storm cluster up and running.
· Test 4 (all components are up and the topology is running): Kill supervisor 2; now we have one of the gray workers on this node. So when this node goes down, the gray worker dies, and then because the second supervisor is not available it's spawned again, this time on supervisor 1. So all workers of the topology will be executing on one single supervisor now, but the system will continue to perform with limited resources but will not fail.
Guaranteed processing of the Storm cluster
The next topic to discuss in this section is to see Storm's guaranteed message processing in action. We discussed this concept in previous chapters, but to understand it practically, I didn't go into depth because I wanted to introduce you all to the AMQP spout first. Now let's go back to the example we discussed in Chapter 2, Getting Started with Your First Topology.
Now as depicted in the following figure, the dash arrow flow shows that the events that fail to process are re-queued to the queue:
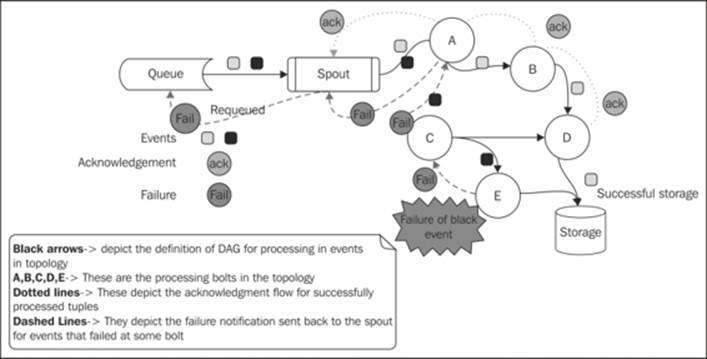
Now let's tweak our wordCount topology a bit where we had added AMQPRecvSpout to fail the events, and see where they actually show up. Let's assume I used FixedEmitter to emit 10 events into the queue. Now I tweak my wordCount bolt and induce artificial sleep for five minutes in the execute method, so that every event is held there for 300 seconds (using Thread.sleep(300)). This will lead to its timeout as the default event timeout is 60 seconds.
Now when you run the topology, you will be able to see the events being re-queued back to RabbitMQ using the UI.
The Storm isolation scheduler
The Storm isolation scheduler was released in Storm Version 0.8.2. This was a very handy feature that is very actively being used ever since its release, in the case of the shared Storm cluster. Let's understand its working and capability through an example; say, we have a four supervisor node Storm cluster with four slots each, so in total I have 16 slots. Now I want to employ three Storm topologies here, say, Topo1, Topo2, and Topo3; each has four workers allocated to it.
So by probable default, the scheduling behavior of the Storm distribution will be as follows:
|
Supervisor 1 |
Supervisor 2 |
Supervisor 3 |
Supervisor 4 |
|
|
Topo1 |
Worker 1 |
Worker 2 |
Worker 3 |
Worker 4 |
|
Topo2 |
Worker 2 |
Worker 1 |
Worker 1 |
Worker 1 |
|
Topo3 |
Worker 3 |
Worker 3 |
Worker 2 |
Worker 2 |
Storm will respect load distribution and will spawn one worker of each topology on each node.
Now let's tweak the scenario a bit and introduce a requirement that Topo1 is a very resource-intensive topology. (I want to dedicate one supervisor entirely to this one so that I save on network hops.) This could be attained by the use of the isolation scheduler.
We will have to make the following entry in the storm.yaml file of each Storm node in the cluster (Nimbus and supervisor):
isolation.scheduler.machines:
"Topol": 2
The cluster is required to be restarted for this setting to take effect. This setting means that we have dedicated two supervisor nodes to Topo1 and it will be no longer be shared with other topologies being submitted to the cluster. This will also ensure a viable solution to multitenancy problems encountered in production.
The other two supervisors will be shared amongst Topo2 and Topo3. The probable distribution will be as follows:
|
Supervisor 1 |
Supervisor 2 |
Supervisor 3 |
Supervisor 4 |
|
|
Topo1 |
Worker 1 Worker 2 |
Worker 1 Worker 2 |
||
|
Topo2 |
Worker 1 Worker 2 |
Worker 1 Worker 2 |
||
|
Topo3 |
Worker 3 Worker 4 |
Worker 3 Worker 4 |
So, as evident from the preceding table, Topo1 will be isolated to Supervisor1 and 2 while Top2 and Topo3 will share the remaining eight slots on the Supervisor3 and 4.
Quiz time
Q.1 State whether the following sentences are true or false:
1. AMQP is a STOMP protocol.
2. RabbitMQ is not fail-safe.
3. An AMQP client is required to publish to RabbitMQ.
4. A mirrored queue can recover from the failure of nodes in a cluster.
Q.2 Fill in the blanks:
1. _______________ is the exchange where messages are delivered based on the routing key.
2. _______________ is the exchange where messages are broadcasted.
3. The ___________ is an implementation of the Storm spout on the AMQP consumer protocol.
Q.3 Execute the WordCount topology on a three node Storm cluster (one nimbus and two supervisor nodes) clubbed with a two node RabbitMQ cluster:
· Try out various failure scenarios mentioned in the Building high availability of components section
· Induce an artificial delay in message processing to calibrate the guaranteed processing of the Storm topology
Summary
In this chapter, you have understood the RabbitMQ implementation of the AMQP protocol. We completed the cluster setup and integrated the output of the Storm topology with the queues. We also explored and practically tested the scenarios of high availability and reliability for both RabbitMQ and Storm. We closed the chapter by touching upon the Storm schedulers. In the next chapter, we will get acquainted with Storm persistence using Cassandra.