WordPress Responsive Theme Design (2015)
Chapter 8. Working with Template Files
Template files are very important files for WordPress themes. We have mentioned this previously, but let's repeat it again. In order to have a theme in WordPress, we need to have at least the following files:
· style.css
· functions.php
· index.php
In style.css, we define the theme name, a description, and the core CSS for the theme. In the functions.php file, we define our own custom functions and calling our styles and JavaScript, and also wireing our theme code to the WordPress core. In the index.php file, we display the list of our posts, pages, or any other objects that are listed in that index page. There can be a lot of index pages in our template.
Without further ado, in this chapter we will:
· Learn the template hierarchy of archive pages
· Learn more about excerpts
· Learn how to customize the paging navigation
· Learn how to style sticky posts
· Modify archive.php
· Modify 404.php
· Modify search.php
The WordPress template hierarchy
So, let's analyze the WordPress template hierarchy again:
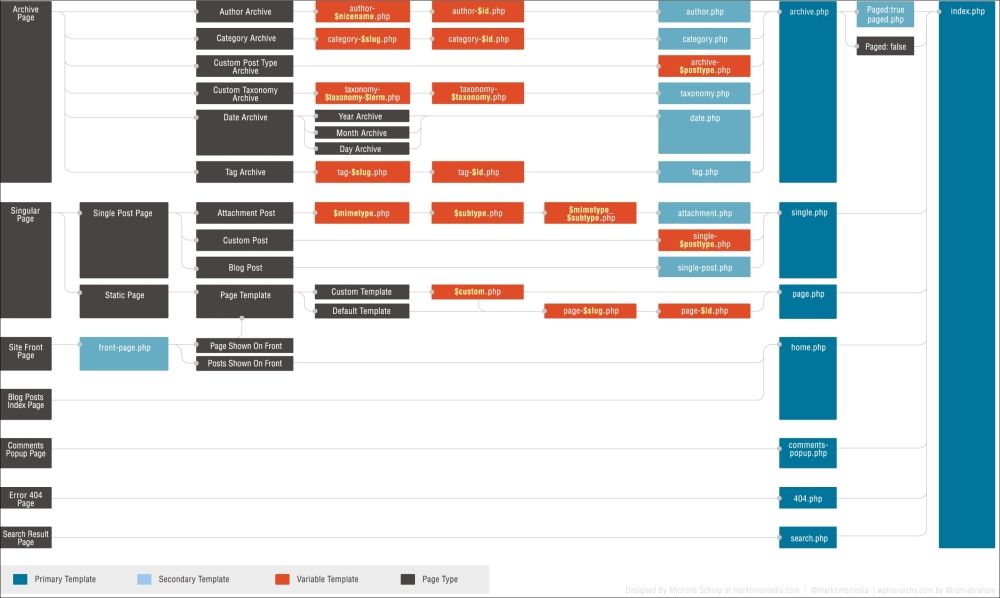
This is taken from: http://codex.wordpress.org/Template_Hierarchy. If we start from right to left, we have the index.php page, and that page catches all requests that are not explicitly handled by another template. If we want to have a special template for archives, then we can create the archive.php (available with our theme) template. For search results, we can use search.php (available with our theme). For a missing page/post, we can use 404.php (available with our theme). So, if we examine the preceding screenshot, we can see that archive.php is a child of index.php, and search.php and 404.php are children of index.php. If we open any of these pages, we will see that they have a similar structure (as they are bootstrap pages too). They just have some code that is unique, as it has to be like that in order to serve the purpose of a page. If we want to see this relationship explained in real life, we can add the testing archive page text in the archive.php page just under get_header();:
get_header(); ?>
testing archive page
From the previous explanation, we know that the archive.php page is an index page for archives, but if we check the preceding screenshot, we will see that it's a parent page for author.php, category.php and tag.php. As we don't have any of these available, archive.php can and will be used as a template for these situations. If we go to the index page of our website, we will see the first post with the Template: Sticky name . This post has tags at the bottom, and if we click on any of the tags, we will see this:
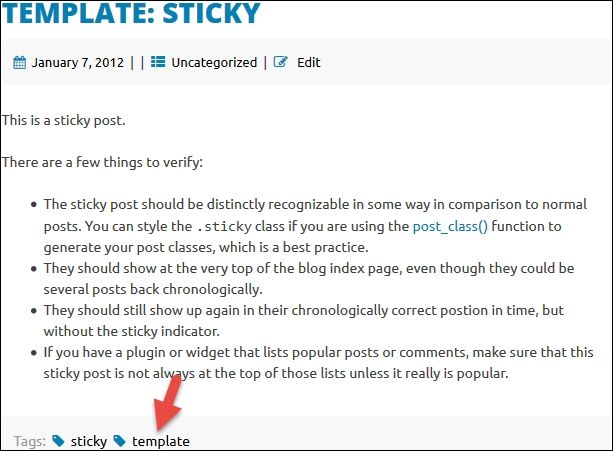
We should go to the index page for this tag (template):
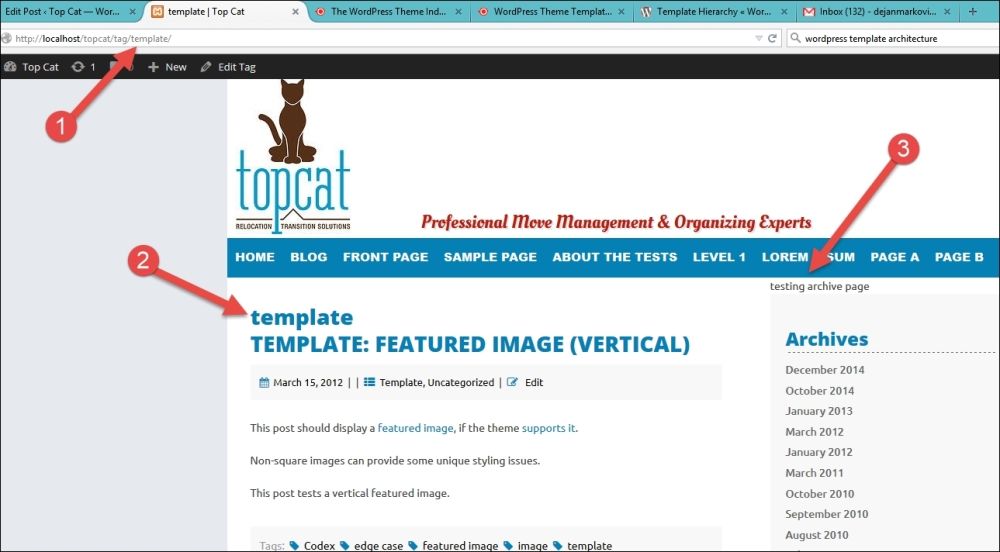
As we can see from the preceding screenshot, our URL (#1) says it's a tag page for the template tag: http://localhost/topcat/tag/template/.
Secondly, the template tag name is listed above the post's title (#2).
Note
This page will list all posts that have the template tag attached to them.
Finally, the testing archive page text that we have added to archive.php is shown here (#3), which means that archive.php was used to that purpose. The same thing will happen if we click on any category. We will go to the index page of the category for which our archive.php page is used, and we will see the same text that we added to the archive page.
Excerpts
As we have a lot of posts loaded with our test data and hopefully, our customers will have a lot of posts too, displaying the full content on index pages is not appropriate as it takes too much space. If somebody is looking for something, it's really confusing, and it takes valuable time. This is where the excerpt functionality comes to the rescue.
Excerpts can be customized but, by default, they display the first 55 words of the article and ends with […], which is called a hellip or an ellipsis symbol.
More info is available at http://codex.wordpress.org/Function_Reference/the_excerpt.
As we have mentioned previously, our index.php file is a bootstrap file with calls to other files that provide page sections. The get_template_part( 'content', get_post_format() ); line includes the content-[post_type].php file, and if that file doesn't exist, it includes the content.php file, which provides the content. In our case, it includes content.php. Suppose that we go to content.php and comment out this code:
the_content( sprintf(
__( 'Continue reading %s <span class="meta-nav">→</span>', 'topcat' ),
the_title( '<span class="screen-reader-text">"', '"</span>', false )
) );
And just leave the excerpt part:
the_excerpt().
Here is the full code example where we have commented out the _content() part:
<?php
/* translators: %s: Name of current post */
/*
the_content( sprintf(
__( 'Continue reading %s <span class="meta-nav">→</span>', 'topcat' ),
the_title( '<span class="screen-reader-text">"', '"</span>', false )
) );
*/
the_excerpt();
?>
We will have our excerpt displayed on our index page, as you can see on the following image:
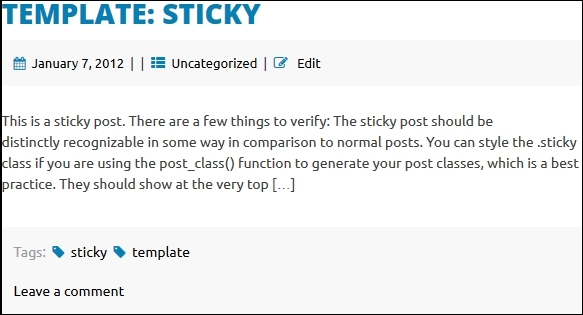
Isn't this easy? The only part missing here is the Read More button (link). We also have a footer there with tags and option to leave the comment, and this is really not needed on the index page, so we will take the footer out:
<?php topcat_entry_footer(); ?>
Replace this line (in content.php) with the Read More link:
<?php echo '<a href="' . get_permalink() . '" title="' . __('Read More ', 'topcat') . get_the_title() . '" >Read More <i class="fa fa-arrow-circle-o-right"></i></a>'; ?>
As you can see, we have added the awesome icon font to the code:
![]()
Now, we just have to style the link properly, and that's it. We will do this in the Posts and pages section (10.1) of style.css.
At the end of the section, we should put this code:
.entry-footer,
.entry-footer a,
.entry-footer a:visited,
.entry-footer a:active
{
color: #000;
font-weight: 600;
font-family: "Open Sans",sans-serif;
text-decoration: none;
}
.entry-footer a:hover
{
color: #0480b5;
font-family: "Open Sans",sans-serif;
text-decoration: underline;
}
The first part is to make the links black and bold in order to make them more distinctive from the content text, make them undecorated (meaning no underline), and assign them a font family. On hovering, we color the text with blue and give it an underline decoration.
Featured images
The next step is to put featured images in the content template, and all it takes is adding one line:
<header class="entry-header">
<?php the_title( sprintf( '<h1 class="entry-title"><a href="%s" rel="bookmark">', esc_url( get_permalink() ) ), '</a></h1>' ); ?>
<?php if ( 'post' == get_post_type() ) : ?>
<div class="entry-meta">
<?php topcat_posted_on(); ?>
</div><!-- .entry-meta -->
<?php the_post_thumbnail('small-thumbnail'); ?>
<?php endif; ?>
</header><!-- .entry-header -->
Tip
Post thumbnails or featured images
While listing the excerpts of posts, we want to also show their post thumbnail—if they are available. This is why featured images are also called post thumbnails—like thumbnails in a gallery, they represent the post in the list context.
If you remember, we have added the two sizes of post thumbnails in the Chapter 6, Responsive Widgets, Footer, and Comments, and we used only the large one for the single post. For the index page, we are using a small thumbnail:
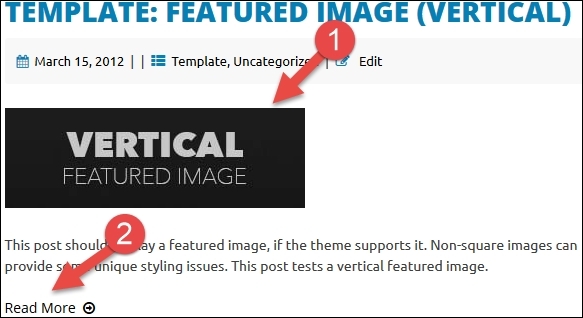
We can see a small thumbnail (#1) and the look of the Read More link (#2) in the preceding screenshot.
Customizing the paging navigation
If we scroll to the end of the index page, we will see the Older posts link:
![]()
This is part of our current navigation. The good thing with this navigation is that we have it and the bad thing is that is really simple and if we have a lot of posts, this navigation is not that helpful. Paging will be more helpful, as there we will have boxes with page numbers. Then we will be able to skip more pages at the same time instead of just going from one page to another. Our navigation code is contained in the topcat_paging_nav() function that is located in the template-tags.php file with other custom functions. As we want to use the more sophisticated solution, I have found the code that has a paging functionality (this code is actually used in the Twenty Fourteen theme, that has been tested a lot and because of that it is good).
Tip
The updated template-tags.php file is provided with the code for this chapter.
Make sure that you change the instances of the word (domain) from twentyfourteen to topcat in this code.
Here is the example:
" 'prev_text' => __( '<i class="fa fa-arrow-left fa-4"></i> Previous', 'twentyfourteen' ), "
" 'prev_text' => __( '<i class="fa fa-arrow-left fa-4"></i> Previous', 'topcat' ), "
Here is the code section where we have to make changes for the navigation located in /inc/template-tags.php:
// Set up paginated links.
$links = paginate_links( array(
'base' => $pagenum_link,
'format' => $format,
'total' => $wp_query->max_num_pages,
'current' => $paged,
'mid_size' => 1,
'add_args' => array_map( 'urlencode', $query_args ),
'prev_text' => __( '<i class="fa fa-arrow-left fa-4"></i> Previous', 'topcat' ),
'next_text' => __( 'Next <i class="fa fa-arrow-right fa-4"></i>', 'topcat' ),
) );
Here is the current look of the paging navigation:
![]()
Now, let's start with styling our pagination:
.pagination,
.pagination a,
.pagination a:visited,
.pagination a:active
{
color: #0480b5;
font-family: "Open Sans",sans-serif;
font-size: 1.6rem !important;
font-size: 16px;
line-height: 16px;
text-transform: uppercase;
font-weight: 800;
padding: 10px;
font-style: normal;
text-decoration: none;
}
In the previous code, we are coloring our pagination in blue, we are making fonts to be uppercase and a 1.6rem size, and finally, we are making sure none of the links are underlined. Take a look at this code:
.pagination .current
{
color: #666;
}
In the next code, we are coloring hover links to dark silver and we are making sure that on hovering, they will be underlined:
In the following code, we are coloring current page number to dark silver:
.pagination a:hover
{
color: #666;
font-family: "Open Sans",sans-serif;
font-size: 1.6rem !important;
font-size: 16px;
line-height: 16px;
text-transform: uppercase;
font-weight: 800;
padding: 10px;
font-style: normal;
text-decoration: underline;
}
With this code, we are making sure that our pagination is centered, as it looks better like that:
.pagination
{
text-align: center;
}
The original pagination used HTML special characters for arrows, but as we are using the font awesome for them on other sections, it will be appropriate to use it for this navigation too. In order to use the font awesome fonts, we have to change the code in template-tags.php:
$links = paginate_links( array(
'base' => $pagenum_link,
'format' => $format,
'total' => $wp_query->max_num_pages,
'current' => $paged,
'mid_size' => 1,
'add_args' => array_map( 'urlencode', $query_args ),
'prev_text' => __( '<i class="fa fa-arrow-left fa-4"></i> Previous', 'topcat' ),
'next_text' => __( 'Next <i class="fa fa-arrow-right fa-4"></i>', 'twentyfourteen' ),
) );
Changes are marked in bold in the previous code. After this, we have to make changes in style.css. As we want these arrows to be smaller than the arrows in other sections, we will use .fa-4 (font awesome 4 class), and because the fonts are the size of 16px, we should have the font awesome icons to have a 16px size, too:
.fa-4{
font-size: 16px;
font-size: 1.6rem !important;
}
Also, we want icons to change color on the hover to our dark silver color. To achieve this, we will use the following code:
.pagination a:hover .fa-arrow-right,
.pagination a:hover .fa-arrow-left
{
color: #666;
}
Styling sticky posts
Sticky post is the most important post that we want to show at the top of all posts, even before the latest posts. As we have mentioned previously, we can check whether our post is sticky; if we go to the post editor and at the top-right Publish section, it will display this:
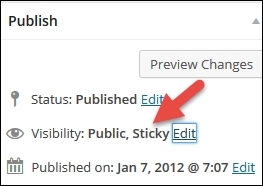
If it's not a sticky post and we want to make it sticky, we should just click on the Edit button and check the Stick this post to the front page option:

If the post is a sticky, WordPress adds a sticky class to the markup:
<article class="post-1241 post type-post status-publish format-standard sticky hentry category-uncategorized tag-sticky-2 tag-template" id="post-1241">
Tip
By default, WordPress adds a sticky class to the markup only under certain circumstances on index pages but not on single post pages.
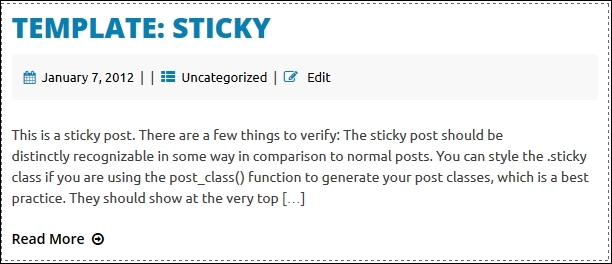
Then, we just have to find the sticky class in our style.css file and add the border and padding:
.sticky {
display: block;
border: 1px dashed #666;
padding: 10px;
}
Let's see our result:
Modifying archive.php
As we have mentioned at the beginning of this chapter, while analyzing the first image (the template hierarchy), the archive.php template is the parent template for archives for authors, categories, post types, taxonomies, dates, and tags. Overall, it displays the array of posts that match the specific post type (mentioned previously).
We have tested this functionality by clicking on a category or a tag in our index page, and we got the output from archive.php. Take a look at the code in archive.php:

We will see that the output is just a basic one. For example, if the end user clicks on the Template category, he/she will get this output:
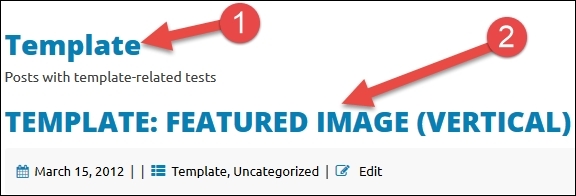
The category name (Template) will be displayed above the title, but it doesn't say anywhere whether that's a category, a tag, or something else. By adding just one line of the code, we will make it more explicit:
echo( __( 'Category: ', 'topcat' ) );
single_cat_title();
We can make the same change with tags:
echo( __( 'Tag: ', 'topcat' ) );
single_tag_title();
The only thing that we should change is the color of that title, as it's currently the same color as the post title and it's hard to differentiate them. We can perform this change by adding an archive-title class to this line:
<h1 class="page-title archive-title">
With just adding the archive-title class to our style.css file:
.archive-title{
color: #666;
}
We should add this code to 10.1 sections: Posts and pages. Our final result is:

Note
We will get the same look if we click on any tags instead of categories, as archive.php is a fallback template.
Modifying 404.php
404.php is the page that shows the warning message when end user tries to go to a page that doesn't exists, for example: http://localhost/topcat/page1234 as you can see in the following image:
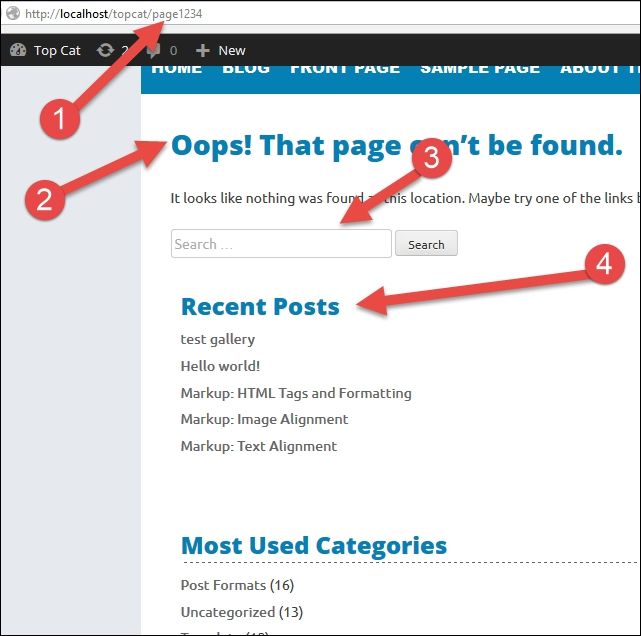
Here, we first search for the term (# 1), and then we get the message (# 2). Below the message, we get the search box (# 3)—same one as in search.php—so we can search for something that exists in the system, as maybe, we have misspelled the page. Below that, we see some other widgets (# 4)—Recent Posts, Most Used Categories, and so on—that will give us more options to find the stuff that we are looking for. So, at first, we should change the color of the title by adding an archive-title class to this line:
<h1 class="page-title archive-title"><?php _e( 'Oops! That page can’t be found.', 'topcat' ); ?></h1>
As we don't have the sidebar on this page and it can be helpful to end user, we should add it to our search.php page just before the call for the footer:
<?php get_sidebar(); ?>
<?php get_footer(); ?>
Let's see how our page looks like after the changes:
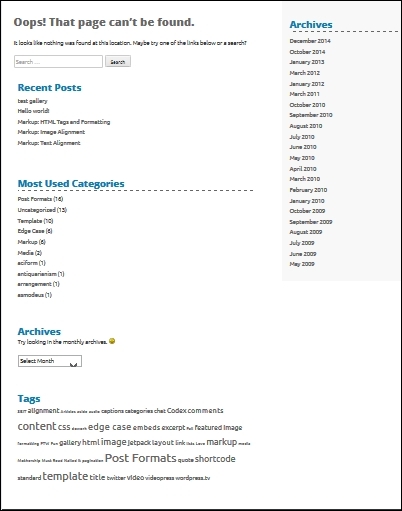
It looks pretty good, right?
Modifying search.php
The search.php file is in the same level as archive.php and its purpose is to show the results of the search, and if there are no results, it should show the message. As we already did a lot of customization, we just need to do the basic styling and test the search. At this moment, we don't have a search form, but we can test the search by adding parameters to the URL, for example:
http://localhost/topcat/?s=test
Here, we are adding the ?s=test parameter, which means that we are searching for any post or page that contains the test term. Our result is:
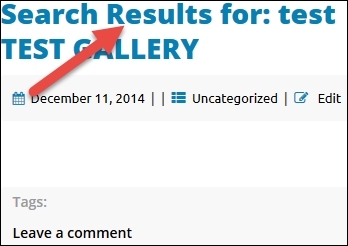
The result looks good, as we have found the matches for our search. The only thing that we should change is the color of the page title; in our case, this is Search Results for: test; to distinguish it from the post title, TEST GALLERY. In order to do this, we just have to go to search.php and add the archive-title class to this line:
<h1 class="page-title archive-title"><?php printf( __( 'Search Results for: %s', 'topcat' ), '<span>' . get_search_query() . '</span>' ); ?></h1>
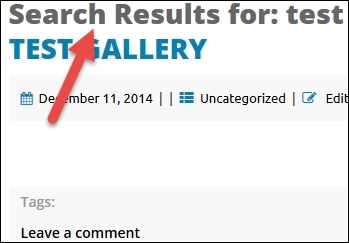
This is the result:
Summary
In this chapter, we have learned about the hierarchy of template files, excerpts, how to customize the paging navigation, how to style sticky posts, archive.php, 404.php, and search.php.
In the next chapter, we will work on static pages and their templates and we will learn how to add extra functionality with plugins. We will cover the home page, as its layout has more elements than other pages and it doesn't have a sidebar, which means that we will add another CSS file for that case.