Foundation ActionScript 3, Second Edition (2014)
Chapter 5. Creating Vector Graphics with the Drawing API
This chapter covers the following topics:
· How to draw straight and curved lines programmatically
· How to create solid and gradient-filled shapes
· How to alter a stroke’s graphic style, including drawing gradient strokes
· How to combine the drawing API methods to create a complete graphic
· How to move your graphic in a 3D space
ActionScript 3.0 includes a Graphics class that provides a drawing API, which you can use to create vector graphics through code. Each Sprite or Shape instance you create actually includes a Graphics instance that can be used to draw within its respective parent object. You’ll learn how to use this drawing API in this chapter.
Why we Need a Drawing API
If you’re from a design background, the fact that I’m getting all excited about being able to create vector graphics with ActionScript might lead you to the conclusion that I’ve spent too long out in the midday sun. You’re wondering why on earth you would want to create vector graphics with code when you have a perfectly good set of drawing tools in the Flash IDE, particularly if you’ve spent years honing your ninja-like Pen tool skills.
Having the ability to create vector graphics with ActionScript code means that you don’t have to know which graphics you need in advance. Imagine putting together a Flash movie that represents the recent history of a stock price like the one shown in Figure 5-1, from Google Finance (finance.google.com). Or maybe you’re building a Flash MP3 player widget for your site, and you want to have a little graphic equalizer going while the music is playing, as shown in Figure 5-2.
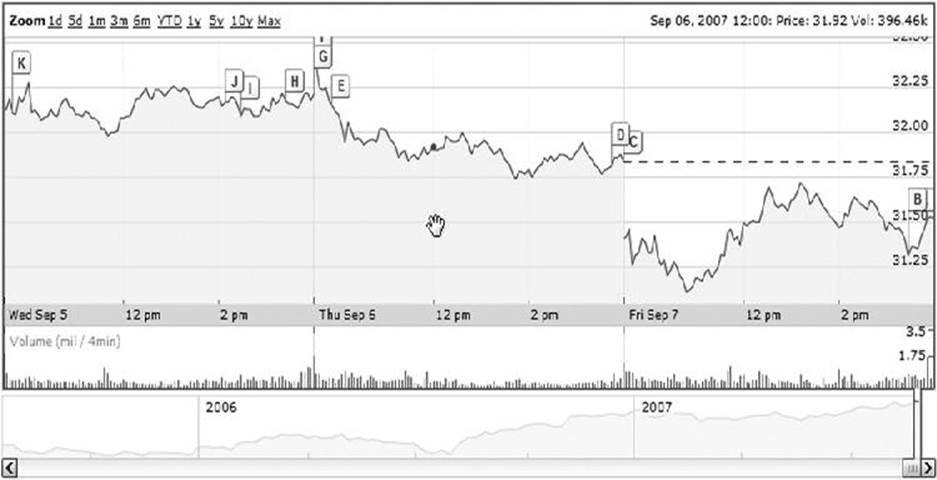
Figure 5-1. A dynamic graph is a prime candidate for runtime graphic creation
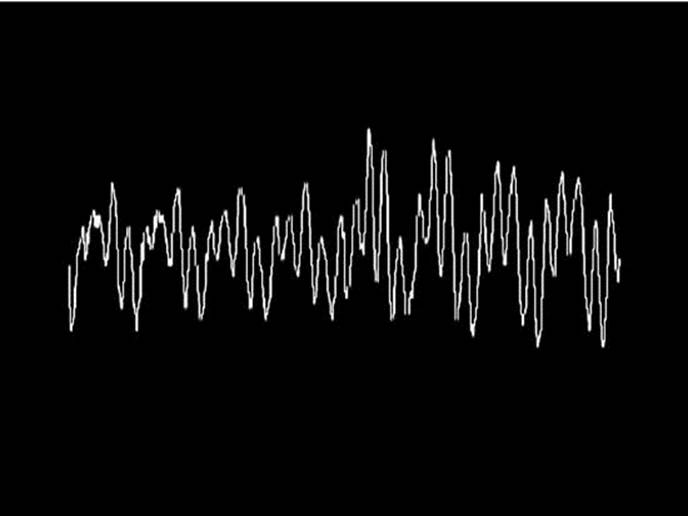
Figure 5-2. Creating sound visualization is a great use of the drawing API
You would require a Tolkienesque army of Flash-wielding orcs to do all the donkeywork required for the stock graph or equalizer scenario. Thankfully, there’s a distinct lack of orcs in our world (they leave one heck of a stain on the carpet), but that means we need to do this ourselves (no, thank you!) or find another solution to the problem.
Drawing API, enter stage right.
The Drawing API (or application programming interface, for the long-winded) was first introduced in Flash MX (a.k.a. Flash 6 for those of us who prefer old-fashioned numbers) but was supercharged in Flash 8 and Flash CS3 and again in Flash Player 10 and CC. It provides a powerful set of drawing tools for creating vector artwork with ActionScript. The drawing API allows you to create, at runtime, pretty much any kind of vector graphics your twisted mind can conjure up. Developers have even used this technique to draw and animate 3D objects, as shown in Figure 5-3.
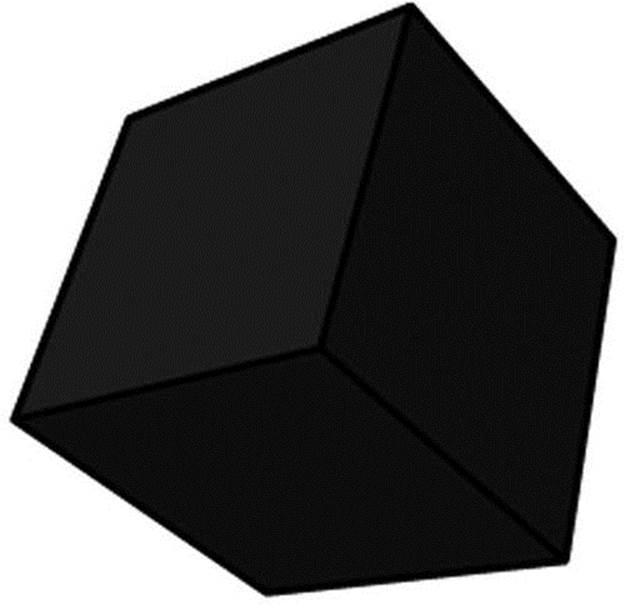
Figure 5-3. A 3D model rendered in Flash at runtime using the drawing API
We won’t be going that far in this chapter (the mathematics behind 3D drawing makes my head hurt), but you will get to play with all the features of the drawing API. You’ll then be free to pursue the whole spinning 3D cube thing yourself, if you feel so inclined.
Understanding the Drawing API
Every instance of the Sprite class (and its descendents) has a graphics property, which contains a host of methods and properties that make up the drawing API. This property is an instance of the Graphics class from the flash.display package, and it has various methods, such as beginGradientFill() and drawCircle(), which you can use to draw vector graphics. The layer on which the vector graphics are drawn is not part of the display list and always appears below any child display objects that the sprite contains.
If you want the vector graphics to be drawn at a specific depth in the display list (in front of any other display objects belonging to the same parent display object), you’ll need to create a new Sprite instance, add that to the display list at the required depth, and draw with that object’sgraphics property. Another alternative is to use a Shape instance, which is a direct child class of DisplayObject, meaning that it can be added to the display list but does not have the added functionality of InteractiveObject and DisplayObjectContainer. So although you cannot add children to a Shape instance or code for interactivity, you can draw into and position it on the stage. If all you want is to create a graphic without children and without interactivity, opt for the leaner Shape class.
I always recommend creating a new Sprite or Shape instance for your vector artwork. It makes positioning art a cinch, and is really helpful if you need to fill any shapes with gradient fills.
Setting up Mr. Smiley
In order to make learning about the drawing API at least a little interesting, you’ll re-create the image shown in Figure 5-4 using nothing but ActionScript code.

Figure 5-4. The image you’ll create with the drawing API
OK, so it’s not fancy 3D, and it’s never going to win any prizes for most original piece of artwork—poor Mr. Smiley doesn’t even have a nose, for goodness sake—but then I’m what you might call graphically challenged. Besides, this is just an exercise to help you learn all about the drawing API. (Yes, that’s my excuse, and I’m sticking to it.)
Let’s set up a project for Mr. Smiley. You’re going to create a new Shape instance as a child of the main document class. You could put this all into a single ActionScript class, but, ideally, you don’t want your document class doing much more than acting as an entry point for your application or movie and instantiating its necessary subcomponents. Things like drawing of internal graphics, especially graphics with any complexity, are best delegated to a subcomponent, so that’s what you’ll set up now.
1. The main document class will instantiate and position the smiley graphic, which you will house in a separate class to make things cleaner. For this class, create a new ActionScript file and save it as Smiley.as into a new com.foundationAS3.ch5 directory that you will be using for this chapter.
2. In Smiley.as, add the necessary package and class definitions. Since the graphic will not need to hold any children or account for user interactivity, you will use the Shape class (in the flash.display package) as its base class.
package com.foundationAS3.ch5 {
import flash.display.Shape;
public class Smiley extends Shape {
public function Smiley() {
}
}
}
3. Create a new ActionScript file for the document class. Save the file as SmileyTest.as in the same directory as Smiley.as.
4. Create the basic package and class definitions for the document class. As you may have guessed, you’re going to extend the Sprite class, so you’ll need to import that from the flash.display package.
package com.foundationAS3.ch5 {
import flash.display.Sprite;
public class SmileyTest extends Sprite {
public function SmileyTest() {
}
}
}
5. In the constructor method, create a new Smiley instance, which is your custom class, and add it to the display list. Then position it in the center of the stage using the stage object’s stageWidth and stageHeight properties. Note that you do not need to import the Smiley class to use it, since Smiley resides within the same package as your SmileyTest document class.
package com.foundationAS3.ch5 {
import flash.display.Sprite;
public class SmileyTest extends Sprite {
public function SmileyTest() {
// Create and center smiley sprite on stage
var smiley:Smiley = new Smiley();
addChild(smiley);
smiley.x = stage.stageWidth / 2;
smiley.y = stage.stageHeight / 2;
}
}
}
6. Create a new Flash document and save it in the project directory with the name smiley.fla.
7. Set the document class of the Flash document to be the com.foundationAS3.ch5.SmileyTest class you just created.
8. Save your changes to the Flash document and test it by selecting Control ![]() Test Movie from the main menu. You should see an empty SWF file with no errors in the Output panel.
Test Movie from the main menu. You should see an empty SWF file with no errors in the Output panel.
With that done, let’s start drawing some lines. What fun!
Drawing Lines
Imagine you have a piece of paper in front of you and you’re holding a pen against the center of the paper. If you move your hand in a straight line in any direction without lifting the pen from the paper, you draw a line on the paper. However, if you lift the pen off the paper, and then move it to another location and lower it again, you have no line, but your pen is now at a new location. In the ActionScript world, drawing lines works in a similar way, and these two actions are performed by the lineTo() and moveTo() methods of the Graphics class, respectively.
Creating Straight Lines
When a Sprite or Shape object is created, the pen is positioned at the origin (0,0) in the drawing layer. To draw a 50-pixel-long horizontal line to the right of the origin, just call the lineTo() method and specify the (x,y) coordinates for the endpoint of the line as the parameters. Use thelineStyle() method to draw a line that has a visual representation (more on this in the next section).
To test this, open the Smiley.as file and add the lines shown in bold to the constructor:
package com.foundationAS3.ch5 {
import flash.display.Shape;
public class Smiley extends Shape {
public function Smiley() {
// Testing
graphics.lineStyle(1);
graphics.lineTo(50, 0);
}
}
}
Save the ActionScript file and test the movie. You should see a small, black line drawn from the center of the stage to the right, as shown in Figure 5-5. Remember that when calling the lineTo() method, the pen is kept against the paper, so a line is drawn from wherever the pen currently resides to where you’ve told it to go. In this case, the pen was at (0,0), and you’ve told the Flash Player to draw a line between there and (50,0).
![]()
Figure 5-5. Your first line
Remember that (0,0) is at the top left of the stage in Flash, as it is in most computer graphics applications. When a new Sprite or Shape instance is created, it is empty with no graphics, and therefore has no width and height, so (0,0) is merely the center of transformation (there is no concept of “top left” in an empty graphic). You can then draw graphics anywhere within the instance in relation to the origin—to the right or left, above or below.
If you are instantiating a symbol from your library, the origin is determined by what you set in the Flash IDE, which could be center, top left, bottom right, and so on.
If you were expecting the line you just added to be drawn in the top-left corner of the Flash movie, remember that we’re drawing into the Smiley instance, which is (0,0), but the instance has been moved to the center of the stage. That means the graphic will show up wherever the instance has been moved to.
After the call to the lineTo() method, the pen is in the new location, so subsequent calls to lineTo() will start at that point. Actually, what you end up with is a single line with several points along it.
Let’s add a vertical line:
public function Smiley() {
// Testing
graphics.lineStyle(1);
graphics.lineTo(50, 0);
graphics.lineTo(50, 50);
}
Now you have an upside-down, back-to-front L shape, and the pen is at (50,50) in the drawing layer.
This is starting to look like a box, and you could finish drawing the rest of the box using the lineTo() method, but that would mean you wouldn’t get to try out the moveTo() method. Instead, let’s create a completely disconnected line:
public function Smiley() {
// Testing
graphics.lineStyle(1);
graphics.lineTo(50, 0);
graphics.lineTo(50, 50);
graphics.moveTo(-50, 50);
graphics.lineTo(-50, -50);
}
There you have it: three distinct lines—two connected at a corner and another off on its own—all drawn by the Flash Player in response to the drawing commands you’ve given it (extra marks if you can tell me where the pen is after the last command). Figure 5-6 shows the result. It isn’t earth-shattering, granted, but even Picasso had to start somewhere.
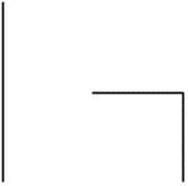
Figure 5-6. lineTo() and moveTo() at work on multiple lines
Controlling the Line Style
You probably won’t want to draw everything with thin, black lines. Fortunately, it’s easy to draw thick, purple lines, or anything else you desire, by specifying your choices with the lineStyle() method. This method takes up to eight parameters, each dictating a different facet of how the Flash Player will render subsequently drawn lines.
At its simplest, you can call lineStyle() with no parameters, meaning that no line will be drawn on subsequent calls to lineTo(), curveTo(), or any of the primitive shape methods. This is useful if you just want to draw a filled shape with no lines/strokes, for example. This is also the default setting for the lines drawn in a Graphics instance, so unless you explicitly set a line style using lineStyle(), you will not see any lines drawn.
The first lineStyle() parameter is thickness, and as you can guess, it controls the thickness of the lines drawn. You pass in a Number value for the desired thickness of the line in points. You can pass any whole or fractional value between 0 and 255 (which is pretty darn thick). Passing in 0 gives you a hairline, which has the special property of never scaling up, even if you scale the Graphics instance or its parent container. In contrast, a 1-point line inside a Sprite that is scaled to 300% will appear at three times its original scale. Here’s an example of setting the thickness parameter to 5 (see Figure 5-7):
public function Smiley() {
// Testing
graphics.lineStyle(5);
graphics.lineTo(50, 0);
graphics.lineTo(50, 50);
graphics.moveTo(-50, 50);
graphics.lineTo(-50, -50);
}
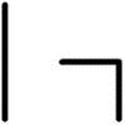
Figure 5-7. Beefier lines created by the thickness parameter in lineStyle()
As you probably have noticed, you don’t need to call lineStyle() before each line is drawn. The lineStyle() method is sticky, which means that once you’ve called it, the settings you provide are used for all drawing functions until you call the method again.
You can also call the clear() method, which wipes the graphics layer clean and resets all aspects of the pen and graphics layer to their defaults, including the line style. The clear() method is an important part of the drawing API. Its most common use is when you need to redraw within a Graphics instance. It is important in such a case to clear any previous graphics that may have been drawn.
The next lineStyle() parameter is color, and, unsurprisingly, it controls the color used to draw the lines. The data type for this parameter is uint, but to make it easy to work with colors, the number is usually specified in hexadecimal (base 16) format. Hexadecimal number literals in ActionScript start with 0x followed by a number of hexadecimal digits. In the case of colors, there are six digits: two each for the red, green, and blue components of the color: 0xRRGGBB. To make it easy, you can copy this number straight from the Color panel in the Flash IDE, as shown in Figure 5-8, replacing the pound symbol (#) with 0x. If you don’t supply a color, the default is black.
Figure 5-8. Color values can be copied directly from the Color panel in the Flash IDE into your ActionScript
The third lineStyle() parameter is alpha, which controls the opacity of the lines drawn. This is a Number value between 0 (transparent) and 1 (opaque), with numbers in between offering varying degrees of semitransparency. The default alpha value is 1, or fully opaque. Here is an example of setting the lineStyle() method’s color parameter to 0xFF0000 (red) and its alpha parameter to 0.5 (see Figure 5-9):
public function Smiley() {
// Testing
graphics.lineStyle(5, 0xFF0000, 0.5);
graphics.lineTo(50, 0);
graphics.lineTo(50, 50);
graphics.moveTo(-50, 50);
graphics.lineTo(-50, -50);
}
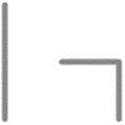
Figure 5-9. Using lineStyle() to set the color and alpha of lines
The other parameters for the lineStyle() method allow you to fine-tune how the Flash Player renders the lines drawn, as follows:
· pixelHinting: A Boolean value that when set to true will improve the rendering of curves and straight lines at small sizes. The default is false.
· scaleMode: A String value that determines how lines are scaled when the scaleX and scaleY properties of the DisplayObject are altered. See the LineScaleMode class in the online help for a list of possible values. The default isLineScaleMode.NORMAL.
· caps: A String value from the CapsStyle class that determines how the ends of lines are rendered. This is equivalent to the Cap setting shown in the Property inspector in the Flash IDE when drawing a line or a shape with a stroke. The default isCapsStyle.ROUND.
· joints: A String value from the JointStyle class that determines how joins between points on a line are rendered. This is equivalent to the Join setting shown in the Property inspector in the Flash IDE when drawing a line or a shape with a stroke. The default isJointStyle.ROUND.
· miterLimit: A Number value that determines the limit at which a miter is cut as a factor of the line thickness. This applies only when the joints parameter is set to JointStyle.MITER, and is equivalent to the Miter setting shown in the Property inspector in the Flash IDE when drawing a line or a shape with a stroke. The default is 3.
You can consult Adobe’s documentation for examples of these more complex parameters.
Drawing Curved Lines
Drawing straight lines is no fun unless you’re trying to draw a map of old Roman roads, or maybe a cartoon caricature of Sylvester Stallone. The rest of us live in a curvy world, and are easily offended by utilitarian straight lines and sharp angles (or is that just me?). Thankfully, we have thecurveTo() method to ease our (or my) troubles.
The curveTo() method is similar to the lineTo() method in that it draws a line from the current pen location to the one you specify, but you also get to include a control point that is used to specify the curve of the line. Some seriously complex math is going on behind the scenes, but all you need to know is that the curve of the line is dragged in the direction of the control point. It’s almost as if the control point were a magnet that is pulling the line toward it in order to create the curve. Figure 5-10 shows an example.
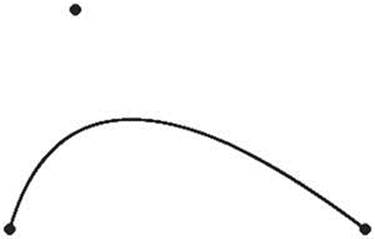
Figure 5-10. curveTo() at work to create a curved line. The control point above is not rendered; it is shown here only to illustrate how it affects the curve of a line
The curveTo() method takes four parameters: the (x,y) coordinates of the control point, and the (x,y) coordinates of the end anchor of the line:
curveTo(controlX:Number, controlY:Number, anchorX:Number,![]()
anchorY:Number):void
Let’s add the curveTo() method to the sample code to draw a curved line from the current pen position back to the Shape instance’s origin, as shown in Figure 5-11.
public function Smiley() {
// Testing
graphics.lineStyle(5, 0xFF0000, 0.5);
graphics.lineTo(50, 0);
graphics.lineTo(50, 50);
graphics.moveTo(-50, 50);
graphics.lineTo(-50, -50);
graphics.curveTo(0, -50, 0, 0);
}
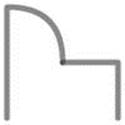
Figure 5-11. In this example, the curveTo() method draws a curved line from the current pen position back to the origin
Drawing and Filling Shapes
The ability to draw straight and curved lines is undoubtedly useful, but it seems like it might be a lot of work to draw simple shapes such as rectangles and circles. Consider trying to draw a rectangle with rounded corners using various combinations of lineTo() and curveTo() calls—we’re talking about 8 lines and 20 points. Thankfully, Adobe has provided a number of primitive shape drawing methods as part of the Graphics class. You can also create custom shapes.
Drawing Primitive Shapes
The shape-drawing methods are drawCircle(), drawEllipse(), drawRect(), and drawRoundRect()—not exactly exhaustive, but not too shabby.
You’ll use two of these methods for the smiley graphic: drawCircle() for the face and the eyes, and drawRoundRect() for the glasses. You’ll draw just the outlines for the moment, and then fill them in later.
The drawCircle() method takes three parameters: the (x,y) coordinate for the center of the circle and a Number value specifying the radius of the circle in pixels. Let’s clear out all the test code and draw a 100-pixel radius circle in the center of the smiley object (see Figure 5-12). You’ll use a 5-point black line for the outlines, some of which you’ll keep and some of which you’ll get rid of in favor of a fill color.
public function Smiley() {
// Draw face
graphics.lineStyle(5);
graphics.drawCircle(0, 0, 100);
}
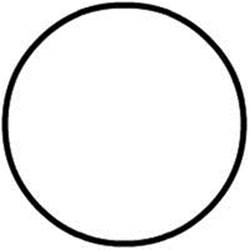
Figure 5-12. Drawing a circle is a cinch with drawCircle()
Remember that this code replaces all the test drawing code you originally put into your constructor.
Next, use the same method to draw the eyes. I had to play around a bit to find the right coordinates for the eyes. Circles that were too close together made my smiley face looked untrustworthy; too far apart made him look just plain weird. In the end, I settled on 10-pixel radius circles at (-35,-30) and (35,-30) (see Figure 5-13).
public function Smiley() {
// Draw face
graphics.lineStyle(5);
graphics.drawCircle(0, 0, 100);
// Draw eyes
graphics.drawCircle(-35, -30, 10);
graphics.drawCircle(35, -30, 10);
}
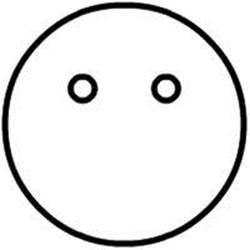
Figure 5-13. drawCircle() is used to draw the eyes as well
You can use the drawRoundRect() method to draw the Woody Allen–style glasses on our little hero. This method takes six parameters:
· x: The x coordinate for the top-left corner of the rectangle
· y: The y coordinate for the top-left corner of the rectangle
· width: The width of the rectangle
· height: The height of the rectangle
· ellipseWidth: The width of the ellipse used to draw the rounded corners
· ellipseHeight: The height of the ellipse used to draw the rounded corners
Again, after a bit of experimentation, I came up with reasonable values for each of these parameters to get the look I wanted (see Figure 5-14):
public function Smiley() {
// Draw face
graphics.lineStyle(5);
graphics.drawCircle(0, 0, 100);
// Draw eyes
graphics.drawCircle(-35, -30, 10);
graphics.drawCircle(35, -30, 10);
// Draw glasses
graphics.drawRoundRect(-60, -50, 50, 40, 20, 20);
graphics.drawRoundRect(10, -50, 50, 40, 20, 20);
}
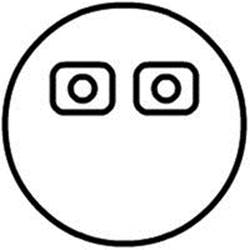
Figure 5-14. drawRoundRect() is employed to create the eyeglass frames
You can see that the eyes look a little big for the glasses, but fear not. Later, you’ll remove the outline from the eyes and fill them with black.
Now you can draw the remainder of the glasses (the arms and nose bridge) using a combination of moveTo(), lineTo(), and curveTo() (see Figure 5-15):
public function Smiley() {
// Draw face
graphics.lineStyle(5);
graphics.drawCircle(0, 0, 100);
// Draw eyes
graphics.drawCircle(-35, -30, 10);
graphics.drawCircle(35, -30, 10);
// Draw glasses
graphics.drawRoundRect(-60, -50, 50, 40, 20, 20);
graphics.drawRoundRect(10, -50, 50, 40, 20, 20);
graphics.moveTo(-60, -30);
graphics.lineTo(-80, -40);
graphics.moveTo(-10, -30);
graphics.curveTo(0, -40, 10, -30);
graphics.moveTo(60, -30);
graphics.lineTo(80, -40);
}
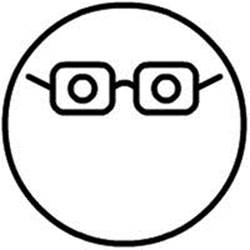
Figure 5-15. The glasses are completed by drawing lines with moveTo(), lineTo(), and curveTo()
Lovely! Next you need to draw the mouth, which requires the use of a custom shape.
Creating Custom Shapes
Sometimes the primitive shape drawing functions offered by the Graphics class aren’t enough, such as when you want to draw a hexagon or something much more complex, like a monkey. For your smiley face, you need to draw the mouth, which is a crescent moon shape on its side—something none of the primitive drawing functions can handle.
In cases like this, you’re left pretty much to your own devices, using the lineTo() and curveTo() methods to draw the shape. The key here is to draw the shape in one continuous series of statements, so that rather than a lot of separate lines, you have many points on a single line. This makes it possible to fill the shape with a color, gradient, or bitmap.
Drawing the mouth of the smiley face is as simple as drawing two curves—from left to right and then back again—using different control points to increase the curve for the bottom of the mouth (see Figure 5-16).
public function Smiley() {
. . .
// Draw glasses
graphics.drawRoundRect(-60, -50, 50, 40, 20, 20);
graphics.drawRoundRect(10, -50, 50, 40, 20, 20);
graphics.moveTo(-60, -30);
graphics.lineTo(-80, -40);
graphics.moveTo(-10, -30);
graphics.curveTo(0, -40, 10, -30);
graphics.moveTo(60, -30);
graphics.lineTo(80, -40);
// Draw mouth
graphics.moveTo(-45, 30);
graphics.curveTo(0, 50, 45, 30);
graphics.curveTo(0, 90, -45, 30);
}

Figure 5-16. Who needs a drawCrescent() when a couple of curveTo() calls do the trick?
As you can see, you’ve finished the outline of the smiley face. Now it’s time to add a splash of color.
Filling Shapes with a Solid Color
Filling shapes with a solid color is as easy as calling the beginFill() method before drawing the shape, and then calling endFill() when you’re finished. The beginFill() method takes two arguments: the color to fill the shape with and a Number value between 0 (transparent) and 1 (opaque) for the alpha value of the fill color. If you omit the alpha value, it defaults to 1, or fully opaque. You can call beginFill() before or after you set the line style. endFill() does not take any parameters and is just used to signify the end of the filled shape, so that a new shape (with perhaps a new fill or no fill) can be drawn.
Using the fill methods, let’s give the smiley face a nice (un)healthy yellow complexion, jet-black eyes, and a super-shiny dentist’s smile (see Figure 5-17):
public function Smiley() {
// Draw face
graphics.lineStyle(5);
graphics.beginFill(0xFFFF00);
graphics.drawCircle(0, 0, 100);
graphics.endFill();
// Draw eyes
graphics.beginFill(0x000000);
graphics.drawCircle(-35, -30, 10);
graphics.drawCircle(35, -30, 10);
graphics.endFill();
. . .
// Draw mouth
graphics.moveTo(-45, 30);
graphics.beginFill(0xFFFFFF);
graphics.curveTo(0, 50, 45, 30);
graphics.curveTo(0, 90, -45, 30);
graphics.endFill();
}

Figure 5-17. beginFill() and endFill() create solid color shapes
Now let’s give the glasses a slight white tint (see Figure 5-18). You can do this by filling them with pure white with an alpha value of 0.3, which equates to 30% alpha and creates a very subtle effect.
// Draw glasses
graphics.beginFill(0xFFFFFF, 0.3);
graphics.drawRoundRect(-60, -50, 50, 40, 20, 20);
graphics.drawRoundRect(10, -50, 50, 40, 20, 20);
graphics.endFill();
graphics.moveTo(-60, -30);
graphics.lineTo(-80, -40);
graphics.moveTo(-10, -30);
graphics.curveTo(0, -40, 10, -30);
graphics.moveTo(60, -30);
graphics.lineTo(80, -40);

Figure 5-18. A transparent fill is given to the glasses
Mr. Smiley is looking better, but his eyes are still too big. Now that they’ve been filled in black, let’s remove the line from them by calling lineStyle() with no parameters before drawing them. You’ll also need to set lineStyle() back to 5-point thickness before drawing the glasses.
// Draw eyes
graphics.lineStyle();
graphics.beginFill(0x000000);
graphics.drawCircle(-35, -30, 10);
graphics.drawCircle(35, -30, 10);
graphics.endFill();
// Draw glasses
graphics.lineStyle(5);
graphics.beginFill(0xFFFFFF, 0.3);
graphics.drawRoundRect(-60, -50, 50, 40, 20, 20);
graphics.drawRoundRect(10, -50, 50, 40, 20, 20);
graphics.endFill();
graphics.moveTo(-60, -30);
graphics.lineTo(-80, -40);
graphics.moveTo(-10, -30);
graphics.curveTo(0, -40, 10, -30);
graphics.moveTo(60, -30);
graphics.lineTo(80, -40);
As you can see in Figure 5-19, the eyes look much better.

Figure 5-19. Calling lineStyle() with no parameters allows for shapes to be drawn without strokes
Filling Shapes with Color Gradients
Gradient fills (both linear and radial) are created using the beginGradientFill() method. A gradient may be a gradual progression through two or more colors, a gradual progression through two or more alpha values, or a mixture of the two, all at varying ratios. Using thebeginGradientFill() method and its many parameters, you can replicate any kind of gradient fill you can create in the Color panel of the Flash IDE.
The beginGradientFill() method has eight parameters:
· type: A String value from the GradientType class that specifies whether to use a linear or radial fill (GradientType.LINEAR or GradientType.RADIAL, respectively).
· colors: An array of the colors in the gradient fill. You must have as many colors as you have alpha values, and vice versa, so if you are setting up a seven-step alpha gradient for a single color, you’ll need to repeat that color seven times in the colors array.
· alphas: An array of the alpha values to use in the gradient fill. These values should be between 0 (transparent) and 1 (opaque).
· ratios: An array of values between 0 and 255 that indicate at what point in the gradient each color and alpha should be positioned. There should be the same number of elements in the ratios array as there are in the colors and alphas arrays. You can think of these values as percentages, except that they go from 0 to 255 instead of 0 to 100.
· matrix: An instance of the Matrix class from the flash.geom package. Its purpose is to describe the dimensions of the gradient (gradients don’t necessarily need to be the same size as the object they’re filling), the rotation of the gradient, and the (x,y) coordinates of the origin of the gradient. Confused? Imagine that the gradient fills a piece of paper underneath the paper on which you’re drawing, and when you draw a shape, you’re revealing the gradient underneath. The matrix determines the size, position, and rotation of the paper with the gradient. How the gradient paper is transformed affects how it fills the shape above. Thankfully, every instance of the Matrix class has a createGradientBox() method, which takes all the pain out of creating matrices for gradients. This method takes five parameters—width, height, rotation, x, and y—and sets the matrix values accordingly.
· spreadMethod: A String value from the SpreadMethod class that determines what happens if the gradient does not fill the entire shape (if it was not wide or tall enough, or was positioned outside the shape). This property maps directly to the Overflow value found in the Color Mixer panel of the Flash IDE. Figure 5-20 shows the results of each of the possible values for this parameter (as set through the IDE). This parameter is optional and defaults to SpreadMethod.PAD if omitted.
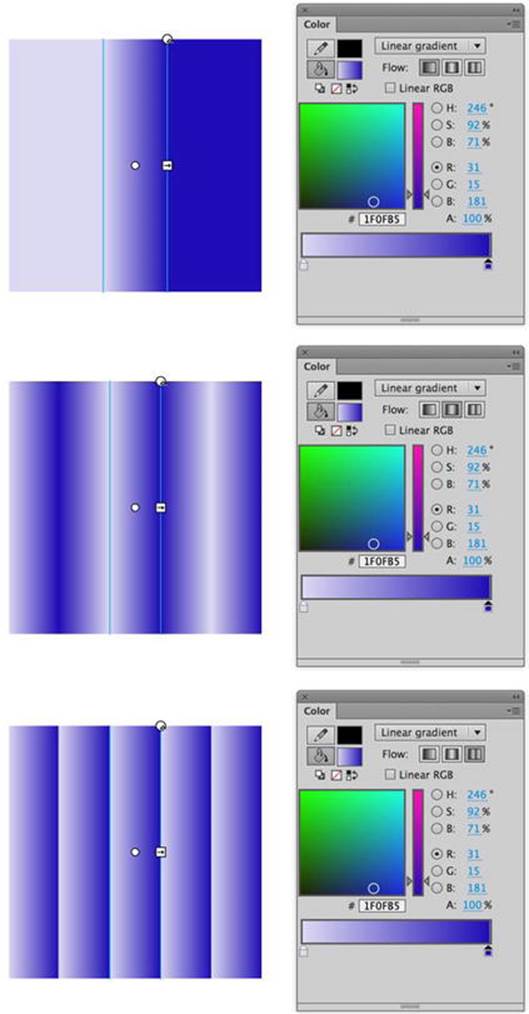
Figure 5-20. Examples of the spreadMethod (or Overflow in the Flash IDE) for a gradient
· interpolationMethod: A String value from the InterpolationMethod class that fine-tunes the method used to calculate the gradations between two colors in the gradient. This parameter is optional and defaults to InterpolationMethod.LINEAR_RGBif omitted.
· focalPointRatio: Specific to radial gradients, a Number value between -1 and 1 that specifies how far along the axis of rotation the focal point for the radial gradient will be. -1 is on the left edge of the gradient, 0 is in the center, and 1 is on the right edge; values in between are somewhere along that line. This parameter is optional and defaults to 0 (center) if omitted.
Going back to Mr. Smiley, he’s looking OK but a little too flat. Let’s give him some depth with a radial fill of the face.
Start with a simple radial fill between a light yellow, a moderate yellow, and a dark yellow to give the face a 3D look (see Figure 5-21). Use 100% alpha for all the colors, and spread them out evenly over the gradient.
package com.foundationAS3.ch5 {
import flash.display.GradientType;
import flash.display.Shape;
public class Smiley extends Shape {
public function Smiley() {
// Draw face
graphics.lineStyle(5);
var colors:Array = [0xFFFF66, 0xFFFF00, 0xCCCC00];
var alphas:Array = [1, 1, 1];
var ratios:Array = [0, 128, 255];
graphics.beginGradientFill(
GradientType.RADIAL,
colors,
alphas,
ratios
);
graphics.drawCircle(0, 0, 100);
graphics.endFill();

Figure 5-21. A gradient fill is applied to the smiley face
That looks a little better, but there’s something slightly unnatural about the focal point for the gradient being dead center in the circle. You can use the focalPointRatio parameter of the beginGradientFill() method to adjust the location of the focal point. Remember that this is a number between -1 (left edge) and 1 (right edge) that specifies where the focal point should be in the gradient. Set this to -0.5 to shift the focal point from the center of the circle to halfway toward the left edge (see Figure 5-22). Because the focalPointRatio parameter comes aftermatrix, spreadMethod, and interpolationMethod, none of which you want to set, you can just pass null for those three parameters.
public function Smiley() {
// Draw face
graphics.lineStyle(5);
var colors:Array = [0xFFFF66, 0xFFFF00, 0xCCCC00];
var alphas:Array = [1, 1, 1];
var ratios:Array = [0, 128, 255];
graphics.beginGradientFill(
GradientType.RADIAL,
colors,
alphas,
ratios,
null,
null,
null,
-0.5
);
graphics.drawCircle(0, 0, 100);
graphics.endFill();

Figure 5-22. The focalPointRatio parameter can be used to offset the center of the gradient
You’re nearly there, but the fill would look better with the focal point above and to the left of center, rather than just to the left. To do this, you’ll need to rotate the gradient by 45 degrees. And for that, you need a matrix. Let’s create a new Matrix instance and call itscreateGradientBox() method to build a gradient matrix.
The only tricky bit about the createGradientBox() method is that the rotation parameter is in radians, whereas we humans normally think in degrees. Thankfully, it is simple to convert degrees to radians, requiring only that you multiply the degrees value by the result ofMath.PI divided by 180. You can even do this in-line in the method call:
matrix.createGradientBox(100, 100, 90 * (Math.PI / 180), 0, 0);
Remember also that Flash’s degrees system is a little kooky in that 0 degrees is at 3 o’clock.
The createGradientBox() method takes five parameters: width, height, rotation, x, and y. The width, height, rotation, x, and y parameters are the dimensions and location of the matrix in the Shape’s coordinate space, and rotation is how far the gradient is rotated (in radians). You need a gradient that’s the same dimensions as your circle (200 ´ 200 pixels), but because the circle is centered at (0,0) in the sprite, you’ll need to move the gradient to (–100,–100), so that the gradient is positioned correctly. For the rotation parameter, just plug 45 degrees into the little degrees-to-radians formula, and you’re finished.
package com.foundationAS3.ch5 {
import flash.display.GradientType;
import flash.display.Shape;
import flash.geom.Matrix;
public class Smiley extends Shape {
public function Smiley() {
// Draw face
graphics.lineStyle(5);
var colors:Array = [0xFFFF66, 0xFFFF00, 0xCCCC00];
var alphas:Array = [1, 1, 1];
var ratios:Array = [0, 128, 255];
var matrix:Matrix = new Matrix();
matrix.createGradientBox(
200,
200,
45 * (Math.PI / 180),
-100,
-100
);
graphics.beginGradientFill(
GradientType.RADIAL,
colors,
alphas,
ratios,
matrix,
null,
null,
-0.5
);
graphics.drawCircle(0, 0, 100);
graphics.endFill();
Make sure that you import the Matrix class from the flash.geom package and that you pass the Matrix instance in the beginGradientFill() method. Figure 5-23 shows the result.

Figure 5-23. With the help of a Matrix instance, the gradient fill is offset for a more 3D look for the smiley face
So there you have it: a smiley face drawn entirely with ActionScript code. You’re not quite finished with the drawing API just yet—I couldn’t shoehorn all of the methods into the smiley face example—but feel free to stop here and play around. Maybe you would be kind enough to give the poor little fellow a nose, perhaps some hair, and swap the geek glasses for some cool shades.
Simplifying the Code
Before continuing with another example of using the drawing API, let’s look at how you might improve the code for drawing the smiley face, to make it a little easier to work with and extend.
First, look at any common pieces and address redundancies in the code. For instance, the thickness of the lines is hard-coded in two separate places in the code. This could be moved into a private variable to make it easier to edit, especially if the number may ever be needed again in another part of the code. The same could hold true for any of the “magic numbers” throughout the code.
You may also notice that the drawing is always done through the graphics property of the Shape instance. Because of this, you can employ the with statement to nest all these lines and reduce the code. Basically, a with allows you to target a specific object to be used to execute all the code within the block. If you use with (graphics), you do not need to continually target the graphics property in each of the calls within the block. Here is the Smiley class rewritten with a with statement, so you can see how it works to simplify the code:
package com.foundationAS3.ch5 {
import flash.display.GradientType;
import flash.display.Shape;
import flash.geom.Matrix;
public class Smiley extends Shape {
public function Smiley() {
with (graphics) {
// Draw face
lineStyle(5);
var colors:Array = [0xFFFF66, 0xFFFF00, 0xCCCC00];
var alphas:Array = [1, 1, 1];
var ratios:Array = [0, 128, 255];
var matrix:Matrix = new Matrix();
matrix.createGradientBox(
200,
200,
45 * (Math.PI / 180),
-100,
-100
);
beginGradientFill(
GradientType.RADIAL,
colors,
alphas,
ratios,
matrix,
null,
null,
-0.5
);
drawCircle(0, 0, 100);
endFill();
// Draw eyes
lineStyle();
beginFill(0x000000);
drawCircle(-35, -30, 10);
drawCircle(35, -30, 10);
endFill();
// Draw glasses
lineStyle(5);
beginFill(0xFFFFFF, 0.3);
drawRoundRect(-60, -50, 50, 40, 20, 20);
drawRoundRect(10, -50, 50, 40, 20, 20);
endFill();
moveTo(-60, -30);
lineTo(-80, -40);
moveTo(-10, -30);
curveTo(0, -40, 10, -30);
moveTo(60, -30);
lineTo(80, -40);
// Draw mouth
moveTo(-45, 30);
beginFill(0xFFFFFF);
curveTo(0, 50, 45, 30);
curveTo(0, 90, -45, 30);
endFill();
}
}
}
}
Creating Gradient line Styles
Earlier, I mentioned that the drawing API was significantly enhanced in Flash 8. The ability to draw lines that use a gradient rather than a solid color was one of those enhancements.
Setting up a gradient line style takes two steps:
· Set up the line thickness by calling the lineStyle() method, just as you would for solid-color lines. You may as well ignore the color and alpha properties for the line style, since they will be ignored in favor of the gradient style.
· Call the lineGradientStyle() method to set up the gradient style. This method takes exactly the same arguments as the beginGradientFill() method you met earlier, and it works in exactly the same way to produce a gradient, which you can then use to render lines with the drawing API.
Let’s give this a go with a linear gradient fill that cycles through all the colors of the rainbow:
1. Create a new Flash document and save it with the name lineGradient.fla in the project directory.
2. Create a new ActionScript document for the document class. Save the file as LineGradientTest.as in the com.foundationAS3.ch5 directory.
3. Create the basic package and class definitions, including the constructor method, using Sprite as the base class. Be sure to import the Shape, Sprite, and GradientType classes from the flash.display package.
package com.foundationAS3.ch5 {
import flash.display.GradientType;
import flash.display.Shape;
import flash.display.Sprite;
public class LineGradientTest extends Sprite {
public function LineGradientTest () {
}
}
}
4. As this is a simpler example than the smiley face, you’ll include all the drawing code within this document class. Create a new Shape object on which you can draw, add the item to the display list, and center it on the stage.
package com.foundationAS3.ch5 {
import flash.display.GradientType;
import flash.display.Shape;
import flash.display.Sprite;
public class LineGradientTest extends Sprite {
public function LineGradientTest() {
// Create and center ellipse shape on stage
var ellipse:Shape = new Shape();
addChild(ellipse);
ellipse.x = stage.stageWidth / 2;
ellipse.y = stage.stageHeight / 2;
}
}
}
5. Set up the basic line style with a call to lineStyle(). So you can see the line gradient clearly, use a thickness of 30 pixels. Remember that the lineStyle() color and alpha parameters are ignored, so you don’t need to supply them.
package com.foundationAS3.ch5 {
import flash.display.GradientType;
import flash.display.Shape;
import flash.display.Sprite;
public class LineGradientTest extends Sprite {
public function LineGradientTest() {
// Create and center ellipse shape on stage
var ellipse:Shape = new Shape();
addChild(ellipse);
ellipse.x = stage.stageWidth / 2;
ellipse.y = stage.stageHeight / 2;
// Set basic line style
ellipse.graphics.lineStyle(30);
}
}
}
6. Begin to set up the properties for the gradient, starting with the colors array. You’ll create an array containing all the colors of the rainbow: red (0xFF0000), orange (0xFF6600), yellow (0xFFFF00), green (0x00FF00), blue (0x0000FF), indigo (0x2E0854), and violet (0x8F5E99). You may as well deal with the alphas array here, too, since you want the gradient to be fully opaque.
package com.foundationAS3.ch5 {
import flash.display.GradientType;
import flash.display.Shape;
import flash.display.Sprite;
public class LineGradientTest extends Sprite {
public function LineGradientTest() {
// Create and center ellipse shape on stage
var ellipse:Shape = new Shape();
addChild(ellipse);
ellipse.x = stage.stageWidth / 2;
ellipse.y = stage.stageHeight / 2;
// Set basic line style
ellipse.graphics.lineStyle(30);
// Set up gradient properties
var colors:Array =
[
0xFF0000,
0xFF6600,
0xFFFF00,
0x00FF00,
0x0000FF,
0x2E0854,
0x8F5E99
];
var alphas:Array = [1,1,1,1,1,1,1];
}
}
}
7. Now you need to deal with the gradient ratios. You want the colors spaced evenly, so you need to divide 255 (the maximum ratio value) by 6 (you have seven colors, but one of them will exist at position 0, so you don’t need to count it). That gives increments of 42, give or take a fraction.
package com.foundationAS3.ch5 {
import flash.display.GradientType;
import flash.display.Shape;
import flash.display.Sprite;
public class LineGradientTest extends Sprite {
public function LineGradientTest() {
// Create and center ellipse shape on stage
var ellipse:Shape = new Shape();
addChild(ellipse);
ellipse.x = stage.stageWidth / 2;
ellipse.y = stage.stageHeight / 2;
// Set basic line style
ellipse.graphics.lineStyle(30);
// Set up gradient properties
var colors:Array =
[
0xFF0000,
0xFF6600,
0xFFFF00,
0x00FF00,
0x0000FF,
0x2E0854,
0x8F5E99
];
var alphas:Array = [1,1,1,1,1,1,1];
var ratios:Array = [0,42,84,126,168,210,255];
}
}
}
8. Call the lineGradientStyle() method to set up a linear gradient using the gradient properties you’ve just created.
package com.foundationAS3.ch5 {
import flash.display.GradientType;
import flash.display.Shape;
import flash.display.Sprite;
public class LineGradientTest extends Sprite {
public function LineGradientTest() {
// Create and center ellipse shape on stage
var ellipse:Shape = new Shape();
addChild(ellipse);
ellipse.x = stage.stageWidth / 2;
ellipse.y = stage.stageHeight / 2;
// Set basic line style
ellipse.graphics.lineStyle(30);
// Set up gradient properties
var colors:Array =
[
0xFF0000,
0xFF6600,
0xFFFF00,
0x00FF00,
0x0000FF,
0x2E0854,
0x8F5E99
];
var alphas:Array = [1,1,1,1,1,1,1];
var ratios:Array = [0,42,84,126,168,210,255];
// Set gradient line style
ellipse.graphics.lineGradientStyle(GradientType.LINEAR, colors,![]()
alphas, ratios);
}
}
}
9. Use the drawEllipse() method to draw the outline of an ellipse on the stage. This method takes four parameters to specify the location and size of the ellipse to draw: x, y, width, and height. Using this method, draw a 200 ´ 100-pixel ellipse in the center of the ellipse sprite.
The drawEllipse() method operates more like drawRect() than drawCircle(). The parameters specify the positions and dimensions of an imaginary rectangle that would contain the ellipse, rather than the center point and the horizontal and vertical radius values.
package com.foundationAS3.ch5 {
import flash.display.GradientType;
import flash.display.Shape;
import flash.display.Sprite;
public class LineGradientTest extends Sprite {
public function LineGradientTest() {
// Create and center ellipse shape on stage
var ellipse:Shape = new Shape();
addChild(ellipse);
ellipse.x = stage.stageWidth / 2;
ellipse.y = stage.stageHeight / 2;
// Set basic line style
ellipse.graphics.lineStyle(30);
// Set up gradient properties
var colors:Array =
[
0xFF0000,
0xFF6600,
0xFFFF00,
0x00FF00,
0x0000FF,
0x2E0854,
0x8F5E99
];
var alphas:Array = [1,1,1,1,1,1,1];
var ratios:Array = [0,42,84,126,168,210,255];
// Set gradient line style
ellipse.graphics.lineGradientStyle(GradientType.LINEAR, colors,![]()
alphas, ratios);
// Draw ellipse
ellipse.graphics.drawEllipse(-100, -50, 200, 100);
}
}
}
10.Save your changes to the LineGradientTest.as document and switch to lineGradient.fla. Set the document class of the movie to com.foundationas3.ch5.LineGradientTest.
11.Save your changes to the lineGradient.fla document and test your movie.
Voilà! You now have an ellipse drawn on the stage using a gradient for its outline, as shown in Figure 5-24.
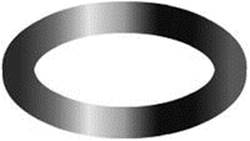
Figure 5-24. A rainbow gradient filling the stroke of an ellipse demonstrates the power of lineGradientStyle()
Flash 3D
Now that we have created our lovely little Mr. Smiley, let’s see if we can move him around in a 3D space. In this section we will be looking at the 3D tool. You were able to move an object in the x and y spaces in previous versions of Flash, but the new 3D tool, which is located in the toolbar, allows you to move an object in the x, y, and z spaces as well as specify the perspective angle and vanishing point. This tool lets you give an object depth of field and determine the direction in which it should move, so we can make Mr. Smiley look far away or close.
Let’s look at these parameters on the timeline:
1. Open a new Flash document and draw a simple rectangle on the stage.
2. Select the rectangle and make it a movie clip, assigning it any name you wish.
3. Open the Properties panel and you will see the new 3D Position and View options, as shown in Figure 5-25.
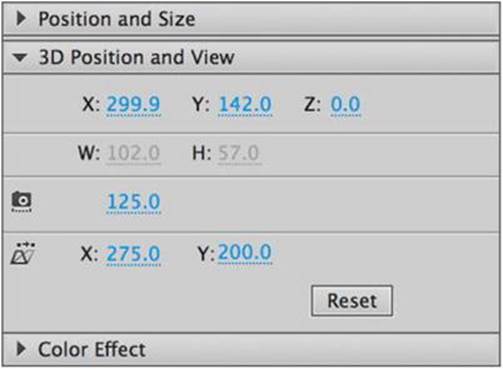
Figure 5-25. The 3D position and view panel
4. Select the z option. (If the field is unavailable, make sure you are set up to publish in Flash Player 10.) Changing the z field parameter will move the rectangle in the z space, which will make it look far away or close depending on the number you enter. Let’s leave the z space alone for now because we will come back to it using the Mr. Smiley example files in a moment.
5. Select the Perspective Angle field, which has a little camera next to it. The camera icon is a giveaway as to what this parameter does. When you change this value, you will see that the rectangle gets bigger or smaller. So what’s the difference between this and the zfield parameter, you ask? Well, the Perspective Angle is your starting point; for example, if I were to set up my camera on a tripod to take a picture of a cow, my camera would stay in the same place but the cow would move around the field, getting bigger and smaller. The perspective point is, in essence, my camera on my tripod.
6. Let’s take a look at the Vanishing Points now; again, these options are pretty self-explanatory. When selecting one of the two options, you will see a crosshair that indicates where in the distance your rectangle will vanish when the z space parameter is set to the maximum amount it needs to be before it disappears.
Now that you have had a preview of the 3D position and view options, let’s have a little fun with Mr. Smiley and the z field parameter.
1. Open the class file called SmileyTest.as and you should see this code:
package com.foundationAS3.ch5 {
import flash.display.Sprite;
public class SmileyTest extends Sprite {
public function SmileyTest() {
// Create and center smiley sprite on stage
var smiley:Smiley = new Smiley();
addChild(smiley);
smiley.x = stage.stageWidth / 2;
smiley.y = stage.stageHeight / 2;
}
}
}
2. Import the MouseEvent class and add a listener to the stage. The listener should capture when the mouse has been moved and trigger a call to the function onNewPosition().
package com.foundationAS3.ch5 {
import flash.display.Sprite;
import flash.event.MouseEvent;
public class SmileyTest extends Sprite {
public function SmileyTest() {
// Create and center smiley sprite on stage
var smiley:Smiley = new Smiley();
addChild(smiley);
smiley.x = stage.stageWidth / 2;
smiley.y = stage.stageHeight / 2;
stage.addEventListener(MouseEvent.MOUSE_MOVE, onNewPosition);
}
}
}
3. Create the function onNewPosition() and remember to pass in the MouseEvent as a parameter; otherwise, you will get one of those pesky Flash errors. Inside the function we are just playing with the z space amounts by taking the localX parameter of the event object, which is in fact the X position of the mouse, and then adding or subtracting 200 pixels depending on the current mouse position. Then, before we leave the function we place Mr. Smiley in the X and Y position of the mouse.
package com.foundationAS3.ch5 {
import flash.display.Sprite;
import flash.event.MouseEvent;
public class SmileyTest extends Sprite {
public function SmileyTest() {
// Create and center smiley sprite on stage
var smiley:Smiley = new Smiley();
addChild(smiley);
smiley.x = stage.stageWidth / 2;
smiley.y = stage.stageHeight / 2;
stage.addEventListener(MouseEvent.MOUSE_MOVE, onNewPosition);
}
function onNewPosition(evt:MouseEvent):void {
if (evt.localX>200) {
smiley.z = (evt.localX + 200);
} else {
smiley.z = (evt.localX - 200);
}
smiley.y = evt.localY;
smiley.x = evt.localX;
}
}
}
4. If you run the code as it is, it will not produce any errors, but neither will it work. So you need to modify the location in which you declare the smiley object so it stays in scope. By placing the object outside the constructor, you are declaring the smiley object as global to the class; therefore, other functions and methods inside that class will be able to reference the smiley object by name. You can still create a new instance in the constructor, but declare it at the top of the class as shown here:
package com.foundationAS3.ch5 {
import flash.display.Sprite;
import flash.events.MouseEvent;
public class SmileyTest extends Sprite {
var smiley:Smiley;
public function SmileyTest() {
// Create and center smiley sprite on stage
smiley = new Smiley();
addChild(smiley);
smiley.x=stage.stageWidth/2;
smiley.y=stage.stageHeight/2;
stage.addEventListener(MouseEvent.MOUSE_MOVE, onNewPosition);
}
function onNewPosition(evt:MouseEvent):void {
if (evt.localX>200) {
smiley.z = (evt.localX + 200);
} else {
smiley.z = (evt.localX - 200);
}
smiley.y=evt.localY;
smiley.x=evt.localX;
}
}
}
Test your movie and watch Mr. Smiley move left and right and backward and forward, depending on where you position your mouse. This was just a small taste of what is possible using the new 3D options in Flash CC, so we suggest you spend some time experimenting with the new 3D tool.
Summary
So, that was the drawing API. This was a relatively brief chapter, but then there’s not that much to the drawing API. The power of the API is that it is very simple to learn, and yet you’re limited in what you can create only by your artistic talents and the amount of time you have to sit and fiddle.
You’ll be seeing the drawing API again in the next chapter, when you combine it with the event model to produce a basic drawing application. Until then, get creative!
For further reading on vector animation via ActionScript, check out AdvancED ActionScript 3.0 Animation by Keith Peters (friends of ED, 2008).