Foundation ActionScript 3, Second Edition (2014)
Chapter 4. Working with the Display
This chapter covers the following topics:
· How to control movie playback
· What the display list is, and why you should care
· How to manipulate items on the display list
· How to create new display items from Library symbols
· How to load external images and SWF files
· How to animate display items
· How to live long and prosper
(Just kidding about that last one—you’ll want a self-help book for that.)
This chapter is all about performing cool visual feats with ActionScript. If you’re from a design background, that’s no doubt music to your ears after the last two and a half chapters of techno-babble. If you rather liked all that geeky, highly technical stuff, the good news is that there’s enough of that in this chapter to keep you interested, too.
Introducing the Display List
In ActionScript 3.0 development, the display list is the term used to describe the hierarchy of visual items that make up your Flash movie. I would have called it the display tree, rather than the display list; the latter implies a flat list of display objects. whereas the former suggests that display objects can be arranged hierarchically. Still, I don’t get to define the terms that Adobe uses, so we’ll have to work with what we’re given. If you’ve done any graphical work in Flash CC (or any previous version of the Flash authoring tool, for that matter), you’ve been creating display lists without really knowing or thinking about it. If you have a Flash movie containing a mixture of movie clips, graphic symbols, text fields (both static and dynamic), and an imported JPEG, the display list might look something like Figure 4-1.
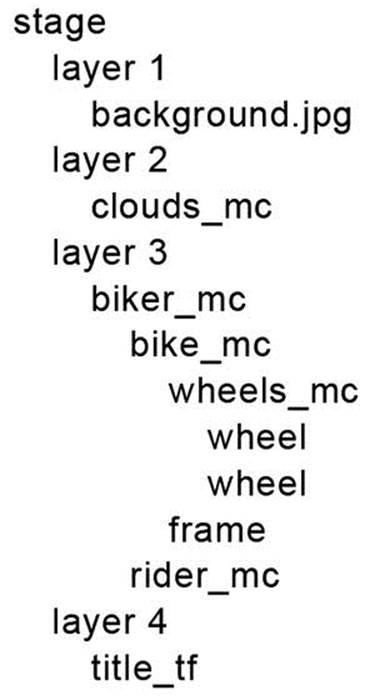
Figure 4-1. See, I told you that the display list is actually more like a tree!
The display list is made up of display objects, which all derive from the DisplayObject class in the flash.display package. However, certain display objects can hold (or nest) other display objects, and these derive from flash.display.DisplayObjectContainer. If you think about how you put graphical objects together in Flash, you should be able to come up with some examples of both DisplayObject and DisplayObjectContainer instances. MovieClip is an obvious candidate for a DisplayObjectContainer, since it can contain just about anything, and a Shape would also be a DisplayObject.
Many different child classes ext these two classes. Everything visual you can add to a Flash movie is represented as a class, and at least some of these should be familiar to you. Figure 4-2 shows all the display object classes and how they relate to one another.
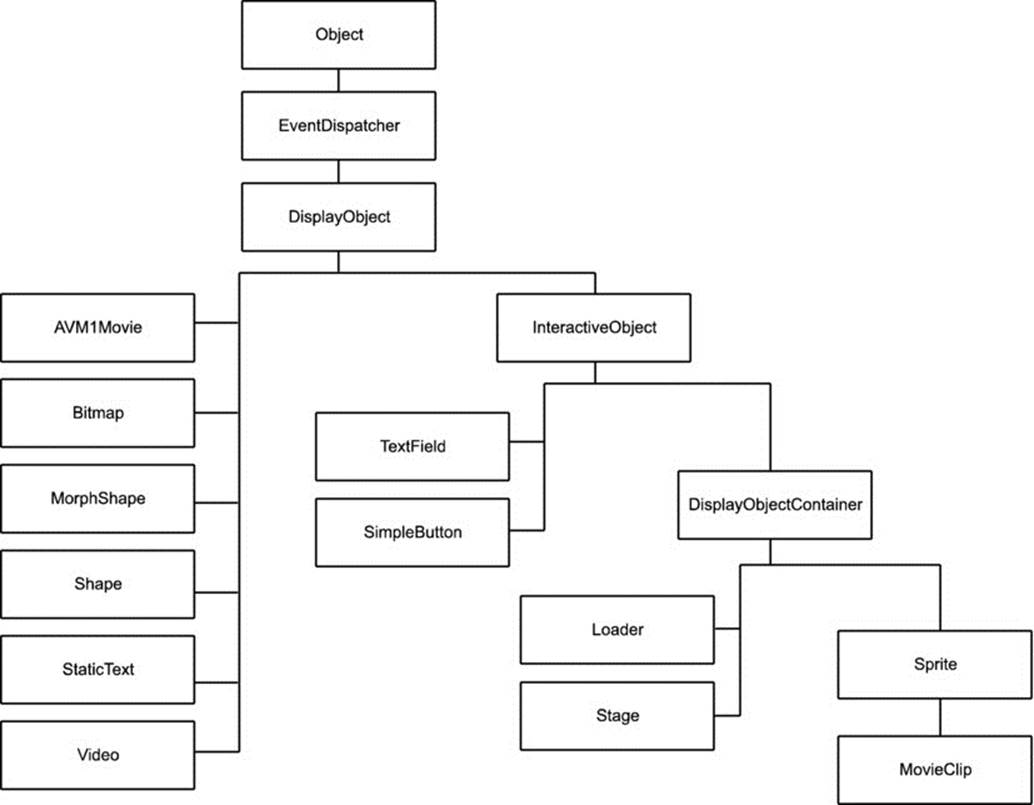
Figure 4-2. The DisplayObject classes available through ActionScript
I’m not going to go through all these classes right here, as that would be drab and boring. You’ll meet most of them during the course of this chapter. I do, however, want to go over the lineage of the MovieClip class to explain what facets and features are added by each class in the hierarchy.
· DisplayObject: At the top of the hierarchy, this class provides the basic properties for all visual items in the display list, such as x, y, z, width, and height. Everything in the display list is an instance of one of the classes that exts the DisplayObject class, either directly or indirectly.
· InteractiveObject: This class adds various properties, methods, and events that allow users to interact with display objects using the mouse and keyboard. You’ll learn more about events and how to allow users to interact with display objects in Chapter 6.
· DisplayObjectContainer: This class gives display objects the ability to contain other display objects, which can be manipulated using methods like addChild() and removeChild(). Other display list classes allow a specific number of child display objects. A good example is SimpleButton, which allows you to specify a different display object for each of the button states, but only DisplayObjectContainer instances allow you to have an open-ed number of child display objects.
· Sprite: This is a new type of object available with ActionScript 3.0, and there is no equivalent in the IDE. Basically, it is like a movie clip without a timeline, so it doesn’t contain any of the timeline-controlling ActionScript necessary with MovieClip instances. You can still draw into it, add new display objects to it, and code for interactivity, but it is lighter weight in memory than a movie clip. It is the best bet if you are programmatically creating interactive graphics in your applications.
· MovieClip: This class adds the concept of frames, frame labels, and scenes, with all the properties and methods you need to query and manipulate the playhead. Note that while you can create MovieClip objects programmatically, you cannot add frames, labels, or scenes with ActionScript code.
Although DisplayObject, InteractiveObject, and DisplayObjectContainer are listed in the class diagram, you can’t actually create instances of any of them. These classes exist just to provide the common functionality for their descants. Trying to create an instance of them will result in a runtime error from the ActionScript compiler such as the following:
ArgumentError: Error #2012: DisplayObjectContainer$ class cannot be![]()
instantiated.
Such classes are known in the trade as abstract classes. ActionScript 3.0 doesn’t support true abstract classes. If they were true abstract classes, you would get a warning from the ActionScript compiler, rather than a runtime error from the Flash Player, but that’s just me being picky.
You also can’t create an instance of the AVM1Movie class, which is used to represent Flash movies that were created for previous versions of the Flash Player (version 8 and earlier). When you load a movie of this type, it will automatically be of type AVM1Movie, which is a stripped-down version of the MovieClip class.
Since you’re probably already familiar with the concept of a movie clip, that seems like an ideal place to start our display list journey.
Working with Display Objects
When you create a movie clip in the Flash CC IDE and place it on the stage, it becomes a property of type MovieClip in the document class specified for the Flash movie. The name of the property is the same as the instance name of the movie clip on the stage.
1. Create a new Flash movie and save it in the project directory with the name display.fla.
2. On the stage, draw a 100 × 100-pixel, light-blue square with a thick, black outline.
3. Select the square (and its outline) and convert it to a movie clip symbol by selecting Modify ![]() Convert to Symbol from the main menu or by pressing F8.
Convert to Symbol from the main menu or by pressing F8.
4. Enter Square in the Name field of the Convert to Symbol dialog box, as shown in Figure 4-3, and then click OK to create the symbol. You will get the familiar warning about the class file being created behind the scenes for you. This is OK.
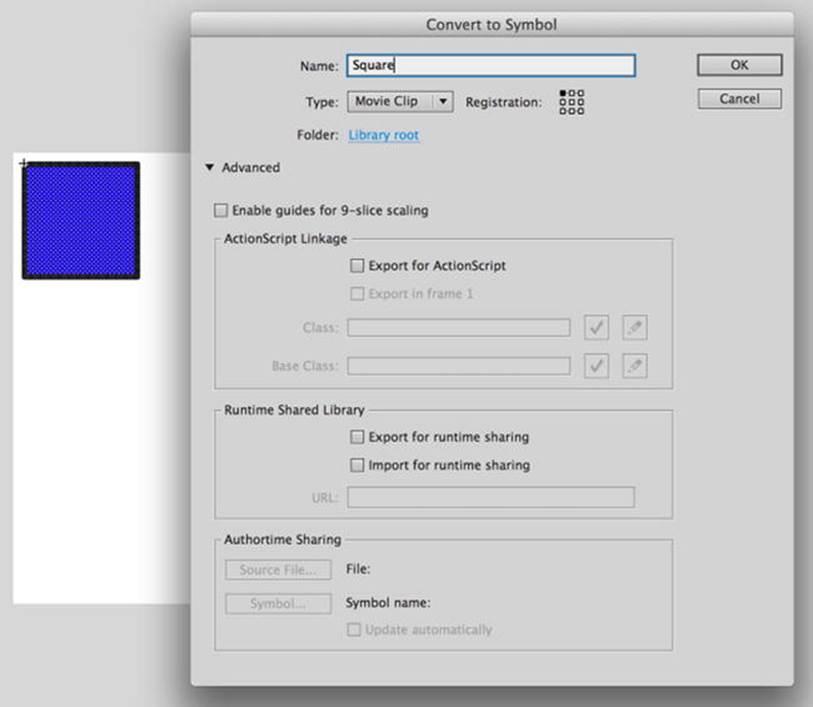
Figure 4-3. A new symbol is created using a blue square
5. Select the instance of the Square symbol on the stage and give it an instance name of square in the Property inspector.
6. Now create a new ActionScript file for the document class. As promised in the previous chapter, you’re going to start organizing classes properly, so create a class named DisplayTest in the com.foundationAS3.ch4 package. This means that you’ll need to create a directory structure in the project directory that mirrors this package structure. Save the file in the ch4 folder with the name DisplayTest.as.
7. Create the basic package and class definitions for the DisplayTest class with an empty constructor method. The main document class needs to ext either the Sprite or MovieClip class. Unless you have timeline animation in the root timeline of the Flash document, it’s always best to use the Sprite class. It’s slightly more efficient in terms of performance and memory usage, because it doesn’t need to keep track of frame information. Since you don’t have any timeline animation, the Sprite class will do just fine.
package com.foundationAS3.ch4 {
import flash.display.Sprite;
public class DisplayTest exts Sprite {
public function DisplayTest() {
}
}
}
8. Once you’ve set this class to be the document class for the display.fla movie and published the SWF file, the instance of the Square symbol on the stage with an instance name of square will become a property of your DisplayTest instance. You can add a simple trace() statement to the constructor method to prove that the MovieClip exists:
package com.foundationAS3.ch4 {
import flash.display.Sprite;
public class DisplayTest exts Sprite {
public function DisplayTest() {
trace(square);
}
}
}
9. Save the changes to the DisplayTest.as file and switch back to the display.fla file.
10.You now need to specify that the display.fla movie should use the DisplayTest class as its document class. Click an empty area of the stage and enter com.foundationAS3.ch4.DisplayTest in the Document class field of the Property inspector, as shown inFigure 4-4.
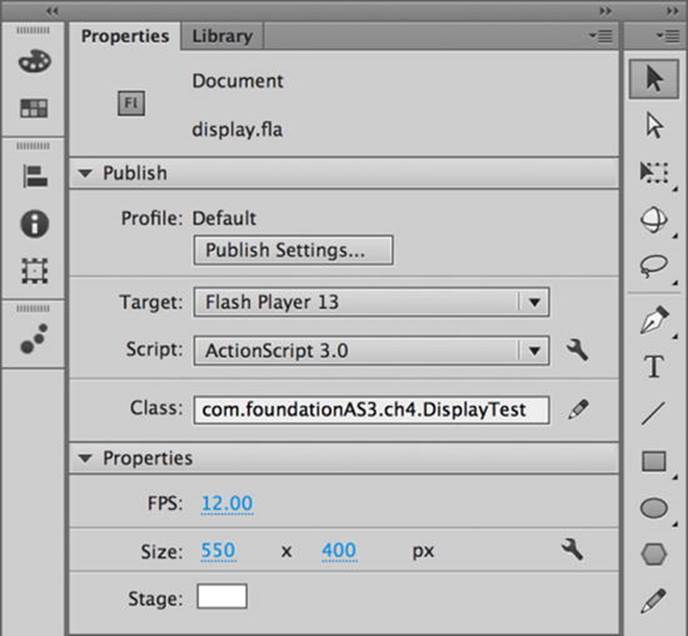
Figure 4-4. Setting the document class
11.Save the changes to the display.fla file and test it by selecting Control ![]() Test Movie from the main menu, or by pressing Ctrl+Enter (Windows) or Command+Enter (Mac OS X).
Test Movie from the main menu, or by pressing Ctrl+Enter (Windows) or Command+Enter (Mac OS X).
Oops! You got your square, but nothing in the Output panel. If you look at the Compiler Errors panel, you’ll see that you got an error, as shown in Figure 4-5.

Figure 4-5. Your frily neighborhood compiler warning for a missing class
The Flash compiler is complaining that it couldn’t find the MovieClip class. But why was it looking for it if you exted the Sprite class? The answer is that the compiler tried to add the Square instance as a property of type MovieClip to theDisplayTest class, but wasn’t smart enough to import the class on its own. This is a bug in the Flash compiler, but you can get around that simply by adding an import statement for MovieClip.
12.In the DisplayTest.as file, add the bold line shown in the following code:
package com.foundationAS3.ch4 {
import flash.display.MovieClip;
import flash.display.Sprite;
public class DisplayTest exts Sprite {
public function DisplayTest() {
trace(square);
}
}
}
13.Save the changes to the file, switch to the display.fla movie, and test the movie again. This time, you should see the result of the trace() statement in the Output panel, as shown in Figure 4-6.
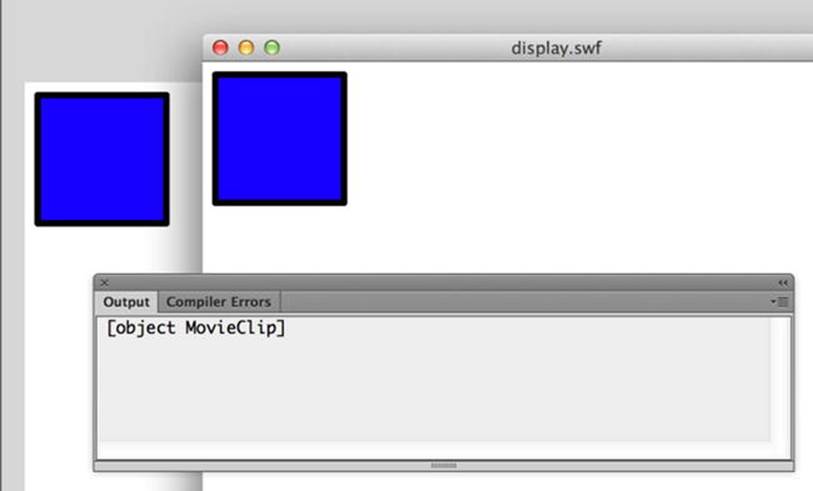
Figure 4-6. The Square instance found and traced in the DisplayTest class
Manipulating Display Objects
Now that you have a reference to the MovieClip instance, you can start to play around with its various properties. For example, you could move the instance of the Square symbol to (300,300) on the stage by setting its x and y properties accordingly (see Figure 4-7):
package com.foundationAS3.ch4 {
import flash.display.MovieClip;
import flash.display.Sprite;
public class DisplayTest exts Sprite {
public function DisplayTest() {
trace(square);
// Move to (300,300)
square.x = 300;
square.y = 300;
}
}
}
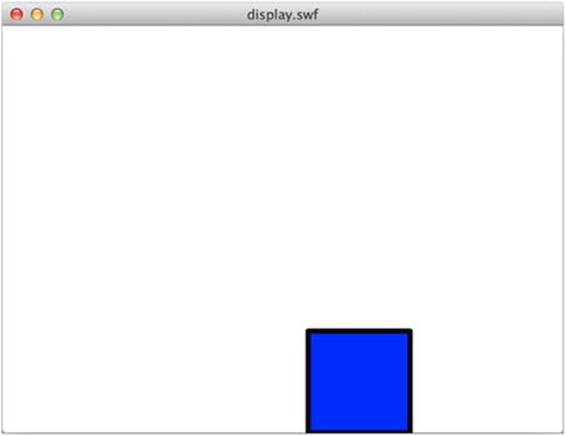
Figure 4-7. The square moved to a new screen position
You can change the Square symbol instance’s width and height by setting its width and height properties (see Figure 4-8):
package com.foundationAS3.ch4 {
import flash.display.MovieClip;
import flash.display.Sprite;
public class DisplayTest exts Sprite {
public function DisplayTest() {
trace(square);
// Move to (300,300)
square.x = 300;
square.y = 300;
// Stretch horizontally and squash vertically
square.width = 200;
square.height = 50;
}
}
}
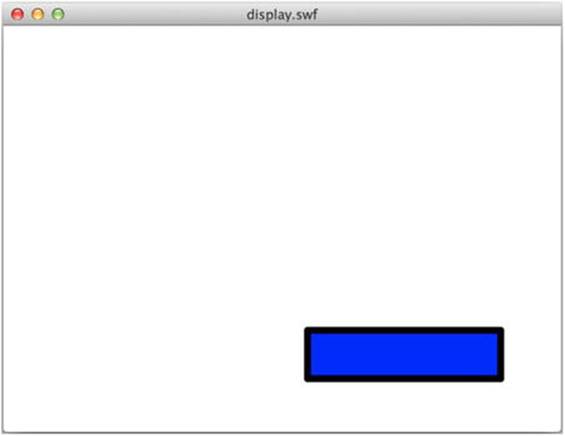
Figure 4-8. Changing an object’s dimensions is a snap
Another way to adjust a display object’s height and width is by changing the scaleX and scaleY properties. These values are used to multiply the original width and height of the object to determine its scale. So, if you set scaleX and scaleY to 2, the Square instance would be twice as wide and twice as high as it was originally. Conversely, if you set scaleX and scaleY to 0.5, the Square instance would be half as tall and half as high. The following code is equivalent to the previous example, but instead of setting width and height, it scales the movie clip using scaleX and scaleY:
package com.foundationAS3.ch4 {
import flash.display.MovieClip;
import flash.display.Sprite;
public class DisplayTest exts Sprite {
public function DisplayTest() {
trace(square);
// Move to (300,300)
square.x = 300;
square.y = 300;
// Stretch horizontally and squash vertically
square.scaleX = 2;
square.scaleY = 0.5;
}
}
}
You can change the opacity of the movie clip using the alpha property. This is a value between 0 (transparent) and 1 (opaque) that indicates the alpha level for the instance. Here’s an example (see Figure 4-9):
package com.foundationAS3.ch4 {
import flash.display.MovieClip;
import flash.display.Sprite;
public class DisplayTest exts Sprite {
public function DisplayTest() {
trace(square);
// Move to (300,300)
square.x = 300;
square.y = 300;
// Stretch horizontally and squash vertically
square.scaleX = 2;
square.scaleY = 0.5;
// Make 50% alpha
square.alpha = 0.5;
}
}
}

Figure 4-9. The alpha of the square is set through code
You can also rotate the movie clip around the registration point by setting the rotation property. This is a number in degrees indicating the rotation amount of the display object. The following example rotates the Square instance 45 degrees (see Figure 4-10):
package com.foundationAS3.ch4 {
import flash.display.MovieClip;
import flash.display.Sprite;
public class DisplayTest exts Sprite {
public function DisplayTest() {
trace(square);
// Move to (300,300)
square.x = 300;
square.y = 300;
// Stretch horizontally and squash vertically
square.scaleX = 2;
square.scaleY = 0.5;
// Make 50% alpha
square.alpha = 0.5;
// Rotate 45 degrees
square.rotation = 45;
}
}
}
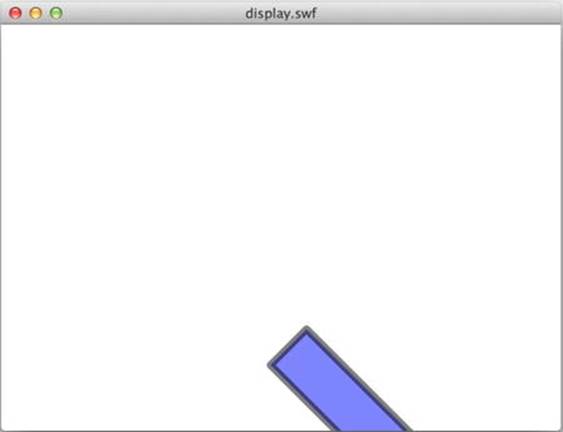
Figure 4-10. The square is rotated as well
You’ll learn about some of the other properties you can manipulate, such as blMode and filters, throughout this chapter. Feel free to stop here and play around for a while.
Managing Depth
In the Flash IDE, you may be used to controlling the depth of a visual object by using layers in the timeline or (if you like to make it harder on yourself) through the entries in the Modify ![]() Arrange menu.
Arrange menu.
In ActionScript, the depth of a display object is determined by its index in the parent display object’s internal array of children. The higher the index, the further toward the front of the movie that object appears. That means if a Sprite instance has a child at index 0, that child will appear visually below a child at index 1 (or any higher number, for that matter). You can’t manipulate this array directly, as it’s an internal property of the DisplayObjectContainer class, but you can use the methods provided to query and manipulate the depth of a display object directly.
Discovering the Depth of Objects
To get the depth of a display object, you need to pass that object to its parent’s getChildIndex() method. Follow these steps to see how that works:
1. Create a new ActionScript file and save it as DepthTest.as in the com.foundationAS3.ch4 directory. Add the following code to the file:
package com.foundationAS3.ch4 {
import flash.display.MovieClip;
import flash.display.Sprite;
public class DepthTest exts Sprite {
public function DepthTest() {
trace(getChildIndex(square));
}
}
}
2. Save the display.fla file as depth.fla. Set the document class as com.foundationAS3. ch4.DepthTest. If you test the movie now, you should see that the square object is at depth 0. Let’s make it a little more interesting by adding a few more instances of the Square symbol to the stage.
3. In the display.fla movie, drag two more instances of the Square symbol from the Library onto the stage, each in its own layer. Make sure they overlap, as shown in Figure 4-11.
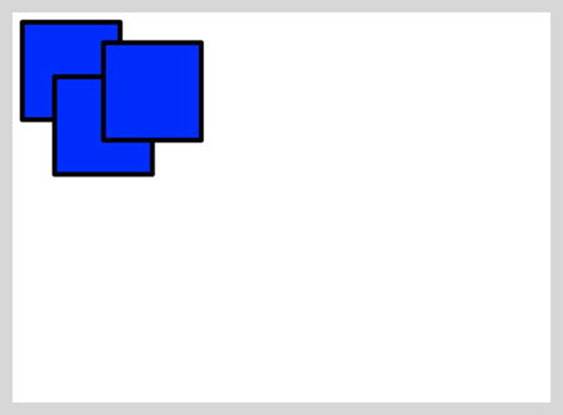
Figure 4-11. Overlapping squares set up for a depth example
4. Give these new Square symbols instance names, from back to front, of square2 and square3 (yeah, just call me Mr. Imaginative from now on).
5. Save the changes to the document, and then switch back to the DepthTest.as file.
6. Now add trace statements to get the depths of the two new instances of the Square symbol. Add string labels before them so you know which depth belongs to which instance.
package com.foundationAS3.ch4 {
import flash.display.MovieClip;
import flash.display.Sprite;
public class DepthTest exts Sprite {
public function DepthTest() {
trace("square: " + getChildIndex(square));
trace("square2: " + getChildIndex(square2));
trace("square3: " + getChildIndex(square3));
}
}
}
7. Save the changes, switch back to the depth.fla movie, and test. In addition to seeing three squares on the stage, you should be able to see the depth of each one in the Output panel, as shown in Figure 4-12.
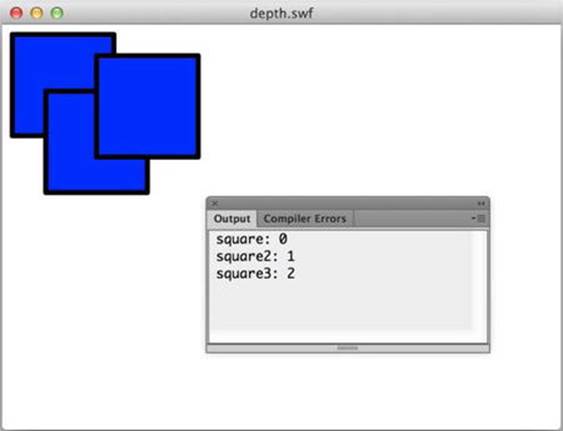
Figure 4-12. The squares’ depths traced to the Output panel
As you can see, from back to front, the Square symbols are arranged from index 0 to index 2.
Manipulating the Depth of Objects
Now that you have several display objects on the screen, you can start to manipulate their depths using the setChildIndex() method. This method takes two parameters: the display object whose index you want to change and the index to which you want to move it.
The specified display object must be a child of the display object on which you’re calling the setChildIndex() method, and the index must not be higher than the number of children that the display object contains. Otherwise, you’ll get a runtime error in the player.
Let’s try moving the original square object to the front of the display list. To do this, call the parent’s setChildIndex() method, passing the square object and a new depth. You could pass in 2 as the depth, but the best way to bring an object to the top of its parent’s list is to usenumChildren to determine the highest depth. Note that you must use (numChildren-1), since the display list is zero-indexed. So a parent with three children has a top depth of 2 (0 for the first child, 1 for the second, and 2 for the third).
package com.foundationAS3.ch4 {
import flash.display.MovieClip;
import flash.display.Sprite;
public class DepthTest exts Sprite {
public function DepthTest() {
trace("square: " + getChildIndex(square));
trace("square2: " + getChildIndex(square2));
trace("square3: " + getChildIndex(square3));
setChildIndex(square, numChildren-1);
}
}
}
Copy and paste the index-tracing statements below the call to setChildIndex(), so you can see what effect setting the index of a display object has on the other display objects belonging to that parent.
package com.foundationAS3.ch4 {
import flash.display.MovieClip;
import flash.display.Sprite;
public class DepthTest exts Sprite {
public function DepthTest() {
trace("square: " + getChildIndex(square));
trace("square2: " + getChildIndex(square2));
trace("square3: " + getChildIndex(square3));
setChildIndex(square, numChildren-1);
trace("square: " + getChildIndex(square));
trace("square2: " + getChildIndex(square2));
trace("square3: " + getChildIndex(square3));
}
}
}
Save the changes, switch to the depth.fla file, and test the movie. On the stage, you can see that the original square is now in front of the others. In the Output panel, shown in Figure 4-13, you can see why: its index is now the highest of all the display objects.
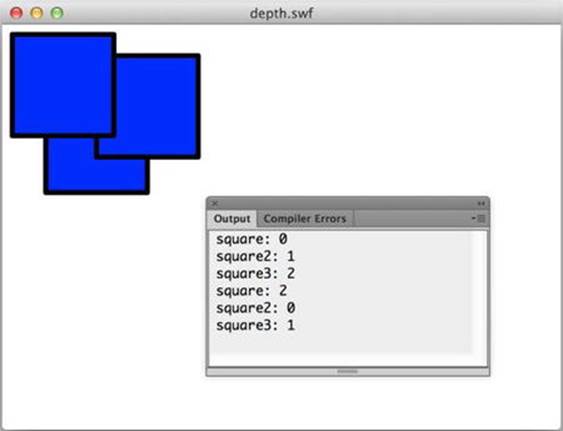
Figure 4-13. The squares with a bit of depth swapping applied using setChildIndex()
Swapping Depths
The other way to alter the index of a display object is to swap its index with another display object belonging to the same parent. There are two ways to do this: call the swapChildren() method and pass the two display objects as the parameters, or call swapChildrenAt() and pass the two indexes you want to swap. Let’s do both.
First swap the indexes of square2 and square3:
package com.foundationAS3.ch4 {
import flash.display.MovieClip;
import flash.display.Sprite;
public class DepthTest exts Sprite {
public function DepthTest() {
trace("square: " + getChildIndex(square));
trace("square2: " + getChildIndex(square2));
trace("square3: " + getChildIndex(square3));
setChildIndex(square, numChildren-1);
trace("square: " + getChildIndex(square));
trace("square2: " + getChildIndex(square2));
trace("square3: " + getChildIndex(square3));
swapChildren(square2, square3);
}
}
}
Now swap the indexes of the display objects at index 0 and 2:
package com.foundationAS3.ch4 {
import flash.display.MovieClip;
import flash.display.Sprite;
public class DepthTest exts Sprite {
public function DepthTest() {
trace("square: " + getChildIndex(square));
trace("square2: " + getChildIndex(square2));
trace("square3: " + getChildIndex(square3));
setChildIndex(square, numChildren-1);
trace("square: " + getChildIndex(square));
trace("square2: " + getChildIndex(square2));
trace("square3: " + getChildIndex(square3));
swapChildren(square2, square3);
swapChildrenAt(0, 2);
}
}
}
Copy and paste the trace() statements, so you know the indexes of your Square symbols:
package com.foundationAS3.ch4 {
import flash.display.MovieClip;
import flash.display.Sprite;
public class DepthTest exts Sprite {
public function DepthTest() {
trace("square: " + getChildIndex(square));
trace("square2: " + getChildIndex(square2));
trace("square3: " + getChildIndex(square3));
setChildIndex(square, numChildren-1);
trace("square: " + getChildIndex(square));
trace("square2: " + getChildIndex(square2));
trace("square3: " + getChildIndex(square3));
swapChildren(square2, square3);
swapChildrenAt(0, 2);
trace("square: " + getChildIndex(square));
trace("square2: " + getChildIndex(square2));
trace("square3: " + getChildIndex(square3));
}
}
}
Finally, switch to depth.fla and test the movie. You should see in the Output panel (and on the stage) that the Square symbols have ed up in the same order in which they started. If you aren’t sure why, cut up some squares of paper and perform the depth-swapping operations in the real world.
Creating new Display Objects
You’re not just limited to the display list that is generated by the Flash IDE. You don’t even need to have anything on the stage in the Flash IDE. You can create new instances of many of the display list classes and add them to the display list.
You create display list class instances in the same way as you create instances of a normal class: with the new keyword. Creating a new MovieClip object is as simple as this:
var myMovieClip:MovieClip = new MovieClip();
You now have a new MovieClip instance, but it isn’t yet part of the display list. To add it to the display list, you need to add it as a child of a display object that’s already on the display list. You can add a display object as a child of another by calling the addChild() method on the parent display object and passing the child object as the single parameter.
var myMovieClip:MovieClip = new MovieClip();
parentMovieClip.addChild(myMovieClip);
The addChild() method is part of the DisplayObjectContainer class, so only instances of classes desced from this class (Sprite, MovieClip, and so on) can have child display objects added in this way.
When you add a new child with the addChild() method, it is assigned the topmost index, and appears in front, or on top, of all other display objects belonging to the same parent. If you want to add a child at a specific depth, you can use the addChildAt() method, passing the display object to be added and the desired index.
var myMovieClip:MovieClip = new MovieClip();
parentMovieClip.addChildAt(myMovieClip, 4);
If there is already a display object at that index, the existing display object’s index (and the index of all display objects above it) are incremented to make room for the new display object, as shown in Figure 4-14.
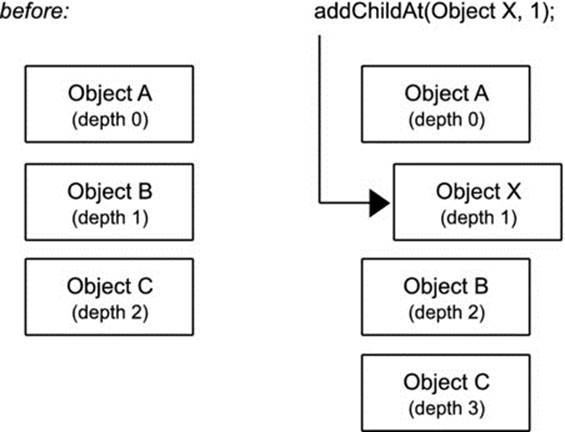
Figure 4-14. A new child is inserted into the display list, shifting all children at higher depths up a level
Just how useful the ability to create new display objects and add them to the display list is will become apparent when we look at using Library symbols in the “Using Library resources” section later in the chapter.
Removing Display Objects from the Display List
You can also remove display objects from the list. The removeChild() method allows you to specify a display object to remove. The removeChildAt() method removes a display object at a specific index. Based on the previous sample code, the following two statements are equal:
parentMovieClip.removeChild(myMovieClip);
parentMovieClip.removeChildAt(4);
When you remove a display object from the display list, the index of each display object above the removed one is decremented to fill in the gap left by the removed display object, as shown in Figure 4-15.
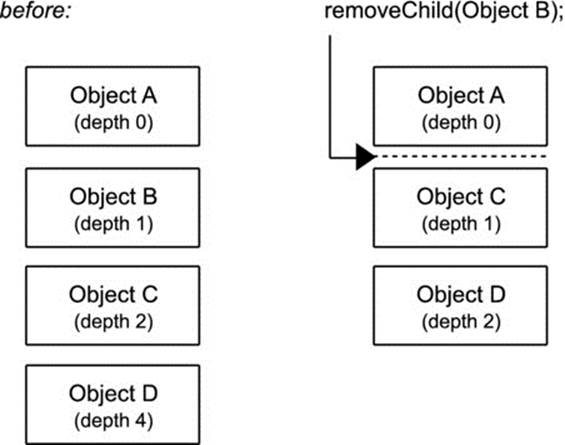
Figure 4-15. When a child is removed from the display list, all children at higher depths are shifted down a depth to fill the gap
The display list does not allow for gaps in the depths, as was possible in ActionScript 2.0 and AVM1. You cannot add a display object at an index that is higher than the parent’s total number of children, and once you remove a display object, all children at higher depths shift down to fill in the gap, automatically adjusting their depths.
To remove all children from the display list, call the removeChildren() method.
parentMovieClip.removeChildren();
By default, this method removes all children display objects from the display list; however, a range may be specified to remove objects between a start index and index. For example, to remove the first three children specify 0 for the inning position, and 2 for the ing position. This will remove children at index zero, one, and two.
parentMovieClip.removeChildren(0, 2);
Specifying Bl Modes
You have access to the same set of bl modes in ActionScript as you have at design time in the Flash IDE. Every display object has a blMode property, which will specify the bl mode to use when rering it.
The blMode property expects a String value, but to help you out (so you don’t need to guess what the string is for each bl mode), a BlMode class in the flash.display package has static constants for each of the bl modes.
To see this in action, go back to the DepthTest.as class from earlier and edit the constructor method to set the blMode property of square3 to BlMode.INVERT. Be sure to import the BlMode class at the top.
package com.foundationAS3.ch4 {
import flash.display.BlMode;
import flash.display.MovieClip;
import flash.display.Sprite;
public class DepthTest exts Sprite {
public function DepthTest() {
trace("square: " + getChildIndex(square));
trace("square2: " + getChildIndex(square2));
trace("square3: " + getChildIndex(square3));
setChildIndex(square, numChildren-1);
trace("square: " + getChildIndex(square));
trace("square2: " + getChildIndex(square2));
trace("square3: " + getChildIndex(square3));
swapChildren(square2, square3);
swapChildrenAt(0, 2);
trace("square: " + getChildIndex(square));
trace("square2: " + getChildIndex(square2));
trace("square3: " + getChildIndex(square3));
square3.blMode = BlMode.INVERT;
}
}
}
Save the changes, switch to the depth.fla file, and test the movie. The result should be as shown in Figure 4-16.
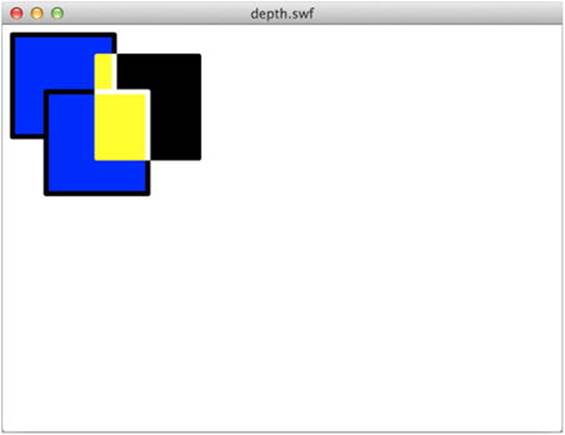
Figure 4-16. The top square in the display list is given a bl mode
Working with Filters
In addition to bl modes, you can apply filters (or manipulate existing filters) from ActionScript. Each display object has a filters property, which is an array of BitmapFilter instances applied to the display object. Each different type of filter you can apply is represented as a subclass of the BitmapFilter class. Filter classes include the following:
· BevelFilter
· BlurFilter
· ColorMatrixFilter
· ConvolutionFilter
· DisplacementMapFilter
· DropShadowFilter
· GlowFilter
· GradientBevelFilter
· GradientGlowFilter
The filter classes live in the flash.filters package, and each has its own set of properties that control various facets of the filter. For example, the BlurFilter class has three properties—blurX, blurY, and quality—that control the amount and quality of the blur effect applied to a display object.
Applying a Filter to a Display Object
Let’s create a simple example and use the GlowFilter.
1. Create a new Flash document and save it to a file named filters.fla.
2. Draw a white 100 × 100-pixel square with a medium, black outline on the stage and convert it to a movie clip symbol named Square, as shown in Figure 4-17.
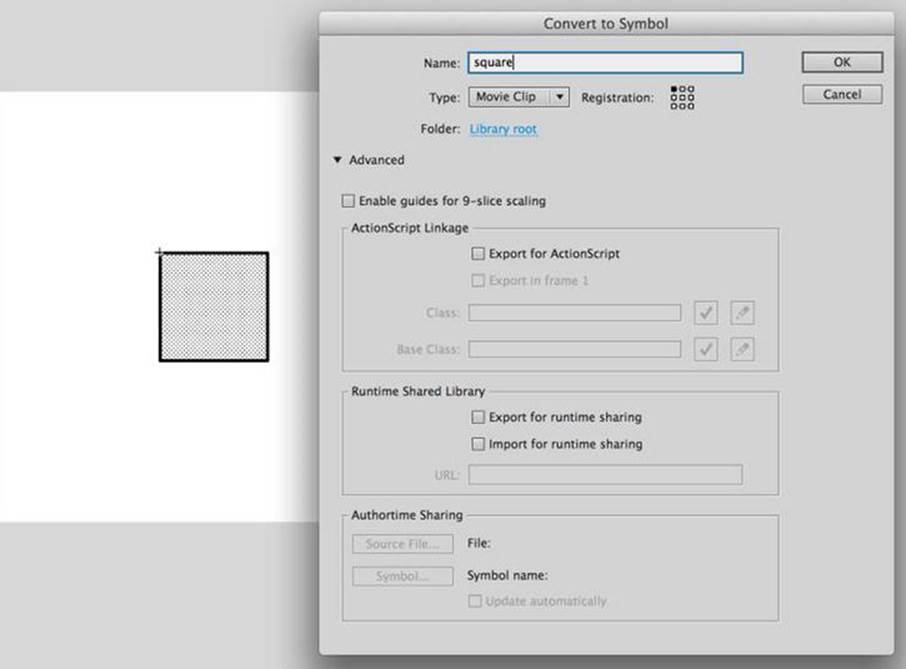
Figure 4-17. A new Square symbol
3. Drag a second Square symbol onto the stage, and position the squares next to each other in the center of the stage, as shown in Figure 4-18. Give the squares instance names of square and square2.
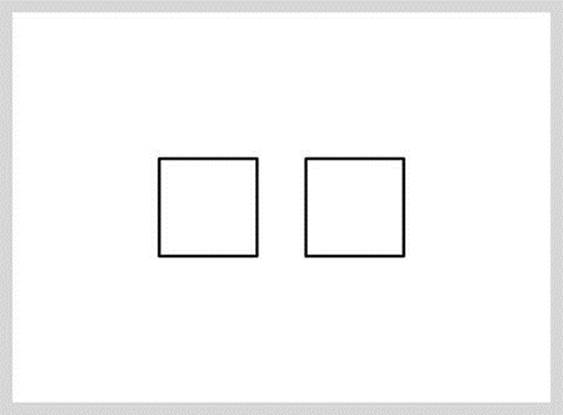
Figure 4-18. A second Square instance is added to the stage
4. Save the changes to filters.fla.
5. Create a new ActionScript file for the document class. Save it as FilterTest.as into the com.foundationAS3.ch4 directory.
6. Create the basic package and class definitions for the FilterTest class, including an empty constructor method.
package com.foundationAS3.ch4 {
import flash.display.MovieClip;
import flash.display.Sprite;
public class FilterTest exts Sprite {
public function FilterTest() {
}
}
}
7. Since you will be trying out a number of filters, use the asterisk (*) wildcard to import all the classes from the flash.filters package and create a new instance of the GlowFilter class as a local variable in the class constructor.
package com.foundationAS3.ch4 {
import flash.display.MovieClip;
import flash.display.Sprite;
import flash.filters.*;
public class FilterTest exts Sprite {
public function FilterTest() {
var glow:GlowFilter = new GlowFilter();
}
}
}
8. Wrap the GlowFilter instance in an array literal, and assign that to the filters property of the square object.
package com.foundationAS3.ch4 {
import flash.display.MovieClip;
import flash.display.Sprite;
import flash.filters.*;
public class FilterTest exts Sprite {
public function FilterTest() {
var glow:GlowFilter = new GlowFilter();
square.filters = [glow];
}
}
}
9. Save the changes to FilterTest.as and switch back to the filters.fla movie. Set the document class of the movie in the Property inspector to com.foundationAS3.ch4.FilterTest.
10.Save the changes to filters.fla and test the movie. You should see that one of the Square symbols on the stage has a red glow, as shown in Figure 4-19, created by the filter you’ve just applied.
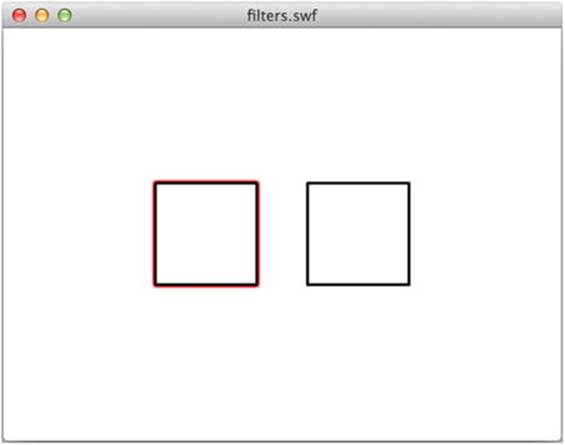
Figure 4-19. Your first ActionScript filter applied, resulting in a red glow
The GlowFilter constructor takes a whole bunch of parameters that control how the filter looks when applied to a display object. You’ve just used the filter with its default values. The parameters for the GlowFilter constructor are as follows:
· color: A hexadecimal value for the desired color of the glow. The default is 0xFF0000 (red).
· alpha: A value between 0 (transparent) and 1 (opaque). The default is 1.
· blurX: A Number value dictating the amount of horizontal blur applied to the glow. The default is 6.
· blurY: Same as blurX, but vertically.
· strength: A Number value between 0 and 255, indicating the intensity of the glow. The default is 2.
· quality: An int value between 1 and 15 that indicates the number of times the filter is applied. The more times a filter is applied, the better it looks, but higher-quality filters can have an impact on performance. The default is 1.
· inner: A Boolean value that, if set to true, applies the glow to the inside of a display object rather than the outside. The default is false.
· knockout: A Boolean value that, if set to true, means that the display object’s fill will be transparent, leaving just the result of the filter. The default is false.
I’m not a big fan of red, and the square’s glow looks a little wimpy to me, so let’s change some of the properties of the filter. Let’s use green (0x00FF00), with full opacity and blur values of 10 pixels. Make these changes in the FilterTest class constructor:
package com.foundationAS3.ch4 {
import flash.display.MovieClip;
import flash.display.Sprite;
import flash.filters.*;
public class FilterTest exts Sprite {
public function FilterTest() {
var glow:GlowFilter = new GlowFilter(0x00FF00, 1, 10, 10);
square.filters = [glow];
}
}
}
Save the changes, switch back to filters.fla, and test the movie. You should now see a much bigger, green glow on the square, as shown in Figure 4-20.
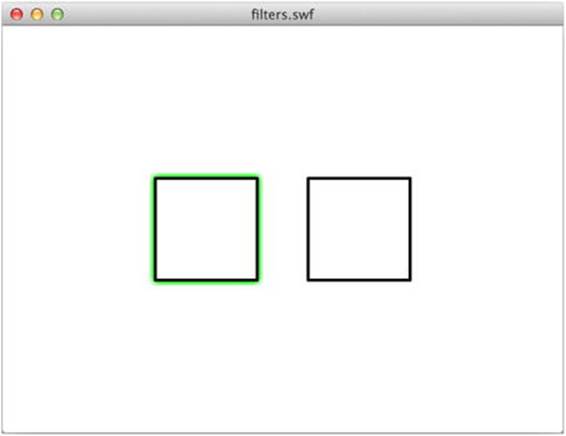
Figure 4-20. The parameters of the glow have been altered for a slightly different effect
Applying Filters in a Specific Order
As in the Flash IDE, the filters for a given display object are applied in the order in which they are assigned. If you apply a DropShadowFilter before a GlowFilter, the glow appears around the composite outline of the symbol and the drop shadow (which, if you ask me, just looks plain weird). Let’s try it out.
In the FilterTest class constructor, create a new DropShadowFilter instance and add it as a second element in the filters array.
package com.foundationAS3.ch4 {
import flash.display.MovieClip;
import flash.display.Sprite;
import flash.filters.*;
public class FilterTest exts Sprite {
public function FilterTest() {
var glow:GlowFilter = new GlowFilter(0x00FF00, 1, 10, 10);
var dropShadow:DropShadowFilter = new DropShadowFilter();
square.filters = [glow, dropShadow];
}
}
}
Now assign the same filters in the reverse order to square2’s filters property.
package com.foundationAS3.ch4 {
import flash.display.MovieClip;
import flash.display.Sprite;
import flash.filters.*;
public class FilterTest exts Sprite {
public function FilterTest() {
var glow:GlowFilter = new GlowFilter(0x00FF00, 1, 10, 10);
var dropShadow:DropShadowFilter = new DropShadowFilter();
square.filters = [glow, dropShadow];
square2.filters = [dropShadow, glow];
}
}
}
Save the changes to the FilterTest.as file, switch to filters.fla, and test the movie. You should see the result shown in Figure 4-21.

Figure 4-21. The ordering of filters is important, as demonstrated here where the same glow and drop shadow are applied to both squares in different orders for different effects
Making Changes to an Existing Filter
You can make changes to a BitmapFilter instance once it has been applied to a display object, but the process for doing so is a little trickier than you might think. Given that the filters array is made up of references to BitmapFilter instances, you would think that all you need to do is get a reference to the relevant BitmapFilter instance, make a change, and that change would be replicated on screen in the appearance of the filter. You could try this:
package com.foundationAS3.ch4 {
import flash.display.MovieClip;
import flash.display.Sprite;
import flash.filters.*;
public class FilterTest exts Sprite {
public function FilterTest() {
var glow:GlowFilter = new GlowFilter(0x00FF00, 1, 10, 10);
var dropShadow:DropShadowFilter = new DropShadowFilter();
square.filters = [glow,dropShadow];
square2.filters = [dropShadow,glow];
// Change glow to blue
glow.color = 0x0000FF;
}
}
}
Frustratingly, that doesn’t work. It turns out that the filters property of a display object is a bit special in the way that it works.
When you assign an array of BitmapFilter instances to a display object, it clones the array and all of the BitmapFilter instances within it, meaning that making a change to one of the original BitmapFilter instances will not affect the clone that the display object is using. To make your changes take effect, you need to overwrite the filters property with a new array.
package com.foundationAS3.ch4 {
import flash.display.MovieClip;
import flash.display.Sprite;
import flash.filters.*;
public class FilterTest exts Sprite {
public function FilterTest() {
var glow:GlowFilter = new GlowFilter(0x00FF00, 1, 10, 10);
var dropShadow:DropShadowFilter = new DropShadowFilter();
square.filters = [glow,dropShadow];
square2.filters = [dropShadow,glow];
// Change glow to blue
glow.color = 0x0000FF;
square.filters = [glow,dropShadow];
}
}
}
If you test filters.fla with the preceding changes to the FilterTest class, you’ll see that only one of your Square symbols has a blue glow, and the other has a green glow—job done!
This was relatively painless because you already had a reference to the BitmapFilter instance you wanted to change in the glow variable, and you had a reference to the other filter, so you could easily reconstruct the filters array. Sometimes that’s not an option (maybe the filters were originally created by another part of the code). In that case, you can use the filters property of the display object to get a clone of the filters assigned to it, make your changes, and then reassign the array back to the filters property.
Let’s pret you don’t have references to the BitmapFilter instances and change the angle of the drop shadow on the second Square symbol. Get a clone to the filters array from the square2 display object and loop through the BitmapFilter instances with a for eachloop.
package com.foundationAS3.ch4 {
import flash.display.MovieClip;
import flash.display.Sprite;
import flash.filters.*;
public class FilterTest exts Sprite {
public function FilterTest() {
var glow:GlowFilter = new GlowFilter(0x00FF00, 1, 10, 10);
var dropShadow:DropShadowFilter = new DropShadowFilter();
square.filters = [glow,dropShadow];
square2.filters = [dropShadow,glow];
// Change glow to blue
glow.color = 0x0000FF;
square.filters = [glow,dropShadow];
// Change angle of drop shadow
var filters:Array = square2.filters;
for each (var filter:BitmapFilter in filters) {
}
}
}
}
Notice that the for each loop allows you to strongly type the iterator for the loop to BitmapFilter, since you know that the filters array can contain only instances of BitmapFilter.
In each iteration of the loop, you will test to see if you’ve found the DropShadowFilter instance and, if so, set the angle property accordingly.
package com.foundationAS3.ch4 {
import flash.display.MovieClip;
import flash.display.Sprite;
import flash.filters.*;
public class FilterTest exts Sprite {
public function FilterTest() {
var glow:GlowFilter = new GlowFilter(0x00FF00, 1, 10, 10);
var dropShadow:DropShadowFilter = new DropShadowFilter();
square.filters = [glow,dropShadow];
square2.filters = [dropShadow,glow];
// Change glow to blue
glow.color = 0x0000FF;
square.filters = [glow,dropShadow];
// Change angle of drop shadow
var filters:Array = square2.filters;
for each (var filter:BitmapFilter in filters) {
if (filter is DropShadowFilter) {
(filter as DropShadowFilter).angle = 270;
}
}
}
}
}
Here, you are using the is operator to check to see whether the filter at the current iteration of the loop is an instance of DropShadowFilter. If it is, you then can use the as operator to cast the filter iterator as a DropShadowFilter, so that you can assign to its angleproperty. If you did not do this, you would get a compile-time error, since filter is typed to the abstract base class BitmapFilter in the loop—a class that does not have an angle property.
Finally, reassign the filters array to the filters property of the display object.
package com.foundationAS3.ch4 {
import flash.display.MovieClip;
import flash.display.Sprite;
import flash.filters.*;
public class FilterTest exts Sprite {
public function FilterTest() {
var glow:GlowFilter = new GlowFilter(0x00FF00, 1, 10, 10);
var dropShadow:DropShadowFilter = new DropShadowFilter();
square.filters = [glow,dropShadow];
square2.filters = [dropShadow,glow];
// Change glow to blue
glow.color = 0x0000FF;
square.filters = [glow,dropShadow];
// Change angle of drop shadow
var filters:Array = square2.filters;
for each (var filter:BitmapFilter in filters) {
if (filter is DropShadowFilter) {
(filter as DropShadowFilter).angle = 270;
}
}
square2.filters = filters;
}
}
}
Save the changes to FilterTest.as, switch to filters.fla, and test the movie. With a bit of luck, the drop shadow on the second square should have changed direction, as shown in Figure 4-22.
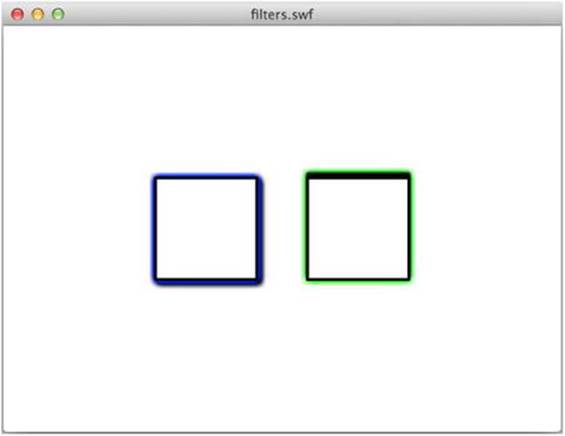
Figure 4-22. The angle of the drop shadow is changed by finding the filter in the original array, altering it, and then reassigning all the filters back to the square
Removing an Existing Filter
Once you understand how to change a property of a filter, removing it from a display object is pretty straightforward. You need to get a clone of the display object’s filters array, remove the element from that array containing the BitmapFilter you want to remove, and then reassign the array to the filters property of the display object.
You can remove an element from an array in several ways:
· To remove the last element in the array, the easiest method is to use pop().
· To remove the first element in the array, the easiest method is to use shift().
· To remove an element in the middle of an array, use the splice() method.
The splice() method is designed to allow you to splice two arrays together, inserting an array at a certain point in another array and replacing a specified number of the original array’s values. It takes three parameters: the index into which to splice the new array, the number of elements in the original array that will be replaced, and the new array itself. However, if you leave out the last parameter, the splice() method will just remove the specified number of elements from the source array at the specified index.
Let’s change the FilterTest class to remove the drop shadow filter from square. In this case, you know the index of the DropShadowFilter in the filters array (it’s at index 1), so you don’t need to loop through the array to find it.
package com.foundationAS3.ch4 {
import flash.display.MovieClip;
import flash.display.Sprite;
import flash.filters.*;
public class FilterTest exts Sprite {
public function FilterTest() {
var glow:GlowFilter = new GlowFilter(0x00FF00, 1, 10, 10);
var dropShadow:DropShadowFilter = new DropShadowFilter();
square.filters = [glow,dropShadow];
square2.filters = [dropShadow,glow];
// Change glow to blue
glow.color = 0x0000FF;
square.filters = [glow,dropShadow];
// Change angle of drop shadow
var filters:Array = square2.filters;
for each (var filter:BitmapFilter in filters) {
if (filter is DropShadowFilter) {
(filter as DropShadowFilter).angle = 270;
}
}
square2.filters = filters;
// Remove drop shadow
filters = square.filters;
filters.pop();
square.filters = filters;
}
}
}
Save the changes to FilterTest.as, switch to filters.fla, and test the movie. You should see that the first square no longer has a drop shadow, as shown in Figure 4-23.
Figure 4-23. The drop shadow on the first square is removed altogether
Introducing the Advanced Filters
All of the filters discussed in the previous sections are the same ones that you can create and apply visually within the Flash IDE. However, two extra BitmapFilter classes are available through ActionScript: ConvolutionFilter and DisplacementMapFilter.
When applied to a display object, the ConvolutionFilter calculates each pixel to display based on its neighboring pixels and a mathematical matrix that you supply. This is a powerful filter that enables you to achieve a number of effects, including sharpen, edge detect, emboss, and bevel. Figure 4-24 shows an example of using the ConvolutionFilter.
The DisplacementMapFilter allows you to warp a display object using a BitmapData object to calculate where and how much to warp. Using this filter, you can create fisheye, warp, mottle, and other effects. Figure 4-25 shows an example of using theDisplacementMapFilter.
If these filters sound interesting to you, many examples are available in the online help.
Figure 4-24. The ConvolutionFilter applied to an image creates an embossing effect
Figure 4-25. The DisplacementMapFilter applied to an image for an interesting effect
Accessing the Stage
You can access the stage through the stage property of a display object. The Stage class is the topmost display object. This class contains a number of additional properties for the movie, such as stageWidth and stageHeight, which give you the dimensions of the entire stage (as opposed to width and height, which will tell you the combined dimensions of all the visible items in the movie).
Using Stage Properties
Although the Stage class is part of the display list class diagram shown earlier in Figure 4-2, you can’t actually create new instances of it—as they say in the Highlander movies, “There can be only one.” In addition, many of the properties that the single Stage instance has by virtue of its class inheritance have no meaning, such as x, y, alpha, and so on; some can actually throw errors if you try to set them. However, a few useful properties of the Stage instance are worth remembering.
First, by setting scaleMode to one of the constants from the StageScaleMode class, you can change how the movie is resized when its size changes from that originally specified in the document’s Property inspector. This can happen when the movie is playing in a stand-alone player and the user resizes the window, or if a developer changes the width/height of the <object>/<embed> tags used to embed the Flash movie in an HTML page.
When scaleMode is set to StageScaleMode.NO_SCALE, the stage dimensions change every time the movie is resized. That’s where the stageWidth and stageHeight properties come in handy. They tell you exactly how big the stage is.
The potentially most useful Stage property is displayState, which allows you to switch the playback of the movie to full screen, either from a movie embedded in a web page or from the stand-alone player. This is great when playing back video or viewing a slide show, but has a couple of drawbacks when you’re dealing with a Flash movie embedded in a web page:
· You must set the allowFullScreen parameter/attribute to true in the HTML source code for both the object and embed tags.
· You can change the Stage.displayState property only in response to a mouse click or a key press (not, for instance, when the movie loads).
· When entering full-screen mode, the Flash Player overlays a message on the screen informing the users that they are in full-screen mode and that they can press the Esc key at any time to exit.
· While the movie is in full-screen mode, keyboard input will be disabled.
This may all seem like a bit of a pain, but can you imagine how badly advertising agencies would misuse this feature if they could s users into full-screen mode without their permission? Even worse, without these precautions, scammers could use this to spoof websites and potentially steal your valuable data. Suddenly, these fail-safe measures don’t seem like so much of a pain.
Making a Movie Full Screen
Let’s go through a quick example to see how you can make your movie full screen. You won’t use any graphics other than a button, so this won’t be much to look at, but you’ll see how easy it is to get the full-screen experience.
1. Create a new Flash file and save it into your project directory as fullscreen.fla.
2. Draw a circle on the stage that will act as your button. Convert it into a movie clip symbol and name it Circle, as shown in Figure 4-26. Click OK to exit the dialog box and create the symbol.
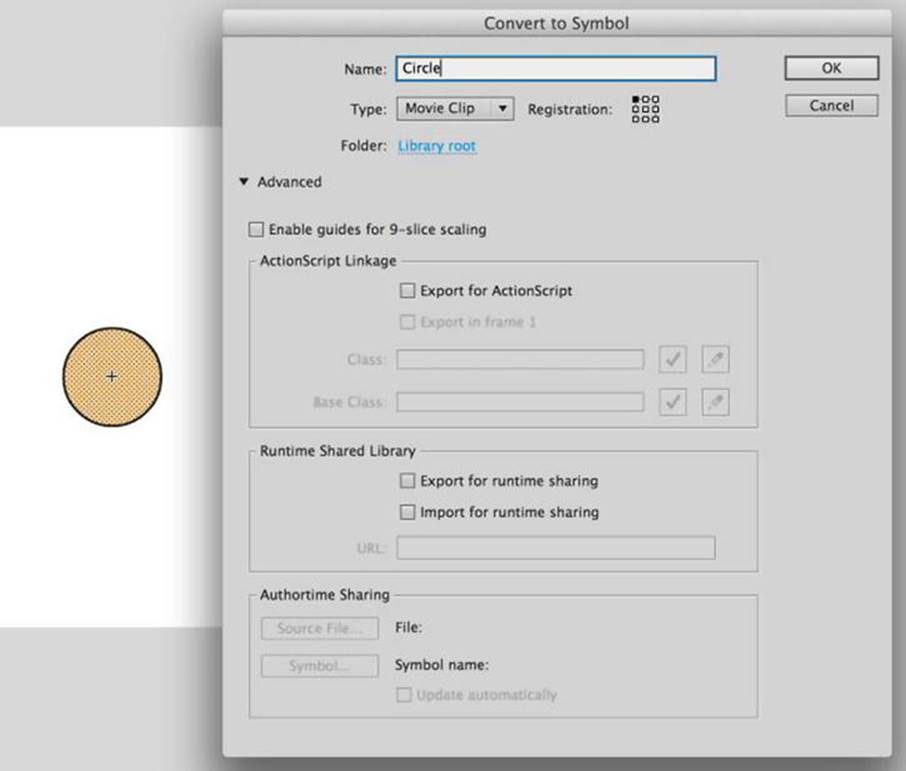
Figure 4-26. A circle created to act as a button for entering full-screen mode
3. Using the Property inspector with the Circle instance still selected, name the instance circle and save the file.
4. Create a new ActionScript file and save it into the com.foundationAS3.ch4 directory as FullScreenTest.as. Add the following package information:
package com.foundationAS3.ch4 {
}
5. Add the class definition. Make sure you import Sprite, which your class will ext. You also need to import MovieClip so you can access the circle on your stage.
package com.foundationAS3.ch4 {
import flash.display.MovieClip;
import flash.display.Sprite;
public class FullScreenTest exts Sprite {
}
}
6. Add a constructor and within it, add an event listener for the click event when the circle is clicked and released. (You’ll learn about events in Chapter 6, but since you need a user event to enter full-screen mode, you get a sneak peek here).
package com.foundationAS3.ch4 {
import flash.display.MovieClip;
import flash.display.Sprite;
import flash.events.MouseEvent;
public class FullScreenTest exts Sprite {
public function FullScreenTest() {
circle.addEventListener(MouseEvent.CLICK, onButtonClick);
}
}
}
7. You need to add the handler for when the button is clicked. A handler is simply a method that will be called when a certain event occurs in the movie, and is said to “handle” the event. (Again, you’ll learn more about event handling in Chapter 6). For now, just know that when the circle is clicked, this method will be called.
package com.foundationAS3.ch4 {
import flash.display.MovieClip;
import flash.display.Sprite;
import flash.events.MouseEvent;
public class FullScreenTest exts Sprite {
public function FullScreenTest() {
circle.addEventListener(MouseEvent.CLICK, onButtonClick);
}
private function onButtonClick(event:MouseEvent):void {
}
}
}
8. Within this method, set the displayState property of Stage to full screen. It’s a pretty simple procedure for a very powerful feature. Make sure you add the new import statement at the top.
package com.foundationAS3.ch4 {
import flash.display.MovieClip;
import flash.display.Sprite;
import flash.display.StageDisplayState;
import flash.events.MouseEvent;
public class FullScreenTest exts Sprite {
public function FullScreenTest() {
circle.addEventListener(MouseEvent.CLICK, onButtonClick);
}
private function onButtonClick(event:MouseEvent):void {
stage.displayState = StageDisplayState.FULL_SCREEN;
}
}
}
9. Save FullScreenTest.as. Return to fullscreen.fla and set com.foundationAS3.ch4.FullScreenTest as the document class for the movie.
10.To test full-screen mode, you need to go through the browser. Open the Publish Setting dialog box (File ![]() Publish Settings), and on the HTML tab, select Flash Only – Allow Full Screen in the Template drop-down list, as shown in Figure 4-27. Then click thePublish button at the bottom of the dialog box.
Publish Settings), and on the HTML tab, select Flash Only – Allow Full Screen in the Template drop-down list, as shown in Figure 4-27. Then click thePublish button at the bottom of the dialog box.
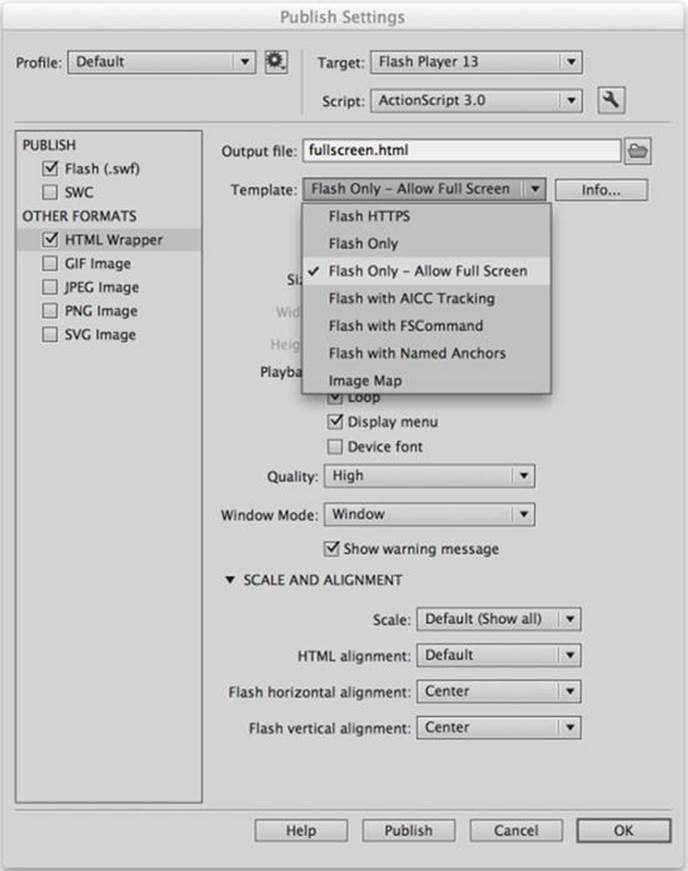
Figure 4-27. Test the full-screen mode using the selected template in the Publish Settings dialog box
11.Save your file and find the HTML file you just published in the same directory as fullscreen.fla. Open this file in your browser, and you will find that clicking the circle takes the movie to full-screen mode, as shown in Figure 4-28. Nice!
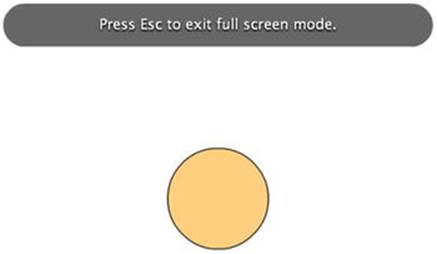
Figure 4-28. Full-screen mode in all of its glory!
You will note that the movie scales as it takes over the screen. If you wanted to maintain the same 100% scale on your objects, you would need to set the scaleMode property of the Stage instance to StageScaleMode.NO_SCALE and (usually) its align property toStageAlign.TOP_LEFT. Then you would listen for when the stage resizes, and redraw or reposition your objects accordingly.
Using Library Resources
Creating instances of Library symbols in ActionScript 3.0 is much easier than it was in ActionScript 2.0. Every symbol in the Library of a Flash movie that has been exported for ActionScript is associated with a class—whether it’s one you have written or one that the ActionScript compiler has created for you.
To add an instance of a symbol to your movie, you just need to create a new instance of that class and add it to the display list. Let’s try it out.
1. Create a new Flash movie and save it in the project directory as library.fla.
2. On the stage, draw a 50 × 50-pixel circle.
3. Select the circle and select Modify ![]() Convert to Symbol from the main menu, or press F8. In the Convert to Symbol dialog box, enter Ball for the symbol name and select Movie clip for the type. Set its registration point at the top left of the graphic.
Convert to Symbol from the main menu, or press F8. In the Convert to Symbol dialog box, enter Ball for the symbol name and select Movie clip for the type. Set its registration point at the top left of the graphic.
4. If the advanced options are not visible in the dialog box, click the Advanced button to reveal them. Click the Export for ActionScript check box in the Linkage options, as shown in Figure 4-29, and then click OK, accepting the default values for the Class and Base class fields.
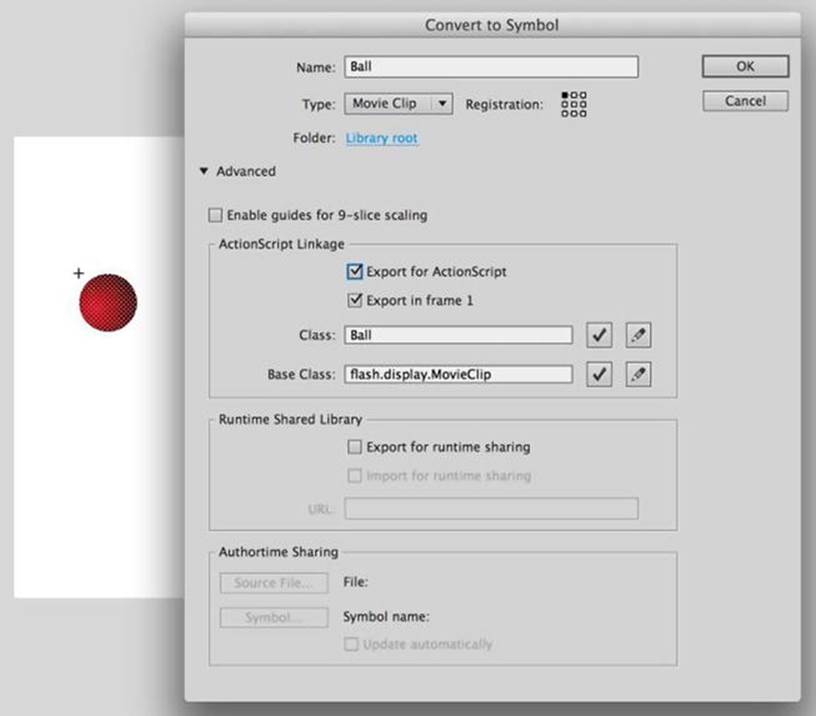
Figure 4-29. Creating the Ball movie clip symbol
That sets up the Ball symbol with a class of the same name. To finish the example, you need to create an instance of the Ball class and add it to the display list. You’ll do this by adding a document class to the movie with the necessary code in the constructor.
5. Back on the main timeline, delete the Ball instance that you originally created on the stage. This example will demonstrate how to add it to a movie through ActionScript, so you want to remove this original instance.
6. Create a new ActionScript file and save it in the com.foundationAS3.ch4 directory as LibraryTest.as.
7. In the LibraryTest.as file, create the package block with the appropriate package name.
package com.foundationAS3.ch4 {
}
8. Create the LibraryTest class definition. Since this is a document class, you’ll need to ext either the MovieClip or Sprite class. There’s no timeline animation in this example, so you’re safe to choose the Sprite class:
package com.foundationAS3.ch4 {
import flash.display.Sprite;
public class LibraryTest exts Sprite {
}
}
Don’t forget to make the class public, or the ActionScript compiler won’t be able to use it as the document class.
9. Add the constructor function for the LibraryTest class. In the constructor function, create a new instance of the Ball class (which is in the default package, so you don’t need to import it) and add it to the display list.
package com.foundationAS3.ch4 {
import flash.display.Sprite;
public class LibraryTest exts Sprite {
public function LibraryTest() {
var ball:Ball = new Ball();
addChild(ball);
}
}
}
10.Save the changes to the ActionScript file. Switch back to the library.fla file, and enter the full package and class name com.foundationAS3.ch4.LibraryTest as the document class for the Flash movie.
11.Save the Flash movie and test it. You should see an instance of the Ball symbol in the top-left corner of the movie, as shown in Figure 4-30.
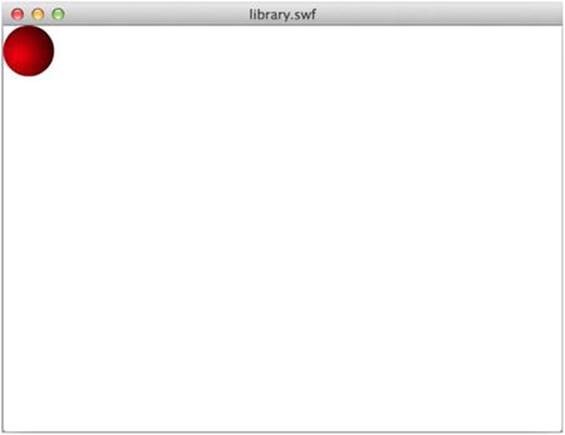
Figure 4-30. An instance of the Ball class is added to the stage through code
Loading from External Files
Embedding every visual asset you want to use into the Library main movie SWF file can make the SWF file unnecessarily large. Imagine an image gallery with hundreds of images where you needed to embed each image (both thumbnail and full size) into the main SWF, which could easily be 10MB or more. Visitors would need to download all the images, even if they wanted to look at only a handful. Wouldn’t it be better if you could load those assets on demand from external files?
In ActionScript 3.0, loading in external visual assets is the job of the Loader class, which lives in the flash.display package and inherits from the DisplayObject class. The Loader class can load in SWF files as well as GIF, JPEG, and PNG images. Video files and sound files are handled by the Video and Sound classes, respectively.
Loading an External Asset
To load an external asset, you create an instance of the Loader class, add it to the display list at the appropriate point, and then tell it to load the asset using the load() method. That sounds relatively painless, so let’s give it a go.
1. Create a new Flash movie and save it in the project directory with the name loadExternal.fla.
2. Copy an image you would like to load into this same directory. If you do not have one, you can use the audrey_computer.png file that is included with this chapter’s source files.
3. Next, you need to create an ActionScript file for the document class. Create a new ActionScript file and save it into the com.foundationAS3.ch4 directory as LoadExternalTest.as.
4. In the LoadExternalTest.as file, create the package container with the appropriate package name:
package com.foundationAS3.ch4 {
}
5. Create the LoadExternalTest class, which should ext the Sprite class, since there won’t be any timeline animation.
package com.foundationAS3.ch4 {
import flash.display.Sprite;
public class LoadExternalTest exts Sprite {
}
}
6. In the constructor function for the document class, create a new instance of the Loader class in a local variable, and then add it to the display list using the addChild() method of the LoadExternalTest instance. Make sure you import the Loader class at the top.
package com.foundationAS3.ch4 {
import flash.display.Loader;
import flash.display.Sprite;
public class LoadExternalTest exts Sprite {
public function LoadExternalTest() {
var loader:Loader = new Loader();
addChild(loader);
}
}
}
7. You need to tell the Loader instance to load the image using the load() method. Rather than a simple string containing the URL of the asset to load, the load() method expects a URLRequest instance to be passed to it. The URLRequest class, which lives in the flash.net package, is used in most calls and requests from the Flash Player. In its simplest form, which is all that’s necessary here, you just need to pass the URL address to call in the constructor. (Obviously, you should replace the audrey_computer.pngstring with the filename of whatever image you have copied into your project directory in step 2).
package com.foundationAS3.ch4 {
import flash.display.Loader;
import flash.display.Sprite;
import flash.net.URLRequest;
public class LoadExternalTest exts Sprite {
public function LoadExternalTest() {
var loader:Loader = new Loader();
addChild(loader);
loader.load(new URLRequest("audrey_computer.png"));
}
}
}
8. Save the changes to the ActionScript file. Switch back to the loadExternal.fla file and set com.foundationAS3.ch4.LoadExternalTest as the document class in the Property inspector.
9. Save the changes to the Flash movie and test it by selecting Control ![]() Test Movie from the main menu. You should see your loaded image as part of your SWF file, as shown in Figure 4-31.
Test Movie from the main menu. You should see your loaded image as part of your SWF file, as shown in Figure 4-31.
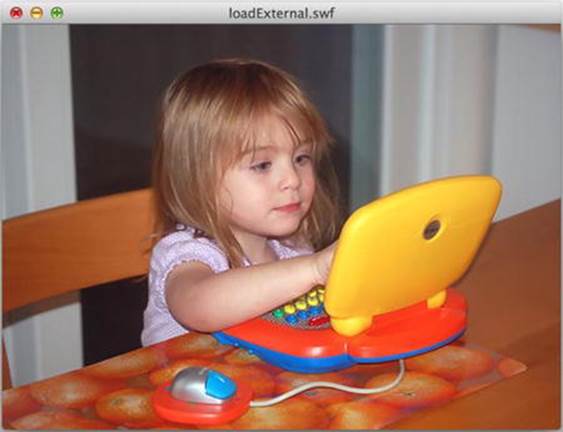
Figure 4-31. An image is loaded into the movie (and what a lovely image it is!)
If the image doesn’t load, check the Output panel for an error message. If you have an error message, double-check that the string path for the image and that you’ve copied the image into the same directory as your FLA file. You can trap these error messages and handle them in ActionScript code, but that will need to wait until Chapter 6, where you’ll learn about event handling.
Manipulating the Loaded Asset
When loading an external asset through an instance of the Loader class, the asset becomes a child of that object and is accessible through the Loader’s content property. This is occasionally useful when loading an image file. You can control whether the image is snapped to the nearest pixel and/or whether smoothing is used if it is resized, but it really comes into its own when you’re dealing with an SWF file.
Since the Loader class can handle both image files (instances of the Bitmap class) and SWF files (either MovieClip instances or AVM1Movie instances if you’re loading Flash 8 or earlier SWFs), the data type of the content property must be something that’s a common ancestor of all those classes. A quick look at the display list class diagram shown earlier in Figure 4-2 will tell you that the only common ancestor for all these classes is the DisplayObject class. What this means in practice is that you’ll need to cast the content property to the appropriate type before you can do anything with it that’s specific to that type of asset.
var loadedClip:MovieClip = loader.content as MovieClip;
You’ll need to wait at least until the asset has started loading before you can use the content property. The loaderInfo property of an instance of the Loader class dispatches a number of events that let you know when the asset ins loading, when it has been initialized (and is ready to interact with), and when it has finished loading. Again, you’ll learn about the details of event handling in Chapter 6.
Making Things Move
When it comes to animating the position of an object on the stage with ActionScript, you have two basic choices: you can copy an animation from the timeline as ActionScript 3.0 code, or you can manually reposition the object at frequent intervals over a certain length of time. The first technique is designed for keyframe-style animation and tweening, and we’ll discuss this approach in detail here. The second technique is much more powerful but requires knowledge of event-based programming in ActionScript, so we’ll leave that one until Chapter 6.
Copying Animation from the Timeline
One of the major innovations in the Flash CC IDE, at least from an ActionScript developer’s point of view, is the ability to copy a timeline animation into the clipboard as ActionScript code. Gone are the days when developers tried to approximate animation in ActionScript from a timeline animation produced by a professional animator, only to be bashed over the head by said animator for getting it totally wrong. No, now you can just copy the animation as a reusable piece of ActionScript that can be applied to any display object.
This system has a couple of limitations. One is that you can copy only continuous frames of animation from a single layer in the Flash movie. The other is that you can have only one object on each keyframe of the animation. You can overcome both of these limitations by breaking down your animation into separate layers and copying the motion of each layer separately.
Creating the Animation
Let’s create a simple three-frame animation of a ball going from the left edge of the screen to the right edge and back again.
1. Create a new Flash movie and save it in the project directory with the name motion.fla.
2. Draw a 50 × 50-pixel ball on the stage.
3. Select the ball and select Modify ![]() Convert to Symbol from the main menu, or press F8. In the Convert to Symbol dialog box, name the symbol Ball. Give it a central registration point, and check the Export to ActionScript check box, as shown in Figure 4-32. Accept the default values for the Class and Base class fields, and then click OK.
Convert to Symbol from the main menu, or press F8. In the Convert to Symbol dialog box, name the symbol Ball. Give it a central registration point, and check the Export to ActionScript check box, as shown in Figure 4-32. Accept the default values for the Class and Base class fields, and then click OK.
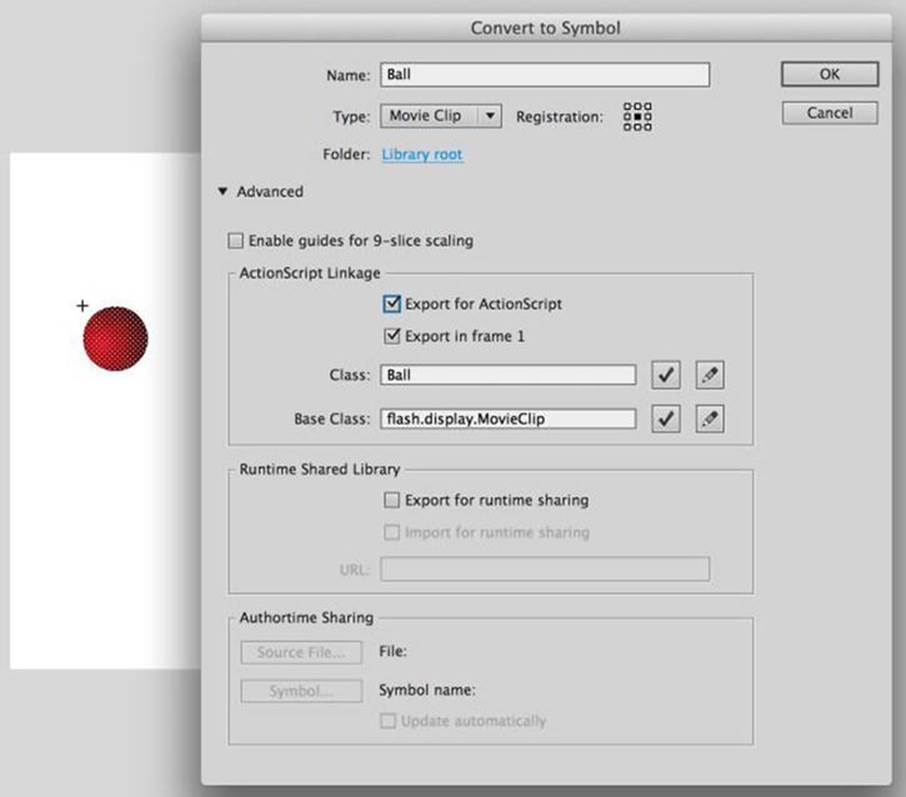
Figure 4-32. Creating a new Ball symbol
4. Position the instance of the Ball symbol on the stage at (50,50), right-click the Ball instance, and choose the Create Motion Tween option. Notice that the timeline has grown by 24 frames. Select the 24th frame and drag your ball to the far left of the stage. Then click on the motion guide and create an upward curve to the tween’s path.
Your timeline should look like Figure 4-33.
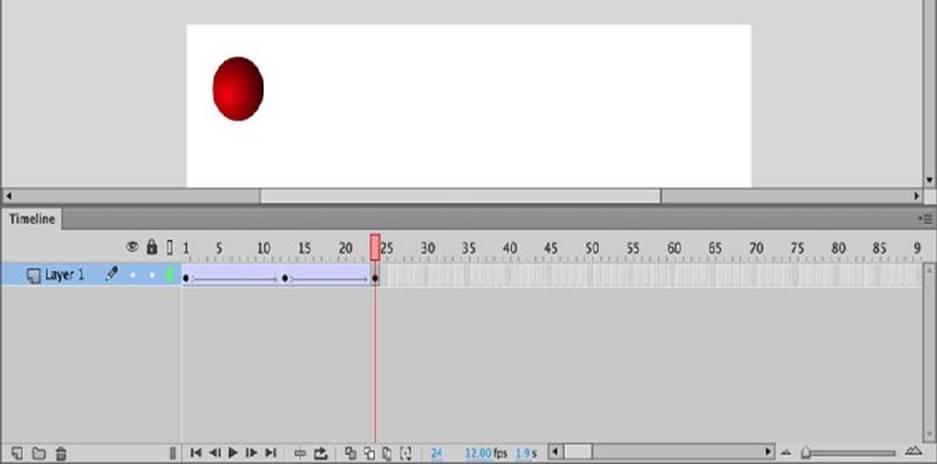
Figure 4-33. Adding some simple timeline animation
5. Save the changes to the motion.fla file and test the movie. You should see the ball moving from the top-left to the top-right corners of the movie.
Copying the Animation Code
Now you’ll copy that animation as ActionScript 3.0 code and create a new Flash Movie to apply it to.
1. Create a new Flash Movie and save it as MotionTest.fla.
2. Draw a shape on the stage and convert it to a symbol.
3. Go back to motion.fla and select the Ball instance. Right-click and select Copy Motion as ActionScript 3.0.
4. Now return to MotionTest.fla and create a new layer. In the first frame of that layer, enter the following code into the Actions panel:
import fl.motion.AnimatorFactory;
import fl.motion.MotionBase;
import flash.filters.*;
import flash.geom.Point;
var __motion_Ball_2:MotionBase;
if(__motion_Ball_2 == null) {
import fl.motion.Motion;
__motion_Ball_2 = new Motion();
__motion_Ball_2.duration = 24;
// Call overrideTargetTransform to prevent the scale, skew,
// or rotation values from being made relative to the target
// object's original transform.
// __motion_Ball_2.overrideTargetTransform();
// The following calls to addPropertyArray assign data values
// for each tweened property. There is one value in the Array
// for every frame in the tween, or fewer if the last value
// remains the same for the rest of the frames.
__motion_Ball_2.addPropertyArray("x", [0,16.9572,34.6471,![]()
53.0949,72.3883,92.4954,113.506, 135.327,157.906,181.17,204.859,228.769,![]()
252.676,276.307,299.468,322.028,343.874,364.976,385.346,404.999,423.925,![]()
442.205,459.852,476.95]);
__motion_Ball_2.addPropertyArray("y", [0,-16.9031,-33.0551,-48.3038,![]()
-62.5272,-75.4939,-87.0413,-96.8931,-104.818,-110.597,-114.025,![]()
-115.001,-113.514, -109.653,-103.591,-95.5415,-85.7543,-74.4588,![]()
-61.856,-48.1317, -33.4746,-17.99,-1.81318,15]);
__motion_Ball_2.addPropertyArray("scaleX", [1.075272]);
__motion_Ball_2.addPropertyArray("scaleY", [1.075272]);
__motion_Ball_2.addPropertyArray("skewX", [0]);
__motion_Ball_2.addPropertyArray("skewY", [0]);
__motion_Ball_2.addPropertyArray("rotationConcat", [0]);
__motion_Ball_2.addPropertyArray("blMode", ["normal"]);
// Create an AnimatorFactory instance, which will manage
// targets for its corresponding Motion.
var __animFactory_Ball_2:AnimatorFactory =![]()
new AnimatorFactory(__motion_Ball_2);
// Call the addTarget function on the AnimatorFactory
// instance to target a DisplayObject with this Motion.
// The second parameter is the number of times the animation
// will play - the default value of 0 means it will loop.
// __animFactory_Ball_2.addTarget(<instance name goes here>, 0);
}
5. Select the shape instance on the stage, and in the Property inspector give it an instance name of Ball.
6. Finally, change the last line of code in the Actions panel from
// __animFactory_Ball_2.addTarget(<instance name goes here>, 0);
to
__animFactory_Ball_2.addTarget(Ball, 0);
Make sure you uncomment the line as well. At this point, you have added your instance to the animation. The second parameter is the loop indicator, with 0 as the default, which sets a continuous loop.
7. All that’s left to do is to test your movie. You should see the new shape moving in the same way as your motion.fla file did.
Animating other Properties
Using the Copy Motion as ActionScript 3.0 menu option, you can copy the following animated properties of a display object (right-click the object to access the option):
· Position
· Scale
· Skew
· Rotation
· Transformation point
· Color
· Bl mode
· Filters
· Orientation to path (as part of a tween)
· Cache as bitmap
The animation system also supports frame labels, motion guides, and custom easing equations. That’s some pretty powerful, heady stuff.
Summary
Wow! What a tour de force of the awesome capabilities of ActionScript 3.0 when it comes to messing with the display. In fact, you’ve seen only the tip of the iceberg. See you across the great (page) divide for a lot more display programming fun and games, where we’ll focus on creating cool graphics from scratch using your ActionScript skills.
As I mentioned in the previous chapter, take a look at AdvancED ActionScript 3.0 Animation by Keith Peters, to delve into the realms of ActionScript motion in greater detail.
All materials on the site are licensed Creative Commons Attribution-Sharealike 3.0 Unported CC BY-SA 3.0 & GNU Free Documentation License (GFDL)
If you are the copyright holder of any material contained on our site and intend to remove it, please contact our site administrator for approval.
© 2016-2025 All site design rights belong to S.Y.A.