Sams Teach Yourself Arduino Programming in 24 Hours (2015)
Part II: The C Programming Language
Hour 11. Pointing to Data
What You’ll Learn in This Hour:
![]() What C pointers are
What C pointers are
![]() How to define a pointer in your sketch
How to define a pointer in your sketch
![]() How to use pointers
How to use pointers
![]() When to use pointers in different sketch environments
When to use pointers in different sketch environments
By far, one of the most complicated topics in the C programming language is data pointers. Although it’s quite possible that you’ll never have to use them in your sketches, data pointers can allow you to do some pretty fancy things in your Arduino sketches, sometimes reducing the amount of code you have to write. This hour delves into the world of C data pointers and shows how you can use them in your Arduino sketches.
What Is a Pointer?
Hour 5, “Learning the Basics of C,” showed how to use variables in your Arduino sketches for storing data in memory. When you define a variable in your sketch, the Arduino system selects a location in the static random-access memory (SRAM) to store the data value that the variable represents.
Most of the time, we don’t care where the Arduino stores the data values in memory, just as long as it can keep track of the data for us. However, it can come in handy knowing where in memory the Arduino stored the variable so that you can directly access the data yourself, sometimes using less code.
To do that, the C programming language provides pointers. Pointers allow us to take a peek under the hood and see just where the Arduino stores the data in our sketches, and then use that information to directly access your data.
You use two operators to handle pointers in Arduino sketches:
![]() & (called the reference operator)
& (called the reference operator)
![]() * (called the dereference operator)
* (called the dereference operator)
The reference operator returns the memory location where the Arduino stores a variable value. Just place the reference operator in front of any variable to return the memory address where the Arduino stores the variable’s value:
ptr = &test;
The ptr variable now contains the memory address location where the Arduino placed the test variable. The problem is that the Arduino returns the memory address as a special value. This is where the dereference operator comes into play.
You use the dereference operator to identify a pointer variable used to store memory locations:
int test = 100;
int *ptr;
ptr = &test;
The ptr pointer variable now contains a value that represents the memory location where the test variable value is stored. You can display that value using the Serial.print function just as you would any other variable value. Memory locations are often displayed as hexadecimal values. To do that, just add the HEX parameter in the Serial.print function:
Serial.print(ptr, HEX);
Notice that I declared the ptr variable using the same data type as the variable that it points to in memory. There’s a reason for that, as discussed a little later on in this hour. However, because of that, if you need to retrieve the memory locations of different variables of different data types, you should use the appropriate data type for each associated pointer:
float test2 = 3.14159;
char test3[40] = "This is a test character array string";
float ptr2 = &test2;
char ptr3 = &test3;
The ptr2 and ptr3 variables each contain the memory address location for the individual data variable they point to. Let’s practice handling pointers and displaying them in the serial monitor.
![]() Try It Yourself: Finding Your Data in Memory
Try It Yourself: Finding Your Data in Memory
You can use the reference operator in your Arduino sketch to find the memory location the Arduino uses to store a variable value. Here’s an experiment you can run to test this:
1. Open the Arduino IDE and enter the following code into the editor window:
int test1 = 10;
float test2 = 3.14159;
char test3[] = "This is a character array";
int *ptr1;
float *ptr2;
char *ptr3;
char buffer[50];
void setup() {
Serial.begin(9600);
ptr1 = &test1;
sprintf(buffer, "The integer value is stored at %x", ptr1);
Serial.println(buffer);
ptr2 = &test2;
sprintf(buffer, "The float value is stored at %x", ptr2);
Serial.println(buffer);
ptr3 = test3;
sprintf(buffer, "The character array value is stored at %x", ptr3);
Serial.println(buffer);
}
void loop() {
2. Save the sketch as sketch1101.
3. Click the Upload icon to verify, compile, and upload the sketch to your Arduino unit.
4. Open the serial monitor to run the sketch and view the output.
When you run sketch1101 and look at the output in the serial monitor, you’ll see the actual memory locations where your Arduino stores each variable value. Figure 11.1 shows the output from my Arduino unit. (Your memory locations may vary from mine.)
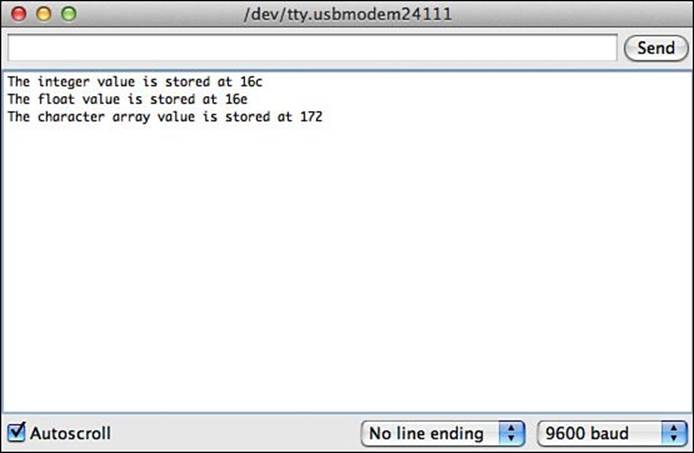
FIGURE 11.1 The output from sketch1101 showing the memory locations.
By The Way: Printing Pointers
Unfortunately, the Serial.println function in the Arduino code doesn’t support printing pointer values. To get around that, the sketch1101 code stores the output in a character array buffer using the sprintf C function. The %x code tells the Arduino to output the value in hexadecimal notation.
You may see that the Arduino placed the variables in sequence within the memory area. (There should be enough separation between each location to hold the number of bytes required for each data type: 2 bytes for the integer value, and 4 bytes for the floating-point value.)
Working with Pointers
Now that you’ve seen the basics of how the reference and dereference operators work, let’s take a look at how to use them in sketches. This section walks through the details of how to use pointers in sketches.
Retrieving Data Using a Pointer
Once you have a memory location stored in a pointer variable, you can use that information to extract the value stored at that location. You just use the dereference operator to do that:
int test1 = 10;
int *ptr = &test1;
int test2 = *ptr;
The ptr pointer variable contains the memory address for the test1 variable. To retrieve the value stored at that memory location, just use the dereference operator on the ptr variable. The test2 assignment statement assigns the value stored in the memory address pointed to by the ptrpointer variable to the test2 variable. The test2 variable will now have to value 10.
Storing Data Using a Pointer
Likewise, you can assign a value to a memory location using the dereference operator:
int test1 = 100;
int *ptr = &test1;
*ptr = 200;
The ptr pointer variable points to the memory location used to store the test1 variable value. When you assign a value to the dereferenced memory location, this places the value into the memory location. After this code runs, the test1 variable will contain the value of 200.
Using Special Types of Pointers
You can run into a couple of special situations when using pointers. This section walks through two situations that might seem odd but that can come in handy when using pointers in your Arduino sketches.
Null Pointers
When you declare a pointer but don’t initialize it to a specific memory location, the pointer may or may not have an initial value assigned to it by the Arduino. That can cause issues in your sketch if you’re not careful. One way to avoid that is to declare a null pointer. A null pointer is set to a value of 0, which doesn’t represent a valid location in memory. You do that using the special NULL label in C:
int *ptr1 = NULL;
The NULL value assigns a value of 0 to the pointer ptr1 as the initial value.
One benefit of initializing an empty pointer to the NULL value is that it allows you to easily check to see whether a pointer is in use or not in your sketch code by using an if-then condition check:
if (ptr1) {
// pointer in use
} else {
// pointer is NULL
}
If the pointer has a NULL value assigned to it, it returns a false value from the if-then condition check.
Void Pointers
Another pointer trick that can come in handy is to use the void data type when declaring a pointer:
void *ptr1 = NULL;
This is called a void pointer. Because there isn’t a data type associated with the pointer, you can use the same pointer variable for storing the memory address of different data type variables:
int test1 = 10;
float test2 = 3.14159;
char[] test3 = "This is a character array string";
void *ptr = NULL;
ptr = &test1;
Serial.print(ptr, HEX);
ptr = &test2;
Serial.print(ptr, HEX);
ptr = &test3;
Serial.print(ptr, HEX);
You can use the void data type to represent a pointer if you’re not sure of the specific data type of the data you need to point to. However, that does limit what you can do with the pointer somewhat. When the Arduino knows the data type that the pointer points to, you can use that information to perform some fancy data manipulation. The next section shows how to do that.
Pointer Arithmetic
One popular use of pointers in the C programming language is manipulating values stored in an array variable. If you remember from Hour 7, “Programming Loops,” array variables store multiple data values sequentially in memory, with each individual data value referenced using an index value. For example:
int test[5] = {10, 20, 30, 40, 50};
Serial.println(test[0]);
You reference a specific data value stored in the array variable using the index value between the square brackets. The index values start at 0, and go to the end of the array data values.
Because pointer variables point to locations in memory, you can use a pointer to point to the location of the start of the array variable in memory:
int *ptr = &test[0];
This line uses the dereference operator to return the memory location where the Arduino stores the first data value in the test array.
Now here’s where the data type for the pointer comes into play. If you increment the ptr value by one, the Arduino actually makes it point to the next data element in memory for that data type. Thus, if you do this:
ptr++;
The ptr variable will now point to the memory location where the test[1] array variable value is stored.
Now here’s the really cool part. The pointer arithmetic works for any data type you use. If you create an array of float values and create a pointer to it
float test2[] = {1.23, 4.56, 7.89};
float *ptr2 = &test2[0];
the pointer arithmetic increments the pointer to the next floating-point number in the array, based on the size of the float data type. So, when you use the statement
ptr2++;
the Arduino skips to the next float value stored in the test2 array.
This feature allows you to iterate through an array of any data type without using an array index value. Let’s go through an example of doing that in an Arduino sketch.
![]() Try It Yourself: Using Pointers with Arrays
Try It Yourself: Using Pointers with Arrays
This example uses a pointer to create an array of integer values, and then uses the pointer to iterate through the stored values. Here are the steps to run the example:
1. Open the Arduino IDE, and enter this code into the editor window:
void setup() {
Serial.begin(9600);
int i;
int test[10];
int *ptr = test;
*ptr = 1;
ptr++;
*ptr = 2;
ptr = ptr + 1;
*ptr = 3;
ptr++;
*ptr = 4;
for(i = 0; i < 4; i++) {
Serial.print("The value in test[");
Serial.print(i);
Serial.print("] is ");
Serial.println(test[i]);
}
}
void loop() {
}
2. Save the code as sketch1102.
3. Click the Upload icon to verify, compile, and upload the sketch to your Arduino unit.
4. Open the serial monitor to run the sketch and view the output.
Figure 11.2 shows the output that you should get from running the sketch.
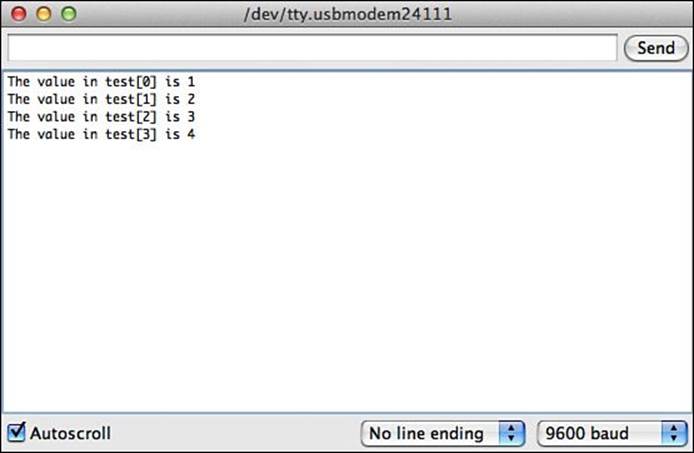
FIGURE 11.2 Output from running the sketch1102 code.
We were able to store values in the array by directly accessing the individual data elements using the pointers. The sketch code uses one line that you may not be familiar with:
int *ptr = test;
We defined the test variable as an array, but in this statement we don’t use the index value for the array. This format is a shortcut to using the reference operator with the array variable:
int *ptr = &test[0];
By referencing just the array variable name without an index value, the Arduino knows you’re referencing the memory location instead of a value in the array.
Strings and Pointers
Another popular use of pointers is working with character array string values. Just like a numeric array, the pointer can reference the starting memory location of the character array. You can use this for a couple of tricks.
Using Pointers for String Manipulation
First, you can use a pointer to reference the individual values in the character array to perform operations on an individual character instead of the entire string. To demonstrate this, let’s go through an example of using pointers to copy a character array string one character at a time.
![]() Try It Yourself: Using Pointers to Copy a String
Try It Yourself: Using Pointers to Copy a String
You can use pointers to reference individual characters within a string value in your sketches. This example defines two strings, and then uses two pointers to copy the characters from one array into the other. Follow these steps to see the example in action:
1. Open the Arduino IDE, and enter this code into the editor window:
void setup() {
Serial.begin(9600);
char string1[] = "This is a test string";
char string2[22];
char *ptr1 = string1;
char *ptr2 = string2;
while(*ptr1 != '\0') {
*ptr2 = *ptr1;
ptr2++;
ptr1++;
}
Serial.print("The result is: ");
Serial.println(string2);
}
void loop() {
}
2. Save the sketch as sketch1103.
3. Click the Upload icon to verify, compile, and upload the sketch to your Arduino unit.
4. Open the serial monitor tool to run the sketch and view the output.
The sketch uses the ptr1 and ptr2 pointers to directly access the individual characters within both character arrays. In the while loop, the code copies the character from one string into the other, and then increments both pointers. Because we know the string value terminates with a NULLcharacter, we just look for that character in the while condition. Figure 11.3 shows the output you should see in the serial monitor window.
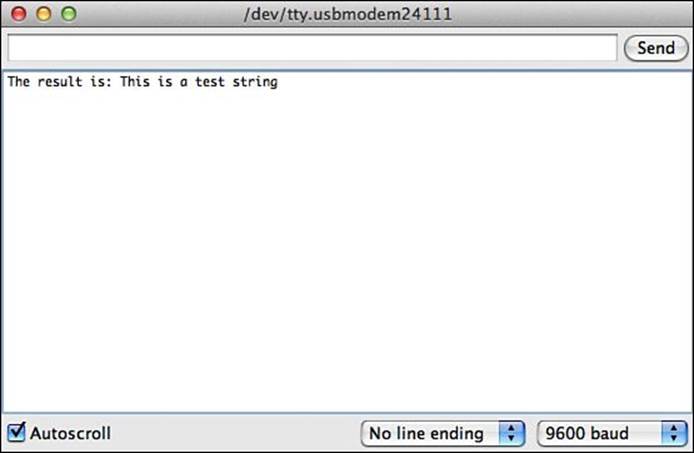
FIGURE 11.3 Output from copying a character array using a pointer.
Using Pointers to Reference Strings
Another popular use for pointers with strings is as a shortcut when declaring a string value:
char *string3 = "This is another test";
When you make this assignment, the Arduino knows to place the string into a memory location as a character array, terminate it with a NULL character, and then assign the starting memory location to the string3 pointer variable. You can then refer to the string variable in your sketch to display the string:
Serial.print(string3);
What’s really cool is that you can then create an array of string values to use in your sketch:
char *messages[3] = {"Sorry, that's too low", "Sorry, that's too high",
"That's the correct answer");
Then you can just use the index value to display the appropriate message that you need:
Serial.print(messages[2]);
This makes working with strings easier than trying to keep track of a lot of separate character array variables.
Combining Pointers and Structures
One of the most complicated and often misunderstood uses of pointers is applying them to data structures. Hour 9, “Implementing Data Structures,” showed how to create a data structure to hold multiple data elements.
Just as with the standard data types, you can create a pointer to point to the start of the memory location where a data structure is stored. The tricky part comes in how to reference the individual data elements inside the data structure.
If you remember from Hour 9, normally you reference a structure data element using the dot notation. For example:
struct sensorInfo (
char date[9];
int indoortemp;
int outdoortemp;
};
struct sensorInfo morningTemps, noonTemps, eveningtemps;
strcpy(morningTemps.date, "01/01/14");
morningTemps.indoortemp = 72;
morningTemps.outdoortemp = 23;
The morningTemp variable represents an instance in memory of the sensorInfo data structure, and the morningTemp.outdoortemp variable represents an individual data value stored in the structure.
You can create a pointer to the sensorInfo data structure using the dereference operator:
struct sensorInfo *testTemps;
Now the testTemps variable points to a location in memory to store a sensorInfo data structure. To access the individual data elements inside the structure, you could use this format:
*(testTemps).indoortemp
However, the C developers decided that was a bit awkward, so they provided a second way to access individual data elements from a data structure pointer:
testTemps->indoortemp
The -> operator indicates the testTemps variable is a pointer, and that we’re trying to access the data value of the indoorTemp element within the structure. Let’s go through a simple example to demonstrate using this in a real Arduino sketch.
![]() Try It Yourself: Using Pointers with Structures
Try It Yourself: Using Pointers with Structures
This example demonstrates how to both store and retrieve data from a data structure using a pointer. Just follow these steps to work out the example:
1. Open the Arduino IDE, and enter this code into the editor window:
void setup() {
Serial.begin(9600);
struct sensorInfo {
char date[9];
int indoortemp;
int outdoortemp;
} morningTemps, *ptr;
strcpy(morningTemps.date, "01/01/14");
morningTemps.indoortemp = 75;
morningTemps.outdoortemp = 25;
ptr = &morningTemps;
Serial.print("For ");
Serial.println(ptr->date);
Serial.print("The indoor temp was: ");
Serial.println(ptr->indoortemp);
Serial.print("The outdoor temp was: ");
Serial.println(ptr->outdoortemp);
strcpy(ptr->date, "01/02/13");
ptr->indoortemp = 70;
ptr->outdoortemp = 20;
Serial.print("For ");
Serial.println(ptr->date);
Serial.print("The indoor temp was: ");
Serial.println(ptr->indoortemp);
Serial.print("The outdoor temp was: ");
Serial.println(ptr->outdoortemp);
}
void loop() {
}
2. Save the sketch code as sketch1104.
3. Click the Upload icon to verify, compile, and upload the sketch to your Arduino unit.
4. Open the serial monitor to run the sketch and view the output.
When the sketch code runs, you should see the output shown in Figure 11.4.
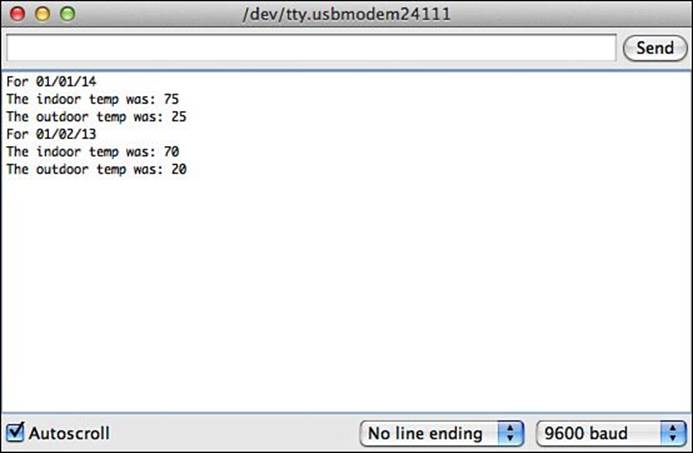
FIGURE 11.4 Using pointers with data structures.
When you define the data structure, the morningTemps variable points to the data structure instance in memory, and the ptr variable stores a memory location that points to the data structure.
The code retrieves the location of the morningTemps variable from memory, and assigns it to the ptr pointer variable:
ptr = &morningTemps;
The code then uses the -> operator to both retrieve the data values stored in the data structure
Serial.println(ptr->date);
and to store new values into the data structure:
ptr->indoortemp = 70;
Warning: Initializing Structures Using Pointers
You can define the values of a data structure variable in the assignment statement:
struct sensorInfo morningTemps = {"01/01/14", 75, 25"};
However, you can’t do that with a pointer variable. The structure pointer variable must point to an existing instance of the data structure in memory.
Using Pointers with Functions
One last pointer topic to cover is how to use pointers with functions. One of the downsides to functions is that the return statement can only return one value back to the calling sketch code. In your sketch writing, you may run into a situation where you need to return more than one value.
One way to solve that problem is to use global variables. However, you saw in Hour 10, “Creating Functions,” that makes the function code reliant on resources external to the function.
Pointers help us solve that problem. When you define a function, instead of passing arguments as values to the function, you can define the function to accept pointers instead. The pointers point to the location in memory where the data is stored.
Because the pointer points to the memory locations, the function can directly access the data in memory, and directly change the data in memory. Although this sounds like it could prove dangerous, with the proper use, this can be a lifesaver in your sketches.
Let’s take a look at an example of passing pointers to a function and see just how that works.
![]() Try It Yourself: Passing Pointers to Functions
Try It Yourself: Passing Pointers to Functions
In this example, you define a function that accepts two pointers as parameters. The function will calculate the addition and subtraction results of two values and make the results of both calculations available to the calling sketch code. Here are the steps to test this:
1. Open the Arduino IDE, and enter this code into the editor window:
void setup() {
Serial.begin(9600);
int a = 5;
int b = 3;
Serial.print("The intitial values are ");
Serial.print(a);
Serial.print(" and ");
Serial.println(b);
addsub(&a, &b);
Serial.print("The addition result is ");
Serial.println(a);
Serial.print("The subtraction result is ");
Serial.println(b);
}
void addsub(int *x, int *y) {
int add = *x + *y;
int sub = *x - *y;
*x = add;
*y = sub;
}
void loop() {
}
2. Save the sketch code as sketch1105.
3. Click the Upload icon to verify, compile, and upload the sketch to your Arduino unit.
4. Start the serial monitor to run the sketch and view the output.
When you run the sketch, you should see the output shown in Figure 11.5.
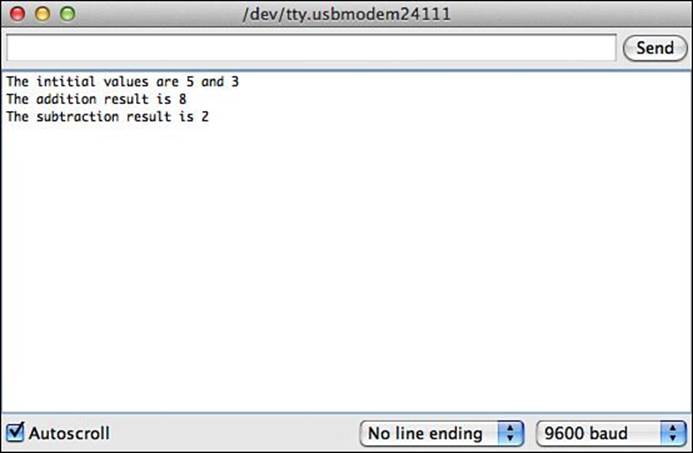
FIGURE 11.5 Using pointers to pass and retrieve values from functions.
The first thing you should notice is that we passed the values to the addsub function as memory locations using the reference operator:
addsub(&a, &b);
Because we’re passing the values as memory locations, we need to define the addsub function parameters as pointers:
void addsub(int *x, int *y) {
Now that the function has the memory locations of both variables, it has to handle them as memory locations instead of data values. When we perform calculations, we need to use the dereference operator to retrieve the data values stored in the memory locations:
int add = *x + *y;
int sub = *x - *y;
And when we return the results, we need to place those values back in the memory locations:
*x = add;
*y = sub;
Notice that the code places the addition result into the memory location passed as the first parameter, and the subtraction result into the memory location passed as the second parameter. When using pointers, it’s important to keep straight which memory locations will contain which return values.
Warning: Returning Values in Pointers
It’s also important to remember that when using pointers to return values from functions, the original values stored in the variables will be overwritten by the return values. If you need to retain the original values passed to the function, you must store them in another variable.
Summary
This hour covered the complicated topic of C data pointers. Pointers allow you to directly access the memory location where you store data on the Arduino, which can be a very powerful tool, but can also cause problems if you’re not careful. The reference operator (&) allows you to retrieve the memory location where a variable is stored in memory, and the dereference operator (*) allows you to retrieve the value stored in a specific memory location. You must define the data type of a pointer so that the Arduino knows what type of data the pointer points to. That allows you to use pointer arithmetic to increase or decrease a pointer to point to additional data elements. Finally, you saw how to use pointers to retrieve more than one data value from a function, by passing memory locations to the function and allowing it to alter the data stored in those memory locations.
The next hour stays on the topic of storing data in memory on the Arduino and covers the different types of memory available and how to store your data in a specific type of memory.
Workshop
Quiz
1. What operator would you use to find the memory location where the variable named test is stored?
A. The dereference operator *test
B. The reference operator &test
C. The incrementor operator test++
D. The decrementor operator test--
2. The dereference operator returns the value stored at the memory location specified by the variable. True or false?
3. How can you tell whether a pointer assignment returns a valid memory address?
Answers
1. B. The reference operator returns the memory location where the Arduino stores the variable.
2. True. The dereference operator reads the value stored in the variable and then goes to that memory location and retrieves the value stored at that location.
3. You can assign a NULL value to the pointer before the assignment statement and then check whether the pointer is still NULL:
int *ptr = NULL;
ptr = &test2;
if (ptr) {
Serial.println("Sorry, the pointer assignment failed");
}
Q&A
Q. Is there a benefit to using pointers rather than arrays?
A. With pointers, you can use pointer arithmetic to iterate through the stored numbers, whereas you can’t do that with an array. That may save some coding from having to iterate through the array indexes.
Q. Is there a benefit to using arrays instead of pointers?
A. The one thing that pointers cannot do is return the number of data elements stored in the memory block. You can use the sizeof function on an array variable to return the number of data elements contained in the array, but that doesn’t work with a pointer variable.
Q. So which is better, pointers or arrays?
A. Both have their use in different applications. You might find that you can use pointers to help cut down on your code if you have to do a lot of manipulation within the array of numbers. However, if you find yourself having to determine the number of values stored, you’ll have to use arrays rather than pointers.
All materials on the site are licensed Creative Commons Attribution-Sharealike 3.0 Unported CC BY-SA 3.0 & GNU Free Documentation License (GFDL)
If you are the copyright holder of any material contained on our site and intend to remove it, please contact our site administrator for approval.
© 2016-2026 All site design rights belong to S.Y.A.