Sams Teach Yourself Arduino Programming in 24 Hours (2015)
Part II: The C Programming Language
Hour 13. Using Libraries
What You’ll Learn in This Hour:
![]() What an Arduino library is
What an Arduino library is
![]() How to use standard Arduino libraries
How to use standard Arduino libraries
![]() How to use contributed libraries
How to use contributed libraries
![]() Creating your own Arduino libraries
Creating your own Arduino libraries
As you start writing larger Arduino sketches, you may find yourself reusing the same pieces of code for different sketches. In Hour 10, “Creating Functions,” you saw how to create functions to help cut down on the amount of code you had to write for a single sketch, but if you wanted to share that code between multiple sketches, you’d still have to copy and paste it into each sketch. This hour shows you how to reuse functions without having to copy code by using libraries.
What Is a Library?
Libraries allow you to bundle related functions into a single file that the Arduino IDE can compile into your sketches. By compiling the library into your sketch, you can use any of the functions defined inside the library code anywhere in your sketch. Instead of having to rewrite the functions in your code, you just reference the library file from your code, and all the library functions become available.
This proves especially handy as you work with different Arduino shields. Each shield requires its own set of functions for accessing the hardware components on the shield, such as the network connection on the Ethernet shield, or the LCD display on an LCD shield. By bundling functions required for each shield into a separate library file, you can include only the libraries you need in your Arduino sketches.
There is a standard format that all Arduino libraries must follow for them to work correctly. The following sections discuss the standard Arduino library format.
Parts of a Library
Arduino libraries consist of two separate files:
![]() A header file
A header file
![]() A code file
A code file
The header file defines templates for any functions contained in the library. It doesn’t contain the full code for the functions, just the template that defines the parameters required for the function, and the data type returned by the function.
For example, to define the template for a simple addition function that requires two integer parameters and returns an integer data type, the header file would contain the following line:
int addem(int, int);
This might look a little odd; the header template doesn’t define any variables for the parameters, only the data types that are required. The compiler uses the header to determine the format of the functions as the sketch code uses them. That way it knows if you’re not using a library function correctly, before it tries to compile the code.
The header file must use a .h file extension, and use the library name as its filename. Thus, if you want to call your library mymath, the header file would be mymath.h.
The code file in the library contains the actual code required to build the function. We’ll take a more in-depth look at the code later on in this hour, but for now, it’s only important to know that the code must be in C++ format. Because of that, the file extension you must use for the code body file is .cpp. So, for the mymath library, you must create the code file mymath.cpp.
Both files work together as the library. The header file helps the compiler know what format the sketch must use to call the library functions. That way it can flag an improperly used library function in your sketch code.
Library Location
The Arduino IDE must know how to access the library header and code files when it compiles your sketch. For that, you must place the library files into a specific folder within the Arduino IDE file structure.
The Arduino IDE stores the library files within its own Arduino folder structure. For Windows, the Arduino IDE installs under the Program Files folder. In OS X, it installs under the Applications/Arduino.app/Contents/Resources/Java/libraries folder. For Linux, there isn’t a default location; the Arduino folder should be wherever you installed the software.
Under the Arduino application folder, you should see a folder named libraries. This is where the standard Arduino library files are stored. Each library is stored under a separate folder, and that folder name represents the name of the library.
By The Way: Personal Libraries
Each user account on the workstation also has a personal library folder where you can place libraries that only you have access to use in the Arduino IDE. For both the Windows and OS X environments, look under the Documents folder for your user account for the Arduino folder. There is another library folder under there where you can store library files.
You can take a look at what libraries are included in your Arduino environment from the Arduino IDE menu bar. Just click the Sketch menu bar option, and then select the Import Libraries submenu option. By default, the Arduino IDE includes several standard libraries to support common shields that you can use with your Arduino unit. The next section discusses how to use the standard library files in your sketches.
Using the Standard Libraries
There are quite a few libraries that come standard with the base Arduino IDE installation. Table 13.1 lists the libraries that you’ll find in the 1.0.5 version of the Arduino IDE.
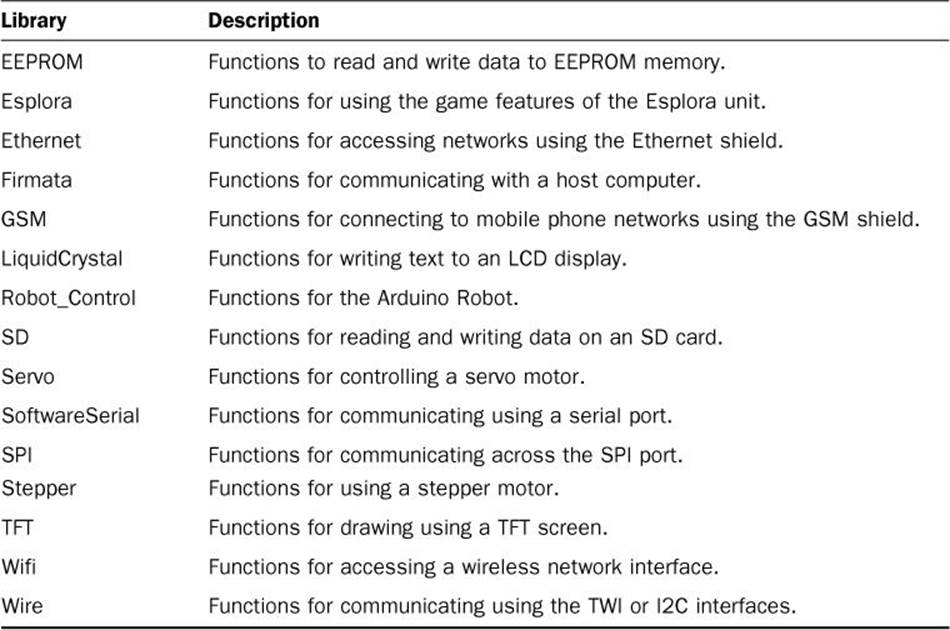
TABLE 13.1 The Standard Arduino Libraries
As you can see from Table 13.1, there are lots of standard libraries associated with Arduino shield devices already available in the Arduino IDE. This makes working with shields a lot easier for the beginning developer. The next sections go through the steps you’ll need to take to use library functions in your sketches.
Defining the Library in Your Sketch
To use a library in your Arduino sketch, just click the Sketch menu option from the menu bar, select the Import Library menu option, and then select the standard library you want to use from the list.
When you select a library, the Arduino IDE adds a line of code to your sketch, referencing the library header file. That line of code uses the #include directive (where libraryheader is the filename of the header file for the library):
#include <libraryheader>
Once you have that line in your sketch, you can start using the functions that are defined in the library.
Referencing the Library Functions
With the header file defined in your sketch, you can reference any of the functions contained in the library without getting a compiler error. However, you have to tell the compiler that the functions you’re using are from a library.
To do that, you must specify the function using the library name as part of the function name:
Library.function()
For example, to use the read function from the EEPROM library, you use the following line:
EEPROM.read(0);
It’s important to know the format for each function that you want to use in the library. Different functions require a different number and types of parameters. Fortunately, the Arduino developers have done an excellent job of documenting all the standard libraries and making that documentation easily available via the web at http://arduino.cc/en/Reference/Libraries.
Compiling the Library Functions
After you’ve created your sketch code using the library functions, you do not have to do anything special to compile it. The header and code body files in the library take care of all that work for us. Just click the Verify icon to verify and compile your code, or the Upload icon to verify, compile, and upload the sketch code to your Arduino unit.
![]() Try It Yourself: Using Libraries in Your Sketch
Try It Yourself: Using Libraries in Your Sketch
This example uses functions from the EEPROM standard library to store data in the EEPROM memory area and then retrieve it. Just follow these steps to run the experiment:
1. Open the Arduino IDE.
2. Click the Sketch option from the menu bar, select Import Library, and then select the EEPROM entry from the list. This places the #include directive at the top of your editor window, pointing to the EEPROM.h header file.
3. Enter the following code in the editor window, under the #include directive:
#include <EEPROM.h>
void setup() {
Serial.begin(9600);
int i, result;
int test[5] = {1, 2, 3, 4, 5};
Serial.println("Saving data in the EEPROM...");
for(i = 0; i < 5; i++) {
EEPROM.write(i, test[i]);
}
Serial.println("Retrieving data from the EEPROM...");
for(i = 0; i < 5; i++) {
result = EEPROM.read(i);
Serial.print("Location ");
Serial.print(i);
Serial.print(" contains value: ");
Serial.println(result);
}
}
void loop() {
}
4. Save the sketch as sketch1301.
5. Click the Upload icon to verify, compile, and upload the sketch code to your Arduino unit.
6. Open the serial monitor to run the sketch and view the output.
The first for loop uses the EEPROM.write function to store values into the first five memory locations in the EEPROM memory area, and the second for loop uses the EEPROM.read function to read those values and display them. You should see the output shown in Figure 13.1 in your serial monitor to tell that the library code worked properly.
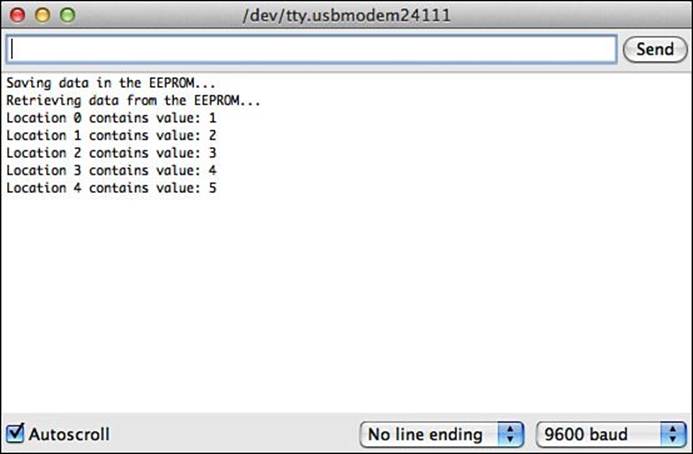
FIGURE 13.1 Using the EEPROM library code to access the EEPROM memory.
Using Contributed Libraries
Besides the standard libraries that the Arduino development group provides, Arduino users have created lots of other libraries. These are called contributed libraries.
One place to find a wealth of contributed libraries is the Arduino Playground website: http://playground.arduino.cc. From there, click the Libraries link on the left-side navigation bar to view a list of all the user-contributed libraries publicly available for the Arduino.
When you find a contributed library, you’ll need to download it to your workstation and add it to your Arduino IDE libraries to be able to use it in your sketches. Fortunately, the Arduino IDE provides an easy interface for adding new libraries.
Watch Out: Multi-User Environments
If you have more than one user using the Arduino IDE on a single workstation, be careful, because the import library feature only imports the library for the current user. If other users on the workstation want to also use the library, they’ll have to import it separately.
The following example shows the steps required to download and install the EEPROMex extended EEPROM library.
![]() Try It Yourself: Adding a Contributed Library
Try It Yourself: Adding a Contributed Library
Once you find a contributed library that you want to use, you must install it into your Arduino IDE environment before you can use it. Here are the steps to do that:
1. Open a browser window and navigate to the http://playground.arduino.cc website.
2. From the main website page, click the Libraries link under the User Code Library section of the navigation bar on the left side of the web page. This should redirect you to this page: http://playground.arduino.cc//Main/LibraryList.
3. From the list of available libraries, scroll down to the Storage section and click the EEPROMex library link. This should redirect you to this page: http://playground.arduino.cc//Code/EEPROMex.
4. Click the link to download the library. Save the library zip file on your workstation in a location where you’ll be able to easily find it.
Watch Out: Incorrect Link
Unfortunately, at the time of this writing, the URL link to the EEPROMex library is incorrect. Let’s hope that gets fixed soon, but if not, the correct link is as follows:
http://thijs.elenbaas.net/downloads/?did=6
5. Close your browser window and start the Arduino IDE.
6. From the Arduino IDE, click Sketch > Import Libraries > Add Library. This produces a navigation dialog box.
7. In the resulting dialog box, navigate to the library zip file that you downloaded, select it, and then click the Open button.
8. The contributed library will be added to your installed libraries. Select Sketch; then Import Libraries from the menu bar. You should see the EEPROMex library listed under the Contributed section.
After you import the contributed library, you can use the functions defined in it without your sketches. Just remember to import the library into your sketch before you try to use them.
Creating Your Own Libraries
Another place where libraries can come in handy is to create your own libraries for functions that you commonly use in your Arduino projects. That helps cut down on the copying and retyping of code between sketches. This section walks through the process of creating your own library, installing it into the Arduino IDE, and then using it in your sketches.
Building Your Library
To create your own library of functions, you’ll need to create both the code file and the header file and then bundle them together into a zip file to add to the Arduino IDE library. It’s usually easier to create the code file first so that you know the formats for the header file.
Creating the Code File
When you create the code file for your library, you must use a slightly different format from what you’re used to using in your Arduino sketches. So far, we’ve been using the C programming language format to create our sketches. To create library files, you must use C++ programming language format.
The C++ language uses an object-oriented programming format to define code classes. A code class bundles the variables and functions into a single class file that is portable between programs.
To start out, your library file must have a #include directive to reference the Arduino.h header file, along with an #include directive to reference the library header file:
#include "Arduino.h"
#include "MyLib.h"
Notice that these #include directives don’t use the < and > symbols, but instead use double quotes around the header file names. That’s because the header files aren’t part of the standard library.
Next, you’ll need to define the functions in your library. The C++ format defines class methods similar to how we defined functions (see Hour 10, “Creating Functions”). With C++ classes, you just define the methods inside a class name in the definition:
Classname::method
For example, to define the method addem in your MyLib library, you use this format:
int MyLibClass::addem(int a, int b) {
int result = a + b;
return result;
}
You can define additional functions in the library by just adding them to the same file. Let’s go through creating the code file to use for our MyLib library file.
![]() Try It Yourself: Creating a Code File
Try It Yourself: Creating a Code File
In this exercise, you create the code file for our demo library. Just follow these steps:
1. Open a standard text editor on your system (such as Notepad in Windows or TextEdit on OS X). We can’t use the Arduino IDE editor because we don’t want to save the code as a sketch.
2. Enter this code into the text editor window:
#include "Arduino.h"
#include "MyLib.h"
int MyLibClass::addem(int a, int b) {
int result = a + b;
return result;
}
int MyLibClass::subem(int a, int b) {
int result = a – b;
return result;
}
int MyLibClass::multem(int a, int b) {
int result = a * b;
return result;
}
MyLibClass MyLib;
3. Save the file to your desktop (or some other common folder) as MyLib.cpp.
Watch Out: Text Files and Filenames
Be careful: Some text editors (such as Notepad) like to automatically append a .txt file extension to filenames when you save them. To get around that in Notepad, use double quotes around the filename when you save the file. For TextEdit on OS X, use the Preferences to select the default file type as Plain Text.
Besides defining the individual functions, the code declares an instance of the class that can be used by the sketch:
MyLibClass MyLib;
This is what allows you to reference functions using the format MyLib.addem in your sketch code, instead of having to create an instance of the entire class itself.
Now that you have the code file for the library created, you can build the header file. That’s shown in the next section.
Creating the Header File
The header file creates a template that defines the functions contained in your library. The tricky thing is that it uses the C++ format to define a class for the functions.
First, it uses a directive to test whether the header file is present when compiling the library code. That uses the #ifndef directive:
#ifndef MyLib_h
#define MyLib_h
// function templates go here
#endif
The #ifndef directive uses a somewhat odd format to check for the MyLib_h declaration. This is used in C++ programs to know when a header file has been included in the code. If the MyLib_h declaration is not found the code uses the #define directive to define it, then defines the function templates. Finally, the entire package is ended with a #endif directive to close out the #ifndef directive block.
The code to actually define the library functions uses the class identifier to define the library class, along with the public and private keywords to define public and private functions:
class MyLibClass
{
public:
// define public functions here
private:
// define private functions here
};
extern MyLibClass MyLib;
Public functions are functions that execute and return values outside of the class definition, such as in your sketches. These are the functions you want to share from your library in your sketches. Private functions allow you to create the “behind the scenes” functions that your public functions use, but aren’t accessible from your sketches.
Let’s go through the steps for creating the header file for our MyLib library package.
![]() Try It Yourself: Creating the Library Code File
Try It Yourself: Creating the Library Code File
Let’s create a library of simple math functions that we can import into our sketches. Follow these steps:
1. Open a standard text editor on your system (such as Notepad in Windows or TextEdit on OS X).
2. Enter this code into the text editor window:
#ifndef MyLib_h
#define MyLib_h
#include "Arduino.h"
class MyLibClass {
public:
int addem(int, int);
int subem(int, int);
int multem(int, int);
};
extern MyLibClass MyLib;
#endif
3. Save the file to your desktop (or some other common folder) as MyLib.h.
Now you have both of the library files necessary to import into the Arduino IDE to use your functions. The next step is to package them for importing.
Building the Zip File
The Arduino IDE imports library files as a single zip-formatted file. You can create zip files using the Compressed Folder option in Windows and copying the MyLib.cpp and MyLib.h files into it.
Creating the zip file on OS X is a little more involved. Here are the steps to do that:
1. Create a folder called MyLib.
2. Copy the MyLib.cpp and MyLib.h files into the MyLib folder.
3. Right-click the MyLib folder, and select Compress “MyLib” from the menu options.
This creates a file called MyLib.zip that you can now import into your Arduino IDE.
Installing Your Library
After you’ve created the zip file with your library files, you’re ready to install it into the Arduino IDE.
![]() Try It Yourself: Installing Your Library
Try It Yourself: Installing Your Library
When you have your zip library file created, you can import it into your Arduino IDE by following these steps:
1. Open the Arduino IDE.
2. Select Sketch from the menu bar.
3. Select Import libraries from the submenu.
4. Select Add library from the list of menu options.
5. This produces a dialog box. Navigate to the location of your library zip file, select it, and then click the Open button.
You should now see your MyLib library appear under the list of Contributed libraries in the Import Libraries section of the Sketch menu. You’re all set to start coding with your new library now!
Using Your Library
Once the MyLib library file is imported into your Arduino IDE, you can use the functions in it in any sketch that you create. Just like any other library, you’ll have to import it into your sketch first, and then you can reference the functions that you defined in the library using the library name, for example:
result = MyLib.addem(i, j);
The Arduino IDE uses the template defined in the library header file to look up the format of the addem function in your library to ensure that you’re using it properly.
Let’s test that by building a sketch that uses all the MyLib library functions.
![]() Try It Yourself: Using Your Library
Try It Yourself: Using Your Library
To use your library, you need to first import it into your sketch, and then you’re ready to use the functions. Here’s a quick example that demonstrates how to use your new library in a sketch:
1. Open the Arduino IDE.
2. Click the Sketch option from the menu bar, then select Import Library, and then select the MyLib entry from the list. This should add the #include directive to the editor window showing your MyLib.h header file.
By The Way: Missing Library
If you don’t see the MyLib library listed in the Imported Libraries, double-check to make sure that there’s a MyLib folder under the libraries section in your Arduino folder path. If not, try to import your library file again.
3. Enter the following code into the editor window, under the #include directive:
#include <MyLib.h>
void setup() {
Serial.begin(9600);
int i = 5;
int j = 3;
int result;
result = MyLib.addem(i, j);
Serial.print("The result of adding them is ");
Serial.println(result);
result = MyLib.subem(i, j);
Serial.print("The result of subtracting them is ");
Serial.println(result);
result = MyLib.multem(i, j);
Serial.print("The result of multiplying them is ");
Serial.println(result);
}
void loop() {
}
4. Save the file as sketch1302.
5. Click the Upload icon to verify, compile, and upload the sketch to your Arduino unit.
6. Open the serial monitor to run the sketch and view the output.
The sketch code imports the MyLib library and then uses the functions defined in it. Figure 13.2 shows the output you should see in your serial monitor window if all went well.
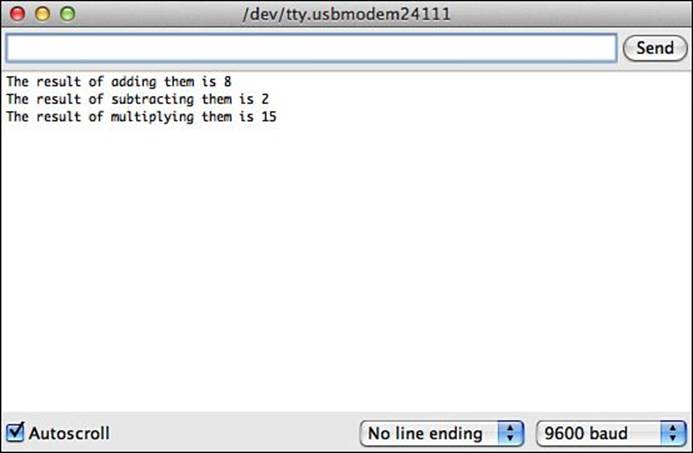
FIGURE 13.2 Output from using the MyLib library in your sketch.
You should now be comfortable with using libraries in your Arduino environment. As you go through the rest of the hours, there will be plenty of times when you’ll need to import libraries to interact with the different shields.
Summary
This hour discussed how to use code libraries with the Arduino IDE. The Arduino IDE comes with some popular libraries already installed, making it easier to write code for the more popular Arduino shields. The hour also showed how to download libraries contributed by Arduino users from the Arduino playground website and import then into your Arduino IDE environment. You also saw how to create your own Arduino libraries with your own functions. That provides an easy way for you to share common code between all of your sketches without having to do a lot of extra typing.
The next hour starts looking at how to interface with the different hardware components of the Arduino, starting out with a look at how to work with the digital interfaces.
Workshop
Quiz
1. What file extension should you use for the code file in a library package?
A. .ino
B. .zip
C. .h
D. .cpp
2. When you import a library into the Arduino IDE, it’s available for use for anyone that uses the workstation. True or false?
3. How do you bundle the library files so that they can be imported into the Arduino IDE?
Answers
1. D. The library code file must use the C++ code format, so it must use the .cpp file extension. You cannot use the standard Arduino .ino sketch file extension for code library files.
2. False. When you import a library into the Arduino IDE, it places the new library files in the user’s local folder path. Other users on the workstation won’t be able to access those library files. Each user who wants to use a contributed library must import the library on their own.
3. The library files must be enclosed in a compressed folder using the zip compression for the Arduino IDE to be able to import them.
Q&A
Q. Is there a limit to how many libraries I can include in a sketch?
A. Yes, each library takes up additional code space in flash memory when you compile and upload your sketch. The more libraries you include, the more room they take. Only include libraries that you know your code uses to help save space in flash memory.
Q. Do I have to bundle my library files in a zip file to import them?
A. Yes, the import utility expects the library files to be in a zipped file. However, you can manually create the library folder in your local Arduino library folder and copy the files manually if you prefer not to use the Arduino IDE import feature.
All materials on the site are licensed Creative Commons Attribution-Sharealike 3.0 Unported CC BY-SA 3.0 & GNU Free Documentation License (GFDL)
If you are the copyright holder of any material contained on our site and intend to remove it, please contact our site administrator for approval.
© 2016-2026 All site design rights belong to S.Y.A.