Sams Teach Yourself Arduino Programming in 24 Hours (2015)
Part III: Arduino Applications
Hour 23. Handling Files
What You’ll Learn in This Hour:
![]() How to use SD cards in an Arduino
How to use SD cards in an Arduino
![]() How to use the Arduino SD library
How to use the Arduino SD library
![]() How to read and write files using an SD card
How to read and write files using an SD card
If you need to store data for long term on your Arduino, you have a couple of options. The EEPROM memory can store data, but there’s a limit to how much space is available. Another option is to use one of the shields that contains an SD card reader, and use the SD library in Arduino to write files to it. This hour shows you just how to do that.
What Is an SD Card Reader?
With the boom in digital camera use, the ability to store large amounts of data in a small footprint became a necessity. One solution was the Secure Digital (SD) memory card format. It was developed in 1999 by a consortium of digital multimedia companies (SanDisk, Matsushita, and Toshiba) as a standard for storing data on a nonvolatile memory card for portable devices, such as digital cameras, mobile phones, and tablet computers. Over the years, there has been some tweaking done to the standard, including the physical size of the cards. At the time of this writing, there are currently three different physical sizes of SD cards:
![]() Standard SD (32mm × 24mm)
Standard SD (32mm × 24mm)
![]() MiniSD (21.5mm × 20mm)
MiniSD (21.5mm × 20mm)
![]() MicroSD (11mm × 15mm)
MicroSD (11mm × 15mm)
Most of the SD card interfaces available for the Arduino utilize the MicroSD card size. However, most MicroSD card packs include a converter that allows you to plug a MicroSD card into a standard SD card reader, often found on workstations and laptops.
Besides the physical changes, as the standard matured there have also been changes in the storage capacity of SD cards. As you can expect, the storage capacity has greatly increased from the original standard of 1MB. Table 23.1 shows the different capacity classes of SD cards.

TABLE 23.1 SD Card Capacity Classes
All SD cards are preformatted by the manufacturer using one of three Windows disk formats. The exFAT format is a proprietary Microsoft format that has not been released to the public at the time of this writing. Because of that, the current Arduino SD library cannot interface with SDXC cards. That means the maximum size of SD card you can use with your Arduino is 32GB.
Watch Out!: Reformatting SD Cards
You may be tempted to purchase an SDXC card and try to reformat it to the FAT32 file system. Unfortunately, that technique has had mixed results with the current Arduino SD readers and library functions. Currently, it’s not recommended to reformat SDXC cards. Instead, use an SDSC or SDHC card less than 32GB in size.
Also, if you must reformat an SDHC card, it’s recommended to use the FAT16 format for cards up to 4GB in size.
The FAT16 file system format requires that you name files using the old 8.3 naming standard: an eight-character (or less) name, followed by a period, followed by a three-character (or less) file extension. Because of that requirement, the SD Library handles all files using the 8.3 format, even if you’re using an SD card formatted with the FAT32 file system format.
When purchasing an SD card, besides the physical size and the storage capacity, there’s one other feature that you need to take into consideration. There are also different classes of write speeds for the SD cards:
![]() Class 2: 2 MBps
Class 2: 2 MBps
![]() Class 4: 4 MBps
Class 4: 4 MBps
![]() Class 6: 6 MBps
Class 6: 6 MBps
![]() Class 10: 10 MBps
Class 10: 10 MBps
The Arduino SD card interfaces can use SD cards from any of these speed classes.
Watch Out!: SD Card Durability
The downside to SD cards is that they have a limited life span. The electronics contained in the card that store the data have a limited number of times the card can be written to, as well as how long the data can be retained on a card. Most SD cards are manufactured to retain data for 10 years, and can be written to about 100,000 times. After that, the card may still work, but may become unreliable.
SD Cards and the Arduino
The great thing about using an SD card in your Arduino project is that it provides an easy way to share data between your Arduino and a workstation. Because SD cards use the standard Microsoft FAT16 or FAT32 file system format, you can read and write to them from both Windows and OS X workstations (assuming your workstation has an SD card reader).
Currently, two official Arduino shields support SD cards on the Arduino:
![]() Ethernet Shield
Ethernet Shield
![]() WiFi Shield
WiFi Shield
Figure 23.1 shows the Arduino Ethernet Shield with a MicroSD card in it.
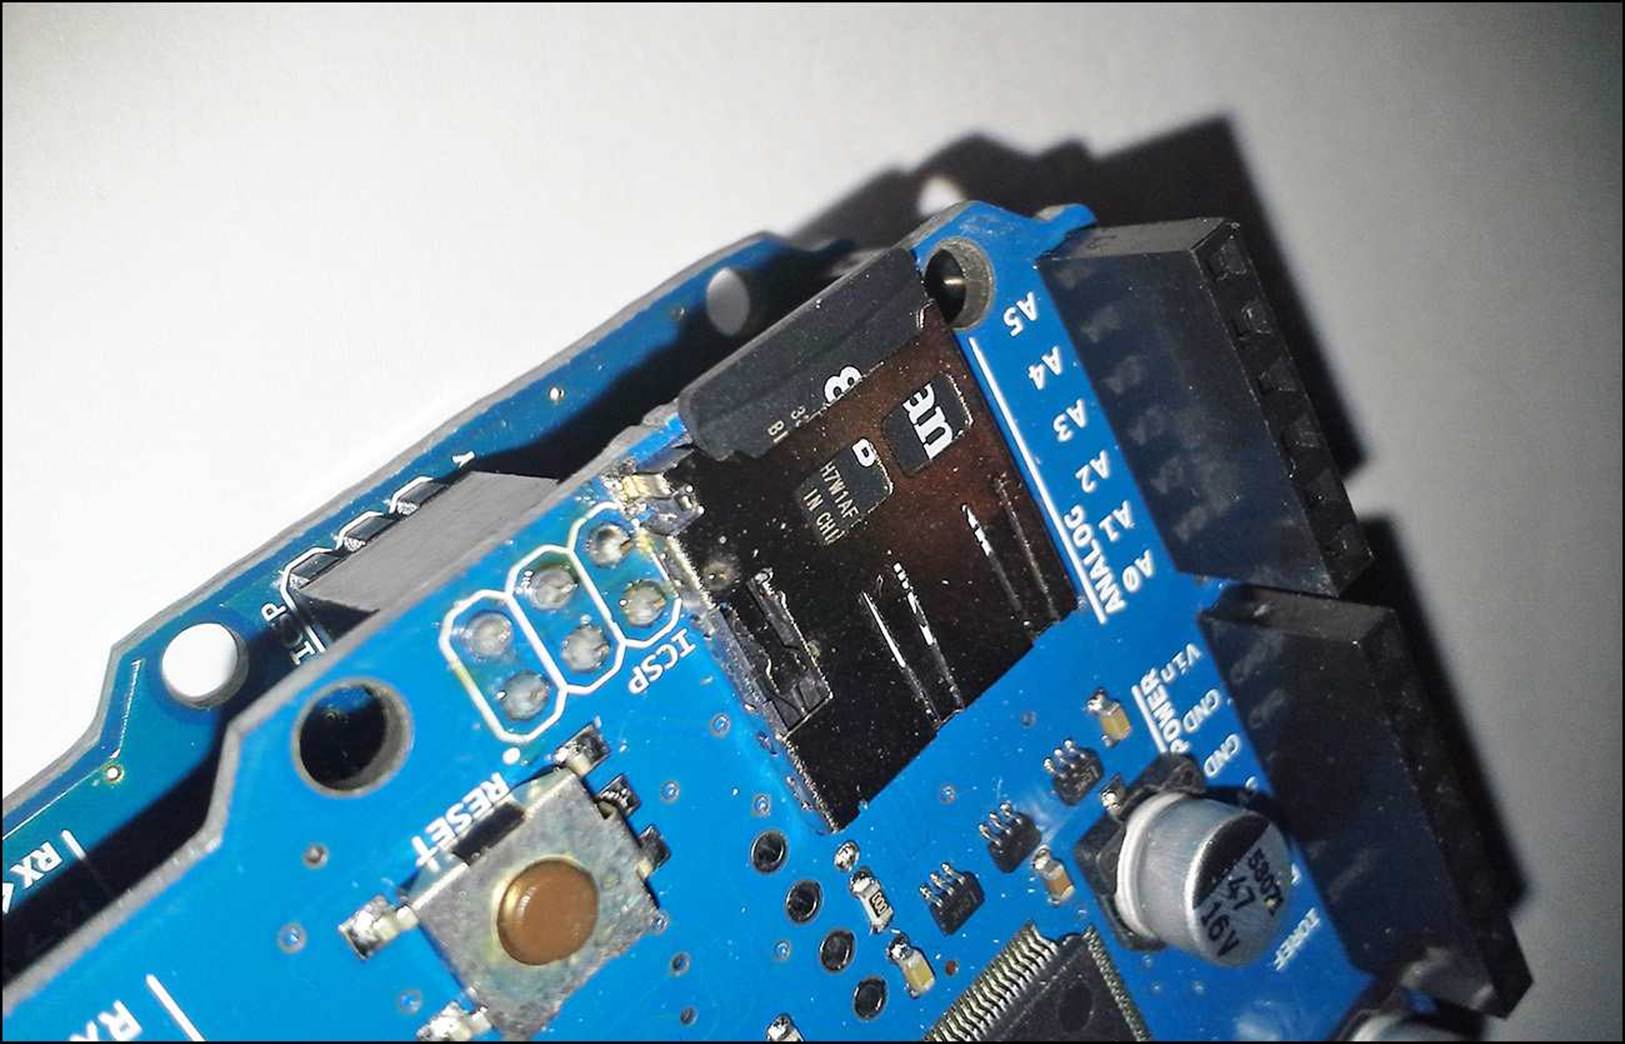
FIGURE 23.1 The Arduino Ethernet Shield with the SD card reader.
Along with those two shields, the Arduino Ethernet device also includes an SD interface. All three platforms accept the MicroSD card size.
Besides the standard Arduino shields, some third-party companies have created SD card interfaces, such as the Adafruit Data Logging Shield, the Wave Shield, and the Micro-SD breakout board. For projects that just require a simple SD card interface, the Micro-SD breakout board contains everything you need in one small package.
All Arduino SD cards use the standard SPI pins to communicate with the SD card interface. For the Arduino Uno, that’s digital pins 11, 12, and 13. For the Mega, it’s pins 50, 51, and 52.
Besides those pins, the SD card readers also need to use an interface for the Select pin. By default, the Uno uses digital interface 10 as the Select pin (SS) to tell the SD card interface when the Arduino is communicating with it. However, with the Ethernet and WiFi shields, that’s been moved to digital interface 4.
The SD Library
The Arduino IDE contains the SD library for interfacing with SD cards. You can use this library whether you’re using an SD reader contained in a shield, a breakout card, or the Arduino itself.
There SD library consists of two classes of methods:
![]() SD class: Provides access to the SD card and manipulate files and directories on the card.
SD class: Provides access to the SD card and manipulate files and directories on the card.
![]() File class: Provides access for reading and writing individual files on the SD card.
File class: Provides access for reading and writing individual files on the SD card.
The following sections detail the methods contained in each of these classes.
The SD Class
The SD class provides methods to initialize the SD card interface and for working with files and directories from a high-level, such as opening a file or creating a directory. Table 23.2 shows the methods that are available in the SD class.
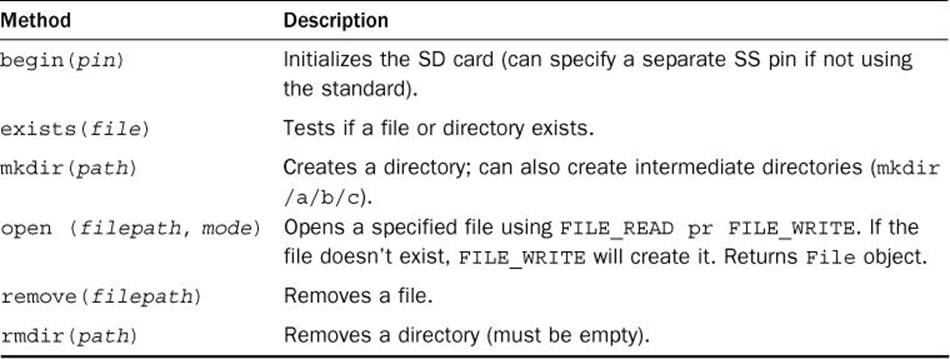
TABLE 23.2 The SD Class Methods
You’ll need to use the begin method before you can do anything with the SD card. The SD library needs to know the Arduino interface pin used to control access to the SD card reader (called the SS pin). For most SD card interfaces, that’s pin 10, but for the Ethernet and WiFi shields, pin 10 is used for the network connection, so the SS pin is moved to pin 4. Just specify the pin used as the parameter to the begin method:
SD.begin(4);
After initializing the SD interface, you use the open method to open a specific file for reading or writing. The open method returns a file handle to refer to a specific file. Since Arduino version 1.0, you can have multiple file handles open at the same time.
SD.begin(4);
File myFile;
myFile = SD.open("test.txt", FILE_WRITE);
The open method must specify both the name of the file to access, and the mode to open it (either FILE_READ or FILE_WRITE). After you have a file handle open, you can interact with the file using the methods in the File class.
The File Class
The File class provides the methods to read data from files, write data to files and a few methods for getting file information and handling file pointers. Table 23.3 shows these methods.
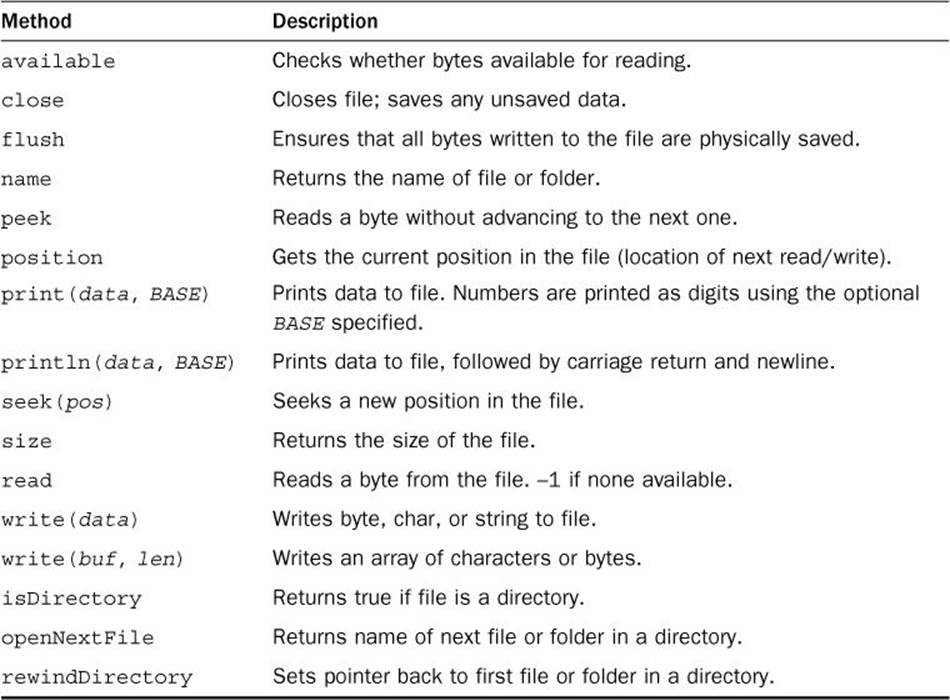
TABLE 23.3 The File Class Methods
The File class uses the file handle that the SD begin method creates when opening a file. That process looks like this:
SD.begin(4);
File myfile = SD.open("test.txt", FILE_WRITE);
myFile.println("This line is saved in the file");
myFile.close();
The myfile variable contains the file handle that points to the myfile.txt file on the SD card. You can then use the print, println, or write methods to write data to the file, or the read method to read data from the file.
Watch Out!: Flushing Data
When you write data to the SD card file, the Arduino library stores the data in an output buffer. The data isn’t actually written to the file until you use either the flush or close methods. To prevent corruption, be careful that you don’t remove the SD card until your sketch runs the close method to close the file.
Interfacing with the SD Card
Now that you’ve seen the classes and methods that you need to work with files, it’s time to start writing some sketches to use them. The following sections walk through the steps you need to create, read, update, and delete files and folders on your SD card. To run these examples, make sure that you have a formatted SD card in your SD card reader.
Writing to Files
Thanks to the SD library, writing data to a file on an SD card from your Arduino sketch is a simple process:
#include <SD.h>
File myFile;
int value;
unsigned long time;
void setup() {
pinMode(10, OUTPUT);
SD.begin(4);
}
void loop() {
myFile = SD.open("test.csv", FILE_WRITE);
time = millis();
if (myFile) {
value = analogRead(0);
myFile.print(time);
myFile.print(",");
myFile.println(value);
}
myFile.close();
delay(60000);
}
At the current time, a quirk in the SD library requires that you set digital interface 10 for output mode, even if your SD card reader doesn’t use pin 10 for the SS interface. In this example, the sketch opens a file named test.txt on the SD card. If the file doesn’t exist, the open method creates it.
The loop function first opens the file, writes the sensor data to it, and then closes the file. This helps ensure that the file is properly closed if you turn off the Arduino between loop iterations.
Reading Files
Reading files from the SD card can be a little tricky. You must know what data to expect when you read the data using your sketch. Fortunately, a few tricks can help with that process.
One trick is to pick a standard format to save the data in the file. The most popular way to save multiple data values in a text file is to use the comma-separated values (CSV) format. This format separates multiple values using a comma, as follows:
1002001,30,23
Each line in the CSV file represents a separate data record, often related to a separate reading iteration. The separate values within the data record are separated using commas. When you read the value from your sketch, you can use standard string functions (see Hour 8, “Working with Strings”) to separate out the different values.
The other tricky part to this process is that the File read method can only read 1 byte of data at a time. You’ll need to use more of the string functions to concatenate the data bytes to create the full string and to parse the strings into meaningful data:
#include <SD.h>
File myFile;
char ch;
void setup() {
pinMode(10, OUTPUT);
Serial.begin(9600);
SD.begin(4);
myFile = SD.open("test.csv", FILE_READ);
if (!myFile) {
Serial.println("Unable to open file");
} else
{
while(myFile.available()) {
ch = myFile.read();
Serial.write(ch);
}
Serial.println("No more data available");
myFile.close();
}
}
void loop() {
}
The sketch tries to open the test.csv file, and if successful, it reads the file 1 byte at a time, displaying each character in the serial monitor until there is no more data in the test.csv file to read.
Working with Folders
By default, all the files that you create on the SD card are placed in the root folder of the drive. If you’re using the same SD card for multiple projects, of if you need to store multiple types of data on the same SD card, you’ll want to organize the data into folders.
The SD class provides methods for creating, listing, and deleting folders. First, let’s go through an example of creating a couple of folders:
#include <SD.h>
void setup() {
pinMode(10, OUTPUT);
SD.begin(4);
SD.mkdir("/test1");
SD.mkdir("/test2");
SD.mkdir("/test3/test4");
}
void loop() {
}
When the path specified in the mkdir method contains subfolders, the SD library will create any parent folders. If you remove the SD card and place it in a workstation or laptop SD card reader, you’ll see the test3 folder at the root level, with the test4 folder under the test3 folder.
Now that you have some folders, here’s an example that lists the folders:
#include <SD.h>
File rootFolder;
File myFile;
void setup() {
Serial.begin(9600);
pinMode(10, OUTPUT);
SD.begin(4);
rootFolder = SD.open("/", FILE_READ);
while(true) {
myFile = rootFolder.openNextFile();
if (!myFile) {
break;
}
if (myFile.isDirectory()) {
Serial.println(myFile.name());
}
}
}
void loop() {
}
After you have the folders created, you can store your data files in them. To do that, just use the folder in the filename in the open method:
SD.open("/folder1/test.txt", FILE_READ);
Notice that you use forward slashes to separate the folder name from the filename, even though the SD card is formatted using a Windows file system.
Finally, if you want to remove folders, you use the rmdir method:
#include <SD.h>
void setup() {
pinMode(10, OUTPUT);
SD.begin(4);
SD.rmdir("/test1");
}
void loop() {
}
After running this example, place the SD card into a workstation or laptop SD card reader to view the folders. You should see that the test1 folder is gone.
Storing Sensor Data
Let’s go through an example that stores data from a temperature sensor in a file on the SD card. You can then remove the SD card from the Arduino when you’re done and read it on a standard workstation or laptop that contains an SD card reader.
![]() Try It Yourself: Temperature Logger
Try It Yourself: Temperature Logger
In this exercise, you’ll create a sketch that polls a TMP36 temperature sensor every minute and writes the values to an SD card. First you need to build a quick circuit to interface the TMP36 analog temperature sensor to the analog interface 0 pin on the Arduino:
1. Plug the TMP36 into a breadboard so that each lead is on a separate rail, and the flat side of the TMP36 is on the left side.
2. Connect the top lead of the TMP36 to the 5V pin on the Arduino.
3. Connect the bottom lead of the TMP36 to the GND pin on the Arduino.
4. Connect the middle lead of the TMP36 to the analog 0 interface on the Arduino.
That’s all the hardware you need for this exercise. Next, you need to create the sketch code to read the sensor, convert it to a temperature, and then store the value in a data file on the SD card every minute. Just follow these steps:
1. Open the Arduino IDE, and enter this code into the editor window:
#include <SD.h>
File myFile;
unsigned long int time;
int tempF;
void setup() {
Serial.begin(9600);
pinMode(10, OUTPUT);
SD.begin(4);
}
void loop() {
myFile = SD.open("temp.csv", FILE_WRITE);
time = millis();
tempF = getTemp();
myFile.print(time);
myFile.print(",");
myFile.println(tempF);
myFile.close();
Serial.print(tempF);
Serial.print(" recorded at time ");
Serial.println(time);
delay(60000);
}
int getTemp() {
int output;
float voltage, tempC, tempF;
output = analogRead(A0);
voltage = output * (5000.0 / 1024.0);
tempC = (voltage - 500) / 10;
tempF = (tempC * 9.0 / 5.0) + 32.0;
return int(tempF);
}
2. Save the sketch as sketch2301.
3. Click the Upload icon to verify, compile, and upload the sketch to your Arduino unit.
4. Open the serial monitor, then let the sketch run for 5 or 10 minutes. Figure 23.2 shows the output you should see in the serial monitor.
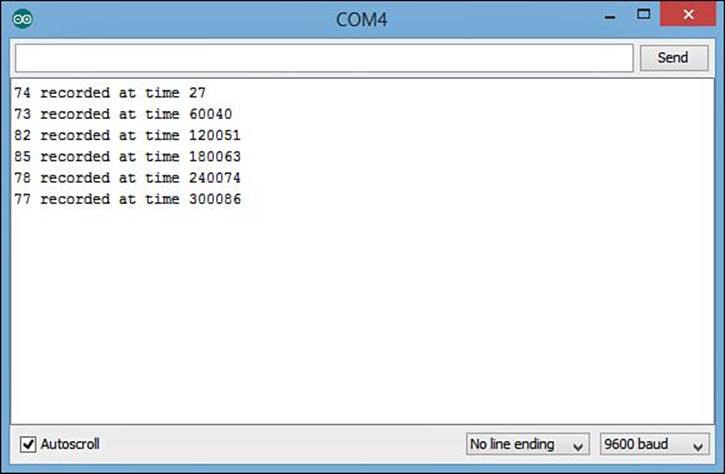
FIGURE 23.2 Output from the temperature logger sketch.
5. Remove the Arduino from the power source (either the USB cable or external power).
6. Eject the SD card from the SD card reader on the Arduino (or shield device), and insert it into the SD card reader on a workstation or laptop.
7. View the contents of the SD card using the file browser on your OS (such as Finder on OS X, or File Explorer on Windows).
8. Open the temp.csv file using either a text editor, or if available, a spreadsheet application such as Excel or LibreOffice Calc. Figure 23.3 shows what the data looks like in Excel.
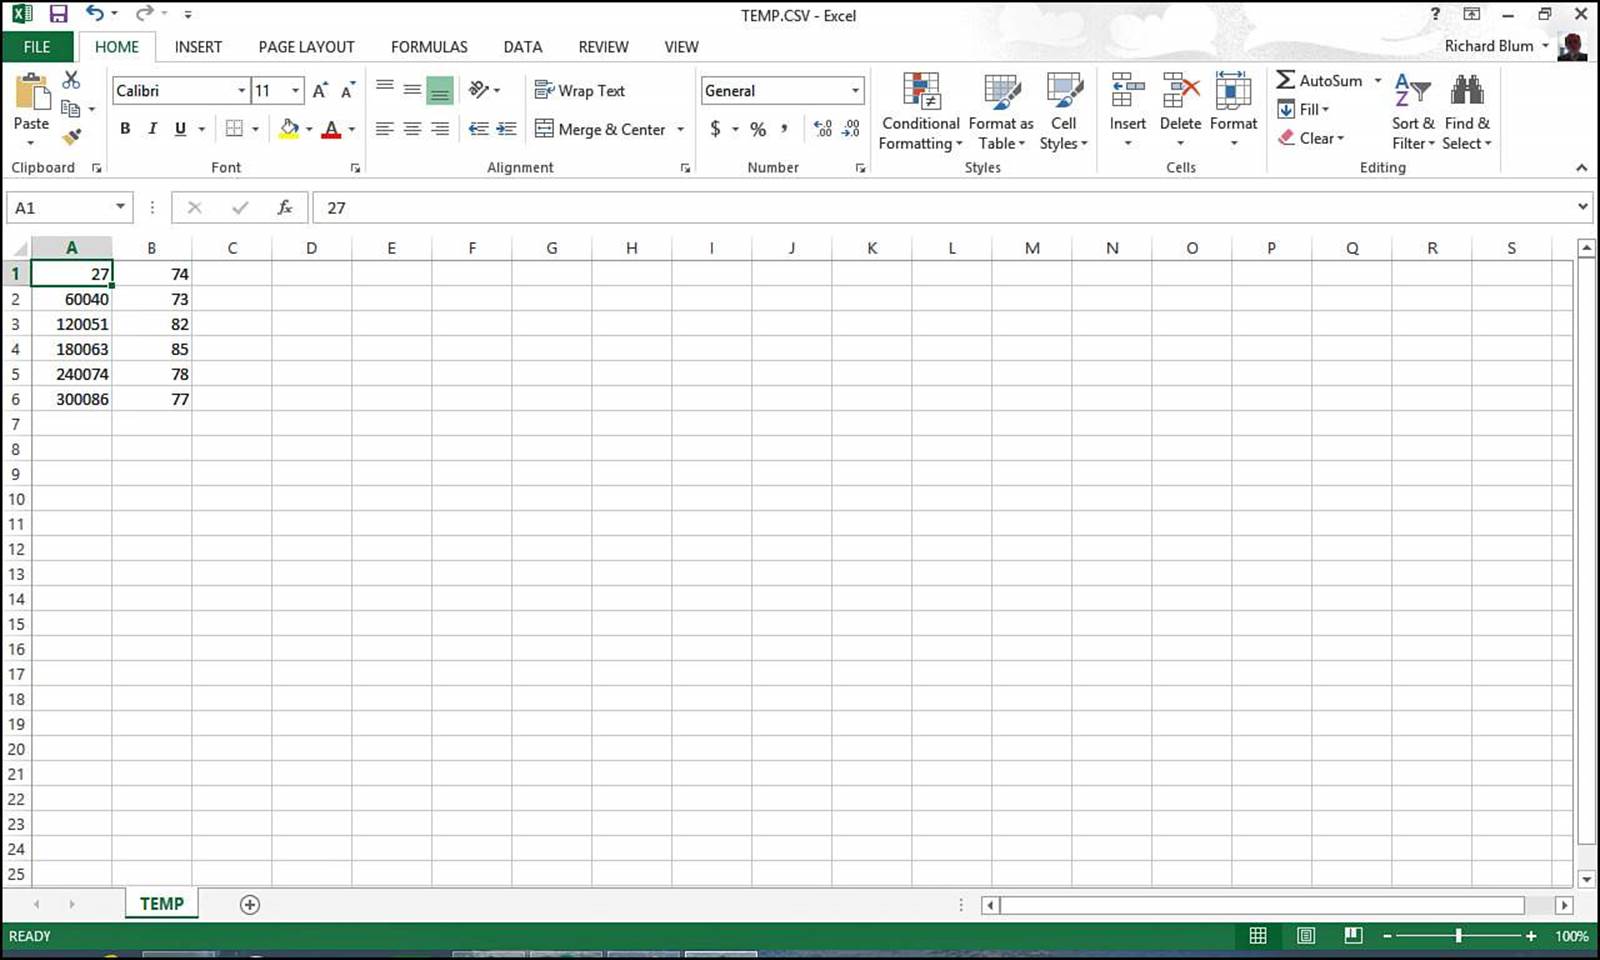
FIGURE 23.3 Viewing the temp.csv log file using Excel.
When you open the data file, you should see the sensor value.
Summary
This hour discussed how to use the SD card readers available on some shield devices as well as the Arduino Ethernet device. You use the SD library to interface with the SD card. The SD library allows you to both read and write to files on the card, as well as create and remove folders.
The next hour wraps up this book by showing how to create a complete Arduino project from start to finish. A few different steps are required to get a complete project up and running properly. The last hour walks through all of these steps to give you an idea of how to create your own Arduino projects.
Workshop
Quiz
1. What physical size of SD cards do most SD card readers available for the Arduino use?
A. Standard SD
B. MiniSD
C. MicroSD
D. SDXC
2. Data written by the Arduino on an SD card can be read from any workstation or laptop that supports an SD card reader. True or false?
3. What File method should you always use in your sketches to ensure that the data files aren’t corrupted if the power is lost to the Arduino?
Answers
1. The Arduino Ethernet device, as well as the Ethernet Shield and WiFi Shield, all use the MicroSD cards for storing data.
2. True. The Arduino SD library can write data using the standard FAT16 or FAT32 file formats, allowing them to be written on any Windows, OS X, or Linux system.
3. You should always use the close method to properly close the data files when not in use. If the power is lost while the file is closed, you won’t lose any data.
Q&A
Q. Can I have more than one file open on an SD card at the same time?
A. Yes. The current version of the SD library allows multiple files to be open at the same time.
Q. Can I use a real date and time value when logging sensor data into a data file?
A. Yes, but it’s tricky. By default, the Arduino doesn’t include a real-time clock, but there are solutions to that. Adafruit provides a hardware real-time clock add-on that you can add to your Arduino circuit to track the current date and time. Also, there is a DateTime software library available for the Arduino that can keep track of the date and time after its been set when the sketch starts.
All materials on the site are licensed Creative Commons Attribution-Sharealike 3.0 Unported CC BY-SA 3.0 & GNU Free Documentation License (GFDL)
If you are the copyright holder of any material contained on our site and intend to remove it, please contact our site administrator for approval.
© 2016-2026 All site design rights belong to S.Y.A.