Sams Teach Yourself Arduino Programming in 24 Hours (2015)
Part I: The Arduino Programming Environment
Hour 3. Using the Arduino IDE
What You’ll Learn in This Hour:
![]() The Arduino IDE interface layout
The Arduino IDE interface layout
![]() Using the features of the Arduino IDE menu bar
Using the features of the Arduino IDE menu bar
![]() Configuring the Arduino IDE to work with your Arduino
Configuring the Arduino IDE to work with your Arduino
![]() Using the serial monitor feature in the Arduino IDE
Using the serial monitor feature in the Arduino IDE
The Arduino IDE software package makes it easier to create and work with Arduino programs. This hour covers the different parts of the Arduino IDE interface and how to use them to create your Arduino programs.
Overview of the IDE
The Arduino integrated development environment (IDE) itself is a Java program that creates an editor environment for you to write, compile, and upload your Arduino programs. Figure 3.1 shows the basic layout of the Arduino IDE interface.
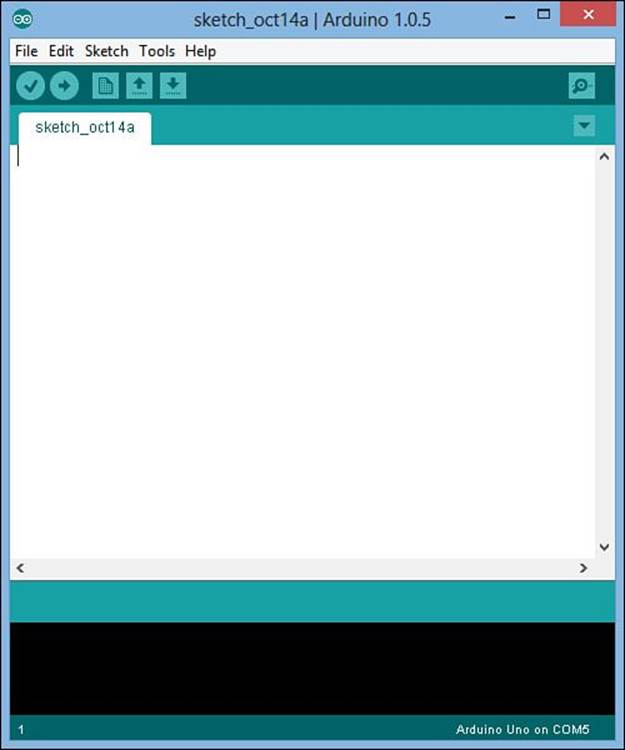
FIGURE 3.1 The Arduino IDE main window.
The Arduino IDE interface contains five main sections:
![]() The menu bar
The menu bar
![]() The taskbar
The taskbar
![]() The editor window
The editor window
![]() The message area
The message area
![]() The console window
The console window
Let’s walk through each of these different sections and explain what they’re for and how to use them.
Walking Through the Menus
The menu bar provides access to all the features of the Arduino IDE. From here, you can create a new program, retrieve an existing program, automatically format your code, compile your program, and upload your program to the Arduino unit. The following sections discuss each of the options you’ll find in the menu bar.
The File Menu
The File menu contains all the file-handling options required to load and save sketches, along with a couple of miscellaneous options that don’t fit in any other menu bar category. The options available under the File menu are described in the following subsection.
New
The New option does what you’d probably expect it to do: It creates a new Arduino sketch tab in the main window. When you select the option to create a new sketch, the Arduino IDE automatically assigns it a name, starting with sketch_, followed by the month and date (such as jan01), followed by a letter making the sketch name unique. When you save the sketch, you can change this sketch name to something that makes more sense.
Open
The Open option opens an existing sketch using the File Open dialog box of the operating system. The Open dialog box will open in the default sketchbook folder for your Arduino IDE (set in the Preferences option, discussed later). The File Open dialog box allows you to navigate to another folder area if you’ve saved sketches on a removable media device, such as a USB thumb drive.
Tip: Working with Older Sketches
Older versions of the Arduino IDE saved sketch files using a different format and file extension name (.pde) than the 1.0 Arduino IDE series. The 1.0 series can open the older sketch files, but when you save the updated sketch, it will automatically convert it to the newer.ino format if you set that option in the Preferences.
Sketchbook
The Sketchbook option provides a quick way to open your existing sketches. It lists all the sketches that you’ve saved in the default sketchbook area in the Arduino IDE. You can select the sketch to load from this listing.
Examples
The Examples option provides links to lots of different types of example sketches provided by the Arduino developers. The examples are divided into different categories, so you can quickly find an example sketch for whatever type of project you’re working on.
When you select an example sketch, the sketch code automatically loads into the editor window. You can then verify and upload the example sketch directly, or you can modify the sketch code before compiling and uploading.
Caution: Modifying Example Sketches
If you modify the example sketch and try to save it, the Arduino IDE will warn you that the example sketch is saved as a read-only file and not let you update it. If you want to save your modifications, use File > Save As from the menu bar to save the modified sketch as a different filename in your standard sketchbook folder.
Close
The Close option closes out the current sketch editor window and safely closes the sketch file. Closing the sketch will also exit the Arduino IDE interface.
Save
The Save option allows you to save a previously saved sketch in your sketchbook area using the same filename. Be careful when using this option, as the Arduino IDE will just overwrite the existing saved sketch and it won’t keep any past versions automatically for you.
Save As
The Save As option allows you to save a sketch using a new filename. The Arduino IDE saves each sketch under a separate folder under the Arduino IDE sketchbook folder area. It saves the sketch file using the .ino file extension.
Upload
The Upload option uploads the compiled sketch code to the Arduino unit using the USB serial interface. Make sure that the Arduino unit is connected to the USB port before you try to upload the sketch.
Upload Using Programmer
The Upload Using Programmer option is for more advanced users. The normal Upload option uploads your sketch to a special location in the flash program memory area on the ATmega microcontroller. The Upload Using Programmer option writes the program to the start of the flash memory area on the ATmega microcontroller. This requires additional coding in your sketch so that the Arduino can boot from your program.
Tip: The Arduino Bootloader
The Arduino system adds a special bootloader program to the start of the microcontroller’s flash memory area. The bootloader runs when the Arduino powers on, and automatically jumps to your program code. It makes formatting and running your Arduino code easier because you don’t have to worry about the boot code.
However, the Arduino IDE is versatile enough to allow advanced users to upload programs directly to the program area on the microcontroller. When you do this, your program code is responsible for creating a fully operational program.
Beginners are best off using the Arduino bootloader format to write the program code. Not using the bootloader means that you need to include more code in your Arduino program to tell the microcontroller how to handle your program.
Page Setup
The Page Setup option allows you to define formatting options for printing your sketch on a printer connected to your workstation.
The Print option allows you to send the sketch text to a printer connected to your workstation.
Preferences
The Preferences option displays a dialog box that contains several settings for the Arduino IDE that you can change:
![]() Sketchbook Location: Sets the folder used to store sketches saved from the Arduino IDE.
Sketchbook Location: Sets the folder used to store sketches saved from the Arduino IDE.
![]() Editor Language: Sets the default language recognized in the text editor.
Editor Language: Sets the default language recognized in the text editor.
![]() Editor Font Size: Sets the font size used in the text editor.
Editor Font Size: Sets the font size used in the text editor.
![]() Show Verbose Output: Displays more output during either compiling or uploading. This proves handy if you run into any problems during either of these processes.
Show Verbose Output: Displays more output during either compiling or uploading. This proves handy if you run into any problems during either of these processes.
![]() Verify Code After Upload: Verifies the machine code uploaded into the Arduino against the code stored on the workstation.
Verify Code After Upload: Verifies the machine code uploaded into the Arduino against the code stored on the workstation.
![]() Use External Editor: Allows you to use a separate editor program instead of the built-in editor in the Arduino IDE.
Use External Editor: Allows you to use a separate editor program instead of the built-in editor in the Arduino IDE.
![]() Check for Updates on Startup: Connects to the main Arduino.cc website to check for newer versions of the Arduino IDE package each time you start the Arduino IDE.
Check for Updates on Startup: Connects to the main Arduino.cc website to check for newer versions of the Arduino IDE package each time you start the Arduino IDE.
![]() Update Sketch Files to New Extension on Save: If you have sketches created using older versions of the Arduino IDE, enable this setting to automatically save them in the new .ino format.
Update Sketch Files to New Extension on Save: If you have sketches created using older versions of the Arduino IDE, enable this setting to automatically save them in the new .ino format.
![]() Automatically Associate .ino Files with Arduino: Allows you to double-click .ino sketch files from the Windows Explorer program to open them using the Arduino IDE.
Automatically Associate .ino Files with Arduino: Allows you to double-click .ino sketch files from the Windows Explorer program to open them using the Arduino IDE.
You can change these settings at any time, and they will take effect immediately in the current Arduino IDE window.
Quit
Closes the existing sketch and exits the Arduino IDE window.
The Edit Menu
The Edit menu contains options for working with the program code text in the editor window. The options available under the Edit menu are:
Undo
This feature enables you to take back changes that you make to the sketch code. This returns the code to the original version.
Redo
This feature enables you to revert back to the changes you made (undoes an Undo command).
Cut
This feature enables you to cut selected text from the sketch code to the system Clipboard. The selected text disappears from the editor window.
Copy
This feature allows you to copy selected text from the sketch code to the system Clipboard. With the Copy feature, the selected text remains in place in the sketch code.
Copy for Forum
This interesting option is for use if you interact in the Arduino community forums. If you post a problem in the forums, members will often ask to see your code. When you use this feature, the Arduino IDE copies your sketch code to the Clipboard and retains the color formatting that the editor uses to highlight Arduino functions. When you paste the code into your forum message, it retains that formatting, making it easier for other forum members to follow your code.
Copy as HTML
The Copy as HTML option also keeps the color and formatting features of the editor, but embeds them as HTML code in your program code. This option comes in handy if you want to post your sketch code onto a web page to share with others.
Caution: HTML Code in Sketches
Be careful when using this feature, because it embeds HTML tags into your sketch code. You can’t run the code this option generates in your Arduino IDE editor; it’s meant only for pasting into a web page HTML document.
Paste
As you might expect, the Paste option copies any text currently in your system Clipboard into the editor window.
Select All
Yet another common editor feature, the Select All option highlights all the text in the editor window to use with the Copy or Cut options.
Comment/Uncomment
You use this handy feature when troubleshooting your sketch code. You can highlight a block of code and then select this option to automatically mark the code as commented text. The compiler ignores any commented text in the sketch code.
When you finish troubleshooting, you can highlight the commented code block and select this option to remove the comment tags and make the code active again.
Increase Indent
This option helps format your code to make it more readable. It increases the space used to indent code blocks, such as if-then statements, while loops, and for loops. This helps the readability of your code.
Decrease Indent
This option enables you to reduce the amount of space placed in front of indented code blocks. Sometimes if code lines run too long, it helps to reduce the indentation spaces so that the code more easily fits within the editor window.
Find
The Find option provides simple search and replace features in the editor window. If you just want to find a specific text string in the code, enter it into the Find text box. You can select or deselect the Ignore Case check box as required. The Wrap Around check box helps you find longer text strings that may have wrapped around to the next line in the editor window.
If you need to quickly replace text, such as if you’re changing a variable name in your sketch code, you can enter the replacement text in the Replace With text box. You can then replace a single instance of the found text, or click the Replace All button to replace all occurrences of the text with the replacement text.
Find Next
The Find Next option finds the next occurrence of the previously submitted search text.
Find Previous
The Find Previous option finds the previous occurrence of the previously submitted search text.
Use Selection for Find
This option lets you control just what section of your code the Find feature looks in. Instead of searching an entire code file, you can highlight a section of the code and use this feature to find a text string just within the highlighted section.
The Sketch Menu
The Sketch menu provides options for working with the actual sketch code. The following subsections describe the various options available under the Sketch menu.
Verify/Compile
The Verify/Compile option checks the Arduino program for any syntax errors, and then processes the code through the avr-gcc compiler to generate the ATmega microcontroller machine code. The result of the Verify/Compile process displays in the console window of the Arduino IDE. If any errors in the program code generate compiler errors, the errors will appear in the console window.
Show Sketch Folder
The Show Sketch Folder option shows all the files stored in the folder associated with the sketch. This comes in handy if you have multiple library files stored in the sketch folder.
Add File
The Add File menu option enables you to add a library file to the sketch folder.
Import Library
The Import Library menu option automatically adds a C language #include directive related to the specific library that you select. You can then use functions from that library in your program code.
The Tools Menu
The Tools menu provides some miscellaneous options for your sketch environment, as described in the following subsections.
Auto Format
The Auto Format option helps tidy up your program code by indenting lines of code contained within a common code block, such as if-then statements, while loops, and for loops. Using the Auto Format feature helps make your program code more readable, both for you and for anyone else reading your code.
Archive Sketch
This feature saves the sketch file as an archive file for the operating system platform used. For Windows, this appears as a compressed folder using the zip format. For Linux, this appears as a .tar.gz file.
Fix Encoding and Reload
This option is one of the more confusing options available in the Arduino IDE. If you load a sketch file that contains non-ASCII characters, you’ll get odd-looking characters appear in the editor window where the non-ASCII characters are located. When you select this option, the Arduino IDE reloads the file and saves it using UTF-8 encoding.
Serial Monitor
The Serial Monitor option enables you to interact with the serial interface on the Arduino unit. It produces a separate window dialog box, which displays any output text from the Arduino and allows you to enter text to send to the serial interface on the Arduino. You must write the code in your programs to send and receive the data using the Arduino USB serial port for this to work.
Board
The Board option is extremely important. You must set the Board option to the Arduino unit that you’re using so that the Arduino IDE compiler can create the proper machine code from your sketch code.
Serial Port
The Serial Port option selects the workstation serial port to use to upload the compiled sketch to the Arduino unit. You must select the serial port that the Arduino is plugged into.
Programmer
The Programmer option is for advanced users to select what version of code to upload to the ATmega microcontroller. If you use the Arduino bootloader format (which is recommended), you don’t need to set the Programmer option.
Burn Bootloader
This option enables you to upload the Arduino bootloader program onto a new ATmega microcontroller. If you purchase an Arduino unit, this code is already loaded onto the microcontroller installed in your Arduino, so you don’t need to use this feature.
However, if you have to replace the ATmega microcontroller chip in your Arduino, or if you purchase a new ATmega microcontroller to use in a separate breadboard project, you must burn the bootloader program into the new microcontroller unit before you can use the Arduino IDE program format for your sketches.
Caution: Working with the Bootloader
All the current Arduino units load the bootloader program into the ATmega microcontroller program memory by default. If you purchase an Arduino unit, you won’t have to worry about using the Burn Bootloader feature. However, if you purchase a new ATmega microcontroller to use outside of your Arduino, you may or may not have to burn the bootloader program. Some vendors preload the bootloader program for you, others don’t. Check with your vendor to find out which option they use. If the bootloader isn’t burned onto the microcontroller, your Arduino programs won’t work correctly.
The Help Menu
The Help menu provides links to help topics for the Arduino IDE. The Help menu consists of six sections that relate to the Arduino IDE documentation:
![]() Getting Started
Getting Started
![]() Environment
Environment
![]() Troubleshooting
Troubleshooting
![]() Reference
Reference
![]() Find in Reference
Find in Reference
![]() Frequently Asked Questions
Frequently Asked Questions
Besides these six topics, two links provide information about the Arduino IDE:
![]() Visit Arduino.cc
Visit Arduino.cc
![]() About Arduino
About Arduino
Exploring the Toolbar
If you don’t want to have to navigate your way around the menu bar to perform functions in the Arduino, you can use a handy toolbar just under the menu bar. The toolbar provides icons for some of the more popular menu bar functions:
![]() Verify (the checkmark icon): Performs the Verify/Compile option.
Verify (the checkmark icon): Performs the Verify/Compile option.
![]() Upload (the right arrow icon): Uploads the compiled sketch code to the Arduino unit.
Upload (the right arrow icon): Uploads the compiled sketch code to the Arduino unit.
![]() New (the page icon): Opens a new sketch tab in the Arduino IDE window.
New (the page icon): Opens a new sketch tab in the Arduino IDE window.
![]() Open (the up arrow icon): Displays the File Open dialog box that allows you to select an existing sketch to load into the editor.
Open (the up arrow icon): Displays the File Open dialog box that allows you to select an existing sketch to load into the editor.
![]() Save (the down arrow icon): Saves the sketch code into the current sketch filename.
Save (the down arrow icon): Saves the sketch code into the current sketch filename.
![]() Serial monitor (the magnifying glass icon): Opens the serial monitor window to interact with the serial port on the Arduino unit.
Serial monitor (the magnifying glass icon): Opens the serial monitor window to interact with the serial port on the Arduino unit.
Now that you’ve seen the menu bar and toolbar options, the next section walks through the basics of setting up the Arduino IDE to work with your Arduino unit.
Exploring the Message Area and Console Window
The last two sections of the Arduino IDE are provided to give you some idea of what’s going on when you compile or upload your sketch. The message area is a one-line section of the Arduino IDE interface that displays quick messages about what’s happening. For example, as you compile the sketch, it shows a progress bar indicating the progress of the compile process, as shown in Figure 3.2.
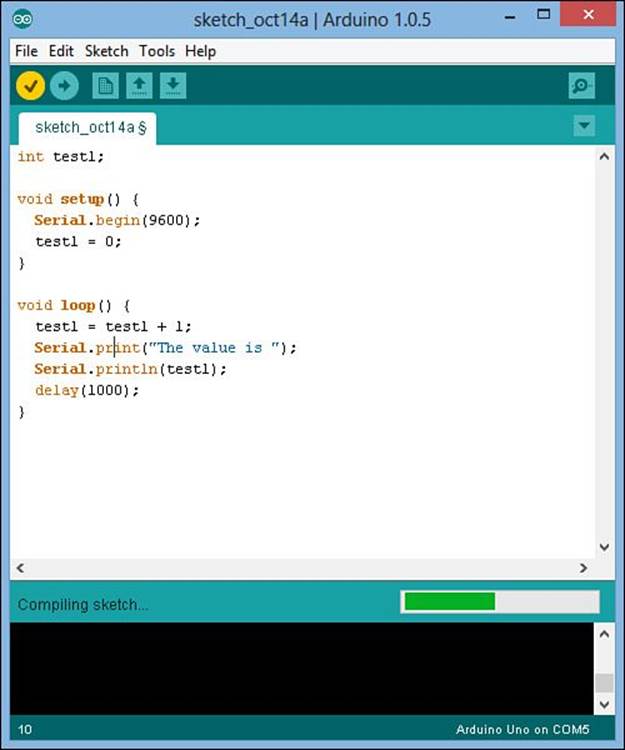
FIGURE 3.2 The Arduino IDE message area indicating the compile progress.
The console window often displays informational messages from the last command you entered. For example, after a successful compile, you’ll see a message showing how large the program is, as shown in Figure 3.3.
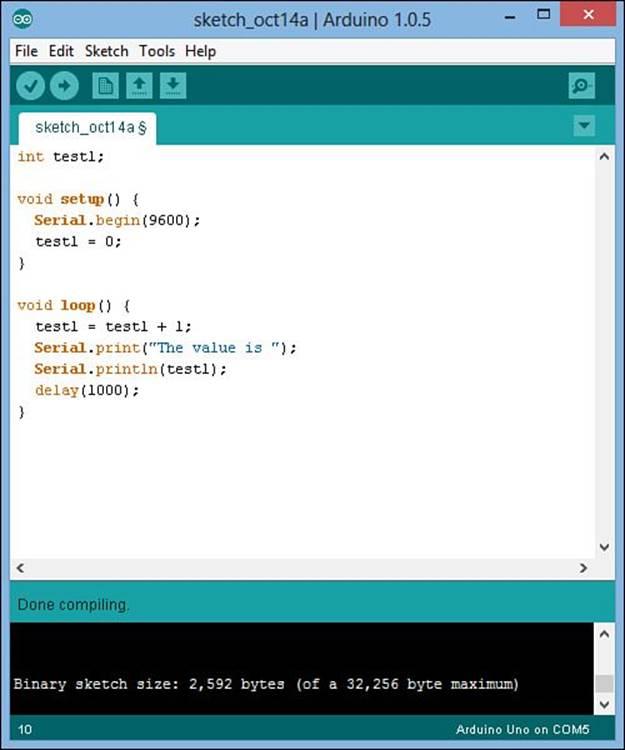
FIGURE 3.3 The Arduino IDE message window displaying the compiler result.
If there are any errors in the compiled sketch code, both the message area and the console window will display messages pointing to the line or lines that contain the errors.
Setting Up the Arduino IDE
You should be able to work with your Arduino IDE with most of the default settings. However, you’ll need to check on two main things before you start working with your Arduino unit. Follow these steps to get your Arduino IDE ready to work with your specific Arduino unit.
![]() Try It Yourself: Setting Up the Arduino IDE
Try It Yourself: Setting Up the Arduino IDE
1. Make sure that the Arduino IDE is set for your specific Arduino unit. Choose Tools > Board from the menu bar. This provides a list of the various Arduino boards available, as shown in Figure 3.4.
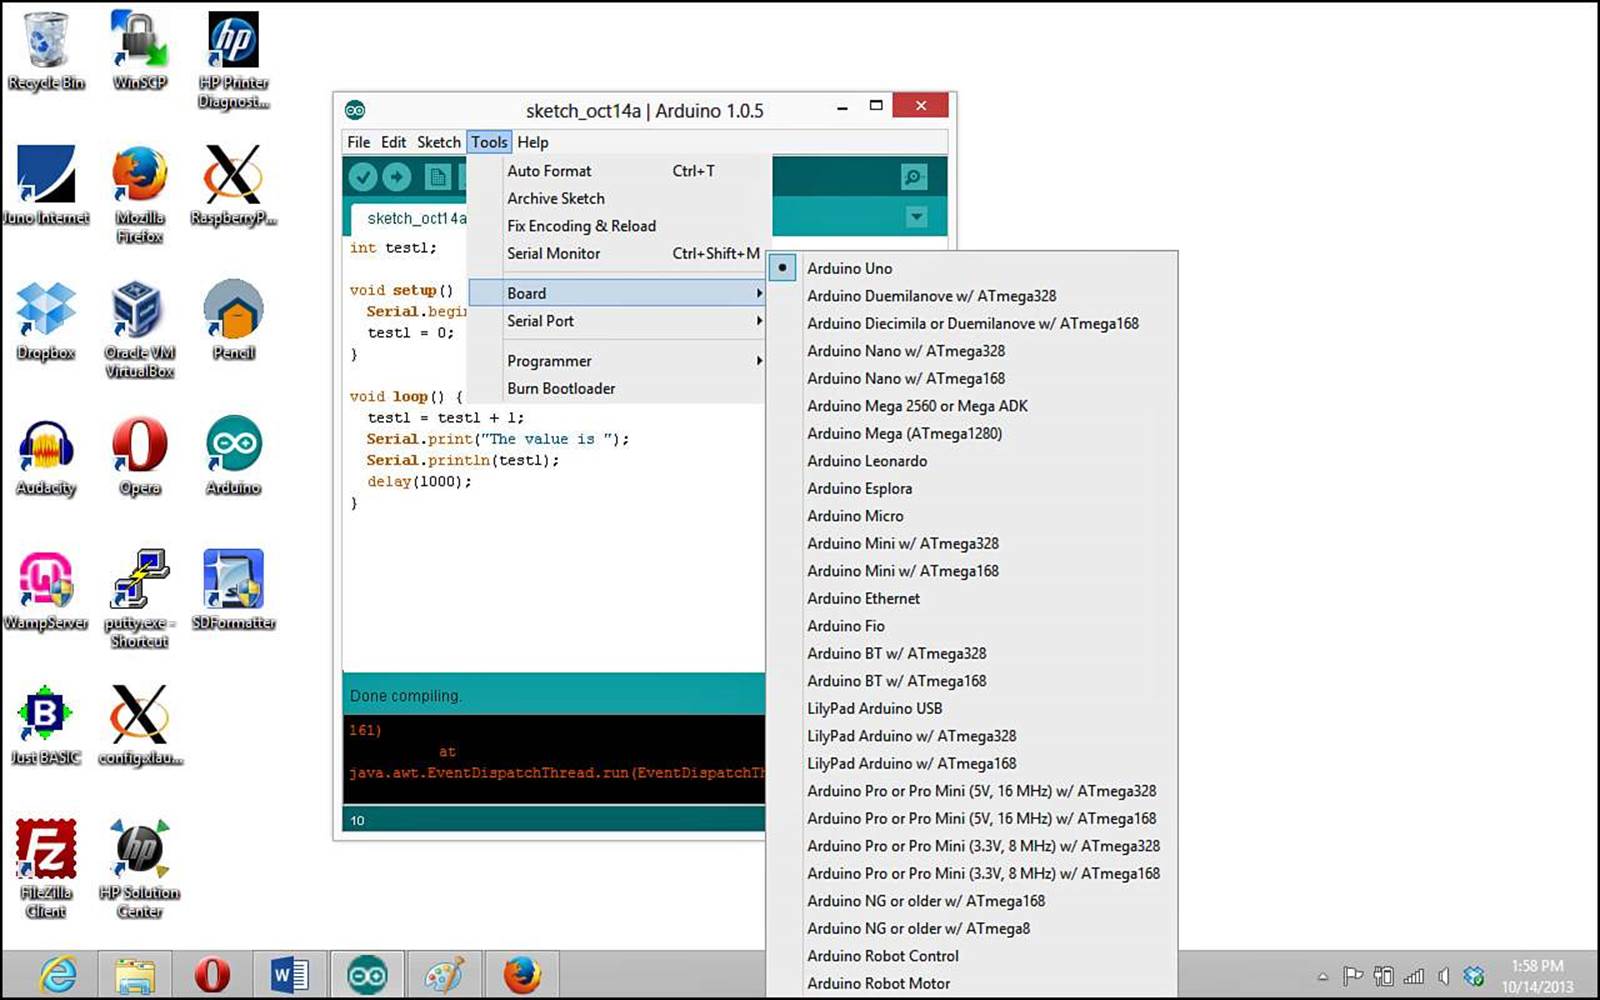
FIGURE 3.4 The Arduino board options in the Arduino IDE.
2. Select the board model that you’re using to ensure the compiler generates the proper machine code for your Arduino unit.
3. The second thing to check is the serial port. Choose Tools > Serial Port from the menu bar. You should see a list of the available serial ports installed on your workstation, as shown in Figure 3.5.
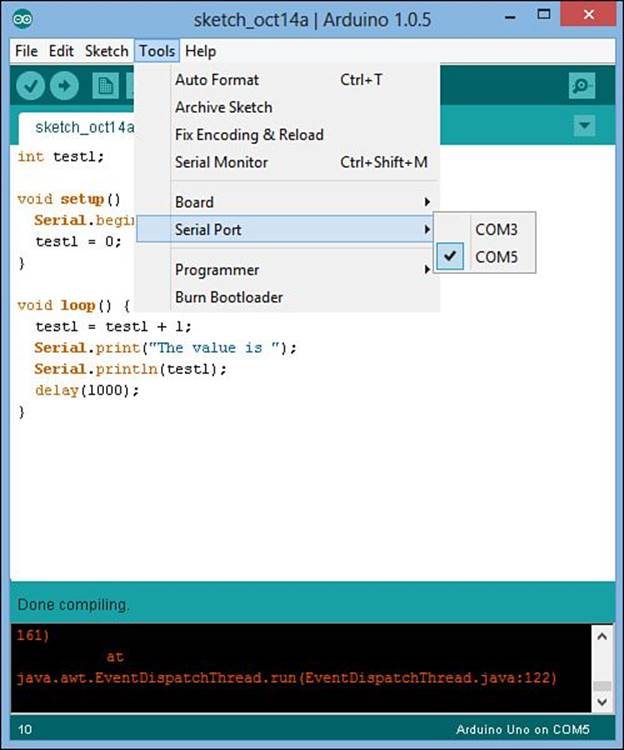
FIGURE 3.5 The serial port options for a Windows workstation.
4. The serial ports listed will depend on your workstation configuration, and what devices you have connected to your workstation. Select the serial port that points to your Arduino IDE.
Tip: Finding Serial Ports in Windows
With Windows, it can sometimes be tricky trying to figure out just which serial port the Arduino unit uses. The easiest way to determine the serial port is to open the Device Manager utility in Windows. From the Device Manager utility, you should see a Ports section. Click the plus sign (+) to expand that section, and it should list the COM port the Arduino unit is assigned to.
Using the Serial Monitor
The serial monitor is a special feature in the Arduino IDE that can come in handy when troubleshooting code running on your Arduino, or just for some simple communication with the program running on the Arduino.
The serial monitor acts like a serial terminal, enabling you to send data to the Arduino serial port and receive data back from the Arduino serial port. The serial monitor displays the data it receives on the selected serial port in a pop-up window.
You can activate the serial monitor feature in the Arduino IDE in three ways:
![]() Choose Tools > Serial Monitor from the menu bar.
Choose Tools > Serial Monitor from the menu bar.
![]() Press the Ctrl+Shift+M key combination.
Press the Ctrl+Shift+M key combination.
![]() Click the serial monitor icon on the toolbar.
Click the serial monitor icon on the toolbar.
If you’ve selected the correct serial port for your Arduino unit, a pop-up window will appear and connect to the serial port to communicate with the Arduino unit serial port using the USB connection. Figure 3.6 shows the serial monitor window.
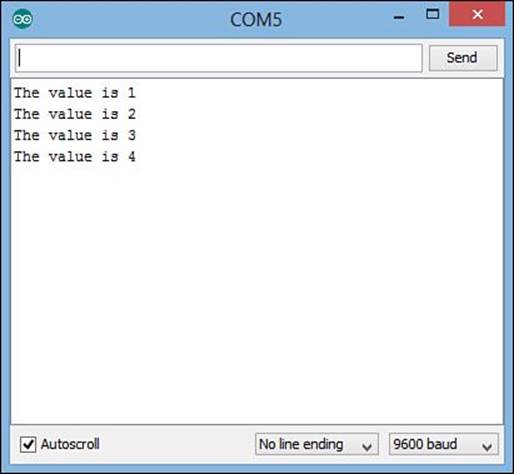
FIGURE 3.6 The serial monitor interface window.
You can enter text in the top line of the serial monitor interface and then click the Send button to send it to the Arduino unit via the serial port. The serial monitor window also displays any text output from the Arduino unit in a scrollable window area.
Three setting options are available at the bottom of the serial monitor window:
![]() Autoscroll: Checking this option always displays the last line in the scroll window. Removing the check freezes the window so that you can manually scroll through the output.
Autoscroll: Checking this option always displays the last line in the scroll window. Removing the check freezes the window so that you can manually scroll through the output.
![]() Newline: This option controls what type of end-of-line marking the serial monitor sends after the text that you enter. You can choose to send no end-of-line marking, a standard UNIX-style newline character, a carriage control character, or a Windows-style newline and carriage control characters. Which you select depends on how you write your Arduino sketch to look for data.
Newline: This option controls what type of end-of-line marking the serial monitor sends after the text that you enter. You can choose to send no end-of-line marking, a standard UNIX-style newline character, a carriage control character, or a Windows-style newline and carriage control characters. Which you select depends on how you write your Arduino sketch to look for data.
![]() Baud Rate: The communications speed that the serial monitor connects to the Arduino serial port. By default, the serial monitor will detect the baud rate based on the Serial.begin() function used in the sketch code.
Baud Rate: The communications speed that the serial monitor connects to the Arduino serial port. By default, the serial monitor will detect the baud rate based on the Serial.begin() function used in the sketch code.
Caution: Starting the Serial Monitor
When you start the serial monitor, it automatically sends a reboot signal to the Arduino unit, causing it to restart the program that’s currently loaded into the flash memory.
Summary
This hour covered the Arduino IDE user interface. You learned about each of the menu bar and taskbar options, including how to create, save, compile, and upload your Arduino sketches. After that, we looked at the serial monitor feature in the Arduino IDE. The serial monitor enables you to send and receive text with the Arduino unit using the USB serial port. This is a handy feature when you’re trying to debug Arduino program code.
In the next hour, we create an Arduino program so that you can get a feel for the Arduino IDE and for working with your Arduino unit.
Workshop
Quiz
1. Which tool should you use to send data to the Arduino unit?
A. Message area
B. Console window
C. Serial monitor
D. Toolbar
2. The upload icon (the right arrow icon) on the toolbar will automatically verify and compile the sketch code before uploading it. True or false?
3. How does the Arduino IDE know what USB port to use to communicate with the Arduino device?
Answers
1. C. The serial monitor enables you to send and receive data from the Arduino unit.
2. True. Clicking the upload toolbar icon will first verify and compile the sketch code before trying to upload it, even if you’ve already compiled the code previously.
3. You must select the serial port (after choosing Tools > Serial Port from the menu bar) before you try to upload your sketch code. The Arduino unit will appear as an available serial port in the listing.
Q&A
Q. Is the Arduino IDE interface different if I load it in Windows, OS X, or Linux?
A. No, the Arduino IDE is written using the Java programming language, and it creates a common window interface on all three operating system platforms.
Q. Can I upload the sketch code to my Arduino unit using a wireless connection?
A. No, at this time you can only upload the sketch code using a serial USB port connection.
Q. Will the Arduino IDE editor window point out syntax errors in my sketch code before I try to compile it?
A. Sometimes. The Arduino IDE editor will highlight library function names and text that it thinks is part of a string, but it can’t pick up all syntax errors in your code.
All materials on the site are licensed Creative Commons Attribution-Sharealike 3.0 Unported CC BY-SA 3.0 & GNU Free Documentation License (GFDL)
If you are the copyright holder of any material contained on our site and intend to remove it, please contact our site administrator for approval.
© 2016-2026 All site design rights belong to S.Y.A.