Sams Teach Yourself Arduino Programming in 24 Hours (2015)
Part II: The C Programming Language
HOUR 5 Learning the Basics of C
HOUR 6 Structured Commands
HOUR 7 Programming Loops
HOUR 8 Working with Strings
HOUR 9 Implementing Data Structures
HOUR 10 Creating Functions
HOUR 11 Pointing to Data
HOUR 12 Storing Data
HOUR 13 Using Libraries
Hour 5. Learning the Basics of C
What You’ll Learn in This Hour:
![]() How to store your sketch data in variables
How to store your sketch data in variables
![]() How to use variables in mathematical operations
How to use variables in mathematical operations
![]() How to output variable values to the Arduino serial port
How to output variable values to the Arduino serial port
![]() How to use some of the built-in Arduino C functions
How to use some of the built-in Arduino C functions
This hour dives head first into the C programming language basics, which is the foundation of the Arduino programming language. It first explores how to store data in your sketches using variables. Then it discusses how to perform simple arithmetic operations in your sketches. The hour wraps up by going through some of the more common functions available in the standard Arduino library for you to use.
Working with Variables
If you remember from Hour 2, “Creating an Arduino Programming Environment,” the Arduino programming language provides a user-friendly interface to write programs for the underlying ATmega microcontroller on the Arduino. One of those interfaces is how data is stored in memory.
Instead of having to reference specific memory locations to store your program data (like you do in assembly language), the Arduino programming language uses simple variables to represent memory locations for storing data. This section discusses how to use those variables in your Arduino sketches to store and retrieve data.
Declaring Variables
Because the Arduino programming language is built on the C programming language, it uses the standard C language format for creating and using variables. In the C programming language, creating a variable requires two steps:
1. Declare the variable for use in the sketch.
2. Assign a data value to the variable.
When you declare a variable, the C language compiler stores the variable name, along with some other information, in an internal table. This table allows the compiler to know what variables the program uses and how much space in memory they’ll require when you run the program. However, when you declare a variable, the compiler doesn’t actually assign the variable to a specific location in the system memory yet; that part comes later.
To declare a variable, you just define the type of data that the variable will store and the variable name in a statement, as follows:
datatype variablename;
The datatype defines what type of data the variable will store. The C programming language uses what’s called strict typing, which forces you to declare what type of data each variable will contain. Once you declare the data type for a variable, you can only store that type of data in the variable (more on that in the “Understanding Data Types” section later this hour).
The variablename defines the label that you’ll use to reference that location in memory from inside your sketch. For example, to declare a variable to hold an integer data type, you use the following:
int pin;
You have to follow a few rules when declaring C variable names:
![]() The variable name must contain only letters, numbers, underscores, or the dollar sign.
The variable name must contain only letters, numbers, underscores, or the dollar sign.
![]() The variable name must start with a letter.
The variable name must start with a letter.
![]() The variable name is case sensitive.
The variable name is case sensitive.
![]() There is no limit to the variable name length.
There is no limit to the variable name length.
Because there is no limit to the length of the variable name, it’s a good idea to use meaningful variable names for the data in your sketch. For example, it’s better to use variable names like pin, blinkrate, and speed rather than generic names like a, b, and c. That makes troubleshooting code a lot easier, and it reminds you just what each variable does if you have to come back to your sketch several months later.
Another common practice in C coding that’s also used by the Arduino developers is a method called camel case. Camel case combines two or more words in a variable name, capitalizing the first letter of each word, with the exception of the first word, as follows:
int blinkRateSetting;
That makes it a little easier to read and recognize multiword variable names.
As you might expect, each variable name that you declare in your sketch must be unique. You can’t declare two variables with the same name; otherwise, you’ll get an error message in the IDE console window when you try to compile your sketch.
Defining Variable Values
The second part of the process is to assign a value to the declared variable. To assign a value to a variable, you use the assignment operator, which in the C language is an equal sign:
blinkRateSetting = 10;
Tip: Terminating a Statement
In the C programming language, you must terminate most statements with a semicolon so that the compiler knows when one statement ends and another starts. We examine which statements don’t use the semicolon later this hour.
This is the step that actually assigns the variable to a location in memory. The compiler looks for an available location in memory large enough to hold the data type and stores the assigned value to that location.
You can take a shortcut by declaring the variable and assigning it a value in one statement:
int blinkRateSetting = 10;
With this method, the compiler assigns the memory location for the variable and stores the data value in one step.
Understanding Data Types
The data type that you declare for a variable defines how large of an area of memory the system needs to reserve to store the data. You can use many different data types in the Arduino programming language. Table 5.1 lists the different data types that Arduino uses to store values, how much memory space they each require, and the maximum values they can hold.
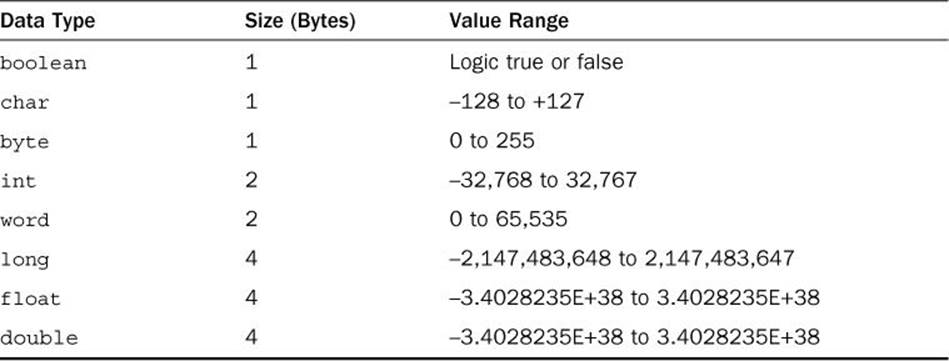
TABLE 5.1 Arduino Data Types
The int and long data types store only whole number values. The float and double data types can store values that contain decimal places, such as 10.5 or –1430.443456.
Caution: Integer and Floating-Point Values
Be careful when you’re working with numbers in your Arduino sketches. When you use integer values, any mathematical operations you use will result in an integer value. So, dividing 5 by 3 will result in a value of 1. To retain precise results, you have to use floating-point values.
After you define a data type for a variable, that’s the only type of data the variable can contain. For example, once you declare a data type as float
float percent;
that defines the storage format the Arduino will use to store the data, and you can’t change it. If you store an integer value of 1 in the percent variable, the Arduino will still store it in floating-point format as 1.0.
Storing character data (called strings) differs a little bit in the C programming language. When working with string values, the C language converts each character in the string to a binary value using an encoding method, such as the ASCII code, and then stores that value using the char data type. It stores each character in the string in sequential order in memory so that it can read the value back in the same order to reproduce the string value. To indicate the end of the string, C places a null character (a 0) as the last byte of the string. This is called a null-terminated string. You’ll learn much more about how to use strings in your Arduino sketches later on in Hour 8, “Working with Strings.”
Variable Qualifiers
You can also use variable qualifiers to modify how the compiler handles a variable in the sketch. The const variable qualifier tells the compiler that the value assigned to the variable won’t change. These types of values are called constants.
In the Arduino programming language, it’s somewhat common practice to use all uppercase letters for constants:
const float TAX = 0.07;
The Arduino library contains several different constants that are predefined with values you’ll commonly use in your Arduino sketches, such as HIGH for the value 1, and LOW for the value 0. Constants make reading the sketch code a bit easier to follow, because you can use meaningful constant names instead of obtuse values.
The other type of variable qualifier is the unsigned keyword. The unsigned keyword tells the compiler to not bother reserving a bit to indicate the sign of the value; all the values stored in that variable will be positive values.
For example, by default, when you define a variable using an int data type, the compiler uses 16 bits (2 bytes) to store the value. However, it uses 1 bit to indicate the sign of the value (0 for positive, or 1 for negative), leaving only 15 bits for the actual value. Those 15 bits can only store integer values from 0 to 32,767, so the maximum value range for a signed integer variable is –32,768 to +32,767.
When you apply the unsigned qualifier to a variable, it indicates that the value can only be a positive number, so the compiler doesn’t need to reserve 1 bit for the sign. This allows the compiler to use all 16 bits to store the value, so the value range can now be from 0 to 65,535.
Table 5.2 shows the unsigned version range of different data types.

TABLE 5.2 Unsigned Data Type Value Ranges
With the unsigned qualifier, you have the ability to store some pretty large integer numbers in your programs.
Variable Scope
The last feature of variables that you’ll need to know about is variable scope. Variable scope defines where the variable can be used within the Arduino sketch. There are two basic levels of variable scope:
![]() Local variables
Local variables
![]() Global variables
Global variables
You declare local variables inside a function, and they apply only inside that function code block. For example, if you declare a variable inside the setup function, that variable value is available only inside the setup function. If you try to use the variable in the loop function, you’ll get an error message.
In contrast, you can use global variables anywhere in the sketch. It’s common practice to declare global variables at the very start of your Arduino sketch, before you define the setup function. That makes it easier to see all the global variables that the sketch uses.
Once you declare a global variable, you can use it in either the setup or loop functions, or any other functions that you create in your sketch. Each time you assign a value to the variable, you can retrieve it from any function.
Using Operators
Just storing data in variables doesn’t make for very exciting programs. At some point, you’ll want to actually do something with the data you store. This section covers some of the operations that you can perform with your data in the Arduino programming language.
Standard Math Operators
The most basic thing you’ll want to do is manipulate numbers, whether it’s a counter keeping track of how many loops your sketch takes or a variable that determines how fast the lights in your project should blink. The Arduino library contains all the standard mathematical operators that you’re used to using from school; it’s just that a few of them may look a little odd.
Table 5.3 lists the different math operators available in the Arduino library.
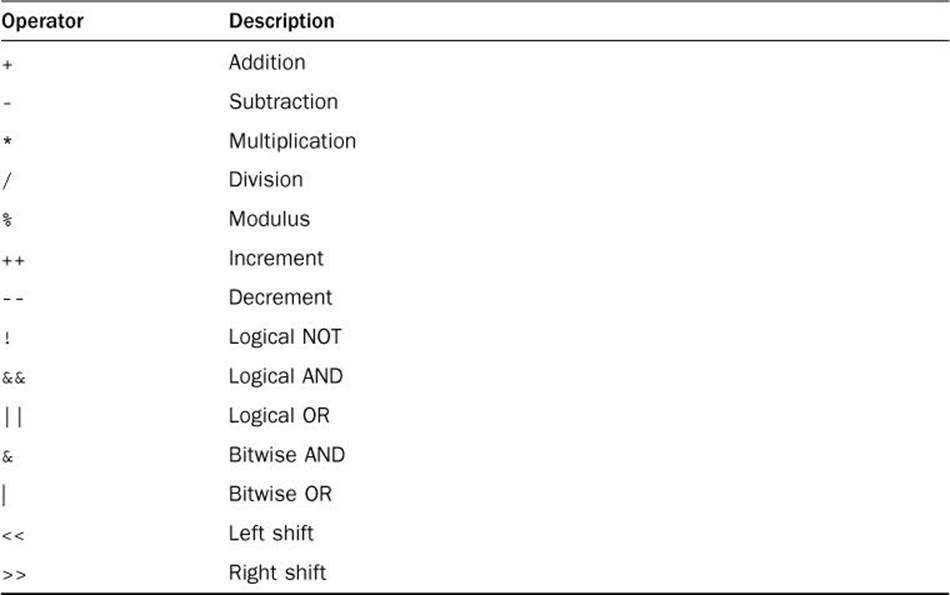
TABLE 5.3 Arduino Math Operators
You should recognize most of these operators from math class. The C programming language also uses the asterisk for multiplication, and the forward slash for division. The modulus operator differs a little; it returns the remainder of the division (what we used to call the “leftover” part).
You’ll notice from the table that there are two types of AND and OR operators. There’s a subtle difference between the bitwise and logical versions of these operators. You use the bitwise operators in what are called binary calculations. You use binary calculations to perform binary math using binary values.
The logical operators allow you to apply Boolean logic, such as combining values using the AND operation.
To use the math operators in your Arduino programs, you just write your equations in the right side of an assignment statement:
blinkRateSetting = 10000 / inputVoltage;
The compiler evaluates the mathematical expression on the right side of the assignment statement, and then assigns the result to the variable on the left side.
Caution: Assignments Versus Equations
Don’t confuse assignment statements with mathematical equations. With assignments, you can use the same variable on both sides of the equal sign:
counter = counter + 1;
This doesn’t make any sense as a mathematical equation, but it is a common assignment statement. The compiler retrieves the current value stored in the counter variable, adds 1 to it, and then stores the result back into the counter variable location.
Using Compound Operators
Compound operators create shortcuts for simple assignments that you’ll commonly use in your Arduino sketches. For example, if you’re performing an operation on a variable and plan on storing the result in the same variable, you don’t have to use the long format:
counter = counter + 1;
Instead, you can use the associated addition compound operator:
counter += 1;
The += compound operator adds the result of the right side equation to the value of the variable you specify on the left side, and stores the result back in the left side variable. This feature works for all the mathematical operators used in the C programming language.
Exploring the Order of Operations
As you might expect, C follows all the standard rules of mathematical calculations, including the order of operations. For example, in the assignment
result = 2 + 5 * 5;
the compiler first performs the multiplication of 5 times 5, and then adds 2 to that result, resulting in a final value of 27, which is assigned to the result variable.
And just like in math, C allows you to change the order of operations using parentheses:
result2 = (2 + 5) * 5
Now the compiler first adds 2 and 5, and then multiplies the result by 5, resulting in a value of 35.
You can nest parentheses as deep as you need in your calculations. Just be careful to make sure that you match up all the opening and closing parentheses pairs.
Exploring Arduino Functions
The Arduino programming language also contains some standard libraries to provide prebuilt functions for us to use. Functions are somewhat of a black box: You send values to the function, the function performs some type of operation on the values, and then you receive a value back from the function. (To learn more about how to create your own functions, see Hour 10, “Creating Functions.”)
This section covers some of the standard Arduino functions that will come in handy as you write your Arduino sketches.
Using Serial Output
Before we get too far, let’s talk about a special feature of the Arduino: the ability to output data to an external serial device. This feature provides an easy way for us to monitor what’s going on in our Arduino sketches, and will be invaluable to you as you debug your sketches.
To output data to the serial port on the Arduino, you need to use the special Serial class, along with its built-in functions. Hour 17, “Communicating with Devices,” examines the Serial class in much more detail, but for now we’re just interested in three basic functions in the class:
![]() Serial.begin() initializes the serial port for input and output.
Serial.begin() initializes the serial port for input and output.
![]() Serial.print() outputs a text string to the serial port.
Serial.print() outputs a text string to the serial port.
![]() Serial.println() outputs a text string to the serial port and terminates it with a return and linefeed character.
Serial.println() outputs a text string to the serial port and terminates it with a return and linefeed character.
You can use the Serial.print() and Serial.println() functions in your Arduino sketches to output information from your sketch to view in the serial monitor in the Arduino IDE. This makes for an excellent troubleshooting tool at your disposal.
![]() Try It Yourself: Using the Serial Class Functions to Debug Arduino Sketches
Try It Yourself: Using the Serial Class Functions to Debug Arduino Sketches
This exercise shows you how to add the Serial.print() and Serial.println() functions to your Arduino sketch to view variables as your sketch runs. Just follow these steps:
1. Open the Arduino IDE, and enter this code in the editor window:
int radius = 0;
float area;
void setup() {
Serial.begin(9600);
}
void loop() {
radius = radius + 1;
area = radius * radius * 3.14;
Serial.print("A circle with radius ");
Serial.print(radius);
Serial.print(" has an area of ");
Serial.println(area);
delay(1000);
}
2. Save the sketch as sketch0501.
3. Compile and upload the sketch to your Arduino.
4. Open the serial monitor tool and watch the output.
The output should look something like this:
A circle with radius 1 has an area of 3.14
A circle with radius 2 has an area of 12.56
A circle with radius 3 has an area of 28.26
A circle with radius 4 has an area of 50.24
A circle with radius 5 has an area of 78.50
The Serial.print() function displays a text string, or the value of a variable, but keeps the output cursor on the same line. The Serial.println() function displays the text string or variable value, then adds the newline character to start a new line of output.
That’s how you can add Serial.println() functions to your sketch to watch the values of variables as your sketch is running on the Arduino.
Working with Time
With real-time applications, your sketch will often need to have some knowledge of time. The Arduino library contains four functions that let you access time features in the Arduino:
![]() delay(x): Pauses the sketch for x milliseconds.
delay(x): Pauses the sketch for x milliseconds.
![]() delayMicroseconds(x): Pauses the sketch for x microseconds.
delayMicroseconds(x): Pauses the sketch for x microseconds.
![]() micros(): Returns the number of microseconds since the Arduino was reset.
micros(): Returns the number of microseconds since the Arduino was reset.
![]() millis(): Returns the number of milliseconds since the Arduino was reset.
millis(): Returns the number of milliseconds since the Arduino was reset.
The delay() and delayMicroseconds() functions are handy when you want to slow down the output, like we did in the previous example, or if you need for your sketch to wait for a predetermined amount of time before moving on to the next step.
The millis() and micros() functions enable you to take a peek at how long the Arduino has been running your sketch. Although this is not related to the real time of day, you can use this feature to get a feel for real time spans within your sketch.
Performing Advanced Math
Yes, the basic math operators are useful, but your sketch might sometimes need to use some more advanced mathematical processing. Although not quite as complete as some programming languages, the Arduino programming language does have some support for advanced math functions.Table 5.4 shows what advanced math functions you have to work with in your sketches.
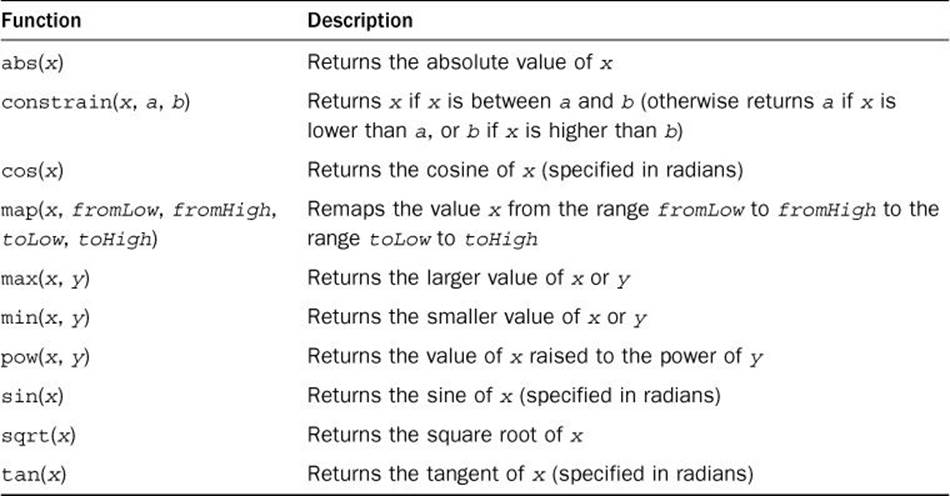
TABLE 5.4 Advanced Arduino Math Functions
You probably recognize most of these functions. The map() and constrain() functions are a little odd from what you’d see in normal math libraries. They’re mostly used when working with sensors. They allow you to keep the values returned by the sensors within a specific range that your sketch can manage.
Generating Random Numbers
When working with sketches, you’ll often run into the situation where you need to generate a random number. Most programming languages include a random number generator function, and the Arduino programming language is one of them.
Two functions are available for working with random numbers:
![]() random([min], max): Returns a random number between min and max – 1. The min parameter is optional. If you just specify one parameter, the min parameter defaults to 0.
random([min], max): Returns a random number between min and max – 1. The min parameter is optional. If you just specify one parameter, the min parameter defaults to 0.
![]() randomSeed(seed): Initializes the random number generator, causing it to restart at an arbitrary point in a random sequence.
randomSeed(seed): Initializes the random number generator, causing it to restart at an arbitrary point in a random sequence.
With computers, random numbers aren’t really all that random. They produce random sequences of repeatable numbers. You may notice if you call the random() function enough times that you’ll start repeating the same “random” numbers.
To get around that, the randomSeed() function allows you to select where in the random sequence the random() function starts selecting values. That helps lessen the frequency of repeatable numbers.
Using Bit Manipulation
The bit manipulation group of functions in the Arduino library allows you to work at the bit-level of values. Table 5.5 shows the bit manipulation functions available.
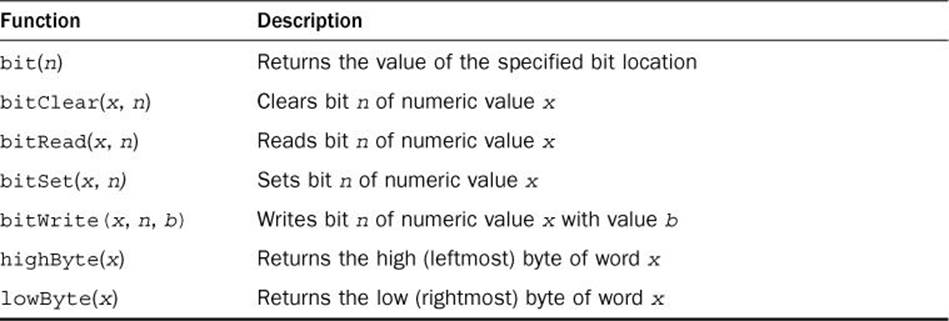
TABLE 5.5 The Arduino Bit Manipulation Functions
When working with sensors or multiple inputs, you’ll often need to know which bits of a value are set. These functions help you work at the bit level with your data values.
Summary
This hour examined the basics of handling data in Arduino sketches. It walked through how to declare variables in your sketches and how to assign values to them. It also discussed the C language data types and how to apply them to the data in your sketches. You then learned about operators, and how the Arduino language uses built-in math operators to perform standard mathematical operations on data. The discussion then turned to some of the Arduino functions available in the standard library. There are functions for communicating with the serial output on the Arduino, in addition to functions for performing advanced math and time features.
The next hour examines how to control your Arduino programs by testing data conditions and selecting which sections of the sketch code to run.
Workshop
Quiz
1. When does the compiler assign a memory location to store a variable value?
A. When you declare the variable name
B. When you define the variable value
C. When you first run the sketch
D. When you upload the sketch
2. You can store a floating-point value in a variable that was previously declared as an integer data type. True or false?
3. Which Serial function should you use to output a variable value and start a new line in the output?
Answers
1. B. The compiler determines the location to store a variable value in memory when you assign a value to it in the sketch.
2. False. The Arduino programming language uses strict typing of variables. When you declare a variable as an integer data type, the compiler only reserves enough space in memory for that type of data; you can’t store another data type in that variable.
3. The Serial.println() function allows you to output the value of a variable to the serial port on the Arduino, and sends a newline character after the value so that the serial monitor starts a new line in the output.
Q&A
Q. What is the largest sized floating-point value the Arduino sketch can handle?
A. The floating-point representation of a value in the Arduino uses 4 bytes (or 32 bits) to store the value: 1 bit for the sign, 8 bits for the exponent, and 23 bits for the significand. The maximum value this can store is about 3.4 times 10 to the 38th power.
Q. Can you convert a variable from one data type to another?
A. Yes, sort of. You can use a feature called type casting to tell the Arduino to store a value using a different data type. This is somewhat of a tricky feature of the C programming language and can cause problems if you’re not careful when using it.
All materials on the site are licensed Creative Commons Attribution-Sharealike 3.0 Unported CC BY-SA 3.0 & GNU Free Documentation License (GFDL)
If you are the copyright holder of any material contained on our site and intend to remove it, please contact our site administrator for approval.
© 2016-2026 All site design rights belong to S.Y.A.