LEARN TO PROGRAM WITH SMALL BASIC: An Introduction to Programming with Games, Art, Science, and Math (2016)
12. BUILDING GRAPHICAL USER INTERFACES
Every device has a set of interfaces. For example, an interface could be the buttons on a microwave or in an elevator, the knobs on a dishwasher, or even the soda pop dispenser at your favorite burger joint. Computer programs have interfaces as well. Back in the day, programs had only text menus, but now we use different ways to interact with computers, such as the icons on your desktop.
Although you’ve written some very useful programs in this book, they don’t look like the programs you’re used to, such as a word processor, a paint program, a web browser, video games, and so on.
Today, most programs use a graphical user interface, or GUI (pronounced “gooey,” but don’t worry, it’s not sticky). GUIs can have menus, buttons, text boxes, and more.
One example is the Calculator program shown in Figure 12-1. When a user clicks one of the number buttons in the program, that number appears in the box at the top of the window. And when the user clicks the = button, the program computes the result of the math operation and displays it.
In this chapter, you’ll learn about the Controls object, which lets you create graphical interfaces for your programs and games.
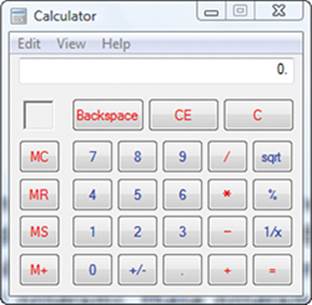
Figure 12-1: The Calculator program’s user interface
Design a User Interface with the Controls Object
Let’s start with a simple program that lets users enter their first and last name, and then the program greets them by name with a friendly message. Figure 12-2 shows you FirstGUIApp.sb, the GUI you’ll create. The gridlines and coordinate points in the figure aren’t part of the output, but they’re included to illustrate the x- and y-coordinates of the interface’s different components.
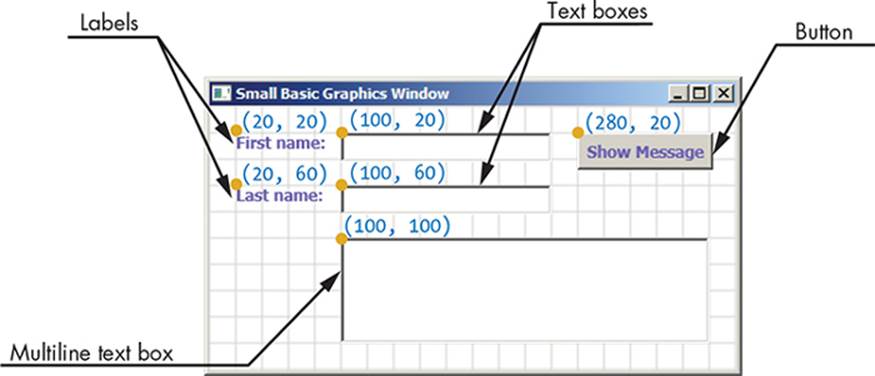
Figure 12-2: The FirstGUIApp.sb user interface
Step 1: The Design Phase
In this program, a user enters their first and last name in the text boxes and then clicks the Show Message button. If their first name is Alpaca and their last name is Bag, the program shows a message like the following (in the multiline text box).
Hello there, Alpaca Bag!
Start Small Basic and enter the following two lines:
GraphicsWindow.DrawText(20, 20, "First name:") ' Label
fnText = Controls.AddTextBox(100, 20) ' First name text box
The first statement draws the text First name: at position (20, 20). In the second statement, the Controls object creates a text box with its upper-left corner at (100, 20). The box’s identifier is saved in the variable fnText (first-name text box). You’ll need this identifier later when you want to know what the user entered in this text box.
Click Run, and you’ll see the First name: label and a text box placed to its right. The size of the text box is about 160×20 (the default size).
Next, add the following two lines to create the Last name: label and its associated text box:
GraphicsWindow.DrawText(20, 60, "Last name:") ' Label
lnText = Controls.AddTextBox(100, 60) ' Last name text box
Here, the box’s identifier is saved in lnText (last-name text box). Click Run again, and you should see the text boxes and their labels perfectly aligned in the graphics window.
Now you’ll create the Show Message button by calling the Controls object’s AddButton() method:
showBtn = Controls.AddButton("Show Message", 280, 20) ' Button
The first argument of AddButton() is the button’s caption, "Show Message". The second and the third arguments tell the Controls object where the upper-left corner of the button should go. The button’s identifier is saved in showBtn (show button). Click Run to see what you’ve just created. By default, the button’s width will be as wide as its label. Try lengthening or shortening the button’s label, and run the program again to see what happens.
Next, you need to add the last GUI element—the box that shows the output message. Because you can greet the user with a long message if you want to, let’s use a multiline text box. The multiline text box has horizontal and vertical scroll bars that appear automatically if needed, like Harry Potter’s Room of Requirement. To create a multiline text box, call the AddMultiLineTextBox() method:
msgText = Controls.AddMultiLineTextBox(100, 100) ' Message text box
Again, the two arguments specify the upper-left position of the box. The box’s identifier is saved in msgText (message text box); you’ll need it later to set the box’s text. Click Run, and you’ll see a multiline text box located at (100, 100). By default, the size of this box is about 200×80. Let’s make this box wider by calling the SetSize() method. Add this line of code just after creating the multiline text box:
Controls.SetSize(msgText, 280, 80) ' Makes width = 280 and height = 80
The first argument is the identifier of the control you want to resize, in this case msgText. The second argument (280) is the width, and the third (80) is the height. If you run the code now, you’ll see an interface similar to the one shown earlier in Figure 12-2. Note that the upper-left corner of the message text box didn’t change when you called SetSize().
Step 2: Program Interactivity
You’ve created all the controls you need and positioned them where you wanted them. Next, you’ll make these controls interactive. You need to write some code that responds to the button’s click. When a user clicks the button, the program needs to read the contents of the first name and the last name text boxes and then display the greeting in the multiline text box. Add lines 13–21, as shown in Listing 12-1, to complete the program (you’ve already written lines 2–11 to create the GUI elements).
1 ' FirstGUIApp.sb
2 GraphicsWindow.DrawText(20, 20, "First name:") ' Label
3 fnText = Controls.AddTextBox(100, 20) ' First name text box
4
5 GraphicsWindow.DrawText(20, 60, "Last name:") ' Label
6 lnText = Controls.AddTextBox(100, 60) ' Last name text box
7
8 showBtn = Controls.AddButton("Show Message", 280, 20) ' Button
9
10 msgText = Controls.AddMultiLineTextBox(100, 100) ' Message text box
11 Controls.SetSize(msgText, 280, 80) ' Makes width = 280 and height = 80
12
13 Controls.ButtonClicked = OnButtonClicked ' Handler for button click
14
15 Sub OnButtonClicked
16 firstName = Controls.GetTextBoxText(fnText) ' First name text box
17 lastName = Controls.GetTextBoxText(lnText) ' Last name text box
18 fullName = firstName + " " + lastName ' Constructs full name
19 message = "Hello there, " + fullName + "!" ' Greeting message
20 Controls.SetTextBoxText(msgText, message)
21 EndSub
Listing 12-1: Creating a simple GUI program
Line 13 registers a handler for the ButtonClicked event. This line tells the Controls object to call the OnButtonClicked() subroutine whenever the user clicks the Show Message button.
In the OnButtonClicked() subroutine, GetTextBoxText() is called first to get the text that’s entered into the first-name text box and save it into the firstName variable (line 16). This method takes one argument—the identifier of the text box whose text is needed. GetTextBoxText() is called again, but with a different argument, to get the text that’s entered into the last-name text box and save it into lastName (line 17). Then the fullName variable is set by concatenating firstName and lastName with a space between them (line 18). At line 19 you create your greeting message and save it in the message variable. Finally, you call SetTextBoxText() to set the text of the message text box. The first argument is the control’s identifier whose text is to be set, and the second argument is the new text (line 20). Run the program, enter some text in the text boxes, and then click the button to see how the program works.
In the next section, you’ll learn how to make GUI programs that have more than one button. Now you can push Small Basic’s buttons!
TRY IT OUT 12-1
Using the code in Listing 12-1, take the first name and last name from the user, and then update the code to display a silly short story that includes the user’s name.
Make a Colorful Drawing Program
If you create a program with several buttons, the ButtonClicked event handler gets called when a user clicks any of these buttons. To find out which button was clicked, you can use the Controls.LastClickedButton property to get the clicked button’s identifier; it’s like asking your friend to tell you who noticed your brand-new shoes.
To show you how to use the ButtonClicked event when a program has more than one button, let’s add to the Scribble.sb program you made in Chapter 11 (see Listing 11-4 on page 156). The user can select the pen’s color by clicking a button. Check out the program’s GUI in Figure 12-3.
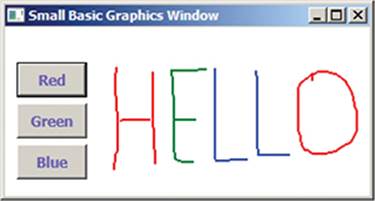
Figure 12-3: Sample output of Scribble2.sb
Try out the updated program, Scribble2.sb, shown in Listing 12-2. You might notice that this program uses the same OnMouseMove event handler as the one in Listing 11-4.
1 ' Scribble2.sb
2 btnR = Controls.AddButton("Red", 10, 30)
3 btnG = Controls.AddButton("Green", 10, 65)
4 btnB = Controls.AddButton("Blue", 10, 100)
5 Controls.SetSize(btnR, 60, 30)
6 Controls.SetSize(btnG, 60, 30)
7 Controls.SetSize(btnB, 60, 30)
8
9 GraphicsWindow.MouseMove = OnMouseMove
10 Controls.ButtonClicked = OnButtonClicked
11
12 Sub OnButtonClicked ' Changes the pen color
13 If (Controls.LastClickedButton = btnR) Then
14 GraphicsWindow.PenColor = "Red"
15 ElseIf (Controls.LastClickedButton = btnG) Then
16 GraphicsWindow.PenColor = "Green"
17 Else
18 GraphicsWindow.PenColor = "Blue"
19 EndIf
20 EndSub
21
22 Sub OnMouseMove
23 x = GraphicsWindow.MouseX ' Current x position of mouse
24 y = GraphicsWindow.MouseY ' Current y position of mouse
25
26 If (Mouse.IsLeftButtonDown) Then
27 GraphicsWindow.DrawLine(prevX, prevY, x, y)
28 EndIf
29
30 prevX = x ' Updates the last (previous) position
31 prevY = y
32 EndSub
Listing 12-2: Clicking the buttons to change the pen color
Lines 2–4 create the three color selection buttons. The coordinates of the upper-left corner of the three buttons are (10, 30), (10, 65), and (10, 100). The statements in lines 5–7 set the size of each button to 60 × 30 (width = 60 and height = 30). Lines 9–10 register the handlers for theMouseMove and ButtonClicked events.
The program calls the OnButtonClicked() subroutine (line 12) when a user clicks any of the three buttons. To know which one was clicked, the subroutine uses an If/ElseIf ladder to compare the LastClickedButton property with the identifiers of the three buttons (lines 13–19). After identifying the clicked button, the subroutine sets the PenColor property (of GraphicsWindow) to the selected color. The OnMouseMove() subroutine is the same as the one in the previous version of the program, and it is defined on lines 22–32.
TIP
You can also write the OnButtonClicked() subroutine like this:
Sub OnButtonClicked
btnID = Controls.LastClickedButton
GraphicsWindow.PenColor = Controls.GetButtonCaption(btnID)
EndSub
Instead of hardcoding the color of the clicked button, you get the color from the clicked button’s caption using the GetButtonCaption() method.
TRY IT OUT 12-2
You can change the color of a button’s caption by setting the BrushColor property of GraphicsWindow before you create the button. Change Listing 12-2 so the text color of each button matches its caption (write the text of the Blue button in blue, and so on).
Explore Circuits with Code
In this section, you’ll create a program that demonstrates an electrical series circuit. (Your skills are shocking!) The circuit includes a battery, three resistors, and a switch connected in series. A user can change the battery’s voltage and the values of the three resistors by entering their values in the text boxes. When the user enters a new value in any of the text boxes, the Controls object raises the TextTyped event. In response to this event, the program automatically calculates (and displays) the current that flows through the circuit and the voltages across each of the three resistors (see Figure 12-4).
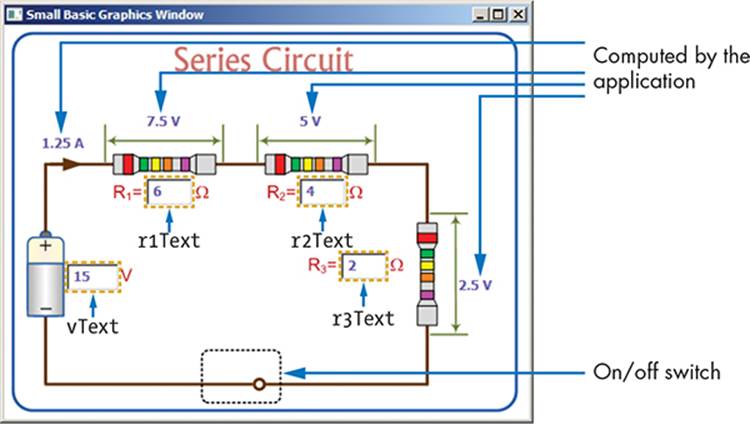
Figure 12-4: A program that shows you the operation of a series circuit
Here are the equations that describe the science behind the program:
Total resistance Rtot = R1 + R2 + R3
Current through the circuit I = V ÷ Rtot, where V is the battery voltage
Voltage across R1 V1 = I × R1
Voltage across R2 V2 = I × R2
Voltage across R3 V3 = I × R3
Let’s look at the computations. You calculate the total resistance (Rtot) by adding the values of the three resistors together. Next, you calculate the current (I) that flows in the circuit by dividing the battery voltage (V) by the total resistance. Then you calculate the voltage across each resistor by multiplying the current by the value of that resistor. (Try reading this paragraph aloud to your friends as if it’s super easy. It will blow their minds!)
The following steps guide you through creating this program. So buckle your seat belt, hold on tight, and get set to rocket into the exciting world of computer simulations.
Step 1: Open the Startup File
To start creating this circuit simulator, open SeriesCircuit_Incomplete.sb from this chapter’s folder. The file contains comments that tell you where to add your code and empty placeholders for the subroutines you’ll write.
The folder for this chapter also includes the two background images you’ll need: bkgndOff.bmp and bkgndOn.bmp (see Figure 12-5; we added the image names for clarity). The two images are the same except for the state of the switch: the switch is in the open position in bkgndOff.bmpbut is closed in bkgndOn.bmp.

Figure 12-5: The two background images of SeriesCircuit.sb
When you start writing the code for this program, you’ll see many hard-coded numbers. These numbers represent the coordinate points for the text boxes and labels and for checking the switch’s boundaries. To help you understand where these numbers come from, refer to Figure 12-6. In this figure, we added coordinate axes and gridlines on top of the background image, and we marked the coordinates of all the points you’ll use in the program.
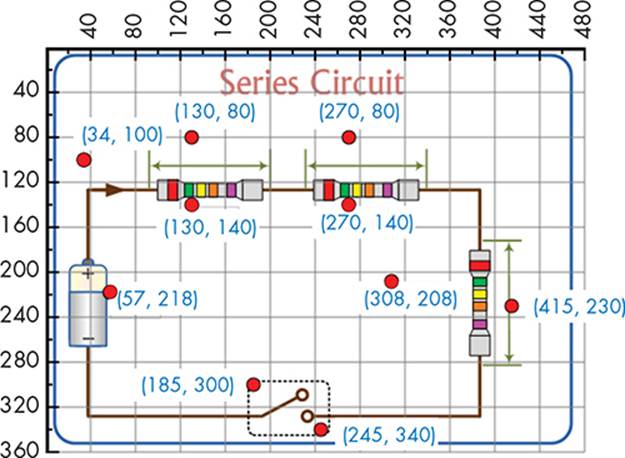
Figure 12-6: Illustrating the magic numbers used in SeriesCircuit.sb
Step 2: Add the Main Code
As in the previous examples, you’ll start by designing the user interface. You’ll write the code to load the background images, create and position the GUI elements (the text boxes), and then register the event handlers. Add the main part of the program, which is shown in Listing 12-3.
1 ' SeriesCircuit_Incomplete.sb
2 offImg = ImageList.LoadImage(Program.Directory + "\bkgndOff.bmp")
3 onImg = ImageList.LoadImage(Program.Directory + "\bkgndOn.bmp")
4 bkgndImg = offImg ' Starts with the switch-off image
5
6 GraphicsWindow.Width = ImageList.GetWidthOfImage(offImg)
7 GraphicsWindow.Height = ImageList.GetHeightOfImage(offImg)
8 GraphicsWindow.DrawImage(bkgndImg, 0, 0)
9
10 r1Text = Controls.AddTextBox(130, 140) ' R1 text box
11 r2Text = Controls.AddTextBox(270, 140) ' R2 text box
12 r3Text = Controls.AddTextBox(308, 208) ' R3 text box
13 vText = Controls.AddTextBox(57, 218) ' Voltage text box
14 Controls.SetSize(r1Text, 42, 25) ' Resizes the text boxes
15 Controls.SetSize(r2Text, 42, 25)
16 Controls.SetSize(r3Text, 42, 25)
17 Controls.SetSize(vText, 48, 25)
18 Controls.SetTextBoxText(vText, 10) ' Sets the initial values
19 Controls.SetTextBoxText(r1Text, 4)
20 Controls.SetTextBoxText(r2Text, 4)
21 Controls.SetTextBoxText(r3Text, 2)
22
23 GraphicsWindow.MouseDown = OnMouseDown
24 Controls.TextTyped = OnTextTyped
Listing 12-3: Setting up the GUI
You start by loading the two background images and saving their identifiers in the offImg and onImg variables (line 2–3). The bkgndImg variable holds the current background image, which changes when a user clicks the switch. When the program starts, the switch is open, so the program sets bkgndImg = offImg (line 4). Lines 6–7 adjust the width and height of the graphics window to match the size of the background image, and line 8 draws the background image (offImg in this case) in the graphics window.
Lines 10–17 create the four text boxes (for the three resistors and the battery voltage) and resize them so they’re exactly on top of their positions in the background image. In lines 18–21, you set default values for these text boxes. In line 23, you register a handler for the MouseDown event, because you’ll want to know when a user clicks the switch. Line 24 registers a handler for the TextTyped event, because you’ll calculate and display the values of I, V1, V2, and V3 automatically when the user enters a new value in any of the four text boxes.
Step 3: Toggle the Switch
When a user clicks the switch, you need to change the background image to toggle the switch. Add the OnMouseDown() subroutine in Listing 12-4.
1 Sub OnMouseDown ' Switches the background image
2 x = GraphicsWindow.MouseX
3 y = GraphicsWindow.MouseY
4 If ((x > 185) And (x < 245) And (y > 300) And (y < 340)) Then
5 If (bkgndImg = offImg) Then
6 bkgndImg = onImg
7 Else
8 bkgndImg = offImg
9 EndIf
10 UpdateUserInterface()
11 EndIf
12 EndSub
Listing 12-4: Changing the background image
The subroutine starts by getting the x- and y-coordinates of the point where the mouse was clicked and setting them to the variables x and y (lines 2–3). Line 4 then checks if this point lies within the rectangular region of the switch; if the mouse was inside the boundaries of the switch, the subroutine toggles the current value of the bkgndImg variable (from on to off or from off to on) at lines 5–9 and then calls the UpdateUserInterface() subroutine to switch the background image and update the calculated values (line 10). As you’ll see in a moment, if the user opens the switch, the program shows only the offImg background image; the values of I, V1, V2, and V3 won’t show because no current’s flowing through the circuit when the switch is open.
Step 4: Respond to Changes
Add the OnTextTyped() subroutine in Listing 12-5. This subroutine is called when the user enters a new value in any of the four text boxes. As you can see, this subroutine just calls UpdateUserInterface(), which updates the UI to show the current values of V, R1, R2, and R3 as well as the state of the switch.
1 Sub OnTextTyped
2 UpdateUserInterface()
3 EndSub
Listing 12-5: The OnTextTyped() subroutine
Step 5: Update the Program’s Interface
Now add the UpdateUserInterface() subroutine in Listing 12-6.
1 Sub UpdateUserInterface ' Puts new values on the background
2 GraphicsWindow.DrawImage(bkgndImg, 0, 0)
3 If (bkgndImg = onImg) Then
4 R1 = Controls.GetTextBoxText(r1Text)
5 R2 = Controls.GetTextBoxText(r2Text)
6 R3 = Controls.GetTextBoxText(r3Text)
7 V = Controls.GetTextBoxText(vText)
8 Rtot = R1 + R2 + R3
9 If (Rtot > 0) Then
10 I = V / Rtot
11 V1 = Math.Round(I * R1 * 100) / 100
12 V2 = Math.Round(I * R2 * 100) / 100
13 V3 = Math.Round(I * R3 * 100) / 100
14 I = Math.Round(I * 100) / 100
15 GraphicsWindow.DrawText(130, 80, V1 + " V")
16 GraphicsWindow.DrawText(270, 80, V2 + " V")
17 GraphicsWindow.DrawText(415, 230, V3 + " V")
18 GraphicsWindow.DrawText(34, 100, I + " A")
19 EndIf
20 EndIf
21 EndSub
Listing 12-6: Updating the text boxes
The UpdateUserInterface() subroutine starts by redrawing the selected background image. If the switch is in the off position, the If statement on line 3 is false and the subroutine ends; the UI doesn’t show any of the computed values (because no current is flowing through the circuit). But if the switch is on (which means the current background image is set to onImg), the subroutine moves on to compute the values of I, V1, V2, and V3. It starts by collecting the content of the four text boxes (lines 4–7). It then computes the total resistance by adding the values R1, R2, and R3together (line 8). If the total resistance is greater than 0 (line 9), the subroutine computes the current (I) that flows through the circuit (line 10) and the values of V1, V2, and V3, rounding each value to the nearest hundredth (lines 11–14). The subroutine then shows the computed values at the correct locations on top of the background image (lines 15–18).
Most of the work in this program was designing the GUI (drawing the background images and positioning the text boxes on top of the background image). Then you had to write the code for handling the events, performing the calculations, and displaying the results. Congratulations; you just made a virtual electrical circuit!
In the next section, you’ll write a GUI program that explains another object in the Small Basic library, the Flickr object.
TRY IT OUT 12-3
Think of ways to change this simulation to something else. Use different background images, like architectural blueprints, a pizza, or a Google Maps photo of your neighborhood. Then update the placement of the text boxes and the logic/math of what’s entered to match your new theme. Head to http://tiny.cc/sharesimulation/ to show off your program and to see what others have created.
Program Your Own Image Viewer
In this section, you’ll create an image viewer called ImageViewer.sb that displays images from Flickr (a photo-sharing website) based on search input from a user. Small Basic gives you an object, appropriately named Flickr, which gets images from the Flickr website: http://www.flickr.com/.Figure 12-7 shows the GUI for this program.
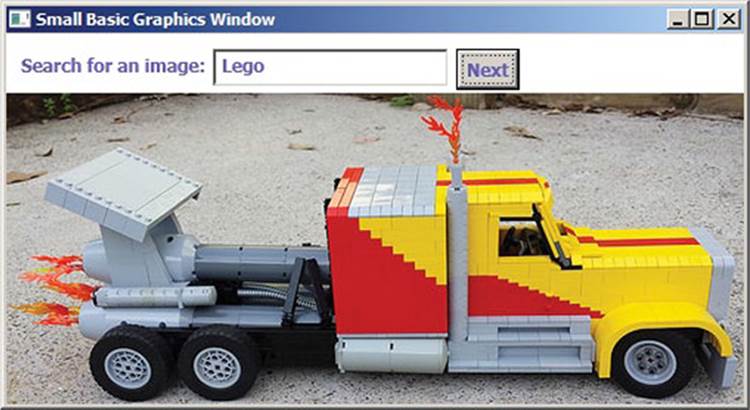
Figure 12-7: Sample output of ImageViewer.sb
NOTE
You’ll need Small Basic version 1.1 or later to use the Flickr object.
The ImageViewer.sb program includes a text box into which the user enters the search tag and a button (labeled Next). When the user clicks the button, the program uses the Flickr object to get (and display) an image that matches the user’s search tag. The program is shown in Listing 12-7.
1 ' ImageViewer.sb
2 GraphicsWindow.DrawText(10, 14, "Search for an image:")
3 tagText = Controls.AddTextBox(140, 10)
4 Controls.SetSize(tagText, 160, 26)
5 Controls.AddButton("Next", 305, 10)
6
7 Controls.ButtonClicked = OnButtonClicked
8
9 Sub OnButtonClicked
10 tag = Controls.GetTextBoxText(tagText)
11 If (tag <> "") Then
12 img = ImageList.LoadImage(Flickr.GetRandomPicture(tag))
13 If (img = "") Then
14 GraphicsWindow.ShowMessage("No images found.", "Sorry.")
15 Else
16 GraphicsWindow.Width = ImageList.GetWidthOfImage(img)
17 GraphicsWindow.Height = ImageList.GetHeightOfImage(img) + 40
18 GraphicsWindow.DrawImage(img, 0, 40)
19 EndIf
20 EndIf
21 EndSub
Listing 12-7: Loading images from Flickr
The program starts by designing the GUI (lines 2–5) and registering the ButtonClicked event handler (line 7). When the button is clicked, the OnButtonClicked() subroutine gets the search text from the text box and saves it in the tag variable (line 10). If tag isn’t empty (line 11), the code searches Flickr using the given tag text for a random picture and then grabs the URL (line 12) by using Flickr.GetRandomPicture().
That URL is passed to ImageList.LoadImage(), which loads an image from a file or the Internet and saves it into the img variable (line 12). If img is empty, which means Flickr didn’t find an image with the user’s tag, you let the user know in a message box (line 14). If Flickr found an image, you resize the graphics window to the dimensions of the loaded image (lines 16–17) and draw the image directly below the text box and the button (line 18).
TRY IT OUT 12-4
Write a program to ask the user what their favorite animal is. Then search for that animal using the Flickr object and display the returned image. Next, ask the user, “Like this one?” and show them two buttons labeled Yes and No. If the user clicks Yes, display Hooray! in a message box. If they click No, display a different random picture of that animal and ask, “How about this one?” Continue these steps until the user clicks Yes. You’ve just turned a simple program into a game!
Programming Challenges
If you get stuck, check out http://nostarch.com/smallbasic/ for the solutions and for more resources and review questions for teachers and students.
1. In this program, you’ll create a hidden treasure game. Open the file HiddenTreasure_Incomplete.sb from this chapter’s folder. When you run the program, you’ll see the following interface.
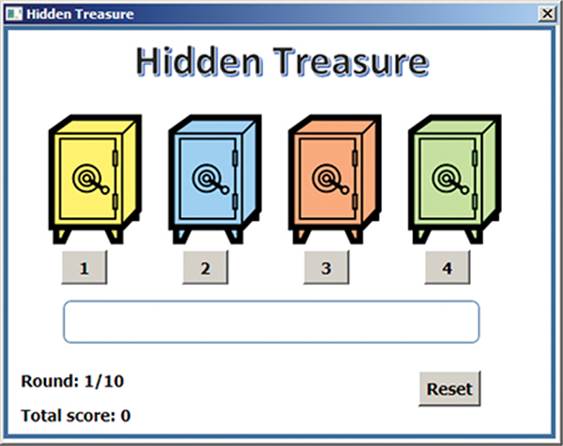
The purpose of the game is to guess the location of a hidden treasure. The player makes a guess by pressing one of the four buttons. If they guess correctly, they gain $10. Otherwise, they lose $5. The game ends after 10 rounds. Follow the comments shown in the program’s source code to write the missing code and complete the program.
2. In this exercise, you’ll create a program that computes the total cost of attending a special show at Sea World. Open the file SeaWorld_Incomplete.sb from this chapter’s folder. When you run the program, you’ll see the following user interface. The user enters the number of adult, senior, student, and VIP tickets they want to buy and then clicks the Compute button to calculate the total charge. Complete the program to display the total charge when the user clicks Compute.

All materials on the site are licensed Creative Commons Attribution-Sharealike 3.0 Unported CC BY-SA 3.0 & GNU Free Documentation License (GFDL)
If you are the copyright holder of any material contained on our site and intend to remove it, please contact our site administrator for approval.
© 2016-2026 All site design rights belong to S.Y.A.