LEARN TO PROGRAM WITH SMALL BASIC: An Introduction to Programming with Games, Art, Science, and Math (2016)
1. INTRODUCING SMALL BASIC
Bill Gates once had a goal to get a computer into every home. Now, nearly every desk has a personal computer—so just about anyone can learn to code, too. In this book, you’ll learn to program with a language called Microsoft Small Basic.
We’ll start this chapter by explaining some general computing concepts and Small Basic itself. Then we’ll show you how to set up everything you need to use Small Basic and top it off with writing your first program!
What Is a Computer?
A computer is an electronic device that processes data according to a set of instructions—it’s that magical device in your pocket or on your desk or lap. Computers can perform calculations (like your math teacher) and compare numbers (like in fantasy football), and they can store, retrieve, and process data at high levels of speed and accuracy (like parents remembering a curfew).
A computer’s hardware is everything you can touch on your computer—inside the guts of every computer are hundreds of interconnected electronic pieces. If you want to imagine data inside your computer, picture a massive mall with hundreds of stores and tens of thousands of shoppers moving like clockwork between the stores.
But without something more, all that hardware couldn’t do anything useful. Every computer requires programs to tell it what to do—we call these instructions software. The people who can write software are called programmers—and you’re about to become one today.
What Is a Computer Program?
A computer program is a set of instructions given to a computer to perform a task (like a list of homework from your teacher). Your web browser, your favorite video games, word processors—these are all computer programs.
A program tells the computer what data to read (like numbers or text), where to read the data from (like from a user, file, or the Internet), how to process this data (it might search, sort, or calculate the data), what kind of information to produce (like paragraphs, reports, or graphs), where to store the produced output (like a disk, network, or database), and how to display the results (like through a monitor, printer, or plotter). Whoa, that’s a lot!
A computer program specifies every detail along the way. Computers communicate in machine language, which is a bunch of 1s and 0s. (Can you imagine talking 1s and 0s to your friends?) A long time ago, the first computer programs ever written were actually entered into to the computer by flipping some switches on the computer’s front panel (on for 1, off for 0). Would you want to flip switches all day? Imagine the errors!
Luckily, computer scientists invented programming languages, which are a lot easier to use than machine language. Today there are hundreds of programming languages, but Small Basic is the programming language you’ll learn in this book!
What Is Small Basic?
Small Basic is a free programming language that Microsoft created for anyone who wants to learn programming. You can write all kinds of applications with Small Basic, including games, simulations, animations, and more.
How did the language come about? It started with a programmer at Microsoft named Vijaye Raji. Raji had just read David Brin’s article, “Why Johnny Can’t Code,”1 which describes how valuable it is to learn and teach coding in BASIC. In his article, Brin challenged Microsoft to make a new BASIC language that would help kids learn to code, and Raji accepted that challenge. Although BASIC was crucial to Microsoft’s success in the 1970s, 1980s, and 1990s, there really wasn’t a great programming language suitable for beginners in 2007.
So Raji wondered if he could create a smaller version of BASIC using only the simplest parts of the original language. On October 23, 2008, he released Microsoft Small Basic v0.1, the first version of Small Basic.
The Vision of Small Basic
Small Basic’s four goals will help make your learning experience as awesome as possible:
• It’s Simple. Small Basic is a simple programming language with a helpful code Editor and a Help Area to make coding easy.
• It’s Fun. Small Basic lets you create games and other cool programs right away. It also lets you command a turtle to make art, and it’s fun to use!
• It’s Social. With Small Basic, you can publish your game to the Web on the Microsoft gallery, show it to your friends, and embed it on your blog or website. Your friends can import your program and collaborate with you to make it better.
• It’s Gradual. Once you learn the fundamentals of programming with Small Basic, it’s easy to export your code into the free Visual Studio Community and start a new adventure with Visual Basic .NET, a programming language that’s used by millions of professional programmers and an important next step in your learning journey.
We’ll cover everything you need to get started with Small Basic in this book!
The Basics of Small Basic
The three main parts of Small Basic are the language, the supporting library, and the programming environment, which is the interface you’ll use to write your own programs. Let’s explore each element now.
The Small Basic Language
To form a valid sentence in English, you need to follow its grammatical rules. In the same way, to write a valid Small Basic program, you must follow the grammatical rules of Small Basic, which are called syntax rules. Syntax includes punctuation, spelling, statement ordering, and so on. When you break these rules, Small Basic detects all the syntax errors in your program and reports them to you so you can fix them.
The Small Basic Library
The Small Basic library contains hundreds of methods that you can use in your programs to perform different tasks. For example, you can use these methods when you want to tell the computer to display an image on the screen, draw a circle, download a file from the Internet, or even compute the square root of 275,625.
The Small Basic Development Environment
Small Basic comes with an integrated development environment (IDE), which is the application you’ll use to write your programs. The IDE contains a text Editor (in which you’ll type your program) and a Toolbar. The Toolbar has buttons that let you save and run your program, open a program so you can modify it, share your program on the Web, graduate your program to Visual Basic, and much more.
Installing Small Basic
The first step in your learning journey is to install Small Basic on your computer. Open your web browser, go to Microsoft’s Small Basic website at http://www.smallbasic.com/, and click the Download button in the upper-right corner. You’ll go to the Download page to pick your operating system and language. When you start the download, a dialog appears asking for your permission to open the SmallBasic.msi file. Click the Run or Open button to start the setup wizard.
When the wizard starts, click Next on the first page, accept the License Agreement, click Next again, click Next for the default setup, and then click Install. (If a User Access Control dialog pops up and asks for your permission to install the program, click Yes.) Click Finish when the installation is done. If you need to see these steps in detail, check out http://tiny.cc/installationguide/.
The Small Basic IDE
Now that your installation is complete, let’s take a look at the Small Basic IDE. Open the Windows Start menu, and either type Small Basic to search for it (and click to open it) or select All Programs ![]() Small Basic
Small Basic ![]() Microsoft Small Basic. When you run the program for the first time, you’ll see something like Figure 1-1 (enter Prog in the Editor to see the IntelliSense menu).
Microsoft Small Basic. When you run the program for the first time, you’ll see something like Figure 1-1 (enter Prog in the Editor to see the IntelliSense menu).
The IDE contains four main parts. The Editor ➊ is where you enter your Small Basic programs. You can open and work with multiple Editor windows at the same time, but only one Editor is active at once. Right-click the Editor to see a pop-up menu with options like Cut, Copy, Paste, and Find. The menu also has a Format Program option that indents the lines in your program to make it easier to read.

Figure 1-1: The Small Basic IDE
The Toolbar ➋ contains buttons that let you edit and run your program, and the Help Area ➌ provides instant information about the code you enter into the Editor. The Surface ➍ is an open area where you can move and organize your Editor windows for each Small Basic program.
You’ll use the Toolbar a lot, so let’s explore it in detail.
Opening and Saving Your Work
In the Toolbar’s File group, click New (CTRL-N) to start programming from scratch, or click Open (CTRL-O) to pick up where you left off in writing a program. Save (CTRL-S) often so you don’t lose your work, and click Save As to save your program in a new file.
Sharing Your Work and Importing Games
Let’s say your friend just published a new game to the Small Basic website, and you want to check it out. In the Web group, click Import to enter the Import ID (which you get from your friend) and download your friend’s code. Then you can make the game even cooler with your own modifications.
Let’s try opening a game that someone has already made. Click Import, and then enter the code TETRIS. You’ll see the code someone wrote to re-create the famous game, and you can see how it was made. To play the game now, click Run.
Later, when you’re ready to share your own programs, you can click Publish, and Small Basic will publish your program to the Web so your friends can play your game or app online and see your code. You can also share your program in the Small Basic forum to get direct help from thecommunity. Small Basic even gives you the option to embed your code snippet so you can add the project to your website. You’ll find the embed code on the published web page.
When you click Publish, you’ll see a dialog like the one in Figure 1-2.
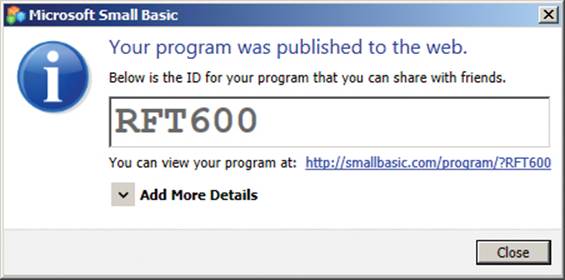
Figure 1-2: The Publish to Web dialog
When you Publish your code, in addition to getting the Import ID and the web page URL, you can also click Add More Details to enter a title, description, and category (like game, sample exercise, example, math, fun, or miscellaneous) for your program.
Copy and Paste; Undo and Redo
In Small Basic, you can edit your code like you’re editing any kind of text. From the Clipboard group, click Cut (CTRL-X) to remove a piece of code from one place in the Editor to paste it somewhere else. To avoid retyping code, click Copy (CTRL-C). To select all your code, press CTRL-A, and then cut or copy it.
After you cut or copy, click Paste (CTRL-V) to paste the contents into the Editor. If you make a mistake, no worries! Just click Undo (CTRL-Z). If you click Undo too many times, click Redo (CTRL-Y) to reverse the change. You can also look for a bit of code in a large file. To open the Find window and search for your text, just press F3, press CTRL-F, or right-click in the Editor and click Find in the context menu.
Running Your Program and Graduating
When you finish a program, click Run (F5) in the Program group to compile it; the Small Basic compiler, which is part of the IDE, checks if you have any errors, and if not, builds your program. When you’ve mastered Small Basic, just click Graduate to export your code into Visual Basic in Visual Studio Community and go on to learn your next language.
Writing and Running Your First Program
Now that you know your way around the IDE, let’s write a Small Basic program. First, create a new folder on your computer called Small Basic; this is where you’ll save all the programs you create throughout this book.
Then click the New button to open a new Editor window, and follow these steps:
1. Enter the program in Listing 1-1 into the Editor. You’ll need to enter it exactly as you see it.
1 ' Greetings.sb
2 TextWindow.WriteLine("Greetings, Planet!")
Listing 1-1: Your first program
NOTE
When you enter a listing to try it out, don’t include the line numbers at the left! These numbers are just for reference; we’ll use them to explain the code. You’ll see them in your Editor, too, but they aren’t part of your code.
2. Click the Save button on the Toolbar (or press CTRL-S), browse to the Small Basic folder you just made, and save your program as Greetings.sb.
3. Click Run on the Toolbar. If you didn’t make any typing mistakes, you’ll see an output window like the one in Figure 1-3.
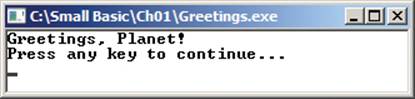
Figure 1-3: The output of Greetings.sb
NOTE
When you run this program, your window will have a black background; that is the default background color for the text window. The images in this book were created with a white background to make it easier for you to read them.
Even though it’s short, this is a complete Small Basic program! But what does each piece of the program do? Let’s dissect it.
Objects and Methods
The window in Figure 1-3 is the text window, and it can only display text. You told Small Basic to bring up the text window using TextWindow, one of the many objects in the Small Basic library. You can think of an object as a little toolbox for a specific job, such as doing math problems, defining words, or drawing pictures.
Objects in Small Basic can perform predefined tasks using methods. Methods are like the tools in your object toolbox. To get most methods to do something, you have to give them one or more values (such as text or numbers) to act on. Each value is called an argument.
WriteLine() is one method of the TextWindow object, and the message "Greetings, Planet!" is an argument that goes in the parentheses. The statement TextWindow.WriteLine() instructs the computer to display the message Greetings, Planet! in the text window.
Throughout this book we’ll include parentheses with the names of the methods, like WriteLine(), so you can easily tell that they’re methods.
Naming Your Programs
Project names can make it easy for you to identify what your project is about; these names don’t really matter much to Small Basic. Although we asked you to save this program as Greetings.sb because it was what the program was about, you could save it as SecretGarden.sb, FuzzyKittens.sb, or even HungerBoardGames.sb, if you really wanted to. Just don’t change the .sb part of the filename, which is called the extension. Small Basic programs use that extension by default, and there’s no reason to change it!
Files Generated by Small Basic
When you click the Run button, Small Basic creates other files in order to run your program. Open the folder where you saved your Greetings.sb program. Table 1-1 lists the files you should find in that folder if you clicked Run earlier.
Table 1-1: Files Generated by the Small Basic Compiler
|
File |
Description |
|
Greetings.sb |
This is your source code file, which contains everything you entered into the IDE. If you want to edit your code and make it better, you edit this file. |
|
Greetings.exe |
This is the executable file created by Small Basic. This file is what your computer actually runs. Double-click this file, and your program will run. |
|
SmallBasicLibrary.dll |
You can ignore this file for now. The dynamic link library (.dll) file contains executable code that supplements your Greetings.exe file. The Greetings.exe file won’t run without this file! |
|
Greetings.pdb |
You can ignore this file for now, too. This program database (.pdb) file contains information that is used by advanced tools to debug, or fix any errors, in the program. |
Now that you’ve compiled your source code, you can also run your Greetings.sb program without using the IDE. You do this by double-clicking the Greetings.exe file.
NOTE
When you click Run after editing your source file, Small Basic overwrites the .exe, .dll, and .pdb files. If you want to keep these files, you need to manually copy them to a different location before you click Run. Also, don’t forget to click Save to save the changes to your .sb file.
Helping Hands: IntelliSense and Syntax Coloring
If you’re following along and typing in Small Basic, you’ve seen how it analyzes what you type, even before you finish the word. Small Basic offers a list of suggestions that could help you complete what you’re typing. You can scroll through this list by pressing the up and down arrows on your keyboard. Press ENTER or double-click your selection to insert the highlighted text into your code. This technology is called intelligent sense or IntelliSense for short. Use it to speed up your typing time and reduce your syntax errors.
TIP
You can make IntelliSense transparent by just holding down the CTRL key to see your code underneath it.
You might have also noticed that the Small Basic Editor used different colors for some words in the program. This feature is called syntax coloring. Keywords, which are reserved words with special meanings to Small Basic, are shown in blue-purple. Strings, which are sequences of characters enclosed in quotes, are orange, and so are numbers. Method names are dark red, object names are blue-green, and so on. Syntax coloring helps you distinguish the different parts of the code and makes your program easier to read. You’ll learn more about these parts of code later in the book.
Drawing with Small Basic
The TextWindow object we used earlier works well for applications that don’t have a graphical user interface (GUI), which is a user interface that contains buttons, text boxes, and images, like Microsoft Word or Angry Birds (or Angry Words). For example, you can use TextWindow to write applications that perform math problems or that process data, where the input and output use only characters (like text). This is called a text-based user interface. If you want to create an application with a GUI (pronounced gooey, like a candy bar), complete with buttons and images, you can use the Small Basic library’s GraphicsWindow object. Using GraphicsWindow, you can create applications that show buttons, images, and more for your users to interact with. Let’s try it out!
Enter the program in Listing 1-2 into the Editor, and then click Run in the Toolbar.
1 ' Graphic.sb
2 GraphicsWindow.DrawText(100, 50, "Greetings, Planet!")
Listing 1-2: Your first graphical program
This program uses the DrawText() method of the GraphicsWindow object to display a message. The DrawText() method requires three arguments. The first two arguments tell Small Basic the horizontal (x) and vertical (y) positions of the output message, starting in the upper-left corner of the window. The third argument tells Small Basic what text to display. The output of this program is shown in Figure 1-4. As you can see, the message is displayed at position (100, 50).
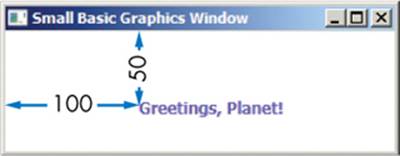
Figure 1-4: The output of Graphic.sb
The GraphicsWindow object contains many other methods that let you create GUI applications; explore a few of them in Try It Out 1-1.
TRY IT OUT 1-1
Enter the following program into the Editor, and then run it to see what happens:
GraphicsWindow.DrawEllipse(20, 20, 100, 100)
GraphicsWindow.DrawRectangle(140, 20, 100, 100)
GraphicsWindow.FillEllipse(260, 20, 200, 100)
The output of the program is shown in Figure 1-5. The numbers illustrate how Small Basic followed your code.
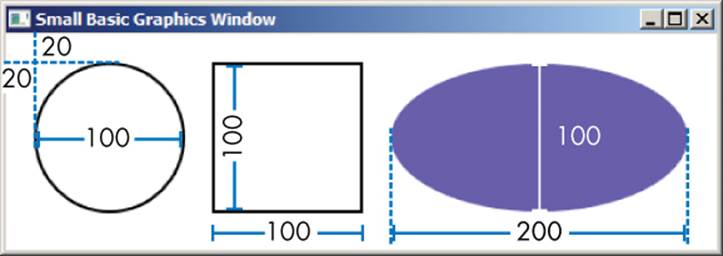
Figure 1-5: The output of the program
Programming Challenges
If you get stuck, check out http://nostarch.com/smallbasic/ for the solutions and for more resources and review questions for teachers and students.
1. Identify the objects, methods, arguments, and keywords in the following code snippet. (Hint: the Small Basic editor shows keywords in blue-purple.)
If (today = "Friday") Then
TextWindow.WriteLine("Today is Friday.")
Else
TextWindow.WriteLine("I lost track of what day it is.")
EndIf
2. Write a program to display your name in the text window.
3. Write a program to display your name in a message box using the GraphicsWindow object. (Hint: use the ShowMessage() method.)
All materials on the site are licensed Creative Commons Attribution-Sharealike 3.0 Unported CC BY-SA 3.0 & GNU Free Documentation License (GFDL)
If you are the copyright holder of any material contained on our site and intend to remove it, please contact our site administrator for approval.
© 2016-2026 All site design rights belong to S.Y.A.