CoffeeScript in Action (2014)
Part 3. Applications
Chapter 11. In the browser
This chapter covers
· Building browser-based programs
· Creating polyfills for cross-browser compatibility
· Building retained- and immediate-mode interfaces
· Structuring browser-based programs
A web browser can be a hostile environment in which to run a program, but CoffeeScript can help you keep your browser-based applications manageable. It’s not the individual features of CoffeeScript that help you in a browser. Instead, it’s the focus on simplicity and clarity of expression and semantics that help you to keep your sanity in the world of web browsers, which can at times seem insane. That said, although the benefit of CoffeeScript in a browser is in how you use it to structure programs, it’s still important to learn the challenges of the browser environment that your CoffeeScript programs live in.
In this chapter you’ll learn how to write browser-based programs in CoffeeScript that run on multiple, often incompatible, browsers. To get there you’ll learn how to deliver your CoffeeScript to a browser, how to deal with browsers that don’t support the features you need, how to create user interfaces using retained- and immediate-mode techniques, how to create animations, and how to manage the structure of your program and how fast it runs. It’s time to get started.
11.1. Getting started
Imagine Agtron has a few servers that frequently run out of both CPU and network bandwidth. This causes his online shop to temporarily go offline, and Agtron loses money. If only Agtron had a web-based dashboard to show him the status of his servers (in real time), then he could prevent the shop from being offline.
Your mission, should you choose to accept it, is to create a real-time dashboard for Agtron. In figure 11.1 you see Agtron’s back-of-the-envelope drawing of how he wants the dashboard to look when viewing the status for a single server. It looks a bit like a heart-rate monitor found in a hospital.
Figure 11.1. Agtron’s dashboard

This is going to be a browser-based dashboard, so you start with the basic HTML in the following listing.
Listing 11.1. The basic HTML page
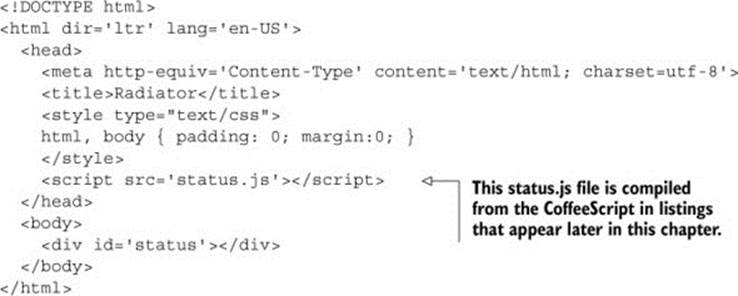
The script referenced by <script src='status.js'></script> is a JavaScript file, but your browser-based program will be written in CoffeeScript. How do you deliver your CoffeeScript program to a browser?
11.1.1. Manual compilation
The first option you have is to use the manual command-line CoffeeScript compiler. But that will quickly become tedious if you have to invoke the compiler every time you change your program. Suppose the program is contained in the file status.coffee:
> coffee –c status.coffee
You don’t want to manually recompile again and again. There are other options; one of them is to send CoffeeScript straight to the browser.
11.1.2. Browser compilation
Browsers execute JavaScript, not CoffeeScript. But because CoffeeScript is implemented in CoffeeScript, a compiled version of CoffeeScript can run in the browser and compile CoffeeScript for you on the fly. Read the previous sentence again. Let it sink in.
Once you’re ready, you can compile CoffeeScript in a browser by first including a browser-specific version of CoffeeScript:
<script src='http://coffeescript.org/extras/coffee-script.js'></script>
Once your HTML document has that, you can include a CoffeeScript source file:
<script type='text/coffeescript' src='status.coffee'></script>
Web browsers don’t recognize the text/coffeescript script type, but by including CoffeeScript in the browser, the CoffeeScript compiler can turn your CoffeeScript source files into JavaScript on the fly. How does it do this? It loads the source of your CoffeeScript program, compiles it, and then tells the browser to evaluate the compiled JavaScript.
That sounds too good to be true! Unfortunately it is. Sending CoffeeScript directly to the browser comes with a performance disadvantage because every time the browser loads your program, it has to first load the CoffeeScript, then compile the program, and then run it. Regardless, you don’t want to compile your CoffeeScript manually. You need a third alternative.
11.1.3. Automatic compilation
Manual compilation is not only annoying; it can hurt your interface. To develop good user interfaces, it helps to have frequent and direct feedback from the working interface. If you have to manually compile every time, you’ll lose your flow.
To keep the immediacy when writing CoffeeScript programs for web browsers, use the –w (watch) compiler argument to automatically recompile every time you save a change to a file. Invoke the compiler with the watch option and the filenames you want to compile:
> coffee –c –w status.coffee
Each time you save a change, you’re notified that the compiler has run:
# 21:52:16 - compiled status.coffee
# 21:52:57 - compiled status.coffee
# 21:53:00 - compiled status.coffee
Now that you’re happily compiling away (or not), it’s time to get back to the task of building Agtron’s dashboard.
11.2. Communicating with the outside world
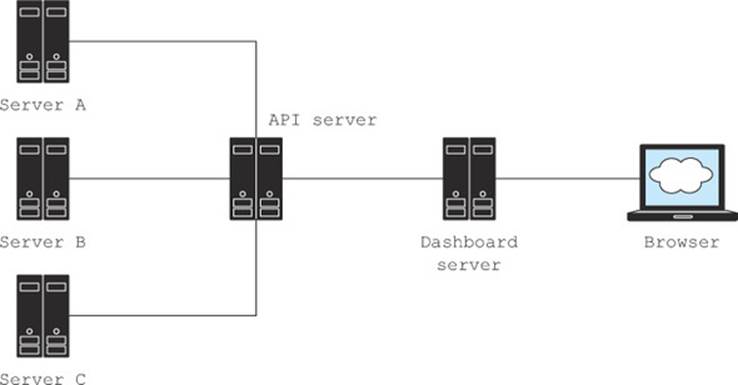
Before you can display any data about Agtron’s servers, you need to get that data from somewhere. Suppose Agtron has already implemented a data server that collects information from all of the servers he wants to monitor and serves them up for you over HTTP as JSON. Agtron’s back-of-the-envelope network diagram is shown in figure 11.2.
Figure 11.2. Agtron’s servers
Your CoffeeScript program is entirely browser-based, so you’ll need to understand the different techniques for loading data from a server from inside a browser. In this section you’ll learn three techniques: XMLHttpRequest, dynamic script insertion, and WebSocket.
11.2.1. Using XMLHttpRequest
One technique you’ve seen for fetching data over the web in a browser-based program is to use the XMLHttpRequest object (discussed in chapter 5). Here, you wrap it in an http function:
http = (method, src, callback) ->
handler = ->
if @readyState is 4 and @status is 200
unless @responseText is null
callback JSON.parse @responseText
client = new XMLHttpRequest
client.onreadystatechange = handler
client.open method, src
client.send()
get = (src, callback) ->
http "GET", src, callback
Unfortunately, there’s a catch with using XMLHttpRequest. For security reasons, it works only if the data you’re loading is on the same domain as your browser-based application. Suppose that in your case the dashboard is on one particular domain at http://www.agtronsemporium.com, and the data server is on a different domain at http://www.agtronsapi.com. How do you load data from a different domain?
11.2.2. Dynamic script insertion
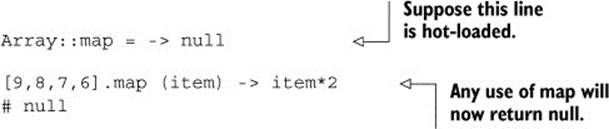
An alternative technique to XMLHttpRequest that works across different domains is to take advantage of the browser’s ability to dynamically load and execute new <script>s at any time. You might call this hot code loading because program code is being loaded while the program is running (while it’s hot). To load an external script dynamically into the application, you dynamically insert a script element with the desired src attribute:
window.serverStatusCallback = (status) ->
console.log status
head = document.querySelector 'head'
script = document.createElement 'script'
script.src = 'http://www.agtronsapi.com/server-status.js'
head.appendChild script
If the server-status script that’s loaded has the data wrapped in the appropriate callback, as follows, then the status will be logged to the console:
window.serverStatusCallback({
'server 1': {
'cpu': 22,
'network': {
'in': 2343,
'out' 3344
}
}
});
But that will only load the data once, and Agtron wants to leave the application running and see the information about his servers update over time. A simple approach to getting regular data updates is to just ask for the data periodically.
How to run the listings
The remaining listings in this chapter are client-side and require a server to run. The downloadable code includes a server.coffee file that can be used to experiment with the listings. Run server.coffee from the command line and visit http://localhost:8080/ to start experimenting.
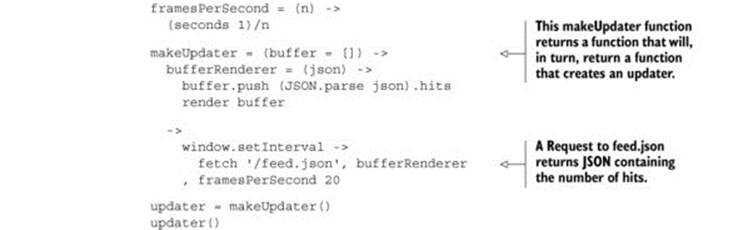
In the following listing, you see the techniques described in this section used in a first version of the dashboard program that repeatedly polls Agtron’s servers to get the most recent data. Instead of displaying a graph, this first version simply displays the current numerical value as text.
Listing 11.2. The status updating script
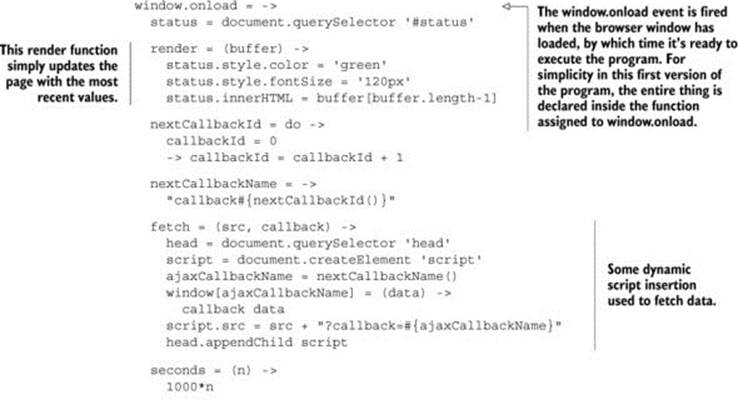
But as with most things in browser-based programs, there’s a catch. Although some code (such as JSON data for Agtron’s servers) is safe to hot load,
{
'servers': [
{
'name': 'tolimas'
'cpu': 22,
'network': {
'in': 2343,
'out' 3344
}
}
]
}
other code can be unsafe, and unsafe code (be it malicious or clumsy) inserted into a hot program can have disastrous effects. Imagine dynamically inserting a script that overrides the built-in map method (chapter 5) on the Array prototype. All of your arrays will break!
If you load source code into your program, there’s a chance that source code will do something that you don’t want it to. It’s possible to sandbox code in a browser as you learned to do on the server (in chapter 8), but the only safe rule to follow in a web browser is to load source code only from sources you trust.
You trust Agtron’s data server to only return objects and not to override any prototypes or do anything else nasty to you. If you only poll it for new information periodically, as in listing 11.2, will you be getting data updates often enough? Surely there’s some way to get updates in real time.
11.2.3. Going real time with WebSocket
If the data server could inform your dashboard application when there was new data, then you wouldn’t need to poll. When the server informs the client in this way, the server is said to push data to the client. To achieve this, you need to open something called a WebSocket connection between the server and your dashboard.
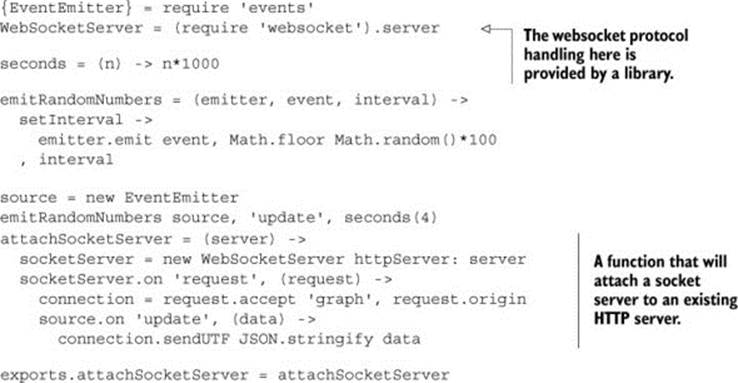
To experiment with and learn about WebSocket, it’s useful to have a local server that will push some data down a WebSocket connection so that you can play with it. You see a very basic Node.js-powered CoffeeScript program that pushes random data down a WebSocket connection in the following listing.
Listing 11.3. A random-number socket emitter
Before WebSocket, web browsers didn’t have any standard way to have data pushed to them. Instead, various tricks were cobbled together to get real-time effects in browsers. Recently, work to standardize the WebSocket protocol (http://tools.ietf.org/html/rfc6455) has made life easier for you, and you can open a connection without much fuss:
socket = new WebSocket 'ws://www.agtronsapi.com/server-data-socket'
As with most things in a browser, WebSocket is event driven, so you must listen for events:
socket.onmessage = (message) -> console.log "Received message #{message}"
The server is now responsible for pushing the data to the client instead of the client having to ask the server for new data. This is a browser-based program, though, so there must be a catch. Indeed there is.
WebSocket is a new technology, so you can’t be sure that any given browser will support it. Cross-browser compatibility is something you must always be aware of when building browser-based programs. Such programs have to work in multiple different browsers—browsers that may not support the same features.
11.3. Cross-browser compatibility
Imagine now that Scruffy tells you he received an email from his 106-year-old great-grandmother telling you that the dashboard doesn’t work for her. You’re not sure why Scruffy’s 106-year-old great-grandmother needs to use Agtron’s dashboard, but apparently she does. When you ask what she sees when she opens the dashboard, she tells you it’s a blank screen. Why does she see a blank screen?
The problem is that Scruffy’s elderly great-grandmother is using an elderly browser. Suppose this browser is called Browser X. When you obtain a copy of Browser X and use it to view the dashboard, you quickly see that there’s an error when it executes document.querySelector:
document.querySelector '#status'
# document.querySelector is not a function
Your browser-based program has to run on many different browsers. Each browser may or may not support a particular browser feature that you use in your program (even when those features are standardized). Special objects that belong to the browser called host objects provide some of those features. You’ve already encountered the XMLHttpRequest and document host objects.
Feature detection
The technique demonstrated in this section is called feature detection because it checks to see whether a runtime has a specific feature and defines it if it does not. A contrasting approach is to detect the runtime instead of the feature. Detecting the runtime proves to be ultimately unmaintainable and isn’t recommended except in rare cases where a runtime is completely broken.
Web browsers define host objects such as the document object. They might not be defined outside of a browser, such as on the REPL:
document?
# false
Host objects are part of the Document Object Model (DOM) and can differ wildly across browsers. Although the behavior of some host objects is standardized, you should anticipate that different browsers will behave differently. More importantly, host objects don’t behave like regular objects. They might look like regular objects, but they’re not. Don’t expect host objects to work like regular objects.
The Document Object Model
The convention, or model, that defines how your browser-based application interacts with host objects that belong to the document loaded by the web browser is called the Document Object Model (DOM). Objects provided by the document are called DOM objects, and all DOM objects are host objects. DOM objects, such as document, are often a source of frustration.
How do you deal with incompatibilities in the host objects of different browsers? By using polyfills.
11.3.1. Polyfilling host objects
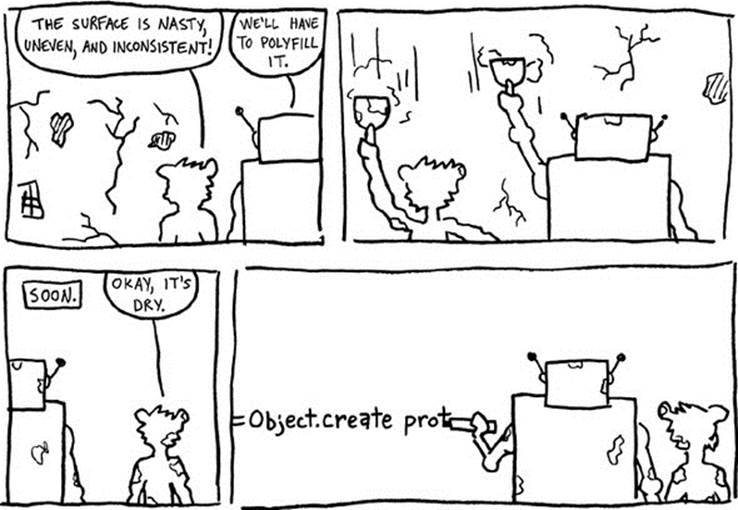
A polyfill is a function or group of functions that makes a smooth surface on which your main program can be written, without having to worry about the inconsistencies. It comes from polyfilla (also known as spackling paste)—a product that’s used to fill in gaps and cracks on a wall to create a smooth surface, just like Scruffy and Agtron are doing in figure 11.3. A polyfill in a web browser works the same way—filling in the gaps and cracks between the different browsers.
Figure 11.3. Scruffy and Agtron using a polyfill
Your first polyfill is for the document.querySelector that doesn’t work in Browser X. You use the method to find an element using an ID, so a reasonable first polyfill for your needs relies on document.getElementById. The trick is to define the method only if it doesn’t already exist:

But suppose that once you’ve defined querySelector, another programmer (such as Scruffy) comes along and, quite reasonably, expects it to work according to the specification. What happens when Scruffy tries to use your polyfill to find an element using the class name?
<ul class='pages'>
<li></li>
<li class='active'>Home</li>
<li>About</li>
<li>Contact</li>
</ul>
Your polyfill fails silently and returns null as if nothing were wrong:
document.querySelector '.links .active'
# null
Suppose, though, that you don’t have time to implement (or even read) the entire specification. Change your polyfill to throw an exception if it’s used for something that you know it doesn’t support:

Now at least other programmers are warned that your polyfill doesn’t implement the specification (assuming that they didn’t read your tests to discover that already). If needed, they can override your implementation with a more complete one.
It’s not just host objects that are inconsistent across browsers, though—some language features aren’t implemented by all browsers. In fact, the absence of things like Array.map in older browsers was one of the early motivations for creating CoffeeScript.
11.3.2. Polyfilling language features
Each browser moves at a different pace. One browser might implement a new feature of JavaScript while it’s still just ideas, whereas another browser may implement the same feature years after it’s standardized.
For example, take a language feature that you’re familiar with—being able to create a new object with an existing object as the prototype using Object.create. It’s easy to take this feature for granted, but unfortunately, when you test your program in Browser X, you discover that it isn’t defined. What do you do? Polyfill:

Job done, right? Not quite. Agtron later informs you that your polyfill doesn’t implement the entire specification (you know, the one you didn’t have time to read). There’s actually a second parameter (see chapter 13). To prevent people from getting nasty surprises when they use your polyfill, you take the approach of throwing an exception if the polyfill is used for part of the specification that it doesn’t implement:

Not all language features can be fixed with a polyfill in this way. Any language feature that requires syntax can’t be polyfilled at runtime. Writing a polyfill for language syntax would be like building a house out of wallpaper. Changing syntax means compilation. Back to Agtron’s dashboard—how will you create those graphs that Agtron wants? More generally, how will you create the user interface?
11.4. Creating a user interface
There are two styles of managing your drawing in a web browser: retained mode and immediate mode. Although web browsers have traditionally used a retained mode, some recent APIs such as canvas are immediate mode. The difference between retained and immediate mode isn’t crucial to your understanding of CoffeeScript, but understanding it will help you write better CoffeeScript programs in the browser. It’s time to learn both.
11.4.1. Retained mode with the DOM
In retained mode, what you draw to the view, such as a graph, can be directly modified and manipulated after it has been drawn. Inside a browser, the DOM is a retained-mode API. You can both assign a value to the innerHTML property of a DOM element and get the current value:
number = document.querySelector '#status'
number.innerHTML = 55
number.innerHTML
# 55
That’s the essence of retained mode. Information persists and can be retrieved.
How do you take this retained-mode API and display a chart for Agtron? Well, a line chart like the one Agtron wants is a bit too involved to start with when working with the DOM, so instead Agtron suggests that you start with a bar chart of 20 bars:
for number, index in values
measurement[index].style.height = 55
A program that displays a bar chart of the last 20 values obtained (by setting the heights of 20 DOM elements) is shown in the following listing. Some sections of the listing are the same as, or similar to, sections of listing 11.2.
Listing 11.4. Drawing a bar chart with DOM elements
Agtron wants a line chart. How do you draw a line chart? Drawing a line chart using regular DOM elements wouldn’t be much fun, so instead you’ll draw the line chart using something called canvas that involves immediate-mode techniques.
11.4.2. Immediate mode with HTML5 canvas
In immediate mode, the view is only a buffer, and what you draw to it has no life outside of that buffer. There’s no way to get elements back out of the buffer, so you never directly access or manipulate them. The HTML5 feature called canvas provides an immediate-mode API for browser-based drawing.
For now, assume that the standard canvas interface is supported everywhere you need it to be—if it isn’t, you can write a polyfill for it later. To create a canvas, you create a new canvas element, append it to the existing status element (see listing 11.1), and then create a context inside the new element:
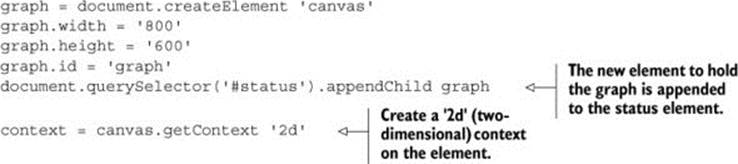
To draw a graph, you’ll also use some other parts of the canvas API: beginPath, lineTo, and stroke. With those you can now draw a line. The basic mechanism is simple; you use coordinates to create a path on the canvas and then stroke or fill that path:

With the graph data in an array, you convert it to a graph on a canvas with beginPath, lineTo, and stroke:
createGraph = (element) ->
graph = document.createElement 'canvas'
graph.width = '800'
graph.height = '600'
graph.id = 'graph'
element.appendChild graph
graph
getClearedContext = (element) ->
element.width = element.width
element.getContext()
drawLineGraph = (element, graphData, horizontalScale) ->
context = element.
context.beginPath()
for y, x in graphData
context.lineTo x*horizontalScale, y
context.stroke()
status = document.querySelector '#status'
drawLineGraph getClearedContext(status), [110,160,350,100,260,240], 100
This will draw a simple line graph on the canvas like the one in figure 11.4.
Figure 11.4. Drawing a simple line graph on a canvas
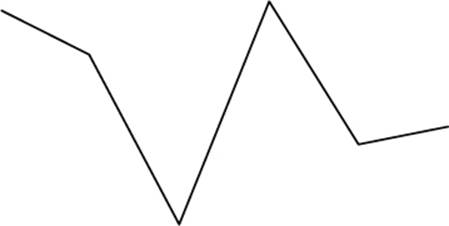
Drawing with canvas is easy! This immediate mode is puzzling, though; if the canvas doesn’t remember anything, then how do you know what you drew last time? How can you animate without knowing where you start? The trick with immediate mode is to not need to.
One of the hallmarks of immediate-mode UIs is a single render function that draws everything to the screen. Suppose your UI contains a graph and a title. Define a render function as drawing a graph and a title:
render = ->
drawGraph()
drawTitle()
You haven’t yet defined drawTitle, but that’s okay; the render function doesn’t have to care about how drawTitle is implemented.
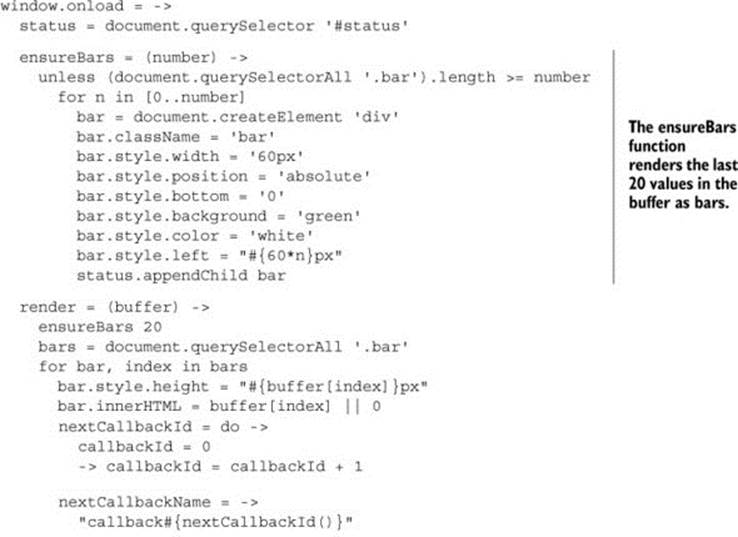
The next listing contains a program for rendering a line graph using canvas. This program has some parts in common with listing 11.4. Compare the retained- and immediate-mode approaches by comparing the listings.
Listing 11.5. Drawing a line chart with HTML5 canvas
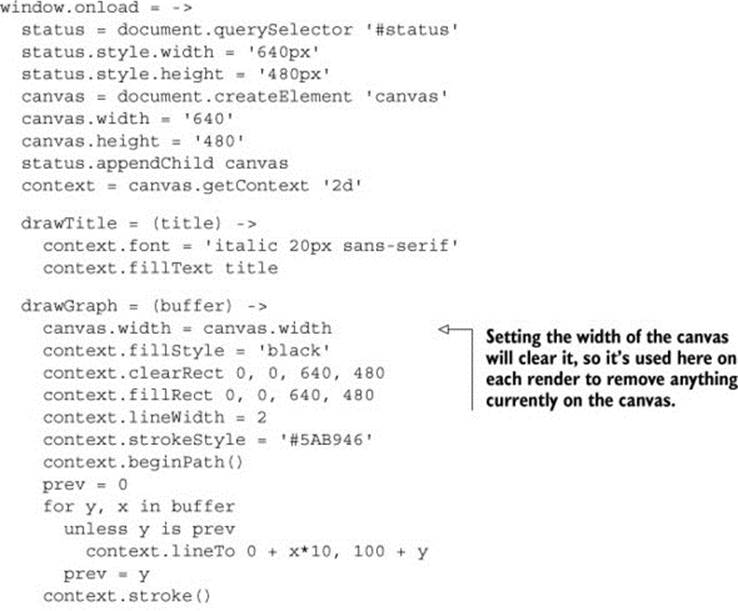
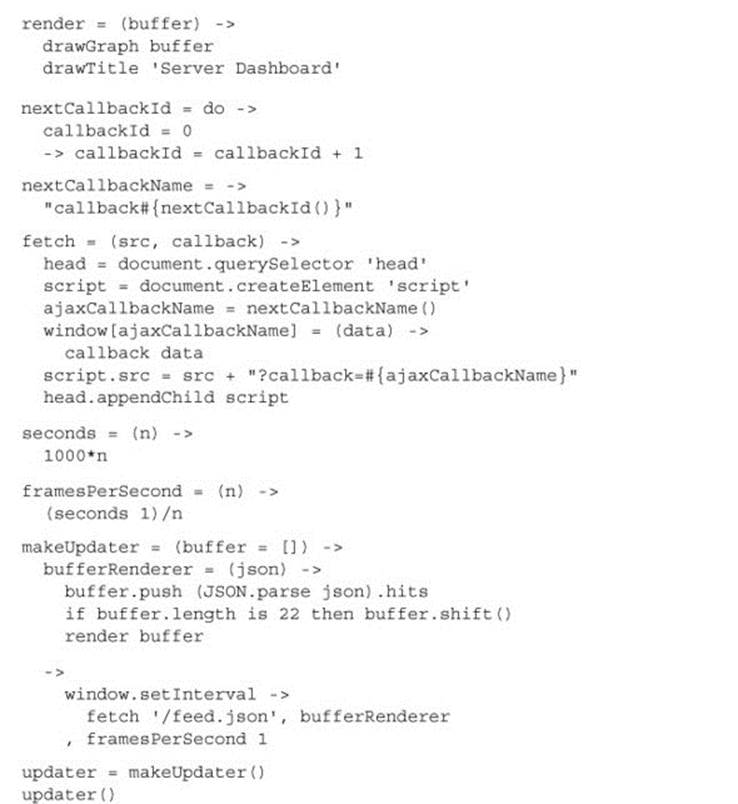
The programs in listings 11.4 and 11.5 both update several times per second. The constantly changing data makes the graphs look like they’re moving. This movement is stuttered, but the feeling of movement is there nonetheless.
Animation can be a subtle and nuanced thing, but the realization that you don’t need to explicitly request animation to make something appear animated is an important one when considering immediate-mode graphics. You want to create smooth animations, though. How do you do that?
11.5. Creating animations
The time-honored way to animate in a browser is to use setInterval or setTimeout to repeatedly change some property of a DOM object over time. Suppose you have a reference named bar to a DOM object that you want to animate:
seconds = (n) -> n*1000
setInterval bar.height, seconds 1
In a retained-mode API like the DOM, you directly manipulate the property on the object. How the object is rendered is taken care of by the retained-mode API. This is in contrast to an immediate-mode API like canvas where you do the rendering yourself.
This section explores animations in retained and immediate mode. It also explores the question of how to keep animations smooth in the single-threaded event-loop environment of a web browser.
11.5.1. Retained mode
To animate DOM objects in retained mode you repeatedly change a style property. Suppose you want to animate the bar on a bar chart so that instead of changing from a height of 20 to a height of 40 instantaneously (as with listing 11.4), it animates the change smoothly over one second.
Tweens
The creation of animation between two states is called a tween.
A single bar in your bar chart is drawn as a single DOM element, and the height is set as a style property:
bar.style.height = 20
To animate this to a height of 40 in one second, use setInterval and increase the height by 1 pixel until the element reaches the target height:
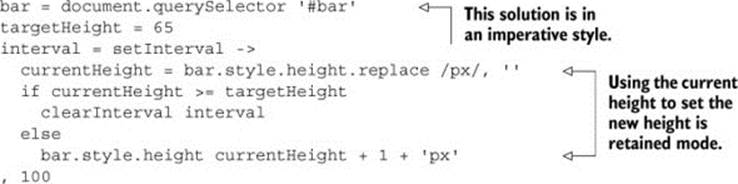
A named abstraction adds some clarity:
animateStyleInPixels = (element, propertyName, targetValue) ->
interval = setInterval ->
currentValue = element.style[propertyName].replace /px/, ''
if currentValue >= targetValue
clearInterval interval
else
bar.style[propertyName] = currentValue + 1 + 'px'
, 100
bar = document.querySelector '.bar'
animateStyleInPixels bar, 'height', 65
That’s all there is to basic animation in retained mode. Instead of moving things to their destinations immediately, you animate (tween) them from the start state to the end state. How does animation in immediate mode look different?
11.5.2. Immediate mode
Immediate-mode animation is like a flipbook or cell-based animation with each frame being a standalone static image. By rapidly flipping through the frames (the pages of the flipbook), you create the appearance of movement. When the frames change faster than the human eye can detect, the animation appears smooth. In the next listing, you see a program for a 30-frames-per-second immediate-mode graph.
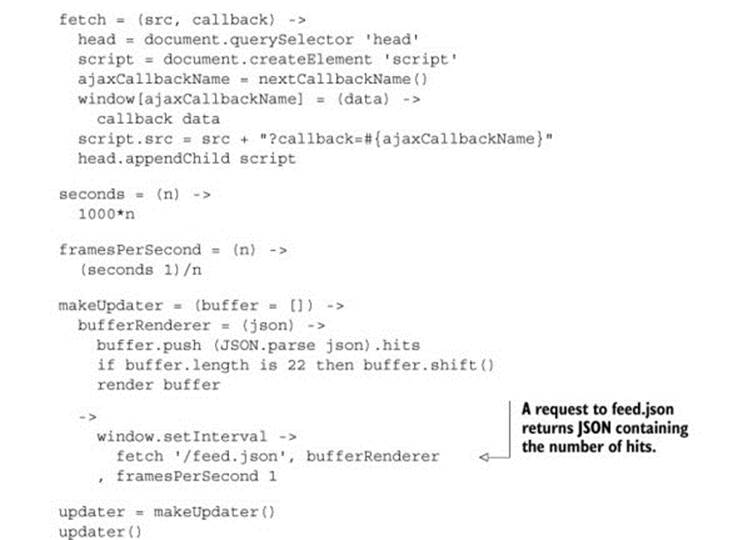
Listing 11.6. Animating an immediate-mode line graph

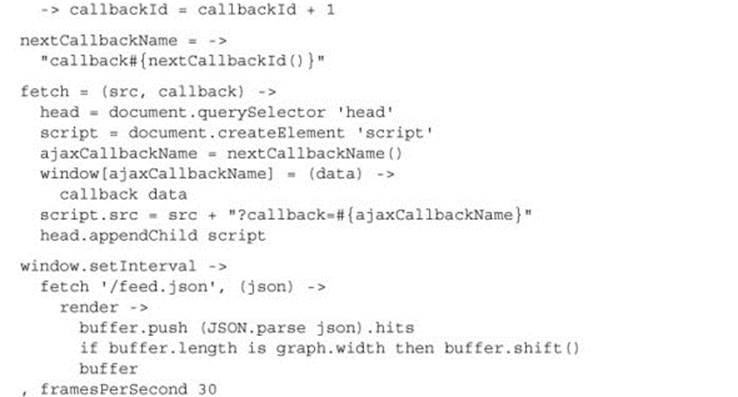
Agtron points out that the solution in listing 11.6 works fine if data is being received frequently. If it’s not being received frequently, you need to consider buffering and interpolation. That, however, is a lesson for another day. The final thing to consider with your browser-based program is how to put it together.
11.6. Structuring programs
Depending on the nature or circumstances of the problem (or the people solving the problem), an immediate-mode API can be inappropriate. Suppose that you must work with canvas, but you really need a retained-mode API. What can you do? Use the powerful design technique called wishful thinking.
11.6.1. Abstraction and APIs
Write your program as if you already had the retained-mode API that you want, and then implement it. Suppose you want a fluent retained-mode API that can draw a circle and then move the circle around. You call the API Cézanne after the famous French artist Paul Cézanne:
scene = Cézanne
.createScene('#scene')
.size(400, 400)
circle = scene
.createCircle()
.radius(10)
.color(Cézanne.RawUmber)
.position(20, 20)
circle.animatePosition 360, 360, 2
This looks very different from the canvas API. If you need an API like Cézanne but you start with raw canvas, then every single line that you write moves you farther from the API that you want. It’s tempting to think that because you’re not writing a library for other people to use, you don’t need to create a nice, readable API. The opposite is true. Unless your program is throwaway (some are!), then write the API today that you will be happy to use in six months’ time.
So, how do you implement an API like Cézanne on an immediate-mode API? The following listing shows an implementation of a retained-mode Cézanne API that can draw and animate circles.
Listing 11.7. A retained-mode circle-drawing API for canvas called Cézanne
Cézanne = do ->
seconds = (n) -> n*1000
framesPerSecond = 30
tickInterval = seconds(1)/framesPerSecond
circlePrototype =
radius: (radius) ->
@radius = radius
this
color: (hex) ->
@hex = hex
this
position: (x, y) ->
@x = x
@y = y
@context.beginPath()
@context.fillStyle = @color
@context.arc @x, @y, @radius, (Math.PI/180)*360, 0, true
@context.closePath()
@context.fill()
this
animatePosition: (x, y, duration) ->
@frames ?= []
frameCount = Math.ceil seconds(duration)/tickInterval
for n in [1..frameCount]
if n is frameCount
do =>
frame = n
@frames.unshift =>
@position x, y
else
do =>
frame = n
@frames.unshift =>
@position x/frameCount*frame, y/frameCount*frame
scenePrototype =
clear: ->
@canvas.width = @width
size: (width, height) ->
@width = width
@height = height
@canvas.width = width
@canvas.height = height
this
addElement: (element) ->
@elements ?= []
@elements.push element
element.context = @context
startClock: ->
clockTick = =>
@clear()
for element in @elements
frame = element.frames.pop()
frame?()
@clockInterval = window.setInterval clockTick, tickInterval
createCircle: ->
circle = Object.create circlePrototype
@addElement circle
circle
RawUmber: '#826644'
Viridian: '#40826d'
createScene: (selector) ->
scene = Object.create scenePrototype
node = document.querySelector selector
scene.canvas = document.createElement 'canvas'
scene.context = scene.canvas.getContext '2d'
node.appendChild scene.canvas
scene.startClock()
scene
The animations provided by the implementation of Cézanne shown in listing 11.7 aren’t very smooth. What’s wrong with them? They don’t deal with time effectively. Whatever your choice of API, you’ll have to deal with time. Time is always a concern.
11.6.2. Dealing with time
The problem with setTimeout and setInterval is that they aren’t guaranteed to be accurate. In chapter 9 you saw that you could block the event loop by executing a long-running process. This is a problem for any program, but it’s visibly bad for your animations. Figure 11.5 shows what happens when the event loop is blocked for something time-critical like drawing a graph.
Figure 11.5. Some setInterval inaccuracy is making the graph inaccurate.
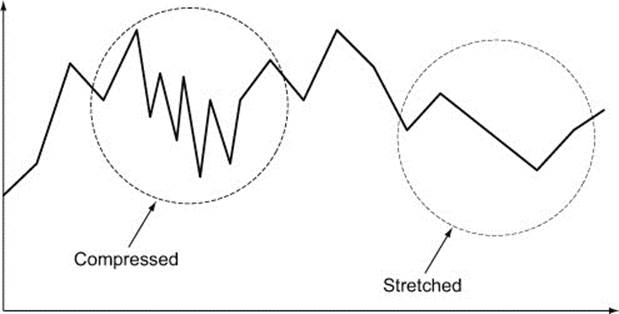
If you block the event loop for 5 seconds, then instead of the animations you want, you’ll get incorrect (and often surprising) animations. The same problem happens for any time-sensitive drawing inside a browser. Remember, the browser provides you with a single event loop—anything that happens on the event loop can impact time-based rendering.
The issue of timeout accuracy has more subtle implications. Although you’ll notice if your event loop is blocked for a second, you won’t normally notice if your event loop is blocked for 50 milliseconds. For an animation, even a 50-millisecond inaccuracy can make it look terrible. For something time-critical like a game, accuracy of the timing and animations is essential.
One tactic for getting around this is called drift compensation:
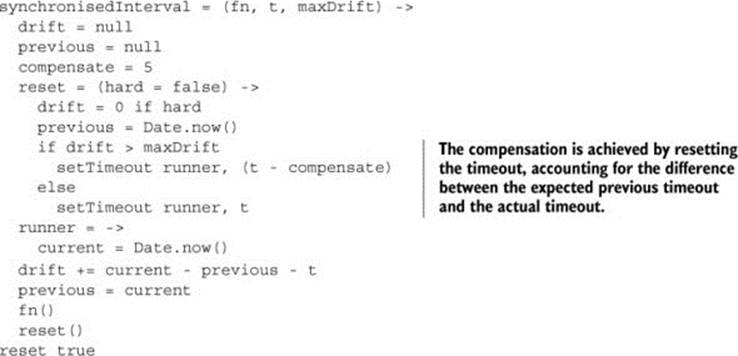
If you have 100 timeouts running and you’re trying to do drift compensation for all of them, then you might notice the browser performance starting to degrade. One solution in cases where you need to synchronize many events is to have a single world interval that synchronizes all the other events in the program to it.
Understanding different techniques for drawing, animation, and timing is essential to writing effective browser applications. Although programming for browser-based user interfaces is a topic too big to cover fully here, you have learned the core concepts you need to start building interfaces in CoffeeScript today.
11.7. Summary
In this chapter you learned about writing CoffeeScript programs in a web browser and the unique challenges that browser incompatibilities, animations, and timing present to you as a developer.
In the next chapter you’ll see how to put together the various server and client components of your CoffeeScript application in a reliable and repeatable way with modules and builds.
All materials on the site are licensed Creative Commons Attribution-Sharealike 3.0 Unported CC BY-SA 3.0 & GNU Free Documentation License (GFDL)
If you are the copyright holder of any material contained on our site and intend to remove it, please contact our site administrator for approval.
© 2016-2026 All site design rights belong to S.Y.A.