CoffeeScript in Action (2014)
Part 3. Applications
Chapter 12. Modules and builds
This chapter covers
· Modular applications with the Node.js module system
· Automated builds
· How to make modules work in a web browser
· Releasing your modular application to the world
It’s unlikely that you’ll only ever write programs that are contained entirely in a single file. Instead, a typical application consists of many files, often written by many people, and, as a result, one big file won’t cut it. Breaking a program into many files makes each file easier to manage but also means you need some way to manage multiple files. Together, the files make up your program.
Individually, the part of the program contained in a single file is called a module. For example, you’re by now very familiar with fs, the filesystem module:
fs = require 'fs'
What you’re not yet familiar with is creating your own modules. That’s what you’ll learn in this chapter: how to create and use server-side modules for Node.js, how to build those modules into a complete application using Cake, how to run your tests against that built application, and how to use the same approach to modules in a web browser. Finally, you’ll learn how to deploy your program for the world to see. First up, modules.
12.1. Server-side modules (on Node.js)
JavaScript doesn’t have modules. To clarify: the JavaScript language doesn’t define a standard module system. The modules that you’ve used so far in your Node.js-based programs have been Node.js modules.
Imagine you’re working on an application to power Agtron’s blog (depending on your opinion of blogs, you might also need to imagine that it’s 2004 to make the picture more vivid). The application needs to display a list of Agtron’s blog posts on the homepage. Each item in the list links to a page containing the content of the blog post. Figure 12.1 shows examples of the two page types in a browser.
Figure 12.1. Agtron’s blog in a web browser

Agtron has some blog posts already written and has supplied them to you as text files. The first line of each file contains the title of the post, and the rest of the file contains the content. Consider this example in a file named my-trip-to-the-zoo.txt:
# -- my-trip-to-the-zoo.txt –-
My trip to the zoo
I went to the Zoo. There were animals.
Scruffy already has written an early version of the application. It’s contained entirely in a single file called application.coffee. Imagine that as you work with Scruffy on the application, the file gets bigger and bigger until it becomes a seething mess of intertwined code. Madness ensues.
Alright, madness might not ensue, but it remains true that keeping all the different parts of the program in a single file can prevent you from keeping them apart in your head. You agree with Scruffy to split the application into multiple smaller files divided by the natural boundaries of the application. The structure you agree on with Scruffy appears in the following listing.
Listing 12.1. File and directory structure for your blog application

The structure in listing 12.1 suits your current needs. Other solutions are possible (such as generating a static website from Agtron’s content), but the one in listing 12.1 is what you chose.
When an application is divided into multiple parts, or modules, there must be a way to join the modules together. That’s done using a module system. At a high level, the module system provides a way for one part of the system to use parts of the program from another module, like in figure 12.2.
Figure 12.2. The structure of modules

How do you use this module system? By creating files to be the modules and then joining them together with require and exports.
In this section, you’ll learn to create, require, and export modules, why module names are not filenames, and how the module cache works. Finally, you’ll see several listings presenting a complete program made up of multiple modules. First, you’ll examine creating and requiring modules.
12.1.1. Creating and requiring
The first problem you and Scruffy encounter is that the Blog class extends the Controller class. When both classes are in the application.coffee file, everything works fine:
class Controller
class Blog extends Controller
There are no errors when compiling:
coffee –c application.coffee
But once you split those classes into separate files according to listing 12.1, then blog.coffee doesn’t compile:
# -- blog.coffee --
class Blog extends Controller
You get a reference error:
coffee –c blog.coffee
# ReferenceError: Controller is not defined
You need some way for one file in your application to load other files. The built-in Node.js module system can do that. It’s a good place to start looking at modules. To use the parts of the application contained in controller.coffee from inside blog.coffee, you require it with the module system:
require './controller'
When you require './controller', the module loader finds the controller.coffee file relative to the current directory, loads it, and evaluates it. To load a local file, you can also use ../., which looks in the parent directory. This works the same as file paths on your command line.
Using require is only half the equation, though; blog.coffee still won’t compile:
# -- blog.coffee –
require './controller'
class Blog extends Controller
You still get a reference error:
coffee –c blog.coffee
# ReferenceError: Controller is not defined
To use the Controller class inside the blog file, you first need to export it from the controller file.
12.1.2. Exporting
To make a property available to other modules via require, you assign it to exports inside the module. You do that at the end of the file:
# -- controller.coffee –
class Controller
exports.Controller = Controller
Now you can require the controller module and access the Controller property it assigned to exports:
# -- blog.coffee –-
controller = require './controller'
class Blog extends controller.Controller
The idiomatic way to write require in CoffeeScript uses destructuring assignment (see chapter 7) on the object returned, avoiding the repetitiveness of unpacking properties from the controller:

Now you have a local variable Controller in blog.coffee that references the Controller class from controller.coffee.
Camel case for exports
Although variable naming can be a matter of taste, all of the standard libraries for JavaScript, whether in the browser or not, use camel case for naming all functions, methods, and properties. Thus, in the interests of being a good module citizen, you should always use camel case for anything you export from a module. So, instead of exports.myproperty, it should be exports.myProperty or exports.myClass if you’re exporting a class. In view of this, you might also choose to use camel case for all variables. It’s up to you.
In summary, to keep different parts of the application in different files, you need to export from one file and require in the other. Suppose you have a module_a.coffee file and a module_b.coffee file in the same directory:
|
module_a.coffee |
module_b.coffee |
|
w = 3 |
z = require('./module_a).y # z == {a: 1} |
The calls to require don’t have any file extensions. Why not?
12.1.3. No file extensions
So far, all of the calls to require haven’t included any of the .coffee file extensions. What happens if you create a require statement with a file extension?
{Controller} = require './controller.coffee'
The program runs just fine when invoked as CoffeeScript from the command line. Was there any reason to leave off the file extensions?
> coffee blog.coffee
# application is running successfully at http://localhost:8080
If you first compile the blog.coffee file and then run it, everything breaks:
> coffee –c blog.coffee
> node blog.js
controller.coffee:2
class Controller
^^^^^
...
SyntaxError: Unexpected reserved word
Never put the file extension in a require statement. A JavaScript program can’t require a CoffeeScript file without loading the CoffeeScript compiler first. If you leave file extensions out, however, then your compiled JavaScript modules can load other compiled JavaScript modules, instead of trying to load CoffeeScript files. The source for a module is in a file, but you don’t think of it as requiring the file itself but as requiring the module it contains. There’s another good reason for thinking this way: modules are cached.
12.1.4. The module cache
Modules can be loaded by specifying the location of a file, but they’re not loaded from source each time they’re required. Modules are cached, meaning that the second, third, or other subsequent load of the same file in your application will not evaluate the file again. Instead, loading any module again anywhere else in the application will return the same object with the same properties assigned to exports the first time the file was evaluated.
Why does this matter? Suppose you want to keep track of all the posts created inside your post module:
class Post
posts = []
constructor: (@title, @body) ->
posts.push @
@all: -> posts
exports.Post = Post
It doesn’t matter how many times you require it; the same object will be returned by the require method:
{Post} = require './post'
aPost = new Post 'A Post', 'Some content'
anotherPost = new Post 'Another Post', 'Some more content'
Post.all().length
# 2
When you require the same module again (in the same REPL session or program), you get a reference to the same object, even if you assign it to a different name:
TheSamePost = require('./post').Post
aThirdPost = new Post 'Three', 'Content three'
TheSamePost.all().length
# 3
Post.all().length
# 3
If this isn’t the behavior you want, then you’ll need to wrap the export in a function in order to create a new scope every time it’s required:
makePost = ->
class Post
posts = []
constructor: (@title, @body) ->
posts.push @
@all: -> posts
{Post}
exports.makePost = makePost
This makePost function now returns a different Post class each time it’s evaluated:
{Post} = require('./post').makePost()
new Post 'A post', 'Some content'
Other = require ('./post').makePost().Post
Post.all().length
# 1
Other.all().length
# 0
In summary, be mindful that modules are loaded only once from source and then cached. This has implications for testing because often when running tests you’ll want a clean state before each test. If you have a module that maintains some internal state, then you might find it difficult to test. It’s best not to keep state in a module.
That’s all there is to requiring local modules. Prefix the path to the module with either ./ or ../ and then specify the location of the file containing the module. A require that doesn’t prefix the path with either of those will cause the module loader to look for a built-in or packaged module.[1]
1 Creating built-in and packaged modules is outside the scope of this book.
For the modules you do create, what does it look like when they’re all together?
12.1.5. Putting it together
You work with Scruffy on the blog application until you have just enough to show Agtron. Although there are both tests and application code, only the application code appears in listings 12.2 through 12.10. These listings demonstrate an ordinary application made up of multiple modules connected together with exports and require. The first one, listing 12.2, shows server.coffee, which is the entry point to the application:
> coffee server.coffee
The server requires the built-in Node.js module http and some local modules.
Listing 12.2. server.coffee
http = require 'http'
{load} = require './load'
{Blog} = require './controllers'
load './content'
server = new http.Server()
server.listen '8080', 'localhost'
blog = new Blog server
In the next listing you see load.coffee, which takes all the content files listed in the content directory and creates posts from them. Because the server.coffee file requires load, the load.coffee file will be evaluated when server.coffee is evaluated.
Listing 12.3. load.coffee

The next listing shows the Controller class. This controller can handle incoming HTTP requests and respond as desired. It invokes a method on a particular view in order to generate the body of the response.
Listing 12.4. controllers/controller.coffee

In the next listing you see the Blog class that inherits from the Controller class. This inheritance is a by-product of your chosen design and isn’t necessary when you have only a single blog controller. But it does help to demonstrate real-world use of modules. To have Blog inherit fromController, the blog module needs to first load the controller module.
Listing 12.5. controllers/blog.coffee

There is also a base Model class from which other models can inherit. It appears in the listing that follows.
Listing 12.6. models/model.coffee

The Post class appears in the next listing. It inherits from the base Model class, and it has to require the model module. This Post class knows how to get an individual post, how to get all of the posts, and how to purge all the posts.
Listing 12.7. models/post.coffee

In the following listing you see the base View class. This View class contains a basic HTML document that can be used to render a response. In a larger program, it’s likely that you’d use a template system. In this small example, though, a simple interpolated multiline string does just enough to serve as a template.
Listing 12.8. views/view.coffee

The next listing shows the List class that inherits from View. This List class is used to render a list of posts.
Listing 12.9. views/list.coffee

Finally, the Post class appears in the next listing. It also inherits from the View class. This Post class is used to render the title and body of an individual post.
Listing 12.10. views/post.coffee

That was a lot of listings. All of these modules are probably overkill for a site as simple as the one you’re creating. That’s deliberate. The preceding listings present a working Model-View-Controller (a technique for breaking a program into different parts). Whether or not you’re familiar with Model-View-Controller isn’t important here. What is important is that you’ve seen a reasonably sized application built from modules. By examining them, you’ve seen examples from a real program of how require and exports work.
So far it’s been all individual modules, but sometimes you’ll want to include a whole group of modules. In that case you’ll need a module index.
12.1.6. Indexes
When you have many modules, it’s easier to load several of them together instead of loading them all individually. Node.js supports module indexes to help you with this.[2] An index file is the module you get back when you require a directory.
2 You can also create Node.js packages with npm, but again, that’s beyond the scope of this book.
Suppose you have a set of modules that you keep under a directory named utils:
├── utils/
│ ├── string.coffee
│ ├── array.coffee
│ ├── statistics.coffee
If you want to use several of those utility modules from another module, having to do multiple require statements is tedious:
{trim, pad} = require 'utils/string'
{remove} = require 'utils/array'
{chebyshev} = require 'utils/stats'
To avoid that tedium, create an intermediary index file from which you can load all of the other modules. An index file goes in the same directory as the other modules and does both require and exports for each of them:
exports.string = require '.utils/string'
exports.array = require '.utils/array'
exports.stats = require '.utils/stats'
Now when you require the utils/index module, you can destructure the object returned by require in a single line:
{string:{trim,pad},array:{remove},stats:{chebyshev}} = require './utils/index'
This creates trim, pad, remove, and chebyshev variables in the local module that reference the properties of the same name exported from the string, array, and stats modules via the index module. To make things a bit easier, the Node.js module system knows to look for an index file implicitly when a directory name is supplied:
{string:{trim,pad},array:{remove},stats:{chebyshev}} = require './utils'
The module system has allowed your program to still run correctly after it has been broken into individual files. Remember, though, that your CoffeeScript program doesn’t actually run as CoffeeScript. It compiles to JavaScript and runs as JavaScript. Once your program gets bigger, it becomes impractical to individually compile all of the source files to JavaScript and then run it. Although the command-line CoffeeScript compiler is capable of compiling multiple files, your build eventually becomes too complicated to do it all manually each time, especially if things need to be done in a particular order. You need an automated build.
How about packages?
You’ll notice that you’ve been installing Node.js programs (and modules) by using npm. This is because npm is how you install external modules, manage those modules, and also package your own modules so that they can be installed using npm. Although npm is an important part of the Node.js ecosystem, a deep exploration of it is beyond the scope of this book. The official npm documentation is available via https://npmjs.org/ and is a good place to start exploring npm.
12.2. Build automation with Cake
Imagine you’ve been working with Scruffy and running your build manually all day. Each time you wanted to compile the CoffeeScript application, you just ran the compiler from the command line:
![]()
Running the application was fairly easy:
> node compiled/server.js
Running the tests was also fairly easy:
> node compiled/tests.js
You’ve only had to remember two things—easy when there’s one application, but not so easy when there are lots of applications. Imagine you’re asked to work on another program that you’ve never seen before. Here’s the directory structure:
├── lib
│ ├── highball.coffee
│ ├── cocktail.coffee
│ ├── julep.coffee
├── app
│ ├── punch.coffee
│ ├── fizz.coffee
│ ├── flip.coffee
├── vendor
│ ├── mug.coffee
│ ├── beaker.coffee
│ ├── teacup.coffee
├── resources
│ ├── reference.csv
How do you compile that program? Perhaps there’s some documentation somewhere that tells you how to build it; it might even be up to date, perhaps not. For an application that lives in a single file, the build just means compiling a single file:
> coffee –c single_file_application.coffee
For a larger application, though, it’s not so easy. All the CoffeeScript files need to be compiled. The compiled files might need to go into a specific directory, and some other files may need to go in there with them. For a large application, the build can be complicated. Instead of doing it manually each time, the build itself should be a CoffeeScript program. Otherwise, there’s a good chance you’ll end up creating complicated software with a complicated build process that nobody can understand—similar to what Scruffy experiences in figure 12.3.
Figure 12.3. A build that nobody understands often results in disaster.

Keep your build simple. A simple build written in CoffeeScript can be made with something called Cake. In this section you’ll learn about Cake and how to use it to create tasks for your build and for your tests. You’ll also learn about task dependencies.
12.2.1. Cake and build tasks
The tool provided by CoffeeScript for writing builds is called Cake. It’s similar to the Unix utility Make and the Ruby utility Rake. It’s smaller than either of those and provides fewer features. That said, Make is one of the most widely used build utilities, so if you’re already familiar with it, you may prefer to use that. Either way, read on to learn how Cake works.
Imagine you agree with Scruffy to make life easier on yourselves (and anybody else who needs to build your application) by writing the build using Cake. When you have CoffeeScript installed, it’s simple to get started using Cake by placing a file named Cakefile in the root directory of your project. Once you have the Cakefile, you invoke cake from the command line. Your Cakefile is currently empty, so the cake command doesn’t do anything interesting:
> cake
For Cake to do something, you need to put one or more tasks in your Cakefile. In Cake, a task is a function that takes the name of the task, the description of the task, and a function that’s the task itself as the three arguments:

When you run cake with no arguments, it displays a list of all the tasks in the Cakefile. Right now you have only a single build task, so that’s what it shows you:
> cake
cake build # Compile all the CoffeeScript
You can run a specific task by putting the name of the task as the argument to cake:
> cake build
Not implemented yet
The task isn’t very useful yet. Here’s a build task that compiles the CoffeeScript files in the application, puts the compiled JavaScript into a compiled folder, and logs Build complete to the console when it’s finished:

Now when you invoke cake build, the build is executed:
> cake build
# Build complete
The compiled JavaScript files for all of your CoffeeScript files are now in the compiled folder:
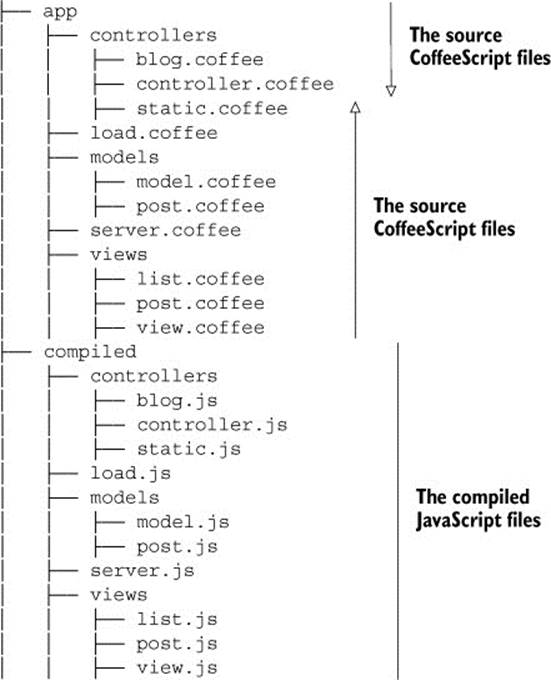
If you create and maintain a build task for every project you have, then you’ll always be able to build each of them with a single command. Even better, by going to the project directory and running cake without any arguments, you’ll be able to see all of the build tasks that have been written for that project.
Now, with a working build for the application, Scruffy is getting impatient to write a program that deploys the application to the server. You agree—deploying manually gets tiring after the first few times. Not so fast, though; is the compiled application actually working as it’s designed to? How can you be sure?
12.2.2. Test tasks
Suppose that you’ve been running all of the tests for the blog application manually. The application is small, so it hasn’t bothered you too much to run each test from the command line as you work. Imagine that late in the afternoon, right before leaving for the day, you run the build, copy the application to the production server, and launch it. Everything breaks. You ran the build but you forgot to run the full test suite. Some of your work in progress broke another part of the application. You’ve just launched something that doesn’t work. You quickly undo the changes on the server and launch an older, working version of the software.
Releasing a broken application into production is stressful. To prevent that from happening, every single build should also run the tests to make sure the application is working. Add a test task to the Cakefile:
task 'test', 'Run all the tests', ->
console.log 'No tests'
The tests are in a spec directory inside your project:
├── Cakefile
├── app
│ ├── # application files are here
├── spec
│ ├── # test files are here
To write a task that will run these tests, it’s best to look at the tests to see what you’re dealing with.
A specification
Suppose you already have tests for the Post class. Those tests appear here.
Listing 12.11. A specification for the Post class

Using Chromic
Listing 12.11 uses a testing module called chromic that was created just for this book. The complete source code for this small testing framework is provided in the downloadable code. Alternatively, you can install it using npm install chromic.
You need a Cake task to run tests such as the one in listing 12.11.
A task to run the tests
To run the tests against the compiled version of the application, the test task will need to perform these steps:
1. Delete any existing compiled files.
2. Compile the application.
3. Compile the tests.
4. Run the tests.
The test task appears in the next listing. Because the application and tests are both compiled before the tests are run, the body of the build task has been extracted to a function.
Listing 12.12. Part of a Cakefile with build and test tasks
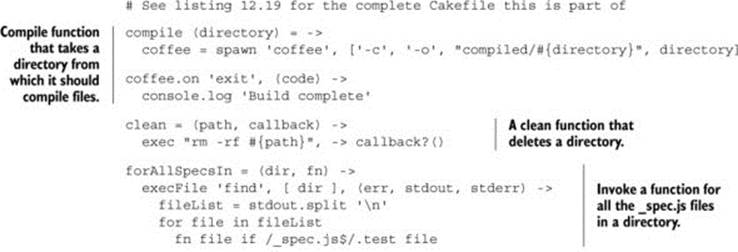
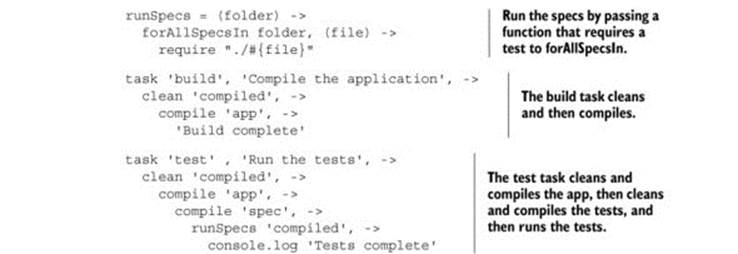
You now have a build task and a test task. There’s a small amount of duplication, but extracting the compile function helped.
In some cases you want an entire task to execute before another task; you need to create a task dependency.
12.2.3. Task dependencies
Good news! Cake doesn’t get task dependencies wrong. The bad news is that it doesn’t actually provide task dependencies for you, so you get no help. But there’s an invoke function that calls one task from another, so you can start by using that:
task 'build', ->
task 'test', -> invoke 'build'
This will make the test task invoke the build task before it runs, but it doesn’t check to see if the build task has already been invoked. Suppose in your Cakefile you have three tasks: deploy, build, and test:
task 'build', ->
console.log 'built'
task 'test', ->
invoke 'build'
task 'deploy', ->
invoke 'build'
invoke 'test'
The deploy task should do a deployment only if the build and test tasks both complete successfully, and the test task requires a completed build to run, so that should run only if the build task is completed. Unfortunately, if you use the tasks as defined previously, then the build task will be invoked twice when you deploy:
> cake deploy
# built
# built
invoke does only what it says in the name: invokes the other task. It doesn’t care if the other task has been run once, twice, or 100 times. Because Cake doesn’t provide any way to tell a task to run only once each time, you have to do it yourself, with a variable. This isn’t pretty, but it works:

Now you’re automating your build with Cake. Depending on how complicated your build is, you might need to dive into some of the more advanced Node.js libraries for doing things like spawning, forking, and executing external processes. The official Node.js documentation is the best place to get up-to-date information on those.
Now it’s time to look at how the modules and builds you’ve gotten used to can be applied to those parts of your application that run on the client. It’s time for the client side. After all, it’s quite likely that the client side is the majority of your application.
12.3. Client-side modules (in a web browser)
Imagine now that Agtron wants to add comments to his blog and have them updated and visible immediately without users having to refresh the page. To achieve this you’ll need part of the application to run on the client. This is commonly referred to as a thick client.
Scruffy has board meetings all day for the rest of the week but agrees to modify the server-side application so that it will serve up all the data for the comments as JSON and also to modify the application to serve the JavaScript files that will be your client-side application. You don’t have to worry about how Scruffy is going to achieve that. Later that day you receive an email from Scruffy telling you to put the client-side scripts into the app folder:

When you move the application to run on the client in a web browser, how will you organize it into modules? Web browsers don’t understand modules. Two options come to mind:
· Return to the dark ages and just develop your entire application in a single file.
· Find a way to get modules to work on the client.
You’ve been spoiled with modules in Node.js and you don’t want to return to the Dark Ages. Given that you’re already familiar with Node.js modules, it’s worth investigating how you can get the same thing to work for your program on the client.
12.3.1. Making modules work in a browser
If web browsers don’t support modules,[3] then how are you going to keep your program modular? One technique you’ve used in the past is to have a top-level object with a hierarchy of properties on it. Individual modules are then just properties on that top-level object.
3 There are no modules in the fifth edition of the ECMAScript specification. See chapter 13 for a discussion of modules in upcoming editions of ECMAScript.
For example, you might build your client-side application by putting everything on a global app object, mirroring the directory structure you had on the server:
@app.controllers = do ->
controller = do ->
blog = do ->
In this case, your entire application can be clobbered if somebody can get source code into the application:
@app = loadSomeNefariousProgram()
That’s not the biggest problem, though. The biggest problem is that if you don’t enforce modularity with an actual module system, then the chances of you actually writing modular code are diminished. You need a module system that works on the client, but you’ll need to implement it yourself. The module system that you’ve used on the server has worked well, so it makes sense to make the same thing work on the client.
How do you implement modules on the client? First, you pretend that they already work and start to write your client-side program accordingly, using the powerful design technique called wishful thinking. Once you have something that uses modules on the client, you’ll know what you need to implement to make them work.
Requirements
Suppose you’re adding the comment functionality to the application and you need to require the comments module from inside the main module. You write these two modules in separate files:
# -- main.coffee --
{Comments} = require 'comments'
# <rest of module omitted>
# -- comments.coffee --
class Comments
# <rest of module omitted>
exports.Comments = Comments
Loading many script files in a web browser is slow, so the first thing you do is write a Cake task that compiles these modules into a single application.coffee file:
task 'concatenate', 'Compile multiple CoffeeScript files', ->
But even when this file contains both modules, they still can’t see each other. Note that the main module appeared first, but the order could be different, depending on how you concatenate the files:

This won’t work in any browser. In order to allow modules to require other modules, you need to write your own module system or use an existing solution.
Client-side module solutions
There are many alternatives and they differ per platform. The solution presented here is along the same lines as Stitch; see https://github.com/sstephenson/stitch/.
If you write your own module system, then you’ll have to change how your CoffeeScript program is compiled. That’s not so scary after chapter 8, so you decide to write your own—with a little help from Agtron.
12.3.2. How to write a module system
For modules to work when they’re all contained in a single file, there must be some way to define a module and to tell it how to do require and exports. On the server, a module was defined implicitly by just having a file. On the client, however, the individual files will be concatenated to a single file, with each module declared and passed to a defmodule function, as shown in the following JavaScript example:

AMD modules?
Another technique for defining modules is Asynchronous Module Definitions (AMD). AMD uses a define function that accepts a module name, its dependencies, and the module definition. In AMD, an object returned from the function contains the properties that are exported from the module. Because the setup is similar to what you just implemented, when you encounter AMD modules in the wild, you’ll understand the basic premise behind them.
At this point you get a little help from Agtron. He writes tests and produces the solution shown in the following listing. It’s very likely that in practice you’ll use an existing library to provide modules on the client, and many of them will use techniques similar to the following listing. It’s always useful to understand how things work, though, so take some time to explore the solution.
Listing 12.13. require and defmodule for the browser (lib/modules.coffee)
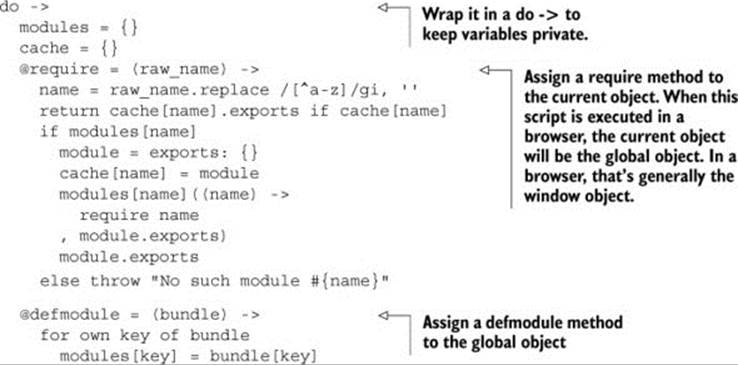
So how does it work? When you load a module, the require invocations trigger other modules to be evaluated, which in turn will cause any require invocations in that module to be evaluated. The application will need to load one module that will load all of the others. The overall structure of the compiled output will have a single require call at the end to invoke this module:
defmodule('comments': function(require, exports) {
class Comments
exports.Comments = Comments;
});
defmodule('main': function(require, exports) {
var Comments = require('./comments').Comments;
});
require './main'
You now have to write the Cake task that compiles your CoffeeScript modules from separate files into a single JavaScript file that includes the module library from listing 12.13 and wraps each module in a defmodule. This Cake task appears in the next listing. This task is suitable for compiling your small project. If your project becomes large (thousands of modules), then you might need to revisit it.
Listing 12.14. Cake task for client-side modules
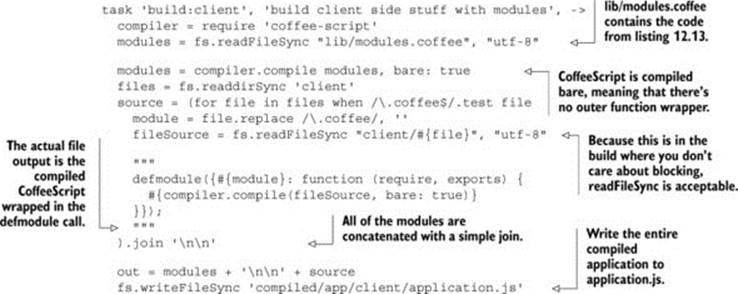
Now you’re able to use the same module system that you use on the server for your client-side application as well. There are other techniques for client-side programs, but the principles are always the same. Moreover, the modules system used in Node.js, which is based on common.js, is the closest thing to a de facto standard until ECMAScript standardizes modules (and browser makers implement them).
12.3.3. Tests
Client-side modules can be tested the same way as server-side modules. All of the testing techniques you learned in chapter 10 (such as dependency injection) apply to modules whether on the server or on the client. In the following listing you can see the test for the client-side Commentsmodule.
Listing 12.15. Comments specification (spec/comments_spec.coffee)
{describe, it} = require 'chromic'
{Comments} = require '../../app/client/comments'
describe 'Comments', ->
it 'should post a comment to the server', ->
requested = false
httpRequest = (url) -> requested = url
comments = new Comments 'http://the-url', {}, httpRequest
comment = 'Hey Agtron. Nice site.'
comments.post comment
requested.shouldBe "http://the-url/comments?insert=#{comment}"
it 'should fetch the comments when constructed', ->
requested = false
httpRequest = (url) -> requested = url
comments = new Comments 'http://the-url', {}, httpRequest
requested.shouldBe "http://the-url/comments"
it 'should bind to event on the element', ->
comments = new Comments 'http://the-url', {}, ->
element =
querySelector: -> element
value: 'A comment from Scruffy'
comments.bind element, 'post'
postReceived = false
comments.post = (comment) -> postReceived = comment
element.onpost()
postReceived.shouldBe element.value
it 'should render comments to the page as a list', ->
out = innerHTML: (content) -> renderedContent = content
comments = new Comments 'http://the-url', out, ->
comments.render '["One", "Two", "Three"]'
out.innerHTML.shouldBe "<ul><li>One</li><li>Two</li><li>Three</li></ul>"
The next listing contains the Comments module.
Listing 12.16. The Comments module (client/comments.coffee)
class Comments
constructor: (@url, @out, @httpRequest) ->
@httpRequest "#{@url}/comments", @render
post: (comment) ->
@httpRequest "#{@url}/comments?insert=#{comment}", @render
bind: (element, event) ->
comment = element.querySelector 'textarea'
element["on#{event}"] = =>
@post comment.value
false
render: (data) =>
inLi = (text) -> "<li>#{text}</li>"
if data isnt ''
comments = JSON.parse data
if comments.map?
formatted = comments.map(inLi).join ''
@out.innerHTML = "<ul>#{formatted}</ul>"
exports.Comments = Comments
With a build and tests for the server and client components of the application in place, it’s now time to learn how to deploy it.
12.4. Application deployment
You have your application broken into modules both on the server and on the client. You also have a build that compiles all your CoffeeScript modules, makes them work for the browser, and runs all of your tests in order to make sure the program behaves as it should. What’s left is deployment to a server for the world to behold. In this section you’ll learn why you always deploy the compiled JavaScript (and not CoffeeScript) and how to package up a version of your compiled application ready to be deployed to a server.
Right now, to run your compiled application, you pass the main application file, server.js, to Node:
> node compiled/app/server.js
That runs the application locally, but to run the application on a remote server, you first need to get it onto the server. Once it’s there, the application needs to know how to run on that server. A simple deployment follows these steps:
1. Create the artifact and manifest.
2. Upload and extract the artifact and manifest.
3. Stop the old version of the application.
4. Start the new version of the application.
If you’re deploying to multiple servers, then the deployment process will be more complicated, but the basic concepts remain the same. In this section you’re at step 1, where you’ll create a version of your application, an artifact, that is ready for deployment, as well as a manifest that will give the application information it needs to run on the environment you deploy it to.
12.4.1. Creating an artifact (something that’s easy to deploy)
First, you need to create something that will be sent to the server and become the program that runs there. That something is called an artifact.
Given that you have a compiled version of the application already, you can create an artifact from the compiled program. From Cake, the Node.js execFile command allows you to call out to an external program that can compress the compiled program and put it in a single file ready to be deployed:

When you run cake artifact, a file containing all of the compiled files is created. Create a file called VERSION in the same directory as the Cakefile and put the number 1 in it. Now when you invoke cake with the artifact task, it will use this version number when generating the artifact:
> cake artifact
# done. artifact.1.tar generated
How about the manifest? Why do you need one and how do you create it?
12.4.2. Creating a manifest (something that tells your artifact where it is)
Consider that in development you run the application on localhost on port 8080. Looking at listing 12.2, you notice that this value is hardcoded:
server.listen '8080', 'localhost'
In production this might need to be something else:
server.listen '80, 'agtronsblog.com'
This is just one example of something that’s likely to change when you run the application on another environment, such as the production environment.
Which environment is this?
The application doesn’t magically know which environment it’s running in. You have to tell it by using an environment variable. Inside a Node.js application, you can access environment variables through process.env. The environment variable you’ll use is called NODE_ENV and is either set for you by the environment you’re running on or is set by you when your program is started on the command line. Suppose it’s already set; here’s how not to use the NODE_ENV environment variable:

Instead of using NODE_ENV in many parts of your program, you should read it once and keep all of the environment information in a single place. That’s what a manifest, or environment config, does. So how do you load one?
Loading an environment config
The application needs to know how to run on the environment it’s deployed to. This information is provided in the manifest.
Using Node.js on Windows?
Some of the listings in this chapter won’t work as is on all operating systems (such as Windows). They’re designed to run on Unix-like operating systems. For other operating systems you’ll need to call out to other commands in order to achieve the same results. That said, the techniques demonstrated here all still apply, so you can still follow along.
Write the configuration as a “plain-old object” and expose it as a module. A server.coffee file that uses a configuration loaded from a local config module appears in the following listing.
Listing 12.17. The blog application (server.coffee)

The local config module appears in the next listing. There’s a configuration for the development and production environments. Any other environments you have (such as testing or staging environments) should also be defined in this file.
Listing 12.18. The blog application configuration file (config.coffee)
config =
development:
host: 'localhost'
port: '8080'
production:
host: 'agtronsblog.com'
port: '80'
for key, value of config
exports[key] = value
Your application is now ready to run in a specific environment with a particular configuration. So how does the environment variable get set?
Defining the environment
You can define the environment where the program is invoked. Define the environment to be development
> NODE_ENV=development node compiled/server.js
or to be production
> NODE_ENV=production node compiled/server.js
Now that it can run on different environments, the application is ready to be deployed.
Deploying to a remote server
The process for getting the application running on a remote server can vary depending on the target, but the basic steps remain the same. Here are the steps again:
1. Create the artifact and manifest.
2. Upload and extract the artifact and manifest.
3. Stop the old version of the application.
4. Start the new version of the application.
Now you’re at step 2 where you’ll upload the artifact that you created and extract it so that it’s ready to run. You can write a Cake task to perform steps 1 and 2 for the production environment defined in the config:
task 'production:deploy', 'deploy the application to production' ->
VERSION = fs.readFileSync('./VERSION', 'utf-8')
SERVER = require('./app/config').production.host
clean 'compiled', ->
compile 'app', ->
copy 'content', 'compiled', ->
createArtifact 'compiled', VERSION, ->
execFile 'scp', [
"artifact.#{VERSION}.tar",
"#{SERVER}:~/."
], (err, data) ->
console.log "Uploaded artifact #{VERSION} to #{SERVER}"
For a production server, steps 3 and 4 will depend on exactly how the application is being run on the environment, so the remaining steps are not presented here.
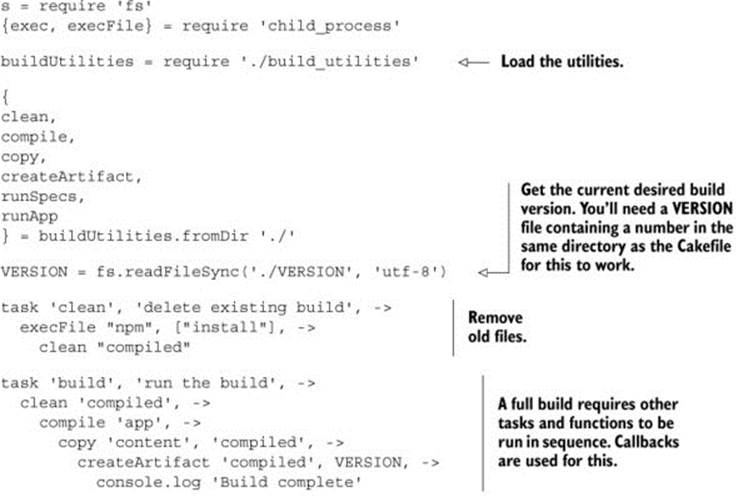
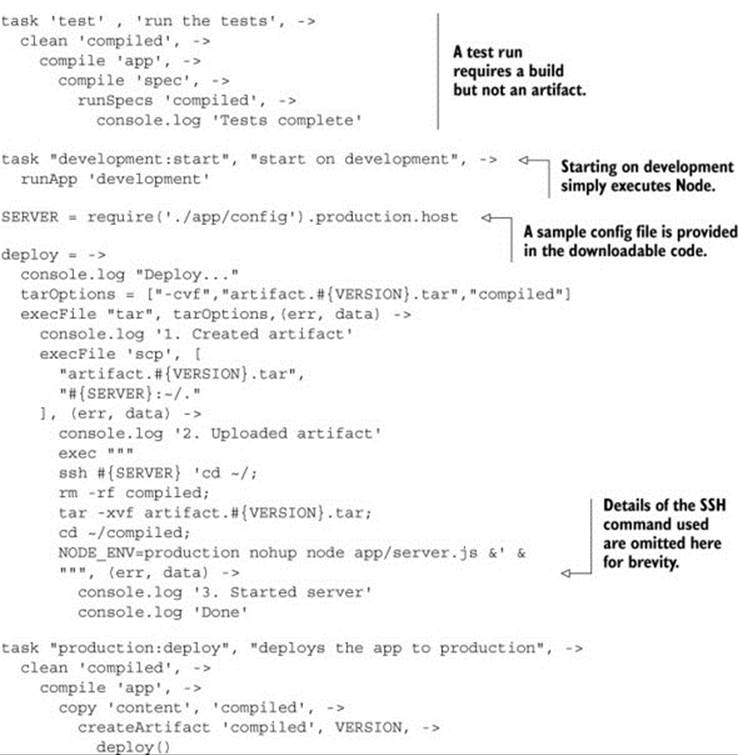
Continuing on, it’s now time to look at the entire build and examine the Cakefile that builds the entire application. Any projects you have in the future are likely to have a similar folder structure and can borrow heavily from the final Cakefile that appears in listing 12.19.
12.5. The final Cakefile
After writing all these individual Cake tasks, it’s useful to look now at the entire Cakefile and see where there’s room for improvement.
12.5.1. Tidying up
The Cakefile in listing 12.19 contains all of the build tasks that you created while developing the blog application. Running cake on the command line will show you which tasks are defined:
> cake
cake clean # delete existing build
cake build # run the build
cake test # run the tests
cake development:start # start the application locally
Note that any functions used by the build but not defined as tasks have been moved to a separate module that’s loaded by the Cakefile.
Listing 12.19. The Cakefile for the blog application (Cakefile)
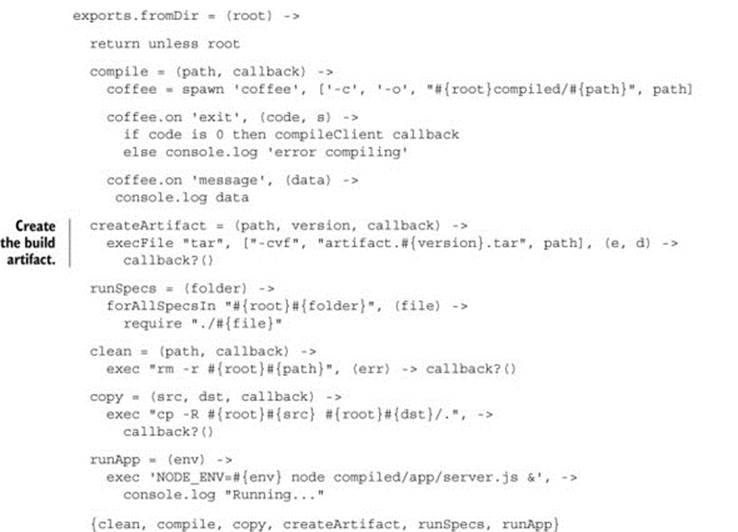
The Cakefile in listing 12.19 would have been large and difficult to read if all of the functions called from the build tasks were included. Instead, those functions are in another file called build_utilities.coffee, which appears in the following listing.
Listing 12.20. Build utilities (build_utilities.coffee)

The Cakefile is complete, but you can see a callback waterfall in some of the tasks—where asynchronous operations that must happen in sequence lead you to deeply nested callbacks:
task 'build', 'run the build', ->
clean 'compiled', ->
compile 'app', ->
copy 'content', 'compiled', ->
createArtifact 'compiled', VERSION, ->
console.log 'Build complete'
Compare this to a roughly equivalent section of a Makefile:
build: artifact
artifact: clean compile copy
tar –cvf artifact.tar compiled
Cake is a simple tool, and in some instances you may be better off using a dedicated build tool. That said, CoffeeScript provides powerful syntactic techniques, so you could roll your own fluent interface:
task 'build', 'run the build', ->
clean('compiled')
.then(compile 'app')
.then(copy 'content', 'compiled')
.then(createArtifact 'compiled', VERSION)
.then(-> console.log 'done')
.run()
Or perhaps you could implement your own function to handle dependencies:
task 'build', 'run the build', depends ['clean', 'compile', 'copy'], ->
Or you could implement your own syntax by extending the CoffeeScript compiler (see chapter 8). Many things are possible, but for now, it’s time to recap.
12.6. Summary
In this chapter you learned how to structure a simple application into discrete modules on the server and on the client and then how to build, test, and release it.
That marks the end of your discovery of the current world of CoffeeScript, but it doesn’t mark the end of your journey. Your journey continues into the future, where in the next chapter you’ll look at where JavaScript is headed and at how CoffeeScript fits into that picture.