Lightning Fast Animation in Element 3D (2014)
Chapter 4. Painting Your Geometry (Textures)
Textures and shaders are the key to a great looking animation. The difference between stunning looks and mediocrity can be as simple as the way your objects bounce virtual light back at the camera. Here's a good real-world analogy. When I visited the set of Star Trek: Deep Space 9 in 1997, I got a chance to check out the prop shop. A lot of the phasers and other gadget props were just made out of wood, and in some cases, foam! The key to get them to look like metal fabrications of magic was simply a paint job. If you approach your 3D world the same way, the usefulness of high attention to detail in your textures is as plain as day.
Digital paint
In this chapter, we're going to discuss the principles of good shading in 3D. We're going to talk about all of the parameters of shading in Element 3D and how to think of them in terms of the real world. Finally, we're going to get the objects that you just created all textured up and ready in Element 3D.
Exporting your objects to Element 3D
Before you can really get started with texturing your objects, they need to be sent to Element 3D. Let's start with the lamp (as that's the most complex object that we've made so far). The lamp has several objects that we want to be able to move independently. For example, if the table gets bumped, we'd like the shades to rock a little to add some more realism to your motion.
Element 3D simply won't recognize that your shapes are objects that are separate from your lamp (because of the export/import process). The way Element 3D breaks objects up from one file into several items is done through surfaces (textures, shaders, or materials).
First, make sure that all of your lampshades are centered over your light sockets. The exact procedure covered here differs slightly from 3D package to 3D package, but the principles are the same. For each object and each different surface, assign a unique shader.
The colors that you use in your modeling software are irrelevant to Element 3D; we're going to use primary colors so that we can keep track of what's what.
Lamp shades
Let's start with lamp shades. We may want to put some patterns on them later (we're making a kind of Tiffany style lamp here). So, we want to create what's called a UV pattern for any images we paste to the object that follow.
What are UVs?
UV mapping would make a lot more sense if it were called XY mapping. However, x and y are already in reference to world coordinates. U is a horizontal axis in reference to a polygon, and V is the vertical of that polygon. If you image an object wrapped like a Christmas present, the world XYZ orientation of the UV map changes from polygon to polygon, and therefore, the map wraps around an object just like a wrapping paper. Generating an exact UV map tells the software how you want the paper (texture) wrapped around the present (object). The following screenshot shows you an example of a UV map for the lamp base object:
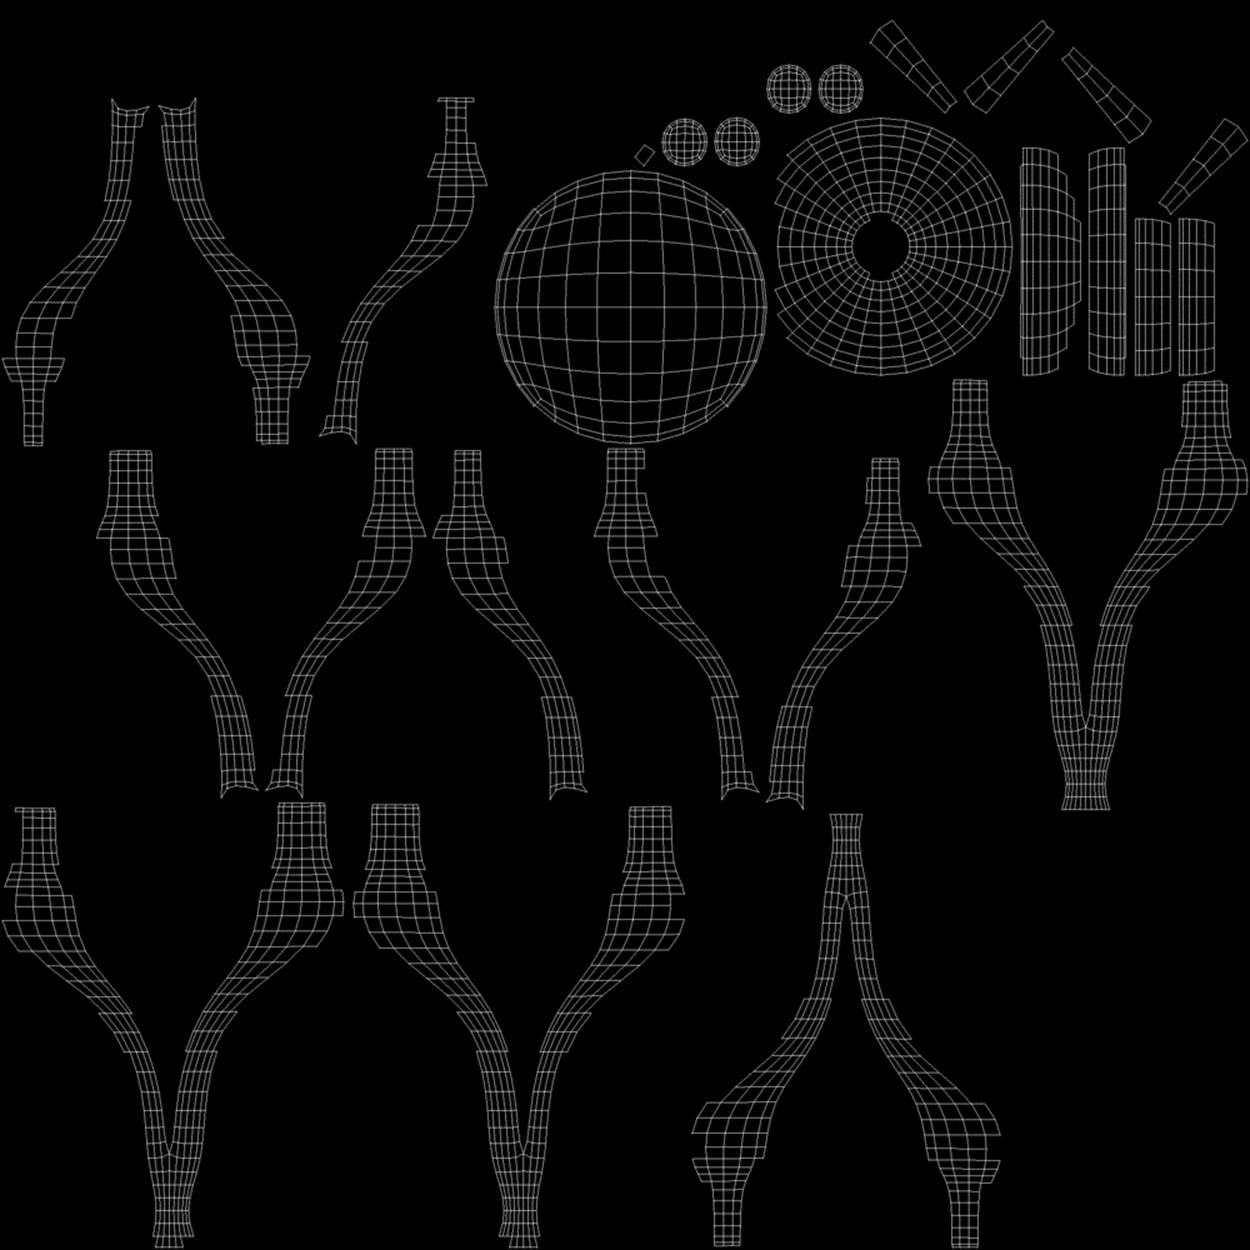
These maps can be highly customizable and can be remapped to the creator's desires. UV maps were revolutionary when they were introduced (compared to simple planar, spherical, cubical, or cylindrical mapping). As Element 3D uses UVs (primarily), let's just move on.
Any time we're thinking of using images to wrap around an object in any way, UVs should be generated to remove all of the guesswork. As our lampshades are nothing more than tapered hollow cylinders, we can simply generate a cylindrical UV map. In Maya, this is done by selecting the object and navigating to Create UVs | Cylindrical Mapping in the menu.
Congratulations, you've created your first UV map!
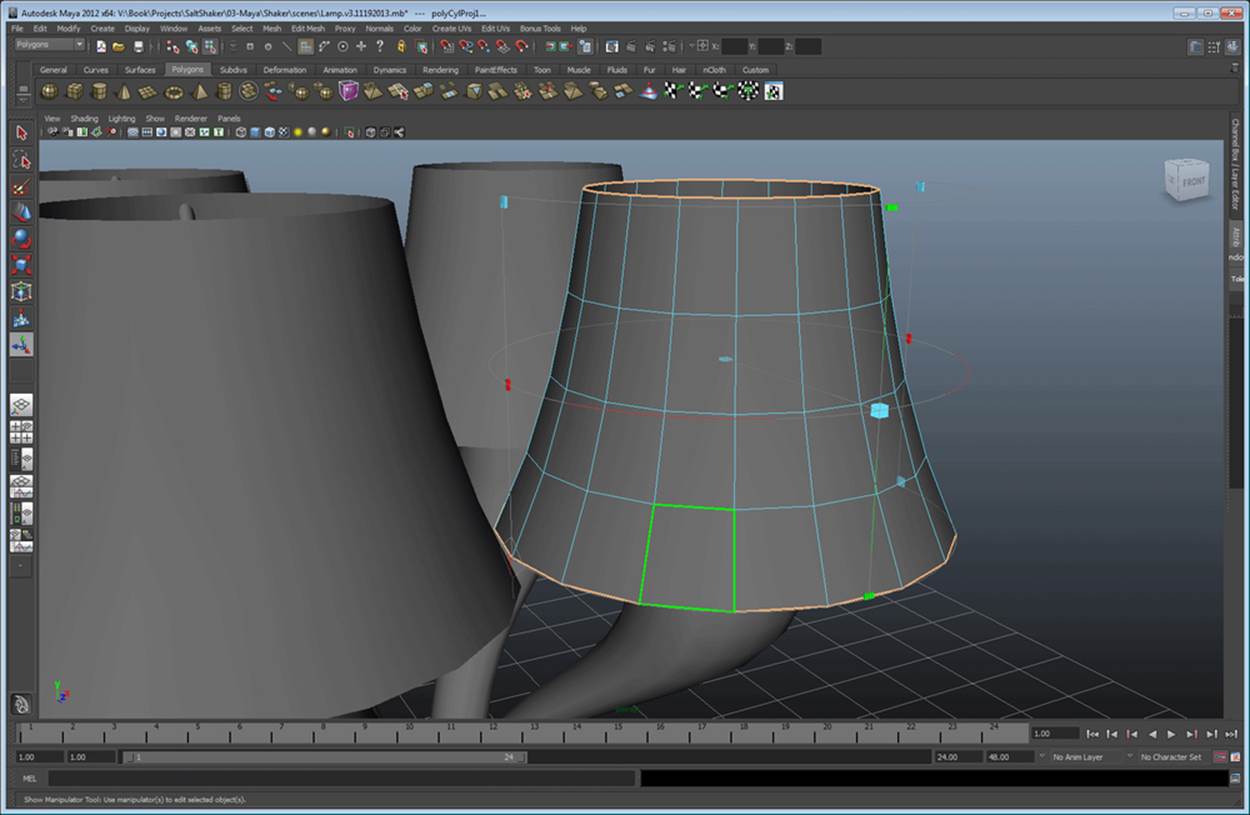
Now, repeat this procedure for each individual lamp shade. Do not do this to all at the same time or your UV mapping will look odd. You'll want one image mapped on each lampshade, not one for all of them.
Assign your materials
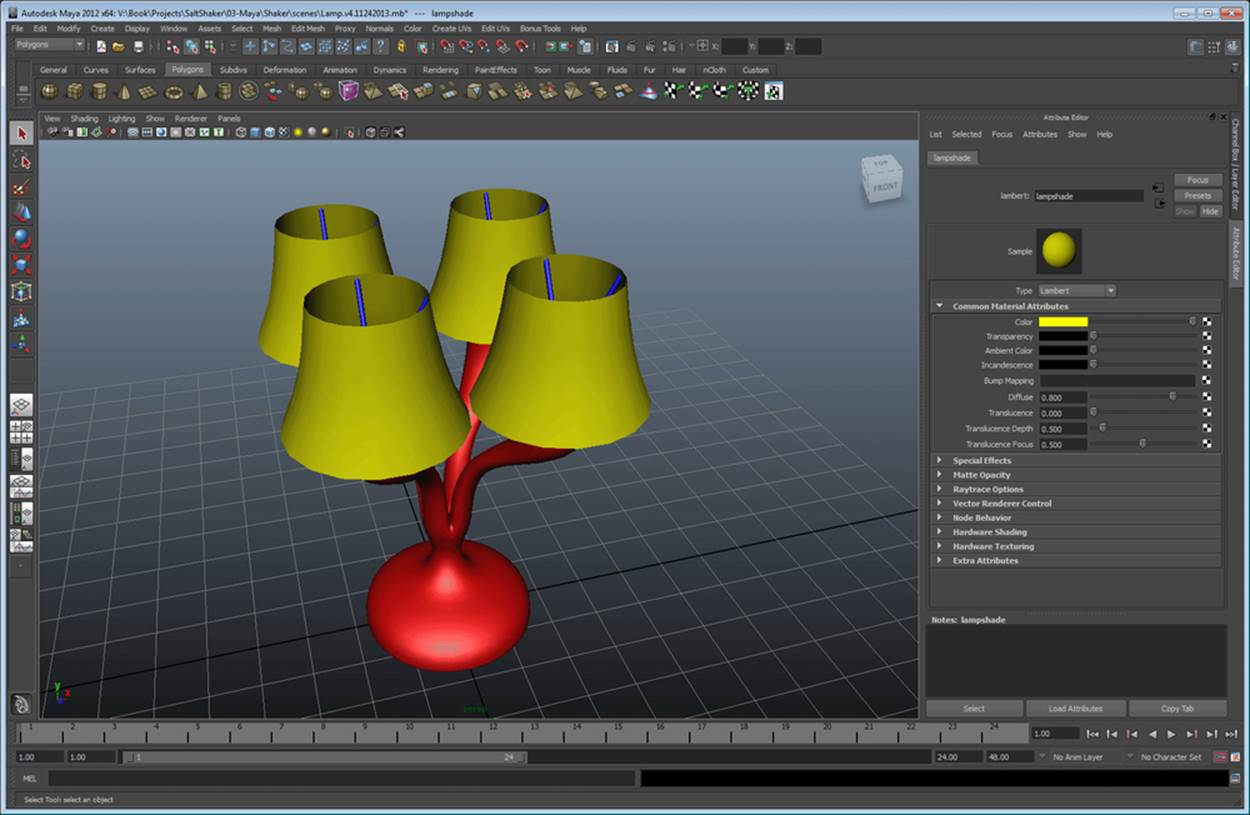
Remember, we can separate all of the components of our object in Element 3D using the polygons that are assigned to textures, so it's time to start making some materials. Create three new materials in your shading editor—one for the lampshades, one for the sticks, and one for the base. If you like to make things a bit easier on the eyes, you can combine (boolean) each lampshade's sticks to the lampshade. However, don't forget to delete all of your history after you do (if using Maya). When you're done, your lamp should look like the following screenshot:
Exporting your objects
Element 3D works very well with the open framework of the Wavefront OBJ format. Fortunately, so does every other piece of 3D software that is worth its salt. This export option is readily obvious in packages such as Cinema 4D and 3DS Max. In Maya, it's also easy to do once that feature is activated. To activate the export feature, go to the plugin manager (Window | Settings/Preferences | Plug-In manager) and activate (check load and auto load) the objExport.mll plugin. Now, export your object (File | Export All) and use the objExport option with all the default settings. Save your file in OBJ format to Project\01-AEX\Element3DAssets\OBJimports\.
Now, just repeat this process for all the other objects that we've created (the salt shaker and table), with the exception of the wine bottle. Remember to break up the components (such as the top of the shaker). Now, let's work with the wine bottle and set it up so that we can put a label on it!
The wine bottle
Let's put the standard wine label scheme on the bottle (a ring around the shaft, and a label on the front of the base.)
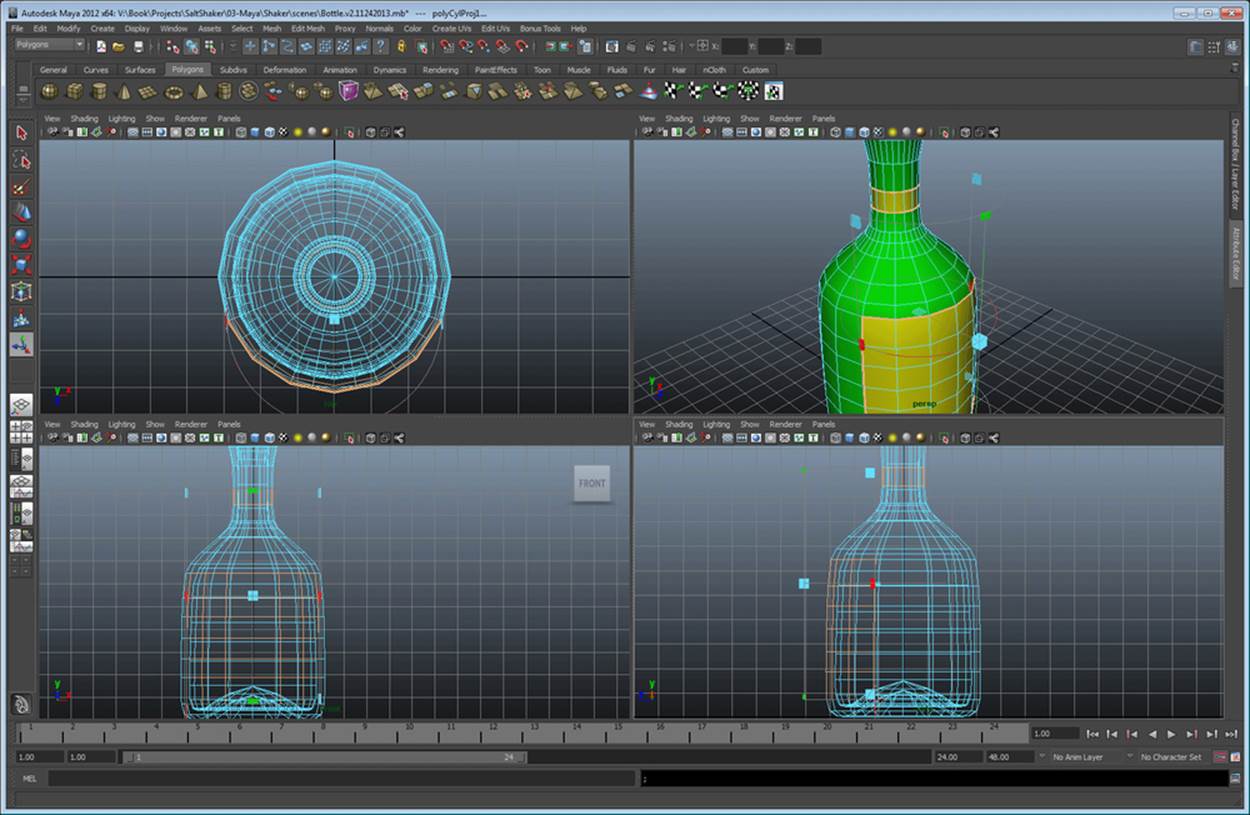
First, create a new shader. Select the polygons on the base that you'd like to make your label from, and select a ring on the shaft. Now apply your new shader to the label polygons, and create a cylindrical UV map the same way that you created for the lampshades (with the polygons still selected). In Maya, you can generate a PSD network (a Photoshop image assigned to the texture that will have the built-in wireframe). The result is a simple PSD that lets you see how the polygons are assigned, and now you can make an image that will get pasted perfectly to the bottle's label.
To create the PSD network in Maya, select the whole bottle; then, in the menu, navigate to Textures | Create PSD Network. Finally, select the wine label's texture and color to go to the PSD network, check Open in Photoshop, and then create the network. Now you can create your own label (as shown in the following screenshot):
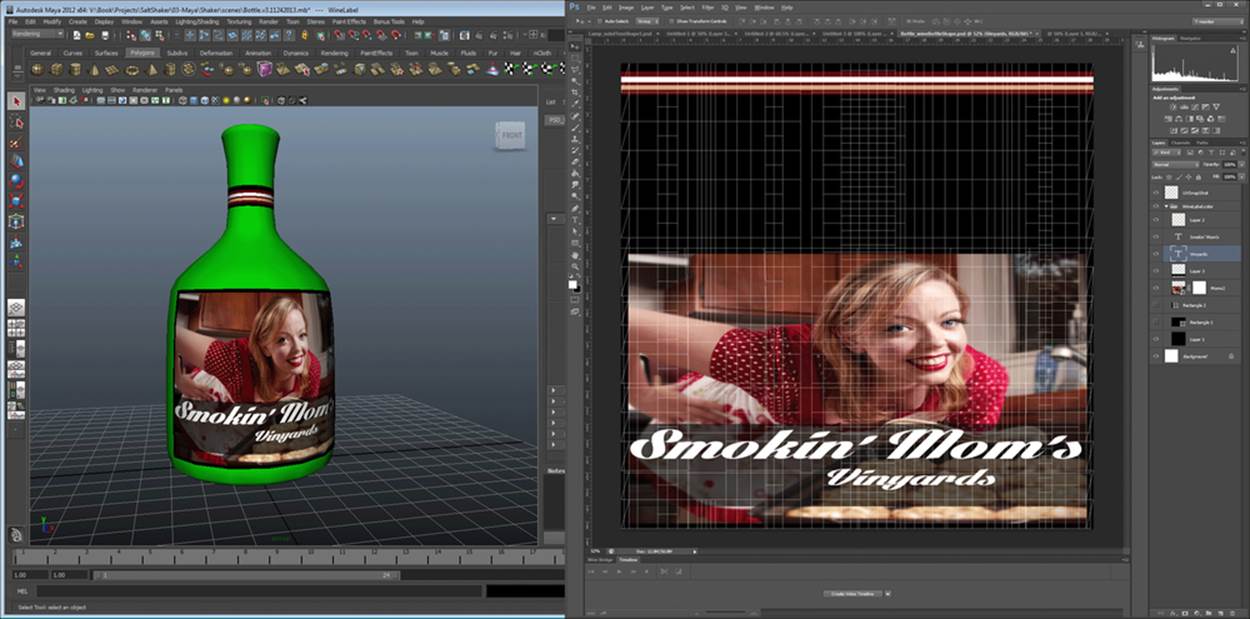
Final wine bottle label
The left part of the preceding screenshot shows you the applied label. The right part shows you the PSD network generated by Maya, complete with a layer that shows you the wireframe representation of the object's UV surfaces.
Before you finish in Photoshop, not only should you save the image you worked with from Maya (and reload it into Maya to make sure it lines up alright), but you should also save a JPG of the highest quality to your Element 3D assets directory (Project\01-AEX\Element3DAssets\TextureImages) for use in Element 3D. Make sure you turn off the top layer (the wireframe) first. Now, you can export your wine bottle to an OBJ file.
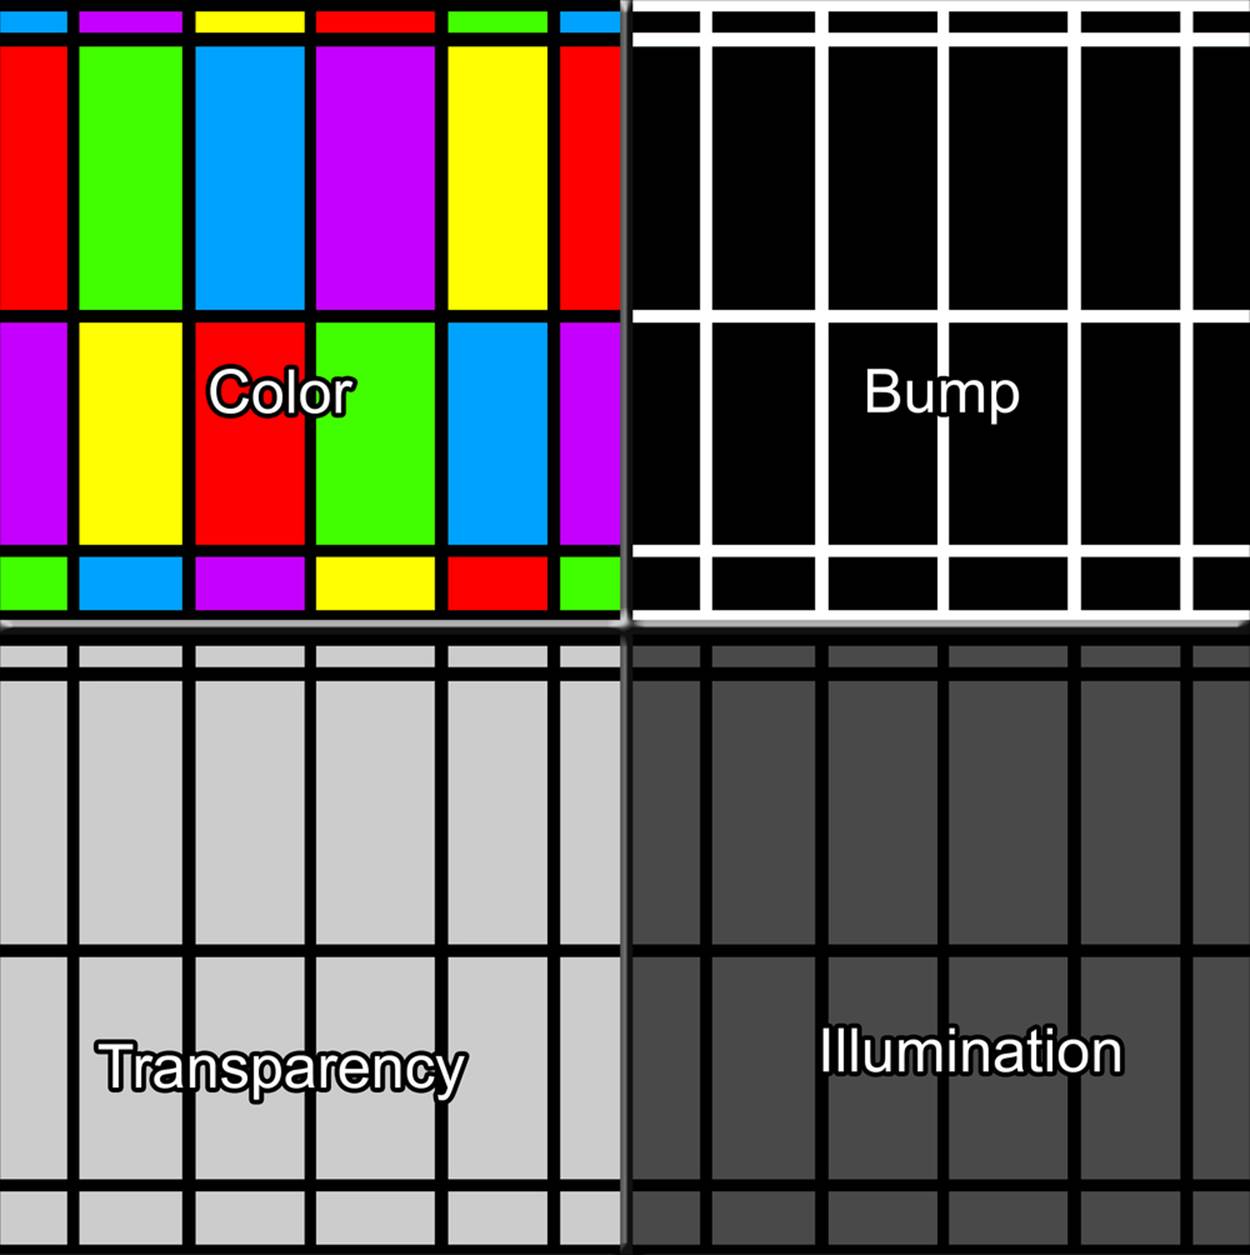
The same process can be used to create bump maps, reflection/refraction maps, specular maps, and a whole host of other image-based maps. These maps will all need to be saved as other files (that is wineBottleBump.jpg and so on) for use in Element 3D. Go ahead and play around with it. Using the same method as the one used for the wine bottle, create a PSD network using as many attributes as you like for the lampshade, and we'll use them in Element 3D! In the following screenshot, you can see the individual maps created for the lampshades. We'll cover what each of these does and what they are while applying them in the sections to come. The color layer has a slightly transparent opacity on the color squares (saved as a 24-bit PNG) so we can adjust them (remember, the shade is stained glass):
Shading in Element 3D
Yay! We can finally start using Element 3D in a book about Element 3D! Are you ready to paint your objects and get down to business? Well, ready or not, here we go.
The first thing that you need to know is if you've ever textured before in a 3D program, you're going to be scratching your head. The parameters (some, not all) are not really what you think they are. For instance, refraction is usually a term that applies to ray tracing. (Ray tracing is the process of literally tracing the light that would hit the lens of a camera as it reflects, refracts, or casts shadows.) As Element does not have ray tracing, what is refraction? Well, the result is still the same with the background layers, but other objects within the same element layer (doesn't matter if they are in a different group) will not be refracted. Element just displaces the background layers as if they were an adjustment layer. You'll see as we get into it. If this is your first time doing any 3D animation, you're about to learn some bad habits (because of the strange differences between Element and other 3D packages).
As we did earlier, start up After Effects. Before we do anything, save your project (in Project\01-AEX) so we don't have to worry about doing anything except a quick save (Ctrl + S) when we hit milestones. Create a new 1080p 30 (29.97) comp that is 30 seconds long. Call this comp Shaker Set Up. Create a solid layer (named ElementWineAndLamp) and apply the Element 3D plugin. Finally, click on the Scene Setup button as we did previously.
Import the lamp
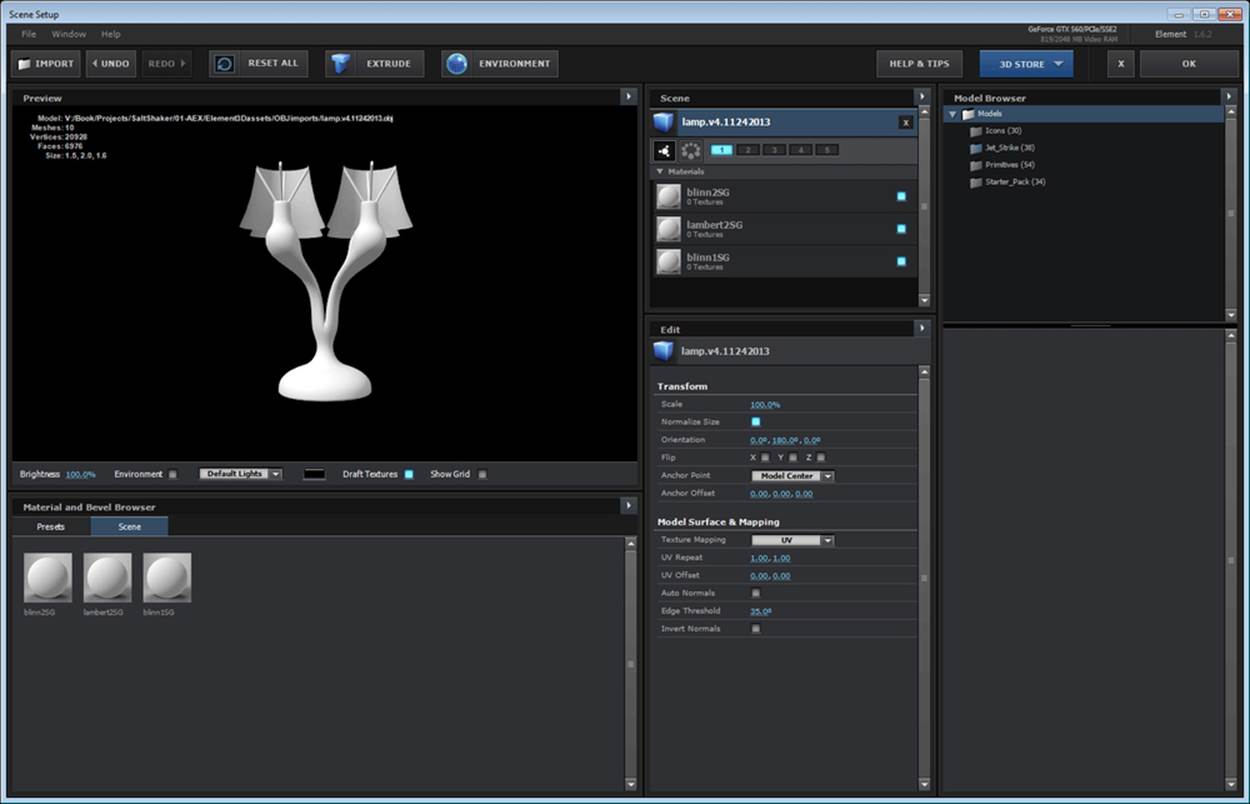
Now that we all have the Element 3D interface open, let's click on that big ominous button on the upper left labeled IMPORT. Navigate to your lamp's OBJ file and double-click on it. That was easy, wasn't it? But wait; what's wrong with the lampshades? We can only see the back half! Don't worry, everything is fine. Some 3D programs only render one side of the polygons. This side is called Normal. We'll ask it to draw both sides soon enough. Your import should look something like the following screenshot:
Fixing and texturing the lampshades
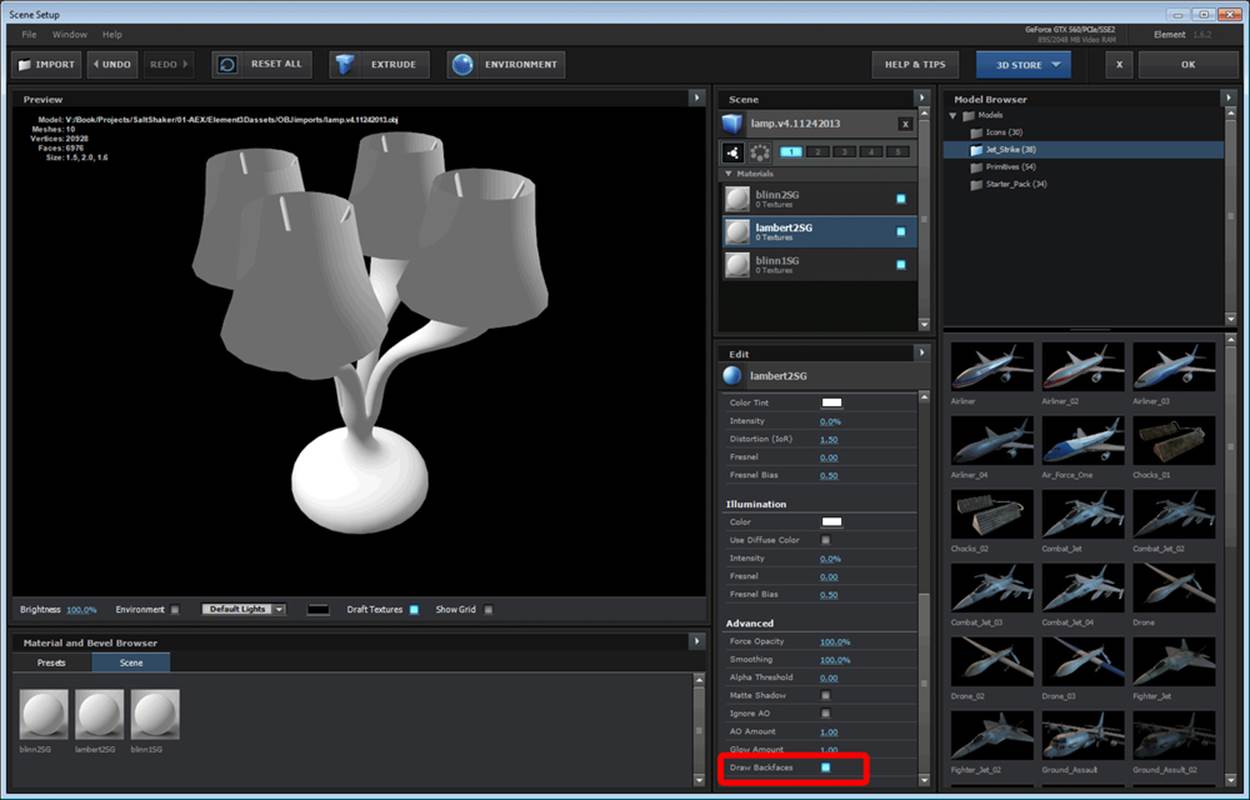
The side of the polygon rendered is called a normal. Obviously, our lampshades are rendering only one side right now. This is going to haunt us throughout this animation, but it's not terrible. Ultimately, we're going to fix this properly (flip the normal so it draws the front, and asks it to draw both sides), but for now, let's just ask it to render both sides. If you select the surface associated with the lampshades and scroll to the bottom, you'll see Draw Backfaces. Check the box in that field. The result should look like the following screenshot:
Great! Wait, do you notice anything strange? You might be asking yourself, "Why did he say he'll need to flip the normal later? Why not just draw the backfaces and call it a day?". If you look carefully, the light source on the lamp base and sticks is coming from the left, and the light source on the shades is coming from the right. In Element, drawing backfaces doesn't give the polygon two normals (as it does in other software). It just draws it the same way on both the sides. If the normal is backward to start with, the appearance of light source will be reversed. We'll fix this later. The rest of the lamp looks good, and we'll worry about this when we finalize the lampshades.
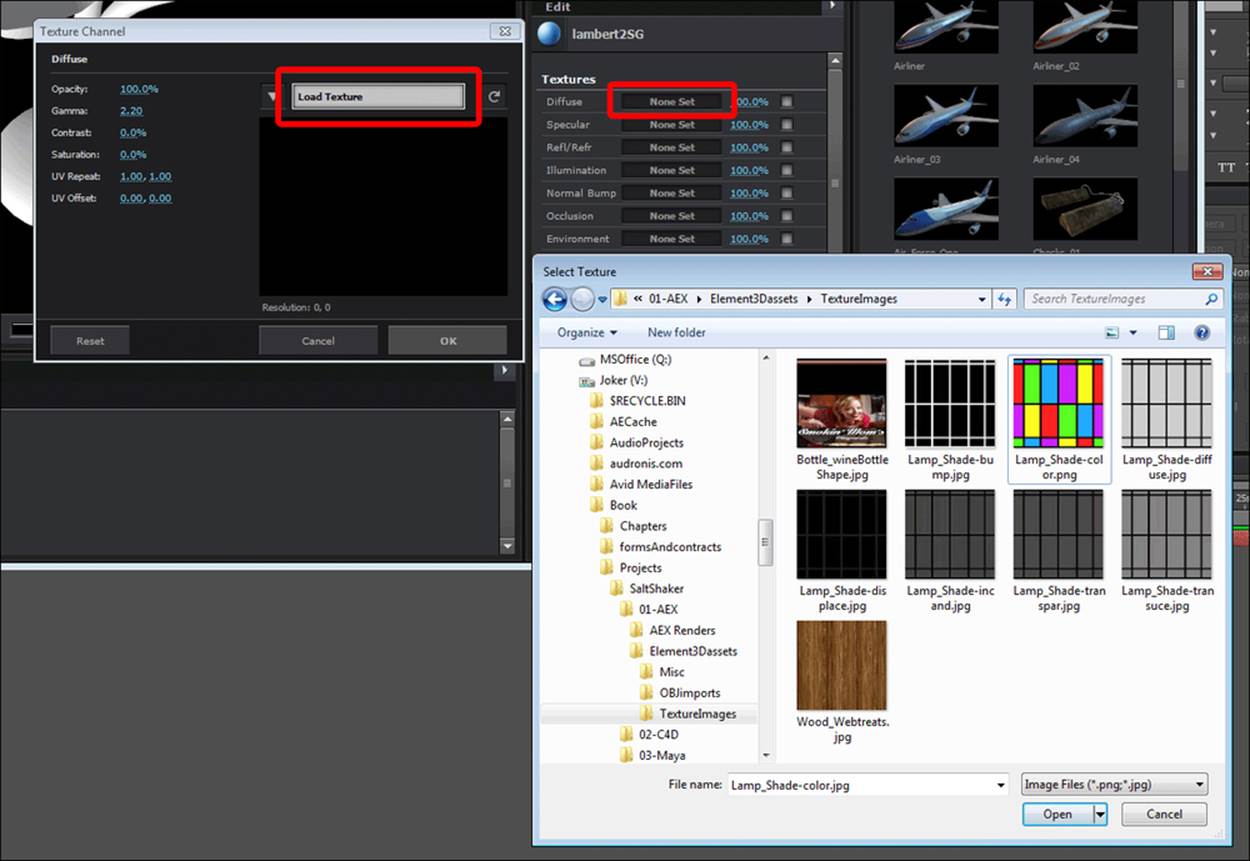
Now, let's make our lampshades the stained glass/Tiffany style. What we're going to need to do is add the image we created to wrap around the lampshade for color. In Element 3D, the Diffuse field is synonymous with color. If we scroll to the top of our Edit window (with the lampshade surface still selected to make sure that we are changing the texture of the lampshade) and click on None Set, we get a new window. Now, click on Load Texture to load our custom image. (All shown in the previous images.)
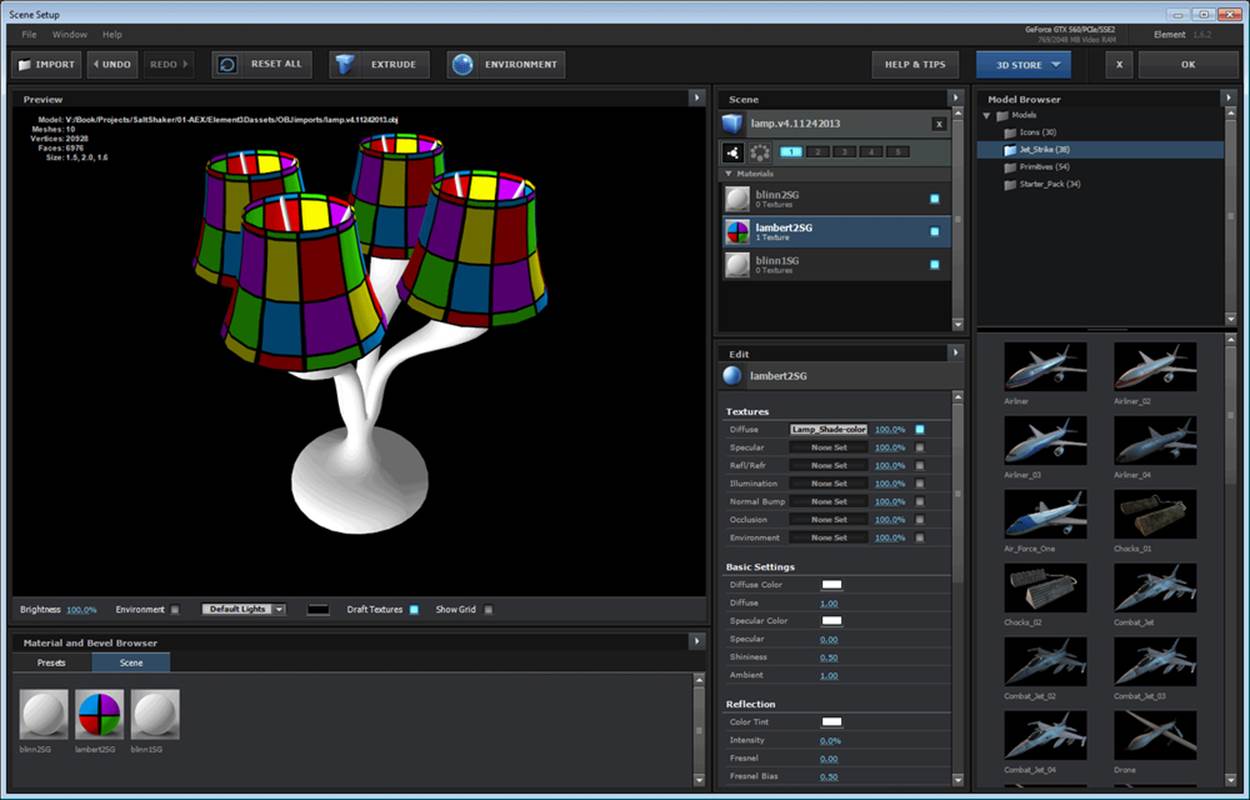
The result is pictured in the following screenshot. Notice that the lampshades have our images wrapped exactly how we said they should wrap when we set up our UVs in Maya:
Okay, so we know that the Tiffany lamps are stained glass, and stained glass is translucent and somewhat transparent. This is where things get a bit weird. You don't yet have the ability to just throw on a transparency map. A transparency map is just like our diffuse map, except that it uses shades of grey to tell the software where it should be more transparent and where it should be less transparent (just like an alpha in AEX). Also, it does not have any sort of translucence at all. So, we're going to have to play around a bit to make all this happen. Sure, we could leave it right where it is. However, that turns this Tiffany into a Partridge Family.
Transparency map workaround
Remember how earlier I told you that we took away 10 percent of the opacity of the color image? We can use that information to cut out holes. Unfortunately, they are just that—holes (not semitransparent glass). So, we can refill those holes with semitransparent glass. We'll talk about how this is done.
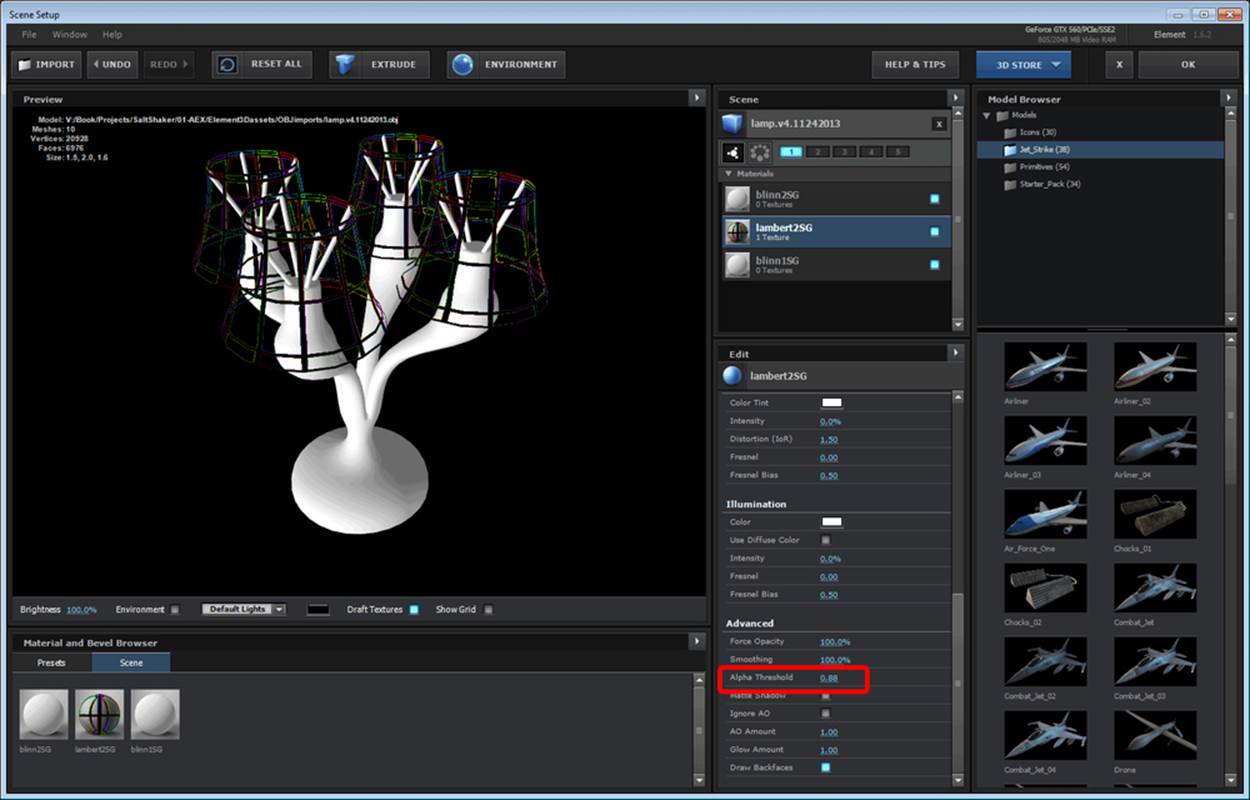
Scroll down to the bottom of the Edit window (the Advanced section) and you'll see a field called Alpha Threshold. Holding down your left mouse button, move the numbers to the right (scrub the value) until the colored squares disappear but the black frame remains (as shown in the following screenshot). You should still see some color outlines around the frames; this is totally fine:
So, what this did was use our transparency information to basically key out everything with a certain threshold of transparency. Unfortunately, it's either there or not. There are no degrees of transparency with these maps. So, we have to cheat (as we're about to do on the next step).
First, we need a fresh copy of our model. Import another lamp. Do not simply duplicate the model. Duplicating the model links all the textures together; we need a fresh set of textures. You could right-click on the texture to copy and replace. However, let's keep it simple and just use a fresh model. See where we're going?
Foremost, let's fix our normal now. With our new lamp selected, turn off any surfaces that are not part of our lampshade's shell by clicking on the blue box on the right of the surface (so that it's not blue anymore). Also, inside the Model Surface & Mapping section in our Edit window, check Invert Normal (as seen in the following screenshot):
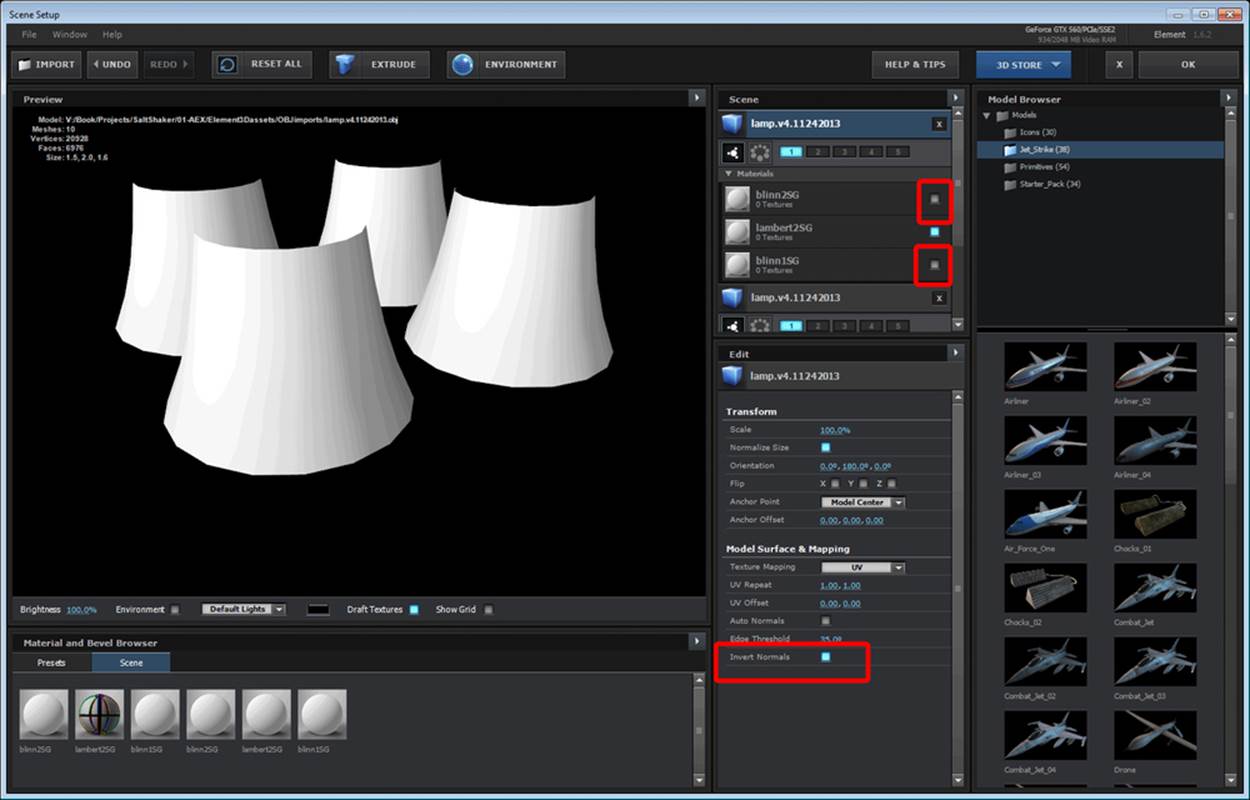
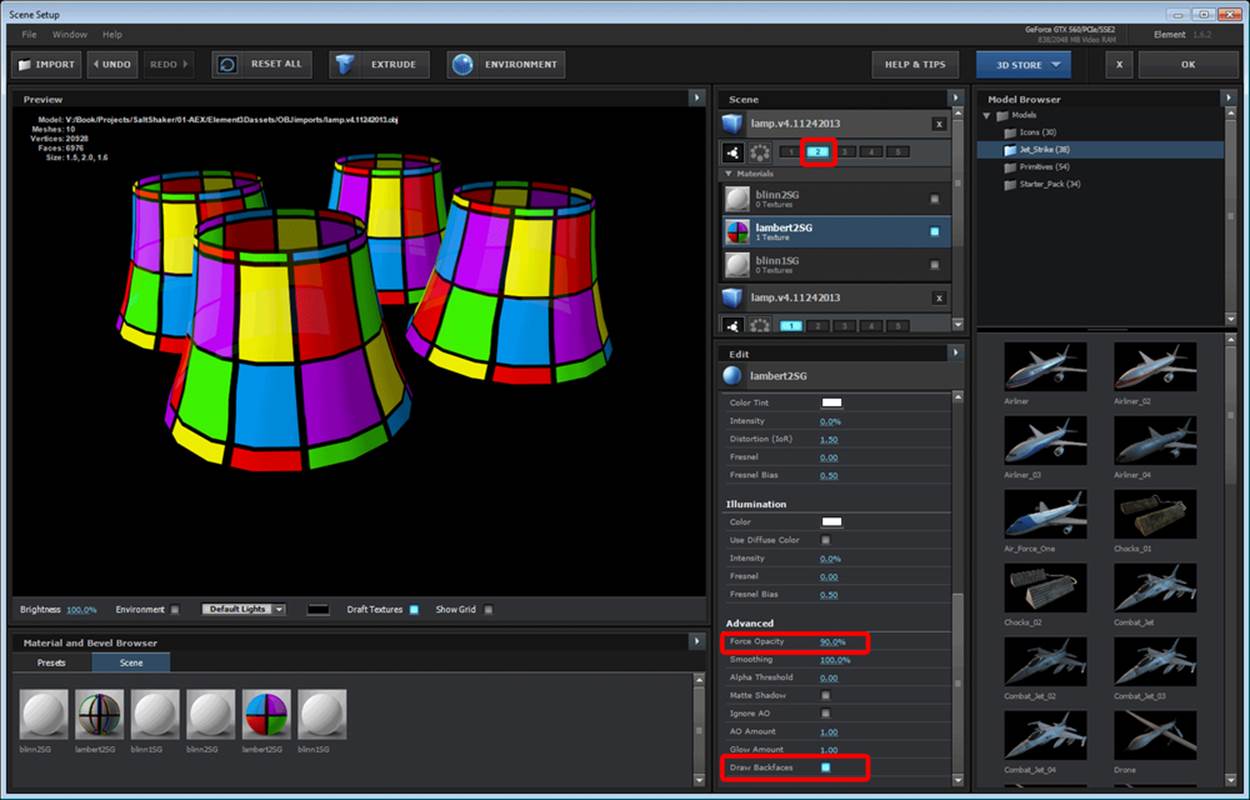
Assign your new lampshades to Group 2 by selecting the number 2 just below the object name. Now, on our new model, select the lampshade's surface, load the diffuse map again, and turn your Force Opacity down to 90 percent. Don't forget to check Draw Backfaces. The result should look like the following screenshot. Don't worry that the rest of the lamp has disappeared. Element's scene setup window doesn't show all the objects but only the one currently being worked with. The rest of the lamp is still on group 1, and we'll work with it later. The rest of your lampshade is right where it should be:
Specularity
You'll rarely hear this word outside of 3D animation. Laymen call it a glint or simply a highlight. This is the shiny spot on an object that mimics the reflection of the light source. We could just turn the specularity up and get some nice highlights all across the glass; but then, our metal frame around the glass would get highlights too. Tiffany metal is usually rough and not shiny at all. So, we can use a matte to mask off the area where we want the highlights to appear.
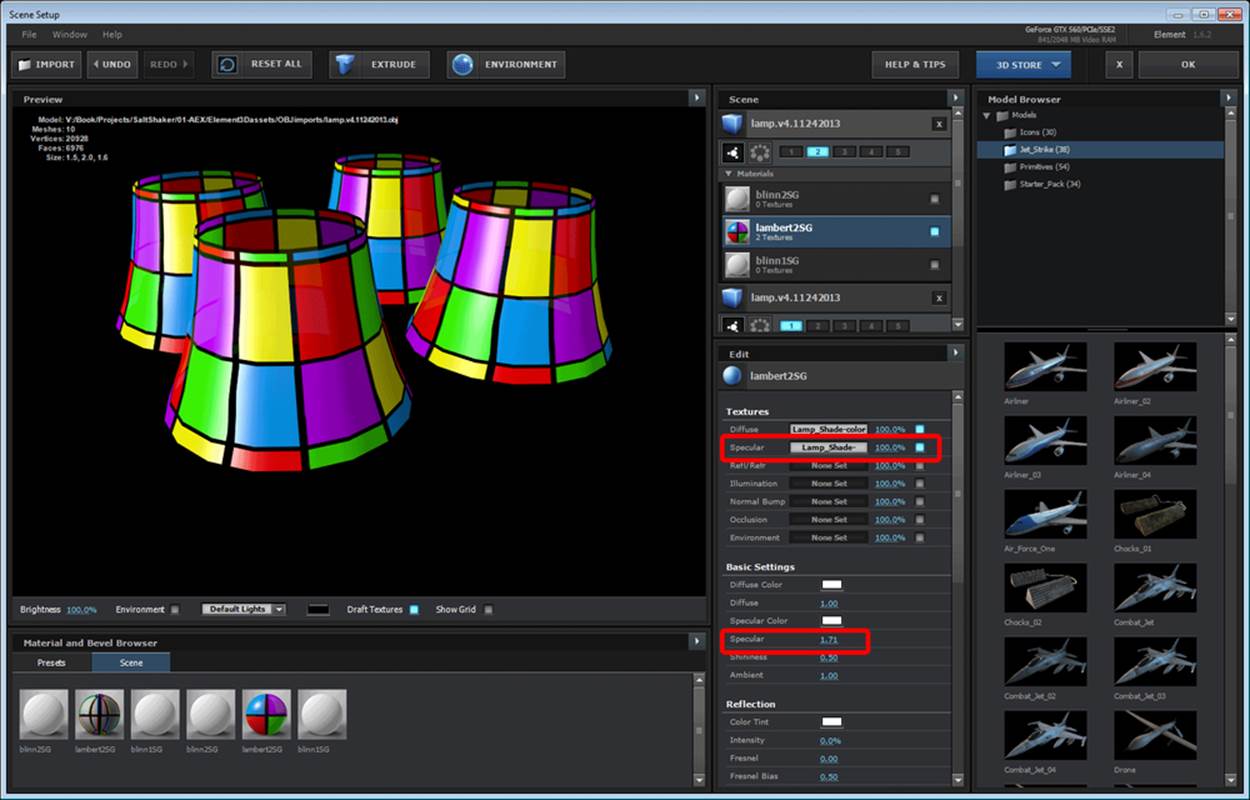
Let's load a specular map the same way that we loaded the diffuse map for color. Then, in the Basic Setting section, turn your specularity up until you like what you see. The result should look something like the following screenshot:
Note
We've added a specular map, and turned up our specularity on our lampshades. Notice that our map has made it so that the black stripes have no highlight even though a specular highlight overlaps them in the front lamp.
Reflections and refractions
Everyone knows what reflections are. Light bounces off something, then it bounces off a shiny surface, then into a camera lens, and you can see a reflection of the first something. Look into a mirror, and you see a reflection of yourself. Refraction is what happens to light when it goes through something. If you look at something on the other side through a glass of water, the thing on the other side is distorted. This is refraction, and it makes everything from eyesight to camera lenses possible. However, whenever you use terms such as through or bounce, you're talking about raytracing. Raytracing is simply tracking lines of light through objects, off objects, and so on, until they go into your camera.
Element 3D does not have a raytracing ability yet. Instead, you have to cheat the system by using reflection maps (an image that acts as a reflection instead of looking at the true environment of an object). This means that you shouldn't imagine that you can stick an object in front of a shiny object and see it's reflection in Element.
Similarly, refractions are cheated. Instead of tracing true refractions, Element 3D appears to use depth as a type of displacement map on the layers behind it. Therefore, any objects put in the scene won't get refracted. However, any layers in After Effects under the Element layer will refract. It helps with render speed, but it can be a pain trying to figure out a way to make good refractions with multiple 3D objects.
Again, because the black parts of the lamp are not shiny or transparent, we want to use matte to make it so that only the glass sections show reflections and refractions. We also want our environment map (the actual reflection) to kind of match the environment that we're in.
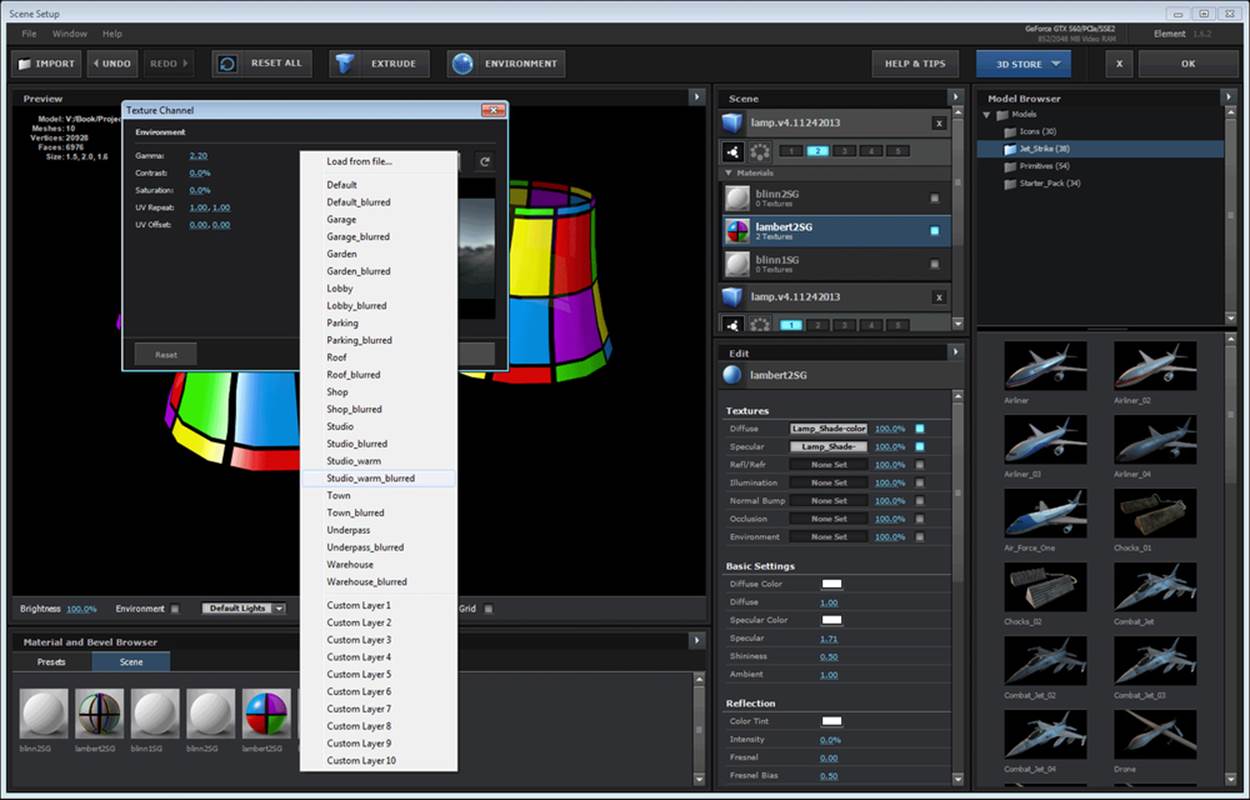
First, let's switch the environment. It can be switched by object (using the environment map section of the Textures section). However, why not hit this one with a sledge hammer and set the environment for all objects? At the top of your interface, selectEnvironment. You'll get a requestor just like the one you got for diffuse and specular. Instead of clicking on Load Texture, click on the down arrow (this shows the stock maps). Select studio_warm_blurred. There, now our environment is indoors at least:
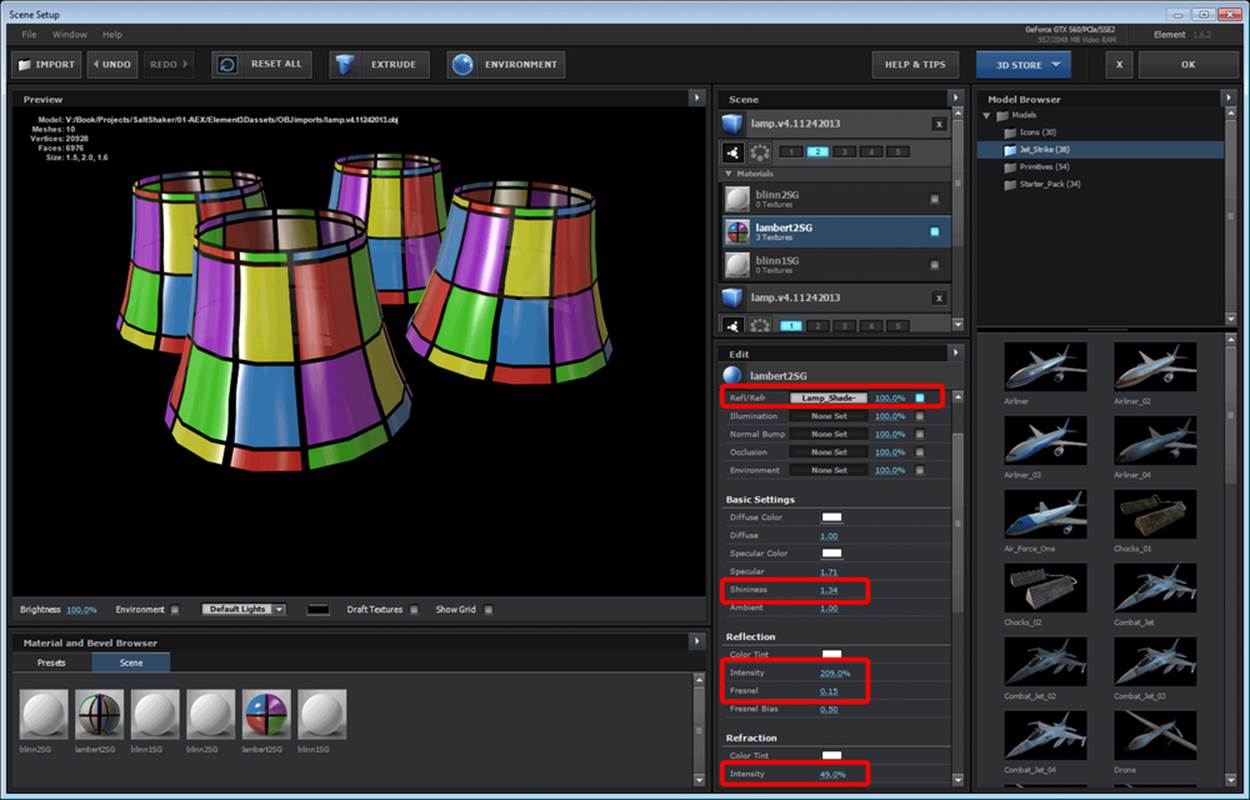
Next, use the same procedure as the one that you used for specularity and diffuse to add a reflection/refraction map. Then, turn up the intensity of your reflection until it looks good to you. Add some Fresnel to it too. Fresnel is basically a calculation of that surface's direction in relationship to your point of view, and it either turns up the effect or turns it down as the angle gets shallower. In this case, I'm turning down the effect a little as it gets closer to the edge. Do the same to refraction (just in case we throw a layer behind and we want some distortion later).
Because our environment is so shiny, I also turned up the shininess of the specular effect so that it is matched more closely. The result should look something like the following screenshot:
Illumination and ambient occlusion
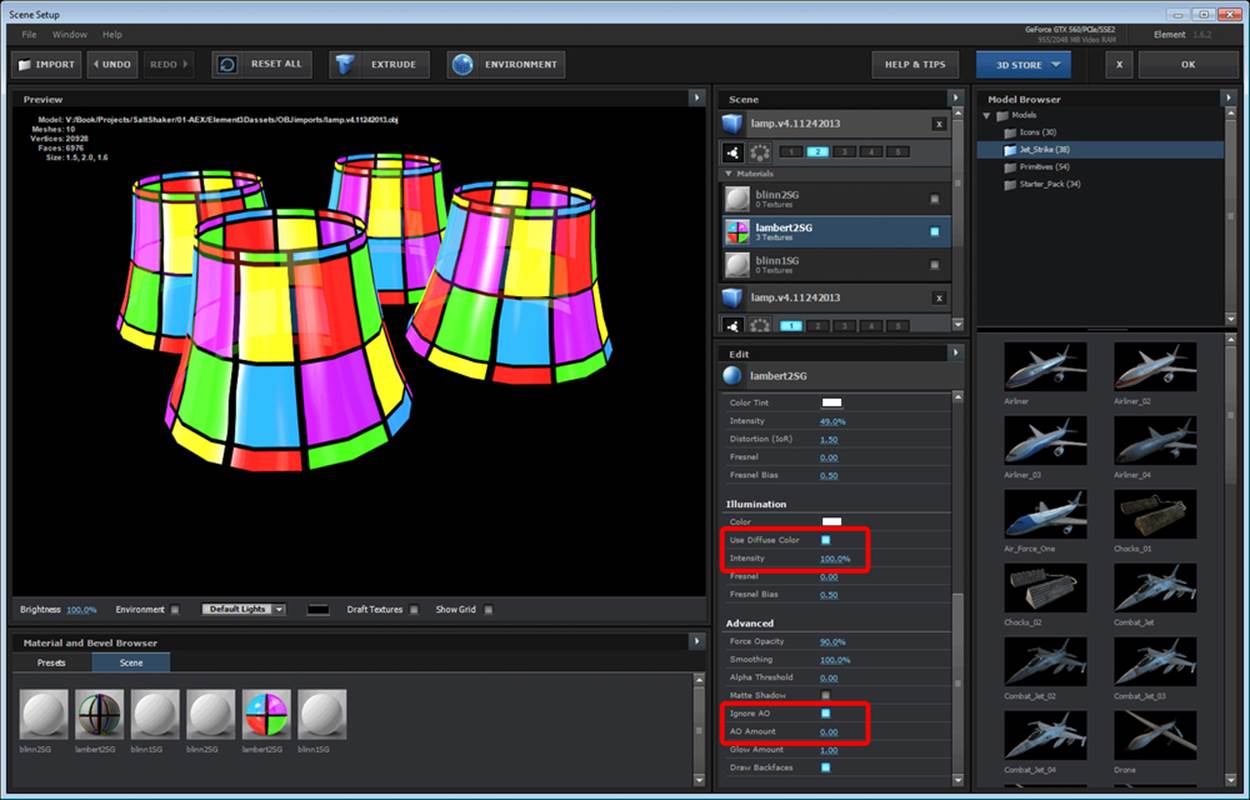
As these are semitransparent lampshades (with the lamps on), they won't really have any shadows or gradation from a light source. We won't need an illumination map in this case; can you guess why? There is a check box in the illumination section (Use Diffuse Color) that allows us to use the diffuse map for it. This is great because we also want it to illuminate in the same colors (not just white) to mimic translucence. Turn the illumination intensity to 100 percent.
Ambient occlusion (AO) is what happens to the light in the corners. It gets trapped and can't come out, giving the illusion of shadows. AO is not shadows, but it can look like them. We'll be using this trick later, but because these shades don't have shadows, check Ignore AO and turn AO Amount to 0.
Personally, I don't really like the glow feature in Element, so I'm not altering it at this time. However, as these shades are self-illuminating, we may come back to them later.
Your result should look like the following screenshot. Bingo! We now have lamp shades:
Bump maps and using AEX layers for texture maps
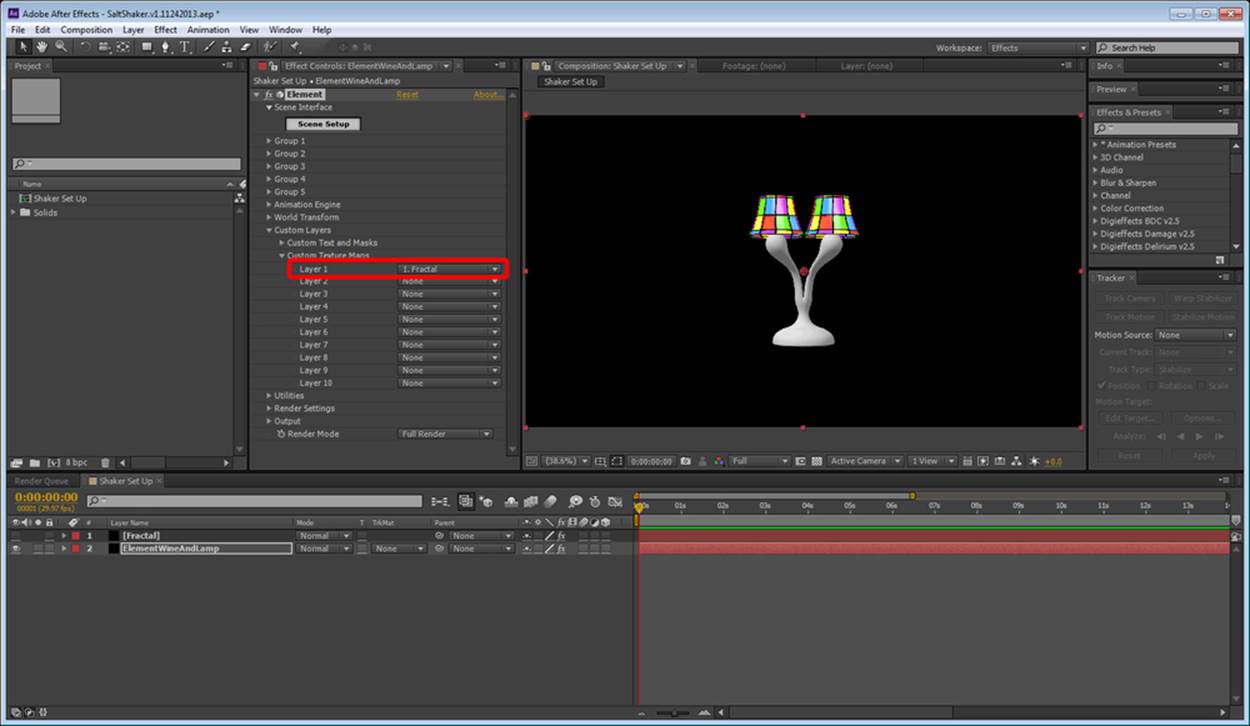
As stained glass has a bit of a ripple to it, we're going to create a quick bump map. First, click on OK on the top-right section of your Element 3D interface to get back into AEX. Your lamp should get an "ooh" out of you. But don't touch it. Instead, create a solid layer, and name it fractal. Add a fractal noise effect to it and just leave it at the default settings. Turn off its visibility (clicking the eye on the left-hand side of the layer). Now, in your Element 3D effect controls, set Custom Texture Maps of Layer 1 to the Fractal layer we just created. The result should look like the following screenshot. Now, get back into your scene setup in Element:
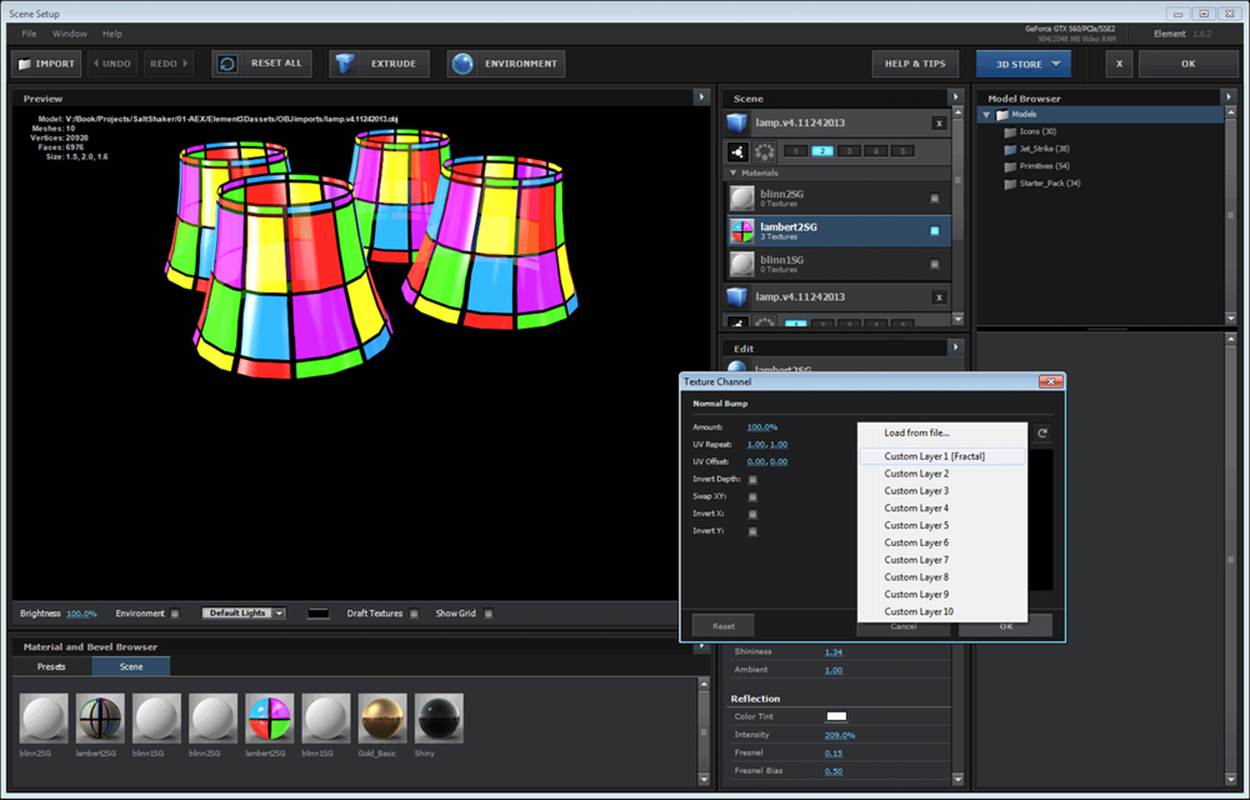
Now, back in your scene setup window, select the surface for our lamp glass and go to the Normal Bump section. Instead of clicking on the words in the requestor, select the down arrow this time and select Custom Layer 1 [Fractal] (as shown in the following screenshot). Then, lower your Amount to 28 percent and click on OK. Boom, you have created your first bump using AEX layers! Now imagine, you can use footage, precomps, and more—all of these for any texture map. So, you can go create a glass with a video playing on it, pulsing abstract shapes, or anything your heart desires:
Preset shaders
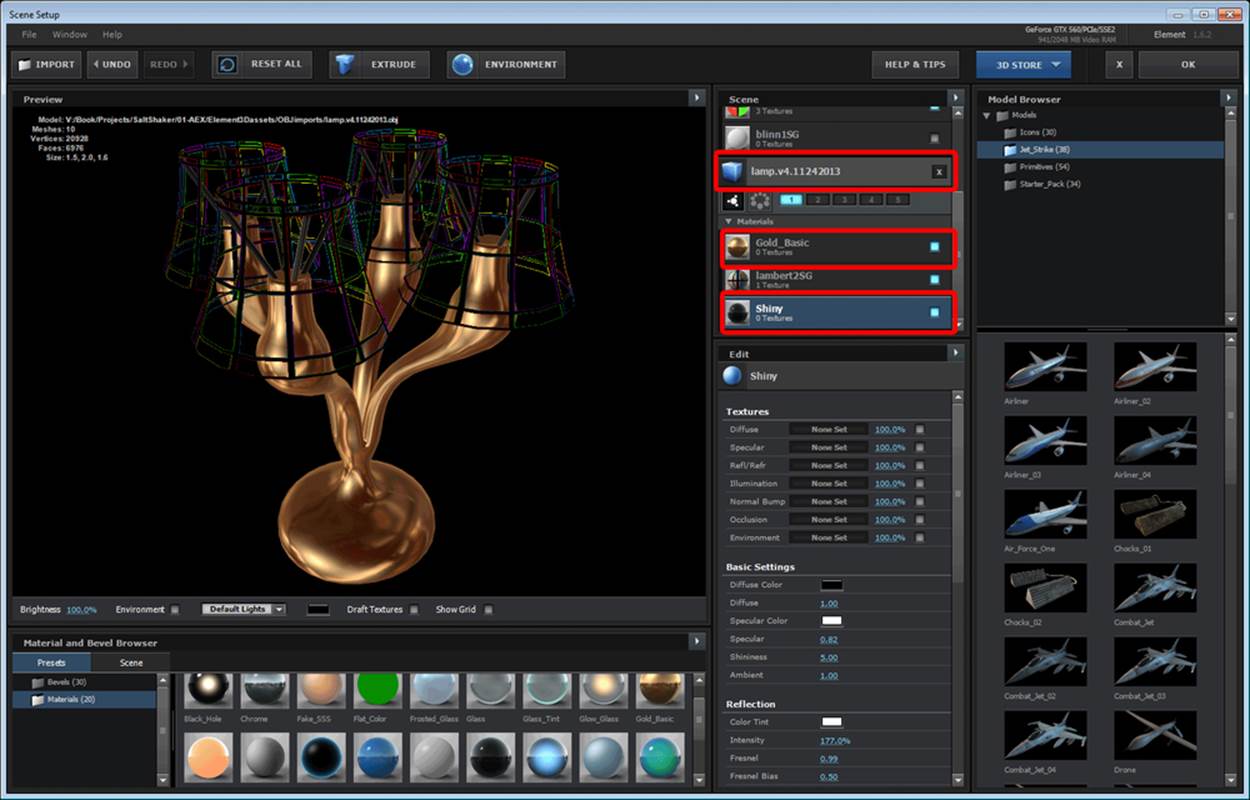
Preset shaders can greatly speed things up. We want a gold base to our Tiffany lamp and some black sticks with some luster for our lampshade support. Select our original lamp object, and in Material and Bevel Browser, select the Presets tab. Now drag theGold_Basic shader to the surface for the base of the lamp, and drag the Shiny shader to the stick surface. Wow, wasn't that easy? Element 3D has an expansion called Pro Shaders that has tons of useful stuff in it. If you find surfacing a bit boring and want to speed it up considerably, you may wish to obtain this expansion. Your result should look like the following screenshot:
Summary
In this chapter, we learned how to prepare our external objects to import them into Element 3D and apply surfaces. We learned all about texture maps and even how to use AEX layers as texture maps. Now, play around with the remaining objects! For your table, you may want to try using a seamless wood texture from the Web. Many free ones under the Creative Commons license are available on Flickr. See whether you can create a realistic wine bottle with what you've learned here and surface your salt shaker.
In the next chapter, we'll be setting up our scene in preparation for our animation. We'll overcome several of Element's limitations and capitalize on several of its strengths.
All materials on the site are licensed Creative Commons Attribution-Sharealike 3.0 Unported CC BY-SA 3.0 & GNU Free Documentation License (GFDL)
If you are the copyright holder of any material contained on our site and intend to remove it, please contact our site administrator for approval.
© 2016-2026 All site design rights belong to S.Y.A.